

Page 1
1
Page 2
Deluxe Kitchen Crop
TM
4-Tray Seed Sprouter
Model VKP1200
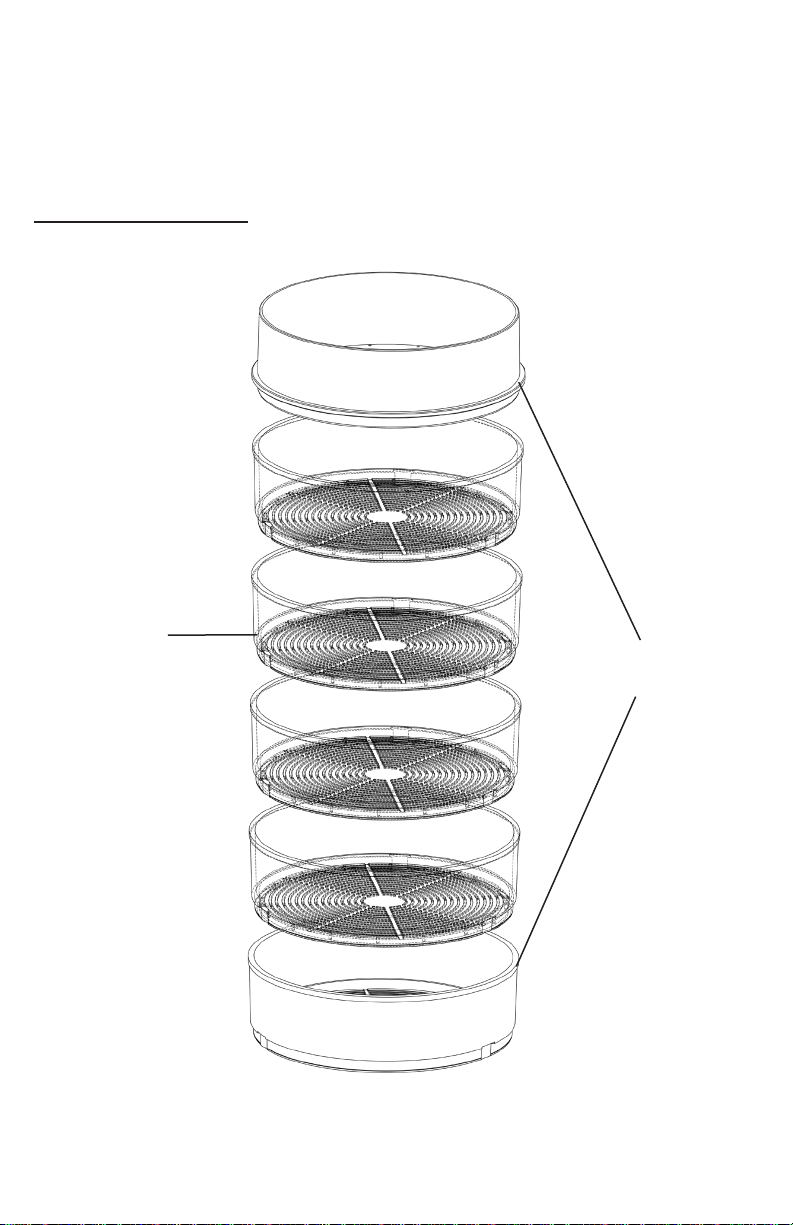
Sprouter Diagram
Your complete Deluxe4-Tray Seed Sprouter includes everything shown below.
4 Seed Trays
(VKP1014-2)
1 Reservoir Lid & Base
(VKP1200-2)
*Also included: (1) 1 oz. bag of Organic Alfalfa Seeds.
© Copyright 2016 VICTORIO Kitchen Products, Inc. All rights reserved.
2
Page 3

Operating Precautions
Read and follow the instructions in all sections of the manual before
using your sprouter.
• DO NOT store any portion of the seed sprouter in direct sunlight.
• DO NOT use near hot surfaces.
• Empty the basin tray of water before each time you water the
seeds.
• Dishwasher safe, top rack ONLY. Do not run the dry cycle.
• For household use only.
Product Overview
Congratulations! You can now grow your own healthy sprouts at home
with your new Kitchen Crop™ Seed Sprouter by VICTORIO®. It is simple
to use and you will nd it to be a wonderful addition to your kitchen. Your
sprouter can grow a variety of sprouts for you to enjoy and its durable
design means it will last for years to come.
Your Seed Sprouter can be used it in several ways:
• Start the same type of seeds in all trays to produce one large batch
of sprouts.
• Start a different type of seeds in each tray to produce a variety of
sprouts.
• Start sprouting seeds in a different tray every other day to produce
a continuous supply of sprouts.
• Use it to grow seed starts for your garden.
Care Instructions
• Sprouter can be hand washed, using a soft cloth and warm, soapy
water. Make sure you dry it thoroughly before storing.
• If desired, Sprouter can be washed in the dishwasher, but on the
top rack only. DO NOT use the drying cycle.
• Sprouter may develop buildup due to hard water. Soak the trays in a
vinegar and water solution (1/4 c. vinegar to 1 qt. water). Soak for
30 minutes, then rinse thoroughly. For tougher buildup, increase
the soak time and/or add more vinegar in the solution.
3
Page 4
Helpful Tips
1. Always rotate the botttom tray to the top before each watering and
replace the Reservoir Lid on top. This provides the opporutnity
for each tray to be watered rst every other day which will help the
sprouts grow better.
2. De-hulling the sprouts, though not required, removes the bitter
avor of the hulls. Also, de-hulling helps decrease mold growth if
sprouts will be stored in the refrigerator for several days.
3. Some seeds may form fuzzy growth. This is not mildew, but actually tiny roots, growing on the sprouts, which are part of the plant.
4. Occasionally some genuine mildew occurs. To correct this problem, reduce the frequency of watering and move the Seed Sprouter
to a cooler area.
5. Sprouting in cooler temperatures may take the sprouts longer to
mature. It is best to keep the sprouter away from extreme temperatures. 70°F is the ideal growing temperature for the seeds.
6. When starting a new crop of seeds, it is common for the growing
trays to not fully drain. This is by design. The extra water helps the
seeds germinate. However, once the seeds start to germinate, they
release organic compounds that break down the surface tension of
the water and the trays will fully drain. The more the seeds grow,
the quicker the water will drain from the trays.
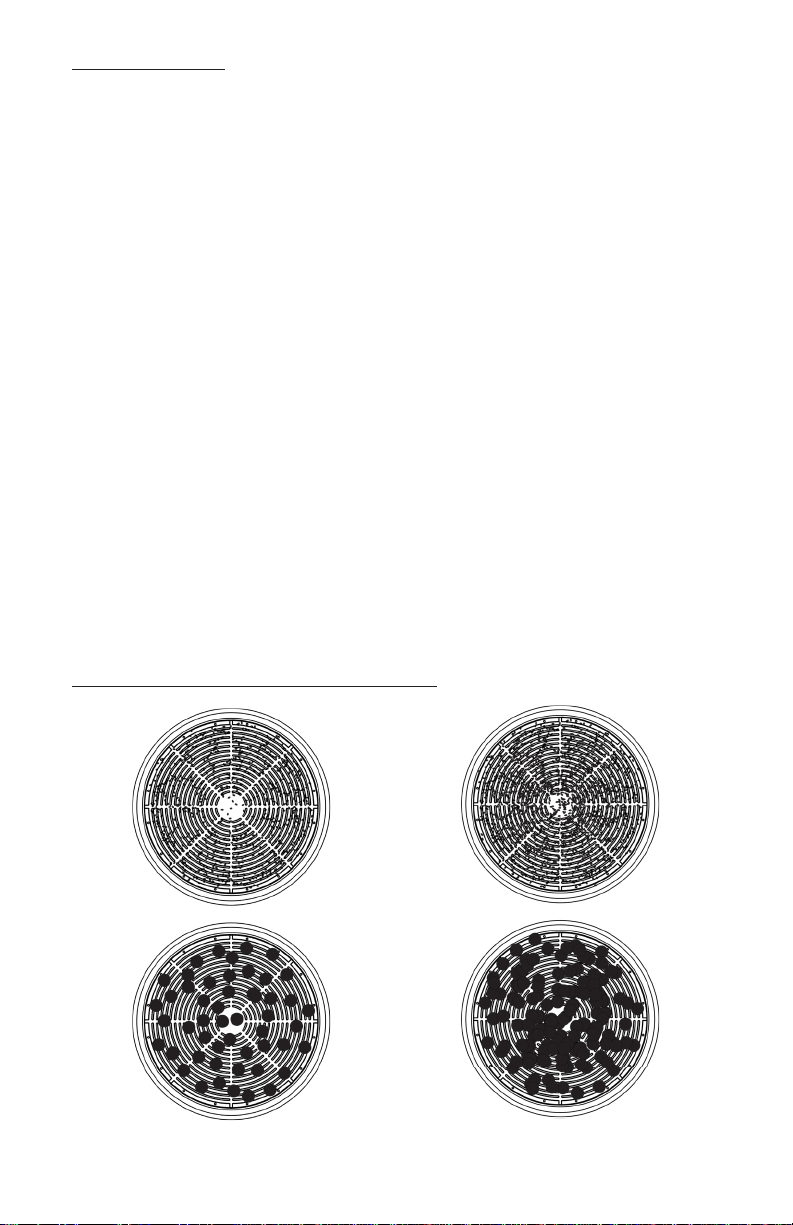
Proper Seed Amounts Per Tray
CORRECT OVERCROWDED
4
Page 5

Use Instructions
Make sure you have read all previous portions of the manual before
you follow the steps below:
1. Soak the seeds in a container of your choice (the trays do not hold
water and cannot be used for soaking, but the base will work for
soaking). Depending on the size of seed, soak for 3-8 hours. Usually, small seeds should soak for 3-4 hours, and large seeds should
soak for 6-8 hours. However, you can soak any size of seed for as
long as 12 hours, if desired. (Amout of seeds vary due to seed size,
see diagram on page 4.)
2. Once your seeds have nished soaking, drain the soak water and
rinse the seeds thoroughly.
3. Take the basin tray and set it on a level surface.
4. Spread the presoaked seeds with a spoon evenly into each seed tray
you plan to use. Stack the prepared seed trays on top of the basin
tray.
5. Place the Reservoir Lid on top of the stacked seed trays.
6. Pour 2 cups of room temperature water (16- oz.) in the reservoir
lid. The water from the reservoir lid will siphon through automatically, from one tray to the next, and collect in the basin tray.
7. Remember to empty the basin tray when top trays are completely
drained or before the next watering.
8. Be sure to water your seeds 2-3 times each day, making sure to
rotate the bottom tray to the top of the stack and replace the
reservoir lid before each watering. The reservoir lid will keep dust,
insects, etc. from getting into the seed trays.
9. Keep in mind, the water may not completely drain from all trays
during the rst 2-3 days of sprouting (see #6 in Helpful Tips).
10. Do not set the sprouter in direct sunlight while sprouting. This can
overheat the sprouts and possibly even cook them.
11. It takes approximately 3-5 days for the sprouts to mature. However, this is only an approximation and can vary. Cooler temperatures
will slow the growing process, and warmer climates can speed it up.
5
Page 6

De-hulling/Storage Instructions
These are optional steps, but following them will change the taste
and extend the life of your grown sprouts.
1. When your sprouts are ready to eat, remove them from the seed
tray and place them in a large bowl of cool water. Break apart the
clumps of sprouts under the water. As you do this, the hulls (seed
husks) will oat to the top, where they can be skimmed off. Continue breaking apart the sprout clumps and skimming the hulls off
the top until you are satised with the results. The fewer hulls that
remain, the better the sprouts will taste. For smaller seeds, this can
be a 5-10 minute process per tray.
2. Rinse the sprouts well and drain thoroughly. You can use a clean
cloth or paper towel to soak up excess water from the sprouts.
3. The sprouts are now ready to be eaten or stored.
4. For storing the sprouts in the refrigerator, put the spouts in a storage bag and place them in the crisper section of your refrigerator.
Using Sprouts
Sprouts are one of the best sources of nutrition available, offering high
amounts of vitamins, protein and ber. Use the simple ideas below to help
you incorporate more sprouts into your diet.
• Salads: Blend sprouts with lettuce to boost the nutritional value
of simple salads. Sprouts by themselves make a tasty side salad, or
you can combine them with raw vegetables for dipping.
• Sandwiches: Dress up any sandwich with sprouts. Thin sprouts,
such as alfalfa, broccoli or clover are ideal for cold meat and cheese
sandwiches. For adding something extra to hot sandwiches, use
larger sprouts, such as mung bean and lentil. Use sprouts instead
of lettuce in tacos, burritos, pita sandwiches, and wraps. You’ll love
the taste and crunch.
• Soups: Use very young sprouts (2-3 days) as garnish for soups.
Use large sprouts, like mung bean and garbanzo, for hot soups and
small, delicate sprouts, such as alfalfa, in cold soups.
6
Page 7

TROUBLESHOOTING GUIDE
PROBLEM SOLUTION
The seeds are not germinating well or
at all.
The sprouts are molding.
The seed trays are not draining well.
Check the expiration date on your
package of seed. For best results, do
not use seeds older than one year.
If your seeds are fresh, make sure
you are soaking them for at least 6-8
hours. Proper soaking is when the
seeds are fully immersed in cool or
warm water, not hot water.
Sometimes, mold can appear on small
clumps of non-germinated seeds.
These clumps can easily be picked
out and will not affect the sprouts.
To cure other mold problems, do
not water your sprouts as often and
make sure each seed tray is draining
properly
If you are sprouting small seeds they
can plug the drain holes. Proper seed
soaking usually prevents this, but you
can easily clear the drain holes by
taking a small straight pin and pushing
it through the holes in each tray. This
may have to be repeated several
times until the seeds begin to sprout.
If your seed trays are holding 1 tbsp of
water or less, then this is normal.
If you notice the seeds in the top tray
get too dry between each watering it
My top tray of seeds dries out.
is possible the location is either too
warm or has too much air blowing
across the sprouter. Try a location
which is slightly cooler and less drafty.
*For the most up-to-date manual, or for more information regarding this
product, visit our website: www.VICTORIO.info.
7
Page 8

Product Warranty
Model VKP1200 - Deluxe Seed Sprouter Warranty: 2 years
We are condent in the quality of our products and back up each one
with a limited warranty for the length of time specied above. Should you
experience any problems with your product, please contact our Customer
Service Department.
All warranty claims must be accompanied by a proof of purchase and are
only valid if the appliance has been operated for its intended purposes.
This product is for household use only.
Items Not Covered:
• Shipping costs or items lost in transit.
• Damages to the product due to accident, misuse, abuse, negligence,
or if the appliance has been altered in any way.
VICTORIO Kitchen Products
1804 Sandhill Rd
Orem UT, 84058
By Phone: 866-257-4741
By Email: [email protected]
www.VICTORIO.info
© Copyright 2016 VICTORIO Kitchen Products, Inc. All rights reserved.
8
 Loading...