

Page 1

ST 4000 Analog/Digital Chronograph ........................................ 2
Specifications ................................................................................. 42
Battery .............................................................................................. 44
ST 4000 Cronografo analogico/digitale .................................... 45
Specifiche tecniche ....................................................................... 88
Pila .................................................................................................... 90
Cronografo ST 4000 Analógico/Digital ..................................... 91
Especificaciones .......................................................................... 132
Pila .................................................................................................. 134
ENGLISH
ITALIANOESPAÑOL
ST 4000 Cronógrafo Analógico/Digital ................................... 135
Especificações .............................................................................. 177
Pilha ............................................................................................... 180
PORTUGUÊS
Page 2
2
SETTING THE ANALOG TIME (HANDS)
A. Pull out the crown and turn it until the desired time.
B. Push back the crown to its normal position.
Note: Never operate when the watch is wet.
DIGITAL DISPLAY CONTROLS
Functions Formats
1
A. Clock .................................... 12 or 24 hour
B. Calendar............................. US or European
C. Alarm................................... On or Off
D. Stopwatch ........................... On or Off / Splits and Times
2 A. Altitude ................................ Feet or Meters
B. Sea Level Barometer ........ Inches of Mercury or Millibars
C. Thermometer...................... Fahrenheit or Celsius
3 A. Vertical Feet Ascended.... Feet or Meters
B. Maximum Altitude ............ Feet or Meters
C. Vertical Feet Descended .. Feet or Meters
D. Runs ..................................... Feet or Meters
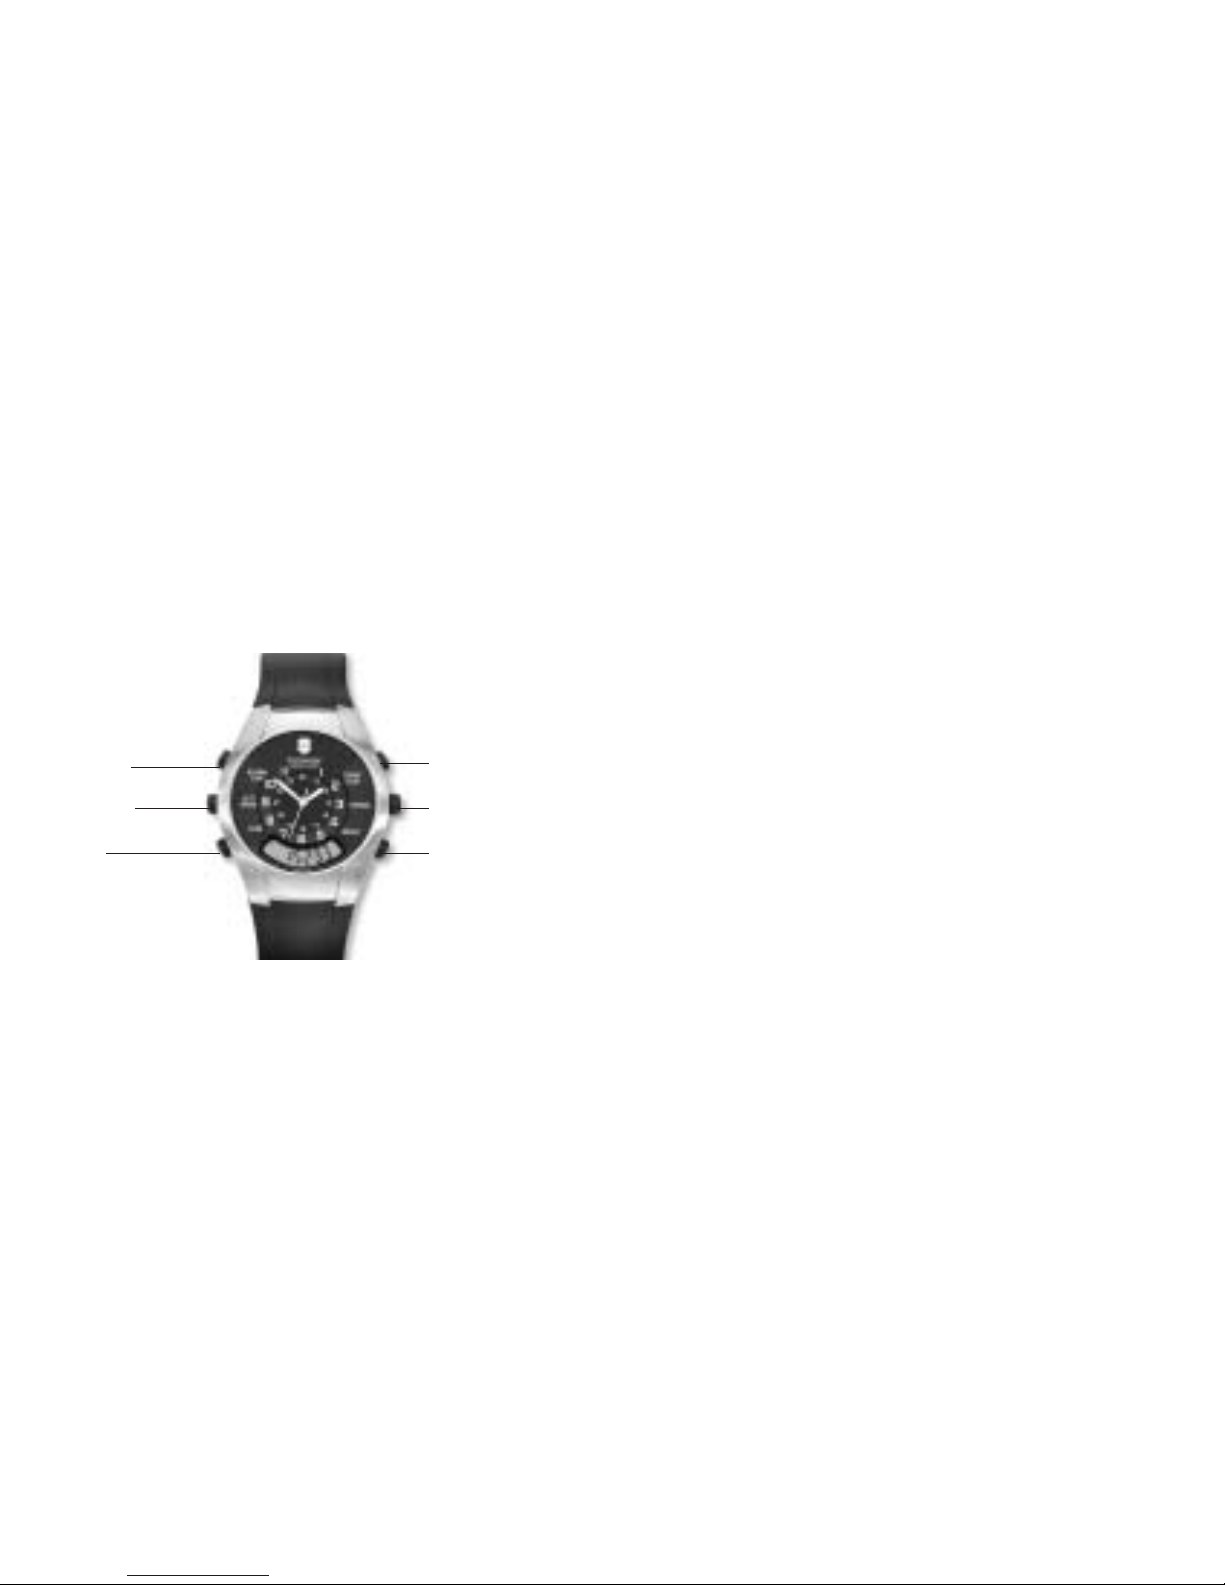
ST 4000
Function Buttons Setup Buttons
1
Clock
function
2 Altimeter
function
3 Sport
function
Start/Stop Button
Crown
Adjust Button
Page 3
FUNCTION FLOW
1. Pressing the Clock Button
A. Displays the Clock (first press)
B. Displays the Calendar (second press)
C. Displays the Alarm (third press)
D. Displays the Stopwatch (fourth press)
2. Pressing the Altimeter Button
A. Displays the Altimeter (first press)
B. Displays the Barometer (second press)
C. Displays the Thermometer (third press)
3. Pressing the Sport Function Button
A. Displays Accumulated Vertical Ascent (first press)
B. Displays Maximum Altitude (second press)
C. Displays Accumulated Vertical Descent (third press)
D. Displays Ski Runs (fourth press)
4
1.
2.
3.
Page 4

SETUP
Pressing the Start/Stop Button
1. Adjusts the blinking digit (if an arrow at the left of
the display is toggling, it adjusts in the arrow
direction).
2. Toggles between formats in the format selection
mode.
Pressing the Start/Stop Button
Starts and stops the Stopwatch when the Stopwatch
is displayed.
Holding the Start/Stop Button
Makes a global change of formats (all English or all
metric) in the Clock format selection mode.
Pressing the Adjust Button
Resets the Stopwatch when the Stopwatch is displayed.
S/S
Pressing the Adjust Button
1. Enters the setup mode of the function displayed.
2. Moves from one setup step to the next and exits setup after completion.
Holding the Adjust Button 1 second
1. Enters the format selection mode.
ADJ
ADJ
6 7
Page 5
SETUP STEP-BY-STEP
Clock Setup
Step 1 Clock Function.
Press the Clock Button to display the Clock.
Step 2 Hours Blink.
Press the Adjust Button – the hour digits blink.
Step 3 Advance Hours.
Press the Start/Stop Button to advance the hours.
Step 4 Minutes Blink.
Press the Adjust Button – the hour is set and the
minute digits blink.
SETUP STEP-BY-STEP
Clock Setup (con’t.)
Step 5 Advance minutes.
Press the Start/Stop Button to advance the minutes.
Step 6 Seconds Blink.
Press the Adjust Button – the minute is set and the
second digits blink.
Step 7 Advance Seconds.
Press the Start/Stop Button to advance the seconds.
Step 8 Exit Setup.
Press the Adjust Button – the seconds are set and
setup mode exited.
8 9
ADJ
S/S
ADJ
S/S
ADJ
S/S
ADJ
Page 6
SETUP STEP-BY-STEP
Calendar Setup
Step 1 Calendar Function.
Press the Clock Button to display the Calendar.
Step 2 Months Blink.
Press the Adjust Button – the month digits blink.
Step 3 Advance Months.
Press the Start/Stop Button to advance the
months.
Step 4 Days Blink.
Press the Adjust Button – the month is set and
the day digits blink.
SETUP STEP-BY-STEP
Calendar Setup (con’t.)
Step 5 Advance days.
Press the Start/Stop Button to advance the days.
Step 6 Year blinks.
Press the Adjust Button – the day is set and the
year digits blink.
Step 7 Advance years.
Press the Start/Stop Button to advance the
years.
Step 8 Exit Setup.
Press the Adjust Button – the year is set and
setup mode exited.
10 11
ADJ
S/S
ADJ
S/S
ADJ
S/S
ADJ
Page 7
12 13
SETUP STEP-BY-STEP
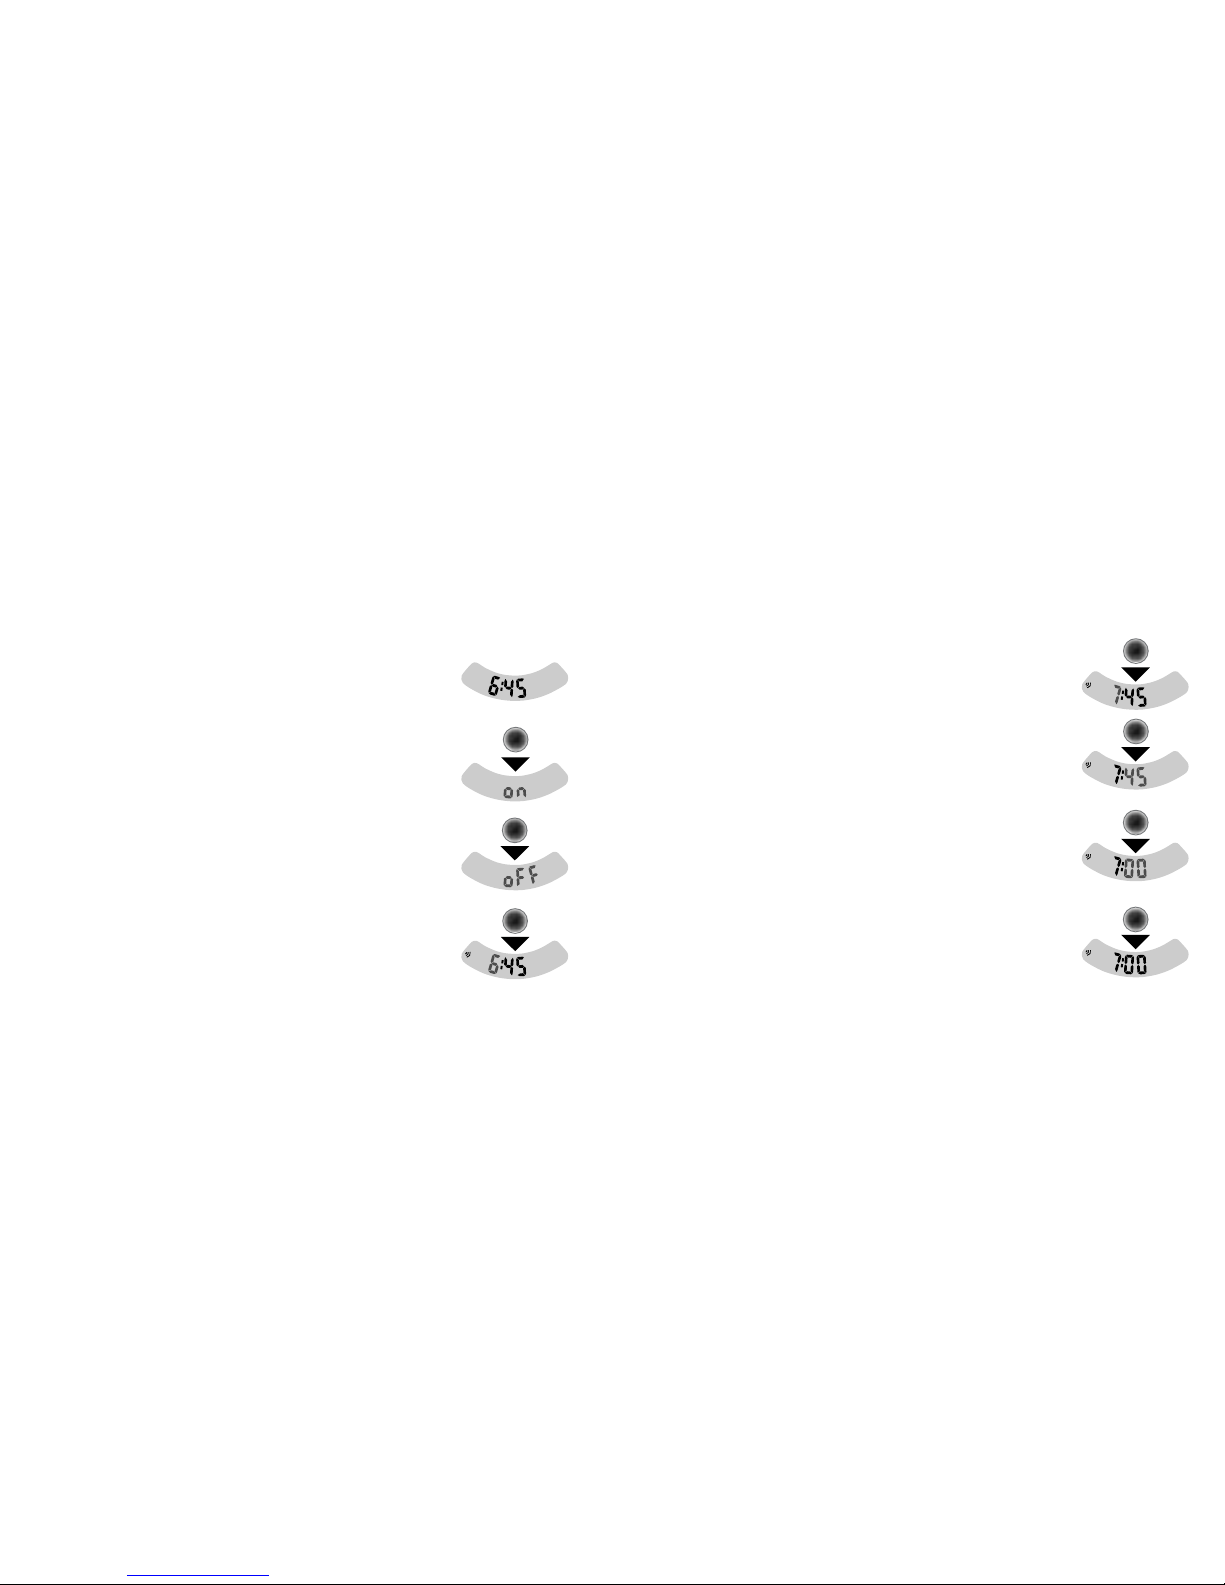
Activating the Alarm and Setting Alarm Time (con’t.)
Step 5 Advance Hours.
Press the Start/Stop Button to advance the hour.
Step 6 Blink Minutes.
Press the Adjust Button – the hour is set and the
minutes blink.
Step 7 Advance Minutes.
Press the Start/Stop Button to advance the minutes.
Step 8 Exit Setup.
Press the Adjust Button to exit. The Alarm icon
indicates the alarm is on.
SETUP STEP-BY-STEP
Activating the Alarm and Setting Alarm Time
Step 1 Alarm Function.
Press the Clock Button to display the Alarm.
Step 2 On/Off.
Press the Adjust Button – ”on” or “off” blinks.
Step 3 Activate Alarm. Press the Start/Stop Button
to toggle between on and off. You can only set the
alarm time when the Alarm is on.
Step 4 Blink Hours. Press the Adjust Button – go to
the alarm-set display – the Alarm hour digits blink.
ADJ
S/S
ADJ
S/S
ADJ
S/S
ADJ
Page 8

14 15
SETUP STEP-BY-STEP
Selecting the Clock and Calendar Formats (con’t.)
Step 5 Calendar Function.
Press the Clock Button to display the Calendar.
Step 6 Selection Mode.
Hold the Adjust Button 1 second – the date in the
current calendar format blinks.
Step 7 Change Calendar Format.
Press the Start/Stop Button to toggle between
month/day/year and day/month/year.
Step 8 Exit Calendar Format.
Press the Adjust Button when the desired format is
displayed to exit.
SETUP STEP-BY-STEP
Selecting the Clock and Calendar Formats
Step 1 Clock Function.
Press the Clock Button to display the Clock.
Step 2 Selection Mode.
Hold the Adjust Button 1 second – the current
clock format is shown (12 or 24).
Note: When the 12-hour format is used, the letter
«P» will appear on the left side of the display to
indicate PM.
Step 3 Change Clock Format.
Press the Start/Stop Button to toggle between 12
and 24 hours.
Step 4 Exit Clock Format.
Press the Adjust Button when the desired format is
displayed.
ADJ
S/S
ADJ
ADJ
ADJ
S/S
ADJ
Page 9

USING THE ST 4000 ALTIMETER AND BAROMETER
Altitude.
The ST 4000 shows altitude below or above sea level from
-4,000 feet to +30,000 feet in 5-foot increments.
How the Altimeter Works. The ST 4000 measures altitude by detecting differences in air pressure and displaying this information as
altitude above sea level. The ST 4000 works the same way an
aircraft altimeter does.
Barometer. There are two kinds of barometers: fixed location and
moving location. Moving barometers are designed to be used at
varying elevations. The ST 4000, like an aircraft altimeter, contains a
moving location barometer. Its reading does not move until you set
it by adjusting the altitude in the altimeter display.
Altitude Offset. A weather change will produce a change in barometric pressure that causes an offset in the displayed altitude from
the actual altitude. This offset is consistent at any altitude, so, if you
start a hike with the altitude reading 50 feet too high, it will read 50
feet too high at any elevation on your hike. You remove the offset by
adjusting the altitude.
When to Adjust Altitude. Adjust the altitude when you want precise
altitude readings, such as before hiking or climbing, or when you
want to update the Sea Level Barometer. Adjust at a known altitude
such as at the sea side, a marked summit or pass, or a location with
an altitude reference on a map such as a lake. Home or office make
convenient adjustment points after learning their elevations from a
topographic map.
Adjust once a day when hiking, climbing, or when following weather patterns. You can also adjust altitude in the barometer by entering a current, local barometer reading from a weather report or
airport weather service. When you enter the barometer reading, the
altitude is also adjusted in the altimeter.
Note: The analog and digital movements of this watch operate indenpendantly. Please set each individually to ensure they are kept in sync.
16 17
Page 10

ALTIMETER AND BAROMETER DETAILS
Effects of Atmospheric Pressure Changes.
A change in atmospheric pressure will make the displayed altitude different from the
known altitude of a landmark. The ST 4000 can be adjusted so that
it displays the same altitude as the landmark. Minor atmospheric
pressure changes may cause the displayed altitude to vary from the
actual altitude by 50 feet. With the arrival or departure of a weather
front, displayed altitude can change 100 to 200 feet, and a storm can
cause a change of more than 200 feet. Wind, rain, snow, and humidity
do not affect altimeter readings.
Barometer-Altimeter Synchronization. Synchronization (the relation
between altitude and sea level barometer) is set at the factory. To
ensure barometer accuracy you can check it after a year or two and
correct minor drift if necessary. You must know your current altitude
and must get the current sea level barometer from a local airport or
weather broadcast to make this adjustment.
You can also synchronize the thermometer if it reads consistently
high or low over a range of temperatures.
Thermometer Accuracy. The ST 4000 measures the ambient air temperature with a sensor inside its case. When the watch is worn
against your skin, temperature readings will be affected significantly. Direct sunlight can also cause the ST 4000 to give high readings.
For accurate readings, remove the watch from your wrist and place
away from direct sunlight.
Display. The Altimeter and Thermometer revert to the Clock 10 minutes
after the last time a button is pressed.
19
Page 11

20
ADJUSTING THE ALTIMETER AND BAROMETER (Con’t.)
Effect on Sea Level Barometer.
When you adjust the altitude the sea level barometer is set at the
same time.
Sea Level Barometer Before Altitude Adjust
Sea Level Barometer After Altitude Adjust
21
ADJUSTING THE ALTIMETER AND BAROMETER
Adjust at a known altitude when you want precise altitude readings
or when you want to update the sea level barometer.
Step 1 Altimeter Function. Press the Altimeter
Button to display the Altimeter.
Step 2 Blink Altitude. Press the Adjust Button –
the Altimeter digits blink and an arrow at the left
of the display toggles between up and down.
Step 3 Change Altitude. Press the Start/Stop
Button to move the Altimeter up or down in 5-foot
increments in the arrow direction.
Step 4 Exit. At the correct altitude press the Adjust
Button to exit.
ADJ
S/S
ADJ
Page 12

22 23
SETTING THE BAROMETER
Barometer & Altimeter Adjust from a Weather Report (con’t.)
Step 4 Exit. At the correct sea level barometer
press the Adjust Button to exit. The altitude will
now be updated in the Altimeter display.
Effect on Altimeter. When you adjust the sea
level barometer, the altitude is set at the same time.
Altimeter before Barometer Adjust
Altimeter after Barometer Adjust
SETTING THE BAROMETER
Barometer & Altimeter Adjust from a Weather Report
Updating the barometer from a broadcast or airport weather report
will adjust the altitude concurrently.
Step 1 Barometer Function.
Press the Altimeter Button to display the
Barometer.
Step 2 Blink Barometer.
Press the Adjust Button – the Barometer digits
blink and an arrow at the left of the display
toggles between up and down.
Step 3 Change Barometer.
Press the Start/Stop Button to move the Barometer
up or down in .01-inches-of-mercury increments in
the arrow direction.
ADJ
S/S
ADJ
Page 13

24 25
ALTIMETER FORMATS
Selecting the Altimeter Formats (con’t.)
Step 2.
Hold the Adjust Button 1 second – the unit symbol
will blink.
Step 3.
Press the Start/Stop Button to toggle between the
unit formats.
Step 4.
When the desired format is displayed press the
Adjust Button to exit.
ALTIMETER FORMATS
Selecting the Altimeter Formats
In the Altimeter select “f” (feet) or “m” (meters).
In the Barometer select “Hg” (inches of mercury)
or “mb” (millibars).
In the Thermometer select “F” (degrees Fahrenheit) or “C” (degrees Celsius).
Step 1. Press the Altimeter Button to display either
the Altimeter, the Barometer, or the Thermometer.
ADJ
S/S
ADJ
Page 14

26 27
ALTIMETER AND BAROMETER DETAILS
Setting the Barometer-Altimeter Synchronization (con’t.)
Step 4.
Press the Start/Stop Button to move the Barometer
up or down in the arrow direction.
Step 5.
When you reach the correct reading, press the
Adjust Button to exit.
If desired, synchronize the ST 4000 Thermometer to
the temperature shown by another thermometer
by repeating this procedure in the Thermometer
display.
ALTIMETER AND BAROMETER DETAILS
Setting the Barometer-Altimeter Synchronization
Synchronization is set at the factory. You can resynchronize after a
year or two if, after altitude adjustment, the ST 4000 barometer is
repeatedly and significantly different from the sea level barometer
given by a current, local weather report.
Step 1.
Adjust the Altimeter so that it displays your current altitude.
Step 2.
Press the Altimeter/Barometer Button to display
the sea level barometer.
Step 3.
Hold down the Adjust Button for more than 5 seconds – the Barometer will blink and a blinking “b”
will appear on the display.
S/S
ADJ
Page 15

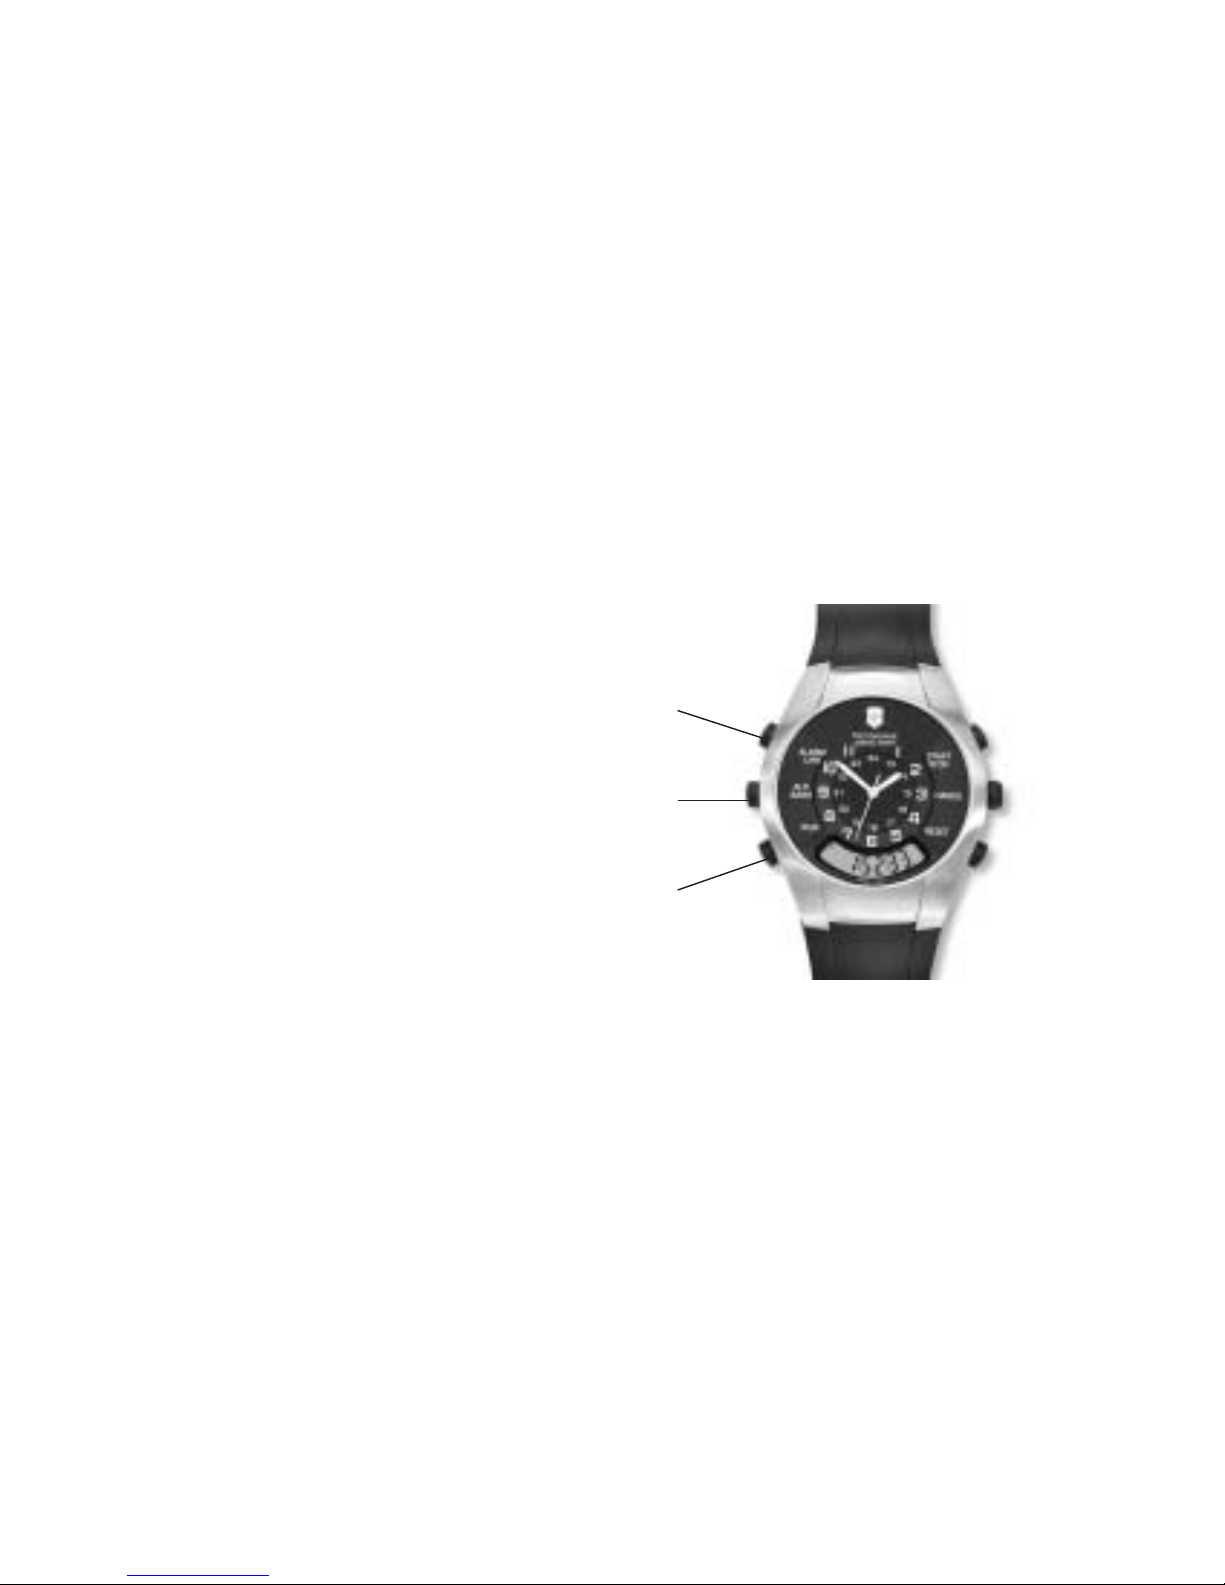
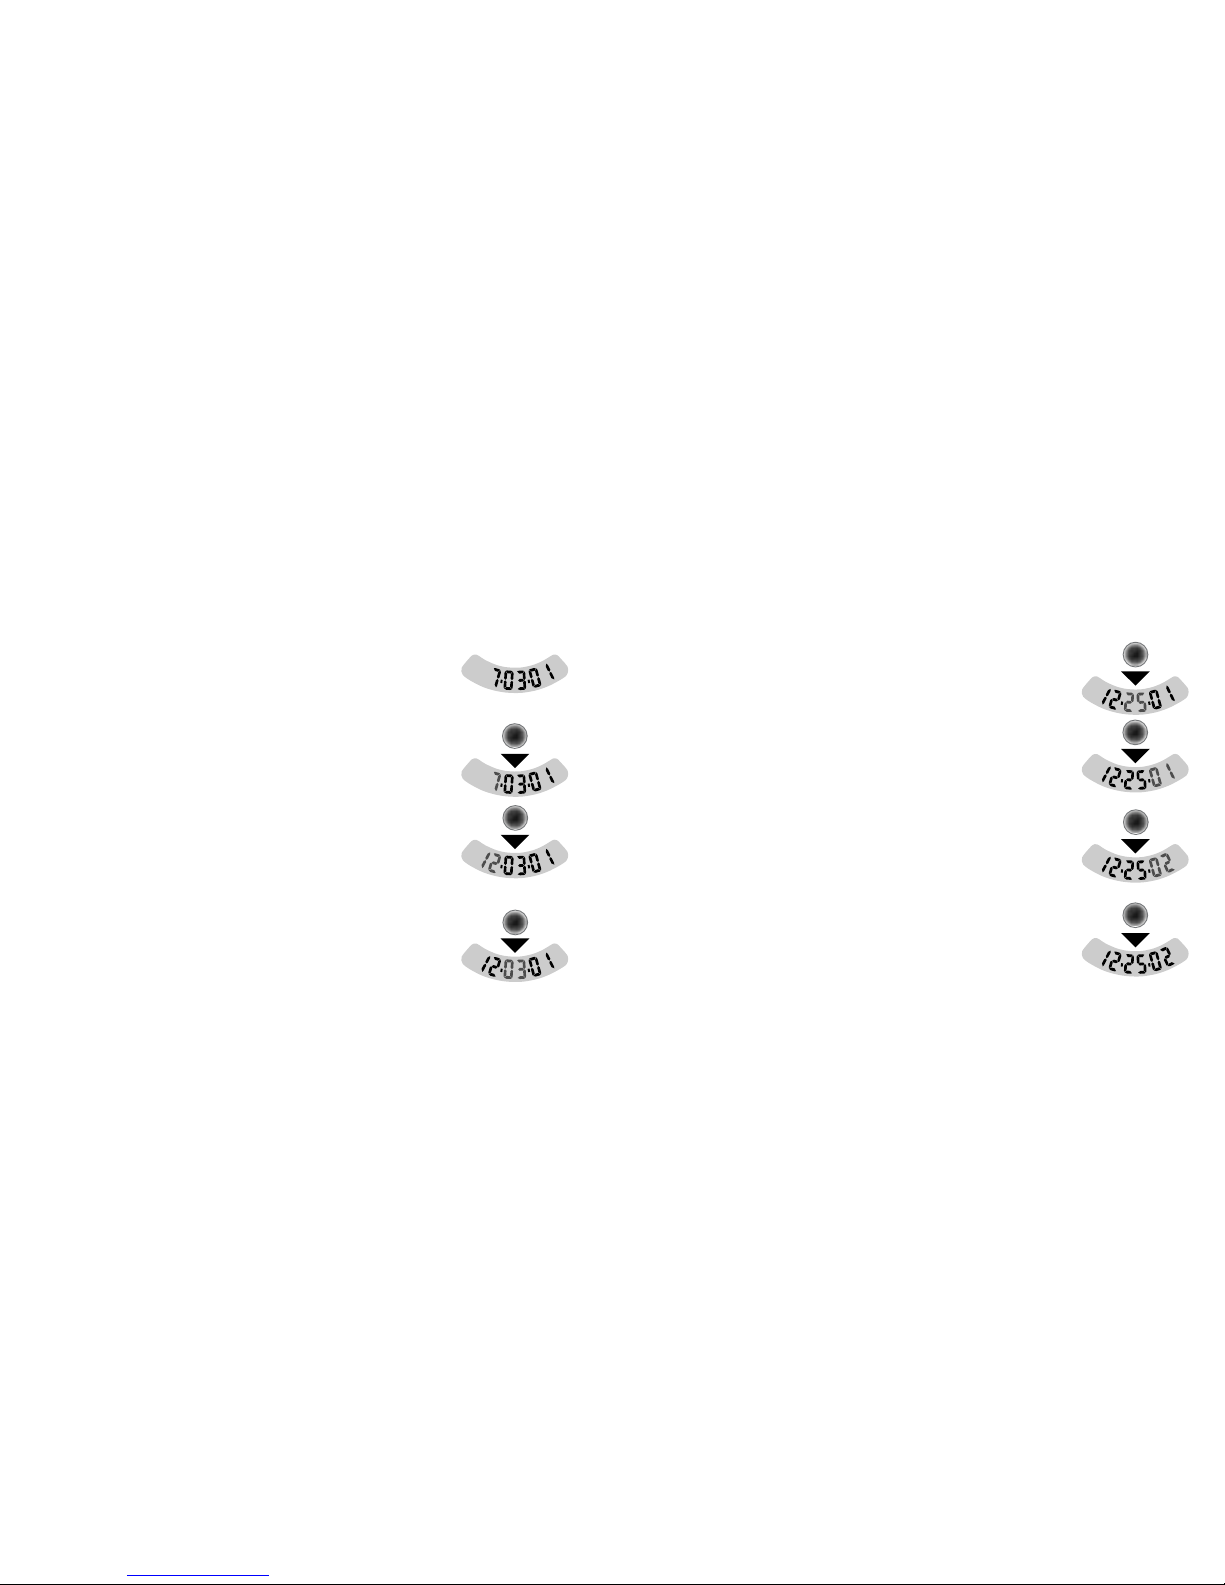
STOPWATCH OPERATION
Starting, Stopping, and Resetting.
Start and stop the Stopwatch by
pressing the Start/Stop Button. You can record times of up to 23:59:59
(hours). Resolution is to .05 second to 29:59.95 (minutes), then in seconds. Reset by pressing the adjust button. Resetting puts the time
recorded into memory as a split.
Viewing Times in Memory. With the Stopwatch displayed, press the
Stopwatch function button. The first time recorded will be recalled
from memory and displayed as a split time. The display will toggle
between the split number and the split time. To view subsequent
recorded times along with their split numbers, press the Stopwatch
button in the Stopwatch Memory display. After viewing all splits in
memory you automatically return to the Stopwatch, or you can
return before viewing everything by pressing the Start/Stop Button.
Creating Split Groups with the Stopwatch Running. Press the Start/
Stop Button to start the Stopwatch. Press the Stopwatch Button with
the Stopwatch running to create a split. The display will freeze for 3
seconds to allow you to view the split time. You can continue to
create splits this way until the total number of splits in memory is 32.
Press the Start/Stop Button to stop the Stopwatch. Press the Stopwatch Button to view the splits you have created in memory.
Viewing Split Groups in Memory. With the Stopwatch displayed,
press the Stopwatch Button. Split groups you created will be displayed from the first split recorded to the last. After all times for the
group have been reviewed by pressing the Stopwatch Button, the total
time for that group will show in the first display and the second display will show the number of splits in the group along with a “t”. Single splits created by resetting the Stopwatch will each show a “t” in
the second display for total group time.
Clearing the Stopwatch Memory. In the Stopwatch Memory function, hold the Adjust Button for 1 second to erase all splits from memory. A beep confirms that memory is clear. Clear Stopwatch memory
before a session of recording splits (such as timing your laps on a
running track). This ensures that memory will be available and will
delete old information that might be confusing when splits are
reviewed in memory.
29
Page 16

30 31
STOPWATCH
Example 1 : Time Recorded and Recalled (con’t.)
Step 5.
Press the Stopwatch Function Button to enter
Stopwatch Memory. The display will toggle
between split number and split time.
Step 6.
Press the Stopwatch Function Button to return to
the Stopwatch. If there is more than one split in
memory, pressing the Function Button will show
each split and exit after the last one.
F
F
STOPWATCH
Example 1: Time Recorded and Recalled
Step 1.
Press the Stopwatch Function Button to display
the Stopwatch.
Step 2.
Press the Start/Stop Button to start the Stopwatch.
Step 3.
Press the Start/Stop Button to stop the Stopwatch.
Step 4.
Press the Adjust Button to reset the Stopwatch.
S/S
S/S
ADJ
Page 17

32 33
Example 2: Recording and Reviewing a Split Group (con’t.)
Step 3.
Press the Start/Stop Button to stop the Stopwatch
at the end of the 4th lap.
Step 4.
Press the Adjust Button to reset the Stopwatch.
Step 5.
Press the Stopwatch Function Button to enter
Stopwatch Memory. The first split you see in memory (split 01) is the first split you recorded, the 1st
lap.
STOPWATCH
Example 2: Recording and Reviewing a Split Group
Four Laps on a Quarter-Mile Running Track
Step 1. Press the Start/Stop Button to start the
Stopwatch.
Step 2. Press the Function Button 3 at the end of
laps 1, 2, and 3. Each time you press the Function
Button the display freezes for 3 seconds so you
can read your split time.
F
F
F
S/S
S/
S
ADJ
F
Page 18

34 35
Example 2: Recording and Reviewing a Split Group (con’t.)
Step 8.
Press the Function Button. The next split (lap 4) is
displayed along with its split number (04).
Step 9.
Press the Function Button. The total time for the
split group (all 4 laps) is displayed indicated by a
“t” in the split number display.
Step 10.
Press the Function Button. Memory is exited and
the display returns to the Stopwatch. You can also
exit Memory by pressing the Start/Stop button
before reviewing all splits.
Example 2: Recording and Reviewing a Split Group (con’t.)
Step 6.
Press the Function Button. The next split (lap 2) is
displayed along with its split number (02).
Step 7.
Press the Function Button. The next split (lap 3) is
displayed along with its split number (03).
FFF
F
Page 19

Resetting the Altitude Accumulators, Runs and Maximum Altitude
Press the Adjust Button when you are in the function you want to
reset, then press the Start/Stop Button to reset the blinking display.
Altitude accumulators reset to zero and maximum Altitude resets to
current altitude. Use the Sport Function Button to move from one display to another.
Sport Function Details
The ST 4000 disregards small vertical irregularities, and accumulation of vertical feet does not begin until there has been a 30-foot
change in altitude. Altitude and vertical feet displays update frequently if there has been a change in altitude or a button has been
pressed recently. During periods of inactivity, updates are less frequent. Atmospheric pressure changes during a day’s activity affect
the accumulated vertical feet very little–usually less than 1%.
37
ST 4000 SPORT FUNCTIONS
Accumulating Altitude
Accumulation can be switched on or off by pressing the Start/Stop
Button when either Vertical Ascent or Vertical Descent is displayed.
The arrow at the left of the display blinks when the accumulator is
on. Remember to turn the accumulators on before beginning your
activity and off when you finish; otherwise you will record no vertical feet or will record unwanted vertical feet. Both accumulators
record up to 500,000 vertical feet with 5 feet resolution. The ST 4000
accumulates vertical feet ascended and descended. Hikers and
climbers can quantify their activity by recording vertical feet
climbed for a day or a season. Skiers can measure their daily vertical descent.
Runs
The ST 4000 records a run after a climb of more than 150 feet is followed by a 150-foot descent. Skiers can record their runs for a day.
The run counter is also useful in air sports for counting thermals
flown and in cycling for counting hills climbed.
36
Page 20

Step 3 Step 4
Reset Maximum Altitude. After completing your hike,
turn the accu.
If your hike is a loop or out-and-back, accumulated ascent and
descent will be the same. Remember that accumulation does not
begin until you have climbed 30 feet. If you want to record your
accumulated vertical or maximum altitude for a week, month, or
year, do not reset until the end of the period you want to record.
39
USING THE SPORT FUNCTIONS IN HIKING AND CLIMBING
Example: Recording vertical ascent and maximum altitude on a
hike.
Step 1 Step 2
At the trailhead reset Start the Vertical
Ve rtical Ascent. Ascent accumulator.
38
S/S
ADJ
S/S
S/S
ADJ
S/S
Page 21

Step 3 Step 4
Reset the Run Counter. When you finish skiing, turn
the accumulator off.
If you want to record your accumulated vertical or runs for a week,
month, or year, do not reset until the end of the period you want to
record. Since Vertical Descent and Vertical Ascent are usually equal
in skiing, you can use the Vertical Ascent accumulator to record total
vertical for a ski trip or a year if you wish. Remember that runs are
only counted when the Vertical Descent accumulator is turned on.
41
USING THE SPORT FUNCTIONS IN SKIING
Example: Recording vertical descent and runs during a day of
skiing.
Step 1 Step 2
At the lift reset Start the Vertical
Ve rtical Descent. Descent accumulator.
40
S/S
ADJ
S/S
S/S
ADJ
S/S
Page 22

ST 4000 SPECIFICATIONS
Altimeter
Current Altitude: –4,000 to 30,000 feet in 5 foot increments
–1,330 to 10,000 meters in 1 meter increments
Weather
Sea Level 28.84 to 31.00 inches of mercury with .01 resolution
Barometer: 977 to 1,050 millibars with 1 millibar resolution
Temperature: 32º F to 122º F in 1° increments
0º C to 50º C in 1° increments
Sport Functions
Ve rtical Ascent To 999,995 feet in 5 foot increments
and Descent: To 999,995 meters in 1 meter increments
Maximum –4,000 to 30,000 feet in 5 foot increments
Altitude: –1,330 to 10,000 meters in 1 meter increments
Runs: To 199;
run counter is tripped by a 150 foot/50 meter
descent
Clock/Calendar
Time of Day: 12 or 24 hour format; to 1 second
Alarm: To one minute
Date: Month/day/year (US) format
Day/month/year (European) format
Stopwatch
Elapsed time and Splits: Resolution .05 second to 29:59.95,
1 second 30:00 to 23:59:59
Memory: Up to 32 splits
General Specifications
Water Resistance: To 100 feet/To 30 meters
Battery:
CR2032 Lithium; approximately 4-year life
Display: Single row, 6 characters
Operational Temperature:
32º F to 122º F
Range: 0º C to 50º C
42 43
Page 23

BATTERY
Your timepiece may be powered by a 1.55 volt silver oxide watch
battery.
DEAD BATTERIES SHOULD BE REPLACED IMMEDIATELY.
Substituting interchangeable batteries is not recommended. Battery
change should be performed by a qualified technician who should
also check the condition of the gaskets and the O-ring at the same
time. Battery is not covered by the warranty.
ST 4000 BATTERY: CR2032Lithium, approximately 4 year life.
44
 Loading...