

Page 1

BASIC OPERATING INSTRUCTIONS
CHRONOGRAPHS
ACCESSORIES
Page 2

In 1897 the Original Swiss Army™Knife was created in the small village of Ibach,
Switzerland. Since that time, Victorinox®has become known in more than
100 countries for precision, quality, functionality and versatility.
This century old heritage has been extended to Swiss Army Watches and Timepieces.
Each reflects the ingenious design and outstanding durability we’ve come to stand
for over the years. Uncompromising craftsmanship makes these watches worthy
to carry the cross and shield emblem that symbolizes the legend of Victorinox and
the Swiss Army Brand.
Whether you’re going around the corner or around the globe, our classically styled
watches will make sure that you’re equipped for life’s adventures. No matter what
those adventures might be.
QUALITY FEATURE S
Made in Switzerland.
Precision Swiss Movements.
Individually tested for water resistance; most are 100M (330 feet).
Solid stainless steel cases and/or bracelets on most models.
Scratch-resistant mineral or sapphire crystals.
Swiss Army Brand Watches are covered by a three-year limited warranty. Only our
watches are authorized by the Swiss government to carry the name “Swiss Army.”
Page 3

- 2 -
WATER RESISTANCE
Water-resistant to 30 meters (100 feet/3 ATM).
Will withstand rain or splashes of water but should
not be worn while showering, swimming or diving.
Water-tested to 50 meters (165 feet/5 ATM).
Suitable for showering or swimming in shallow water.
Water-tested to 100 meters (330 feet/10 ATM).
Suitable for swimming or snorkeling.
Water-tested to 200 meters (660 feet/20 ATM).
Suitable for swimming, snorkeling or skin diving.
Water-tested to 300 meters (990 feet/30 ATM).
Suitable for swimming, snorkeling or scuba diving.
+
&
/
;
\
WATER RESISTANCE CHART
Page 4
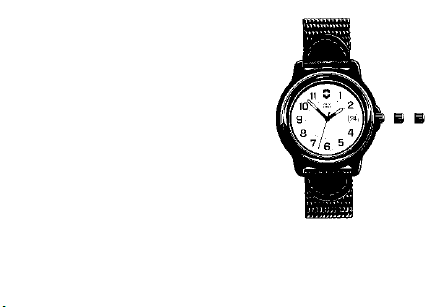
THRE E HAND ANALOG QUARTZ
NOTE: Your watch will have either a “pull-out” or
“screw-down” crown. To determine this, gently try to
pull out the crown to position (2). If it does so, your
watch has a pull-out crown. If not, use the thumb and
forefinger to apply mild pressure on the crown while
rotating toward you to release it. If it does so, your
watch has a screw-down crown.
SETTING TH E DATE & TIME - Pull Out Crown
A. Pull out the crown to position (2).
B. Rotate the crown toward you until the date
showing is the day before the desired setting.
C. Pull out the crown to position (3) and rotate
toward you. When midnight is reached, the
date will advance to the desired date. Continue
to turn the crown until the desired time is set. Remember, the date
advances at 12:00 midnight, not 12:00 noon.
D. Push in the crown, returning it to position (1). The date and time are
now set.
- 3 -
1 2 3
Page 5

- 4 -
To Set Time Alone
Refer to instruction “C”.
SETTING TH E DATE & TIME - Screw Down Crown
A. Using the thumb and forefinger, apply mild pressure on crown
while rotating toward you until crown releases.
B. Pull out crown to position (2). Turn the crown away from you
until the date showing is the day before the desired setting.
C. Pull out the crown to the fully extended position (3) and rotate
toward you. When midnight is reached, the date will advance
to the desired date. Continue to turn the crown until the desired
time is set. Remember, the date advances at 12:00 midnight,
not 12:00 noon.
D. After setting, push in the crown then press and screw down away
from you until it is sealed tight into position (1). The date and time
are now set.
To Set Time Alone
Release crown (refer to “A”) and follow instruction “C”.
Page 6
- 5 -
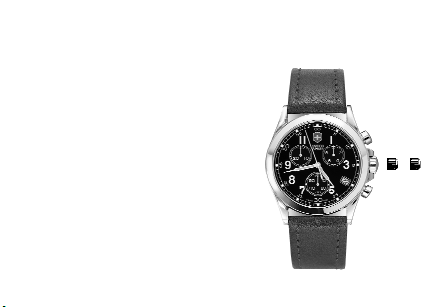
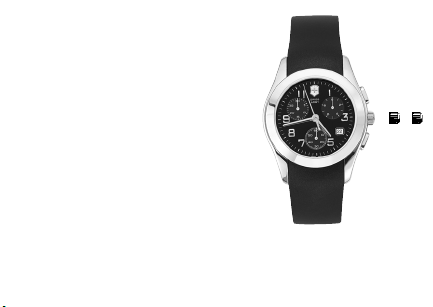
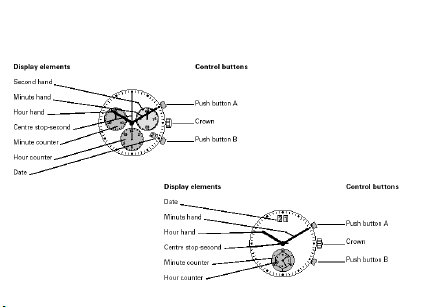
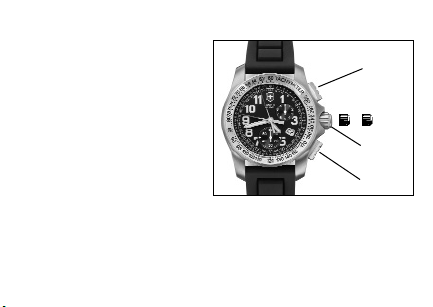
ANALOG CHRONOGRAPH S
*Refer to NOTE on page 2 to determine the type of crown on your watch.
CHRONOG RAPH OPERATING
PROCEDURE
(CHRONO TYPE I, II, III, IV, V)
Chrono types I and II feature a 30-minute
counter, one-tenth second timer, sweep
second hand and date calendar. It enables
short times to be measured to an accuracy
of one-tenth of a second in a 30-minute
period. Chrono types III and IV feature a
12-hour counter, a 30-minute counter, sweep
second hand counter and date calendar.
They enable time to be measured to an
accuracy of one second in a 12-hour
period. Chrono type V features a 60-minute
counter, 60-second sweep counter and a
date calendar.
1 2 3
B
A
Page 7

- 6 -
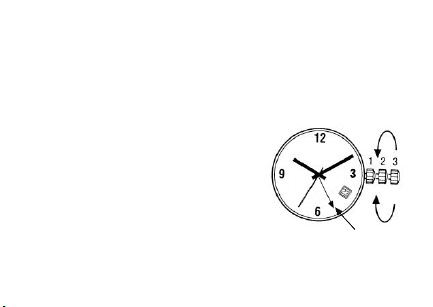
The crown has three positions:
1. Normal position – recessed.
2. Extended position – to set the date.
3. Fully extended position – to set the time.
SETTING TH E DATE AND TIME
(CHRONO TYPE I)
A. Pull out the crown to position (2).
B. Rotate the crown toward you until the date showing is the day
before the desired setting.
C. Pull out the crown to position (3) and rotate toward you. When
midnight is reached, the date will advance to the desired date.
Continue to turn the crown until the desired time is set.
Remember, the date advances at 12:00 midnight, not 12:00 noon.
D. Push in the crown, returning it to position (1). The date and time
are now set.
To Set Time Alone
Refer to instruction “C”.
Page 8
- 7 -
CHRONO TYPE I I AND V
The Quick-Set feature allows the hour hand
to be advanced without advancing the minute
hand and will also quick-set the calendar. It is
especially useful when traveling to different
time zones, as the hour hand can be rapidly
advanced to set the desired time.
NOTE: Your watch will have either a
"pull-out" or "screw-down" crown.
To determine this, gently try to pull out
the crown to position (2). If it does so, your
watch has a pull-out crown. If not, use
the thumb and forefinger to apply mild
pressure on the crown while rotating
toward you to release it. If it does so, your
watch has a screw-down crown.
1 2 3
A
B
Page 9

SETTING TH E DATE AND TIME (CHRON O TYPE II)
A. Pull out crown to position (2). Turn the crown away from you and the
quick-set feature will rapid-advance the hour hand. As the hour hand
passes midnight it will also advance the calendar. Continue to turn
the crown away from you until the date showing is the day before the
desired setting.
B. Pull out the crown to position (3). The seconds subdial hand will stop.
Turn the crown away from you. When midnight is reached, the date
will advance to the desired date. Continue to turn the crown until the
desired time is set. Remember, the date advances at 12:00 midnight,
not 12:00 noon.
C. After setting, push in the crown then press and screw down away
from you until it is sealed tightly into position (1). The date and time
are now set.
To Set Time Alone
Release the crown and then follow instructions “B”.
NOTE: You must always push in and screw down the crown to form a
water resistant seal with the case. Never operate the crown when the
watch is wet.
- 8 -
Page 10

- 9 -
SETTING TH E DATE AND TIME
(CHRONO TYPE III & IV)
SETTING TH E DATE (Quick Mode)
A. Pull out the crown to position (2) (the watch continues to run).
B. Turn the crown until the correct date appears.
C. Push the crown back into position (1).
Please note: The date can be changed during the date changing
between 9:00 PM and 12:00 PM; please note that the date must be set to
the date of the following day as in this case the automatic date changing does not occur at midnight.
Page 11

- 10 -
SETTING TH E DATE AND TIME
A. Pull out the crown to position (2) (the watch continues to run).
B. Turn the crown until yesterday’s date appears.
C. Pull out crown to position (3).
D. Turn the crown until the correct date appears.
E. Turn the crown until you reach the correct time.
F. Push the crown back into position (1).
To Set Time Alone
Follow instructions "C".
NOTE: In order to set the time to the exact second, the crown must
be pulled out when the second hand is in position "60" (i.e. 12:00).
Once the hour and minute hands have been set, the crown must be
pushed back into position (1) at the exact second.
Page 12

- 11 -
CHRONOG RAPH FUNCTIONS
(CHRONO TYPE I + II)
The stopwatch function records the time of an event in tenths of a
second starting from zero.
Measurement of Elapsed Times
A. Press Pusher A (top) once to start the timing operation: press
again to stop timing.
B. Once the timing operation has been completed, press Pusher B
(bottom). The chronograph and totalizer hands reset to zero.
Measurement of Lap Times
A. Press Pusher A again to restart timing. Further pressure on Pusher A
stops the timing operation. The chronograph indicates the final time.
B. Once the timing operation has been stopped, press Pusher B.
The hands on chronograph and totalizer hands reset to zero.
Measurement of Intermediate (Split) Times
A. Press Pusher A to start timing.
B. Press Pusher B to read off the first split time without interrupting
the measurement of the total time (continued on page 13).
Page 13
- 12 -
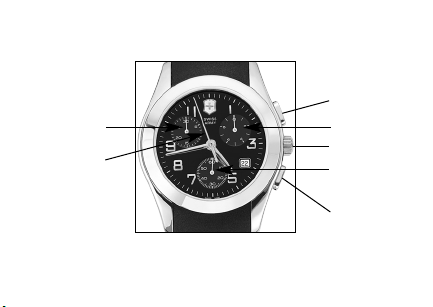
CHRONOG RAPH SUBD IALS
30-minute counter
One-tenth
second timer
Seconds
subdial
Seconds
counter
Pusher A
Pusher B
Crown
Page 14

- 13 -
Measurement of Intermediate (Split) Times (continued)
C. Press Pusher B to continue timing. The chronograph has continued
its measurement so that the tenth of a second hand now reverts to
zero and the other hands “fly back” to allow for the elapsed time.
D. Press Pusher B again to read the split time.
E. Repeat this procedure until the action to be timed has been
completed.
F. Press Pusher A to stop timing.
G. Once the timing operation has been completed, press Pusher B.
The hands on the chronograph and totalizer reset to zero.
Page 15

- 14 -
Measurement of Two Times at Very Short Intervals
This function enables two times separated by a very short interval
to be measured.
A. Press Pusher A to start timing.
B. Press Pusher B to stop the first time without interrupting measurement
of the second time.
C. Press Pusher A to stop measurement of the second time.
D. The chronograph will indicate the first time.
E. Press Pusher B to display the second time.
F. Once the timing operation has been completed, press Pusher B.
The hands on the chronograph and totalizer reset to zero.
Page 16
- 15 -
CHRONOG RAPH FUNCTIONS (CHRONO TYPE III + IV)
Chrono Type IV
Chrono Type III
Page 17

- 16 -
The chronograph function records the time of an event in seconds up
to 12 hours.
Basic Function (Elapsed Time)
A. Press Pusher A (top) once to start the timing operation: press again
to stop timing.
B. Once the timing operation has been completed, press Pusher B
(bottom). The chronograph and totalizer hands reset to zero.
Chronograph Accumulated Timing
A. Press Pusher A (top) once to start the timing operation: press again
to stop timing. Continue to press A to start and stop accumulated timing function.
B. Once the timing operation has been completed, press Pusher B
(bottom). The chronograph and totalizer hands reset to zero.
Page 18

- 17 -
Measurement of Intermediate (Split) Times
A. Press Pusher A to start timing.
B. Press Pusher B to read off the first split time without interrupting.
C. Press Pusher B to continue timing. The chronograph has continued
its measurement so that the chronograph hands catch-up to allow
for the elapsed time.
D. Press Pusher B again to read the split time.
E. Repeat this procedure until the action to be timed has been
completed.
F. Press Pusher A to stop timing.
G. Once the timing operation has been completed, press Pusher B.
The hands on the chronograph and totalizer reset to zero.
Page 19
- 18 -
CHRONO TYPE V
The crown has three positions
which affect push button
functions:
Position 1: Normal position.
Push-buttons: chronograph
functions.
Position 2: Quick correction of
hour hand. Date corrections by
passing through 24 hours.
Push-button B (at 4 o'clock):
Initialization of the 60 minute
counter.
Position 3: Time setting, stopping of the movement (for storage).
Push-button A (at 2 o'clock): Initialization of the 60 second timer hand.
Push-button B: Initialization of the 1/10th of a second timer.
Pusher A
Crown
Pusher B
1 2 3
Page 20

- 19 -
SETTING TH E DATE AND TIME (CHRON O TYPE V)
Remember, the date advances at 12:00 midnight, not 12:00 noon.
A. Pull out the crown to Position 2 (middle position).
B. Rotate the crown away from you until the date showing is the day
before the desired setting.
C. Pull out the crown to Position 3 (fully extended) and rotate away from
you. When midnight is reached, the date will advance to the desired
date. Continue to turn the crown until the desired time is set.
D. Push in the crown, returning it to Position 1. The date & time are
now set.
To Set Time Alone
Refer to instruction “C”.
CHRONOG RAPH OPERATING PROCED URE
This chronograph movement features a 60-minute counter-hand, a 60
Page 21

- 20 -
second counter hand (both located on center post - silver with red tip)
and one tenth second indicator.
Measurement of Elapsed Times
A. Press Pusher A (at 2 o'clock) to start the timing operation.
B. Press again to stop timing. NOTE: Timing will be indicated within
1/10th of a second on appropriate sub-dial.
These two operations may be repeated several times, to add short time
measurements.
C. Once the timing operation has been completed, press Pusher B
(at 4 o'clock) briefly until the hands revert to the original position.
Measurement of Intermediate (Split) Times
A. Press Pusher A to start timing.
B. Press Pusher B to read off the first split time without interrupting the
measurement of total time.
C. Press Pusher B to continue timing. The chronograph will continue its
Page 22

- 21 -
measurement by reverting the 1/10th hand to zero and “flying back”
to the elapsed time.
D. Press Pusher B again to read the second split time.
E. Repeat this procedure until the action to be timed has been completed.
F. Press Pusher A to stop timing. NOTE: Timing will be indicated within
1/10th of a second on appropriate sub-dial.
G. Once the timing operation has been stopped, press Pusher B briefly
until the hands revert to the original position. The chronograph and
totalizer hands will be reset to zero.
Page 23

- 22 -
REI NITIALIZING THE CHRONOGRAPH HANDS (SU B-DIALS)
Following a battery change, an incorrect actuation, violent impact
or exposure to a strong magnetic field, one of the chronograph counter
hands may fail to revert to the original position (0). To reinitialize
the hands, proceed as follows:
CHRONO TYPE I
Zero Reset of the Minutes Counter Hand
A. Pull out the crown to position (3).
B. Press Pusher A briefly until the hand reverts to the original position.
Zero Reset of the Seconds Counter Hand
A. Pull out the crown to position (2).
B. Press Pusher B briefly until the hand reverts to the original position.
Zero Reset of the Tenths of a Second Counter Hand
A. Pull out the crown to position (2).
B. Press Pusher A briefly until the hand reverts to the original position.
Page 24

- 23 -
CHRONO TYPE II
Zero Reset of the Minutes Counter Hand
A. Pull out the crown to position (2).
B. Press Pusher B briefly until the hand reverts to the original position.
Zero Reset of the Seconds Counter Hand
A. Pull out the crown to position (3).
B. Press Pusher A briefly until the hand reverts to the original position.
Zero Reset of the Tenths of a Second Counter Hand
A. Pull out the crown to position (3).
B. Press Pusher B briefly until the hand reverts to the original position.
NOTE: Hold buttons in for more than one second for rapid
advancement.
Page 25

- 24 -
CHRONO TYPE III
A. Pull out the crown to position (3).
B. Keep the Pushers A and B depressed simultaneously for at least
2 seconds (the center stop-second rotates by 360 degrees. Corrective
mode is activated.
Zero Reset of the Center Stop Second
A. Single step: press Pusher A briefly
B. Continuous: press and hold Pusher A
Adjusting next hand press Pusher B
Zero Reset of the Hour Counter (position 6:00)
C. Single step: press Pusher A briefly
D. Continuous: press and hold Pusher A
Adjusting next hand press Pusher B
Zero Reset of the Minute Counter Hand (position 9:00)
E. Single step: press Pusher A briefly
Page 26

- 25 -
F. Continuous: press and hold Pusher A
Return the crown to position (1)
CHRONO TYPE IV
A. Pull out the crown to position (3).
B. Keep the Pushers A and B depressed simultaneously for at least
2 seconds (the center stop-second rotates by 360 degrees. Corrective
mode is activated.)
Zero Reset of the Center Stop Second
A. Single step: press Pusher A briefly
B. Continuous: press and hold Pusher A
Adjusting next hand press Pusher B
Zero Reset of the Minute Counter Hand and the Hour Counter Hand
(position 6:00)
A. Single step: press Pusher A briefly
B. Continuous: press and hold Pusher A
Return the crown to position (1)
Page 27

- 26 -
CHRONO TYPE V
Zero Reset of the Minute Counter Hand
A. Pull out the crown to position (2).
B. Press Pusher B briefly until the hand reverts to the original
position (on 60).
Zero Reset of the Seconds Counter Hand
A. Pull out the crown to position (3).
B. Press Pusher A briefly until the hand reverts to the original
position (on 60).
Zero Reset of the 1/10th Second Counter
A. Pull out the crown to position (3).
B. Press Pusher B briefly until the hand reverts to the original
position (on 0).
C. Push the crown back down firmly against the case to position (1).
NOTE: You must always push in and screw down (if applicable) the
crown to form a water resistant seal with the case. Never operate the
crown when the watch is wet.
Page 28

- 27 -
DIGITAL DIS PLAY
By repeatedly pressing Pusher C the following functions can be selected:
– Date
– Second Time Zone (12 or 24 hour display)
– Alarm
– Chrono (60-Minutes) / Lap
ANALOG/DI GITAL CHRONOGRAPHS
Digital Display
Display Mode
Pusher C
Start/Stop
Pusher A
Set
Pusher B
Inactive Position
Crown
Stops movement
Sets hands/time
Page 29

- 28 -
ADJUSTING TH E DIG ITAL DATE, MONTH, DAY
By pressing Pusher A and Pusher B simultaneously when the date or
the second time zone is displayed, the chime can be switched on or off.
ANALOG DISPLAY
To set the analog time, pull out the crown. The movement stops.
Turn the crown away from you to set the desired time. Push in the
crown, returning it to the original position. The time is now set.
NOTE:
The analog and digital movements of this watch operate independently. Please set each
individually to ensure they are kept in sync.
Page 30

- 29 -
ADJUSTING TH E DIG ITAL DATE, MONTH, DAY (cont’d)
Page 31

- 30 -
ADJUSTING TH E SECON D TIME ZON E
Page 32

- 31 -
ADJUSTING TH E ALARM
Page 33

- 32 -
USIN G THE CHRON OGRAPH
NOTE: To use your digital chronograph as a tachymeter, refer to “Case
Functions: Tachymeter” feature (page 45).
Page 34

- 33 -
LAP TIME
Page 35

- 34 -
NIGHT VI SION
The Night Vision watch makes use of Light
Emitting Diodes (LEDs) for its flashlight and
soft dial lighting. LEDs last longer than
conventional incandescent bulbs, and are
more durable and energy-efficient.
Please note that the battery life of the
lighting functions is significantly reduced
with greater use. To maximize battery life,
please turn lighting functions off when
no longer needed. Luminous hands
and markers are activated by external
UV lighting.
Pusher
for Lighting
Functions
LED Light
Functions
Crown
Locator
Beacon
Function
Page 36

- 35 -
Time and Date
To set time and date please refer to page 3
(Three Hand Analog Quartz).
Lighting Functions
1. Dial Illumination Mode One quick push
of the pusher will activate the soft LED light.
The angle of the light directs it to reflect off the
crystal for maximum visibility of the dial and hands.
Ö
1.
Page 37

- 36 -
Ö
2.
2. Extended Light Mode Two quick pushes of
the pusher will activate the LED flashlight for 21⁄
2
minutes. Light will automatically deactivate,
or you can turn the light off by pressing the
pusher once.
3. Signal Mode Three quick pushes of the pusher
will cause the light to strobe continuously. To
deactivate, press pusher once.
4. Quick Search Mode Holding the pusher,
the LED light stays activated up to 2
1
⁄2minutes.
Upon release, the light will stay active for
an additional 5 seconds.
5. Locator Mode Red LED locator beacon is
positioned at the 6 o’clock marker and blinks once
every 10 seconds. An easy way to find your watch.
Page 38

- 37 -
Light Function
The lighting module of your Night Vision watch operates off of a separate
battery power source (2 battery cells) than the watch movement itself
(1 battery cell). Batteries are 3 volt 2016 Lithium batteries.
Please use an authorized Swiss Army Brands service center in the
event either the light module or watch battery require replacement.
See page 61 for information on replacing watch movement battery.
Page 39

MECHANI CAL: MANUAL WIND WATCHES
NOTE: Your watch will have either a “pull-out” or “screw-down”
crown. To determine this, gently try to pull out the crown to position
(2). If it does so, your watch has a pull-out crown. If not, use the
thumb and forefinger to apply mild pressure on the crown while
rotating toward you to release it. If it does so, your watch has a
screw-down crown.
The crown has three positions:
1. Normal position – recessed.
2. Extended position – to set the date.
3. Fully extended position – to set the time.
Note: If your watch does NOT have a date calendar the crown will only
have 2 positions (1 & 3 from above).
Manual Winding
Leaving the crown in position (1), wind the watch by turning the crown
away from you until fully wound (approximately 20-30 times).
Do not over wind.
NOTE: This operation should be consistently done at the same
time every day (for example, every morning or every evening).
- 38 -
Page 40

SETTING TH E DATE AND TIME
A. Pull out the crown to position (2).
B. Turn the crown away from you until the date showing is the
day before the desired setting.
C. Pull out the crown to the fully extended position (3) and rotate
toward you. When midnight is reached, the date will advance to
the desired date. Continue to turn the crown until the desired
time is set. Remember that the date advances at 12:00 midnight,
not 12:00 noon.
D. Push in the crown, returning it to the normal position (1).
The date and time are now set.
To Set Time Alone
Refer to instruction “C.”
NOTE: You must always push in and screw down the crown to
form a water resistant seal with the case. Never operate the crown
when the watch is wet. Mechanical watch crowns are located at
the 3 o’clock position.
- 39 -
Page 41

- 40 -
MECHANI CAL: SELF-WIN DING TH REE-HAN D WATCHES
NOTE: Your watch will have either a “pull-out” or “screw-down” crown.
To determine this, gently try to pull out the crown to position (2). If it does
so, your watch has a pull-out crown. If not, use the thumb and forefinger
to apply mild pressure on the crown while rotating toward you to release
it. If it does so, your watch has a screw-down crown. Turn crown towards
you to release. After use, push the crown back to position 1, then press
and screw down the crown (to ensure a tight seal).
Winding
The watch is wound automatically when worn on the wrist. If the watch is
not worn on a daily basis, the movement will have to be wound manually
by turning the crown away from you at least twenty times in position (1).
Page 42

- 41 -
SETTING TH E TIME
A. Wind the movement if necessary.
B. Pull out the crown into position (3). The seconds hand will stop.
C. Make sure that the position of the hands corresponds to a change
of date at midnight and not at noon.
D. Turn the crown to pre-position the hands on the desired time.
E. Push the crown back down firmly against the case in position (1),
the watch will begin to run again instantly.
NOTE: For precise time setting, it is advisable to pass the desired
minute, then turn the crown counterclockwise to position the minute
hand on the relevant mark.
Page 43

- 42 -
Setting the Day/Date
A. First turn the crown (in position 1) away from you approximately
ten times to activate the automatic movement if the watch is not
already wound. The sweep second hand will be moving.
B. Pull the crown out into position 3 (completely out). Set the correct
time by moving the hands clockwise. When you reach 12 PM,
the calendar date will jump and then set the correct time. Push
the crown back to position 1.
C. Set the crown in position 2 (intermediate position). Adjust the
date by turning the crown away from you.
D. If your watch is equipped with a day calendar, turn the crown
toward you to adjust the day setting. Then set the crown back to
position 1 and your watch is adjusted
Page 44

- 43 -
AUTOMATIC CHRONOG RAPHS
The chronograph movement indicates the hours, minutes, seconds
and date and enables short times to be measured up to a total of
12 hours.
The crown C has three positions:
A. Position (1:) Neutral and winding position
B. Position (2:) Correction of the date
C. Position (3:) Setting the time, seconds stop
NOTE: You must always push in and screw down the crown to form a
water resistant seal with the case. Never operate the crown when
the watch is wet.
Page 45

- 44 -
Pushers
• Pusher A: Chronograph start/stop
• Pusher B: Chronograph zero reset
Watch Indications
F Hours
D Minutes
G Seconds
H Date
Chronograph Indications
I 12-hour counter
E 30-minute counter
J 60-second counter
NOTE: If your watch is equipped with screw down pushers, they must
be released prior to operating. After use, press and screw down.
Use mild pressure while rotating toward you to release.
Page 46

- 45 -
TACHYMETER
The tachymeter scale, located on the inner bezel of the watch, enables
the speed of a moving body to be read off in km/h (or in some other unit
of measurement). Measure the time taken to travel one kilometer (or a
different unit) and read the result on the tachometer scale. For example,
the time taken is 40 seconds, equivalent to a speed of 90 km/h.
CHRONOG RAPH FUNCTIONS
Measurement of Partial Times (Addition Function)
A. Press pusher A to start timing. Further pressure on Pusher A
will stop the timing operation. The chronograph will indicate
the final time.
B. Once the timing operation has been stopped, press Pusher B.
The chronograph and totalizer hands will be reset to zero.
Page 47

- 46 -
ALLIANCE TRAVELLER - DUAL TIM E ZONE
SETTING TH E DATE & TIME
Upper Time (upper crown)
A. Pull out the crown to position (2).
B. Rotate the crown toward you until
the date showing is the day before
the desired setting.
C. Pull out the crown to position (3) and
rotate toward you. When midnight is
reached, the date will advance to the
desired date. Continue to turn the crown
until the desired time is set. Remember,
the date advances at 12:00 midnight, not
12:00 noon.
D. Push in the crown, returning it to position
(1). The date and time are now set.
1 2 3
Page 48

- 47 -
SETTING TH E DATE & TIME - Lower Time (lower crown)
A. Pull out crown to position (2).
B. Set the time by rotating the crown toward or away from you.
C. Push in the crown, returning it to position (1). The time is now set.
Page 49
- 48 -
ALARM WATCHES
The crown has three positions:
1. Normal position – recessed.
2. Extended position – to set the date and
desired alarm activation time.
3. Fully extended position – to set the time.
SETTING TH E DATE AND TIME
A. Pull out the crown to position (2).
B. Rotate the crown toward you until the
date showing is the day before the
desired setting.
C. Pull out the crown to position (3) and rotate
toward you. When midnight is reached, the date will advance to the
desired date. Continue to turn the crown until the desired time is set.
Remember, the date advances at 12:00 midnight, not 12:00 noon.
D. Push in the crown, returning it to position (1). The date and time
are now set.
1 2 3
Page 50

- 49 -
To Set Time Alone
Refer to instruction "C".
Setting the Alarm
A. Pull out the crown to position (2) and rotate away from you to set the
alarm hand to the desired activation time. NOTE: The alarm will
only sound once the hour hand aligns itself with the alarm hand.
B. Pull the alarm button out to activate the alarm.
C. When the hour hand aligns itself with the alarm hand the alarm will
sound. Press the alarm button in to deactivate.
Page 51
- 50 -
INSTR UCTIONS FOR US ING YOUR 2ND TI ME ZON E WATCH
The 2nd time zone watch is equipped with four hands (hour, minute,
second and 2nd time zone) and a ratchet bezel (see 'ratchet bezel'
section of manual). The time in the 2nd time zone should be referenced
using the time scale located on the inner bezel of the watch marked
1 through 24 (military time). See reverse for settings.
SETTING TH E 2nd TIME ZON E
A. Pull out the crown to position (2).
B. Rotate the crown toward you to set
time for the 2nd time zone.
C. Push in the crown, returning it to position
(1). The 2nd time zone is now set.
SETTING TH E DATE AND TIME
A. Pull out the crown to position (2).
B. Rotate the crown away from you until the date showing is the day
before the desired setting.
2ND TIME
ZONE
Page 52

- 51 -
C. Pull out the crown to position (3) and rotate the crown until the date
advances to today's date. Continue to rotate the crown to set the time.
Remember, the date advances at 12:00 midnight, not 12:00 noon.
D. Push in the crown, returning it to position (1). The date and time
are now set.
Page 53

- 52 -
RATCHET B EZ EL (Available on select models only.)
The rotating ratchet bezel was designed to enable divers to time dives,
but can be used to measure any elapsed time period. The turning bezel
has grooves to make it easy to operate.
To measure elapsed time, simply rotate the bezel toward you until the
zero mark (also the 60 mark) is opposite the minute hand. From this
moment on, the position of the minute hand in relation to the zero mark
on the bezel will indicate the total number of minutes that have elapsed.
Page 54

- 53 -
ILLU MI NATING D IAL (Available on select models only.)
To illuminate the dial, press the button located at the eight o’clock
position. The normal battery life is 27 months (using the light for 30
seconds per day). Excess use may decrease normal battery life.
Page 55

- 54 -
LEASH WATCH
The crown of the Swiss Army Brand
Leash Watch has three positions:
1. Position 1 - recessed
2. Position 2 - extended
3. Position 3 - fully extended
SETTING TH E DATE AND TIME
A. Pull out the crown to position (2).
B. Turn the crown away from you until the date
showing is the day before the desired setting.
C. Pull out the crown to position (3) and rotate toward you. When mid-
night is reached, the date will advance to the desired date.
Continue to turn the crown until the desired time is set. Remember,
the date advances at 12:00 midnight, not 12:00 noon.
D. Push in the crown, returning it to position (1). The date and time
are now set.
1 2 3
Page 56

- 55 -
LEASH WATCH (con’t)
To Set Time Alone
Refer to instruction “C”.
PACK, POCKET, AND POCKET/ DES K WATCHES
The crown of your Swiss Army Brand Timepiece
has two positions:
1. Position 1 - recessed
2. Position 2 - extended
SETTING TH E TIME
A. Pull out the crown out to position (2).
B. Turn the crown until the desired time is set.
C. Push in the crown returning it to position (1).
The time is now set.
2
1
Pocket Watch
Page 57
- 56 -
POCKET/D ESK ALAR M
The crown of your Pocket/Desk Alarm
has three positions:
1. Position 1 - recessed
2. Position 2 - extended
3. Position 3 - fully extended
The alarm button of your Pocket/Desk Alarm
has two positions:
1. Position 1A - normal recessed
2. Position 2A - extended - to turn on alarm
SETTING TH E TIME
A. Pull out the crown out to position (2).
B. Turn the crown until the desired time is set.
C. Push in the crown returning it to position (1).
The time is now set.
1
Pocket/Desk Alarm
2
3
1A
2A
Page 58

- 57 -
SETTING TH E ALARM
A. Pull out the crown to position (2).
B. Rotate the crown left to set desired alarm time.
C. Push in crown to return to position (1).
D. Pull alarm button up to extend position (2A). Alarm is now activated
and will be confirmed by bip sound.
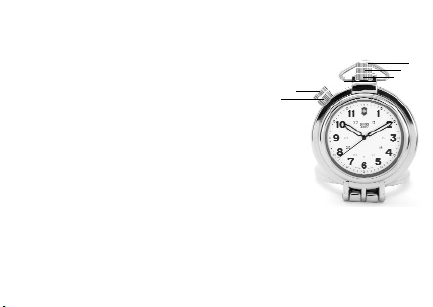
TRAVEL ALARM
The travel alarm face cover (refer to image page 58, “1”) doubles as
a kickstand.
To insert the battery (refer to image page 58, “2”) open the back lid.
SETTING TH E TIME
A. Open the back lid.
B. Set the time by using the convenient finger-dial (3) that is protected
under the back cover. Continue to turn it until the desired time is set.
C. Return the lid to the closed position.
Page 59

- 58 -
TRAVEL ALARM (con’t)
SETTING TH E ALARM
A. Open the back lid.
B. Set the alarm time by using
the convenient finger-dial (4).
Continue to turn it until the
desired wake-up is set.
C. Then pull out the on/off button
(5). The alarm is now set.
D. To turn off the alarm, push in
the on/off button (5).
5
1
4
BACK
CLOSED
BACK
OPENED
3
2
Page 60

- 59 -
DUAL TIME TRAVEL ALARM
The travel alarm face cover (1)
doubles as a kickstand.
To insert the battery (2) open the
back lid.
SETTING TH E TIME
A. Open the back lid.
B. Set the time by using the con-
venient finger-dial (3) that is
protected under the back cover.
Simply turn it until the desired
time is set.
C. Return the lid to the closed
position.
6
4
5
1
4
3
2
BACK
CLOSED
BACK
OPENED
Page 61

- 60 -
SETTING TH E ALARM
A. Set the alarm time by using the convenient finger-dial (4).
Continue to turn it until the desired wake-up is set.
B. Then pull out the on/off button (5). The alarm is now set.
C. To turn off the alarm, push in the on/off button (5).
SETTING TH E SECON D TIME ZON E
The second time zone can be set by turning the small, black, toothed
wheel positioned at 5:00 (6). As you turn this wheel forward or backward
you will see the outer ring of numerals also turning. Set this ring so
the numeral of your desired second time zone lines up with the full hour
of the actual time. Example: It is 7:30, the numeral must line up with 7.
The second time zone can be easily read by looking at the hour hand
and its position in relation to the outer ring of numerals.
CRESCE NDO AN D SNOOZE FEATURE S
(Available on select models only.)
Crescendo: When the alarm is activated, it will emit 4 bips low/4 bips
middle/4 bips high, increasing in volume.
Page 62

- 61 -
It will remain high until the alarm is shut off. If it is not shut off, it will
ring at the high setting for about 15 minutes.
Snooze: If the alarm is ringing, it can be shut off temporarily using the
button on the side of the case. It will start to ring again every 4
1
⁄2minutes
for 6 to 8 cycles—also in crescendo mode.
NOTE: Alarm must be shut off using the button on the backside of the case.
NOTE: When travel alarm or dual travel alarm battery is low, the
alarm may not shut off using the on/off button. Check the battery
power level and replace battery if necessary.
BATTERY Your Swiss Army Brand timepiece may be powered by a
1.55 volt silver oxide watch battery. Worn Batteries should be replaced
immediately. Substituting interchangeable batteries is not recommended.
Battery change should be performed by a qualified technician who
should also check the condition of the gaskets and the o-ring at the
same time. Battery is not covered by the warranty.
Page 63

- 62 -
THRE E-YEAR LIMITE D WARRANTY:
Swiss Army Brands, Inc. warrants, for a period of three years from the date of original
purchase, the face, hands and movement of this Swiss Army Brand Watch to be free
from defects in material and workmanship. If any of the aforementioned parts are
defective we will, at our option, either repair or replace the watch, without charge.
Visit our website at www.swissarmy.com to find a Swiss Army Authorized Repair
Center or call us at 800-442-2706.
While there is no charge for repair or replacement of the watch during the warranty
period, a check in the amount of $10.00, payable to Swiss Army Brands, Inc., must
accompany the watch to cover postage, handling, insurance and related costs. As a
condition to this warranty, either the enclosed warranty repair coupon, completed in
its entirety and date stamped by the retailer from whom the watch was purchased,
or the original retail purchase receipt, must be presented with the watch upon return.
Alternatively, if you purchase the watch in California, you may return the watch to
the retailer from whom it was purchased and the return postage will be processed
without charge. Please include your name, street address and phone number to
ensure proper return.
This warranty does not apply to any part of the watch not expressly warranted herein
or damage to the watch while in the possession of the consumer or damage or defect
caused by abnormal or unreasonable use (including repairs or alterations by anyone
not authorized by Swiss Army Brands, Inc.). This warranty gives you specific legal
rights and you may also have other rights which vary from state to state.
Page 64

- 63 -
The foregoing warranty is exclusive and in lieu of all other warranties
of quality and
performance, written, oral or implied, and all other warranties, including any implied
warranties of merchantability or fitness for a particular purpose, are hereby
disclaimed. In no event shall Swiss Army Brands, Inc. or its affiliates be liable for
special, indirect, incidental or consequential damages whether in contract, tort,
negligence, strict liability or otherwise. Some states do not allow limitations on how
long an implied warranty lasts and/or the exclusion or limitation of incidental or
consequential damages, so the above limitations and exclusions may not apply to you.
IMPORTANT CONSUM ER INFORMATION
Thank you for purchasing a Swiss Army Timepiece. We invite you to register online at
www.swissarmy.com/register. Please select “Watch Warranty Registration”. In the field
marked “Item Number”, enter the item or product number located on the package. Your
registration will allow Swiss Army to:
• Communicate future service related information
• Inform you of any upcoming promotions
• Keep you up-to-date on new product releases
We hope you enjoy your Swiss Army Timepiece.
Page 65

THRE E-YEAR LIM ITED WARRANTY REPAIR COUPON
Name
Address
City
State Zip Date of Purchase
Purchased from
Repair Coupon. To be detached and submitted with watch only when watch
is returned for repair covered by the warranty.
Page 66

SWISS ARMY BRANDS, IN C.
One Research Drive, P.O. Box 874
Shelton, CT 06484-0874
Consumer Department: 800 442 2706
www.swissarmy.com
SAF05248
06/05
 Loading...