

Page 1

QUICK GUIDE
CHRONO CLASSIC 1/100
V.03044
Page 2

ENGLISH
DEUTSCH
FRANÇAIS
ITALIANO
ESPAÑOL
PORTUGUÊS
中文
РУССКИЙ
日本語
عربي
Page 3
TIME MODE
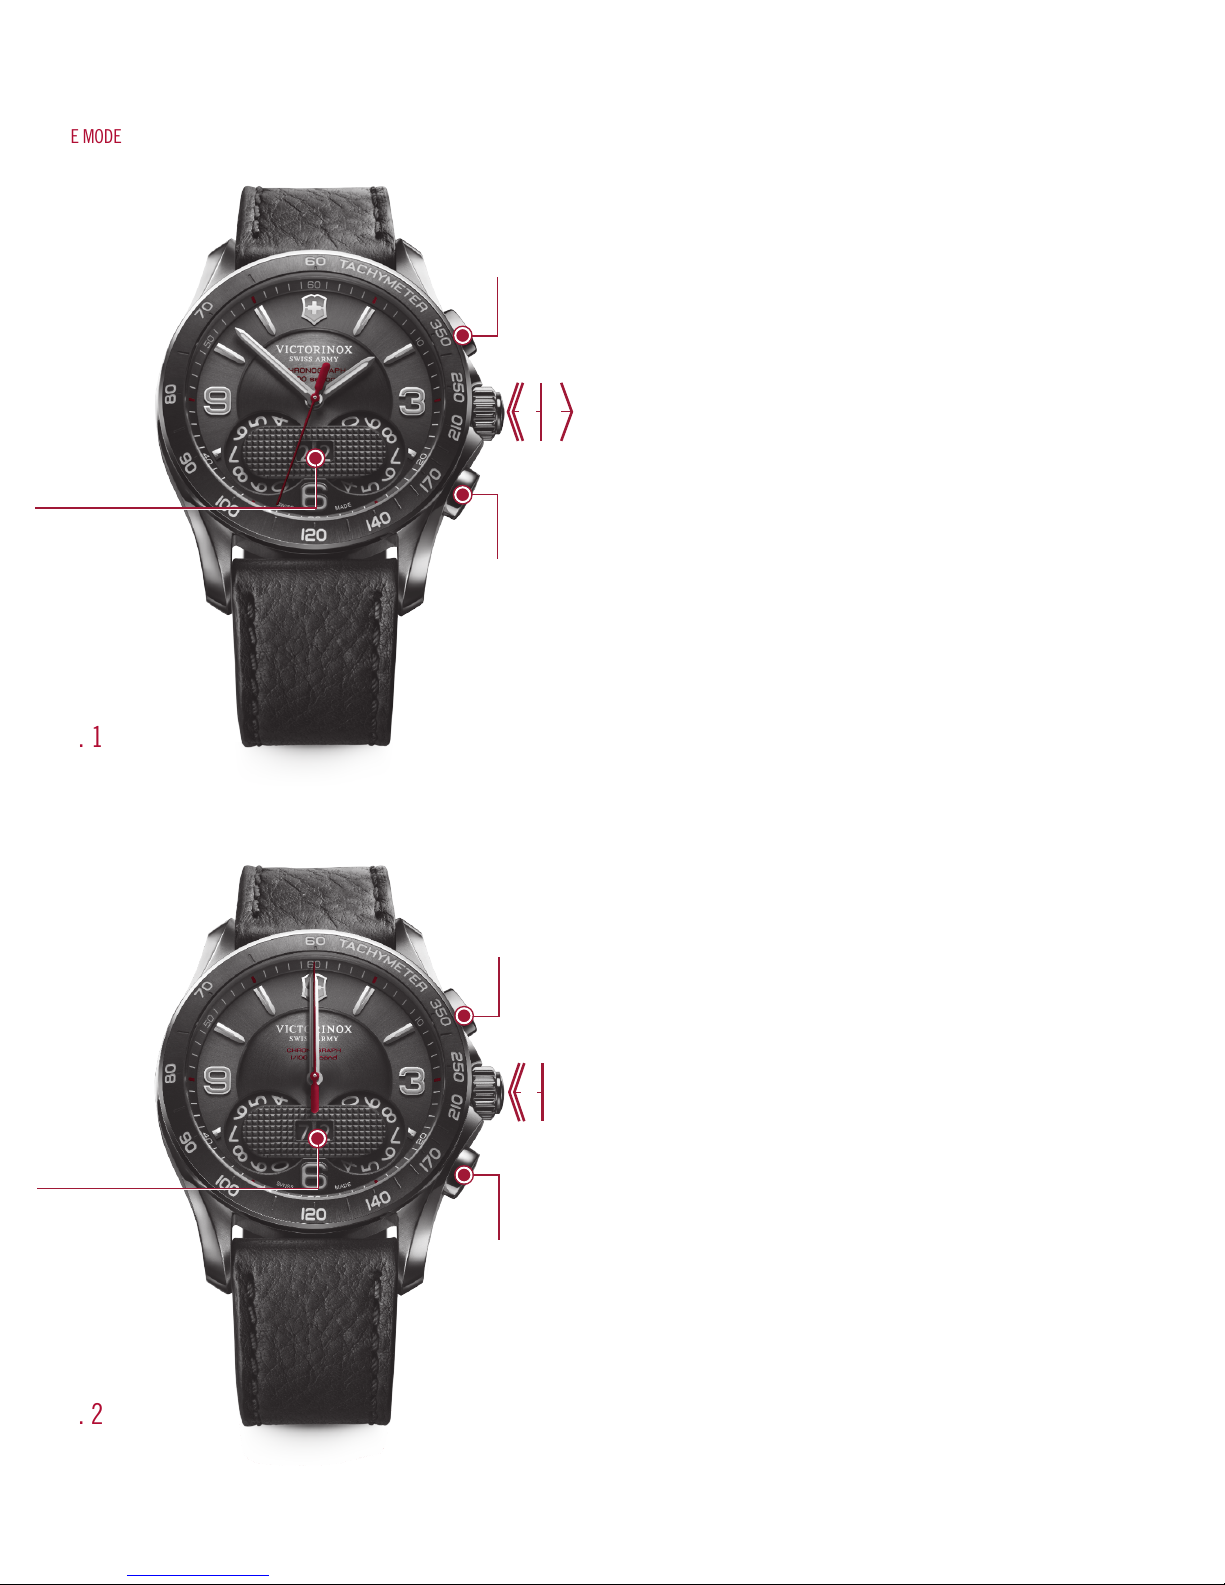
TIME MODE (g.1)
Setting the time and the perpetual
calendar
The time can only be set in TIME mode.
1. Pull the crown out to position III. The
second hand moves to a determined
position to indicate you what you are
now setting (6 positions):
45’=AM hour setting
15’=PM hour setting
30’=Minute setting
55’=Year setting (discs)
00’=Month setting
05’=Date setting
2. Press pusher A for the hour setting,
short press one hour, long press fast
forward. Make sure that the position
of the second hand corresponds to AM
or PM (change of date at midnight and
not at noon).
3. Press pusher B for the minute
setting. Correct the minutes with
pusher A. The seconds will be set to
zero once you press the crown.
4. Press pusher B for the year setting.
The year is displayed by the two digits
located on the two discs at six. Correct
the year with pusher A.
5. Press pusher B for the month setting.
The month is displayed by the two
digits at six. Correct the month with
pusher A.
6. Press pusher B for the date setting.
The date is displayed by the two digits
at six. Correct the date with pusher A.
7. Push the crown back to position II to
exit the setting mode. The second hand
will be set automatically to zero.
Note: This is a perpetual calendar, the
date will be automatically corrected at
the end of each month up to 2099 (C).
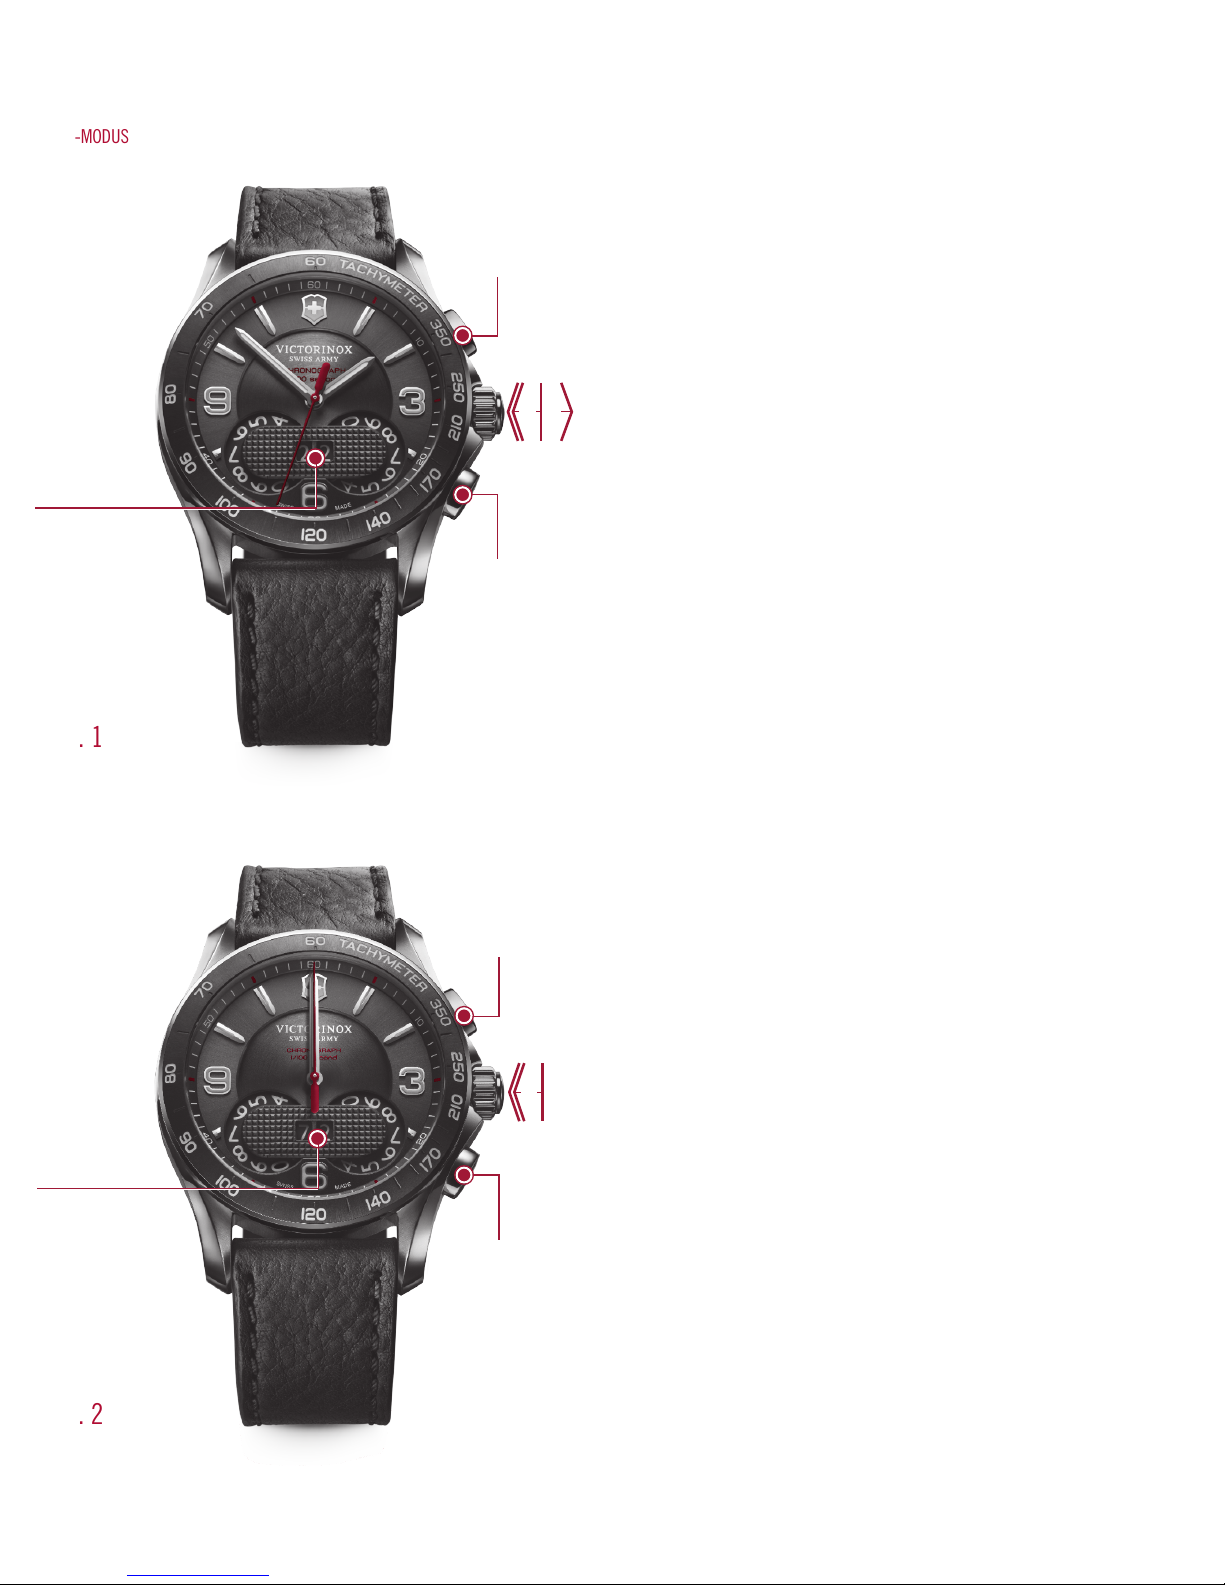
CHRONO MODE (g. 2)
To move to CHRONOGRAPH mode, press
the crown to position I twice shortly
(within <1sec). The hour, the minute,
the seconds hands and the two discs
go to zero.
Your chronograph is now ready to start.
Simple and additional timing function
This function enables the chronometer to
measure one time, or several consecutives
times and add them together to show the
total cumulative time.
1. Move to CHRONO mode by pressing
twice the crown to position I
2. Set to zero by pushing pusher B
3. Start time 1 by pushing pusher A
(START)
4. End time 1 by pushing pusher A (STOP)
> Read measured time 1
5. Start time 2 by pushing pusher A
(START)
6. End time 2 by pushing pusher A (STOP)
> Read time 1 + 2 and so on
7. Reset to zero by pushing pusher B
Note: Whenever you wish, you can display
the current time in TIME mode by briey
pressing the crown twice. This will not
interrupt the chronograph operation.
Pushers A and B have no function in time
mode. Press the crown twice again to
return to CHRONO mode which indicates
the time being measured. To return to
TIME mode, press the crown twice again.
The 1/100th are displayed only when the
chronograph is stopped (C).
Fig. 2
Fig. 1
I
A
B
II III
C
C
I
A
B
II
C
Page 4
ZEIT-MODUS
ZEIT-MODUS (Abb. 1)
Einstellen der Zeit und des ewigen
Kalenders
Die Zeiteinstellung erfolgt
ausschliesslich im ZEIT-Modus.
1. Krone in Position III herausziehen.
Je nach eingenommener Position zeigt
der Sekundenzeiger an, was gerade
eingestellt wird (6 Positionen):
45 Sek. = Stunde vor 12 Uhr
15 Sek. = Stunde nach 12 Uhr
30 Sek. = Minuten
55 Sek. = Jahr (Scheiben)
00 Sek. = Monat
05 Sek. = Tag
2. Zum Einstellen der Stunde Drücker A
betätigen. Kurzes Drücken für eine Stunde,
längeres Drücken für Schnellvorlauf.
Dabei ist sicherzustellen, ob die Position
des Sekundenzeigers auf Vormittag (vor
12 Uhr) oder Nachmittag (nach 12 Uhr)
steht (Ein Datumswechsel erfolgt nur um
Mitternacht und nicht am Mittag.).
3. Zum Einstellen der Minuten Drücker
B betätigen. Minuten mit Drücker A
korrigieren. Die Sekunden werden
auf Null gestellt, sobald Sie die Krone
drücken.
4. Zum Einstellen des Jahres Drücker B
betätigen. Das Jahr wird von den beiden
Ziffern auf den beiden Scheiben bei
6 Uhr angezeigt. Jahr mit Drücker A
korrigieren.
5. Zum Einstellen des Monats Drücker
B betätigen. Der Monat wird von den
beiden Ziffern bei 6 Uhr angezeigt.
Monat mit Drücker A korrigieren.
6. Zum Einstellen des Datums Drücker
B betätigen. Das Datum wird von den
beiden Ziffern bei 6 Uhr angezeigt.
Datum mit Drücker A korrigieren.
7. Krone zurück in Position II drücken,
um den Einstellungsmodus zu verlassen.
Der Sekundenzeiger wird automatisch
auf Null gestellt.
Hinweis: Es handelt sich um einen
ewigen Kalender.
Das Datum wird bis
2099 zu jedem Monatsende automatisch
korrigiert (C).
CHRONO-MODUS (Abb. 2)
Zum Wechseln in den CHRONOGRAPHENModus Krone durch zweifaches kurzes
Drücken (innerhalb <1 Sek.) in Position
I bringen. Stunden-, Minuten- und
Sekundenzeiger sowie die beiden Scheiben
werden auf Null gestellt.
Ihr Chronograph ist nun startbereit.
Einfache und mehrfache Zeitfunktion
Diese Funktion erlaubt dem Chronometer
das Messen eines einzelnen Zeitabschnitts oder aber mehrerer aufeinanderfolgender Zeitabschnitte. AlleZeitabschnitte können addiert und als
Gesamtsumme angezeigt werden.
1. Zum Wechseln in den CHRONO-Mo
dus Krone durch zweifaches Drücken in
Position I bringen.
2. Durch Betätigen des Drückers B auf
Null stellen.
3. Messen der Zeit 1 durch Betätigen des
Drückers A starten (START)
4. Messen der Zeit 1 durch Betätigen des
Drückers A beenden (STOPP)
> Gemessene Zeit 1 ablesen
5. Messen der Zeit 2 durch Betätigen des
Drückers A starten (START)
6. Messen der Zeit 2 durch Betätigen des
Drückers A beenden (STOPP)
> Gemessene Zeit 1 + 2 usw. ablesen
7. Durch Betätigen des Drückers B auf
Null stellen.
Hinweis: Durch zweifaches kurzes Drücken
der Krone kann die aktuelle Zeit jederzeit
im ZEIT-Modus angezeigt werden. Der
Chronographenvorgang wird dadurch nicht
unterbrochen. Drücker
A
und B erfüllen im
ZEIT-Modus keine Funktion. Zur Rückkehr
in den CHRONO-Modus, der die gemessene
Zeit anzeigt, Krone erneut zweimal drücken.
Zur Rückkehr in den ZEIT-Modus Krone
erneut zweimal drücken. Die 1/100-Sekunde
wird nur angezeigt, wenn der Chronograph
gestoppt wird
(C)
.
Fig. 2
Fig. 1
I
A
B
II III
C
C
I
A
B
II
C
Page 5

MODE HEURE
MODE HEURE (g. 1)
Réglage de l’heure et du calendrier
perpétuel
L’heure ne peut être réglée qu’en mode
HEURE.
1. Tirez sur la couronne pour la placer
sur la position
III
. L’aiguille des
secondes se déplace jusqu’à une
position déterminée vous indiquant
le réglage que vous effectuez
(6positions):
45’= réglage heures A.M.
15’= réglage heures P.M.
30’= réglage des minutes
55’= réglage de l’année (disques)
00’= réglage du mois
05’= réglage de la date
2. Appuyez sur le poussoir
A
pour régler
l’heure, une pression courte fait avancer
d’une heure, une pression plus longue
fait avancer plus rapidement. Assurez-vous que la position de l’aiguille des
secondes correspond aux heures A.M. ou
P.M. (changement de date à minuit et
non à midi).
3. Appuyez sur le poussoir
B
pour régler
les minutes. Corrigez les minutes avec
le poussoir
A
. Les secondes seront
remises à zéro après avoir appuyé sur
la couronne.
4. Appuyez sur le poussoir
B
pour
régler l’année. L’année est afchée par
les deux chiffres situés sur les deux
disques à 6h. Corrigez l’heure avec le
poussoir
A
.
5. Appuyez sur le poussoir
B
pour régler
le mois. Le mois est afché par les deux
chiffres à 6h. Corrigez le mois avec le
poussoir
A
.
6. Appuyez sur le poussoir
B
pour régler
la date. La date est afchée par les
deux chiffres à 6h. Corrigez la date
avec le poussoir
A
.
7. Appuyez sur la couronne pour la
remettre en position
II
et quitter le
mode réglage. L’aiguille des secondes
se replacera automatiquement à zéro.
Remarque: il s’agit d’un
calendrier perpétuel,
la date sera
automatiquement corrigée à la n de
chaque mois jusqu’en 2099 (C).
MODE CHRONO (g. 2)
Pour passer en mode CHRONOGRAPHE,
appuyez brièvement deux fois sur la
couronne en position I (en moins de 1sec.).
Les aiguilles des heures, des minutes et
des secondes ainsi que les deux disques
se mettent à zéro. Votre chronographe est
maintenant prêt à démarrer.
Fonction chronomètre simple et additionnel.
Cette fonction permet au chronomètre de
mesurer un temps, ou plusieurs temps
consécutifs et de les additionner an d’af
-
cher le temps total cumulé.
1. Passez en mode CHRONO en appuyant
deux fois sur la couronne en position I
2. Remettez à zéro en appuyant sur le
poussoir B
3. Démarrez le temps 1 en appuyant sur
le poussoir A (DÉPART)
4. Arrêtez le temps 1 en appuyant sur le
poussoir A (ARRÊT)
> Lisez le temps 1 mesuré
5. Démarrez le temps 2 en appuyant sur
le poussoir A (DÉPART)
6. Arrêtez le temps 2 en appuyant sur le
poussoir A (ARRÊT)
> Lisez le temps 1 + 2 et ainsi de suite
7. Remettez à zéro en appuyant sur le
poussoir B.
Remarque: dès que vous le souhaitez,
vous pouvez afcher l’heure actuelle
en mode HEURE en appuyant
brièvement deux fois sur la couronne.
Cela n’interrompra pas l’opération du
chronographe. En mode HEURE, les
poussoirs
A
et B n’ont pas de fonction.
Appuyez de nouveau deux fois sur la
couronne pour revenir dans le mode
CHRONO qui indique le temps mesuré.
Pour revenir en mode HEURE, appuyez de
nouveau deux fois sur la couronne. Les
centièmes ne sont afchés que lorsque le
chronographe est arrêté (C).
Fig. 2
Fig. 1
I
A
B
II III
C
C
I
A
B
II
C
Page 6

MODALITÀ ORA
MODALITÀ ORA (g. 1)
Impostazione dell’ora e del calendario
perpetuo
L’ora può essere impostata
esclusivamente nella modalità ORA.
1. Estrarre la corona in posizione
III
La
lancetta dei secondi si muove no a una
determinata posizione, ad indicare cioè
che si sta impostando (6 posizioni):
45’ = impostazione ore AM
15’ = impostazione ore PM
30’ = impostazione dei minuti
55’ = impostazione dell’anno (dischi)
00’ = impostazione del mese
05’ = impostazione della data
2. Premere il pulsante
A
per impostare
l’ora. Premere brevemente per andare
avanti di un’ora. Tenere premuto a
lungo per andare avanti velocemente.
Assicurarsi che la posizione della
lancetta dei secondi corrisponda ad
AM o a PM (cambio di data alla
mezzanotte e non a mezzogiorno).
3. Premere il pulsante
B
per impostare
i minuti. Correggere i minuti con il
pulsante
A
. Una volta premuta la
corona i secondi verranno azzerati.
4. Premere il pulsante
B
per impostare
l’anno. L’anno viene visualizzato dalle
due cifre situate sui due dischi in
corrispondenza del numero sei.
Correggere l’anno con il pulsante
A
.
5. Premere il pulsante
B
per impostare
il mese. Il mese viene visualizzato dalle
due cifre situate in corrispondenza del
numero sei. Correggere il mese con il
pulsante
A
.
6. Premere il pulsante
B
per impostare
la data. La data viene visualizzata dalle
due cifre situate in corrispondenza del
numero sei. Correggere la data con il
pulsante
A
.
7. Riportare la corona in posizione
II
per
uscire dalla modalità di impostazione.
La lancetta dei secondi si azzererà
automaticamente.
Nota bene: Questo è un calendario
perpetuo. La data verrà corretta
automaticamente al termine di ogni
mese no al 2099
(C)
.
MODALITÀ CRONOGRAFO (g. 2)
Per passare alla modalità
CRONOGRAFO, premere brevemente
due volte la corona in posizione I
(entro <1 secondo). Le lancette delle
ore, dei minuti, dei secondi e i due
dischi si azzerano. Ora è possibile
avviare il cronografo.
Funzione tempo semplice e addizionale
Questa funzione consente al cronometro
di misurare uno o più tempi consecutivi
per poi raggrupparli insieme e
visualizzare il tempo totale.
1. Passare alla modalità CRONOGRAFO
premendo due volte la corona in
posizione I
2. Azzerare premendo il pulsante B
3. Avviare il tempo 1 premendo il
pulsante A (START)
4. Fermare il tempo 1 premendo il
pulsante A (STOP)
> Leggere il tempo 1 misurato
5. Avviare il tempo 2 premendo il
pulsante A (START)
6. Fermare il tempo 2 premendo il
pulsante A (STOP)
> Leggere il tempo 1 + 2 e così via
7. Azzerare premendo il pulsante B
Nota bene: È possibile visualizzare
l’ora nella modalità ORA premendo la
corona brevemente e per due volte.
Il funzionamento del cronografo non
si interromperà. I pulsanti A e B non
hanno funzioni nella modalità ORA. Per
tornare alla modalità CRONOGRAFO e
visualizzare il tempo misurato, premere
nuovamente la corona per due volte. Per
tornare alla modalità ORA, premere due
volte la corona. È possibile visualizzare i
centesimi di secondo soltanto quando
il cronografo viene fermato (C).
Fig. 2
Fig. 1
I
A
B
II III
C
C
I
A
B
II
C
Page 7

MODO HORA
MODO HORA (g.1)
Ajuste de la hora y del calendario
perpetuo
Solo se puede poner en hora el reloj en
el modo HORA.
1. Tire de la corona hasta la posición
III
. El segundero se mueve hasta una
posición determinada para indicar lo que
se está congurando (6 posiciones):
45’ = hora AM
15’ = hora PM
30’ = minutos
55’ = años (discos)
00’ = meses
05’ = fecha
2. Accione el pulsador
A
para establecer
la hora, una pulsación breve avanza
una hora y una pulsación larga avanza
varias horas. Compruebe que la posición del segundero corresponde a las
horas AM o PM (la fecha cambiará
a medianoche y no a mediodía).
3. Accione el pulsador B para establecer
los minutos.
Corrija los minutos con el
pulsador
A. Los segundos se establecerán
en cero cuando pulse la corona.
4. Accione el pulsador B para establecer el año. El año se muestra mediante
los dos dígitos de los dos discos
situados a las seis horas. Corrija el
año con el pulsador
A
.
5. Accione el pulsador
B
para
establecer el mes. El mes se muestra
mediante los dos dígitos situados a
las seis horas. Corrija el mes con el
pulsador
A
.
6. Accione el pulsador
B
para establecer
la fecha. La fecha se muestra mediante
los dos dígitos situados a las seis horas.
Corrija la fecha con el pulsador
A
.
7. Pulse la corona hasta llevarla a la
posición
II
para salir del modo puesta
en hora. La aguja de los segundos se
situará automáticamente en cero.
Nota: Se trata de un calendario
perpetuo, la fecha se corregirá
automáticamente al nal de cada
mes hasta el año 2099 (C).
MODO CRONÓGRAFO (g. 2)
Para pasar al modo CRONÓGRAFO, pulse
rápidamente la corona dos veces (en me
nos de 1 segundo) hasta la posiciónI. Las
agujas de los segundos, minutos y horas,
así como los dos discos se sitúan en cero.
El cronógrafo está listo para empezar a
contar.
Función de medida del tiempo simple
oacumulado. Esta función permite al cro
nómetro medir un tiempo o ir adicionando
varios tiempos consecutivos para mostrar
el tiempo total acumulado.
1. Accione el modo CRONÓGRAFO pulsan
-
do dos veces la corona hasta la posición I
2. Establezca el cronógrafo en cero
accionando el pulsador B
3. Lance el tiempo 1 accionando el
pulsador A (START)
4. Detenga el tiempo 1 accionando el
pulsador A (STOP)
> Lea la medida del tiempo 1
5. Lance el tiempo 2 accionando el
pulsador A (START)
6. Detenga el tiempo 2 accionando el
pulsador A (STOP)
> Lea la medida de los tiempos 1 + 2, etc.
7. Vuelva a establecer el cronógrafo en
cero accionando el pulsador B
Nota: Es posible volver al modo HORA para
consultar la hora siempre que lo desee
pulsando brevemente dos veces la corona.
Esto no interrumpirá el funcionamiento del
cronógrafo. Los pulsadores A y B no co
rresponden a ninguna función en el modo
hora. Vuelva a pulsar dos veces la corona
para volver al modo CRONÓGRAFO, que in
dica el tiempo que se está midiendo. Para
volver al modo HORA, pulse nuevamente
dos veces la corona. Las centésimas de
segundo se muestran únicamente cuando
el cronógrafo está parado (C).
Fig. 2
Fig. 1
I
A
B
II III
C
C
I
A
B
II
C
Page 8

TIME MODE
TIME MODE (g. 1)
Ajustar a hora e o calendário perpétuo
A hora apenas pode ser ajustada em
TIME mode.
1. Puxar a coroa para a posição III.
Oponteiro dos segundos desloca-se
para determinada posição, indicando
que está ajustando (6 posições):
45’= ajuste hora AM
15’= ajuste hora PM
30’= ajuste Minutos
55’= ajuste Ano (discos)
00’= ajuste Mês
05’= ajuste Data
2. Pressionar o botão A para ajustar
a hora, pressão curta para avançar
uma hora, pressão longa para avançar
rapidamente. Certique-se que a
posição do ponteiro dos segundos
corresponde à posição AM o PM
(alteração da data à meia-noite e
não ao meio-dia).
3. Pressionar o botão B para ajustar os
minutos. Corrigir os minutos com o
botão A. Os segundos carão em zero
assim que pressionar a coroa.
4. Pressionar o botão B para ajustar
o ano. O ano é mostrado pelos dois
dígitos que estão nos dois discos
às seis horas. Corrigir o ano com o
botão A.
5. Pressionar o botão B para ajustar
o mês. O mês é mostrado pelos dois
dígitos às seis horas. Corrigir o mês
com o botão A.
6. Pressionar o botão B para ajustar
a data. A data é mostrada pelos dois
dígitos às seis horas. Corrigir a data
com o botão A.
7. Pressionar a coroa de volta para
a posição II para sair do modo de
ajuste. O ponteiro dos segundos cará,
automaticamente, em zero.
Nota: Este é um calendário perpétuo,
a data será automaticamente corrigida
no nal de cada mês até 2099 (C).
CHRONO MODE (g. 2)
Para mudar para o modo CRONÓGRAFO,
pressionar a coroa para a posição
I
com
duas pressões curtas (dentro de < 1 seg.).
Os ponteiros da hora, minutos e segundos
e os dois discos cam em zero. Agora, seu
cronógrafo está pronto para iniciar.
Função de cronometragem simples e
suplementar. Esta função permite ao
cronômetro medir um tempo ou vários
tempos consecutivos, e juntá-los mos
-
trando o tempo total acumulado.
1. Mudar para o modo CRONÓGRAFO,
pressionando a coroa duas vezes para a
posição I
2. Colocar em zero, pressionando o botão B
3. Iniciar o tempo 1, pressionando o
botão A (START)
4. Parar o tempo 1, pressionando o botão
A (STOP)
> Ler o tempo 1 medido
5. Iniciar o tempo 2, pressionando o
botão A (START)
6. Parar o tempo 2, pressionando o botão
A (STOP)
> Ler o tempo 1 + 2 e assim
sucessivamente
7. Recolocar em zero, pressionando o
botão B
Nota: Sempre que quiser, pode ver a hora
atual no modo HORÁRIO, pressionando
brevemente a coroa duas vezes. Isso não
interromperá a operação do cronógrafo.
Os botões A e B não têm qualquer função
no modo hora. Pressionar novamente
a coroa duas vezes para regressar ao
modo CHRONO que indica o tempo a ser
medido. Para regressar ao modo HORÁRIO,
pressionar novamente a coroa duas
vezes. O 1/100th é mostrado apenas
quando o cronógrafo é parado (C).
Fig. 2
Fig. 1
I
A
B
II III
C
C
I
A
B
II
C
Page 9

TIME MODE
Fig. 2
Fig. 1
I
A
B
II III
C
C
I
A
B
II
C
Page 10

TIME MODE
Fig. 2
Fig. 1
I
A
B
II III
C
C
I
A
B
II
C
Page 11

TIME MODE
Fig. 2
Fig. 1
I
A
B
II III
C
C
I
A
B
II
C
Page 12

TIME MODE
Fig. 2
Fig. 1
I
A
B
II III
C
C
I
A
B
II
C
 Loading...