

Page 1
1
4
7
2
3
5
6
8
Interactive guide online at
9
www.victorinoxswissarmy.com
Page 2

English
English
VICTORINOX SWISS ARMY INSTRUCTIONS FOR USE
I. GENERAL INFORMATION
Disposal of used batteries 3
Water resistance 4
Meter/bar correlation 5
II. GETTING STARTED
1. Using the crown 5
2. Display function 6
3. Selecting the functions 6-7
III. INSTRUCTIONS FOR USE
1. Synchronizing the analog display with the digital display 7-8
2. Checking and changing the time display mode 8
3. Setting the time 9-10
4. Setting the date and month 10
5. Correction of the day 11
6. Using the timer 11-12
7. Display the time of another time zone 12-13
8. Using the chronograph 13-15
9. Using the alarm 15-16
2
I. GENERAL INFORMATION
Congratulations on having chosen a Victorinox Swiss Army timepiece. To ensure your
timepiece operates perfectly, we recommend that you follow these instructions.
Your timepiece is fitted with either a screw-down or a “pull-out”crown. In order to
establish which, gently try to pull the crown out to position 2, if that works, your
timepiece is fitted with a “pull-out” crown. If not, use your thumb and forefinger to
apply mild pressure on the crown, while rotating towards you to release it. If it does
so, you have a screw-down crown
After use, push the crown back in or screw it down until it is secure in
order to maintain the water resistance of your timepiece.
Quartz timepieces are battery-operated. When the battery is exhausted, we
recommend that you have it replaced immediately at an authorized Victorinox Swiss
Army Service Center where the water resistance of your timepiece will also be
checked. The battery is not covered by the warranty.
COLLECTION AND DISPOSAL OF QUARTZ TIMEPIECE BATTERIES*
This symbol indicates that this product must not be thrown away
with household rubbish. It must be disposed of at an authorized
battery disposal point. By doing so you will be protecting the
environment and human health. Recycling conserves natural
resources.
*Applicable in EU member countries and countries with similar
legislation.
3
Page 3

English
English
WATER RESISTANCE
Please check the details on the back of your Victorinox Swiss Army timepiece case
and read the following information carefully:
Water-resistant to 3 atm (100 feet/30 meters). Resistant to rain, splashes and
accidental immersion, but must not be worn in the shower or when
swimming.
Water-resistant to 5 atm (165 feet/50 meters). May be worn in the shower or
when swimming in shallow water. Do not wear when diving.
Water-resistan t t o 1 0 a tm (3 30 feet/100 meters ). M ay be wo rn when
swimming or snorkelling.
Water-resistan t t o 3 0 a tm (9 90 feet/300 meters ). M ay be wo rn when
swimming, snorkelling or skin diving.
Wate r-resista nt to 50 a tm (1650 fe et/500 meters). May be worn when
swimming, snorkelling or scuba diving.
The water resistance of your timepiece cannot be guaranteed indefinitely,
considering that joints may age, crowns or pushers may sustain knocks and climate
or t emperature may var y. We therefore recomme nd that you have th e water
resistance of your timepiece checked at an authorized Victorinox Swiss Army
Service Center every 18 months or whenever the timepiece case is opened.
Never operate the crown and/or pushers when the timepiece is under water
and ensure that the crown and pushers are properly pushed back or screwed
down after each use.
4
METER/BAR CORRELATION
Meter and bar measurements are different things: Under water, the water
pressure is added to the air pressure above; a depth of 10 meters corresponds to 1
bar of water pressure and 1 bar of atmospheric pressure above water level,
therefore 2 bars in total.
II. GETTING STARTED
1. USING THE CROWN
A characteristic feature of your Chrono Classic XLS MT (MultiTask) timepiece
equipped with an ETA movement 988.333 is its unique programming crown for all
manipulations which you can turn to obtain different functions:
– In neutral position (1):
Selection of the different functions
– In pulled-out position (2):
Correction of the display indication.
The crown also acts as a pusher to activate different
functions such as the arming and disarming of the alarm,
and to operate the three chronograph functions: starting,
stopping and resetting to zero.
5
Page 4

English
English
2. DISPLAY FUNCTION
Hour hand
Minute hand
Setting crown
Indication of the selected function
Digital display
Fixed bezel with count-up scale
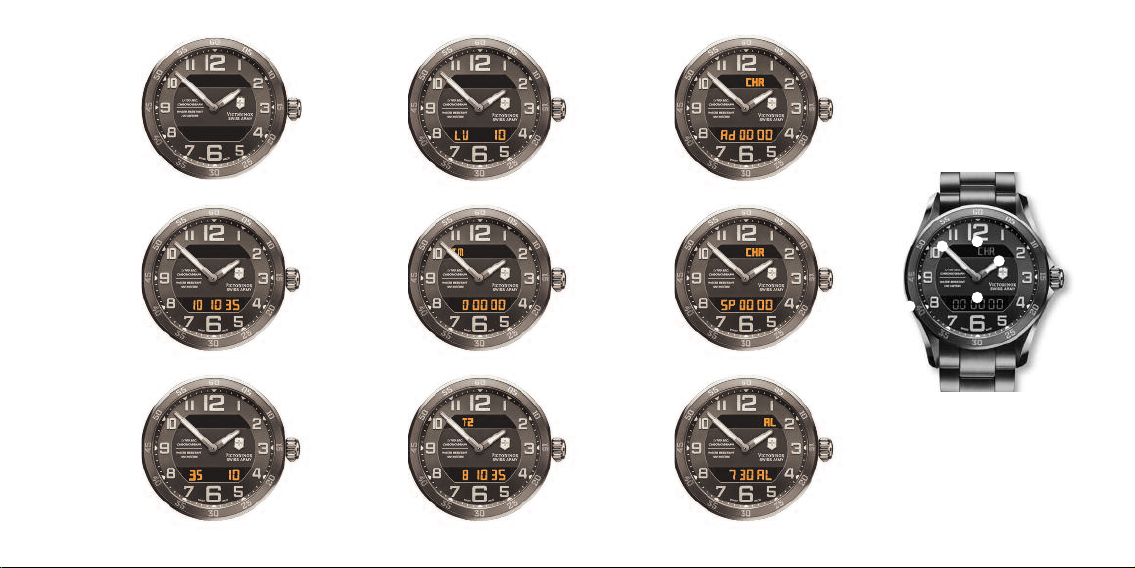
3. SELECTING THE FUNCTIONS
(refer to figure 1-9)
With the crown in neutral position, turn it clockwise or counter-clockwise. The
following information appears on the dial in quick succession depending on the
direction of the crown rotation, following a sequential order of 1 to 9 (turn the
crown counter-clockwise) or 9 to 1 (turn the crown clockwise).
Please refer to corresponding imagery on the fold-out page.
Fig.1: Neutral Fig.2: Local Time H-M-S
Fig.3: Seconds/Date Fig.4: Day/Date
The selected functions are identified by the alphabet symbol, which appears in the
upper section of the dial.
Fig.5: Timer TM Fig.6: Second Time Zone T2
Fig.7: Chrono ADD Mode CHR Fig.8: Chrono SPLIT Mode CHR
Fig.9: Alarm AL
6
Note: The timepiece is equipped with an end-of-life (EOL) battery indication, which
operates by causing the digital display to flash.
Countup scale ()
When a scale is going from 5 to 60 (clockwise incrementation), you may use the
bezel as a counter, to count up to 60 minutes. To know how many minutes have
elapsed, simply note the number that the minute hand points to.
III. INSTRUCTION FOR USE
1. SYNCHRONIZING THE ANALOG DISPLAY (HANDS) WITH THE DIGITAL
DISPLAY (LCD)
After a battery change, or exceptionally in the event of a malfunction, you must
always synchronize the time indication by the hands with the time indication by the
digital numerals on the dial.
How to synchronize:
– Select the neutral function (Fig. 1) (dial with no digital figures displayed).
– Pull out the crown . The symbol R then appears in the upper display (). The
time which appears on the lower display is different from the time shown by the
hands.
– Turn the crown in either direction until the hands show the same time as the
numerals on the digital display :
7
Page 5

English
English
a rapid rotation advances or retracts the hands by one full hour,
a slow rotation enables the minutes setting to be corrected.
– Push the crown back down.
– Select the function for local time (Fig.2).
– Proceed to time setting (3. Setting the time).
2. CHECKING AND CHANGING THE TIME DISPLAY MODE
There are 2 time display modes:
– once 24 hours
– twice 12 hours:
AM from midnight to midday
PM from midday to midnight.
– Select function from T2 (Fig.6).
To check the display mode:
– Push the crown once. If the letter A or P appears time is displayed in the 12-hour
mode.
– In the 12-hour mode, a small letter P appears between midday and midnight
alongside the numerals displaying the hours.
– Push the crown twice to return to 24-hour mode.
8
3. SETTING THE TIME
Hours and minutes
– Select and display local time (Fig. 2).
– Pull out the crown. The symbol T appears in the upper section of the dial and
numerals for hours and minutes flash ().
– Set the correct time by turning the crown either clockwise or counter-clockwise:
a rapid rotation advances or retracts the hands by one complete hour,
a slow rotation enables the minutes setting to be corrected.
– Push the crown back down.
Fine correction of the second
After the time has been set (3. Setting the time), or after a certain period of time in
operation, if the watch is showing a slight inaccuracy, the time can be set to the
exact second.
How to set the exact second:
– Select and display local time (Fig. 2).
– Pull out the crown. The symbol T appears in the upper section of the dial and
the numerals for hours and minutes flash ().
– Push the crown back down. The numerals displaying seconds flash for 1 minute.
9
Page 6

English
English
– While the numerals displayed for seconds are flashing, push the crown to
synchronise the time with a time reference. The numerals displayed for seconds
are then reset to zero.
Note: Between 0 and 30 seconds, the time will be adjusted to the current minute.
Between 31 and 60 seconds, the time will be adjusted to the next minute.
– Check that the minute display is showing exactly the right time. If needed,
correct the time by plus/ minus one unit (3. Setting the time).
4. SETTING THE DATE AND MONTH
– Select the function Second-Date (Fig.3).
– Pull out the crown. The seconds disappear and the numeral for the month
appears alongside the date . The numerals flash.
– Turn the crown clockwise or counter-clockwise:
a rapid rotation changes the month,
a slow rotation changes the date.
– Push the crown back down. The month display disappears and the seconds
display reappears.
Note: Even if the month is not displayed while the watch is being used in normal
mode, it is still necessary for it to be set otherwise the perpetual calendar will not
function correctly (up to 2099).
10
5. CORRECTION OF THE DAY
– Select the function Day-Date (Fig.4).
– Pull out the crown. A letter appears in the place of the date . It indicates the
language in which the day is displayed:
E = English, F = French, S = Spanish, D = German.
The language and year flash.
– Turn the crown clockwise or counter-clockwise to obtain the desired language
and year:
a rapid rotation changes the language,
a slow rotation changes the year.
– Push the crown back down.
The language and year disappear and the day of the week and the date reappear. If
date, month and year are setted, the day of the week will be defined automatically
(perpetual calendar).
6. USING THE TIMER
Select the Timer (TM) function (Fig. 5):
– Pull out the crown. The numerals displaying hours and minutes start to flash ().
– Display the desired time by turning the crown clockwise or counter-clockwise (a
rapid rotation changes the hours, a slow rotation changes the minutes).
11
Page 7

English
English
– Push the crown back down. The countdown function starts automatically and the
watch alarm rings when the preset time period has elapsed.
– Push the crown down to stop the alarm.
Note: The countdown function can be cancelled at any time (push in the crown for
more then 2 seconds), or a running countdown can be restarted by pushing the
crown in once.
7. DISPLAY THE TIME OF ANOTHER TIME ZONE
The watch is capable of displaying not only the local time but also the time in a
second time zone.
– Select the function Time in a second time zone (T2) (Fig. 6).
– Pull out the crown. The numerals displaying the hours and minutes for the sec-
ond time zone start to flash ().
To change these settings:
– Turn the crown clockwise or counter-clockwise.
– Push the crown back down.
Note:
– The display showing seconds cannot be altered (). This display is the same as
the one for local time.
12
– The time zone display is corrected in multiples of ½ hours ().
– Since the watch can operate in either 12 hour (AM-PM) mode, or in 24 hour
mode, you must bear this in mind when reading the time shown for a second time
zone.
Changing the time zone
Whenever you change time zone or whenever daylight saving changes occur
between winter and summer (and vice versa), you are able to advance or retract the
time shown by the hands for anywhere between one and several hours without
losing the display showing the minutes and seconds. To do this:
– Select and display local time (Fig.2) and follow the instruction of 3. Setting the
time.
Note: In case of daylight saving changes, you will also have to adjust the second
time zone accordingly.
8. USING THE CHRONOGRAPH
– Select the Chronograph function CHR () in ADD (Ad) mode – for addition of
time (Fig. 7) – or SPLIT (SP) mode – for intermediate times (Fig. 8).
You can only select one of these functions at one time (), i.e. either ADD or SPLIT,
but never both together.
– Starting and stopping the counter with consecutive pushes of the crown.
13
Page 8

English
English
– In SPLIT mode, the split time function enables users to stop the digits to read an
intermediate time while continuing timing. When the digits are restarted, the
chronograph makes up the elapsed time.
– In ADD mode, you can start and stop the counter. Each time you stop the count-
er the time is stopped and does not take into consideration the elapsed time.
– To reset the counter to zero, push the crown and hold it down for more than 2
seconds.
– The maximum operational duration is 47 hours, 59 minutes and 59.99 seconds.
– While the chronograph is operating, it is possible to select and use the other
timepiece functions at the same time (except for the alternative chronograph
mode).
– In order to change the mode (ADD/SPLIT) you have to stop and reset the running
chronograph to zero.
– If either of the modes ADD or SPLIT is selected, the display shows the following
information:
Timed period < 1 minute:
– SP or Ad mode – seconds – hundredths.
Timed period > 1 min and < 1 hour:
– Minutes – seconds – hundredths alternately with modes SP + or Ad.
14
Timed period > 1 hour and < 48 hours:
– Hours – minutes – seconds alternately with modes SP + hundredths or Ad +
hundredths.
9. USING THE ALARM
– Select the Alarm (AL) function (Fig. 9).
– Pull out the crown. The numerals start to flash.
– Display the desired time by turning the crown clockwise or counter-clockwise (one
rapid rotation changes the hours, and one slow rotation changes the minutes).
– Push the crown back down. The alarm is then set, with AL showing on the
display ().
– To activate / deactivate the alarm, push the crown after first selecting the Alarm
(AL) function (Fig. 9).
– AL display = alarm set (armed) ().
– OF display = alarm not set (disarmed) ().
– Push the crown down to stop the alarm.
Note: Since the timepiece can operate in either 12 hour (AM-PM) mode, or in 24 hour
mode, you must bear this in mind when reading the time shown for a second time
zone.
15
Page 9

Test of alarm
Push the crown and hold down for more than 2 seconds after first selecting the
Alarm (AL) function (Fig. 9). The alarm will start to sound at this point.
16
English
 Loading...