

Victorinox AIRBOSS MATCH 1, AIRBOSS MATCH 2, AirBoss Mach 1, AirBoss Mach 2, AirBoss Mach 3 User Manual
...Page 1

AirBoss Mach 1 & 2: Three Hand Analog Quartz ............. 6
AirBoss Mach 2: Mechanical (Self-winding) .................... 10
AirBoss Mach 3: Special Quartz Chronograph ............... 12
AirBoss Mach 4: Mechanical Manual Wind .................... 20
AirBoss Mach 5: GMT Mechanical (Self-winding) ......... 21
AirBoss Mach 6:
Mechanical (Self-winding) .................... 25
Tachymeter Feature .............................................................. 28
Water-resistance .................................................................... 30
Battery ...................................................................................... 31
ENGLISH
AirBoss Mach 1 & 2:
Montres analogiques à 3 aiguilles
.. 32
AirBoss Mach 2: Montre à remontage automatique ...... 36
AirBoss Mach 3: Chronographe à quartz spécial .......... 38
AirBoss Mach 4: Montre à remontage manuel ............... 46
AirBoss Mach 5: GMT mécanique (automatique) .......... 48
AirBoss Mach 6:
Chronographe mécanique (automatique)
52
Tachymètre ............................................................................. 55
Etanchéité................................................................................. 57
Pile ............................................................................................ 58
FRANÇAIS
Page 2
6 7
SETTING THE DATE AND THE TIME
PULL-OUT CROWN
A. Pull out the crown to position 2.
B. Rotate the crown away from you until the date showing is the
day before the desired setting.
C. Pull out the crown to position 3 and rotate away from you. When
midnight is reached, the date will advance to the desired date.
Continue to turn the crown until the desired time is set.
Remember, the date advances at 12:00 midnight, not 12:00 noon.
D. Push in the crown, returning it to position 1. The date and time
are now set.
TO SET TIME ALONE: Refer to instructions “C”.
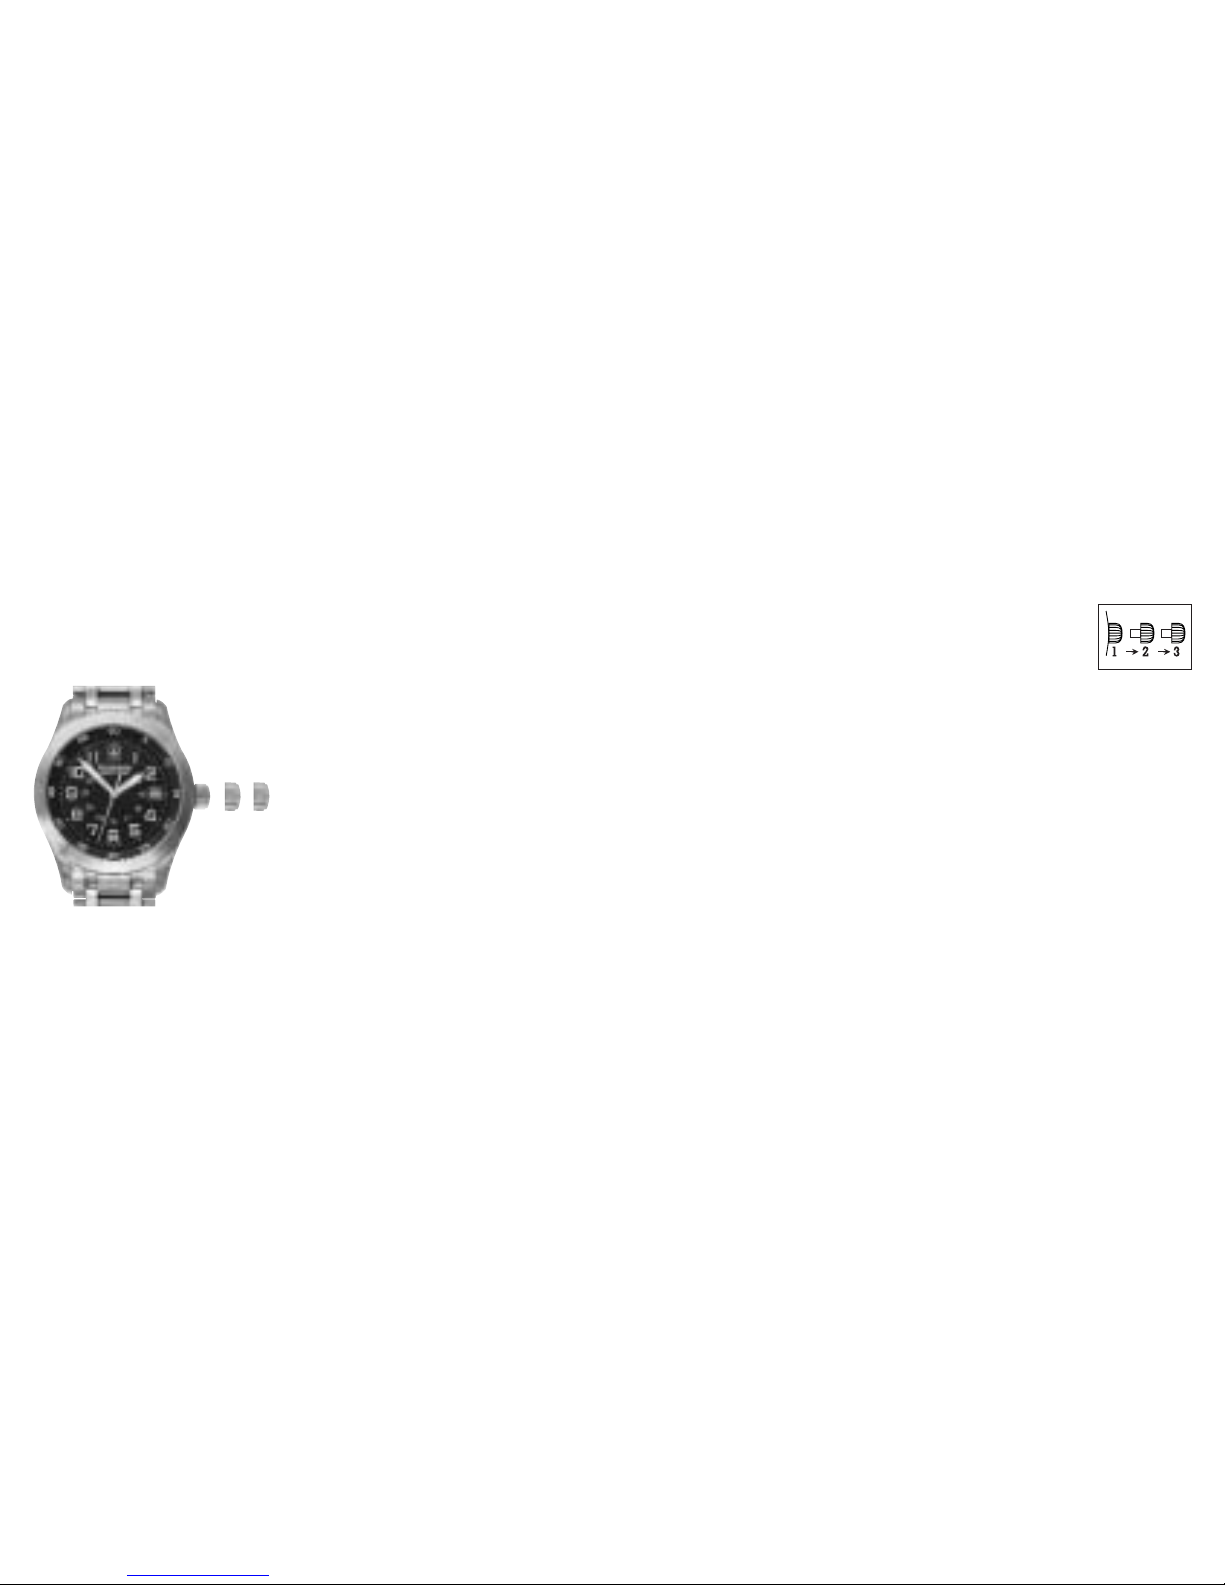
AIRBOSS MACH 1, AIRBOSS MACH 2
THREE HAND ANALOG QUARTZ
The crown C has three positions:
• Position 1: Running position
(neutral)
• Position 2: Quick correction of
the date
• Position 3: Time setting,
interruption of circuit for motor
(in case of long term storage
– to conserve battery life)
123
C
Page 3
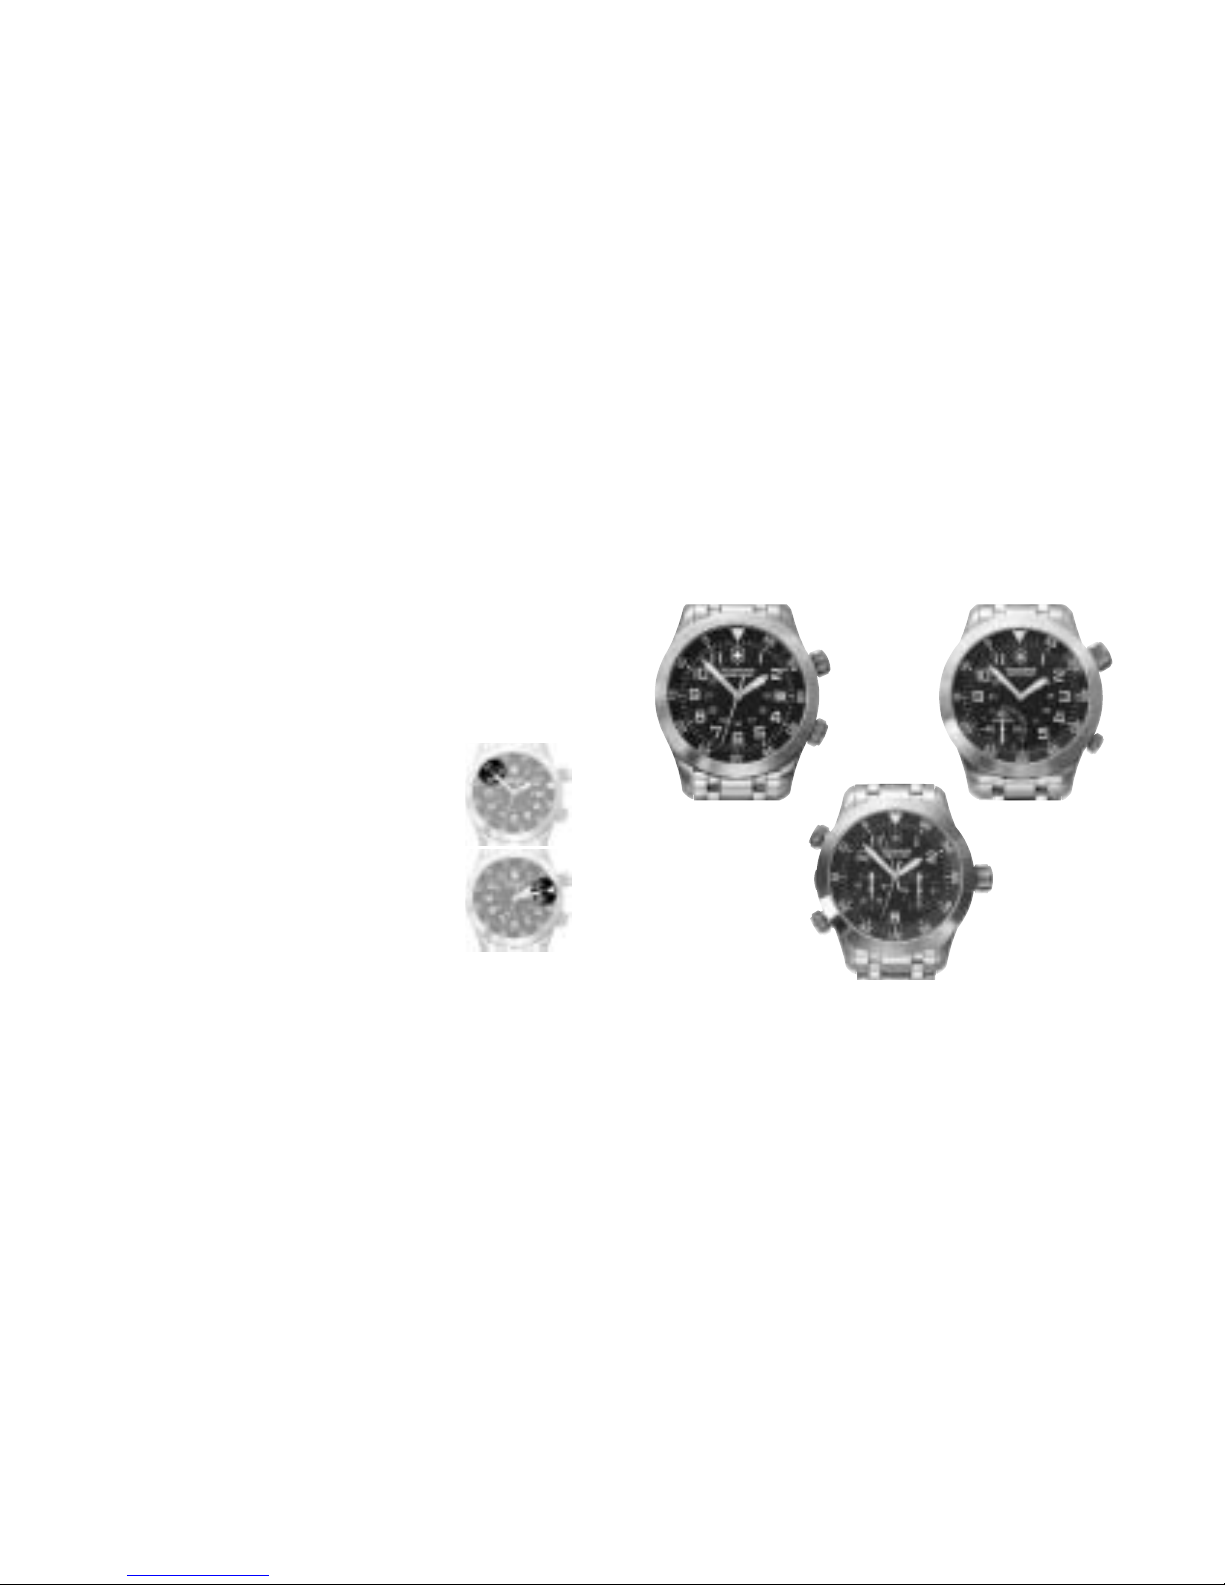
USING THE VISUAL COUNTDOWN
(AIRBOSS MACH 2 - 3 - 4)
To determine if you have the visual countdown feature, look at the
watch dial. You will see an inner bezel. If it has a triangle at 12
o’clock with numbers counting down clockwise from 60, you have
the visual countdown feature. The bi-directional visual countdown is
easy to use:
1. When rotating the visual countdown turner, simply
align minutes on the inner bezel to be counted
down with the minute hand (i.e. 20 minutes).
2. When the minute hand reaches the triangle
(0 minutes), 20 minutes will have been counted
down.
NOTE: The countdown feature works for a duration
between 60 minutes and one minute.
8
Visual
Countdown
turner
Visual
Countdown
turner
Visual
Countdown
turner
AIRBOSS MACH 4AIRBOSS MACH 2
AIRBOSS MACH 3
Page 4
SETTING THE DATE AND TIME
•Wind the movement if necessary.
• Pull out the crown into position 2. Rotate the crown
until the day before the desired setting.
• Pull out the crown into position 3. Rotate the crown. When midnight
is reached, the date will advance to the desired date.
• Make sure that the position of the hands corresponds to a change
of date at midnight and not at noon.
•Turn the crown away to pre-position the hands on the desired time.
• Push the crown back down firmly against the case in position 1.
TO SET TIME ALONE
•Wind the movement if necessary
• Pull out the crown to position 3. The seconds hand will stop.
•Turn the crown away to pre-position the hands on the desired time.
• Push the crown back down firmly against the case in position 1
and the watch will begin to run again instantly.
USING THE VISUAL COUNTDOWN (AIRBOSS MACH 2 - 3 - 4):
Refer to page 8.
11
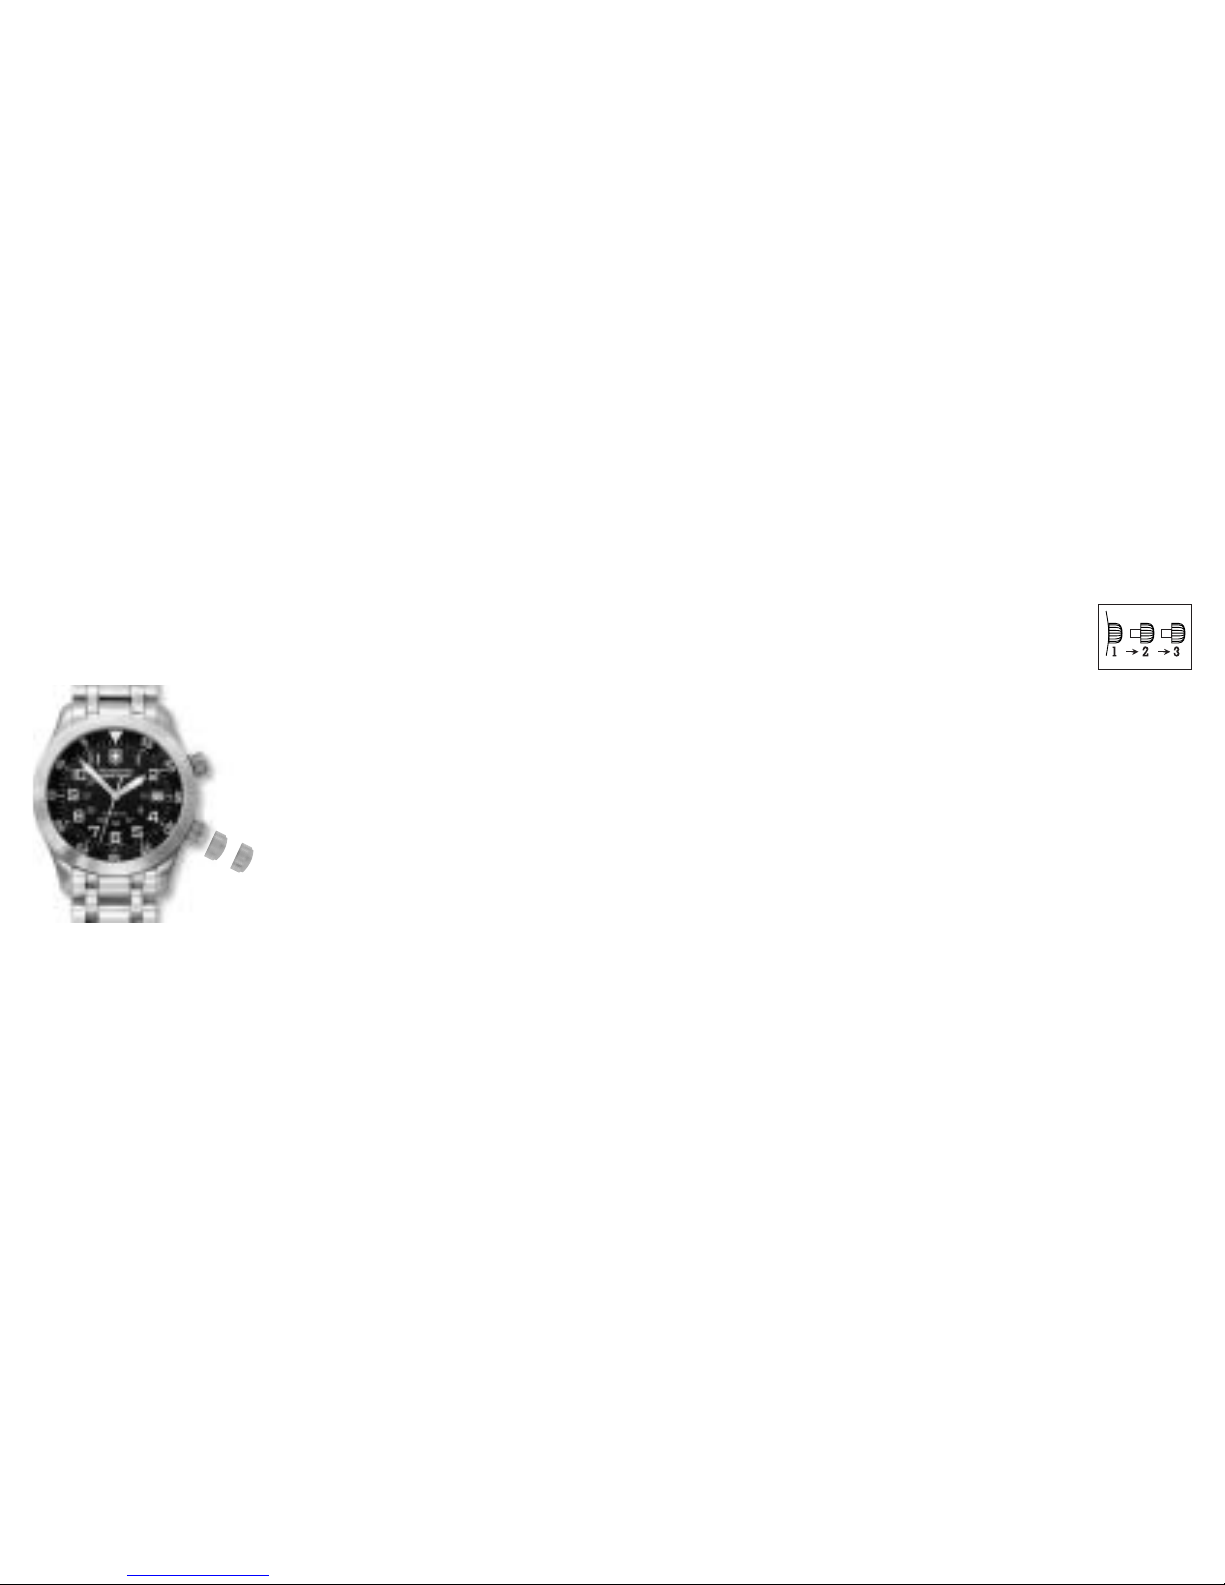
AIRBOSS MACH 2
MECHANICAL (SELF-WINDING)
The watch is wound automatically
when worn on the wrist. If the watch
is not worn on a daily basis, the
movement will have to be wound
manually by turning the crown away
from you at least twenty times in
position 1.
10
12 3
C
Page 5
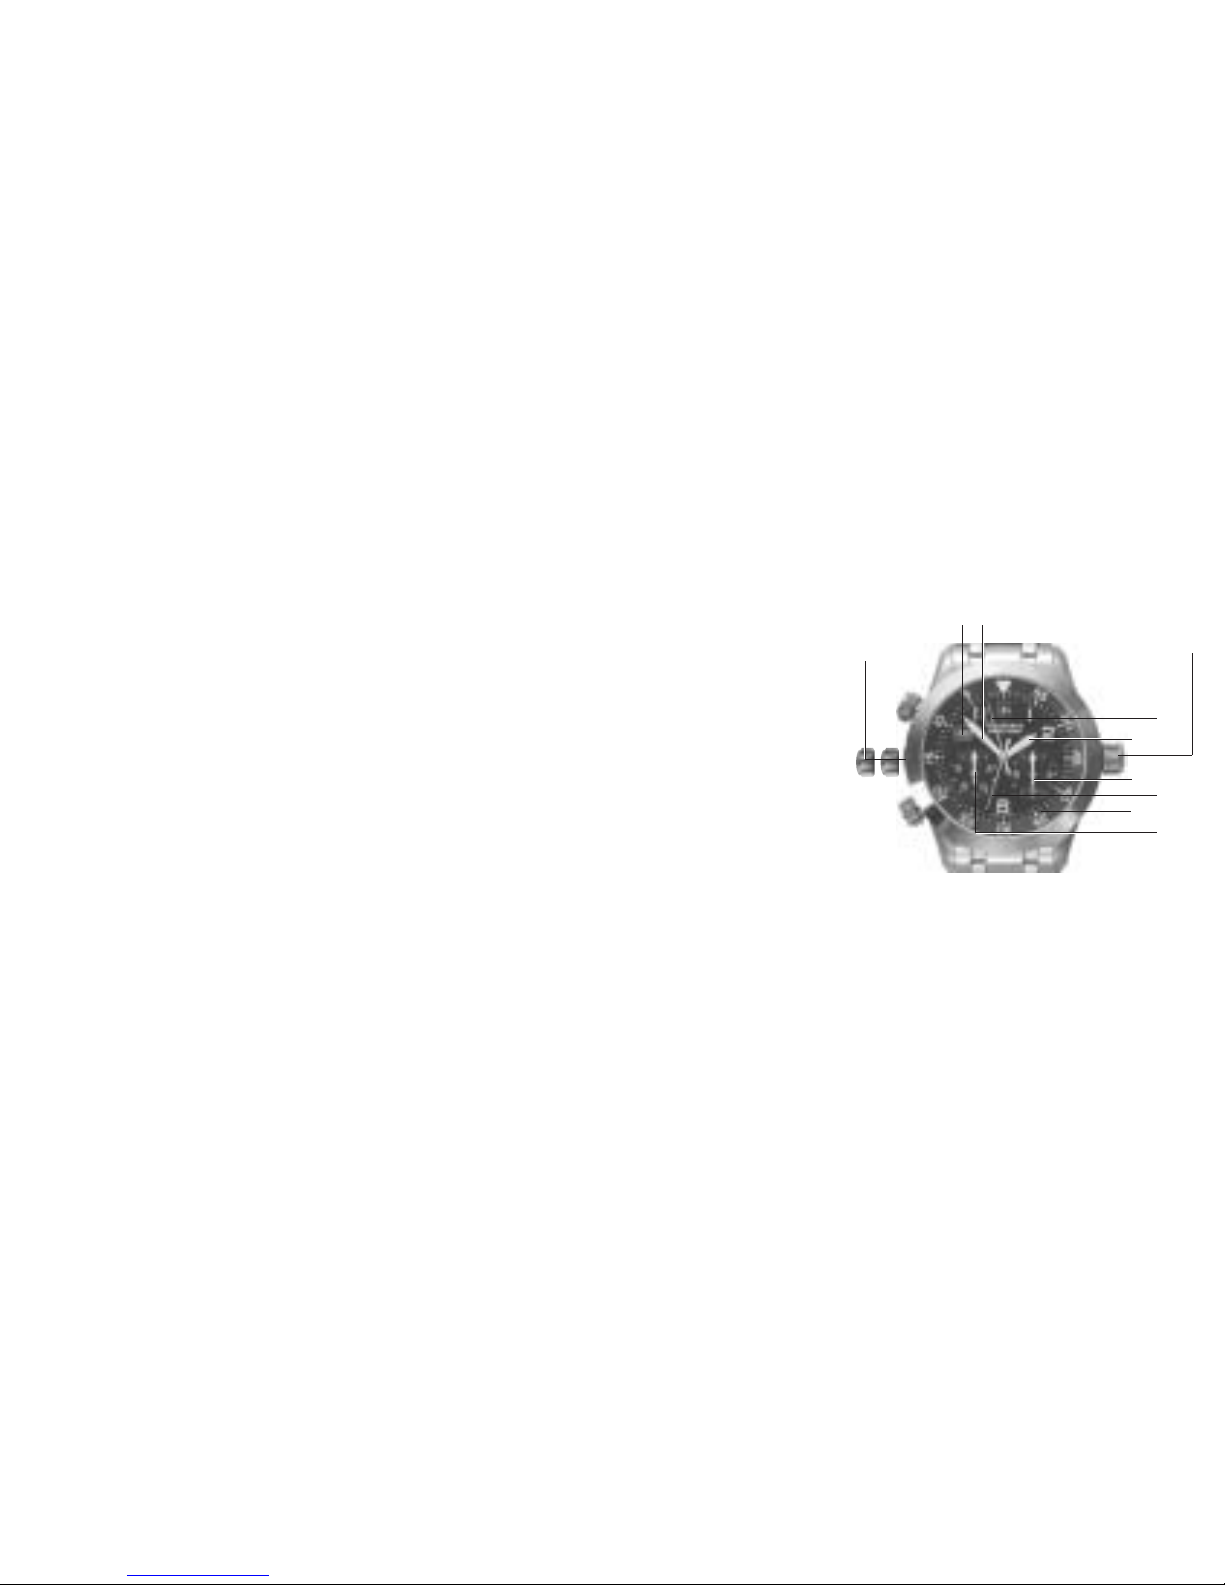
Push-buttons
• Push-button A:
Chronometer
Start/Stop
• Push-button B:
Intermediate times
Chronograph zero reset
Watch Indications
1 Date
2Minutes
5 Hours
8Visual Countdown ring
Chronograph Indications
3 60 second counter
4 60 minute counter
6 12 hour counter
7 1/10th second counter
13
AIRBOSS MACH 3 - SPECIAL QUARTZ CHRONOGRAPH
SPECIFICITIES
To facilitate the use of the of the Airboss Mach 3, two original features have been developed:
A. Enlargement of the two subdials for easier legibility
B. Placement of the chrono push-buttons on the left side of the case
for easy Start/Stop by the thumb.
The crown C has three positions which affect push button functions:
• Position 1: Normal position. Push-buttons: chronograph functions.
• Position 2: Quick correction of time-zones (hour hand).
Date corrections by passing through 24h.
Push-button B (at 10 o’clock): Initialization of the timer hand (60
minute counter).
Push-button A (at 8 o’clock): Initialization of the 12 hour counter.
• Position 3: Time setting, stopping of the movement (storage).
Push-button B: Initialization of the 1/10 seconds counter.
Push-button A: initialization of the 60 second counter.
12
C
(recessed crown)
3 positions
B
4
8
1 2
5
6
3
7
A
Visual
Countdown turner
Page 6

USING THE VISUAL COUNTDOWN
Refer to page 8.
CHRONOGRAPH OPERATING PROCEDURE
This chronograph movement features a 60 minute counter-hand, a
60 second counter-hand, one tenth second indicator, and a 12 hours
totalizer.
Measurement of elapsed times
• Press push-button A (at 8 o’clock) with the thumb once to start the
timing operation.
• Press again to stop timing.
These two operations may be repeated several times, to add short
time measurements.
• Once the timing operation has been completed, press push-button
B (at 10 o’clock) briefly until the hands revert to the original
position.
15
SETTING THE DATE AND THE TIME
PULL-OUT CROWN
A. Pull out the crown to position 2.
B. Rotate the crown away from you until the date showing is the
day before the desired setting.
C. Pull out the crown to position 3 and rotate toward you. When
midnight is reached, the date will advance to the desired date.
Continue to turn the crown until the desired time is set.
Remember, the date advances at 12:00 midnight, not 12:00 noon.
D. Push in the crown, returning it to position 1. The date and time
are now set.
TO SET TIME ALONE: Refer to instructions “C”.
14
Page 7

E. Repeat this procedure until the action to be timed has been
completed.
F. Press push-button A to stop timing.
G. Once the timing operation has been stopped, press push-button
B (at 10 o’clock) briefly until the hands revert to the original posi-
tion. The chronograph and totalizer hands will be reset to zero.
17
Measurement of Lap times
A. Press push-button A again to restart timing. Further pressure on
push-button A stops the timing operation. The chronograph indicates the final time.
B. Once the timing operation has been stopped, press push-button
B. The chronograph and totalizer hands are now reset to zero.
Measurement of Intermediate (Split) Times
A. Press push-button A to start timing.
B. Press push-button B to read off the first split time without inter-
rupting the measurement of the total time.
C. Press push-button B to continue timing. The chronograph will
continue its measurement by reverting the 1/10th hand to zero
and “flying back” the other hands to recover the elapsed time.
D. Press push-button B again to read the second split time.
16
Page 8

Zero Reset of the Seconds Counter Hand
A. Pull out the crown to position 3.
B. Press push-button A briefly until the hand reverts to the original
position (on 60).
Zero Reset of the 1/10th Second Counter
A. Pull out the crown to position 3.
B. Press push-button B briefly until the hand reverts to the original
position (on 0).
C. Push the crown back down firmly against the case to position 1.
19
Reinitializing the Chronograph Hands
Following an incorrect activate, violent impact or exposure to a
strong magnetic field, one or the other of the chronograph counter
hands may fail to revert to its original position (zero). To reinitialize
the hands, proceed as follows:
Zero Reset of the Hour Counter Hand
A. Pull out the crown to position 2.
B. Press push-button A briefly until the hand reverts to the original
position (on 12).
Zero Reset of the Minute Counter Hand
A. Pull out the crown to position 2.
B. Press push-button B briefly until the hand reverts to the original
position (at noon.)
18
Page 9

AIRBOSS MACH 5 GMT MECHANICAL (SELF-WINDING)
Using the rotating crown A, rotate inner bezel to select the time zone
where you currently are and align it with «City» marking at 12
o’clock.
C Pull Out Crown to set date and
time
The crown C has three positions:
•
Position 1: Running position (neutral)
• Position 2: Quick correction of the
date
• Position 3: Time setting
21
AIRBOSS MACH 4 - MECHANICAL MANUAL WIND
Setting of the time and winding the watch:
• Position 1: Normal position.
To rewind the watch. The best
way to rewind your watch is to
do it everyday at the same time,
(i.e. every morning). This way,
your watch is working at its best
and will never stop. Turn the
crown C until you meet a resistance of the mechanism. The
power reserve will be 56 hours
minimum.
• Position 2: Setting the time.
Tu rn the crown to set the
hour and the minute.
USING THE VISUAL COUNTDOWN: Refer to page 8.
20
1
2
C
Visual
Countdown
turner
Line up current time zone with «City» marking at 12 o’clock
A Rotating crown
12 3
C
GMT Military time Scale on
Inner Bezel
Fig. 1
Page 10

SETTING THE GMT TIME (HAND WITH RED ARROW)
Note:
GMT time is on a 24 hour military time scale (see Figure 1).
A. Pull out the crown C to position 2 and rotate it away from
you to adjust the GMT arrow hand to your local time.
(Example – 7 pm is 19 hours military time).
B. Push in the crown C, returning it to position 1.
HOW TO READ GMT TIME IN OTHER CITIES
NOTE:
GMT time is on a 24 hour military time scale (see Figure 1).
A. Select any time zone or city on the bezel and rotate crown A until
it is aligned with «City» marking at 12 o’clock. The GMT hand
(Red Arrow) will indicate the time in this zone.
23
SETTING THE DATE AND TIME
PULL-OUT CROWN
Remember, when setting the date, it advances
at 12 midnight, not 12 noon.
A. Pull out the crown C to position 2.
B. Rotate the crown toward you until the date showing is the
day before the desired setting.
C. Pull out the crown C out to position 3 and rotate toward you.
When midnight is reached, the date will advance to the desired
date. Continue to turn the crown until the desired time is set.
D. Push in the crown, returning it to position 1. The date and time
are now set.
22
Page 11

25
Example: Time in AKL is 6 am
24
Fig. 2
City Codes:
AKL – Aukland
ANC – Anchorage
AZO – Azores
BKK – Bangkok
CAI – Cairo
CCS – Caracas
CHI – Chicago
DAC – Dacca
DEN – Denver
DKR – Dakar
DUB – Dubai
HAW – Hawaii
HKG – Hong Kong
KHI – Karachi
LA – Los Angeles
LON – London
MOW – Moscow
MWY – Midway
NYC – New York City
NOU – Noumea
PAR – Paris
RIO – Rio de Janeiro
SYD – Sydney
TYO – Tokyo
AIR BOSS MACH 6 MECHANICAL CHRONOGRAPH
(SELF-WINDING)
The crown C has two positions:
• Position 1: Running position
(neutral) and manual winding
• Position 2: Time setting and
stopping the movement
Chronograph Indications
12 hour counter
30 minute counter
60 second counter
12
C
Pusher A
Pusher B
Watch Indications
Hours Seconds
Minutes Date
D
E
H
I
J
D
E
F
G
H
I
J
Date corrector on side of case
F
G
Page 12

27
SETTING THE DATE AND THE TIME
Your watch is wound automatically when you wear it on your wrist.
If the watch is not worn often enough, the movement will have to be
wound manually by turning the crown at least twenty times in position 1.
To set date and time
A. Wind the movement if necessary.
B. There are
two ways to set the date:
a) By using the rapid Date Corrector located at 10 o’clock position
on side of watch case. Gently apply pressure to the date corrector and advance calendar to desired date.
NOTE: Rapid date correction is not possible between 8:30pm and
11pm.
or
b) Pull out the crown to position 2 (fully extended). Rotate the
crown toward you until the date showing is the correct date.
When midnight is reached, the date will advance.
Continue to turn the crown until the desired time is set.
Remember, the date advances at 12:00 midnight, not 12:00 noon.
C. Push in the crown, returning it to position 1. The date and time are
now set.
CHRONOGRAPH OPERATING PROCEDURE
This chronograph movement features a 12 hour counter-hand, a 30
minute counter hand and one second counter (located on center
post).
How to Measure Elapsed Times
•Press Pusher A (at 2 o’clock) to start the timing operation.
•Press again to stop timing.
These two operations may be repeated several times, to add short
time measurements.
• Once the timing operation has been completed, press Pusher B
(at 4 o’clock) briefly until the hands revert to the original position.
Page 13

2. Read the corresponding number on the outer tachymeter ring.
Let’s say the car covered one mile or one kilometer in 45 seconds. The tachymeter number next to the 45-second mark is 80 –
so the car averaged 80 miles per hour, or 80 kilometers per hour,
over that measured course.
TO DETERMINE UNITS PER HOUR:
1. Start the stopwatch, count a convenient number of units and then
stop the watch. Say, for example, that you are counting units of
production and you stop the count at 10 units, and the sweep
seconds hand reads 45 seconds.
2. The tachymeter number next to the 45-second mark is 80. Multiply
10 times 80 to get the number of units produced per hour: 800.
NOTE: The tachymeter numbers offer you a mathematical shortcut.
29
TACHYMETER FEATURE
You use your tachymeter to measure rates of speed. Although it is
marked “kmh” for kilometers per hour your tachymeter can also be
used to measure “mph” or other units per hour.
It can calculate how many cars per hour pass a given point on the
highway, or how many units roll off a production line per hour.
Here’s how it works:
TO MEASURE SPEEDS OF TRAVEL:
1. Assume you wish to measure a car’s average speed over a one
mile course. Start the stopwatch when the car passes the starting
point. Stop it when the car passes the one-mile or one-kilometer
mark.
28
Page 14

BATTERY (MACH 1-2-3 QUARTZ)
Your timepiece may be powered by a 1.55 volt silver oxide watch
battery. When the battery is low, the second hand will effect four
second jumps.
WORN BATTERIES SHOULD BE REPLACED IMME-
DIATELY.
Substituting interchangeable batteries is not recommended. Battery change should be performed by a qualified technician
who should also check the condition of the gaskets and the O-ring at
the same time. Battery is not covered by the warranty.
31
WATER RESISTANCE
Please check the indication of water resistance on the case back of
your Victorinox Swiss Army watch and carefully read the corresponding explanation from the following list:
30
Water-resistant to 30 meters
(100 feet/3 ATM). Will withstand rain or splashes of
water but should not be worn
while showering, swimming
or diving.
Water-tested to 50 meters
(165 feet/5 ATM). Suitable
for showering or swimming in shallow water.
Water-tested to 100 meters
(330 feet/10 ATM). Suitable
for swimming or snorkeling.
Water-tested to 200 meters
(660 feet/20 ATM). Suitable
for swimming, snorkeling
or skin diving.
Water-tested to 300 meters
(990 feet/30 ATM). Suitable
for swimming, snorkeling
or scuba diving.
Water-tested to 500 meters
(1,650 feet/50 ATM). Suitable
for swimming, snorkeling
or scuba diving.
 Loading...