

Page 1
Sales:
Hermann Hartje KG
Tel. +49 (0) 4251 - 811-500
[email protected]
www.hartje.de
USER MANUAL
AS ORIGINAL USER MANUAL
DIN EN 15194 / DIN EN 82079-1
E-BIKE
(
PEDELEC/EPAC
)
93316_01_Impulse_20160302_a_enGB
Page 2

Page 3
3
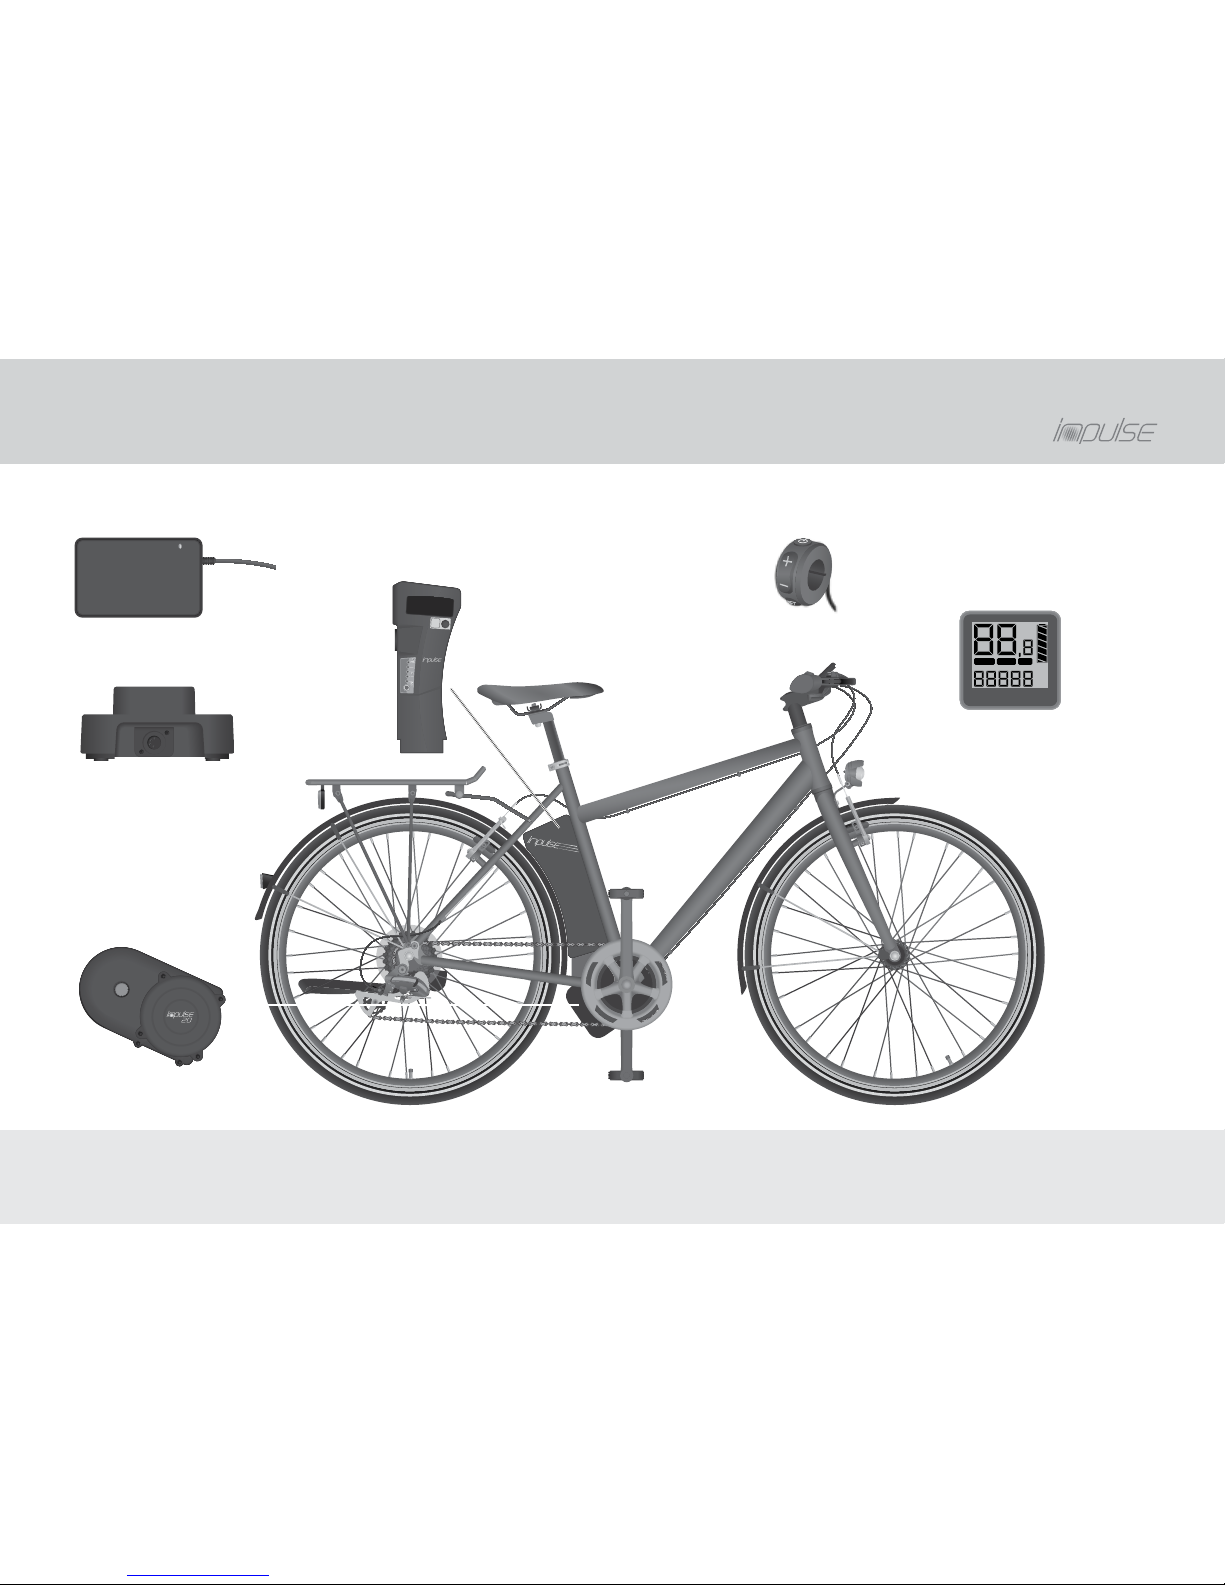
» E-bike components
E-bike components
Control unit
Display panel
Rechargeable
battery
Charging
adapter
Charger
Drive
mph
kmh
mi
km
POWER SPORT ECO
17
Ah
36
Volt
17AH
Li-ionen Batterie
Page 4

4
» Table of contents
E-bike components 3
In an emergency 6
Important information for your safety 7
Be absolutely sure to read the warning notes 7
Labelling of warning notes 7
Safety notes 8
Use 8
Rechargeable battery 9
Charger 10
Residual risks 11
Fundamental information 12
Symbols and terms 12
Symbols on the products 12
Symbols in this manual 13
Terms 13
Written labels 14
Units 14
Notes 15
E-bike 15
Differences between a bicycle and an e-bike 15
Functionality 15
Range 15
Cycling with an empty rechargeable battery 16
Drive overheat protection 16
Rechargeable battery 17
Charging times 17
Storing the rechargeable battery 17
Transporting or shipping the rechargeable battery 18
Protective equipment for charging 18
Use 19
Information regarding road traffic 19
Areas of application of the rechargeable battery and charger 19
Insurance 19
Lighting 19
Admissible total weight 19
Exclusion of wearable parts 19
Disclaimer 19
Transport 20
Disposal 21
Before each ride 22
Before your first ride 22
Your first ride 22
Testing instruction 22
Table of contents
Page 5

5
Start-up 23
Preparations 23
Rechargeable battery 23
Charger 23
Operation 24
Rechargeable battery 24
Removing the rechargeable battery 24
Inserting the rechargeable battery 24
Sleep mode 25
Checking the charge level of the rechargeable battery 25
Charging the rechargeable battery 27
E-bike 30
Activating the e-bike 30
Deactivating the e-bike 31
Display panel 31
Setting the level of assistance 32
Lighting 33
Walk assistance 34
Care 35
Notes on the key 35
Troubleshooting 36
Technical data 39
Rechargeable battery 39
Charger 39
Lighting 39
Drive 39
Declaration of conformity 40
Credits 41
» Table of contents
Table of contents
Page 6

6
You can find notes on handling the rechargeable battery in
this user manual. Despite compliance with all safety measures,
the rechargeable battery poses a risk, e.g. if it catches fire
(see chapter “Residual risks”).
• In an emergency, respond to ensure that you do not at any
time endanger yourself or other persons.
• In an emergency, follow the instructions on this page.
• Immediately read these instructions so that you can
concentrate and respond in a calculated manner in the event
of an emergency.
General protective measures
If you identify defects or damages to the rechargeable battery:
1. Do not use the rechargeable battery.
2. Wear protective gloves when you touch the rechargeable
battery.
3. Do not inhale any gases or vapours that are emitted.
4. Avoid contact between your skin and any liquid that is leaked.
In the event of excessive heat
If you notice that excessive heat is being generated by the
rechargeable battery:
1. Have a specialist bicycle dealer check the rechargeable
battery immediately.
2. For short-term temporary storage, select an outdoor
location and, if possible, place the rechargeable battery in
a fire-proof container or on the soil.
3. If you store the rechargeable battery outdoors, clearly
secure the area with ample space around the storage
location.
In the event of deformation, odour, liquid
If you identify any deformation, odour or liquid leaked on the
rechargeable battery:
1. If possible, do the following if there is no danger: Place the
rechargeable battery in a fire and acid-proof container,
e.g. made of rock or clay.
2. If you are able to transport the rechargeable battery
without any danger: Have your specialist bicycle dealer
dispose of the rechargeable battery immediately.
3. Select a fire-proof location outdoors for short-term
temporary storage, e.g. on the soil.
4. If you store the rechargeable battery outdoors, clearly secure
the area with ample space around the storage location.
If the rechargeable battery catches fire
1. Call the fire brigade immediately.
2. If possible, do the following if there is no danger:
Use plenty of water and sand to cool the fire.
In an emergency
» In an emergency
Page 7
7
Be absolutely sure to read the warning
notes
Read all warnings and notes in this user manual with
care before you operate the e-bike for the first time.
This user manual is a supplementary manual and
integral part of the e-bike user manual. Keep all user
manuals so that they are handy and available at all times.
Include the user manual when passing the e-bike on to third
parties.
Labelling of warning notes
The sense of the warning notes is to draw your attention to
potential hazards. Your complete attention is required for the
warning notes; the statements must be understood completely.
Failure to follow a warning note may result in injury to yourself
or other persons. The warning notes alone cannot prevent
dangers. Follow all warning notes to avoid a risk when using
the e-bike.
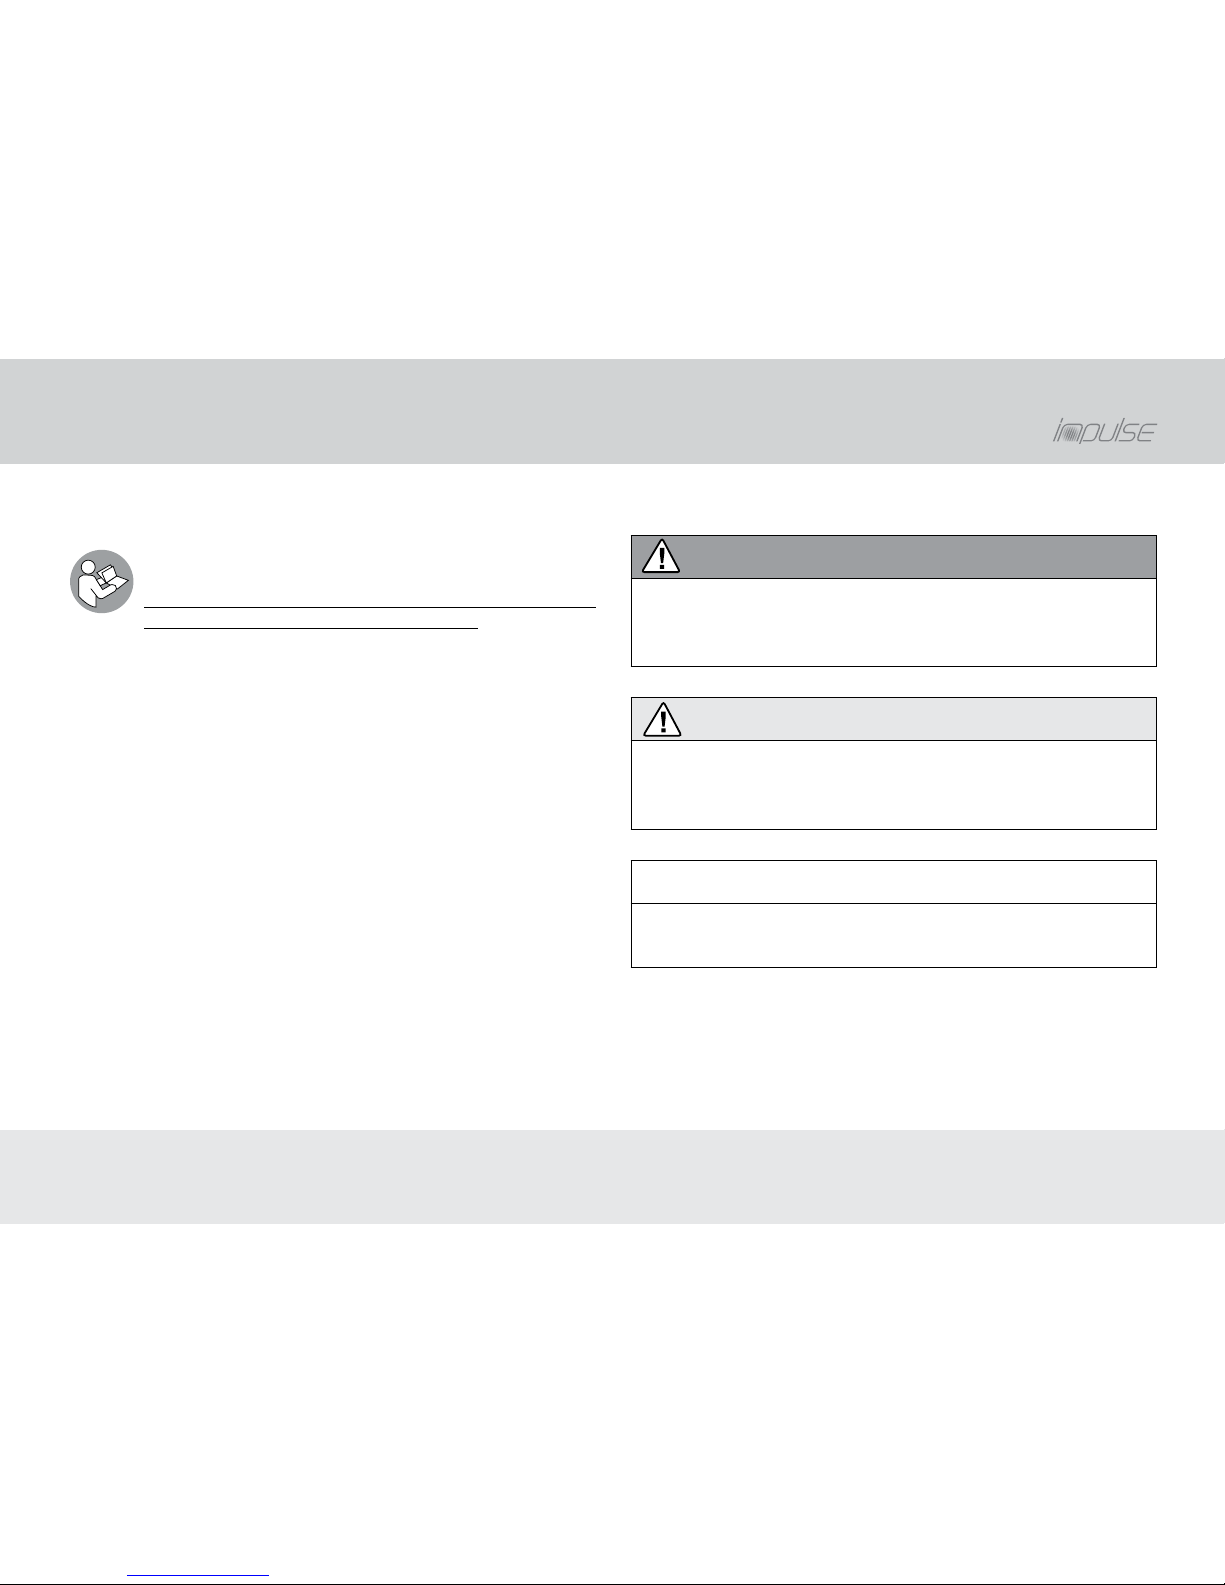
There are safety notes in the following categories:
WARNING
The signal word “Warning” designates a hazard with
moderate degree of risk which may lead to death or
severe injury if not avoided.
CAUTION
The signal word “Caution” designates a hazard with
low degree of risk which may lead to minor or moderate
injury if not followed.
NOTICE
The signal word “Notice” warns against potential
damages to property.
Important information for your safety
» Important information for your safety » Be absolutely sure to read the warning notes / Labelling of warning notes
Page 8
8
WARNING
Risks for children and persons with impaired
physical, sensory or mental capacities or lack of
experience and knowledge, e.g. children or persons
with impaired mental and physical capacities.
The e-bike, rechargeable battery and the charger may
only be used by persons, who are able to act without
restriction with respect to their mental and physical
abilities. There is a high risk of injury for persons with
restricted mental and physical capacities.
• Only allow the e-bike, rechargeable battery and the
charger to be used by persons briefed on safe and
proper use and who understand the risks arising in
connection with it.
• Do not let children, young persons and persons
without a vehicle operator’s license to play with the
e-bike.
WARNING
Risk of accident and injury!
Improperly performed repairs may cause accidents.
• Do not repair the e-bike yourself.
• Have repairs performed by your specialist bicycle dealer.
NOTICE
Risk of damage!
High or low temperatures could restrict the functioning
of the e-bike or damage it.
• Observe the temperature limits (see chapter
“Technical data”).
• Do not park the e-bike near heat sources.
Safety notes »
Use
» Safety notes » Use
Page 9
9
Safety notes »
Rechargeable battery
WARNING
Risk of fire and explosion!
Internal damages to the rechargeable battery may cause
the rechargeable battery to overheat, emit gases or
leak liquids even a significant amount of time after the
damage occurred.
• Have your specialist bicycle dealer inspect the
rechargeable battery after falls or severe impacts.
• Do not open, dismantle, drill through or deform the
rechargeable battery.
WARNING
Risk of fire and explosion!
Rechargeable batteries that have caught fire are very
difficult to extinguish; the cells affected must burn down
in a controlled manner. Responding properly may
prevent severe damages.
• Read the chapter “In an emergency” so that you are
properly prepared.
CAUTION
Risk of injury!
Lithium could be leaked if the rechargeable battery is
damaged. Lithium causes severe burns to the skin.
• Do not touch the damaged rechargeable batteries with
bare hands.
NOTICE
Risk of damage!
Improperly charging the rechargeable battery can
damage the rechargeable battery and the drive.
• Do not charge the rechargeable battery if you suspect
that it is damaged.
• Before charging the rechargeable battery for the first
time, be absolutely sure to read the chapter “Charging
the rechargeable battery”.
• Only use the original charger to charge the rechargeable battery and only under supervision.
• While charging the rechargeable battery, always place it
on non-flammable materials (e.g. stone, glass, ceramics).
» Safety notes » Rechargeable battery
Page 10

10
Safety notes »
Rechargeable battery/Charger
• If you are not absolutely sure how to handle lithium
ion rechargeable batteries, have a qualified specialist
explain how to do so.
NOTICE
Risk of damage!
Incorrect use of the rechargeable battery could cause
damage to the rechargeable battery, the drive or
surrounding objects, e.g. due to overheating.
• Only use the rechargeable battery included in the
product contents for the original drive.
• Only use original rechargeable batteries approved for
use with the original drive.
• Keep the rechargeable battery away from fire and other
heat sources; protect it against exposure to intense
sunlight.
• Protect the rechargeable battery against moisture. Never
clean or spray the rechargeable battery with liquids.
• Do not use the rechargeable battery if you notice any
unusual warmth, odour or discolouration and/or if the
rechargeable battery exhibits obvious damages.
• Read the chapter “In an emergency”.
Charger
WARNING
Risk to life!
Incorrect handling of electrical current and corresponding
components poses a risk to life due to electric shock.
• Check the charger, mains cord and mains plug for
damage before each use.
• If you identify or suspect damages, do not use the
charger.
• Only use the charger indoors.
• Only connect the charger to a properly installed
voltage supply “220 to 240 V ~ (50 Hz)”.
• Set up the charger so that it is not able to become
moist or wet, e.g. due to splashing water.
• Never clean or spray the charger with liquids.
• While charging, always place the charger on
non-flammable materials (e.g. stone, ceramics).
Continued on the following page.
» Safety notes » Rechargeable battery / Charger
Page 11
11
WARNING
Continuation
• Do not open, dismantle, drill through or deform the
charger.
• Only have the charger repaired by qualified
professionals with original spare parts.
• Only use the charger to charge the original
rechargeable battery or equivalent replacement
rechargeable batteries.
• Always pull the mains plug out of the socket after use.
• Read the additional safety notes on the housing of the
charger.
• If applicable, label the charger to prevent confusion
with chargers from other manufacturers.
Residual risks
Using the e-bike is associated with the following unforeseeable
residual risks despite compliance with all safety notes:
Risk of injury
- Gases, vapours and liquids could leak out of the recharge-
able battery due to internal, invisible damages and in the
event of fire. Injuries to external and internal organs are
possible, e.g. in the event of contact with skin or inhalation
of the gases (see chapter “In an emergency”).
Fire hazard
- Internal, invisible damages can cause the rechargeable
battery to catch fire and ignite objects in the surrounding
area (see chapter “In an emergency”).
Risk of damage
- If the rechargeable battery catches fire, hydrofluoric acid
leaks out with the smoke gas. Hydrofluoric acid is very
corrosive and causes permanent damage to surfaces
(see chapter “In an emergency”).
Safety notes »
Charger
|
Residual risks
» Safety notes » Charger | Residual risks
Page 12

12
Symbols on the products
The following symbols are located on the packaging, the
rechargeable battery or the charger.
Label for electrical devices that you must not
dispose of with household or other garbage. You
are obligated by law to dispose of correspondingly
labelled products at suitable recycling points for
environmentally-friendly recycling.
Label for rechargeable batteries and batteries that
you must not dispose of with household or other
garbage. You are obligated by law to dispose of
correspondingly labelled products at suitable
recycling points for environmentally-friendly
recycling.
Label for waste materials intended for recycling. Sort
the packaging before you dispose of it. Dispose of
cardboard and carton as waste paper and foils via
the recyclable material collection service.
Symbol confirming conformity with guidelines for
products corresponding to the requirements of the
European General Product Safety Directive.
Labelling for products that may only be used
indoors.
The 230 V ~/50 Hz mains connection corresponds
to protection class II.
Symbol for direct current (DC).
Before you use the rechargeable battery, read the
user manual.
Keep the rechargeable battery away from fire and
other heat sources.
Do not immerse the rechargeable battery in water
or other liquids.
Do not step on the rechargeable battery. Do not
subject the rechargeable battery housing to stress.
Fundamental information »
Symbols and terms
» Fundamental information » Symbols and terms » Symbols on the products
Page 13

13
Symbols in this manual
1. Steps to be performed in a particular order
begin with a number.
• Steps to be performed in no particular order
begin with a dot.
– Lists begin with a so-called dash.
» Separates a chapter if the chapter is
subordinate to the previous one.
/ Separates a chapter if the chapter is not
subordinate to the previous one.
| Separates a chapter if the chapter is super-
ordinated to the previous one.
NOTICE: Supplementary notes regarding steps to be
performed or use.
Terms
Terms with “nominal”: Nominal output, nominal capacitance
etc. are values stipulated according to the design. The actual
values may vary from the nominal values depending on
operating conditions.
E-bike (Pedelec/EPAC): An e-bike is a bike powered by an
electrical auxiliary motor. E-bikes of this kind are also referred
to as pedelecs (pedal electric cycle) or EPAC (electric power
assisted cycles). The term “e-bike” will be used hereinafter.
Capacitance: The amount of electrical charge in the unit “Ah”
if the rechargeable battery has been completely charged
(see chapter “Units”).
Charging cycle: Refers to fully charging a completely depleted
rechargeable battery.
Memory effect: Refers to the loss in the capacitance of
rechargeable batteries if they are not completely charged
(does not apply to lithium ion rechargeable batteries).
Pedal drive: Assembly consisting of pedal, crank arm and
chainwheel.
Temperature limits: Minimum and maximum temperature at
which the corresponding component may be used. At the
same time, both the temperature limits for the component as
well as for the ambient temperature may be specified.
Pedalling frequency: Number of revolutions of the pedal drive
in one second expressed in the unit “1/s”.
Fundamental information »
Symbols and terms
» Fundamental information » Symbols and terms » Symbols in this manual / terms
Page 14
14
Written labels
- Image captions and references in the text are rendered in
italics.
- Emphasis of passages in the text are underlined.
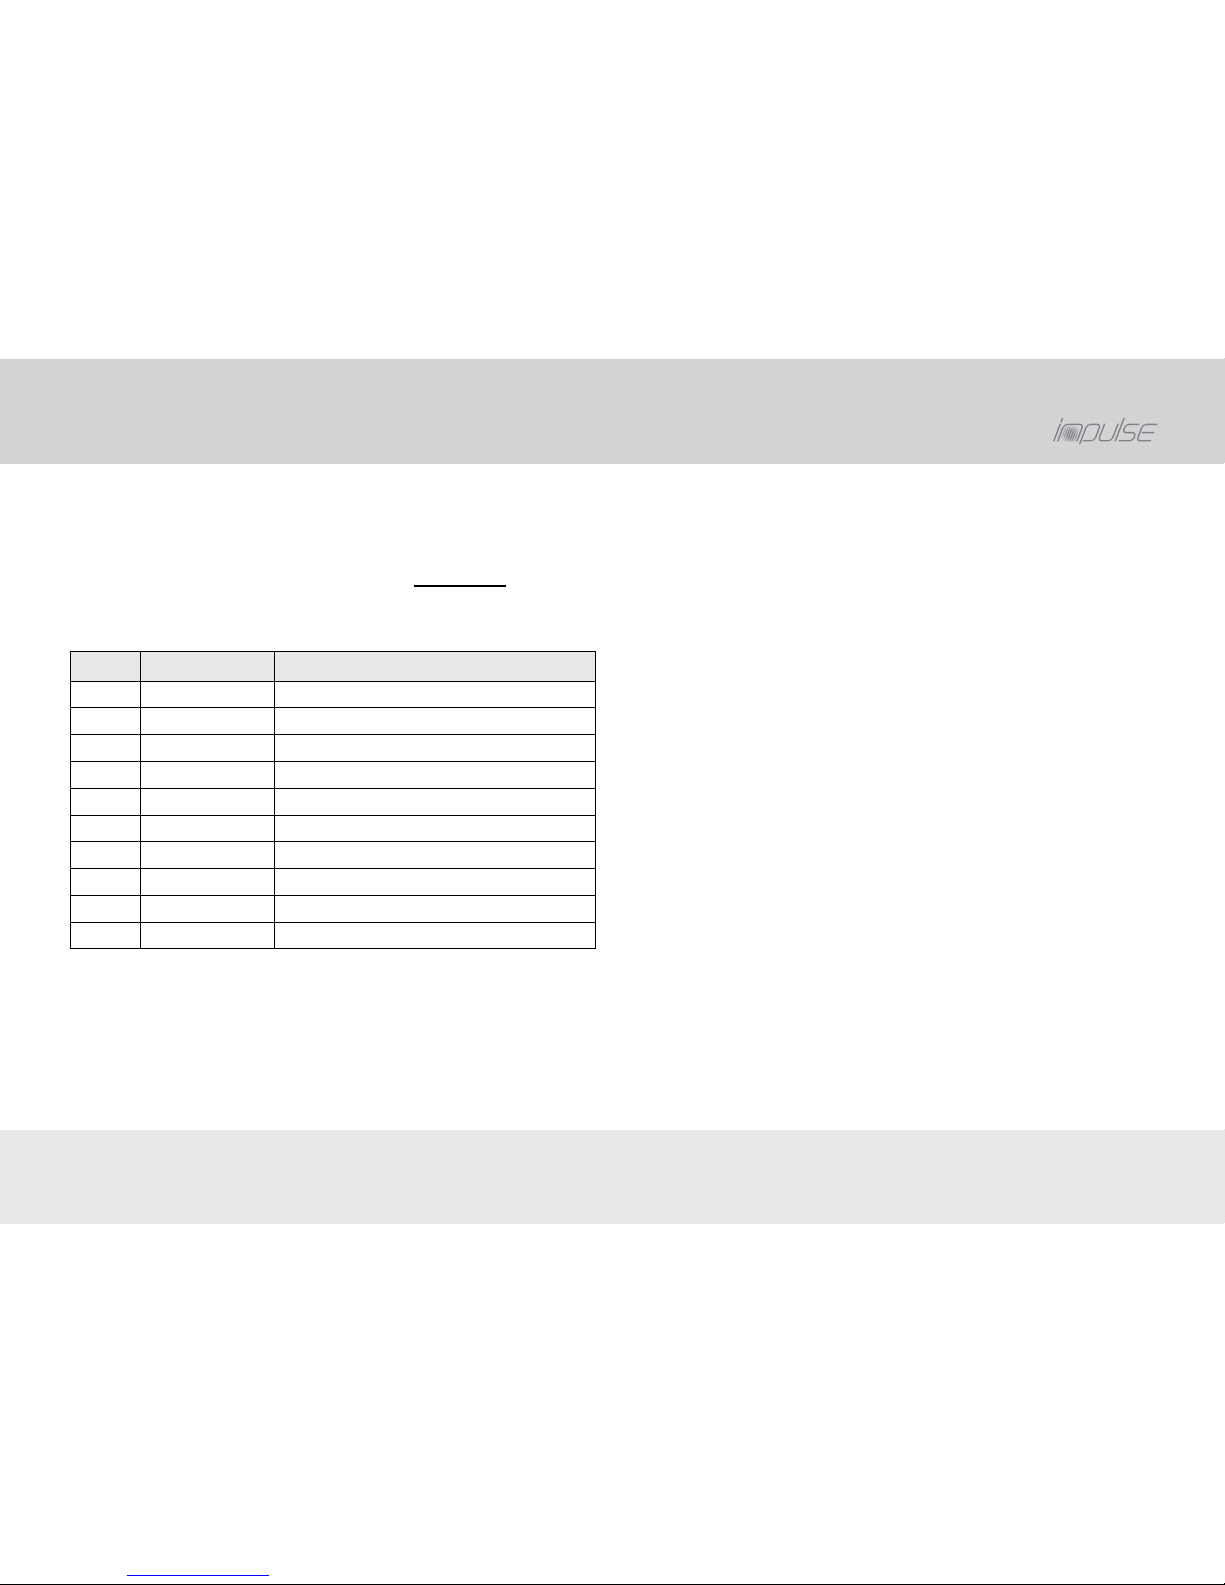
Units
Unit Meaning Unit for
1/s per second Revolutions
A Ampere Electric current (=W/V)
Ah Ampere hour Electric charge (=Wh/V)
g Gram Weight (=kg/1000)
Hz Hertz Frequency (Hz=oscillation/s)
kg Kilogramme Weight (=g×1000)
Nm Newton meter Torque
V Volt Electric voltage (=W/A)
W Watt Electric power (A/V)
Wh Watt hour Electric capacitance (=V×Ah)
Fundamental information »
Symbols and terms
» Fundamental information » Symbols and terms » Written labels / Units
Page 15

15
Differences between a bicycle and an e-bike
The additional components of the electric drive constitute the
major differences between a conventional bike and an e-bike.
- The e-bike’s weight is considerably greater and its weight
is distributed differently than with conventional bikes.
This results in different handling.
- The drive has a significant effect on braking characteristics.
- E-bikes require greater braking forces. The wear may be
greater than with conventional bicycles as a result.
- The electrical assistance will increase your average speed.
• You should therefore cycle attentively. Keep in mind that
other road users must get used to the increased speed
of the e-bike.
- The bike’s handling and braking as well as handling of the
rechargeable battery and charger require an appropriate
level of knowledge.
• Familiarise yourself with the characteristics of your e-bike
even if you already have some experience with electric
assisted bicycles (see chapter “Notes» Use» Before your
first ride”).
Functionality
When riding, the drive only provides assistance when you
pedal. The intensity of assistance is automatically adjusted
depending on the selected riding mode, the pressure applied
when pedalling, the load and the speed. The drive assists you
up to a speed of 25 km/h.
Range
The drive is an assistive motor. The range is affected by your
pedalling intensity.
• Set the assistance as low as possible.
The lower the pedalling frequency of the pedal drive the higher
the energy requirement for the drive.
• Use the gear shift as you would without assistance.
• For inclines, head wind or a heavy load, use the lower gears
of the gear shift.
The drive requires a large amount of energy when starting.
• Always start in a low gear and apply as much pressure to
the pedal as possible.
• Before travelling uphill, switch to a lower gear in time.
• Ride with foresight to avoid any unnecessary stops.
Notes »
E-bike
» Notes » E-bike » Differences between a bicycle and an e-bike / Functionality / Range
Page 16
16
The energy consumption will increase with high loads.
• Do not transport any unnecessary loads.
Lack of care and maintenance may reduce the range.
• Handle the e-bike with care and observe all notes regarding
the rechargeable battery in this user manual.
• Check the tyre pressure regularly.
• Comply with the maintenance intervals.
Temperatures below +10 °C may negatively affect the performance of the rechargeable battery during operation.
When you are not using your e-bike:
• At low outdoor temperatures, take the rechargeable
battery out of the holder and store it (see chapter “Notes »
Rechargeable battery » Storing the rechargeable battery”).
• Only put it back in the holder directly before cycling.
Cycling with an empty rechargeable battery
If the rechargeable battery is completely used up during the
ride, you can use your e-bike as you would a normal bike
(see chapter “Operation"» Rechargeable battery » Charging
indicator”).
Drive overheat protection
CAUTION
Risk of injury!
The drive and rechargeable battery can become very hot
if a fault is at hand. You could injure yourself in the event
of contact with your skin.
• Do not touch the drive and the rechargeable battery.
The drive is automatically protected against damage caused
by overheating. If the temperature of the drive is too high, the
drive will automatically switch off.
• To prevent the drive from overheating, set a low level of
assistance at high outdoor temperatures or roads or paths
with a substantial incline (see chapter “Operation» E-bike »
Setting the level of assistance”).
• If the drive is switched off when the rechargeable battery
is charged and at a speed of under 25 km/, do not use the
e-bike temporarily to allow the drive to cool off.
• If allowing the drive to cool off does not resolve the
disturbance, have your specialist bicycle dealer inspect
the e-bike.
Notes »
E-bike
» Notes » E-bike » Range / Cycling with an empty rechargeable battery / Drive overheat protection
Page 17
17
• Keep in mind that the output of the rechargeable battery
may begin to decline after 500 complete charging processes
(charging cycles).
• Keep in mind that you will get used to cycling with electrical
assistance after a while. This may result in a perceived drop
in the output of the rechargeable battery.
• If there is a loss of power or the operating time is significantly
reduced, contact your specialist bicycle dealer.
• Never perform any modifications on the rechargeable battery.
NOTICE: You can find more information about the rechargeable
battery in the chapter “Operation » Rechargeable battery”.
Charging times
If the rechargeable battery is empty, a full charge cycle requires
4 to 6 hours. The duration of the rechargeable battery charge
cycle depends on the following factors:
- Charge level of the rechargeable battery.
- Temperature of the rechargeable battery and surroundings.
Storing the rechargeable battery
If you do not use the rechargeable battery for a prolonged
period of time, please store it as follows:
• Charge the rechargeable battery to approx. 60 to 80 % of
the capacitance.
• For storage, take the rechargeable battery out of the holder
and place it in a safe location.
Your e-bike is equipped with a high-quality lithium-ion rechargeable battery (Li-ion rechargeable battery). Li-ion rechargeable
batteries are safe if used properly. Li-ion rechargeable batteries
have a relatively high energy density. Therefore, this rechargeable battery must be handled with great care. For your safety,
be absolutely sure to observe the following notes to ensure
reliable operation and a long life-cycle:
Partial charging does not damage the rechargeable battery as
it does not have a memory effect. Partial charging is evaluated
according to its capacitance (a charge of 50 % corresponds
to ½ charge cycle).
NOTICE
Risk of damage!
Self-discharge of the rechargeable battery for technical
reasons may cause irreparable damages.
• Immediately recharge the rechargeable battery if empty.
• Take note of the temperature limits of the rechargeable
battery (see chapter “Technical data”).
• Please note that outside temperatures under +10 °C may
reduce the power of the rechargeable battery.
Notes »
Rechargeable battery
» Notes » Rechargeable battery » Charging times / Storing the rechargeable battery
Page 18
18
• Please note that the special requirements for packaging and
labelling e.g. during air transport or shipping orders apply
for commercial transport.
• Contact e.g. the forwarding company or your specialist
bicycle dealer directly for information regarding the transport
of the rechargeable battery and suitable transport packaging.
NOTICE: To transport the e-bike, read the chapter “Notes »
Use » Transport”.
Protective equipment for charging
The rechargeable battery is equipped with a temperature monitor,
which only permits charging within a temperature range between
0 °C and +45 °C. If the rechargeable battery is outside of the
temperature limits, the charging process will automatically end.
CAUTION
Risk of injury!
Temperatures of over 40 °C can cause injury to the skin.
• If you would like to end the charging process prematurely, let the rechargeable battery cool off.
1. Pull the mains plug out of the socket.
2. Once the rechargeable battery has cooled off, pull the
charging plug out of the charging slot.
3. Have your specialist bicycle dealer inspect the
rechargeable battery.
• Store the rechargeable battery so that there is no risk of it falling
down and so that it is not accessible for children and animals.
• If possible, store the rechargeable battery at room temperature in a dry, well ventilated area.
• If you do not use the rechargeable battery for a prolonged
period of time, it is best to store the rechargeable battery
in a well ventilated location such as a basement at
approx. +10 to +15 °C.
• Protect the rechargeable battery against moisture and water.
• Make sure that the top and bottom temperature limit is
not exceeded or underrun during storage (see chapter
“Technical data”).
• For storage exceeding 3 months, please recharge the
rechargeable battery every quarter to half year depending
on storage conditions. Then charge the rechargeable battery
again to approx. 60 to 80 % of the capacitance.
• After the charging process, always disconnect the charger
from the rechargeable battery and pull the mains plug out
of the socket.
Transporting or shipping the rechargeable
battery
Lithium ion rechargeable batteries are subject to the
requirements of dangerous goods legislation. The private user
may transport undamaged rechargeable batteries on the road
without any further requirements.
Notes »
Rechargeable battery
» Notes » Rechargeable battery » Transporting or shipping the rechargeable battery / Protective equipment for charging
Page 19
19
Information regarding road traffic
The assistance provided by e-bikes is effective up to a speed
of 25 km/h. The technical configuration of your e-bike complies
with the European standard EN 15194 for electrically power
assisted bicycles and the bicycle standard DIN EN ISO 4210-2.
• Get information regarding the respectively valid regulations
on road traffic for your country or the region, e.g. from
bicycle associations or the ministry of transport.
• Ensure that you regularly obtain information regarding
changes to the content of valid regulations.
Areas of application of the rechargeable
battery and charger
The drive unit, rechargeable battery and charger are configured
for use with one another and are approved only for use with
your e-bike.
Insurance
• Check whether the conditions of your insurances adequately cover damages, e.g. liability insurance or household insurance.
• In case of doubt, contact your insurer office.
Lighting
Your e-bike is equipped with rechargeable battery-powered
lighting. The rechargeable battery must always be inserted
when using public roads so that the lighting is operational at
all times.
Admissible total weight
The total admissible weight of your e-bike is specified on the CE
sticker. The sticker is located on the inside of the chain stays.
gefertigt nach DIN 15194
Nenndauerleistung 250W bis 25km/h
zulässiges Gesamtgewicht 130 Kg
Hermann Hartje KG . Deichstraße 120-122
27318 Hoya/Weser . Germany . www.e-rad.de
BJ: 2016
CE sticker specifying the total admissible weight.
Exclusion of wearable parts
In addition to the wearable parts listed in the user manual for
the bicycle, the rechargeable battery – with the exception of
production defects – is not covered by the warranty.
Disclaimer
The manufacturer cannot be held liable for damages or
breakdowns resulting from direct or indirect use of the e-bike.
Notes »
Use
» Notes » Use » Road traffic / Rechargeable battery and charger / Insurance / Lighting / Total weight / ...
Page 20
20
Transport
CAUTION
Risk of short-circuiting and fire!
The lithium ion rechargeable battery is considered a
dangerous good and may be damaged if exposed
to shocks and impacts without such damages being
externally apparent.
• When transporting your e-bike, remove the rechargeable battery and store it separately.
• Transport the rechargeable battery with special care.
• To rule out any risks and damages, transport the e-bike as
follows:
• Remove the rechargeable battery before transport
(see the chapter “Notes » Rechargeable battery »
Transporting or shipping the rechargeable battery”).
By car
• Store the rechargeable battery so as to prevent slipping and
collision with other objects during the trip.
• Properly secure the load to protect the rechargeable battery
against compressive loads and avoid shocks.
• Store the rechargeable battery so that it is unable to be
heated up by exposure to the sun or other heat sources.
With e-bikes, the forces from braking and lateral forces that act
on the bike rack are stronger than with conventional bicycles.
• Check whether your bike rack is suitable for e-bikes.
• Ask your specialist bicycle dealer about suitable bike racks
for your e-bike.
Using other forms of transportation
When transporting e-bikes with the rechargeable battery,
special guidelines, which are constantly being expanded or
updated, apply. These guidelines may vary from one another
depending on the form of transportation.
• Contact the airline, train or ferry company in due time to
get informed regarding valid provisions that apply for the
transport of e-bikes. Have the technical data handy for this
purpose.
Shipping
• If you ship your e-bike, ship the rechargeable battery
separately and well packed in a suitable transport container
(see chapter “Notes » Rechargeable battery » Transporting
or shipping the rechargeable battery”).
Notes »
Use
» Notes » Use » Transport
Page 21

21
Disposal
• Read the explanation of the symbols printed or stamped on
the packaging, the rechargeable battery and the charger
(see chapter “Fundamental information » Symbols and
terms”).
• Contact your specialist bicycle dealer or the official
administration to get informed regarding questions relating
to disposal.
Packaging
• Dispose of the packaging material for environmentallyfriendly recycling using the collection systems provided.
Rechargeable battery and charger
• Do not dispose of rechargeable batteries, electric
components and the charger with household waste.
According to European Directive 2012/19/EU, electrical devices
that are no longer functional must be collected separately and
made available for environmentally-friendly use.
According to European Directive 2006/66/EC, defective
or used up rechargeable batteries and batteries must be
collected separately and made available for environmentallyfriendly use.
• Dispose of the rechargeable battery and the charger at a
collection point for electrical devices.
E-bike
• Dispose of the e-bike at your specialist bicycle dealer or a
collection station.
Notes »
Use
» Notes » Use » Disposal
Page 22
22
Before each ride
• Check your e-bike according to the chapter “Testing
instruction” in this user manual and in the user manual for
your bicycle.
Before your first ride
CAUTION
Risk of injury!
The e-bike may respond in a manner other than you
expect if operated incorrectly.
• Read the chapter “Operation” completely before you
switch it on for the first time.
• Fully charge the rechargeable battery before your first ride
(see chapter “Start-up”).
Your first ride
• Practice operating and using it in an open area away from
public road traffic.
• Practice on a level, solid ground with adequate grip.
1. Select the lowest level of assistance on the control unit
(see chapter “Operation » E-bike » Setting the level of
assistance”).
2. Start slow.
3. Carefully apply the brakes and get used to the brake
effectiveness (see chapter “Notes » Brake” and
“Operation » Brake”).
4. Once you are able to safely operate the brakes, familiarise
yourself with the fully automatic assistance.
5. Once you are able to ride safely, repeat the familiarisation
phase and test the brake in other riding modes.
6. Practice using the walk assistance function (see chapter
“Operation » E-bike » Walk assistance”).
Testing instruction
1. Check whether the rechargeable battery lock is engaged.
2. Check the rechargeable battery for any damage
(visual inspection).
3. Check the drive for any damage (visual inspection).
4. Check the cables and plugged connections for damage
and make sure they are securely seated
(visual inspection).
• If you discover any missing or damaged parts, do not
use the e-bike.
• Have your specialist bicycle dealer repair the e-bike.
Notes »
Use
» Notes » Use » Before each ride / Before your first ride / Your first ride / Testing instruction
Page 23
23
Start-up »
Preparations
1. Read the entire user manual before you use the e-bike.
2. Prepare the rechargeable battery and the charger for the
start-up of your e-bike.
Rechargeable battery
NOTICE
Risk of damage!
If the rechargeable battery is not fully charged before
start-up, the nominal charge of the rechargeable battery
will decrease.
• Before start-up, charge the rechargeable battery until
the charging process automatically ends (see chapter
“Operation » Rechargeable battery » Charging the
rechargeable battery”).
Charger
1. Read the information on the nameplate of the charger.
• If the information does not correspond to the voltage
supply, do not use the charger.
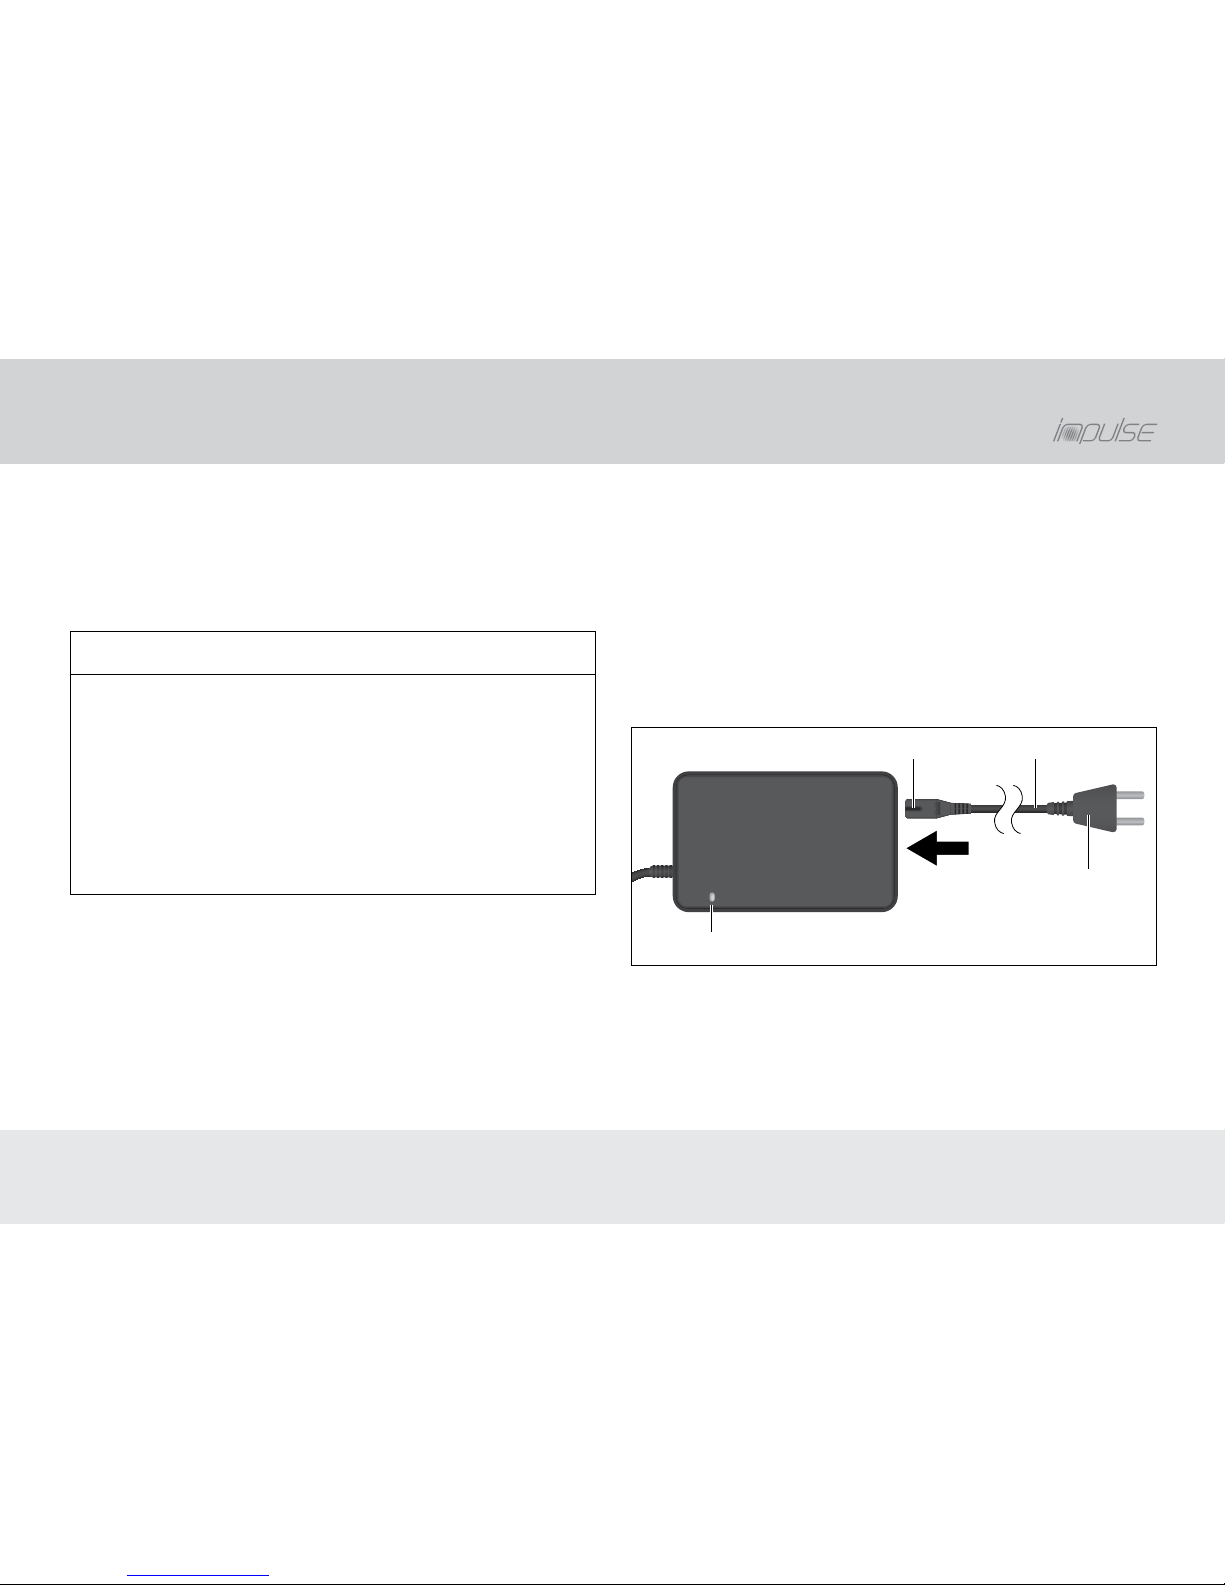
2. Insert the device plug in the mains connector jack of the
charger (see figure 1).
3. Before you connect the charger to the voltage supply,
read the chapter “Operation » Rechargeable battery
» Charging the rechargeable battery”.
LED
Mains plug
Device plug Mains cord
Figure 1: Connecting the mains cord to the charger.
» Start-up » Preparations » Rechargeable battery / Charger
Page 24
24
Operation »
Rechargeable battery
Removing the rechargeable battery
NOTICE
Risk of damage!
The electronic system could be damaged.
• Always switch off the e-bike before you take the
rechargeable battery out of the holder.
1. Switch the e-bike off (see chapter “Operation » E-bike »
Deactivating the e-bike”).
2. Hold the rechargeable battery tightly by the handle.
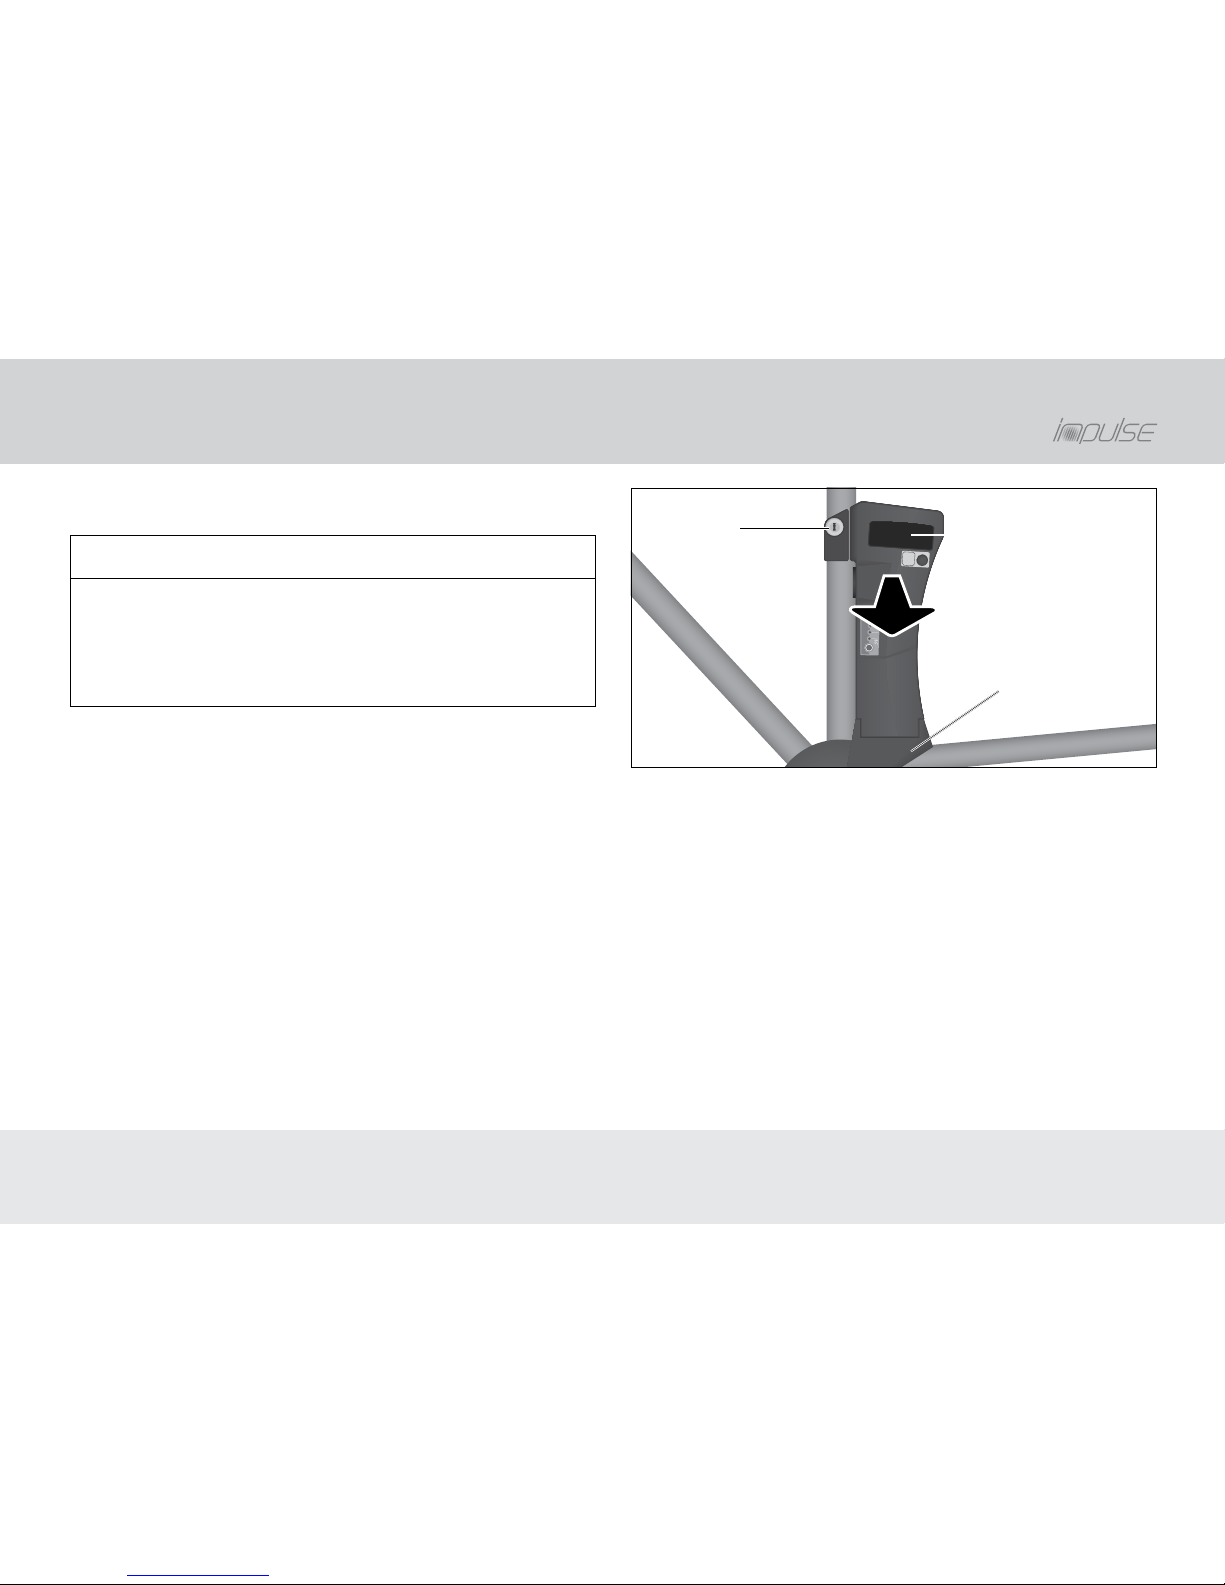
3. Insert the key in the lock (see figure 2).
4. Turn the key to the left to open the lock.
5. Tip the rechargeable battery out to the side.
6. Pull the rechargeable battery out of the bottom holder.
7. To prevent damages, pull the key out of the lock.
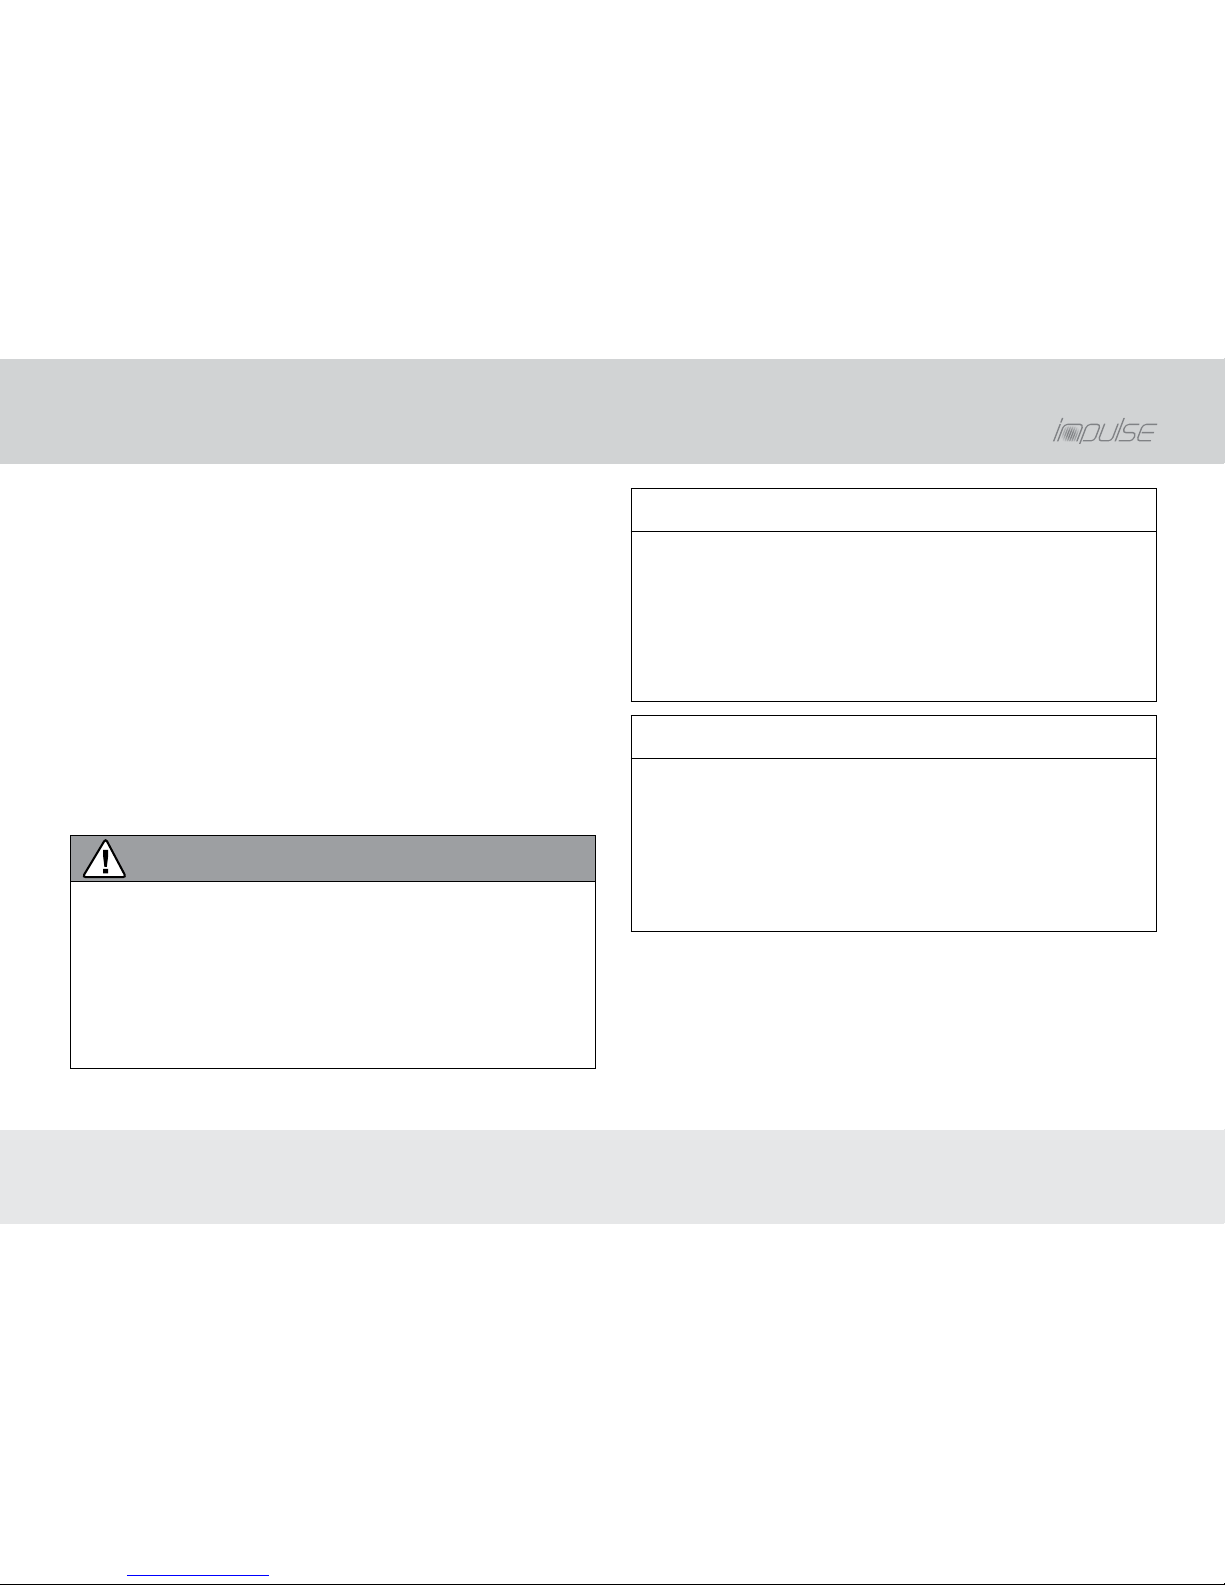
17
Ah
36
Volt
17AH
Li-ionen Batterie
Lock
Handle
Bottom holder
Figure 2: The rechargeable battery is removed by tipping it out
to the side.
Inserting the rechargeable battery
1. Turn the key to the left to open the lock.
2. Place the rechargeable battery at an angle from the side
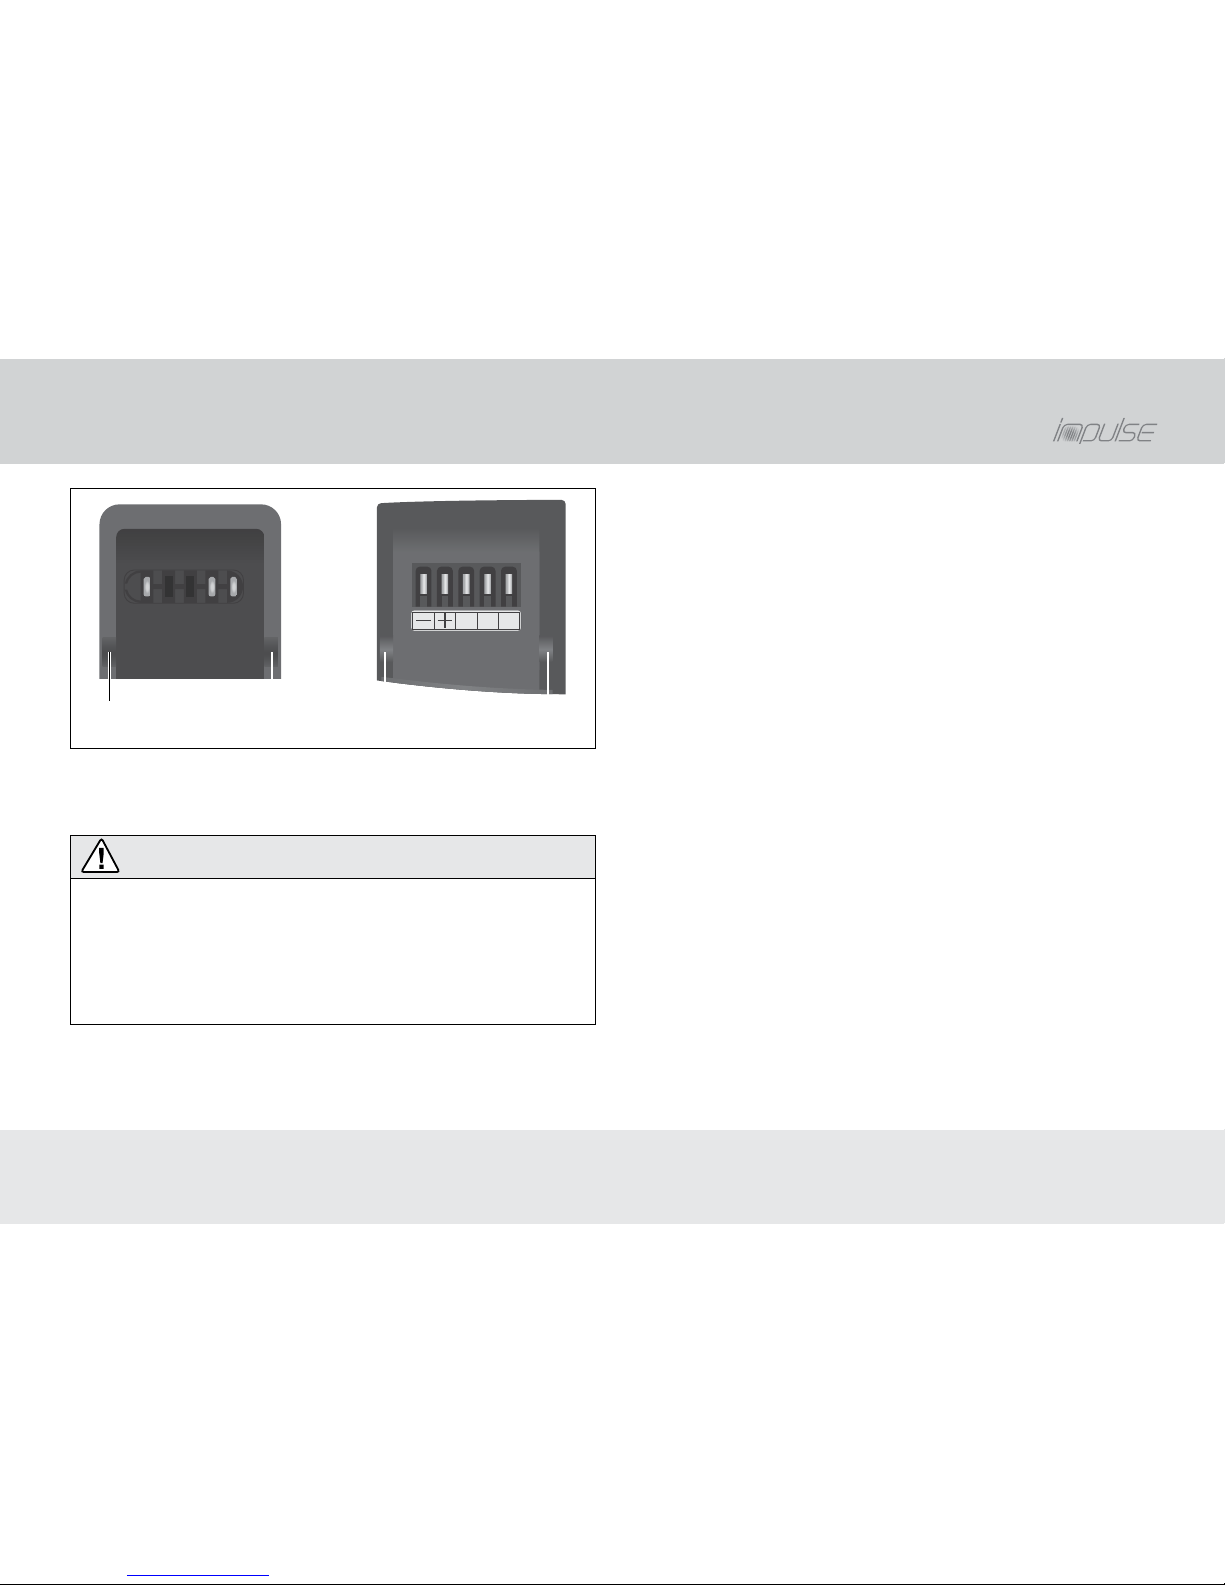
with the pins in the bearing of the bottom holder (see
figure 3). Do not use any force in the process.
3. Carefully tip the rechargeable battery in on the side until it
locks into the lock.
4. Turn the key to the right to close the lock.
5. Pull the key out of the lock.
» Operation » Rechargeable battery » Removing the rechargeable battery / Inserting the rechargeable battery
Page 25
25
Operation »
Rechargeable battery
C D R
Bearing Pins
Figure 3: Top view of the bottom holder (left) and the rechargeable battery from below (right).
CAUTION
Risk of damages resulting in fire!
The lock could open. The rechargeable battery could fall
out of the holder and be damaged.
• Verify that the rechargeable battery is securely seated
in the holder.
6. Hold the rechargeable battery by the handle and make
sure that you cannot pull it out.
Sleep mode
After no later than 10 days without use, the rechargeable battery
will automatically activate sleep mode. This will minimise the
risk of a deep discharge of the rechargeable battery.
• To end sleep mode, charge the rechargeable battery or push
the rechargeable battery button (see chapter “Checking the
charge level of the rechargeable battery” and “Charging the
rechargeable battery”).
Checking the charge level of the
rechargeable battery
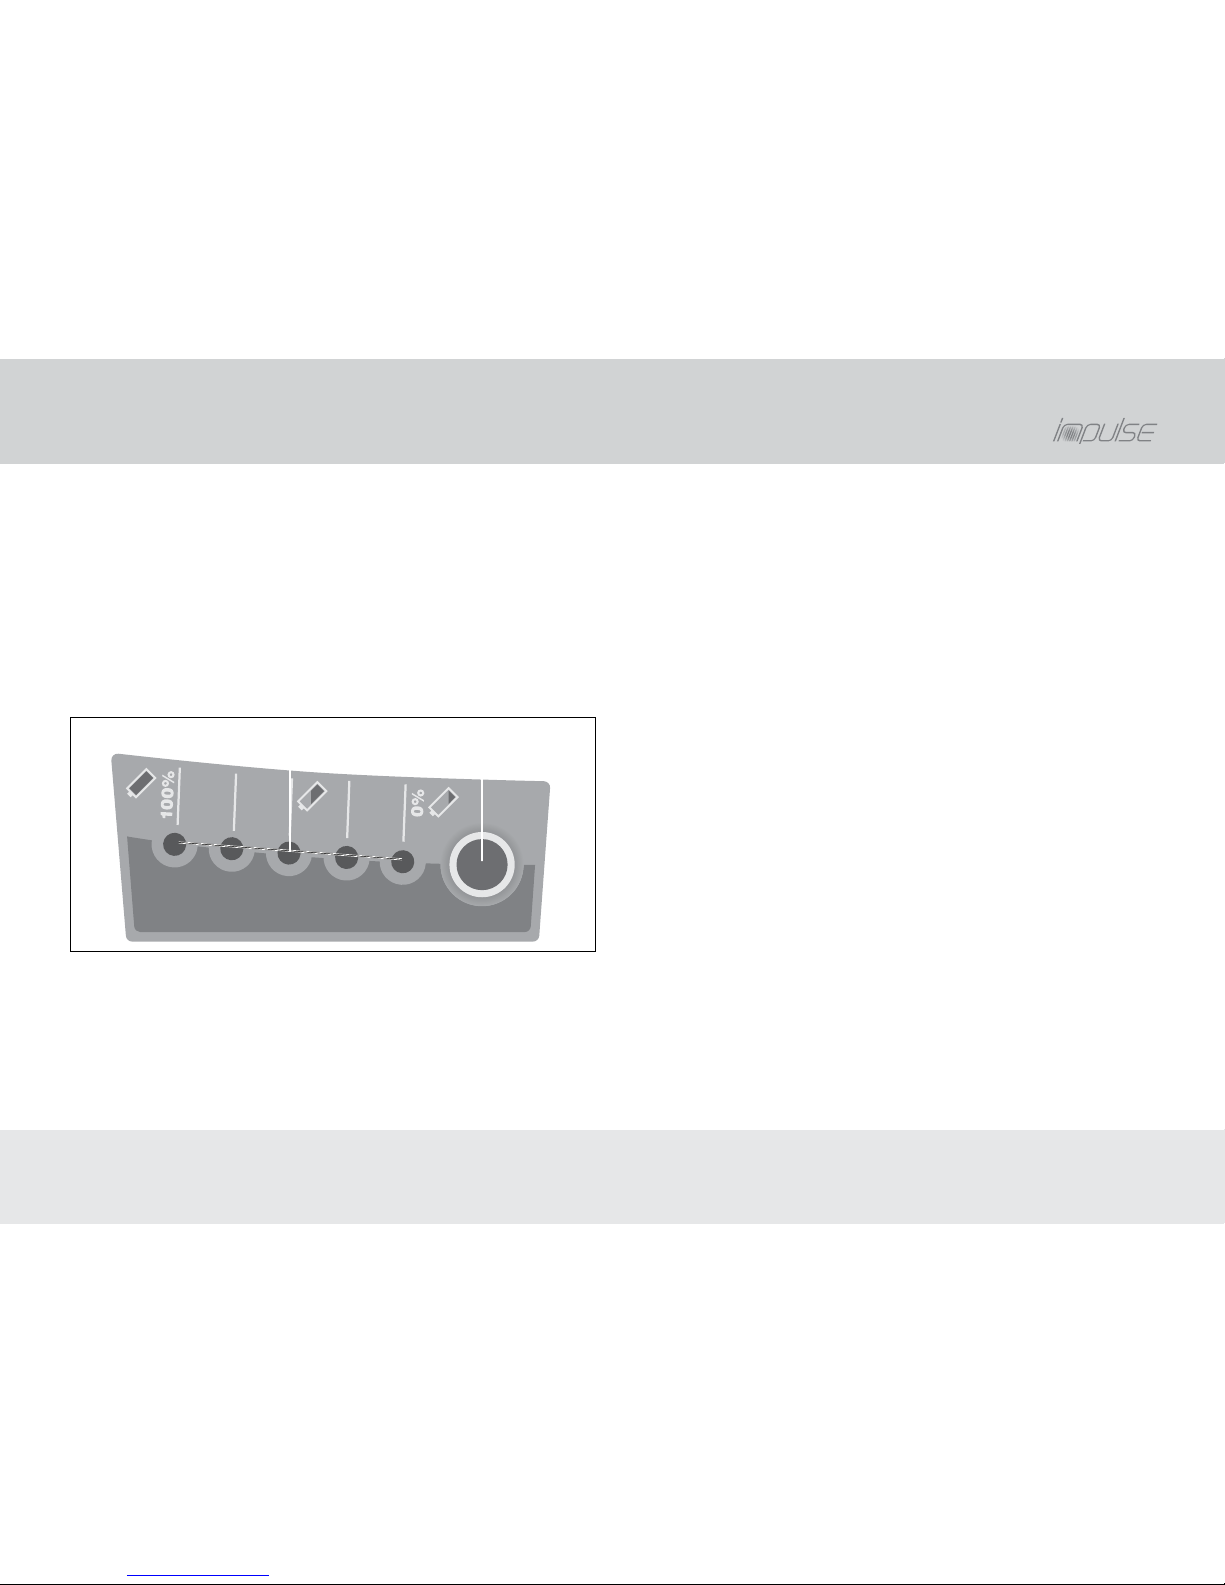
1. To check the rechargeable battery charge, briefly push the
rechargeable battery button (see figure 4).
2. Read the charge level on the charging indicator.
1 LED is blinking: Charge level of 1 to 16 %
1 LED is illuminated: Charge level of 17 to 33 %
2 LEDs illuminate: Charge level of 34 to 50 %
3 LEDs illuminate: Charge level of 51 to 67 %
4 LEDs illuminate: Charge level of 68 to 83 %
5 LEDs illuminate: Charge level of 84 to 100 %
» Operation » Rechargeable battery » Sleep mode / Checking the charge level of the rechargeable battery
Page 26
26
Operation »
Rechargeable battery
5 LEDs blink: Rechargeable battery is empty or
overloaded
1 LED is blinking quickly: Fault
• If 5 LEDs blink or 1 LED blinks quickly, calibrate the
rechargeable battery (see chapter “Calibrating the
rechargeable battery”).
NOTICE: When the e-bike is switched on, the rechargeable
battery charge will also be shown on the display panel
(see chapter “Operation » E-bike » Display panel”).
11A H
Li-ionen Batterie
Charging indicator Rechargeable battery
button
Figure 4: Rechargeable battery button and charging indicator
on the rechargeable battery.
Checking the capacitance of the rechargeable battery
The rated capacitance of the rechargeable battery will decline
as the rechargeable battery ages and with use (see chapters
“Notes» Rechargeable battery” and “Technical data”).
1. To check the capacitance of the rechargeable battery,
push the rechargeable battery button for 5 seconds.
2. Read the rechargeable battery capacitance on the
charging indicator.
1 LED is blinking: 0 to 19 % capacitance
1 LED is illuminated: 20 to 39 % capacitance
2 LEDs illuminate: 40 to 59 % capacitance
3 LEDs illuminate: 60 to 79 % capacitance
4 LEDs illuminate: 80 to 96 % capacitance
5 LEDs illuminate: 97 to 100 % capacitance
Calibrating the rechargeable battery indicator
Calibrating the rechargeable battery indicator ensures that the
rechargeable battery charge is shown exactly.
1. Use the rechargeable battery until the rechargeable
battery is completely empty.
2. Charge the rechargeable battery completely.
The rechargeable battery indicator automatically calibrates
itself during this process.
3. Repeat the process every 6 months.
» Operation » Rechargeable battery
Page 27
27
Operation »
Rechargeable battery
Calibrating the rechargeable battery
In the event of a fault, the function of the rechargeable battery
may be restored if applicable through calibration.
1. If one or all LEDs on the charging indicator of the
rechargeable battery are blinking, charge the rechargeable
battery for at least one minute (see chapter “Charging the
rechargeable battery”).
2. Check the charge level of the rechargeable battery
(see chapter “Checking the charge level of the
rechargeable battery”).
If one or all LEDs blink again, have the rechargeable battery
inspected by your specialist bicycle dealer.
Charging the rechargeable battery
WARNING
Risk of fire and injury!
If you notice heat, an odour or damages while charging:
• Do not inhale gases that are emitted.
• Do not touch the charger and the rechargeable battery.
• Pull the mains plug of the charger out of the socket.
• Read the chapter “In an emergency”.
NOTICE
Risk of damage!
If the charging process takes an excessive amount of
time, the rechargeable battery may be damaged.
• During excessively long charge cycles disconnect the
rechargeable battery from the charger and contact
your specialist bicycle dealer.
NOTICE
Risk of damage!
If the rechargeable battery is not completely discharged
after the first charge, the rated capacitance will decrease.
• After the first charge, use the rechargeable battery until
it is completely discharged.
• Then charge the rechargeable battery completely.
The rechargeable battery is charged with the rechargeable
battery inserted on the e-bike with the rechargeable battery
removed.
• Only charge the rechargeable battery in dry rooms.
• If you are able to park your e-bike under shelter, charge the
inserted rechargeable battery, e.g. in a garage or in a bike
shed.
» Operation » Rechargeable battery » Charging the rechargeable battery
Page 28
28
Operation »
Rechargeable battery
• If you cannot park your e-bike in shelter, remove the
rechargeable battery to charge it (see chapter “Operation »
Rechargeable battery » Removing the rechargeable
battery”).
• If applicable, remove dirt on the charging slot and the
contacts with a dry cloth.
• Only charge the rechargeable battery under supervision.
Inserted rechargeable battery
1. Prepare the charger (see chapter “Start-up » Preparations »
Charger”)
2. Switch the e-bike off (see chapter “Operation » E-bike »
Deactivating the e-bike”).
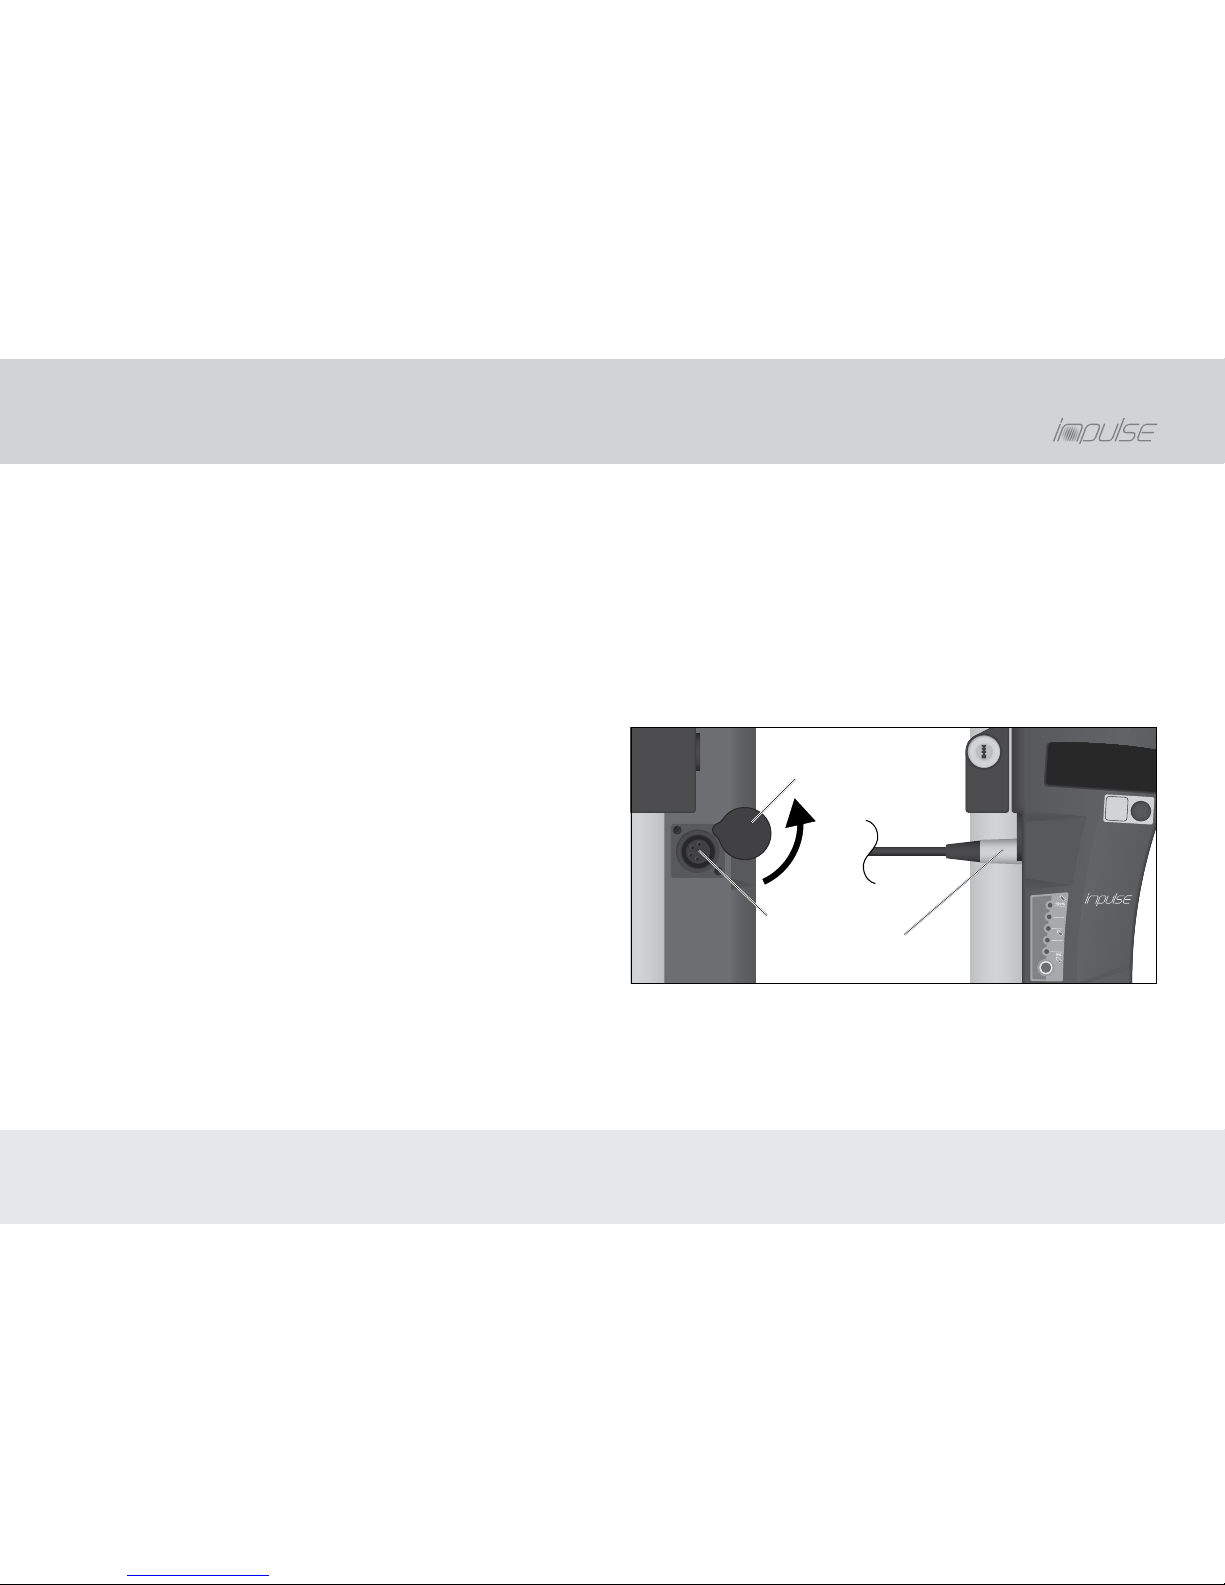
3. Open the cover of the charging slot (see figure 5, left).
4. Insert the charging plug in the charging slot
(see figure 5, right).
The charging process will start and the LEDs on the charging
indicator of the rechargeable battery will illuminate (see
chapter “Display of the charging process”). The LED of the
charger will illuminate in green.
• If the LED on the charger blinks red, pull the charging
plug out of the charging slot.
• Read the chapter “Troubleshooting”.
5. Monitor the charging process.
Rechargeable battery removed
1. Prepare the charger (see chapter “Start-up » Preparations »
Charger”)
2. Place the charger and the charging adapter on a clean,
solid, non-flammable surface.
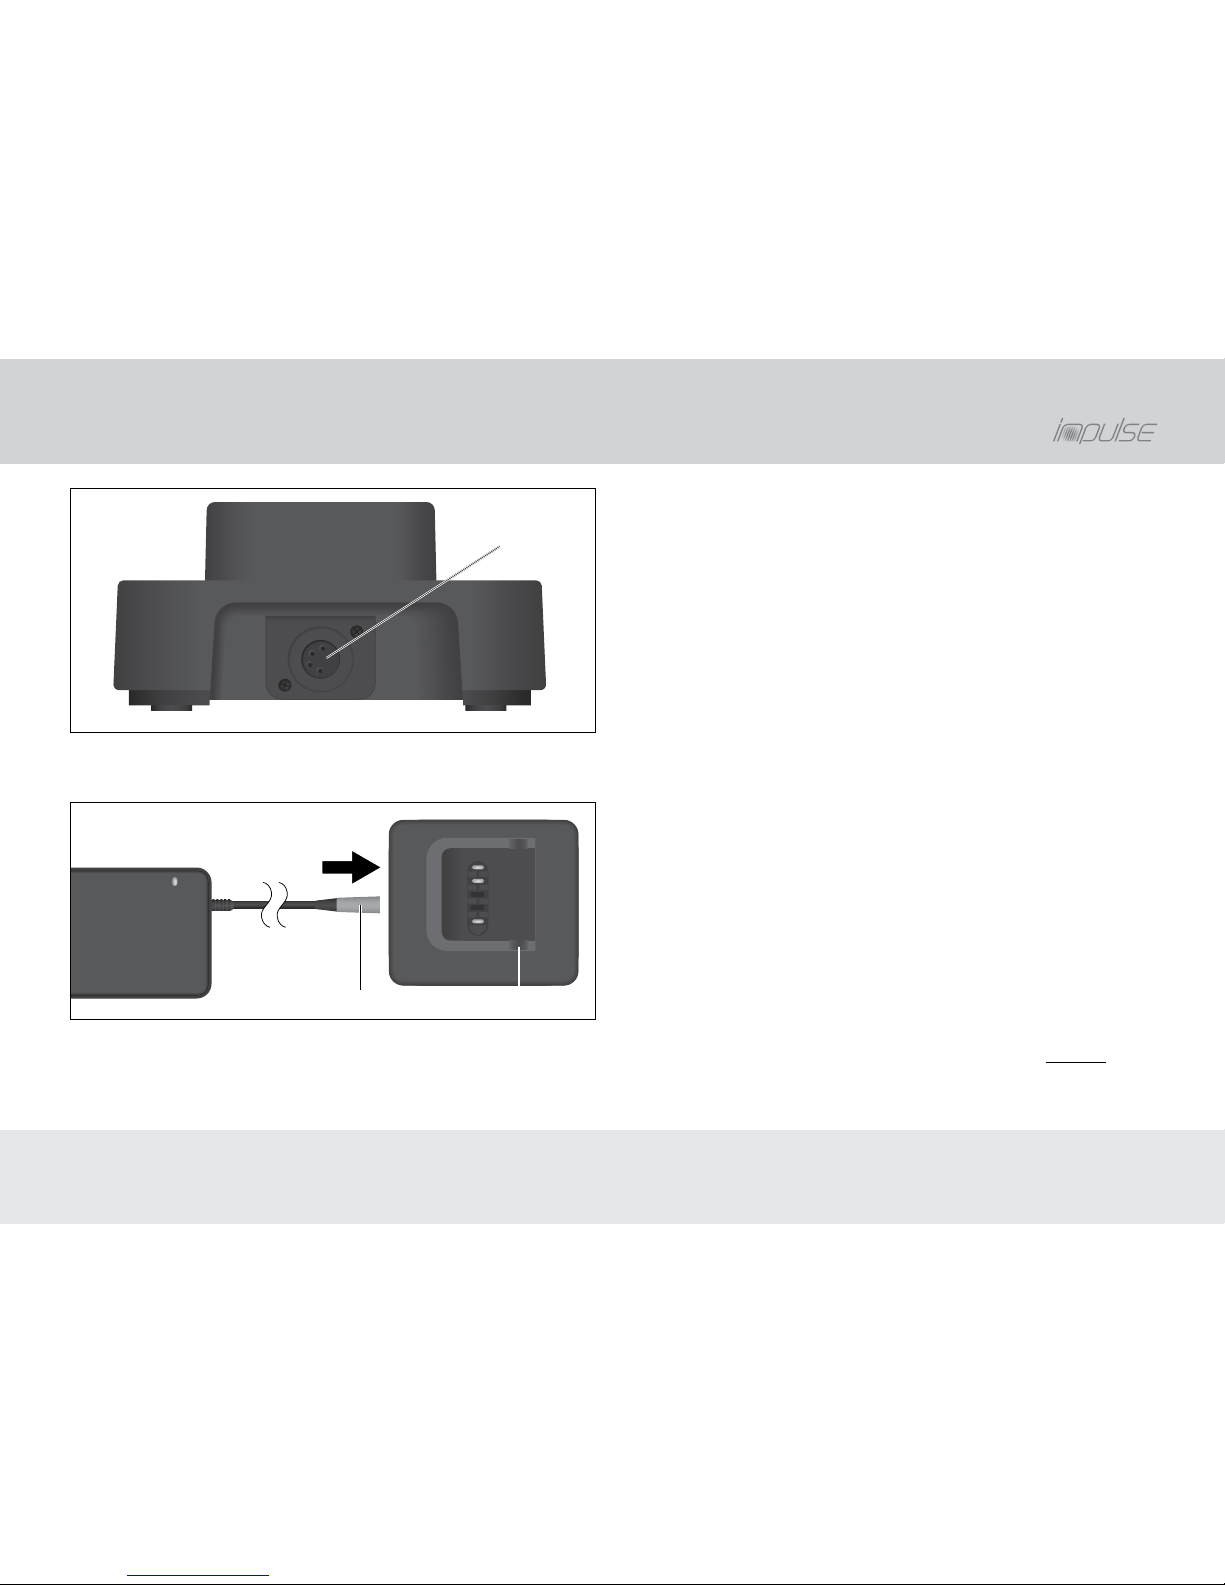
3. Insert the charging plug in the charging slot of the charging
adapter (see figure 6 and figure 7).
The LED on the charger will first illuminate in red and then
in green.
17
Ah
36
Volt
17AH
Li-ionen Batterie
Charging slot
Charging plug
Cover
Figure 5: Charging slot on the rechargeable battery viewed
from the front (left) and with the inserted charging plug in the
side view (right).
» Operation » Rechargeable battery » Charging the rechargeable battery
Page 29
29
Charging slot
Figure 6: Charging adapter with the charging slot.
Charging plug Bearing
Figure 7: Connecting the charger (left) to the charging adapter
(right).
4. Place the rechargeable battery in the charging adapter.
At the same time, make sure that the pins of the rechargeable battery are aligned with the bearings of the charging
adapter (compare with figure 3).
The charging process will start and the LEDs on the charging
indicator of the rechargeable battery will illuminate (see
chapter "Display of the charging process").
• If the LED on the charger blinks red, pull the charging
plug out of the charging slot.
• Read the chapter “Troubleshooting”.
5. Monitor the charging process.
Display of the charge process
The rechargeable battery charge is shown on the charging
indicator of the rechargeable battery while charging (see
figure 4). An LED that blinks slowly signals that another 20 %
is charging.
The 1st LED will blink slowly: Charge level of 0 %
1 LED is illuminated: Charge level of 1 to 20 %
2 LEDs illuminate: Charge level of 21 to 40 %
3 LEDs illuminate: Charge level of 41 to 60 %
4 LEDs illuminate: Charge level of 61 to 80 %
5 LEDs illuminate: Charge level of 81 to 100 %
• If an LED on the rechargeable battery blinks quickly, read
the chapter “Troubleshooting”.
Operation »
Rechargeable battery
» Operation » Rechargeable battery » Charging the rechargeable battery
Page 30
30
Ending the charging process
Once the charging process is complete, none of the LEDs on
the charging indicator will be illuminated.
1. When the rechargeable battery is removed: Pull the
rechargeable battery out of the charging adapter.
2. Pull the charging plug out of the charging slot.
3. Pull the mains plug out of the socket.
4. When the rechargeable battery is inserted: Close the
charging slot with the cover.
CAUTION
Risk of injury!
The e-bike may respond in a manner other than you
expect if operated incorrectly.
• Read the chapter “Operation” completely before you
switch it on for the first time.
Activating the e-bike
NOTICE: Do not apply pressure to the pedals during activation.
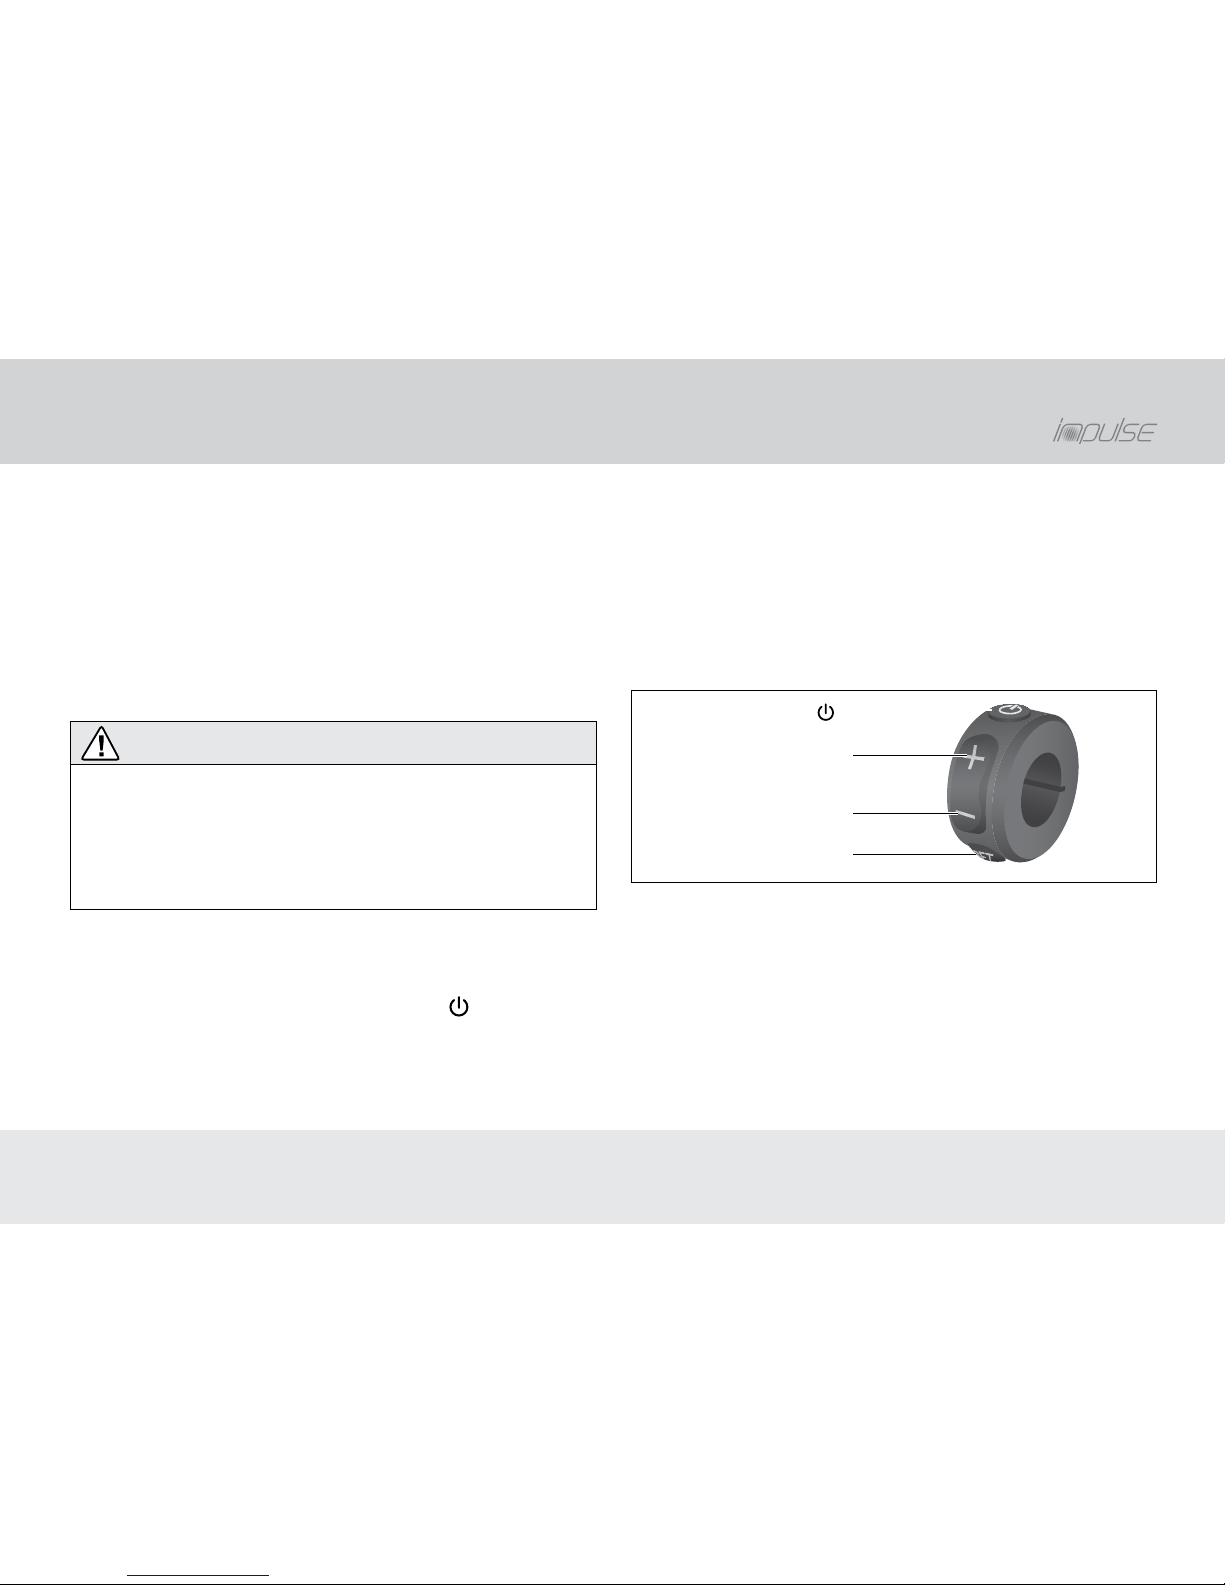
• To switch on the e-bike, push the button
on the control
unit (see figure 8).
A welcome text will appear on the display panel after a short
delay followed by the standard view (see chapter “Display
panel”).
In the case of e-bikes with a back pedal brake, the text
“Please move the pedals” will appear. The drive will be
automatically calibrated once you start pedalling.
• If the drive does not provide any assistance while cycling,
briefly apply the back pedal brake and then continue
pedalling.
NOTICE: The e-bike cannot be switched on when charging the
rechargeable battery on the e-bike.
On/Off button ( )
Plus button
Minus button
Set button
Figure 8: Control unit.
Using the drive
- The drive will automatically activate as soon as you pedal.
- The drive will automatically switch off when you are not
pedalling or no later than when you reach a speed of 25 km/h.
Operation »
E-bike
» Operation » E-bike » Charging the rechargeable battery / Activating the e-bike
Page 31
31
NOTICE: Other than with conventional e-bike drives, the
impulse drive also deactivates depending on the selected
gear and the pedalling frequency. In first gear, the drive
provides assistance up to 18 km/h. Depending on your gear
shift, the higher gears are switched off at speeds between
18 and 25 km/h. This ensures that the drive provides optimal
assistance.
Depending on the selected gear, the drive will automatically
activate as soon as you pedal.
Deactivating the e-bike
• To switch off the e-bike, push and hold the button on the
control unit for 2 seconds.
• NOTICE: After 10 minutes of inactivity, the e-bike will automatically switch off.
Operation »
E-bike
Display panel
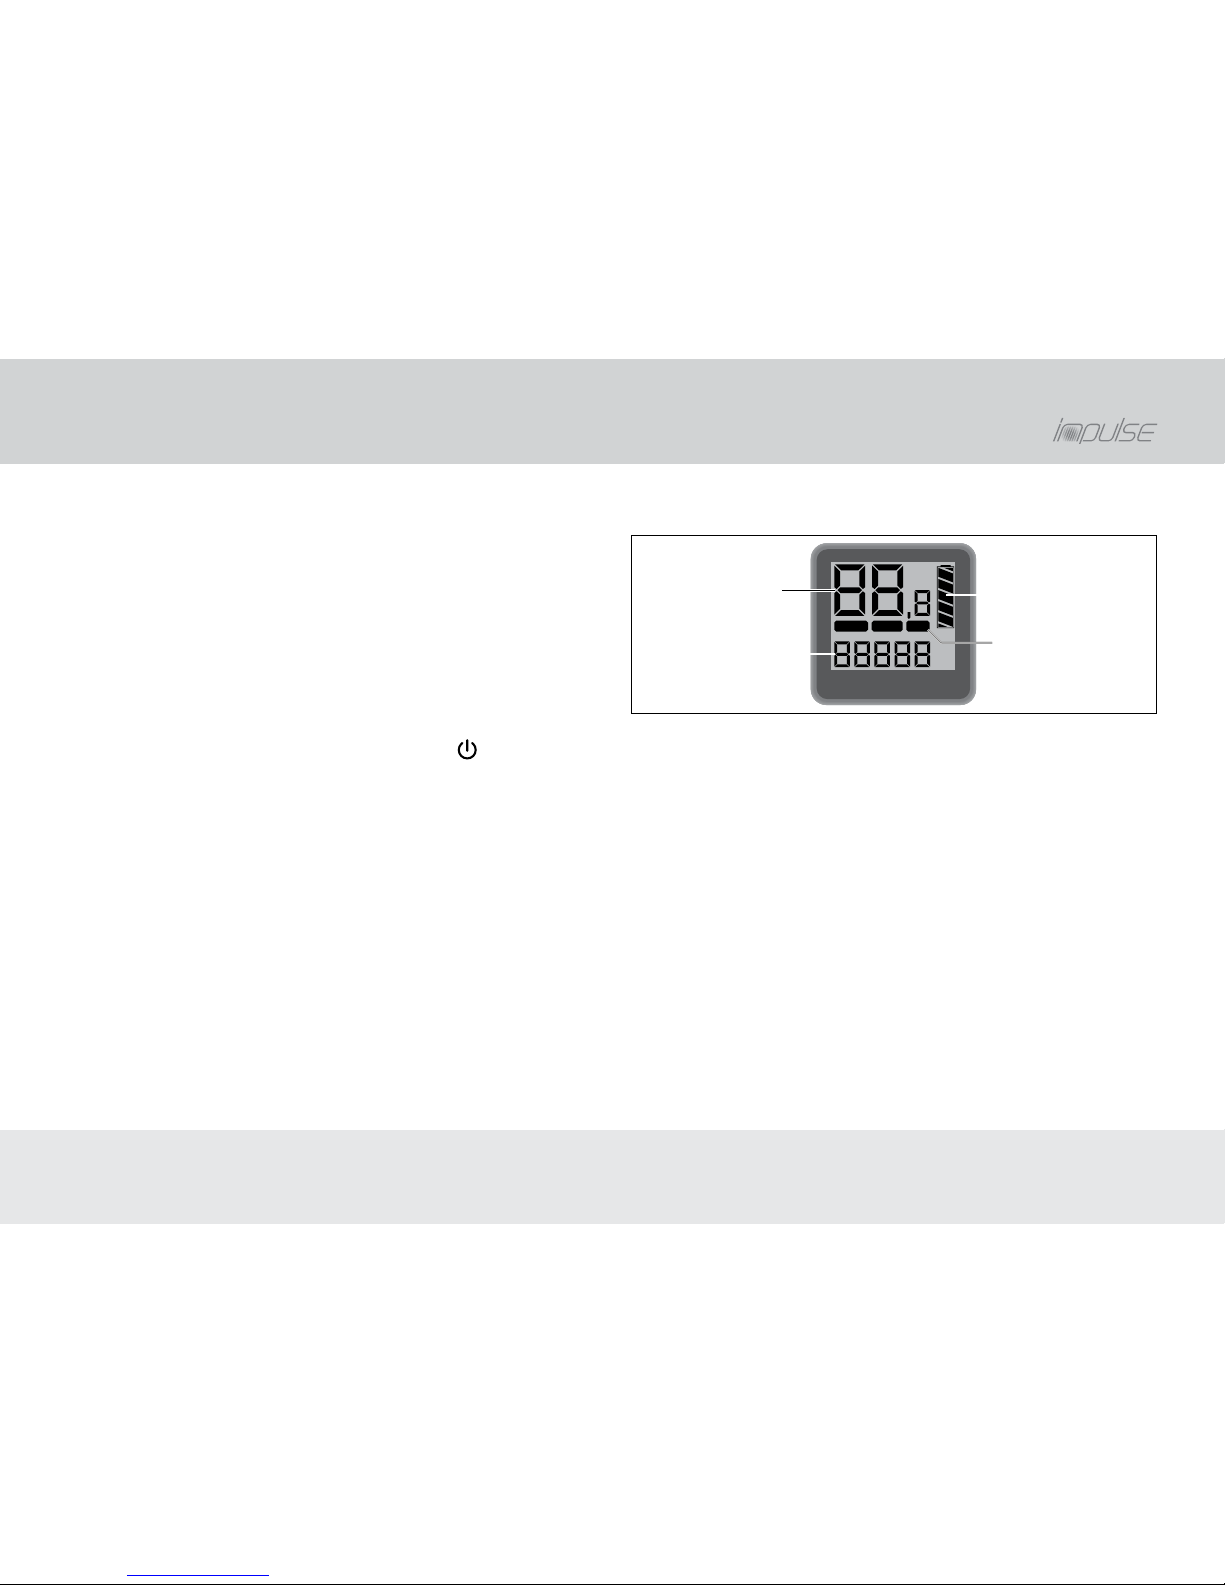
mph
kmh
mi
km
POWER SPORT ECO
Rechargeable
battery indicator
Assistance
Speed
Range
Figure 9: Exemplary view of the display panel with all display
elements.
Standard indicators
Speed: Displays the current speed.
• To change the unit for speed (mph or km/h), push the set
button for 3 seconds (see figure 8).
Rechargeable battery indicator: The rechargeable battery
indicator on the display panel will display the battery charge
that is currently available.
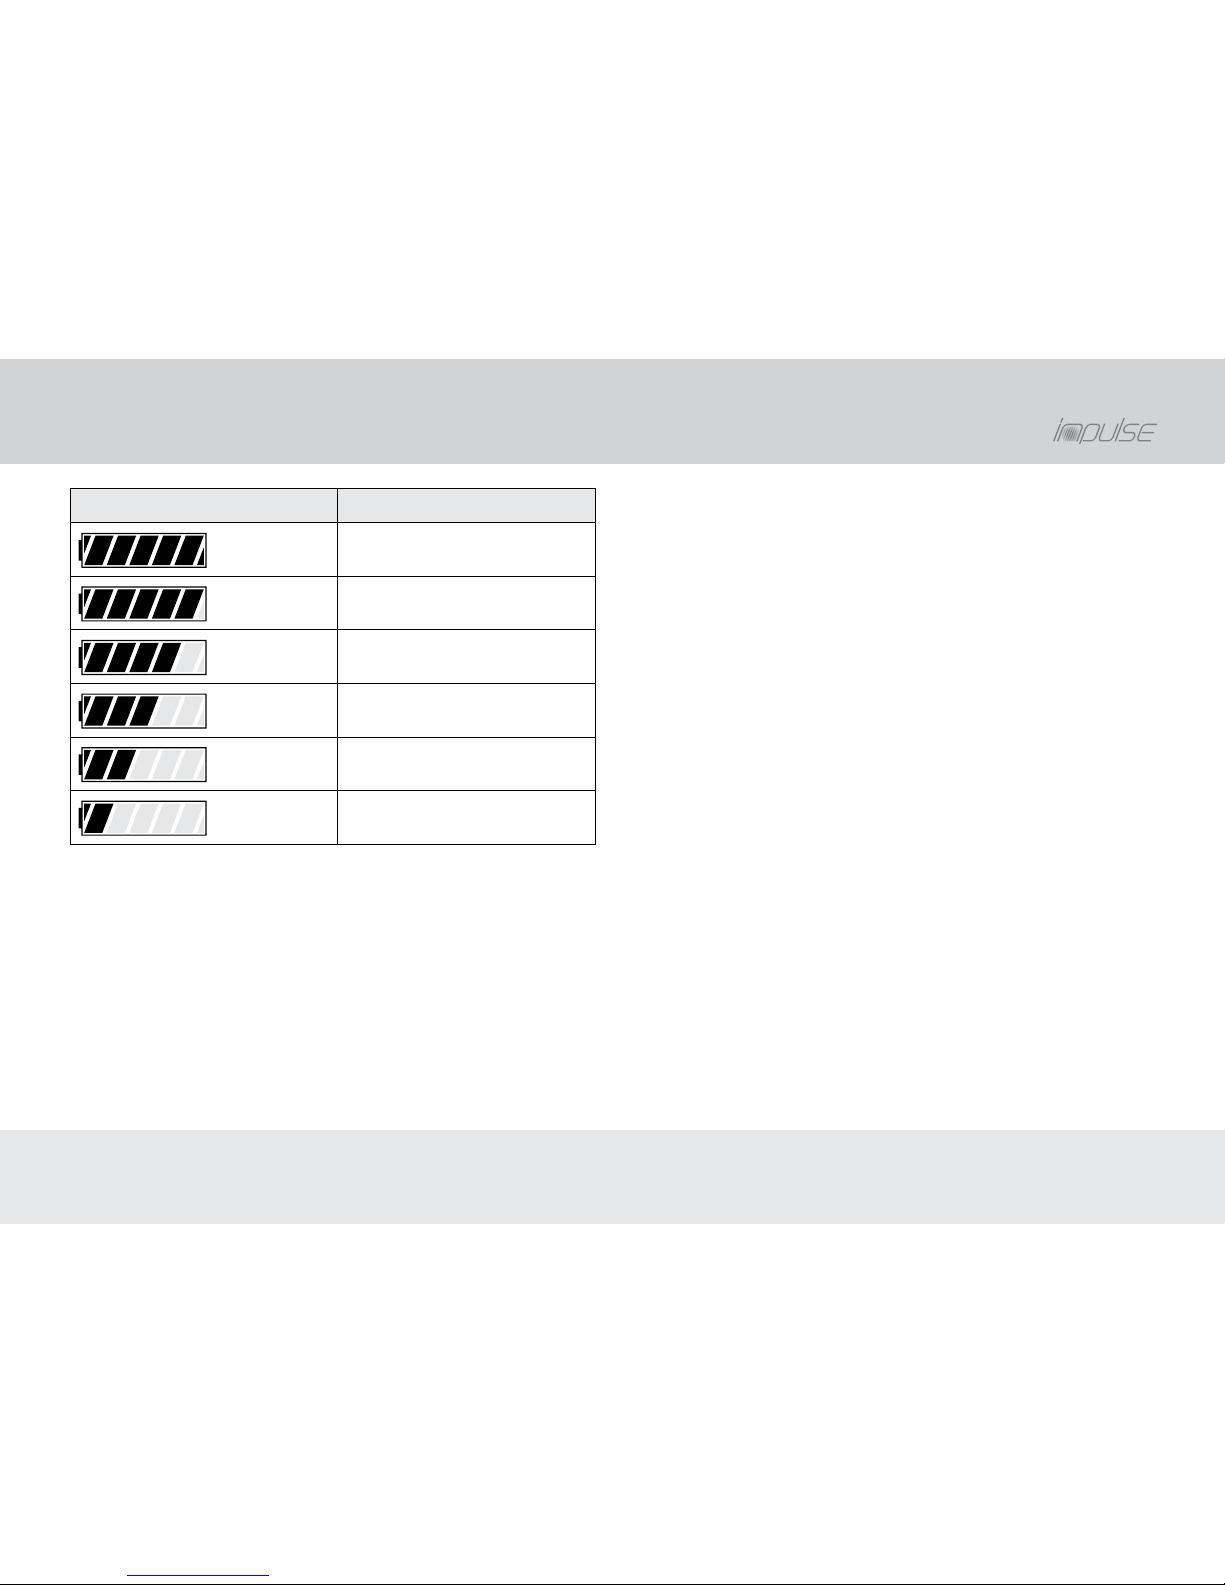
• Compare the number of displayed segments on the
rechargeable battery indicator with table 1.
» Operation » E-bike » Deactivating the e-bike / Display panel
Page 32
32
Operation »
E-bike
Rechargeable battery indicator Rechargeable battery charge
100 to 85.5 %
85.4 to 71.5 %
71.4 to 57.5 %
57.4 to 42.5 %
42.4 to 28.5 %
28.4 to 14.5 %
Table 1: Read the charge level on the display panel.
If the charge for the assistance of the drive is completely used
up, the assistance will be gently deactivated and the display
panel will go out. The lighting will continue to be supplied with
power from a rechargeable battery reserve for 2 hours.
Assistance: Displays the selected level of assistance.
• To select the level of assistance or deactivate assistance,
read the chapter “Setting the level of assistance”.
Range: Displays the remaining range. This value is calculated
based on the current cycling data and is an estimated value
that is calculated for use if conditions remain unchanged.
Setting the level of assistance
• When at a standstill or while riding, set the level of assistance
from the e-bike drive when pedalling.
• For a higher level of assistance, briefly push the plus button
(see figure 8).
• For a lower level of assistance, briefly push the minus button.
• To ride without assistance, push the minus button until no
level of assistance is shown.
POWER: Maximum assistance for cycling up slopes or with a
heavy load.
SPORT: Setting for level routes.
ECO: Reduced, energy-saving assistance to maximise the
range.
» Operation » E-bike » Display panel / Setting the level of assistance
Page 33
33
Operation »
E-bike
Lighting
WARNING
Risk of accident and injury!
If you switch the lighting on or off while riding, you will
not be able to concentrate on road traffic.
• Only operate the lighting when you have come to a
complete stop.
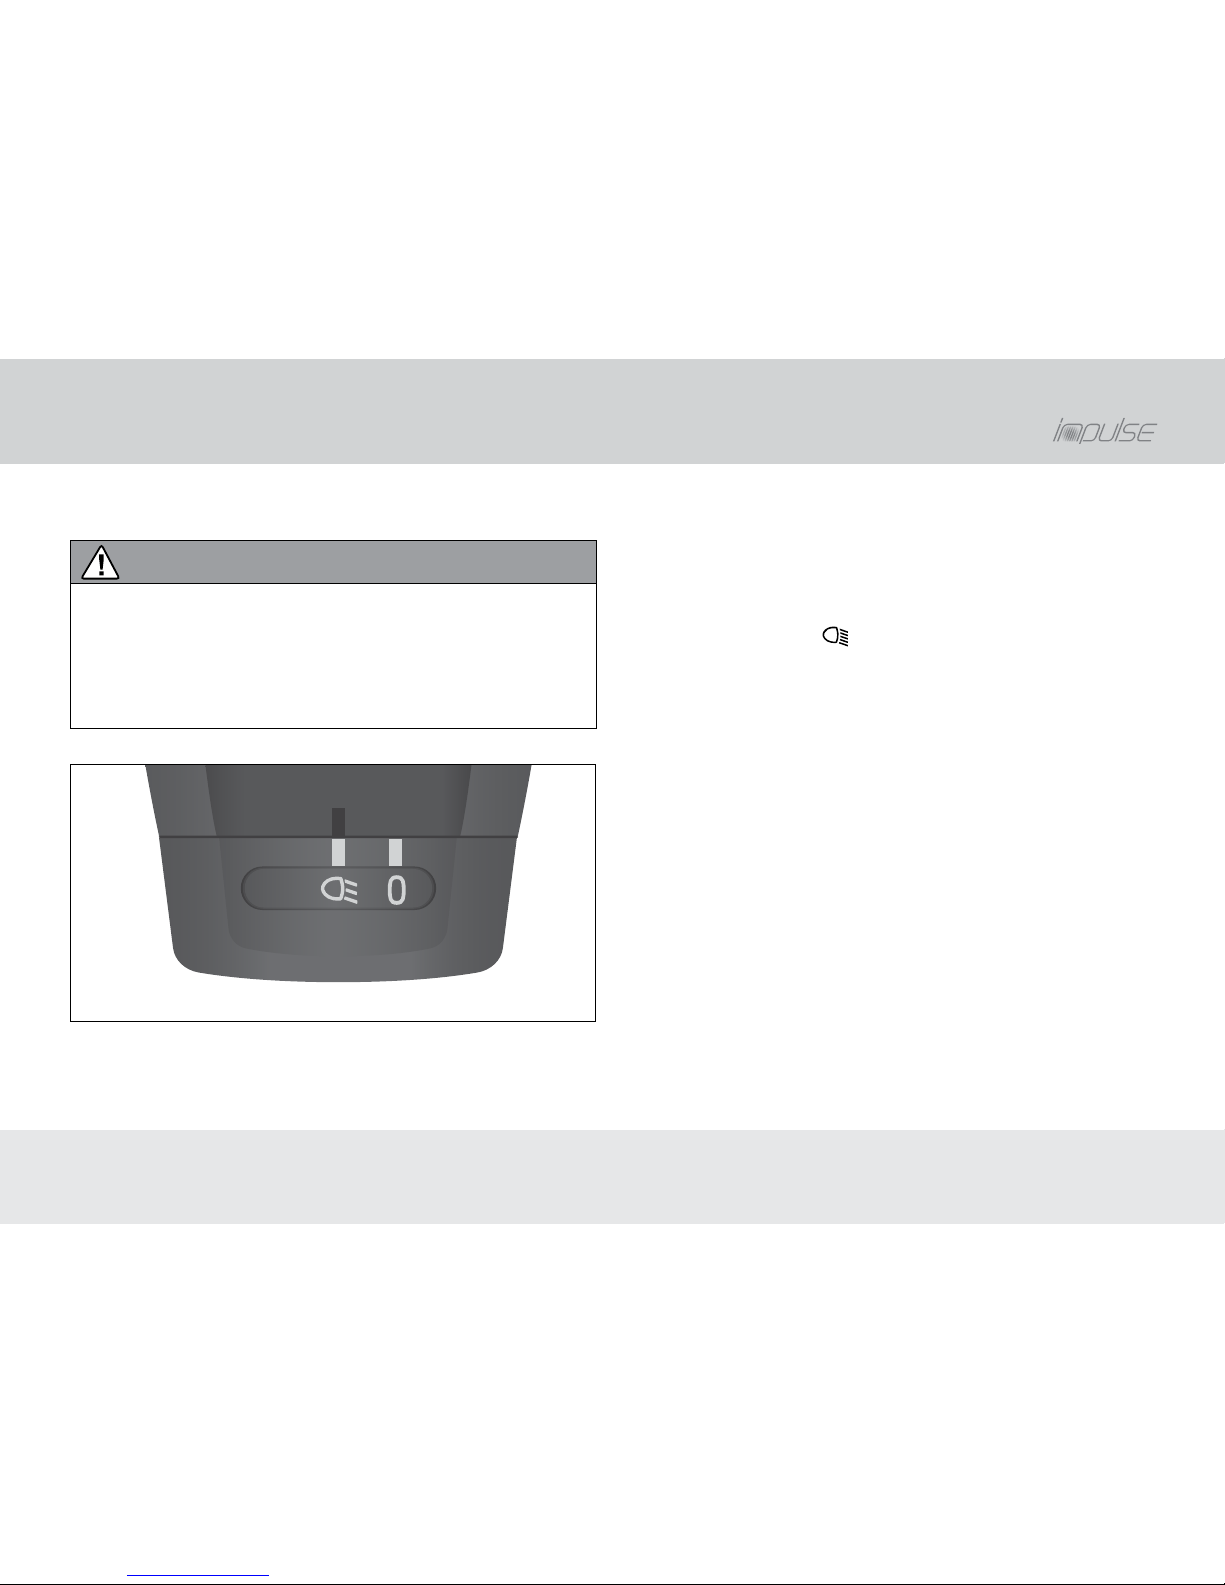
Figure 10: Rotary switch on the headlight when the lighting is
switched on.
Your e-bike is equipped with rechargeable battery-powered
lighting. The headlight and the tail light are switched on and
off together.
NOTICE: The lighting must always be operational in order to
use public roads.
• To switch the lighting on, turn the rotary switch of the headlight to the position
(see figure 10).
• To switch the lighting off, turn the rotary switch to the position 0.
» Operation » E-bike » Lighting
Page 34
34
Operation »
E-bike
Walk assistance
CAUTION
Risk of injury!
If used incorrectly, your limbs could get caught in rotating parts.
• Only use the walk assistance when pushing the e-bike.
• Only use the walk assistance on level and solid ground.
• Only use the walk assistance if the e-bike is on both
wheels.
Walk assistance helps you push the e-bike. In the highest gear,
the maximum speed is 6 km/h when this function is activated.
1. Stand next to the e-bike and hold the handlebar with both
hands.
2. Fold the stand up.
3. Push and hold the plus button for 3 seconds.
Walk assistance will activate and the e-bike will move.
4. Hold the plus button down while using the walk
assistance.
Walk assistance will be deactivated as soon as one of the
following events occurs:
- You release the plus button.
- The speed exceeds 6 km/h.
» Operation » E-bike » Walk assistance
Page 35
35
Care
WARNING
Risk of electric shock and short circuit!
When performing care, maintenance and repairs, there
is a risk associated with the electrical current.
• Make sure that the mains plug of the charger has been
pulled out off the socket.
• Remove the rechargeable battery.
• Do not clean the components with running water or
other liquids.
• Do not use a high-pressure cleaner or water jet.
CAUTION
Risk of injury!
The drive and rechargeable battery can heat up through
use. You could injure yourself in the event of contact with
your skin.
• Let the drive and rechargeable battery cool off before
performing care.
» Care » Notes on the key
Regular care will ensure that your e-bike stays safe and reliable.
Wipe the e-bike components clean with a damp cloth
(see chapter “E-bike components”).
• Use a mild cleaner.
• Check to make sure that all electrical lines, connections and
contacts are not damaged and are clean (visual inspection).
• Have damaged or corroded parts replaced by your
specialist bicycle dealer.
• Prevent moisture or dirt from contaminating the contacts.
Notes on the key
• Take note of the key number(s) imprinted on the key.
• Contact your specialist bicycle dealer for a replacement key.
Page 36
36
Troubleshooting
WARNING
Risk of electric shock!
When working with an inserted rechargeable battery or
connected charger, there is a risk of electric shock.
• Take the rechargeable battery out of the holder.
• Disconnect the charger from the voltage supply.
CAUTION
Risk of injury!
The drive and rechargeable battery may become very
hot in the event of errors. You could injure yourself in the
event of contact with your skin.
• Let the drive and rechargeable battery cool off before
you touch them.
» Troubleshooting
Depending on the type of error, the drive will be automatically
deactivated if necessary. You can continue to cycle without the
assistance of the drive.
• If the following measures do not help, please consult your
specialist bicycle dealer.
Page 37
37
Troubleshooting
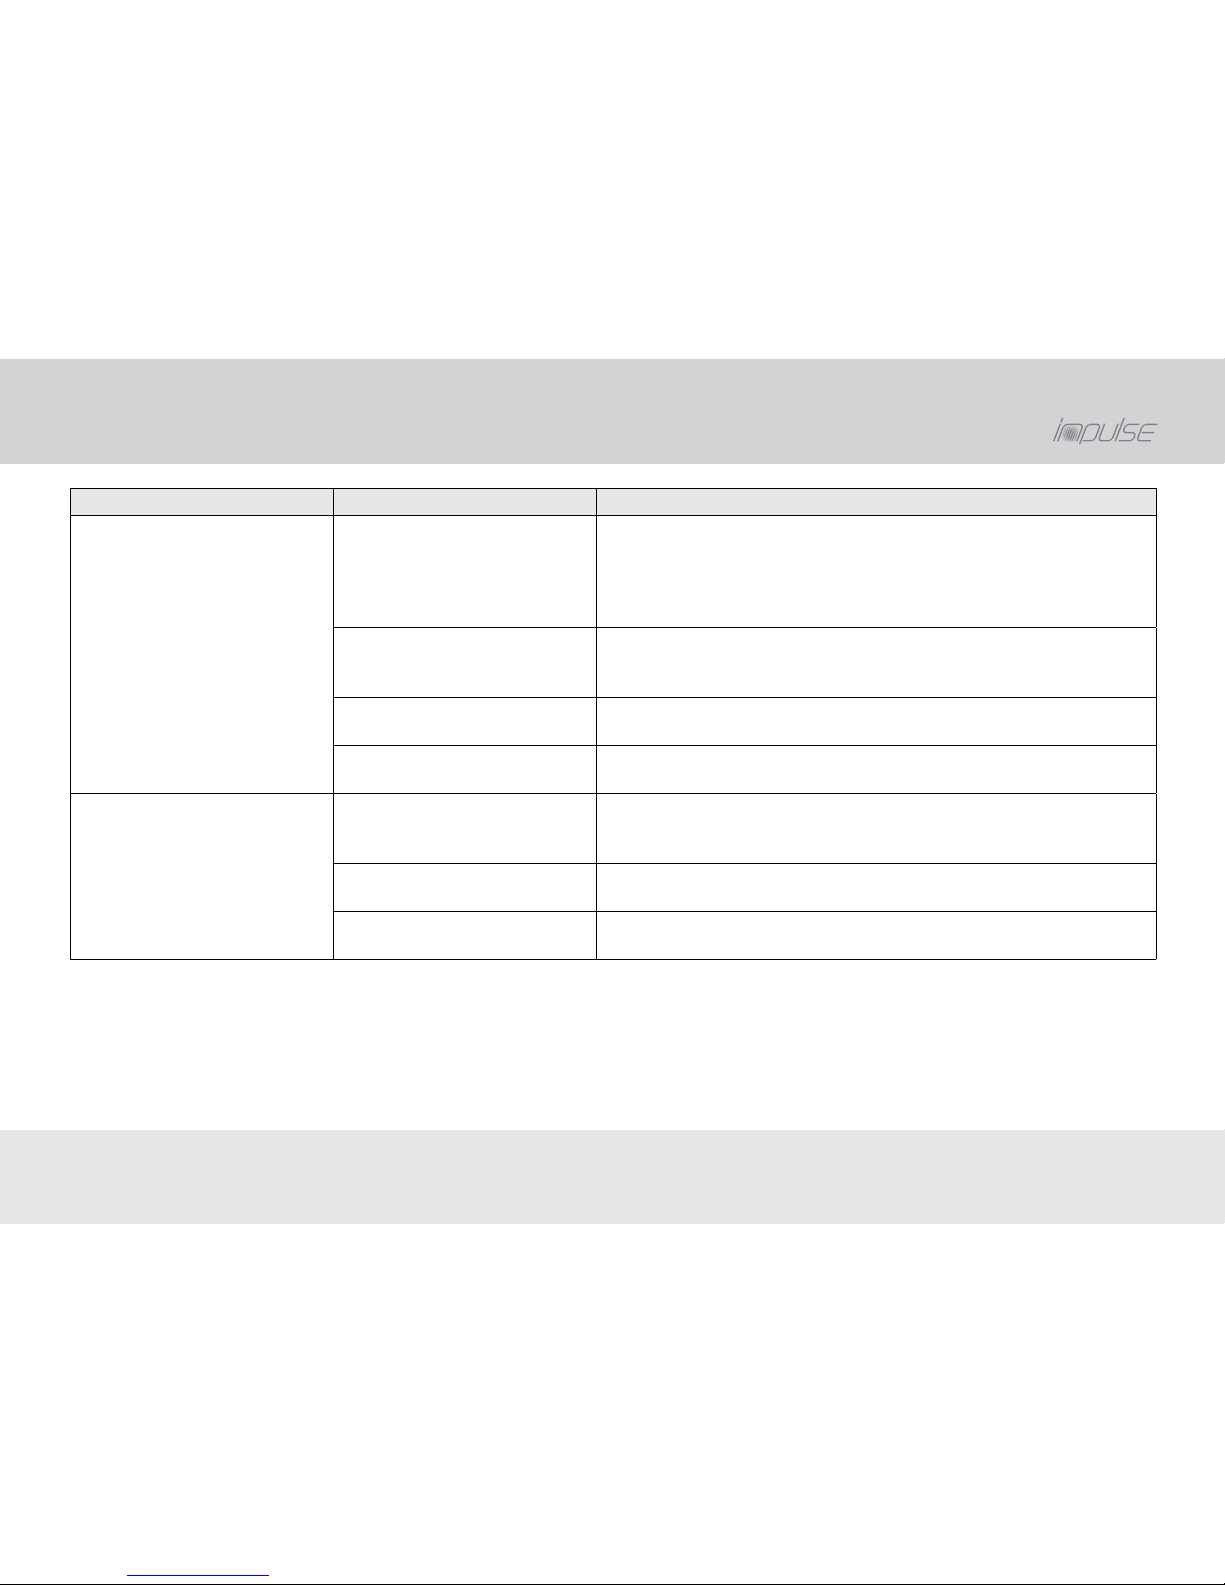
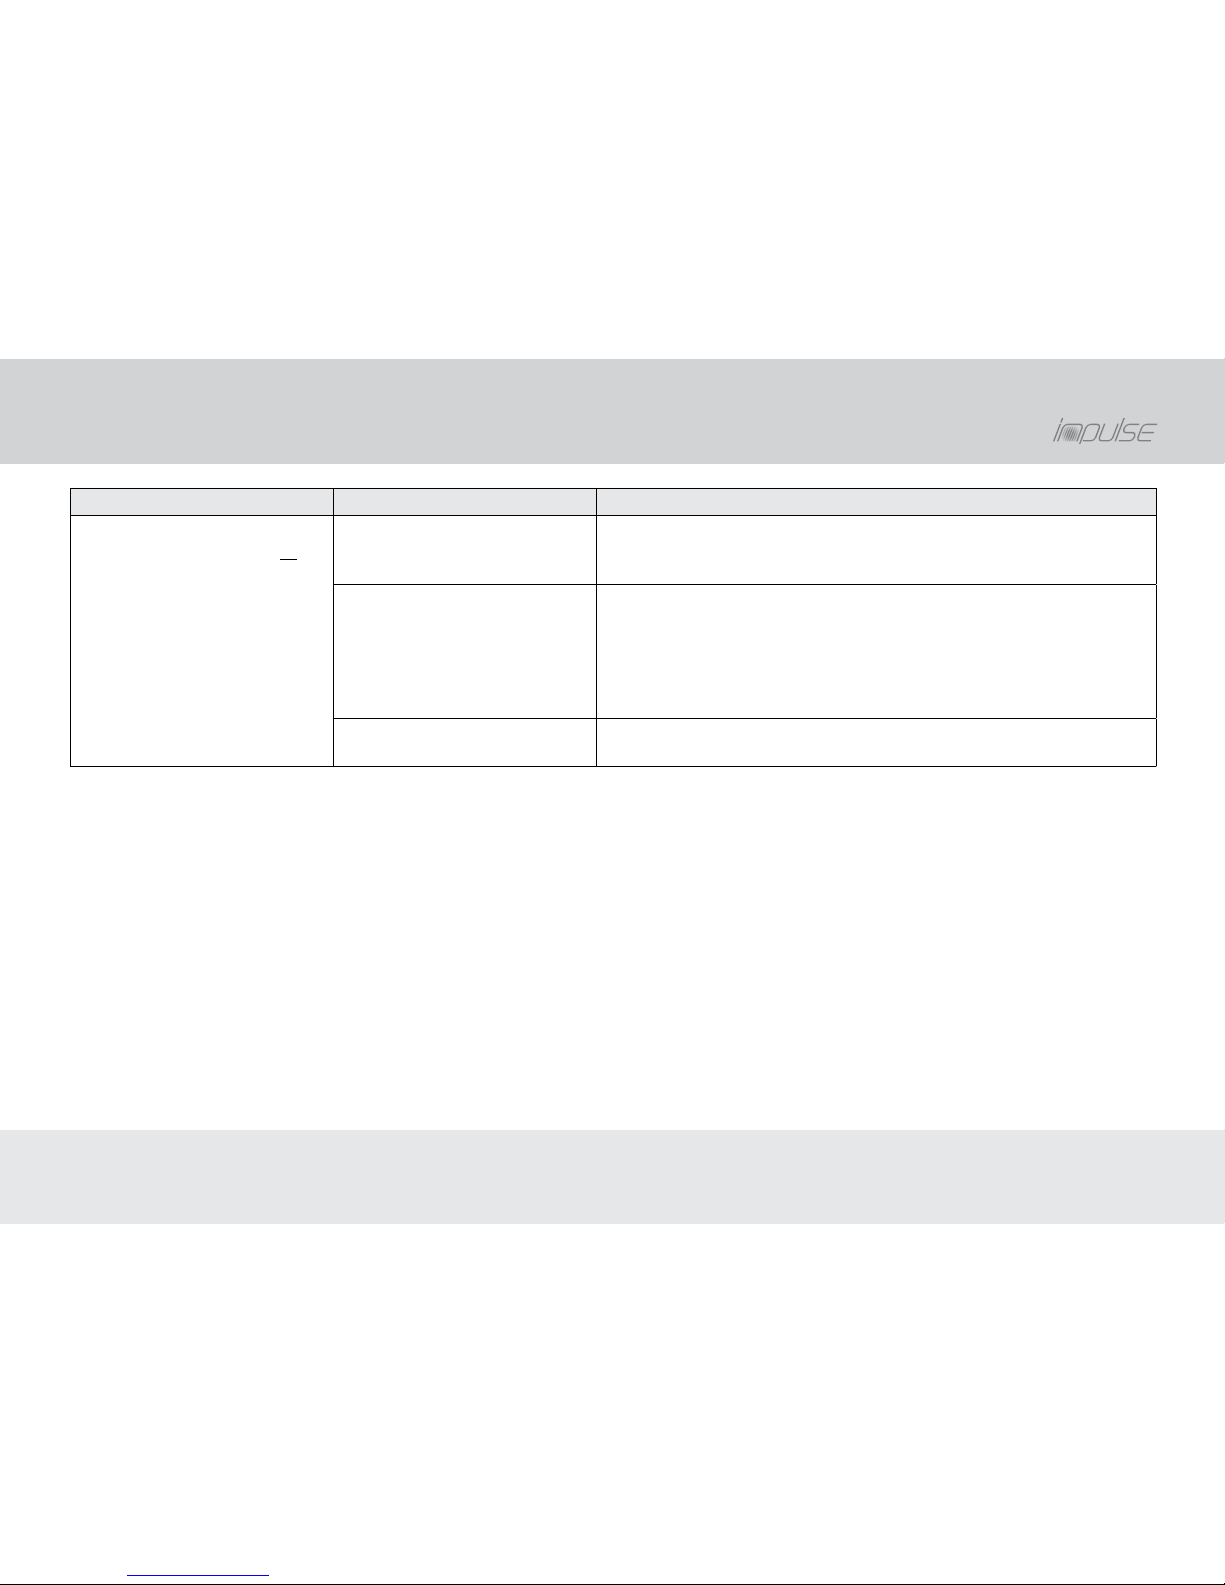
Fault Cause Measure
No indicator shown on the
display panel
The e-bike is deactivated. 1) Insert the rechargeable battery
(see chapter “Operation » Rechargeable battery » Inserting the
rechargeable battery”).
2) Switch the e-bike on
(see chapter “Operation » E-bike » Deactivating the e-bike”).
The rechargeable battery is
empty.
Charge the rechargeable battery
(see chapter “Operation » Rechargeable battery » Charging the
rechargeable battery”).
The rechargeable battery is in
sleep mode.
Exit sleep mode
(see chapter “Operation » Rechargeable battery » Sleep mode”).
Electrical lines or contacts are
defective.
Check to make sure that the electrical lines or contacts are not
damaged or connected (visual inspection).
The drive switches off during
the trip.
The rechargeable battery is
empty.
Read the charge level on the display panel
(see chapter “Operation » Rechargeable battery » Checking the
charge level of the rechargeable battery”).
Your speed is too high. Read the chapter “Operation » E-bike » Activating the e-bike »
Using the drive”.
The drive is too hot. Let the drive cool off
(see chapter “Notes » E-bike » Overheat protection ...”).
» Troubleshooting
Page 38
38
Troubleshooting
» Troubleshooting
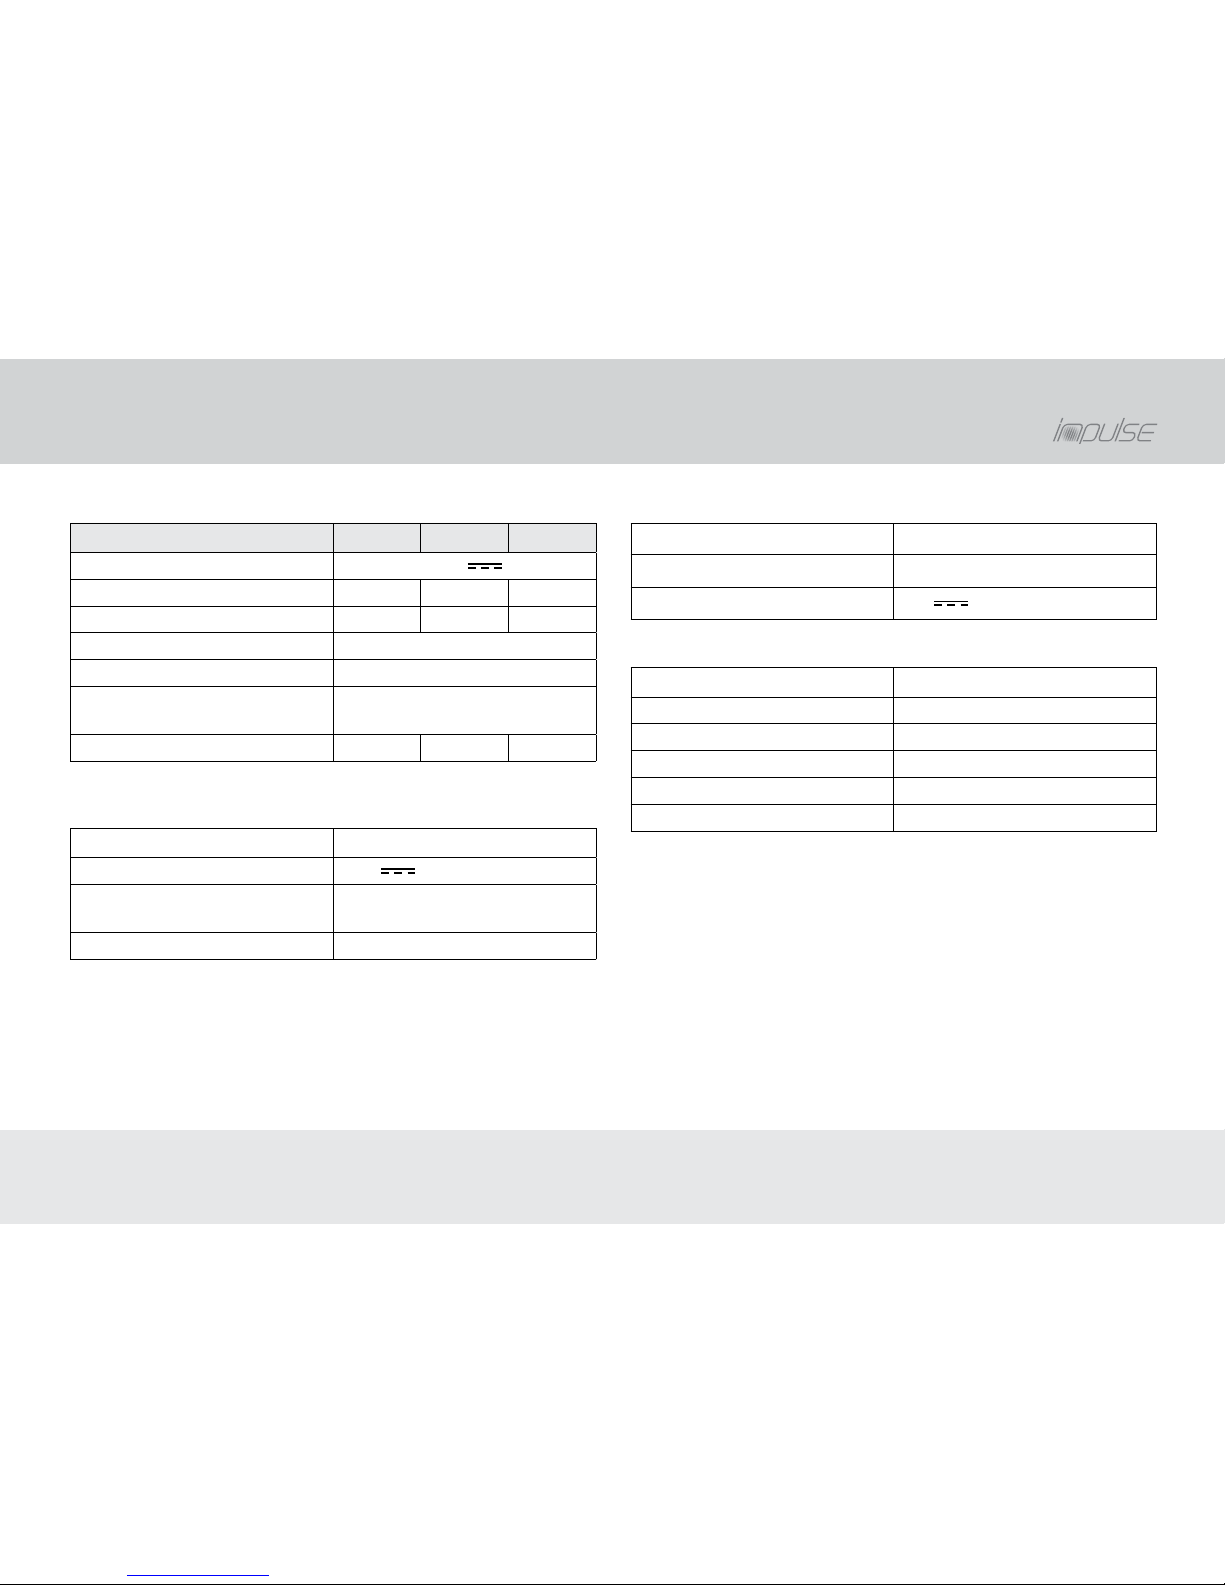
Fault Cause Measure
When charging, the LED on
the charger will blink red or an
LED on the charging indicator
of the rechargeable battery will
blink quickly.
The temperature of the
rechargeable battery is
incorrect.
Observe the temperature limits (see chapters “Notes »
Rechargeable battery » Protective equipment ...” and “Technical
data”).
Error when charging. 1) Stop the charging process (see chapter “Operation »
Rechargeable battery » Charging the rechargeable battery »
Ending the charging process”).
2) Charge the rechargeable battery again.
3) If the error occurs again, have the rechargeable battery and the
charger inspected by your specialist bicycle dealer.
The rechargeable battery or
the charger is defective.
Have a specialist bicycle dealer check the rechargeable battery
and charger.
Page 39
39
Technical data
Rechargeable battery
small medium large
Nominal voltage: 36 V
Nominal charge: 11 Ah 14.5 Ah 17 Ah
Nominal capacitance: 396 Wh 522 Wh 603 Wh
Operating temperature: –5 °C to +50 °C
Storage temperature: 5 °C to +25 °C
Permissible charging
temperature:
0 °C to +45 °C
Weight: 2.9 kg 3.0 kg 3.2 kg
Charger
Input: 100–240 V ~ (50/60 Hz) – 2 A
Output: 42 V
– 3 A
Permissible charging
temperature:
0 °C to +40 °C
Weight: 700 g
Lighting
Headlight output: 3 W
Tail light output: 3 W
Nominal voltage: 6 V
Drive
Nominal output: 250 W
Nominal voltage: 36 V AC
Maximum torque: 40 Nm
Operating temperature: –10 °C to +50 °C
Storage temperature: 0 °C to +50 °C
Weight: 6.8 kg
» Technical data » Rechargeable battery / Charger / Lighting / Drive
Page 40
40
Declaration of conformity
» Declaration of conformity
2016-01-29_CE-Declaration Vers.2.3
EC Declaration of Conformity
EF Overensstemmelseserklæring
according to EC directive 2006/42/EC on machinery (Annex II A)
ifølge EF Direktivet 2006/42/EF (bilag ll A)
Name and address of the manufacturer:
Navn og adresse på fabrikant: Hermann Hartje KG, Deichstr. 120 – 122, 27318 Hoya/Weser, Germany
This declaration relates exclusively to the machinery in the state in which it was placed on the market,
and excludes components which are added and/or operations carried out subsequently by the final user.
The declaration is no more valid, if the product is modified.
Denne deklaration vedrører udelukkende maskiner, som er i original tilstand, som da de blev indført på markedet,
og hermed ikke de dele, som er tilføjet/skiftet senere af slutbrugeren. Denne deklaration er ikke længere gyldig,
såfremt produktet er blevet ændret. Herewith we declare, that the product described below
Hermed erklærer vi, at nedenstående produkt E-Bike VICTORIA e Urban 7.4 , 7.5 , e Retro 7.6 and e special 7.7
Modelyear 2016 + battery charger
is complying with all essential requirements of the Machinery Directive 2006/42/EC and Directive
2004/108/EC relating to electromagnetic compatibility.
opfylder alle relevante krav ifølge Maskindirektivet 2006/42/EF, samt Direktivet 2004/108/EF om elektromagnetisk
kompatibilitet. The following technical standards were used:
De følgende tekniske standarder er brugt:
DIN EN ISO 4210:2014 Cycles -- Safety requirements for bicycles
DIN EN 15194:2009-06(D) Electrically power assisted cycles (EPAC)
DIN EN 61000:2007-09(D) Electromagnetic compatibility (EMC)
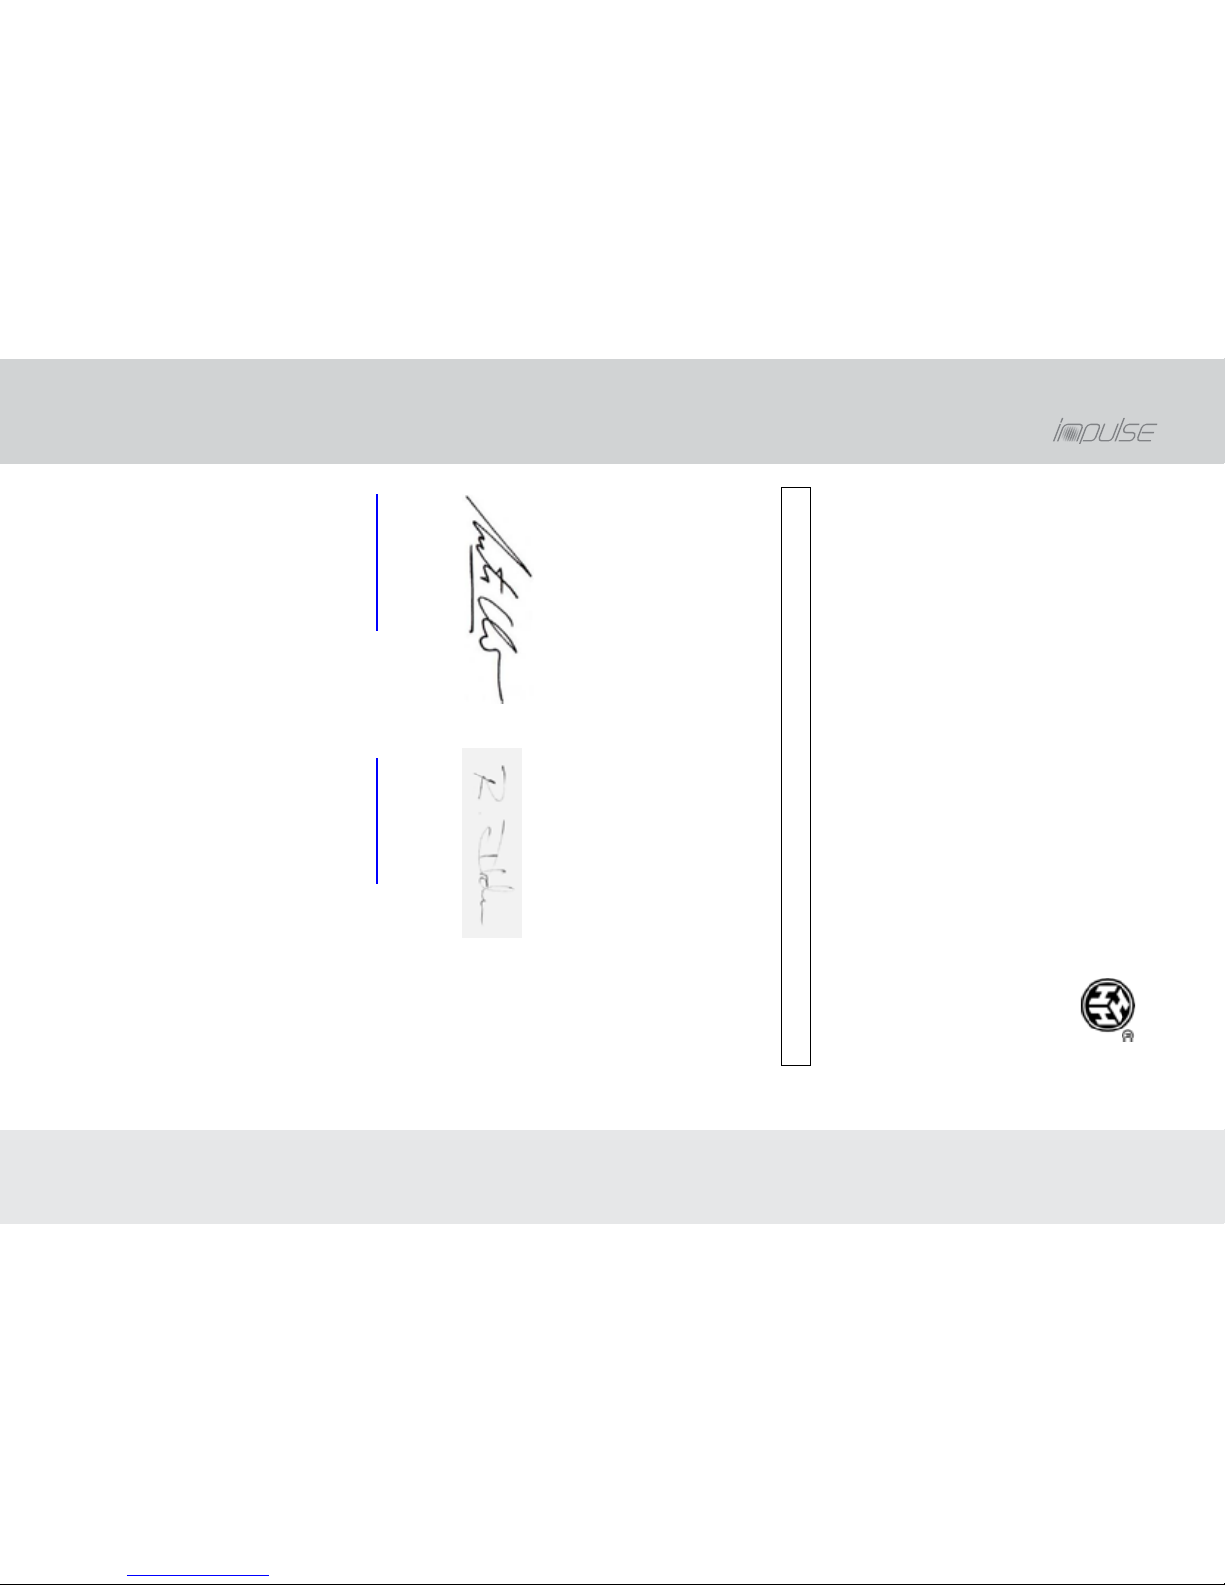
Hoya/Weser, January 2016
---------------------------------------------------- ------------------------------------------------- ----
Head of Quality Assurance: Product Management E-Bike:
Martin Claus, Tel.: +49 4251 811 558 Ralf Dreher, Tel.: +49 4251 811 525
Page 41

41
Credits
Responsible for sales and marketing
Hermann Hartje KG
Deichstraße 120 - 122
D-27318 Hoya/Weser
Tel. +49 (0) 4251 - 811-500
[email protected]
www.hartje.de
Text, content and layout
Prüfinstitut Hansecontrol GmbH
Schleidenstraße 1
D-22083 Hamburg
Tel. +49 40 300 3373-73 0
www.hansecontrol.com
The user manual is a supplemental user manual for your bicycle
and covers the requirements and the domain of validity of the
DIN EN 15194 and DIN EN 82079-1 standards.
© Duplication, reproduction and translation as well as any
commercial exploitation, including excerpts, in printed or electronic
form, is only permissible with prior written approval.
Issue DE 93316_01_Impulse_20160302_enGB
» Credits
Page 42
 Loading...