

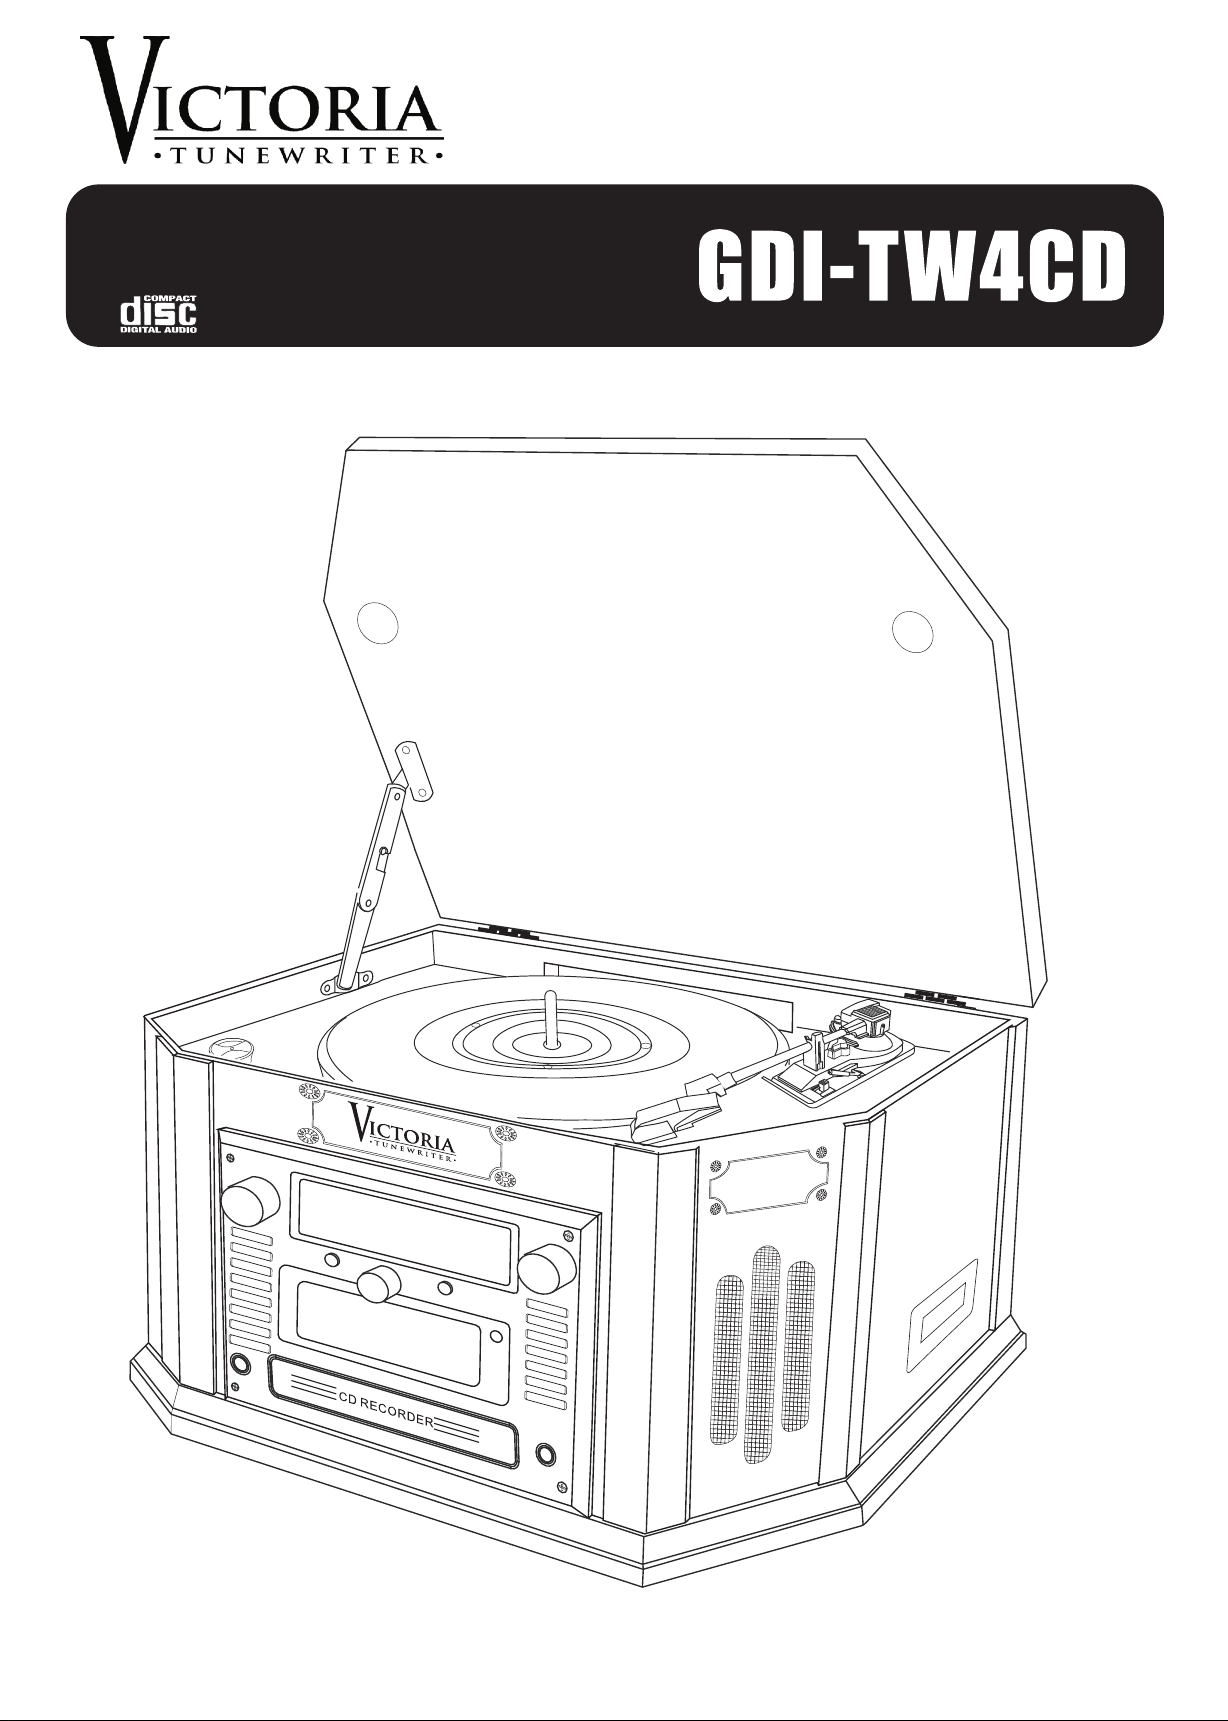
Page 1
Page 2
IMPORTANT SAFETY INSTRUCTION
PLEASE READ CAREFULLY ALL THE FOLLOWING IMPORTANT SAFEGUARDS
THAT ARE APPLICABLE TO YOUR EQUIPMENT
.
ed
t
ra
e
op
s
i
t
c
u
rod
p
e
h
t
e
r
o
f
e
b
d
a
e
e r
b
d
ul
ho
s
ns
tio
ruc
t
s
n
g i
n
ti
a
r
pe
o
nd
a
y
et
f
a
s
e
th
l
l
A
s -
n
io
t
uc
r
t
s
d In
a
e
R
1
Re
2
3
4
C
5
6
7
i
8
9
0
1
p
1
1
o
unab
2
1
3
1
o
14
15
o
16
e
h
t
7
1
vo
8
1
t
cov
wil
19
s
0
2
ch
1
2
22
(
WA
ser
u
OTE
N
e
th
st
in
c
a
a
h
t
le
te
t
in
Re
-
- I
Conn
-
C
-
a
t
ed W
He
lo
l
Fo
an
le
cloth f
c
Atta
er
t
a
W
n a w
ro
p
A
a
f
sur
nt
e
V
rat
e
op
ver
o
c
mi
si
le
n
u
we
Po
you a
od
r
rou
G
ne b
to
il
a
f
we
Po
b
o
t
ten
at
ht
ig
L
d
n
a
r cab
Powe
electr
syst
might be
ve
O
f f
j
Ob
ol
v
o
pr
Serv
l
am
D
e
h
a.
.
b
.
c
.
d
e.
.
f
p
Re
ec
p
res
fe
a
S
ecks to d
l
a
W
a
He
includin
IN
RN
's
: Th
C
F
at
ll
a
an
d
or
c
t
in
t
io
s
i
v
re
e
f
er
e
i
or
ea
r
nc
ec
su
n
o
i
in
w I
ng
i
o
men
h
a
et ba
du
ce
tio
la
i
i
ed
s
r
la
s
s
So
r
r
uct
d
n
lad
e to i
l
fi
r
wa
e
tio
n
nu
u
em
rlo
e o
r
i
ec
a
t
duct.
ic
ag
t
ag
ol
f
Whe
f
I
th
f
I
If
If
W
lac
ified by
ult
y Che
t
l o
T
t
G:
u
a
R
C
n
o
i
c
f
r
e
n
ce
n
t
n
e
s
t
lt
tru
s
n
i
rn
a
uc
nstr
n
U
-
clea
r
ts
Mo
d
n
n
a
t
c
ma
s
-
n
f
o
on
he
T
,
a
f
ur
p
ro
p
rc
u
e not s
s int
o
g
n
i
e wi
o
c
t,
rd P
co
e
lk
to
n
-Fo
g
in
se
syst
e
l
n
Li
r
i
ic l
,
fat
ng
di
a
elect
r
nd
a
t
points o
ge
-
g
in
or o
e
R
e
lowi
n
uid
iq
l
e
e
th
ed by
er
l open
e
th
th
en
h
en
em
n fir
i
il
ce
r
he p
g am
Ch
it
r
ho
t
eq
s
i
es
ul
Th
.
wi
e
n
re
e
e
c
re
y
b
r r
o
s
the
he
t
d
e
th
n
y
Slo
e
nser
nt
es
gh
e
Li
p
p
an
th
ce
p
e
eq
c
g
ti
lu
p
Do
stur
i
se
d c
c
the
op
ce
r
e
ended t
Po
r
a
o
d
c
for l
d
xt
-D
Do
q
e
n conditions
h
t
h
ro
rod
p
rod
e
t
e, el
k -
c
in
o
r
y
u
. Th
s
i
th
tio
o
lo
ep
ea
a
w
All
-
s
ning.
a
. T
ven
s u
de
o
r
t
e Pow
P
the manuf
g
d
g
o
t
pm
i
eq
will
ne
u
o
All
-
ns
o
m
a
ct
qu
et
ca
r
s p
i
h
t
g
se
u
t
no
o
D
-
e
or n
;
nt
e
comb
rt
e
th
e
us
op
d
an
ts
ct a
u
rod
p
s
ng
i
n
e
rod
p
is
h
o
ti
la
i
t
pr
s
i
Th
h
f t
e o
r
o o
at
riz
la
n t
ha
r t
he p
t t
r e
u
o
y
o
ti
c
te
ro
inc
p
r
o
n
p
t
s a
rd
p
ed
d
ad
ong
This w
.
m
e
t
ou
An
or power
e care sh
m
e
r
al.
o
t
o
n
o
c shoc
ri
d Ent
i
sh
r
t
a
ot
n
ther haz
S
g
rin
ui
er
en
e
s b
a
a
h
t
uc
d
oes
d
ct
u
he o
t
r
i
qu
e
r
as
h
ct
u
uc
d
ro
p
rts -
a
tr
ec
on c
Up
mine t
e
r
ti
n
u
Mo
o
sh
t
uc
r
e
i
f
i
l
p
m
r
o
es
ra
pe
o
t h
n
e
se
e
me
ip
u
st
n
i
e
o
n
c
i
wh
n,
o
m
r
o
e
th
e
t
n
io
rat
a
t
n
me
ip
an
r
o
ler
h
- T
s
on
ti
y
fet
sa
e
o
gs
n
rni
ti
a
er
p
f
ct
u
od
c
a
tt
a
use
t
no
ear a sw
n
o
i
at
in
uc
rod
p
ng
ni
e
o
t
nd
d n
l
ou
sh
ct s
u
rov
p
is
n
t
c
du
o
o
pe
e ty
perat
hi
T
-
on
i
h
t
he o
lug fully i
cia
i
r
ct
le
wer-
o
-P
n
d
he
co
s,
ug
l
t
c
te
o
r
ds of
o
i
per
il
an
de
si
circuits ,
ad
rlo
e
v
.
k
- N
ry
- out
t
or
t
pt
em
t
ds.
r
a
-Un
e
rvic
e
ly
p
up
s
-
le
il
sp
en
e
s b
t
o
n
t
a
r
e
p
ens
xt
e e
n
e
be
ib
h
x
e
t
r
en
h
W
acturer
oc
h
c s
i
le
mp
o
the p
t
a
h
T
g -
n
e s
b
d
ul
that p
)
s
a
fic
i
d
o
e
e
h
t
te
ee
b
as
ar
ts
mi
li
en
g
t
n
n
o
ti
ruc
ur
cc
o
t
b
can
h
th
of
re
v
i
e
c
e
r
e
etw
b
an
to
in
e
p
ex
n
a
th
n
ng a
rom t
me
h
hi
t
h
s
t a
in
s
ro
p
e
u
ho
id
ou
sh
f p
e f
pr
s
er
nt
to
n
y
b
n
on
i
pre
l
ten
ul
o
wal
er
ev
o se
Ref
or
c
d,
ex
op
g
in
o
r
d
a
ts
i
p
e
k,
io
t
e
h
tu
i
r
n
io
t
qu
tes
n
e
e
,
s
n
i
d
e
e
ng
i
n
e
ci
nc
rie
r
pe
o
d
pro
e
s
u
d
n
wal
e
h
n
s
nt
d
o
r
p
s
mmin
i
b
ld
ou
t
ar
c
nd
ca
e
h
t
it
t
ec
t
e
b
r
e
v
t
no
d
l
t
or
d
e
be
ld
r s
e
ow
om b
r
t
uc
d
o
is p
Th
.
)
he outlet tr
o t
a
pl
e
r
pl
p
su
ems
it
en
i
ven
h
t
r
o
f
m
ti
t
en
v
y
s
a
n
or
d be t
ut
o
l
h
s
u
p
ar
p
e
c
rvi
al
er
th
ug
l
p
r
o
d
ec
bj
o
r
o
d
se
o
p
e
t
ra
e
instr
ive wor
d
e
pp
in
st
di
me
e
c
la
or ha
ot
or
a
f
o
n
o
duct
r
c
u
d
o
pr
d
te
a
e heat.
c
du
o
th
to
s
en
m
ip
d
e
t
si
de
s,
e
rat
y c
ma
pa
a
rmi
e
t
e
ow
ll
o
f
n
te
n
a
q
e
the
d
it
rcu
d ra
e
at
uc
d
e
r
ot
u
mo
e
com
bi
fr
bl
b
e
h
o
up
att
ma
lu
ce
y
la
p
c
is
e
d
te
s
wh
a
le
ob
ts t
h
t
s
l
s
i
pl
o
t
o
n
uc
or
c
n
v
h
ny
t
awa
is
t.
an
ne
g
u
u
a
rt
n
ng
i
na
ui
iffe
d
ng
i
an
t
st
in
ou
l
co
e
n
t
c
g poo
v
t
ne
m ov
o
ke
c
o
l
p
e
ma
pe
ly
p
er
y
g
yo
rd
co
e
c
re
e
rod
p
un
,
am
m
er
ke
s,
t
ec
j
ha
is
er
pr
ug
s h
t
ain
r
m
r
ons a
ti
k b
d
c
t
par
t
e
r ha
e
er
s
ho
s
y fr
u
d
d
e
s
se
ul
ic
d
e
me
.
pm
ren
io
r
y pow
w
n
i
am
h
fo
t
TV
ct
u
tr
ns
i
th
n
i
d
n
io
ct
u
r
ef
t b
le
t
nd
mme
wat
ar
e
an
;
l
th
wi
d
e
o
i
at
in
b
o
pr
re
a
rhe
e
p
by
d
in
d
e
c
a
t
c
a
f
u
n
on
d
e
at
u
o
y
to
er, o
i
qu
e
be
n
i
it
f
ll
i
y r
bs
o
ur
ho
s
s
n
po
u
d
tac
ep
c
d
uct
g
u
l
p
o
t
e
ag
ld
u
ho
s
an
c
it
e
to kee
si
n
te
ex
f
o
ts
cou
t
ct
u
od
r
p
ng to
ci
v
i
fr
t
c
u
d
o
am
d
s
fa
e
v
a
wa
r
o
y
b
ly
al
s an i
y a qua
d
e
ag
e
g
an
ar
s
t
the sam
ds
r
za
o
e
ic
v
pro
n
s i
i
e
b
d
l
u
h
m
o
t
o
n
it
n
t
d
n
u
o
r
p
o
d
n
s, a
rmf
a
h
ns
i
r
a
rn
u
y t
b
res
u
as
an
t
en
om th
r
f
t
hn
ec
t
s
n
o
i
ope
e
u
ho
s s
cle
e
r
o
by
d
e
o
f
r -
e
e l
h
d t
e
ar
c
ov
to
n
d
de
vi
g ,
n
ati
g
in
c
la
lt
i
u
b
a
r's
e
ur
om th
r
f
ly
me
ho
r
r ot
d
e
pp
e
h
t
to
s
r
e
ev
e
et
l
o
e
b
ld
u
r a
o
an
s,
le
g
n
i
ur
om t
it fr
pr
he
t
b
t
o
n
ll
fa
p from t
n c
o
kin
ny
a
result i
ld
rs
ou
y
q
t
m
o
d.
e
ag
in
n
e
ll
r.
e
t
lo
l
fo
m
d
e
i
f
i
l
an
in
rfo
e
p
in
ui
q
re
e
char
e
.
pa
e
r
r
er
p
u
mo
s
t
a
e
re
p
x
e
mp
o
c
o
rea
e
vid
rad
an
c
er
t
l in
u
o
ti
la
l
ta
t
ng
i
:
ceiv
re
d
t
a
an
i
ic
l
ou
h
s
g
in
rat
e
b
ld
n
ni
a
he
t
examp
r
ike .
ck
i
Qu
.
ur
t
r
e
e
v
or
f
d
n
a
pr
e
th
in
n
- i
r
st
in
e
Co
.
s
er
h
a
h
wit
we
o
p
th
g
n
i
t
le
ut
o
ut
o
r
ns
ai
g
the
d
h
ig
l
a
he
c
du
o
ca
lo
e
to s
in
,
s
rd
o
nt
i
d
a
lf
e
i
f
i
l
ua
wal
e
h
th
o
t
t
g
win
pe
o
pr
tec
wa
y
ma
r
,
ed
r
acteri
t
s
ir
operat
d
e
nt
e
rc
u
o
ap
y
sl
s
w
ly
s
ia
e
er
f
I
n.
q
e
e
h
.
er
wh
to
r
o
f
e
r
be
d
ru
st
In
we
lo
fol
n
o
D
g.
ct
u
rod
p
ne
le,
ps
o
t
s
.
n
on
ti
la
i
t
n
o
se
e
th
c
u
od
at
l
al
st
ns
tio
uc
of
e
tap
y
t
sul
n
es
c
ur
o
i
ar
ol
p
le
t
ou
r
,
g
lu
p
e
ot
n
. Do
so
ed
m
e
h
t
t
n
i
po
g
in
n
t
l outl
wal
t
e
du
t
i
d
te
p
ch
u
n
i
h
uc
o
e
nt
r i
o
is
h
t
o
a fi
n
en
p
o
s
ser
d
e
le
ut
o
l
du
o
r
p
e
p
o
he
adj
r
hnicia
y.
-
ce
n
ur
s
be
stics as t
p
his
t
o
g condition.
n
i
wa
to a
h as
c
su
s
v
ro
p
he
th t
i
le
ab
n
o
d
a
r
e
t
o
t
e
c
n
eq
is
h
t
f
m
e
ip
u
the r
h
ic
p.
el
h
or
f
d
ne
i
ta
ns s
ctio
.
d
iq
l
se
u
o
fa
nu
ma
at
b
a
ar
si
s
e
c
, ex
o
t
d
an
gs
in
n
pe
t
ion
h
po
ou
z
t o
i
th
,pl
t
s
o
n
ower
p
re or el
er
n
th
ed
ra
n
d
e
a b
on
h
uc
s
be
e
av
s
wer
uc
d
ro
r p
o
t
er
ef
r
,
n
r
te
dal
e
n
o
y
nl
lu
p
he
f t
th
t
a
fe
e
d
ey
h
at t
ng
yi
a
e th
er
h
w
or
rm,
o
t
et and
tn
h
ig
l
c
vi
he
t
n
li
ch powe
g su
on
c
l
a
gr
ct t
u
d
ro
r r
o
ng
i
vice pers
d r
n
a
t
.
ct
g s
n
ti
a
ustment o
e
to
store the pr
r
s ind
i
e s
th
e
h
,as
t
uc
d
ro
ei
r c
o
ll
di
ra
th
y
b
for
limits
ti
tec
o
pr
equ
r
f
o
i
co
io
d
me
p
ui
n
a
off
t
er
ceiv
e
fut
ou
h
c
id
u
tu
c
t
h
f
e
v
ns
e
us
m
o
,s
a
as
a
n
e
c
ur
o
d
t
e
h
t
ng
i
at
wa
e
ho
s
g
s
e
re
a
rti
a
p
y e
e
whe
a
g
in
ty
ni
i
o
s
e
ni
e
v
rou
h
r
t
ec
mo
e
onne
r
e
ef
u
r
t
f
tes
ca
i
ce
i
rv
e
ori
e
k
on
ng
li
to
a
a
p
e
a
on ag
c
en
mmun
t
n
on
d
is
ld
r
ub
or
u
fa
d
e
ea
op
y.
a
di
of
r
ic
ct
ot
t
rs.
C
y e
d
c
re
u
b
le
r
e
c
e
r
n
t
,r
o
b
he
in
Th
u
fe
no
cu
x
n
sco
d p
n
c
r l
nc
e
gh
in
v
er
s
ion
a
t
g
e
h
ly
Heat
rty
l
oe
, t
o
re
a
e
e
an
s
a
was
,
a
e,
li
re
b
ot
,
g
u
kc
o
d
e
r
ic
d
o
r
le
rat
e
rre
u
c
s i
i
st
d
l
pu
y
t
ikel
l
t
r
la
fr
it
is
t
i
nne
owe
er
v
o
ui
c
ir
n
i
e
op
shock
c
g
.
l
ic
v
.
s
er
h
e
n
ch
e
na
i
se
s
a
sp
e
r
s
as
s
in
a
er
n
ca
i
c
s
us
he
ne
n
rs
th
e
a
i
rec
o
in
A
contr
l pa
rvic
tio
c
e
er
f
he
d
or
e
h
d
n
le
ab
bl
ot
r
o
e
as
.
to
ed o
t
loc
r
g
in
n
a
s
ll
p
r
y
om
ft
le
ct
r-li
ea
h
ts.
s or
e
ni
e
. Neve
e
v
g
dj
du
o
ed
ci
ni
ec
r
e
r
ns
o
B
h
t
gy
ns
se
u
a
e
d
te
ce
n
red
a
y ma
wl
o
b
e
n
u
k
oc
he
or
n
l po
a
s
in
n
li
t
sa
eo
s
o
the
n
u
t
n
d
Wh
ci
ac
t
ep
ng
m
rs
qu
to
us
c
r
o
f
ha
n
a
. Un
rt
e
t
e
mm
o
gis
ib
it
g
di
m
ar
nd
a
. H
har
s
i
r
.
.
.
to
ea
l cl
o
os
er
h
se
u
ca
y
k
,
n
e
v
o
d
e
r
c
ra
he
t
w
c
u
tr
l
e p
y
t
fe
t
f
pr
t
at
e ante
h
s
e
owe
p
n
e
r
le
a
s
y
a
a
n
o
t
s m
l
o
to i
t
er
s
s
chn
rs
te
le
d
al
l
fu
,
ow
n
e
si
n
e
ch
it
r
k
g
rkin
ma
mp
o
c
r
e
.
s
on
i
t
lu
p
a
(
g
u
he
o
e
u
c
s th
li
v
en
fo
mfu
I
.
re
tu
a
fe
r
la
po
.
t
c
du
ed
nd
nna
.
s
rge
s
e
n
li
r
in
ll
ta
s
in
s as contact with t
t
ui
is
th
as
s
ey m
l
l
l
pi
s
r
e
s
o
p
x
e
r
se
d
e
fi
se
o
th
y
l
es
r
y
a
s norm
t
e.
ic
repla
sed
u
z
i
or
h
ut
a
to
an
ci
i
y
b
ed
d
ove
st
,
p
om
r c
,
e
ic
v
e
rfer
e
nt
i
in
ot
n
if
the
,
er
ev
te
n
i
l
ed
g
ra
u
o
c
s.Use a dam
r
ne
.
ds
zar
a
g
i
g
s,
pu
e
r
,o
nk
el
ab
l
F
.
ny
a
i
av
h
a
u
o
y
f
pl
d
ze
o
r
o
o
n
a
r
an
c
o
t
y
a
iquid o
ou
y
pe
ce
vi
r
t
n
co
n
ult i
al o
ceme
su
d
e
rfo
pe
e
th
r
o
ce
n
a
li
su
r
e
nc
ed
ll
a
st
re
en
er
rf
t
to
l
f
, i
r
o
g
n
re
g
u
he
t
ut
s
e
uch danger
o
t
r
s
ol
dama
pe
st
b
rm safety
man
h
ot
co
n
a
n a
i
s n
i
e
c
ry
y tub;
aundr
.
r
e a
d
si
lt in
u
ny k
a
f
dang
s
one
l un
that
ge and
ation.
r
ar
p
nt
ons
ti
u
it
ufacture
pro
er
v
d
l
u
a
p
to
t
res
u
d
an
ua
o g
r
o
t
r
or
c
o
t
n
a r
ero
are
o
rt
id
s
a
e
ten
h
nd
i
ts
d
id
ed
an
r
dio
c
e
isk
d
m
uc
1
en
t
p
na
m
ou
s
on
s
u
er
ay
.
r
s
t
e
th
f
o
5
l
tia
in
e
te
or
e
h
t
1
Page 3

2
Page 4

Table of Contents
Preparation for use
Unpacking&Set up
Power Source
....................
....................
4
5
Location of Controls & Indicators
Operation Instruction
General
Radio Operation
(Antenna Information)
Turntable Operation
Cassette Operation
CD Operation
CD Recording Instruction
Preparation
Recording RECORDS to CD
Recording CASSETTES to CD
Manual track division
Erasing a CD-RW
Audio Connection
....................
....................
....................
6-7
8-9
10-11
12
Aux In
Line Out
Specifications
Accessories&Gift Box Contents
Trouble Shooting Guide
Warranty&Customer Support
....................
....................
13
14
3
Page 5
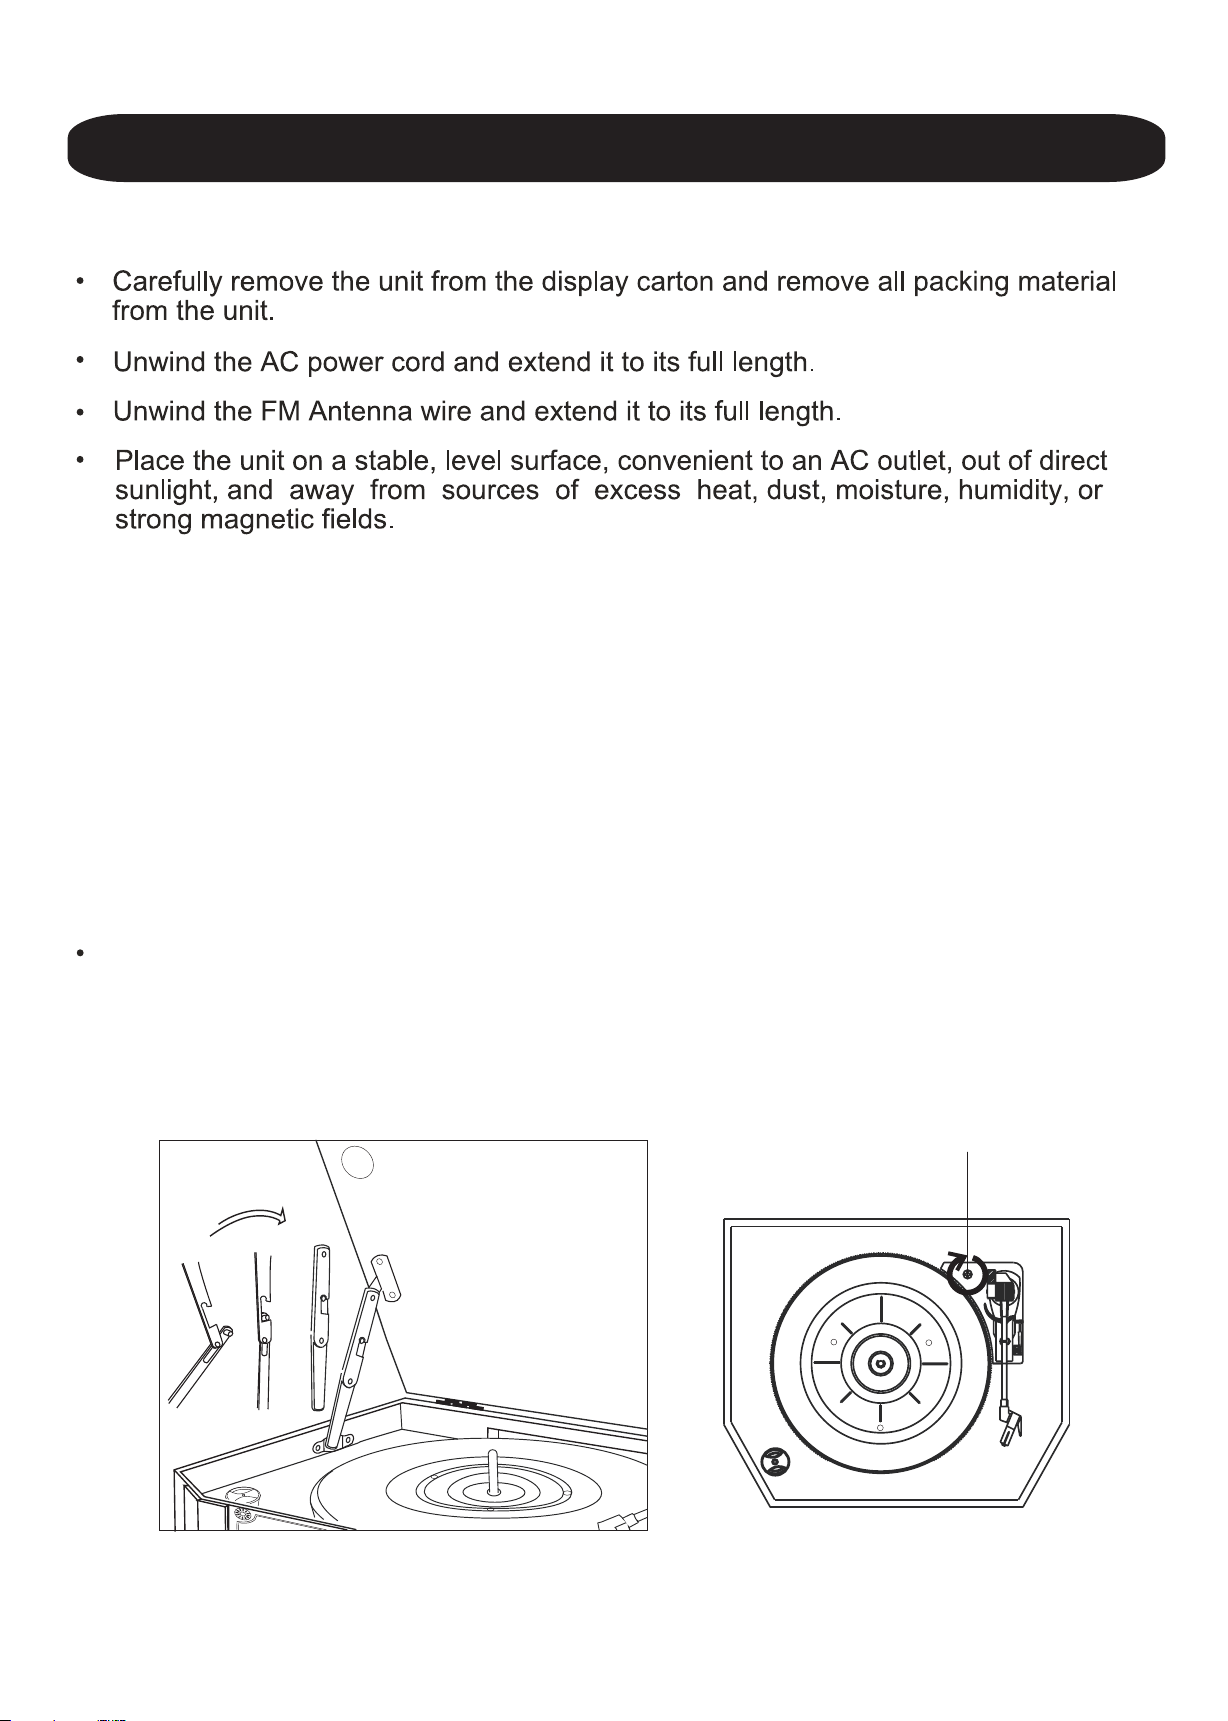
PREPARATION FOR USE
UNPACKING AND SET UP
IMPORTANT : Raising And Lowering The Lid
To open the lid, raise it as far as it will go until the lid support bracket locks in
the open position .
To close the lid, lift it upward slightly until the lid support bracket unlocks, and
then gently lower the lid.
TO AVOID DAMAGING THE CABINET OR THE LID, NEVER FORCE THE
LID CLOSED. ALWAYS RAISE THE LID TO RELEASE THE LID SUPPORT
BRACKET.
Raise the lid The phonograph has been secured for shipment with a TRANSIT
SCREW. Use a coin or screwdriver to turn the transit screw clockwise
.
This will allow the turntable to “float”.
TRANSIT SCREW
4
Page 6

needle
STYLUS COVER
Discard the stylus cover.
Remove the twist -tie that was used to secure the tone arm during shipment.
Release the tone arm lock lever.
TONE ARM LOCK LEVER
Connect the plug to your AC outlet.
120V 60Hz
5
Page 7

1
21
22
2
23
12
10
U
L
M
O
E
V
AUX
3
4
5
6
7
8
9
AM/F M
TAPE
PHON O
CD
ERAS E
AUTO MA NUAL
TRAC K INCREM ENT
ERAPHONE
11
POWE R
CD RECO RDER
E
L
V
C
E
E
R
Mo./ ST
L
24
EJ
AUTO STOP
/
EF
27
29
I
N
N
G
U
T
SENSO R
RECO RD
FINA LIZE
FF
FR
PLAY/PA USE
STOP
OPEN /CLOS E
AUX IN
13
14
15
16
17
18
19
20
2526
30
35
28
31
32
33
34
6
Page 8

LOCATION OF CONTROLS AND INDICATORS
36 LINE OUT JACK
37 FM ANTENA WIRE
38 AC POWER CORD
39 OP/CLOSE
40 CD
41 PHONO
42 AM/FM
43 TAPE
44 AUX
45 AUTO MANUAL
46 INCREMENT TRACK
47 REC LEVEL “+” “-”
48 VOLUME “+” “-”
49 FINALIZE
50 REPEAT
51 PROGRAM
52 REW/FF
53 PLAY/PAUSE
54 ERASE
55 STOP
56 REC
39
Unit Controls
LINE OUT
37
OP/ CLOSE
FUN TION
CD PHO NO
L
36
R
38
40
41
42
45
46
49
54
AM/ FM
AUT O
MAN UAL
INC REMEN T
TRA CK
FINA LIZE
ERA SE STO P
TAPE
REC L EVEL
REP EAT
PLAY /PAUS E
REW
REC
+
_
VOL UME
FF
AUX
+
_
PRO GRAM
43
44
47
48
50
51
52
53
56
55
7
Page 9

OPERATION INSTRUCTION
General
1 Make sure the unit is plugged in
correctly to an AC outlet.
2 Press the POWER(22) to turn on the
main power. Then you can press any
button you want.
Radio Operation
1 Press the AM/FM button(4/42)to set
the unit to tuner mode.
2 Adjust the TUNING(12) to select a
station.
3 Adjust the VOLUME(2/48) to desired
listening level.
4 Press the Mo./ST (23) to select the
normal or stereo mode of Radio.
Turntable operation
1 Press the PHONO(6/41)to set the unit
to phono mode.
2 Make sure that you have removed the
stylus cover from the stylus and have
released the Tone Arm Lock that
secured the tone arm to the tone arm
rest.
3 Set the turntable Speed Selector to
t h e a p p r o p r i a t e s p e e d 33 , 4 5 o r 7 8
R P M . If y o u a r e p l a y i n g 4 5 R P M
‘ s i n g l e s ' , p l a c e t h e 4 5 R P M
ADAPTER(35) on the center spindle.
4 Place your record on the center
spindle.
5 Raise the CUE LEVER(30) to lift the
tone arm off its rest .Move the tone arm
to the edge of the record.The turntable
sta rts aut om ati cally .Us e th e CU E
LEVER (30)to gently lower the tone arm
onto the record.
Antenna Information
1 The AM antenna is inside the cabinet.
If AM reception is unsatisfactory try
repositioning the cabinet slightly until
the internal antenna is picking up the
strongest signal.
2 The FM wire antenna is located on the
back cabinet.If necessary adjust the
position and direction of this antenna
until you find the position that provides
the best reception.
6 Adjust the VOLUME(2/48) control to
the desired level.
7 When the tone arm reaches the end
of the record it automatically returns to
the tone arm rest and the record player
stops.
N O T E : D o n o t s t o p t h e t u rn t ab l e
m a n u a l l y M o v i n g o r j a r r i n g t h e
Turntable without securing the Tone
Arm clamp could result in damage to the
Tone Arm.
8
Page 10

OPERATION OPERATION
OPERATION INSTRUCTIONS
CASSETTE OPERATION
PLAYING CASSETTE
1 Press the TAPE(5/43) button to set
the unit to tape mode.
Not e : Before inserting a tape in the
player be sure that there is no excess
slack in the casse tt e t ha t co ul d
jammed in the mechanism.
2 Insert your cassette into the
slot, as shown in the illustration,
with the side you wish to play
facing 'up' and the open end on
the right sde.
3 Cassette playback begins as
soon as the tape is inserted.Adjust
the VOLUME(2/48) control to the
desired level.
CD OPERATION
1 Press the CD(7/40) button to set
the unit to CD mode.
2 Press the CD OPEN/CLOSE(19/39)
button to open the CD drawer.
3 Place your disc in the drawer with
the printed label side facing up.
4 Press the CD OPEN/CLOSE(19/39)
button once more to close the
drawer.The disc will spin for a few
seconds while the player reads the
disc ,then the disc stops and the
display shows the total number of
tracks on the disc.
4 To advance the tape rapidly
depress the EJ/ FF(26) (Eject/Fast
Forward) button approximately half
way. The tape will move forward
rapidly as long as the button is
depressed. Normal playback will
resume when the button is released.
5 When the tape ends the player
stops automatically. Depress the
E J / F F( 2 6 ) ( Ej e c t / Fa s t F o r w a r d )
button completely to remove the
cassette from the player. You may
press theEJ / FF(26) ( Ej ect/ Fas t
Forward) button to stop playback
and remove the cassette at any
5 Press the CD PLAY/ PAUSE(17 /53 )
button to begin playback on track
number one .The Play Indicator lights.
6 Adjust the VOLUME(2/48) control to
the desired level.
7 Playback will continue until the
end of the dicc. When the disc ends
the display again shows the total
number of tracks on the disc. You
may also stop playback at any time
by pressing the CD STOP( 18/ 55) button .
9
Page 11

CD RECORDING INSTRUCTIONS
Preparation
This unit is designed to record CD-R and
CD-RW discs bearing the identification
logo “Compact Disc Recordable” or “CDRewritable”,If CD’s do not confirm to this
standard, they may not record properly.
Recording Records to CD
1 Load a compatible blank CD-R or CD-RW into the
unit.
2 Press the PHONO button (6/41) to set the unit to
Phono mode.
3 Set the SPEED CONTROL SWITCH (32) to the
correct speed (33 ,45 or 78 rpm) for the selected
record.
4 Use the CUE LEVER (30) to raise the tone arm off
its rest .Move the tone arm over the record and use
the cue lever to lower it to the point you want the
recording to start.
5 Press the RECORD button (13/56).Then press
“ PLAY/PAUSE” button(17/53) .The CD will
begin recording.
Recording Cassettes to CD
1 Load a compatible blank CD-R or CD-
RW into the unit.
2 Press the TAPE button (5/43) to set the
unit to TAPE mode.
3 Load a pre-recorded cassette tape into
the cassette player. Press to PLAY
button(17/53) to get the cassette to the
point in which you want to start the
recording.
4 Once the cassette is ready and playing,
press the CD RECORD button (13/56) .
Then press “PLAY/PAUSE”(17/53) . The
CD will begin recording.
5 Once the first side of the cassette is
finished , press the STOP(18/55) button ,
then change to “TAPE”.
6 Eject the cassette tape and flip it over to
the other side.
7 Repeat steps 4 and 5 to record the other
side of the cassette .
8 After recording is completed,press the
STOP button(18/55),then change to“TAPE”.
6 Once the first side of the record is finished ,
press the STOP(18/55) button. The display will
change “PHONO”.
7 Turn the record over and repeat steps 4-6 to
record the other side.
8 After recording is completed, press the
STOP(18/55) button . The display then change to
“PHONO”.
9 Once you have finished the recording ,press the
CD button(7/40) then press FINALIZE button(14/49).
Then press PLAY/PAUSE(17/53) to finalize.
10 Once the CD has been finalized, the unit will
return to Phono mode and the display will show
“PHONO”. The CD door will open ,the CD is
now ready for use.
NOTE: If the CD is not finalized, it will not play in
any other CD player . Not all CD players are
compatible with CD-R and CD-RW ’s. Check the
owner's manual for other CD players for
compatibility.
9 Once you have finished the recording,
press the CD button(7/40), then press
“FINALIZE”button(14/49). Then press
PLAY/PAUSE (17/53) to finalize.
10 Once the CD has been finalized, the
unit will return to tape mode and the
display will show “TAPE” . The CD door
will open ,the CD is now ready for use.
NOT E: If the CD is not finalized. The
LCD will display "No TOC CD-R or CDRW. If the CD is finalized. The LCD will
display"CD-R or CD-RW.
10
Page 12

11
Page 13

AUDIO CONNECTION
AUDIO CONNECTION
1 AUX IN
Press the AUX(3) button to set the unit
to Audio connection mode.
Using the Aux in allows you to hook up
additional external audio components
an d li s te n to th e m th ro u g h y o ur
unit.Any component with an audio
output such as a Tuner ,can be
c o n n e ct e d by u s i n g t h e c o r re c t
cables(not included).This unit uses
st a nd a rd 3. 5 mm c ab l es . Fo r mo re
information on hooking up the external
component, see the owner's manual
for that component.
2 LINE OUT
Using the LINE OUT will allow you to
run the audio from your unit into a
home stereo ,television or other stereo
source. To make this connection,you
will need standard RCA cables.Plug
the red and white connectors on one
end of the cable into the red and white
Audio Output jacks on the back of the
unit. The other end of the cable will
plug into the LINE OUT jacks of your
se le ct ed com po n en t. F or mo re
information on hooking up to the
ex t e rna l c o mp o n e nt , se e t he
owner' s manual for that component.
Audio output
LINE OUT
L
R
LINE OUT LINE OUT
L
(WHITE JA CK )
L
R
R
(RED JACK )
12
Page 14

/
13
Page 15

WARRANTY & CUSTOMER SUPPORT
Congratulations on the purchase of your new Grace product. All Grace Digital products
purchased directly from Grace Digital or from a Grace Digital authorized dealer are supported
by a 1 year limited warranty.
Grace Digital Inc. guarantees this item for a period of 1 year from the original date of
purchase.
The product is guaranteed against original defects in materials, manufacture and
workmanship for 1 year from the date of purchase. The guarantee covers the replacement of
equipment that proves to be faulty as a result of manufacturing defect only. No liability shall be
accepted for faults arising from accident or misuse.
In the event your equipment requires warranty attention and/or service, please contact your
place of purchase, Grace Digital Inc. at www.gracedigitalaudio.com or a Grace Digital
authorized Dealer.
In the event a replacement is required and a replacement of the same model is not available
for any reason, Grace Digital Inc. reserves the right to replace items with similar equipment of
equivalent value.
Under this warranty, at the company's discretion, repair of any defect, replacement of the
failed component(s) without charge for parts or labor, is agreed. This warranty does not imply
any acceptance by Grace Digital, nor agents of Grace Digital for consequential loss or
damages related to a product. The warranty specifically excludes fair wear and tear, accident,
and misuse of unauthorized modification.
This warranty is applicable in the United States only and does not in any way limit the
customer's legal rights. Claims and enquiries under the warranty for Grace products purchased
outside the USA should be addressed to the local importers or distributors. If you have
reason to claim under the warranty please contact your Dealer (original place of
purchase) in the first instance. Please retain all original packaging materials for
possible future use. We suggest that you complete details of purchase now and keep this
information, along with your proof of purchase in a safe place for future reference.
CONDITIONS
1. This Warranty will be granted when the original invoice or sales receipt (with proof of date
of purchase, product type and dealer's name) is presented together with the defective product.
2. This guarantee will NOT reimburse for any loss nor cover damage that may result from
adaptations or adjustments, made to the product.
3. This guarantee does NOT include any of the following:
i. Maintenance and/or repair of parts due to normal wear and tear.
ii. Changes to or uses of the product outside of the intended use as described in the
instruction manual.
iii. Transportation costs, home service costs and all related risks and costs of transport.
4. Damage resulting from any of the following:
i. Misuse including use for a purpose other than intended, installation or use of the product in
a manner inconsistent with the technical or safety standards, improper or incorrect installation.
ii. Repair done by a non-authorized agent, establishment or individual.
iii. Accidents related to shipping with UPS, USPS or any other mailing or shipping agent.
iv. Accidents including lightening, water, fire, improper ventilation or any cause beyond the
control of Grace Digital Inc.
Should you have any questions regarding your product, warranty or Grace Digital Inc. please
contact your original place of purchase or Grace Digital Customer Service Monday to Friday at
customerservice@gracedigital.net
14
Page 16

Troubleshooting Guide
In case of trouble with the unit, please look through this chart and see if you can solve the
problem by yourself before calling your dealer.
Problem
Power dose not come
on when the power
switch is pressed.
No sound comes out
of the speakers.
THE WH O L E UNIT
The tape dose not
move.
No sound from tape.
TAPE DECK
The sound is distorted
or faint.
Cause
Unit is unplugged.
The vol ume is turn e d
down (to MIN).
The input selector does
not match the playback
source.
The cassette tape is not
inserted properly.
The tape heads are dirty.
The tape heads are dirty.
Solution
Connect the unit to the AC
power supply.
Adjust the volume.
Re-select the desired
input source.
Insert the cassette tape
correctly.
Clean the tape heads.
Clean the tape heads.
Cannot listen to any
s t a ti on , o r s i g n al
appears weak.
The sound is distorted.
TUNER U N IT
CD stops immediately
after starting, or unit
p a u s e s o r s t o p s
during play.
No sound.
CD PLAYER
Specific CD is noisy ,or
p l a yb a c k s t op s o r
skips.
The station is not tuned-in
properly.
A TV set is being used
nearby and is interfering
with the radio reception.
The antenna is not
oriented properly.
T h e C D i s i n s e r t e d
upside down. The CD is
dusty or dirty or there is
condensation on the CD.
The CD player is paused.
The CD is scratched.
Damaged or warped.
The disc is is very dirty.
P r o p e r l y t u n e - i n t h e
desired station. Turn-off
the interfering set TV.
Re-orient the antenna until
reception improves.
Inse r t the C D with the
printed side right-side up.
Carefully clean and dry the
CD.
Press the PLAY/PAUSE
button.
The CD should be
changed.
Carefully clean the CD.
15
 Loading...