

Victoria GDI-TW2SQ, TuneWriter II User Manual
IMPORTAN T SA FETY INST RU CT IO NS
FOR AUDI O PRODUCTS-READ THO RO UG HLY
Whe n usin g elect ric al pro duc ts , basic pre ca uti on s shoul d alwa ys be follo wed inc lu din g:
1. Read Ins tru ct ion s - All the saf et y and opera ti ng inst ruc ti ons sho ul d be r ead bef or e the
pro du ct is opera ted .
2. Reta in Inst ru cti on s - Th e safet y and opera ti ng inst ru cti on s shoul d be r et ain ed for
fut ur e refer en ce.
3. Heed Ins tru ct ion s - All war ni ngs on the prod uc t and i n the oper ati ng ins tru ct ion s
sho ul d be a dhe re d to.
4. Foll ow Inst ru cti on s - A ll ope rat in g and user inst ru cti on s shoul d be f oll ow ed.
5. Clea ni ng - Un pl ug this pro du ct from the wal l outle t befo re clea ni ng. Do not use liqu id
cle an ers or aero sol cle an ers . Use a dr y clot h for clean ing .
6. Attac hm ent s - Do not use att ac hme nt s not r ec omm en ded by the prod uc t manuf ac tur er
as they may cau se haza rd s.
7. Water and Moi st ure - Do n o t use this pro duc t near wat er- fo r examp le, nea r a ba th tub ,
was h bowl , kitch en sink , or l au ndr y tub, in a we t basem en t, or near a s wim mi ng pool ,
etc .
8. Acces so rie s - Do not pla ce thi s produ ct on an s urf ac e. The prod uct may fal l, cau s in g
ser io us inju ry to a ch ild or adul t, and ser iou s damag e to t he pro duc t. Use onl y with a
sta nd, bra ck et, or tabl e recom me nde d by t he man ufa ct ure r, or s ol d with the prod uct . A ny
mou nti ng of the produ ct sho uld fol lo w the manuf ac tur er 's inst ru cti on s, and shou ld use a
Mou nti ng acc ess or y recom me nde d by t he manu fa ctu re r.
9. Trans po rti ng - T his pro du ct shou ld be moved wit h care to avoid dam ag e or i nju ry.
10. Vent il ati on - S lot s and open ing s in t he cab ine t are provi de d for venti la tio n, to ensu re
rel ia ble ope ra tio n of t he prod uc t and to p rot ec t it f rom ove rh eat in g. Thes e openi ng s
mus t not be b loc ke d or c ove re d. The open ing s shou ld neve r be b lo cke d by p la cin g the
pro du ct on a bed , sofa , rug, or simil ar sur fac e. This pro du ct shou ld not be place d in a
bui lt -in ins ta lla ti on such as a bo ok cas e or r ac k unles s prop er vent il a ti on is provi de d or
the man uf act ur er' s instr uc tio ns hav e been adhe re d to.
11. Powe r Sourc es - T hi s produ ct shou ld be oper ate d only fro m the t yp e of p owe r sour ce
ind ic ate d on t he mark in g label . If y ou are not sur e of th e type of powe r suppl y to y ou r
hom e, con sul t your prod uc t deale r or l oc al powe r comp any. For pro duc ts inte nd ed to
ope ra te from bat ter y powe r, or o the r sour ces , refe r to t he oper ati on ins tru ct ion s.
12. Pow er - C ord Pro te cti on - P ow er- su ppl y cord s shoul d be r ou ted so that the y are not
lik el y to b e trapp ed in any way.
13. Lig ht nin g - Fo r added pro te cti on for thi s produ ct duri ng a l ig htn in g storm , or w he n it i s
lef t unat ten de d and u nu se d for lon g peri ods of time , unplu g it f ro m the wall outl et and
dis co nne ct the ante nn a or c abl e syst em. Thi s will prev en t damag e to t he prod uc t due
to ligh tn ing and pow er- li ne surg es .
14. Pow er Line s - An outs id e anten na sys tem sho ul d not b e loca ted in the vici ni ty of
ove rh ead pow er line s or o th er elec tr ic ligh t or p ow er circ ui ts, or wher e it c an fall int o
suc h powe r lines or circ uit s. Whe n insta ll ing an outs ide ant en na syst em , extre me car e
sho ul d be t ake n to k ee p fro m touc hin g such pow er line s or c irc ui ts as conta ct wit h
the m migh t be fa ta l.
1
MO DE L: GD I- TW2S Q
PH ON O/ CD Recorde r wit h Ca ss et te
pl ay er an d AM/ FM S TE RE O Rad io
R0. 0

15. Ove rl oad in g - Do not over lo ad wall out le ts, ext en sio n cords , or i nt egr al con ven ie nce
rec ep tac le s as t his can res ult in a r isk of fire or elec tri c shoc k.
16. Obj ec t and L iq uid Ent ry - N ev er push obj ec ts of any k in d into this pro du ct thro ug h
ope ni ngs as they may tou ch dang er ous vol ta ge poin ts or short -o ut part s that cou ld
res ul t in a fire or elec tr ic shoc k. Nev er spil l liqui d of a ny kin d on t he prod uc t.
17. Ser vi cin g - Do not att emp t to s er vic e this pro duc t yours el f as o pen in g or r emo vi ng
cov er s may expos e you to d ang er ous vol ta ge or other haz ard s. Ref er all serv ic ing to
qua li fie d serv ice per son ne l.
18. Dam ag e Requi rin g Serv ice - Unplu g this pro duc t from the wall out le t and refer
ser vi cin g to q ua lif ie d servi ce pers on nel und er the fol low in g condi ti ons :
a. If the p ow er- su ppl y cord or plug is dama ged .
b. If liqui d has spill ed , or o bje ct s have fall en into the pro du ct.
c. If the p ro duc t has been exp ose d to r ai n or w ate r.
d. If the produ ct doe s not opera te nor mal ly by foll owi ng the ope ra t in g inst ruc ti ons . A dj ust
onl y t ho se con tr ols th at are co ve r ed by th e o per at ing in st ruc ti ons , a s a n imp rop er
adj us tme nt of o th er c on tro ls may res ul t i n da ma ge and wil l o fte n r equ ir e e xte ns ive
wor k by a qua lif ie d techn ic ian to rest or e the produ ct to its norma l oper ati on .
e. If t he p ro duc t ha s bee n dr op ped o r da mag ed i n an y way, a nd t he pr od uct exh ibi ts a
dis ti nct cha ng e in pe rf orm an ce - th is indi ca tes a need for serv ic e.
19. Rep la cem en t Parts - W he n repla ce men t part s are requi re d, be s ur e the servi ce
tec hni ci an has used rep lac em ent par ts spe cif ie d by t he manu fa ctu re r or h ave the sam e
cha rac te ris ti cs as the origi nal par t. Una uth or ize d subs tit ut ion s may resu lt in f ir e, elec tr ic
Sho ck, or othe r hazar ds .
20. Saf et y Check - U po n compl et ion of any serv ic e or re pa irs to this pro du ct, ask the
ser vi ce tech ni cia n to p erf or m safet y chec ks to deter mi ne that the pro duc t is i n prop er
ope ra tin g cond iti on .
21. Wall or Ceil in g Mount in g - The pro du ct shou ld be mount ed to a wa ll or ceili ng onl y
as reco mm end ed by the manuf ac tur er.
22. Do not ins tal l near any hea t sou rc es such as radi at ors , heat regi st ers , stov es, or othe r
app ara tu s that prod uc e heat.
23. Do not defe at the safe ty pur pos e of t he pola ri zed . A po la riz ed plu g has two bla de s with
one wid er than the oth er.
24. Ref er all serv ic ing to qual if ied ser vi ce pers on nel . Servi ci ng is requi re d when the
app ara tu s has been dama ged in any way, such as powe r-s up ply cor d or p lug is
dam ag ed, liq ui d has been spil led or obje ct s have fall en into the app ar atu s, the
app ar atu s has been expo se d to r ain or mois tu re, doe s not opera te nor mal ly,
or has been drop pe d.
Precautions
Saf et y Infor ma tio n
Cau ti on:
1. Use of cont ro ls and adj ust me nts or per for ma nce of pro ced ur es oth er than th ose sp eci fi ed
her ei n may resul t in h aza rd ous rad ia tio n expo sur e.
2. I f t hi s pr od uct de vel op s t rou bl e, c on tac t q ua lif ie d se rv ice ce nte rs , a nd d o n ot use the
pro du ct in defec tiv e stat e.
Saf et y Preca ut ion s
WARN IN G:
To r edu ce the risk of fire or elec tr ic shoc k, do not expos e this app lia nc e to r a in or mois tur e.
CAU TI ON
No user ser vic ea ble par ts ins ide . Refe r servi ci ng to quali fie d serv ice per so nne l.
RIS KS OF ELECT RI C SHOCK - DO N OT OP EN !
To r edu ce the risk of elec tr ic shoc k, do not remov e cove r or b ack .
Lig ht nin g flas h with arro whe ad sym bol , with in an equil at era l tria n gl e, is
int en ded to aler t user to the prese nc e of u nin su lat ed “dan ge rou s volt age ”
wit hi n the produ ct' s encl osu re tha t may be o f suffi cie nt mag nit ud e to
con st itu te ris k of el ec tri c shoc k to p ers on s.
The exc la mat io n point wit hin an equi la ter al tri ang le is inten de d to a ler t
use r to t he pres en ce of impor ta nt oper at ing and mai nt ena nc e (serv ici ng )
ins tr uct io ns in the l it era tu re acco mp any in g the appli an ce.
Cau ti on:
For com pa ct disc uni ts only : invi sib le las er radi at ion whe n open and
int er loc k fail ed or d ef ea t ed . avoid dir ec t expos ur e to l ase r beam .
(Se e mark ing s on t he back of the unit )
Cau ti on:
To p rev en t elect ri c shock , match wid e blad e of p lug to wide slo t, full y inse rt.
2 3
WARNIN G
Thi s prod uct may con tai n chem ica ls lis ted in Prop os iti on 65 (http :/ /ww w.o ehh a. ca.
gov /p rop 65 /pr op 65_ li st/ Ne wli st .ht ml ) th at may be k no wn to cause can ce r, birth
def ec ts or other rep rod uc tiv e harm .
Before Us e
1. Choo se unit ins ta lla ti on loca ti on care fu lly. Avoi d pla ci ng it in d ire ct sun lig ht or close to a
sou rc e of h eat . A ls o avoid loc ati on s subje ct to vibr ati on s and exces si v e dust , cold or
moi st ure . Keep away fro m sour ces tha t hum, suc h as tran sf orm er s or m oto rs .
2. Do not o pe n the cabin et as this mig ht resu lt in damag e to t he cir cui tr y or e l ec tr i ca l shock ,
if a f ore ig n objec t shoul d get into the set , conta ct your dea le r.
3. Be sure not to h an dle dis cs wit h dirty fin ger s. Nev er inse rt a d is c that has a cr ac k on t he
sur fa ce.
4. When rem ovi ng the pow er plug fro m the wall outl et , alway s pull dir ect ly on the plug, nev er
pul l the cord.
5. To kee p the lase r picku p clean , do n ot tou ch it, and do n ot for get to clos e the disc tray.
6. Do not a tt emp t to c le an the unit wit h chem ica l solve nt s as t his mig ht dam age the fin is h.
Use a clean , dry cloth .
7. In order to shut off the powe r to t hi s produ ct comp le tel y, unplu g the powe r cord from the
wal l outl et. Be sure to unpl ug the unit if you do n ot int end to use it f or an exte nde d peri od
of time , such as a va cat io n.
8. Keep thi s manua l in a saf e plac e for futur e refer en ce.
Bew ar e of C ond en sat io n
Whe n the playe r (or a co mp act dis c) is move d from a co ld to a wa rm pla ce or is us ed aft er a
sud de n tempe ra tur e chang e, the re is a da nge r of c on den sa tio n. Wate r vapor in the air coul d
con den se on the mecha ni sm or the laser pic ku p. If dropl ets of wate r form on these par ts ,
cor re ct play ba ck will be impo ssi bl e becau se the las er cann ot read the inf or mat io n from the
dis c corre ct ly. To pre ven t this , if y ou are goin g to u se the play er in a co nd iti on whe re
con de nsa ti on coul d occu r, you sho ul d leave the pla ye r for 1 or 2 h our s afte r plugg in g it i nto
an AC o utl et depe nd in g on the amou nt of cond ens at ion . If t his is done , the play er will
sta bi liz e at t he temp er atu re of its surr oun di ngs .
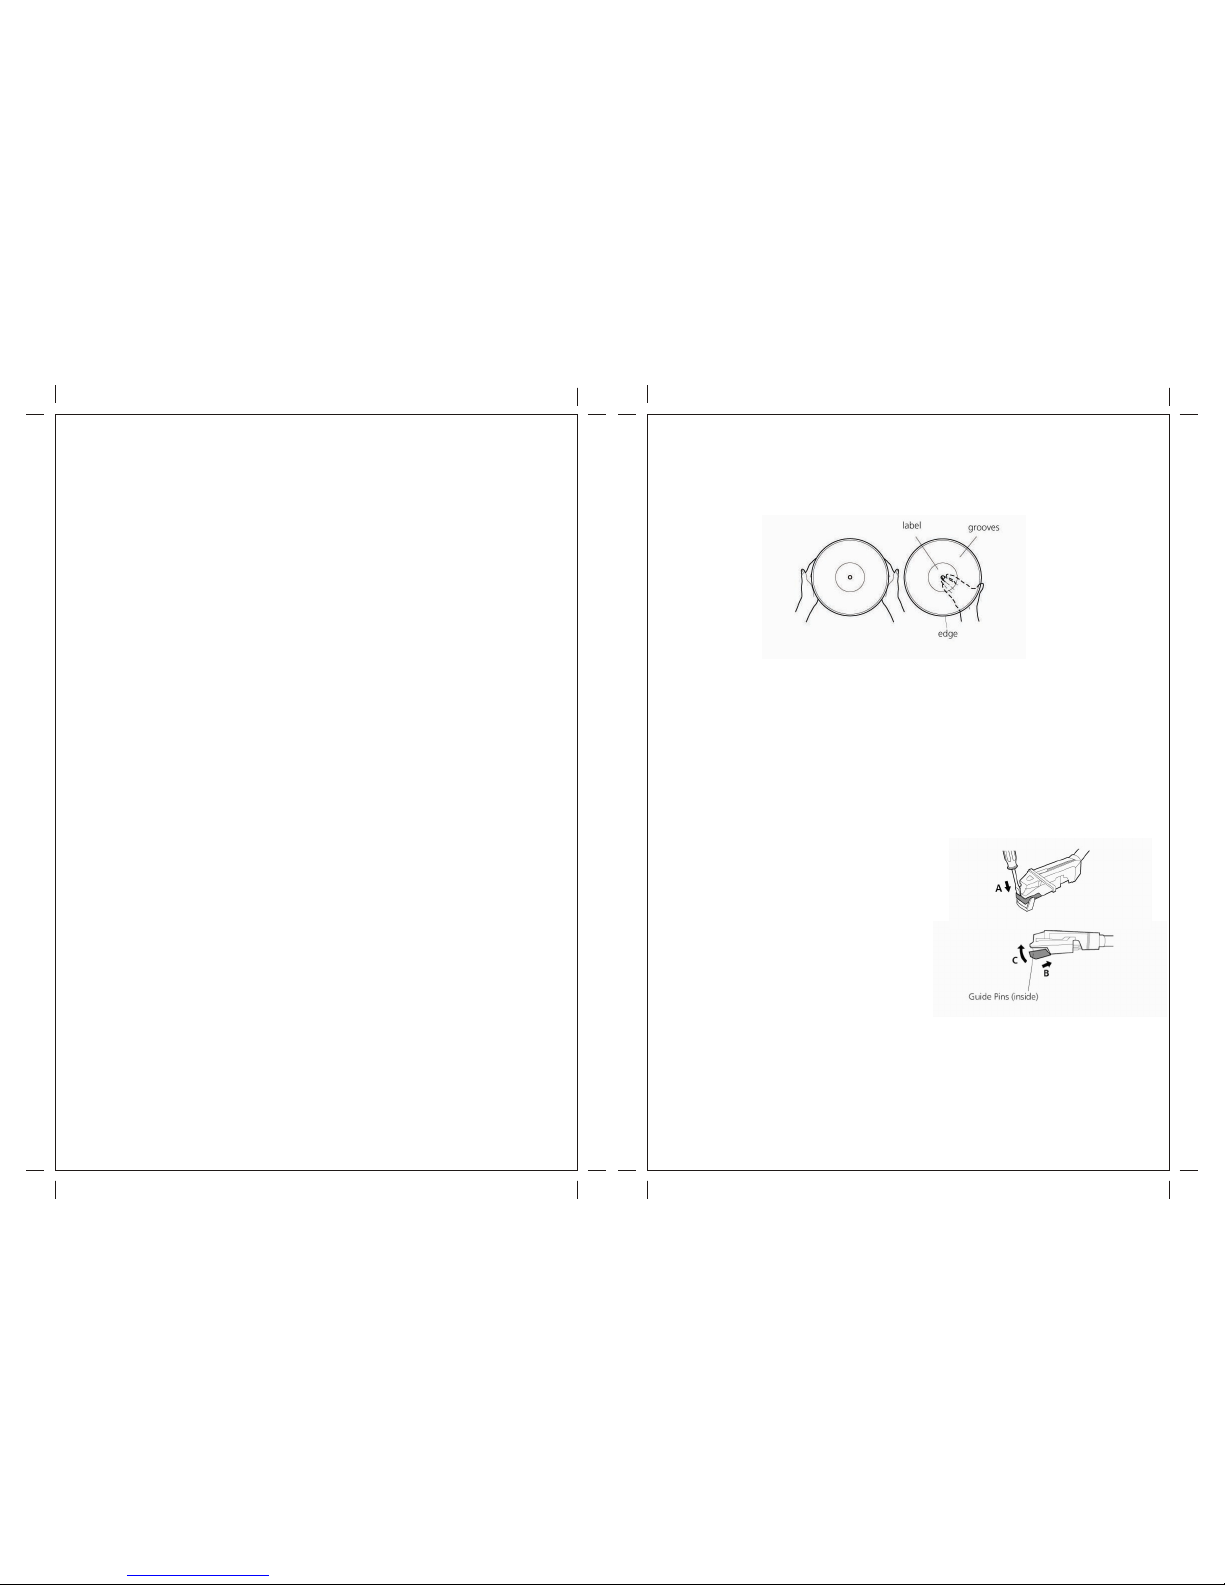
Handling Re co rd s
Do not touc h the r ec ord 's gro ove s. Onl y handl e reco rds by the edge s or t he labe l with
cle an han ds. Gre ase or dirt can lea ve a r es idu e on t he reco rd ’s surf ace tha t will gra dua ll y
det er ior at e the quali ty of your reco rd .
Use sof t anti- st ati c cloth to gent ly wip e the recor d surfa ce whe n the recor d has becom e
dir ty whe n not i n use.
Sto re reco rd s uprig ht on their edg es . Flat stor ag e can make it b ec ome cur ve d.
Av oi d placi ng it in d ir ect sun li g ht or clos e to a sou rce of heat suc h as r adi at ors , stov es.
Als o avoi d locat ion sub je ct to vibra ti on and exce ss ive dus t, heat , cold or mois tur e.
How to Rep la ce the St yl us
Cau ti on:
Do not remo ve or b en d the stylu s.
Do not touc h the n ee dle , whic h could inj ur e your hand .
T urn off the uni t's pow er befo re you rep lac e the styl u s.
Kee p out of t he reac h of c hil dr en.
Av oi d direc t sunl igh t or o th er heat sou rce s.
Rem ov ing old sty lus
1. Set a sc re wdr iv er at the tip of t he styl us and push
dow n to t he dire ct ion “A” .
2. Remo ve the styl us by pull ing it forw ar d and dow n.
Ins ta lli ng a n ew styl us
1. Hold the tip of the styl us and inse rt the othe r edge by
Pre ssi ng in the direc ti on “B”.
2. Push up in t he dir ect io n “C” until it lock s at t he tip.
4 5
Discs
Depe nd ing on th e qual it y of the dis c and the co nd iti on of th e reco rd ing , som e CD-R /C D-
RW disc s may not be pl ay abl e.
Alwa ys pl ace t he di sc on t he di sc tr ay wi th th e lab el s ide u pwa rd (co mp act d isc s can b e
pla ye d or r eco rd ed only on one side )
To move a di sc fr om i ts st or age c ase , pr ess d ow n on th e cen te r of th e cas e an d lif t the
dis c out, hold in g it c are fu lly by the edge s.
If the disc beco me s dirty, wip e the surfa ce fro m the cente r
Hol e outwa rd tow ard s the outer edg e with a s of t, dry clot h.
Nev e r use s uch c hem ic als a s reco rd sp ra y, anti st ati c spr ay s or flu id , benz in e or thi nn er
to cl ea n th e dis cs . Su ch ch em ica ls w il l do i rre pa rab le d ama ge t o th e di sc' s pl ast ic
sur fa ce.
Disc s sho ul d be ret urn ed to th ei r case s aft er us e to avo id du s t and sc ra tch es th at co uld
cau se the lase r pick up “ski p”.
Do not exp os e di sc s to dir ect sun li ght or h ig h hu mi dit y a nd t em per at ure for ext en ded
per io ds. Lon g expos ur e to h igh tem pe rat ur es will war p the disc.
Pri nta bl e CD-R and CD-R W disc s are not recom me nde d, as the labe l side migh t be s ti cky
and dam ag e the u ni t.
Use a so ft oil -ba se d felt -ti pp ed pen to writ e th e infor ma tio n on the label sid e. Nev er use a
bal l- poi nt or hard- ti ppe d pen, as this may cau se dama ge to the recor de d side.
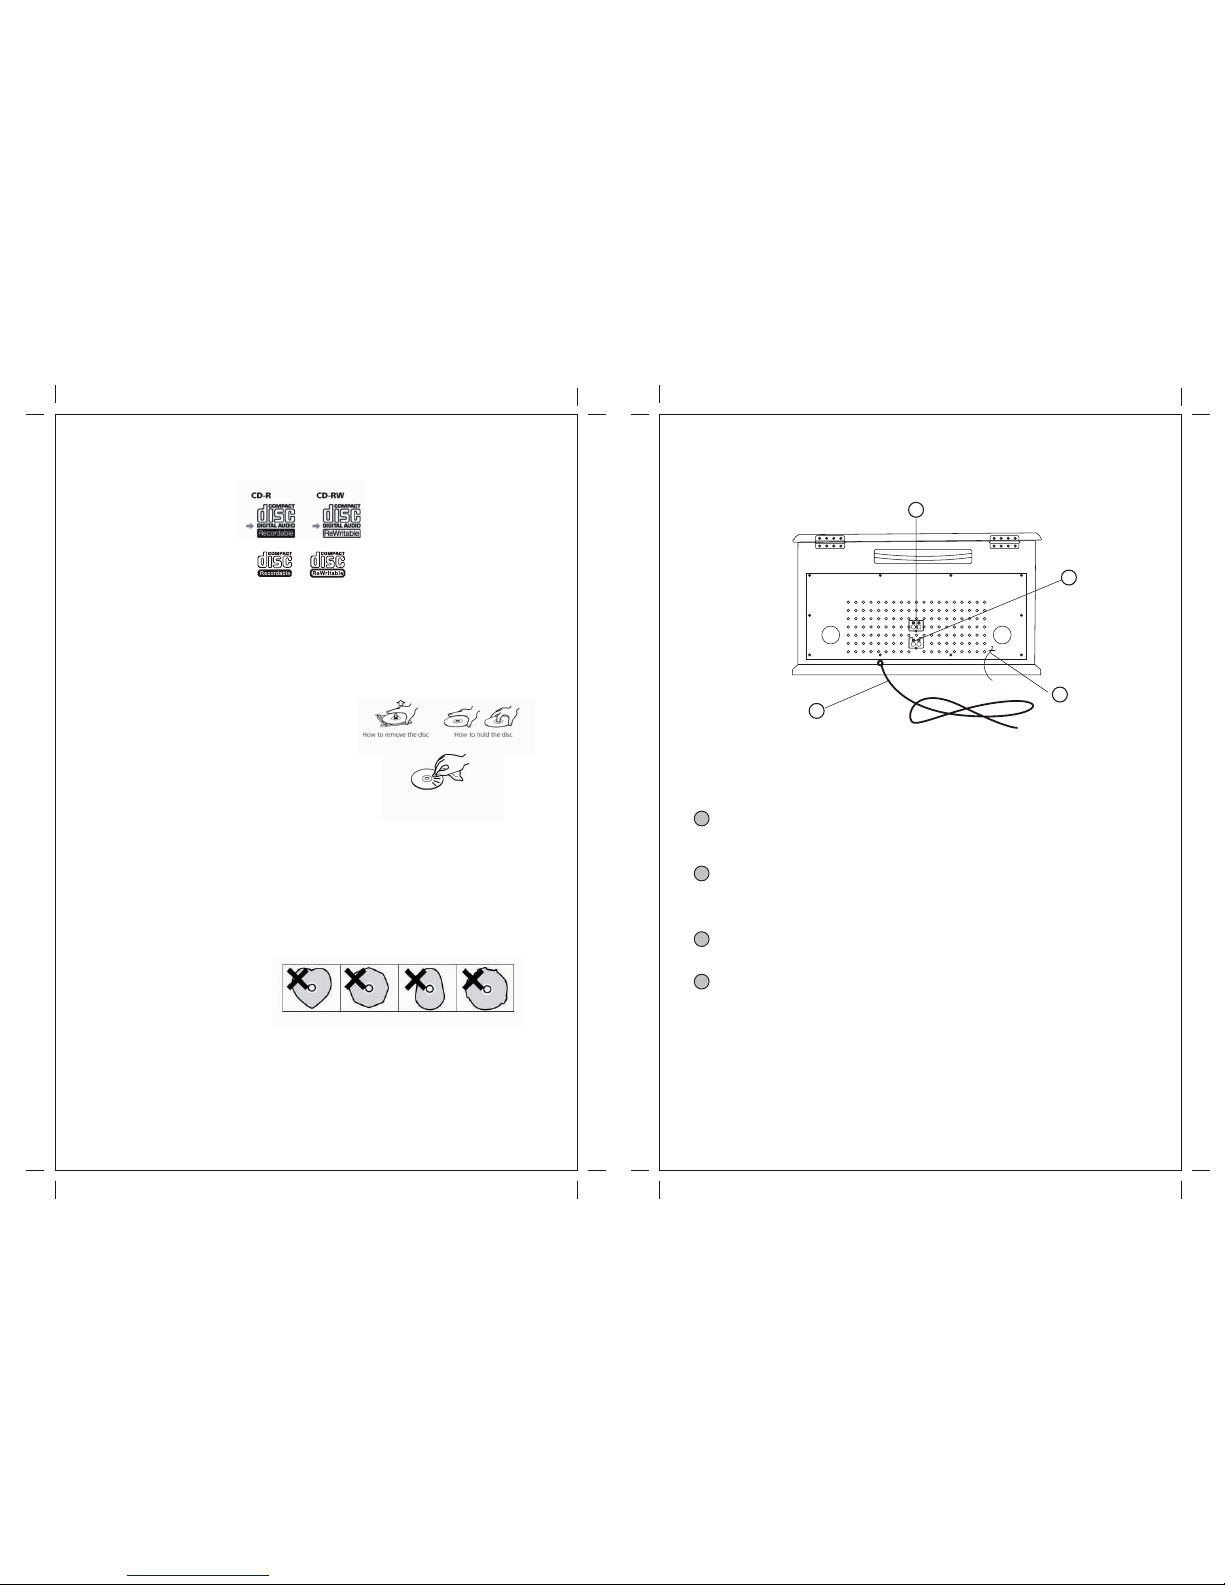
Do not use C Ds wit h an irr egu la r sh ap e(o ct ago na l, h ea rt s hap ed , bu si nes s ca rd siz e,
etc ). CDs of this sor t can damag e the unit :
If y ou hav e any dou bts ab out CD- R/ CD- RW dis cs, re ad the pre ca uti on s supp lie d with the
dis c, or conta ct the dis c manuf ac tur er dir ect ly.
6 7
Connections
Cau ti on:
Swi tch off the pow er to all e qu ipm en t befor e maki ng conn ec tio ns .
Rea d the instr uc tio ns of each comp on ent you int en d to u se with thi s unit.
Be sure to ins ert ea ch plu g secu re ly. To pr ev ent hu m and noi se, av oid bu nd lin g the sig nal
int er con ne cti on cab les tog et h er wit h the A C power cor d.
A FM A nt enn a
Whi le in FM m ode , tune in an F M stati on and ext end the lea d to f ind the bes t posit io n for
the rec ept io n. This ant enn a may need to be r epo si tio ne d if y ou move you r unit to a ne w
loc ati on .
B LI NE IN
You can conne ct a C D playe r, cass ett e tape dec k or MP 3 play er, etc. to this uni t.
Con nec t the comp one nt with RCA pi n cords . Make sur e to c onn ec t the white plu g to t he
whi te jack s( Lef t) and the red plug to the red jack s(R ig ht)
C AC Powe r Cord
Plu g this powe r cord into an AC w all soc ke t.
LIN E OUT
(1) Plug the Power Cord into a s tan dar d 120V~60 Hz outle t.
2) Plug the RCA Cables int o the Line Out jacks loc ate d at t he rear of the unit makin g sure that the
red RC A Cabl e is ins ert ed in to the r ed jac k and th e whi te RCA Ca ble is i nse rte d int o the wh ite
jac k.
3) Plug th e o the r e nds of the RCA Cab le into th e a uxi lia ry inp ut (AU X) on y our TV, ho me
ent ert ain me nt rece ive r or o th er musi c syste m, agai n bein g sure that the cor rec t colo r coded jac ks
are used .
4) Tur n th e un it on usi ng th e On /Of f/Vol ume K no b. Do not t urn up th e vo lum e on y our Uni t.
Ins tea d adjust the volu me on yo ur TV or h ome ente rt ain men t receiv er.
A
B
C
LINE OUT
D
D
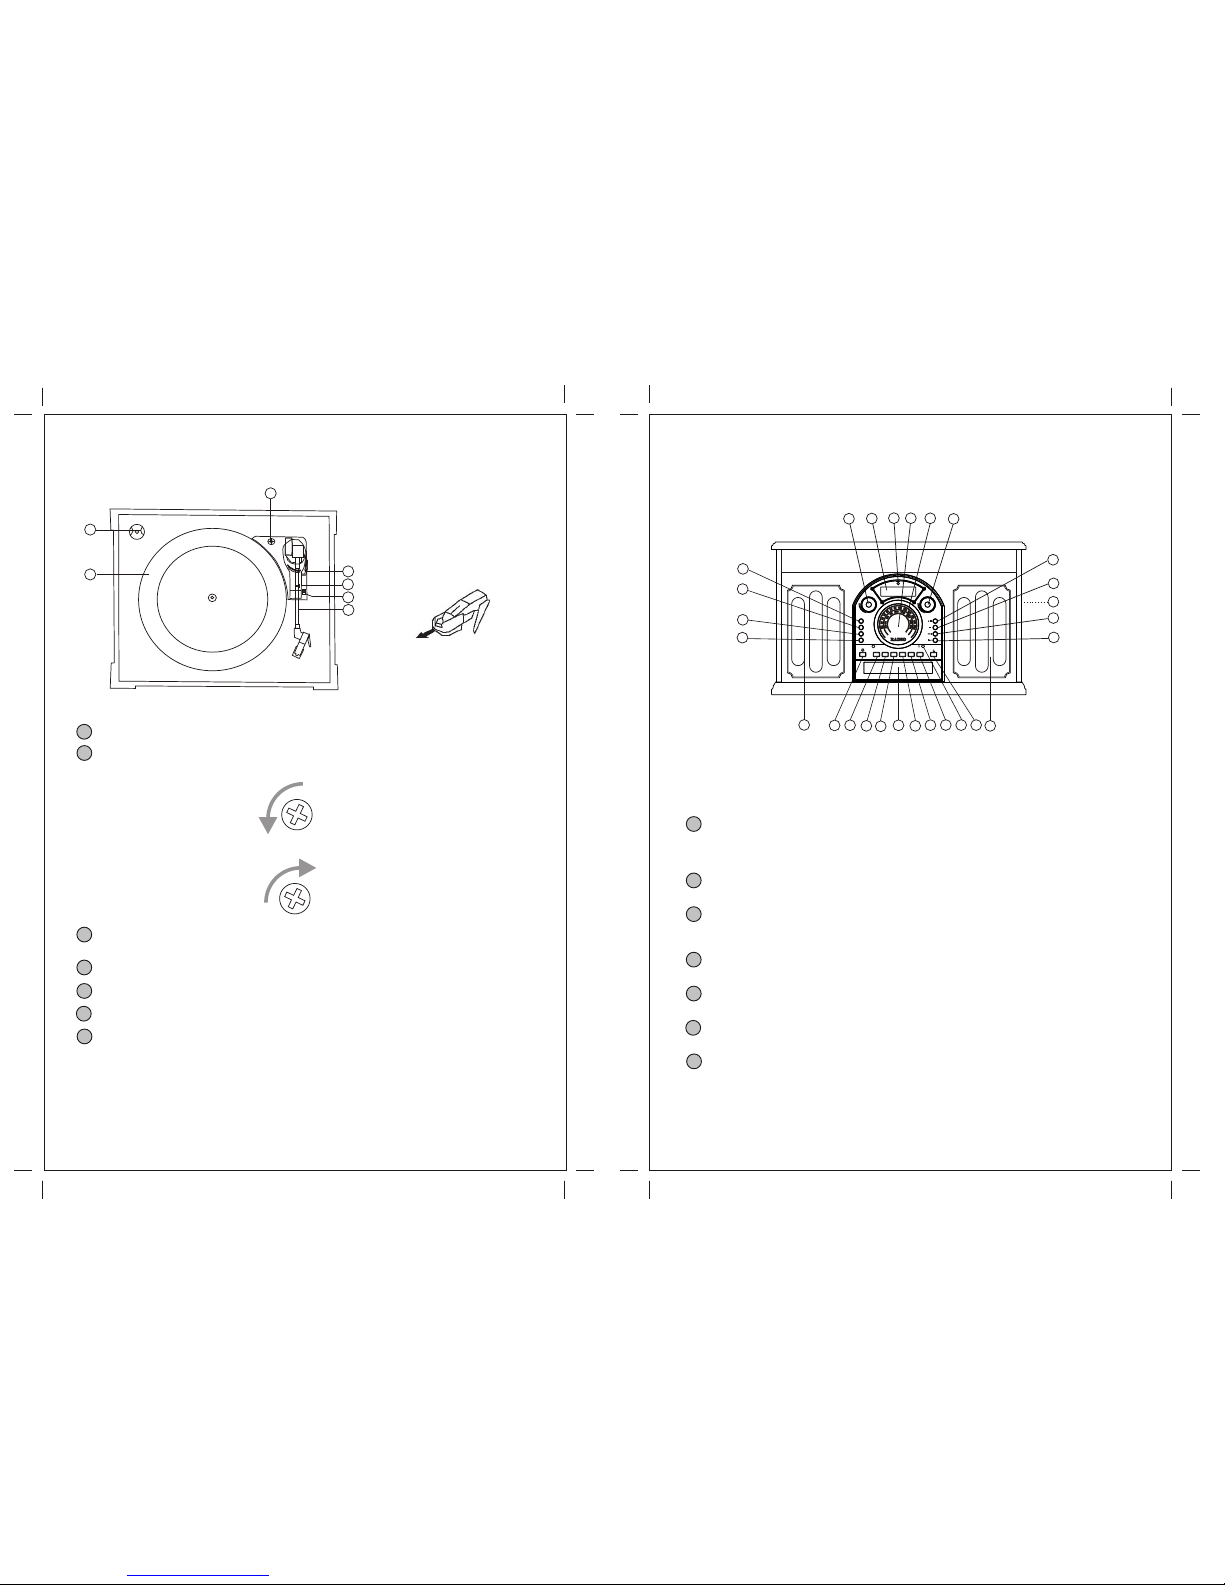
Parts of the Tur nt ab le
A Turnt abl e
B Tur nta bl e Transp or tat io n Screw
Whe n you trans po rt the unit , turn the scre w count er cl o ck wi s e to s ec ure the tur nt abl e.
Be for e use, tur n the scre w cloc kwi se wit h a co in or scre wd riv er to rel ea se the turn ta ble
pla te r from a se cu re posi ti on.
C Cu e-l ev er
Use thi s lever to lift the ton e arm.
D Ton e arm hold
E Sp eed sel ec tor
F Ton e arm
G 45 RPM ada pto r
1 POWER
Pre ss thi s butto n to t urn the uni t on o r off.
NOT E: If you exper ie nce a malfu nc tio n duri ng oper at ion , you may power off
The uni t and re-st ar t.
2 P HON O
Pre ss the PHON O butt on and sele ct PHO NO to play a re co rd.
3 A UX
Pre ss the AUX butto n and sele ct AUX to l i st en to the exter na l sourc e conn ect ed to the
AUX IN jack s.
4 F M/A M
Pre ss the FM/A M butt on to liste n to t he rad i o.
5 C D
Pre ss the CD butto n to p la y a CD .
6 TAP E
Pre ss the TAPE butt on to play cass ett e.
7 Rem ote Sen so r
Whe n oper ati ng the remo te con tro l unit , point it towa rds the REM OT E SENSO R.
9
Unit Fu nc ti on s
8
A
G
B
C
E
D
F
Rem ov e the white pla sti c
nee dl e guard bef ore use
1
2
3
4
5
6
7
8
9
10
11
13
14
15
16
17
18
19
20
21
22
23
25
12
12
24
26
REMOTO
SENSOR
VOLUME
REC LEVEL
ERASE
FINALIZE
TRACK
INCREMENT
AUTO/
MANUAL
AM/FMCDPHONO
TAPE
AUX
RECORD
AUX IN
Dis pl ay pane l (freq ue ncy )
Whe n the unit is on, this disp la y will ligh t.
TRA CK INC REM EN T
Dur in g recor di ng, use thi s butto n to d iv ide tra ck s.
REC ORD
Use thi s butto n to e nt er reco rd pau se mode .
Dis pla y
Spe ak ers (st er eo)
STOP
Use thi s butto n to s to p playb ac k or r eco rd ing .
PLAY/ PAU SE
Use thi s butto n to s ta rt play ba ck or pause rec or din g, fina li zin g and eras ing .
OPE N/ CLO SE
In CD,P HO NO or AU X mode , use this butt on to open and clos e the disc tray.
Thi s butto n does not work in FM/A M mode .
VOL UM E
Turn thi s knob to adju st the volu me soun d. (NO TE : The v ol ume con tr ol l eve l is f ro m 00
to 32.)
D ISC Tray
Pre ss the FF butto n once to go t he star t of t he next tra ck .
Pre ss the FR butto n once to go b ack to the star t of t he curr en t track . Pres s the F R butt on
twi ce to go b ack to the star t of t he prev io us trac k.
REC LEV EL
In reco rd paus e mode , use this knob to adju st the reco rd ing lev el .
FI NA LIZ E
Use thi s butto n to f in ali ze a C D- R/C D- RW disc .
E RAS E
Use thi s butto n to e ra se a C D-R W disc.
TUN ING
In FM/A M mode, tur n this kno b to t une in a st at ion .
10
11
Remote Co nt ro l Uni t
Rem ot e Contr ol Unit can ope ra te the unit fro m a di sta nc e.
Whe n oper ati ng the remo te con tro l unit , point it towa rds the fro nt pan el of the u ni t.
E ve n i f t he re mot e con tro l uni t i s ope rat ed wi th in the ef fec ti ve ran ge , r em ote co nt rol
ope ra tio n may b e impo ss ibl e if th ere a re an y obs tac le s bet wee n the un it an d the r emo te
con tr ol.
If the remo te con tr ol uni t is oper ate d nea r othe r appl ia nce s whic h gen era te inf ra red ra ys,
or if ot he r rem ot e c on tro l dev ic es us ing i nf r ar ed ra ys ar e use d ne a r th e uni t, it ma y
ope ra te inco rr ect ly. Conv er sel y, the other app li anc es may oper at e incor re ctl y.
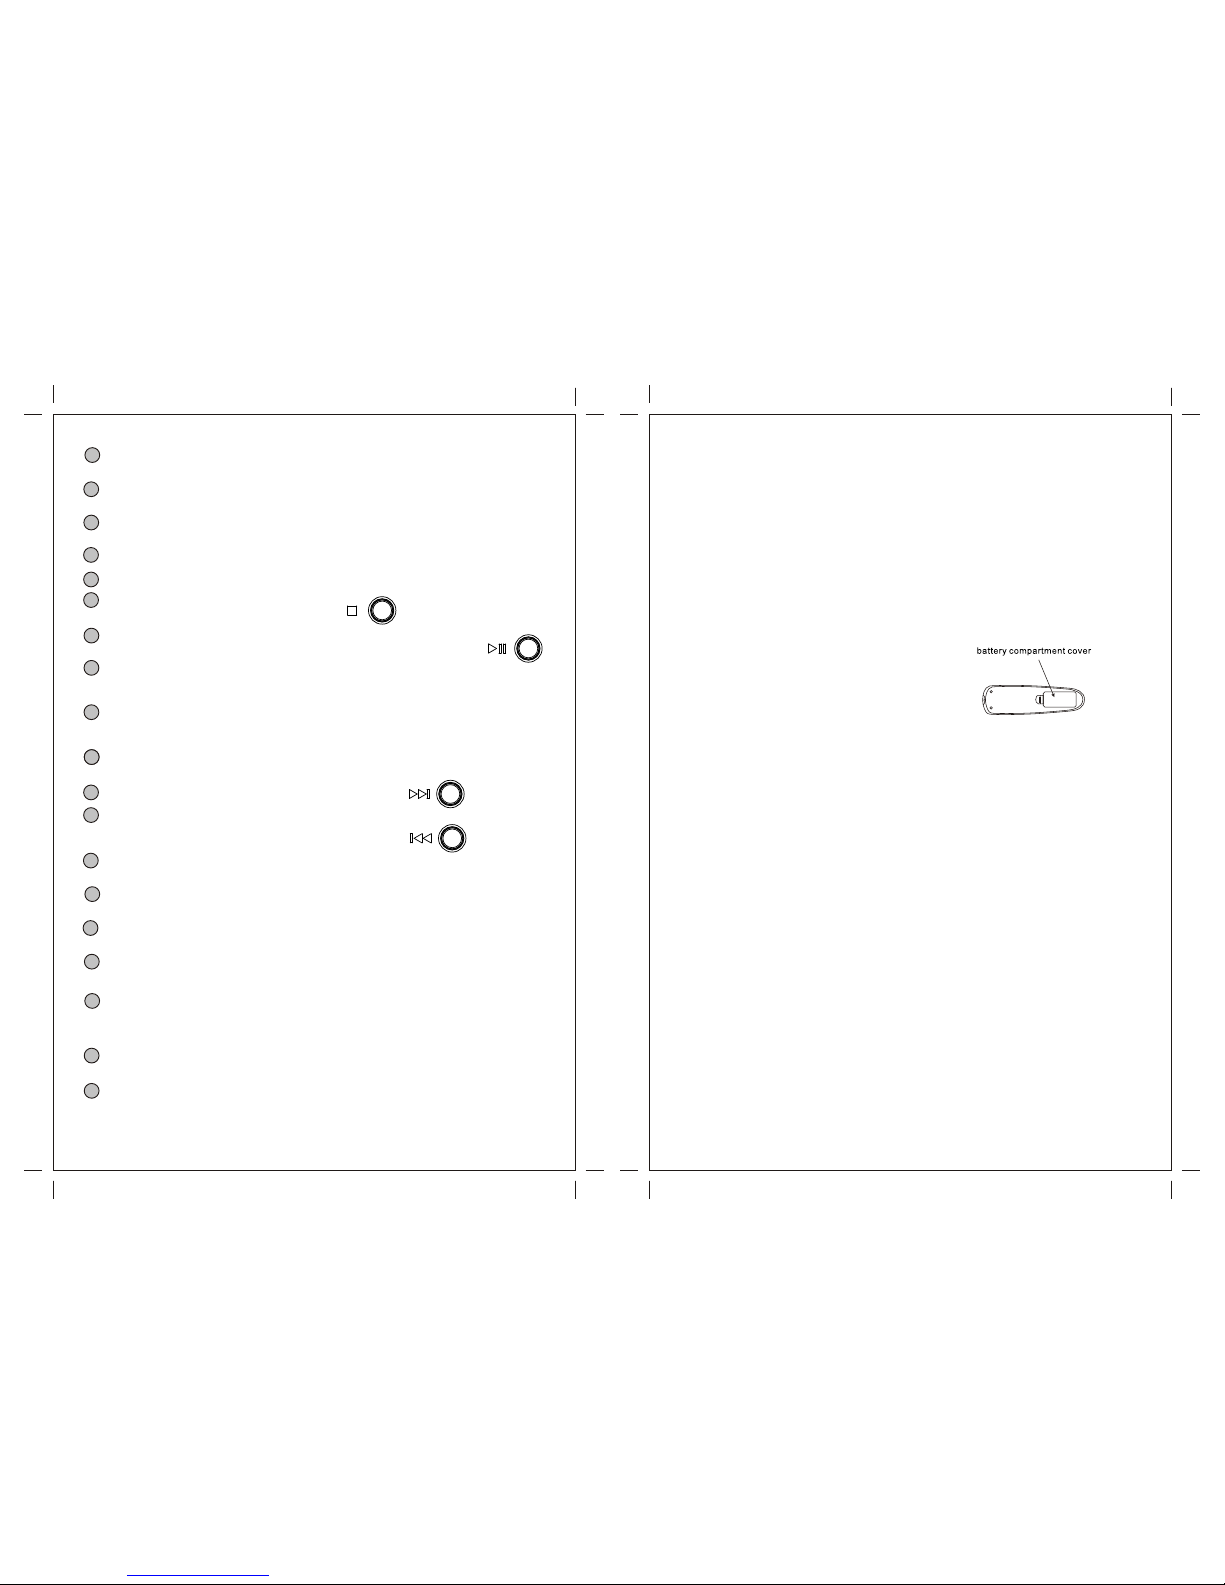
Battery Ins ta ll at io n
1. Remo ve the batt er y compa rt men t cove r.
2. Ins ert tw o “AAA ” bat ter ie s. Mak e sure th at the ba tte ri es are in se rte d with po la rit y “+” and
“-” pol es posi ti one d corr ect ly.
3. Clos e the cover.
Bat te ry Repl ac eme nt
If the dist anc e requ ire d betw een the rem ot e contr ol unit and mai n unit dec rea se s, the
bat te rie s are exhau st ed. In this cas e, ple ase rep la ce the batt eri es wit h new ones.
Pre ca uti on s conce rn ing bat ter ie s
Be sure to inser t the batt eri es wit h corre ct pos i ti ve “+” and nega ti ve “-” pola ri tie s.
Use bat ter ie s of t he same typ e, neve r use diffe re nt type s of b at ter ie s toget he r.
Rech ar gea bl e and non -r e-c ha rge ab le bat te rie s can be us e d. Re fer to th e pre cau ti ons on
the ir lab els and do not mix toge the r.
W hen th e rem ote co nt rol un it is not to be us ed for a lon g t im e ( mo re tha n a mo nt h),
rem ov e th e ba tte ri es f ro m th e re mot e co nt rol uni t to pre ve nt t hem fro m le ak ing . If the y
lea k, wi pe aw ay th e liq uid i nsi de th e bat te ry co mpa rt men t and r epl ac e the ba tt eri es wi th
new one s.
Do not heat or dis ass em ble ba tte ri es and nev er dis po se of old bat ter ie s by throw in g them
in a f ire .
8
9
10
11
12
13
14
17
15
16
18
20
19
21
22
23
PHO NE S
For pri va te list eni ng , first red uc e the volum e leve l to mi ni mum . Then inse rt the plu g from
you r head pho ne s into the PHON ES jack , and adju st the volu me by turni ng the VOLU ME
kno b. The soun d from spea ke rs will be cut off whil e the headp ho nes are plu gge d in.
AUT O/M AN UAL
Use thi s butto n to s el ect the mod e of t ra ck numb er assi gn men t.
CAS SE TTE EJE CT
24
25
26
 Loading...