

Page 1
Bedienungsanleitung
Manual
Victoria FY780
Page 2

2
Wichtige Sicherheitshinweise
Beim Gebrauch der Nähmaschine sollten grundlegende Sicherheitsvorkehrungen stets beachtet
werden. Bitte lesen Sie daher alle Hinweise durch, bevor Sie die Nähmaschine in Gebrauch
nehmen.
GEFAHR - Zum Schutz gegen elektrischen Schlag:
•
Die Nähmaschine nie unbeaufsichtigt lassen, solange sie am Stromnetz angeschIossen ist.
Nach Gebrauch und vor der Reinigung die Nähmaschine immer vom Stromnetz trennen.
•
Vor einem Glühlampenwechsel immer den Netzstecker ziehen. Nur Glühlampen des gleichen
Typs (15 W) verwenden.
WARNUNG - Zum Schutz gegen Verbrennungen, Feuer, elektrischen Schlag oder
Personenverletzungen:
•
Eine Nähmaschine ist kein Spielzeug. Erhöhte Vorsicht ist geboten, wenn die Nähmaschine
von oder in der Nähe von Kindern benutzt wird.
•
Diese Nähmaschine darf nur zu dem in dieser Bedienungsanleitung beschriebenen Zweck
eingesetzt werden. Es ist nur das hierin genannte, vom Hersteller empfohlene Zubehör zu
verwenden.
•
Diese Nähmaschine nicht benutzen, falls Kabel oder Stecker beschädigt sind, die Nähmaschine nicht störungsfrei funktioniert, fallen gelassen oder beschädigt wurde bzw. ins Wasser
gefallen ist. Bringen Sie die Nähmaschine in diesem Fall zum nächstgelegenen autorisierten
Händler oder entsprechenden Fachmann zur Überprüfung oder Reparatur.
•
Bei Gebrauch der Nähmaschine Lüftungsschlitze nicht blockieren und diese freihalten von
Fusseln, Staub- und Stoffrückständen.
•
Keine Gegenstände in Öffnungen an der Nähmaschine stecken oder hineinfallen lassen.
•
Die Nähmaschine darf nicht im Freien benutzt werden.
•
Die Nähmaschine nicht an Orten benutzen, an denen Treibgasprodukte (Sprays) oder
Sauerstoff verwendet werden.
•
Zum Ausschalten Schalter auf
"0"
stellen und den Netzstecker herausziehen.
•
Beim Trennen vom Stromnetz immer am Stecker und nicht am Kabel ziehen.
•
Finger von allen beweglichen Teilen fernhalten. Spezielle Vorsicht ist im Bereich der
Nähnadel angebracht.
•
Nur originale Stichplatten benutzen. Eine falsche Stichplatte kann zu Nadelbruch führen.
•
Keine krummen Nadeln verwenden.
•
Während des Nähens den Stoff weder ziehen noch schieben. Dies kann zu Nadelbruch
führen.
•
Nähmaschine bei Tätigkeiten im Bereich der Nadel wie Einfädeln, Nadelwechsel, Einfädeln
der Spule, Nähfußwechsel oder ähnlichen Tätigkeiten stets den Netzstecker ziehen.
•
Beim Entfernen von Abdeckungen, beim Ölen der Nähmaschine oder während anderer, in
dieser Bedienungsanleitung genannter Wartungsarbeiten muss der Netzstecker der
Nähmaschine immer gezogen sein.
Bewahren Sie diese Sicherheitshinweise sorgfältig auf!
Diese Nähmaschine ist nur für den Haushaltsgebrauch bestimmt.
Page 3

3
Important safety instructions
When using the sewing machine, basic safety precautions should always be followed. Read all instructions carefully before using the sewing machine.
DANGER - To reduce the risk of electric shock:
• The sewing machine should never be left unattended when plugged in. Always unplug this
sewing machine from the electrical outlet immediately after use and before cleaning.
• Always unplug the machine before changing the light bulb. Replace bulb with the same type
rated 15 watts.
WARNING -
To reduce the risk of burns, fire, electric shock, or injury to persons:
• Do not allow this machine to be used as a toy. Close attention is necessary when the sewing
machine is used by or near children.
• Use this sewing machine only for its intended use as described in this manual. Use only
accessories recommended by the manufacturer as contained in this manual.
• Never operate this sewing machine if it has a damaged cord or plug, if it is not working
properly, if it has been dropped or damaged, or dropped into water. Return the sewing
machine to the nearest authorized dealer or service center for examination, repair, electrical
or mechanical adjustment.
• Never operate the sewing machine with any of the air openings blocked. Keep the ventilation
openings of the sewing machine free from lint, dust and loose cloth.
• Never drop or insert any object into any openings.
• Do not use this machine outdoors.
• Do not operate this machine where areosol (spray) products are being used or where oxygen
is being administered.
• To disconnect, turn the switch to the "0" position, then remove plug from outlet.
• Do not unplug by pulling on the cord. To unplug, grasp the plug and pull
• Keep fingers away from all moving parts. Special care is required around the sewing machine
needle.
• Always use the proper needle plate. The wrong plate can cause the needle to break.
• Do not use a bent needle.
• Do not pull or push the fabric while sewing. It may deflect the needle causing it to break.
• Always unplug the machine when making and adjustments in the needle area such as
threading the needle, changing the needle, threading the bobbin, or changing the presser foot.
• Always unplug the sewing machine from the electrical outlet when removing covers,
lubricating, or when making any other user service adjustments mentioned in this instruction
manual.
Save these instructions!
This sewing machine is intended for household use only.
Page 4

4
Inhaltsverzeichnis
Wichtige Sicherheitshinweise . . . . . . . . . . . . . . . . . . . . . . . . . . . . . . . . . . . . . . . . . . . . . . . . . . . . . . . . . . .2
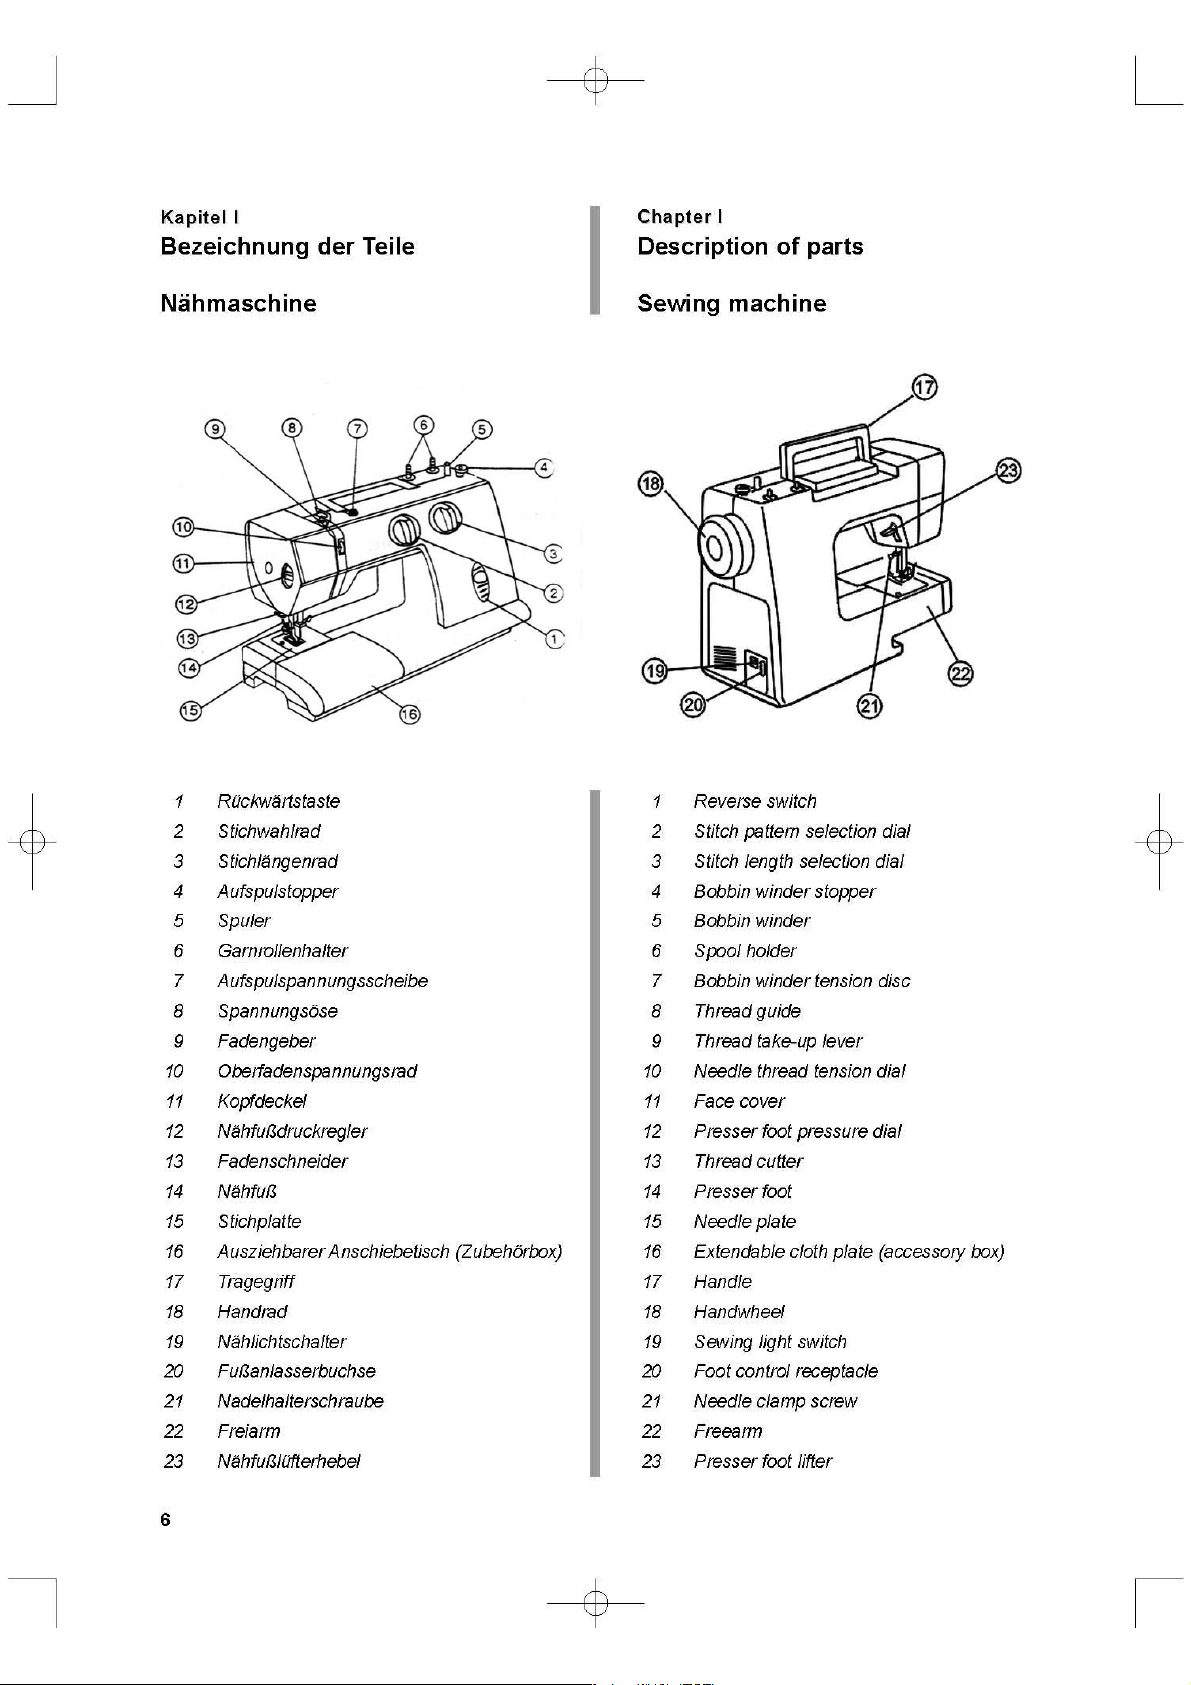
Bezeichnung der Teile
Nähmaschine . . . . . . . . . . . . . . . . . . . . . . . . . . . . . . . . . . . . . . . . . . . . . . . . . . . . . . . . . . . . . . . . . . . . . . . . . .6
Zubehör . . . . . . . . . . . . . . . . . . . . . . . . . . . . . . . . . . . . . . . . . . . . . . . . . . . . . . . . . . . . . . . . . . . . . . . . . . . . .7
Stromversorgung . . . . . . . . . . . . . . . . . . . . . . . . . . . . . . . . . . . . . . . . . . . . . . . . . . . . . . . . . . . . . . . . . . . . . . .8
Fußanlasser . . . . . . . . . . . . . . . . . . . . . . . . . . . . . . . . . . . . . . . . . . . . . . . . . . . . . . . . . . . . . . . . . . . . . . . . . .8
Vorbereitung der Näharbeit
Ausziehbarer Anschiebetisch . . . . . . . . . . . . . . . . . . . . . . . . . . . . . . . . . . . . . . . . . . . . . . . . . . . . . . . . . . . . .9
Freiarm-Nähen . . . . . . . . . . . . . . . . . . . . . . . . . . . . . . . . . . . . . . . . . . . . . . . . . . . . . . . . . . . . . . . . . . . . . . . .9
Nählicht . . . . . . . . . . . . . . . . . . . . . . . . . . . . . . . . . . . . . . . . . . . . . . . . . . . . . . . . . . . . . . . . . . . . . . . . . . . . .10
Wechseln des Nähfußes . . . . . . . . . . . . . . . . . . . . . . . . . . . . . . . . . . . . . . . . . . . . . . . . . . . . . . . . . . . . . . . .11
Wechseln der Nadel . . . . . . . . . . . . . . . . . . . . . . . . . . . . . . . . . . . . . . . . . . . . . . . . . . . . . . . . . . . . . . . . . . .12
Nadel- und Fadentabelle . . . . . . . . . . . . . . . . . . . . . . . . . . . . . . . . . . . . . . . . . . . . . . . . . . . . . . . . . . . . . . . .13
Garnrollenhalter . . . . . . . . . . . . . . . . . . . . . . . . . . . . . . . . . . . . . . . . . . . . . . . . . . . . . . . . . . . . . . . . . . . . . . .14
Herausnehmen und Einsetzen der Spulenkapsel . . . . . . . . . . . . . . . . . . . . . . . . . . . . . . . . . . . . . . . . . . . . .15
Aufspulen . . . . . . . . . . . . . . . . . . . . . . . . . . . . . . . . . . . . . . . . . . . . . . . . . . . . . . . . . . . . . . . . . . . . . . . . . . .16
Einfädeln der Spulenkapsel . . . . . . . . . . . . . . . . . . . . . . . . . . . . . . . . . . . . . . . . . . . . . . . . . . . . . . . . . . . . . .17
Einfädeln des Oberfadens . . . . . . . . . . . . . . . . . . . . . . . . . . . . . . . . . . . . . . . . . . . . . . . . . . . . . . . . . . . . . .18
Heraufholen des Unterfadens . . . . . . . . . . . . . . . . . . . . . . . . . . . . . . . . . . . . . . . . . . . . . . . . . . . . . . . . . . . .19
Einstellen der Oberfadenspannung . . . . . . . . . . . . . . . . . . . . . . . . . . . . . . . . . . . . . . . . . . . . . . . . . . . . . . . .20
Stichwahlrad . . . . . . . . . . . . . . . . . . . . . . . . . . . . . . . . . . . . . . . . . . . . . . . . . . . . . . . . . . . . . . . . . . . . . . . . .21
Umschalten auf Trikotstiche . . . . . . . . . . . . . . . . . . . . . . . . . . . . . . . . . . . . . . . . . . . . . . . . . . . . . . . . . . . . .21
Stichlängenrad . . . . . . . . . . . . . . . . . . . . . . . . . . . . . . . . . . . . . . . . . . . . . . . . . . . . . . . . . . . . . . . . . . . . . . . .22
Rückwärtstaste . . . . . . . . . . . . . . . . . . . . . . . . . . . . . . . . . . . . . . . . . . . . . . . . . . . . . . . . . . . . . . . . . . . . . . .23
Nähfußdruckregler . . . . . . . . . . . . . . . . . . . . . . . . . . . . . . . . . . . . . . . . . . . . . . . . . . . . . . . . . . . . . . . . . . . . .23
Absenken des Transporteurs . . . . . . . . . . . . . . . . . . . . . . . . . . . . . . . . . . . . . . . . . . . . . . . . . . . . . . . . . . . .24
Erste Schritte
Einfache Nähte . . . . . . . . . . . . . . . . . . . . . . . . . . . . . . . . . . . . . . . . . . . . . . . . . . . . . . . . . . . . . . . . . . . . . . .25
Ändern der Nährichtung . . . . . . . . . . . . . . . . . . . . . . . . . . . . . . . . . . . . . . . . . . . . . . . . . . . . . . . . . . . . . . . .26
Verwendung der Markierungen auf der Stichplatte . . . . . . . . . . . . . . . . . . . . . . . . . . . . . . . . . . . . . . . . . . .26
Nähen eines rechten Winkels . . . . . . . . . . . . . . . . . . . . . . . . . . . . . . . . . . . . . . . . . . . . . . . . . . . . . . . . . . . .27
Nutzstiche
Stichübersicht . . . . . . . . . . . . . . . . . . . . . . . . . . . . . . . . . . . . . . . . . . . . . . . . . . . . . . . . . . . . . . . . . . . . . . . .28
Geradstich . . . . . . . . . . . . . . . . . . . . . . . . . . . . . . . . . . . . . . . . . . . . . . . . . . . . . . . . . . . . . . . . . . . . . . . . . . .29
Zickzackstich . . . . . . . . . . . . . . . . . . . . . . . . . . . . . . . . . . . . . . . . . . . . . . . . . . . . . . . . . . . . . . . . . . . . . . . . .30
Dreifachgenähter Zickzackstich . . . . . . . . . . . . . . . . . . . . . . . . . . . . . . . . . . . . . . . . . . . . . . . . . . . . . . . . . . .31
Blindstich . . . . . . . . . . . . . . . . . . . . . . . . . . . . . . . . . . . . . . . . . . . . . . . . . . . . . . . . . . . . . . . . . . . . . . . . . . . .32
Dessousstich . . . . . . . . . . . . . . . . . . . . . . . . . . . . . . . . . . . . . . . . . . . . . . . . . . . . . . . . . . . . . . . . . . . . . . . . .33
Brückenstich . . . . . . . . . . . . . . . . . . . . . . . . . . . . . . . . . . . . . . . . . . . . . . . . . . . . . . . . . . . . . . . . . . . . . . . . .34
Trikotstiche
Stichübersicht . . . . . . . . . . . . . . . . . . . . . . . . . . . . . . . . . . . . . . . . . . . . . . . . . . . . . . . . . . . . . . . . . . . . . . . .35
Dreifachgenähter Geradstich . . . . . . . . . . . . . . . . . . . . . . . . . . . . . . . . . . . . . . . . . . . . . . . . . . . . . . . . . . . .36
Zickzack-Stretchstich . . . . . . . . . . . . . . . . . . . . . . . . . . . . . . . . . . . . . . . . . . . . . . . . . . . . . . . . . . . . . . . . . . .37
Wabenstich . . . . . . . . . . . . . . . . . . . . . . . . . . . . . . . . . . . . . . . . . . . . . . . . . . . . . . . . . . . . . . . . . . . . . . . . . .38
Elastischer Overlockstich . . . . . . . . . . . . . . . . . . . . . . . . . . . . . . . . . . . . . . . . . . . . . . . . . . . . . . . . . . . . . . . .39
Overlockstich . . . . . . . . . . . . . . . . . . . . . . . . . . . . . . . . . . . . . . . . . . . . . . . . . . . . . . . . . . . . . . . . . . . . . . . . .40
Stretch-Overlockstich . . . . . . . . . . . . . . . . . . . . . . . . . . . . . . . . . . . . . . . . . . . . . . . . . . . . . . . . . . . . . . . . . . .41
Geschlossener Overlockstich . . . . . . . . . . . . . . . . . . . . . . . . . . . . . . . . . . . . . . . . . . . . . . . . . . . . . . . . . . . .42
Nähtechniken
Knöpfe annähen . . . . . . . . . . . . . . . . . . . . . . . . . . . . . . . . . . . . . . . . . . . . . . . . . . . . . . . . . . . . . . . . . . . . . .43
Knopfloch nähen . . . . . . . . . . . . . . . . . . . . . . . . . . . . . . . . . . . . . . . . . . . . . . . . . . . . . . . . . . . . . . . . . . . . . .45
Knopflöcher mit Beilaufgarn . . . . . . . . . . . . . . . . . . . . . . . . . . . . . . . . . . . . . . . . . . . . . . . . . . . . . . . . . . . . .47
Einnähen von Reissverschlüssen . . . . . . . . . . . . . . . . . . . . . . . . . . . . . . . . . . . . . . . . . . . . . . . . . . . . . . . . .48
Wartung der Nähmaschine
Reinigen des Greifers . . . . . . . . . . . . . . . . . . . . . . . . . . . . . . . . . . . . . . . . . . . . . . . . . . . . . . . . . . . . . . . . . .49
Reinigung des Transporteurs . . . . . . . . . . . . . . . . . . . . . . . . . . . . . . . . . . . . . . . . . . . . . . . . . . . . . . . . . . . .50
Ölen der Maschine . . . . . . . . . . . . . . . . . . . . . . . . . . . . . . . . . . . . . . . . . . . . . . . . . . . . . . . . . . . . . . . . . . . .51
Fehlerbehebung . . . . . . . . . . . . . . . . . . . . . . . . . . . . . . . . . . . . . . . . . . . . . . . . . . . . . . . . . . . . . . . . . . .52, 53
Technische Daten . . . . . . . . . . . . . . . . . . . . . . . . . . . . . . . . . . . . . . . . . . . . . . . . . . . . . . . . . . . . . . . . . . . .56
Garantie . . . . . . . . . . . . . . . . . . . . . . . . . . . . . . . . . . . . . . . . . . . . . . . . . . . . . . . . . . . . . . . . . . . . . . . . . . . .56
Page 5

5
Table of Contents
Important safety instructions . . . . . . . . . . . . . . . . . . . . . . . . . . . . . . . . . . . . . . . . . . . . . . . . . . . . . . . . . . .3
Description of parts
Sewing machine . . . . . . . . . . . . . . . . . . . . . . . . . . . . . . . . . . . . . . . . . . . . . . . . . . . . . . . . . . . . . . . . . . . . . . .6
Accessories . . . . . . . . . . . . . . . . . . . . . . . . . . . . . . . . . . . . . . . . . . . . . . . . . . . . . . . . . . . . . . . . . . . . . . . . . . .7
Power supply . . . . . . . . . . . . . . . . . . . . . . . . . . . . . . . . . . . . . . . . . . . . . . . . . . . . . . . . . . . . . . . . . . . . . . . . . .8
Foot control . . . . . . . . . . . . . . . . . . . . . . . . . . . . . . . . . . . . . . . . . . . . . . . . . . . . . . . . . . . . . . . . . . . . . . . . . . .8
Preparation before sewing
Extendable cloth plate . . . . . . . . . . . . . . . . . . . . . . . . . . . . . . . . . . . . . . . . . . . . . . . . . . . . . . . . . . . . . . . . . .9
Freearm sewing . . . . . . . . . . . . . . . . . . . . . . . . . . . . . . . . . . . . . . . . . . . . . . . . . . . . . . . . . . . . . . . . . . . . . . .9
Sewing light . . . . . . . . . . . . . . . . . . . . . . . . . . . . . . . . . . . . . . . . . . . . . . . . . . . . . . . . . . . . . . . . . . . . . . . . . .10
Changing the presser foot . . . . . . . . . . . . . . . . . . . . . . . . . . . . . . . . . . . . . . . . . . . . . . . . . . . . . . . . . . . . . . .11
Changing the needle . . . . . . . . . . . . . . . . . . . . . . . . . . . . . . . . . . . . . . . . . . . . . . . . . . . . . . . . . . . . . . . . . . .12
Needle and thread chart . . . . . . . . . . . . . . . . . . . . . . . . . . . . . . . . . . . . . . . . . . . . . . . . . . . . . . . . . . . . . . . .13
Spool holders . . . . . . . . . . . . . . . . . . . . . . . . . . . . . . . . . . . . . . . . . . . . . . . . . . . . . . . . . . . . . . . . . . . . . . . . .14
Removing and loading the bobbin case . . . . . . . . . . . . . . . . . . . . . . . . . . . . . . . . . . . . . . . . . . . . . . . . . . . .15
Winding the bobbin . . . . . . . . . . . . . . . . . . . . . . . . . . . . . . . . . . . . . . . . . . . . . . . . . . . . . . . . . . . . . . . . . . . .16
Threading the bobbin case . . . . . . . . . . . . . . . . . . . . . . . . . . . . . . . . . . . . . . . . . . . . . . . . . . . . . . . . . . . . . .17
Threading the machine . . . . . . . . . . . . . . . . . . . . . . . . . . . . . . . . . . . . . . . . . . . . . . . . . . . . . . . . . . . . . . . . .18
Pulling up the bobbin thread . . . . . . . . . . . . . . . . . . . . . . . . . . . . . . . . . . . . . . . . . . . . . . . . . . . . . . . . . . . . .19
Adjusting the tension of the needle thread . . . . . . . . . . . . . . . . . . . . . . . . . . . . . . . . . . . . . . . . . . . . . . . . . .20
Stitch pattern selection dial . . . . . . . . . . . . . . . . . . . . . . . . . . . . . . . . . . . . . . . . . . . . . . . . . . . . . . . . . . . . . .21
Switching to elastic stitches . . . . . . . . . . . . . . . . . . . . . . . . . . . . . . . . . . . . . . . . . . . . . . . . . . . . . . . . . . . . . .21
Stitch length selection dial . . . . . . . . . . . . . . . . . . . . . . . . . . . . . . . . . . . . . . . . . . . . . . . . . . . . . . . . . . . . . . .22
Reverse switch . . . . . . . . . . . . . . . . . . . . . . . . . . . . . . . . . . . . . . . . . . . . . . . . . . . . . . . . . . . . . . . . . . . . . . .23
Presser foot pressure dial . . . . . . . . . . . . . . . . . . . . . . . . . . . . . . . . . . . . . . . . . . . . . . . . . . . . . . . . . . . . . . .23
Lowering the feed dog . . . . . . . . . . . . . . . . . . . . . . . . . . . . . . . . . . . . . . . . . . . . . . . . . . . . . . . . . . . . . . . . . .24
Simply sewing
Start sewing . . . . . . . . . . . . . . . . . . . . . . . . . . . . . . . . . . . . . . . . . . . . . . . . . . . . . . . . . . . . . . . . . . . . . . . . . .25
Changing the sewing direction . . . . . . . . . . . . . . . . . . . . . . . . . . . . . . . . . . . . . . . . . . . . . . . . . . . . . . . . . . .26
Using the alignment marks on the needle plate . . . . . . . . . . . . . . . . . . . . . . . . . . . . . . . . . . . . . . . . . . . . . .26
Turning corners . . . . . . . . . . . . . . . . . . . . . . . . . . . . . . . . . . . . . . . . . . . . . . . . . . . . . . . . . . . . . . . . . . . . . . .27
Utility stitches
Stitch chart . . . . . . . . . . . . . . . . . . . . . . . . . . . . . . . . . . . . . . . . . . . . . . . . . . . . . . . . . . . . . . . . . . . . . . . . . . .28
Straight stitch . . . . . . . . . . . . . . . . . . . . . . . . . . . . . . . . . . . . . . . . . . . . . . . . . . . . . . . . . . . . . . . . . . . . . . . . .29
Zigzag stitch . . . . . . . . . . . . . . . . . . . . . . . . . . . . . . . . . . . . . . . . . . . . . . . . . . . . . . . . . . . . . . . . . . . . . . . . . .30
Triple zizag stitch . . . . . . . . . . . . . . . . . . . . . . . . . . . . . . . . . . . . . . . . . . . . . . . . . . . . . . . . . . . . . . . . . . . . . .31
Blind stitch . . . . . . . . . . . . . . . . . . . . . . . . . . . . . . . . . . . . . . . . . . . . . . . . . . . . . . . . . . . . . . . . . . . . . . . . . .32
Shell stitch . . . . . . . . . . . . . . . . . . . . . . . . . . . . . . . . . . . . . . . . . . . . . . . . . . . . . . . . . . . . . . . . . . . . . . . . . . .33
Double-action stitch . . . . . . . . . . . . . . . . . . . . . . . . . . . . . . . . . . . . . . . . . . . . . . . . . . . . . . . . . . . . . . . . . . . .34
Elastic stitches
Stitch chart . . . . . . . . . . . . . . . . . . . . . . . . . . . . . . . . . . . . . . . . . . . . . . . . . . . . . . . . . . . . . . . . . . . . . . . . . . .35
Triple straight stitch . . . . . . . . . . . . . . . . . . . . . . . . . . . . . . . . . . . . . . . . . . . . . . . . . . . . . . . . . . . . . . . . . . .36
Ric-rac stitch . . . . . . . . . . . . . . . . . . . . . . . . . . . . . . . . . . . . . . . . . . . . . . . . . . . . . . . . . . . . . . . . . . . . . . . . .37
Honeycomb stitch . . . . . . . . . . . . . . . . . . . . . . . . . . . . . . . . . . . . . . . . . . . . . . . . . . . . . . . . . . . . . . . . . . . . .38
Elastic overlock stitch . . . . . . . . . . . . . . . . . . . . . . . . . . . . . . . . . . . . . . . . . . . . . . . . . . . . . . . . . . . . . . . . . .39
Overlock stitch . . . . . . . . . . . . . . . . . . . . . . . . . . . . . . . . . . . . . . . . . . . . . . . . . . . . . . . . . . . . . . . . . . . . . . . .40
Stretch overlock stitch . . . . . . . . . . . . . . . . . . . . . . . . . . . . . . . . . . . . . . . . . . . . . . . . . . . . . . . . . . . . . . . . . .41
Closed overlock stitch . . . . . . . . . . . . . . . . . . . . . . . . . . . . . . . . . . . . . . . . . . . . . . . . . . . . . . . . . . . . . . . . . .42
Sewing techniques
Sewing on buttons . . . . . . . . . . . . . . . . . . . . . . . . . . . . . . . . . . . . . . . . . . . . . . . . . . . . . . . . . . . . . . . . . . . .43
Sewing buttonholes . . . . . . . . . . . . . . . . . . . . . . . . . . . . . . . . . . . . . . . . . . . . . . . . . . . . . . . . . . . . . . . . . . . .45
Corded buttonholes . . . . . . . . . . . . . . . . . . . . . . . . . . . . . . . . . . . . . . . . . . . . . . . . . . . . . . . . . . . . . . . . . . . .47
Inserting zippers . . . . . . . . . . . . . . . . . . . . . . . . . . . . . . . . . . . . . . . . . . . . . . . . . . . . . . . . . . . . . . . . . . . . . .48
Maintenance
Cleaning the hook . . . . . . . . . . . . . . . . . . . . . . . . . . . . . . . . . . . . . . . . . . . . . . . . . . . . . . . . . . . . . . . . . . . . .49
Cleaning the feed dog . . . . . . . . . . . . . . . . . . . . . . . . . . . . . . . . . . . . . . . . . . . . . . . . . . . . . . . . . . . . . . . . . .50
Oiling the machine . . . . . . . . . . . . . . . . . . . . . . . . . . . . . . . . . . . . . . . . . . . . . . . . . . . . . . . . . . . . . . . . . . . . .51
Troubleshooting . . . . . . . . . . . . . . . . . . . . . . . . . . . . . . . . . . . . . . . . . . . . . . . . . . . . . . . . . . . . . . . . . . . .54, 55
Sewing machine specifications . . . . . . . . . . . . . . . . . . . . . . . . . . . . . . . . . . . . . . . . . . . . . . . . . . . . . . . .57
Warranty . . . . . . . . . . . . . . . . . . . . . . . . . . . . . . . . . . . . . . . . . . . . . . . . . . . . . . . . . . . . . . . . . . . . . . . . . . . .57
Page 6
Page 7

Zubehör Accessories
1 Zipper foot
2 Buttonhole foot
3 Guide
4 Seam ripper
5 Screwdriver
6 Bobbins (3 pcs.)
7 Needle pack
8 Oil
9 Accessory box
1 Reißverschlussfuß
2 Knopflochfuß
3 Führungsschiene
4 Knopflochschneider
5 Schraubendreher
6 Spulen (3 Stück)
7 Nadelsatz
8Öl
9 Zubehörbox
7
1
2
4
6
7
9
8
5
3
Page 8
8
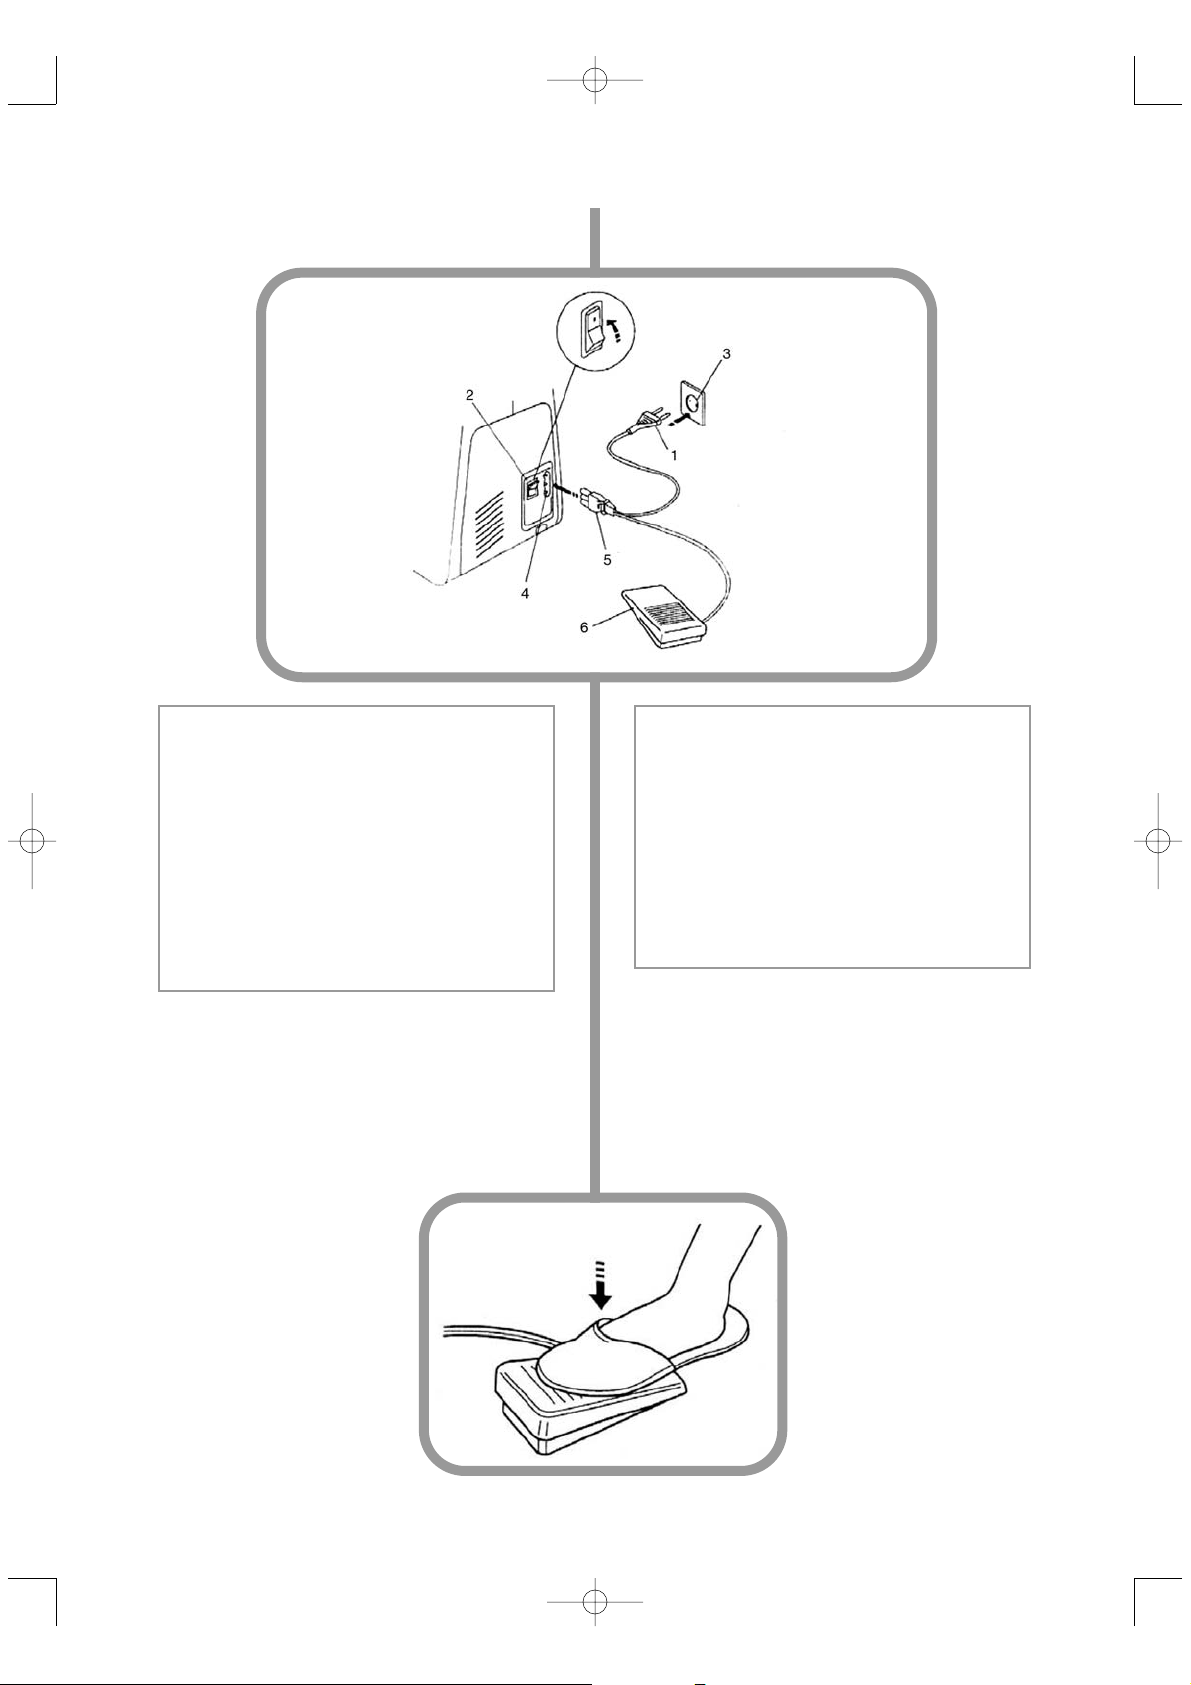
Stromversorgung Power Supply
1. Führen Sie den Stecker 5 des Fußanlasserkabels in die entsprechende Buchse 4 an der
Nähmaschine ein.
2. Verbinden Sie den Netzstecker 1 mit einer
Netzsteckdose 3.
3. Schalten Sie das Nählicht ein, indem Sie den
Schalter 2 auf 1 stellen.
1. Connect machine plug 5 to machine interface
4 on the sewing machine.
2. Connect mains plug 1 to an electrical outlet 3.
3. Switch on the sewing light by setting switch 2
to 1.
Fußanlasser
Mit Hilfe des Fußanlassers 6
können Sie die Nähgeschwindigkeit bestimmen. Je weiter
der Fußanlasser nach unten
gedrückt wird, desto schneller
näht die Maschine.
Foot control
The foot control 6 lets you
control the sewing speed.
The further you press the
foot control down, the faster
the machine will stitch.
Achtung
Stellen Sie sicher, dass die auf der Maschine
angegebene Spannung und Frequenz mit der
Spannung und Frequenz des Stromnetzes
übereinstimmen, bevor Sie die Maschine anschließen!
Bei Schalter 2 handelt es sich nicht um einen
Netzschalter, sondern lediglich um einen Schalter für das Nählicht! Ziehen Sie stets den Stecker aus der Steckdose, bevor Sie Wartungsarbeiten, etc. durchführen.
Caution
Make sure that the voltage and frequency indicated on the machine are identical to the voltage and frequency of power supply prior to connecting the machine to the power!
Switch 2 is not a power switch but simply a
switch for the sewing light! Therefore always
disconnect the machine by removing the plug
from the socket before carrying out maintenance work, etc.
Page 9
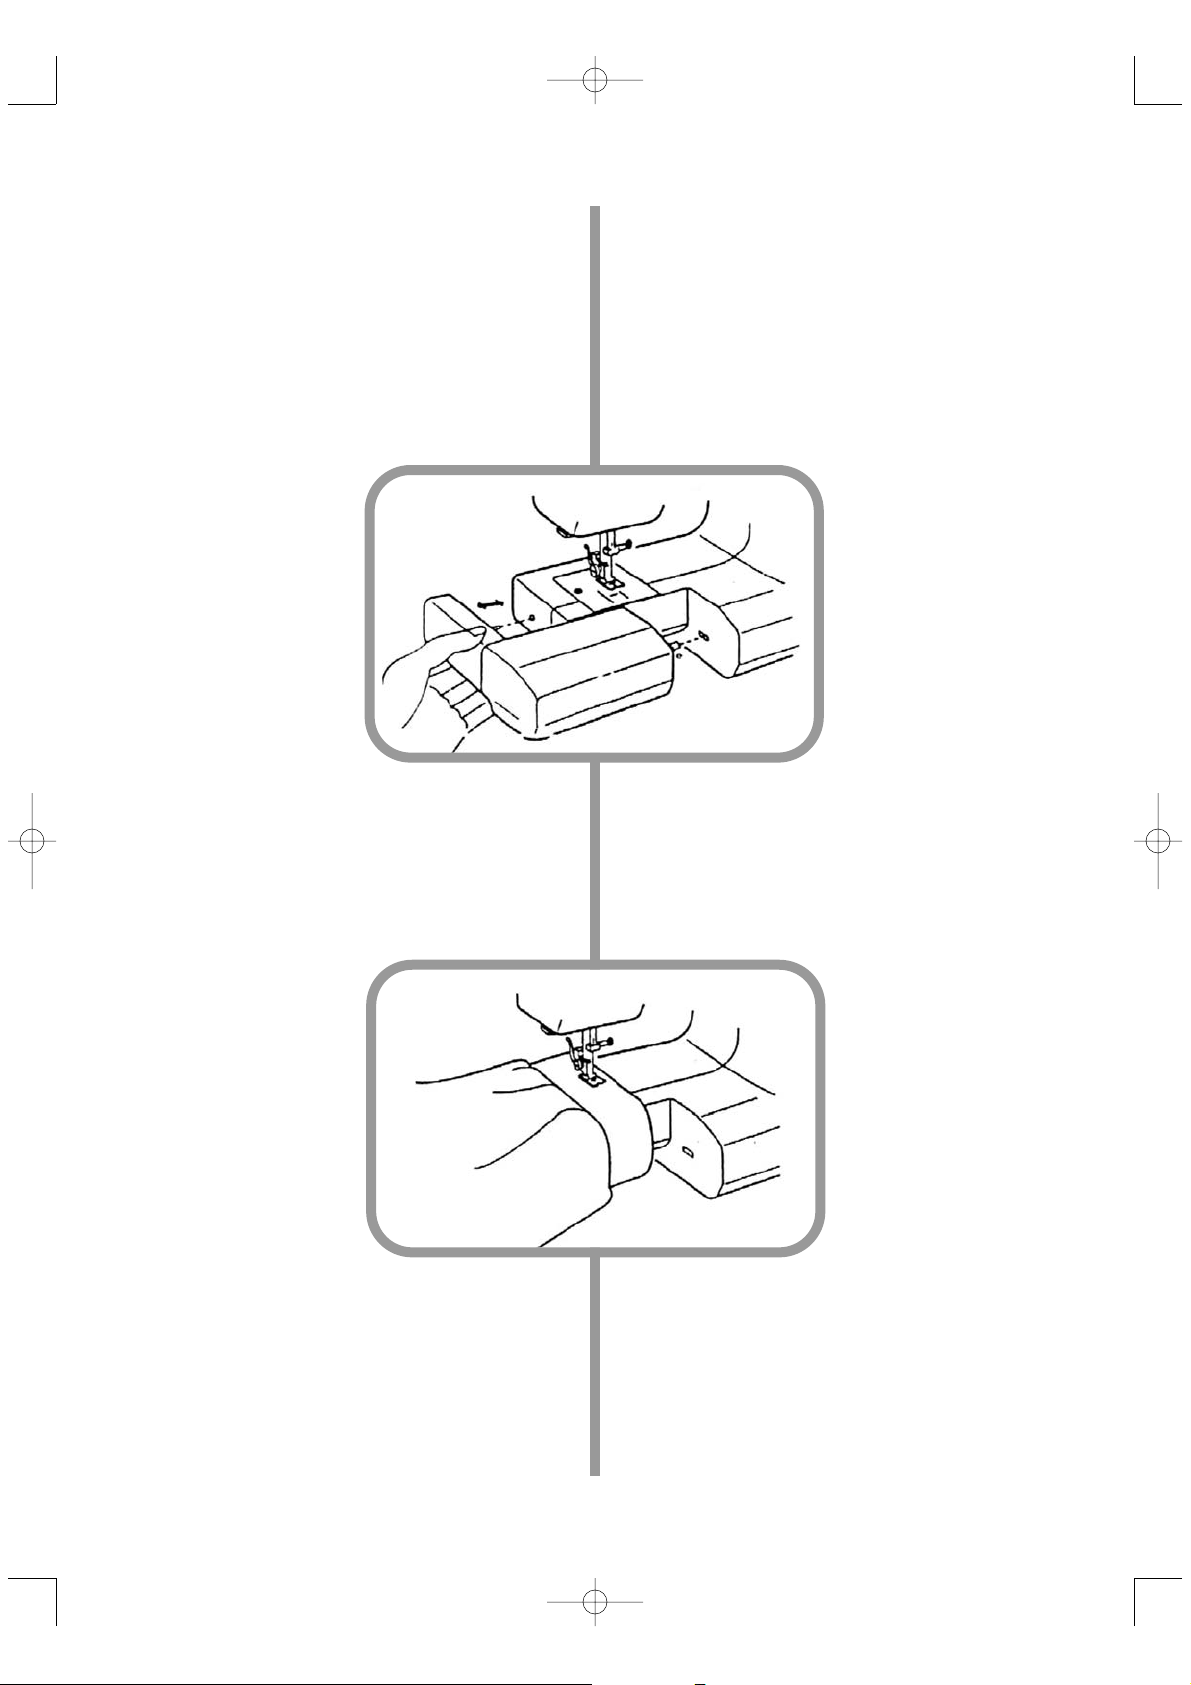
Preparation before sewing
Freearm sewing
Using the freearm, you can avoid cloth piling up
in front of needle while sewing pockets and hemming tubular goods such as sleeves and waist
edges. You can also easily darn knees, elbows
and children’s clothes.
To remove the cloth plate
Remove the extendable cloth plate by pulling it to
the left as shown in the illustration above.
To replace the cloth plate
Push the cloth plate back onto the sewing machine from the left until it clicks into place.
Freiarm-Nähen
Mit dem Freiarm vermeiden Sie einen Stoffstau
vor der Nähnadel beim Nähen von Taschen, Säumen und bei rundgeschlossenen Nähten an
Ärmeln, Taillenausschnitten und anderen gerundeten Nähteilen. Außerdem lassen sich Stellen
an Knie und Ellbogen sowie Kinderkleidung damit
leichter ausbessern.
Entfernen des Anschiebetisches
Ziehen Sie den Anschiebetisch wie oben abgebildet nach links ab.
Einsetzen des Anschiebetisches
Schieben Sie den Anschiebetisch von links auf
die Nähmaschine, bis er hörbar einrastet.
Ausziehbarer Anschiebetisch
Der ausziehbare Anschiebetisch vergrößert beim
Nähen den Arbeitsbereich. Er kann aber auch
problemlos abgenommen werden, um die Maschine in eine Freiarmmaschine zu verwandeln.
Die Benutzung des Freiarms ermöglicht das Nähen an schwer zugänglichen Stellen.
Extendable cloth plate
The extendable cloth plate enlargens the workspace when sewing. It can also be easily removed to turn the sewing machine into a freearm
machine. Using the freearm lets you sew in pla-
ces which are otherwise
difficult to access.
Vorbereitung der Näharbeit
Kapitel II
Kapitel II
Chapter II
Chapter II
9
Page 10
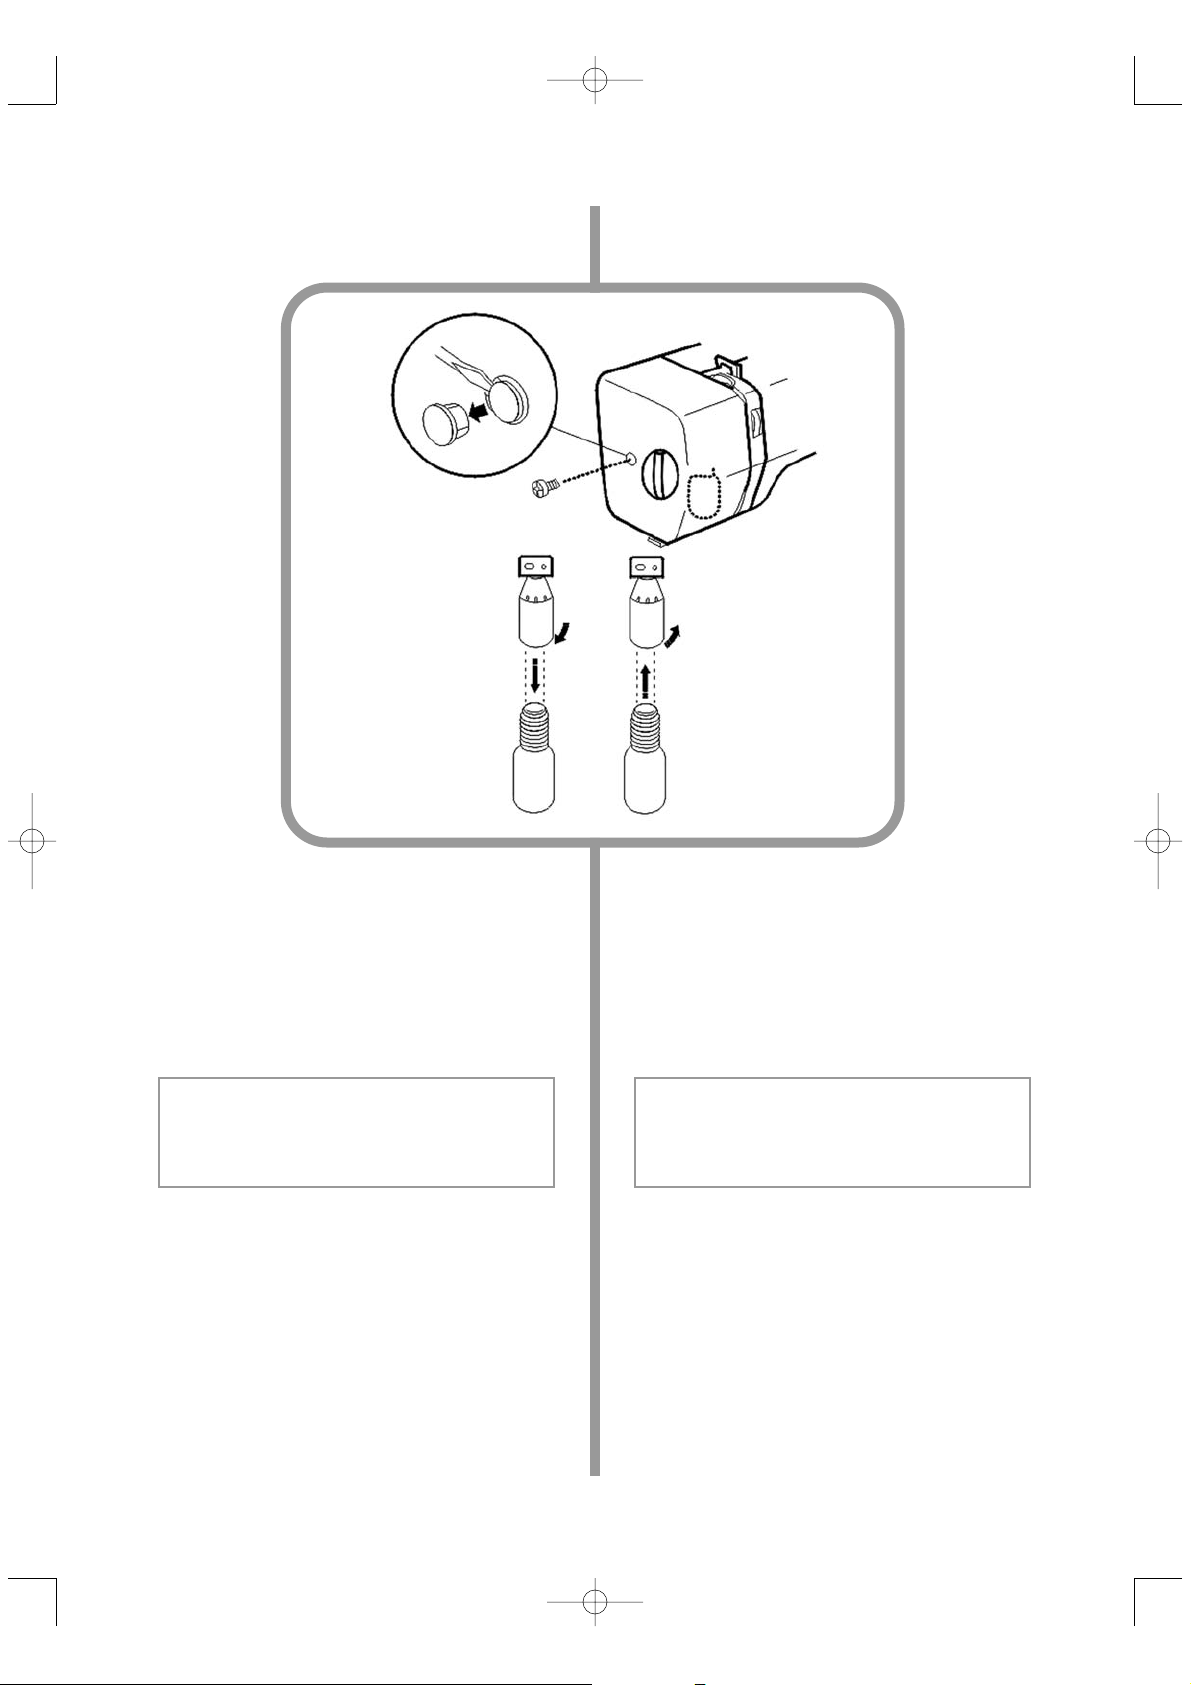
Nählicht Sewing light
10
Das Nählicht befindet sich unter dem Kopfdeckel.
Nehmen Sie den Kopfdeckel ab, wenn Sie die
Glühbirne auswechseln möchten. Entfernen Sie
dazu die Schraubenkappe und drehen Sie die
Schraube an der Seite des Kopfdeckels mit
einem Schraubendreher heraus.
The sewing light is located under the face cover.
Remove the face cover, if you need to change the
light bulb. To do so, first remove the screw cap
and then unscrew the screw at the side of the
face cover with a screwdriver.
Achtung
Schalten Sie die Nähmaschine vor dem Auswechseln der Glühbirne stets aus und ziehen
Sie den Netzstecker heraus!
Caution
Always switch off and unplug the machine before replacing the light bulb!
Entfernen der Glühbirne
Drehen Sie die Glühbirne nach links, um sie zu
entfernen.
Einsetzen der Glühbirne
Setzen Sie die Glühbirne ein und drehen Sie sie
nach rechts.
Removing the bulb
To remove the bulb, turn the bulb in a clockwise
direction.
Replacing the bulb
To replace the bulb, insert it into the socket and
turn it anti-clockwise.
Page 11
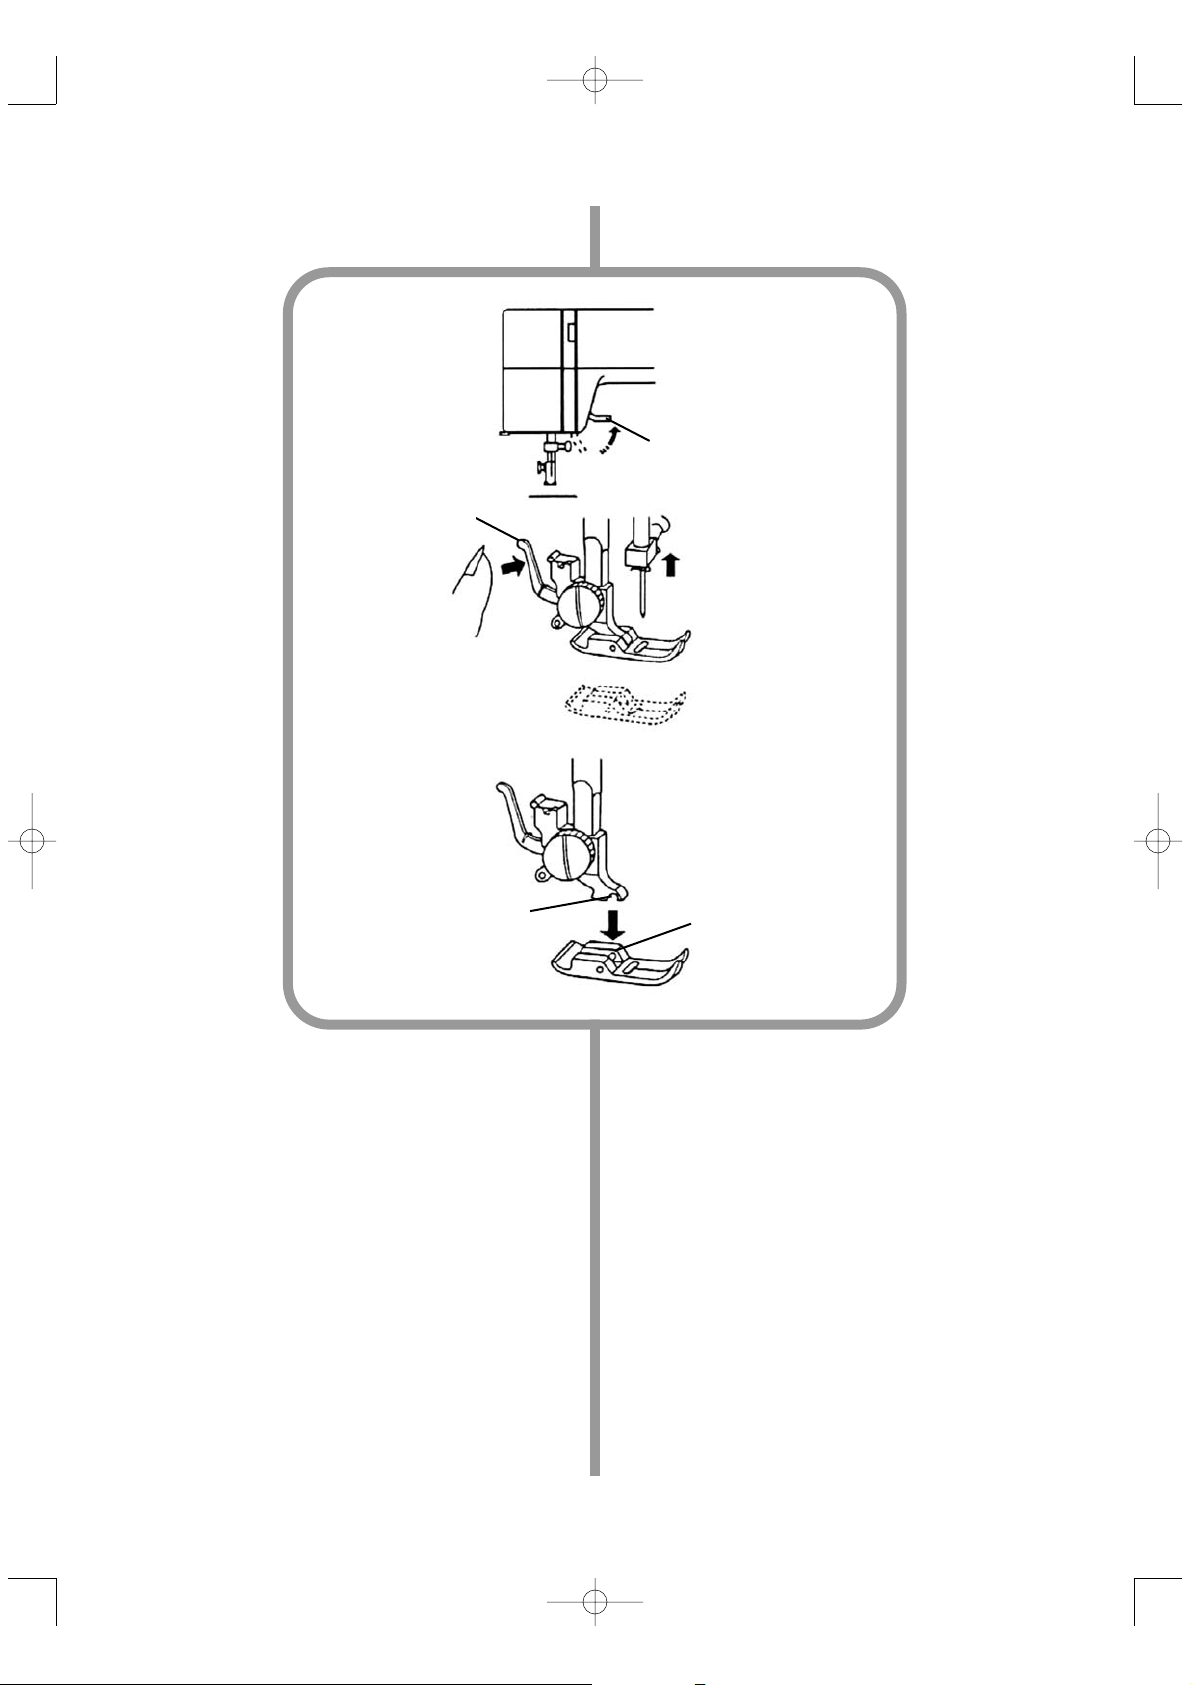
Wechseln des Nähfußes Changing the presser foot
Entfernen
Bringen Sie die Nadel in die höchste Position,
indem Sie das Handrad auf sich zu bewegen.
Stellen Sie den Nähfußlüfterhebel 1 nach oben
und lösen Sie den Nähfuß, indem Sie den Füßchenhebel 2 an der Rückseite des Nähfußhalters
zu sich drücken.
Einsetzen
Legen Sie den Nähfuß so auf die Stichplatte,
dass sich der Bügel 3 des Nähfußes genau unterhalb der Nut 4 des Nähfußhalters befindet. Senken Sie dann den Nähfußlüfterhebel ab und stellen Sie dabei sicher, dass Nut und Bügel ineinander greifen. Drücken Sie nun den Füßchenheber
zu sich. Der Nähfuß rastet hörbar in den
Nähfußhalter ein und ist wieder fixiert.
Removing
Turn the handwheel towards you to raise the
needle to its highest position. Then lift the presser
foot using the presser foot lifter 1. Pull the little
lever 2 at the back of the presser foot holder
towards you to release the presser foot.
Inserting
Position the presser foot on the needle plate so
that clamp 3 on the presser foot is directly positioned under groove 4 of the presser foot holder.
Lower the presser foot lifter again, making sure
that the clamp is in the groove. Then pull the little
lever at the back of the presser foot holder
towards you again. The presser foot will now
automatically snap on.
3
4
2
1
11
Page 12
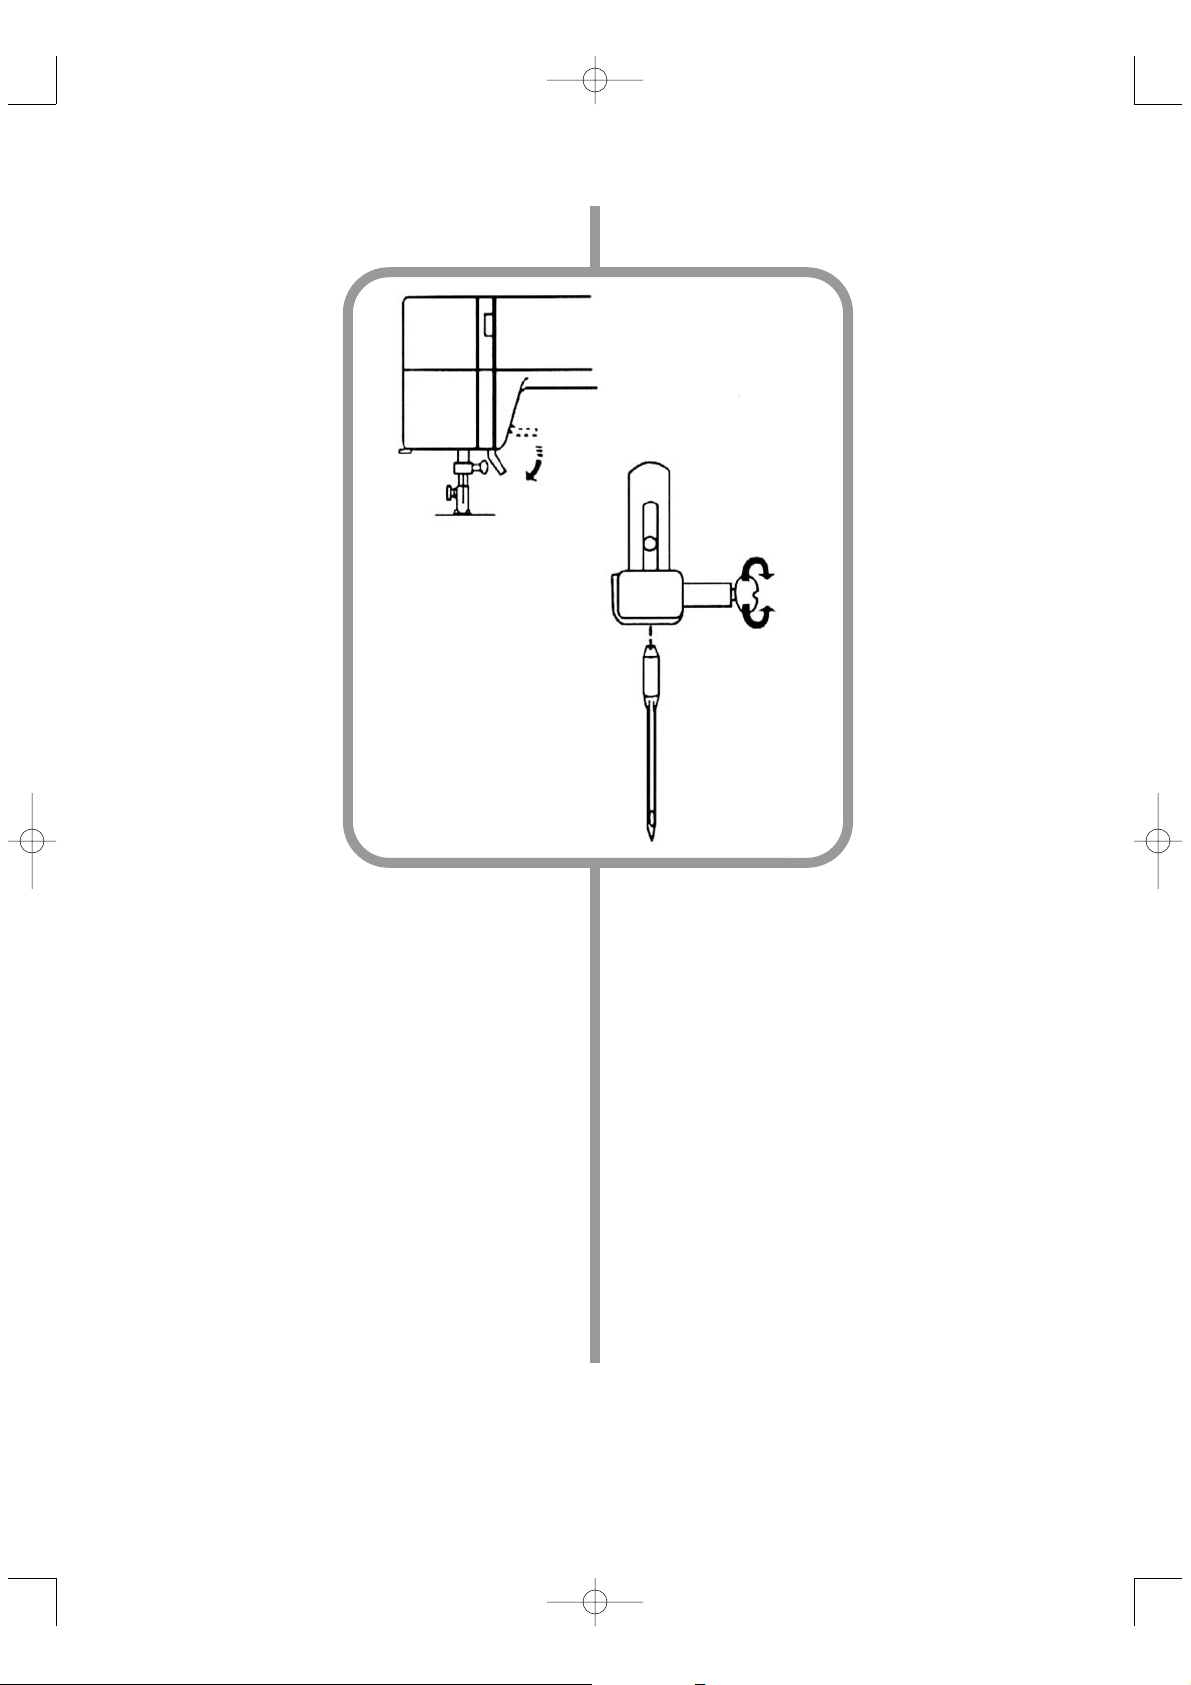
Wechseln der Nadel Changing the needle
12
Bringen Sie die Nadel in die höchste Position,
indem Sie das Handrad auf sich zu bewegen.
Senken Sie den Nähfuß. Lösen Sie die Nadelhalterschraube, indem Sie sie gegen den Uhrzeigersinn drehen. Nehmen Sie die gebrauchte
Nadel aus der Nadelhalterung und setzen Sie die
neue Nadel so ein, dass die flache Seite nach hinten zeigt. Achten Sie darauf, dass Sie die Nadel
beim Einsetzen bis zum Anschlag in die Nadelhalterung schieben. Bitte ziehen Sie anschließend
die Nadelhalterschraube mit einem Schraubendreher fest.
Hinweis
Bitte überprüfen Sie in regelmäßigen Abständen,
ob die Nadel noch gerade und scharf ist. Knoten
und Fehlstiche in Jerseystoffen, feinmaschiger
Seide oder Seidengeweben werden häufig durch
beschädigte Nadeln verursacht.
Turn the handwheel towards you, until the needle
stops in its highest position. Then lower the presser foot and loosen the needle clamp screw by
turning it anti-clockwise. Remove the used needle and insert the new one with its flat side facing
to the back. The needle should be pushed into the
needle clamp as far as it will go. Then tighten the
needle clamp screw with a screwdriver.
Note
Please check regularly to ensure that the needle
is not bent or blunt. Skipped stitches and knots in
knit materials, fine silk or silk fabrics are often a
result of damaged needles.
Page 13

Nadelstärke Material
Baumwoll-/Poly-
esterfaden
Seidenfaden
Nr. 60 Feinmaschige Seide -- 100 - 140
Nr. 70 Kreppgewebe
50 --
Nr. 80 Popelin, Naturseide
50 -60 80 - 100
Nr. 80 - 90
Wollgewebe
Baumwolle
40 - 50 60 - 70
Nr. 90 - 100 Wolle
30 - 40 50 - 60
Nr. 90 - 100 Jeansstoffe
30 - 50 --
Gewebe Nr. 70 Jerseystoff
50 (Polyester)
--
Needle size Fabric
Cotton/polyester
thread
Silk thread
#7 fine-spun silk -- 100 - 140
#10 crepe fabric
50 --
#12 poplin, natural silk
50 -60 80 - 100
#12 - 14 wool fabric, cotton
40 - 50 60 - 70
#14 - 16 wool
30 - 40 50 - 60
#14 - 18 denim
30 - 50 --
Fabric #10 jersey
50 (polyester)
--
Nadel- und Fadentabelle
Needle and thread chart
13
Page 14

14
Garnrollenhalter Spool holders
Die Garnrollenhalter 1 dienen zur Aufnahme von
Garnrollen. Ziehen Sie die Garnrollenhalter vor
dem Nähen aus dem Gehäuse der Nähmaschine.
Versenken Sie die Garnrollenhalter im Gehäuse
der Maschine, bevor Sie die Nähmaschine verstauen.
Hinweis
Falls sich der verwendete Faden häufig um den
Garnrollenhalter wickelt oder verknotet, können
Sie den Oberfaden 2 durch die Öffnung 3 im
Garnrollenhalter führen. Dabei sollte die Öffnung
in Richtung der Garnrolle zeigen.
The spool holders hold the spools. Pull the spool
holders out of the sewing machine, before you
start sewing. Push them back down into the sewing machine when storing the machine away.
Note
In case the thread gets tangled or knotted on the
spool holder, pull upper thread 2 through hole 3 in
the spool holder. Make sure that the hole is
directly facing the spool.
1
2
3
Page 15
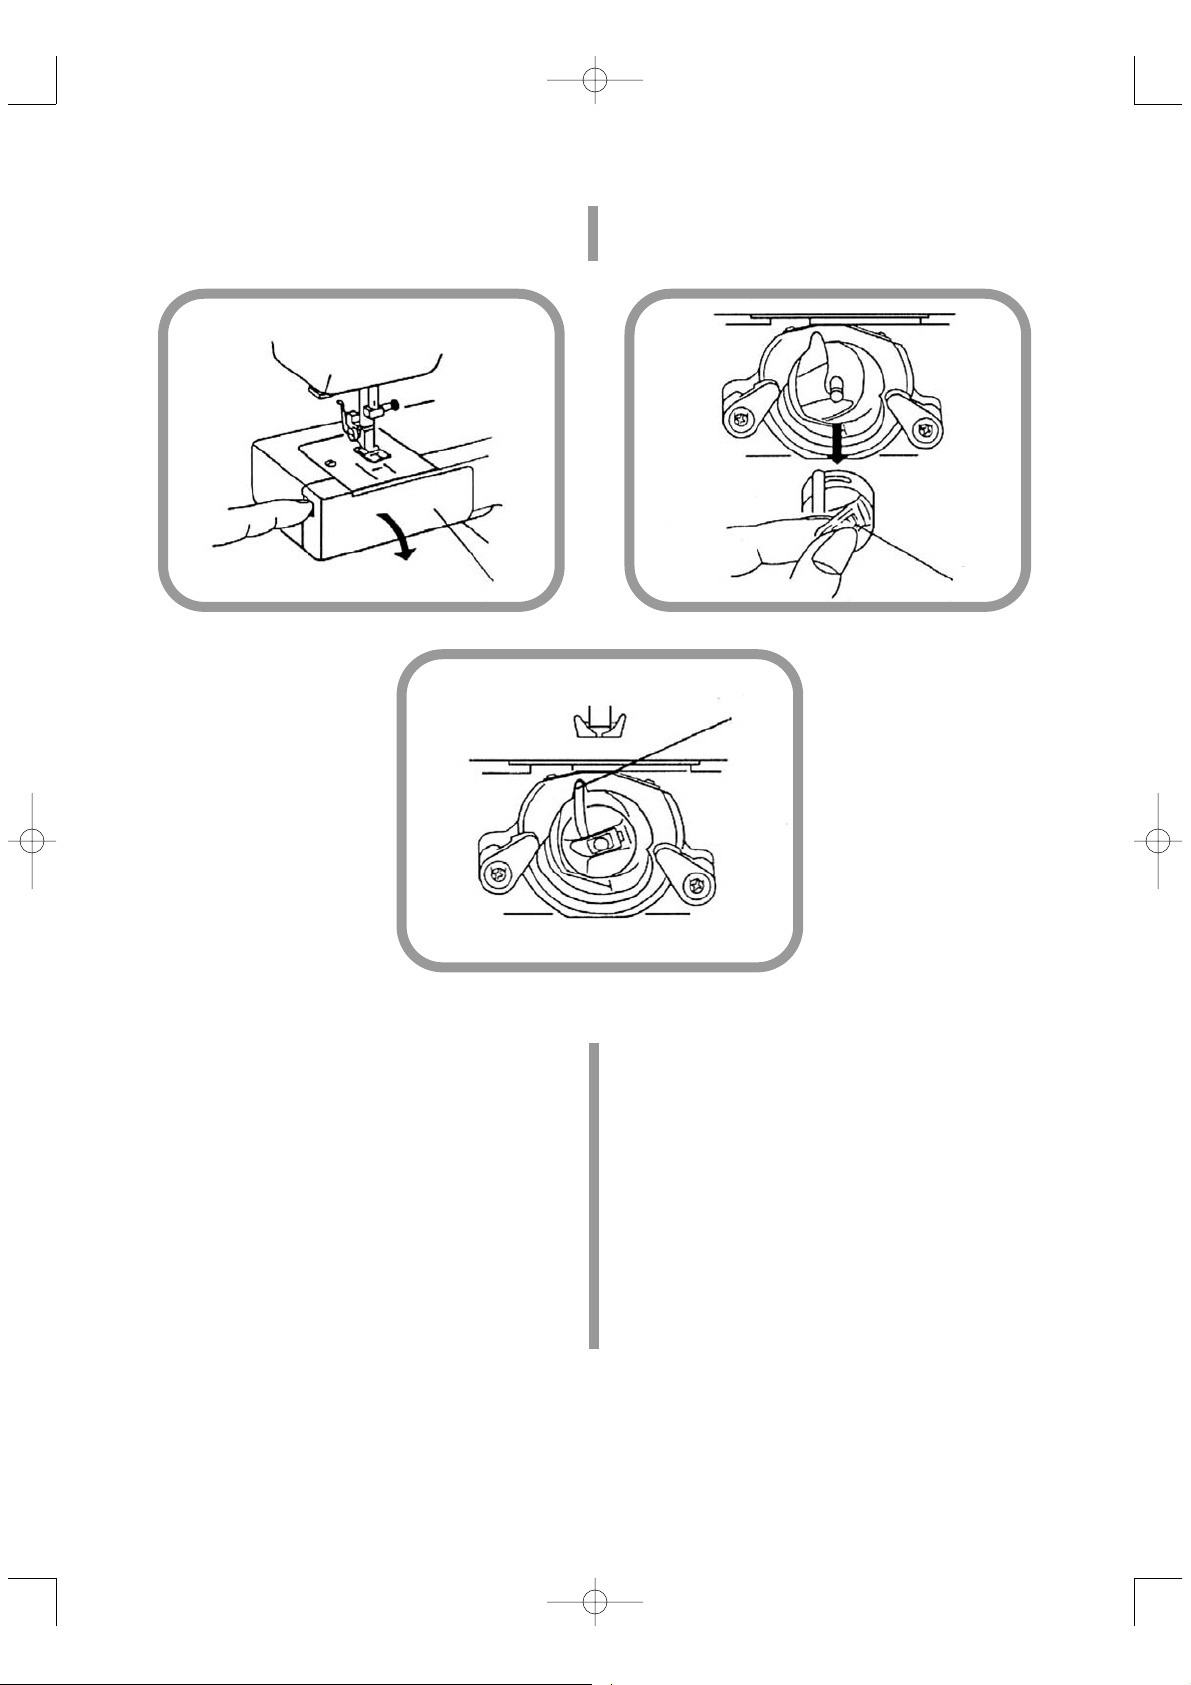
Herausnehmen und Einsetzen
der Spulenkapsel
1. Öffnen Sie die Freiarmklappe 1.
2 Bringen Sie die Nadel in die höchste Position,
indem Sie das Handrad auf sich zu bewegen.
Fassen Sie den Spulenkapselriegel 2 und ziehen Sie die Spulenkapsel horizontal aus dem
Gehäuse.
3. Vergewissern Sie sich beim Wiedereinsetzen
der Spule, dass der Spulenkapselfinger 3 fest
in die Aussparung oben im Gehause einrastet.
1. Open freearm cover 1.
2. Turn the handwheel towards you to raise the
needle to its highest position. Hold the bobbin
case by its latch 2 and remove it horizontally
from its housing.
3. When inserting the bobbin case again, make
sure that bobbin case positioning finger 3
clicks back into place at the top of the housing.
Removing and loading the
bobbin case
15
1
2
3
Page 16
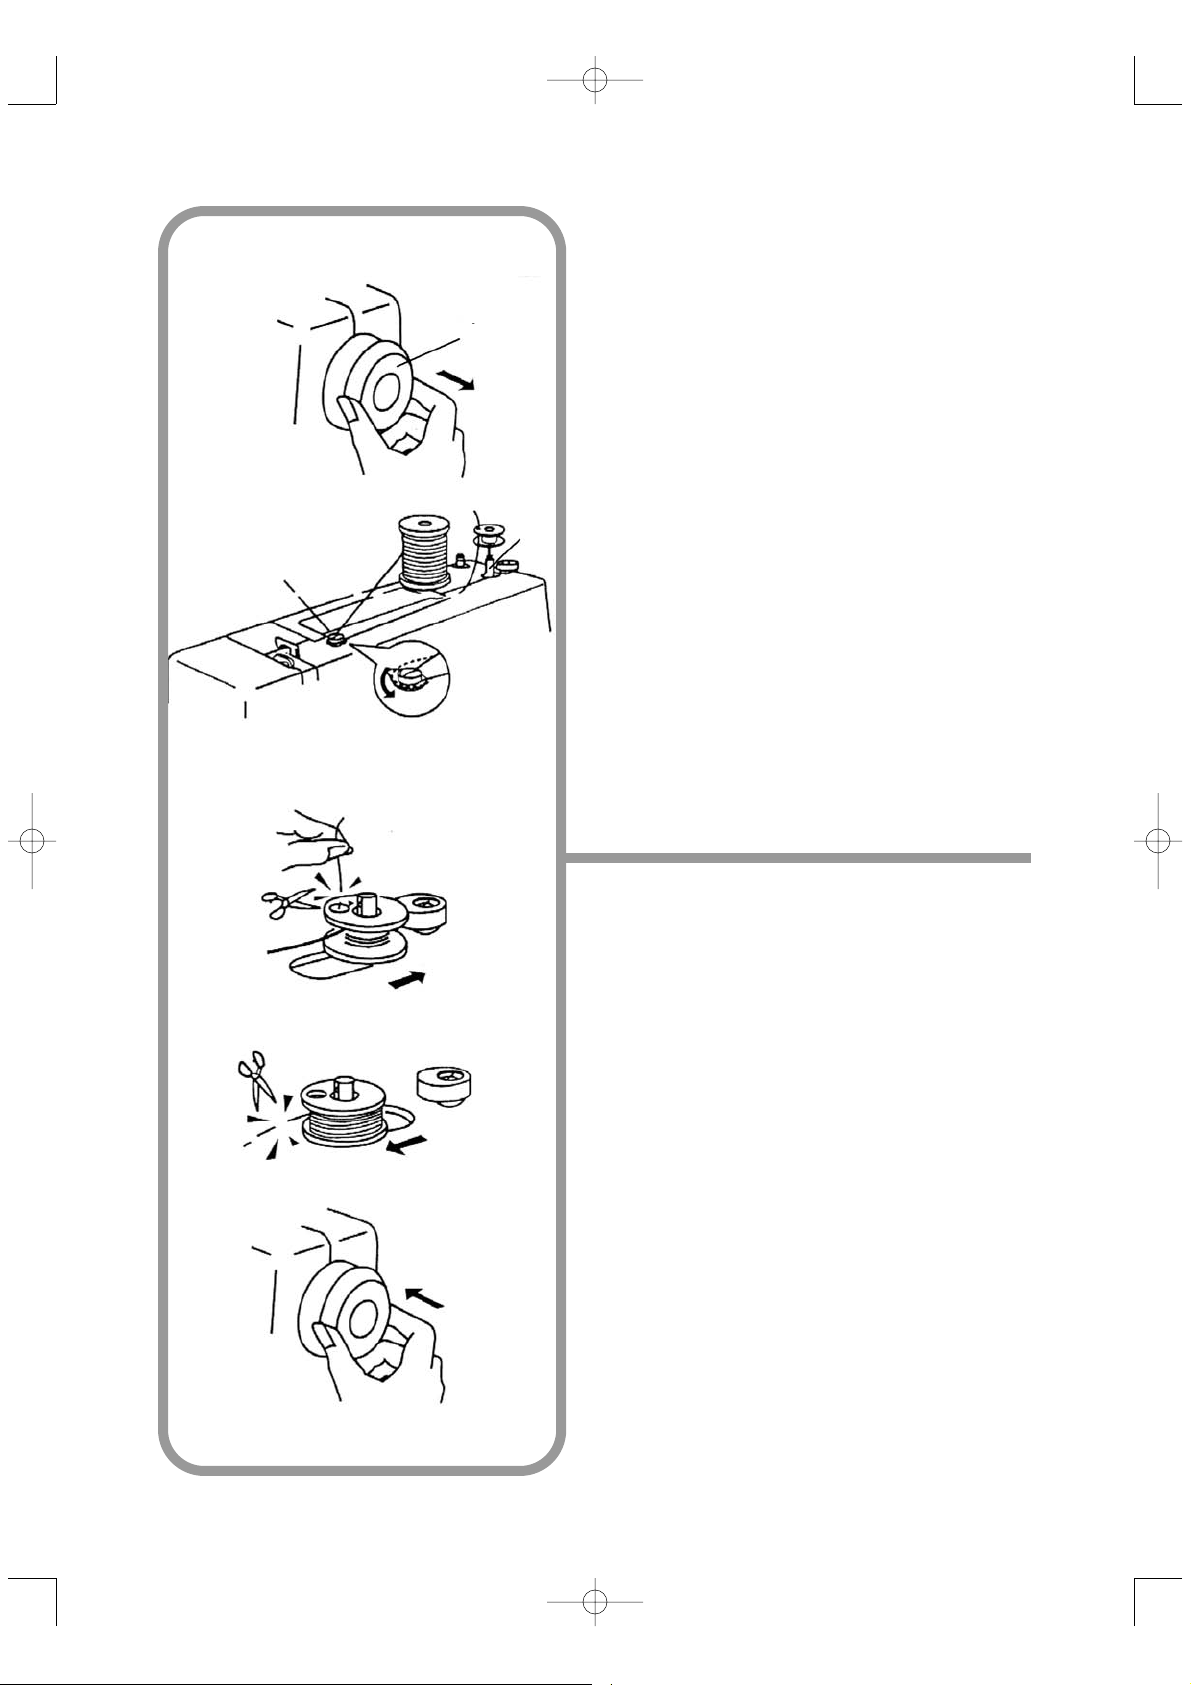
16
Aufspulen
1. Ziehen Sie das Handrad 1 nach außen, um den
Kontakt zu unterbrechen.
2. Führen Sie den Faden von der Garnrolle durch die
Aufspulspannungsscheibe 2.
3. Führen Sie das Fadenende von innen durch die
Öffnung in der Spule und setzen Sie die Spule auf
den Spuler 3.
4. Drücken Sie den Spuler 3 nach rechts.
5. Halten Sie das Fadenende fest und drücken Sie
leicht auf den Fußanlasser. Halten Sie die Maschine
an, nachdem der Faden sich einige Male um die
Spule gewickelt hat. Schneiden Sie das überstehende Fadenende dicht an der Spule ab.
6. Drücken Sie nun erneut den Fußanlasser und
spulen Sie so lange Faden auf, bis die Spule voll ist.
Stoppen Sie dann die Maschine, drücken Sie den
Spuler wieder nach links und schneiden Sie den
Faden ab.
7. Nach dem Aufspulen schieben Sie das Handrad
wieder nach innen in die Ausgangsposition zurück,
um den Kontakt wieder herzustellen.
Winding the bobbin
1. Pull out the handwheel 1 to the right in order to
release it.
2. Draw thread from the thread spool through the
bobbin winder tension disc 2.
3. Now pull the end of the thread through the hole in
the bobbin, making sure the end of the thread goes
through the bobbin from the inside to the top. Place
the bobbin on the bobbin winder 3.
4. Push the bobbin winder 3 to the right.
5. Hold onto the end of the thread and step on the foot
control. As soon as the bobbin has been wound with
thread a few times let go of the end of the thread.
Cut the excess thread close to the bobbin.
6. Step down again on the foot control. Wind thread
until the bobbin is full and stop the machine. Push
the bobbin winder back to the left and cut the thread
with a pair of scissors.
7. When you are finished winding the bobbin, push the
balance wheel back in (to its original position).
1
2
3
Page 17
1. Setzen Sie die Spule 1 in die Spulenkapsel 2
ein. Stellen Sie dabei sicher, dass der Faden
im Uhrzeigersinn verläuft.
2. Ziehen Sie das Fadenende in den Schlitz 3 der
Spulenkapsel.
3. Ziehen Sie dann den Faden durch die Spulenspannfeder 4 hindurch zur Austrittsöffnung
5.
Hinweis
Lassen Sie ca. 10 cm Faden aus der Spule
heraushängen.
1. Insert the bobbin 1 into the bobbin case 2.
Make sure that the thread is wound in a
clockwise direction.
2. Pull thread into the slit 3 of the bobbin case.
3. Then pull the thread through bobbin tension
regulator spring 4 into the opening 5.
Note
Pull about 10 cm of thread out of the bobbin.
Einfädeln der Spulenkapsel Threading the bobbin case
17
1
2
4
5
3
Page 18
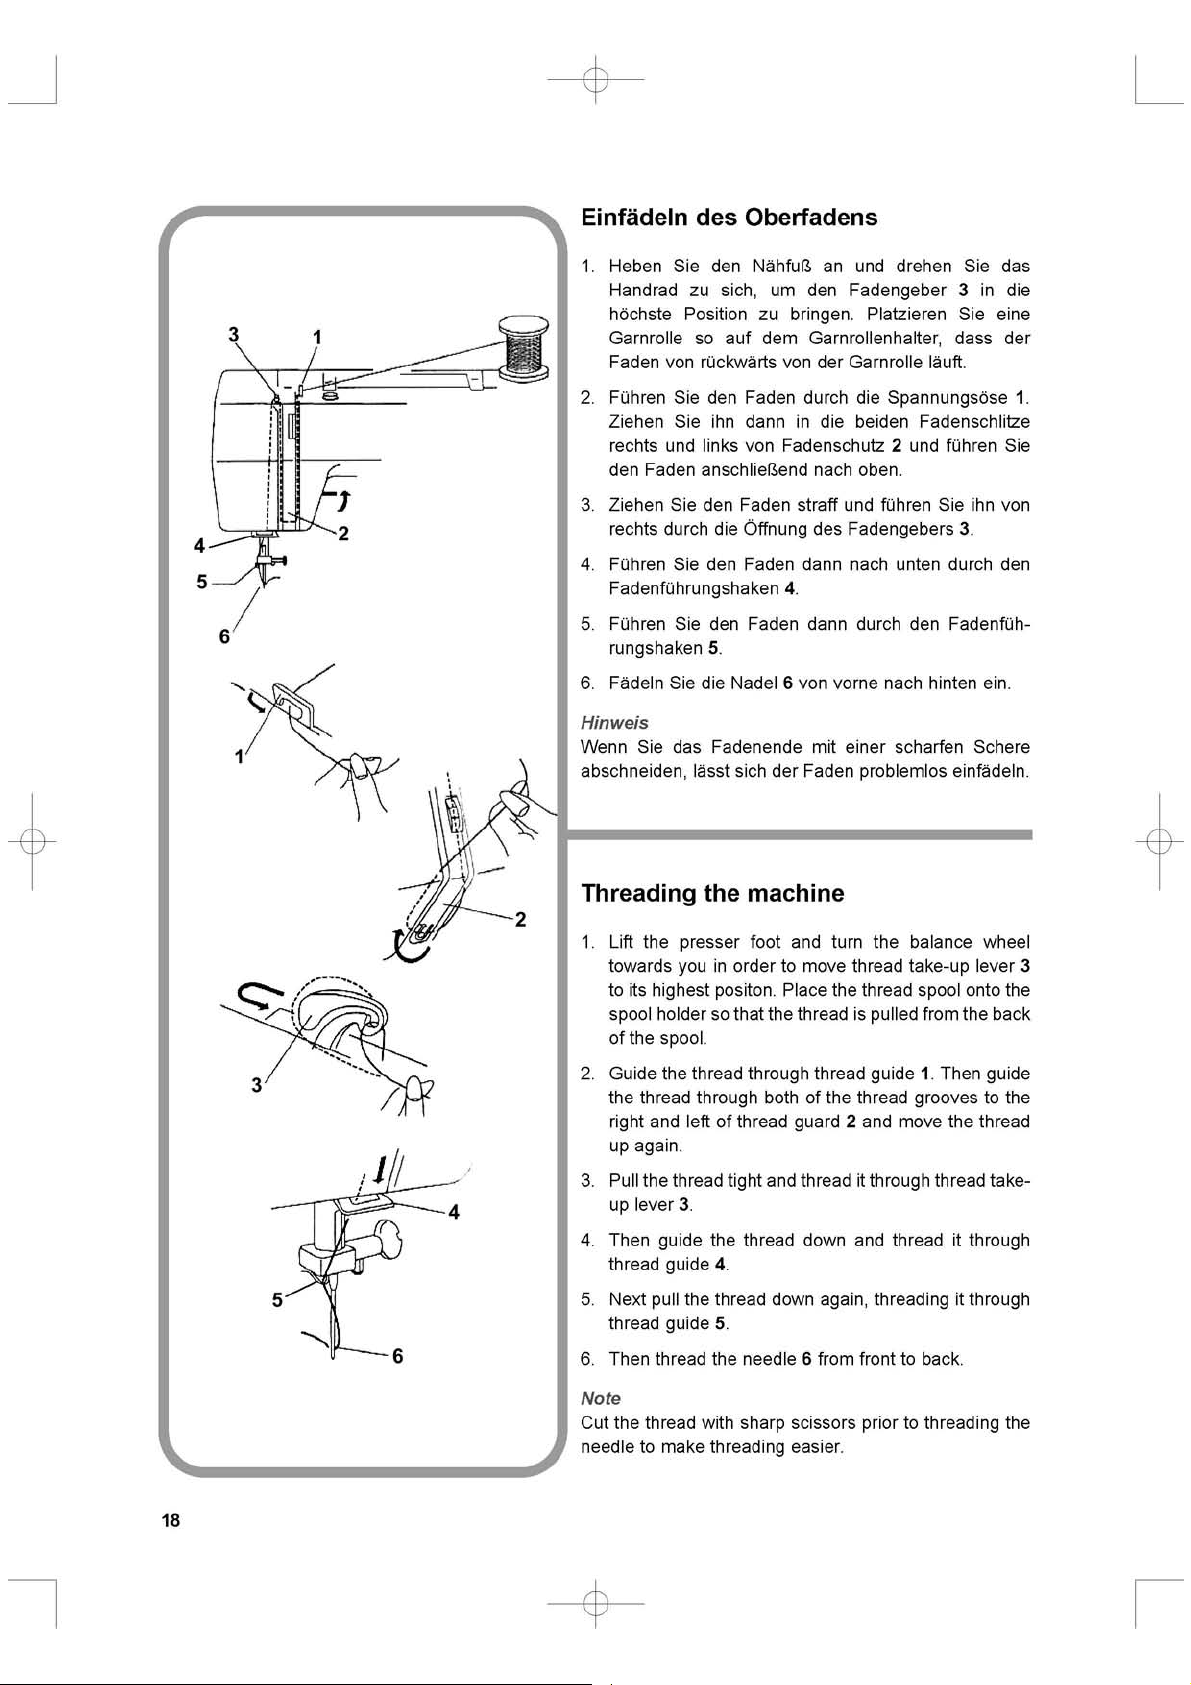
Page 19

Heraufholen des Unterfadens Pulling up the bobbin thread
1. Heben Sie den Nähfuß an und halten Sie das
Ende des Oberfadens locker in Ihrer Iinken
Hand.
2. Bewegen Sie das Handrad so lange auf sich
zu, bis sich der Fadengeber in seiner
höchsten Position befindet. Ziehen Sie nun
leicht am Oberfaden, um den Unterfaden
heraufzuholen.
3. Ziehen Sie beide Fäden etwa 5 cm heraus
und führen Sie beide Fäden unter dem Nähfuß
hindurch nach hinten.
1. Lift the presser foot and hold the upper thread
lightly with your left hand.
2. Keep turning the handwheel toward you until
the thread take-up Iever is at its highest
position. Pull the needle thread in order to pull
up the bobbin thread.
3. Draw about 5 cm of both threads out and put
them to the rear underneath the presser foot.
19
1
2
3
Page 20

20
Einstellen der
Oberfadenspannung
Adjusting the tension of the
needle thread
Beim Nähen werden Oberund Unterfaden miteinander verknüpft. Die Spannung ist ausgewogen,
wenn beide Fäden in der
Mitte der beiden Stofflagen
verbunden werden (siehe
Abb. 1).
Bei zu hoher Oberfadenspannung werden die beiden Fäden auf der Oberseite des Nähguts ineinander
verwoben (siehe Abb. 2). Stellen Sie das
Oberfadenspannungsrad 1 in diesem Fall auf einen kleineren Wert. Bei zu geringer Oberfadenspannung werden die beiden Fäden an der
Unterseite des Nähguts verknüpft (siehe Abb. 3).
Stellen Sie das Oberfadenspannungsrad 1 in diesem Fall auf einen höheren Wert.
Ab Werk ist das Oberfadenspannungsrad 1 auf
den Wert 5 eingestellt. Dies führt auf den meisten
Materialien zu einer ausgewogenen, optisch ansprechenden Naht.
When stitching, both needle
and bobbin thread are interlocked between the two
material layers. Whether your
stitching looks nice largely
depends on a balanced tension of the needle and bobbin
thread (see Fig.1).
If the needle thread tension is
too high, the needle and bob-
bin thread will be interlocked
on the right side of the material (see Fig. 2). To
correct the tension, set the needle thread tension
dial 1 to a smaller value. If the needle thread tension is too low, the needle and bobbin thread will
be interlocked on the wrong side of the material
(see Fig. 3). To correct the tension, set the needle
thread tension dial 1 to a higher value.
The needle thread tension dial 1 is preset to a
value of 5 in the factory which will result in a balanced, pretty seam on most materials.
Oberfadenspannung bei
Zickzackstich
Zur Erzielung von guten
Ergebnissen beim Nähen
mit Zickzackstich sollte die
Oberfadenspannung niedriger sein als beim Nähen mit
Geradstich. Der Oberfaden
sollte auf der Rückseite des
Nähteils zu sehen sein.
Needle thread tension
when zigzag stitching
In order to achieve perfect
results when zigzag stitching, the tension of upper
thread should be lower than
for straight stitching. The
needle thread should be
visible from the wrong side
of the fabric.
1
2
3
Page 21

Page 22

Page 23

Drücken Sie zum Nähen von Rückwärtsstichen
die Rückwärtstaste nach unten. Die Maschine
näht so lange rückwärts, wie Sie die Rückwärtstaste gedrückt halten.
Push down and hold the reverse switch to sew
reverse stitching. The machine sews in reverse
until you release the reverse switch.
Rückwärtstaste Reverse switch
Nähfußdruckregler Presser foot pressure dial
Für alle gewöhnlichen Näharbeiten ist der
Nähfußdruck auf Stufe 3 voreingestellt. Unter
Umständen müssen Sie den Nähfußdruck jedoch
regeln. So sollte der Nähfußdruck beim Aufnähen
von Applikationen oder beim Nähen von Netzgewebe auf Stufe 2 gestellt werden. Für Chiffon,
Spitzengewebe und andere feine Mischgewebe
verwenden Sie ebenfalls diese Einstellung. Baumwollflanell und Stretchgewebe sollten mit Stufe 1
genäht werden.
The presser foot pressure dial is preset to position
3. This is fine for all ordinary fabrics and sewing
operations. You might, however, have to change
this setting. When sewing on appliqué or sewing
mesh fabrics, for example, set the dial to 2. Also
use this setting for chiffon, lace, and other miscellaneous fine materials. For cotton flannel and
stretch fabrics set the presser foot pressure dial to
1.
23
Page 24

24
1. Open the freearm cover 1.
2. Lower the feed dog by pulling the feed dog
lever 2 downwards and moving it in the direction of arrow A.
3. Raise the feed dog by pulling the feed dog
lever 2 downwards and moving it in the direction of arrow B.
Note
The feed dog should be raised for normal sewing
operations so that the fabric gets fed.
1. Öffnen Sie die Freiarmklappe 1.
2. Senken Sie den Transporteur, indem Sie den
Transporteurhebel 2 nach unten drücken und
in Pfeilrichtung A bewegen.
3. Heben Sie den Transporteur, indem Sie den
Transporteurhebel 2 nach unten drücken und
in Pfeilrichtung B bewegen.
Hinweis
Der Transporteur sollte bei allen gewöhnlichen
Näharbeiten angehoben sein, damit der Stoff
transportiert wird.
Absenken des Transporteurs Lowering the feed dog
Page 25

Kapitel III
Kapitel III
Chapter III
Chapter III
3. Ziehen Sie die Fäden unter dem Nähfuß nach
hinten und senken Sie den Nähfuß.
4. Bewegen Sie das Handrad auf sich zu, sodass
sich die Nadel in den Stoff senkt.
5. Treten Sie nun langsam auf den Fußanlasser, um
mit dem Nähen zu beginnen. Führen Sie den
Stoff dabei behutsam mit der Hand.
6. Betätigen Sie die Rückwärtstaste und nähen Sie
einige Stiche rückwärts, um das Nahtende zu
verriegeln.
7. Heben Sie den Nähfuß an, stellen Sie die Nadel
mit dem Hadrad noch oben und ziehen Sie den
Stoff heraus. Führen Sie dabei Ober- und Unterfaden nach hinten. Schneiden Sie beide Fäden
mit der Schere ab und lassen Sie dabei zur Vorbereitung auf weitere Näharbeiten ausreichend
lange Fadenenden überstehen.
Erste Schritte
Start sewing
Simply sewing
1. Lift the presser foot and raise the needle to its
highest position by turning the handwheel towards you.
2. Align the fabric with the lines on the needle plate.
3. Then lower the presser foot making sure that the
threads have been placed to the back.
4. Turn the handwheel towards you and lower the
needle down into the fabric.
5. Slowly step on the foot control. Guide the fabric
gently with your hands. There is no need for
pushing as the fabric will automatically be fed by
feed dog.
6. Press the reverse switch and sew a couple of
reverse stitches to secure the seam.
7. Raise the presser foot and the needle, remove
the fabric and put the threads to the back. Cut
both threads with a pair of scissors, leaving
enough thread for further sewing operations.
1. Heben Sie den Nähfuß an und bringen Sie
die Nadel in Hochstellung, indem Sie das
Handrad zu sich drehen.
2. Legen Sie den Stoff so unter den Nähfuß auf
die Stichplatte, dass die Stoffkante mit einer
der Markierungen auf der Stichplatte abschließt.
Einfache Nähte
25
Page 26

26
Ändern der Nährichtung Changing the sewing direction
Wenn Sie die gewünschte Stelle erreicht haben,
halten Sie die Nähmaschine an und bewegen das
Handrad auf sich zu, damit sich die Nadel in den
Stoff absenkt. Heben Sie den Nähfuß dann an und
drehen Sie den Stoff in die gewünschte Richtung,
indem Sie die Nadel als Drehpunkt benutzen.
Senken Sie den Nähfuß anschließend wieder ab
und fahren Sie mit dem Nähen fort.
Sew until you have reached the place where you
would like to change the sewing direction. Stop
the machine and turn the handwheel towards you
to bring the needle down into the fabric. Then
raise the presser foot. Turn the fabric to change
the sewing direction, using the needle as a pivot.
Lower the presser foot back into the fabric and
resume sewing.
Using the adjustment marks on
the needle plate
The alignment marks on the needle plate (see Fig.
page 27) are of great help to keep an even distance between the seamline and the fabric edge.
The numbers at the front of the needle plate are
metric, the numbers at the back are in inches.The
following table shows the correlation between the
numbers on the needle plate and the resulting
seam width in inches.
Verwendung der Markierungen
auf der Stichplatte
Die Markierungen auf der Stichplatte (siehe Abb.
Seite 27) sind von großem Nutzen, um den Abstand der Naht zur Stoffkante beizubehalten.
Die vorderen Angaben auf der Stichplatte sind
metrische Maße, die hinteren Maße sind in englischen Zoll angegeben. Die folgende Tabelle zeigt
die Korrelation zwischen den Angaben auf der
Stichplatte und der resultierenden Saumbreite in
Zentimetern.
Angaben auf
Stichplatte
Saumbreite
10 1,0 cm
15 1,5 cm
20 2,0 cm
3/8 0,9 cm
4/8 1,3 cm
5/8 1,6 cm
6/8 1,9 cm
Numbers on
needle plate
Seam width
10 2/5”
15 3/5”
20 4/5”
3/8 3/8”
4/8 4/8”
5/8 5/8”
6/8 6/8”
Page 27

Beim Nähen eines rechten Winkels ist darauf zu
achten, dass ein gleichmäßiger Abstand zum
Stoffrand beibehalten wird. Wenn Sie sich beim
Nähen eines rechten Winkels der Eckmarkierungen bedienen möchten, wählen Sie eine Saumbreite von 1,6 cm (5/8). Halten Sie die Nähmaschine an, wenn der Stoffrand sich auf gleicher
Höhe mit der Eckmarkierung 2 befindet. Bewegen
Sie das Handrad auf sich zu, um die Nadel in den
Stoff zu bringen. Heben Sie den Nähfuß an und
drehen Sie den Stoff so lange in die gewünschte
Richtung, bis die Kante wieder mit der Stichplattenmarkierung 5/8 abschließt. Senken Sie dann
den Nähfuß und fahren Sie mit dem Nähen fort.
1 Alignment marks
2 Comer marks
3 Needle plate
4 Hole of needle plate
Make sure that you keep an even distance between the needle and the fabric edge when turning corners. The corner marks on the stitch plate
will help you turn corners more easily. For this
purpose, use a seam width of 5/8 inches (1.6 cm)
and sew until the front edge of the fabric is aligned with corner mark 2. Then stop the machine
and turn the handwheel towards you to lower the
needle into the fabric. Raise the presser foot, turn
the fabric around the needle, using the needle as
a pivot, until the fabric edge is aligned with the
alignment mark 5/8. Then lower the presser foot
and sew in the new direction.
1 Stichplattenmarkierungen
2 Eckmarkierungen
3 Stichplatte
4 Stichloch
Nähen eines rechten Winkels
Turning corners
27
1
2
2
3
4
1
Page 28

28
Kapitel III
Kapitel III
Nutzstiche
Chapter III
Chapter III
Utility stitches
Bezeichnung Symbol Name
Geradstich
Nadelposition Mitte
Geradstich
Nadelposition links
Zickzackstich (schmal)
Zickzackstich (medium)
Zickzackstich (breit)
Dreifachgenähter Zickzackstich
Elastischer Blindstich
Blindstich
Dessousstich
Brückenstich
Straight stitch
Needle position center
Straight stitch
Needle position left
Zigzag stitch (narrow)
Zigzag stitch (medium)
Zigzag stitch (wide)
Triple zigzag stitch
Elastic blind stitch
Blind stitch
Shell stitch
Double action stitch
Nutzstiche werden für allgemeine Näharbeiten
auf allen Materialien eingesetzt. Sie sind für normale Steppnähte, für Versäuberungsarbeiten an
Stoffkanten und zum Säumen bestens geeignet.
Darüber hinaus lassen sich damit auch Reißverschlüsse einnähen, Knöpfe annähen sowie
Knopflöcher nähen.
Wenn Sie ein Nähanfänger sind, dann beginnen
Sie am besten mit dem Geradstich. Versuchen
Sie, das Nähgut schön gleichmäßig zu führen
und den Abstand zur Stoffkante gleich breit zu
halten. Anhand der parallelen Naht können Sie
dann überprüfen, ob Sie das Material gut zugeführt haben.
Utility stitches are used for general-purpose
sewing. They are perfectly suited for top-stitching,
for overedging the material edge to prevent fraying and for hemming. You may also use them to
sew in zippers, to sew on buttons or to sew buttonholes.
If you are a sewing novice, it is best to start
sewing using the straight stitch. Try and feed the
fabric evenly and keep the seamline parallel to
the material edge. If you end up having a nicely
parallel seamline after finishing sewing, you have
succeeded in feeding the material evenly.
Stichübersicht Stitch chart
Page 29

Page 30

Page 31

Page 32

Page 33

Page 34

Page 35

Trikotstiche sind sehr elastisch und daher hervorragend zum Nähen von dehnbaren Stoffen
geeignet. Mit Trikotstichen erzielen Sie einwandfreie Ergebnisse beim Nähen von Badeanzügen
aus Lycra, etc. Sie lassen sich aber auch als
Randstiche an Gürteln oder als Zierstiche einsetzen.
Stellen das Stichlängenrad auf , um auf das
Nähen mit Trikotstichen umzuschalten. Dadurch
werden die in der unteren Reihe der Stichanzeige
dargestellten Stichmuster aktiviert. Wählen Sie
anschließend das gewünschte Stichmuster am
Stichwahlrad aus.
Die Stichlänge läßt sich für alle Trikotstiche beliebig variieren. Drehen Sie dazu das Stichlängenrad im Uhrzeigersinn. Je näher Sie das Stichlängenrad an die Zahl 0 heranstellen, desto enger
werden die Stiche.
As the name suggests, elastic stitches are very
elastic and thus perfectly suitable for sewing
stretch fabrics. Elastic stitches will produce perfect results when sewing bathing costumes made
of lycra, etc. They are also very suitable as a border stitch on belts or for ornamental stitching.
Set the stitch length selection dial to in
order to switch to sewing elastic stitches, which
are represented in the bottom row of the stitch
display on the machine. Then select the desired
elastic stitch type using the stitch pattern selection dial.
The stitch length of all elastic stitches can be
adjusted as desired. To do so, turn the stitch
length selection dial clockwise after you have
selected your elastic stitch. The closer you move
the dial to zero, the denser the stitches will get.
Kapitel IV
Kapitel IV
Chapter IV
Chapter IV
Elastic stitchesTrikotstiche
Dreifachgenähter Geradstich
Nadelposition Mitte
Dreifachgenähter Geradstich
Nadelposition links
Stretch-Zickzackstich (schmal)
Stretch-Zickzackstich (medium)
Stretch-Zickzackstich (breit)
Wabenstich
Elastischer Overlockstich
Overlockstich
Stretch-Overlockstich
Doppelter Overlockstich
Triple straight stitch
centered
Triple straight stitch
left
Ric-rac stitch (narrow)
Ric-rac stitch (medium)
Ric-rac stitch (wide)
Honeycomb stitch
Elastic overlock stitch
Overlock stitch
Stretch overlock stitch
Double overlock stitch
Bezeichnung Symbol Name
Stichübersicht
Stitch chart
35
Page 36

Page 37

Page 38

Page 39

Page 40

Page 41

Page 42

Page 43

Page 44

44
5. Sew approx. five stitches and raise the needle.
Leave about 20 cm of thread if you want to
create a sturdier button base.
6. Bring the needle thread down through one
hole of the button. Then wind it several times
around the threads between the button and
the material to form a firm button base.
7. Pull the needle thread through to the back of
the material and tie a knot.
Note
Make sure you raise the feed dog again after you
have finished sewing on buttons, before continuing with normal sewing operations.
5. Nähen Sie etwa fünf Stiche und heben Sie die
Nadel an. Lassen Sie ein etwa 20 cm langes
Fadenende überstehen, wenn Sie einen festeren Knopfhals wünschen.
6. Fädeln Sie den Oberfaden durch eines der
Löcher im Knopf nach unten und wickeln Sie
den Faden mehrmals um die Fäden, die den
Knopf mit dem Nähgut verbinden, sodass ein
Knopfhals entsteht.
7. Ziehen Sie den Faden auf die Stoffunterseite
durch und verknoten Sie ihn.
Hinweis
Vergessen Sie nicht, den Transporteur nach dem
Annähen des Knopfes wieder anzuheben, bevor
Sie mit normalen Näharbeiten fortfahren.
Note
Place a pin on the button between the toes of the
presser foot so that you can wind the thread
around more easily after you have finished
sewing on the button.
Hinweis
Damit Sie den Knopf nach dem Annähen leichter
an der Unterseite umwickeln können, schieben
Sie eine Stecknadel in den Spalt zwischen den
beiden Nähfußspitzen, sodass sich beim Nähen
ein Steg bildet.
Page 45

Page 46

46
1. Lift the presser foot and replace the standard presser foot with
the buttonhole foot. Then mark the buttonhole on the material.
Pull forward slide A and align mark C with mark B on the fabric.
Then lower the presser foot.
Note: The marks on the slide are spaced at 0.5 cm.
2. Set the stitch pattern selection dial to . Keep stitching forward until your reach the front end of the mark on the material.
Then stop sewing with the needle in the top left position.
3. Set the stitch pattern selection dial to . Sew 4 - 6 stitches
before stopping sewing, with the needle pausing at top right.
4. Set the stitch pattern selection dial to . Keep stitching backward until your reach the top end of the buttonhole.Then stop
sewing with needle with the needle in the top right position.
5. Set the stitch pattern selection dial to . Sew 4 - 6 stitches
before stopping sewing with the needle in the top left position.
6. Remove the fabric and place a straight pin across the buttonhole bartack to help prevent over-cutting by mistake. Then open
the buttonhole carefully with the seam ripper.
1. Stellen Sie den Nähfuß nach oben und bringen Sie den Knopflochfuß an. Zeichnen Sie dann die Position des Knopflochs auf
dem Stoff an. Ziehen Sie den Schlitten A des Knopflochfußes
nach vorne und bringen Sie die Markierung auf dem Knopflochfuß C mit der Markierung B auf dem Stoff überein. Senken
Sie dann den Nähfuß.
Hinweis: Die Abstände zwischen den Markierungen auf dem
Schlitten betragen jeweils 0,5 cm.
2. Stellen Sie das Stichwahlrad auf . Nähen Sie so lange
vorwärts, bis Sie die vordere Knopflochmarkierung erreicht
haben. Halten Sie die Nähmaschine dann an. Die Nadel muss
sich dabei oben links befinden.
3. Stellen Sie das Stichwahlrad auf . Nähen Sie vier bis sechs
Stiche, bevor Sie die Nähmaschine wieder anhalten. Die Nadel
muss sich dabei oben rechts befinden.
4. Stellen Sie das Stichwahlrad auf . Nähen Sie so lange rückwarts, bis Sie die hintere Knopflochmarkierung erreichen. Halten Sie dann die Nahmaschine an. Die Nadel muss sich dabei
oben rechts befinden.
5. Stellen Sie das Stichwahlrad auf . Nähen Sie vier bis sechs
Stiche, bevor Sie die Nähmaschine wieder anhalten. Die Nadel
muss sich dabei oben links befinden.
6. Entnehmen Sie den Stoff und stecken Sie eine Nadel vor den
hinteren Knopflochriegel, damit Sie ihn beim Ausschneiden des
Knopflochs nicht versehentlich durchtrennen. Schneiden Sie
das Knopfloch vorsichtig mit dem Knopflochschneider aus.
1
2
3
4
5
6
Page 47

Page 48

Page 49

49
Reinigen des Greifers Cleaning the hook
Caution
Switch off the sewing machine and disconnect
it from the power by pulling out the plug before
you start cleaning the hook!
Achtung
Schalten Sie die Maschine aus und ziehen Sie
den Netzstecker, bevor Sie mit dem Reinigen
des Greifers beginnen!
Maintenance
Chapter V
Chapter V
Wartung der Nähmaschine
Kapitel V
Kapitel V
1. Raise the needle to its highest position,
remove the extendable cloth plate and open
the freearm cover.
2. Take out bobbin case 1.
3. Turn catch levers 2 outward and remove
shuttle race ring 3.
4. Remove hook 4, holding it by the pin in the
middle of the hook.
5. Remove all dirt and lint from the shuttle race
5, the hook 4 and the shuttle race ring 3 using
a small brush.
6. Apply a few drops of oil to the shuttle race 5.
7. Put back all of the parts in reverse order.
Note
Make sure to fit projection 6 on the shuttle race
ring into groove 7 on the shuttle race when putting
the shuttle race ring back into the shuttle race.
1. Bringen Sie die Nadel in die höchste Position,
entfernen Sie den Anschiebetisch und öffnen
Sie die Freiarmklappe.
2. Entfernen Sie die Spulenkapsel 1. Klappen Sie
dazu den Spulenkapselriegel nach vorne und
ziehen Sie die Spulenkapsel horizontal heraus.
3. Drehen Sie die beiden Schnapphebel 2 nach
außen und entfernen Sie den Greiferbahnring 3.
4. Entfernen Sie den Greifer 4. Halten Sie ihn
dazu am Zapfen fest.
5. Entfernen Sie mit einem Pinselchen Staub und
Flusen aus der Greiferbahn 5, dem Greifer 4
und dem Greiferbahnring 3.
6. Geben Sie einige Tropfen Öl auf die Greiferbahn 5.
7. Setzen Sie die Teile in umgekehrter Reihenfolge wieder ein.
Hinweis
Achten Sie beim Wiedereinsetzen des Greiferbahnrings darauf, dass Sie die Nase 6 des Greiferbahnrings in die Nut 7 der Greiferbahn einpassen.
Page 50

50
Caution
Switch off the sewing machine and pull out the
plug out to disconnect it from the power before
you start cleaning the feed dog!
Achtung
Schalten Sie die Nähmaschine aus und ziehen
Sie den Netzstecker, bevor Sie mit der
Reinigung des Transporteurs beginnen!
1. Remove the presser foot and the needle.
2. Loosen the needle plate screws and remove
the needle plate.
3. Use a small brush to remove dust and lint from
the feed dog’s teeth.
4. Put the needle plate back and tighten the
screws.
5. Fit the presser foot and needle back on the
sewing machine. Your machine is now ready
for sewing again.
Note
It is very important to keep the feed dog’s teeth
clean at all times to ensure that the machine sews
properly. If you use your machine often, you
should clean it every 2 - 3 months.
1. Entfernen Sie den Nähfuß und die Nadel.
2. Lösen Sie die Schrauben der Stichplatte und
entfernen Sie die Stichplatte.
3. Entfernen Sie nun mit einer kleinen Bürste
Staub und Fadenreste von den Transporteurzähnen.
4. Setzen Sie die Stichplatte auf und drehen Sie
die Schrauben wieder fest.
5. Bringen Sie den Nähfuß und die Nadel wieder
an. Die Maschine ist nun wieder einsatzbereit.
Hinweis
Um ein einwandfreies Nähen zu gewährleisten, ist
es notwendig, die Transporteurzähne immer gereinigt zu halten. Bei stärkerem Gebrauch sollte
die Reinigung alle 2 - 3 Monate erfolgen.
Reinigung des Transporteurs Cleaning the feed dog
Page 51

51
Ölen der Maschine Oiling the machine
Ölen der Teile unterhalb des Kopfdeckels
1. Entfernen Sie die Schraubenkappe 1, drehen
Sie die Schraube 2 mit einem Schraubendreher
heraus und nehmen Sie den Kopfdeckel 3 ab.
2. Reinigen Sie die in der Abbildung oben rechts
mit Pfeilen bezeichneten Stellen.
3. Geben Sie ein bis zwei Tropfen gutes Nähmaschinenöl auf diese Stellen.
4. Setzen Sie anschließend den Kopfdeckel
wieder auf, drehen Sie die Schraube fest und
bringen Sie die Schraubenkappe wieder an.
Oiling the parts below the face cover
1. Remove screw cap 1, loosen screw 2 with a
screwdriver and remove face cover 3.
2. Clean the machine at positions indicated by
arrows as shown in the illustration above.
3. Apply 1-2 drops of quality sewing machine oil
to the positions indicated by arrows.
4. Reattach the face cover, tighten the screw
and put back the screw cap.
Ölen Sie Ihre Nähmaschine regelmäßig alle 2 - 3
Monate, damit sie ihre volle Betriebsfähigkeit erhält. Verwenden Sie dazu ausschließlich Nähmaschinenöl und geben Sie lediglich 1 - 2 Tropfen
an die zu ölenden Stellen, damit kein überschüssiges Öl austritt und so Flecken auf Ihrem Nähgut
verursacht. Nach längeren Ruhezeiten sollten Sie
Ihre Nähmaschine vor Gebrauch ölen. Dadurch
erlangt die Maschine ihre volle Funktionsfähigkeit
zurück.
You should oil your sewing machine every 2 - 3
months to keep it in good working condition. To
do so, use high-quality sewing machine oil exclusively. Apply no more than 1 or 2 drops on the
places to be oiled to stop excess oil staining your
material. If the machine does not run well after
being out of use for a while, apply a few drops of
oil before using it. Your machine will then be in
perfect working order again.
Ölen des Greifers
Öffnen Sie die Freiarmklappe 4 und geben Sie
etwas Öl an die mit dem Pfeil markierte Stelle.
Oiling the hook
Open freearm cover 4 and oil the hook as indicated by the arrow in the illustration.
Page 52

52
Fehlerbehebung
Fehler Grund Abhilfe Seite
Oberfaden reißt
Der Oberfaden ist nicht richtig eingefädelt. Oberfaden neu einfädeln. 18
Die Oberfadenspannung ist zu hoch. Oberfadenspannung verrin-
gern.
20
Die Nähnadel ist verbogen oder stumpf. Neue Nadel einsetzen. 12
Die Nähnadel wurde nicht richtig eingesetzt. Nadel richtig einsetzen. 12
Der Faden ist entweder zu dick oder zu dünn. Fadenstärke anhand der
Nadel- und Fadentabelle
überprüfen.
13
Unterfaden reißt
Die Spulenkapsel ist nicht richtig eingefädelt. Spulenkapsel richtig ein-
fädeln.
17
Spulenkapsel oder Greifer sind durch Flusen
blockiert.
Spulenkapsel/Greifer reinigen.
49
Die Spulenkapsel ist beschädigt und
funktioniert nicht ordnungsgemäß.
Spulenkapsel ersetzen. 15
Nadel bricht
Die Nähnadel wurde nicht richtig eingesetzt. Nadel richtig einsetzen. 12
Die Nähnadel ist verbogen oder stumpf. Neue Nadel einsetzen. 12
Die Nadelhalterschraube hat sich gelockert. Nadelhalterschraube fest-
drehen.
12
Die Oberfadenspannung ist zu hoch. Oberfadenspannung verrin-
gern.
20
Die Nähnadel ist zu dünn für das Nähgut. Andere Nadel einsetzen. 12, 13
Stiche werden
ausgelassen
Die Nähnadel wurde nicht richtig eingesetzt. Nadel richtig einsetzen. 12
Die Nähnadel ist verbogen oder stumpf. Neue Nadel einsetzen. 12
Weder Nadel noch Faden sind für das
Nähvorhaben geeignet.
Nadel und Faden passend
zum Nähgut verwenden.
13
Der Oberfaden ist nicht richtig eingefädelt. Oberfaden neu einfädeln. 18
Page 53

53
Fehlerbehebung
Fehler Grund Abhilfe Seite
Stoff wellt sich
Die Oberfadenspannung ist zu hoch.
Oberfadenspannung verringern.
20
Die Maschine ist nicht richtig eingefädelt.
Maschine neu einfädeln. 18
Die Nähnadel ist zu dick für das Nähgut.
Nadelstärke anhand der
Nadel- und Fadentabelle
überprüfen.
13
Die Stichlänge ist zu hoch für das Nähgut.
Stichlänge verringern. 22
Bei sehr dünnen Stoffen:
Kein Trägervlies untergelegt.
Trägervlies unterlegen.
Schleife in der
Naht
Die Oberfadenspannung ist zu niedrig.
Oberfadenspannung erhöhen.
20
Nadel und Faden sind nicht richtig auf das
Nähgut abgestimmt (zu dick oder dünn).
Nadel und Faden passend
zum Nähgut verwenden.
13
Nähgut wird
nicht richtig
transportiert
Der Transporteur ist durch feine Fasern
blockiert.
Transporteur reinigen. 50
Der Transporteur ist versenkt. Transporteur anheben. 24
Die Stiche sind zu kurz.
Stichlänge erhöhen. 22
Maschine läuft
nicht an
Die Maschine ist nicht richtig angeschlossen.
Maschine richtig anschließen.
8
Der Faden hat sich im Spulenkapselfinger
verfangen.
Spulenkapsel und Greifer
reinigen.
49
Das Handrad befindet sich in Spulstellung.
Handradauslösung deaktivieren.
16
Die Maschine ist
laut oder langsam
Der Faden hat sich im Spulenkapselfinger
verfangen.
Spulenkapsel und Greifer
reinigen.
49
Der Transporteur ist durch feine Fasern
blockiert.
Transporteur reinigen. 50
Unzureichende Schmierung.
Maschine ölen. 51
Page 54

54
Troubleshooting
Problem Cause Solution Page
Upper thread
breaks
Upper thread is not correctly threaded.
Rethread upper thread. 18
Upper thread tension is too tight.
Lower upper thread tension. 20
Needle is bent or dull.
Replace needle. 12
Needle is not inserted properly
.
Insert needle properly. 12
Thread is either too thick or too thin
.
Choose the right thread
referring to the needle and
thread chart.
13
Lower thread
breaks
Bobbin thread tension is incorrect. Bobbin case is threaded in-
correctly.
17
Bobbin case and/or hook are blocked
by lint.
Clean bobbin case and/or
hook.
49
Bobbin case is damaged or malfunctioning. Replace bobbin case. 15
Needle breaks
Needle is not correctly inserted
.
Insert needle correctly. 12
Needle is bent or dull.
Replace needle. 12
Needle clamp screw is loose.
.
Tighten needle clamp
screw.
12
Upper thread tension is too high. Lower upper thread tension. 20
Needle is too thin for the fabric to be sewn. Use appropriate needle. 12, 13
Skipped stitches
Needle is not correctly inserted
.
Insert needle correctly. 12
Needle is bent or dull.
Replace needle. 12
Neither needle nor thread are right for
the fabric to be sewn.
Use the correct needle and
thread for the fabric.
13
Upper thread is not correctly threaded. Rethread upper thread. 18
Page 55

Troubleshooting
Problem Cause Solution Page
Fabric puckers
Upper thread tension is too high.
Reduce upper thread tension.
20
Threading is not correct.
Rethread the machine. 18
Needle is too thick for the fabric.
Choose the right needle
referring to the needle and
thread chart.
13
Stitches are too long for the fabric to be
sewn.
Reduce stitch length. 22
For very thin materials:
No non-woven lining has been applied.
Use non-woven lining.
Stitches form loops
Upper thread tension is too low.
Increase upper thread tension.
20
Needle and thread are not right for the fabric
to be sewn (too thick or too thin).
Use the correct needle and
thread size by referring to
the needle and thrad chart.
13
Fabric does
not feed
properly
Feed dog is blocked by lint and fluff. Clean the feed dog. 50
Feed dog is lowered. Raise the feed dog. 24
The stitches are too short.
Increase the stitch length. 22
Sewing machine
will not sew
Machine is not connected properly. Connect machine properly. 8
Thread has got entangled in the bobbin
case positioning finger.
Clean the bobbin case
and/or the hook.
49
Handwheel is set for winding bobbin.
Set handwheel to its original
position.
16
Sewing machine is
slow or noisy
Thread has got entangled in the bobbin
case positioning finger.
Clean the hook. 49
Feed dog is blocked by lint and fluff. Clean the feed dog. 50
Machine is not lubricated properly.
Oil the machine. 51
55
Page 56

Technische Daten
Anschlussspannung 230 Volt, 50 Hz
Leistungsaufnahme 6 5 Watt (gesamt)
Arbeitsplatzbeleuchtung 15 Watt (Birnenformlampe Gewinde E 14, max. 15 Watt)
Nähgeschwindigkeit max. 800 Stiche/Minute
Unsere Geräte besitzen das CE-Zeichen und sind TÜV/GS geprüft.
Weitere Auskünfte hierzu erteilt Ihnen die FEIYUE GROUP EUROPE APS - Sundsholmen 14, DK-9400 Nr. Sundby
®
56
Garantie 24 Monate
Als Nachweis für die Garantie gilt der Kaufbeleg mit Kaufdatum.
Bitte bewahren Sie den Beleg daher sorgfältig auf.
Bei Fragen oder Problemen wenden S ie sich bitte an unsere
SERVICE HOTLINE TEL. 01805 703283.
Page 57

Connection voltage 230 volts, 50 Hz
Power consumption watts (total)
Workplace lighting 15 Watt (pear-shaped bulb, socket E 14, max. 15 watts)
Sewing speed 800 stitches/minute max.
Our machines carry the CE Mark and are tested and by German TÜV/GS.
For further information please contact FEIYUE GROUP EUROPE APS - Sundsholmen 14, DK-9400 Nr. Sundby
24 month w arranty
Sales receipt with purchase date required as proof of purchase for the
warranty. Therefore please keep your receipt.
If you have any questions or problems, please call our
SERVICE HOTLINE 01805 703283.
57
 Loading...