

Page 1

VICTOR 1570-6
VICTOR 1560-6
VICTOR 1530-6
12/14 DIGIT HEAVY DUTY PRINTING CALCULATOR
INSTRUCTION MANUAL
Page 2

2
TABLE OF CONTENTS
1. OPERATIONS AND MAINTENANCE...........……................................................ 3
2. REPLACING INK CARTRIDGE.......................……….......................................... 4
3. LOADING PAPER.................................................……….................................... 4
4. BATTERY REPLACEMENT...........................................…................................... 5
5. KEYBOARD LAYOUT................................................………................................ 5
6. SLIDE SWITCH FEATURES..........................................………........................... 7
7. KEY FEATURES...............................................................………........................ 8
8. CALCULATION EXAMPLES ……………...................................….....................12
9. TECHNICAL SPECIFICATION……………….……………………………..……..24
Page 3
3
1. OPERATIONS AND MAINTENANCE
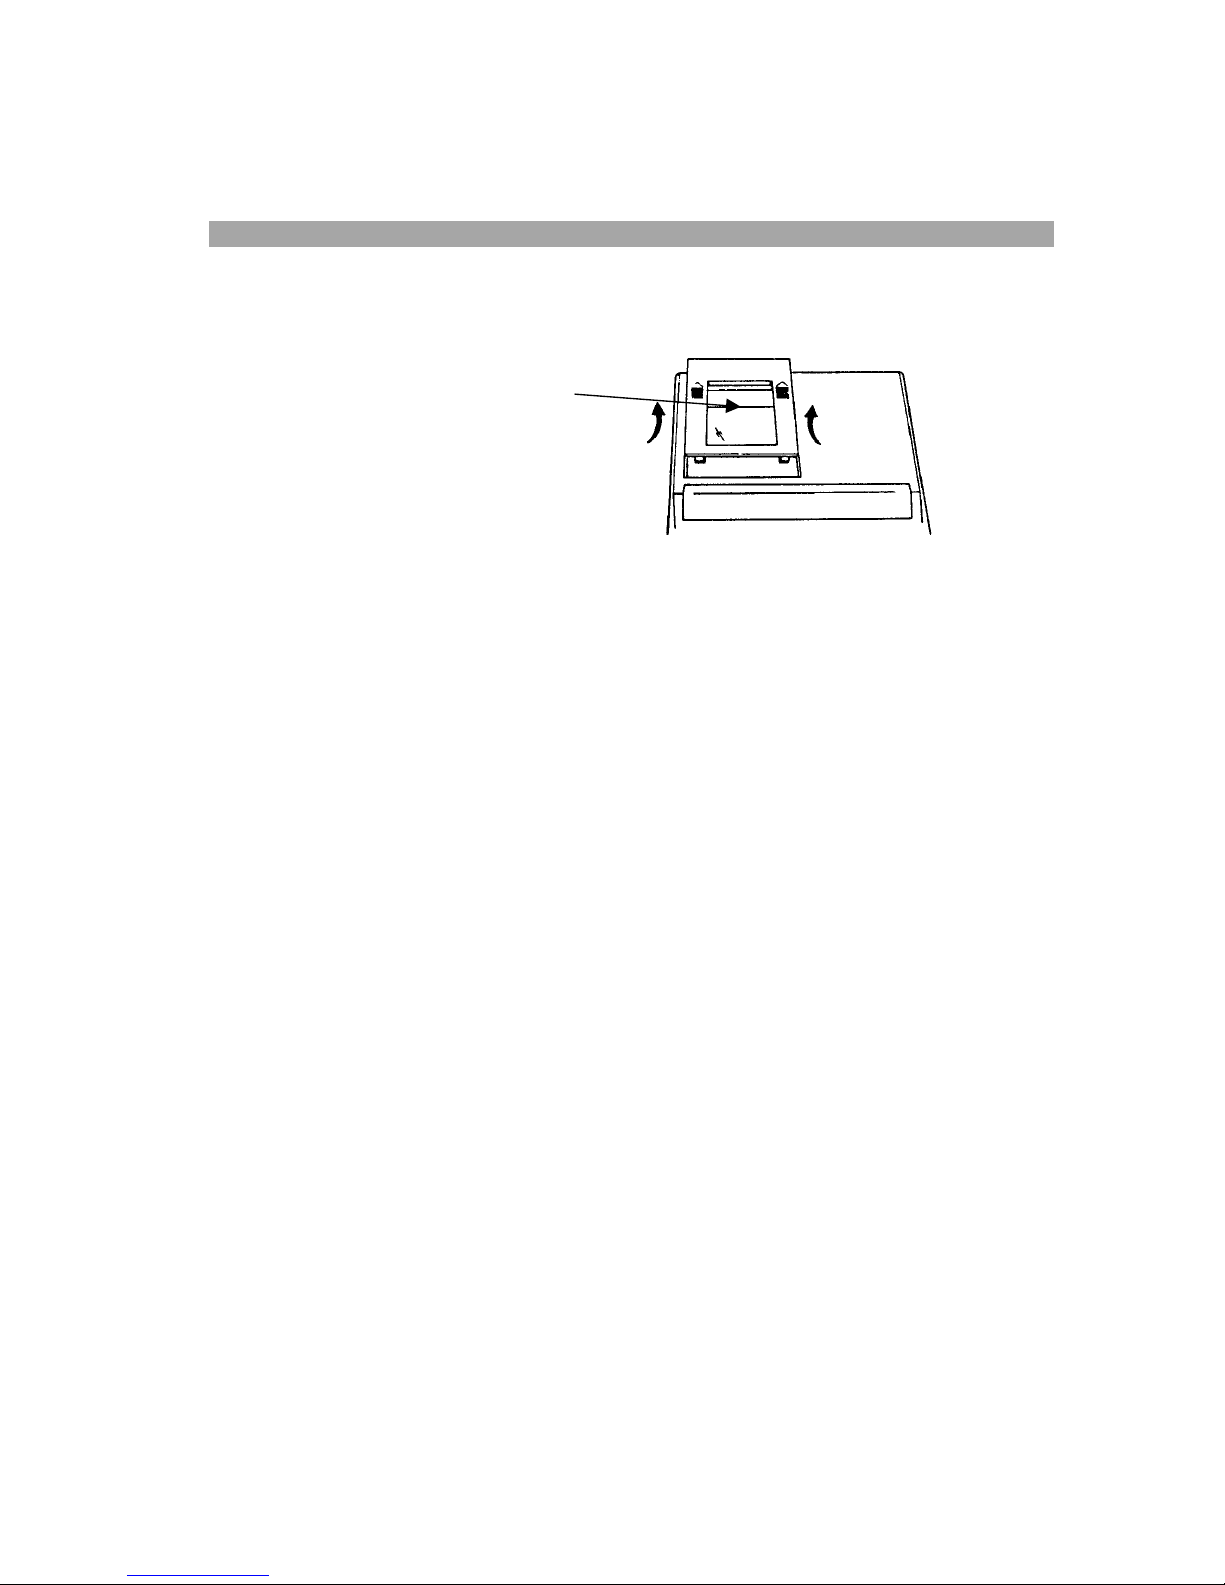
Before Turning On - Please remove ribbon-cushion placed on a ribbon and check the rating
label on the bottom to see if the rated voltage corresponds to the local voltage before plug in
AC cord.
Note: Ribbon cushion is located under
printer cover.
Printer Switch – This switch is located on upper middle portion of the keyboard. Slide the
switch depend on your application.
. - If only the display is needed.
PRINT - If you wish to have the printer to be operational.
CAUTIONS
- The calculator must not be covered when turned on. This will cause the unit to
overheat.
- Do not use organic solutions such as alcohol to clean the housing.
- Do not use or leave the calculator in the direct sun light. Area subject to quick
temperature changes, high humidity and dirt should be avoided.
- The socket-outlet shall be installed near the equipment and shall be easily accessible.
Page 4
4
2. REPLACING INK CARTRIDGE
1. Remove printer cover.
2. Move spool holder to remove both spools
3. Insert new spools. Making sure that black side of ribbon is up, ribbon to go through
ribbon guide, and with right direction.
Correct direction Incorrect direction
3. LOADING PAPER
1. Plug in calculator and turn it on.
2. Cut or tear evenly the end of paper rolls to get a straight, even edge for proper
feeding through the printer head.
3. While holding the paper roll in one hand, feed the paper from the bottom of the roll and
insert into the paper slot at the back of the calculator.
4. Depress paper feed key until the paper catches and advances through the printer.
5. Place the paper roll on the dual paper holders.
Page 5
5
4. BATTERY REPLACEMENT
1. Turn the AC power switch off.
2. Remove the battery compartment cover located on the calculator bottom case.
3. Remove the old battery and install a new CR2025 or equivalent.
4. PRESS THE RESET SWITCH.
5. Replace the battery compartment cover.
6. Turn on the AC power switch.
7. Reprogram the date and time.
CAUTION
Danger of explosion if battery is incorrectly replaced. Replace only with the same or
equivalent type recommended by the manufacturer. Dispose of use batteries
according to the manufacturers’ instruction.
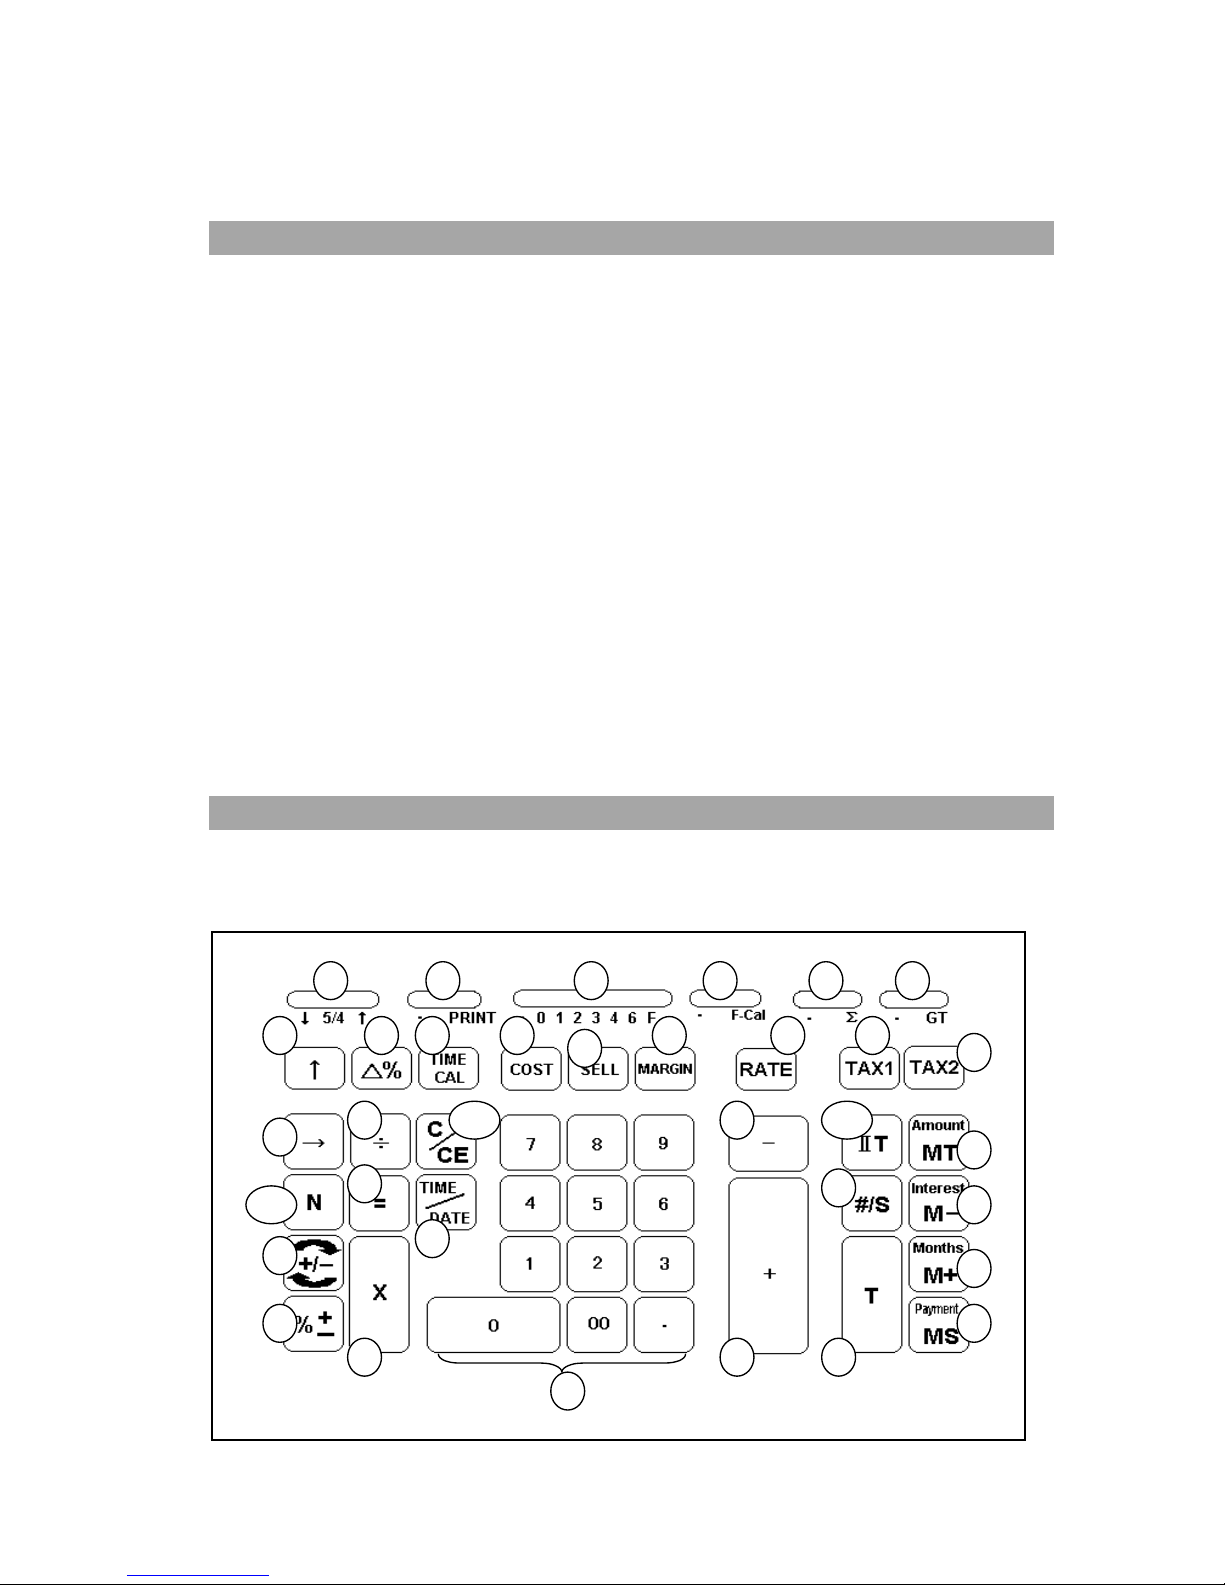
5. KEYBOARD LAYOUT
Model 1570-6
1 2 3 4 5 6
7 8 9 10
11
13 12
15
14
16
17a
18
19
20
21
22
24
23a
25
27
26
30
29
28a
34
33
32
31
Page 6
6
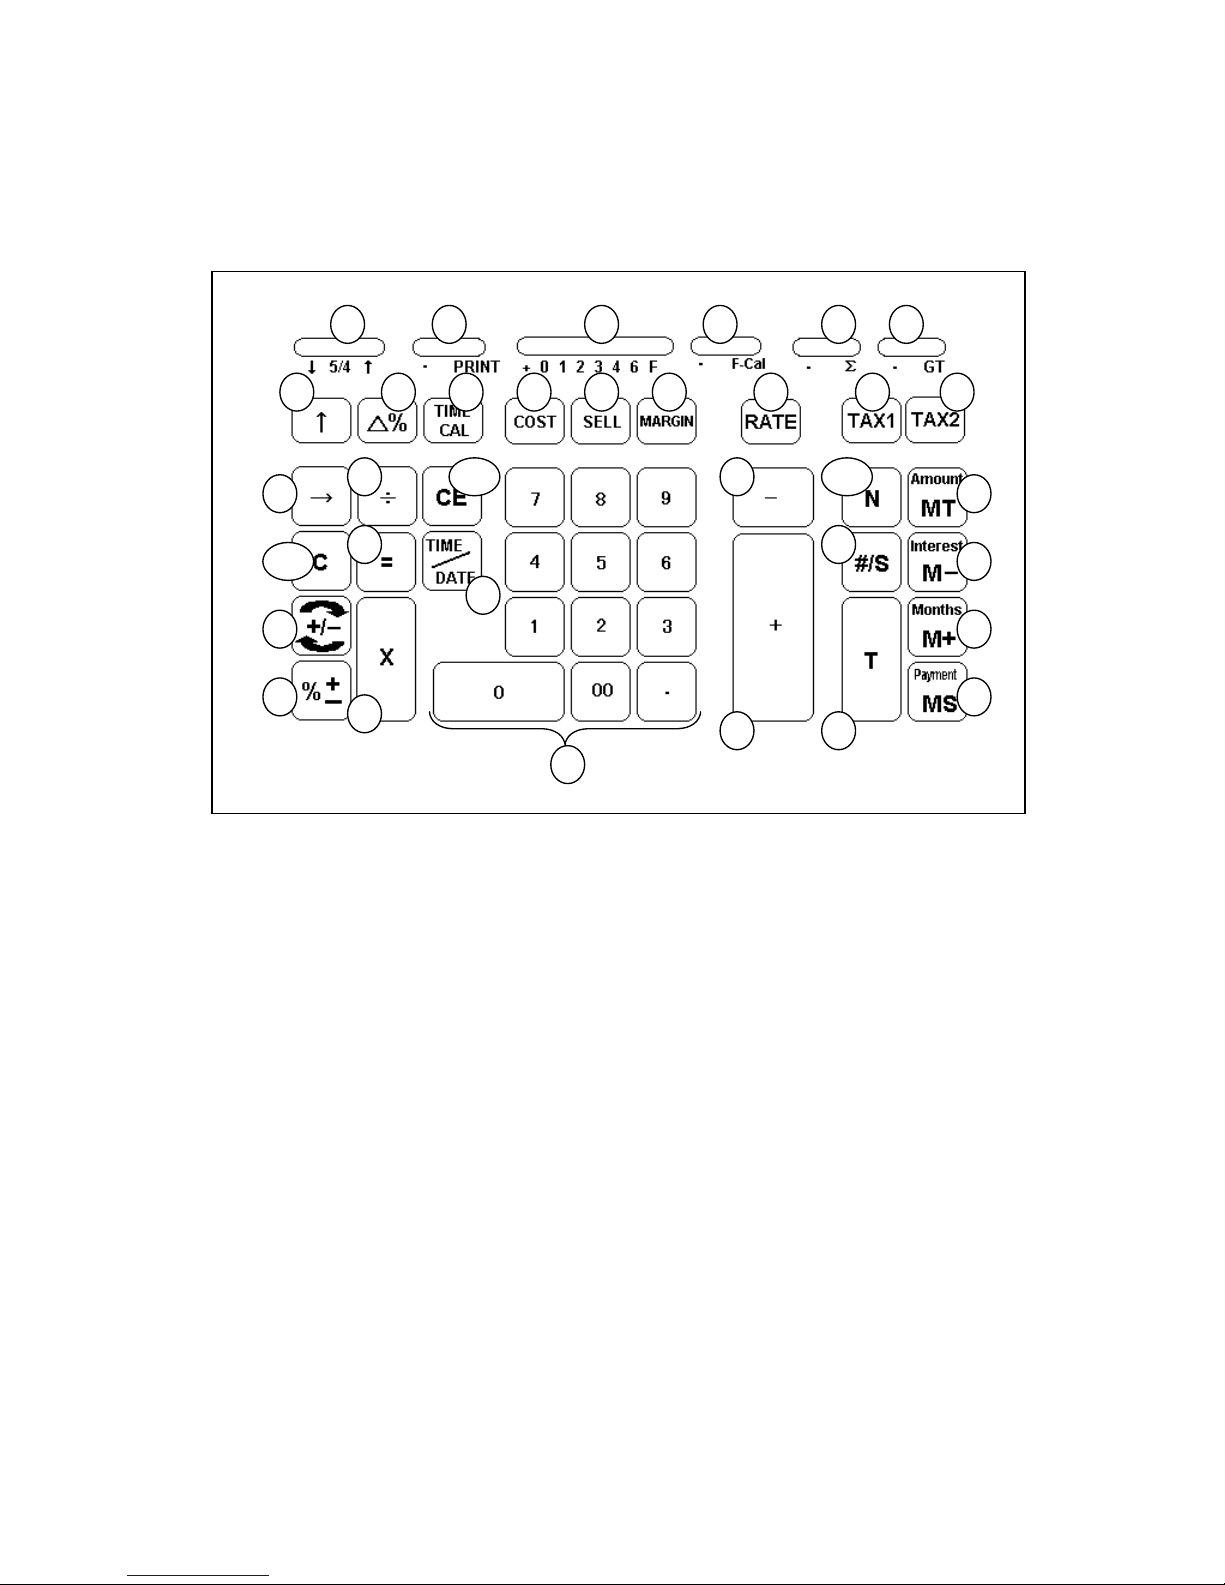
Model 1560-6 and 1530-6
1. Rounding Selector
14. Tax 1
25. Numeric Key Pad
2. Print Switch
15. Tax 2
26. Subtraction
3. Decimal Selector 16. Back Space 27. Addition
4. Financial Calculation Switch 17a. Item Count
28a. Memory II Selector
5. Sigma Switch 17b. Clear 28b. Item Count
6. Grand Total Switch 18. Sign Change 29. Subtotal / Date
7. Paper Feed 19. Percentage 30. Total
8. Delta Percentage 20. Division 31. Memory Total / Amount
9. Time Calculation 21. Equal 32. Memory Subtraction / Interest
10. Cost 22. Multiplication 33. Memory Addition / Months
11. Sell 23a. Clear / Clear Entry 34. Memory Subtotal / Payment
12. Margin 23b. Clear Entry
13. Tax Rate Preset 24. Time / Date Display
1 2 3 4 5 6
7 8 9 10 11 13 12 15 14
16
17b
18
19
20
21
22
24
23b
25
27
26
30
29
28b
34
33
32
31
Page 7

7
6. SLIDE SWITCH FEATURES
1. ↓↓↓↓ 5/4 ↑↑↑↑ Rounding Switch
↓↓↓↓ Absolute round down.
5/4 Final result is rounded up if the 1
st
digit not to be printed is 5 or more
and rounded down if the 1
st
digit not to be printed is 4 or less.
↑↑↑↑ Absolute round up.
2. •••• PRINT Printer Selects Switch
•••• (Non-print) Printer is activated only when feed key or non-add/date key is
pressed.
PRINT Printer is activated as long as calculator is turned on.
3. + 0 1 2 3 4 6 F Decimal Point Selector
+ Add mode. The decimal point is automatically placed before the last two
digits in addition and subtraction.
0,1,2,3,4,6 For multiplication and division, decimal point is set to the result of
calculation. For addition and subtraction, decimal point is set to all
entries. To all the results, number in the decimal place to the last
decimal place designated will be rounded. For example, number at 3
rd
decimal place is rounded at “2” position.
F Automatic floating point for decimally accurate computing. Decimal
point is entered at desired position and the decimal point is
automatically shifted to the right is under 14 digits of integer.
4. Financial Calculation Switch
•••• Without Financial Calculation
F-Cal Memory Total key change to Amount key
Memory Minus key change to Interest key
Memory Plus key change to Months key
Memory Subtotal key change to Payment key
5. ∑∑∑∑ Switch
•••• Calculation without sigma
∑∑∑∑ Calculation with Sigma. The results of multiplication or division
calculations completed by the = or % keys are automatically added to
the accumulator. The sum of these accumulations is displayed by
pressing Subtotal key and displayed and cleared by pressing the Total
key.
Page 8

8
6. Grand Total Switch
•••• Calculation without Grand Total
GT 1570-6: Any total taken with T key is automatically accumulated to
Grand Total memory. The accumulated grand total can be recalled by
pressing the IIT key then the T key.
1560-6 & 1530-6: Any total taken with T key is automatically
accumulated to memory. The accumulated grand total can be recalled
by pressing the MT key.
NOTE: For model 1560-6 and 1530-6, when F-Cal switch in ON, user may unable
to recall GT memory.
7. KEY FEATURES
7. [↑↑↑↑] Paper feed key
Advance the paper roll.
8. [∆∆∆∆%] Delta Percentage
Automatically compares any two amounts and then calculates and prints the
percent change.
9. [TIME CAL] Time Calculation key
Set the calculator to Time Mode. +, -, S and T will be calculated and displayed in
Time Mode (Hours, Minutes).
10. [COST] Cost key
Calculate amount exclude profit margin.
11. [SELL] Sell key
Calculate amount include profit margin.
12.
[MARGIN]
Profit margin
Use to enter profit margin.
13. [RATE] TAX rate preset key
Used to enter TAX rate.
14. [TAX 1] Tax 1 key
Calculate an amount VAT with VAT rate preset by RATE key. Used + key for
calculate an amount including VAT, and – key for calculate an amount excluding
VAT.
Page 9

9
15. [TAX 2] Tax 2 key
Calculate an amount VAT with VAT rate preset by RATE key. Used + key for
calculate an amount including VAT, and – key for calculate an amount excluding
VAT.
16. [→→→→] Right shift key
Deletes right most character of a live entry.
17a. [N] Item Count key
Model 1570-6
Calculations with item count.
17b. [C] Clear
Model 1560-6 & 1530-6
Clear the accumulator or pending calculation. Does not clear the Memory or
Grand total.
18. [+/-] Sign change key
Reverse the sign on the display.
19. [%+
] Percent key
Completes percent calculation when Multiple or Division key is used.
20. [
÷÷÷÷
] Division key
To divide, enter the number to be divided (dividend) then depress the Divide key.
Then enter the second number (divisor) and depress Equals to obtain result. If
the key is depressed repeatedly, it will make sequential division calculation.
21. [=] Equal key
To get the result in multiplication or division.
22. [X] Multiplication key
To multiply, enter the first number (multiplicand) and depress the Times key; then
enter the second number (multiplier) and depress Equals or other keys as
necessary, it will make sequential multiple calculation.
23a. [C/CE] Clear / Clear entry key
Model 1570-6
Clears a live entry by pressing this key once. Press twice to clear the
accumulator or pending calculation. Does not clear the Memory or Grand total.
23b. [CE] Clear entry
Model 1560-6 & 1530-6
Clears a live entry.
Page 10

10
24. [TIME/DATE] Time and Date display key
Used to display or program the date and time. Depressing this key once will
cause the date to display, a second depression will display the time. Holding the
key down for three seconds will cause the date or time to flash, this is the
program mode.
25. [0]-[9], [00] & [••••] Numeric keys.
Any numeral over 14 digits will be ineffective. When decimal point key is used
more than once in one numeral, the first decimal point will be considered as
effective.
26. [−−−−] Minus key
Subtracts an amount from the accumulator. To subtract the same amount more
than one time (repeat subtraction), enter that amount once and depress the
Minus key as many times as necessary. If this key is depressed immediately
after [%] key, it works as percent minus key.
27. [+] Plus key
Adds an amount to the accumulator. To add the same amount more than one
time (repeat addition), enter that amount once and depress the Plus key as
many times as necessary. If this key is depressed immediately after [%] key, it
works as percent plus key.
28a. [IIT] Memory II Selector key
Model 1570-6
Calculation on memory II by press Memory II key follow by plus, minus, subtotal
or total key.
28b. [N] Item Count key
Model 1560-6 & 1530-6
Calculations with item count.
29. [# / S]
Date / Subtotal key
#: It will print live entry as an identifier as an invoice number with “#” mark.
S: It prints but does not clear the accumulator.
30. [T] Total key
Prints and clears the accumulator. When this key is pressed with the “GT” switch
is on, the result is accumulated automatically in the memory register.
31. [MT / Amount] Memory Total key / Amount
MT: Prints and clears the memory.
Amount: If this key is pressed after 10-key input, it is means enter the value as
Total Amount. However, if Interest, Month, and Payment are entered in
prior or modification is done on any of the three as above in prior, user
can calculate / recalculate the Loan Amount by press this key.
Page 11

11
32. [M- / Interest] Memory Minus key / Interest
M-: Subtracts an amount from memory. If there is a live calculation pending, the
Memory Minus key will complete the calculation and subtract the amount
from Memory.
Interest: This key will enter the 10-key input value as Loan Interest. Loan
Interest must be entered in order to do any financial calculation.
Therefore, this key will only be able to use for recall Loan Interest, or
enter the 10-key value.
33. [M+ / Months] Memory Plus key / Months
M+: Adds an amount to memory. If there is a live calculation pending, the
Memory plus key will complete the calculation and accumulate the result
to Memory.
Months: If this key is pressed after 10-key input, it is means enter the value as
Number of Months to settle the Loan. If Amount, Interest, and Payment
are entered in prior, or modification is done on any of the three as
above in prior, user can calculate / recalculate the Number of Months
to clear the Loan by press this key.
34. [MS / Payment] Memory Subtotal key / Payment
MS: Prints but do not clear the memory.
Payment: If this key is pressed after 10-key input, it is means enter the value as
Payment. If Amount, Interest, and Months are entered in prior, or
modification is done on any of the three as above in prior, user can
calculate / recalculate the Payment by press this key.
Page 12

12
8. CALCULATION EXAMPLES
1. ADDITION / SUBTRACTION
Rounding
Print Decimal F-Cal ∑ GT
5/4 P F . . .
Calculation Enter Display Paper
2 + 3.1415926 - 6 = ? 2 [+] 2.
3.1415926 [+] 5.1415926
6 [−] - 0.8584074
[T] - 0.8584074
2. ADDITION / SUBTRACTION IN ADD MODE
Rounding
Print Decimal F-Cal ∑ GT
5/4 P + . . .
Calculation Enter Display Paper
1.23 − 4.56 + 7.89 = ? 123 [+] 1.23
456 [−] - 3.33
[#/S] - 3.33
789 [+] 4.56
[T] 4.56
3. ITEM COUNT PRESETTING
Rounding Print Decimal F-Cal ∑ GT
5/4 P + . . .
Calculation Enter Display Paper
[C/CE] 0.
Setting Item
(Press & Hold 3 sec)
[N]
(Blinking)
0000.
Count Plus [+]
0
000.
[C/CE] 0.
Setting Item
(Press & Hold 3 sec)
[N]
(Blinking)
0
000.
Count Plus Minus [-]
0
000.
2. +
3.1415926 +
6. −
0.8584074 -T
1.23 +
4.56 −
3.33 -S
7.89 +
4.56
T
0. C
000
0. C
000
Page 13

13
4. ADDITION / SUBTRACTION WITH ITEM COUNT
Rounding
Print Decimal F-Cal ∑ GT
5/4 P + . . .
Calculation
Enter Display Paper
11.32 + 7.98 − 33.33 = ? 1132 [+] 11.32
798 [+] 19.30
[N]
0
002.
[#/S] 19.30
3333 [−] - 14.03
[N]
0
001.
[T] - 14.03
[C/CE] 0.
5a. GRAND TOTAL MEMORY
Model 1570-6
Rounding
Print Decimal F-Cal ∑ GT
5/4 P + . . GT
Calculation Enter Display Paper
13.20 9.55 [C/CE] 0.
8.30 7.36 13.2 [+] 13.20
+ 2.95
18.33 8.3 [+] 21.50
24.45 +35.24 =T? 2.95 [+] 24.45
[T] II 24.45
9.55 [+] II 9.55
7.36 [+] II
16.91
18.33 [+]
II 35.24
[T]
II 35.24
[IIT]
II 35.24
[T] 59.69
11.32 +
7.98 +
002
19.30 S
33.33 –
001
14.03 -
T
0. C
0. C
13.20 +
8.30 +
2.95 +
24.45 T
+
9.55 +
7.36 +
18.33 +
35.24 T
+
59.69 T
M
II
Page 14

14
5b. GRAND TOTAL MEMORY
Model 1560-6 & 1530-6
Rounding
Print Decimal F-Cal ∑ GT
5/4 P + . . GT
Calculation Enter Display Paper
13.20 9.55 [C] 0.
8.30 7.36 13.2 [+] 13.20
+ 2.95
18.33 8.3 [+] 21.50
24.45 +35.24 =T? 2.95 [+] 24.45
[T] I 24.45
9.55 [+] I 9.55
7.36 [+] I 16.91
18.33 [+]
I 35.24
[T]
I 35.24
[MT] 59.69
6. REPETATIVE CALCULATION WITH REFERENCE TO DATE
Rounding
Print Decimal F-Cal ∑ GT
5/4 P + . . .
Calculation
Enter Display Paper
6.54 + 6.54 + 6.54 − 21.9.2001 [#/S] 21.92001
7.89 − 7.89 = ? 654 [+] 6.54
[+] 13.08
[+] 19.62
789 [−] 11.73
[−] 3.84
[T] 3.84
# 21.09.2001
6.54 +
6.54 +
6.54 +
7.89 −
7.89 −
3.84
T
0. C
13.20 +
8.30 +
2.95 +
24.45 MT
+
9.55 +
7.36 +
18.33 +
35.24 MT
+
59.69 MT
Page 15

15
7. ROUNDING FOR ADDITION / SUBTRACTION
Rounding Print Decimal F-Cal ∑ GT
↓ P 0 . . .
Calculation
Enter Display Paper
3.4 + 2.1 = ? 3.4 [+] 3.4
2.1 [+] 5.5
[T] 5.
Rounding Print Decimal F-Cal ∑ GT
5/4 P 0 . . .
Calculation Enter Display Paper
3.4 + 2.1 = ? 3.4 [+] 3.4
2.1 [+] 5.5
[T] 6.
8. RIGHT SHIFT
Rounding
Print Decimal F-Cal ∑ GT
5/4 P 4 . . .
Calculation
Enter Display Paper
5.4321 + 2.34567 = ? 5.4321 [+] 5.4321
2.3457 [→] 2.345
67 [+] 7.77777
[T] 7.7778
3.4 +
2.1 +
5. T
3.4 +
2.1 +
6. T
5.4321 +
2.34567 +
7.7778 T
Page 16

16
9. CONSTANT MULTIPLICATION
Rounding
Print Decimal F-Cal ∑ GT
5/4 P 2 . . .
Calculation Enter Display Paper
2 × 4 = 8 2 [×] 2.00
2 × 5 = 10 4 [=] 8.00
2 × 6 = 12
5 [=] 10.00
6 [=] 12.00
10. CONSTANT DIVISION
Rounding
Print Decimal F-Cal ∑ GT
5/4 P 2 . . .
Calculation
Enter Display Paper
755 ÷ 4 = 188.75 755 [÷] 755.00
409 ÷ 4 = 102.25 4 [=] 188.75
32 ÷ 4 = 8.00
409 [=] 102.25
32 [=] 8.00
2.00 ×
4.00 =
8.00 ∗
5.00 =
10.00 ∗
6.00 =
12.00 ∗
755.00 ÷
4.00 =
188.75 ∗
409.00
=
102.25 ∗
32.00 =
8.00 ∗
Page 17

17
11. MULTIPLICATIONS AND DIVISION WITH ACCUMULATION
Rounding Print Decimal F-Cal ∑ GT
↓ P 2 . ∑ .
Calculation
Enter Display Paper
[132 x 5.67]=748.44 132 [x] 132.00
+[146 x 4.45]=649.70 5.67 [=] 748.44
+[155 x 3.11]=482.05
Total = ?
146 [x] 146.00
4.45 [=] 649.70
155 [x] 155.00
3.11 [=] 482.05
[T] 1,880.19
12. DISCOUNT CALCULATION
Rounding
Print Decimal F-Cal ∑ GT
↓ P + . . .
Calculation Enter Display Paper
Price = $169.50 169.5 [×] 169.50
Discount = 14% 14 [%+
] 23.73
Total Discount = $23.73
Net = $145.77
[-] 145.77
132.00 x
5.67 =
748.44 +
146.00 x
4.45 =
649.70 +
155.00 x
3.11 =
482.05 +
1,880.19 T
169.50 ×
14.00 %
23.73 ∗
145.77 -%
Page 18

18
13. DELTA PERCENTAGE CALCULATION
Rounding
Print Decimal F-Cal ∑ GT
↓ P 2 . . .
Calculation
Enter Display Paper
175,000−125,000 125000 [∆%] 125,000.00
= 50,000 175000 [=] 40.00
50,000 ÷ 125,000
x 100 = 40%
14. PROFIT MARGIN
Rounding
Print Decimal F-Cal ∑ GT
5/4 P 2 . . .
Calculation Enter Display Paper
Cost = 100 100 [COST] 100.00
Margin = 5% 5 [MARGIN] 105.26
Sell = ?
Sell = 150.00 150 [SELL] 150.00
Margin = 10% 0 10 [MARGIN] 135.00
Cost = ?
125,000.00 ∆
175,000.00 =
50,000.00 ∆∗
40.00 ∆%
100.00 C
5.00 M%
5.26 ∆∗
105.26 S
150.00 S
10.00 M%
15.00 ∆∗
135.00 C
Page 19

19
15. MEMORY CALCULATION
Rounding Print Decimal F-Cal ∑ GT
5/4 P F . . .
Calculation Enter Display Paper
[C/CE] 0.
100 + 200 = ? 100 [+] 100.
900 - 500 = ? 200 [+] 300.
20 X 7 = ? [T] 300.
12 X 5 = ?
Total ? [M+]
I 300.
900 [+] I 900.
500 [-] I 400.
[T] I 400.
[M+] I 400.
20 [X]
I 20.
7 [=] I 140.
[M+] I 140.
12 [X] I 12.
5 [M+]
I 60.
[MS] I 900.
[MT]
900.
16. TAX RATE PRESETTING
Rounding Print Decimal F-Cal ∑ GT
5/4 P 2 . . .
Calculation Enter Display Paper
[C/CE] 0.
Preset TAX 1 = 7.5%
(Press & Hold 3 sec)
[RATE]
(Blinking)
0.
7.5 [TAX 1] 7.5
[C/CE] 0.
Preset TAX 2 = 18.6%
(Press & Hold 3 sec)
[RATE]
(Blinking)
0.
18.6 [TAX 2] 18.6
0. C
…1…
7.5 %
0. C
…2…
18.6 %
0. C
100. +
200. +
300. T
300. M+
900. +
500. -
400. T
400. M+
20. x
7. =
140. ∗
140. M+
12. x
5. =
60. M+
900. MS
900. MT
Page 20

20
17. TAX CALCULATION
Rounding Print Decimal F-Cal ∑ GT
5/4 P 2 . . .
Calculation Enter Display Paper
Price without Tax 1 [C/CE] 0.
=261.56 261.56 [TAX 1] 261.56
Price with Tax 1 = ? [+] 281.18
Price without Tax 1 [TAX 1] 281.18
[-] 261.56
Price without Tax 2 [C/CE] 0.
=300 300 [TAX 2] 300.00
Price with Tax 2 = ? [+] 355.80
Price without Tax 2 [TAX 2] 355.80
[-] 300.00
VAT including TAX 1 and TAX 2:
200 [TAX 1] 200.00
[TAX 2] 200.00
[+] 252.20
0. C
261.56
…1…
7.5 %
19.62 ∆
281.18 ∗
281.18
…1…
7.50 %
19.62 ∆
261.56 ∗
0. C
300.00
…2…
18.6 %
55.80 ∆
355.80 ∗
355.80
…2…
18.6 %
55.80 ∆
300.00 ∗
200.00
…1…
7.5 %
15.00 ∆
…2…
18.6 %
37.20 ∆
…
1,2
…
52.20 ∆
252.20 ∗
Page 21

21
18. MEMORY II CALCULATION
Model 1570-6
Rounding Print Decimal F-Cal ∑ GT
5/4 P + . . .
Calculation Enter Display Paper
[C/CE] 0.
4.56 - 1.23 + 456 [IIT] 456.
(2 x 0.03) = ? [+] II 4.56
123 [IIT] II 123.
[-] II 1.23
[IIT] II 1.23
[#/S] II 3.33
2 [x] II 2.00
3 [=] II 0.06
[IIT] II 0.06
[+] II 0.06
[IIT] II 0.06
[T]
3.39
19. DATE AND TIME PRESETTING
Rounding
Print Decimal F-Cal ∑ GT
5/4 P F . . .
Calculation Enter Display Paper
[C/CE] 0.
Set Time to [TIME/DATE] MM-DD-YYYY
4:37 PM
(Press & Hold 3 sec)
[TIME/DATE]
(Blinking)
HH-MM-SS
1637
(Blinking)
1637
[TIME/DATE] P 04-37-00
Set Date to [C/CE] 0.
September 14, 2000
(Press & Hold 3 sec)
[TIME/DATE]
(Blinking)
MM-DD-YYYY
091400
(Blinking)
91400
[TIME/DATE] 09-14-2000
0. C
4.56 +
1.23 -
3.33 S
2.00 x
0.03 =
0.06 ∗
0.06 +
3.39 T
0. C
M
II
M
II
M
II
M
II
M
II
Page 22

22
20. TIME CALCULATION
Rounding Print Decimal F-Cal ∑ GT
5/4 P 2 . . .
Calculation Enter Display Paper
[C/CE] 0.
12 H 34 M [TIME CAL] 00-00
+ 5 H 12 M
1234 [+] 12-34
? 0512 [+] 17-46
- 1 H 20 M
0120 [-] 16-26
? [#/S] 16-26
[T] 16-26
5 H 23 M x 4 = ? [C/CE] 00-00
11 H 54 M ÷ 8 = ?
0523 [x] 5.3833333333333
Total ? 4 [=] 21.53
[+] 21-32
1154 [÷] 11.90
8 [=] 1.49
[+] 23-01
[T] 23-01
[TIME CAL] 0.
0. C
00 00 C
12 34 +
05 12 +
01 20 -
16 26 S
16 26 T
00 00 C
5.3833333333333 x
4.00 =
21.53 ∗
21 32 +
11.90 ÷
8.00 =
1.49 ∗
01 29 +
23 01 T
0. C
Page 23

23
21. FINANCIAL CALCULATION
Rounding
Print Decimal F-Cal ∑ GT
5/4 P 2 F-Cal . .
Calculation Enter Display Paper
[C/CE] 0.
Loan Amount
= 100000 100000 [Amount] 100,000.00
Interest = 6.5 % 6.5 [Interest] 6.50
Months = 180 180 [Months] 180.00
Payment = ? [Payment] 871.11
Payment changed
to 600 600 [Payment] 600.00
Months = ? [Months] 432.00
NOTE: When F-Cal Switch is ON, Cost, Sell, Margin, Time Calculation and Memory are no
function.
0. C
100,000.00 ∆
6.50 %
180.00 M
……………………
871.11 C∗
……………………
600.00 C
……………………
432.00 M∗
……………………
Page 24

24
9. TECHNICAL SPECIFICATIONS
Type: Desktop Adding Machine/Calculator, Electronic Print/VFD
Basic Operations: Addition/subtraction and multiplication/division
Capacity: Input and result 14 digits for 1570-6 and 1560-6,
Input and result 12 digits for 1530-6.
Decimal System: Add Mode(+), Floating(F), Fixed(0,1,2,3,4,6)
Functions: 4 rules, successive calculation, memory calculation, grand
total calculation, constant calculations, time calculation,
financial calculation, tax calculation, cost, sell and margin
calculation.
Printer: Character wheel selection type.
Power Consumption:
Ink Cartridge:
Paper width: 57.5 ± 0.5mm
Display: 14 digit VFD display for 1570-6 and 1560-6,
12 digit VFD display for 1530-6.
Operating Temp: 0°C ~ 40°C
Dimensions:
Weight:
 Loading...