

Page 1

SMART-KILL
Attic Trap
LAST ACTIVITY: 9/22/16 • 5:28 PM
RODENT
CAUGHT
Electronic Traps
USER GUIDE
™
Page 2

Victor® Smart-Kill™ Electronic
Mouse Trap Model: M1
®
Smart-Kill™ Electronic Rat Trap
Victor
Model: M2
Contains FCC ID: 2ADHKATWINC1510
Module Manufacturer: ATMEL
Module Designation: ATWINC1510
THIS DEVICE COMPLIES WITH PART 15
OF THE FCC RULES. OPERATION IS
SUBJECT TO THE FOLLOWING TWO
CONDITIONS: (1) THIS DEVICE MAY NOT
CAUSE HARMFUL INTERFERENCE, AND
(2) THIS DEVICE MUST ACCEPT ANY
INTERFERENCE RECEIVED, INCLUDING
INTERFERENCE THAT MAY CAUSE
UNDESIRED OPERATION.
Warning: Changes or modications to
this device not expressly approved by
Woodstream Corporation could void the
user’s authority to operate the equipment.
NOTE: This equipment has been tested
and found to comply with the limits for a
Class B digital device, pursuant to Part 15
of the FCC Rules. These limits are
designed to provide reasonable protection
1
Page 3

against harmful interference in a
residential installation. This equipment
generates, uses, and can radiate radio
frequency energy and, if not installed and
used in accordance with the instructions,
may cause harmful interference to radio
communications. However, there is no
guarantee that interference will not occur
in a particular installation. If this
equipment does cause harmful
interference to radio or television
reception, which can be determined by
turning the equipment off and on, the user
is encouraged to try to correct the
interference by one or more of the
following measures:
• Reorient or relocate the receiving
antenna.
• Increase the separation between the
equipment and receiver.
• Connect the equipment into an outlet on
a circuit different from that to which the
receiver is connected.
• Consult the dealer or an experienced
radio/TV technician for help.
2
Page 4

WARNING: Electric Shock and Spark
Hazards Ignition: Use indoors ONLY on
dry, clean surfaces. Do not use near
unvented ammable vapors, liquids, or
combustible solids. Do not use in barns,
stables, or similar wet or dusty locations.
High Voltage: Keep out of reach of
children and pets. Use only dry hands or
rubber gloves to handle. Power OFF and
separate units before baiting. Do not touch
metal plates when device is powered on.
Electromagnetic Waves: Keep
pacemakers and life support devices at
least one foot away. Consult your heart
doctor if you receive a shock. Failure to
read and heed all warnings and directions
may cause electric shock, re, or serious
injury. Read and follow all label
instructions.
3
Page 5

STATEMENT APPLIES ONLY TO
EUROPEAN COUNTRIES. (CE): This
appliance can be used by children aged
from 8 years and above and persons with
reduced physical, sensory or mental
capabilities or lack of experience and
knowledge if they have been given
supervision or instruction concerning use
of the appliance in a safe way and
understand the hazards involved.
Cleaning and user maintenance shall not
be made by children without supervision.
Manufactured for:
Woodstream Corporation
69 N. Locust Street, Lititz, PA 17543
800-800-1819
Europe Phone: +44 (0) 1572 722558 or
email enquiries@woodstream.com
4
Page 6

You Will Need:
• A smart phone, tablet or similar
connected mobile device.
• Broadband internet connection. Do
NOT use a phone/tablet hot spot.
• A strong Wi-Fi signal where trap
will be placed.
• Password for your home network.
• A Victor® Smart-Kill™ trap.
• A set of brand new batteries
(4 "AA" for the mouse trap, 4 "C"
for the rat trap).
Important Notes
•
Once a rodent is caught, a
notication is sent to your
connected device if it is connected
to the Victor® Pest App.
•
A notication is sent to your mobile
device when the battery life of the
trap is low. Replace batteries when
you receive this notication.
5
Page 7

•
You can share your experience
through social media within the App.
•
The trap will still operate without
being connected to Wi-Fi. However,
you will not receive notications
upon catching a rodent and will
need to regularly check the trap.
•
Visit: www.victorpest.com/electronics
for customer support.
Trouble Shooting:
STOP! If you have questions or
problems with your purchase do
not return it to the retail store.
Please contact us directly for
immediate assistance at
1-855-5-VICTOR.
Europe Phone: +44 (0) 1572 722558.
You may need to check your Wi-Fi
signal strength. Do this by making
sure your mobile device is
connected to your Wi-Fi network.
Hold your mobile device in the place
where your Victor® Smart-Kill™ trap
will be stationed and check the WiFi signal strength.
6
Page 8

If you see:
Wi-Fi signal is strong.
You’re all set!
Wi-Fi signal is weak. Your Victor®
Smart-Kill™ trap will likely
connect to your Wi-Fi network, but
connection may be intermittent.
No Wi-Fi signal:
Try one of the following:
• Move your router closer to your
Victor® Smart-Kill™ trap.
• Buy a Wi-Fi range extender.
Indications that the trap did not
successfully connect to Wi-Fi during
setup:
• A network/server error has
occurred if the blue Wi-Fi light and
the red Victor® “V” light stay on for
5 seconds. Power the trap off and
start over.
• A password error has occurred if
the blue Wi-Fi light and the red
Victor® “V” light blink for 5 seconds.
Re-enter password. Note that
passwords are case sensitive.
7
Page 9
Frequently Asked Questions
• Where should I place my trap?
Traps can be placed anywhere
indoors. Place trap against a wall
where rodent activity is frequently
seen.
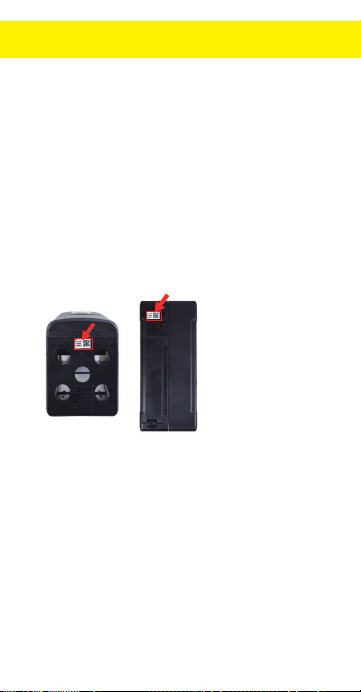
• Where is my trap/QR code?
The QR code is located on the
bottom of the mouse trap and the
back of the rat trap.
• What kind of bait should I use?
The best baits are high in fat and
protein, such as peanut butter or
hazelnut spread.
8
Page 10

• How much bait do I need?
The trap has a bait cup that shows
you exactly how much bait to use.
Do not overll the bait cup. Do not
place bait on the metal plates. Doing
so may interfere with the electrical
functionality and your trap may not
work unless you completely clean
the bait off.
• How do I dispose of a caught
mouse?
Press the power button to turn the
unit “OFF”. Open the kill chamber
door and properly discard rodent.
Clean and bait trap after each use
for most effective results. Press the
power button to turn the unit back
on. The trap will automatically
reconnect to Wi-Fi. Opening and
closing the kill chamber door will
re-arm the mouse trap if it has not
been powered “OFF”.
9
Page 11

• How do I dispose of a caught
rat?
Press the power button to turn the
unit “OFF.” Properly discard rodent.
Clean and bait trap after each use
for most effective results. Press
power button to turn the unit back
on. The trap will automatically
reconnect to Wi-Fi.
10
Page 12

Getting Started: Android Devices
1. Download the free Victor® Pest
App from the Apple App Store® or
Android Google Play™ store.
Check that the unit is turned
“OFF” by making sure the power
button is not pressed down. Insert
batteries into the battery
compartment and launch the
Victor® Pest App.
2. Connect your trap by following the
instructions on screen. Step by
step instructions are also in this
guide.
3. Once the power button and Wi-Fi
button have been pressed during
the initial setup, users will have 5
minutes to successfully nish.
Once 5 minutes have passed, the
user should power the trap off and
start over if setup was not
successful.
11
Page 13
Android Devices
Important Note: Some screens,
instructions and settings may differ
slightly depending on what device
you are using.
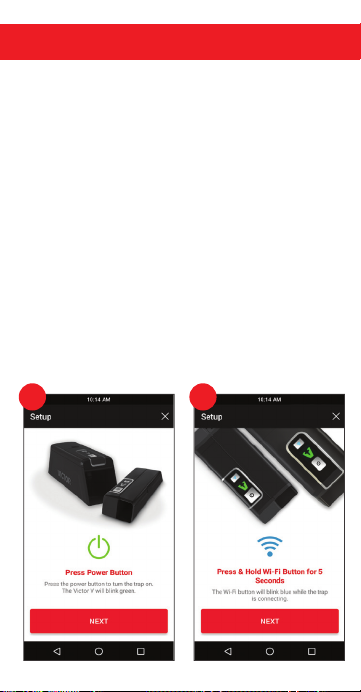
1. Press Power Button
Press the power button to turn the
trap on. The Victor® “V” will blink
green 3 times.
2. Press and Hold Wi-Fi Button for
5 Seconds
The Wi-Fi button will blink blue 10
times while the trap is connecting.
21
12
Page 14

3. Scan Trap Code
Center the trap’s code in the
window on the screen. The trap
code is the QR code located on the
bottom of the mouse trap and the
back of the rat trap. See FAQ page
for images of QR code locations.
3
13
Page 15

3. Scan Trap Code (Continued)
If you have trouble successfully
scanning the code, try changing the
distance between the trap and mobile
device. Alternatively you can enter the
15 digit alphanumeric code manually
by pressing the
MANUALLY”
“ENTER CODE
text found on the bottom
of the screen. Enter the serial number
found next to the QR code on your
trap.
33
14
Page 16

4. Connect Mobile Device to Trap
Go to Wi-Fi settings on your device
by pressing the red “GO TO
SETTINGS” button. Select the trap,
which is VICTOR followed by 15
alphanumeric digits.
(Ex: VICTOR-WM170818BE00004).
Press “Connect”, then press the
back button.
44
15
Page 17

5. Connect Trap to Wi-Fi
Select the Wi-Fi network to connect
the trap to.
Enter the network password for the
Wi-Fi network, then press the red
“Connect” button. It may take up to
1 minute to connect.
5
5
16
Page 18

6. Connected
A notication appears when the trap
successfully connects. Press the red
“Next” button and continue to step
number 8.
5
6
17
Page 19

7. Unable to Connect
If your trap did NOT
successfully connect, go to the
Settings menu of your mobile
device, then select the Wi-Fi
option.
Select more options (often can
be found by pressing the
options button in the top right
corner) then select “Saved
Networks.”
7
7
18
Page 20

7. Unable to Connect (Continued)
Find the trap name
(Ex: VICTOR-WM170818BE00004)
and select it.
Select “FORGET.”
Power trap off, then repeat steps
1 through 7. If the trap still does
not connect,
visit the Trouble
Shooting section or call
1-855-5-VICTOR for
immediate assistance.
Europe Phone: +44 (0) 1572 722558
7
7
19
Page 21

8. Name Your Trap
After successful connection,
name the trap and press the
red “Next” button.
9. Bait and Place Trap
Swipe through the three
instruction screens on baiting
and placing the trap, then
press the red “Done button.
Visit the Frequently Asked
Questions section for more
information on baiting and
placing the trap.
8
9
20
Page 22

10. Monitor Trap
Stay up to date on trap activity
from anywhere via your
mobile device.
21
Page 23

Getting Started: iOS Devices
1. Download the free Victor® Pest
App from the Apple App Store® or
Android Google Play™ store.
Check that the unit is turned
“OFF” by making sure the power
button is not pressed down. Insert
batteries into the battery
compartment and launch the
Victor® Pest App.
2. Connect your trap by following the
instructions on screen. Step by
step instructions are also in this
guide.
3. Once the power button and Wi-Fi
button have been pressed during
the initial setup, users will have 5
minutes to successfully nish.
Once 5 minutes have passed, the
user should power the trap off and
start over if setup was not
successful.
22
Page 24

iOS Devices
Important Note: Some screens,
instructions and settings may
differ slightly depending on what
device you are using.
1. Press Power Button
Press the power button to turn the
trap on. The Victor® “V” will blink
green 3 times.
2. Press and Hold Wi-Fi Button for
5 Seconds
The Wi-Fi button will blink blue 10
times while the trap is connecting.
21
23
Page 25

3. Scan Trap Code
Center the trap’s code in the
window on the screen.
The trap code is the QR code
located on the bottom of the
mouse trap and the back of the rat
trap. See FAQ page for images of
QR code locations.
3
24
Page 26

3. Scan Trap Code (Continued)
If you have trouble successfully
scanning the code, try changing the
distance between the trap and
mobile device. Alternatively you can
enter the 15 digit alphanumeric
code manually by pressing the
“ENTER CODE MANUALLY” text
found on the bottom of the screen.
Enter the serial number found next
to the QR
33
25
Page 27

4. Connect Mobile Device to Trap
Go to Wi-Fi settings on your device
by pressing the red “GO TO
SETTINGS” button.
Select the trap, which is VICTOR
followed by 15 alphanumeric digits.
(Ex: VICTOR-WM170818BE00004).
Press the back button on the
device’s top menu bar to return to
the Victor® Pest App.
34
Victor Pest
26
4
Page 28

5. Connect Trap to Wi-Fi
Press the red “Next” button to go to
Wi-Fi settings.
Choose the Wi-Fi network you
would like your trap to connect to.
35 35
27
Page 29

5. Connect Trap to Wi-Fi (Continued)
Enter the network password for the
Wi-Fi network, then press the red
“Submit” button.
35
28
Page 30

6. Reconnect Mobile Device to
Wi-Fi
Go to the Wi-Fi settings on your
device by pressing the red “Go to
Settings” button.
Choose a Wi-Fi network.
Most devices will automatically
re-connect to the most recently
selected Wi-Fi network. If it does
not, select it. Then press the back
button on the phone’s top menu
bar to return to the Victor® Pest
App.
36 6
Victor Pest
29
Page 31

6. Reconnect Mobile Device to Wi-Fi
(Continued)
Press the red “Next” button.
It may take up to 1 minute to
connect.
36 36
30
Page 32
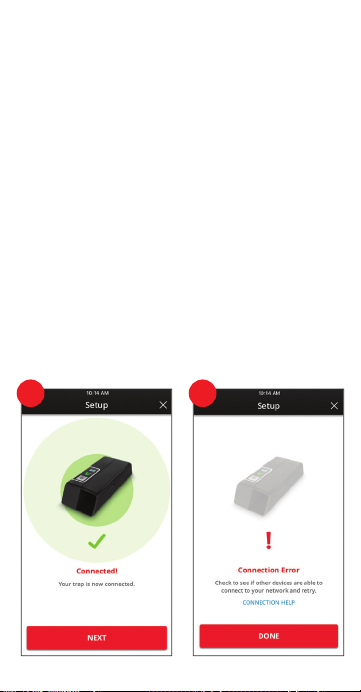
7. Connected
A notication appears when the
trap successfully connects. Press
the red “Next” button and continue
to step number 9.
8. Connection Error
If your trap did NOT successfully
connect, visit the Trouble Shooting
section of this manual or click
“Connection Help” on screen.
37 38
31
Page 33

9. Name Your Trap
After successful connection, name
the trap and press the red “NEXT”
button.
10. Bait and Place Trap
Swipe through the three
instruction screens on baiting and
placing the trap, then press the
red “Done” button. Visit the
Frequently Asked Questions
section for more information on
baiting and placing the trap.
31039
32
Page 34

11. Monitor Trap
Stay up to date on trap activity
from anywhere via your mobile
device.
33
Page 35

Mouse Trap Cleaning Instructions
1. Press the power
1
button to turn the
trap OFF, then
remove the batteries.
Hold the trap with the battery
compartment in your left hand,
buttons facing upwards and the
rodent entrance facing towards
you.
2. With your right hand
2
push forward and
separate the kill
chamber from the
electronics housing.
3. The kill chamber is
3
now ready for
cleaning. Open the
rodent disposal door.
Use a hydrogen peroxide topical
solution (available at most drug
stores) and an old toothbrush to
clean the inside of the chamber. If
needed, use a wire brush to
34
Page 36

remove any corrosion, being
careful not to be too vigorous.
This could accidentally remove all
of the protective zinc plating.
4. Thoroughly dry the interior and
exterior of the kill chamber prior
to trap reassembly.
5. To reassemble trap, hold the
battery compartment in your left
hand, buttons facing upwards.
Hold the kill chamber in your
right hand with the rodent
entrance facing towards you.
Align the key holes and insert
keys into opposite openings while
pulling your right hand
backwards to reconnect the
halves.
6. The trap is ready
6
for use.
35
Page 37

Rat Trap Cleaning Instructions
1. Press the power button
1
to turn the trap OFF,
then remove the
batteries. Open the trap
by holding the base of
1
the trap with your left
hand and sliding the top
backwards with your
right hand about one
1
inch. Pull the top away
from the base.
2. The kill chamber is now ready for
cleaning. Use a hydrogen peroxide
topical solution (available at most
drug stores) and an old toothbrush
to clean the inside of the chamber.
Use a wire brush as needed to
remove any corrosion, being careful
not to be too vigorous. This could
accidentally remove all of the
protective zinc plating.
36
Page 38

3. Thoroughly dry the interior and
exterior of the kill chamber prior to
trap reassembly.
4. To reassemble trap,
4
hold the base of the
trap with your left hand
and slide the top into
place by pushing forward with your
right hand to reconnect the pieces.
5. The trap is ready for use.
37
 Loading...