

Page 1
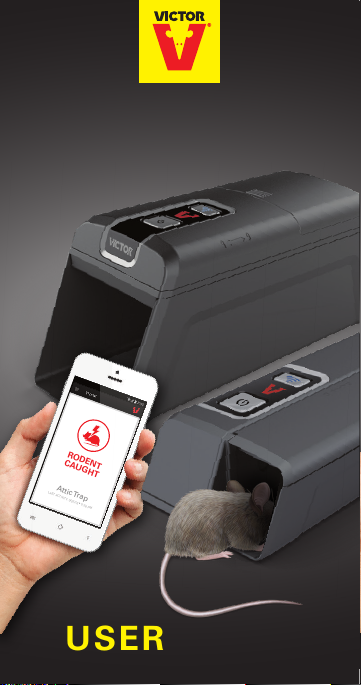
SMART-KILL
Attic Trap
LAST ACTIVITY: 9/22/16 • 5:28 PM
RODENT
CAUGHT
Electronic Traps
USER GUIDE
™
Page 2

This is a list of changes in this most
recent version of the SMART-KILL™
Users Guide:
Latest Updates
Do NOT use a phone/tablet
1.
hotspot for a Wi-Fi connection.
Each new trap requires a set of
2.
brand new batteries. (4 “AA” for
the mouse trap. 4 “C” for the
rat trap.)
The Victor® Pest app will need
3.
to be downloaded from the
Apple App Store or Google Play
Store.
This feature will not work -
4.
Pressing the home button, then
selecting the app to return
where you left off during set
up.
Push notications are enabled
5.
only when connected to Wi-Fi.
Updated 12.19.17
Page 3

You Will Need:
• A smart phone, tablet or similar
connected mobile device.
• Broadband internet connection. Do
NOT use a phone/tablet hot spot.
• A strong Wi-Fi signal where trap
will be placed.
• Password for your home network.
• A Victor
• A set of brand new batteries (4
®
Smart-Kill™ trap.
"AA" for the mouse trap, 4 "C" for
the rat trap).
Getting Started:
1
Download the free Victor® Pest
App from the Apple App Store® or
Android Google Play
that the unit is turned “OFF” by
making sure the power button is not
pressed down. Insert batteries into
the battery compartment and launch
the Victor
2
Connect your trap by following the
®
Pest App.
instructions on screen. Step by step
instructions are also in this guide.
3
Once the power button and Wi-Fi
button have been pressed during
the initial setup, users will have 5
minutes to successfully nish. Once
5 minutes have passed, the user
should power the trap off and start
over if setup was not successful.
™
store. Check
Page 4

Did You Know? Trouble Shooting:
• Once a rodent is caught, a
notication is sent to your
connected device if it is connected
to the Victor® Pest App.
• A notication is sent to your
mobile device when the battery life
of the trap is low. Replace
batteries when you receive this
notication.
• You can share your experience
through social media within the
App.
• The trap will still operate without
being connected to Wi-Fi. However,
you will not receive notications
upon catching a rodent and will
need to regularly check the trap.
• For general maintenance, you can
visit
www.victorpest.com/electronics.
Trouble Shooting:
STOP! If you have questions or
problems with your purchase do
not return it to the retail store.
Please contact us directly for
immediate assistance at
1-855-5-VICTOR.
Page 5
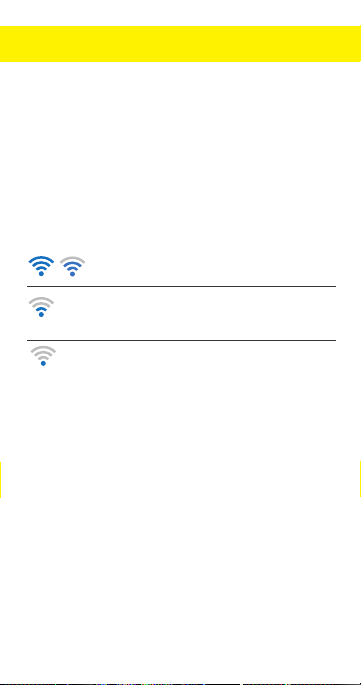
You may need to check your Wi-Fi
signal strength. Do this by making
sure your mobile device is
connected to your Wi-Fi network.
Hold your mobile device in the place
where your Victor® Smart-Kill™ trap
will be stationed and check the Wi-Fi
signal strength.
If you see:
Wi-Fi signal is strong. You’re all set!
Wi-Fi signal is weak. Your Victor® Smart-Kill™ trap
will likely connect to your Wi-Fi network, but
connection may be intermittent.
No Wi-Fi signal: Try one of the following:
• Move your router closer to your Victor
Smart-Kill™ trap.
• Buy a Wi-Fi range extender
®
Indications that the trap did not
successfully connect to Wi-Fi
during setup:
• A network/server error has
occurred if the blue Wi-Fi light and
the red Victor® “V” light stay ON
for 5 seconds. Power the trap off
and start over.
Page 6
Trouble Shooting:
• A password error has occurred if
the blue Wi-Fi light and the red
Victor® “V” light blink for 5
seconds. Re-enter password. Note
that passwords are case sensitive.
Frequently Asked
Questions
• Where should I place my trap?
Traps can be placed anywhere
indoors. Place trap against a wall
where rodent activity is frequently
seen.
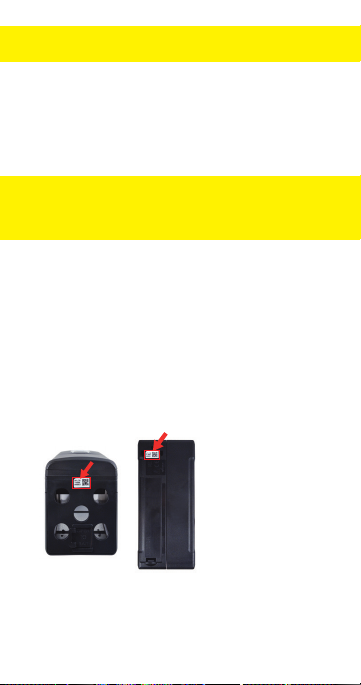
• Where is my trap/QR code?
The QR code is located on the
bottom of the mouse trap and the
back of the rat trap.
• What kind of bait should I use?
The best baits are high in fat and
protein, such as peanut butter or
hazelnut spread.
Page 7

Frequently Asked
Questions
• How much bait do I need?
The trap has a bait cup that shows
you exactly how much bait to use.
Do not overll the bait cup. Do not
place bait on the metal plates.
Doing so may interfere with the
electrical functionality and your trap
may not work unless you
completely clean the bait off.
• How do I dispose of a caught
mouse?
Press the power button to turn the
unit “OFF.”Open the kill chamber
door and properly discard rodent.
Clean and bait trap after each use
for most effective results. Press the
power button to turn the unit back
on. The trap will automatically
reconnect to Wi-Fi. Opening and
closing the kill chamber door will
re-arm the mouse trap if it has not
been powered “OFF”.
• How do I dispose of a caught rat?
Press the power button to turn the
unit “OFF.” Properly discard rodent.
Clean and bait trap after each use
for most effective results. Press
power button to turn the unit back
on. The trap will automatically
reconnect to Wi-Fi.
Page 8
QUICK START GUIDE:
ANDROID DEVICES
Important Note: Some screens,
instructions and settings may differ
slightly depending on what device
you are using.
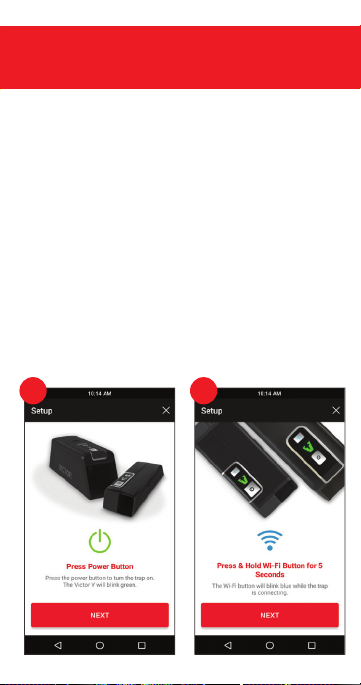
1. Press Power Button
Press the power button to turn the
trap on. The Victor® “V” will blink
green 3 times.
2. Press and Hold Wi-Fi Button for 5
Seconds
The Wi-Fi button will blink blue 10
times while the trap is connecting.
21
Page 9

3. Scan Trap Code
Center the trap’s code in the window
on the screen. The trap code is the
QR code located on the bottom of
the mouse trap and the back of the
rat trap. See FAQ page for images of
QR code locations.
If you have trouble successfully
scanning the code, try changing the
distance between the trap and
mobile device. Alternatively you can
enter the 15 digit alphanumeric code
manually by pressing the “ENTER
CODE MANUALLY” text found on the
bottom of the screen. Enter the
serial number found next to the QR
code on your trap.
3
33
Page 10

4. Connect Mobile Device to Trap
Go to Wi-Fi settings on your device
by pressing the red “GO TO
SETTINGS” button. Select the trap,
which is VICTOR followed by 15
alphanumeric digits.
(Ex: VICTOR-WM170818BE00004).
Press “CONNECT”, then press the
back button.
44
Page 11

5. Connect Trap to Wi-Fi
Select the Wi-Fi network to
connect the trap to.
Enter the network password for
the Wi-Fi network, then press the
red “CONNECT” button. It may
take up to 1 minute to connect.
5
5
Page 12

6. Connected.
A notication appears when the
trap successfully connects. Press
the red “NEXT” button and
continue to step number 8.
5
6
Page 13

SMART-KILL
Electronic Traps
www.victorpest.com/smart-kill
™
This device complies with Part 15 of the FCC
Rules. Operation is subject to the following two
conditions:
(1) this device may not cause harmful
interference, and
(2) this device must accept any interference
received, including interference that may
cause undesired operation.
CAUTION: Inappropriate use of this product may
cause electrical shock. Usage in an environment
rich in dust/debris might shorten the product's
life. Read and follow all label instructions. For
indoor use only. The device is not suitable for use
in barns, stables and similar locations. The
appliance is not to be used in locations where
ammable vapor or explosive dust is likely to
exist. Children should be supervised to ensure
that they do not play with the appliance. KEEP
OUT OF REACH OF CHILDREN AND PETS. Do not
touch metal plates when device is powered on.
FCC Statement
WARNING
Page 14

7. Unable to Connect
If your trap did NOT successfully
connect, go to the Settings menu
of your mobile device, then select
the Wi-Fi option.
Select more options (often can be
found by pressing the options
button in the top right corner) then
select “Saved Networks.”
7
7
Page 15

7. Unable to Connect (Continued)
Find the trap name
(Ex: VICTOR-WM170818BE00004)
and select it.
Select “FORGET.”
Power trap off, then repeat
steps 1 through 7. If the trap
still does not connect, visit the
Trouble Shooting section or
call 1-855-5-VICTOR for
immediate assistance.
7
7
Page 16

8. Name Your Trap
After successful connection,
name the trap and press
the red “NEXT” button.
9. Bait and Place Trap
Swipe through the three
instruction screens on baiting
and placing the trap, then
press the red “DONE button.
Visit the Frequently Asked
Questions section for more
information on baiting and
placing the trap.
10. Monitor Trap
Stay up to date on trap
activity from anywhere via
your mobile device.
8
9
Page 17

QUICK START GUIDE:
iOS DEVICES
Important Note: Some screens,
instructions and settings may differ
slightly depending on what device
you are using.
1. Press Power Button
Press the power button to turn the
trap on. The Victor® “V” will blink
green 3 times.
2. Press and Hold Wi-Fi Button for 5
Seconds
The Wi-Fi button will blink blue 10
times while the trap is connecting.
21
Page 18

3. Scan Trap Code
Center the trap’s code in the
window on the screen.
The trap code is the QR code
located on the bottom of the
mouse trap and the back of the rat
trap.
code locations
scanning the code, try changing the
distance between the trap and
mobile device. Alternatively you can
enter the 15 digit alphanumeric code
manually by pressing the “ENTER
CODE MANUALLY” text found on
the bottom of the screen. Enter the
serial number found next to the QR
code on your trap.
See FAQ page for images of QR
.
If you have trouble successfully
3
33
Page 19

4. Connect Mobile Device to Trap
Go to Wi-Fi settings on your device
by pressing the red “GO TO
SETTINGS” button.
Select the trap, which is VICTOR
followed by 15 alphanumeric digits.
(Ex: VICTOR-WM170818BE00004).
Press the back button on the
device’s top menu bar to return to
the Victor® Pest App.
34 4
Victor Pest
Page 20

5. Connect Trap to Wi-Fi
Press the red “NEXT” button to go
to Wi-Fi settings.
Choose the Wi-Fi network you
would like your trap to connect to.
35 35
Page 21

5. Connect Trap to Wi-Fi (Continued)
Enter the network password for
the Wi-Fi network, then press the
red “SUBMIT” button.
35
Page 22

6. Reconnect Mobile Device
to Wi-Fi
Go to the Wi-Fi settings on your
device by pressing the red “GO TO
SETTINGS” button.
Choose a Wi-Fi network.
Most devices will automatically
re-connect to the most recently
selected Wi-Fi network. If it does
not, select it. Then press the back
button on the phone’s top menu
bar to return to the Victor
®
Pest
App.
36 6
Victor Pest
Page 23

6. Reconnect Mobile Device
to Wi-Fi (Continued)
Press the red “NEXT” button.
It may take up to 1 minute to
connect.
36 36
Page 24

7. Connected.
A notication appears when the
trap successfully connects. Press
the red “NEXT” button and
continue to step number 9.
8. Connection Error
If your trap did NOT successfully
connect, visit the Trouble Shooting
section of this manual or click
“CONNECTION HELP” on screen.
37
38
Page 25

9. Name Your Trap
After successful connection,
name the trap and press the red
“NEXT” button.
10. Bait and Place Trap
Swipe through the three
instruction screens on baiting
and placing the trap, then press
the red “DONE” button. Visit the
Frequently Asked Questions
section for more information on
baiting and placing the trap.
11. Monitor Trap
Stay up to date on trap activity
from anywhere via your mobile
device.
31039
 Loading...