

Victor Europa Series, Sprite 300, Lynx Series, Contractor Series, Heavy Duty Trojan Operating Instructions Manual
Page 1
4) MULTISPEED Control Dial:
The VR-MSI450 multispeed rotary machine has 2 speed settings, each speed setting
(used with the correct pad) is suited to a different cleaning application. When setting
the speed it is recommended that the following guidelines are used
200 RPM – Scrubbing, Carpet Cleaning, Stripping.
400 RPM – Spray Cleaning
To select the required speed, rotate the speed selector knob until it points at the
appropriate RPM.
CAUTION:
Operating the machine at either an incorrect speed for an application or the
incorrect pad type can result in damage to floor covering.
ROUTINE MAINTENANCE
Always remove plug from socket outlet before carrying out any routine
maintenance.
1) Wipe all surfaces of the machine after use, particularly after scrubbing or spray
cleaning.
2) Always wind the cable around the bottom cable hook and the handle.
3) Wipe power cable clean after use, using a cloth. Check cable visually for signs
of wear and damage. If any is detected, ensure that it is replaced immediately.
This operation need not require a service call, as a new cable can be
plugged in by unqualified Personnel.
4) (Lynx Models) It is important that the dust collection bag is changed regularly.
5) (Exhauster Models) Change dust bag when bag full indicator light comes on.
6) (Lynx Models) The seal on the skirt can be removed and refitted the other way
around to double the life.
High Visibility Cable Pack Replacement :
1) Disconnect machine from mains supply.
2) Unscrew 2 x 4mm screws (fig 11) that attach the cable inlet moulding to the
socket box.
3) Disconnect the straight connector (attached to the cable) from the inlet
socket (attached to the socket box).
4) To connect new Victor cable pack (Part No D1000), reverse the process.
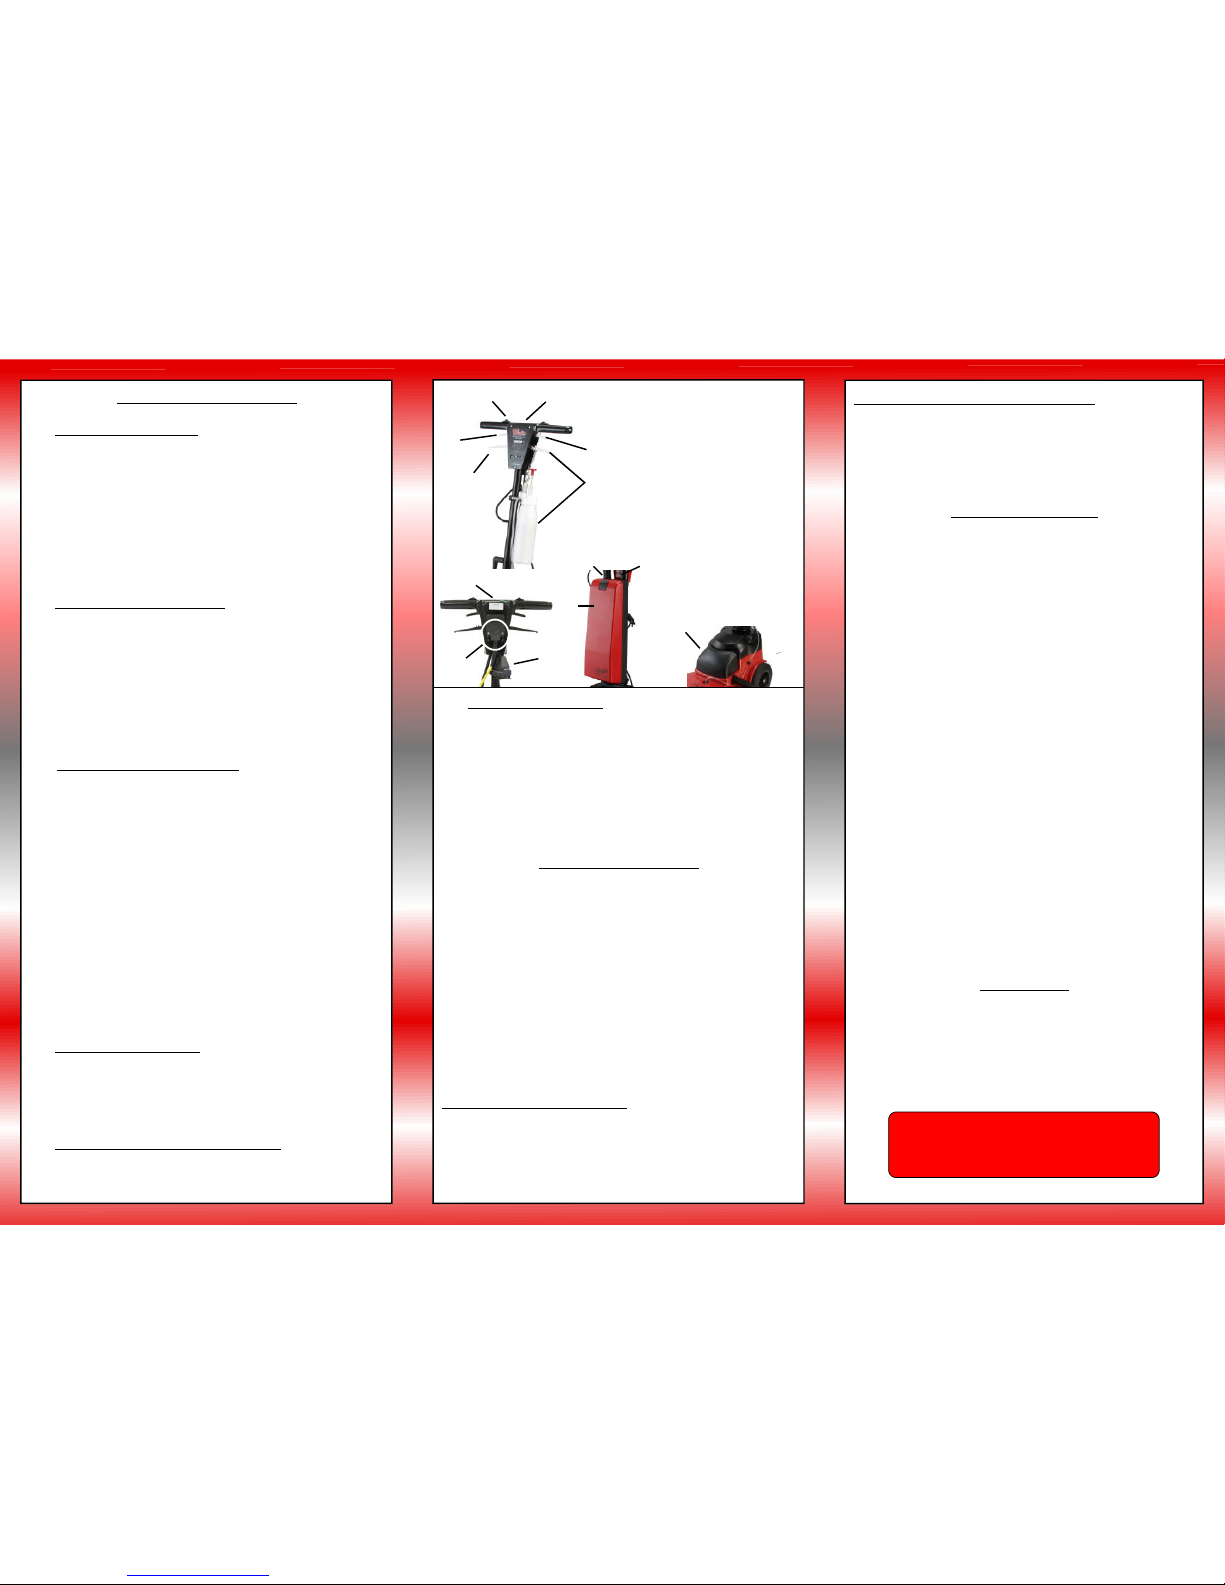
1. Safety Switch
2. Power On Light
3. On/Off Lever
4. Height Adjustment Co ntro l
5. Solution Dispenser Control / Bottle
6. Inlet Socket
7. Exhauster On/Off Switch
8. Exhauster
9. Bag Full Indicator Light
10. Socket Box
11. Cable Inlet Moulding
12. Dust Bag Cover (Lynx models)
OPERATING INSTRUCTIONS
1) Attach drive board and pad:
• Tilt the machine back on its wheels until the machine is resting on the floor
exposing the drive mechanism.
• The brush or drive board should now be placed on the drive
mechanism and locked in place by turning the brush or board anti clockwise.
• If a drive board is used, you must select the appropriate size and grade of pad
and fit to the drive board.
• With the brush or drive board fitted, the machine can be returned to the upright
position.
• Reverse process to remove brush or drive board.
Attach drive pad (LYNX Models):
• Tilt the machine back on its wheels until the machine is resting on the floor
exposing the drive mechanism.
• Unscrew the central pad retainer by pushing it inwards and rotating it anti-
clockwise.
• Select grade and size of pad: Lynx 15 = 15” pad, Lynx 17 = 17” pad, Lynx =
20” pad.
• Screw the central pad retainer clockwise through the pad and into the threaded
location in the drive mechanism. The pad retainer should click when fully
tightened.
2) Operate the machine: (See graphic)
• Plug into power supply and check that the green power on light is on. (fig 2)
• The handle should be adjusted to a comfortable working height, when the pad
or brush is flat on the floor.
• The handle is adjusted by pulling the height adjustment lever (fig 4). This allows
the handle to be adjusted. The handle will lock into position when this lever is
released.
Lynx Models: Once lock is released, the handle is ‘free floating’ enabling the
operator to work at a preferred handle height.
• Lift the handle so that the machine base is parallel to the floor.
• Operate the machine by sliding one of the safety switches (fig 1) outwards and
lifting the corresponding on/off lever (fig 3). Once in operation, the safety
switch can be released.
• To start vacuum option, ensure exhauster power cable is connected to the inlet
socket (fig 6) and that the front cover is fully closed, then press the switch
located at the top of the exhauster unit (fig 7) to the on position.
• Apply solution by lifting solution dispenser lever (fig 5 ). (If Applicable)
3) Control machine movement:
• When the brush or pad is flat on the floor, the machine will stay in the central
position.
• To move to the Right – slightly Raise the handle.
• To move to the Left – slightly Lower the handle.
Control machine movement (LYNX Models):
• The machine is operated in a forward motion, do not use the machine in a
stationary position.
High Visibility Cable Pack Replacement (Continued):
NOTE: In the interests of operator safety and to prevent the use of inferior
replacement cables,VICTOR machines are fitted with Anti-Tamper(screw), High
Visibility cable packs comprising of Cable Inlet Moulding, Straight Connector,
High Visibility Cable and Moulded Plug. Replacement packs (Part No:D1000)
are available from Victor direct or their agents.
SAFETY INFORMATION
a) This appliance should only be used by trained operators. This
appliance is not intended for use by persons (including children) with
reduced physical, sensory or mental capabilities, or lack of experience and
knowledge, unless they have been given supervision or instruction
concerning use of the appliance by a person responsible for their safety.
Children should be supervised to ensure that they do not play with
the appliance.
b) Do not use this machine unless it is in a safe condition. Check the
cable and plug for damage before use, and if necessary, replace
with a new cable pack.
c) To stop the machine, release the on/off switches whilst holding on to
the handle.
d) Always pay attention to the cable and keep it away from the brush, drive
board and pad. Hazard may occur if machine runs over power supply cord.
e) Always work within the cable length to avoid cable stress or damage.
f) When using a solution tank, always empty the tank after use into a safe,
suitable, approved location.
g) Never use dirty pads or allow pads to become over soiled before changing.
h) This machine has been designed for use with the boards supplied by the
manufacturer. The fit ting of other Boards may effect its safety.
i) Check that the voltage shown on the s erial number plate is suitable for the
supply available.
j) Only use the outlet socket for its intended purpose.(Exhauster Attachment)
k) The Exhauster attachment front cover must be closed as per (8) before use.
l) Machine ingress rating : IPX4
m) The VICTOR Rotary Floor Machines maximum A-Weighted sound pressure
level Lpa measured in dB(A) is less than 85dB(A).
n) The maximum r.m.s. acceleration value of a VICTOR Rotary Floor Machine
which operators arms are subjected to =1.5m/s².
o) Always remove plug from mains socket outlet before carrying out any
cleaning, routine maintenance, drive board or pad attachment.
p) Always remove Drive Board or Brush from machine when not in use.
CIRCUIT BREAKER
If the machine is overloaded, the circuit breaker will trip out. The reset button
can be depressed after 30 seconds to restart the machine.
NOTE: BEFORE RE-SETTING CHECK:-
1) The pad, if a drive board is used , is clean. (if not, turn or change)
2) There are no cable or supply faults.
© Dowding & Plummer Ltd. Issue Level 8, Aug 2016
For an exploded parts listing for this
machine visit our web site:
www.victorfloorcare.com
8
9
7
12
10
11
6
1
2
3
5
3
4
Page 2
After
Sales
Support
Installation Assistance
Technical Support
Training
Machine Service and Repair
Extended Warranties
Maintenance Contracts
The Floor Care People
WARNING: Do not use the appliance without reading the instruction manual.
This appliance is suitable for use in Schools, Hospitals, Hotels, Offices etc.
CAUTION: This appliance is not suitable for use with flammable liquids or picking up
hazardous dust or flammable materials. This appliance is not to be used or stored
outdoors in wet conditions.
NOTE: This document contains warranty information.
Dowding & Plummer Ltd.
40 - 42 Rushey Lane, Tyseley, Birmingham B11 2BL
Tel: 0121 706 5771 Fax: 0121 708 1052
Email: info@victorfloorcare.com
Web Site: www.victorfloorcare.com
visit our web site:
www.victorfloorcare.com
for details on the full range of industrial floor cleaning equipment or call our
sales office on Tel:0121 706 5771.
© Dowding & Plummer Ltd. Issue Level 8, Aug 2016
SAFETY INFORMATION (Cont’d)
WARNING THIS APPLIANCE MUST BE EARTHED
IMPORTANT:
Wires in the mains lead are coloured in accordance with the following code:
Green and Yellow = Earth (This is connected to terminal E)
Blue = Neutral (This is connected to terminal N)
Brown = Live (This is connected to terminal L)
VICTOR STANDARD WARRANTY CONDITIONS
With the exception of Distributors, this warranty applies to the original purchaser of the
product from Dowding & Plummer Ltd.,(The Company) for the following periods:
Vacuum Cleaners – Motors 2 Years, all other components 1 Year
Rotary Floor Machines – Motors 3 Years, all other components 1 Year
Scrubber Driers – Control Unit and Tanks 2 Years, all other components 1 Year
Carpet Extractors / Battery Burnishers / Ride On Scrubber Driers – 1Year
Other Specialist Machines – 1 Year
This warranty excludes normal maintenance parts and consumables such as hoses, filters,
drive belts, floor tools, cables, capacitors, relays, skirts and pads etc. that are considered
replaceable during the normal working life of the machine. This list is not exhaustive.
The warranty period commences from t he date the goods are purchased by the user.
All warranty claims must be processed through the Distributor from whom the
equipment was purchased.
The Distributor will be responsible for the service, maintenance and repairs during the
warranty period.
The Distributor will co-operate with the purchaser throughout the warranty claims
procedure and will arrange any necessary repairs using genuine Victor parts.
If the original Distributor is no longer available to fulfil his obligations, or if you did not
make your original purchase through a dist ributor, the Company should be contacted
and given details of proof of purchase and full details of the claim in order that the claim
may be processed without delay.
Any warranty claim can only relate to the specific part that is proven to be at fault and
for which a replacement will be supplied but cannot be extended to constitute a claim
against the complete appliance.
The Company will supply the Distributor with any warranty parts required subject to the
claim being validated after return of the faulty items in accordance with the Company's
Conditions of Sale.
All replacement parts are guaranteed for a period of 6 months.
Claims will not be accepted if they are the result of fair wear and tear, misuse or abuse
of any kind, acts of God, damage in transit other than original product delivery, failure
due to lack of proper care or maintenance or failure to comply with safety guidance.
No replacement will be given unless the appropriate evidence of the validity of the
claim has been provided to the satisfaction of the Company.
The Company reserves the right to charge for any unnecessary work carried out as a
result of an invalid claim.
No variation to this warranty may be made or implied by any member of the Company,
its Distributors or representatives unless such variation is in writing and authorised by
the Company.
EXTENDED WARRANTIES
Extended warranty packages are available on all our rotaries, please contact Dowding &
Plummer Ltd Service Department f or details.
WEEE DIRECTIVE
Products bearing this symbol should not be disposed of in your general waste.
Dowding & Plummer Ltd is a registered producer under the WEEE Directive (number WEEE/AB0043SY/PRO) and has procedures in place for dealing with
the end of life treatment & disposal of obligated equipment. Please contact the
Company or visit our website for more details.
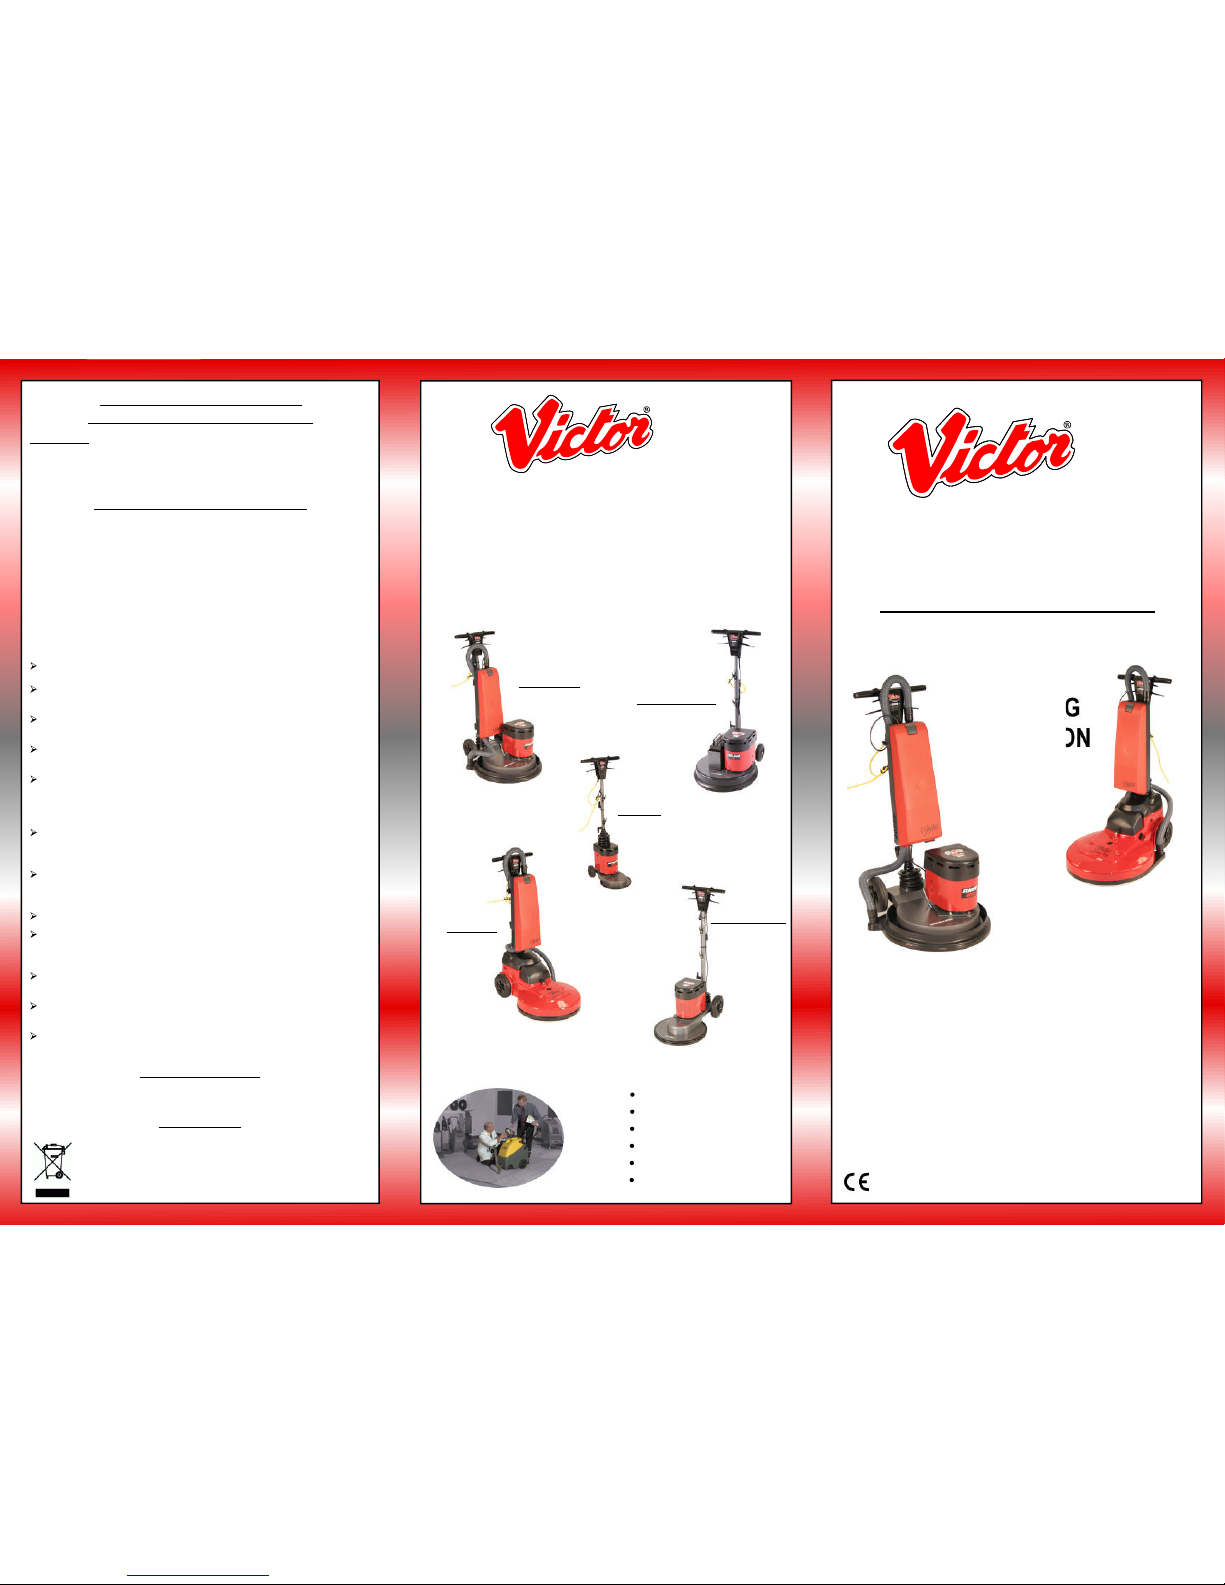
Contractor Range
Lynx Range
Europa Range
Heavy Duty Trojan
Sprite 300
The Floor Care People
ROTARY FLOOR MACHINE
OPERATING
INSTRUCTION
MANUAL
 Loading...