

Page 1
I-V9INSTALLATION INSTRUCTIONS
Style V9 Victaulic® FireLock™ IGS™
Installation-Ready™ Sprinkler Coupling
I-V9_1
REV_B
IMPORTANT INFORMATION
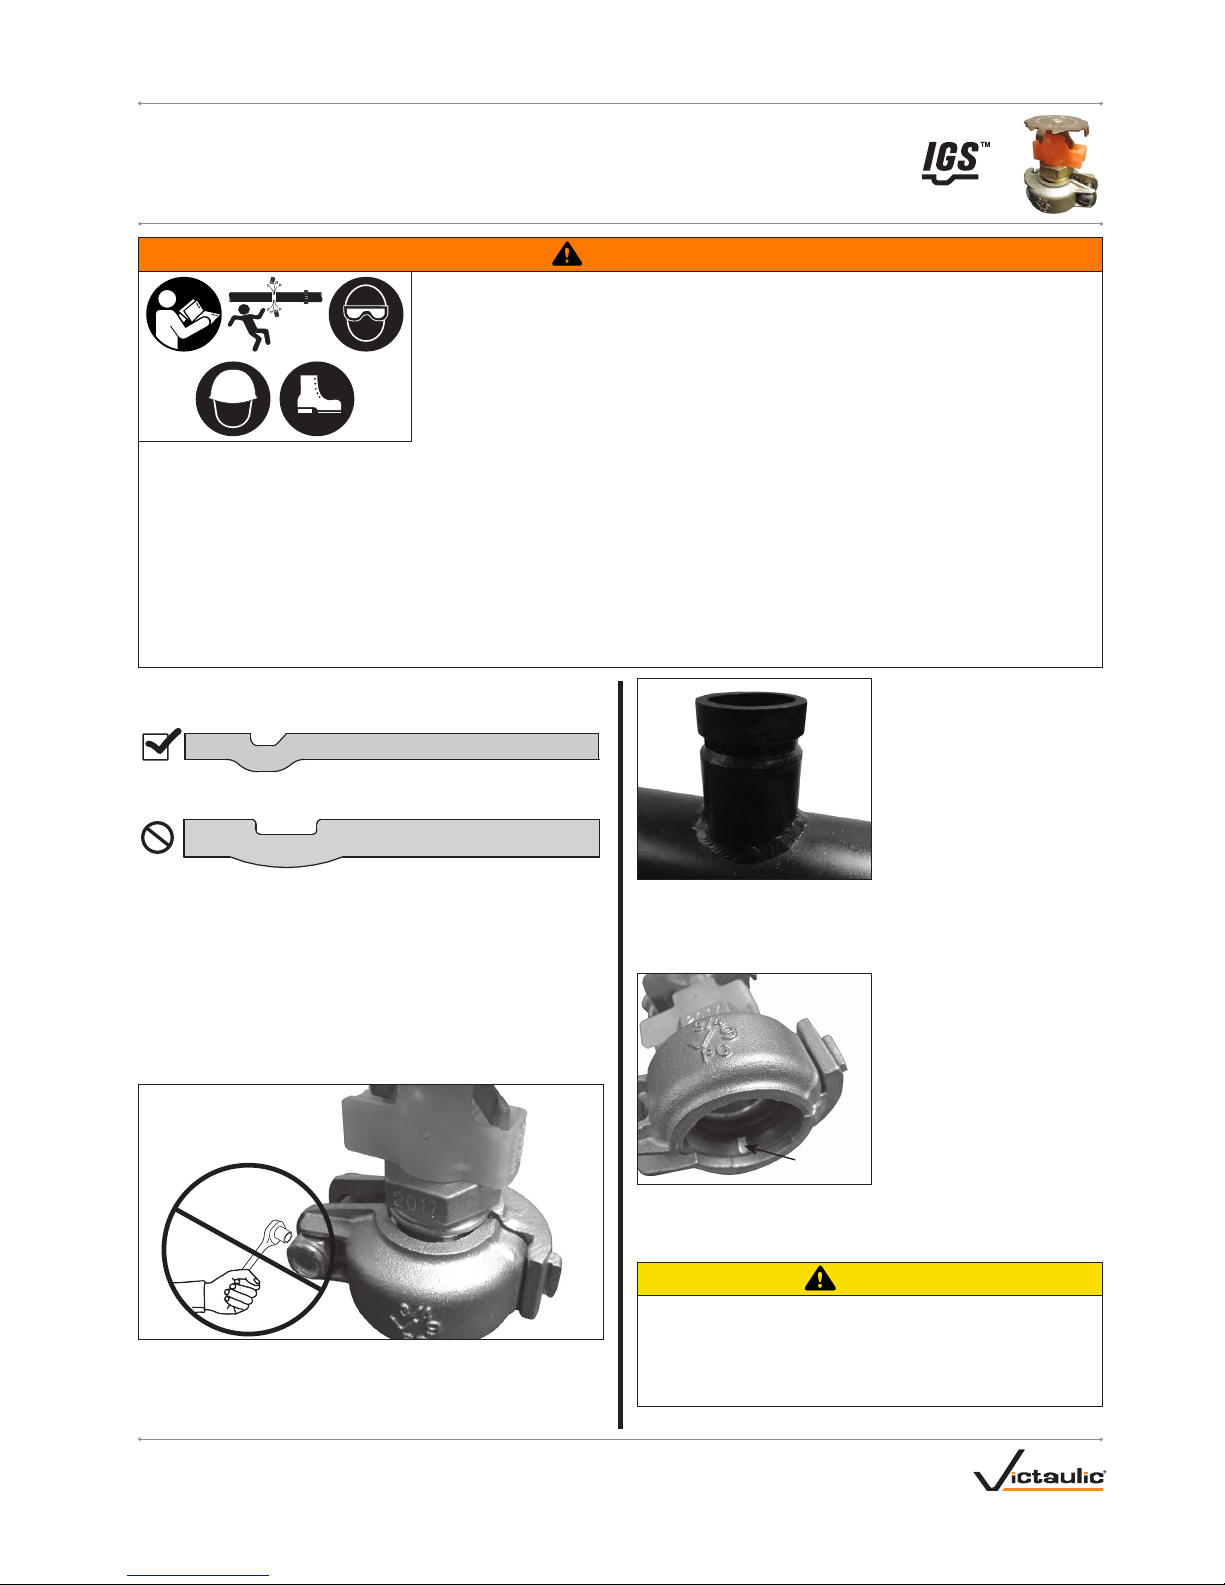
INCORRECT - Orignal Groove System (OGS) Groove Prole
CORRECT - IGS Groove Prole
The Style V9 Victaulic® FireLock™ IGS™ Installation-Ready™ Sprinkler
Coupling shall be used ONLY with sprinkler piping connections that are
prepared to Victaulic IGS proprietary groove specifications. DO NOT
attempt to install the Style V9 on sprinkler piping connections that are
prepared to any other groove specification. Refer to Victaulic publication
25.14 for the IGS groove specification, which can be downloaded at
victaulic.com.
INSTRUCTIONS FOR THE INITIAL
INSTALLATION OF A STYLE V9
DO NOT REMOVE
NUT/BOLT FOR INITIAL
INSTALLATION
1. DO NOT DISASSEMBLE THE STYLE V9: The Style V9 is designed
so that the installer does not need to remove the bolt and nut for
installation. This facilitates installation by allowing the installer to directly
install the Style V9 onto the sprinkler piping’s grooved end.
2. CHECK GROOVED END OF
SPRINKLER PIPING: The outside
surface of the sprinkler piping,
between the groove and the end
of the sprinkler piping, shall be
generally free from indentations,
projections, weld seam anomalies,
and roll marks to ensure a leaktight seal. All oil, grease, loose
paint, dirt, and cutting particles
shall be removed.
The sprinkler piping’s outside diameter (“OD”), groove dimensions,
and maximum allowable flare diameter shall be within the tolerances
published in current Victaulic IGS specifications, publication 25.14,
which can be downloaded at victaulic.com.
Gasket Grade
Color Code Mark
3. Check the gasket to verify
that it is suitable for the intended
service. The color code identifies
the material grade. Refer to
Victaulic publication 05.01 for
the color code chart, which can
be downloaded at victaulic.com.
Refer to the "NOTICE" on the
following page for important
gasket information.
3a. If any conditions listed in the "NOTICE" are met, apply a thin coat of
a compatible lubricant, such as Victaulic Lubricant or silicone lubricant,
only to the gasket sealing lips.
CAUTION
• If any conditions listed in the "NOTICE" are met, a thin coat of a
compatible lubricant shall be applied only to the gasket sealing
lips to prevent pinching, rolling, or tearing during installation.
Failure to use a compatible lubricant may cause gasket damage,
resulting in joint leakage and property damage.
WARNING
• Read and understand all instructions before attempting to install any Victaulic products.
• Always verify that the piping system has been completely depressurized and drained immediately
prior to installation, removal, adjustment, or maintenance of any Victaulic products.
• Wear safety glasses, hardhat, and foot protection.
Failure to follow these instructions could result in death or serious personal injury and property
damage.
• The Style V9 Victaulic® FireLock™ IGS™ Installation-Ready™ Sprinkler Coupling shall be used only in fire protection systems that are
designed and installed in accordance with current, applicable National Fire Protection Association (NFPA 13, 13D, 13R, etc.) standards, or
equivalent standards, and in accordance with applicable building and fire codes. These standards and codes contain important information
regarding protection of systems from freezing temperatures, corrosion, mechanical damage, etc.
• The Style V9 shall be used only for sprinkler-piping-to-sprinker connections. DO NOT use the Style V9 for pipe-to-pipe connections.
• These installation instructions are intended for an experienced, trained installer. The installer shall understand the use of this product and
why it was specified for the particular application.
• The installer shall understand common industry safety standards and potential consequences of improper product installation.
Failure to follow installation requirements and local and national codes and standards could compromise system integrity or cause system
failure, resulting in death or serious personal injury and property damage.
Page 2
I-V9_2
REV_B
I-V9 / Style V9 Victaulic® FireLock™ IGS™ Installation-Ready™ Sprinkler Coupling / Installation Instructions
NOTICE
• Gaskets for the Style V9 are provided with
Vic-Plus
. Additional
lubrication is not required for the initial installation of wet pipe
systems that are installed at or continuously operating above
0°F/–18°C. Refer to Victaulic publication 05.03 for the
Vic-Plus
Safety Data Sheet (SDS), which can be downloaded at victaulic.
com.
Supplemental lubrication is required only if any of the following
conditions exist. Apply a thin coat of a compatible lubricant to the
gasket sealing lips, as noted in step 3a on the previous page. It
is not necessary to remove the gasket from the housings to apply
additional lubricant to the exterior surface.
• If the installation or continuous operating temperature is below
0°F/–18°C
• If the gasket has been exposed to fluids prior to installation
• If the surface of the gasket does not have a hazy appearance
• If the gasket is being installed into a dry pipe system
• If the system will be subjected to air tests prior to being filled
with water
• If the gasket was involved in a previous installation
Lubricated gaskets will not enhance sealing capabilities on
adverse sprinkler piping conditions. Sprinkler piping condition
and preparation shall conform to the requirements listed in these
product installation instructions (refer to step 2 on page 1).
WARNING
• Never leave a Style V9 partially assembled.
ALWAYS TIGHTEN THE HARDWARE
IMME DIAT ELY. A partially-assembled Style
V9 poses a drop or fall hazard during
installation and a burst hazard during
testing.
• Keep hands away from the opening of the
Style V9 when attempting to install and
tighten the Style V9 onto the sprinkler
piping’s grooved end.
Failure to follow these instructions could
result in serious personal injury and property
damage.
4. ASSEMBLE JOINT: Assemble the joint by installing the Style V9 onto
the sprinkler piping's grooved end until contact with the center leg of
the gasket occurs. Rotate the sprinkler and Style V9 so that the frame
arms and bolt pads are in alignment with the sprinkler piping, as shown
above. A visual check is required to verify that the keys of the Style V9
align with the groove in the sprinkler piping.
WARNING
• The bolt shall be tightened until metal-to-metal c ontact occurs
at the bolt pads.
• DO NOT continue to tighten the bolt after the visual installation
guidelines for the Style V9 are achieved.
• DO NOT attempt to rotate the sprinkler or Style V9 after the bolt
is tightened completely.
Failure to follow these instructions could cause joint damage or
improper sprinkler operation, resulting in death or serious personal
injury and property damage.
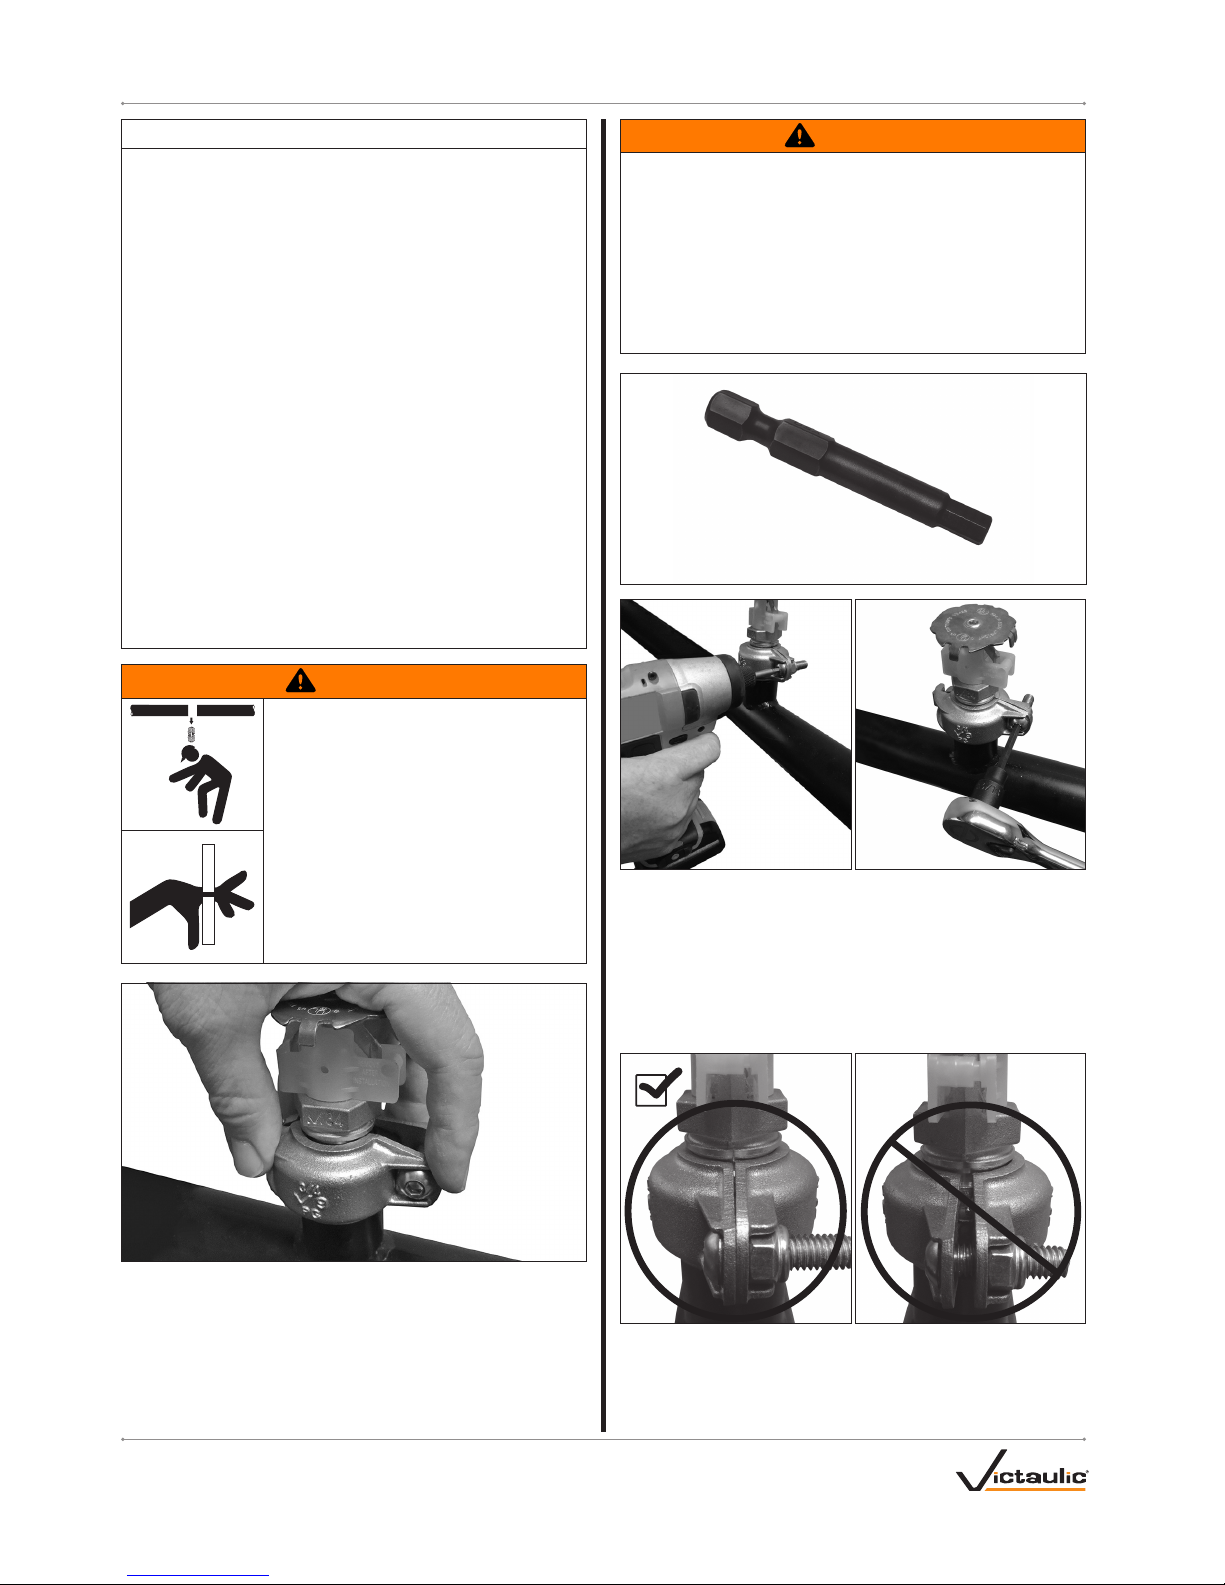
Hex Installation Bit Provided
with Product Shipment
3⁄16-inch
(Bolt End)
¼-inch
(Drive End)
5. TIGHTEN BOLT: Using an impact wrench or standard socket wrench
with the 3/16-inch hex installation bit that is provided with the product
shipment, tighten the bolt until metal-to-metal contact occurs at the bolt
pads. DO NOT continue to tighten the bolt after metal-to-metal bolt pad
contact is achieved. Refer to the “Impact Wrench Usage Guidelines”
section. NOTE: Do not at tempt to rotate the sprinkler or Style V9 after
the bolt is tightened. If necessary, loosen the bolt before attempting to
rotate the sprinkler or Style V9, then retighten the bolt as stated earlier
in this step.
GOOD
BAD
6. Visually inspect the bolt pads at each sprinkler piping connection
to verify that metal-to-metal contact is achieved in accordance with
step 5.
Page 3

I-V9_3
REV_B
I-V9 / Style V9 Victaulic® FireLock™ IGS™ Installation-Ready™ Sprinkler Coupling / Installation Instructions
WARNING
• Sprinklers cannot operate properly with bulb protectors in place.
• Bulb protectors shall be removed from all sprinklers before the
sprinkler system is placed in service.
• DO NOT use any tools to remove bulb protectors.
Failure to remove bulb protectors from all sprinklers before the
system is placed in service will cause improper sprinkler operation,
resulting in death or serious personal injury and property damage.
7. Remove the bulb protector
from all sprinklers carefully by
hand before the sprinkler system
is placed in service. Refer to
the installation instructions for
applicable sprinkler for complete
requirements.
IMPACT WRENCH USAGE GUIDELINES
WARNING
• The bolt shall be tightened until metal-to-metal c ontact occurs
at the bolt pads.
• DO NOT continue to tighten the bolt after the visual installation
guidelines for the Style V9, described in steps 5 − 6 on page 2,
are achieved.
Failure to follow these instructions could cause joint failure,
resulting in death or serious personal injury and property damage.
Impact wrenches do not provide the installer with direct “wrench feel”
or torque to judge bolt tightness. Since some impact wrenches are
capable of high output, it is important to develop a familiarity with the
impact wrench to avoid damaging or fracturing the bolt or the coupling's
bolt pads during installation. Always choose the right size impact
wrench that has enough power, but DO NOT continue to tighten the
bolt after the visual installation guidelines for the Style V9, described
in steps 5 − 6 on page 2, are achieved. If you suspect that any
hardware has been over-tightened (as indicated by a bend or crack
in the bolt, etc.), the entire Style V9 assembly shall be replaced
imm edia tely.
If the battery is drained or if the impact wrench is under-powered, a
new battery pack or new impact wrench shall be used to ensure that
the visual installation guidelines for the Style V9, described in steps
5 − 6 on page 2, are achieved. Visual inspection of each joint is
required for verification of proper assembly.
Perform trial assemblies with the impact wrench and check the
assemblies with a torque wrench to help determine the suitability of the
impact wrench. Using the same method, periodically check assemblies
throughout the system installation.
For safe and proper use of impact wrenches, always refer to the impact
wrench manufacturer’s operating instructions. In addition, verify that
proper impact grade hex drivers are being used for Style V9 installation.
WARNING
Failure to follow instructions for tightening hardware could result in:
• Personal injury or death
• Bolt damage or fracture
• Damaged or broken bolt pads or fractures to housings
• Joint leakage and property damage
• A negative impact on system integrity
INSTRUCTIONS FOR REASSEMBLY
OF A STYLE V9
WARNING
• Always verify that the piping system has
been completely depressurized and drained
immediately prior to installation, removal,
adjustment, or maintenance of any Victaulic
products.
• The sprinkler shall be replaced upon disassembly of a Style V9.
Verify that the replacement sprinkler is the proper model, style,
orifice size, temperature rating, and response.
Failure to follow these instructions could result in death or serious
personal injury and property damage.
1. Verify that the system is depressurized and drained completely before
attempting to disassemble a Style V9 from the sprinkler piping.
2. Loosen the hardware of the Style V9 to permit removal from the
sprinkler piping.
3. Remove the nut, bolt, and gasket from the Style V9 housings.
Inspect all components for damage or wear. If any damage or wear is
present, use a new Victaulic-supplied Style V9 assembly.
NOTE: The sprinkler shall be replaced upon disassembly of a Style V9.
Verify that the replacement sprinkler is the proper model, style, orifice
size, temperature rating, and response.
4. Check sprinkler piping ends, as described in step 2 on page 1.
CAUTION
• A thin coat of a compatible lubricant shall be used to prevent the
gasket from pinching, rolling, or tearing during reassembly.
Failure to use a compatible lubricant may cause gasket damage,
resulting in joint leakage and property damage.
5. LUBRICATE GASKET: Apply a thin coat of Victaulic Lubricant or
silicone lubricant to the gasket sealing lips and exterior. NOTE: It is
normal for the gasket surface to have a hazy white appearance after it
has been in service.
Page 4

I-V9INSTALLATION INSTRUCTIONS
Style V9 Victaulic® FireLock™ IGS™
Installation-Ready™ Sprinkler Coupling
For complete contact information, visit victaulic.com
I-V9 11351 REV B UPDATED 11/2018 Z0000V9000
VICTAULIC, FIRELOCK, IGS, AND INSTALLATION-READY ARE REGISTERED TRADEMARKS OR TRADEMARKS OF VICTAULIC COMPANY AND/OR
ITS AFFILIATED ENTITIES IN THE UNITED STATES AND/OR OTHER COUNTRIES. © 2018 VICTAULIC COMPANY. ALL RIGHTS RESERVED.
Larger Opening
of Housings to
Larger Opening
of Gasket
6. REASSEMBLE STYLE V9: Place the lubricated gasket inside
the gasket pocket of one Style V9 housing. NOTE: For all sizes other
than the 1-inch x 1-inch/33.7-mm x 33.7-mm, verify that the larger
opening of the gasket is facing the larger opening of the housings, as
shown above. Engage the tab of the one housing with the slot of the
other housing, and close the housings around the gasket.
Head of Bolt Shall
Face Angled Feature
of Bolt Pad
7. INSTALL BOLT: Install the bolt through the housings. Verify that the
head of the bolt faces the angled feature of the bolt pad, as shown
above.
8. INSTALL NUT: Thread the bolt into the nut until the top of the nut
is flush with the end of the bolt, as shown above. Verify that the gasket
remains seated in the gasket pocket of the housings and that the nut is
engaged with the flat features of the bolt pad.
WARNING
• The sprinkler shall be replaced upon disassembly of a Style V9.
Verify that the replacement sprinkler is the proper model, style,
orifice size, temperature rating, and response.
Failure to follow this instruction could cause improper sprinkler
operation, resulting in death or serious personal injury and property
damage.
9. INSTALL NEW SPRINKLER: Insert a new sprinkler that is the proper
model, style, orifice size, temperature rating, and response into the
corresponding opening of the Style V9 housings. Rotate the sprinkler so
that the frame arms align with the bolt pads, as shown above.
10. Follow steps 4 – 7 on pages 2 – 3 of this instruction sheet to
complete the assembly.
 Loading...