

Page 1
Page 2

Index
English 02
中文 14
01
Page 3
Vico-MF3 Installation Guide
Thank you for choosing Vico-MF3 Car Camcorder. To ensure
safety, please read this manual carefully before installation.
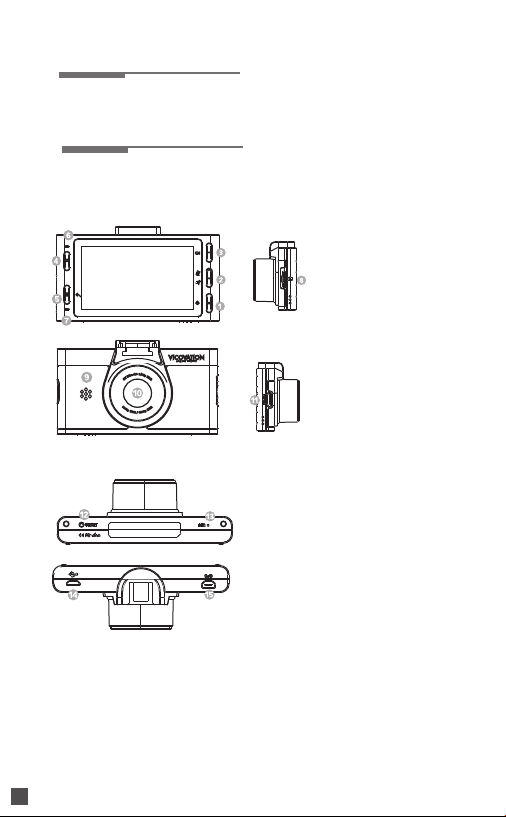
Vico-MF3 Exterior Overview :
Power(hold for 3
1.
seconds) / Confirm.
Down / Mute / Parking
2.
Surveillance(hold for
3 seconds).
Up / Recording.
3.
Emergency Recording
4.
MF3
9. Speaker.
10. Lens.
11. Mini HDMI Output Port.
12. Reset Button.
13. Microphone.
14. Power Cable Port.
15. External GPS Mouse Port.
Button.
Menu / Return.
5.
LED Indicator for GPS
6.
LED Indicator for
7.
Power.
Micro SD Card Slot.
8.
English
02
Page 4
Special Button
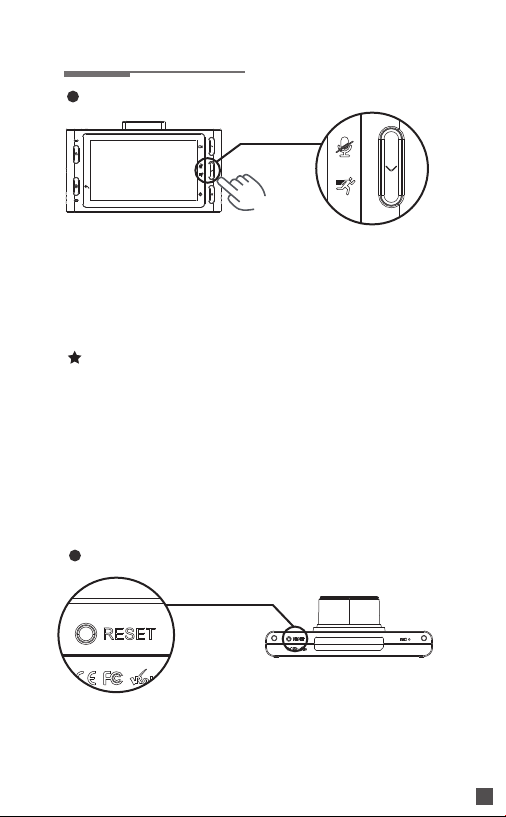
Hot Key for Parking Mode
Make sure your car has a battery discharge prevention device
such as the VicoVation Vico-Power PLUS installed. After parking,
hold "Parking Mode Hot Key", the button in the middle on the right,
for 3 seconds. The device will switch from Normal Recording Mode
to Parking Mode immediately. Loop recording will be stopped and
recording will only be activated when a motion is detected by
motion detection.
Special Notice:
Rebooting the device under Parking Mode would reset the device
back into Normal Recording Mode. Vico-Power PLUS has a built in
ACC Restore Reboot feature. Every time the engine starts, Power
PLUS would reboot the device to avoid the dashcam from
crashing. The device will automatically start recording once
rebooted.
Please be aware that if you are using a battery discharge
prevention device from other brands with no ACC Restore Reboot
feature, you will have to manually switch back to Normal Recording
Mode from Parking Mode with the hot key.
Reset Button
When unable to shutdown the device or encountering
malfunctioning, you may shut down the device forcefully with
the Reset Button.
English
03
Page 5

Vico-MF3 Accessories:
Suction Bracket
4 Meters
Cigar Car Charger
3M Sticker Bracket
MF3
MF3
User’s Manual Warranty card
Ultra-HDR (High Dynamic Range)
2K Ultra-HD @1440p 30fps HDR Mode
Vico-MF3 is equipped with the latest Ultra-HDR technology. It adjusts
the images to the best balance between bright and dark and
generates extremely high quality 1440p recording footages. The
default resolution setting is under 1440p@30fps HDR mode.
ULTRA HIGH
DYNAMIC RANGE
English
04
Page 6
Installation on the Mounts
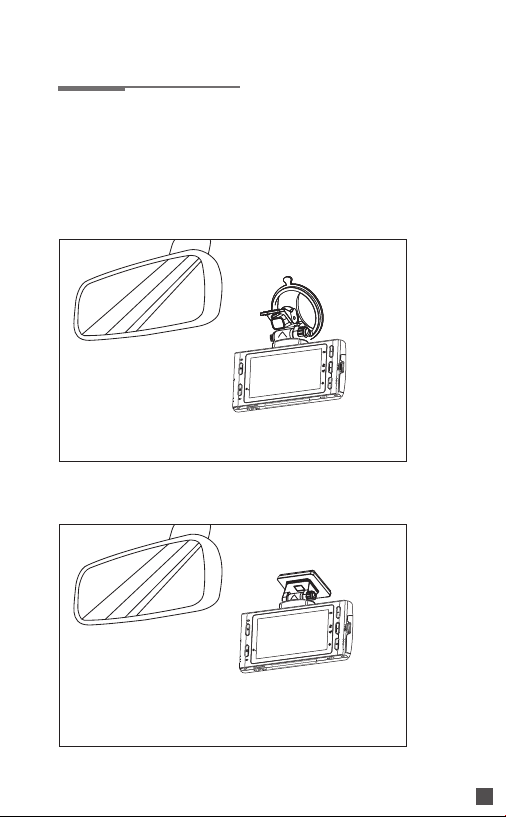
Suction Cup Mount and Adhesive Windscreen
Mount are included in the package. Please
follow the diagrams shown below to assemble
your mounts on the windshield.
Vico-MF3
Vico-MF3
+ Suction Cup Mount
+ Adhesive Windscreen Mount
English
05
Page 7
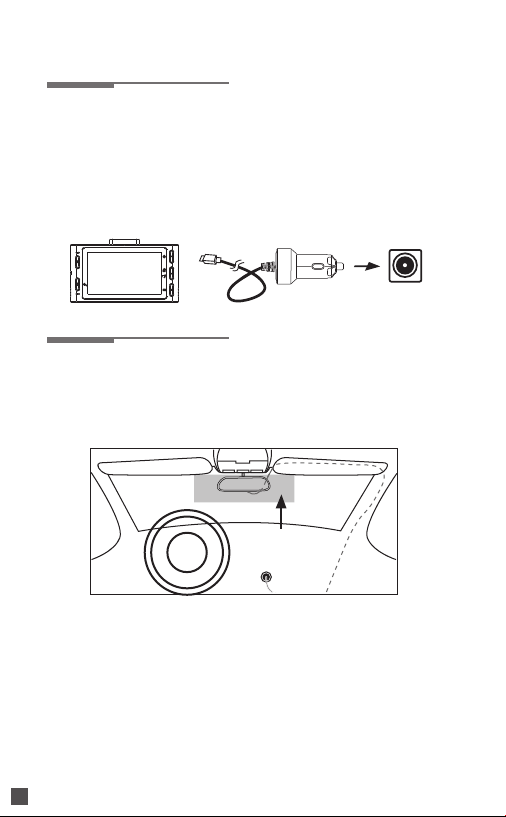
Camera and Cord Installation
Installation Steps
1.2.In order to keep the device functioning properly, please use the
VicoVation power cable that comes with the package at all times.
Plug the Power Cable into the D/C outlet then connect the USB side with
the device’s power cable port.
Recommend Installation Position for Wiring
To achieve a clean looking installation after you have plugged the camera in
follow the cord back from the camera and tuck it in under the roof headliner.
Then run it along the “A” Pillar and tuck it behind. Finally hide the cable
under the passenger side floor mat.
Recommend Area
Special Notice:
1.
It is not recommended to wiring the cables on your own if your car is
equipped with airbags in the “A” Pillar. Please seek for professional
assistance.
2.
To avoid effecting the water proof performance on the doors, please
restore the rubber seal properly after wiring the power cable.
3.
MF3 Power Cable is specially designed and only for MF3 dashcam.
It is not compatible with other VicoVation products.
English
06
Page 8
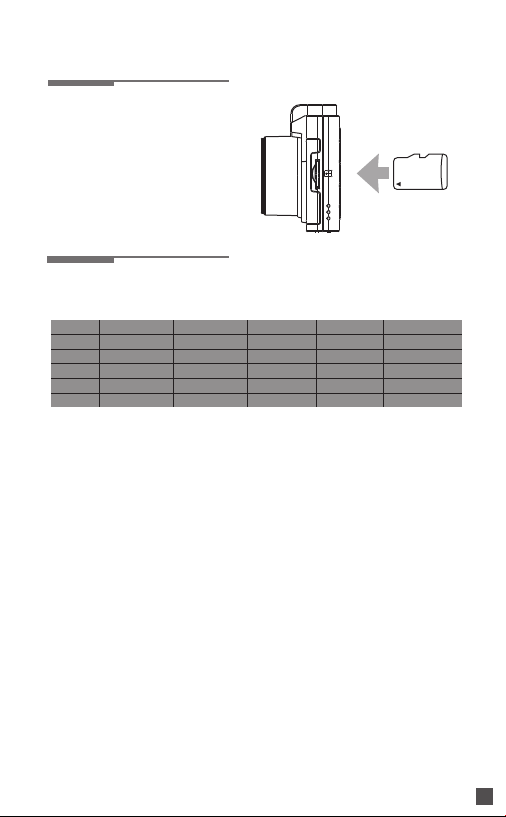
Start Operating the Device
Insert the memory card into
1.
microSD Card Slot following
the direction shown in the
diagram. Push to the end until
you hear a light click.
Vico-MF3 supports 1440p
2.
recording, and a class 10
memory card must be used.
Recording Storage Capacity
Micro SD
1440p 30fps
8GB
20 mins
16GB
62 mins
32GB
146 mins
64GB
314 mins
128GB
After connecting to a power source, the device will boot up and enter
3.
recording mode. During the initial 3 seconds, recording cannot be
paused due to the system check. However, you may enter “Menu”
during this time.
Please adjust “Time/date” settings and format the memory card from
4.
the settings menu first before operating the device for the first time.
To remove your inserted memory card, please make sure the
5.
recording has been stopped and the power has been turned off. Do
not try to eject the memory card while the camera is recording as this
may result in the file becoming damaged.
Vico-MF3 is equipped with standard microSD card slot. A Class 10
6.
microSD memory card (SDHC/SDXC) is required.
Card reader mode can be turned on Vico-MF3 by connecting the
7.
USB port on the device with a computer. To go back to operating the
device normally, simply connect the device back to the power source
with the power cable.
1296p 30fps
30 mins
79 mins
177 mins
372 mins
1080p 60fps
30 mins
79 mins
177 mins
372 mins
762 mins 1016 mins762 mins649 mins 1536 mins
1080p 30fps
40 mins
105 mins
235 mins
495 mins
1080p 45fps
73 mins
170 mins
365 mins
756 mins
English
07
Page 9

Menu Functions
Instructions on entering Menu: Press MENU button on the lower left
corner. There are two labels on the upper right corner in the Menu,
press MENU button to switch. Press twice to exit.
《Label 1》
Video Resolution:
Video Playback:
Smart Warning System:
Parking Surveillance:
G-Sensor Sensitivity:
Loop Recording Length:
Microphone Setting:
Expose Value:
《Label 2》
Language Setting:
TV system:
Date/Time Stamp:
Vico-Tag Stamp:
Speed Stamp:
Stamps Setting:
Time Zone:
Format:
Factory Reset:
Format Reminder:
Device Volume:
Screen Saver:
Version:
Set video recording resolution. Default is 1440p@30fps HDR.
Play recorded videos from Normal Recording and Emergency
Recording files.
VicoVation GPS Mouse is required. Turn on this feature to enable
Lane Departure Warning System, Forward Collision Warning System,
Lead Car Departure Notification System, Driver Fatigue Alert System,
Speed Warning System, Headlights-on Reminder, and GPS Tracking.
Default is Off.
Monitor your car while it is stationary from impacts or sabotage. The
video recording will be activated by Motion Detection. Default is Off.
NOTE: This is not Smart Parking Surveillance (SPS). It is advised to
turn this function off while driving.
Set the sensitivity on the G-Sensor. Default is Off.
Change recording time per video under 1 min, 3 mins, or 5 mins.
Default is 3 mins.
Choose to record sound or not during recording. Default is On.
Change exposure volume. Default is 0.0.
Choose language in between Traditional Chinese, Simplified
Chinese, and English. Default is English.
Choose in between NTSC and PAL. Default is NTSC.
Set the displayed time on the device and footages.
Users may customize the characters to be embedded on the
videos.
Choose speed display unit in between KPH and MPH.
Choose whether to display Date, Time. Vico-Tag, and Speed on
the footages.
Set GPS regulation on time zone. Default is +8.
Format the inserted memory card to erase all files.
Reset to factory settings.
Set a memory format reminder to be on or off.
Change the sound on the device to be On/Off. Default is Off.
Set a period of time before the display screen gets dark. Default is
Off.
Firmware version on this device.
English
08
Page 10

Playback On a Computer
Connect the device to the computer using micro USB cable. The
1.
device will be turned on and enter USB Mode. You may browse the
files in the folders on the device.
Copying the files onto the computer first before playing is highly
2.
recommended.
English
09
Page 11

3-Axis G-Sensor Settings
The device is equipped with G-Sensor. It triggers Emergency Recording
automatically when impacts are detected. To avoid false detections during
initial installation, G-Sensor function is defaulted as OFF. Please activate
this function manually after the device has been properly installed.
Off(Default) LowMediumHigh
Emergency Recording Function
Users may manually activate Emergency Recording function by
1.
pressing the orange button on the device in the event of accident.
Aa yellow triangle will show up on the screen when this function is
activated.
The device will save recorded footage within the prior 10 seconds
2.
and subsequent 50 seconds (total 1-minute video) as an individual
file into the emergency recording folder. The files will be protected
from loop recording until it’s capacity has been filled up.
Special Note:
If the power source is removed during Emergency Record or the
backup process, the device will continue finishing this process
next time when it’s powered up. It will take longer for it to finish
processing.
English
10
Page 12
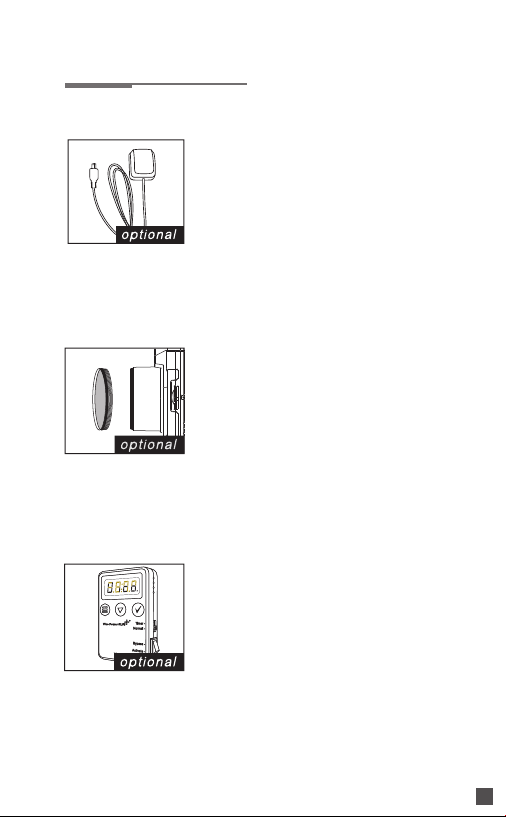
Accessories
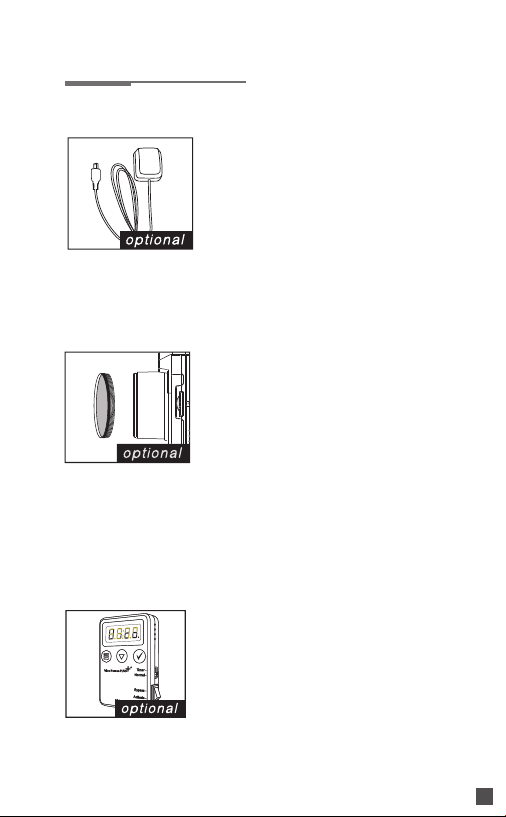
VicoVation External GPS Mouse
The features below can be unlocked after
having GPS Mouse installed.
1. Lane Departure Warning System
2. Forward Collision Warning System
3. Lead Car Departure Alert
4. Driver Fatigue Alert
5. GPS Tracking
6. Overspeed Alert
VicoVation 30mm CPL Filter
1. Having VicoVation 30mm CPL installed
can eliminate glare from the windshield
effectively in result in clearer images.
2. Having CPL filters installed can also
result in a darker image. Please adjust the
settings for night-time recording by (1)
adjusting the CPL Filter’s installation angle.
(2) changing exposure values. (3) removing
the CPL Filter at night.
VicoVation PowerPLUS
Vico-Power PLUS (VPP) is a Battery
Discharge Prevention device that
connects to the car battery (Fuse Box).
It continuously provides power to
Dashcam after engine is turned off and
monitors car battery status at the
same time.
1. Low voltage protection
2. Over-temperature protection
3. Auto shutdown timer
4. Overcurrent & Impulse current protection
English
11
Page 13

Limited Warranty Service
1.
The limited warranty starts from the Original Purchase Date. 12
months limited warranty is available on all car video recorders (body
units only) and Vico-Power PLUS. 6 months limited warranty is
available on all the accessories of VicoVation. The original valid proof
of purchase will be required.
2.
The limited warranty is only valid in the countries where this product is
sold. Please contact the retailer or online shop who sold this unit for
detailed in-warranty service.
3.
The limited warranty does not apply to the damages caused by
shipping, malfunctioning in events of accident, misuse, abuse, water,
fire, or other acts of nature, external causes, or faulty installation.
4.
Warranty is void if this unit has been disassembled or modified.
If you have any questions, please feel free to
contact us or our local distributors.
Email : [email protected]
Facebook : www.facebook.com/VicoVationOfficial
English
12
Page 14

English
13
Page 15
Vico-MF3 Ultra-HDR行車紀錄器
安裝操作指南與注意事項
感謝您選購Vico-MF3 2K Ultra-HD行車紀錄器,請詳閱使用手冊,並注意
以下提醒,正確操作主機。
1. 請使用標配的車充電源線,使用非原廠的電源線可能因為電壓/電流不足
而造成主機異常。
2. 支援2K Ultra-HD 1440p超高畫質攝影,嚴禁使用Class 10等級以下之低
速記憶卡。
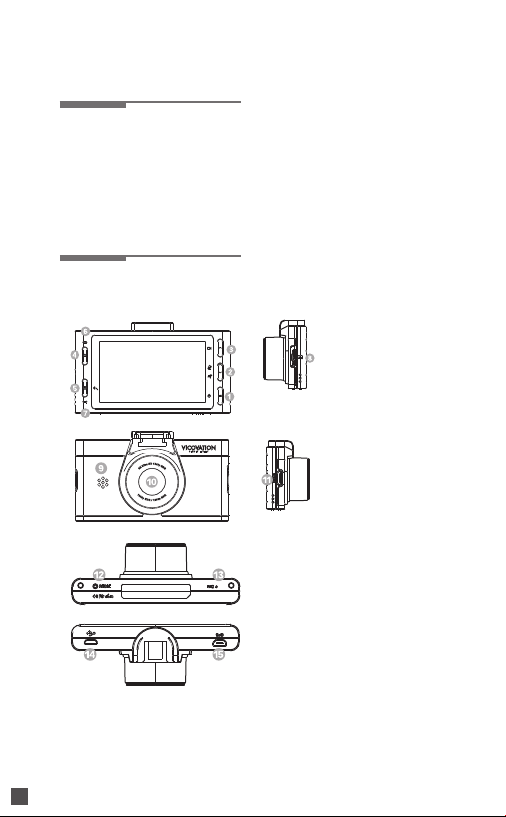
Vico-MF3 產品外觀介紹
MF3
中文
14
1. 電源開關(長按三秒
關機) / 確認鍵
2. 向下鍵(靜音/錄音快
速切換鍵) /停車監控
模式切換鍵
3. 向上鍵/錄影鍵
4. 緊急錄影鍵
5. 選單/返回鍵
6. GPS訊號指示燈
7. 電源指示燈
8. Micro SDHC卡槽
9. 喇叭
10. 百萬像素鏡頭
11. Mini HDMI輸出接口
12. Reset鍵
13. 麥克風
14. 車充電源接孔
15. GPS外接模組接孔
Page 16
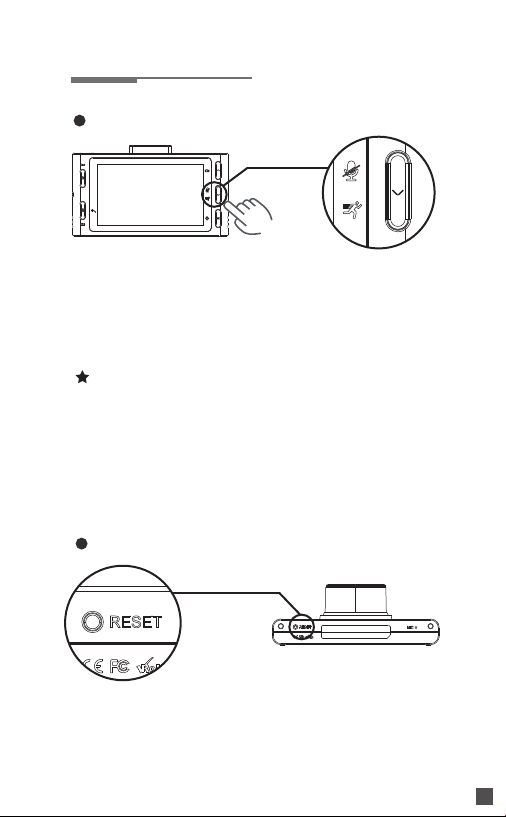
特殊按鍵功能
停車監控模式切換鍵
停車監控,一鍵切換
確認已經加裝熄火不斷電裝置(如:Vico-Power PLUS電力加),在停
車後,按住“停車監控模式切換鍵”三秒 (右邊中間按鈕),主機會從
『一般錄影模式』切換為『停車監控模式』,此時主機將立刻停止一
般循環錄影,切換成位移偵測錄影功能,根據鏡頭前方的物體位移來
觸發錄影。
特別注意:
『停車監控模式』的狀態之下,只要重啟主機,主機將會自動回復成
『一般錄影模式』。Vico-Power PLUS電力加 - 智慧不斷電裝置
內建“ACC Restore Reboot (ACC開關切換/輸出重啟) ”功能,下次
開車發動引擎時,電力加會主動使機器斷電重啟。重新啟動後,主機
自動開始循環錄影,上車後無須再次手動切換。
若使用其他熄火不斷電裝置,則無“ACC Restore Reboot (ACC開關
切換/輸出重啟)”功能,必須在下次開車前,手動切換回『一般錄影
模式』,請特別注意!
Reset鍵
無法操作關機或是主機出現異常時,可以透過按下Reset鍵強制將主
機關閉。
中文
15
Page 17
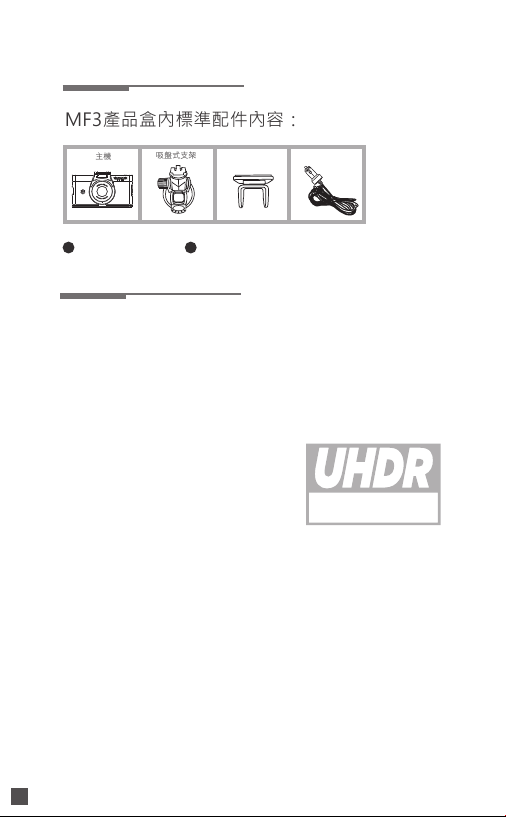
MF3產品盒內標準配件內容:
Vico-MF3 產品盒內標準配件
吸盤式支架
主機
黏貼式支架 原廠4米車充
MF3
快速安裝指南 保固卡
Ultra-HDR (高動態影像)
2K Ultra-HD @1440p 30fps HDR錄影模式
MF3內建視連科最新的高動態影像錄影模式,可以在夜間平衡影像的
亮部及暗部,產生極高品質的畫面。
預設的解析度為1440p 30fps HDR錄影模式。
ULTRA HIGH
DYNAMIC RANGE
中文
16
Page 18
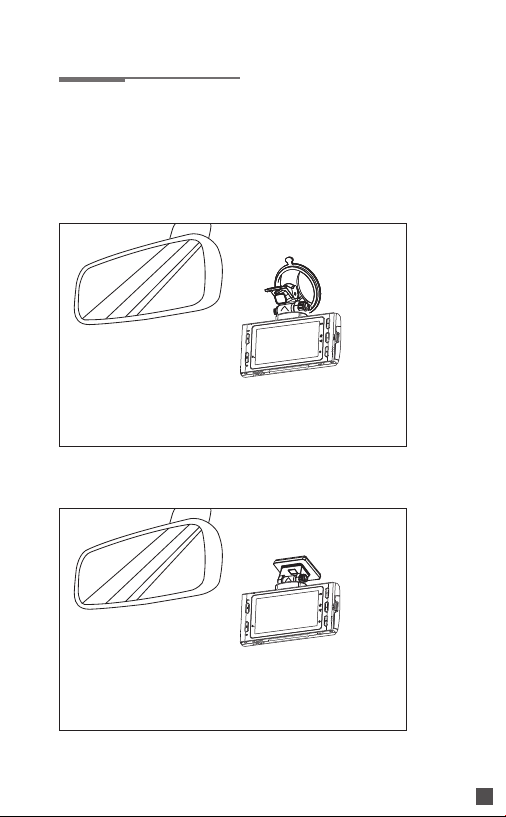
支架安裝說明
盒內附有專用吸盤式支架以及黏貼式支架。安裝方式如下圖,使用
者可自行選擇適合自己愛車的方式以及安裝位置。
安裝以不影響行車視線為原則,請特別注意。
主機 + 吸盤式支架
主機 + 黏貼式支架
中文
17
Page 19
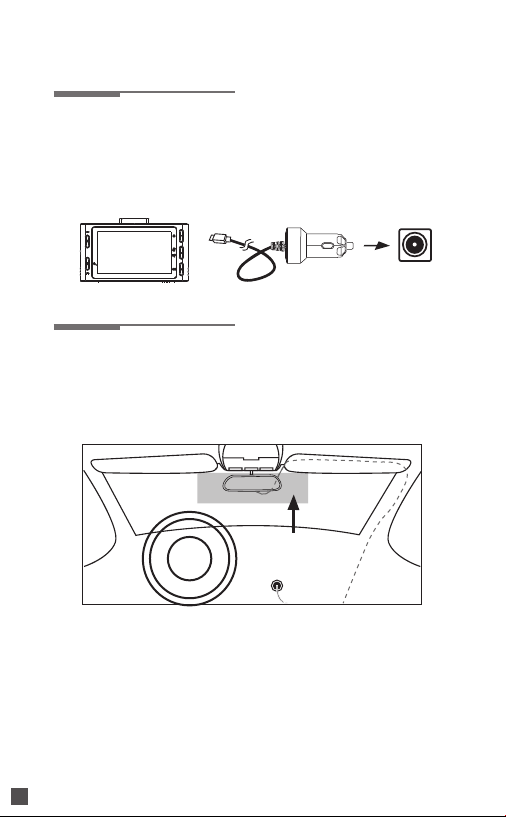
車用環境安裝方式
安裝步驟
1.
請務必使用Vicovation原廠車充線,以確保主機運作正常。
2.
請將車充電源線接至汽車點菸座,另一端接至主機的車充電源接口。
建議安裝位置與電源走線
簡易DIY走線方式:車充電源線可由副駕駛座(腳踏墊下方),往上走右邊A
柱內側防水膠條(可能需要工具輔助,請注意復原膠條位置。),再經由副駕
駛座遮陽板上固定,走至主機。
建議安裝區域
特別注意
1.
若您的愛車A柱內有安全氣囊,建議由專業人員協助安裝,不建議自行
埋線安裝。
2.
安裝時請注意防水膠條的位置復原,否則可能影響車門防水性能。
3.
請務必使用盒內專屬車充電源線,請勿使用其他車充電源。
中文
18
Page 20
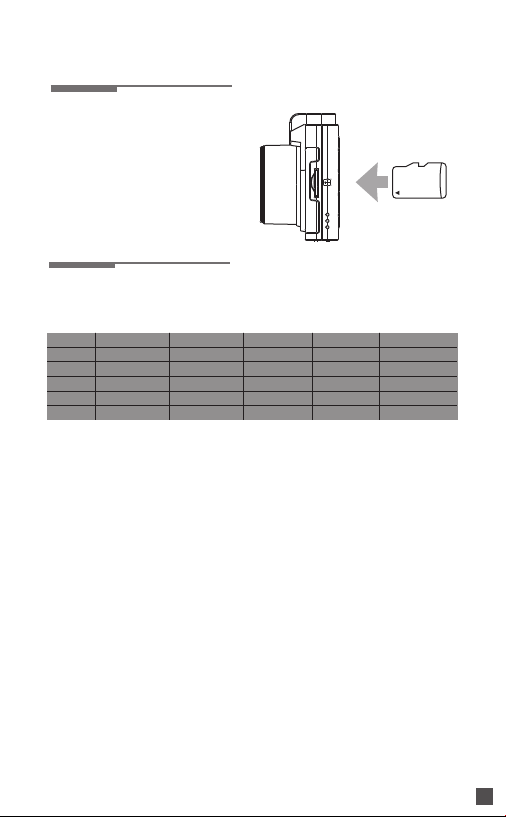
開始操作
1.
請依照正確方向插入
MicroSDHC / SDXC 記憶卡。
輕推到底後會有輕微喀擦聲。
(請注意卡片金手指方向)
2.
Vico-MF3支援1440p錄影,
嚴禁使用Class10等級以下之
記憶卡。
Micro SD
錄影時間對照表 (不含緊急錄影時間)
1440p 30fps
8GB
20 mins
16GB
62 mins
32GB
146 mins
64GB
314 mins
128GB
3.
電源連接後 (請連接車充電源接口),自動開機進入錄影模式。首
次使用,請先設定時間並將記憶卡格式化。
4.
拔插記憶卡前,請先停止錄影或關閉電源,請勿在錄影中任意拔
除記憶卡以避免資料損毀。
1296p 30fps
30 mins
79 mins
177 mins
372 mins
1080p 60fps
30 mins
79 mins
177 mins
372 mins
762 mins 1016 mins762 mins649 mins 1536 mins
1080p 30fps
40 mins
105 mins
235 mins
495 mins
1080p 45fps
73 mins
170 mins
365 mins
756 mins
中文
19
Page 21

選單功能介紹
進選單方式
按左下方選單鍵,即可進入選單。
選單上方右側共有兩個標籤,切換標籤方式請按左下方選單鍵。
《標籤一》
影像解析度設定:
影片播放選單:
智慧警示系統設定:
停車監控模式設定:
G值靈敏度設定:
影片長度設定:
錄音設定:
曝光值設定:
設定錄製影像解析度大小。預設值為1440p HDR。
播放一般錄影/緊急錄影資料夾中的檔案。
設定台灣地區定點測速照相警示、車道偏離警示、開大燈
提醒、前車起步提醒、前方碰撞提醒、疲勞駕駛提醒、超
速提醒。預設值為關閉。(需加裝GPS模組)
關閉或開啟停車監控模式。預設值為關閉(此功能為停車
監控專用)。
設定重力感測器靈敏度。預設值為關閉。
可設定每個影像檔案時間為1分鐘 / 3分鐘 / 5分鐘。預設
值為3分鐘。
設定錄製的影像為錄音/靜音。
可調整錄影曝光值。
中文
20
《標籤二》
語言設定:
電視系統:
個性化標籤:
時間設定:
時速顯示:
標籤設定:
記憶卡格式化:
還原預設值:
時區設定:
提示音設定:
螢幕自動關閉:
格式化提醒:
軟體版本:
選擇操作語言為繁體中文 / 簡體中文 / 英文。
預設值為英文。
選擇NTSC / PAL。預設為NTSC。
可自行編輯影像浮水印標籤的文字內容。
手動設定現在時間。
選擇時速標籤的顯示單位(KPH/MPH)。
選擇是否於影像中顯示(日期/時間/個性化標籤/時速)標籤
內容。
格式化記憶卡,清除記憶卡中的所有檔案。
將所有設定還原成出廠預設值。
設定GPS時間校正區域。預設值為+8。
關閉或開啟系統提示音。預設值為開啟。
設定螢幕休眠時間。預設值為關閉。
定期出現記憶卡格式化提醒。
可確認軟體版本。
Page 22

使用電腦播放
1.
使用USB連接線,一端接到主機的Micro USB輸出接口,另一端與電
腦連接。
2.
連接電腦後,主機會開機並且進入USB模式。此時可以透過瀏覽資料
夾的方式點選欲瀏覽的檔案。
3.
建議將檔案複製到電腦後播放,避免因傳輸速度不足造成影片播放不
順暢。
中文
21
Page 23

三軸G-Sensor碰撞感測器
Vico-MF3配備G-Sensor碰撞(三軸重力)感測器,能在碰撞發生時,自
動觸發緊急錄影功能。為了避免誤動作發生,G-Sensor功能預設值為
關閉,請在車內安裝完畢之後進入選單開啟此功能。
關閉(預設) 低中高
緊急錄影介紹
1.
行車途中,遇見特殊狀況或緊急事故時,可手動觸發緊急錄影(左上
方按鍵)。此時螢幕上方會出現一個黃色三角形符號。
2.
緊急錄影觸發點的前10秒以及後50秒影像,會儲存成一個獨立一
分鐘的影像檔案存放在EVENT資料夾下,不受循環錄影複寫。
中文
22
Page 24
其他選購配件
Vico-GPS Mouse
安裝GPS模組後,主機增加智慧行車輔助系
統。
1.車道偏離警示
2.前車碰撞警示
3.自動校正時間
4.行車軌跡記錄
5.超速提醒
6.台灣地區定點測速照相提醒
Vico-CPL 30mm 偏光濾鏡
MF3支援標準30mm鏡環,可選購搭配CPL
偏光濾鏡。安裝Vico-CPL Filter可減少白天
車內前擋玻璃的內反射,有更清晰飽和的錄
影畫面。
請注意CPL偏光濾鏡有減光效果,請特別
留意夜間錄影畫面。
或於夜間錄影時,選擇:
1.調整偏光鏡偏折角度
2.調整錄影曝光值
3.夜間解除使用偏光鏡
Vico-PowerPLUS 電力加
Vico-Power PLUS (VPP) 是一個車輛電力監
控保護裝置,與車用電瓶連接後,可在車輛
熄火後持續供電給行車記錄器,提供停車監
控所需之電力。
1. 電瓶低電壓斷電保護
2. 溫度過高斷電保護
3. 計時斷電保護
4. 大電流與突波電流保護
中文
23
Page 25
售後服務支援
有任何安裝操作問題,歡迎來信或是致電視連科客服中心
台灣地區:
Email : [email protected]
Line : VicoVation
客服專線 : 02-2627-5883轉分機22, 23客服部
行動客服專線 : 0975-023-262
視連科客服中心地址 : 台北市內湖區瑞光路358巷38弄36號2樓之2
客服時間:週一~週五上午09:00~12:30,13:30~18:00 (例假日與國定
假日除外)
歡迎您加入視連科Facebook專頁www.facebook.com/VicoVation,
可得到第一手產品相關資訊與更新軟體資源,有任何問題也可以直接
於Facebook留言提問。
中國地區:
視連科數碼科技(上海)有限公司
Email : [email protected]
Weibo : VicoVation_China
客服專線 : 021-61197208
客服中心地址 : 上海市普陀區中山北路1715號707室(浦發廣場E座)
客服時間 : 週一~週五上午09:00~12:00,下午13:00~18:00(例假日
與國定假日除外)
觀迎您關注視連科微博專頁http://weibo.com/3204503793,可得
到第一手產品相關資訊與更新軟資源,有任何問題也可以直接於微博
留言提問。
中文
24
Page 26

維修服務與保固條款
視連科保證產品皆經過完整測試,避免原物料及加工過程之瑕疵,並
符合所公佈之規格。若產品在保固期間內,於正常環境使用下有任何
不良或損壞發生,您可與原購買的經銷商連絡,透過原購買經銷商寄
回視連科維修。若有其他相關維修問題,也歡迎您直接撥打客服專線
與我們聯繫。
客服專線:02 -2627-5883轉23
行動客服專線:0975-023-262
LINE線上客服ID:vicovation
視連科客服部地址:
台北市內湖區瑞光路358巷38弄36號2樓之2
免付費維修服務保固說明
1.
視連科產品主機提供一年保固,自消費者之原始購買日起算一年
。用戶須出示原始購買日之證明 (發票或是保固卡) 始能享有保固
服務。若無法提供正常購買證明,視連科將依產品序號判定保固
期間。
2.
若產品主機在購買七日內 (含),於正常操作下發生硬體故障,視
連科提供免費更換新品。
3.
所有配件 (車充,支架,線材)為耗損品,自購買日起享有六個月
的免費保修服務。
4.
如逾保固期之維修與配件更換則另行報價收費。
中文
25
Page 27

 Loading...