

Page 1
Page 2

Index
English 02
中文 14
01
Page 3
Vico-MF2 Installation Guide
Thank you for choosing Vico-MF2 Car Camcorder.
To ensure safety, please read this manual carefully before
installation.
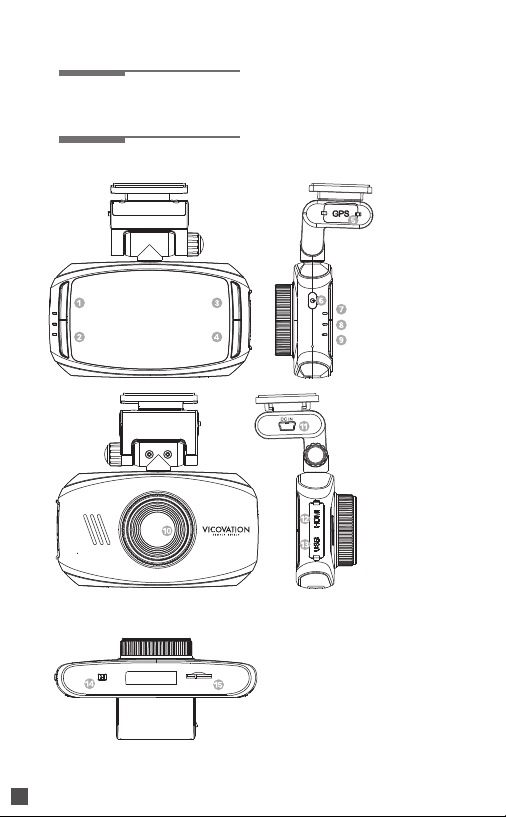
Vico-MF2 Exterior Overview :
1. Start/Stop
Recording/Confirm
2. Emergency
Recording
/Menu/Return
3. Up/Change
Exposure Values
4. Down/Mute
5. External GPS
socket
6. Power button
7. LED Indicator for
Power
8. LED Indicator for
Recording
English
02
9. LED Indicator for GPS
10. Lens
11. Power Port
12. Mini HDMI Output
13. USB Port (Data)
14. Reset
15. Micro SD card slot
Page 4
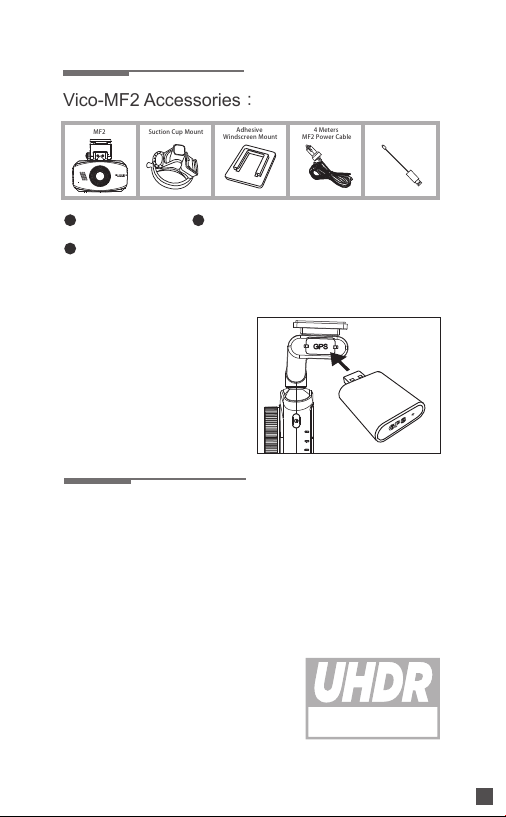
Vico-MF2 Accessories:
MF2
Suction Cup Mount
Vico-MF2 Accessories:
4 Meters
MF2 Power Cable
Adhesive
Windscreen Mount
USB cable
Installation guide Warranty card
GPS Module
Advanced Driver Assistance System(ADAS) can be unlocked after
connected with GPS Module.
1. Lane Departure Warning
System
2. Lead Car Departure
Notification System
3. Forward Collision Warning
System
4. GPS Tracking
5. Driver Fatigue Alert System
6. Overspeed Alert System
7. Headlights-on Reminder
Ultra-HDR (High Dynamic Range)
@1080p 30fps HDR Mode
Ultra-HDR (High Dynamic Range) in 1080p@30fps HDR Mode
Vico-MF2 is equipped with the latest Ultra-HDR technology. It adjusts
the images to the best balance between bright and dark and
generates extremely high quality 1080p recording footages. The
default resolution setting is under 1080p@30fps HDR mode.
ULTRA HIGH
DYNAMIC RANGE
English
03
Page 5
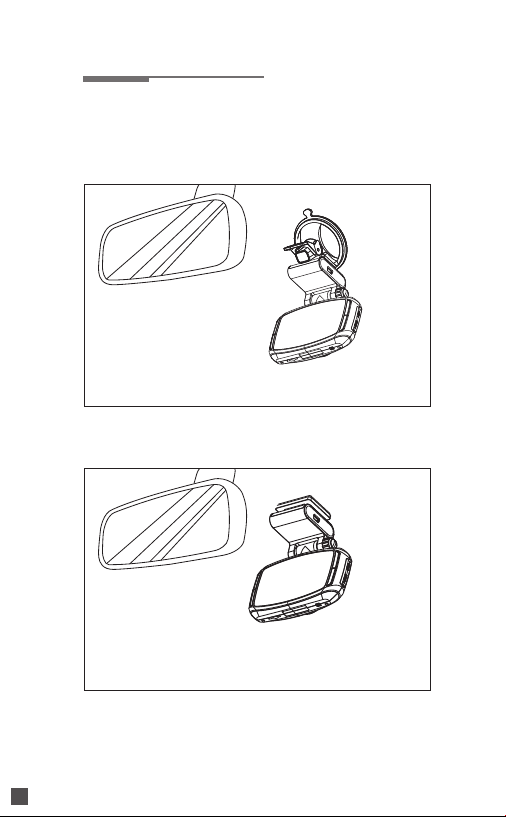
Suction Cup Mount Installation
Please make sure to face the direction of the
mounts toward the windshield.
Vico-MF2
+ Suction Cup Mount
English
04
Vico-MF2
+ 3M Adhesive Windscreen Mount
Page 6
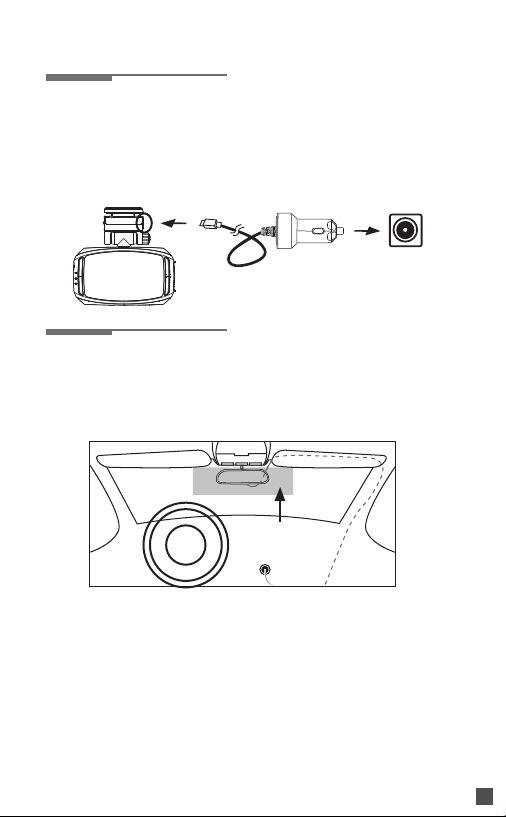
Camera and Cord Installation
Installation Steps
1.2.In order to keep the device functioning properly, please use the
VicoVation power cable that comes with the package at all times.
Plug the power cable into the D/C outlet then connect the USB side
with Vico-MF2 insert into the power port.
Recommend Installation Position for Wiring
To achieve a clean looking installation after you have plugged the camera in
follow the cord back from the camera and tuck it in under the roof headliner.
Then run it along the “A” Pillar and tuck it behind. Finally hide the cable
under the passenger side floor mat.
Recommend Area
Special Notice:
1.
It is not recommended to wiring the cables on your own if your car is
equipped with airbags in the “A” Pillar. Please seek for professional
assistance.
2.
To avoid effecting the water proof performance on the doors, please
restore the rubber seal properly after wiring the power cable.
3.
MF2 Power Cables are specially designed and only for MF2
dashcams.MF2 Power Cables are not compatible with other
VicoVation products.
English
05
Page 7
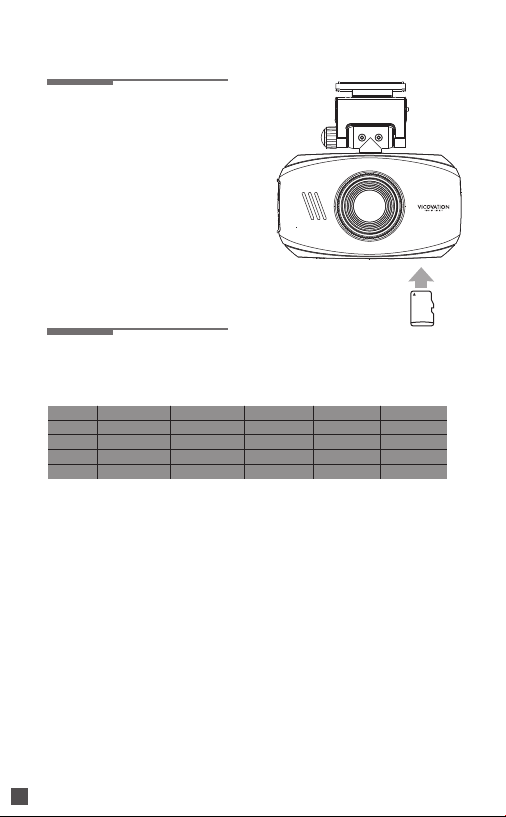
Camera and Cord Installation
Insert the memory card into
1.
microSD Card Slot following
the direction shown in the
picture. Push to the end until
you hear a light click.
Vico-MF2 supports
2.
1296p/1080p recording, and
a class 10 memory card must
be used.
Recording Storage Capacity
(10 sets of EmgencyRecording is not included)
2560p 30fps
8GB
60 mins
16GB
120 mins
32GB
240 mins
64GB
480 mins
The device will start up and enter Recording Mode once you connect
3.
the power cable with the device. Please format your memory card
before you operate for the first time.
Please turn off the device before you eject the memory card. Ejecting
4.
the memory card while recording is prohibited.
The USB port is only for computer use. Plugging the power cable into
5.
the USB port may damage the device.
1296p 30fps
60 mins
120 mins
240 mins
480 mins
1080p 30fps
70 mins
140 mins
280 mins
560 mins
720p 60fps
90 mins
180 mins
360 mins
720 mins
720p 30fps
130 mins
260 mins
520 mins
1040 mins
Micro SD
English
06
Page 8
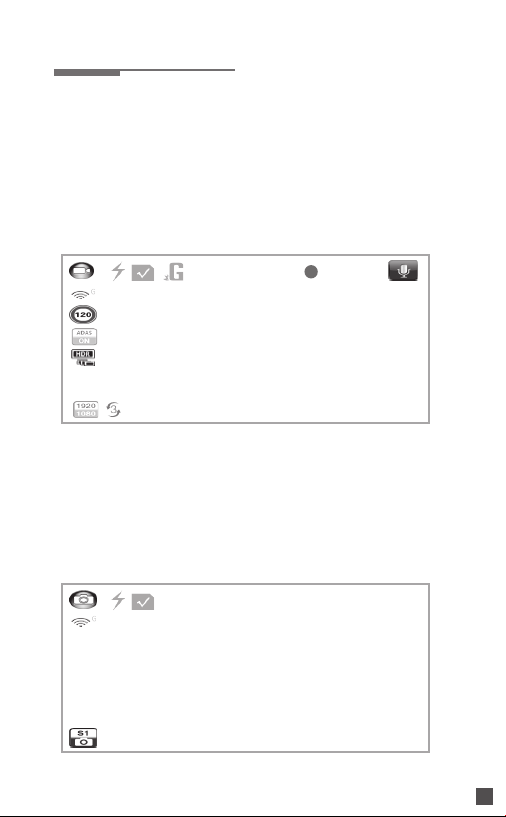
Main Display Icons
Recording Mode Interface
Icons on the upper side bar (from
left to right) :
Recording Mode /
Power /
Memory Card /
G-Sensor Function Indicator /
Current Time /
Mute
0.0 EV
Snapshots Mode Interface Switch Modes
Icons on the upper side bar (from
left to right) :
Snapshots Mode /
Power /
Memory Card /
Photo Size
Icons on the left side bar
(from top to bottom) :
Recording Mode /
GPS Indicator /
Speed Warning setting /
ADAS /
HDR / EV / Recording Resolution /
Loop Setting
000:19:48
Stop recording→Press DOWN to
switch between modes.
PHOTO:02/50
English
07
Page 9

Main Settings
Instructions on entering Menu:
Stop recording then press EMERGENCY on the lower left
corner to enter Menu.
There are two labels on the upper right corner in the Menu, press
EMERGENCY on the lower left corner to switch. Press twice to exit.
《Label 1》
Video Resolution:
Video Quality:
Deflicker:
Time Stamp:
[ADAS Detect]:
Loop Setting:
Time Zone:
AE Bias:
Speed Alert System:
Keypad LED:
G-Sensor Sensitivity :
Parking Surveillance:
《Label 2》
Language Setting:
Television Display System:
English
08
Vico-Tag:
Date/Time:
Format:
Factory Reset:
Screen Saver:
Volume:
Version:
Video Resolution: Set video recording resolution. Default is 1080p
HDR.
Set video recording quality. Default is S.Fine.
Adjust this setting depend on the country you are in. Default is Auto.
Date and time will be embedded on the video. Default is On.
Turn on this feature to enable Lane Departure Warning System,
Speed Cameras Detection In Taiwan、Lane Depature Warning
System、Headlights-on Reminder、Lead Car Departure Notification
System、Forward Collision Warning System、Driver Fatigue Alert
System.
Change recording time per video under 1 min, 3 mins, or 5 mins.
Default is 3 mins.
Set GPS regulation on time zone. Default is +8.
Chang exposure volume. Default is 0.0.
When the driving speed is faster than the set value, the device will
alert the drive with a beep warning sound and an alert icon to be
displayed on the screen. Default is Off.
Change the lights on the keypad to be on or off. Default is On.
Set the sensitivity on the G-Sensor. Default is Medium.
Monitor your car while it is stationary from impacts or sabotage. The
video recording will be activated by Motion Detection. Default is Off.
NOTE: This is not Smart Parking Surveillance (SPS). It is advised to
turn this function off while driving.
Change language in between Traditional Chinese / Simplified
Chinese / English. Default is English.
Switch between NTSC or PAL. Default is NTSC.
Users may customize 9 characters to be embedded under Time
Stamp.
Set the displayed time on the device and footages.
Format the inserted memory card.
Reset to factory settings.
Set a period of time before the display screen gets dark. Default is
Off.
Change the sound on the device to be on or off. Default is On.
Firmware version on this device.
Page 10
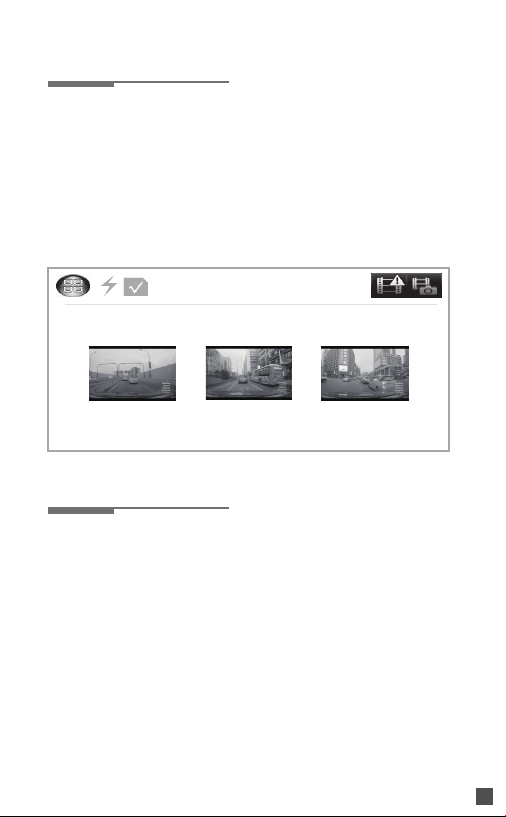
Playback Settings
Enter Playback Mode:
Under Recording Mode, press CONFIRM on the upper left to stop
1.
recording. Then press SWITCH on the lower right twice to enter Playback
Mode.
After entering Playback Mode, press Up button on the upper right to
2.
switch in between Emergency Recording folder and Normal Recording
folder.
You may choose files to preview to after pressing CONFIRM, press
3.
CONFIRM again to play.
Playing On a Computer
Connect the device to the computer using Vico-USB cable.
1.
After pressing POWER, the device will be turned on and enter USB
2.
Mode. You may browse the files in the folders on the device.
Copying the files onto the computer first before playing is highly
3.
recommended.
When connected with the computer for the time, the device would
4.
program a new player on the memory card. Users may play
recorded footages using this player to see GPS tracking information.
Users who use Windows operating system shall choose “Run this
program as an administrator”.
English
09
Page 11

3-Axis G-Sensor Settings
Vico-MF2 is equipped with 3-Axis G-Sensor. Emergency Recording can
automatically be trigged when impacts are sensed. In order to avoid false
alert, this setting is OFF by default. Please turn on this function once the
device is properly installed in car.
Off(Default) LowMediumHigh
Emergency Recording Settings
During driving, special circumstances, or emergency accidents,
1.
Emergency Recording can be manually trigged by pressing
EMERGENCY on the lower left corner. After trigged, a yellow
triangle sign would appear on the upper screen.
An Emergency Recording file would consist the prior 10 seconds
2.
and the subsequent 20 seconds into an independent file. This 30
seconds file will be kept under EVENT folder and won’t be erased
by circulated Normal Recording.
English
10
Page 12
Accessories
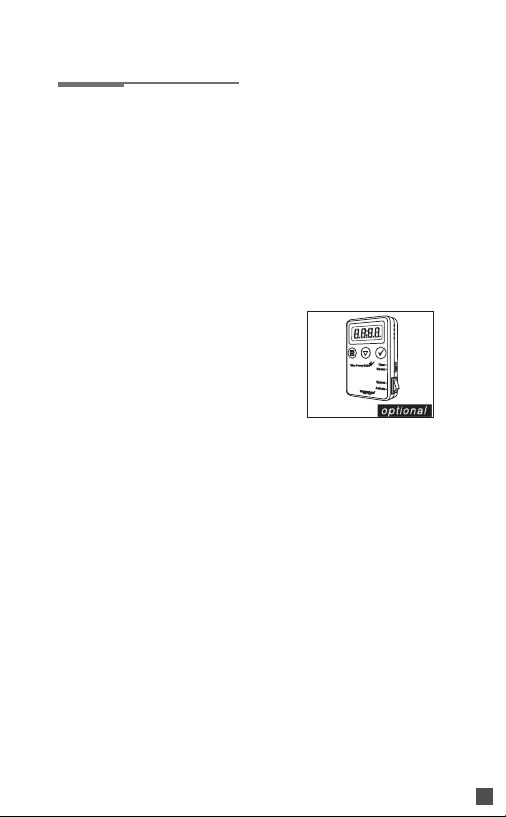
Vico-Power PLUS (Optional Accessory)
Power PLUS is a power safety device which connects to car battery to
work with Dash Cam/Black Box, continuously providing power after
engine-off while parking. Together working with Parking Surveillance
function, your Dash Cam can have motion-detection recording after
you left your car, for having full protection of your car. Power Plus will
auto-detect your battery status to cut-off power supply to prevent car
battery from being drained out.
Vico-Power PLUS Special Features
1. Low Voltage Protection
2. Over-Temperature Protection
3. Auto Shutdown Timer
4. Overcurrent & Impulse current Protection
English
11
Page 13
HD-Player
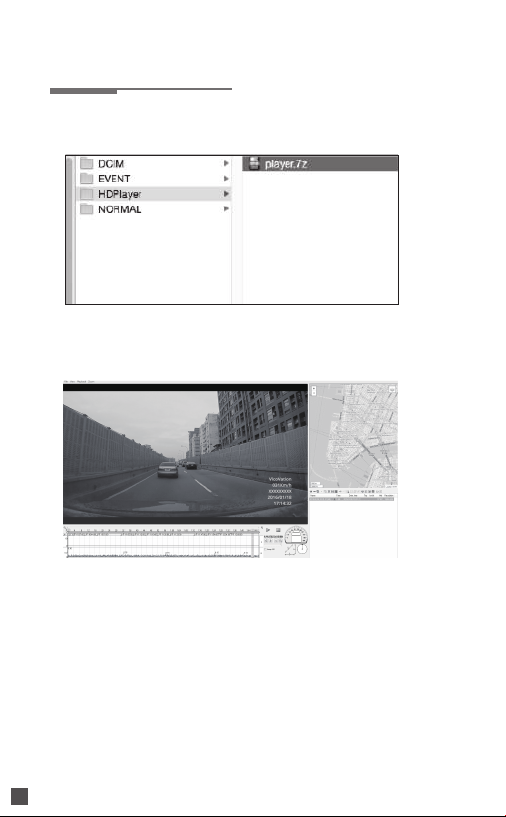
After connecting to the computer using the Vico-USB cable, HD
1.
Player would automatically appear in the folder.
2.
Install HD Player onto the computer. Choose SD card to play
files.Player would display GPS tracking and 3-Axis G-Sensor data.
English
12
Page 14

 Loading...