

Page 1
Vico-Marcus 3 Installation Guide
Thank you for choosing Vico-Marcus 3 Extreme HD Car
Camcorder. Please follow the installation guide for more detail
when using Vico-Marcus 3, and notice our highlight parts as
important reminders.
Vico-Marcus 3 Outlook Introduction:
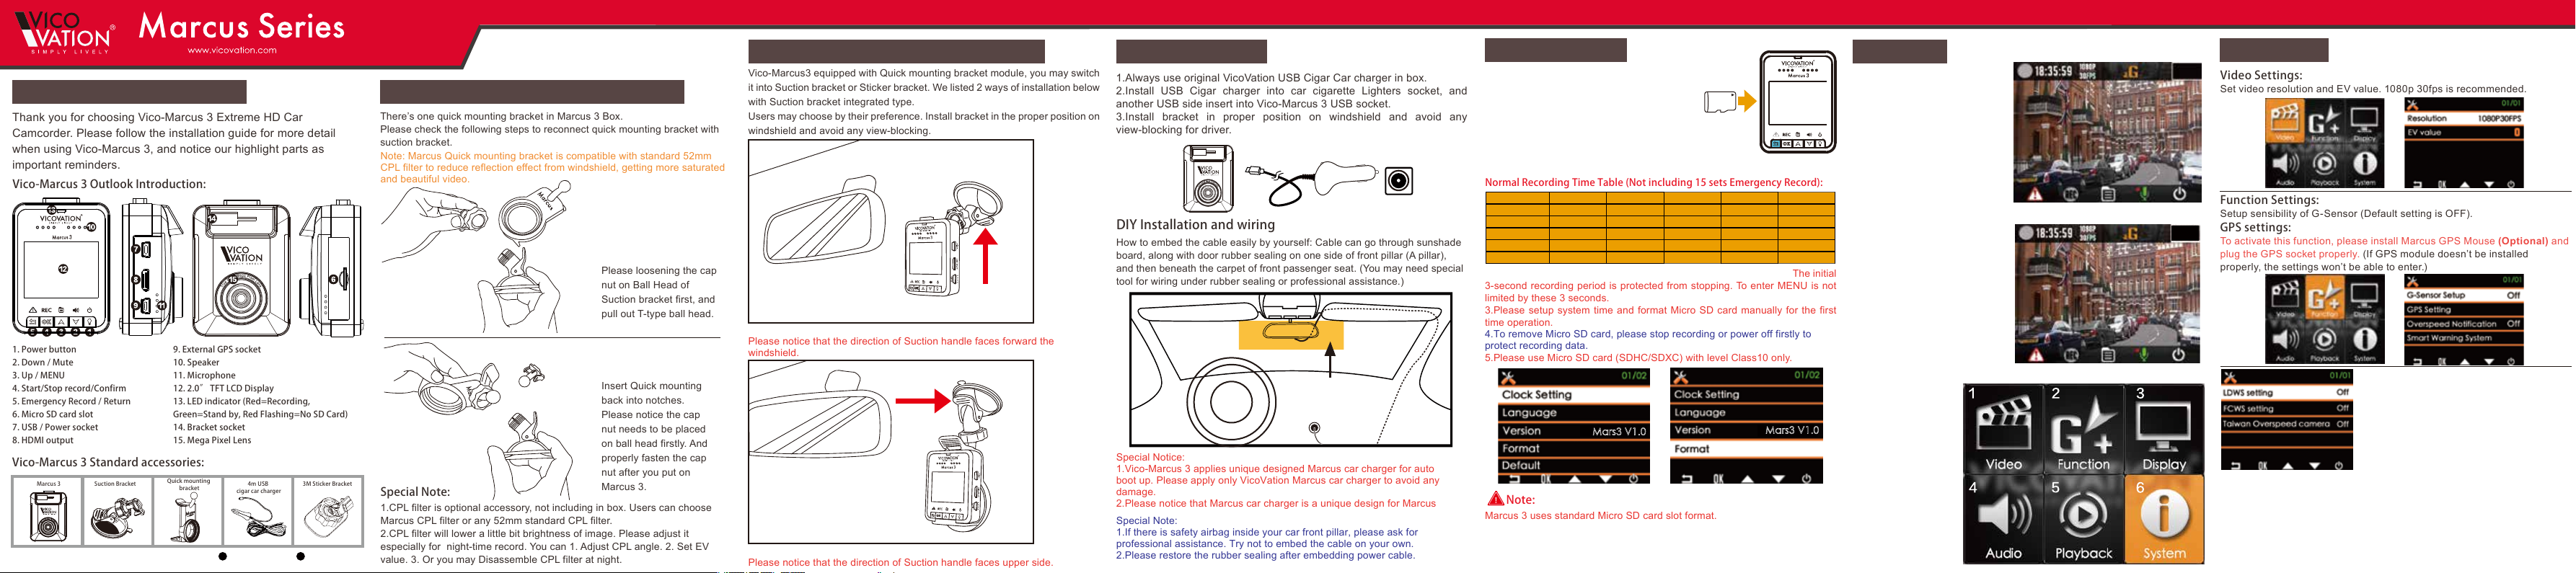
1. Power button
2. Down / Mute
3. Up / MENU
4. Start/Stop record/Confirm
5. Emergency Record / Return
6. Micro SD card slot
7. USB / Power socket
8. HDMI output
9. External GPS socket
10. Speaker
11. Microphone
12. 2.0” TFT LCD Display
13. LED indicator (Red=Recording,
Green=Stand by, Red Flashing=No SD Card)
14. Bracket socket
15. Mega Pixel Lens
Vico-Marcus 3 Standard accessories:
There’s one quick mounting bracket in Marcus 3 Box.
Please check the following steps to reconnect quick mounting bracket with
suction bracket.
Vico-Marcus3 equipped with Quick mounting bracket module, you may switch
it into Suction bracket or Sticker bracket. We listed 2 ways of installation below
with Suction bracket integrated type.
Users may choose by their preference. Install bracket in the proper position on
windshield and avoid any view-blocking.
Please loosening the cap
nut on Ball Head of
Suction bracket first, and
pull out T-type ball head.
Insert Quick mounting
back into notches.
Please notice the cap
nut needs to be placed
on ball head firstly. And
properly fasten the cap
nut after you put on
Marcus 3.
Note: Marcus Quick mounting bracket is compatible with standard 52mm
CPL filter to reduce reflection effect from windshield, getting more saturated
and beautiful video.
Special Note:
1.CPL filter is optional accessory, not including in box. Users can choose
Marcus CPL filter or any 52mm standard CPL filter.
2.CPL filter will lower a little bit brightness of image. Please adjust it
especially for night-time record. You can 1. Adjust CPL angle. 2. Set EV
value. 3. Or you may Disassemble CPL filter at night.
1.Always use original VicoVation USB Cigar Car charger in box.
2.Install USB Cigar charger into car cigarette Lighters socket, and
another USB side insert into Vico-Marcus 3 USB socket.
3.Install bracket in proper position on windshield and avoid any
view-blocking for driver.
How to embed the cable easily by yourself: Cable can go through sunshade
board, along with door rubber sealing on one side of front pillar (A pillar),
and then beneath the carpet of front passenger seat. (You may need special
tool for wiring under rubber sealing or professional assistance.)
DIY Installation and wiring
Marcus 3
Suction Bracket
Quick mounting
bracket
4m USB
cigar car charger
3M Sticker Bracket
Video Settings:
Set video resolution and EV value. 1080p 30fps is rec ommended.
Function Settings:
Setup sensibilit y of G- Sensor (Default setting is OFF).
GPS settings:
To activate this function, please install M arcus GPS Mouse (Optional) and
plug the GPS socket properly. (If GPS module doesn’t be installed
properly, the settings won’t be able to enter.)
1
s
0
p
8
f
0
0
p
6
F
D
u
H
l
l
1
s
0
p
8
f
0
0
p
6
F
D
u
H
l
l
Installation guide Warranty card
Marcus Quick Mounting Bracket Installation
Suction Bracket & Quick mounting bracket
▲Type A: Marcus 3 + Standard Suction Bracket
Please notice that the direction of Suction handle faces forward the
windshield.
▲Type B: Marcus 3 + Quick mounting bracket + Suction Bracket
Please notice that the direction of Suction handle faces upper side.
First time installation
1
s
0
p
8
f
0
0
p
6
F
D
u
H
l
l
Best Area
Special Notice:
1.Vico-Marcus 3 applies unique designed Marcus car charger for auto
boot up. Please apply only VicoVation Marcus car charger to avoid any
damage.
2.Please notice that Marcus car charger is a unique design for Marcus
Special Note:
1.If there is safety airbag inside your car front pillar, please ask for
professional assistance. Try not to embed the cable on your own.
2.Please restore the rubber sealing after embedding power cable.
First time operation
1.Insert Micro SD card firstly.
(Please aware the direction of Micro SD
card data pins.)
2. Marcus 3 support Extreme HD 1296p
and High Speed Full HD 1080p 60fps
recording. Micro SD card under Class10
is forbidden.
Normal Recording Time Table (Not including 15 sets Emergency Record):
8GB
16GB
32GB
64GB
Video Bit Rate
1296p 30fps
45 mins
105 mins
222 mins
460 mins
18Mb/s
1080p 60fps
45 mins
105 mins
222 mins
460 mins
18Mb/s
2.After power on, device will boot up and enter into recording mode. The initial
3-second recording period is protected from stopping. To enter MENU is not
limited by these 3 seconds.
3.Please setup system time and format Micro SD card manually for the first
time operation.
4.To remove Micro SD card, please stop recording or power off firstly to
protect recording data.
5.Please use Micro SD card (SDHC/SDXC) with level Class10 only.
Mars3 V1.0
Note:
Marcus 3 uses standard Micro SD card slot format.
Marcus 3 becomes card reader (Slave device) in connection with PC by USB
cable. To operate Marcus 3, please connect it with cigar car charger or USB
power adaptor.
1080p 30fps
75 mins
166 mins
347 mins
710 mins
12Mb/s
Micro SD
720p 60fps
100 mins
215 mins
445 mins
910 mins
9Mb/s
720p 30fps
180 mins
375 mins
765 mins
1545 mins
6Mb/s
Mars3 V1.0
Main Display
Recording:
1.Under normal recording,
icons represent
(From upper left side):
Red dot recording sign/
Current Time/
Recording Size/
G-Sensor function sign/
Emerg. Rec. Numbers.
2.Icons in bottom side:
Emergency record/
Recording sign/
Menu/
Voice recording/ mute switch
Power ON/Off
User Interface:
1.Video settings
2.Function Settings
3.Display settings
4.Audio settings
5.Playback settings
6.System settings.
5/10
5/10
Settings detail
Special Notice:
1. GPS relative function can be only ac tivated
while GPS installed correct ly. GPS func tion
menu can be entered after G PS antenna recei ve
GPS signal.
2. Afte r booting, GPS function will be ac tivated
after G PS signal received.
After successful GPS positioning, a Blue Ar row will pop out at the top of
display to c onfirm GPS features are activated.
LDWS (Lane Departure Warning System):
When current speed reac h your set ting value (For examp le: 60km/h), Marc us 1
will notify drivers with Beep sound and alert Icon while lane departure.
FCWS (Forward Collision Warning System):
When current speed over 60km/h, Marcus 1 will not ify dr ivers with Beep sounds
and aler t Icon if distance bet ween car in front reaches 5~7 meters.
Page 2
1.After Marcus 3 power off, take out Micro SD card. Using Card adaptor or card
reader to connect with PC. Copy videos from SD card to PC to playback.
2.Marcus 3 can become a card reader when connecting with PC by USB cable
directly. When connecting PC by USB cable, please manually turn on Marcus 3.
Notice: Make sure the files are copied to PC HDD for playback. Otherwise, it
might not be smooth enough due to lack of transmission speed from SD card to
PC.
Marcus 3 store .MOV format with H.264 compression. Some built-in PC media
player might not support H.264 codec, causing unsmooth playback or no image.
Users can download other professional player to solve this problem.
Marcus 3 default video file is under 1920x1080 @ 30fps. Higher computing power
and graphic card requirement are necessary for PC environment.
Special Notice:If recorded video display on PC is not normal, users can use
Vico-Marcus 3 to playback video in SD card. This is the best way to first check
whether the video is corrupted or not. If the display on device itself is smooth, it
means the files are properly stored. You may double check PC environment for
correction.
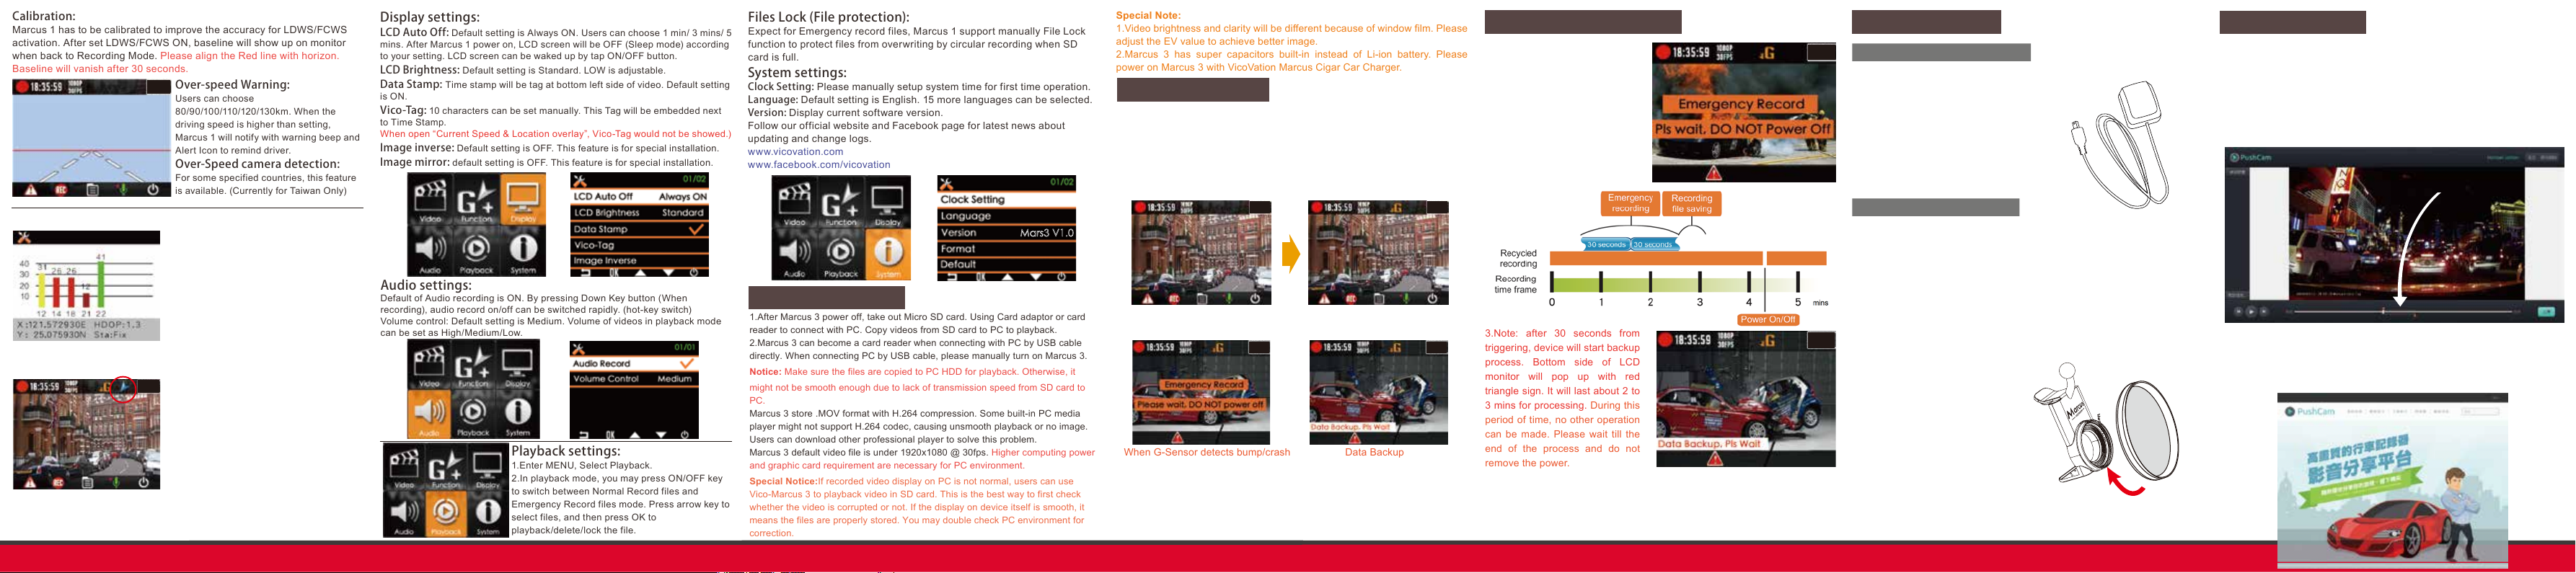
When G-Sensor detects bump/crash
Data Backup
3.Note: after 30 seconds from
triggering, device will start backup
process. Bottom side of LCD
monitor will pop up with red
triangle sign. It will last about 2 to
3 mins for processing. During this
period of time, no other operation
can be made. Please wait till the
end of the process and do not
remove the power.
Special Note:
1.Video brightness and clarity will be different because of window film. Please
adjust the EV value to achieve better image.
2.Marcus 3 has super capacitors built-in instead of Li-ion battery. Please
power on Marcus 3 with VicoVation Marcus Cigar Car Charger.
Calibration:
Marcus 1 has to be calibrated to improve the accuracy for LDWS/FCWS
activation. After set LDWS/FCWS ON, baseline will show up on monitor
when back to Recording Mode. Please align the Red line with horizon.
Baseline will vanish after 30 seconds.
Over-speed Warning:
Users can choose
80/90/100/110/120/130km. When the
drivin g speed is higher than setting,
Marcus 1 w ill notify wit h warning beep and
Alert Icon to remind driver.
Over-Speed camera detection:
For some specified countries, this feature
is available. (Currently for Taiwan Only)
Audio settings:
Default of Audio recording is ON. By p ressing Down Key button ( When
recording), audio record o n/off c an be switched rapidly. (hot-key switc h)
Volume control: Default set ting is M edium. Volume of videos in playback mode
can be set as High/ Medium/Low.
Playback settings:
1.Enter MEN U, Select Playback.
2.In playback mode, you may press ON/OFF key
to switch b etween Normal Record files and
Emergency Record files mode. Press arrow key to
select files, and then p ress OK to
playback/del ete/lock the f ile.
Display settings:
LCD Auto Off: Default setting is Always ON. Users can choose 1 min/ 3 mins/ 5
mins. Af ter Marcus 1 power on, LCD screen will be OFF (Sleep mode) acc ording
to your set ting. LCD screen c an be waked up by tap ON/OFF button.
LCD Brightness: Default setting is Standard. LOW is adjustable.
Data Stamp: Time stamp will be t ag at bot tom lef t side of video. Default setting
is ON.
Vi co-Tag : 10 characters can b e set manually. This Tag will be embedded next
to Time St amp.
When open “Current Speed & Locat ion overlay”, Vico-Tag would not be showed.)
Image inverse: Default setting is OFF. This feature is for special installation.
Image mirror: default setting is OFF. This feature is for special i nstall ation.
System settings:
Clock Setting: Please manually setup system time for first time operation.
Language: Default setting is English. 15 more languages can be selected.
Version: Display cur rent sof tware version.
Follow our official website and Facebook page for latest news about
updating and change logs.
www.vicovation.com
www.facebook.com/vicovation
Files Lock (File protection):
Expect for Emergency record files, Marcus 1 support manually File Lock
function to protect files from overwriting by circular recording when SD
card is full.
5/10
GPS Signal:
GPS Positioning requires at least 3
Normal satellite signals to accomplish.
As picture shown, there are f ive
satellites signal captured. Different color
represents different strength of GPS
signal.
Green: Great (40dB or above)
Yellow: Normal (30~ 40dB)
Red: Medium (20~30dB)
Dark Red: Bad (20dB or below)
Monitor will display Blue Arrow icon on
top to confirm the GPS positioning
successfully.
Special Notice:
5/10
Windshield film contains metal ingredient
or high buildings might affect GPS signal
receiving. Please kindly notice that if
monitor show Blue Arrow ic on while
install Marcus GPS module.
Or you can enter Menu → Function to
see the positioning status, to make sure
you capture more than 3 Normal satellite
signal (40 ~30dB Yellow color bar).
Various environment causes different
signal receiving, requiring different
positioning-accomplished time.
Playback video on PC
Mars3 V1.0
3 Axis Gravity Sensor
Marcus 3 has built-in G-Sensor which can detect accident bump/crash
and trigger emergency record automatically. To avoid any false alarm
during initial installtion, G-sensor function is defaulted as OFF. Please
install device properly first and then enter MENU to activate this function
manually.
When G-Sensor is activated, detection will be started in 15 seconds to
avoid false alarm.
5/10
After 15 seconds of each boot up, G-Sensor will be activated with “G”
icon on the top side of LCD display.
5/10 5/10
Special Note:
After 30 seconds upon detection, device will start backup process. Bottom
side of LCD monitor will pop up with red triangle signal. It will last about 2 to
3 mins. During this period, no other operation can be made. Please wait till
the end of processing and do not remove power.
5/10
Emergency Record Function
1.You may manually press orange
button to trigger emergency
record when emergency happens.
Bottom side of LCD monitor will
pop up with red triangle signal.
2.Marcus 3 will pack 30 seconds
before and after you trigger the
emergency button (total 1 min
video) into emergency folder. The
file will be protected from circular
recording.
Special Note: if power is removed during emergency record or backup process, device will
continue to finish this process in the next power up. It will take longer time to finish
processing. Please keep patient. Please DO NOT repeatedly remove power when triangle
signal pops up. It will extend processing time by abnormal power off during Emergency
Record/Data backup.
5/10
5/10
Optional Accessories
(Optional) Marcus GPS mouse
New add function with Marcus GPS mouse installed:
1. LDWS (Lane Departure Warning System).
2. FCWS (Forward Collision Warning System).
3. GPS Tracking, work with VicoPlayer.
Download from www.vicovation.com
4. Over Speed warning system.
5. GPS location/Speed info overlay on video.
(Optional) Marcus CPL filter
Marcus Quick mounting bracket is compatible with standard 52mm
CPL filter. Users may purchase optional Marcus CPL filter or other
compatible one.
Notice: CPL filter would lower a little bit brightness of image. Please
adjust it especially for night-time record. You can
1. Adjust CPL filter to adjust deflection angle
2. Set EV value
3. Disassemble CPL filter
Install CPL filter can reduce reflection effect from windshield, getting
more saturated and beautiful video.
If there is any question, please don’t hesitate to contact us.
Email: [email protected]
Facebook: www.facebook.com/vicovation.
Marcus 3+PushCam
VicoVation crossover PushCam Service, providing PushCam Platform
for Dash Cam video uploading/sharing.
Download PushCam Player (Support Windows & iOS) from PushCam
website. Take out SD card from Marcus 3 and connect with PC. Open
the video files by PushCam Player. Edit your one minute clip (Or 1 min
emergency recording) and then upload to PushCam. Share/backup the
special scenery captured when driving. Video witness also helps to
clarify accident causes.
1 Minute Clip
Special Notice:
1.PushCam platform limit video clip to be 1 min when upload. Please
edit the1 min video by the Tool Bar below the PushCam Player.
2.Users are able to upload one minute Emergency recording easily
without any additional edition.
3.Log in PushCam by your Facebook or Google+ acc ount.
 Loading...