

Page 1
2
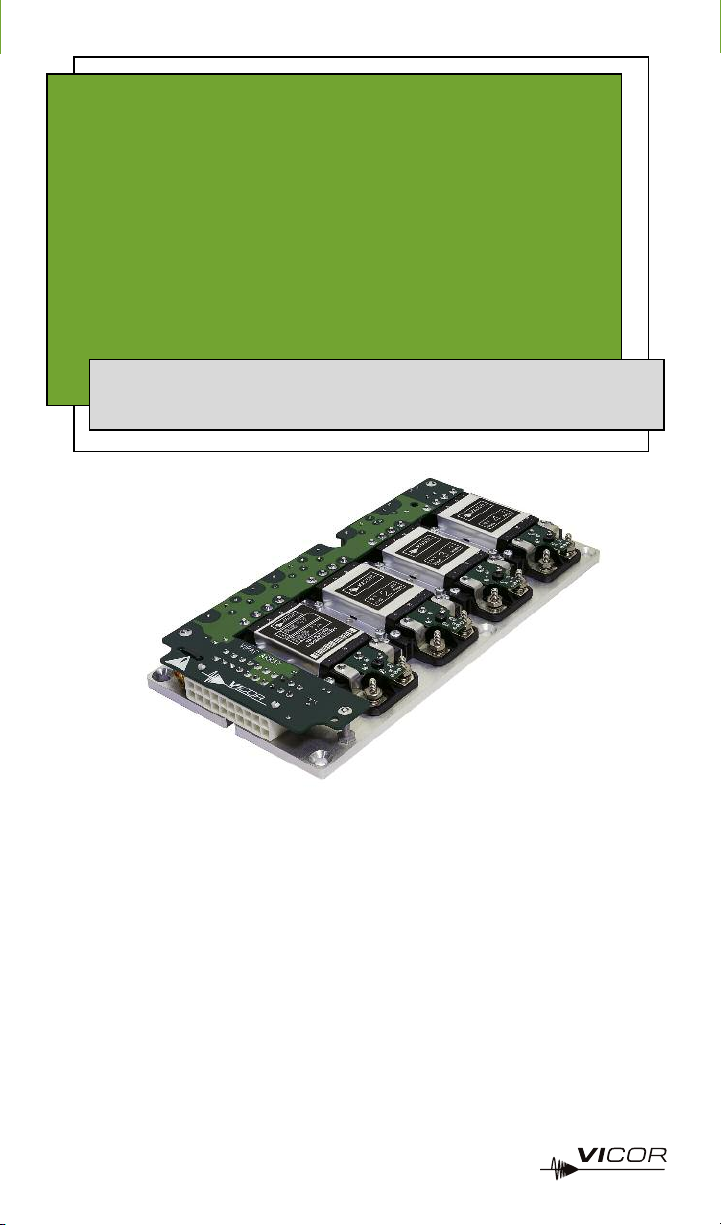
VIPAC Array
Family
of DC-DC Converters
Up to 750 Watts
Description & Installation Guide
Product Description
The VIPAC Array is a highly flexible system of DC input, power building-blocks that can
be configured with as many as four user-definable outputs on a low profile, coldplate
chassis. VIPAC Array offers the convenience of a prepackaged, chassis mount solution
with the performance and power density of Vicor’s Maxi, Mini, Micro, DC-DC converters.
Using Vicor’s PowerBench design tools, designers are able to quickly specify VIPAC
Arrays with standard inputs of 24, 28, 48, 72, 110,150, 300 or 375 Vdc and standard
outputs from 2 to 48 Vdc at power levels up to 600 Watts per output. A total of 8
standard chassis configurations offers the user a choice of power and mechanical options
to fit any budget or design. Short cycle time and rapid delivery make VIPAC Array a
valuable tool for power system prototyping and development efforts as well.
Page 2

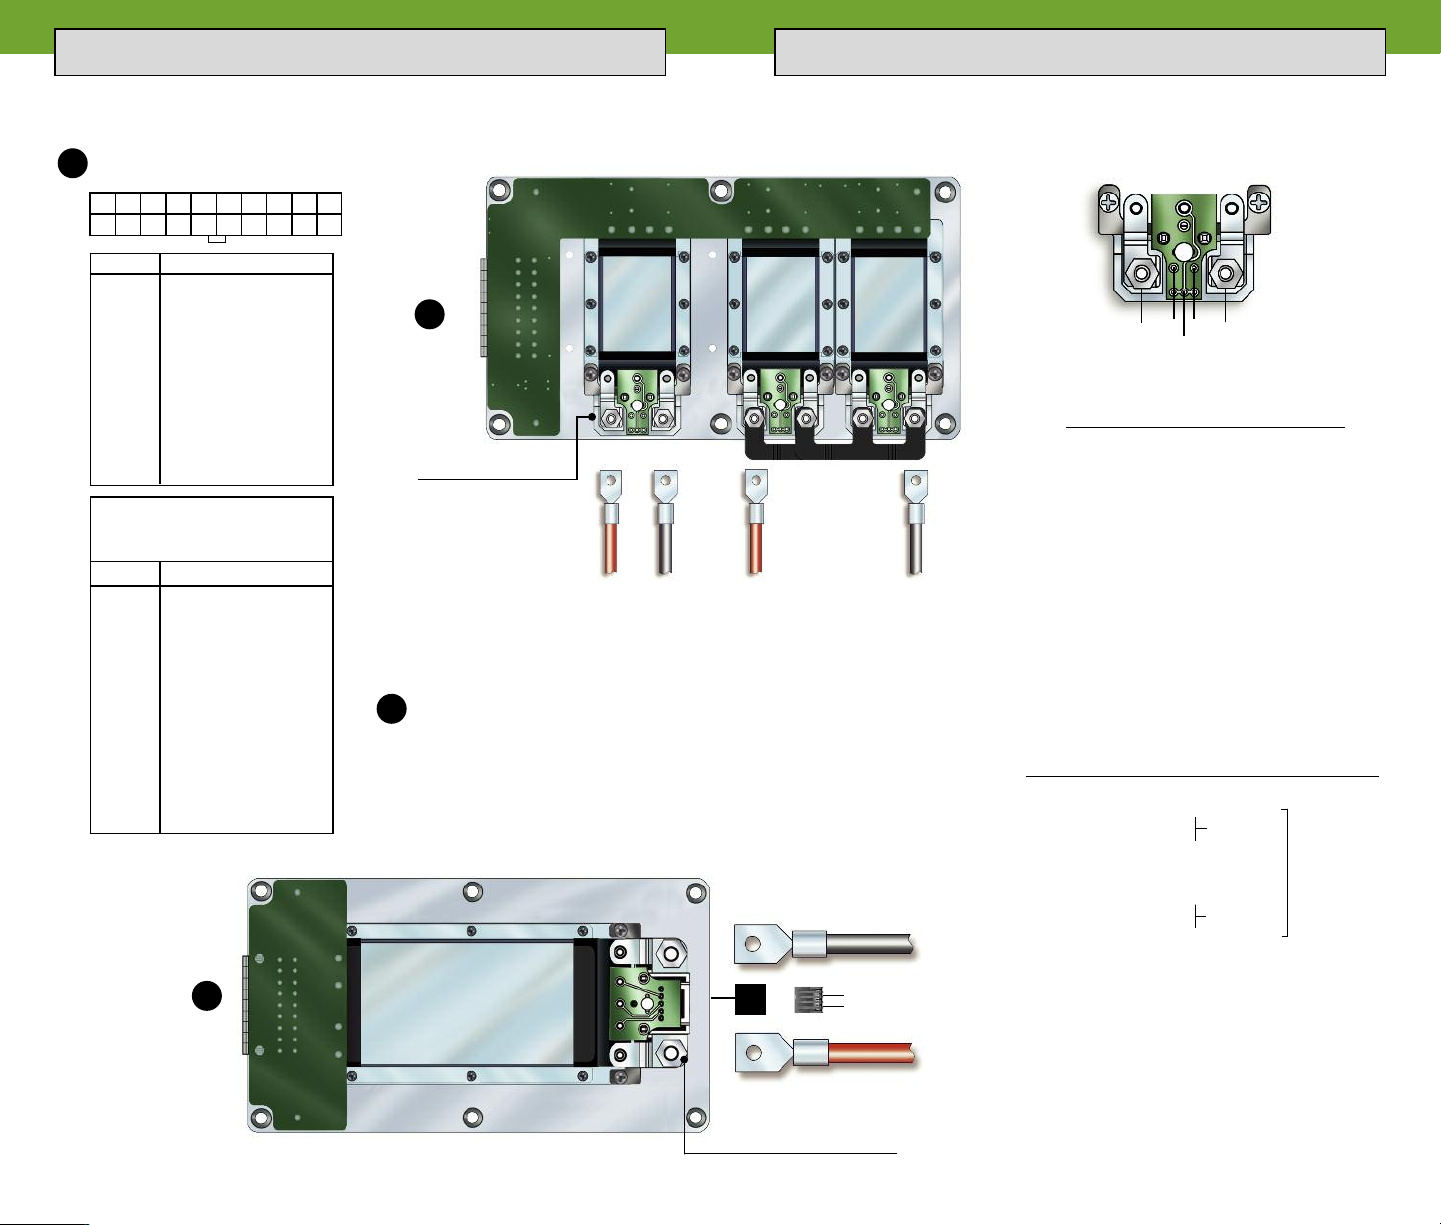
Product Overview Application Tips
32
VIPAC Arrays are ideal for use in distributed and modular power systems where power
density and reliable operation are critical. A current share option is available on single
module configurations enabling Arrays of identical output voltage and current ratings to
be used in applications requiring either redundant operation or kilowatts of power.
The 300 and 375 Vdc input versions can be coupled to a bulk AC Front-end to create a
modular, scalable power supply serving a variety of power architectures from centralized
to distributed. VIPAC Arrays include internal fusing, a global enable/disable function and
connectorized input and output terminations to speed system installation while a
versatile coldplate chassis simplifies thermal management and mounting.
A
E
B
C
D
Remote Sense
A remote sense feature is provided on outputs configured with Mini or
Maxi sized DC-DC converters. The output sense connections must be
terminated either locally or remotely and should not be left open. VIPAC
Arrays provided with the optional LugMate connectors are configured
for local sensing via removable jumpers installed at the factory. The
jumpers will need to be removed if access to the secondary control
function is made via mating connector 16385 and connections will
need to be established for local or remote sensing.
Wire Routing
Avoid routing wires over the VIPAC Array Power System.
Do not bundle Input and Output leads together.
Parallel Outputs
The VIPAC Array can be configured with parallel modules for increased
power or redundancy. When output terminations other than the
LugMate are specified the user must properly connect the output and
sense terminals. At no time operate a paralleled output with a load
applied to only one module! (See Output Connections)
A D
Vicor’s Maxi, Mini, Micro
DC-DC Converters
Output Voltages 0.5 – 48 Vdc
50 – 600 W / Output
(1/4 Brick Modules Shown)
B
Choice of Output Termination
LugMate
PlugMate
C
Low Profile Coldplate
Wide Operating Temperature Range
Up to 95°C Chassis
Up to 65°C Ambient
* Note: 24, 28, 48, 72, 110, & 150 V input VIPAC Arrays are designed primarily for military COTS
and industrial applications and do not carry safety agency approvals.
Standard Input Voltage Ranges
10 – 36 Vdc*
18 – 36 Vdc*
36 – 75 Vdc*
43 – 110 Vdc*
66 – 154 Vdc*
100 – 200 Vdc*
180 – 375 Vdc
250 – 425 Vdc
See pp. 4 – 7 for input connections.
E
Features
Optional current share (see overview)
Onboard fusing
Page 3
4 5
Input /Output Connections Input /Output Connections
Input Connector
1
11
Pin # Function
1-4 –Vin
5-7 +Vin
8 NC /PR bus
9 PE protective earth
10 – Remote enable
11-13 –Vin
14-17 +Vin
18 NC /PR bus
19 PE protective earth
20 + Remote enable
VA-J & VA-K configurations only
(300 & 375 Vin single Maxi &
single Mini)
Pin # Function
1-3 –Vin
4-6 +Vin
7 NC
8 NC /PR bus
9 PE protective earth
10 – Remote enable
11-13 –Vin
14-16 +Vin
17 NC
18 NC /PR bus
19 PE protective earth
20 + Remote enable
To disable output(s)
apply +5 Vdc
between pins
10 and 20 in the
polarity indicated
10
20
#4-40 torque 4 in. lbs.
Discrete Output
Mating Connector
Vicor part # Amp part #
Housing 24795 2-794657-0
Contacts 24796 1-106529-2
Kit 24828
NOTE: Contacts accept #22-#18 Gage Wire.
1
5
Parallel Output
Shown with the output(s) of two
modules connected in parallel
using factory installed bus bar.
*
1
J4
5
P/N 16385
Factory Installed Micro LugMate
3
1
Solder
Pin # Pad Function
1 – Vout
Rd Trim Down
SC Secondary Control
Ru Trim Up
3 + Vout
Consult design calculator for Rd/Ru trim resistor
values located at vicorpower.com.
Factory Installed
Pin # Conn. Function Mating Conn.
1 – Vout
J4-1 – Vout
J4-2 – Sense
*Removable
Jumper
J4-3 Secondary Control P/N 16385
J4-4 + Sense
J4-5 + Vout
*Removable
Jumper
5 + Vout
*Removable jumpers in J4 are factory installed for
local sensing. For remote sensing the +Sense pins
should be tied to the same point on the +Out power
bus; the -Sense pins should be tied to the same point
the -Out power bus.
#10-32 torque 16 in. lbs.
Page 4

6
7
Parallel/Redundant Connections Parallel/Redundant Connections
Input Connector
(View looking into J1)
1
11
Pin # Function
1-4 –Vin
5-7 +Vin
8 NC /PR bus
9 PE protective earth
10 – Remote enable
11-13 –Vin
14-17 +Vin
18 NC /PR bus
19 PE protective earth
20 + Remote enable
VA-J & VA-K configurations only
(300 & 375 Vin single Maxi &
single Mini)
Pin # Function
1-3 –Vin
4-6 +Vin
7 NC
8 NC /PR bus
9 PE protective earth
10 – Remote enable
11-13 –Vin
14-16 +Vin
17 NC
18 NC /PR bus
19 PE protective earth
20 + Remote enable
To disable output(s) apply +5 Vdc
between pins 10 and 20 in the polarity
indicated
10
20
PR bus leads should be connected
to like pin #’s on redundant arrays
when equipped with optional
current share transformer.
Factory Installed
Mini/Maxi LugMate
1
J4
*
1
5
P
/N 16385
J4
1
5
P/N 16385
*
5
L
O
A
D
1
*
1
J4
5
P/N 16385
5
#10-32 torque 16 in. lbs.
Pin # Conn. Function Mating Conn.
1 – Vout
J4-1 – Vout
J4-2 – Sense
*Removable
Jumper
J4-3 Secondary Control P/N 16385
J4-4 + Sense
J4-5 + Vout
*Removable
Jumper
Mating Connector
Vicor part # Amp part #
Housing 24795 2-794657-0
Contacts 24796 1-106529-2
Kit 24828
*Removable jumpers in J4 are factory installed for local sensing. For remote
sensing the +Sense pins should be tied to the same point on the +Out power
bus; the -Sense pins should be tied to the same point the -Out power bus.
** There should be one master module, this is realized by choosing one
module to be the master and shorting the SC to –S on the other module.
Units configured from the factory as paralled will already have this
configured.
Page 5

8 9
14
58
I
1
9
10
18
1
12
13
24
PlugMate Output Connectors General Information
PlugMate
(Factory Installed Option)
Micro PlugMate
Vicor P/N 25073
in # Function Pin # Function
P
1 +Vout 5 +Vout
+Vout 6 N/C
2
–Vout 7 SC
3
–Vout 8 –Vout
4
Mating Connector Amp. P/N Vicor P/N
Housing TYC-794657-8 25056
Pin 1-106529-2 24796
Kit 25073
Mini PlugMate
Vicor P/N 25067
1 +Vout 10 +Vout
2 +Vout 11 +Vout
3 +Vout 12 +Vout
4 N/C 13 +S
Pin # Function Pin # Function
5 N/C 14 SC
6 N/C 15 –S
7 –Vout 16 –Vout
8 –Vout 17 –Vout
9 –Vout 18 –Vout
Mating Connector Amp. P/N Vicor P/N
Housing TYC1-794657-8 25050
Pin 1-106529-2 24796
Kit 25067
Pin # Function Pin # Function
1 +Vout 13 +Vout
2 +Vout 14 +Vout
3 +Vout 15 +Vout
4 +Vout 16 +Vout
Maxi PlugMate
Vicor P/N 25061
5 +Vout 17 +Vout
6 N/C 18 +S
7 SC 19 –S
8 –Vout 20 –Vout
9 –Vout 21 –Vout
10 –Vout 22 –Vout
11 –Vout 23 –Vout
12 –Vout 24 –Vout
Mating Connector Amp. P/N Vicor P/N
Please Note:
VIPACs that contain multiple modules configured as a single output
(paralleled for power or redundancy) MUST have their Outputs and
Sense connected to each other at the load.
DO NOT OPERATE A PARALLEL CONFIGURATION WITH ONLY ONE MODULE CONNECTED.
Additi onally o ne module must be designated as “Master” by having all other modules configured
as “Boosters”. Boosters are c reated by shorting the S C pin t o –S.
Housing TYC2-794657-4 25044
Pin 1-106529-2 24796
Kit 25061
Trimming
Provisions have been made on PlugMate output connectors for adding
resistors to trim the output voltage up or down. Consult the design
calculator, for Rd/Ru trim resistor values, located at vicorpower.com.
Rd = Trim Down
Ru = Trim Up
Suggested Wire Gauge
Function Wire Gauge Application
DC Input/Output Leads #20 0 A - 3 A
#18 4 A - 6A (PlugMate)
#16 7 A - 10 A
#14 11 A - 15 A
#12 16 A - 25 A
#10 26 A - 40 A
#8 41 A - 65 A
#6 66 A - 104 A
#4 105 A - 160 A
Page 6

10 11
VIPAC Array Configurations VIPAC Array Configurations
VA-A
Single or Dual Output Models
Up to 600 Watts
VA-B
Dual or Triple Output Models
Up to 600 Watts
VA-C
Dual or Triple Output Models
Up to 450 Watts
VA-E
Dual or Triple Output Models
Up to 750 Watts
VA-F
Dual, Triple or Quad Output Models
Up to 600 Watts
VA-G/K
Single Output
Up to 300 Watts
Current share option is available for
redundant or higher power applications.
VA-D/J
Single Output
Up to 600 Watts
Current share option is available for
redundant or higher power applications.
VA-H
Single or Dual Output Models
Up to 300 Watts
Page 7

12
nformation furnished by Vicor is believed to be accurate and reliable. However, no
I
esponsibility is assumed by Vicor for its use. No license is granted by implication or
r
otherwise under any patent or patent rights of Vicor. Vicor components are not designed to be
used in applications, such as life support systems, wherein a failure or malfunction could
result in injury or death. All sales are subject to Vicor’s Terms and Conditions of Sale, which
are available upon request. No user serviceable components, contact Vicor to arrange for
repair or replacement. Specifications are subject to change without notice.
Visit the Vicor website at:
vi c orpo w er. c om
Vicor Corporation
25 Frontage Road
Andover, MA, USA 01810
Tel: 800-735-6200
Fax: 978-475-6715
email
Customer Service:
custserv@vicorpower.com
Technical Support: apps@vicorpower.com
P/N 28075 Rev.1.6 10/13
 Loading...