

Page 1

Cool-Power
®
PI33XX-2X
PI33XX-2X I2C Digital Interface Guide
Section
Page
Program Capability………………………….…..
1
Fault Telemetry…………………………………….
1
I2C Communication Compatibility ………..
1
Interface Software Tool………………………..
1
USB Interface Hardware……………………….
2
Addressing & Register Mapping……………
3
Software Installation and Operation…….
4
Fault Telemetry Command Description..
8
Configuration Programming…………………
12
Programming Initial Conditions…………...
16
Configuration Examples
Sync Delay…………………………....…...…….
17
Enable polarity……………….………………..
19
Setting Kill Bit……………….……………..…..
20
Error Messages…………………………………….
21
Notes…………………………………………………...
22
Description
The PI33XX-2X I2C Digital Interface Guide provides an
overview of how to read and write to the user
accessible registers within the PI33XX-2X series. This
guide details use of the Picor I2C Digital Interface
Software Tool coupled with a USB based I2C
hardware interface device. Information is also
provided for I2C communication protocol using
generic tools and/or embedded hardware.
Contents
All settings are one time programmable except for
the Vout margining which settings are stored in
volatile memory only and not retained by the device.
Fault Telemetry
The PI33XX-2X can report when a fault is detected
via the I2C interface. Reported faults include:
Input Under Voltage Lock Out (UVLO)
Input Over Voltage Lockout (OVLO)
Output Voltage Over Voltage
Over-Temperature Protection (OVP)
Slow Current Limit
Fast Current Limit
VCC (internal to the SIP) Undervoltage
I2C Communication Compatibility
The PI33XX-2X is Hardware compatible with the NXP
I2C Bus Specification Version 2.1 Standard Mode
(100kHz) January 2000 for all bus timing and voltage
resistors levels up to 5.5V maximum. The PI33XX-2X
is configured as an I2C slave device with no internal
bus pull up or pull down.
Program Capability
The PI33XX-2X devices provide an I2C digital
interface that enables the user to program the EN
pin polarity (from high to low assertion) and input
switching frequency synchronization phase/delay.
Margining the output is also available via the I2C
interface.
Interface Software Tool
The Picor Buck GUI software tool allows quick access
to the one time programmable parameters and user
adjustable parameters. The one time user
programmable parameters include enable (EN)
polarity, synchronization (SYNCI) delay, and edge
trigger. User adjustable parameters include output
margin (MRGN) level percentage and the ability to
clear the fault (FLT) register. This software also
provides the user with the ability to read and decode
fault telemetry information.
vicorpower.com Rev 1.0 Cool-Power®
800 735.6200 11/2012 Page 1 of 22
Page 2
PI33XX-2X I2C Digital Interface Guide
SCL
SDA
VCC
(not used)
SGND
SCL
SDA
VCC
(not used)
SGND
The Picor Buck GUI operates under the Windows
or XP (Service Pack 3) environment. JAVA
TM
version
TM
1.5 or greater 32 bit version is required. This
software has been tested using Windows 7 32 bit
and 64 bit and Windows XP with Service Pack 3.
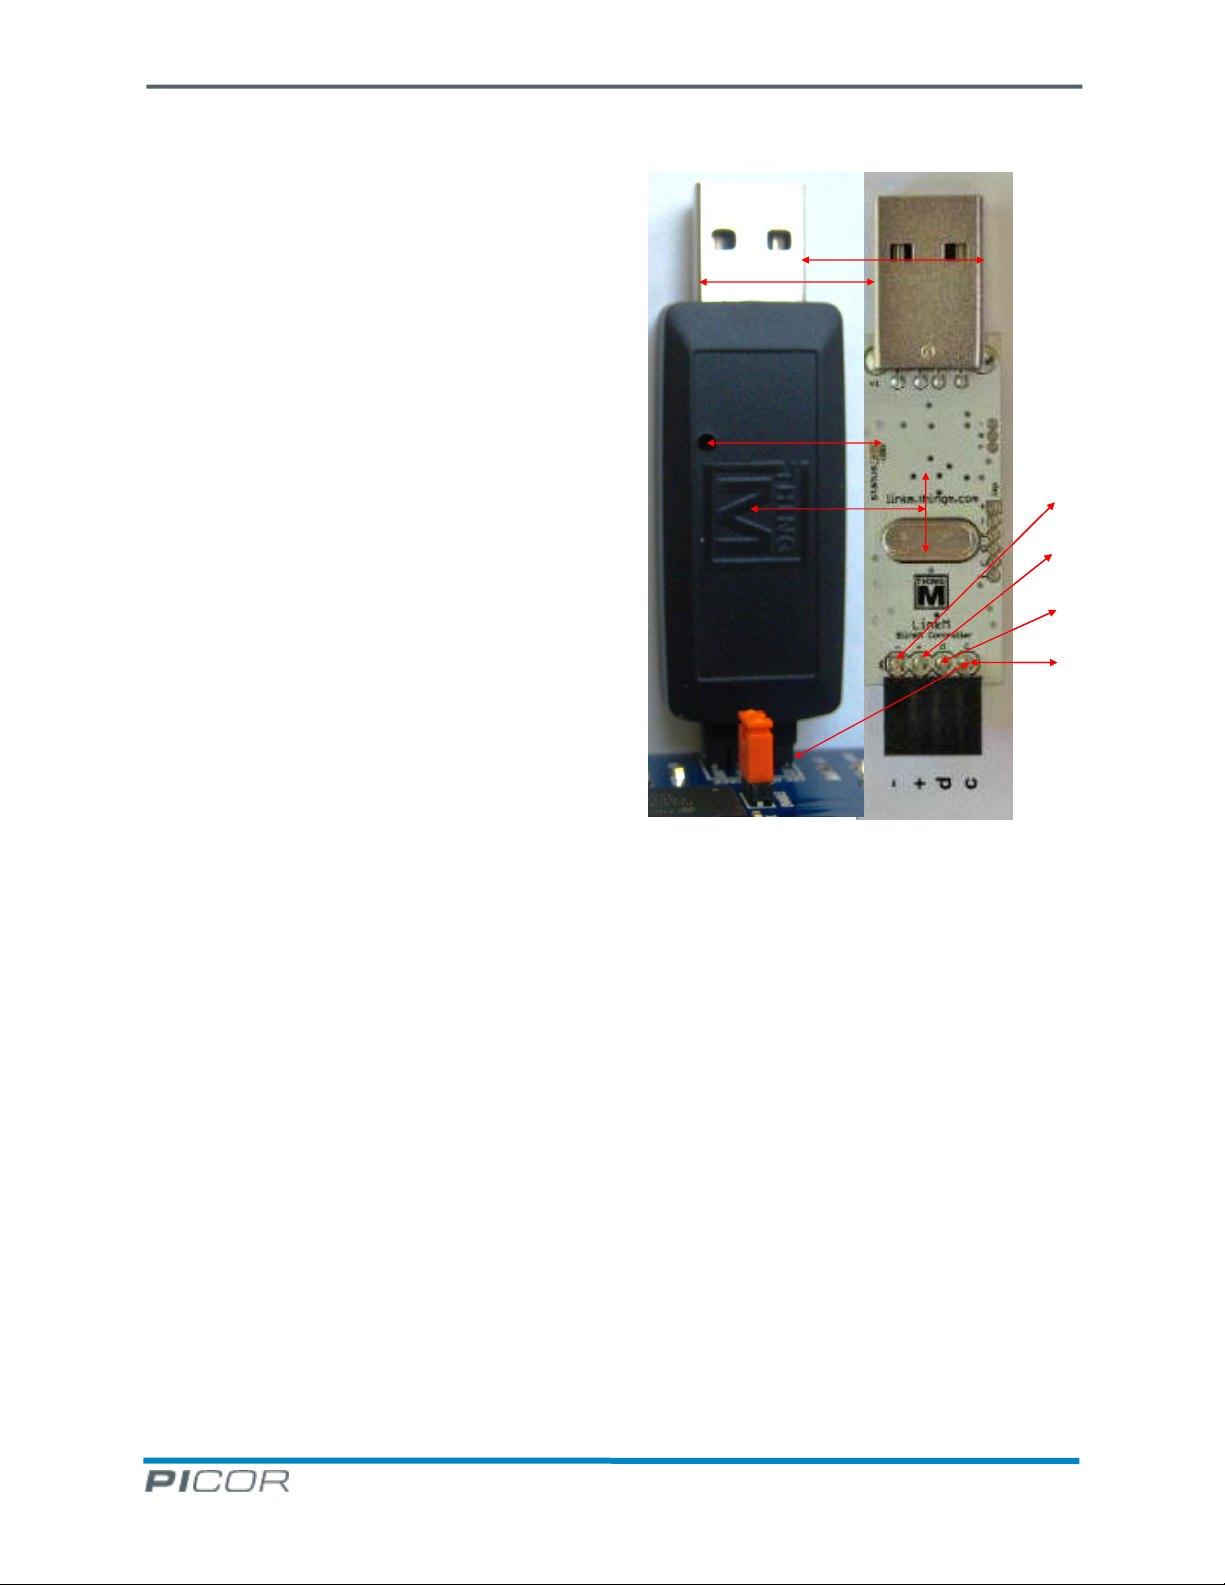
USB Interface Hardware
The Picor Buck GUI software is designed to work
with the LinkMTM USB to I2C interface device
manufactured by ThingM. Information about the
LinkM can be found at http://linkm.thingm.com/. A
Windows based PC is required with a dedicated USB
port. The use of USB expansion ports; especially
those that are heavily loaded, is not recommended.
The LinkM interface can be mounted directly to the
PI33XX-2X Evaluation Board using a straight 4 pin
header (see Figure 1). Users who wish to connect the
LinkM in this manner will need to use a male to
female USB extension cable. This method works very
well and is the preferred method. Other users may
wish to probe the I2C bus or connect to it with ball
clips. For this option, the LinkM datasheet describes
the recommended connectors to build such a cable.
7
Figure 1 - LinkM with Case Removed
vicorpower.com Rev 1.0 Cool-Power®
800 735.6200 11/2012 Page 2 of 22
Page 3
PI33XX-2X I2C Digital Interface Guide
A[6]
A[5]
A[4]
A[3]
A[2]
A[1]
A[0]
R/W
ADR1
ADR0
HEX
DEC
1 0 0 1 0 0 0 X 0 0 48
72 1 0 0 1 0 0 1 X 0 NC
49
73
1 0 0 1 0 1 0 X 0 1 4A
74
1 0 0 1 0 1 1 X NC 0 4B
75 1 0 0 1 1 0 0 X
NC
NC
4C
76
1 0 0 1 1 0 1 X NC 1 4D
77 1 0 0 1 1 1 0 X 1 0
4E
78 1 0 0 1 1 1 1 X 1 1 + NC
4F
79
I2C Hardware Interface Signals
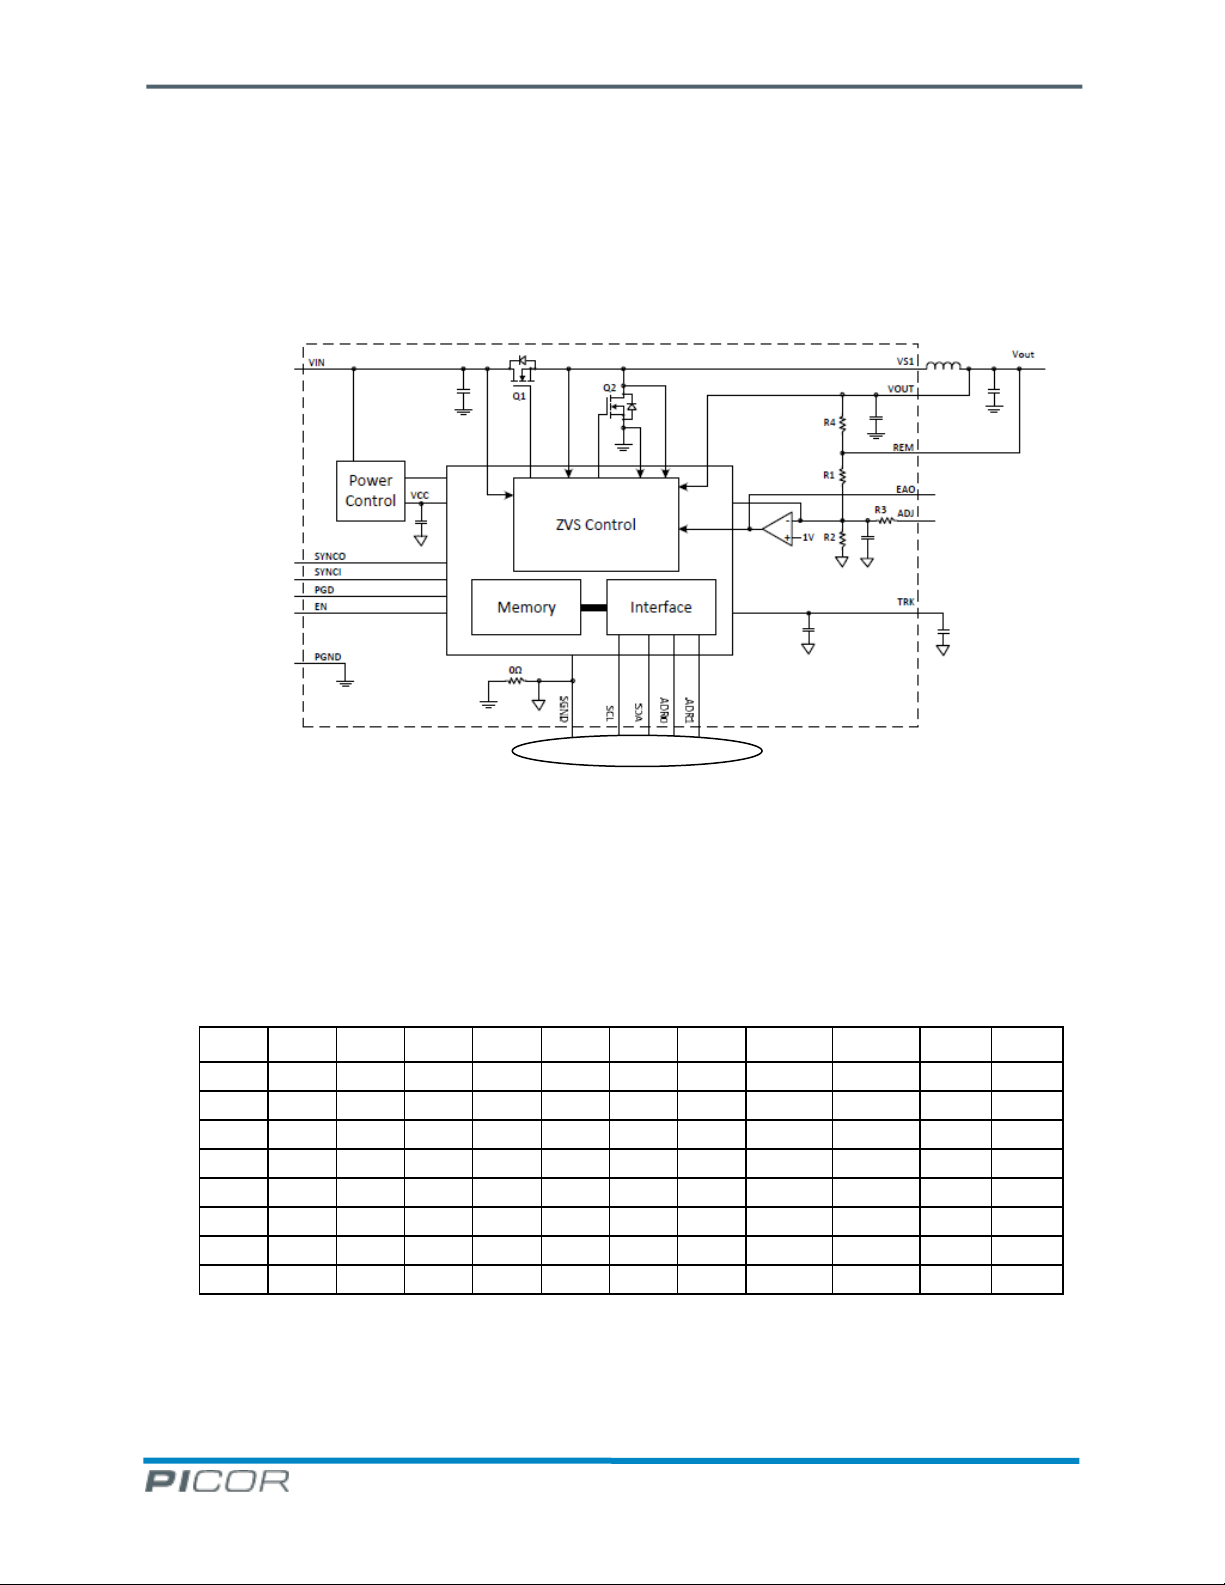
Addressing & Register Mapping
Figure 2 shows the PI33XX-2X I2C hardware interface. The PI33XX-2X supports floating addressing so that two
address lines allows for up to 8 programmable addresses. The address is 7 bit with the read/write bit not included.
Table 1 shows the address range that can be achieved using all possible combinations of ADR0 and ADR1. Bits A[6]A[3] are fixed internally and may not be changed.
Figure 2 - PI33XX-2X Block Diagram Showing I
The least significant 3 bits; A[2]-A[0], will assume the values in the table based on the decoding of ADR1 and ADR0.
A zero or one indicates the logic strength of the bit and “NC” indicates that the pin is floating or not connected.
The HEX column indicates the final address in hexadecimal, while the DEC column is the decimal address value.
Table 1 - Addressing Options (logic 1 => 1V)
2
C Hardware Interface
vicorpower.com Rev 1.0 Cool-Power®
800 735.6200 11/2012 Page 3 of 22
Page 4
PI33XX-2X I2C Digital Interface Guide
Name
Address HEX
# Bits
Description
TSTMDE[2:0]
18
3
Test mode register used for burning bits into non-volatile
memory
MRGN[3:0]
19
4
Volatile register for output voltage margining.
FLT[7:0]
1A
8
Fault Register read only
FREG_CLR
1B
0
Register for clearing the Fault Register-writing address
clears register.
ENA_POL
20
1
EN pin polarity programming bit
SYN[3:0]
21
4
SYNC programming. SYN[3]= SYNC polarity
KBIT2
22
1
User kill bit for SYN[3:0] and ENA_POL - can not be
reversed. Register is write only, can not be read
Table 2 – User Accessible Registers
Software Installation and Operation
Users downloading the Picor Buck GUI should save the compressed file in a desired directory. The user should
unzip the compressed file and run the executable installation file “PicorBuckGuiFull.exe”. The installer will then
install the Picor Buck GUI in either the default Programs directory or to a directory specified by the user. Once the
software is installed, the user should next plug in the LinkM into a dedicated USB port. The LinkM will detect and
use a valid driver without the need of installing one. If the LinkM device is not detected, the user should consult
the LinkM homepage at http://linkm.thingm.com/. If the LinkM is not installed, the Picor Buck GUI will not start
and an error message will be generated like the one shown in Figure 3.
Figure 3 - Error message due to missing LinkM upon software start
Successful installation of the LinkM Interface should result in a successful start up screen of the Picor Buck GUI as
shown in Figure 4. First a dialog box will pop up indicating proper detection of the LinkM. When the user clicks the
“OK” button, that box will disappear. The Picor Buck GUI program screen will appear as shown in the bottom half
of Figure 4.
vicorpower.com Rev 1.0 Cool-Power®
800 735.6200 11/2012 Page 4 of 22
Page 5

PI33XX-2X I2C Digital Interface Guide
Figure 4 - LinkM Detection Followed by Picor Buck GUI Main Screen
After the user observes a successful main screen like the one shown in Figure 4 and the LinkM is installed to the
target board as shown in Figure 1, it is possible to use the Picor Buck GUI to monitor and configure the PI33XX-2X.
The target PI33XX-2X unit should be powered on using the proper input voltage value and enabled by the user.
Failure to apply input voltage will result in the error message shown in Figure 28 (see Picor Buck GUI Error
Messages Section) upon pressing any of the “soft” buttons on the screen. The LinkM should not be removed or
vicorpower.com Rev 1.0 Cool-Power®
800 735.6200 11/2012 Page 5 of 22
Page 6

PI33XX-2X I2C Digital Interface Guide
FLT[7]
FLT[6]
FLT[5]
FLT[4]
FLT[3]
FLT[2]
FLT[1]
FLT[0]
0
OTP
FAST_ IL
SLOW_IL
VOUT_HI
OVLO
UVLO
VCC_UV
installed with the power already applied to the PI33XX-2X. Always power down the PI33XX-2X prior to installing or
removing the LinkM.
The following information is intended to provide the user with a description of the various “soft” buttons and user
menus available in Picor Buck GUI.
The “File” menu provides “Exit” as the only option available when left clicking on it. If the user chooses “Exit”, a
dialog box will pop up to allow the user to confirm their selection. If “Yes” is chosen, the GUI will close and Picor
Buck GUI will terminate. If “No” is selected, the user will be returned to the main program without exiting the GUI.
The “Help” menu provides the current revision of Picor Buck GUI. There is no interactive user help or search utility
provided at this time, although there may be expanded help facilities in the future build releases of the software.
The “Address” menu will produce a drop down dialog box for the user to be able to select the decimal address of
the PI33XX-2X determined by the ADR0 and ADR1 decodes in Table 1. For example, if the PI33XX-2X unit has both
ADR0 and ADR1 floating or not connected, the slave address will be 76 decimal or 4C. Configuring ADRO and ADR1
allow for eight addressable locations from 72d to 79d or 48h to 4Fh.
The “FAULT” button allows the user to read the PI33XX-2X fault telemetry information. The fault register is 8 bits
wide with the most significant bit set to logic 0 always. The gray indicator panels for each fault on the Picor Buck
GUI display will illuminate bright red to indicate the decoded fault(s) for the user, so they don’t have to refer to
Table 3 for the decoded value. In addition, the binary value of the register will be displayed in the “FAULT”
window.
Table 3 - Fault Register Assignments
The PI33XX-2X fault logging only occurs when the controller is in normal operation mode. After a fault is detected
and assessed, the fault is latched into the register so long as the controller Vcc is active and above the minimum
threshold. The controller will take the appropriate action to protect the PI33XX-2X and system based on the type
of fault. If for example, the input voltage is high enough to power the controller but below the minimum under
voltage lock out threshold, the controller will prevent the unit from enabling and remain in a low power state.
Since it has not entered operate mode, the UVLO fault will not be logged. If the input voltage is higher than the
under voltage lock out threshold but drops to zero, the fault will remain latched as long as there is Vcc to the
controller. Once the controller Vcc dips below the minimum value, the fault data will not remain valid. The fault
register will be cleared upon power on reset. If Vcc remains after a logged fault, the fault register must be cleared
in order to log any new events. A description of the logged faults is as follows:
vicorpower.com Rev 1.0 Cool-Power®
800 735.6200 11/2012 Page 6 of 22
Page 7

PI33XX-2X I2C Digital Interface Guide
FLT[0] – VCC_UV; if this bit is set, it indicates that the internal power supply for the PI33XX-2X has gone into under
voltage.
FLT[1] – UVLO; if this bit is set, the indication is that the input voltage decreased below the under voltage lock out
threshold (UVLO) at some point while the unit was in operate mode. The UVLO threshold is defined as the
minimum value required for a PI33XX-2X to be able to meet all specified parameters of operation.
FLT[2] – OVLO; if set indicates that the input voltage exceeded the over voltage lockout threshold (OVLO) at some
point while the unit was in operate mode. The OVLO threshold is that value where the input voltage is too high for
a PI33XX-2X to be able to meet all specified parameters of operation.
FLT[3] – VOUT_HI; if this bit is set, it indicates that the error amplifier input was higher than it should be for the
programmed output voltage during operate mode, indicating that the output voltage may be too high.
FLT[4] – SLOW_IL; if this bit is set, it indicates that the error amplifier output was at the positive rail for more than
1 ms during operate mode. This means that the load current demand was higher than the maximum output
current available from the PI33XX-2X.
FLT[5] – FAST_IL; if this bit is set, it indicates that the peak current in the output inductor was higher than the
maximum peak current allowed during operate mode. It is an indicator of output short circuit or inductor failure.
FLT[6] – OTP; if this bit is set, it indicates that the PI33XX-2X internal temperature exceeded the maximum
temperature for safe operation during operate mode and that the PI33XX-2X shut down to prevent damage.
The “Clear” button allows the user to clear the PI33XX-2X fault telemetry information.
The “ENA POL” button allows the user to read the EN polarity by left clicking on it. Changing the polarity can be
accomplished by entering the desired value in the dialog box and then left clicking the “BURN” button. The Picor
Buck GUI will then instruct the user for the remaining steps. The burn function is irreversible and requires careful
consideration. For that reason, further details can be found in the section “Configuration Programming”
The “SYNC” button allows the user to read the SYNC polarity and delay settings by left clicking on it. Changing the
polarity can be accomplished by entering the desired value in the dialog box and then left clicking the “BURN”
button. The Picor Buck GUI will then instruct the user for the remaining steps. The burn function is irreversible and
requires careful consideration. For that reason, further details can be found in the section “Configuration
Programming”
The “KILL BIT2” button allows the user to prevent further changes to any programmed register value when used in
conjunction with the “BURN” button. The burn function is irreversible and requires careful consideration. For that
reason, further details can be found in the section “Configuration Programming”
The “MARGIN” button operates using volatile memory. Any changes made to this register are dynamic and will
change as soon as the command is sent. The user simply enters the value they wish to margin and then clicks
margin. Any value sent to this register will be lost as soon as power is removed. Note that margining down 20% or
more in one step may cause a VOUT_HI fault, which is a normal condition.
vicorpower.com Rev 1.0 Cool-Power®
800 735.6200 11/2012 Page 7 of 22
Page 8

PI33XX-2X I2C Digital Interface Guide
MRGN[3:0]
% V(OUT)
1100
-20
1101
-15
1110
-10
1111
-5
0000
0
1000
+5
1001
+10
1010
+15
1011
+20
Table 4 - PI33XX-2X Margin Register Assignments
Fault Telemetry Command Structure
The PI33XX-2X command structure is always a 2 byte write and a 1 byte read following the start condition and the
base address when using Picor Buck GUI and the LinkM interface. The second data byte is either 00h or additional
data based on the command being sent. Figure 5 is an example of an I2C bus command to read the fault register
and it can be implemented using the Picor Buck GUI by left clicking the “FAULT” button. In a similar fashion, the
actual fault register can be read from a generic I2C device as shown in Figure 6 by sending the commands shown
followed by stop bits. The I2C device used for sending the command required a R/W bit for addressing so the
address of 4Ch was sent as 98h.
Figure 5 - Fault Register Read No Fault
In figure 5, the address of 4Ch was sent followed by the first data byte. “4Ch” represents the base address of the
PI33XX-2X as determined by ADR0 and ADR1. The first data byte is the address decode of the internal register to
be read (or written); in this case, read. “1Ah” is address of the fault register as shown in Table 2.
vicorpower.com Rev 1.0 Cool-Power®
800 735.6200 11/2012 Page 8 of 22
Page 9

PI33XX-2X I2C Digital Interface Guide
Figure 6 - Bus Capture Read Fault Register with Generic I2c Interface
The sequence for sending the data in Figure 6 applies to a generic I2C interface, not the Picor Buck GUI Software.
There are many devices available on the market (including microcontrollers) that may be configured for this
function. In the end, the final result is the same. The sequence was:
START WRITE 98h 2 Bytes 1Ah,00h followed by STOP
START READ 99h 1 Byte followed by STOP
The returned value in the Data field is the actual fault register value sent by the PI33XX-2X.
Figure 7 - I2C Bus Capture Clear Fault Register Using Picor Buck GUI and LinkM
vicorpower.com Rev 1.0 Cool-Power®
800 735.6200 11/2012 Page 9 of 22
Page 10

PI33XX-2X I2C Digital Interface Guide
Figure 7 shows the bus capture of the instructions sent after clicking on the “Clear” button using Picor Buck GUI.
Here there are four I2C messages sent. The address field shows the address of the PI33XX-2X and then there are
two bytes of data. The first byte is the address of the FREG_CLR register. The second byte is the data. The next
message is a read of the address. This read is performed by the LinkM and is not needed to make the transaction
complete. This command could be sent by a generic I2C interface as:
START WRITE 98h 2 Bytes 1Bh,00h followed by STOP
START WRITE 98h 2 bytes 1Ah,00 followed by STOP
START READ 99h 1 Byte followed by STOP
The data returned should be the same as seen previously. In the event an actual fault occurs, the Picor Buck GUI
will indicate the fault graphically as a result of decoding the fault register. Figure 8 shows the I2C bus capture of the
event, while the Picor Buck GUI decodes the fault and gives a visual indication as shown in Figure 9.
Figure 8 - I2C Bus Capture Input Under Voltage Fault Register Read Using Picor Buck GUI and Linkm
Figure 10 shows several more common faults displayed by the Picor Buck GUI along with the corresponding I2C bus
capture of each event. The first fault SLOW_IL, the second fault is VOUT_HI and the third fault is OVLO.
Figure 11 shows the I2C bus capture of dynamically margining the PI33XX-2X output voltage down -20% by entering
“1100” in the “MARGIN” dialog box and clicking the “MARGIN” button. Note that “0Ch” is sent in the second data
byte, which is the margin value.
vicorpower.com Rev 1.0 Cool-Power®
800 735.6200 11/2012 Page 10 of 22
Page 11

PI33XX-2X I2C Digital Interface Guide
Figure 9 - Picor Buck GUI Capture of Input Under Voltage Fault
Figure 10 - Picor Buck GUI Capture of Common Faults with Corresponding I2C Data
vicorpower.com Rev 1.0 Cool-Power®
800 735.6200 11/2012 Page 11 of 22
Page 12

PI33XX-2X I2C Digital Interface Guide
Figure 11 - I2C Bus Capture
Configuration Programming
The PI33XX-2X has three programming registers that can be changed by the user as a one time change only. Of
each register, any bit that is not set may be set. The programming requires burning internal fuse links as
permanent memory. Once they are burned there is no way to change or reset the settings back to default. For this
reason, it is critical to be sure the settings are correct prior to clicking on the burn button. The three registers are
ENA_POL, SYN[3:0] and KBIT2. ENA_POL is programmed by using the “ENA POL” soft key and dialog box. SYN[3:0]
is programmed by the “SYNC” soft key and dialog box. KBIT2 is programmed using the “KILL BIT2” soft key and
dialog box.
The programmable values for the SYN[3:0] register are shown in Table 5. Bits 0 through 2 define the delay setting
between a synchronizing signal (rising or falling edge as selected) applied to the SYNCI input and the SYNCO output
rising edge, applied as a fraction of the main system clock period (MP). The most significant bit SYN[3] determines
which edge trigger occurs. A “1” indicates rising edge and a “0” indicates falling edge. As an example, if the MP
value is 1 us, and the SYNC dialog box reads “1101”, the programmed delay is 500 ns from the rising edge of the
SYNCI input. The actual programmed value does not take effect until the bits are actually burned so there is no way
to measure the delay without actually burning the value in. For this reason, the user should review the waveform
plots in Figures 12 through 19 to understand the timing relationship prior to attempting to burn the values into the
register. The value of main system clock can be found in the PI33XX-2X datasheet for each part number.
To understand the relationship between the synchronization timing and the PI33XX-2X operation, an overview of
the PI33XX-2X power train timing is shown in Figure 12. There are three main timing states in the ZVS Buck
Topology; T1, T3 and T4 as defined below:
T1: T1 defines the start of a power cycle when the clamp switch has opened and the zero voltage switching
resonant action has started, followed by the turn on of Q1 and continuing until Q1 turns off. During T1, current
ramps up to a positive peak value, charge is delivered to the output capacitor and energy is stored in the output
inductor.
T3: Q1 has turned off, Q2 has turned on and energy stored in the inductor is delivered to the load. As the current
in the inductor passes through zero, energy is stored in the inductor to provide zero voltage switching for the next
time Q1 is required to turn on.
vicorpower.com Rev 1.0 Cool-Power®
800 735.6200 11/2012 Page 12 of 22
Page 13

PI33XX-2X I2C Digital Interface Guide
= Clamp open
Vout
Q1
Q2
Cin
Cout
VS
LS
Driver
HS
Driver
ZVS-Buck
Vin
Clamp
Switch
Vout
Q1
Q2
Cin
Cout
VS
LS
Driver
HS
Driver
ZVS-Buck
Vin
Clamp
Switch
Vout
Q1
Q2
Cin
Cout
VS
LS
Driver
HS
Driver
ZVS-Buck
Vin
Clamp
Switch
Sync at T1
T1
T3
T4
Q1
Q2
CLAMP
SWITCH
VS
Vout
Vin
ON ON
ON ON
ON
ON
I_L
Iout
IQ1
= Clamp open= Clamp open
Vout
Q1
Q2
Cin
Cout
VS
LS
Driver
HS
Driver
ZVS-Buck
Vin
Clamp
Switch
Vout
Q1
Q2
Cin
Cout
VS
LS
Driver
HS
Driver
ZVS-Buck
Vin
Clamp
Switch
Vout
Q1
Q2
Cin
Cout
VS
LS
Driver
HS
Driver
ZVS-Buck
Vin
Clamp
Switch
Vout
Q1
Q2
Cin
Cout
VS
LS
Driver
HS
Driver
ZVS-Buck
Vin
Clamp
Switch
Vout
Q1
Q2
Cin
Cout
VS
LS
Driver
HS
Driver
ZVS-Buck
Vin
Clamp
Switch
Vout
Q1
Q2
Cin
Cout
VS
LS
Driver
HS
Driver
ZVS-Buck
Vin
Clamp
Switch
Sync at T1
T1
T3
T4
Q1
Q2
CLAMP
SWITCH
VS
Vout
Vin
ON ON
ON ON
ON
ON
I_L
Iout
IQ1
T1
T3
T4
Q1
Q2
CLAMP
SWITCH
VS
Vout
Vin
ON ON
ON ON
ON
ON
I_L
Iout
IQ1
T4: After Q2 turns off, the clamp switch turns on to preserve the energy stored in the inductor to be used for the
next T1, while clamping VS to Vout. At the end of T4 and beginning of T1, the clamp switch opens and the parasitic
capacitance of Q1 and Q2 resonates with the output inductor to provide zero voltage switching.
The rising edge of SYNCO defines the beginning of T1 and can be observed in Figure 13. The rising edge of SYNCO is
synchronized to SYNCI rising or falling edge as programmed plus any delay desired. Figure 13 shows the timing
relationship of SYNCO, SYNCI and the phase node VS with default timing and phase delay. Note that the node VS in
the schematic of Figure 12 is called VS1 in Figure 13 and can be observed on channel 3 of the plot.
vicorpower.com Rev 1.0 Cool-Power®
800 735.6200 11/2012 Page 13 of 22
Figure 12 - ZVS Buck Topology Timing Diagram
Page 14

PI33XX-2X I2C Digital Interface Guide
SYN[3:0]
SYN[3]
SYN[2:0]
Polarity Bit
Control Bits
SYNC delay
0 = Falling
000
NONE
1 = Rising
001
3/4 MP
100
2/3 MP
101
1/2 MP
110
1/3 MP
111
1/4 MP
Start of T1 (ZVS)
Turn on of high side
MOSFET
External sync pulse
falling edge
Start of T1 (ZVS)
Turn on of high side
MOSFET
External sync pulse
falling edge
Figure 13 - PI33XX-2X ZVS Buck Sync to T1 Timing Relationship Where VS = Ch3 VS1
Table 5 - PI33XX-2X SYN[3:0] Register Assignments
The ENA_POL and KBIT2 registers are single bit registers. A “0” in the ENA_POL register is the default value. This
means the PI33XX-2X will enable when the ENA pin is floating or logic high. Pulling down ENA pin will disable the
PI33XX-2X. If a “1” is programmed into the ENA_POL register, the ENA polarity reverses. If the ENA pin is floating or
logic low, the PI33XX-2X is enabled. Pulling the ENA pin high will disable the PI33XX-2X.
The KBIT2 register may only be written with a “1” entered into the dialog box. This register can not be read, it is
write only. Burning this register will prevent making any more changes to any register, even if there are unused
bits available to burn.
vicorpower.com Rev 1.0 Cool-Power®
800 735.6200 11/2012 Page 14 of 22
Page 15

PI33XX-2X I2C Digital Interface Guide
Figure 14 - PI33XX-2X SYNC = “1000” Timing
Figure 15 - PI33XX-2X SYNC = “1111” 1/4 MP
Figure 17 - PI33XX-2X SYNC = “1101” 1/2 MP
Figure 18 - PI33XX-2X SYNC = “1100” 2/3 MP
Figure 16 - PI33XX-2X SYNC = “1100” 1/3 MP
vicorpower.com Rev 1.0 Cool-Power®
800 735.6200 11/2012 Page 15 of 22
Figure 19 - PI33XX-2X SYNC = “1001” 3/4 MP
Page 16

PI33XX-2X I2C Digital Interface Guide
Programming Initial Conditions
Once the user has selected the configuration for the timing register, the burn process can be initiated. To begin
this process, the user must be ready to be able to enable and disable the PI33XX -2X, since this is required to enter
the burn mode and actually burn the bits. The initial conditions to begin the burn process are as follows:
1. Proper input voltage should be applied to the target PI33XX-2X.
2. The unit can be either enabled and producing output voltage or disabled with the output voltage at zero. The
preferred method is disabled since in some cases multiple units may depend on proper phase delay for best
performance. The user must adhere to the instructions from the GUI to ensure proper burn results.
The burn process consumes power from the internal bias for the controller, so only a single bit can be burned at a
time. Picor Buck GUI takes care of this for the user and will generate the appropriate number of bus commands to
ensure each bit is burned correctly. Users that write their own software or operate from a different GUI will need
to consider this. In addition, power should not be removed from the PI33XX-2X during the burn process. The Picor
Buck GUI will prompt the user when to enable and disable the target. Enabling and disabling is done using the EN
pin. One important note to consider is that if the enable polarity has been changed already due to a separate
operation, the new enable polarity must be used when enabling and disabling. The procedure along with the Picor
Buck GUI commands, for changing the SYN[3:0] register so that the synchronization polarity is falling edge and the
delay is 3/4 MP is as follows:
vicorpower.com Rev 1.0 Cool-Power®
800 735.6200 11/2012 Page 16 of 22
Page 17

PI33XX-2X I2C Digital Interface Guide
Configuration Example - Sync Delay
Type “0001” into the SYNC dialog box. Left click on the “BURN” button.
Figure 20 - SYNC “0001” Burn Phase 1 While Unit Enabled or Disabled
The first four writes and reads ensure that the three User registers are cleared. Then the test mode register is
selected at address 18h and the test mode 05h is entered. Next, the user is prompted to disable the unit using the
enable pin. The target can be enabled or disabled prior to being prompted to disable. See Figures 20 and 21.
Figure 21
When the user disables the target, another prompt will provide notification to enable the target again as shown in
Figure 22. When the unit is enabled, the output voltage will remain low as if the PI33XX-2X was still disabled. This
is normal. The Picor Buck GUI will next write “01h” into the SYN[3:0] register.
Figure 22 - SYNC “0001” Burn Phase 2 Unit Must be Enabled
The next step prompts the user to disable the target again. After clicking “OK”, Picor Buck GUI will reset from test
mode 5 and then clear the other user registers as shown in Figure 23. Picor Buck GUI will display a dialog box to
inform the user of the successful burn completion. When the user enables the PI33XX-2X, it should power up
normally and the burned in changes shall take effect.
vicorpower.com Rev 1.0 Cool-Power®
800 735.6200 11/2012 Page 17 of 22
Page 18

PI33XX-2X I2C Digital Interface Guide
Figure 23 - SYNC “0001” Burn Phase 3 Unit Must be Disabled
The user may read the register that was just programmed by clicking on the “SYNC” button. Picor Buck GUI should
show the new burned in values read back from the SYN[3:0] register as shown in Figure 24. If an error message
occurs or the incorrect results are obtained, refer to the section titled “PI33XX-2X Error Messages” for more
information.
Figure 24 - Read SYN[3:0] After Burning “0001”
It is important to note that the data sent here is the value shown in the dialog window. The actual read is the
burned in value of the register. Sending “4Ch 21h FFh” or “4Ch 21h 00h” would also work properly.
vicorpower.com Rev 1.0 Cool-Power®
800 735.6200 11/2012 Page 18 of 22
Page 19

PI33XX-2X I2C Digital Interface Guide
Configuration Example - Enable Polarity
Figure 25 shows the complete procedure for changing the enable polarity along with the I2C bus capture of all of
the commands required to make the changes using Picor Buck GUI or some other generic software. Since the
enable polarity is not changed until AFTER the burn is completed, always use the default polarity of the signal
before the burn process to enable and disable the target PI33XX-2X. It should be pointed out that the SYN[3:0]
register had already been programmed to “0010” on the PI33XX-2X target prior to the enable polarity change.
Note that the first two bus transactions occur when the target PI33XX-2X is enabled and the final transaction
occurs when it is disabled. Failure to follow this exact sequence will prevent successful storage of the desired
configuration settings. If an error message occurs or the incorrect results are obtained, refer to the section titled
“Error Messages” for more information.
Figure 25 - Changing ENA_POL Register to “1” With SYN[3:0] Programmed to “0010”
vicorpower.com Rev 1.0 Cool-Power®
800 735.6200 11/2012 Page 19 of 22
Page 20

PI33XX-2X I2C Digital Interface Guide
Configuration Example - Setting Kill Bit
The procedure for setting the KBIT2 register to prevent any further programming is outlined in sequence in Figure
26. The SYN[3:0] register has been programmed to “1111” and the ENA_POL register has been programmed to “1”
in advance. Like the previous procedures, the first two bus transactions occur while the PI33XX-2X is enabled and
the final transaction occurs while the PI33XX-2X is disabled. After completing this step, no further changes can be
made to the PI33XX-2X. It is very important to double check all settings before clicking the “BURN” button. If the
user makes a mistake in a setting after clicking on the “BURN” button, the instructions for enabling and disabling
the unit that are prompted by Picor Buck GUI should be IGNORED by leaving the target enabled and clicking “OK”
to each pop up dialog box. This will prevent the burn from occurring and give the user another chance to correct
the mistake. Picor Buck GUI will report the failed burn with a pop up dialog box.
Figure 26 - Setting KBIT2 Register After Setting ENA_POL Register to “1” With SYN[3:0] Programmed to “1111”
vicorpower.com Rev 1.0 Cool-Power®
800 735.6200 11/2012 Page 20 of 22
Page 21

PI33XX-2X I2C Digital Interface Guide
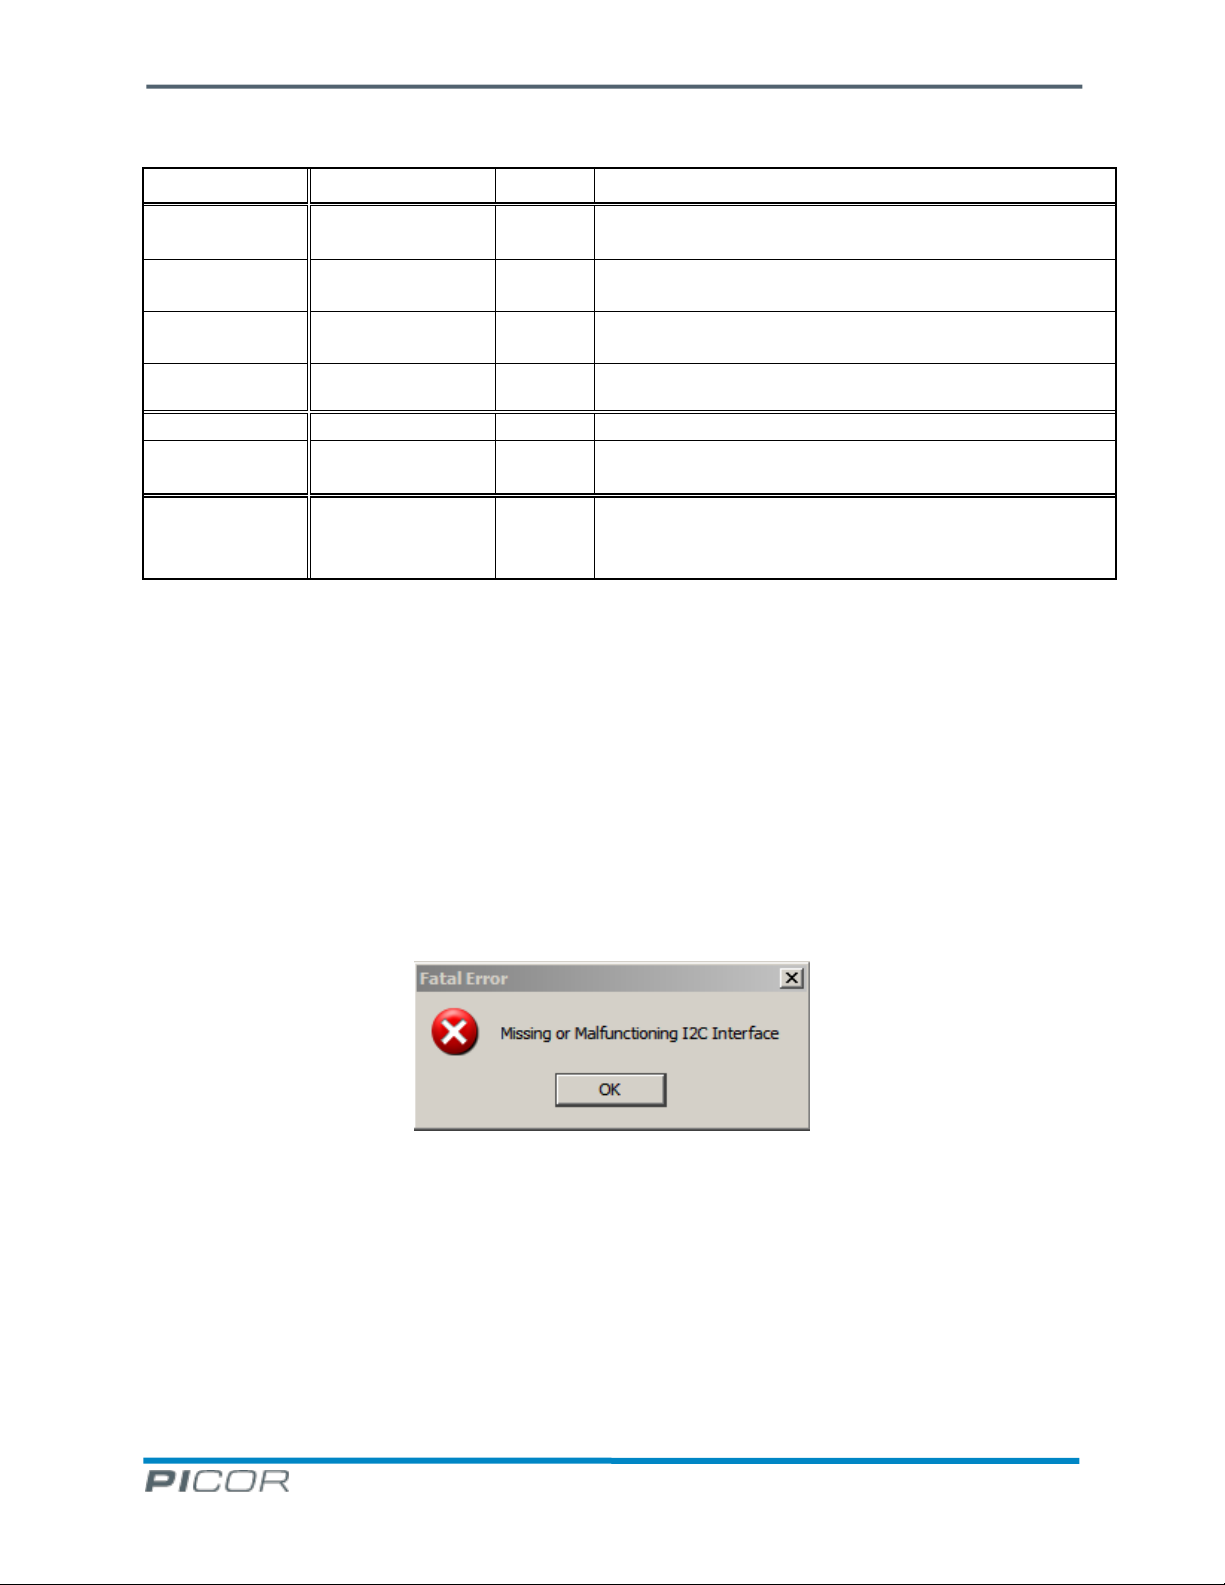
Error Messages
Missing or Malfunctioning I2C Interface Error:
The error message shown in Figure 27 occurs only at the first boot of the Picor Buck GUI each time the program is
executed. During program initialization, the software determines the existence of the LinkM USB interface. If the
hardware or software interface from the computer USB port to the LinkM is either not connected, missing or
malfunctioning, Picor Buck GUI will display this error message. If some error occurs with this interface during
program execution, a different error message will be displayed. This error ONLY applies to the USB portion of the
LinkM and does not indicate any problem with the PI33XX-2X or the LinkM I2C bus interface.
Figure 27 - Fatal Error Message at Picor Buck GUI Boot
Incorrect I2C Address or Missing Unit Error:
The error message shown in Figure 28 occurs during Picor Buck GUI program execution if either the PI33XX-2X or
LinkM I2C interface is malfunctioning. It will also occur during program execution if the PC to USB or LinkM USB
hardware or software interface is malfunctioning. If the USB portion of the interface is at fault, Picor Buck GUI can
not recover and will continue to display this error even if the USB interface problem is corrected. Picor Buck GUI
will need to be closed and restarted to reestablish USB connectivity with Picor Buck GUI. If the I2C interface is the
problem, the error will clear without restarting Picor Buck GUI once the problem is corrected. It is very important
to note that a failure of the critical interface to either the LinkM or the PI33XX-2X during a programming operation
can result in the incorrect or unintentional programming of parameters. If the user encounters this error during a
programming operation:
1. Remove input power to the PI33XX.
2. Exit Picor Buck GUI.
3. Restore power to the PI33XX-2X
4. Restart Picor Buck GUI.
Figure 28 - I2C Bus or USB Error Message During Picor Buck GUI Execution
vicorpower.com Rev 1.0 Cool-Power®
800 735.6200 11/2012 Page 21 of 22
Page 22

PI33XX-2X I2C Digital Interface Guide
Burn Failed Error:
The error message shown in Figure 29 occurs only during a failed program attempt. Here, the value that is
programmed into the associated register does not match the value that was entered into that registers dialog box
prior to executing the programming operation. The most likely cause of this error is a missed enable or disable step
during the programming procedure. Other causes could be a communication error that would also prompt Picor
Buck GUI to report the appropriate error. If this error occurs after receiving the “Missing or Malfunctioning I2C
Interface Error”, it is critically important to ensure that you shut down power to the PI33XX-2X and exit the Picor
Buck GUI prior to attempting to reprogram again. Adhering to this step can possibly avoid programming the wrong
register values.
Figure 29 - Burn Failed Error Message
Burn Skipped Error:
The error message shown in Figure 30 occurs only when the user has attempted to program a value into an
associated register that was previously programmed. The burn process will be terminated and the user will be
returned to the main menu.
Figure 30 - Burn Skipped Error Message
Notes
2
I
C is a trademark of NXP Semiconductors
LinkM is a trademark of ThingM Corporation
Windows 7 and Windows XP are trademarks of Microsoft Corporation
JAVA is a trademark of Sun Microsystems Corporation
vicorpower.com Rev 1.0 Cool-Power®
800 735.6200 11/2012 Page 22 of 22
 Loading...