

Page 1
Made in Taiwan
ABOUT Vibramax Pro 8
02
INTRODUCTION
SAFETY INSTRUCTIONS
07
USER GUIDE
ASSEMBLY INSTRUCTIONS
10
PREPARATION
EXERCISE MODE
13
14
16
17
19
22
24
POWER FUNCTIONS
BASIC OPERATIONS
USER LOGIN
Main menu
MEDIA MODE
USER MODE
FAQ
TROUBLESHOOTING CONTINUED
Vibramax Pro 8 Oscillation
Vibramax Pro 8 Oscillation
TM
Quick Reference
Integrated 7” TFT LCD Touch Panel
Display leading you to enjoy multimedia vibration and muscle training.
ACCESSORIES
26
ACCESSORIES
SPECIFICATION
27
SPECIFICATION
Page 2
ABOUT VIBRAMAX PRO 8
INTRODUCTION
Benefits of Whole Body Vibration:
Features:
The benefits of vibration training have been pushed
forward by fitness professionals and verified by academic
medical research.
Generally, the benefits of vibration training are:
1.
2.
3.
4.
5.
Workout to get rapid weight loss and toning.
Workout to reduce cellulite.
Effectively increase strength and flexibility.
Effectively improve circulation and bone density.
Effectively reduce recovery time from pain and injury.
2.
Built-in speaker compatible with MP3, Digital photo,
Animation Training player.
3.
Vivid and interesting exercise coaching programs to
achieve the maximum benefit of vibration training!
1.
Integrated 7” TFT LCD Touch Panel Display with our
software technology leading you to enjoy multi-media
vibration and muscle training.
02
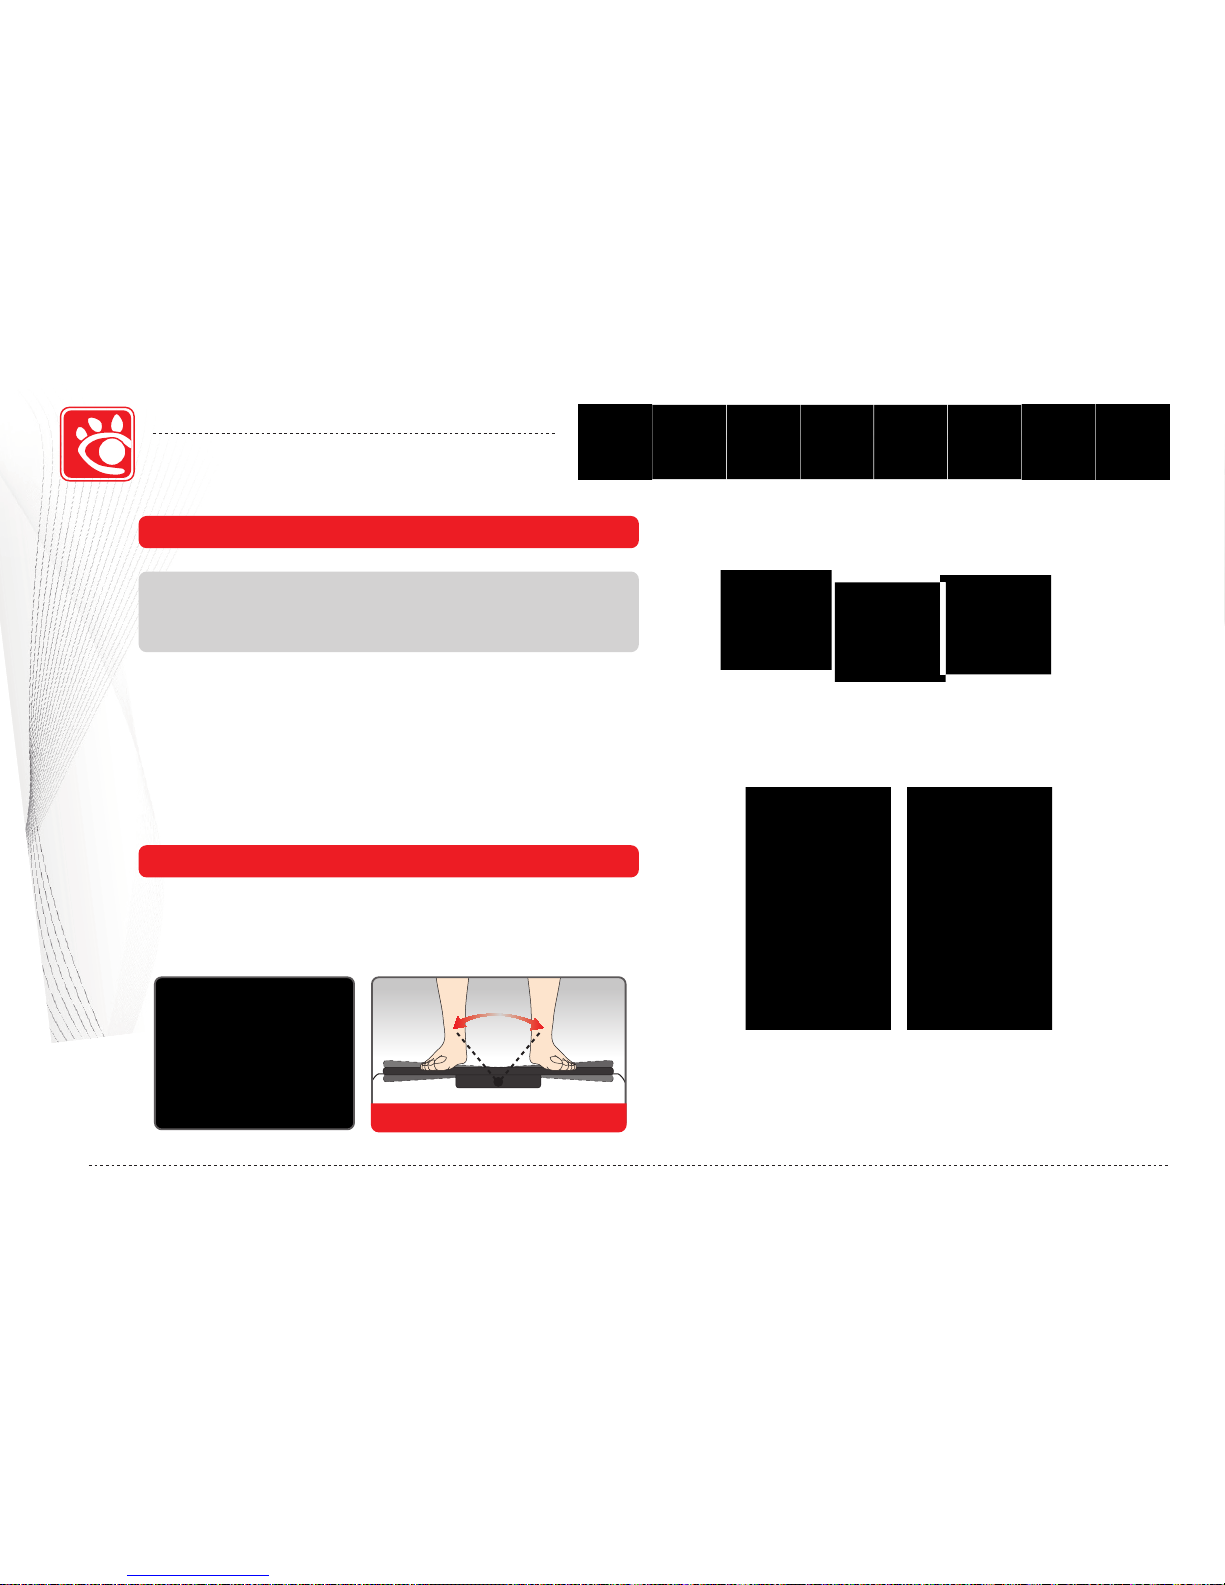
Triangular Oscillation
Page 3
INTRODUCTION
03
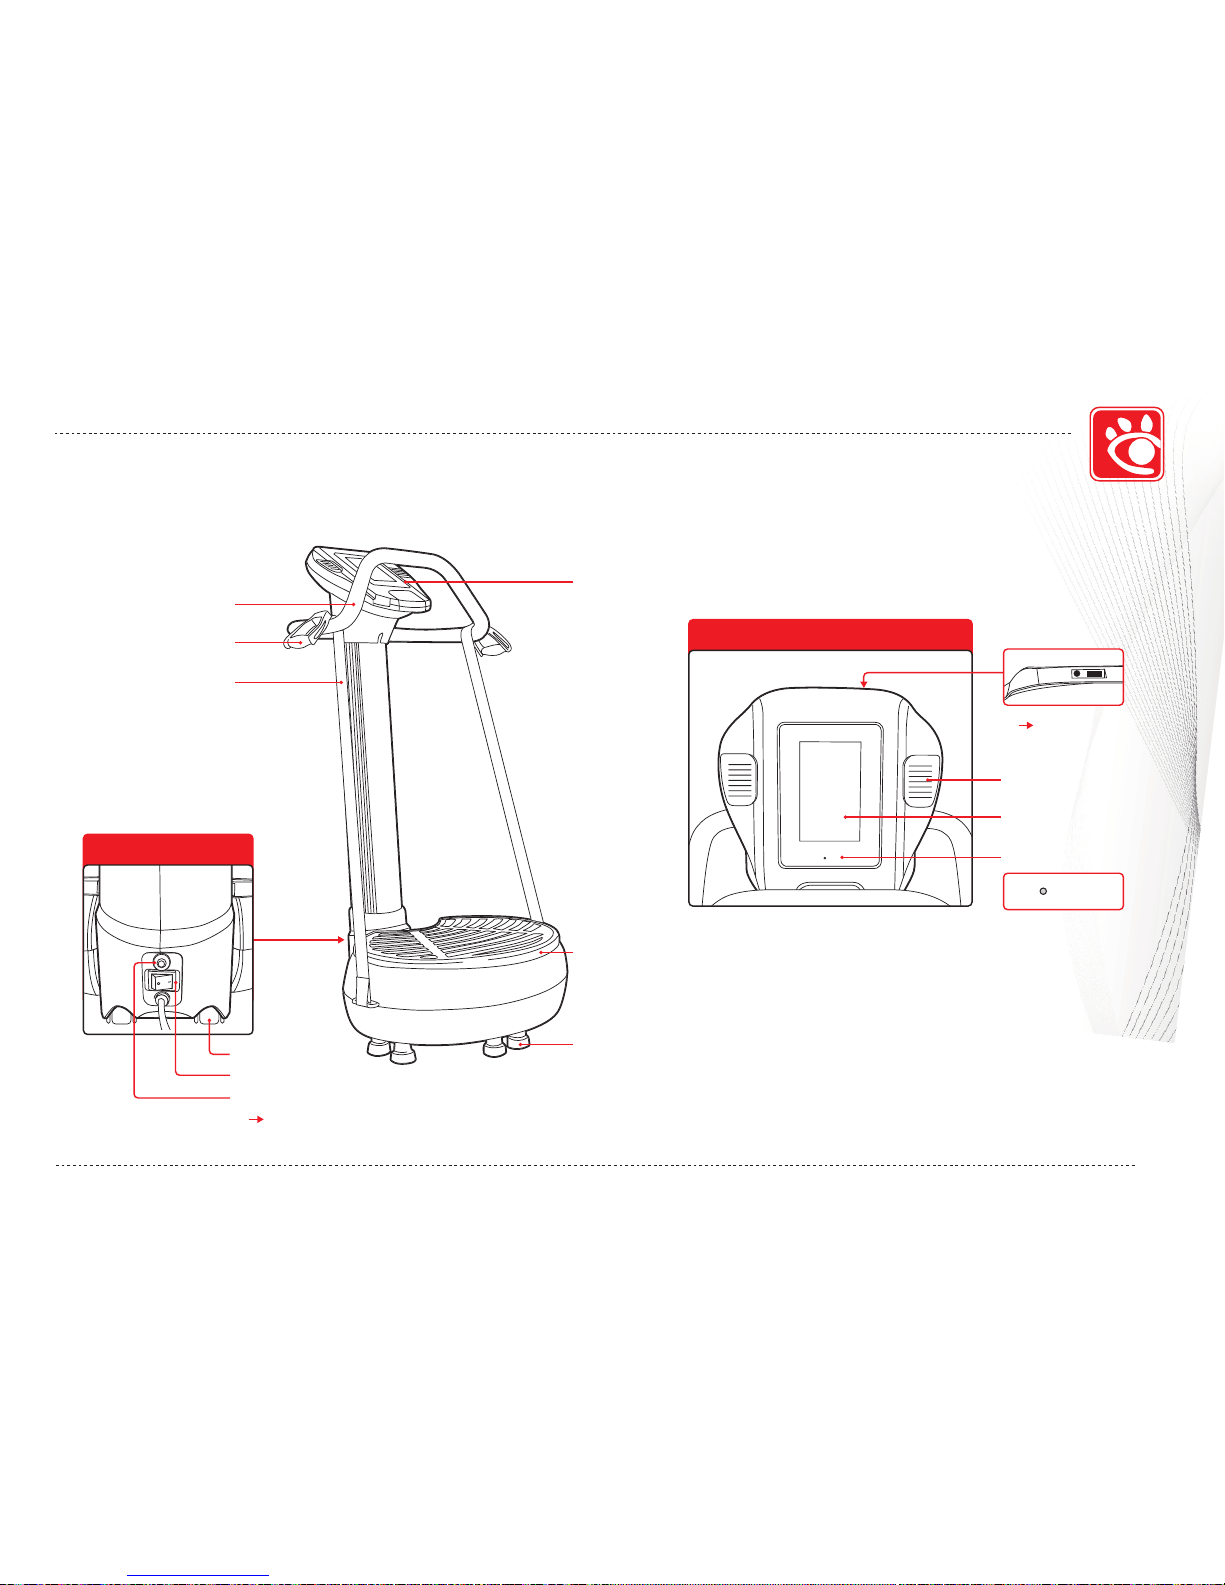
Handle bar
Wheel
Protector key
Handle
Rubber pad
Panel cover
Bumper
Power switch
Belt
BACK
Panel cover
POWER
Speaker
LCD Screen
Connector
USB/Earphone
( page 19)
Power indicator
POWER
( page 13)
ABOUT VIBRAMAX PRO 8
Page 4
INTRODUCTION
04
66
66
51
51
47
52
50
47
52
50
61
51
51
52
50
52
50
50
55
54
53
53
50
52
53
54
55
55
50
52
53
54
55
53
54
55
50
52
53
54
55
52
63
49
63
50
52
55
54
52
10
40
39
41
41
40
39
41
38
41
38
35
37
37
64
64
36
33
33
33
34
7
17
18
18
17
14
14
14
14
12
13
3
5
4
6
11
16
16
15
2
1
8
9
9
9
58
59
59
70
76
45
48
46
46
46
45
45
41
41
41
18
18
18
42
42
28
28
28
43
44
56
65
41
71
71
32
57
41
59
59
18
18
62
62
65
60
60
69
29
28
30
28
28
26
27
27
26
28
28
28
30
29
31
30
30
29
29
29
73
74
77
29
30
68
25
23
22
16
24
19
21
20
67
76
75
69
ABOUT VIBRAMAX PRO 8
Page 5
05
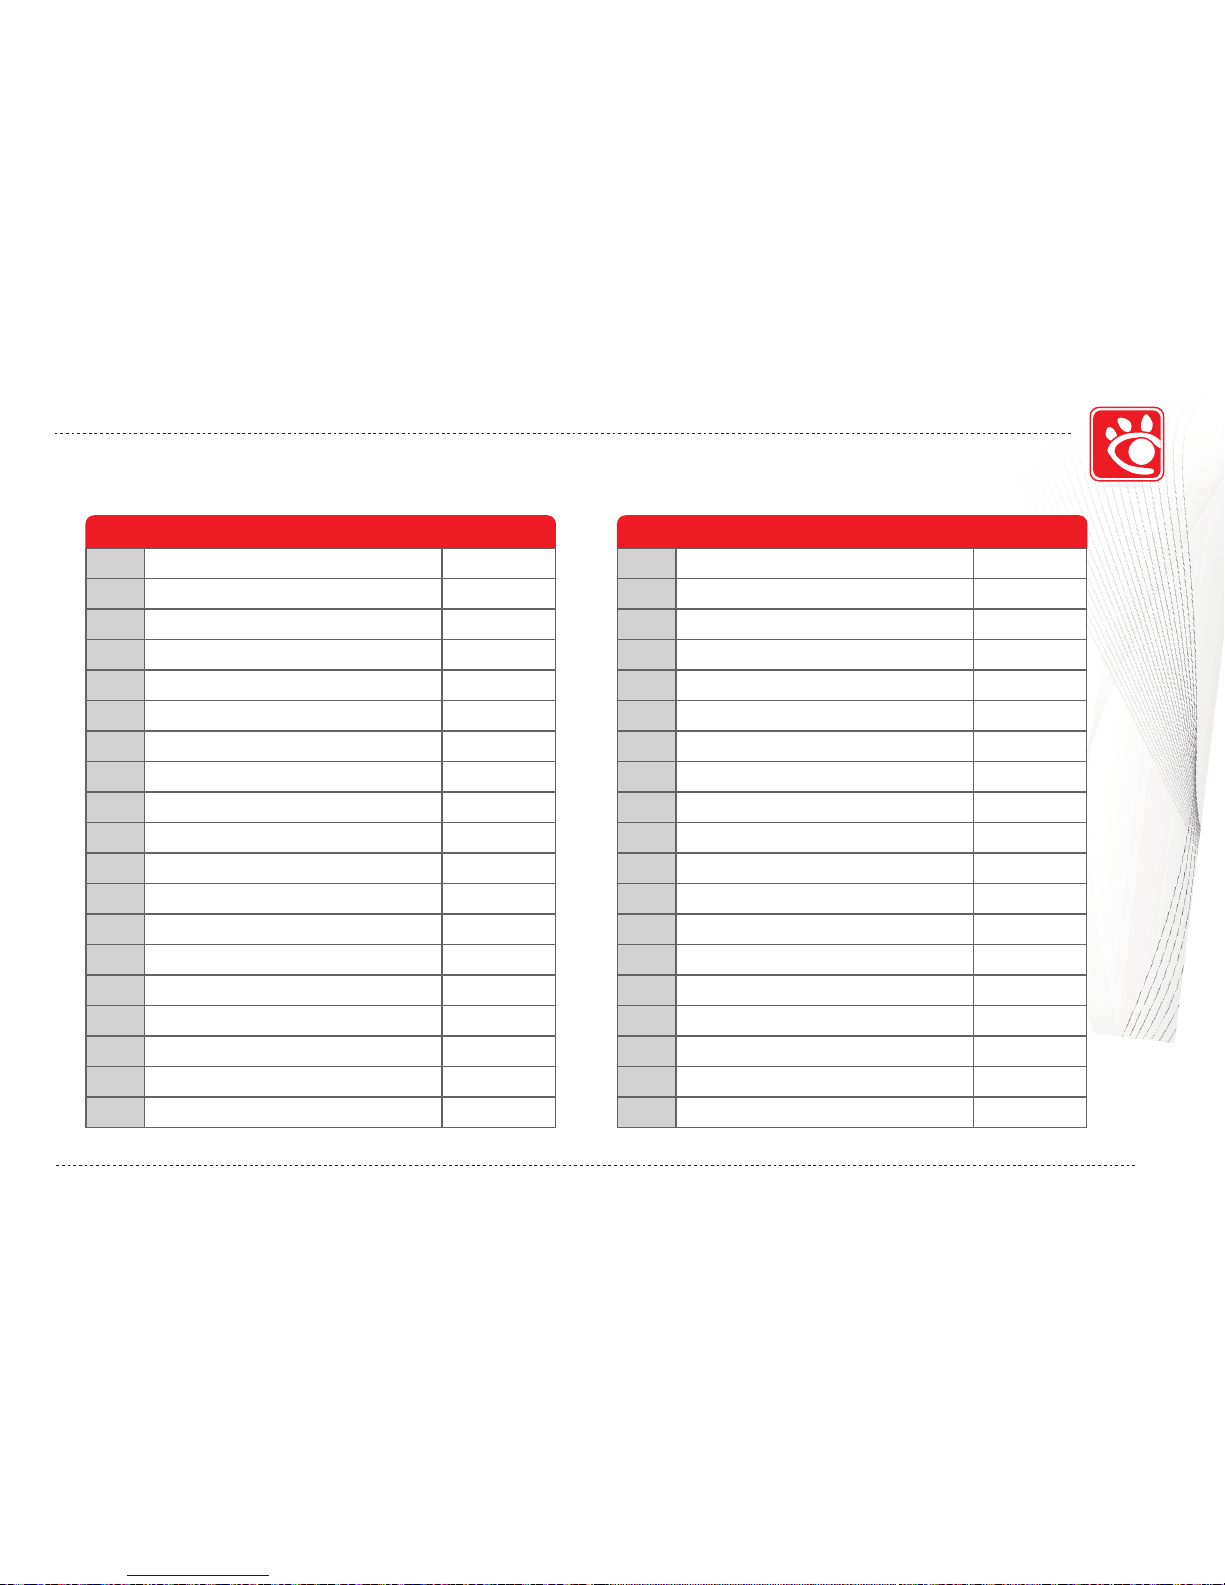
1
2
3
4
5
6
7
8
9
10
11
12
13
14
15
16
17
18
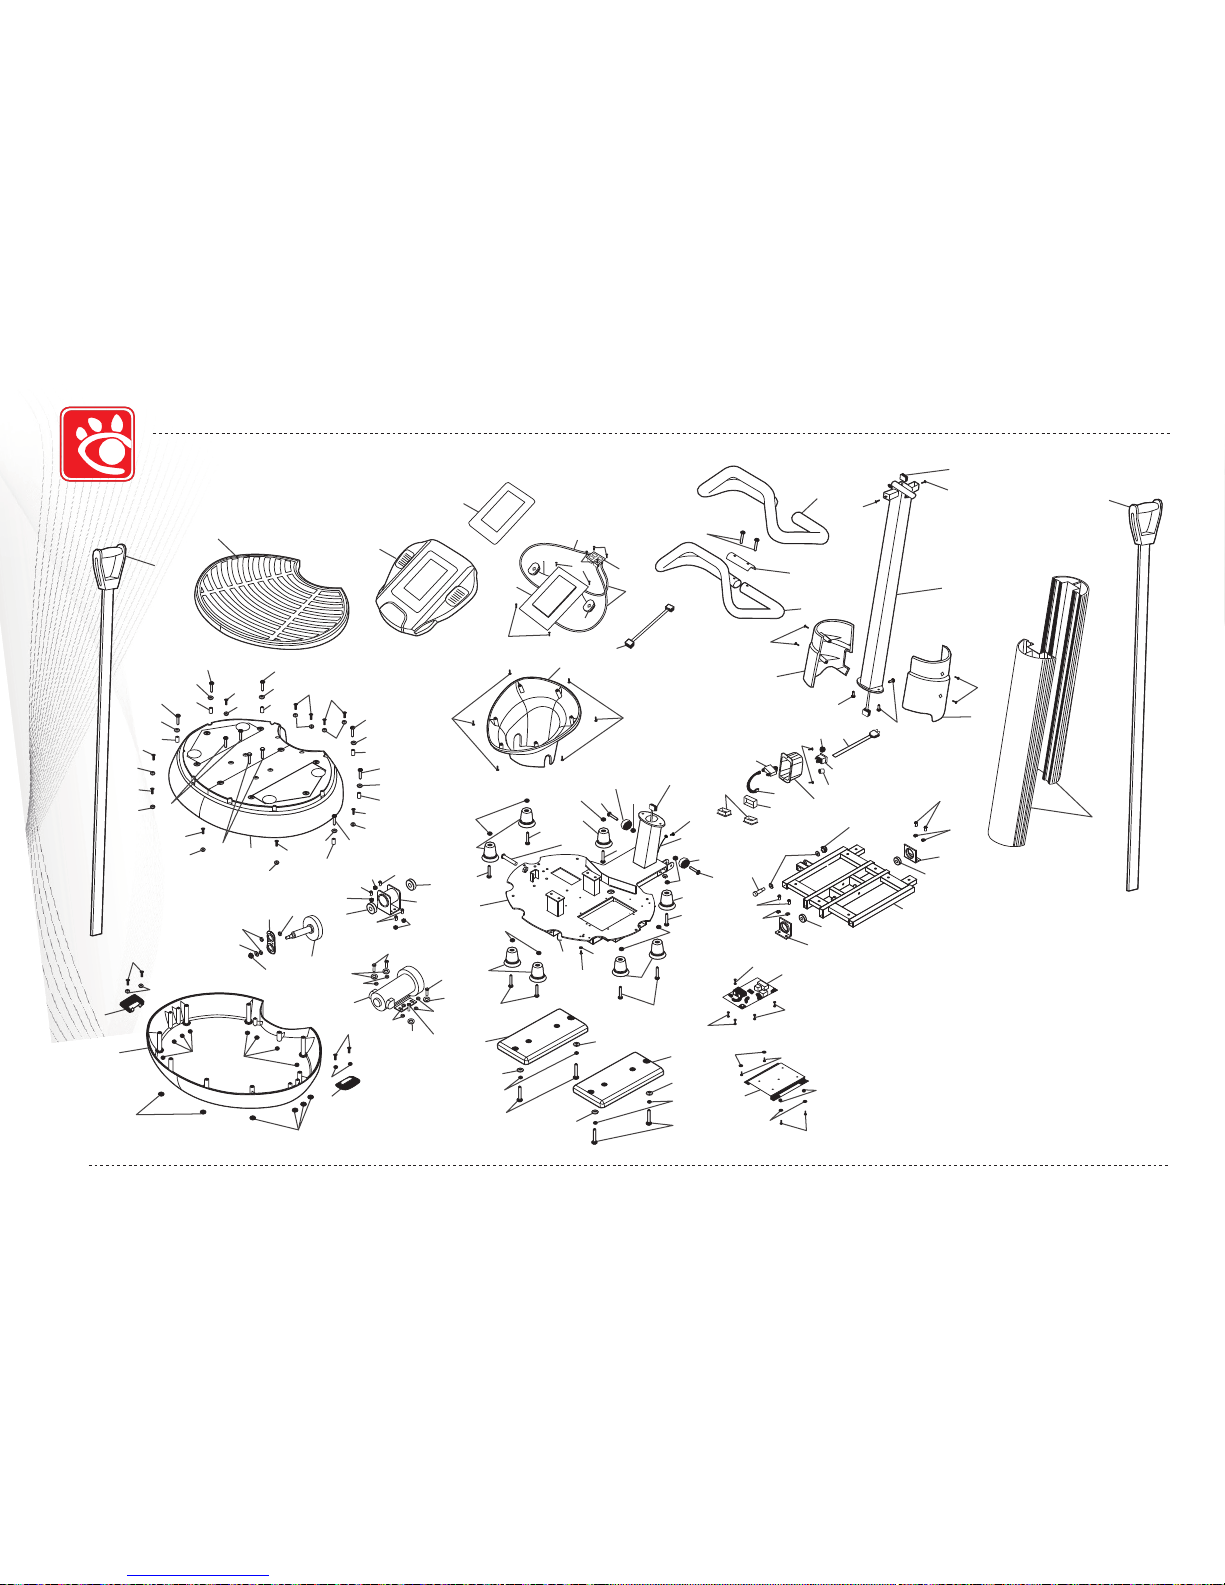
Panel label
Panel cover(upper)
Foam
Reinforce
Bolt 8m/m*45m/m
Handle bar
Post cover
Panel controller
Bolt 2.6m/m*8m/m
Rubber pad
Panel cover(bottom)
Post 1
Cable connectors(middle)
Bolt 4m/m*12m/m
Cable(top)
Bolt 4m/m*12m/m
Right cover/Left cover
Bolt 8m/m*15m/m
1
1
1
1
2
1
2
1
8
1
1
1
6
1
8
2
3
No. Description Qty
19
1
20
21
22
23
24
25
26
27
28
29
30
31
32
33
34
35
36
37
1
1
1
1
1
1
1
2
2
14
8
9
1
5
1
1
2
4
No. Description Qty
38
2
Breaker
Protector key
Cable
Bolt 8m/m*40m/m
Wheel 8m/m*50*24T
Nut 8m/m
Bolt 8*55
Bumper
Lower cable connector
Support Frame
Spacer
Controller
Controller bracket
Nut 1/4''
Power cord
Bushing 6N-2
Power switch
Switch stand
Bolt 4m/m*16m/m
Weight plate
INTRODUCTION
ABOUT VIBRAMAX PRO 8
Page 6
06
INTRODUCTION
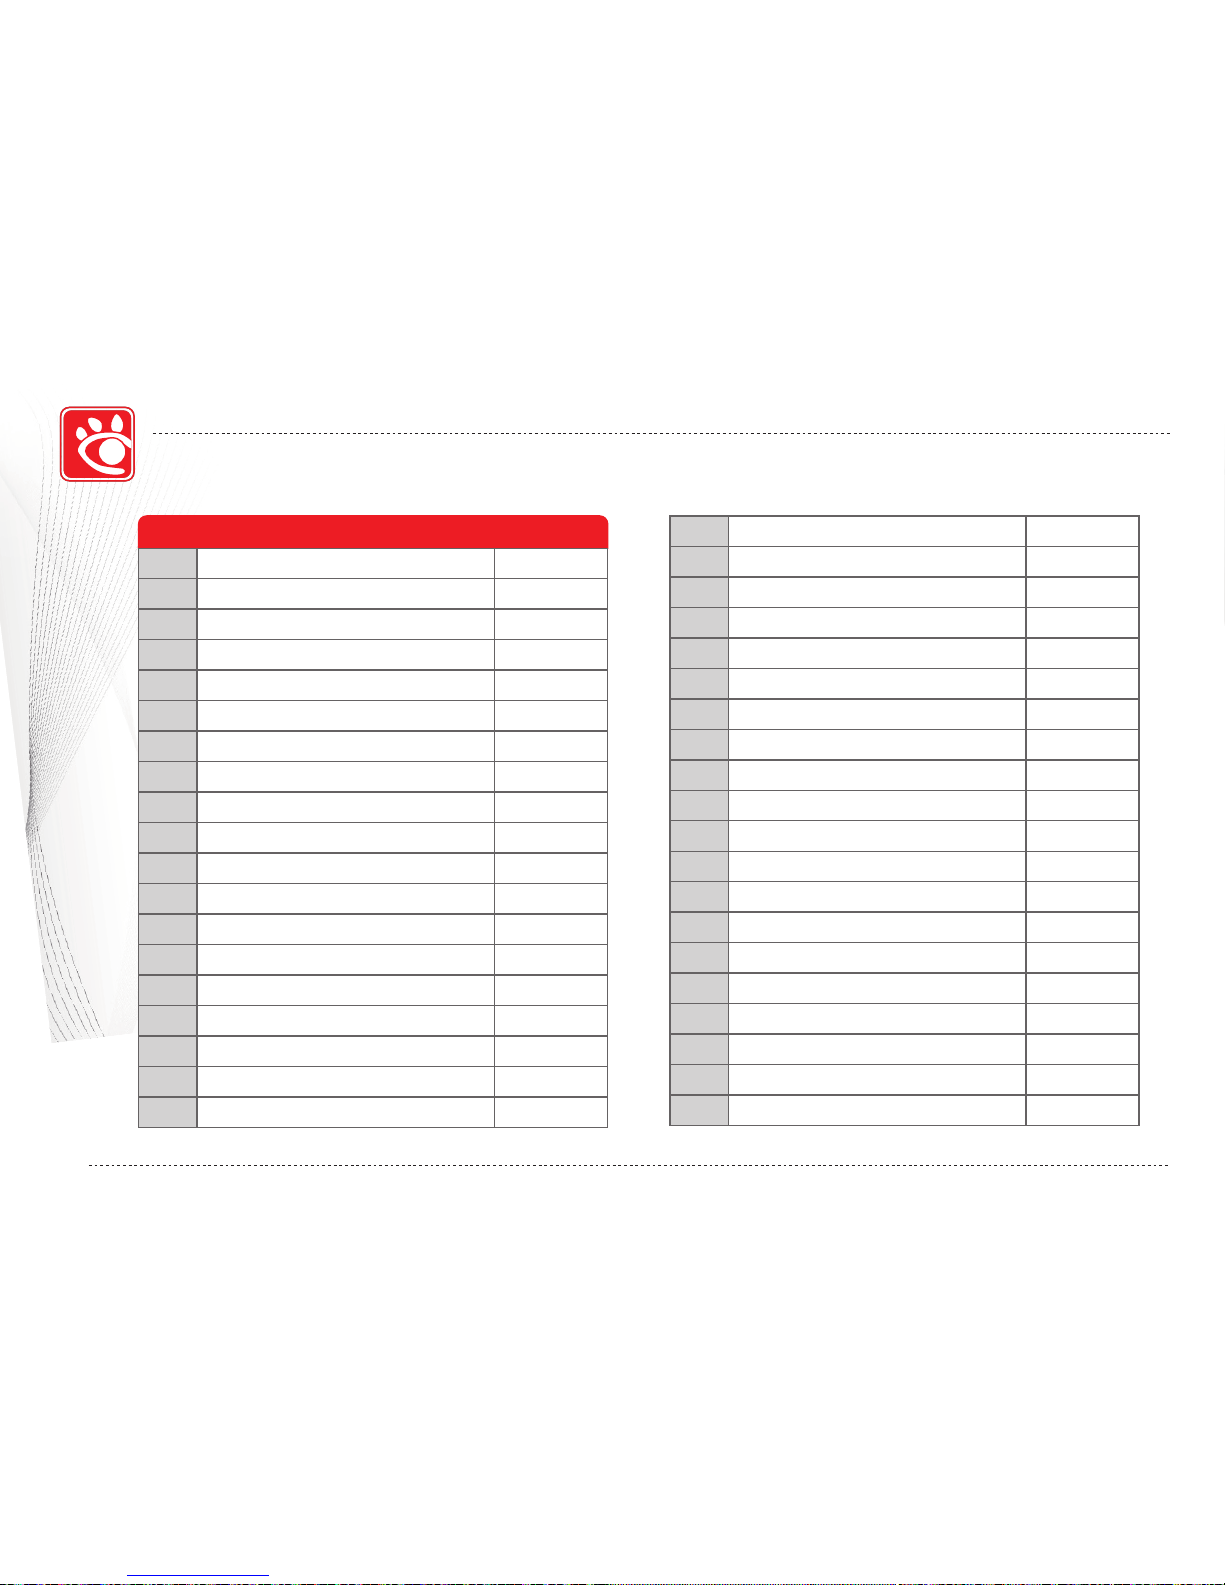
39
40
41
42
43
44
45
46
47
48
49
50
51
52
53
54
55
56
14
4
4
19
2
1
6
8
4
2
1
1
14
14
6
6
6
1
No. Description Qty
57
1
Bushing14x8x22
Crank Set
Bolt FKE 12.9
58
59
60
61
62
63
64
65
66
67
68
69
70
71
72
73
74
75
2
Bolt M8 x75
Bolt M4 x16
Washer M14
1
2
2
1
2
4
4
1
2
1
2
2
3
1
1
1
1
76
Bolt M5 x12 1
77
Main Frame 1
Signal Cable
Bearing 6201ZZ
Motor cover(bottom)
Fixed Bearing Housing
Bolt 3/8''*1 1/4''
Washer 5*15*1.5
Nut M10
Straps with handle bar
End cap 30x60
End cap 25x50
Earth wire
Speaker
Bushing
Signal Cable
Usb Board
Washer 5/16''*23*1.5
Bearing 6005ZZ
Bearing Housing
Propeller Shaft
Rubber Washer
Bolt 8m/m*30m/m
Belt clasp
Motor
Motor cover(top)
Bolt 6m/m*18m/m
Spring washer 6m/m
Washer 1/4''*13*1.0
Bolt 8m/m*45m/m
Washer 5/16''*18*1.5
Spring washer 8m/m
Bolt 8m/m*50m/m
ABOUT VIBRAMAX PRO 8
Page 7
SAFETY INS TRUCTIONS
07
USER GUIDE
STEP 3
Follow the steps of the assembly instructions carefully.
Use only original parts as delivered.
Before the assembly, be sure to check if delivery is complete by using the included parts-list.
For assembly, use only suitable tools and ask for assistance with assembly if necessary.
Place the exerciser on a flat, stable base, and non-slippery surface. You will need levelling for uneven floor. Because of
possible corrosion, the usage of any exerciser in moist areas is not recommended.
Keep the product indoors, away from moisture and dust. Do not put the product in a garage or covered patio, or near
water.
Make sure before each use that you will have enough space around the exerciser (at least 1 meter ), so that you will
not push against walls, furniture, or something like that when exercising
Check before initial use and every 1-2 months that all connecting elements are tight fitted and are in the correct place.
WARNING: The safety level of this exerciser can be maintained only if it is examined regularly for damage
and wear, e.g. connection points, power cord, etc.
Replace defective components immediately and/or keep the equipment out of use until repaired.
For repairs, use only original spare parts.
In case of repair please ask your dealer for advice.
Avoid the use of aggressive detergents when cleaning.
Ensure that training starts only after correct assembly and inspection.
This exerciser is designed for adults. Please ensure that children (under 14) use the exerciser only under the
supervision of an adult. Important: Keep unsupervised children away from the exerciser.
Only one person is permitted to use this exerciser during training.
Do not use this exerciser while eating, drinking, or smoking.
Before you start training on your exerciser, please read the instructions carefully.
1. This exerciser is tested up to a max body weight of 150 kg(330.lbs).
2.
3.
4.
5.
6.
7.
8.
9.
10.
11.
12.
13.
14.
15.
16.
17.
18.
Page 8
1.
2.
3.
4.
5.
You have to do some warming-up exercises before using this exerciser. Start your exercise slowly and
increase intensity of exercise gradually. Follow all points of your exercise instruction.
Warning: incorrect/excessive training can cause health injuries.
Interrupt your exercises immediately when feeling sick, having pain of breast or joints, heartbeat or any
Pregnant women should not use this exerciser or only after having consulted their doctor.
Operation time: 10 minutes per session
Hitting by hard or sharp objects.
Dropping liquids on the console.
Heat sources.
Enormous shocking.
Color_LCD screen is fragile; please protect it against the following conditions:
1.
2.
3.
4.
Always unplug the power cord immediately, before cleaning the exerciser, and before
performing the maintenance and adjustment procedures described in this manual. Never leave
the exerciser unattended while it is running. Never remove the motor hood unless instructed to
do so by an authorized service representative. Servicing other than the procedures in this
manual should be performed by an authorized service representative only.
!
caution
08
USER GUIDE
SAFETY INSTRUCTIONS
other symptoms.
Page 9
•
•
The owner’s manual is only for customers’ reference.
The supplier can not guarantee for mistakes occurring due to translation or change in technical specification of the
product.
Consult your physician before starting with any exercise program. He/She can advise on the kind of training and which
impact is suitable.
All data displayed are approximate guidance and cannot be used in any medical application.
09
SAFETY INS TRUCTIONS
USER GUIDE
Page 10
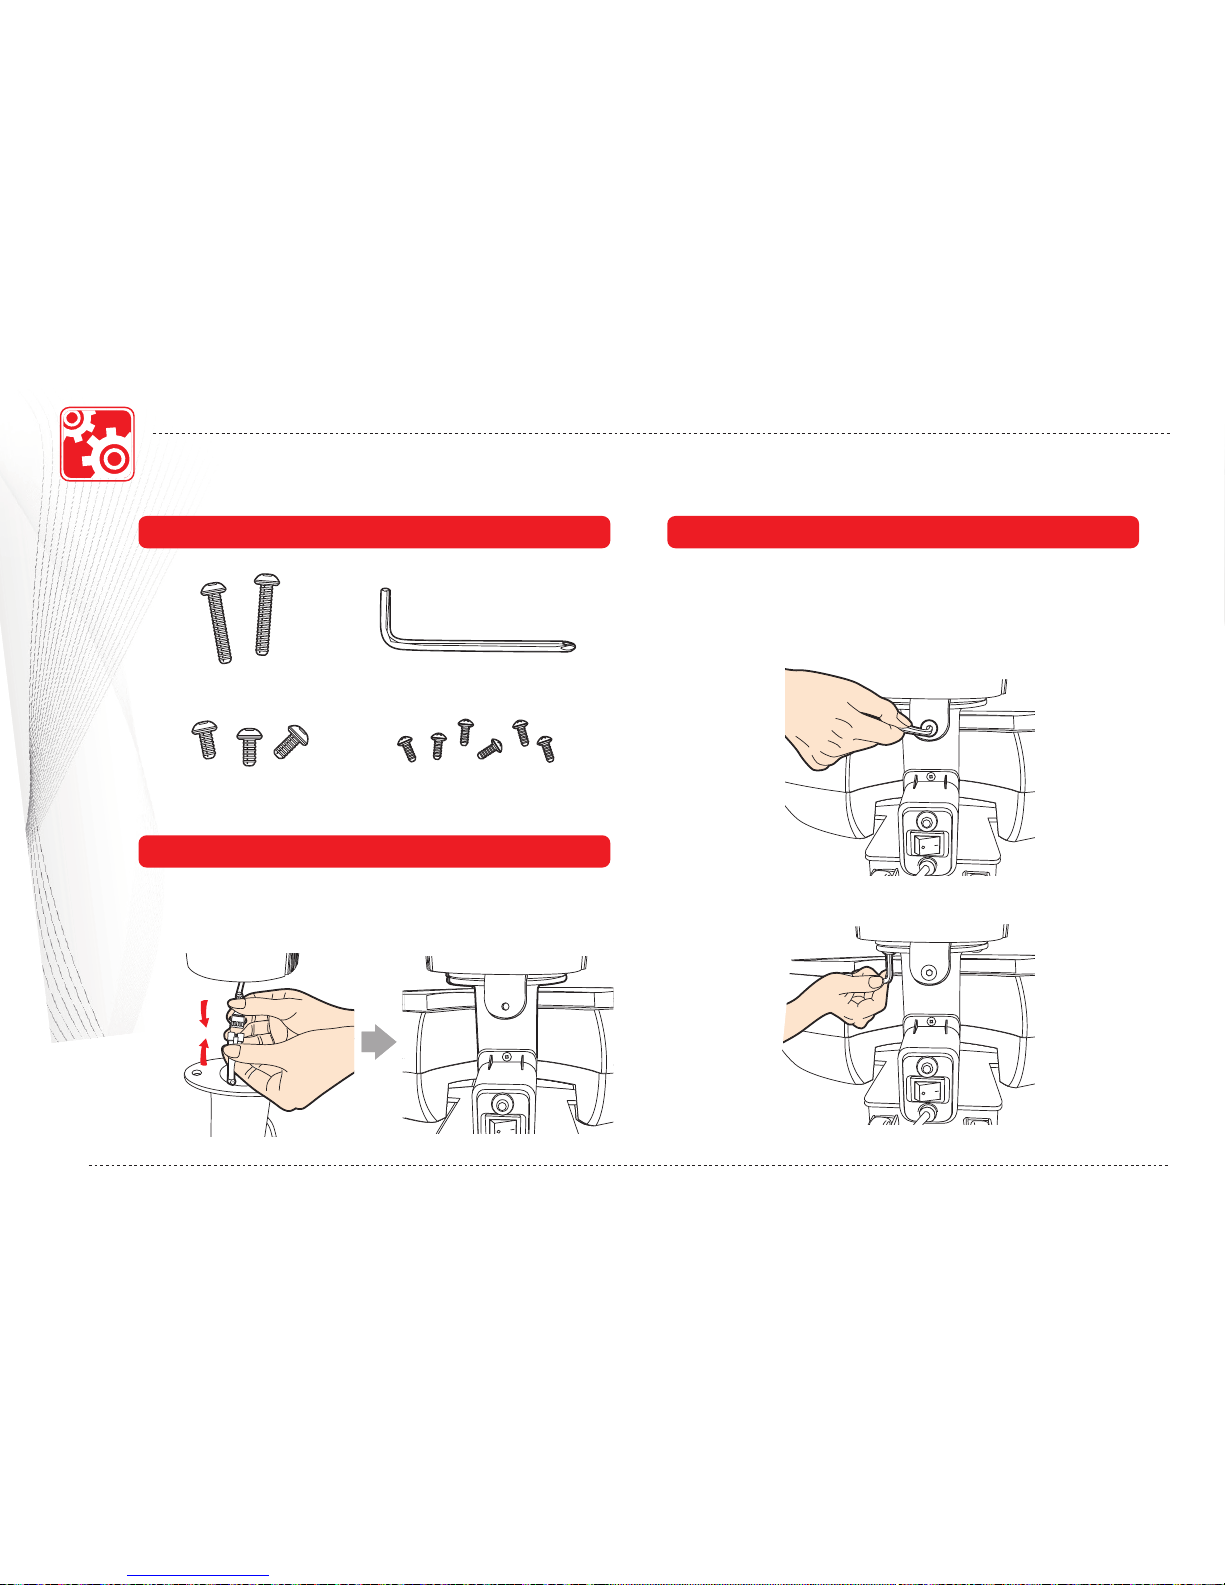
ASSEMBLY INSTRUCTIONS
PREPARATION
Screw Set STEP 2
STEP 1
Bolt 8m/m*45m/m X 2
Wrench X 1
Bolt 4m/m*12m/m X 6Bolt 8m/m*15m/m X 3
Connect sensor cable as shown and assemble handlebar
post onto the housing.
After attaching on the housing, use 3 bolts of
8m/m*15m/m to fix the set.
Please well-tightened the bolts by the enclosed wrench.
a)
b)
10
Page 11
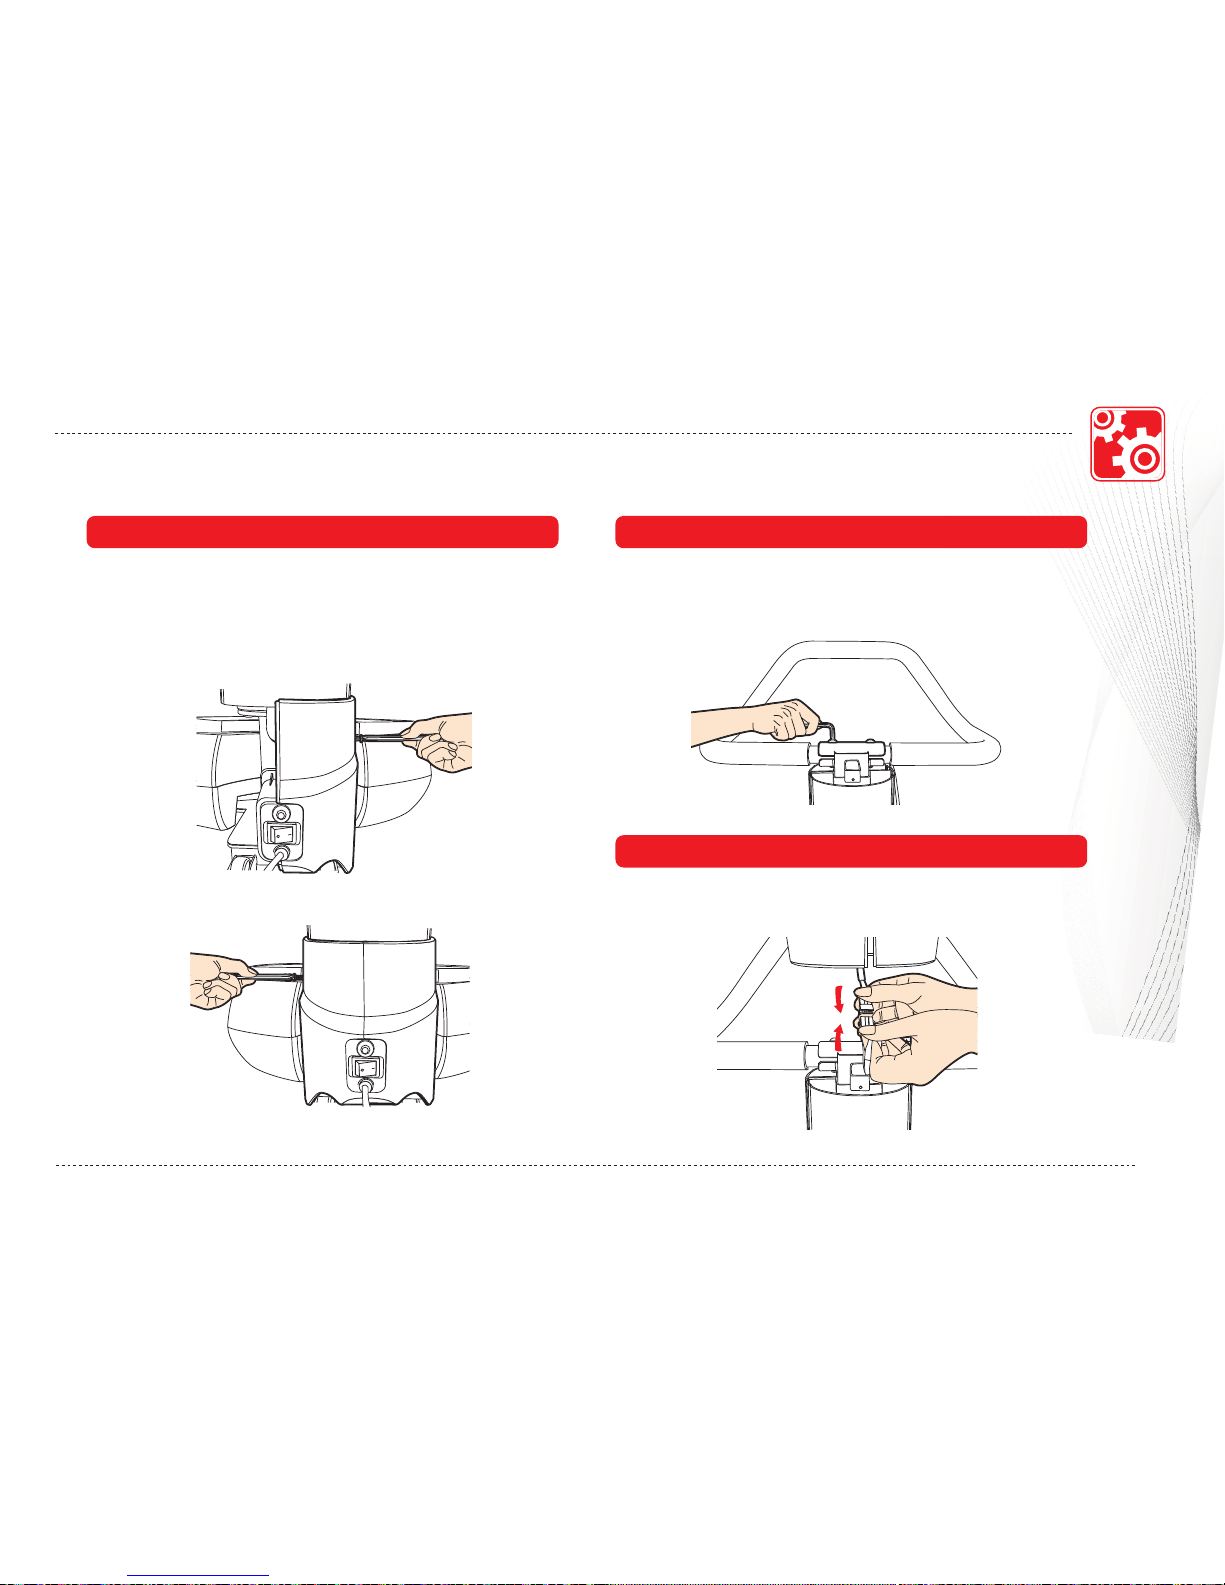
ASSEMBLY INSTRUCTIONS
PREPARATION
STEP 3
Attach the Left and Right Frame Cover to the Main Frame.
Please secure it with 4 pcs Bolt 4m/m*12m/m.
a)
b)
STEP 4
Attach the Handlebar to the Main Frame, secure it with
reinforce (4) & 2 pcs Bolt 8m/m*45m/m.
STEP 5
Connect the computer cable
11
Page 12
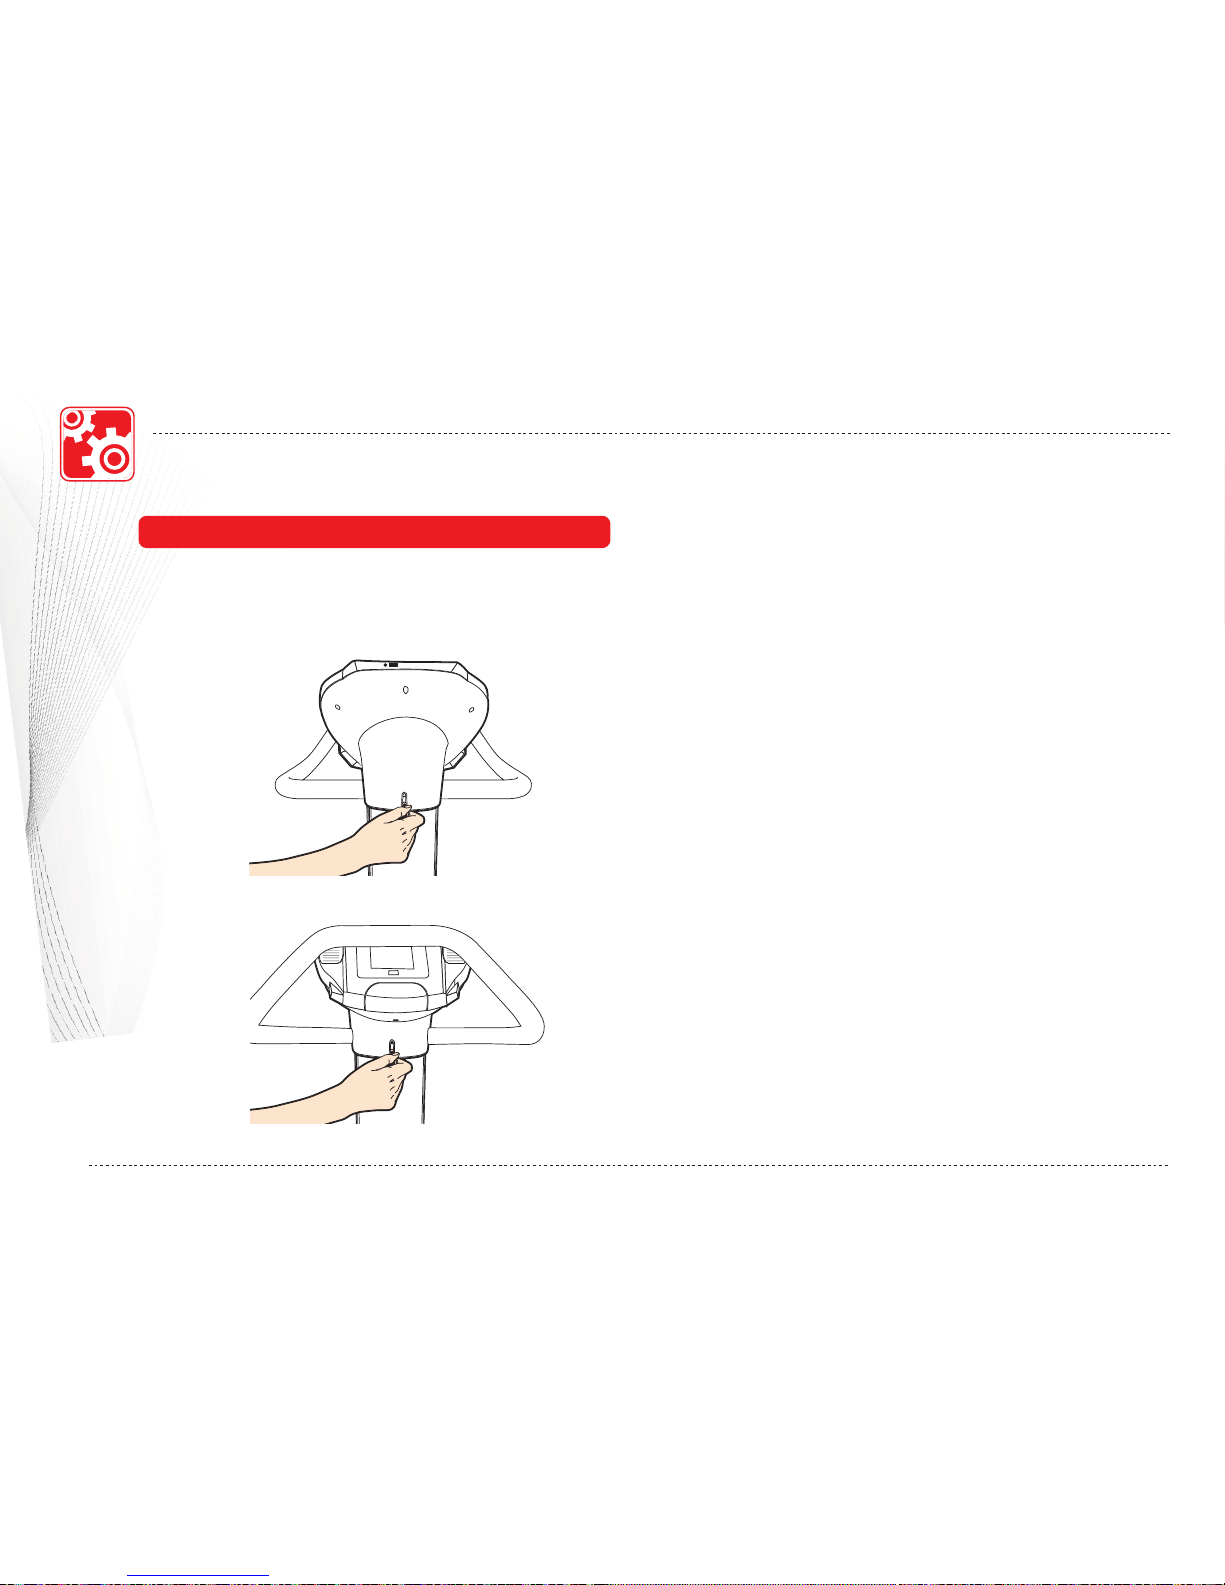
FinIsh
STEP 6
Mount the computer to the hold of the handlebar post
with 2 pcs of Bolt 4m/m*12m/m.
a)
b)
12
ASSEMBLY INSTRUCTIONS
PREPARATION
Page 13
13
POWER FUNCTIONS
BASIC OPERATIONS
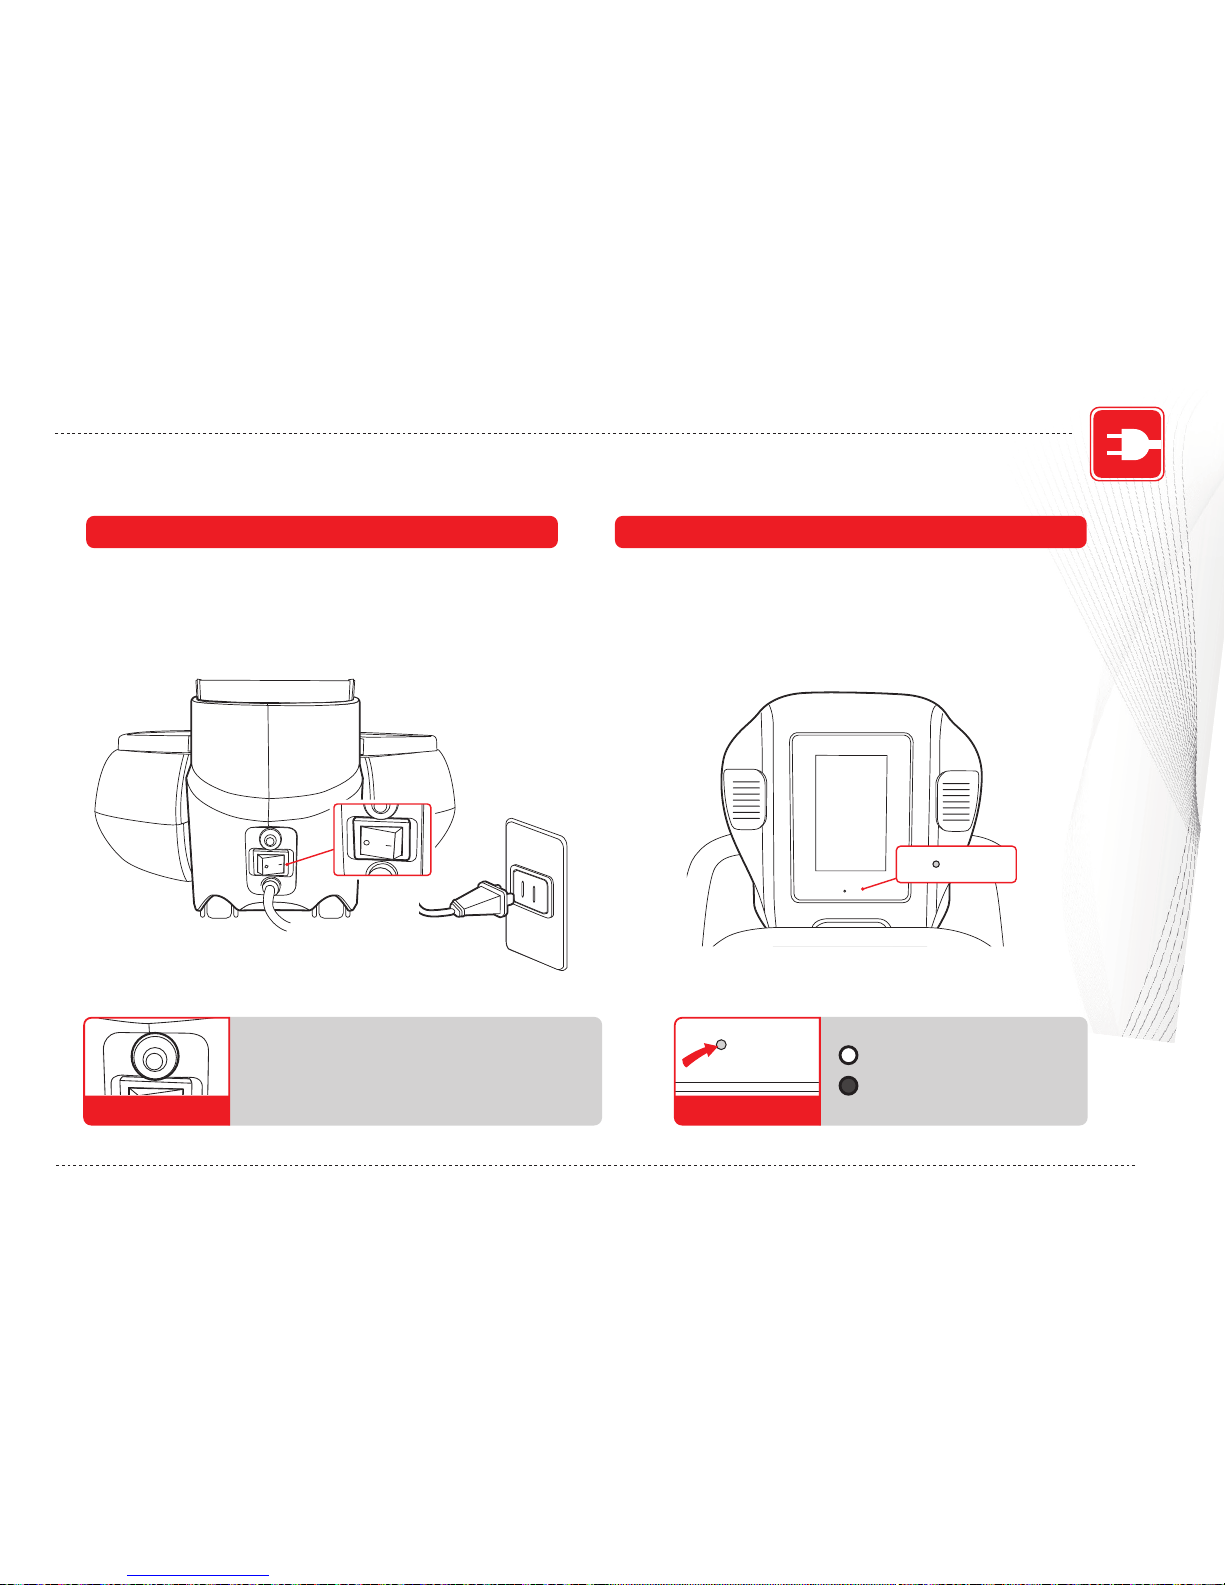
POWER
Plug the electrical power Power
Plug the electrical power into the outlet and switch on
the power. (Button behind the front post)
ON
The power indication light will be lit when turning on
the power. After a few seconds, this exerciser will start to
work. (For safety and product life, please turn off the
power of this exerciser in non-use time.)
The protector (breaker) will be bounced out to
cut off power supply once overload detected.
Once overload solved and then depress the
protector key, power will be restored.
Protector key
Light Off >>
Power Off
Solid Red >>
Power On
Power indicator
POWER
POWER
Page 14
14
BASIC OPERATIONS
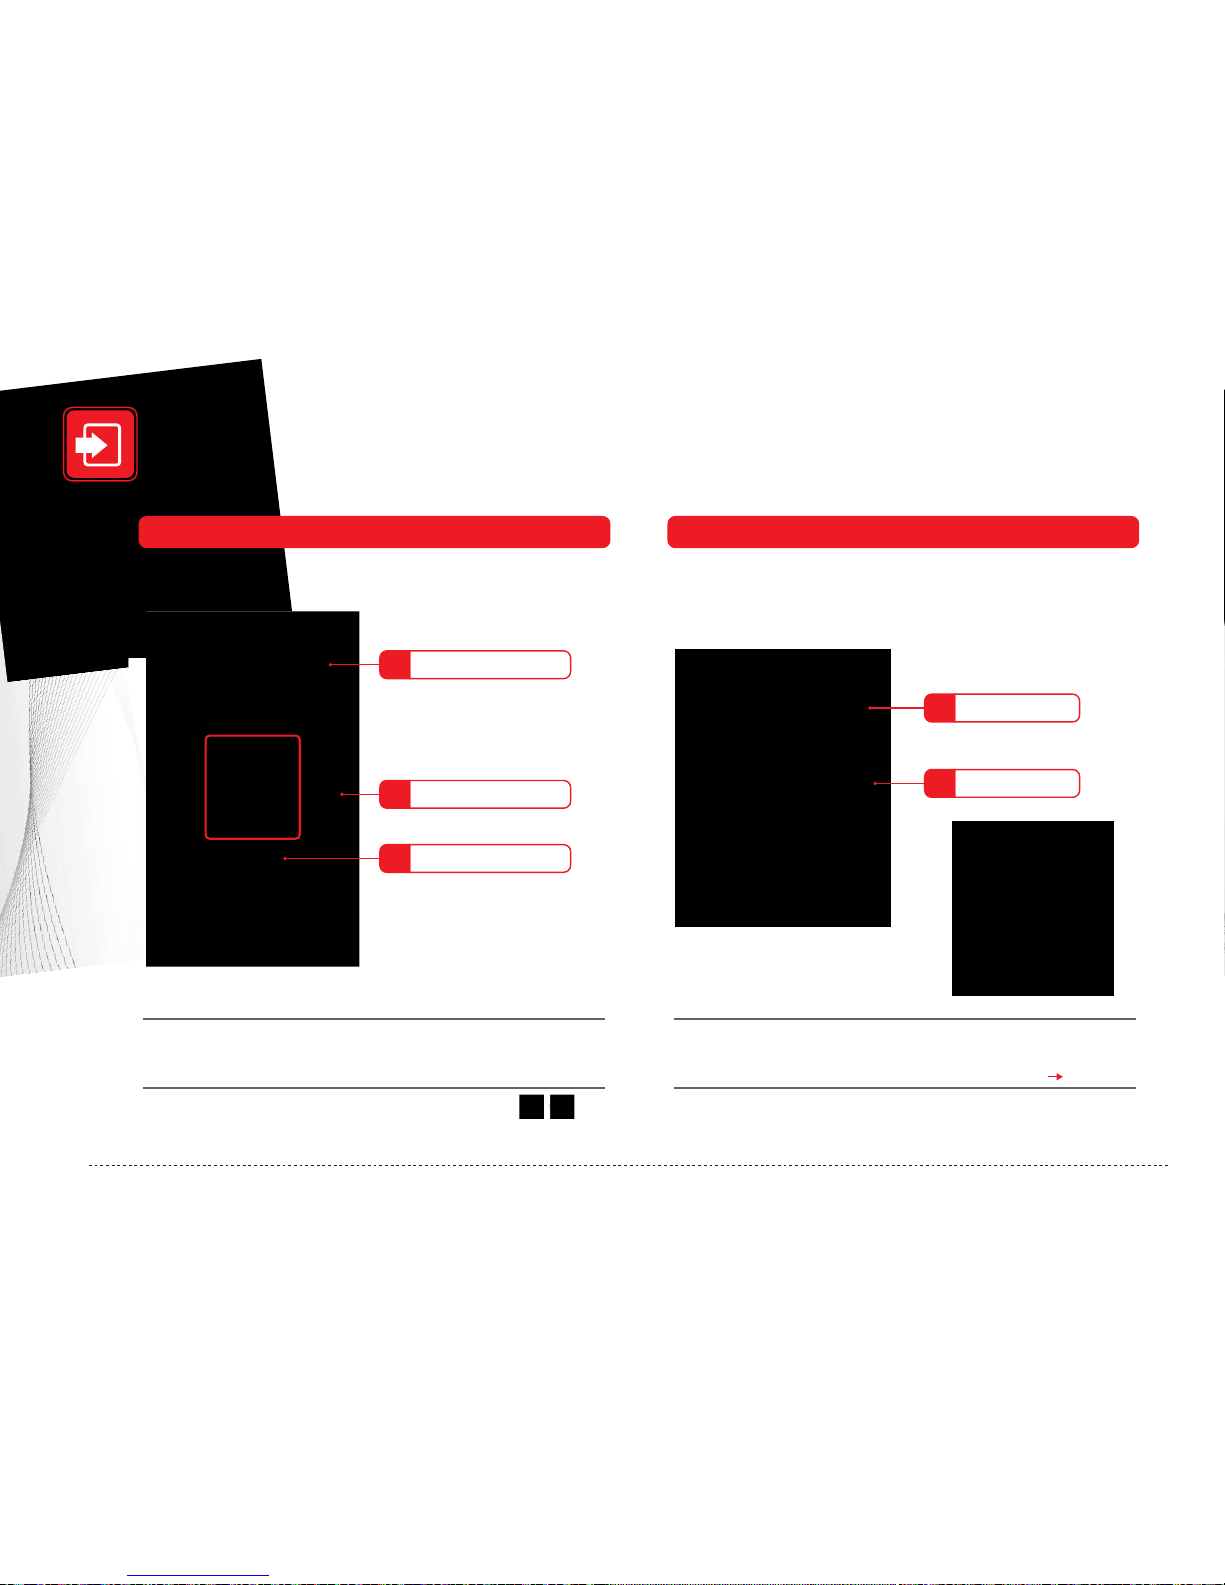
Login
Before starting the product operation, you need to login: You can set up your own user account and input personal data.
New User
1. New user
If you are a new user, please input your basic personal data.
2. User page
Enter User Page, select your name by moving
(Right/Left keys) then login.
1
New user
User page
Right/Left keys
2
3
Press this input column, keyboard comes out.
2. Basic data
Once you become a user, you can also modify your
data in User Mode.
( page 22)
1
User name
2
Basic data
1. User name
USER LOGIN
Page 15
BASIC OPERATIONS
USER LOGIN
15
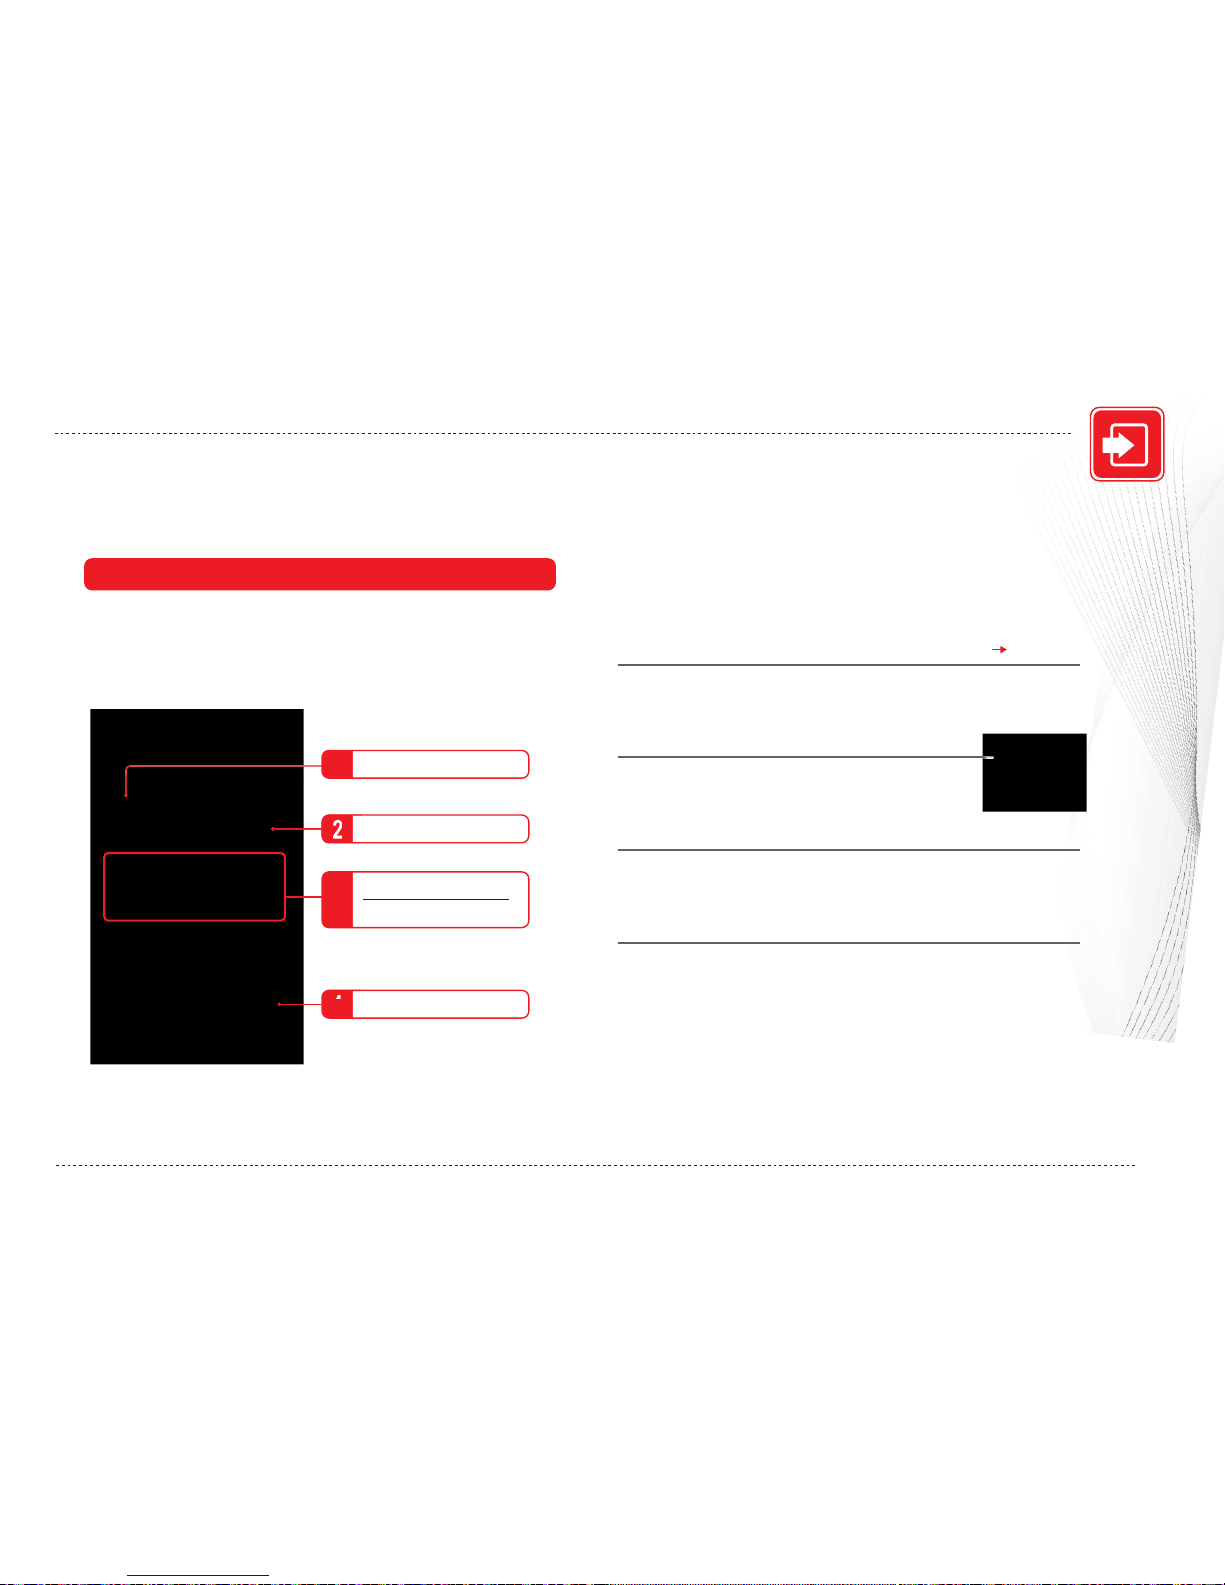
1. Your BMI
Work out your BMI value according to height/weight data
input, you can also find this data in USER mode.
2. Last BMI
This system will show your last BMI value to
easily maintain basic health management.
3. Assessment and Recommendation
The product will provide you the latest assessment and
recommendation according to the data you have inputed.
4. The latest status
The product will give you advice about whether you’ve
already achieved your ideal and healthy weight according to
your BMI value.
( page 22)
The product will work out your personal BMI value
according to the data you’ve inputed. Give you an initial
assessment and recommendation.
BMI Value
The latest status
2
4
Assessment
Recommendation
3
1
Your BMI
Last BMI
Page 16
BASIC OPERATIONS
16
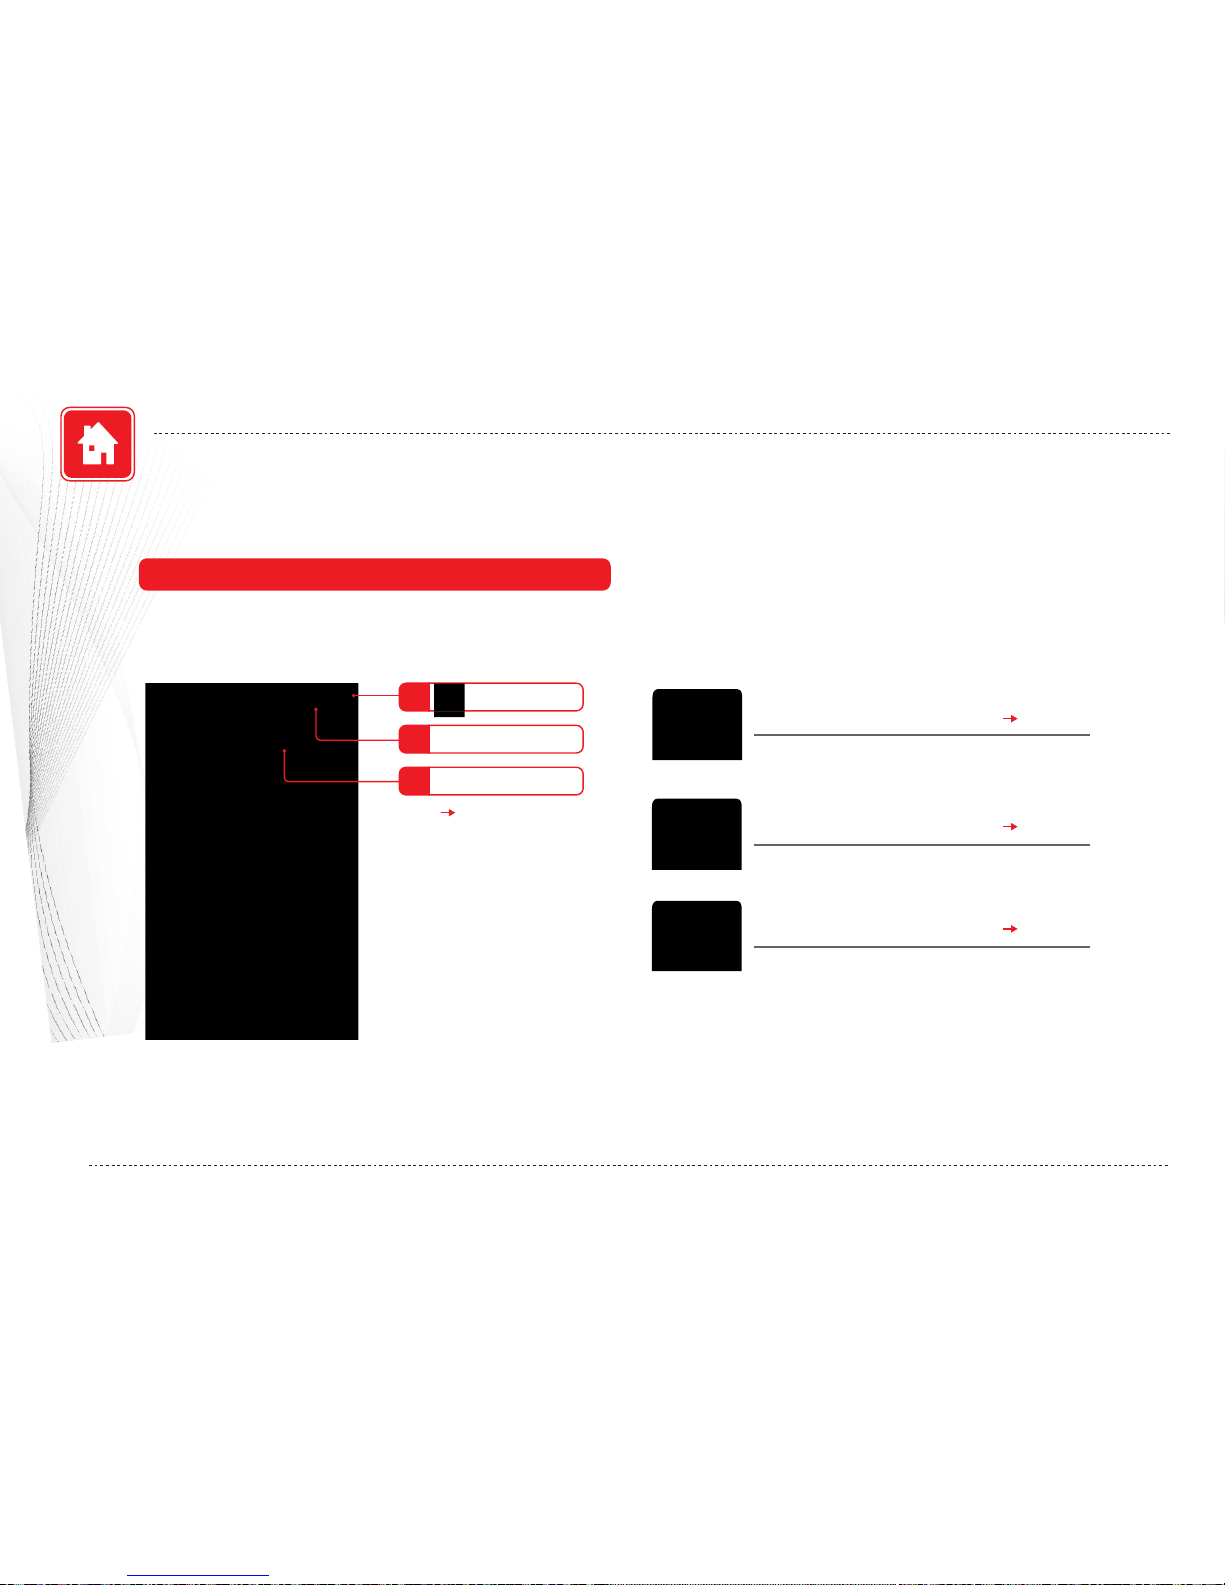
Main menu
EXERCISE
MEDIA
USER
( page 17)
( page 19)
( page 22)
Basic Training / Indication / Muscle Group
Photo / Music / Animation
Personal Data / Time&Date Setting
/ Engineering Mode
Introduction
After Login, enter main menu.
( page 22)
User name
2
Logout
1
Time display
3
Page 17
BASIC OPERATIONS
17
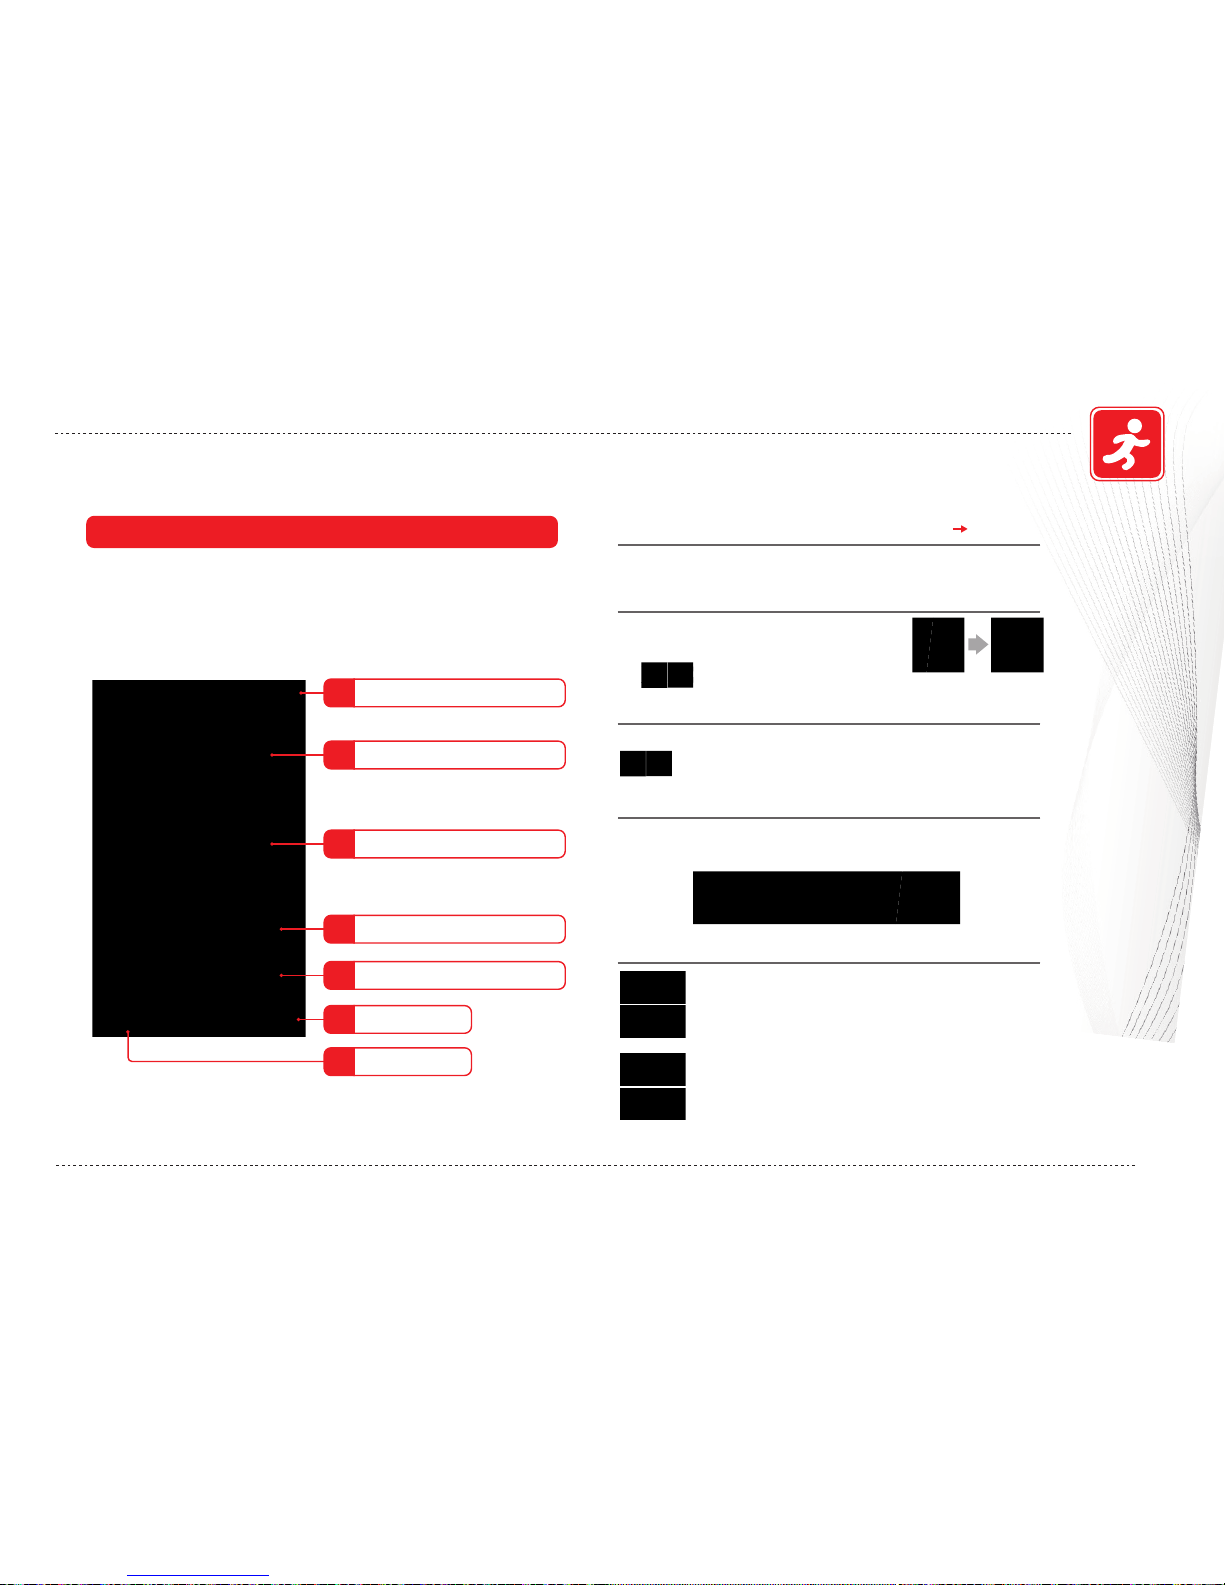
Instant response key
In basic training, you can adjust time and frequency
anytime as you like and need to come to a personalized
training purpose.
( page 22)
Basic Training
Frequency
Time display
1
Training time (m/s)
2
3
4
Function keys
5
Back
6
Main menu
7
1. Time display
Set up time in USER MODE.
4. Instant response key
You can press any Instant response key to start your
workout quickly.
5. Function keys
REPEAT
>>
Repeat the last setting.
START
>>S
tart the workout. (Icon will become
“PAUSE” once started.)
PAUSE
>>
Pause the workout
STOP
>>
Stop all workout.
2. Training time (m/s)
a) Select “Time” block
b) Adjust desired time by moving
(Up/Down keys).
3. Frequency
Adjust desired frequency by moving
(Up/Down keys).
EXERCISE MODE
Page 18
BASIC OPERATIONS
EXERCISE MODE
18
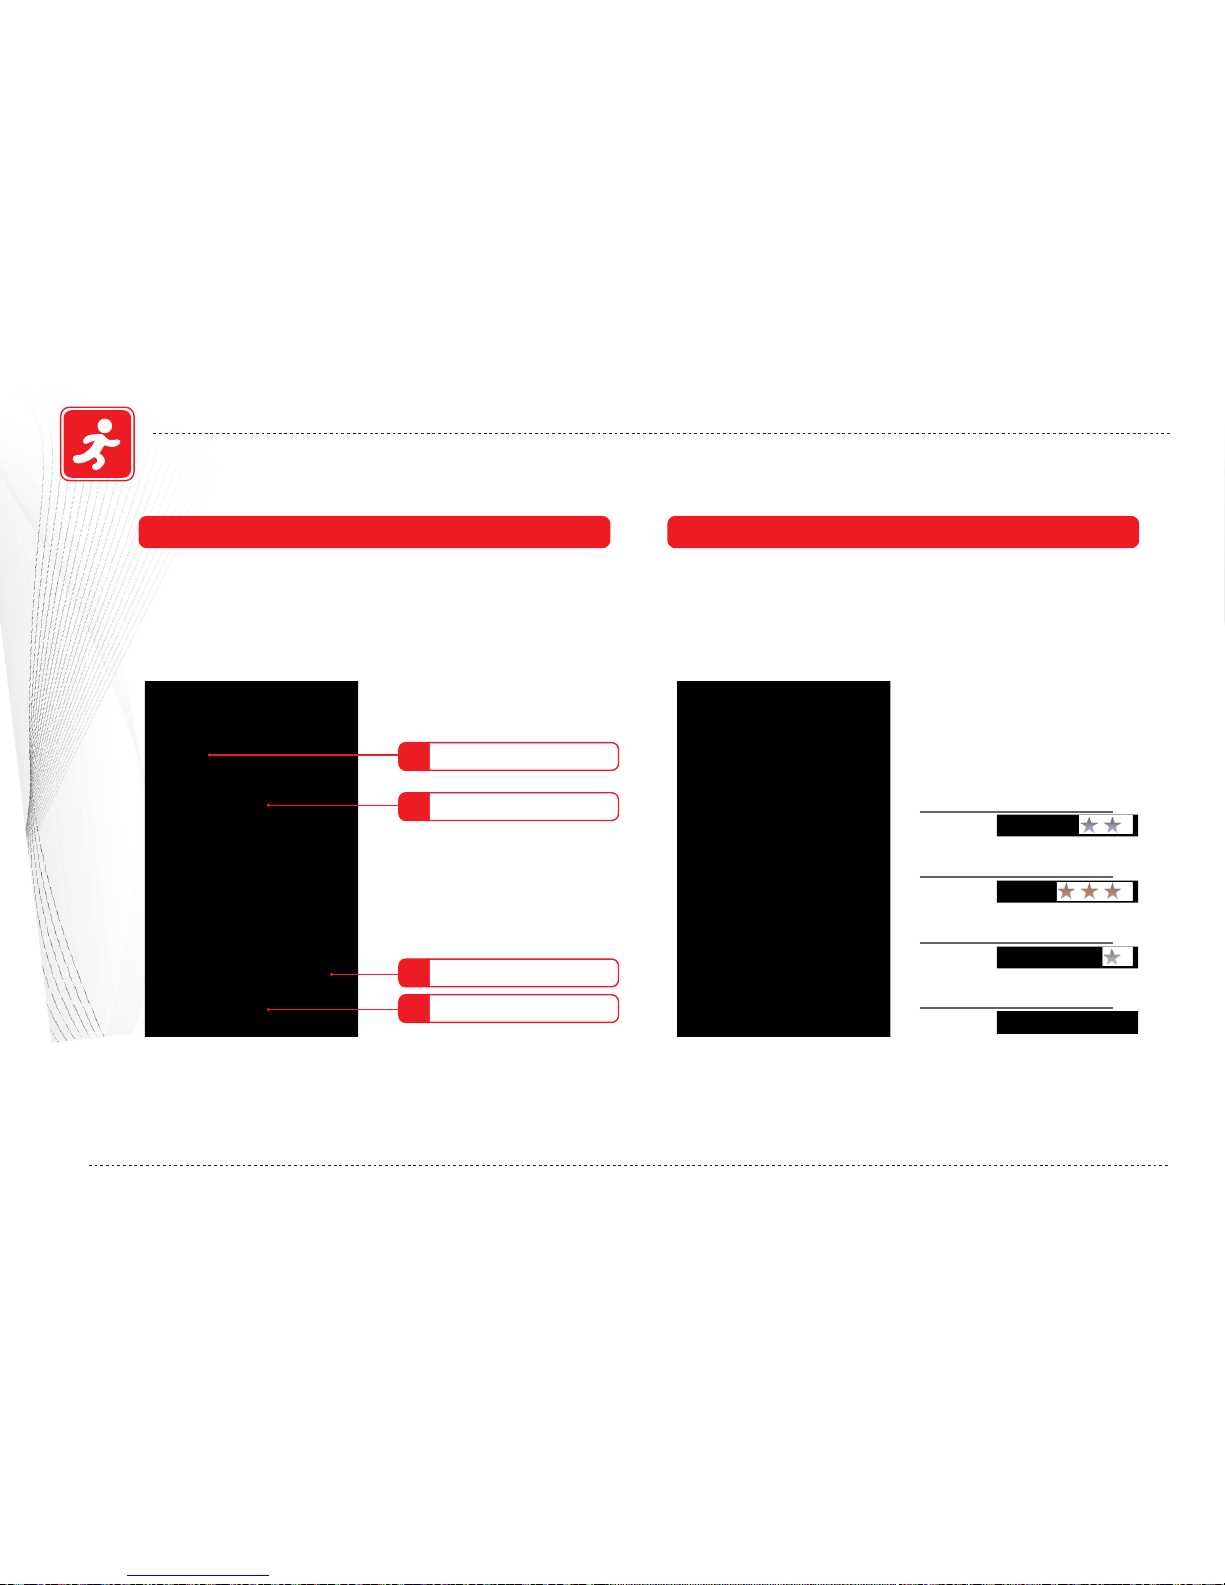
Muscle Group Indication
Vibramax divides the courses into four different levels
according to the individual need of the user. Choose your
ideal level for training.
You can choose the muscle position for training, virtual
fitness coach sets up training courses for you to achieve
your fitness goal.
Turning key
3
Fitness coach
2
Muscle group
1
Start training courses
4
All Fitness Levels
Beginner/Intermediate
Intermediate/Advanced
Intermediate/Advanced
Page 19
19
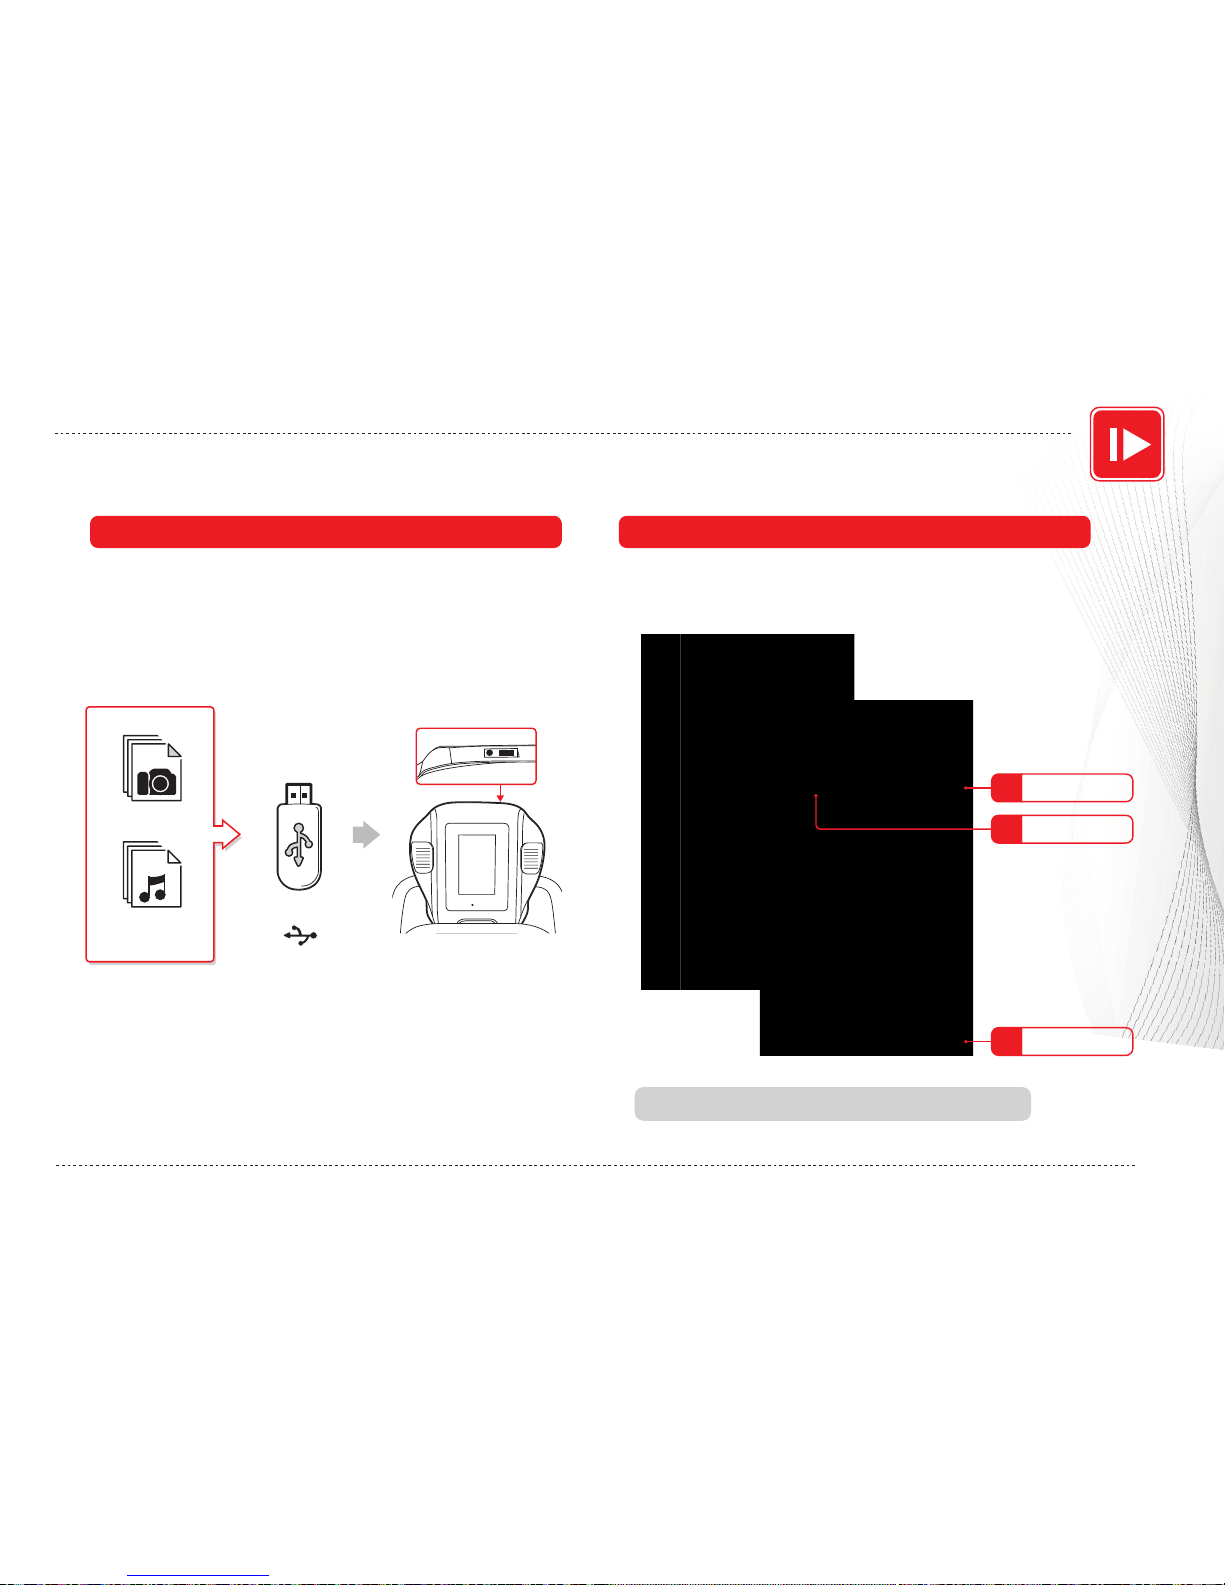
With Vibramax owns built-in multimedia player function, you
can save your music/video files into USB device, insert
into this Vibramax USB port to enjoy your colorful multimedia
world during your workout.
You can select your preferred files from the list to play
photo show.
Photo Mode
Photo
Music
USB
Tool
3
File Transmission
Compatible with JPEG/PNG/BMP Format files.
Quit
File name
1
2
MEDIA MODE
BASIC OPERATIONS
POWER
Page 20
20
MEDIA MODE
BASIC OPERATIONS
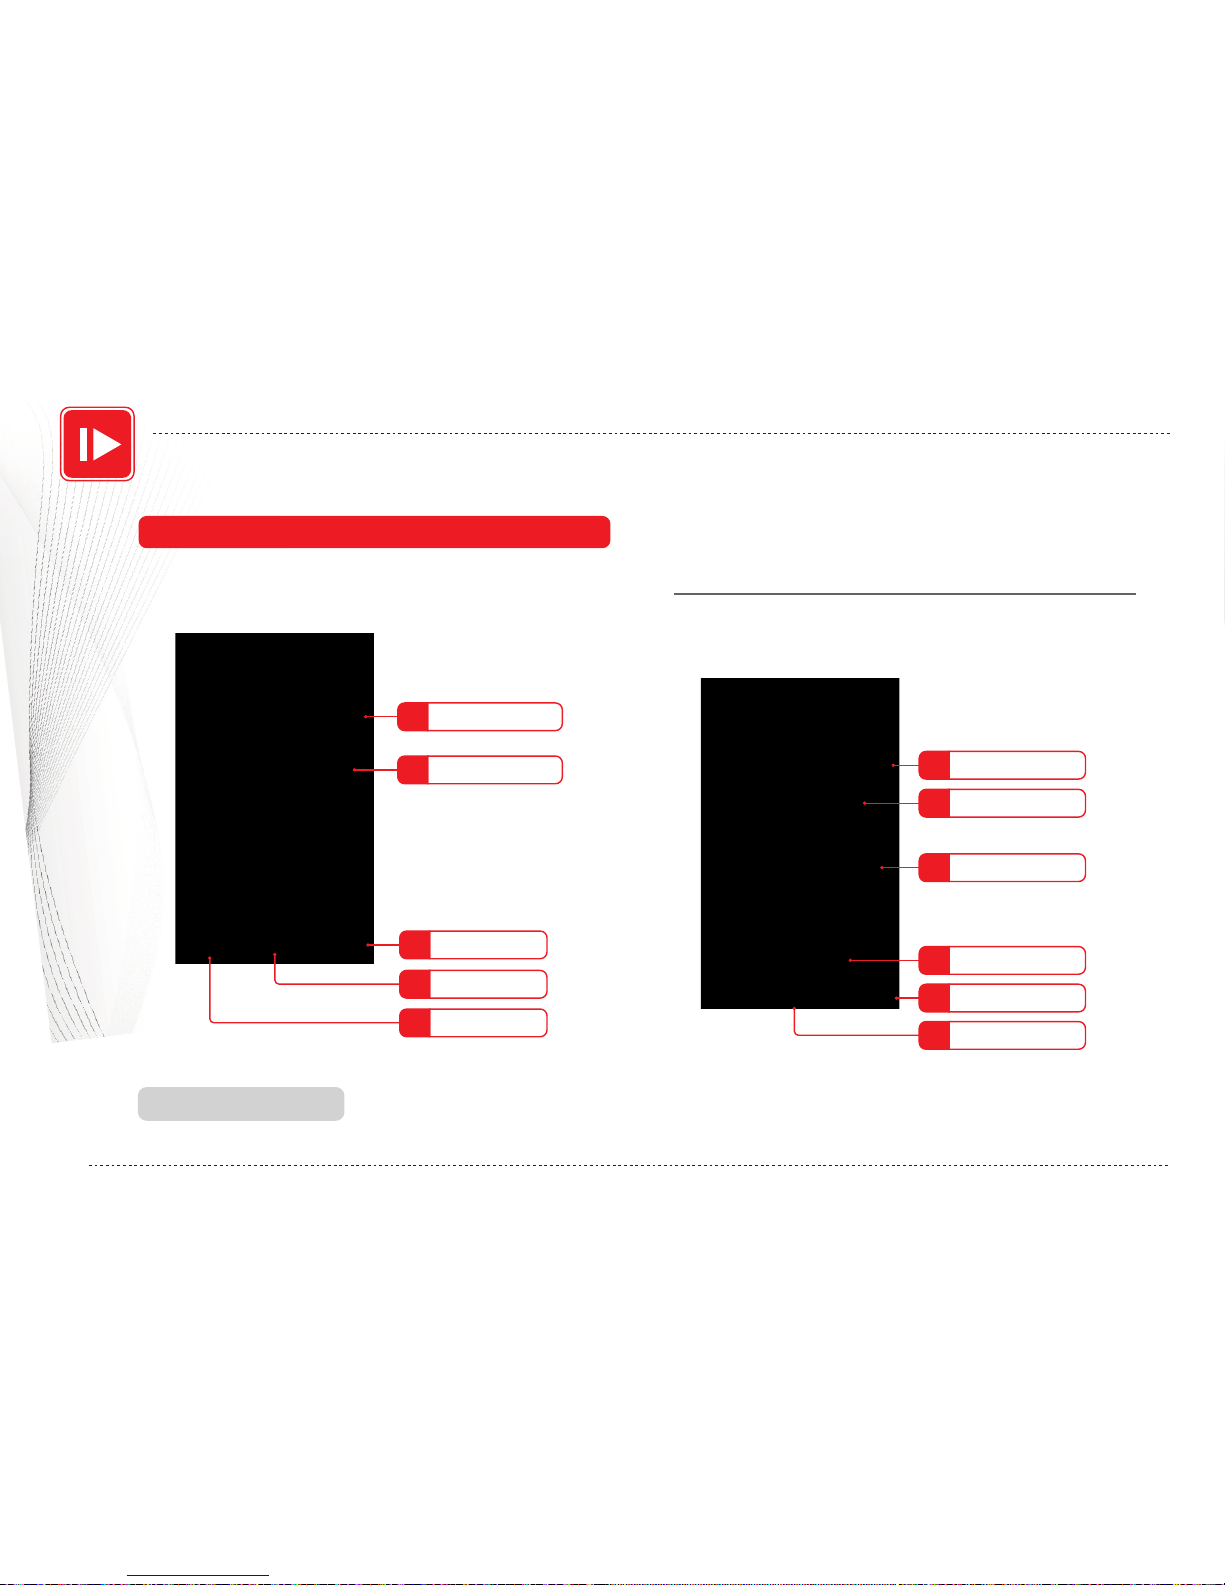
Music Mode
Select the songs that you want to listen to from the music list.
Quit
1
Playing
2
Playing key
4
3
5
6
Volume
Playing list
Playing mode
Compatible with MP3
You can play the music you select here, Vibramax provides
different playing mode for your selection.
Playing mode
Quit
1
2
Playing list
3
4
Play
5
Select all
Remove all
Page 21
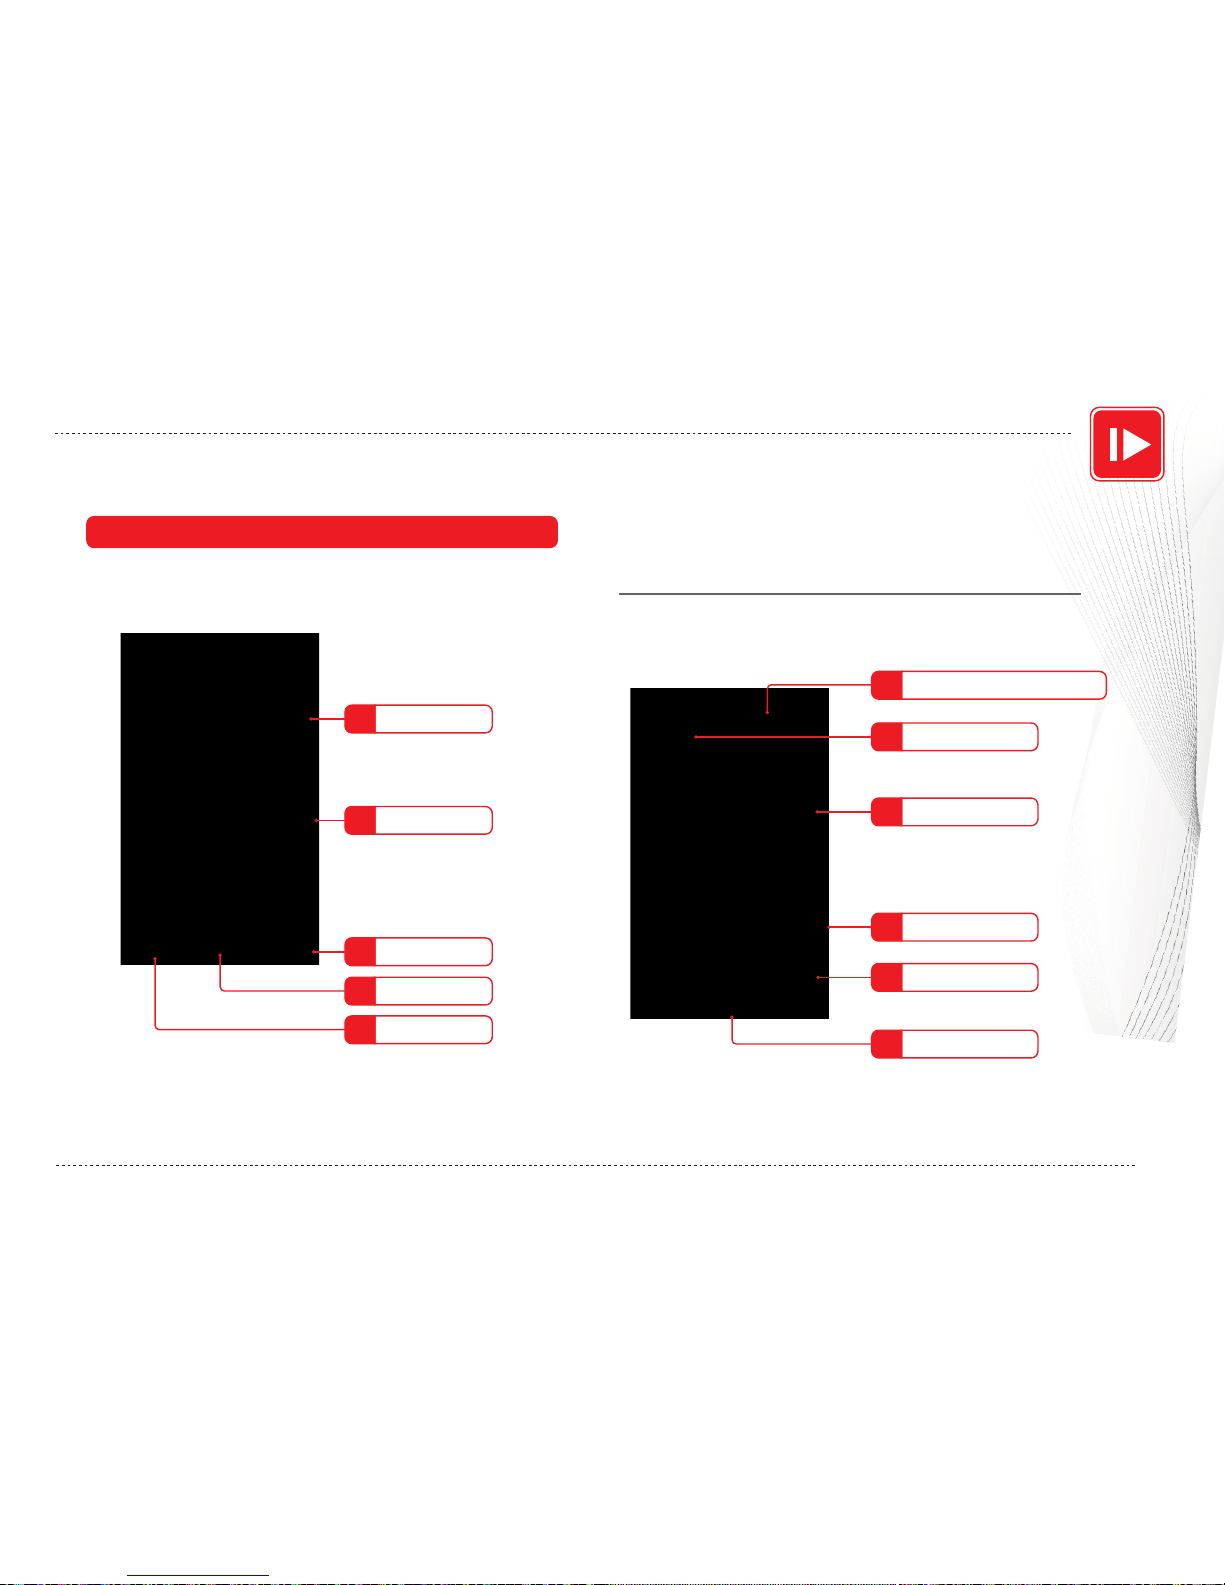
MEDIA MODE
BASIC OPERATIONS
21
You can select your preferred animation video from the
list to play.
Animation Mode
Quit
1
2
3
4
Play
5
Select all
Next page
Remove all
Countdown finished, starts to execute the time and cycles
playing.
Playing mode
Playing
3
Information
4
5
2
6
Pause
Playing list
Countdown
Playing time / Cycles
1
Page 22
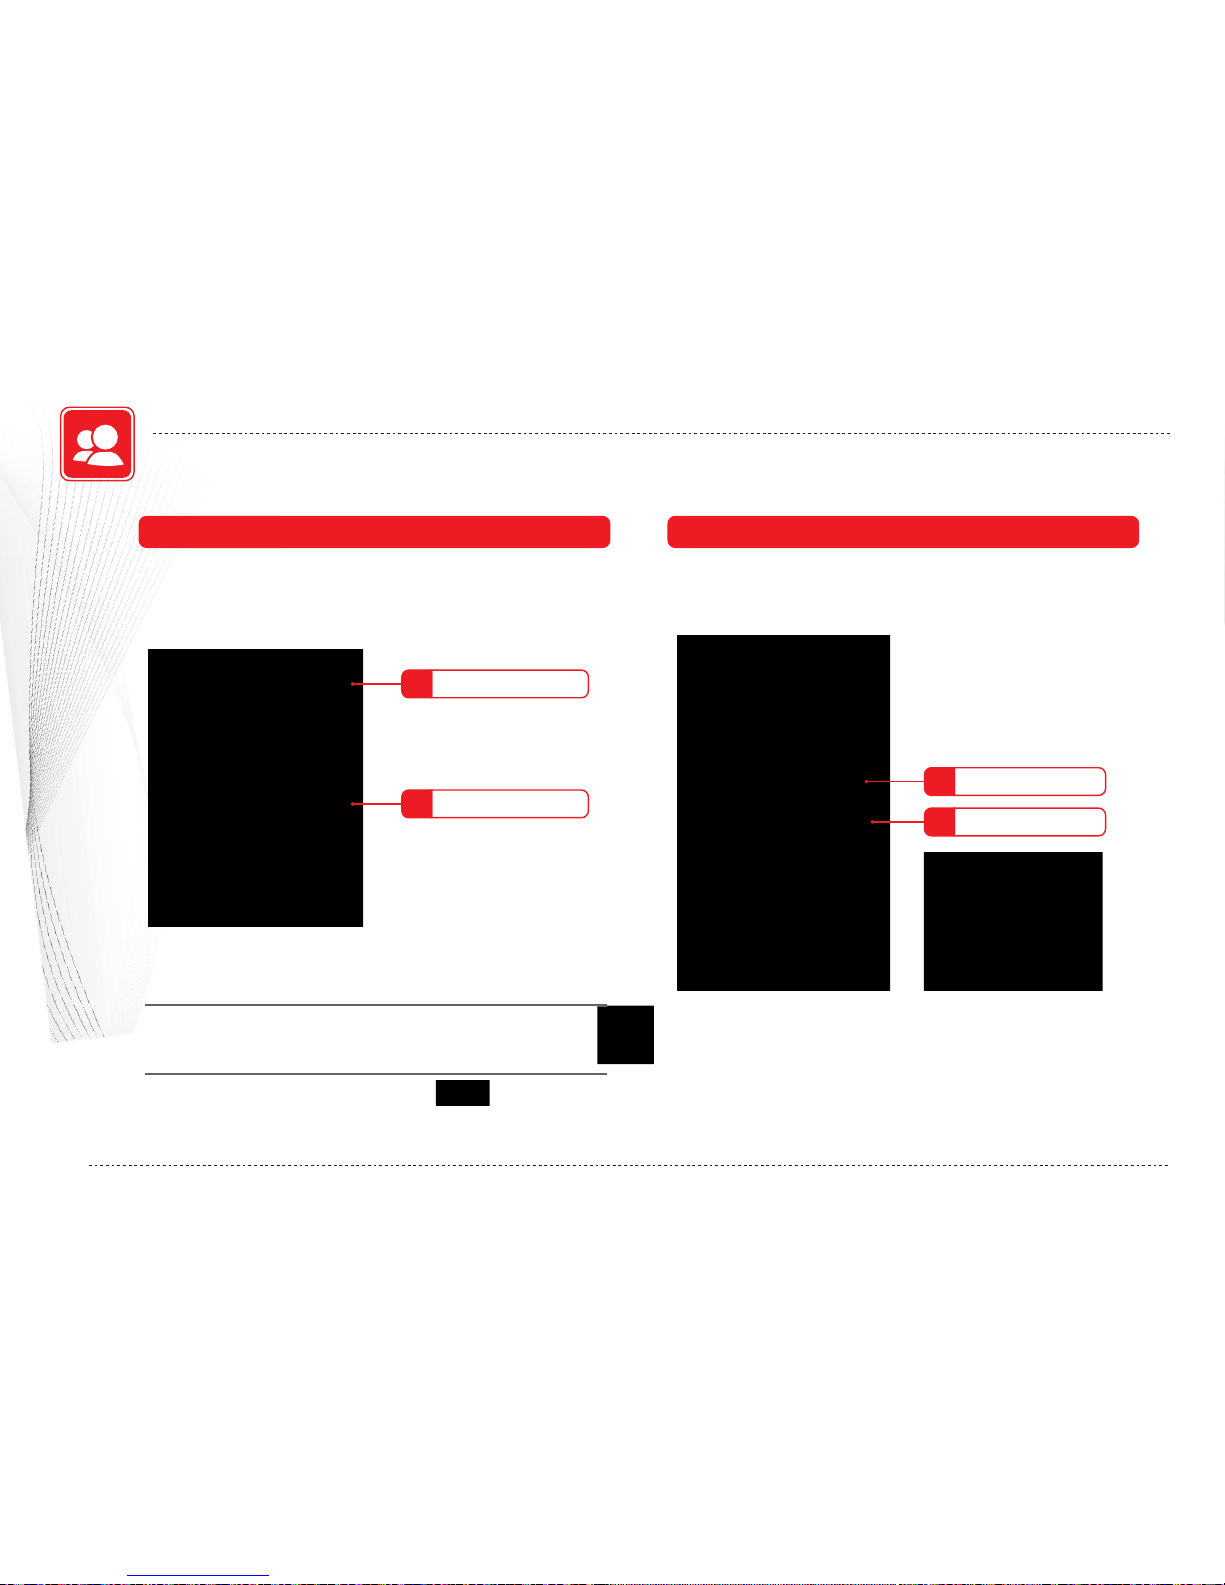
22
USER MODE
BASIC OPERATIONS
Set up time and date
Time / Date settingPersonal Date
Enter personal data page, modify your own data, age,
height, weight, etc.
1. Delete this User
If you want to delete this user, perform this operation.
2. Basic data
Modify your basic data by moving (Up/Down keys).
1
Time
2
Date (D-M-Y)
1
Delete this User
2
Basic data
Page 23
USER MODE
BASIC OPERATIONS
23
Version Upgrade
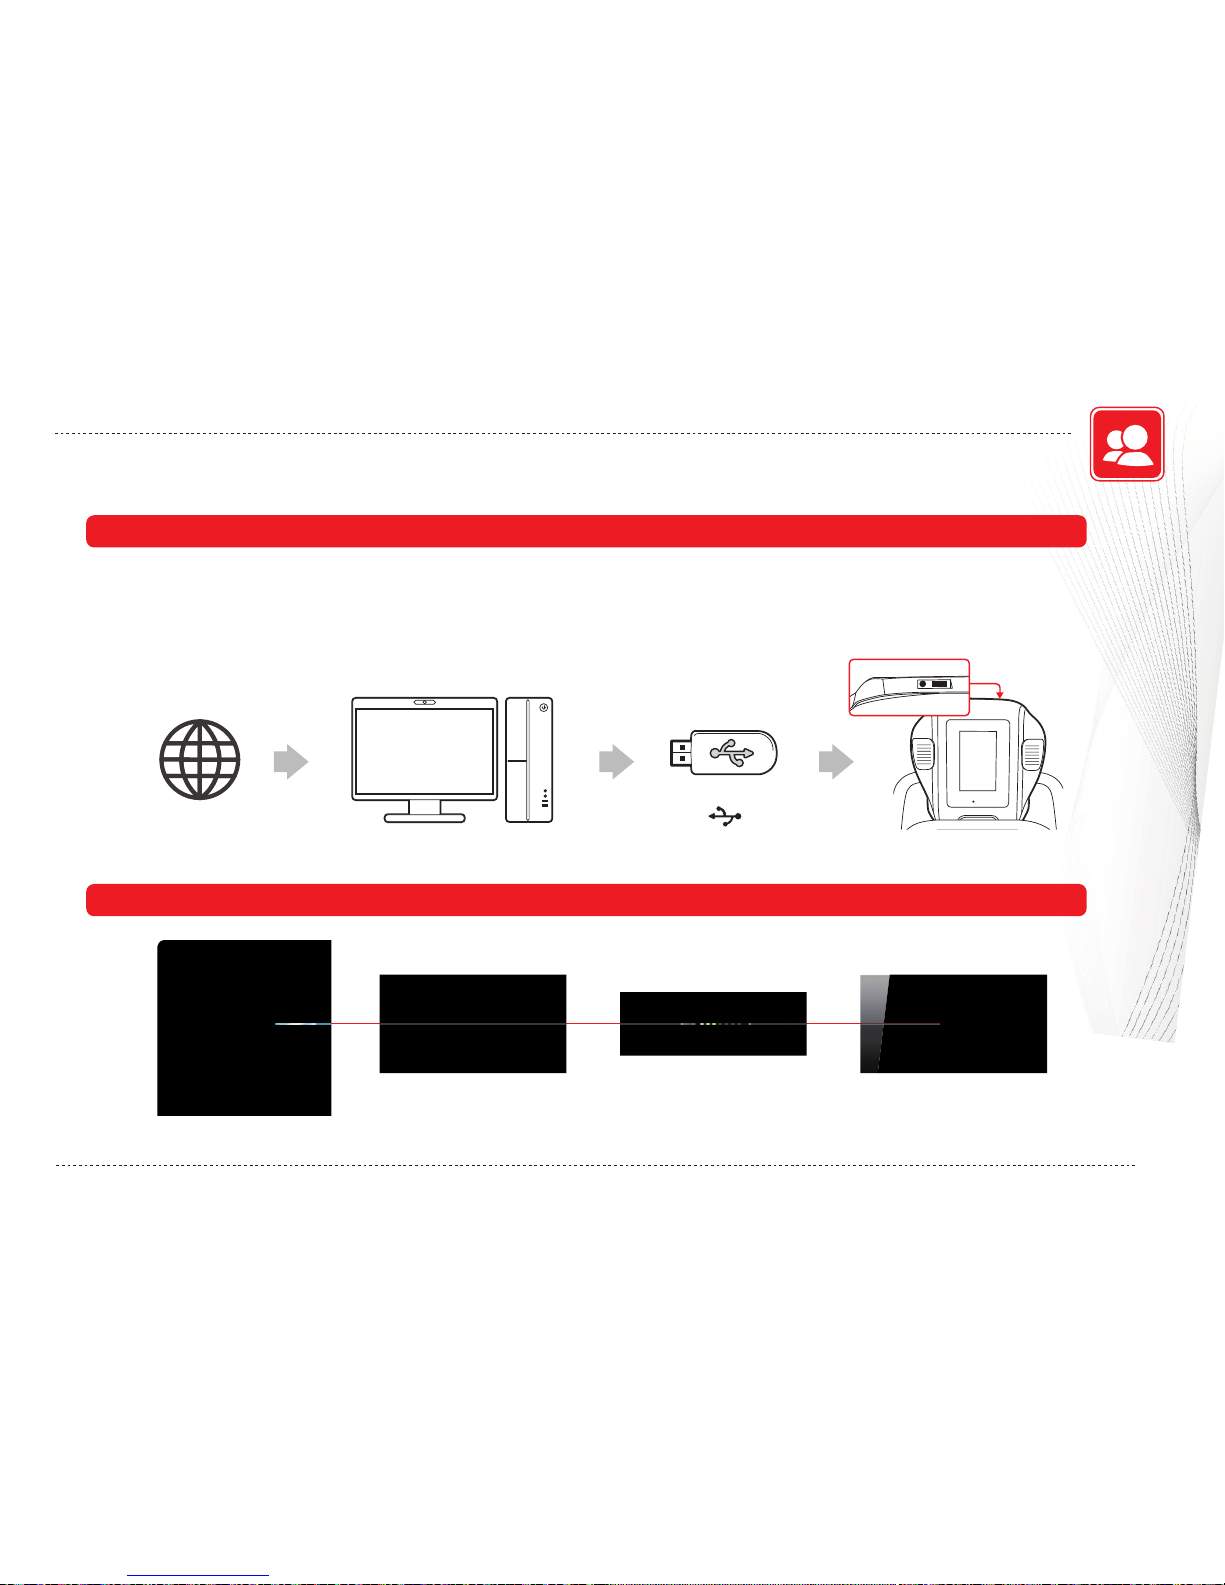
Prior to any operation on the program version upgrade, please contact authorized service agent whom you purchased
this product from for more instructions. You can download the upgraded version from our designated website server
into your USB device, insert into your product and upgrade the program.
USB
PC
Internet
Vibramax
POWER
Update Procedure
Start
Updating
Finish
Version Upgrade
Page 24
FAQ
TROUBLESHOOTING CONTINUED
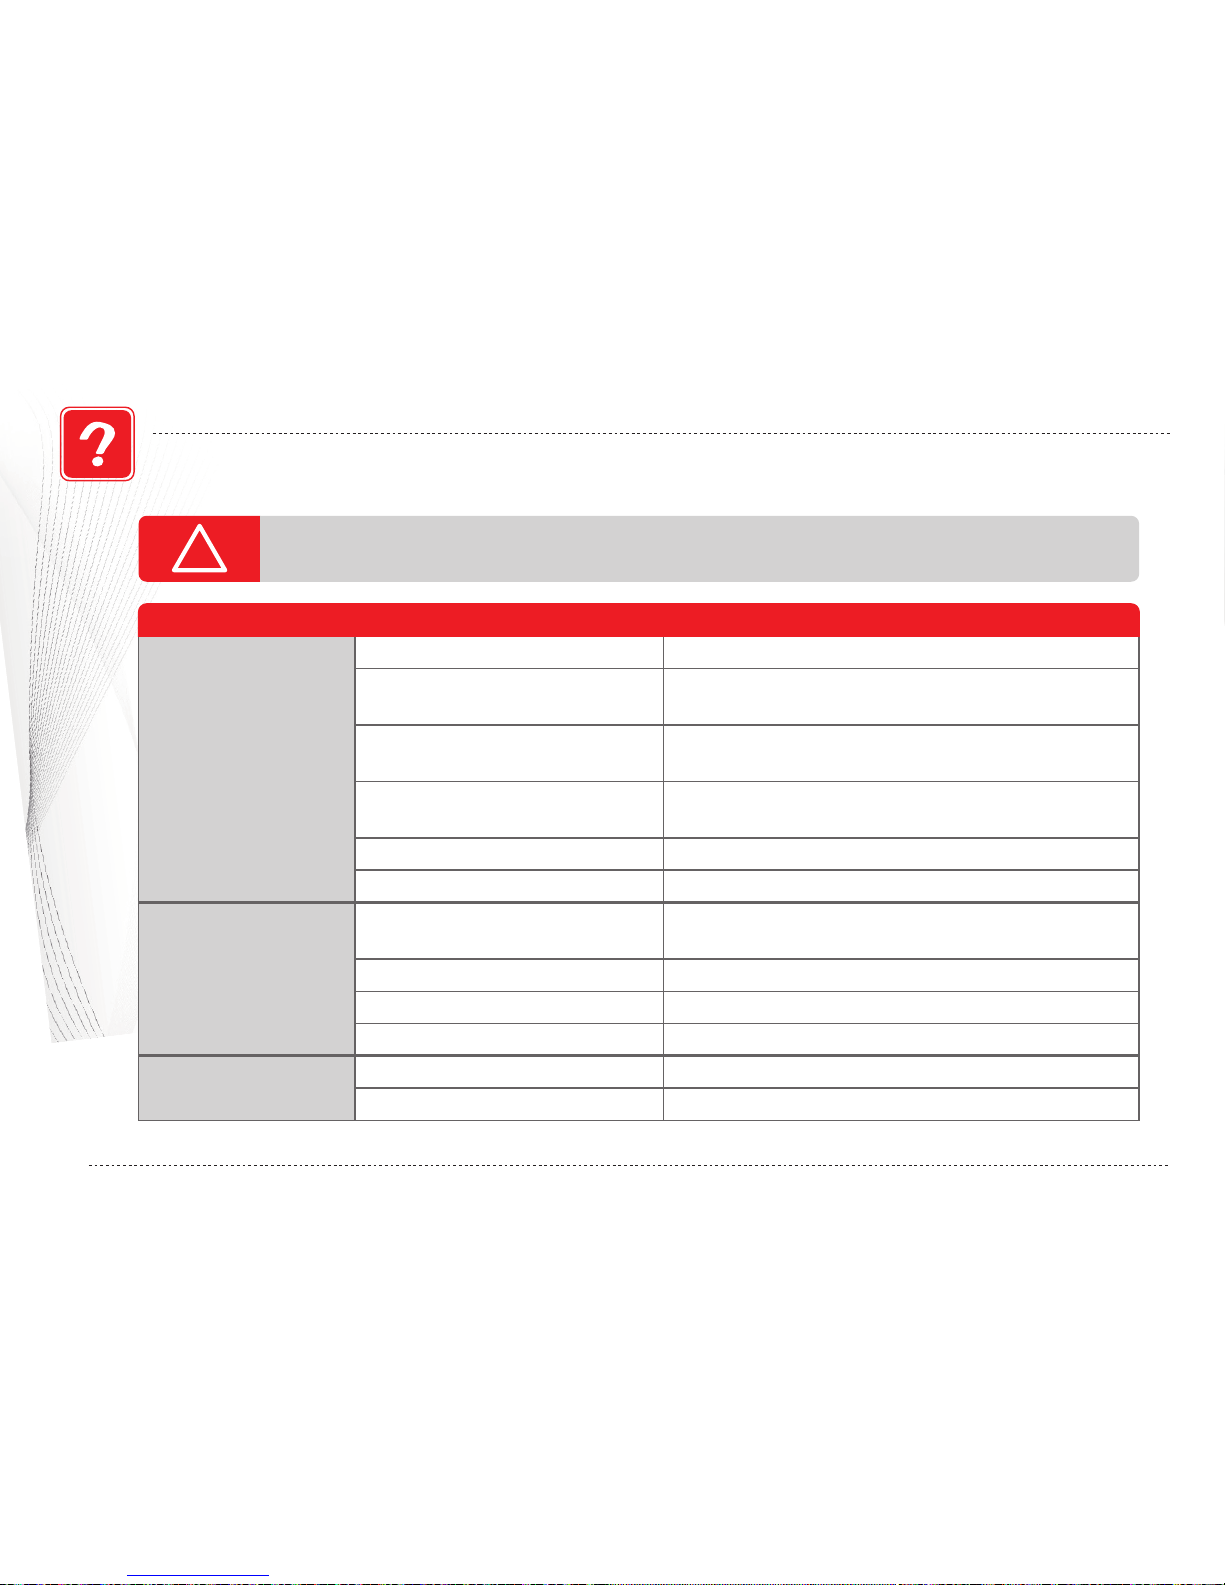
Prior to any actions to solve the problems, please make sure power is normally supplied and power cord is
plugged in completely.
!
Console doesn't work
1. The console connection wires
were damaged or loosened.
2. System Crashed
3. Malfunction of console PCB
1. Check the connection of the cables and replug them,
if damaged, replace with new ones.
2. Restart the system
3. Replace Console PCB with a new one.
4. Malfunction of motor controller 4. Replace motor control board with new good one.
USB Function
Incomplete
1. Overlarge size of USB data.
2. System Crashed
1. Delete unnecessary data from USB device.
2. Restart the system
No power
1. Power switch is not turned on.
2. Breaker was actuated and
bounced out to protect MCB.
1. Make sure the power of this machine is turned on
5. Malfunction of motor controller 5. Replace motor controller with a new one.
6. Malfunction of console PCB 6. Replace Console PCB with a new one.
2. Press the breaker button and restart.
3. Malfunction of the fuse in motor
controller
3. Replace fuse
4. The console connection wires
were damaged or loosened.
4. Check the connection of the cables and replug them,
if damaged, replace new ones.
Error Situation Possible Root Causes Solution
24
Page 25
FAQ
Moter doesn't work
1. Check the motor connection wires and replug them,
if damaged, replace with new ones.
1. Connection between motor and
motor control board failed.
2. Replace Motor2. Malfunction of motor
3. Replace motor control board with a new one. 3. Malfunction of motor controller
4. The console connection wires
were damaged or loosened.
Error Situation Possible root causes Solution
25
TROUBLESHOOTING CONTINUED
4. Check the connection of the cables and replug them,
if damaged, replace with new ones.
Page 26

Accessories:
4G USB Stick
Elastic Cords
Cotton Wristband
Straps
Jump Rope
Rubber Mat Exercise Mat
Page 27

OS:Linux 2.6
Software
:
Vibramax V1.00a
Hardware
:
VAR 950
CPU:Embedded 200 MHz
Memory:64MB RAM / 4G Flash Disk
InterFace:USB 2.0 Port × 1
Display:7” TFT Digital LCD With Touch panel
Speaker:5W X 2
Power:AC IN 100~240V /DC Out 12V
Media:MP3、MPEG format
Photo:JPG、PNG、BMP Format
Vibration Console Display Specification:
Page 28
 Loading...