

“Aspen”
Reference Guide

This document provides final product specifications.
This document contains proprietary information of VIA Telecom, Inc. The information contained
herein is not to be used by or disclosed to third parties without the express written permission of an
officer of VIA Telecom, Inc.
VIA Telecom, Inc. reserves the right to make changes to any product herein at any time without
notice. VIA Telecom does not assume any responsibility or liability arising out of the application or
use of any product described herein, except as expressly agreed to in writing by VIA Telecom; nor
does the purchase or use of a product from VIA Telecom convey a license under any patent rights,
copyrights, trademark rights, or any other of the intellectual property rights of VIA Telecom or third
parties.
The VIA Telecom logo design and VIA TELECOM are trademarks owned by the company. All other
brand and product names may be trademarks of their respective companies.
VIA Telecom is certified to the ISO 9001:2000 quality management system international standard.
VIA Telecom, Inc.
3390 Carmel Mountain Road
San Diego, CA 92121, U.S.A.
Tel: 858.350.5560
Internet: www.via-telecom.com
Copyright © VIA Telecom, Inc. 2005
All Rights Reserved. Printed in U.S.A..
May 2005

Contents
CHAPTER 1 QUICK START .................................................................................................1-1
Installing the Battery ...........................................................................................................1-1
Charging the Battery Prior to Use.......................................................................................1-2
Powering the Phone On and Off.........................................................................................1-3
Making, Answering, and Ending a Call...............................................................................1-4
Locking the Keypad ............................................................................................................1-4
Parts of the Phone..............................................................................................................1-5
Screen Icons.......................................................................................................................1-7
Navigating Through the Menus...........................................................................................1-8
CHAPTER 2 CONTACTS......................................................................................................2-1
Using the Keypad to Enter Information...............................................................................2-1
Entering and Editing Contacts ............................................................................................2-4
Creating and Using the Speed List.....................................................................................2-7
Using the vCard - VCard Exchange....................................................................................2-8
Set Reception Mode.......................................................................................................2-8
Read vCards ..................................................................................................................2-8
Send a vCard ...............................................................................................................2-10
Send All of Your Phonebook ........................................................................................2-11
Delete vCards ..............................................................................................................2-12
CHAPTER 3 MESSAGES .....................................................................................................3-1
Using Short Message .........................................................................................................3-1
Using Ring Tone.................................................................................................................3-3
Browse all rings ..................................................................................................................3-3
Manage rings......................................................................................................................3-3
Message Settings ...............................................................................................................3-5
Using Voice Mail.................................................................................................................3-7
CHAPTER 4 MAKING CALLS ..............................................................................................4-1
Viewing Incoming Call Details ............................................................................................4-1
Making an Emergency Call.................................................................................................4-1
Making Calls .......................................................................................................................4-2
Viewing a List of Call Logs..................................................................................................4-6
i

Aspen Reference Guide
Contents
CHAPTER 5 SETTING UP YOUR PHONE ........................................................................... 5-1
Selecting Ring Tones .........................................................................................................5-1
Editing Profile .....................................................................................................................5-2
Adjusting the Volume .....................................................................................................5-2
Setting Up Alerts.................................................................................................................5-4
Setting up the Display.........................................................................................................5-7
Security...............................................................................................................................5-8
Security – Call Restriction ..................................................................................................5-9
Call Setup.........................................................................................................................5-12
Viewing Phone Information...............................................................................................5-15
Enable Key guard ............................................................................................................. 5-16
Network Service ...............................................................................................................5-16
vCard Receiving Prompt...................................................................................................5-17
CHAPTER 6 USING THE PHONE TOOLS ...........................................................................6-1
Using the Schedule ............................................................................................................6-1
Using the Alarm Clock ........................................................................................................ 6-2
Using the Calculator ...........................................................................................................6-3
Using the Tip Calculator .....................................................................................................6-3
CHAPTER 7 KEYPAD SERVICE PROVISIONING ..............................................................7-1
Program NAM1, NAM2, or SPCs .......................................................................................7-1
Abbrev.NAM .......................................................................................................................7-3
System NAM Setting ..........................................................................................................7-3
Test Screen ........................................................................................................................7-4
Factory test mode...............................................................................................................7-4
CHAPTER 8 HEALTH AND SAFETY INFORMATION.........................................................8-1
Exposure to Radio Frequency (RF) Signals .......................................................................8-1
For Body Operation ............................................................................................................8-2
ii

Chapter 1 Quick Start
Congratulations on purchasing your phone. This chapter provides you with information
to get you started using your new phone quickly.
Installing the Battery
(If any background/introduction information is needed, type it here)
To install the battery
1. first step aaaaaa aaaaaa aaaaa aaaaa
aaaaa aaaaa aaaaa aaaaa aaaaa aaaaa
aaaaa aaaaa aaaaa aaaaa aaaaa aaaaa
aaaaa aaaaa aaaaa aaaaa aaaaa.
Insert
picture
2. second step
3. etc.
Insert
picture
1-1

Aspen Reference Guide
Chapter 1 Quick Start
Charging the Battery Prior to Use
(type any background/introduction information here, such as, the battery is delivered
uncharged and you must charge the battery before first use, ok for power to be on while
charging the battery, etc.)
To charge the battery
1. first step aaaaaa aaaaaa aaaaa aaaaa
aaaaa aaaaa aaaaa aaaaa aaaaa aaaaa
aaaaa aaaaa aaaaa aaaaa aaaaa aaaaa
aaaaa aaaaa aaaaa aaaaa aaaaa.
Insert
picture
2. second step
Insert
picture
3. etc.
1-2

Apsen Reference Guide
Chapter 1 Quick Start
Powering the Phone On and Off
(If any background/introduction information is needed, type it here.)
To turn the phone on
1. press end key for a while without
release
To turn the phone off
1. press End key for a while without
release
1-3

Aspen Reference Guide
Chapter 1 Quick Start
Making, Answering, and Ending a Call
(If any background/introduction information is needed, type it here.)
To make a call
1. enter the phone number you want to
call in idle state.
2. press the “Send” button
3. press the “End” button
To answer a call
1. press the “Send” button
2. To end the call, press the “End” button
Locking the Keypad
1. in idle state, press * for a while, do not
release.
2. press “*#” to unlock.
1-4

Apsen Reference Guide
y
r
Chapter 1 Quick Start
Parts of the Phone
The illustration below shows the main components of your phone.
(in the text boxes in the picture below, type in names of the major components)
Earpiece speake
Up/down key
LCD screen
Soft ke
Soft key
Send
End
(xxxx)
(xxxxx)
Microphone
(xxxx)
1-5

Aspen Reference Guide
Chapter 1 Quick Start
(type in descriptions of the phone’s components in the table below)
Key Description
(insert picture)
Up/down key
(insert picture)
Send key
(insert picture)
End key
(insert picture)
Soft key (left)
(insert picture)
Soft key (right)
Alphanumeric keypad Use these keys to input numbers, or characters
Use up/down to navigate in menus
Use this key to dial, or answer a call
Use this key to end a call, or turn power on/off
Use this key to select or confirm something
Use this key to cancel something
1-6
Apsen Reference Guide
Chapter 1 Quick Start
Screen Icons
(insert all of the screen icons in the table below--or instead of using the table, insert a
sample LCD screen with call-outs showing each of the possible screen icons)
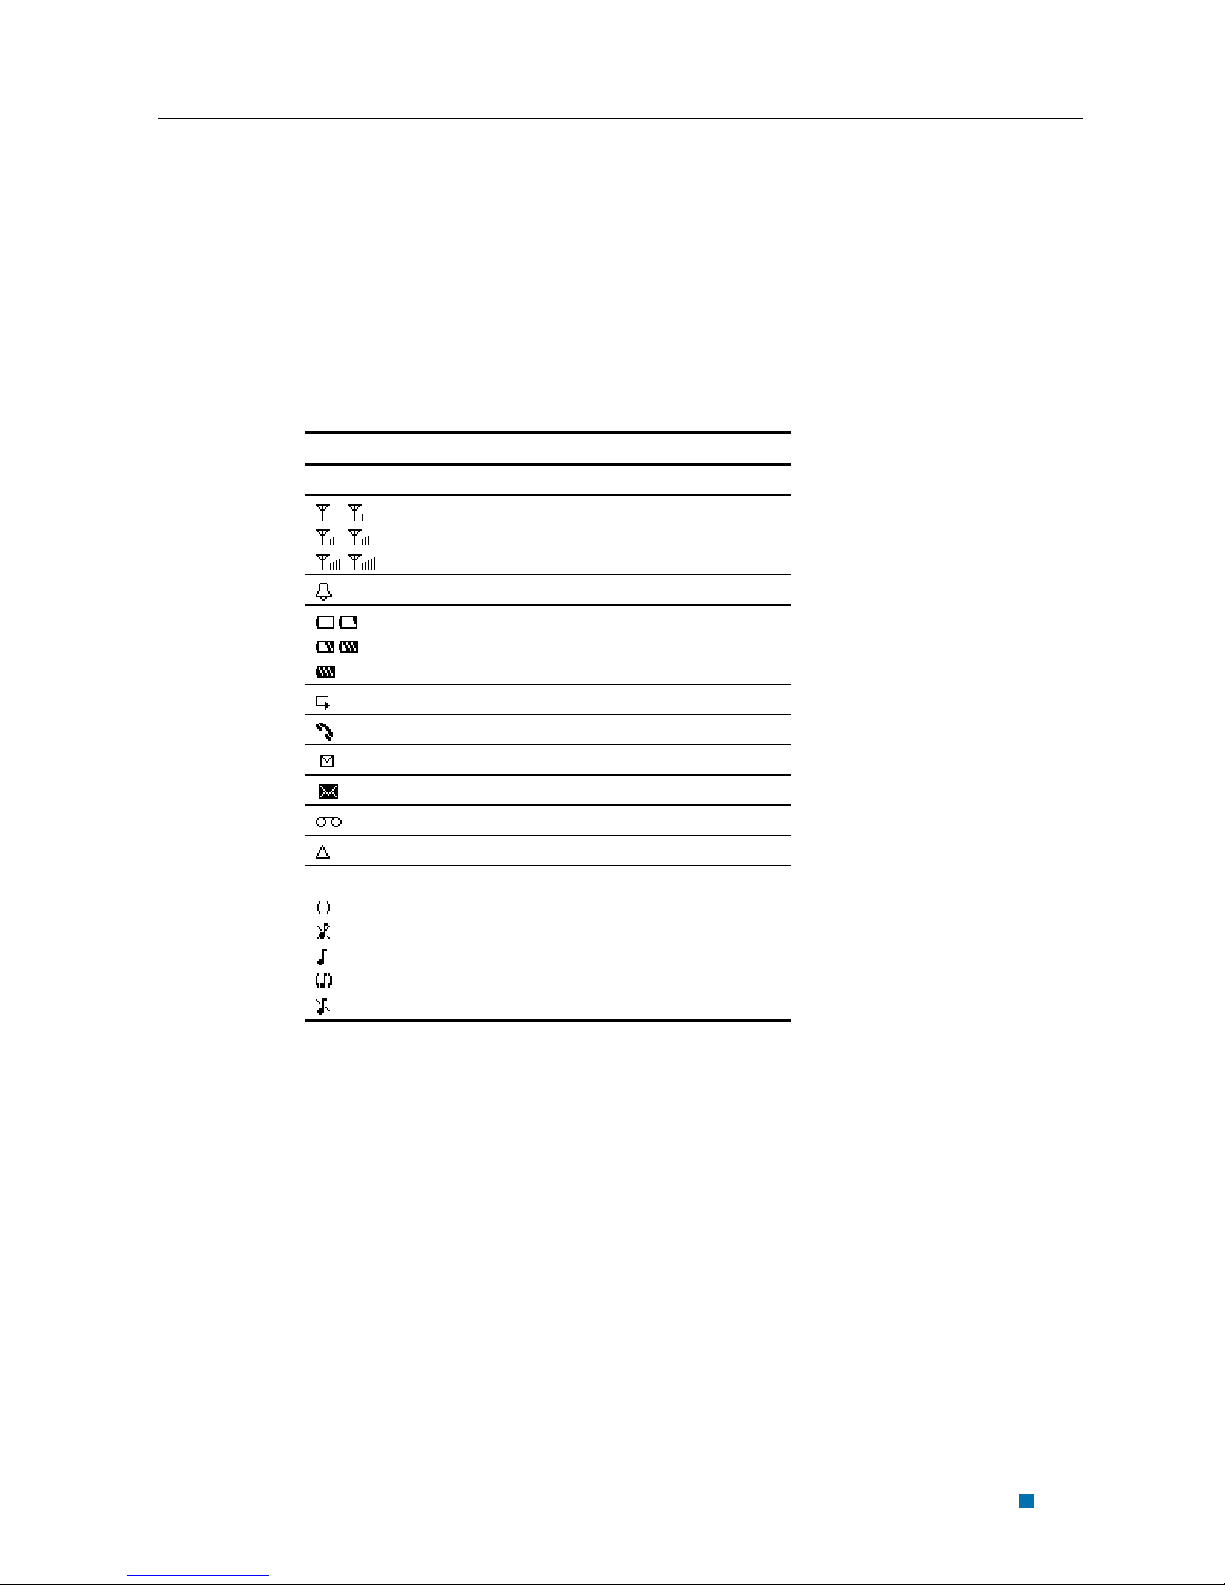
When the phone is powered on, the following icons may display:
Icon Description
Indicate the strength of rssi
Indicate the alarm is set
Indicate the level of battery
Indicate call forward enabled
Indicate the phone is in a call
Indicate new message’s arrival
Indicate new urgent message
Indicate voice mail
Indicate phone is in roaming
Indicate all kinds of phone mode
Only vibrate
No ring
Ring
Ring and vibrate
1-7

Aspen Reference Guide
Chapter 1 Quick Start
Navigating Through the Menus
The top two levels of the phone menus are shown below.
(insert pictures of the icons in front of each menu item)
1 Contacts
2 Messages
1 List
2 New
3 Find Name
4 Groups
5 Erase All Contacts
6 Speed List
1 New Message
2 Inbox
3 Outbox
4 Quick Text
5 Erase Msgs
6 Voice Mail
7 Settings
8 Multimedia
3 Call Logs
1 Incoming
2 Outgoing
3 Missed
4 Erase Lists
5 Charge Bill
6 Call Statistics
4 Tools
1 Schedule
2 Alarm Clock
3 Tip Calculator
4 Voice Memo
5 Settings
1 Sounds
2 Display
3 Security
4 Call Setup
5 Management
6 Phone Info
7 Network Service
1-8

Apsen Reference Guide
Chapter 1 Quick Start
(type in instructions below for which buttons to use to navigate through the menus and
select menu items)
To navigate through the menus
1. press up or down to navigate
2. press left soft key to enter
3. press right soft key to back
1-9
Chapter 2 Contacts
Contacts is a list of your contacts. Each contact can contain three phone numbers,
address, email, URL, and note.
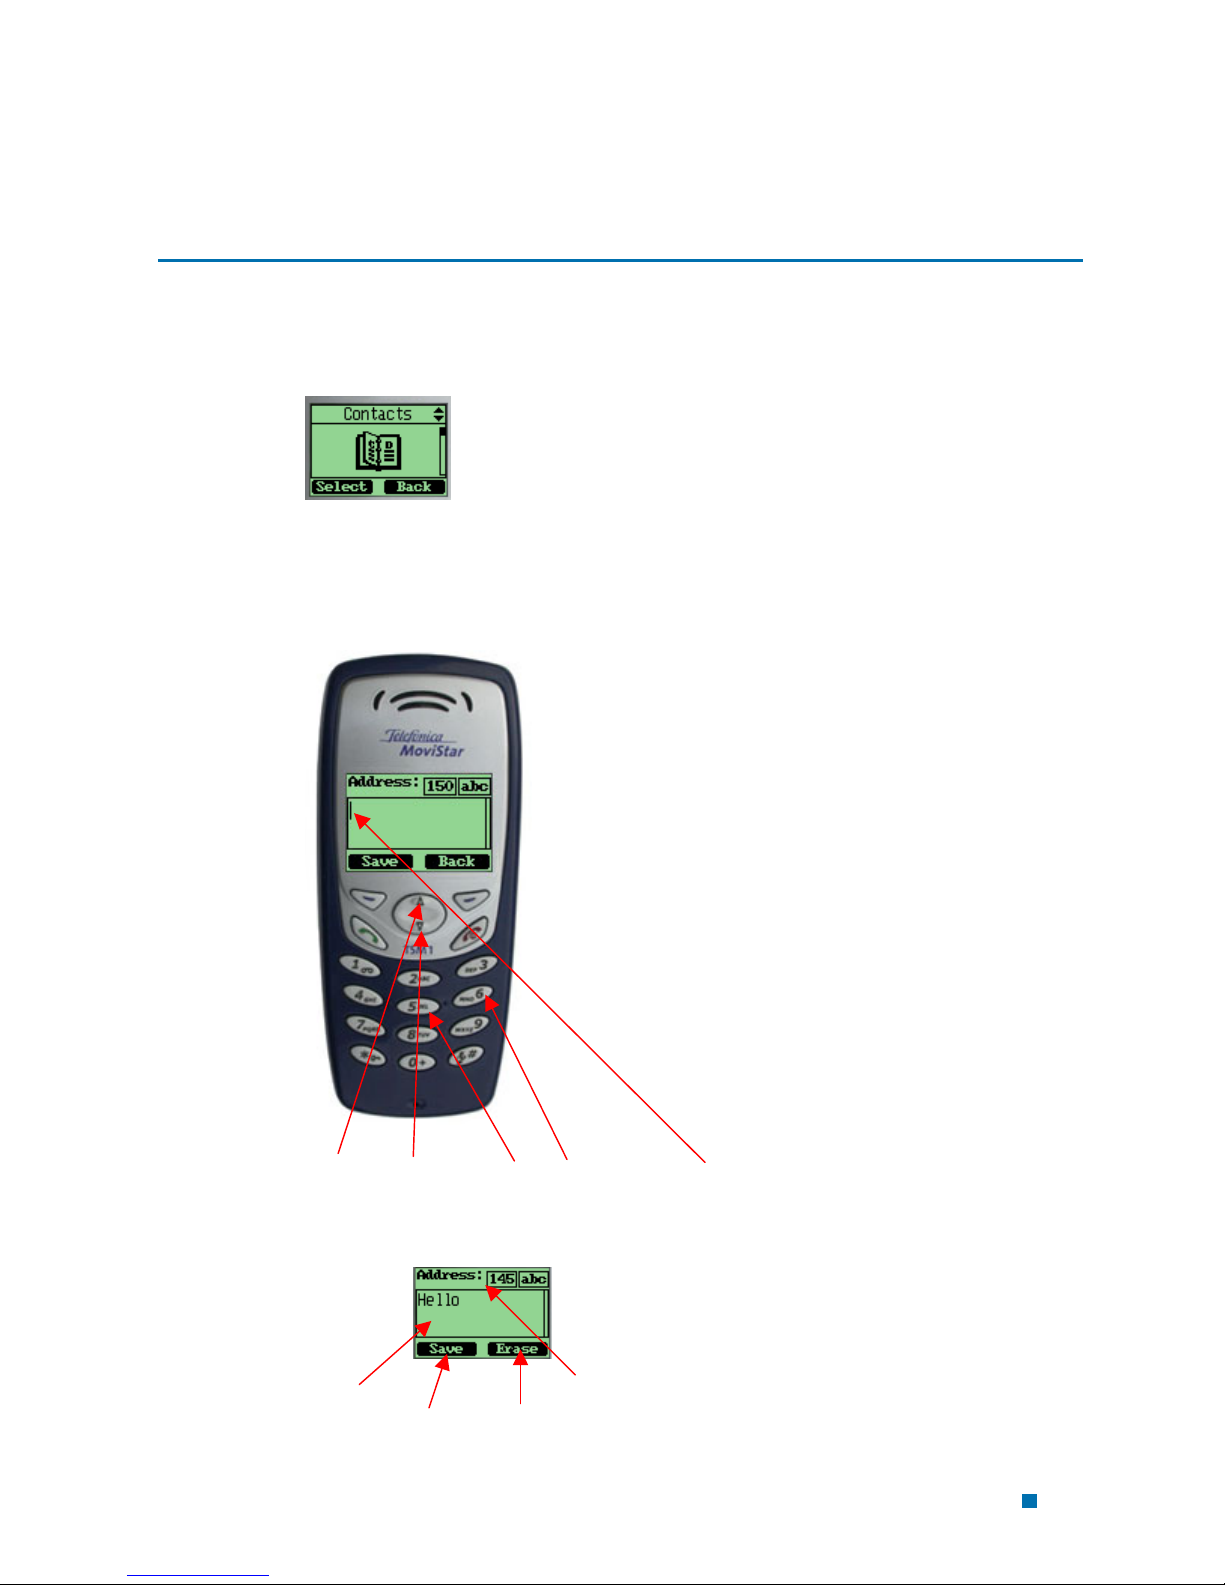
Using the Keypad to Enter Information
You can use keypad to enter something. There is a cursor, which looks like “|”, at the
right side of current character.
↑Up ↓Down Alphanumeric keys Cursor
To enter text
Input area left length
Left soft key Right soft key
2-1
Apsen Reference Guide
Chapter 2 Contacts
1. Press alphanumeric key to insert text before
cursor.
2. if You make a mistake, you can press the
right soft key “Erase” to delete current
character before cursor.
3. You can use “↑” and “↓” to move the
cursor.
4. After editing, select “Save” to save your
editing.
5. To cancel editing, long-press “Erase” key
until it changes to “Back”, then press it
again.
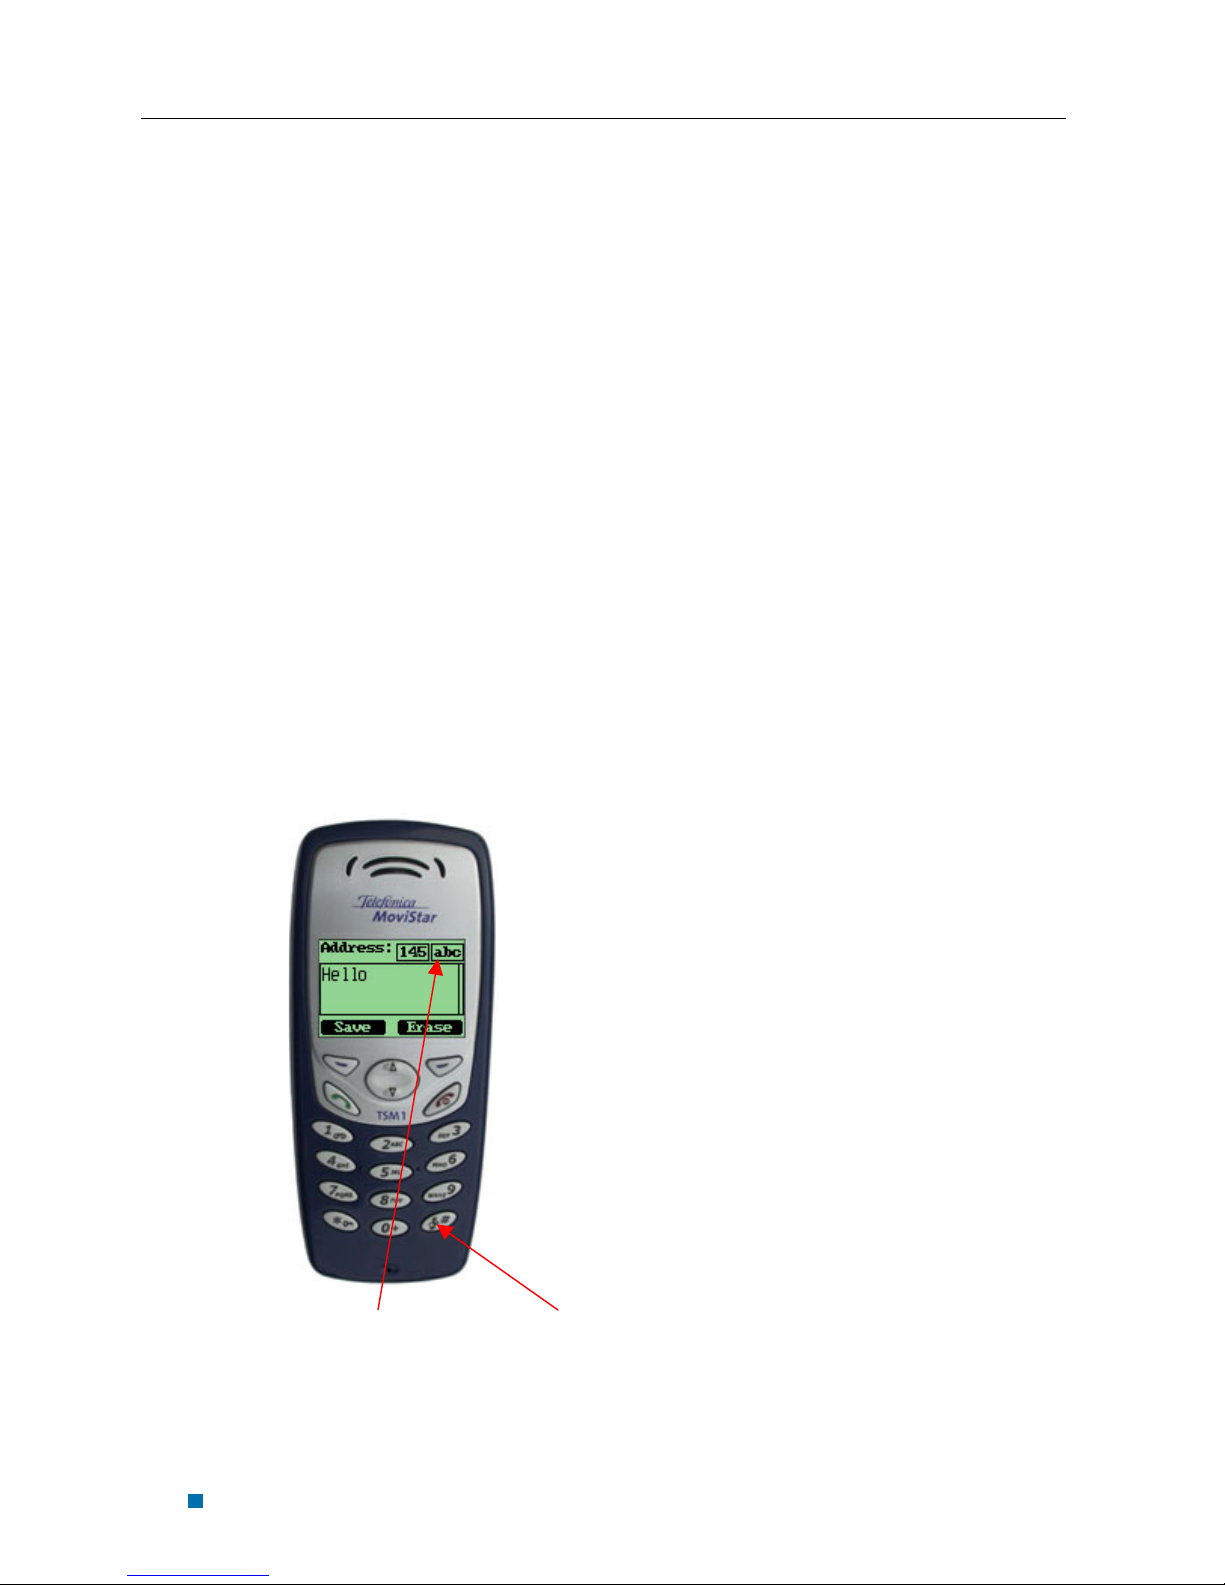
To enter numbers
1. Press “#” several times until “123” is
displayed at the top-right corner of the
screen.
2. Press numberic keys to input numbers.
To enter uppercase or lowercase letters
uppercased/lowercased #
1. Press “#” several times until “abc” is
displayed at the top-right corner of the
2-2
screen, then you can input lowercased
letters.
2. Press “#” several times until “ABC” is
displayed at the top-right corner of the
screen, then you can input lowercased
letters.
3. Press alphanumeric key several times(no
longer than 0.5 seconds between each two
pressing) to enter a letter written in the key.
4. If the cursor is hidden, you can keep on
pressing to change current character.
current character will be entered when the
cursor appears.
5. If you want to enter a letter which in the
same key, you must wait for 0.5 seconds
until the cursor appears, so you can press
the key again. If you want to enter a letter
which in a different key, you need not wait
for the cursor, and can press the key as you
want directly.
Apsen Reference Guide
Chapter 2 Contacts
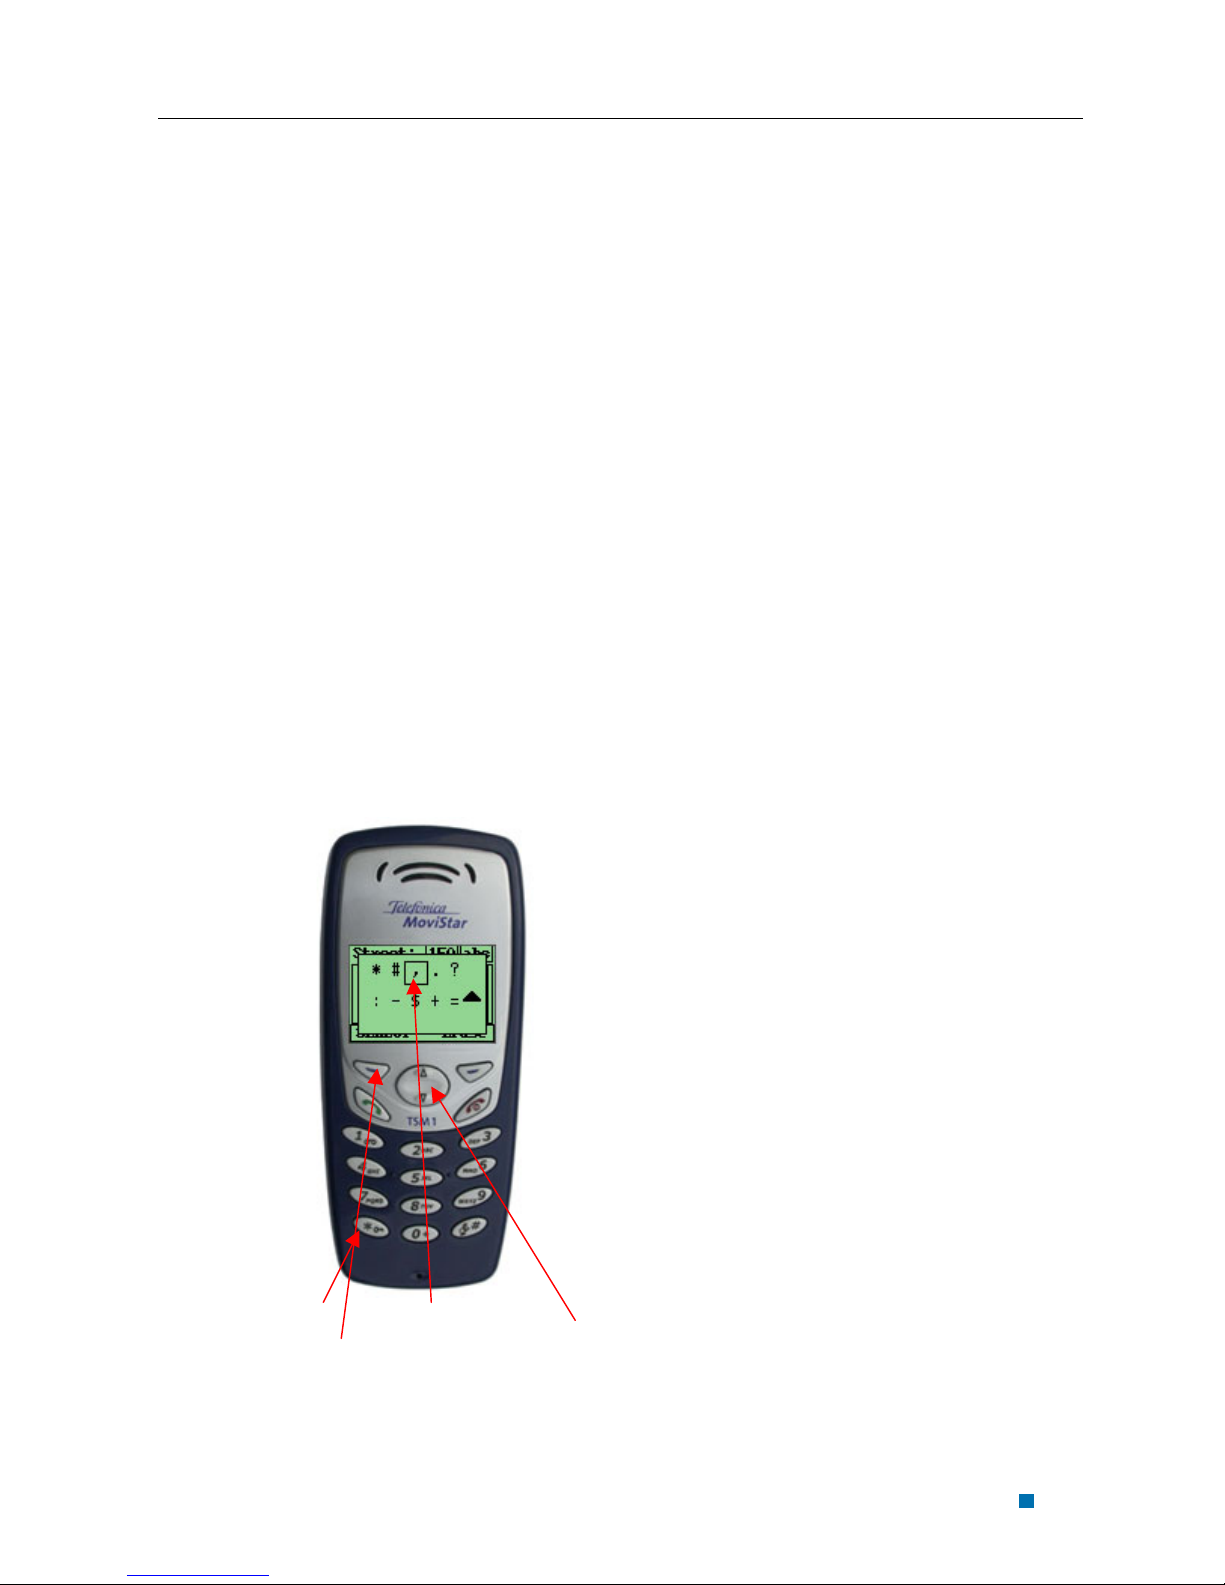
To enter symbols or special characters
* selected symbol up/down
Confirm
1. Press “*”.
2-3
Apsen Reference Guide
Chapter 2 Contacts
2. Use “up” and “down” to select the symbol
you need.
3. Press the left soft key to confirm.
To change the language
1. Select “Settings” in main menu
2. Select “Display”
3. Select “Language”
4. Select the language you want.
5. If you set your phone to another language
which you cannot read, you can press 5,3,3
after entering the main menu, then select
the correct language.
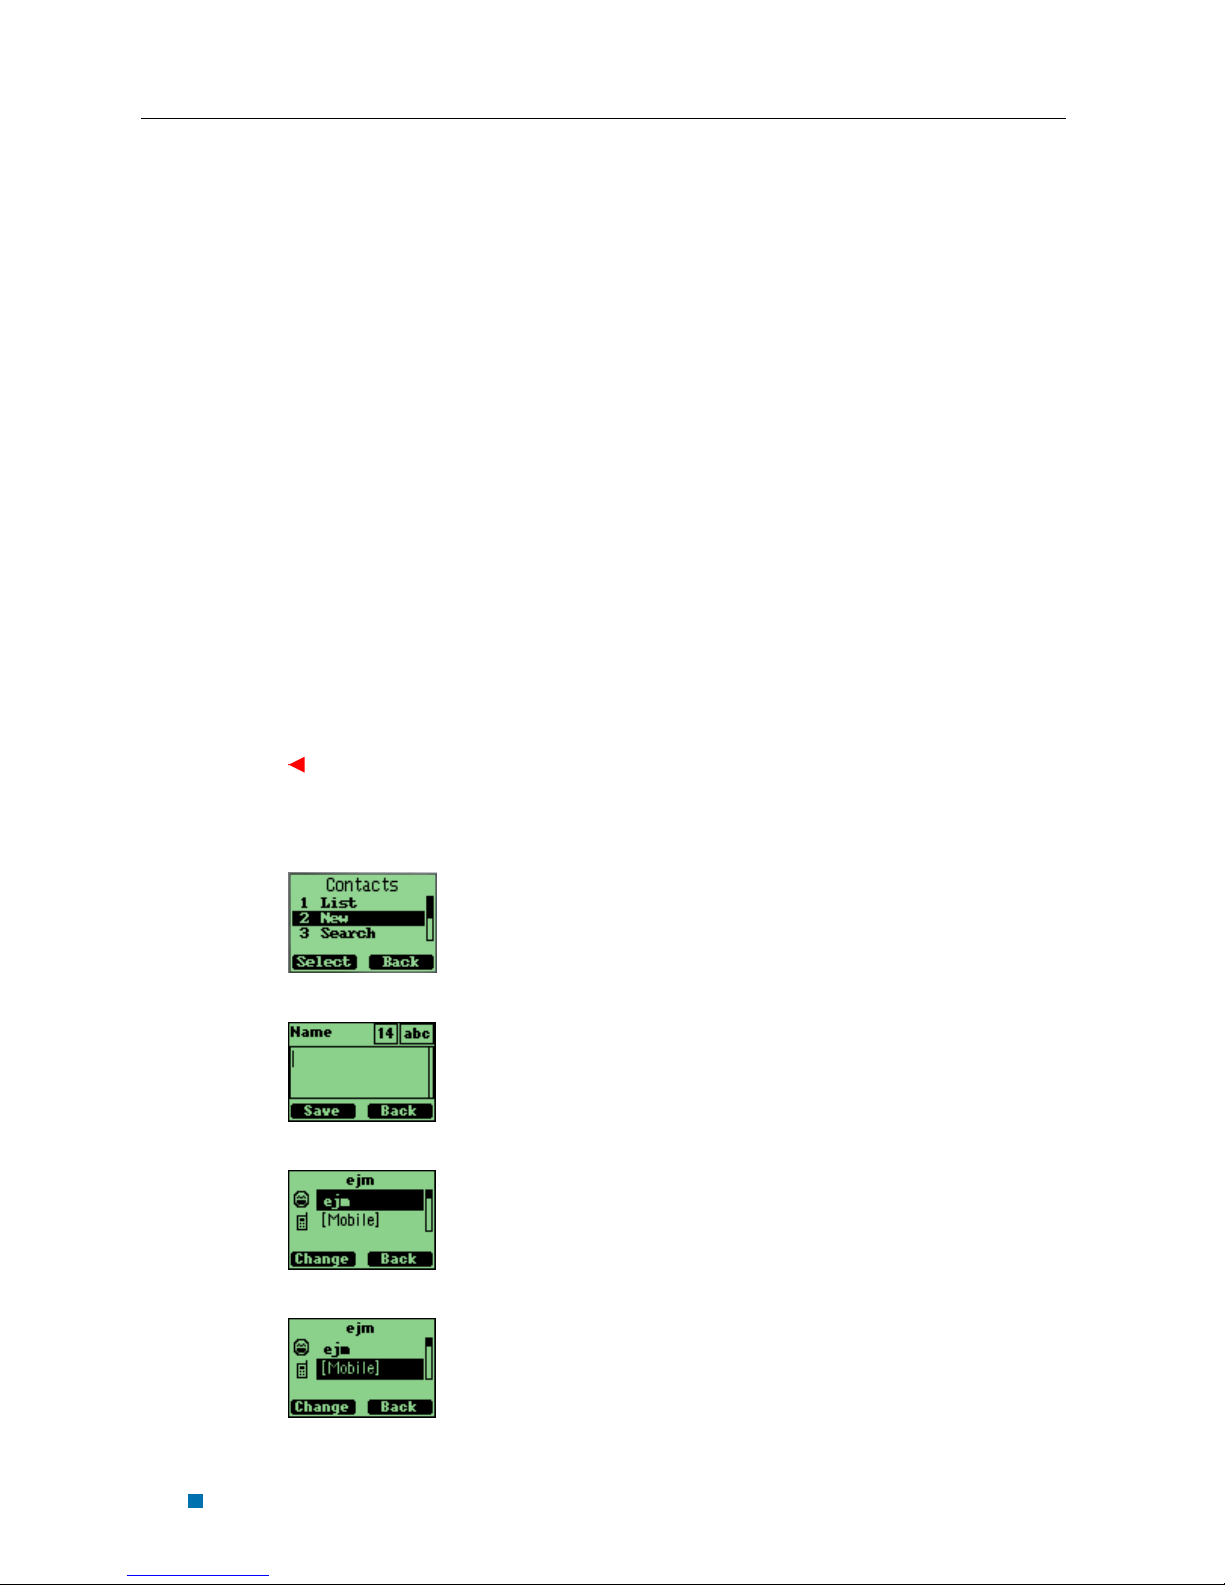
Entering and Editing Contacts
To add a new contact
1. At the main menu, select “Contacts”.
2. Select “new”.
3. Input the contact name, press “Save”
4. Choose [mobile], press “change”
2-4
5. Press “save” after editing
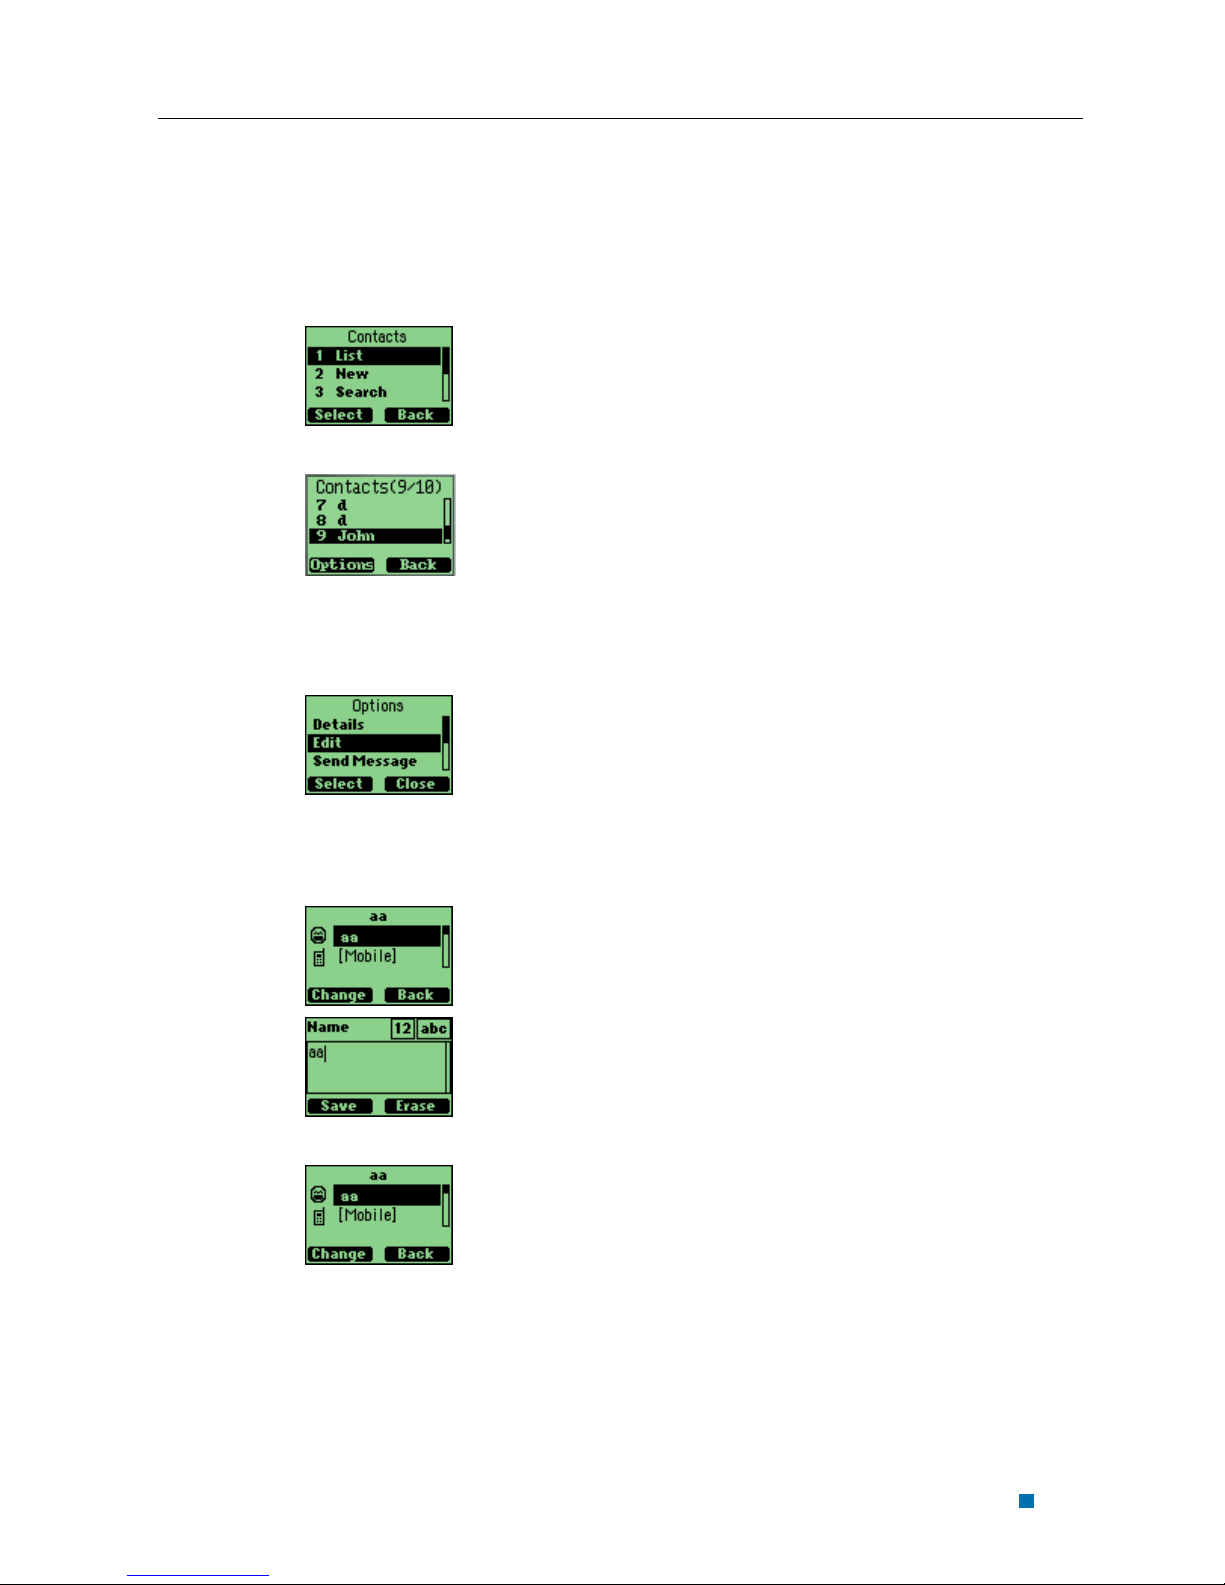
To list contacts
1. Select “Contacts” in main menu.
2. Select “List”
To edit a contact
Apsen Reference Guide
Chapter 2 Contacts
1. Select a contact in list, press “Options”
2. Select a detail entry you want to change,
then press “Change”
3. After editing, press “Save”
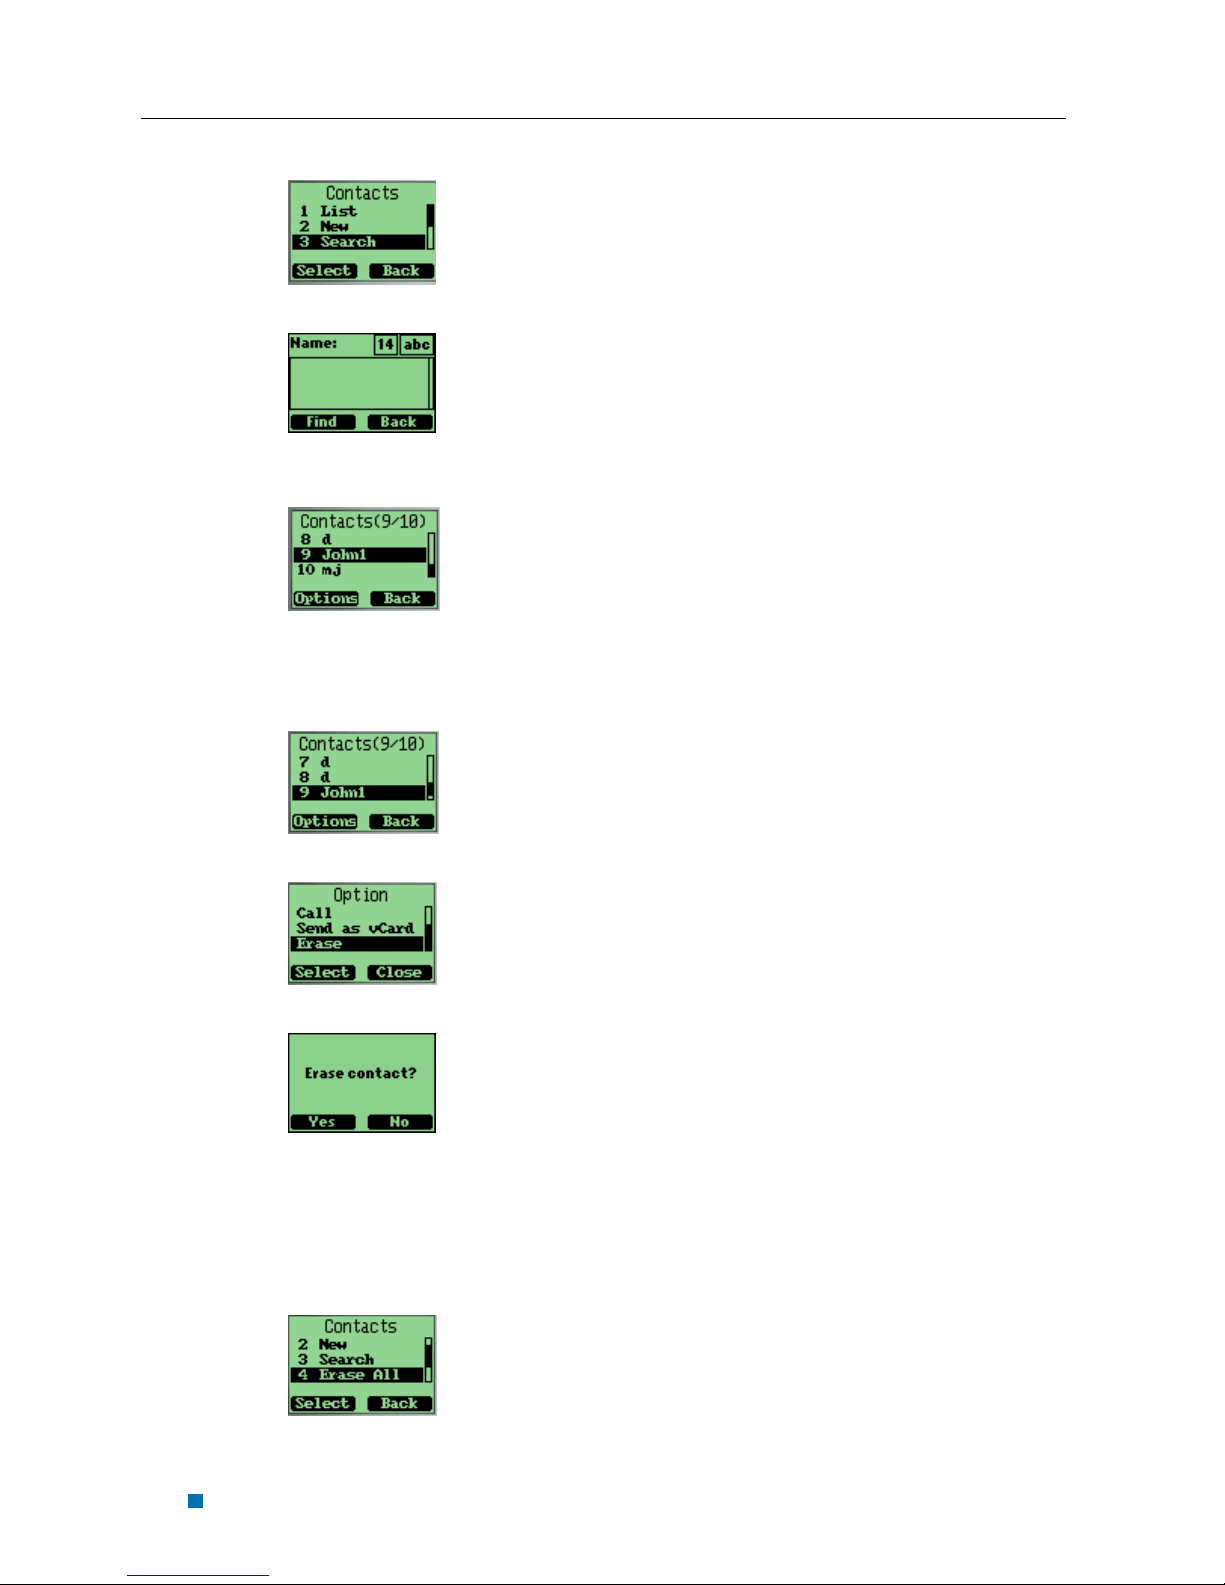
To find a name
1. Select “Contacts” in main menu.
2-5
Apsen Reference Guide
Chapter 2 Contacts
2. Select “Search”
3. Enter the full name you want to search,
press “Search”
To erase a contact
1. Select one contact in the list
2. Press “Options” soft key
3. select “Erase” in “Options” menu
4. press “yes” or “no” soft key to confirm
To erase all contacts
■ Select “Erase All” in “Contacts” menu
to erase all the contacts.
2-6
Apsen Reference Guide
Chapter 2 Contacts
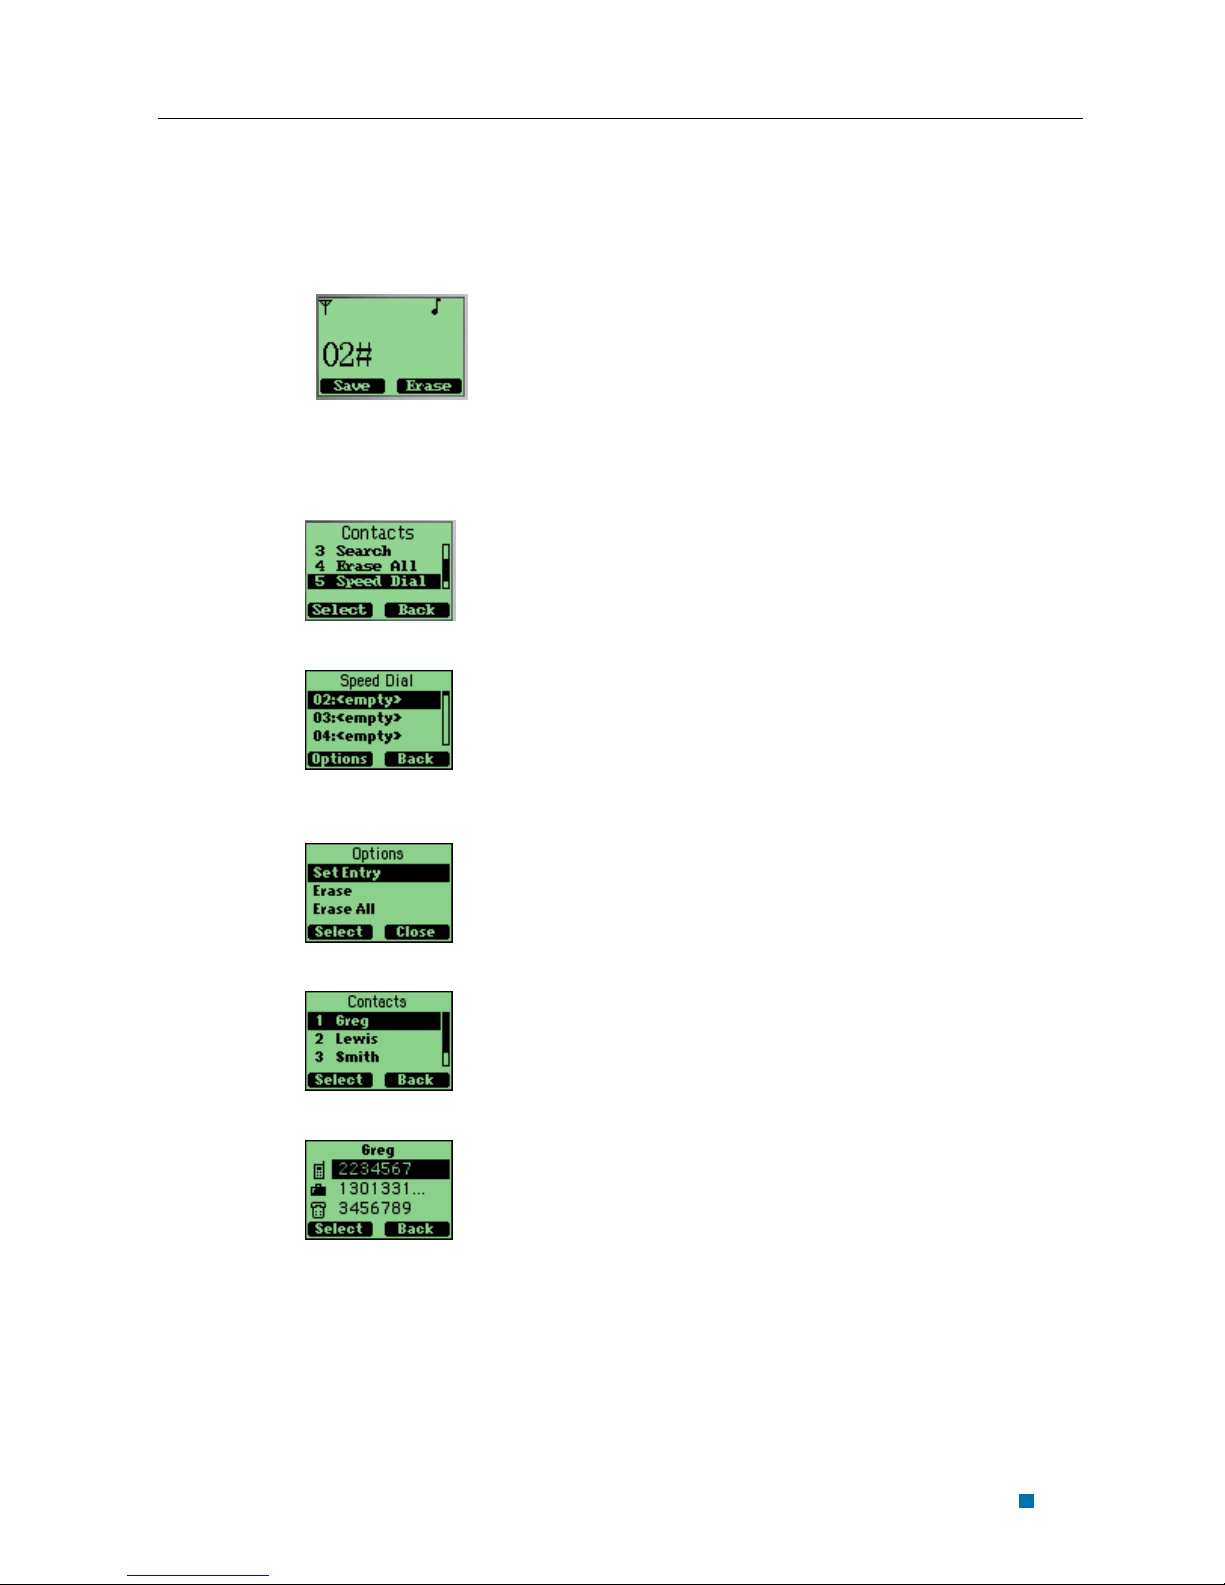
Creating and Using the Speed List
You can assign 02 to 99 to some contacts in “Speed List”. Then you can use such short
number as “02#” to dial quickly.
To add/edit a phone number to the speed list
1. Select “Contact” in Main Menu.
2. Select “Speed List”.
3. Select one short number (the index is the
short number) , press “Options” soft key.
4. Select “Set Number” in “Option” menu.
5. Select one contact.
6. Select one phone number, save it to speed
list.
2-7
Apsen Reference Guide
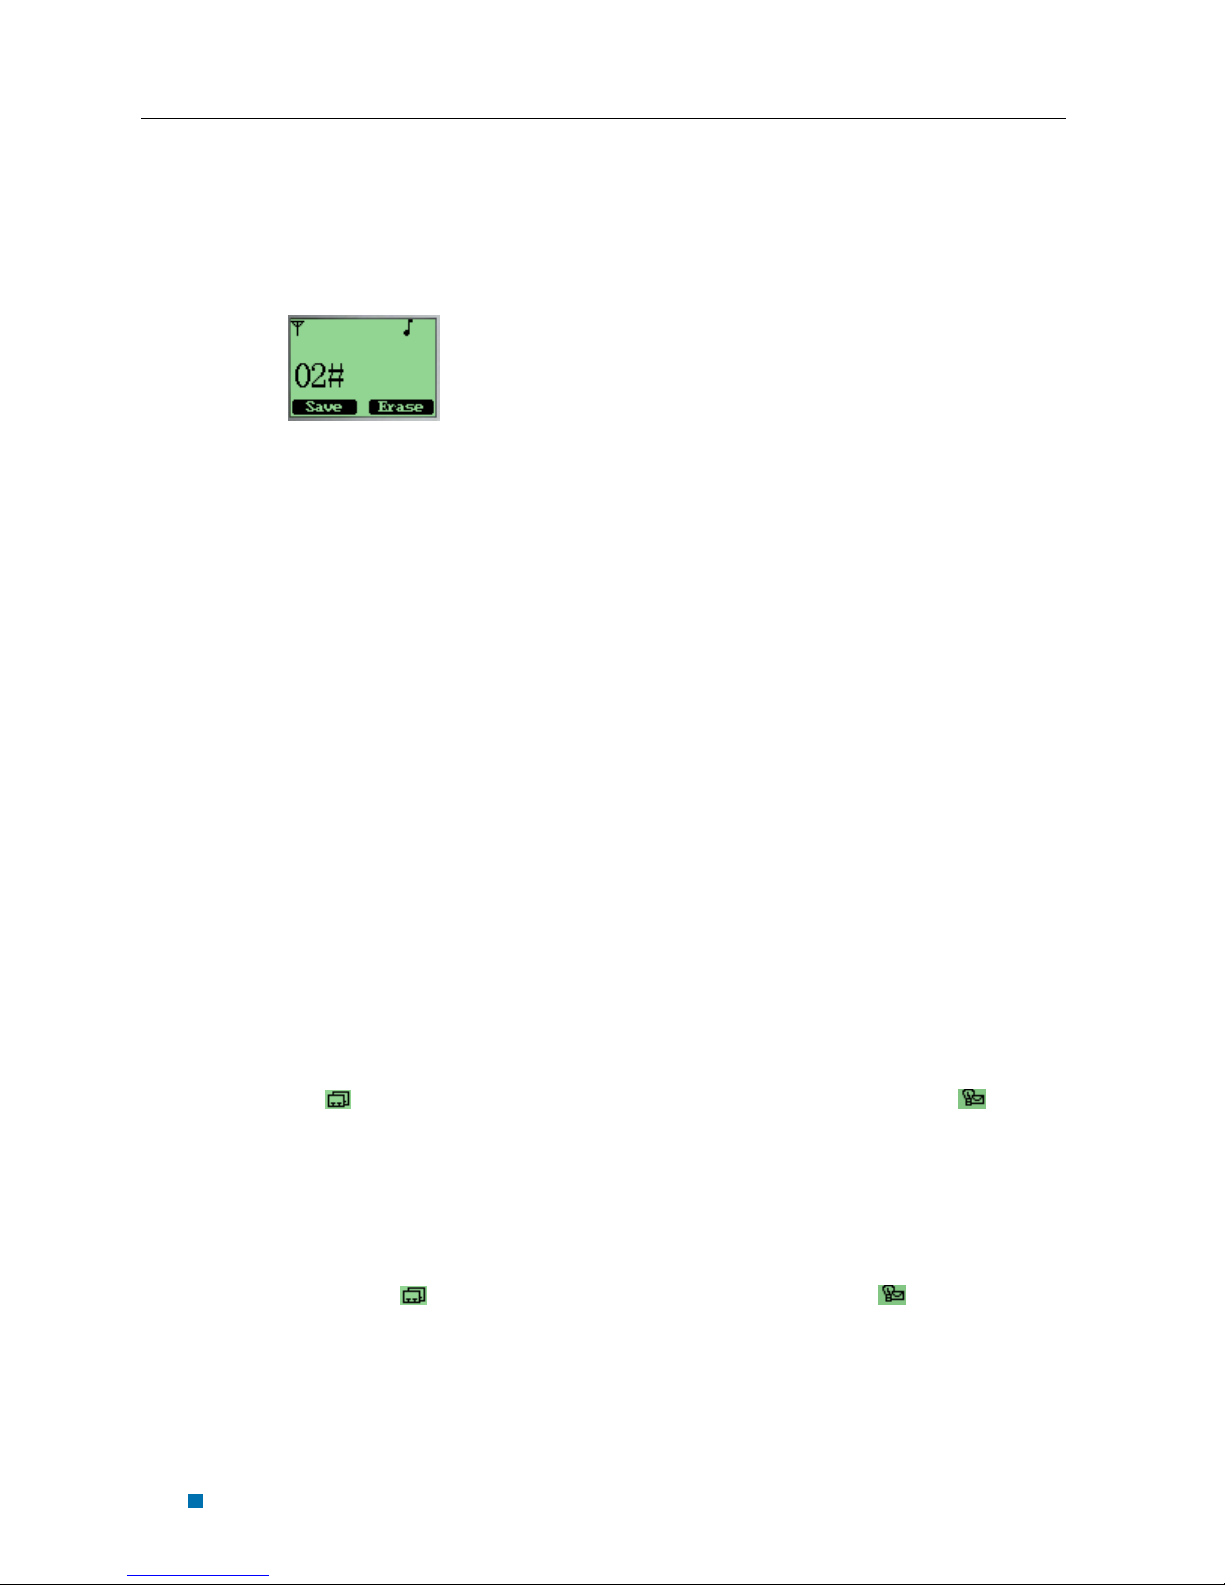
Chapter 2 Contacts
To make a call to a number on the speed list
1. In “idle” state, enter the short number and
“#”, then the long number will appear, and
instead the short number and “#”.
To delete one or all numbers on the speed list
1. Select “Contact” in the main menu
2. Select “speed List”
3. Choose “Erase” or “Erase All” in
“Option”
Using the vCard - VCard Exchange
The vCard allow you to exchange phonebook entries via SMS with others whose
handsets support Smart Messaging.
Set Reception Mode
The handset support two vCards reception mode, ‘On phonebook’ or ‘Prompt’.
‘On phonebook’ means when you receive a new vCard, the handset will save the
contact information directly on your phonebook, and if the entry with the same contact
name exists already in your phonebook, it will be overwritten without prompt. After the
contact information has been saved to phonebook, the vCard received will be deleted.
‘Prompt’ means the handset will prompt for a new vCard’s incoming. The handset will
popup a dialog to ask you whether read the message right now, and your phone sounds,
and
shown on the display instead.
Your phone holds up to 120 vCards.
Read vCards
vibrates and is shown on the display (if you have unread SMSs, is shown on the
display instead.). You have a choice of reading the message immediately by pressing
“View” key or reading it later by press “Back” key. When you press “View” key, the
display will show the content of the vCard message if there is only one unread vCard
message. Otherwise, the display will show the vCard message list.
is shown on the display. If you have both unread SMSs and vCards, is
If your phone is turned on when it receives a vCard, your phone sounds an alert or
2-8

To read a vCard
1. Enter ‘Message’ and select “8:
Multimedia Box”.
Apsen Reference Guide
Chapter 2 Contacts
2. Select “2 vCard”
If a vCard message is unread, there is a flag before the item in the message list.
Otherwise, the flag is
.
3. You can select a vCard by scrolling “↑↓” keys
and press “Option” to choose “View”. The
vCards shown are sorted by the time they
received.
4. You can read the vCard’s content by scrolling “
↑↓” keys.
5. If you want to save this vCard’s contact
information, press “Save”. If a contact entry
2-9

Apsen Reference Guide
Chapter 2 Contacts
with the same name exists, your phone will
prompt to ask you whether to overwrite the
existed entry.
Send a vCard
You can send a vCard through your phone.
To send a vCard
1. Press “Contact” key at the idle state,
and select the contact entry you want to
send by scrolling “↑↓” keys.
2. Press “Option” key, and select “Send as vCard”,
then press “Select”.
3. All contact details lists on the display, and each
with a check box. You can select a detail to send
by scrolling “↑↓” keys, and then press
“Option” key to add/delete it into/from to-besent data, or add all details into to-be-send data
by selecting “Un/Select”, “Select all” menus.
4. When you finish selecting the details to send
out, press “Option” key and select “Ok” menu,
then press “Select” key, you can input addresses
which will receive the vCard. You also can press
‘Option’ key and select the ‘Search’ menu to
select a contact entry to send this vCard to. The
selected contact’s mobile phone number will be
displayed.
2-10

5. If the contact entry is set to ‘private’, you must
enter the correct lock code before you send the
vCard.
6. Send out the vCard via SMS by pressing
“Option” key, and selecting the ‘Ok’ menu, and
you phone will send the vCard to the address
you have inputted.
7. If the vCard has been sent to an address
successfully, your phone will display ‘Message
Sent!’.
Apsen Reference Guide
Chapter 2 Contacts
Send All of Your Phonebook
You can send out all of your phonebook via vCards.
To make a batch-send
1. Press “Menu” key at the idle state, and
enter contact menu.
2. Select “Send all as vCards” menu.
3. Input the address you want to send the
phonebook to, and then press “send” key. You
can only input one address to make the batchsend.
4. Your phone will prompt to ask you whether you
are sure to make the batch-send.
5. Press “Ok” key to confirm.
2-11

Apsen Reference Guide
Chapter 2 Contacts
-
6. The send status will be displayed. Refrence:
“Sending” means the current status is sending.
“2/3” means the phone is sending the second contact entry in phonebook.
“Success!” means the previous contact entry in phonebook is sent out successfully. If
there are errors in sent, your phone displays
and your phone try to resend the vCard up to 10 times. If the vCard can’t be sent
successfully in the end, this batch-send will be paused. You can continue this batchsend by press “Continue” key. You can manually pause a batch-send by press “Pause”
key too.
You also can break a batch-send by pressing the “Break” key.
Delete vCards
You can delete vCards one by one or delete all vCards at once.
To delete a vCard
1. When you read vCards, Select the
vCard you want to delete by scrolling “
↑↓” keys. If you want delete all of
the vCards, select any one vCard.
2. Press “Option” key, and select “Erase” if you
want to delete this vCard, or select “Erase all” if
you want to delete all of the vCards, then press
“Select”.
2-12

3. You phone will prompt to ask you whether sure
to delete the vCard or delete all the vCards.
4. Press “Ok” key, the vCard(s) will be
deleted.
Apsen Reference Guide
Chapter 2 Contacts
2-13

Chapter 3 Messages
This chapter introduces the usage of Short Message and Ring Tone.
Using Short Message
You can use Short Message function to send and receive message,There is an inbox
and an outbox in you phone, inbox and outbox can hold a maximum of 60
messages,each messages can contain a maximum of 160 characters, you can send the
message now or later, etc.
To check for received text messages
1. when a new message comes, you will
be noticed by means what you set at
setting->profiles->message prompt,
and “You have 1 new messages!” will
be displayed on screen.
2. select “View” in the left soft key bar to
view.
Note:When you have new message,there is
an icon in idle screen to indicate.
If your message memory is full,the
icon will change to
To read a text message
1. select “Messages” in main menu
2. select “inbox”
3. select one message
3-1

Aspen Reference Guide
Chapter 3 Messages
To erase a text message
4. select one message
5. select “Erase” in “Option”
To send a text message
6. select “Messages” from main menu
7. select “New Message” to edit the text
message.
8. select “Options->Send” to edit the
address
9. select “Options->Ok” to send the
message.
To send a text message to several addresses
10. When you at send text message’s step
2 ,you can select “Option->Group” to
send the message to several addresses.
11. select “Select” to select number from
contact list.
12. Select “Options->Select One”to select
focused address,or Select “Options>Select All”to select all address.The
max number you can send in group one
time is 10.
3-2

Aspen Reference Guide
Chapter 3 Messages
13. Select “Options->Send”to send
message to selected address,
Ring Tone module is used to manage the rings downloaded via Short Message. It
includes functions of playing ring, deleting ring and renaming ring title.
Using Ring Tone
Download a Ring Tone
The Sequoia phone can only receive ring tones through SMS messages in midi format.
However, the process in downloading ring tones to the handset varies and is carrier
specific. For more details as to how to download a ring tone in your specified country,
please refer to the Appendix.
Browse all rings
Browse all the rings downloaded via SM.
To browse all ring downloaded via Short Message
1. Enter menu “Messages”
2. Enter menu “Multimedia Box”
3. Enter menu “Ring”
4. Browsing all the rings by “UP” and ”DOWN” keys
Manage rings
To Play, delete and rename rings downloaded via short message.
To play a ring
4. Enter menu “Messages”
5. Enter menu “Multimedia Box”
6. Enter menu “Ring”
3-3

Aspen Reference Guide
Chapter 3 Messages
7. Select a ring by “UP” and
8. Select “Option” softkey.
”DOWN” keys
9. Select “Play” Menu.
To rename the title of a ring
1. Enter menu “Messages”
2. Enter menu “Multimedia Box”
3. Enter menu “Ring”
4. Select a ring by “UP” and ”DOWN” keys
5. Select “Option” softkey.
6. Select “Rename” Menu
7. Input the new title in the renaming dialog.
8. Select “Save” softkey.
To delete a ring
1. Enter menu “Messages”
2. Enter menu “Multimedia Box”
3. Enter menu “Ring”
4. Select a ring by “UP” and ”DOWN” keys
5. Select “Option” softkey.
6. Select “Delete” Menu
7. Say “Yes” to the confirming dialog.
3-4

Aspen Reference Guide
Chapter 3 Messages
Message Settings
1. Select menu “Messages”
2. Select menu “Settings”
Enable/disable auto save outgoing message
1. Select menu “Auto Save”
2. Select “Auto Save/Do Not Save” to enable/disable atuo save outgoing
message.
Set Call Back Number
If you enable Callback number,every message you sent will postfix the number
you set here and the receiver will know which number to callback when he read the
message.
1. Select menu “Callback”.
2. Select “Edit” to enter Callback number, then press “Ok” key.
3. Select “On” to enable Callback number.
4. Select “Off” to disable Callback number.
Set Send Time
If you set Send Time, message will be deferred sent according to the time you set
here,but this function need operator’s support.
1. Select menu “Send Time”.
3-5

Aspen Reference Guide
Chapter 3 Messages
2. Press up and down key to select the defferred time, then press “Select” key.
Set Validity Time
If you set Validity Time, message will be keeped in Short Message Center until
the time you set here is expired.But this function need operator’s support.
1. Select menu “Validity”.
2. Press up and down key to select the Validity Time, then press “Select” key.
Set Priority
You can set priority of sent message, and the receiver will know which priority the
message is when he read it.
1. Select menu “Priority”.
2. Press up and down key to select the Priority, then press “Select” key.
Set Voice Mailbox Number
1. Select menu “Voice Mailbox #”
2. Enter Voice mailbox number, then press “Save” key.
3. When in idle screen, press “1” key for a while, the handset will call the voice
mailbox number automatically.
Enable/disable broadcast message service
1. Select menu “Broadcast Service”
3-6

Aspen Reference Guide
Chapter 3 Messages
2. Select “On/Off” to enable/disable broadcast message service.
Using Voice Mail
Please contact with operator.
3-7

Chapter 4 Making Calls
Viewing Incoming Call Details
the detailed information will be displayed on screen, when there is a incoming call.
1. Press
2. Press
or (or 1~9 and #, * if any key in Answer Mode) to accept call.
to refuse this call.
Making an Emergency Call
To make an emergency call if phone is locked
1. Default emergency call is 911. No more than three emergency numbers can be
added in setting menu.
2. When phone is locked, you can input this emergency number and make a call.
(Of course, these emergency numbers begin with ‘1’ or ‘9’).
4-1

Aspen Reference Guide
Chapter 4 Making Calls
Making Calls
To make a phone call
Call key
1. at idle state, input phone number, then
press Call key
4-2

2. The Ms enter outing coming call. Now
press ‘Cancel’ to cancel this call, and
return Idle state, Or else go to step 3.
3.
Mute or Unmute
Aspen Reference Guide
Chapter 4 Making Calls
Input
End Call
3. Press
to End call.
4. Return Idle state.
To call a number on the contact list
1. at idle state, select “Contact” to enter
contact list
Up or Down volume
2. choose the person you want to call,
press the “Call” key
4-3

Aspen Reference Guide
Chapter 4 Making Calls
To call a number on the speed list
Two keys dial
1. at idle state, input the short number
2. press “#”, then the short number will
turn into long number
One key dial
At idle state, press 2~9 key and hold it. If there are relative numbers in speed list,
Enter incoming state to make an originated call of this number.
To display and redial the last number called
1. at idle state, press the call key, then the
last number called will display
2. press the call key again to redial.
To use call waiting
1. if a third part call you when you are in
a calling process, the phone will alert
you, and the new comer’s phone
number or name will be displayed in
screen.
You can press ‘Accept’ to accept
incoming call And meanwhile, The
picture displays as before.
4-4

Aspen Reference Guide
Chapter 4 Making Calls
2. You can use the
key to switch
between the 2 persons.
To forward a call (unconditional/no answer/busy)
1. please contact with your operator
To make a three-way call
1. please contact with your operator
To make a conference call
1. please contact with your operator
To mute the phone during a voice call
1. select “mute” from the soft key bar.
To change the earpiece volume during a call
1. press “UP” or ”DOWN” to change the
volume.
4-5

Aspen Reference Guide
Chapter 4 Making Calls
Viewing a List of Call Logs
can view lists that show phone number of the last 18 incoming, outgoing, and missed
calls.
To view or edit the incoming, outgoing, or missed calls list
1. select “Call Log” in main menu
2. then select one item
3. select “Detail” in “options” to view
detail.
To erase one or all lists of call logs
1. select “Erase” in “Options”
4-6

Chapter 5 Setting Up Your Phone
To personalize your phone, you can select ring tones, volumes, alerts, display, call
setup, password, phone information, network service.
Selecting Ring Tones
Can select from more than 9 different ring tones, can set ring tones for calls with or
without caller id, restricted calls.
To select a ring tone
1. Select “Settings” in main menu
2. Select “Ringers”
3. Select one, press the “select” soft key
to save.
5-1

Aspen Reference Guide
Chapter 5 Setting Up Your Phone
Editing Profile
Changing Call mode
1、Select “Call mode” menu item.
2、Select a call mode and select “select” soft key to save.
Changing Message Prompt Mode
1、Select “Message Prompt Mode” menu item.
2、Select a message prompt mode and select “select” soft key to save.
Adjusting the Volume
Change volume of ringer, key beep and speaker.
Changing the Ringer volume
1. Select “Volume” menu item.
5-2

2. Select “Ringer” menu item.
3. Select one level and select “ok” to save.
Changing the Key Beep volume
Aspen Reference Guide
Chapter 5 Setting Up Your Phone
1. Select “Volume” menu item.
2. Select “Key Beep” menu item.
3. Select one level and select “ok” to save.
Changing the Speaker volume
1. Select “Volume” menu item.
2. Select “Speaker” menu item.
5-3

Aspen Reference Guide
Chapter 5 Setting Up Your Phone
3. Select one level and select “ok” to save.
Changing the Key Tone
1. Select “Key Tone” menu item.
2. Select an option and select “ok” to save.
Setting Up Alerts
You can set alerts for service change, minute beep, call connect on/off.
Minute beep is a beep when your call near to minutes.
Setting alert for Service Change
1. Select “Alerts” menu item.
2. Select “Service Change” menu item.
3. Select “On” to enable service change alert.
5-4

Setting alert for Minute Beep
1. Select “Alerts” menu item.
2. Select “Minute Beep” menu item.
Aspen Reference Guide
Chapter 5 Setting Up Your Phone
3. Select “On” to enable Minute Beep alert.
Setting alert for Call Connect
1. Select “Alerts” menu item.
2. Select “Call Connect” menu item.
3. Select “On” to enable Call Connect
alert.
5-5

Aspen Reference Guide
Chapter 5 Setting Up Your Phone
Setting alert for Dropped Call
1. Select “Alerts” menu item.
2. Select “Dropped Call” menu item.
3. Select “On” to enable Dropped Call
alert.
Setting alert for Fail on Outgoing
1. Select “Alerts” menu item.
2. Select “Fail on Outgoing” menu item.
3. Select “On” to enable Fail on Outgoing alert.
Setting alert for Power Tone
1. Select “Alerts” menu item.
2. Select “Power Tone” menu item.
5-6

Aspen Reference Guide
Chapter 5 Setting Up Your Phone
3. Select “On” to enable Power Tone alert.
Setting up the Display
Customizing your display by creating a banner, adjusting the backlight, selecting the
language for display text, etc.
Creating a display banner
1. Select “Display” menu item.
2. Select “Banner” menu item.
3. Editing the banner
4. Select “OK” to save banner.
Setting backlight
Setting the timer for the backlight.
1. Select “Display” menu item.
2. Select “Backlight” menu item.
3. Select an option.
5-7

Aspen Reference Guide
Chapter 5 Setting Up Your Phone
4. Select “OK” to save.
Setting the display language
1. Select “Language” menu item.
2. Select a language and select “OK” to save.
Security
Provide password protection for Reset to Default, Call Restriction.
Login Security
1. Select “Security” menu item.
2. Enter the password, and the default password is “0000”.
5-8

Changing lock code
1. Select “Change code” menu item.
2. Input new password.
3. Confirm password
Aspen Reference Guide
Chapter 5 Setting Up Your Phone
Reset to default
1. Select “Reset to Default” menu item.
2. Select “Yes” soft key to reset to default.
Security – Call Restriction
Call restriction provide methods for the user to restrict
the operations of originating outgoing calls, accepting
incoming calls or viewing phone book.
Login call restriction menu
Input call restriction password. The default
password is “0000”.The max length of the
password is 4.
5-9

Aspen Reference Guide
Chapter 5 Setting Up Your Phone
Restricting all outgoing call
1. Select “Outgoing”.
2. Select “Yes” or “No”.
v
3. If “Yes” is selected, you will need to
input the call restriction password when
you try to originate a voice call and only
when the password is verified to be
correct, the call can really be originated.
Restricting all incoming call
1. Select “Incoming”.
2. Select “Yes” or “No”.
3. If “Yes” is selected, you will be requested
to input the call restriction password first
when you try to accept an incoming call.
5-10

Restricting outgoing local call
1. Select “Local”.
2. Select “Yes” or “No”.
3. If “Yes” is selected, you will be requested
to input the call restriction password first
when you try to originate an outgoing
local call.
Aspen Reference Guide
Chapter 5 Setting Up Your Phone
Restricting outgoing long distance call
1. Select “Long Distance”.
2. Select “Yes” or “No”.
3. If “Yes” is selected, you will be requested
to input the call restriction password first
when you try to originate an outgoing
long distance call.
Restricting phone book
1. Select “Phone Book”.
2. Select “Yes” or “No”.
5-11

Aspen Reference Guide
Chapter 5 Setting Up Your Phone
3. If “Yes” is selected, you will be requested to
input the call restriction password every time
you want to access the “Contact” menu or
save a number to phone book from idle ,call
log or short message menu options. And you
will also be requested to input the password
when you originate a call which the calling
number exists in the phone book.
Changing call restriction password
1. Input the new password
2. To input the password once more to
confirm the new password.
Call Setup
Auto answer enables to inform of caller with default voice when the callee is not
nearby. Voice priority is used to encrypt the voice data.
Setting up auto answer
1. Select “Call Setup” menu item
5-12

Aspen Reference Guide
Chapter 5 Setting Up Your Phone
2. Select “Auto Answer” menu item
3. Select “Off” or “After 3 seconds” , and then select “OK” to save.
Setting up Voice Privacy
1. Select “Call Setup” menu item
2. Select “Voice Privacy” menu item
3. Select an option , and then select “OK” to save.
To set up CSP
CSP: long distance code to be inserted in
long distance calls. If you enable a carrier
selection code, this code will be inserted to
the long distance calling number which
originate from the phone.
1. Select “Settings” in main menu
5-13

Aspen Reference Guide
Chapter 5 Setting Up Your Phone
2. Select “call setup”
3. Select “CSP”
4. Select “Preferred Code” to add carrier
codes you prefer. there can be 5 codes
in the list at most. The max length of
each code is 2.
5. Select “Enable/Disable” to set up CSP.
6. Select “New Carrier” to enable a
carrier code which is not in the
preferred list.
5-14

7. Select “Preferred Code” to enable a
carrier code which exists in the
preferred list.
8. Select “Disable” to disable carrier
code.
Aspen Reference Guide
Chapter 5 Setting Up Your Phone
9. Select “Status Checking” to check the
current status of CSP.
Viewing Phone Information
To view your phone number
1. Select “Phone Info” menu item.
4. Select “Phone Number”.
5-15

Aspen Reference Guide
Chapter 5 Setting Up Your Phone
5. Editing the number, then save, or
cancel if you just want to view the
number.
To view the version of software installed on your phone
1. Select “Settings” in main menu
6. Select “Phone info”
7. Select “S/W version”
Enable Key guard
Enable user to lock the keypad during phone’s idle status.
1. Select “Keyguard” menu item.
8. Select “Off” to disable key guard. Or select “Customize” to enable key guard.
Network Service
Enable user to set call diverting and call forwarding.
Turning call diverting on/off
1. Select “Network Service” menu item.
9. Select “Call diverting” menu item.
5-16

Chapter 5 Setting Up Your Phone
3.Select an option and then select “ok” to enable the function.
Aspen Reference Guide
Turning call forwarding on/off
1. Select “Network Service” menu item.
10. Select “Call forwarding” menu item.
3.Select an option and then select “ok” to enable/disable the function.
vCard Receiving Prompt
Giving prompt when receiving a vCard.
1. Select “vCard” menu item.
2. “On Phonebook” means not giving the
prompt when receiving a vCard, and
save it to phonebook directly.
5-17

Aspen Reference Guide
Chapter 5 Setting Up Your Phone
5-18

Chapter 6 Using the Phone Tools
Phone tools menu includes schedule, alarm clock, calculator,tip calculator.
Using the Schedule
You can use schedule to associate an alert with an event.
To add a schedule
1. select “Tools” from main menu
2. select “Schedule”
3. select “add new”
4. edit the date, then press “OK” to save.
5. add the description, then press “Ok”
6. set the time, then press Ok
6-1

Aspen Reference Guide
Chapter 6 Using the Phone Tools
To delete the schedule
1. select “Tools” in main menu
2. select “Schedule”
3. select “List All”
4. select the item you want to delete
5. select “Erase” in options
Using the Alarm Clock
To set the alarm time
1. select “Tools” in main menu
2. select “Alarm Clock”
3. select “set” in Option
4. set alarm time, then press Done
To turn off the alarm
1. select “Tools” in main menu
2. select “Alarm Clock”
3. select “Disable” in Option
6-2

Using the Calculator
Calculate
1. select “Tools” in main menu
2. select “Calculator”.
3. Enter the number.
Aspen Reference Guide
Chapter 6 Using the Phone Tools
4. Select option to select an operator.
5、Enter another number.
6、select “=” operator to get the result.
Using the Tip Calculator
To calculate a tip
5. select “Tools” in main menu
6. select “Tip Calculator”, and enter bill amount.
6-3

Aspen Reference Guide
Chapter 6 Using the Phone Tools
7. select the rate
8. press left soft key ,and get the result.
5、select “Option” soft key.
6、select “Split” option to split the payment.
6-4

Chapter 7 Keypad Service Provisioning
This is a hidden menu, and you can enter it by pressing ‘#*0204’.
This is protected by SPC1. The default is “111111”.
Program NAM1, NAM2, or SPCs
Select the menu “Service program” and press ‘Select’ key.
After you input the SPC2, you can program NAM1 or NAM2. The default is “222222”.
To program NAM 1
select NAM 1
There will be many parameters to be input one by one. The next will bring up when
you press “Ok”, and the value you input will be stored. You can back to the previous
parameters by pressing “Back” key.
7-1

Aspen Reference Guide
Chapter 7 Keypad Service Provisioning
The MIN Lock is set to “Enable” as default. When you input a new MIN, it must meet
the creterias stored in the MIN Lock table. Otherwise the phone will prompt “Invalud
MIN!”.
If you want to change the MIN Lock setting, you must input SPC3 firstly.
The SPC3 is “333333” as default.
To program NAM 2
select “NAM 2” and it is almost the same as programming NAM 1.
To change SPCs
Select SPC
You can change SPC1 or SPC2 and set the max tries of SPC1 or SPC2.
7-2

Aspen Reference Guide
Chapter 7 Keypad Service Provisioning
The phone will reboot when you exit the ‘Service program’ menu.
Abbrev.NAM
You can program with the active NAM. The following parameters can be changed:
MIN, MDN, Home SID, Primary CH A and Secondary CH A.
The phone will reboot if you changed any parameters.
System NAM Setting
To select preferred
Select the preferred for the active NAM.
To set the active NAM
You can set witch NAM to be activated. If the current active NAM is locked, you
must unlock it before you set the other NAM to be active.
7-3

Aspen Reference Guide
Chapter 7 Keypad Service Provisioning
To lock/unlock the active NAM
The phone will reboot when quit the ‘System’ menu if you have changed the
prefeered or the active NAM.
Test Screen
This menu will display some system parameters such as Rx Power, Tx Power, Pilot Pn,
EC/IO, etc. While the test screen is active, you can dial a number and end a call through
the keypad. When in a call, the test screen will be taken to the front to show the
parameters.
Factory test mode
This is also a hidden menu, and you can enter it by pressing “#*0203”.
Note: You can quit ‘Keypad’ test by press right soft key twice.
7-4

Chapter 8 Health and Safety Information
Exposure to Radio Frequency (RF) Signals
Your wireless phone is a radio transmitter and receiver. It is designed and manufactured
not to exceed the emission limits for exposure to radio frequency (RF) energy set by the
Federal Communications Commission (FCC) for the U.S. Government. These limits
are part of comprehensive guidelines and establish permitted levels of RF energy for
the general population. The guidelines are based on the safety standards that were
developed by independent scientific organizations through periodic and thorough
evaluation of scientific studies.
The standards include a substantial safety margin designed to assure the safety of all
persons, regardless of age and health.
The exposure standard for wireless phones employs a unit of measurement known as
Specific Absorption Rate (SAR). The SAR limit set by the FCC is 1.6 W/kg
1
. SAR tests
are conducted using standard operating positions specified by the FCC with the phone
transmitting at its highest certified power level in all tested frequency bands. Although
the SAR is determined at the highest certified power level, the actual SAR level of the
phone while operating can be well below the maximum value. This is because the
phone is designed to operate at multiple power levels so as to use only the power
required to reach the network. In general, the closer you are to a wireless base station
antenna, the lower the power output of the phone.
Before a new model phone is available for sale to the public, it must be tested and
certified by the FCC to insure that it does not exceed the limit established by the
government adopted requirement for safe exposure. The tests are performed in
positions and locations (e.g., at the ear and worn on body) as required by the FCC for
each model. While there may be differences between SAR levels of various phones and
at various positions, they all meet the government requirement.
The FCC has granted an Equipment Authorization for this model phone with all
reported SAR levels evaluated as in compliance with the FCC RF exposure guidelines.
SAR information on this model phone is on file with the FCC and can be found on the
FCC website (http://www.fcc.gov/oet/fccid) after searching the FCC ID printed in the
label on the phone.
The highest SAR value for this model phone when tested for use at the ear is
1.38 W/kg, and when worn on the body, as described in this user guide, is 1.55 W/kg.
1
In the U.S. and Canada, the SAR limit for mobile phones used by the public is 1.6 Watts/kg
(W/kg) averaged over one gram of tissue. The standard incorporates a substantial margin of
safety to give additional protection for the public and to account for any variations in
measurements.
8-1

Aspen Reference Guide
Chapter 8 Health and Safety Information
For Body Operation
To maintain compliance with FCC RF exposure requirements, use only belt-clips,
holsters or similar accessories that maintain a 1.5 cm separation distance between the
user’s body and the back of the phone, including the antenna, whether extended or
retracted. The use of belt-clips, holsters and similar accessories should not contain
metallic components in its assembly. The use of accessories that do not satisfy these
requirements may not comply with FCC RF exposure requirements, and should be
avoided.
For more information concerning exposure to radio frequency signals, see the following
websites:
Federal Communications Commission (FCC)
http://www.fcc.gov/oet/rfsafety
Cellular Telecommunications Industry Association (CTIA)
http://www.wow-com.com
U.S. Food and Drug Administration (FDA)
http://www.fda.gov/cdrh/consumer
World Health Organization (WHO)
http://www.who.int/peh-emf/en
8-2
 Loading...