

Page 1
1.07-05052017-133500
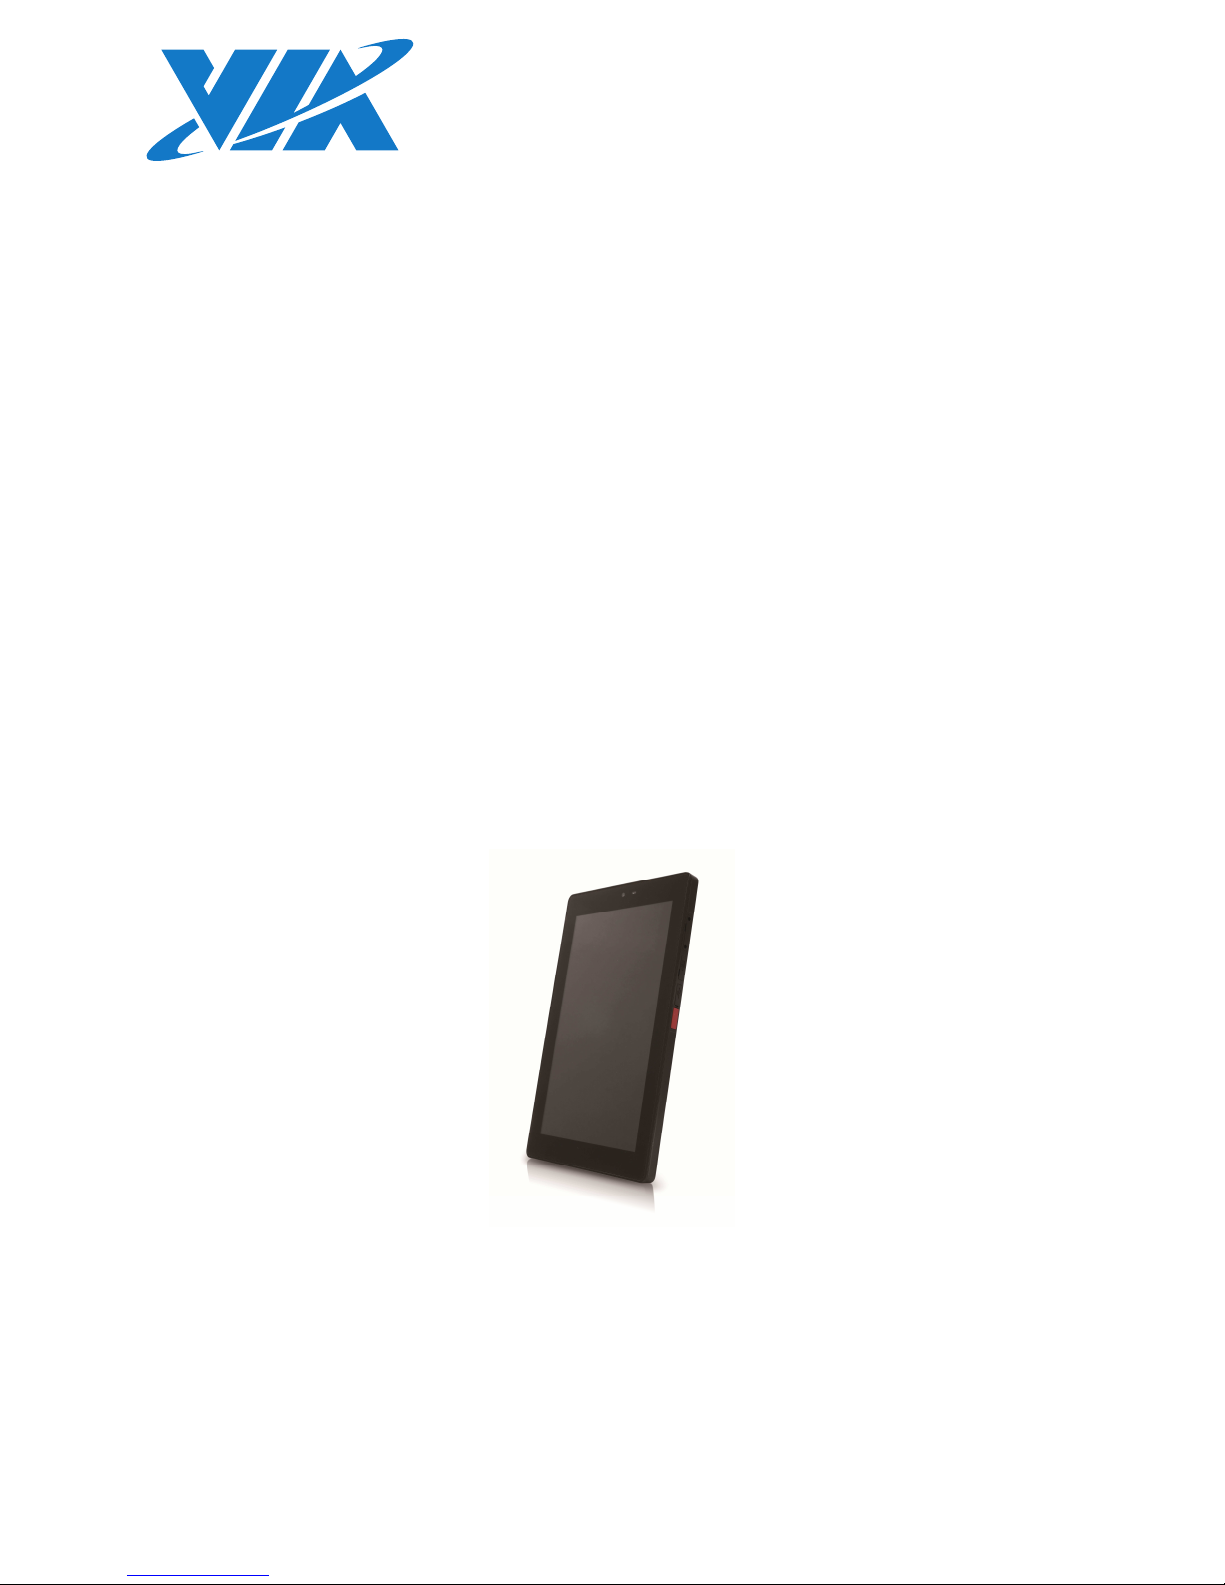
USER MANUAL
Viega Tablet
Semi-ruggedized embedded
Android tablet
Page 2

Copyright
Copyright © 2014-2017 VIA Technologies Incorporated. All rights reserved.
No part of this document may be reproduced, transmitted, transcribed, stored in a retrieval system, or translated into any language,
in any form or by any means, electronic, mechanical, magnetic, optical, chemical, manual or otherwise without the prior written
permission of VIA Technologies, Incorporated.
Trademarks
All trademarks are the property of their respective holders.
Disclaimer
No license is granted, implied or otherwise, under any patent or patent rights of VIA Technologies. VIA Technologies makes no
warranties, implied or otherwise, in regard to this document and to the products described in this document. The information
provided in this document is believed to be accurate and reliable as of the publication date of this document. However, VIA
Technologies assumes no responsibility for the use or misuse of the information (including use or connection of extra
device/equipment/add-on card) in this document and for any patent infringements that may arise from the use of this document. The
information and product specifications within this document are subject to change at any time, without notice and without obligation
to notify any person of such change.
VIA Technologies, Inc. reserves the right the make changes to the products described in this manual at any time without prior notice.
Page 3

Safety Precautions
Always read the safety instructions carefully.
Keep this User's Manual for future reference.
All cautions and warnings on the equipment should be noted.
Place the power cord in such a way that people cannot step on it.
If any of the following situations arises, get the equipment checked by authorized service personnel:
The power cord or plug is damaged.
Liquid has penetrated into the equipment.
The equipment has not worked well or you cannot get it work according to User's Manual.
The equipment has dropped and damaged.
The equipment has obvious sign of breakage.
Never pour any liquid into the opening. Liquid can cause damage or electrical shock.
Do not place anything over the power cord.
Caution
RISK OF EXPLOSION IF BATTERY IS REPLACED BY AN INCORRECT TYPE.
DISPOSE OF USED BATTERIES ACCORDING TO THE INSTRUCTIONS.
To prevent possible hearing damage, do not listen at high volume levels for long periods.
Page 4

Viega Tablet User Manual
iv
Table of Contents
1. Hardware Setup ............................................................................................................................ 1
1.1. Box Contents ...................................................................................................................................................... 1
1.2. Top & Right panel ............................................................................................................................................. 2
1.3. Bottom panel ...................................................................................................................................................... 3
1.4. Micro HDMI port ............................................................................................................................................... 4
1.5. Micro SIM Card Slot .......................................................................................................................................... 5
1.6. Micro SD card slot ............................................................................................................................................ 6
1.7. Charging the tablet ........................................................................................................................................... 7
1.8. Installing the Rubber Ribs ................................................................................................................................ 9
1.9. Installing the Tablet to the Docking Station .............................................................................................10
2. Basics ............................................................................................................................................ 11
2.1. Switching the power on or off .....................................................................................................................11
2.2. Unlocking the screen ......................................................................................................................................11
2.3. Sleep Mode ......................................................................................................................................................11
2.4. Home Screen ....................................................................................................................................................12
2.4.1. Removing an app from Home screen ..................................................................................................12
2.4.2. Relocating an app from Home screen.................................................................................................12
2.5. Finger Gestures ................................................................................................................................................13
2.6. Notifications Panel ..........................................................................................................................................14
2.7. Quick Settings ..................................................................................................................................................14
2.8. Switching between recently opened apps ................................................................................................14
2.9. Airplane mode .................................................................................................................................................14
2.10. NFC (Near Field Communication) ...............................................................................................................14
3. Keyboard ...................................................................................................................................... 15
3.1. Using the onscreen keyboard .......................................................................................................................15
4. Camera ......................................................................................................................................... 16
4.1. Taking a photo ..................................................................................................................................................16
4.2. Recording videos .............................................................................................................................................16
4.3. Capturing panoramas ......................................................................................................................................16
4.4. Configuring camera settings ..........................................................................................................................16
5. Gallery .......................................................................................................................................... 17
5.1. Sharing and deleting the album ...................................................................................................................17
5.2. Sharing the photo ............................................................................................................................................17
5.3. Editing the photo .............................................................................................................................................17
5.4. Setting function in Gallery .............................................................................................................................17
6. Widgets ........................................................................................................................................ 17
7. File Browse .................................................................................................................................. 18
8. Email ............................................................................................................................................. 18
8.1. Setting up an e-mail account ........................................................................................................................18
8.2. Adding a new e-mail account ......................................................................................................................18
9. Location ........................................................................................................................................ 19
9.1. Location Settings ..............................................................................................................................................19
10. Search and Wed browser ......................................................................................................... 20
Page 5

Viega Tablet User Manual
v
10.1. Searching setting ..............................................................................................................................................20
10.2. Start Searching..................................................................................................................................................20
10.3. Web Browser ....................................................................................................................................................20
10.3.1. Go to a webpage .....................................................................................................................................20
10.4. Viewing a webpage ........................................................................................................................................20
10.5. Open a new browser window .....................................................................................................................20
10.6. Incognito tab.....................................................................................................................................................20
10.7. Bookmarking .....................................................................................................................................................21
10.8. Viewing a previously visited page ...............................................................................................................21
10.9. Viewing the most visited page .....................................................................................................................21
10.10. Clearing the browser cache and history ....................................................................................................21
11. Internet Connections .................................................................................................................. 22
11.1. Wi-Fi connection ..............................................................................................................................................22
12. Bluetooth ..................................................................................................................................... 22
13. Security ......................................................................................................................................... 23
13.1. Screen lock .......................................................................................................................................................23
14. Settings ......................................................................................................................................... 24
15. Restart and Reset ........................................................................................................................ 25
15.1. Restarting ...........................................................................................................................................................25
15.2. Resetting ............................................................................................................................................................25
16. Warning ........................................................................................................................................ 26
Page 6

Viega Tablet User Manual
vi
Lists of Figures
Figure 1: Top and Right panel of the Viega tablet ........................................................................................................ 2
Figure 2: Left panel of the Viega tablet............................................................................................................................ 2
Figure 3: Bottom panel of the Viega tablet ..................................................................................................................... 3
Figure 4: Connecting to an HDMI display ........................................................................................................................ 4
Figure 5: Installing the Micro SIM card ............................................................................................................................. 5
Figure 6: Installing the Micro SD card .............................................................................................................................. 6
Figure 7: Connecting to Micro USB port .......................................................................................................................... 7
Figure 8: Plug to Micro USB charger cable ..................................................................................................................... 7
Figure 9: Insert the dock head ............................................................................................................................................ 8
Figure 10: Twist the dock head .......................................................................................................................................... 8
Figure 11: Connecting the power adapter ....................................................................................................................... 8
Figure 12: Insert the rubber ribs ......................................................................................................................................... 9
Figure 13: Secure the rubber ribs ...................................................................................................................................... 9
Figure 14: Insert the tablet into the docking station ...................................................................................................10
Figure 15: Secure the docking station .............................................................................................................................10
Figure 16: Home screen .....................................................................................................................................................12
Page 7

Viega Tablet User Manual
vii
Lists of Tables
Table 1: Onscreen keyboard table .................................................................................................................................15
Table 2: Screen lock table ................................................................................................................................................23
Table 3: System Settings table .........................................................................................................................................24
Page 8

Viega Tablet User Manual
1
1.
Hardware Setup
1.1. Box Contents
10.1” Viega tablet x 1
Rubber ribs x 4 and screws x 4
Micro-HDMI to HDMI adapter x 1
Micro-USB to USB cable x 1
Power Adapter x 1
Micro-USB charger cable x 1
Dock Head x 1
Docking station x 1 set (optional)
Page 9
Viega Tablet User Manual
2
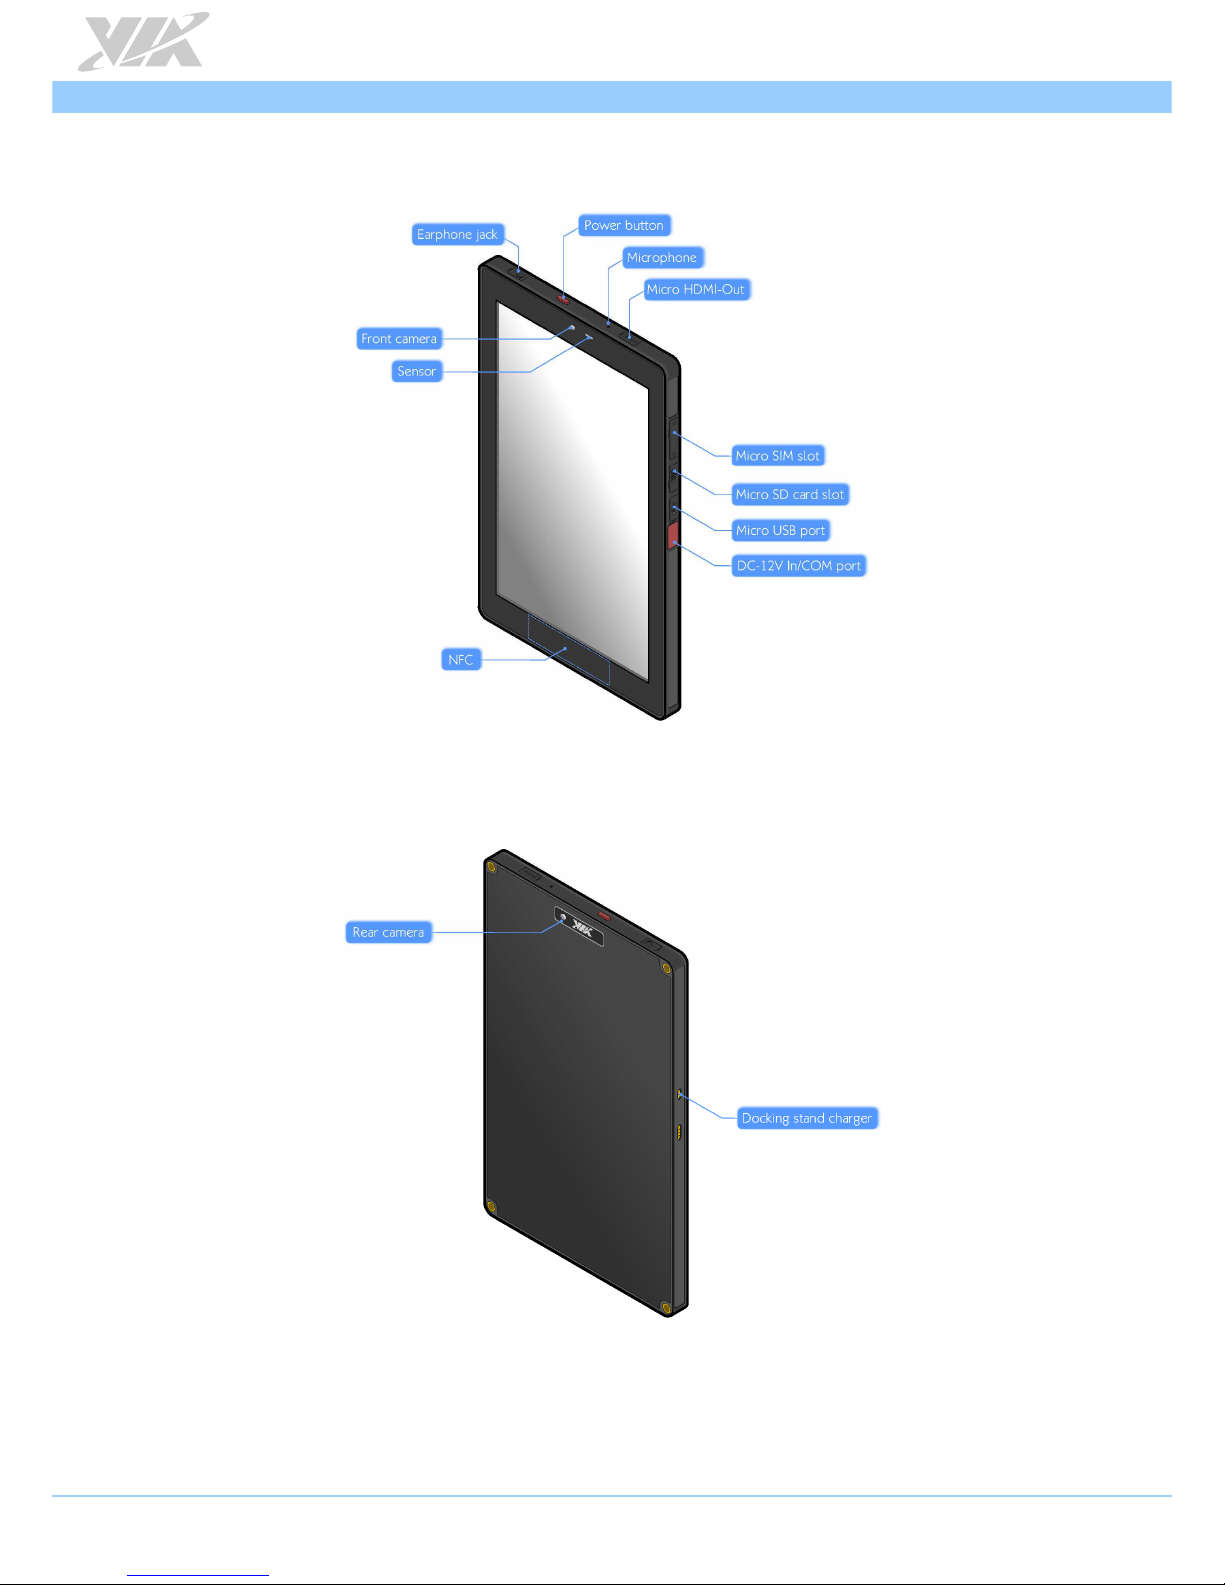
1.2. Top & Right panel
Figure 1: Top and Right panel of the Viega tablet
Left panel
Figure 2: Left panel of the Viega tablet
Page 10
Viega Tablet User Manual
3
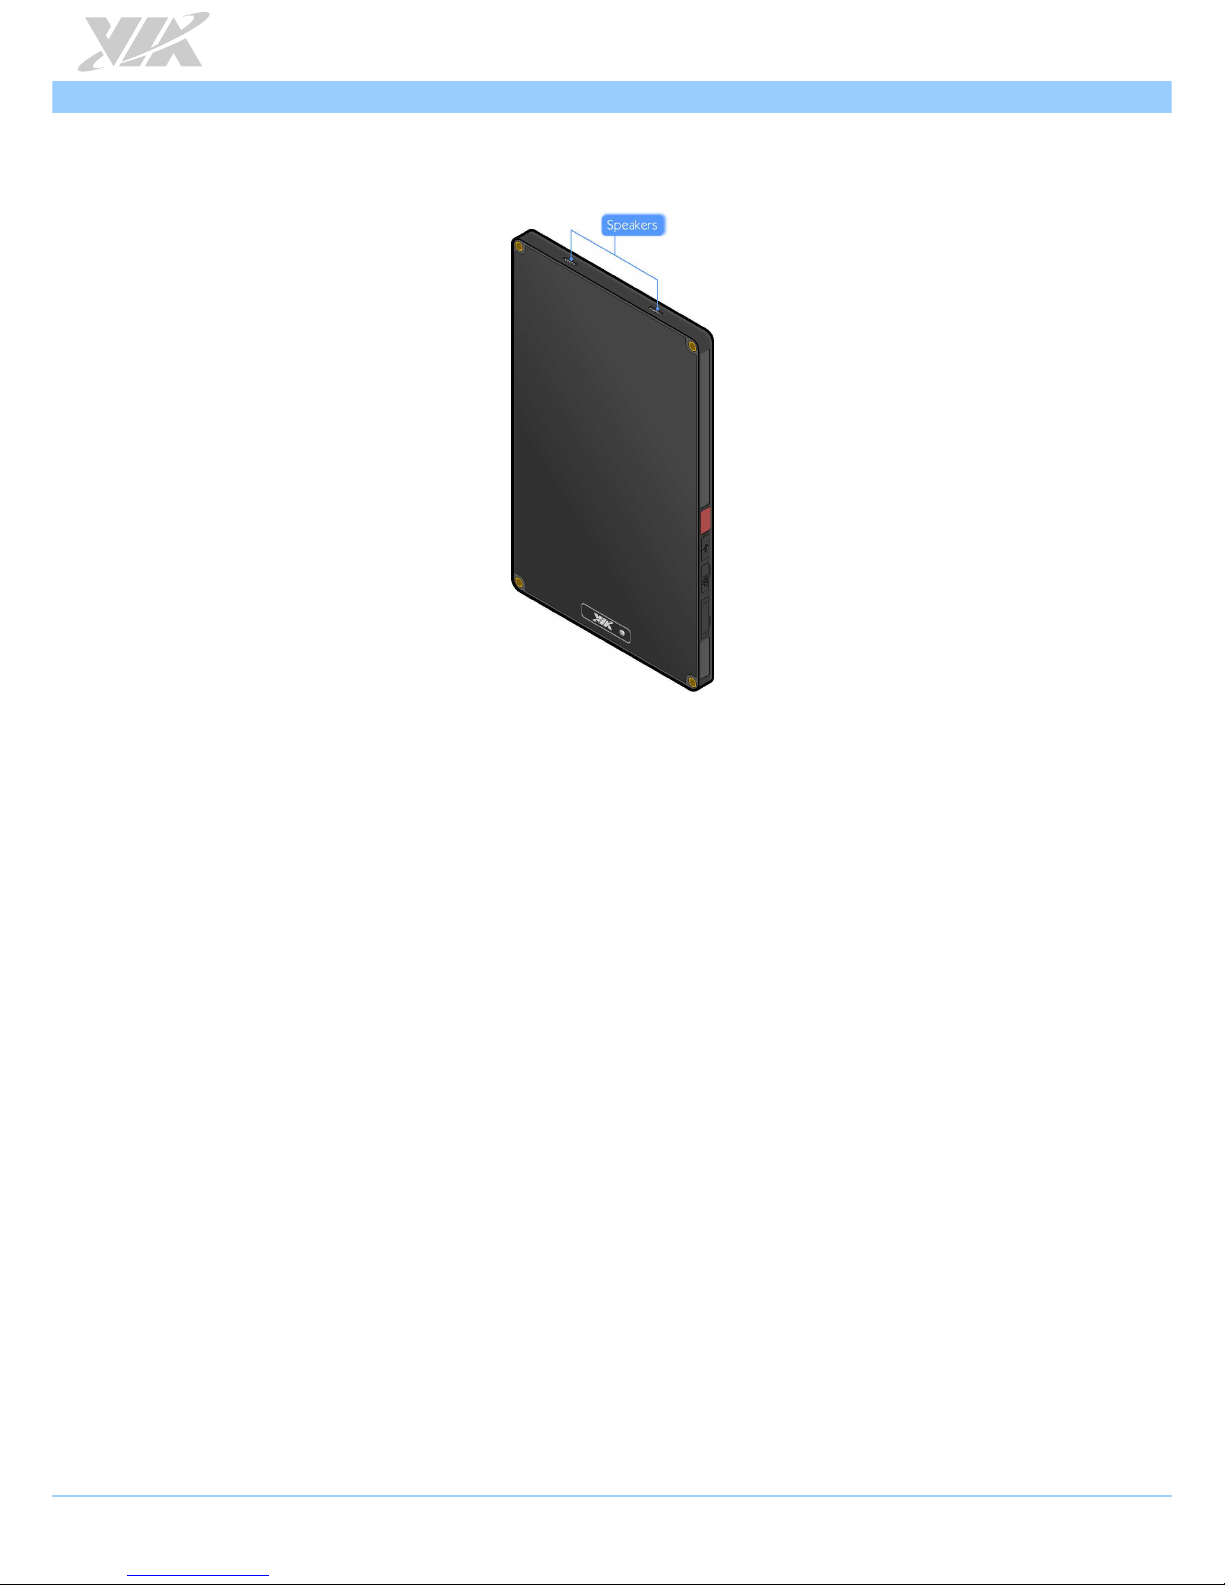
1.3. Bottom panel
Figure 3: Bottom panel of the Viega tablet
Page 11

Viega Tablet User Manual
4
1.4. Micro HDMI port
The Micro HDMI port allows you to connect the tablet to an HDMI display.
Step 1
Plug the HDMI adapter to the micro HDMI port of your Viega tablet.
Step 2
Connect the HDMI cable to the HDMI adapter.
Step 3
Plug the other end of HDMI cable to the HDMI port of your HDMI monitor.
Figure 4: Connecting to an HDMI display
Page 12

Viega Tablet User Manual
5
1.5. Micro SIM Card Slot
The Viega Tablet comes with a Micro SIM card slot that you can use for data connection.
Step 1
To insert the Micro SIM card, remove the 2 screws from the cover.
Step 2
Insert the Micro SIM card into the Micro SIM card slot.
Figure 5: Installing the Micro SIM card
Note:
Ensure the angled corner of the SIM card is placed in the correct way before closing the slot.
Page 13

Viega Tablet User Manual
6
1.6. Micro SD card slot
The Viega Tablet comes with a memory card reader slot that you can store your data such as photos,
videos, music, etc.
Step 1
To insert the Micro SD card, lift the cover.
Step 2
Insert the Micro SD card into the Micro SD card slot.
Figure 6: Installing the Micro SD card
Notes:
1. Ensure the angled corner of the SD card is placed in the correct way before closing the slot.
2. Please note that the lifespan of the onboard eMMC memory chip may vary depending on the amount of
access. More frequent and larger data access on eMMC memory makes its lifespan shorter. Therefore, it is
highly recommended to use a replaceable external storage (e.g., Micro SD card) for large data access.
Page 14

Viega Tablet User Manual
7
1.7. Charging the tablet
To charge the Viega Tablet, you need the following accessories:
1. Power adapter
2. Dock head
3. Micro-USB charger cable
Step 1
Lift the cover from the Micro-USB port.
Step 2
Take the Micro-USB charger cable and plug Micro-USB connector to the Micro USB port of the tablet.
Figure 7: Connecting to Micro USB port
Step 3
Plug the other end of the Micro-USB charger cable to the power adapter.
Figure 8: Plug to Micro USB charger cable
Page 15

Viega Tablet User Manual
8
Step 4
Insert the dock head to the power adapter.
Figure 9: Insert the dock head
Step 5
Twist the dock head until it locks into place.
Figure 10: Twist the dock head
Step 6
Plug the power adapter to a power outlet to start charging the battery.
Figure 11: Connecting the power adapter
Notes:
1. When using the Viega tablet for the first time, please charge the tablet for four hours before using it.
2. Only use the power adapter provided in the box to charge the battery. Using a different type of adapter
may damage the tablet.
3. Due to some physical limitations of the battery, it is highly suggested to charge the battery in an
environment where the room temperature is between 0℃ and 40℃ to protect the battery.
Page 16

Viega Tablet User Manual
9
1.8. Installing the Rubber Ribs
Use the rubber ribs to protect the tablet from vibration and shock.
Step 1
Insert the rubber ribs to the 4 corners of the tablet.
Figure 12: Insert the rubber ribs
Step 2
Secure the rubber ribs in place with 4 mounting screws (screw type: M4*8).
Figure 13: Secure the rubber ribs
Page 17

Viega Tablet User Manual
10
1.9. Installing the Tablet to the Docking Station
Step 1
Align the tablet with the docking station. Gently insert the tablet into the slot.
Figure 14: Insert the tablet into the docking station
Step 2
Secure the docking station to the tablet from the back by fastening the 4 mounting screws.
Figure 15: Secure the docking station
Note:
Before installing the tablet to the docking station, please ensure that the rubber ribs have been
removed from the tablet.
Page 18

Viega Tablet User Manual
11
2.
Basics
2.1. Switching the power on or off
Press the power button to turn on/off the Viega tablet.
2.2. Unlocking the screen
On the lock screen, tap and drag the ring from lock to unlock .
2.3. Sleep Mode
Slightly press the power button to switch the display to sleep mode. To wake it up from sleep mode,
simply press the power button again.
Page 19

Viega Tablet User Manual
12
2.4. Home Screen
Figure 16: Home screen
1. Google Search
2. Back
3. Home
4. Recently opened Apps
5. Apps
2.4.1. Removing an app from Home screen
To remove an app from your Home screen:
Step 1
Tap and hold the app you want to remove.
Step 2
Drag the app to the X button.
2.4.2. Relocating an app from Home screen
To relocate an app from your Home screen:
Step 1
Tap and hold the app you want to relocate.
Step 2
Drag the app to a new place on the screen.
○
1
○
2
○
3
○
4
○
5
Page 20

Viega Tablet User Manual
13
2.5. Finger Gestures
Tap
Single tap to select an item. Double tap to launch an item.
Press and hold
To open the available options for an item, press and hold the item.
Swipe or slide
Drag your finger vertically or horizontally across the screen.
Drag
Press and hold your finger with pressure to drag. Release your finger until you have
reached the target location.
Rotate
Change the screen orientation by turning the Viega tablet sideways.
Zoom In/Out
Pinch two fingers together or spread them apart to adjust zoom level.
Page 21

Viega Tablet User Manual
14
2.6. Notifications Panel
Check event notification, battery status and network connection status in Notifications panel. Tap the
status bar which is located on the lower right side of the screen to open the Notifications panel.
2.7. Quick Settings
Quickly turn on airplane mode, Wi-Fi, auto-rotate screen, notification alerts and adjust brightness of the
screen in Quick Settings. You can also access to the Viega tablet setting through a shortcut in quick setting.
Tap the status bar on the lower right side of the screen and tap to open the Quick Settings.
2.8. Switching between recently opened apps
You can quickly switch between the apps you recently opened.
1. Tap at the bottom of the screen.
2. You will see a list displaying all the apps that you recently launched. Tap an app to open it.
2.9. Airplane mode
To turn off the wireless function of the tablet while on board an aircraft, press and hold Power button and
tap Airplane mode. Once this feature is enabled, the Airplane mode icon will appear in the status
bar.
2.10. NFC (Near Field Communication)
NFC allows data exchange or contactless transactions when the tablet touches another NFC-enabled
device.
3. From the Home screen, tap ->
Settings
.
4. In Wireless & Networks section, tap
More
.
5. Tap
NFC
to enable NFC function
6. Bring the tablet’s NFC tag close to another NFC device.
Page 22

Viega Tablet User Manual
15
3.
Keyboard
3.1. Using the onscreen keyboard
Tap the letters or numbers on the onscreen keyboard to enter the text.
Tap the shift key to input an uppercase letter. Tap the shift key twice to turn on caps lock
Tap to change to the number/symbol keyboard
Next/Done key. Tap to create a new line or to confirm text input
Backspace key. Tap to delete the previous letter/number
Go to next line.
Language key. Tap to get 2 input options:
1. Change input languages.
2. Configure Android keyboard settings.
Tap to close the onscreen keyboard
Table 1: Onscreen keyboard table
?123
Next
Tab
Page 23

Viega Tablet User Manual
16
4.
Camera
To open the camera, tap on the Home screen and tap
Camera
.
4.1. Taking a photo
To take a photo, tap .
4.2. Recording videos
To record videos, tap -> . Tap to start recording.
4.3. Capturing panoramas
To capture panoramas, tap -> . Tap to start capturing.
4.4. Configuring camera settings
To configure camera setting, tap .
Switch
camera
Set
Exposure
Change other settings
Page 24

Viega Tablet User Manual
17
5.
Gallery
Using Gallery app to view photos, play videos or edit files stored in your album.
1. From the Home screen, tap ->
Gallery
.
2. Tap an album thumbnail to open that folder. Then, tap a photo or video to view it.
5.1. Sharing and deleting the album
Tap and hold the album to be shared/deleted and a tool bar will display on top of the screen. Select the
appropriate task.
5.2. Sharing the photo
1. Tap the photo to be shared from the album.
2. The tool bar on upper right side of the screen allows you to share your photo.
5.3. Editing the photo
1. Tap the photo to be edited from the album.
2. You will see an icon on lower right side of the screen; tap it to get the editing tools.
3. Use the editing tools to edit your image.
5.4. Setting function in Gallery
1. From Gallery screen, you can configure some settings to the photo you selected.
2. Tap
Setting
on upper right side of the screen. You can delete the image, show the image in
slideshow, edit the image, rotate left, rotate right, crop the photo, set picture as contact
photo/wallpaper or check details of the picture.
6.
Widgets
Widgets are apps that enable you to easily access to Apps on your tablet’s Home screen.
1. From the Home screen, tap ->
Widgets
on top of the screen
.
2. In the Widgets screen, select a widget that you want to display on the Home Screen. Tap and hold
the widget, then drag it to the Home screen.
3. To remove a widget from the Home screen, simply tap and hold the widget, then drag it to X button.
Page 25

Viega Tablet User Manual
18
7.
File Browse
File Browse allows you to find and manage your data.
To access the file storage:
1. From the Home screen, tap and go to the All Apps screen
.
2. Tap
File Browse
and you will see all the data you stored in the tablet/SD card/Udisk.
8.
Email
You can add POP3, IMAP and Exchange accounts to view, send and receive e-mails using the tablet.
8.1. Setting up an e-mail account
From the Home screen, tap and go to the All Apps screen
.
1. Tap
EMAIL.
2. In the
EMAIL
App, enter your e-mail address and password, then tap
Next
.
3. Configure the
Account settings
->
Next
.
4. Enter the account name that will be shown in the outgoing emails. Tap
Next
and you will be directed
to your inbox.
8.2. Adding a new e-mail account
1. From the Home screen, tap and go to the All Apps screen
.
2. Tap
EMAIL.
3. Log-in using your e-mail account.
4. Tap
Settings
->
Add Account
to add a new email account.
Page 26

Viega Tablet User Manual
19
9.
Location
9.1. Location Settings
Setup location sources to find your location on this tablet.
1. From the Home screen, tap ->
Settings
.
2. Tap
Location access
on the left panel.
3. Select from the following options:
GPS satellites
Let apps use GPS on your tablet to pinpoint your location
Wi-Fi & mobile
network location
Let apps use Google’s location service to estimate your location faster. Anonymous
location data will be collected and sent to Google.
Page 27

Viega Tablet User Manual
20
10. Search and Wed browser
Google Search function allows you to search for information on your tablet and on the Web.
10.1. Searching setting
1. Tap from the Home screen.
2. Tap Search settings .
3. In the Searchable items, select the items to be searched.
10.2. Start Searching
1. Tap from the Home screen.
2. Input the text you intend to search for. Tap to search the web. Or simply tap the app from the list
of suggestions to open it.
10.3. Web Browser
10.3.1. Go to a webpage
On the Home screen, tap
Browser .
Enter the webpage address or search keyword in the URL box
which is on the top of the screen.
10.4. Viewing a webpage
Swipe your finger on the screen to navigate. Quickly tap the screen twice to zoom in and tap twice again
to zoom out. Alternatively, bring your two fingers together to zoom out or spread your two fingers to
zoom in.
10.5. Open a new browser window
To open a new browser window, tap . You can easily switch between different browser windows.
10.6. Incognito tab
You have the choice to use either incognito tabs or normal browser tabs. Incognito tabs allow you to surf
with more privacy. Pages you view in incognito tab won’t appear in your browser history.
Open your browser and tap
New incognito tab
to open a new incognito browser.
Page 28

Viega Tablet User Manual
21
10.7. Bookmarking
To bookmark a webpage, open the browser and tap . A bookmark panel pops up. Edit bookmark label,
address, account and the shortcut to add the bookmark. Tap OK to add the bookmark.
To open a bookmark, tap and select the bookmark you want to view.
10.8. Viewing a previously visited page
Open a webpage, tap . Tap the
History
tab on the top of the webpage. Select the page you want to
view and tap it.
10.9. Viewing the most visited page
Open a webpage, tap . Tap the
History
tab on the top of the webpage. On the
Most Visited
tab,
select the page you want to view and tap it.
10.10. Clearing the browser cache and history
Open a webpage, tap ->
Settings
->
Privacy & security
.
Tap
Clear cache
to clear locally cached content and database.
Tap
Clear history
to clear the browser navigation history.
Page 29

Viega Tablet User Manual
22
11. Internet Connections
11.1. Wi-Fi connection
To use Wi-Fi, you need to connect to a wireless network.
1. From the Home screen, tap ->
Settings
.
2. In “
Wireless & Networks
”, slide the Wi-Fi switch to ON. The system will scan for all available Wi-Fi
networks.
3. Tap a network to be connected. For security reason, a passcode may be required to access to the
wireless networks.
4. When the tablet is connected to the Wi-Fi, the icon will show in the status bar and indicate the
signal strength.
5. If your Viega tablet detects a network that you have previously connected to, you won’t be asked to
input the passcode again.
12. Bluetooth
Bluetooth allows you to exchange data between several devices wirelessly.
1. From the Home screen, tap ->
Settings
.
2. In “
Wireless & Networks
”, slide the Bluetooth switch to ON.
3. To Pair the Bluetooth device to be connected with your Viega tablet, tap “
Bluetooth
” to show all
available Bluetooth devices within range.
4. From all available Bluetooth devices, select the Bluetooth device you want to pair with and tap it.
5. When the tablet is connected to the Bluetooth, the icon will show in the status bar.
Page 30

Viega Tablet User Manual
23
13. Security
13.1. Screen lock
You can setup screen lock for a better protection of your tablet.
1. From the Home screen, tap ->
Settings
.
2. Tap
Security
->
Screen Security
->
Screen lock
None
Disable the lock screen
Slide
Slide the screen to any direction
Pattern
Set a screen lock pattern
PIN
Set a numeric password (4~17 digits)
Password
Set an alpha-numeric password (4~17 characters)
Table 2: Screen lock table
Page 31

Viega Tablet User Manual
24
14. Settings
Configure the system settings for your Viega tablet.
1. From the Home screen, tap ->
Settings
.
Wireless &
Networks
Configure wireless connections, such as Wi-Fi, Bluetooth, data usage, airplane mode,
VPN, NFC and mobile networks.
Sound
Adjust the volume and choose sounds to be applied for notifications.
Display
Configure display settings such as brightness, TV screen adjustment, wallpaper, sleep
mode, daydream, font size and wireless display.
Storage
Indicate storage status and manage your internal storage.
Battery
Indicate battery status.
Apps
Manage all the Apps. Tap the App to see detailed information or force stop/uninstall
the App.
Users
Add or edit owner information
Location Access
Configure location access setting.
Security
Configure security settings, such as screen lock, encryption, passwords setting, device
administration and credential storage.
Language &
input
Set the system language, keyboard & input methods, text-to-speech setting and
mouse/trackpad setting.
Backup & reset
Reset the data to factory default values.
Account
Add an account.
Date/Time
Set the date and time, time zone and date/time format
Accessibility
Set calibration and some accessibility tools such as auto-rotate screen, speak
password, text-to-speech output, and more.
Performance
Indicate CPU information.
About tablet
Indicate information about Viega tablet, such as the battery level, hardware and
software information and so on.
Table 3: System Settings table
Page 32

Viega Tablet User Manual
25
15. Restart and Reset
15.1. Restarting
If the system becomes unresponsive, you can force the system to restart. Press and hold the power button
for a while (about 7 seconds) to force shut down and press the power button again to turn it on.
15.2. Resetting
You can reset the system to factory default settings.
1. From the Home screen, tap ->
Settings
.
2. Tap
Backup & reset
->
Factory data reset
.
3. Tap
Reset tablet
->
Erase everything
.
Page 33

Viega Tablet User Manual
26
16. Warning
Notice:
Any changes or modifications not expressly approved by the party responsible for compliance could void
your authority to operate the equipment.
Notice:
This equipment has been tested and found to comply with the limits for a Class B digital device, pursuant
to part 15 of the FCC Rules. These limits are designed to provide reasonable protection against harmful
interference in a residential installation. This equipment generates, uses and can radiate radio frequency
energy and, if not installed and used in accordance with the instructions, may cause harmful interference
to radio communications. However, there is no guarantee that interference will not occur in a particular
installation. If this equipment does cause harmful interference to radio or television reception, which can
be determined by turning the equipment off and on, the user is encouraged to try to correct the
interference by one or more of the following measures:
— Reorient or relocate the receiving antenna.
— Increase the separation between the equipment and receiver.
— Connect the equipment into an outlet on a circuit different from that to which the receiver is
connected.
— Consult the dealer or an experienced radio/TV technician for help.
Notice:
This device complies with Part 15 of the FCC Rules. Operation is subject to the following two conditions:
1. This device may not cause harmful interference and
2. This device must accept any interference received, including interference that may cause undesired
operation.
Notice:
This equipment complies with FCC RF radiation exposure limits set forth for an uncontrolled environment.
This device was tested for typical lap held operations with the device contacted directly to the human
body to the back side of the notebook computer. To maintain compliance with FCC RF exposure
compliance requirements, avoid direct contact to the transmitting antenna during transmitting.
Page 34

 Loading...