

Page 1

Tentative User Manual V0.1.0
Stretched TFT-LCD Display
Model VIA P650IVF01.0
VIA Technologies, Inc.
1F, 531 Zhongzheng Rd.,
Xindian Dist. New Taipei City
– 231, Taiwan, R.O.C
Page 2

Index
Important Product Safety Instructions ............................................................................................................................. 1
Safety Precautions and Maintenance ........................................................................................................................ 1
To reduce the risk of electric shock or damage to the equipment ................................................................... 2
Declaration of Conformity ......................................................................................................................................... 2
IMPORTANT NOTE ................................................................................................................................................... 2
Federal Communications Commission (FCC) Statement ................................................................................... 2
Overloading Outlets .................................................................................................................................................... 3
Other Notices and Precautions ................................................................................................................................ 3
Proper Positioning of Display .................................................................................................................................... 3
Ventilation .............................................................................................................................................................................. 4
Cleaning .......................................................................................................................................................................... 4
Power Cord Protection .............................................................................................................................................. 4
Introduction ............................................................................................................................................................................ 5
Functions and Features ............................................................................................................................................... 5
Package Content ........................................................................................................................................................... 6
Product Overview ................................................................................................................................................................. 6
Connections .................................................................................................................................................................. 7
Firmware Upgrade by Inserting USB Stick.............................................................................................................. 7
Connect Signal Cables ................................................................................................................................................. 8
Control Panel ................................................................................................................................................................ 8
Installation ............................................................................................................................................................................... 9
Install Remote Control Batteries .............................................................................................................................. 9
Using the Remote Control ................................................................................................................................................ 10
The OSD Functions ............................................................................................................................................................ 11
INPUT SOURCE ........................................................................................................................................................ 11
PICTURE ...................................................................................................................................................................... 12
SETUP ........................................................................................................................................................................... 12
More Information ................................................................................................................................................................ 13
Supported Timing Mode ............................................................................................................................................ 13
Input Video Pattern Guideline ................................................................................................................................. 14
Product Specification .......................................................................................................................................................... 15
Dimensions .................................................................................................................................................................. 17
Other Notices ...................................................................................................................................................................... 18
Operation and Maintenance Guide ................................................................................................................................. 18
MagicView User Guide ....................................................................................................................................................... 27
BIOS Setup ............................................................................................................................................................................ 70
Page 3

Use for control, adjustments, or procedures other than those specified in this document may result in
40° C or above 110° C. The product must
USA
UL
Switzerland
SEV
Canada
CSA
Germany
VDE
Britain
BASE/BS
Japan
Electric Appliance Control Act
Important Product Safety Instructions
exposure to shock, electrical hazard and/or mechanical hazards.
Use this product in environments with ambient temperatures of 0˚C ~50˚C. Do not leave this product
in an environment where the storage temperature is below be used in a controlled environment.
WARNING
• Do not use this product near water or a heat source.
• Do not spill water or any other liquids on this product.
• Do not place heavy objects on the top of this product.
Safety Precautions and Maintenance
• Read carefully and follow all warnings and instructions in this document and those marked on the
product before you operate your display. Failure to follow warnings can result in personal injury or
damage to product. Keep this document in a convenient location for future reference.
• This product should be operated from the type of power indicated on the marked label.The attached
AC adapter is designed for use with this product.
• To use a different ac adapter, use only a power source and connection compatible with this product. If
you are not sure of the type of power available, consult your dealer or local power company.
• An approved power cord greater or equal to H03VV-F or H05VV-F 3G, 0.75 mm² or 18AWG must be
used.
• This device must be operated with the original power supply.
• The socket-outlet should be installed near the equipment and should be easily accessible.
• Use a power cable that is properly grounded.Always use the appropriate AC cord that is certified for the
individual country. Some examples are listed in below table:
Country
• Do not place inflammables/volatile matter/liquids near by the product.
Safety Certificate
To reduce the risk of electric shock or damage to the equipment
• Do not disable the power cord grounding plug.The grounding plug is an important safety feature.
1
Page 4

• Plug the power cord into a grounded (earthed) electrical outlet that is easily accessible at all times.
• Disconnect power from the equipment by unplugging the power cord from the electrical outlet.
• Do not place anything on power cords or cables.Arrange them so that no one may accidentally step on
or trip over them.
• Do not pull on a cord or cable.
• Always grasp the cord by the plug, while unplugging from the electrical outlet.
• Always plug in the DC connector first, then plug in the AC connector.
Declaration of Conformity
FCC Part 15.19 Caution:
1. This device complies with Part 15 of the FCC Rules. Operation is subject to the following two
conditions:
(1) this device may not cause harmful interference and
(2) this device must accept any interference received, including interference that may cause
undesired operation
2. This device and its antenna(s) must not be co-located or operating in conjunction with any other
antenna or transmitter.
3. Changes or modifications to this unit not expressly approved by the party responsible for
compliance could void the user authority to operate the equipment.
IMPORTANT NOTE
FCC Radiation Exposure Statement:
This equipment complies with FCC radiation exposure limits set forth for an uncontrolled environment.
This equipment should be installed and operated with minimum distance 20cm between the radiator &
your body.
Federal Communications Commission (FCC) Statement
This equipment has been tested and found to comply with the limits for a class B digital device, pursuant to
Part 15 of the FCC Rules. These limits are designed to provide reasonable protection against harmful
interference in a residential installation. This equipment generates uses and can radiate radio frequency
energy and, if not installed and used in accordance with the instructions, may cause harmful interference to
radio communications. However, there is no guarantee that interference will not occur in a particular
installation. If this equipment does cause harmful interference to radio or television reception, which can
be determined by turning the equipment off and on, the user is encouraged to try to correct the
2
Page 5

interference by one or more of the following measures:
-- Reorient or relocate the receiving antenna.
-- Increase the separation between the equipment and receiver.
-- Connect the equipment into an outlet on a circuit different from that to which the receiver is
connected.
-- Consult the dealer or an experienced radio/TV technician for help.
Overloading Outlets
Do not overload electrical power sources when installing the display. Overloading wall outlets, circuits, or
extension cords can result in overheating, fire, or electric shock. Use only grounded or polarized outlets.
Other Notices and Precautions
• Never remove the rear cover.There are no user serviceable parts inside.Your display contains
high-voltage parts.You may be seriously injured if you touch them.
• Do not attempt repairs yourself.Your warranty does not cover repairs or attempted repairs by anyone
not authorized by VIA.
• Refer all servicing and repairs to qualified service personnel.
• If smoke, abnormal noise or strange odor is present, immediately unplug the power cord. Contact a
qualified service technician.
• If your display will not be used for extended periods of time, unplug the power cord and remove the
batteries from the remote control.
• Do not scratch the surface of the display with any sharp objection.
Proper Positioning of Display
• Always handle your display with care.Avoid touching the screen. Skin oils are difficult to remove.
• Always position your display on a stable and level surface or mount it on a wall. Unstable surfaces can
cause your display to topple and fall, resulting in possible damage or injury.
• Avoid exposing the display to direct sunlight or high temperatures, which can damage or shorten its
useful life.
• Do not place near heat sources such as radiators, heat registers, or other appliances that generate heat.
• Avoid exposing the display to rain, water, moisture or high humidity.
• Do not place your display near basins or sinks where it may come in contact with water.
• Orient your display s away from direct sunlight to reduce glare.
• Never place heavy or sharp objects on the display, video cable, or power cord.
3
Page 6

Ventilation
• Slots and openings on the cabinet are provided for ventilation purposes.To ensure reliable operation of
the product and to protect it from overheating, these openings must not be blocked or covered.
• Keep the display a minimum of 4 inches/10 cm away from any wall to assure sufficient airflow and
ventilation. Increased temperatures may cause fire or device failure.
• To assure proper ventilation, do not block the openings by placing the display on a bed, sofa, rug or other
similar surface. Do not place it in a built-in installation, such as a bookcase or an enclosed rack, unless
proper ventilation is provided.
Cleaning
Make sure the display is turned off and never spray or pour liquid directly onto the screen or case.
To clean the screen:
- Wipe the screen with a clean, soft, lint-free cloth.This removes dust and other particles.
- If it still is not clean, apply a small amount of non-ammonia, non-alcohol based glass cleaner onto
a clean, soft, lint-free cloth, and wipe the screen.
To clean the enclosure:
- Use a soft, dry cloth.
- If it still is not clean, apply a small amount of non-ammonia, non-alcohol based, mild non-abrasive
detergent onto a clean, soft, lint-free cloth, then wipe the surface.
Disclaimer
VIA does not recommend the use of any ammonia or alcohol-based cleaners on the display screen. Some
chemical cleaners have been reported to damage the screen and/or display signage box.VIA will not be liable
for damage resulting from use of any ammonia or alcohol-based cleaners.
Power Cord Protection
• Minimize wear on power supply cords. Power supply cords should be routed away from foot traffic and
contact with other objects.
• Do not route power cord under rugs or carpeting.
• The cord should never be severely bent, pinched, or twisted.
• Periodically inspect power cords for wear or damage, particularly near plug and the point where it exits
from the product.
• Unplug cord and discontinue use if damage is discovered.
4
Page 7

IMPORTANT NOTICE CONCERNING POWER CORD SELECTION
The power cord set for this unit has been enclosed and has been selected according to the country of
destination and must be used to prevent electric shock. Use the following guidelines if it is necessary to
replace the original cord set, or if the cord set is not enclosed.
The female receptacle of the cord set must meet IEC-60320 requirements and may look like this:
Figure A1 Figure A2
Introduction
This manual will explain the operation of P650IVF01.0, including functions, features and other important
information. Before installing or operation your display, please take time to read the manual, particular the
sections on safety.
Functions and Features
• 1920 x 376 image resolution
• 450 nits brightness
• 4000:1 contrast ratio
• LED backlight source
• VGA,Video Graphics Array
• DVI, Digital Visual Interface
• HDMI digital, high –definition multimedia interface
• USB flash disk for monitor firmware upgrade
5
Page 8

Package Content
LCD Display
Power Cord Adapter
Product Overview
Remote Controller
6
Page 9

Connections
Firmware Upgrade by Inserting USB Stick
You can upgrade the monitor firmware by the steps as follows:
1. Select a empty USB stick, and copy the firmware file (M57ML2DG181**.bin) into the root in USB stick.
2. Turn on the monitor, select VGA or DVI or HDMI input, plugging in the USB stick.
3. Enter OSD menu, and select software update item.
4. Select “Yes” to upgrade.
7
Page 10

Right
Up
Connect Signal Cables
The connection between the signal source and the display is:
Signal Source Description Connection Cable
D-Sub (15-pin)
Cable
Note: This cable is not including in the accessory.
DVI Cable
Note:This cable is not including in the accessory.
HDMI
Note:This cable is not including in the accessory.
Control Panel
Item
Function
Power
OSD Exit
Menu
Left
Down
8
Page 11

CAUTION
•
•
•
Installation
Install Remote Control Batteries
Remove the battery cover.
Install batteries.
Re-attached the batter support.
Note:AAA batteries need to be purchased by the customers.
Dispose of the battery in accordance with local laws and regulations.
Keep the battery away from children and pets.
When the remote control will not be used for an extended period, remove the batteries.
9
Page 12

Zoom mode setting
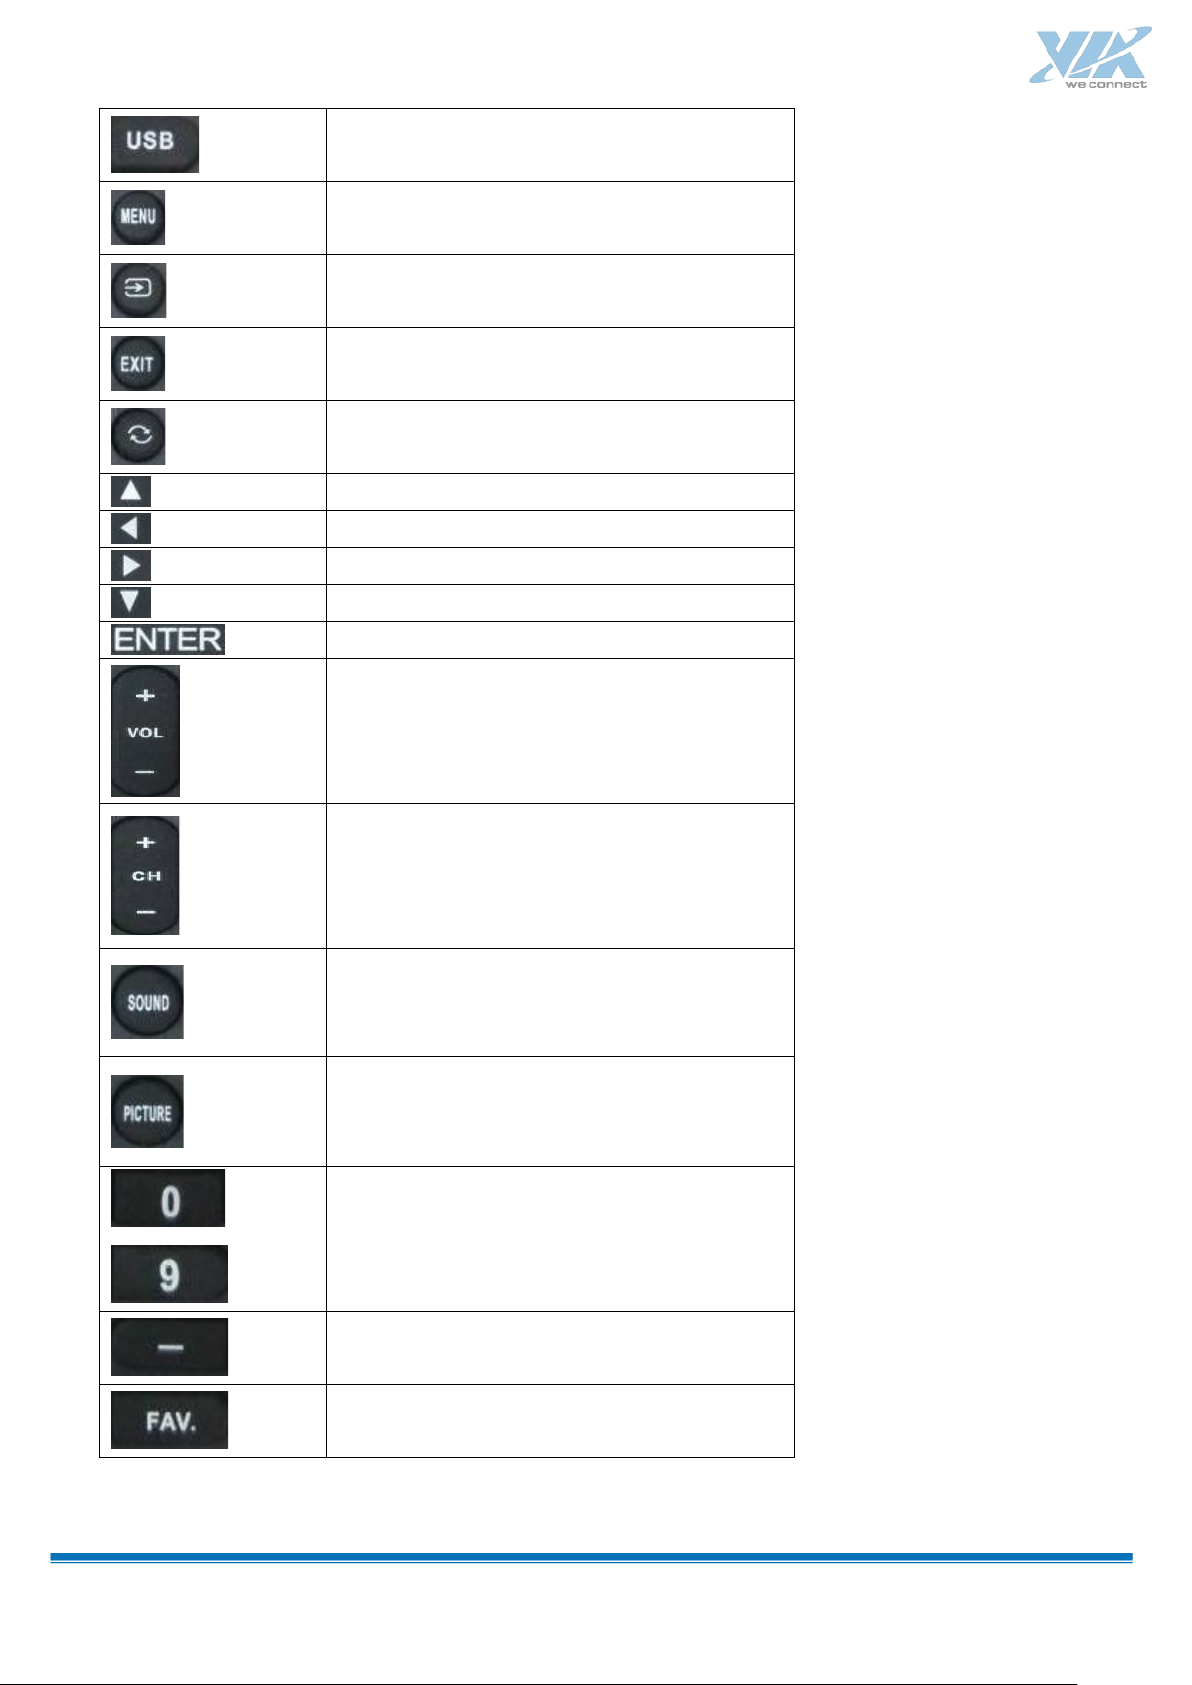
Using the Remote Control
Keypad
Function
Switch power on or power off
No support
No support
No support
No support
No support
No support
No support
No support
No support
No support
No support
No support
No support
No support
information
10
Page 13
No support
Exit
No support
Left
No support
No support
No support
No support
Enter setup menu
Input source setting (Support only for
HDMI/VGA/DVI)
UP
Right
Down
Enter
No support
Image mode setting (Support only for
HDMI/VGA/DVI)
~
No support
11
Page 14

it your personal preference
The OSD Functions
INPUT SOURCE
Item Selection Description
Input Source
PICTURE
HDMI
DVI
VGA
To select the input signal source.
( Press to enter Setup page; press to enter USB page; press for each item selecting )
Item Selection Description
Picture Mode
(Support only for
HDMI/VGA/DVI)
Note: Sharpness, Saturation &
Hue and Color can be selected
only for video signal
Color Mode
Standard
Dynamic
Soft
Personal
Contrast
Brightness
Sharpness
Hue
Saturation
Cool
Normal
Warm
User
To select the type of preset picture mode that suit your personal preference or
viewing requirement.
To manual configure following picture setting to su
or viewing requirement.
To adjust the contrast level of picture.
To adjust the brightness level of picture.
To adjust the edge definition of picture.
To adjust the color hue of picture.
To adjust the color saturation of picture.
Color temperature adjustment, you can select cool mode/Normal mode/warm
mode/User mode.
Auto Adjust (Only for input
source is set to VGA)
H-Pos.
V-Pos.
Clock
Phase
Auto
To manually adjust the position of display area left or right.
To manually adjust the position of display area up or down.
To manually adjust the width of display image.
To manually sharpen the focus of text or graphic with pixel boundaries.
To automatically adjust incoming VGA signal to optimal status for displaying.
11
Page 15

To restore all setting of menu to
Zoom Mode
Backlight
SETUP
Full
Zoom
4:3
16:9
0~100 To adjust the brightness of LED backlight.
Set the picture to Full screen.
Set the picture to Zoom mode, for set the display bar position (Top area,
Middle Area, Bottom Area.),
Set the picture to 4:3 format and put black borders on the left and right of
picture.
Set the picture to 16: 9 format and put black borders on the left and right of
picture.
Item Selection Description
Menu Language English, Chinese Traditional, Chinese Simplified
To select menu displaying
language.
SW Version
Restore
Default
Auto Wake-up
Software
Update(USB)
Yes
No
On
Off
Yes
No
FW Version
default factory
setting.
To proceed software update
via USB driver (Only available
for authorized technician).
12
Page 16

Timing Mode
Resolution
VGA
640x480@60Hz
SVGA
800x600@56Hz
XGA
1024x768@60Hz
SXGA
1152x864@75Hz
WXGA
1366x768@60Hz
1440x900@60Hz
WSXGA+
1680x1050@60Hz
SD
NTSC 480i
HD
NTSC 720p
Full HD
1080i
More Information
Supported Timing Mode
The supported timing modes for VGA signal / HDMI signal are:
640x480@72Hz
640x480@75Hz
800x600@60Hz
800x600@72Hz
800x600@75Hz
1024x768@70Hz
1024x768@75Hz
1280x1024@60Hz
1280x1024@75Hz
NTSC 480p
1080p
13
Page 17

Input Video Pattern Guideline
Please select FHD pattern and input FHD video signal to the monitor.
Please allocate the display content such as video/photo on the top area.
Note: It will be better to input 10 bits signal into the monitor.
14
Page 18

Power
IPC IO
ry
Monitor IO
D X 1/ VGA X 1/ USB X 1/ COM X1(IPC
Used)
Audio
OSD Control
Wall Mounting
Color
Package size (W x H x D)
Product Specification
Model P650IVF01.0
LCD Size
LCD Vendor VIA
Light Source
Active Area (mm)
Resolution Special format (1920x376)
Aspect Ratio
Panel
Brightness (typ)
Contrast Ratio (typ.)
Response Time (ms)
Frame Rate
Viewing Angle
Light Life
Panel Surface
Color gamut (x% NTSC)
65”
LED
1428.5±1(H) x280±1(V) mm
16:3.13
450 cd/m
4000:1
8 (Typ)
60
100,000 hrs
Anti-Glare, 3H, Haze = 2%
72%
178 degree (H) / 178 degree (V)
2
with CR≧10
Power supply
Display
Packing
DC Input
Power consumption (Watt)
Standby Power (Watt)
Audio W (Amp)
Control RS232, Keypad and Remote Controller
Dimension (Lx W x D mm)
Weight
Border width (U/D/R/L) 16.0/16.0/16.0/16.0 mm
OSD Language
Display Orientation
Package weight
AC 100V~240V ( 50/60Hz)
24V , 6.67 A
<0.5W(w/o IPC , WiFi)
HDMI X 1(IPC Used)/ COM(IPC Used) X 1/ RJ45 X 2/ USB X 4
HDMI X 1(IPC Used)/ DVI-
1464.5±2 x 316±2 x 60±1(Without Adaptor) mm
Landscape / Portrait (Except OSD)
1642 ±1 (W) x 450 ±1 (H) x 226±1 (D) mm
≦100W (w/o IPC , WiFi)
-
-
16.1±0.5 kg
IR
繁體中文 / 简体中文 / English
400mmX100mm
Black
23.3±1 kg
AC Adapter
X 1, including AC in power cable (UK Type)
15
Page 19

Accesso
Remote Controller
X 1 , w/o battery
ry
HDMI Cable
RS-232 Cable
IPC Main Board
X 1, (male to female, Tx/Rx non-swap)
X 1 including installed OS inside,
Fixed to FHD output on HDMI out
IPC Main Board Cover
Power Wire for IPC
WiFi Antenna
X 2, including wire
Left WiFi Cover
HDMI/RS-232 Cover
X 1
X 1
X 1
X 1
X 1
16
Page 20
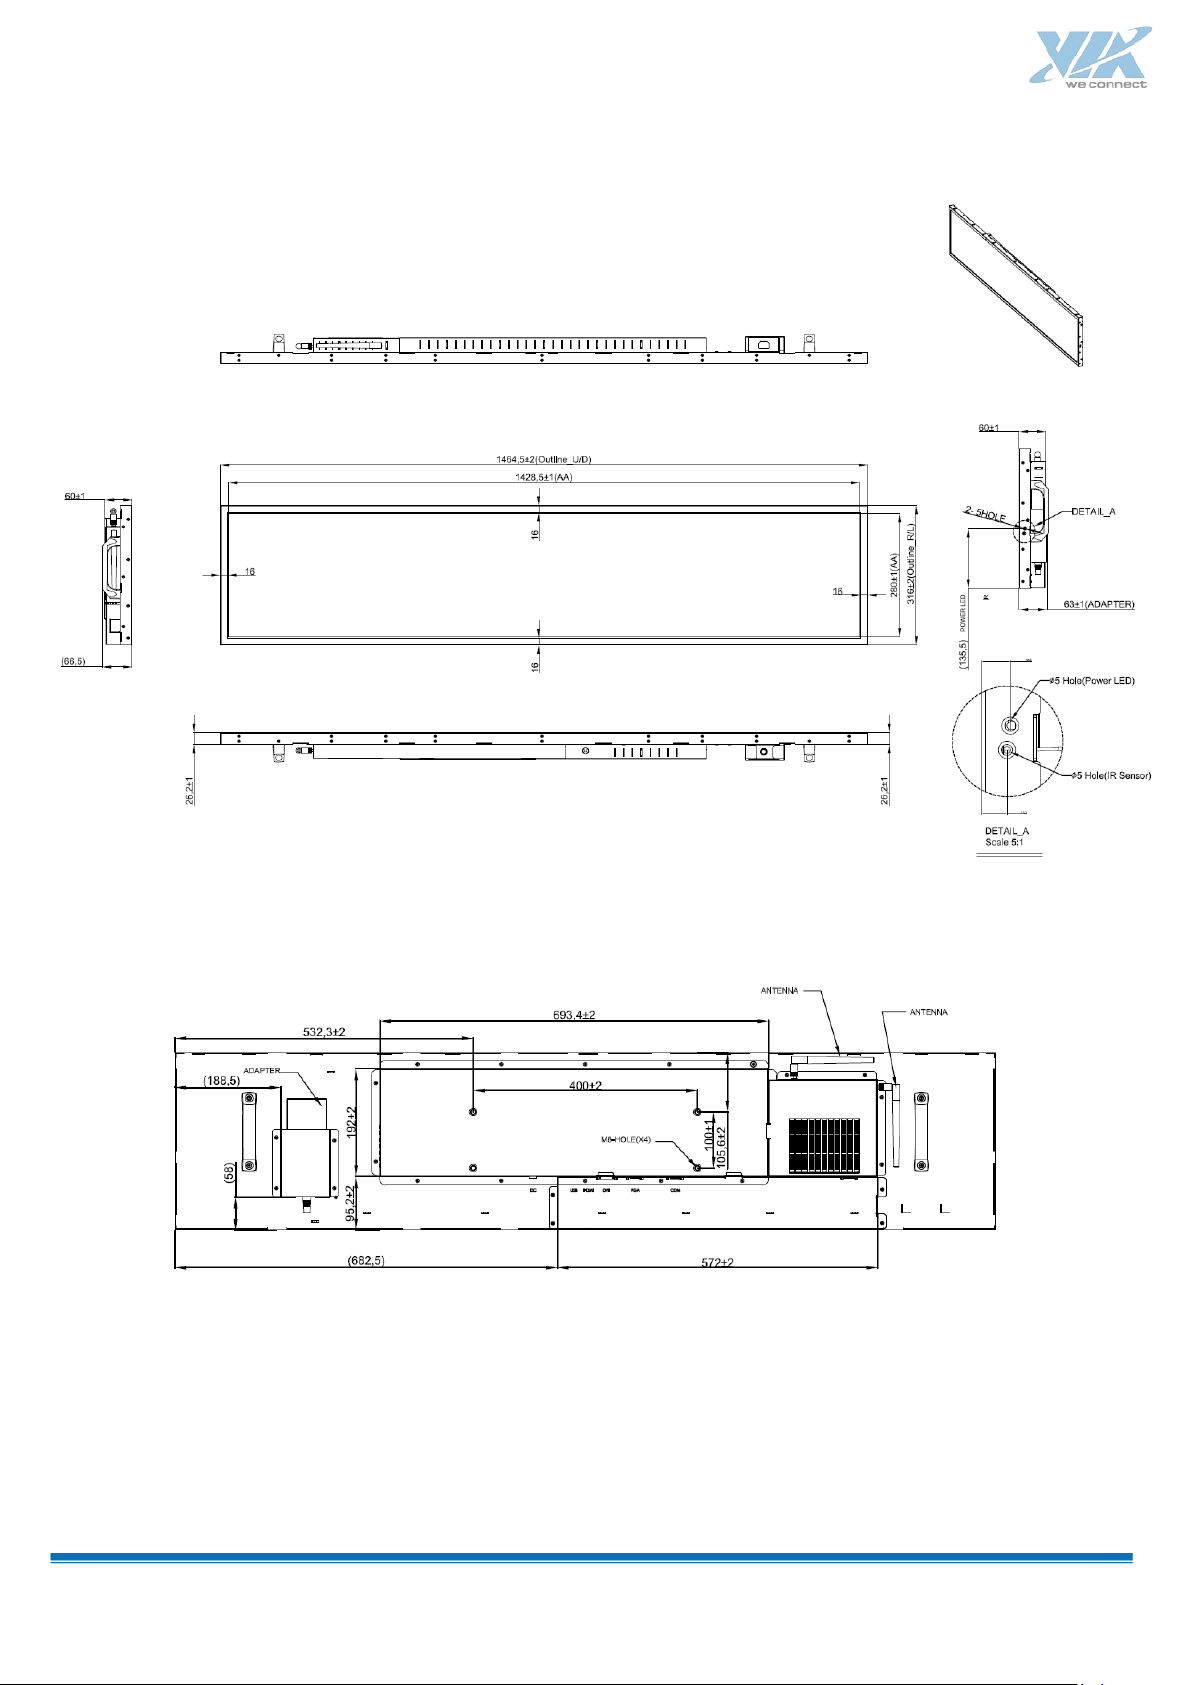
Dimensions
17
Page 21

Other Notices
• The display is able to remember the last input source before it is turned off by control panel. Next
time when you turn on the display, it will present the last file via the last input directly. If the
previous input source has been removed, you need to switch to the new input source manually.
• If a regular image is displayed on the displayed screen for a long period of time, it might occur
“imprint”, which may result to permanent defected images on the screen.This is called screen
burn-in or imprint, thus this specific issue is not covered within the guarantee scope.
• If the proportional selection’ display screen for a long period of time is 4:3, screen burn-in may appear at
the black and image of the screen.
• In order to prevent the occurrence of residual shadow, avoid to display a regular image for a long
period of time on the display screen (TFT-LCD more than two hours, Plasma display panel more than
one hour)
• Avoid stationary images as much as possible. Stationary images are images that remain onscreen for
extended periods of time. Stationary images include onscreen menus, black bars, time displays, etc.
• Please plug in only one source. If multiple source (i.e.VGA/DVI/HDMI & USB stick) are plugged into
the I/P ports, the system might be unstable.
Operation and Maintenance Guide
Before Getting Started
• This product is a highly integrated product featuring a LCD and IPC, with building Windows 10 IoT
64bit operating system and VIA MagicView software. Relevant OS configurations have been made in
advance so that when you receive the product, simply connect it to power and the system will
automatically run the startup process and MagicView Client.
• When you turn on the product for the first time, you will be asked to make a few simple settings in
order to fully activate the product and have it connected to the Digital Signage Monitoring System
Server to commence online operation. And as such, it is recommended that you complete the
following settings before installing the LCD Panel at the designated premise.
1. Connect to keyboard and mouse
USB ports(IPC) are available at the back of the LCD Panel for keyboard and mouse to be connected.
The USB ports(IPC) is next to the RJ45 port.
18
Page 22

2. Starting up
When the LCD is connected to power, it will automatically run the startup program and show the default logo
screen. Please press Ctrl+Q to return to OS desktop.
3. Network configuration
a. Press on the keyboard and select (Settings)
b. Select “Network and Internet”
c. Select ”Wi-Fi”
d. Make sure your Wi-Fi is activated
e. Select ”Show available networks”
f. A list of Wi-Fi networks available will pop up at the lower right of the screen; select your Wi-Fi
network to be connected
Note: For Wi-Fi connections involving specific settings (i.e. security verification, connection
to hidden SSID and so forth), relevant IT specifications will apply.
Please have your IT personnel to resolve relevant connection issues.
19
Page 23

4. Starting Windows / Renaming the computer
a. Press on the keyboard and select (Settings)
b. Select ”System”
20
Page 24

c. Click “About”
21
Page 25
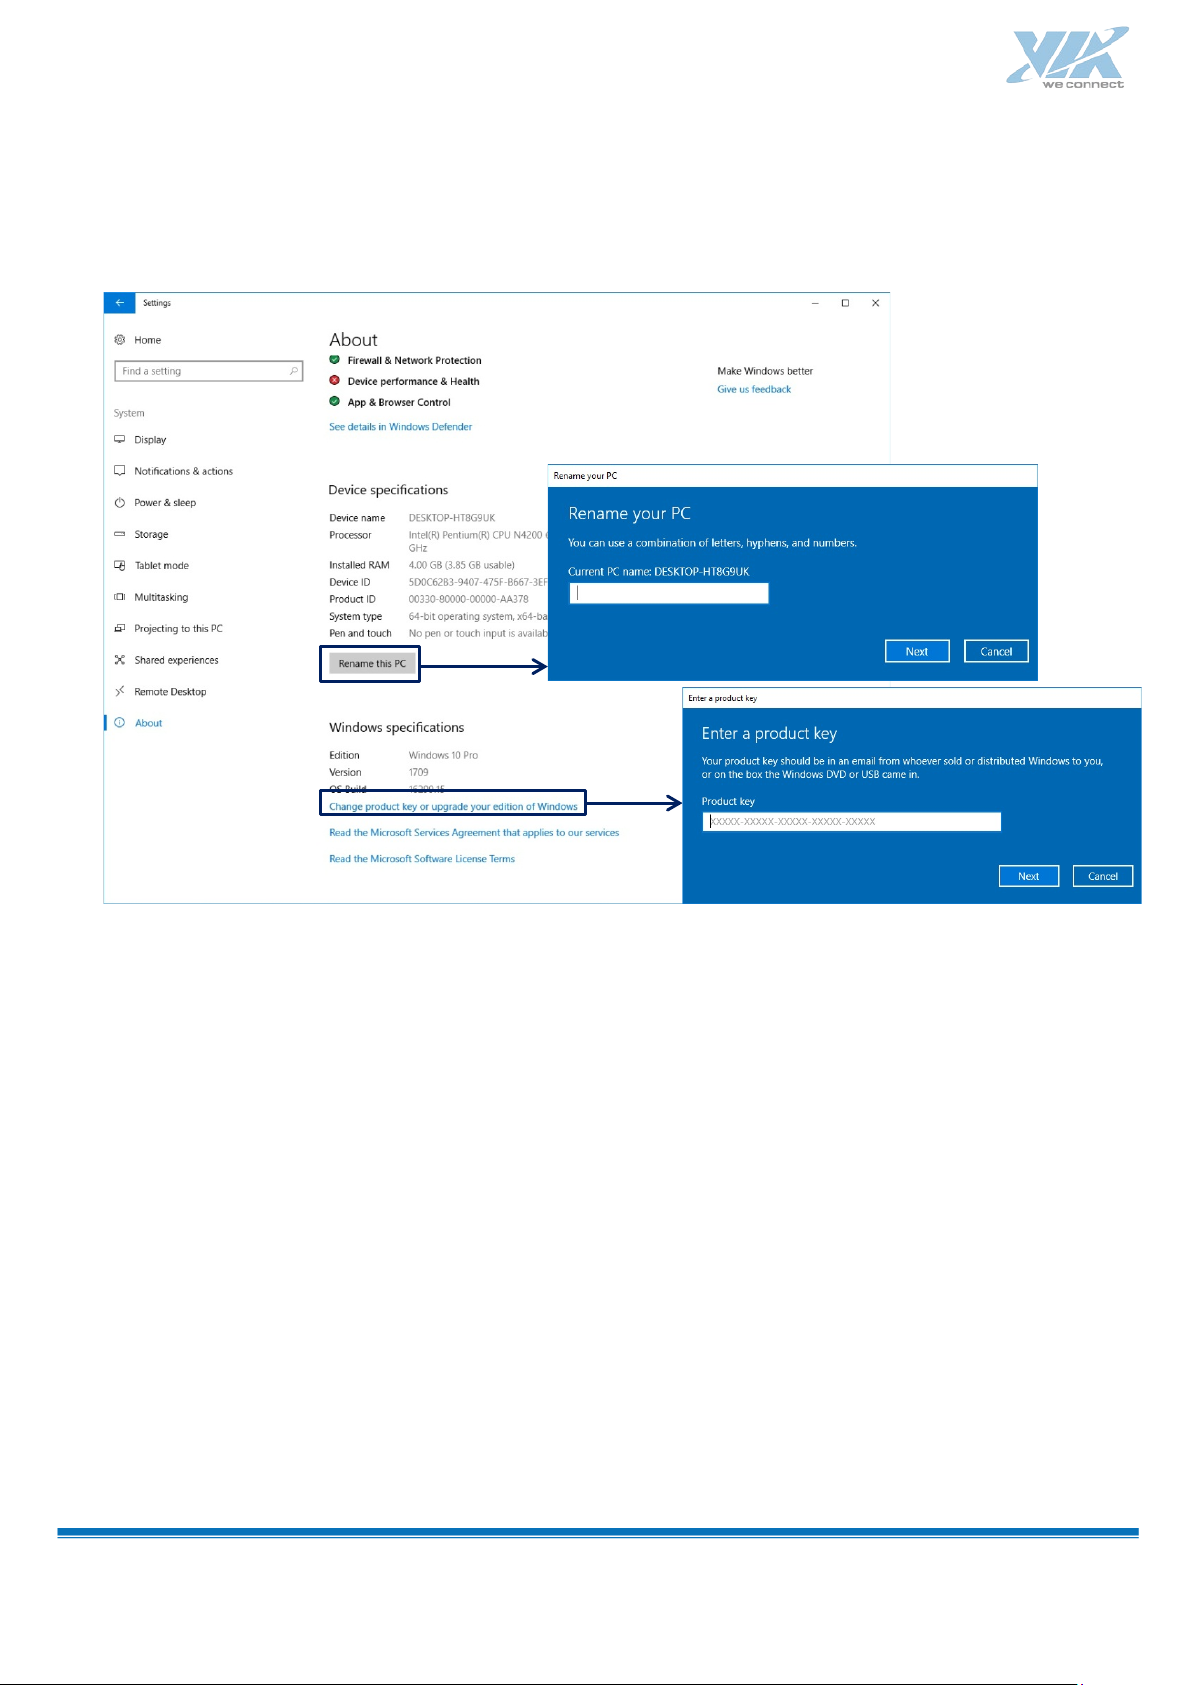
d. Click “Renaming the computer” to change the name of the computer; click “Change
product key or upgrade your edition of Windows” to enter product key
e. Once you have entered the correct key, Windows will be activated
f. Once Windows has been activated, it will be bound to the H/W and the key you have used.
It is therefore recommended that you put the sticker of the key on the back of the LCD
so that you can easily locate it when you need to enter the key again in the future.
22
Page 26

5. Registering your MagicView Client on the MagicView Server
LCD Module
Screen Type
VIA P65IVF1.0
VIA P65IVF1.0
VIA P65IVF2.0
VIA P65IVF2.0
VIA VT32LLUM
VIA VT32LLUM
VIA VT55LLUM
VIA VT55LLUM
VIA VT65LLUM
VIA VT65LLUM
a. Press on the keyboard select VIA select MagicView Client Configure” and you will be
taken to the page as shown below:
b. COM setting:
1. Screen Type: Refers to below table to select screen type.
c. Player setting
1. Decoder format setting: simply check the YV12 box.
23
Page 27

d. Server Setting
1. Client Hardware ID: this cannot be changed (this ID can be used for offline registration in the UI)
2. Server Address: enter the Server IP
3. User name: admin
4. Password: admin
5. Client Name: assign different client name for different LCD panels in order to ensure easy
identification in MagicView
6. Click “Save”
7. Click “Register Client”
8. When you see “Register Succeed “(The setting has been saved)!,”click “Ok”.
9. Click “Close”
24
Page 28

6. Running MagicView Client
Press on the keyboard select VIA select MagicView Client”.
This will get the MagicView Client running officially and when you restart the system, it will automatically
run MagicView Client and try to connect to the Server.
Notice: Regarding powering off
• As the IPC in the LCD shares the same power with the LCD’s power board, the only way to turn off IPC
(i.e. windows shutdown)while LCD power is on is to unplug the power cord from the LCD and plug the
power cord back to restart IPC.
• If the windows system freezes during operation, please unplug the power cord from the LCD and plug it
back in to restart the IPC.
• Turning the LCD off directly without shutting down the IPC first may damage the windows system. And
as such, if you wish to turn off the LCD for purposes of disassembly, be sure to perform the shutdown
process for windows.
• Procedure to turn off the Windows:
Press Ctrl+Q to return to OS desktop, right-click the Start button, you'll see a lengthy pop-up
25
Page 29

shortcut menu -- with "Shut down or sign out" right near the bottom. Mouse over that option and
then click "Shut down."
• If you wish to restart IPC but find it difficult to unplug the power cord when the LCD is installed in a
suspended configuration, simply restart the relay of the power supply to restart IPC.
26
Page 30

MagicView User Guide
The MagicView featured for this product has been custom designed by VIA for Hong Kong International
Airport. The following contents are only meant as a reference for users to familiarize themselves with the
various features of MagicView. For official SOPs, please refer to the definitions provided by C&R.
Playlist Publish
Upload Media Files
Step 1: click “Media” button;
Step2: choose “General Media” type;
Step3: click to upload media files:
27
Page 31

Step 4: The uploaded files are in the audit list. Users need approve them before using:
Create Playlist
Step 1: click “Playlist” button.
Step 2: click and pop-up a dialog, fill in name and select resolution as Refer to player:
28
Page 32

Step 3: Select videowall group and begin to design playlist in the designer area:
Step 4: click at left side and choose template to create new scene:
29
Page 33

Now users can find the videowall layout in the designer area:
Step 5: click to create layers:
Step 6: Add media files to layers. Select the layer you need to add, and then click to add the
media file in the media list.
30
Page 34

Step 7: Click the button to save the scene and approve it.
The next step is to schedule the playlist.
31
Page 35

Schedule
Step 1: Select the player group.
Step 2: Move the pointer to the calendar region. Press the left-button and drag the mouse, the
following dialog box will pop up.
Step 3: Set start/end date and time.
Step 4: Click to publish program.
After the steps of “upload media files”, “create playlist” and “schedule”, we finish the process of
program designing and publishing. If network is working, player will playback the program after
downloading the playlists.
32
Page 36

Advanced Tutorial
Media
MagicView supports the following formats:
1. Normal:
Video
Encoder:
ALTA DS2: H.264
ALTA DS4K/A910: H.264、H.265
Container:.mp4、.mkv、.mov
Max resolution
ALTA DS2: 1x1080P Full HD
ALTA DS 4K/A910: 1x4k Full HD (16:9 only)
Image:
.jpg、.jpeg、.bmp、.png
Max resolution:8kx4k
Audio:
Encoder:aac、mp3
container:.mp3
2. Marquee
3. PPT、pptx、pdf (Need install TranscodeEngine and Apache Openoffice)
4. Widget:Weather、Clock、RSS、APK
5. webpage
6. Streaming:RTSP
33
Page 37

Create New Folder
Step 1: Click on the left navigation area of a class of media files or directories.
Step 2: Click the button ,the following dialog box will be shown:
Step 3 : Input the name and description (Description is optional), then click the button “ok”, the new
folder is now created.
Create New Media files
For the different type of media, there are three ways to create them.
Note:
After successfully creating a new media file, the message “Success to create media file, it’s needed to
be approved” will pop up in the bottom right corner. Only approved media can be used. For details
about how to approve, please refer to Approve.
Upload general media file
Step 1 : First, click “General media file” in the left navigation bar, and then click ,the following
dialog will be shown:
34
Page 38

Step 2: Select the media files.
Create Marquee
Step 1: First, click the “Marquee” in the left navigation bar, and then the button , the following
dialog box will be shown;
35
Page 39

Create streaming/web page
Step 1: First, click the “Streaming” in the left navigation bar, then the button , the following dialog
box will be shown;
: the start point of coordinate of the webpage.
36
Page 40

: scaling the webpage.
Create time widget
Step 1: First, click the “Widget” in the left navigation bar, and then the button , the following dialog
box will be shown:
Step 2: Input the name and define the attributes of the widget, then click the button “ ” to save it.
Two types of Time: Digital or Analog;
Language: Simplified Chinese, Traditional Chinese or English;
Time format: 12 hour or 24 hour;
Time zone;
Transparence;
Date and week.
37
Page 41

Create Weather Widget
Step 1: Select the widget – Weather:
Step 2: Create city weather and define the attributes of the widget:
• Name;
• Language: Simplified Chinese, Traditional Chinese or English;
• City: click and search the city;
• Transparence;
• Weather proxy: When the player can not access weather source from internet directly, users need
configure a weather proxy to visit weather source.
38
Page 42

Create APK widget
Step 1: Install the APK which would be played at player side;
Step 2: Find the package name of the APK at player side:
Method:
• At player side, press hotkey of “Ctrl +Q”, Input user name and password (default is admin/admin)
and backward to desktop;
• Run Client Configure;
• Click “Show Android Setting “and list the APK package name/
Back to web UI, and begin to create APK.
Step 3: Select the widget – APK:
Step 4 : Create APK:
Package name: refer to Figure2-2-2-10. Eg: the package name of APK “angrybirds”is
“com.rovio.angrybirds”.
39
Page 43

Create RSS Widget
Step 1: Select “RSS”widget;
Step 2: Fill in content:
Source Address: input RSS server’s IP address. Click , the page will display RSS content;
Flush time: time interval that MagicView request content from RSS server;
Switch time: time interval that RSS content are updated at MagicView web UI.
40
Page 44

Playlist
Main page:
How to Create Playlist
Click the button ,and the following dialog box will pop up.
41
Page 45

Resolution: it is the size of block. There are four types for reference:
a. Predefined size. For example, 1920x1080,1024x768 etc;
b. Customized;
c. Refer to the player layout;
d. Refer to screen block: because the playlist is published to one block of the layout. It usually
applies to videowall.
Add tags.
For interactive application. Please refer to Interactive Playlist.
Edit Playlist
Use designer to edit playlist. The following figure is the designer interface.
42
Page 46

There are four areas of this designer interface:
Scene area: display scene list;
Designer area: the main design area, display the effect of the scene, including the layer location, the
media
Media area: display media list of this layer;
Toolbar area: function icons.
Step 1: Click the button to create a new scene. One playlist is composed of one or more scenes.
Default is a blank template.
43
Page 47

Click at the left side, users can add more scenes.
Moving the mouse to the scene, users can delete, copy the scene or the scene to save as a template.
Step 2 : Click the button “ ” to create a layer. One scene is composed of one or more layers.
44
Page 48

The following is the function icons of the toolbar:
:Check the attributes of the playlist. Users can modify the playlist name.
Note: Once the playlist is created, the resolution cannot be modified.
:Layer’s coordinate.
:Close the design window and return to playlist.
:Add layer. This layer doesn’t support marquee and Android APK types.
:Add Text layer.
:Add Android APK layer.
:Delete layer.
:List more function buttons as below:
:Fullscreen of the selected layers.
:Fill with single screen. Only for videowall.
:Indicate that the current interface is editable. Press this button to lock the edit interface.
:The current edit scene can be enlarged or reduced.
:Preview playlist.
45
Page 49

:Save the playlist.
:Save as… the playlist.
:Left aligned for the selected layers(two or more layers)
:Right aligned for the selected layers(two or more layers)
:Top aligned for the selected layers(two or more layers)
:Bottom aligned for the selected layers(two or more layers)
:Two layers close to each other horizontally
:Two layers close to each other vertically
:Move the layer up
:Move the layer down
:Copy layer.
:Paste layer.
Note:
Select two or more layers by hotkey “shift”.
The layer can rotate and zoom in/out with the mouse.
Step 3 : Add media files to layers. Select the layer you need to add, and then click to add the media
file in the media list.
46
Page 50

Note:
Media files are available only after they are approved. For details about how to approve, please refer to
chapter to Approve.
Step 4 : Edit the features of media playback.
Video:
a. Duration. The default duration is 15s. User can modify it.
b. The videos in the same directory can be multi-selected, but users cannot modify the duration.
Picture:
a. Duration. The default duration is 15s. User can modify it.
47
Page 51

b. The pictures in the same directory can be multi-selected.
c. Transition effect. If user selects transition effect, the duration cannot be 0s.
Text:
a. Reference file: this option, said the marquee file is not modified. Do not check, said marquee can
be modified; the modified file is not synchronized to the media library, only for this playlist.
Select the marquee, and edit marquee attributes in the right area:
a. Two types of Text: static and marquee;
b. Edit the font type, size and color;
48
Page 52

c. Background color;
d. Transparency;
e. The speed of marquee: Slow, Medium and Fast; user can modify the speed according to
reference time.
Note:
Change the playback order by dragging the published media file.
Step 5:Click the button to save the scene. A new scene is created.
Step 6:Add other scene again according to the above steps. A new playlist is creatd.
Schedule
Schedule is for player group, it includes layout, media, playback time, etc.
Create the schedule
49
Page 53

Step 1:Select the player group.
Step 2:Select the block in the layout preview. (If there is only one block in the layout, it is selected by
default.)
Step 3:Move the pointer to the calendar region. Press the right-button and drag the mouse, the following
dialog box will pop up.
Choose one playlist and set start/end time/date.
The following example is based on the following configuration:
50
Page 54

Start time is set to 2:30; end time is 18:45.
Start date is Dec 11, 2015; end date is Dec 24, 2015.
Loop type:
Not loop: it means the playback time is from the start time of the start date to the end time of the
end date.
For example: It means the playlist will play from Dec 11, 2015, at 2:30 to Dec 24, 2015, at 18:45.
Loop every day.
Within the selected date, each day is fixed within a fixed time.
For example: Every day from Dec 11, 2015, at 2:30 to Dec 24, 2015, at 18:45.
Loop every week.
For example: The playlist will play from 2:30 to 18:45 every Tuesday and Friday from Dec 11, 2015 to Dec
24, 2015.
There is a " " identification of the schedule, which means that the program is a loop mode.
Step 4:Select the playlist and define the schedule, then click the button “ok” to the main window of
schedule.
51
Page 55

Step 5:Click the button to publish the schedule. The color in the schedule block will be changed
from orange to blue.
Modify the schedule
There are three ways to modify the schedule.
1. First, select the schedule, then click the button , the following dialog box will pop up;
52
Page 56

The way is common one. User can get the accurate schedule by redefining the start time, end time, start
date, end date and loop mode.
2. Select the schedule, then hold the left mouse and drag the rectangle to modify the start time, end
time, start date and end date. However, the loop mode and the whole playback time will stay.
3. Select the schedule, move the pointer over the top edge or bottom edge of the rectangle, it changes
to a two-way arrow. Drag the two-way arrow to modify the start time or end time. However, the start
date, end date and loop mode will stay, they cannot be modified.
4. Select the schedule, click then set another duration, click to copy:
53
Page 57

5. Click to modify schedule:
:Horizontal copy. User can copy date and loop mode:
:Vertical copy. User can copy start and end time.
54
Page 58

time.
:Align to top. The start time is fixed to 0 a’clock. And can not change start/end date and interval
:Align to buttom. The end time is fixed to 23:59. And can not change start/end date and interval
time.
Replace the schedule
Step 1: Select a published playlist, click :
Step 2: Click to select another playlist:
55
Page 59

Spots
The priority of the spots is higher than scheduled playlist. At the same time, player will playback spot
instead of schedule playlist.
Step 1:Click the label “spots”;
Step 2:Move the pointer to the calendar region. Press the right-button and drag the mouse, the following
dialog box will pop up. Choose playlist and schedule.
Step 3:Click the button to publish the project. The color in the project block will be changed
from orange to blue.
56
Page 60

Default playlist
The default program can be played in any idle period to avoid the status that player hasn’t program to
playback. And users need not define playlist’s schedule and loop mode of the default program.
Step 1:Click to open the default program page.
Step 2:Switch to , click Settings and select a playlist.
Publish Off-line Playlist
When player is off-line, users can download a playlist to USB disk and plug-in the player to playback.
Step 1:At schedule page, click , then all the scheduled playlists will be downloaded to downloads
57
Page 61

folder at local machine as the zip package. Such as C:\Documents and Settings\[user name]\My
Documents\Downloads\mgv_offsch_default.zip.
Step 2:Copy the zip package to the root directory of a USB disk.
Step 3:Plug-in the sub disk to player. Player will load the zip package and auto playback according to the
schedule.
Playlist Download Status
Click to check the download processing of each playlist.
The table does not include urgent cases and preload playlists.
If the playlist’s status is “preparing”, it can not be deleted.
58
Page 62

How to create a player group
Step 1:Click the button , the following dialog box will pop up.
Note:
1. There is a default group named android default group.
2. Once the player is successfully configured, it will be automatically added into the default group.
Create videowall group(Mainstreams)
59
Page 63

If users want to combine the players as a videowall, please refer to (Mainstreams) Combine VideWall
Click to revert to normal group.
Create Synchronized Group
This function implements sync-playing of multi players.
Select a player group, click .
Note:
1. Videowall group can not set to synchronized group.
Player/Player Group remote power management
Choose the players or player groups to set remote power management.
:Remote reboot;
:Remote shutdown;
:WOL.
Player groups power on/off on schedule
Step 1:Choose a player group:
Step 2:Click , and set the boot/off time:
Step 3:Edit power on/off time.
60
Page 64

Volume Setting for Player Group
Step 1:Select a player group;
Step 2:Click :
61
Page 65

Player Groups’ Advanced Properties
You can set more properties of group: screen rotation, time zone, ntp server and mini free space of player.
Schedule update time: You can set the time of updating schedule in daily, e.g. Update schedule in 2:00 am in
every day.
Click to save.
Player Basic Properties
User can modify player basic properties such as name, description and owner. Click to save.
Screenshot
Step 1:Choose the player:
Step 2:Click label at right column, then click to snapshot:
62
Page 66

Screen Status
Step 1:Choose the player:
Step 2:Click label at right column, then click to snapshot:
63
Page 67

You can get/set screen brightness, contrast, color saturation and temperature, you can power on/off
screen and disable/enable infra-red control.
For color temperature, you can set customized value:
64
Page 68

Check Hardware Status
Users can check the usage of player’s CPU, memory and Hard Disk.
Check Software Status
Users can check player’s client version, player version and OS version. If there is a new version of player
software, users can upgrade it by pressing update button.
65
Page 69

Check Advanced Properties
Player’s advanced properties include:
• Mac address;
• Gateway;
• Mask;
• Command Server IP;
• Media Server IP.
System Setting
It sets log query type:
Update Players
Step 1:Click the button to open the window of system management.
Step 2:Click the button to upload the software package.
Step 3:Select the players at Player Management Page to upgrade.
66
Page 70

Log
The log includes player log and operation log.
Play log:
Click to enter log page.
Choose the dedicate media file.
Choose player group.
Select start/end date and time.
Click to check the search result.
67
Page 71

Click to export the results to the excel table.
Operation log:
Select user, start/end date and time, click to check the result.
Urgent Case
When there is an urgent need to broadcast in time, user can use the function of emergency information.
Once publishing, it will playback immediately.
Step 1:Click enter the urgent case publish page.
68
Page 72

Step 2:Choose a playlist from the table or click to open playlist table to add.
Step 3:Choose an urgent case, click to publish. Choose a player group or groups and click ok.
:Stop to playback urgent case.
:Delete urgent case from table. User can not delete the case which is playbacking.
69
Page 73

BIOS Setup
Introduction
The BIOS (Basic Input/Output System) installed in the ROM of your computer system supports Intel®
processors. The BIOS provides critical low-level support for standard devices such as disk drives, serial
ports and parallel ports. It also provides password protection as well as special support for detailed
fine-tuning of the chipset controlling the entire system.
BIOS Setup
The BIOS provides a Setup utility program for specifying the system configurations and settings. The BIOS
ROM of the system stores the Setup utility. When you turn on the computer, the BIOS is immediately
activated. Press the <Del> key immediately allows you to enter the Setuputility.
BIOS default password:DS@HKAA
Warning: It is strongly recommended that you avoid making any changes to the defaults.
70
Page 74

Main Settings
BIOS Setting
Description
System Date
Sets the date. Use the <Tab> key to switch between the data elements.
System Time
Set the time. Use the <Tab> key to switch between the data elements.
71
Page 75

Advanced Settings
This section allows you to configure, improve your system and allows you to set up some system features
according to your preference.
72
Page 76

ACPI Computing
BIOS Setting
Description
Enable Hibernation
Enables / Disables the system ability to hibernate (OS/S4 Sleep State). This
option may be not effective with some OS.
ACPI Sleep State
Selects an ACPI sleep state (Suspend Disabled or S3) where the system
will enter when the Suspend button is pressed.
73
Page 77

LFP (eDP) to LVDS Configuration
BIOS Setting
Description
LVDS Support
Enables / Disables eDP to LVDS.
Panel Color
Depth
Selects a panel color depth as 18 or 24 (VESA or JEIDA) bit.
LVDS Channel
Type
Sets the LVDS channel type as single or dual channel.
Panel Type
Selects a resolution that fits your panel.
Options: 800 x 600 / 1024 x 768 / 1280 x 1024 /
1366 x 768 / 1440 x 900
1080
LVDS Backlight
Level Control
Selects from Level 1 to Level 8 for the LVDS backlight.
/ 1600 x 900 / 1920 x
74
Page 78

EFP (DP) to LVDS Configuration
BIOS Setting
Description
LVDS Support
Enables / Disables DP to LVDS.
Panel Color Depth
Selects a panel color depth as 18 or 24 (VESA or JEIDA) bit.
LVDS Channel Type
Sets the LVDS channel type as single or dual channel.
Panel Type
Selects a resolution that fits your panel.
Options: 800 x 600 / 1024 x 768 / 1280 x 1024 /
1366 x 768 / 1440 x 900 / 1600 x 900
1080
LVDS Backlight Level
Control
Selects from Level 1 to Level 8 for the LVDS backlight.
/ 1920 x
75
Page 79

Fintek Super IO Configuration
BIOS Setting
Description
Standby Power on
S5 (ERP)
Enable the item to provide the standby power for devices.
Disable
Options: All Enable / Enable Ethernet for WOL / All Disable
Serial Ports
Configuration
Sets parameters of serial ports.
Enables / Disables the serial port and select an optimal setting for the Super IO
device.
the item to shut down the standby power.
76
Page 80

Serial Port 1 Configuration
BIOS Setting
Description
Serial Port
Enables / Disables the serial port.
Change Settings
Selects an optimal settings for Super IO device.
Device Mode
Changes the serial port mode to:
RS232
RS485 TX Low Active
RS485 with
RS422
RS422 with Termination
Termination TX Low Active
77
Page 81

Fintek Super IO Hardware Monitor
BIOS Setting
Description
Temperatures /
Voltages
These fields are the parameters of the hardware monitoring function feature of
the motherboard. The values a
and show the PC health status.
CPU Shutdown
Temperature
Sets a threshold of temperature to shut down if CPU goes overheated.
Options: Disabled / 70 °C / 75 °C / 80 °C / 85 °C / 90 °C / 95 °C
re read-only values as monitored by the system
78
Page 82

CPU Configuration
BIOS Setting
Description
Socket 0 CPU
Information
Displays the socket specific CPU information.
CPU Power
Management
Allows you to enable / disable Turbo Mode.
Active Processor
Cores
Enables / Disables the cores in the processor package.
Monitor Mwait
Enables / Disables Monitor Mwait.
79
Page 83

Socket 0 CPU Information
CPU Power Management Configuration
80
Page 84

BIOS Setting
Description
Turbo Mode
Enables / Disables the turbo mode.
BIOS Setting
Description
Output Select
Outputs through HDMI interface.
AMI Graphic Output Protocol Policy
81
Page 85

Network Stack Configuration
BIOS Setting
Description
Network Stack
Enables / Disables UEFI Network Stack.
IPv4 PXE Support
Enables / Disables IPv4 PXE Boot Support.
If disabled, Ipv4 PXE boot option wil
IPv4 HTTP Support
Enables / Disables IPv4 HTTP Boot Support.
If disabled, Ipv4 HTTP boot option will not be created.
IPv6 PXE Support
Enables / Disables IPv6 PXE Boot Support.
If disabled, Ipv4 PXE boot option will not be created.
IPv6 HTTP Support
Enables / Disables IPv6 HTTP Boot Support.
If disabled, Ipv4 HTTP boot option will not be created.
PXE boot wait time
Assigns a period of time to press ESC key to abort the PXE boot.
Media detect count
Assigns a number of times to check the presence of media.
l not be created.
82
Page 86

CSM Configuration
BIOS Setting
Description
CSM Support
Enables / Disables CSM support.
GateA20 Active
Upon Request disables GA20 when using BIOS services.
Always cannot disable GA20, but is useful when any RT code is executed
ab
INT19 Trap
Response
Sets how BIOS reacts on INT19 trap by Option ROM.
Immediate executes the trap right away.
Postponed executes the trap during legacy boot.
Boot option filter
Controls the priority of Legacy and UEFI ROMs.
Network
Controls the execution of UEFI and Legacy PXE 0pROM.
Storage
Controls the execution of UEFI and Legacy Storage OpROM.
Video
Controls the execution of UEFI and Legacy Video OpROM.
Other PCI devices
Determines OpROM execution policy for devices other than network,
s
ove 1 MB.
torage or video.
83
Page 87

USB Configuration
BIOS Setting
Description
Legacy USB Support
Enabled enables Legacy USB support.
Auto disables legacy support if there is no USB device connected.
Disabled keeps USB devices available only for EFI applications.
XHCI Hand-off
This is a workaround for OSes without XHCI hand-off support. The XHCI
ownership change should be claimed by XHCI driver.
USB Mass Storage
Driver Support
Enables / Disables the support for USB mass storage driver.
USB Transfer
time
The time-out value (1 / 5 10 / 20 secs) for Control, Bulk, and Interrupt transfers.
Device reset
time
Gives seconds (10 / 20 / 30 / 40 secs) to delay execution of Start Unit command to
USB mass storage device.
Device power-up
delay
The maximum time the device will take before it properly reports itself to the Host
Controller.
Auto uses default value for a Root port it is 100ms. But for a Hub port, the delay is
taken from Hub descriptor.
-out
-out
84
Page 88

Chipset Settings
BIOS Setting
Description
Max TOLUD
Sets a maximum value of TOLUD.
North Bridge
85
Page 89

South Cluster Configuration
BIOS Setting
Description
HD-Audio Support
Enables / Disables HD-Audio support.
HD Audio Configuration
86
Page 90

PCI Express Configuration
BIOS Setting
Description
PCI Express Root
Port 1 ~ 6
Accesses the control of the PCI Express Root Port.
87
Page 91

BIOS Setting
Description
PCI Express Root
Port
Enables/ Disables the PCIe root port.
Auto allows you to disable unused root port automatically for the most
optimum power savings.
ASPM
Sets the PCIe active state power management.
Options: Disable / L0s / L1 / L0SL1 / Auto
L1 Substates
Sets PCIe L1 substates.
Options: Disables / L1.1 / L1.2 / L1.1 & L1.2
PME SCI
Enables / Disables PME SCI.
PCIe Speed
Configures the PCIe speed.
Options: Auto, Gen1, Gen2
BIOS Setting
Description
Chipset SATA
Enables / Disables the Chipset SATA Controller.
The Chipset SATA Controller supports the 2 black internal SATA ports (up to
3Gb/s supported per port).
SATA Mode Selection
Determines how SATA controller(s) operate.
SATA Drivers
88
Page 92

USB Configuration
BIOS Setting
Description
XHCI Pre-Boot
Driver
Enables / Disables the support for XHCI Pre-Boot Driver.
XHCI Mode
Enables / Disables XHCI mode.
If disabled, XHCI controller would be disabled, and none of the USB devices are
d
Do NOT disable it unless for debug purpose.
USB VBUS
VBUS should be ON in HOST mode. It should be OFF in OTG device mode.
USB HSIC1 Support
Enables / Disables USB HSIC1.
USB SSIC1 Support
Enables / Disables USB SSIC1.
USB Port Disable
Override
Selectively enables / disables the corresponding USB port from reporting a
device connection to the controller.
XDCI Support
Enables / Disables XDCI.
XHCI Disable
Compliance Mode
FALSE makes the XHCI Link Compliance Mode not disabled.
TRUE disables the XHCI Link Compliance Mode.
etectable or usable when systen is booted up in OS.
89
Page 93

Security Settings
BIOS Setting
Description
Setup Administrator
Password
Sets an administrator password for the setup utility.
User Password
Sets a user password.
90
Page 94

Boot Settings
BIOS Setting
Description
Setup Prompt
Timeout
Number of seconds to wait for setup activation key.
65535 (0xFFFF) means indefinite waiting.
Bootup NumLock
State
Selects the keyboard NumLock state.
Quiet Boot
Enables / Disables Quiet Boot option.
New Boot Option
Policy
Controls the placement of newly detected UEFI boot options.
Options: Default, Place First, Place Last
Boot mode select
Selects a Boot mode, Legacy / UEFI / Dual.
Boot Option
Priorities
Sets the system boot order priorities for hard disk, CD/DVD, USB, Network.
91
Page 95

Save & Exit Settings
BIOS Setting
Description
Save Changes and Exit
Exits system setup after saving the changes.
Discard Changes and
Exit
Exits system setup without saving any changes.
Save Changes and Reset
Resets the system after saving the changes.
Discard Changes and
Reset
Resets system setup without saving any changes.
Save Changes
Saves changes done so far to any of the setup options.
Discard Changes
Discards changes done so far to any of the setup options.
Restore Defaults
Restores / Loads defaults values for all the setup options.
Save as User Defaults
Saves the changes done so far as User Defaults.
Restore User Defaults
Restores the user defaults to all the setup options.
92
Page 96

 Loading...