

Page 1

1
ENGLISH
For your safety . . . . . . . . . . . . . . . . . . . . . . . .2
Welcome to digital satellite TV! . . . . . . . . . . .3
Updates to your box . . . . . . . . . . . . . . . . . . . . . . . . 3
Inserting the batteries in your remote control . . . 3
Your remote control . . . . . . . . . . . . . . . . . . . .4
Your Viasat Box . . . . . . . . . . . . . . . . . . . . . . . .5
Front panel . . . . . . . . . . . . . . . . . . . . . . . . . . . . . . . . 5
Rear panel connectors overview . . . . . . . . . . . . . . 6
Installation . . . . . . . . . . . . . . . . . . . . . . . . . . .7
The supplied equipment . . . . . . . . . . . . . . . . . . . . . 7
Where to place your box . . . . . . . . . . . . . . . . . . . . 7
What else do I need? . . . . . . . . . . . . . . . . . . . . . . . . 7
Smart card . . . . . . . . . . . . . . . . . . . . . . . . . . . . . 7
Satellite dish . . . . . . . . . . . . . . . . . . . . . . . . . . . . 8
Optional audio connections . . . . . . . . . . . . . . . . .12
Connecting to the telephone line . . . . . . . . . . . . 12
Connecting a ‘magic eye’ . . . . . . . . . . . . . . . . . . . .13
Connecting to the mains supply . . . . . . . . . . . . . .13
Switching on for the first time . . . . . . . . . . . . . . .14
RF Tuning . . . . . . . . . . . . . . . . . . . . . . . . . . . . . . . . .15
Making the installation settings . . . . . . . . . . . . . . .15
Switching on and off . . . . . . . . . . . . . . . . . . . . . . . 16
Getting Started . . . . . . . . . . . . . . . . . . . . . . .17
Using the Viasat Guide . . . . . . . . . . . . . . . . . . . . . . 17
Changing channel . . . . . . . . . . . . . . . . . . . . . . . . . . 17
Unlocking a locked channel . . . . . . . . . . . . . . . . . . 17
Changing the volume on your TV . . . . . . . . . . . .18
Using the channel banner . . . . . . . . . . . . . . . . . . . 18
Displaying the channel banner . . . . . . . . . . . . 18
Watching a programme . . . . . . . . . . . . . . . . . 19
Instantly recording a programme . . . . . . . . .19
Setting a reminder . . . . . . . . . . . . . . . . . . . . . 19
Displaying extra programme information . . 19
Symbols in the channel banner and extra
information screens . . . . . . . . . . . . . . . . . . . . 20
Using Live Pause . . . . . . . . . . . . . . . . . . . . . . . . . . . 21
Using Instant Rewind . . . . . . . . . . . . . . . . . . . . . . .22
On-screen symbols . . . . . . . . . . . . . . . . . . . . . . . .23
Viasat EPG . . . . . . . . . . . . . . . . . . . . . . . . . . .25
Finding a programme . . . . . . . . . . . . . . . . . . . . . . . 25
Choosing a programme to watch or
set a reminder for . . . . . . . . . . . . . . . . . . . . . .27
Choosing a programme to record . . . . . . . . . . . . 28
Viasat Ticket . . . . . . . . . . . . . . . . . . . . . . . . .28
Purchasing a Ticket programme . . . . . . . . . . . . . .29
Planner . . . . . . . . . . . . . . . . . . . . . . . . . . . . .30
Your box’s disk space . . . . . . . . . . . . . . . . . . . . . . .32
Schedule changes . . . . . . . . . . . . . . . . . . . . . . . . . . 32
Using Series Link . . . . . . . . . . . . . . . . . . . . . . . . . . 32
Deleting a programme from your Planner . . . . .32
Contents
Watching a programme when you
see the reminder . . . . . . . . . . . . . . . . . . . . . . 33
Reminder clashes . . . . . . . . . . . . . . . . . . . . . . . . . .34
Recording Programmes . . . . . . . . . . . . . . . . 34
Recording programmes . . . . . . . . . . . . . . . . . . . . . 34
Using your box while you are recording a
programme . . . . . . . . . . . . . . . . . . . . . . . . . . . 35
Recording clashes . . . . . . . . . . . . . . . . . . . . . .35
Disk space warning . . . . . . . . . . . . . . . . . . . . . 36
Manual recording . . . . . . . . . . . . . . . . . . . . . . . . . .37
Watching Recordings . . . . . . . . . . . . . . . . . . 38
Watching recordings . . . . . . . . . . . . . . . . . . . . . . . 38
Playback symbol . . . . . . . . . . . . . . . . . . . . . . .38
During playback . . . . . . . . . . . . . . . . . . . . . . . 39
Watching recordings of restricted programmes
or locked channels . . . . . . . . . . . . . . . . . . . . . 40
Using Bookmarks . . . . . . . . . . . . . . . . . . . . . . 40
Active . . . . . . . . . . . . . . . . . . . . . . . . . . . . . . 40
Interactive TV . . . . . . . . . . . . . . . . . . . . . . . . . . . . . 40
Playing games . . . . . . . . . . . . . . . . . . . . . . . . . 40
Setup . . . . . . . . . . . . . . . . . . . . . . . . . . . . . . 41
Using the Setup menus . . . . . . . . . . . . . . . . . . . . .41
Using the Parental Control menu . . . . . . . . . . . . 41
Locking Channels . . . . . . . . . . . . . . . . . . . . . .42
Setting viewing restrictions . . . . . . . . . . . . . . 43
Setting purchase restrictions . . . . . . . . . . . . . 44
Changing your PIN code . . . . . . . . . . . . . . . . 44
Changing your Planner settings . . . . . . . . . . . . . . . 45
Changing your PVR recording settings . . . . . . . . 46
Using the System Settings . . . . . . . . . . . . . . . . . . . 47
Changing the Picture settings . . . . . . . . . . . . 48
Changing the Sound settings . . . . . . . . . . . . . 49
Changing the Language & Subtitles settings .50
Viewing the box information . . . . . . . . . . . . .51
Viewing the Signal Test screen . . . . . . . . . . . . 51
Installation Setup . . . . . . . . . . . . . . . . . . . . . . . 52
Changing the LNB Setup . . . . . . . . . . . . . . . . 52
Setting the Default Transponder . . . . . . . . .53
Changing the Modem Settings . . . . . . . . . . . 54
Setting the RF output channel . . . . . . . . . . . .54
Setting up your remote control for your TV . . . . 55
Extra Information . . . . . . . . . . . . . . . . . . . . 57
Recording a digital satellite programme . . . . . . . 57
Switching between digital satellite TV
and terrestrial TV . . . . . . . . . . . . . . . . . . . . . . 57
Error messages . . . . . . . . . . . . . . . . . . . . . . . . . . . . 57
Solving Problems . . . . . . . . . . . . . . . . . . . . . 58
On-screen messages . . . . . . . . . . . . . . . . . . . . . . . 58
General Problems . . . . . . . . . . . . . . . . . . . . . . . . . 61
Specification . . . . . . . . . . . . . . . . . . . . . . . . . 63
End User Licence Terms . . . . . . . . . . . . . . . . 64
Page 2
2
Using your Viasat box
Your set-top box has been manufactured to meet international safety standards, but you must take
care if you want to obtain the best results and operate it safely.
It is important that you read this booklet completely, especially the safety instructions below. If you
have any doubts about the installation, operation or safety of your set-top box, please consult your dealer .
WARNING!
Remember that contact with 230 V AC mains can be lethal or can cause a severe
electric shock. To avoid this risk:
Never remove the top cover from your set-top box. There are no userserviceable parts inside it, but there are some high-voltage live parts.
Make sure that all electrical connections are properly made.
Do not connect any of your equipment (set-top box, TV, video recorder etc.) to
the mains supply until you have properly connected all the other leads.
Disconnect your set-top box from the mains supply (by disconnecting its mains
lead from the mains wall socket) before you disconnect any other equipment
from its rear panel.
Never push anything into the holes, slots or other openings of the set-top box
case (except a smart card into its correct slot).
CAUTION!
✔
In order to ensure a free flow of air around the set-top box, allow at least 5cm of space above
and around the set-top box.
✘
Never stand your set-top box on soft furnishings or carpets. Do not cover any ventilation slots.
✘
Do not place your set-top box in an unventilated cabinet or on top of a unit which emits heat
(e.g. a TV or VCR).
✘
Do not place your set-top box in a cabinet with more than one other piece of audio/video
equipment, for example, VCR or DVD.
✘
Do not use or store your set-top box in hot, cold, damp or dusty places.
✘
Do not put anything on your set-top box which might drip or spill into it. Never stand objects
filled with liquids, such as vases, on top of your set-top box.
✘
Never place naked flame sources, such as lighted candles, on top of your set-top box.
✘
To avoid possible damage to the internal hard disk, do not pick up or otherwise move your settop box while it is connected to the mains supply. If you want to move your set-top box, first
disconnect it, then wait at least 30 seconds before continuing.
For your safety
Page 3
3
ENGLISH
Thank you for choosing the Pace PVR box for viewing your Viasat channel packages. Please follow the
instructions in this User Guide carefully to enjoy all the advantages of digital satellite TV. We advise
following the user instructions and recommendations supplied with your box, especially for first-time
use.
Your box fully complies with international DVB (Digital Video Broadcasting) standards.
❖
Updates to your box
From time to time, your box may be updated. These updates provide enhanced features; new screens
and menus may become available. Although any new screens and menus may look a little different
from those described in this User Guide, you should be able to use the same techniques (e.g. highlight
and select) with them.
Updates will usually happen in the middle of the night. Your box needs to be in standby to receive
updates.
❖
Inserting the batteries in your remote control
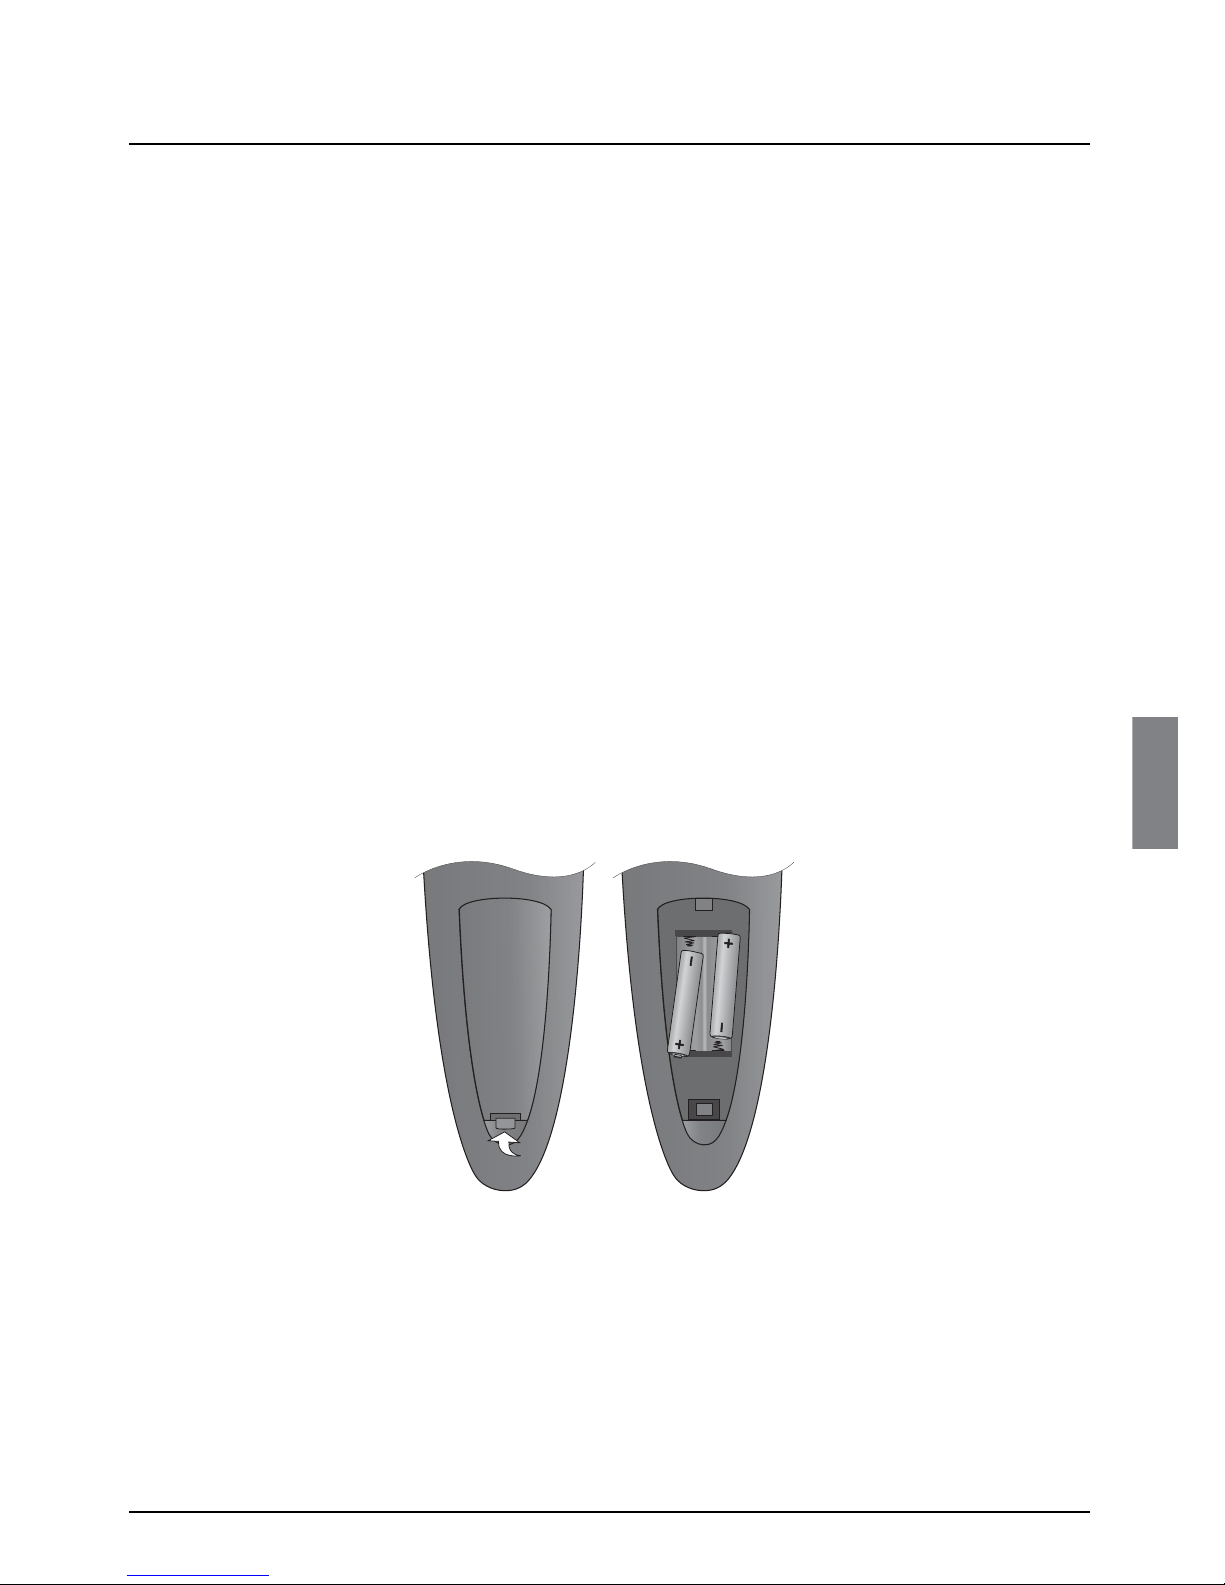
Before you can use your remote control, you must insert the two supplied AA batteries as follows:
1. Push the catch at the bottom of the remote control battery cover up, then lift off the cover.
2. Insert the batteries as shown below. Be sure to match the + and – marks on the batteries to
their respective marks inside the battery compartment.
3. Replace the battery cover, by inserting the tab at the top of the cover first, then pushing the
cover into place.
✘
Don’t leave flat batteries in your remote control.
✔
Replace both batteries at the same time.
✔
Dispose of flat batteries in an environmentally-friendly way.
Welcome to digital satellite TV!
Page 4
4
Using your Viasat box
*
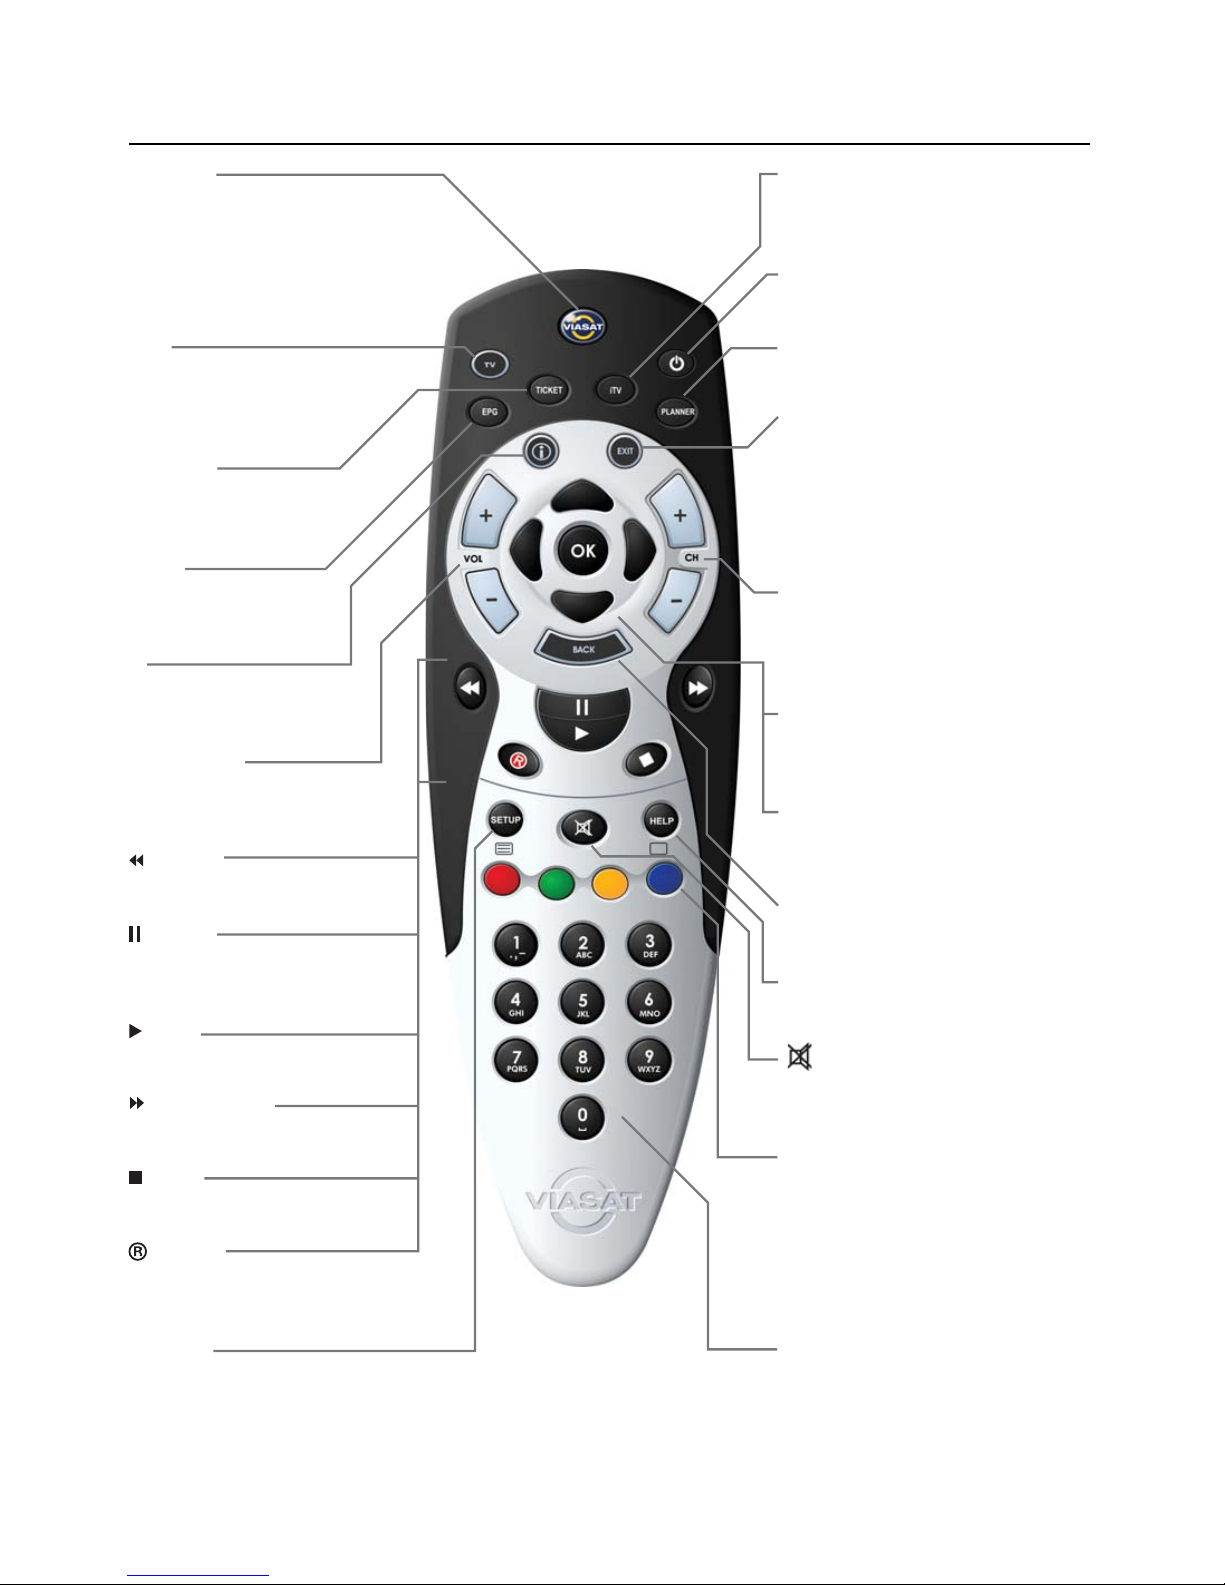
For information on setting up your remote control to operate your TV, see page 55.
VIASAT
Takes you from the EPG to the
last channel you were watching
Takes you back to Normal mode
after you have been using 'TV-only
mode'
TV
Switches to ëTV-o nly mode’, to use
your VCR or other item
connected through your box
TICKET
Displays the Ticket screen to
order movies and events
EPG
Displays the electronic
programme guide (EPG)
i
Displays more information
about a programme
vol + an
d –
Changes the volume of your
TV up or down*
rewind
Rewinds the programme
pause
Pauses the programme or star ts a
‘Live Pause’ recording
play
Plays a recorded programme
fast forward
Fast forwards the programme
stop
Stops playback of the programme
record
Records the programme or sets a
reminder for a future recording
SETUP
Displays the Setup scree
n to alter
your box‘s settings
iTV
Displays the menu for Viasat’s range
of interactive services
S
Puts your box into or out of standby
PLANNER
Displays your Planner
EXIT
Takes you from the EPG to the last
channel you were watching
Takes you back to Normal mode
after you have been using 'TV-only
mode'
ch + and –
Changes channel and pages up and
down through listings in
the EPG and
Planner
arrow buttons
U, D, L, R
Moves the highlight around the screen
OK
Confirms a choice or makes a
selection
BACK
Jumps back to the previous screen
HELP
Displays help information
mute
Turns the sound of your TV
on or off*
colour buttons
Use to select the matching colour
option shown on screen, or as
explained i
n this User Guide.
Also, the red button launches an
interactive service when you see the
red button on your TV screen
number buttons (0-9)
Use to change channel, enter
numbers and select on-screen options
Your remote control
Page 5
5
ENGLISH
❖
Front panel
indicator light
Lights up red when your box is in standby
Lights up green when your box is active
Lights up orange when your box is
receiving a signal from your remote
control
S button
To switch your box into or out of
standby
Back button
To remove a menu and go
back to the previous screen
U D (arrow buttons)
To highlight the previous or next
item in a list or on-screen menu
L R (arrow buttons)
To move to the left and the right
through on-screen menus, lists or
items
To change settings on the screens
OK button
To confirm a choice or save a
setting
LED display
Shows the current time when your
box is in standby
Shows the channel number when
tuned to a TV or radio channel;
Shows the current playback
function, for example ‘PLAY’,
‘PAUS’, ‘FF 2’, ‘RW 4’ etc.
record and play indicators
Lights up red when your box is
recording to the hard disk
Lights up green when your box is
playing back from the hard disk
EPG button
To display the on-screen Viasat
EPG (electronic programme
guide)
smart card slot
To inser t your smart card
record
play
OKBackEPG
PVR Digital Satellite Receiver
Your Viasat Box
Page 6

6
Using your Viasat box
❖
Rear panel connectors overview
Full details about connecting up and installing your box begin on page 7.
WARNING
Always disconnect your box from the mains supply before you connect it to (or disconnect it from)
any other equipment .
230V 50Hz
K
C
OHS CIRTCELE FO K
S
IR
NE
P
O TON OD
NOI
TUAC
Mains input
Do not connect the mains
plug to the wall socket
until you have made ALL
the other connections
AUDIO L + R
(Left and right stereo audio)
To connect phono leads (not
supplied) to a TV, VCR or hi-fi
amplifier
TV SCART (out)
To connect to the SCART
connector on your TV
TELEPHONE LINE
T
o connect the telephone lead
VCR SCART (in/out)
To connect to the SCART
connector on your VCR or to
connect to another item of
equipment with a SCART
output
OPTICAL AUDIO
OUT
To connect an optical
digital-audio lead (not
supplied) to a home
cinema system
AERIAL IN
To connect the lead from your
TV aerial
RF OUT - 1
To connect an RF lead to your
TV (or video recorder)
RF OUT - 2
To connect an RF lead to a
second TV or ‘magic eye’
INPUT 1 and
INPUT 2
To connect the
satellite signal inputs
from the Quad LNB
S-VIDEO OUT
To connect an S-Video lead (not
supplied) to the S-Video
connector on your TV
Your Viasat Box
Page 7

7
Installation
ENGLISH
To install your box, follow the instructions from this page up to page 16.
❖
The supplied equipment
If you have not already done so, remove all the packaging.
You should have the following items:
◆
Viasat PVR box (see page 6)
◆
Remote control and batteries (see page 4)
◆
User Guide in five languages (Swedish, Norwegian, Danish, Finnish and
English)
◆
Mains lead - with 2-way connector and 2-pin mains plug (see right)
◆
SCART lead (see right)
◆ RF lead (see right)
◆ Telephone lead - RJ11 to RJ11 (see right)
◆ Telephone line (RJ11) adapter suitable for your location (see page 12)
◆ Quad LNB and 2 x 25m coaxial cables (please ensure your LNB is set
up correctly before you begin installing your box - see below)
❖ Where to place your box
Before you start, make sure that your TV, VCR and box will be placed in a
location that is conveniently located:
◆ near an easily-accessible mains wall socket;
◆ within reach of your TV-antenna and satellite-dish leads;
◆ within 10 metres of a telephone point. (If not, you will need an extension telephone lead.)
❖ What else do I need?
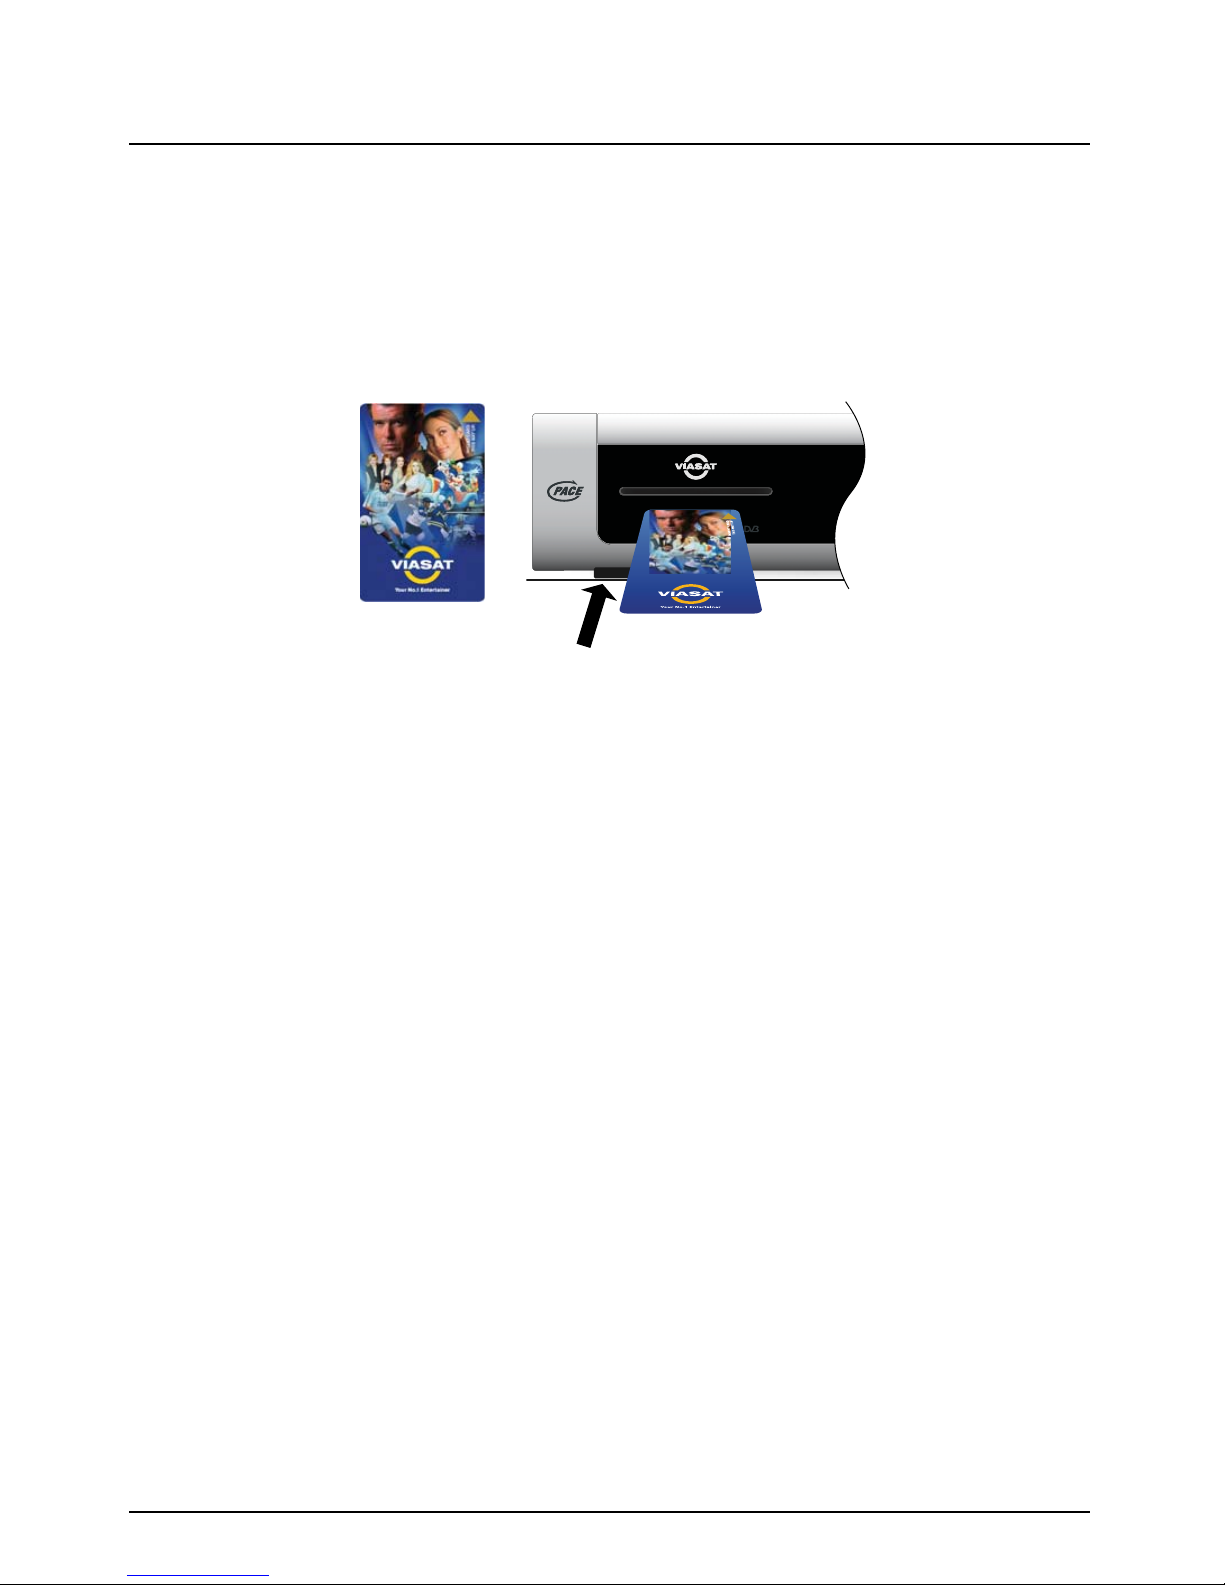
Smart card
To get access to the channels to which you have subscribed, you will need a smart card.
If you are an existing Viasat customer...
◆ Please remove your smart card from your old box and insert it into your new box.
If you are a new Viasat customer...
◆ The smart card is not included in the package, but will arrive in a separate delivery within a
week. In the meantime you can use your box to watch non-encrypted channels.
WARNING
Before you connect your box to any other equipment, you must disconnect ALL the
equipment from the mains supply.
Mains lead
SCART lead
RF lead
Telephone lead
Page 8
8
Using your Viasat box
Installation
Inserting your smart card
1. Take your smart card from its packaging (if you have not already done so) and hold it so that the
picture is facing upwards, and the ‘smart’ patch is facing downwards and at the end away from
you.
2. Insert the smart card into the smar t card slot of the front panel of your box. Inser t it as far as it
will go, without forcing it.
Taking care of your smart card
◆ Do not remove and re-insert your smart card unnecessarily.
◆ Do not bend your smart card; keep it away from children and pets.
◆ Do not put your smart card in liquids or use cleaning fluids on it.
Activating your subscription
When you have completed the installation (see page 15), a Subscription Activation screen will be
displayed. Please follow the instructions that are given on the screen to get access to your Viasat
channel package.
Satellite dish
You will need a correctly-installed satellite dish, pointing at the correct satellite(s).
◆ If you have a satellite dish but it is not pointing at the correct satellite(s), you will need to make
adjustments. Please see the information supplied with your dish/LNB for details on how to do
this, or seek professional advice.
◆ If you do not have a satellite dish installed, please ask your dealer to recommend a local dish-
installation engineer.
Quad LNB set-up
Since the PVR has two tuner inputs you need to duplicate the incoming signal. This is done by
replacing your existing Sirius Universal Single LNB with a Universal Quad LNB and install an extra
cable to the PVR, or, if you are a new customer, installing two cables to the PVR. One Universal Quad
LNB and 2 x 25 m coaxial cables are included in this package by Viasat.
Your choice of setup depends on the number of LNB:s in your antenna:
◆ One LNB - Your antenna is equipped with only one LNB. The antenna must be aligned towards
Sirius 5°East
◆ Two or more LNBs - If you are using a DiSEqC™ unit* with two or more LNBs/satellite dishes,
to ensure a simpler installation, and for the best Viasat channel line-up, you should connect up
PVR Digital Satellite Receiver
Page 9

9
Installation
ENGLISH
the LNBs to the DiSEqC™ ports as shown in the LNB positions table below. You must then
connect your DiSEqC™ unit to the satellite input on your box (see also pages 9 to 11).
The Quad LNB setup requires that two DiSEqC™ switches are installed, one for each tuner input.
If you have more than one LNB in your antenna, it is recommended, for full PVR functionality, that
you exchange the LNBs for the other satellites also. Universal Quad LNBs are available at your local
installer.
With a Universal Quad LNB there will be two spare signal outputs, where it is possible to connect
an extra box, for example in your bedroom.
LNB positions table
If you change your satellite dish installation, you may need to change your settings so that your box
can tune to all the satellites available - See “Changing the LNB Setup” on page 52.
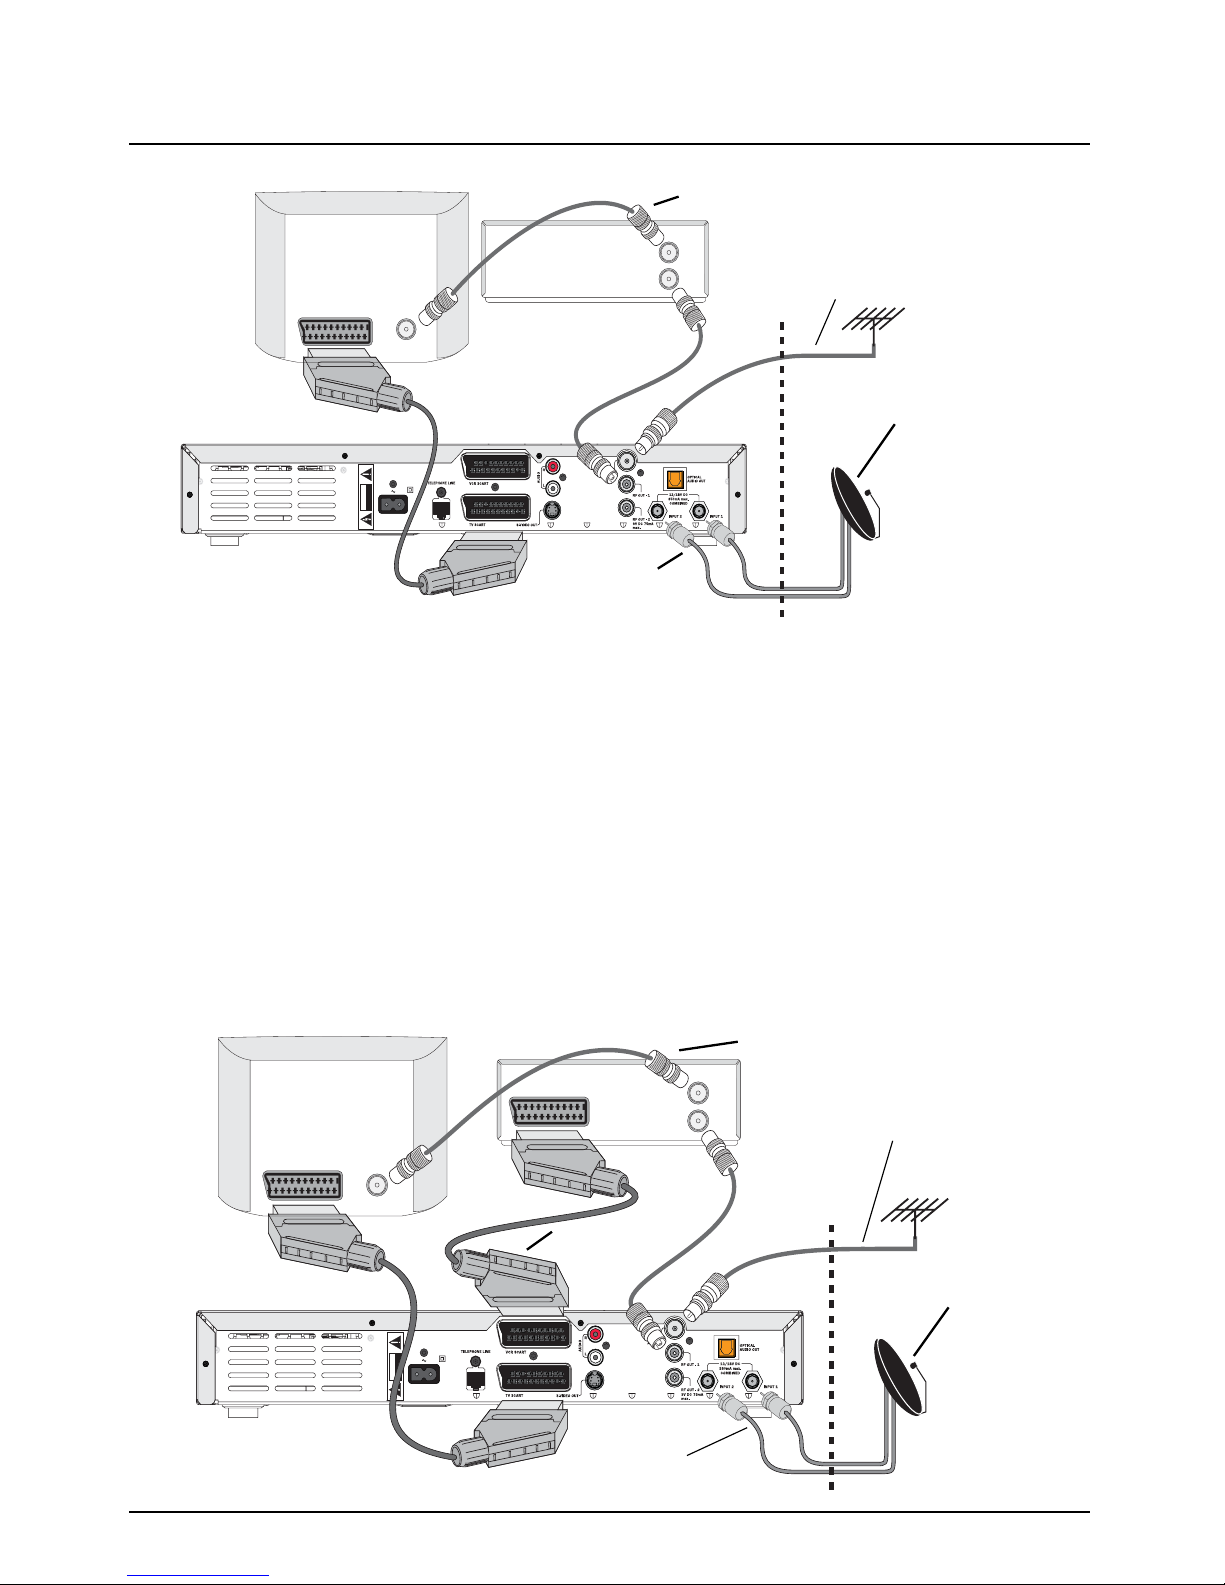
Connection method 1: To TV and VCR (without SCART)
If wish to connect your box to a TV (with or without a SCART connector) and a VCR (without
SCART connectors), connect up as shown in the diagram on page 10.
Satellite Position Recommended DiSEqC™ port
(for multiple LNB set-ups)
Thor 1° West 1
Sirius 5° East 2
Hotbird 13° East 3
Astra 19° East 4
Note
Initially, only a two-way LNB set-up is supported, on DiSEqC™ ports 1 and 2. A three- or four-way
LNB set-up using DiSEqC™ ports 3 and 4 (i.e. for Hotbird and Astra) will be supported after your
box has collected an automatic software update from Viasat.
*DiSEqC™ is a trademark of Eutelsat.
Page 10
10
Using your Viasat box
Installation
1. If your TV has a SCART connector, use the supplied SCART lead to connect your box to your
TV, for improved quality picture and sound.
2. Use the supplied RF lead to connect from your box’s RF out connector (marked RF OUT - 1)
to the antenna input on your VCR.
3. Use an RF lead (not supplied) to connect your VCR to your TV as shown.
4. Connect the lead from your TV antenna to the antenna input connector (marked AERIAL IN)
on your box.
5. Connect the leads from your satellite dish to the satellite input connectors (marked INPUT 1
and INPUT 2) on your box.
Connection method 2: To TV and VCR
If you have a VCR with a SCART connector and a TV with a SCART connector, you can connect up
as shown in the diagram below.
230V 50Hz
K
C
OHS CIRTCELE FO K
S
IR
NE
P
O TON OD
NOI
TUAC
Supplied
SCART lead
Supplied RF lead
RF lead (not supplied)
Lead from your
TV antenna
TV
ANTENNA
IN
VCR
TV OUT
ANTENNA IN
IN
Supplied
Quad LNB
Leads from your
satellite dish
230V 50Hz
K
C
OHS CIRTCELE FO K
S
IR
NE
P
O TON OD
NOI
TUAC
Supplied SCART lead
Supplied RF lead
SCART lead
(not supplied)
Lead from your
TV antenna
Leads
from your
satellite dish
TV
ANTENNA
IN
VCR
TV OUT
ANTENNA
IN
IN
IN
RF lead (not
supplied)
Supplied
Quad LNB
Page 11
11
Installation
ENGLISH
1. Use the supplied SCART lead to connect your box to your TV.
2. Use a SCART lead (not supplied) to connect your box to your VCR.
3. Connect the leads from your satellite dish to the satellite input connectors (marked INPUT 1
and INPUT 2) on your box.
The RF connection is not required for digital satellite TV. However, you may wish to connect RF
leads as shown, to continue to view or record terrestrial TV from your TV antenna.
You must then connect the lead from your TV antenna to the antenna input connector (marked
AERIAL IN) on your box.
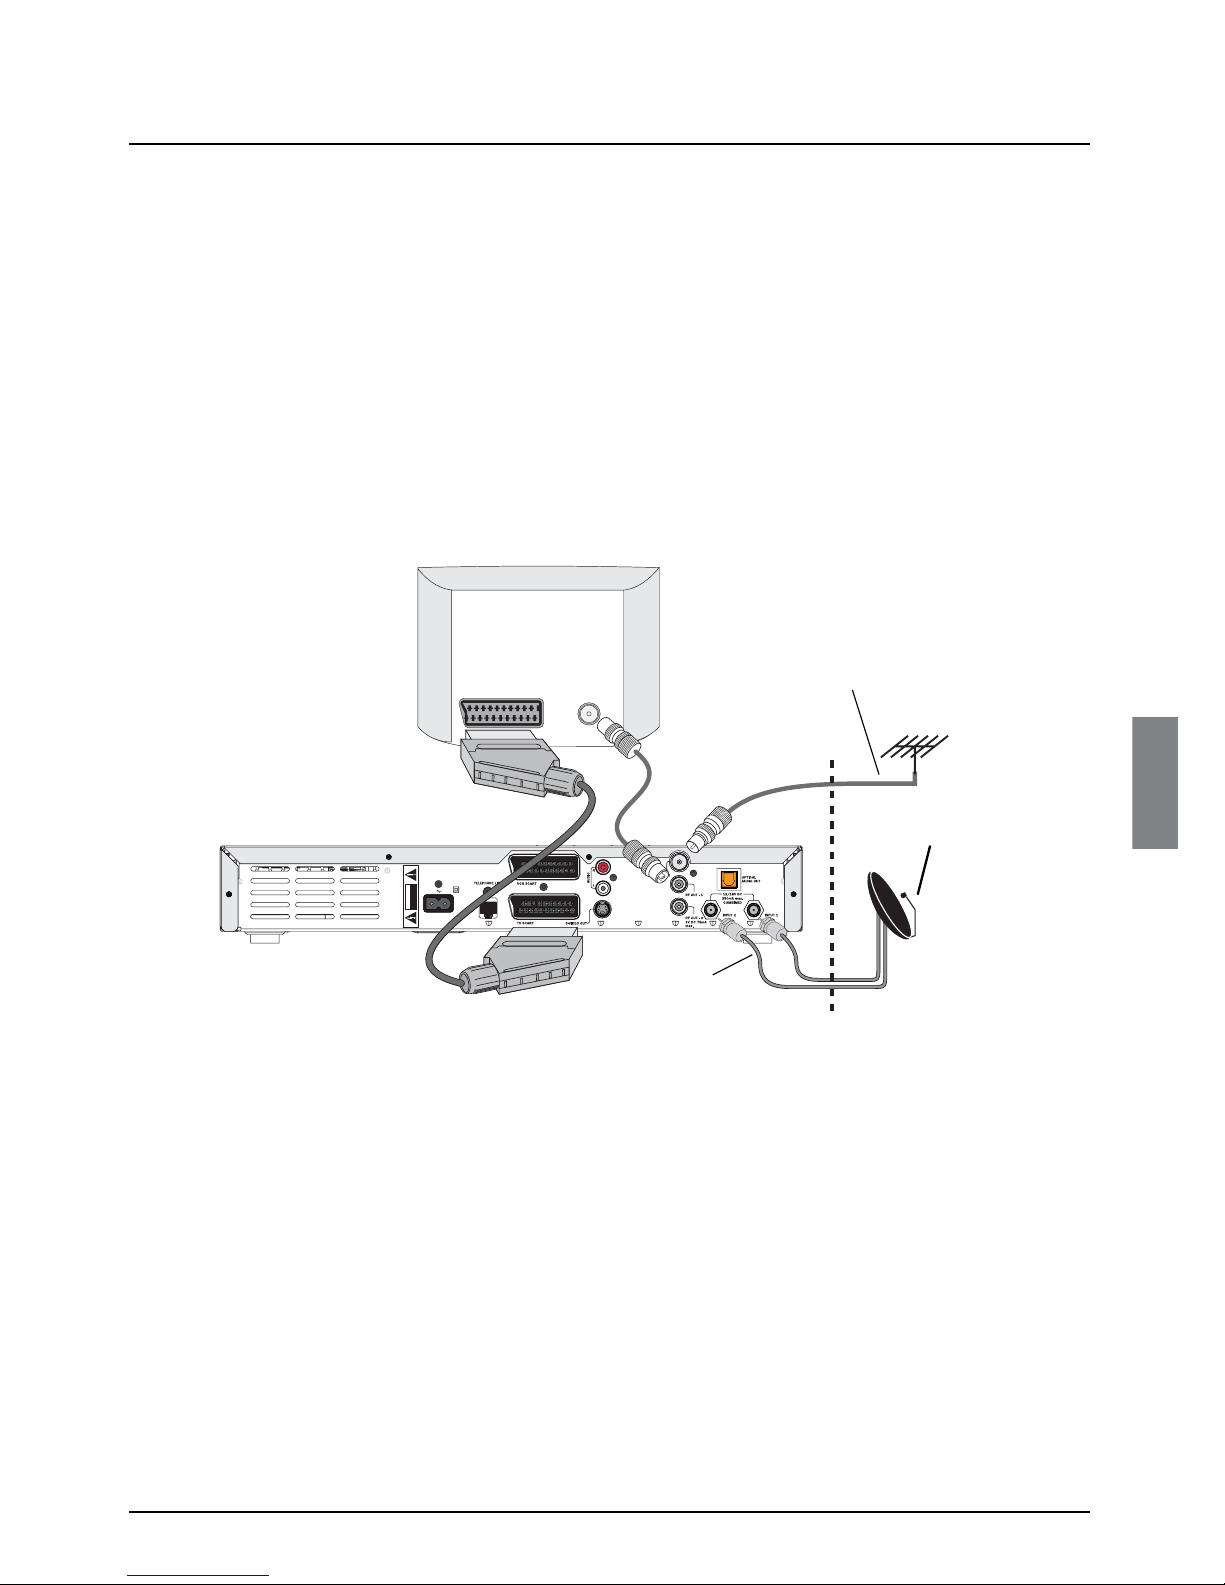
Connection method 3: To TV only
If wish to connect your box to a TV only, connect up as described in 3A or 3B below.
(The diagram below shows methods 3A and 3B combined.)
3A: If your TV has a SCART connector
1. Use the supplied SCART lead to connect your box to your TV.
2. Connect the leads from your satellite dish to the satellite input connectors (marked INPUT 1
and INPUT 2) on your box.
3. To continue to view or record terrestrial TV from your TV antenna, connect the lead from your
TV antenna to the antenna input connector (marked AERIAL IN) on your box, and use the
supplied RF lead to connect from your box’s RF out connector (marked RF OUT - 1) to the
antenna input on your TV.
3B: If your TV does not have a SCART connector
1. Use the supplied RF lead to connect from your box’s RF out connector (marked RF OUT - 1)
to your TV.
2. Connect the leads from your satellite dish to the satellite input connectors (marked INPUT 1
and INPUT 2) on your box.
3. Connect the lead from your TV antenna to the antenna input connector (marked AERIAL IN)
on your box.
230V 50Hz
K
C
OHS CIRTCELE FO K
S
IR
NE
P
O TON OD
NOI
TUAC
Lead from your
TV antenna
Leads from your
satellite dish
Supplied SCART lead
Supplied RF lead
TV
ANTENNA
IN
IN
Supplied
Quad LNB
Page 12

12
Using your Viasat box
Installation
❖ Optional audio connections
This diagram shows the optional audio connections you can make to obtain improved quality sound.
You can connect to stereo audio equipment as shown, or alternatively, if your TV and/or video
recorder has the correct input connectors, you can connect to these as required.
❖ Connecting to the telephone line
Note
If you connect to your TV, video recorder or other equipment via the S-VIDEO OUT connector, you
must also use an audio connection, in order to hear/record sound.
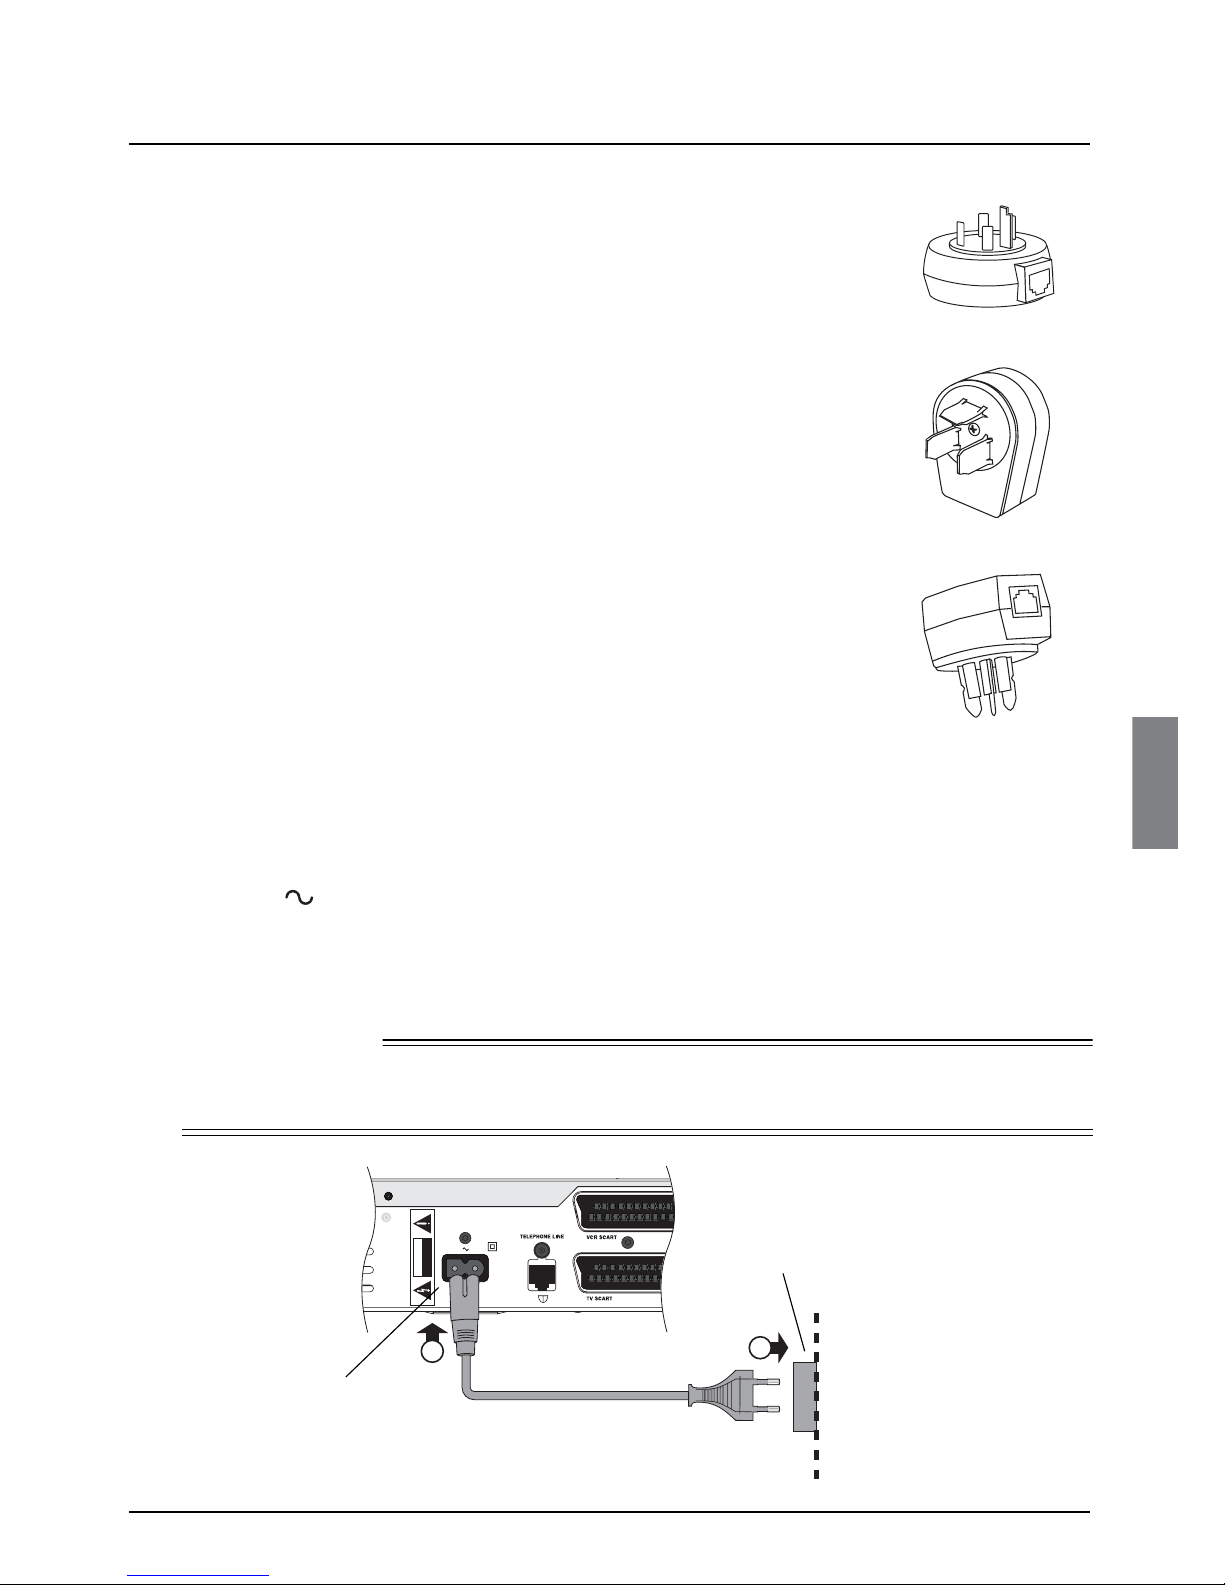
Notes
If your telephone wall socket is not an RJ11 socket (see
right), you will need to use one of the supplied adapters,
shown on page 13.
If your telephone wall socket is an RJ11 socket, you may need a splitter (not supplied) so that you
can plug in both your box and your telephone.
230V 50Hz
K
C
OHS CIRTCELE FO K
S
IR
NE
P
O TON OD
NOITUAC
230V 50Hz
K
C
OHS CIRTCELE FO K
S
IR
NE
P
O TON OD
NOI
TUAC
3
2
1
Telephone line
wall-socket
Telephone socket
Supplied telephone adapter
Supplied telephone lead
RJ11 socket
Page 13
13
Installation
ENGLISH
1. Insert one end of the supplied telephone lead into the telephone socket
(marked TELEPHONE LINE) on the rear panel of your box, as
shown in the diagram at the top of the page.
2. If you need to use an adapter, choose the correct adapter for your
location. If you are not sure which one to use, compare with your
telephone connector.
Insert the free end of your supplied telephone lead into the RJ11 socket
on the adapter.
3. Remove your telephone connector from your telephone wall socket.
Insert your telephone connector into the correct socket on your
adapter.
Insert the adapter into your telephone wall socket.
❖ Connecting a ‘magic eye’
You can connect a ‘magic eye’ (not supplied) to the secondar y RF output
(marked RF OUT - 2) on the rear panel of your box, so that you can
operate your box from a different room.
To connect the ‘magic eye’, consult the instructions that came with it.
❖ Connecting to the mains supply
Once you have safely made all the other connections, you can connect your
box to the mains supply.
1. Using the supplied mains lead, inser t the box mains connector into the mains input (marked
230V 50Hz) on your box, as shown in the diagram below.
2. Connect the mains plug to the mains wall socket as shown in the diagram below.
3. If there is a switch by the mains wall socket, switch it on.
4. Connect your other equipment to the mains supply.
WARNING
DO NOT connect the mains plug to the wall socket until you have made ALL the
other connections.
Adapter for Sweden
Adapter for Denmark
Adapter for Norway
and Finland
230V 50Hz
K
C
OHS CIRTCELE FO K
S
IR
NE
P
O TON OD
NOI
TUAC
1
2
Mains plug
Wall socket
Mains
connector
Mains input
Page 14

14
Using your Viasat box
Installation
❖ Switching on for the first time
When you connect your box to the mains, your box’s front panel lights go through a star t-up
sequence. After about 20 seconds, your box is switched on and out of standby, and the standby light
is green.
◆ Make sure your TV is switched on.
If the Welcome screen below displays, your TV is ready for digital satellite channels.
You can now continue the installation by turning to the section ‘Making the installation settings’ on
page 15.
If the Welcome screen does not display...
If you have connected your box to your TV (and VCR) via SCART leads, try selecting your TV’s ‘AV
input’.
If you have connected your box to your TV (and VCR) via RF leads only, you need to tune a ‘channel
for satellite TV’ (see ‘RF Tuning’ on page 15).
Caution
Your box operates with 230 V AC, 50 Hz mains supplies.
Do not connect it to a DC power supply.
The supplied mains lead has a 2-way connector at one end and a mains plug at the other. You
should always insert the 2-way connector into your box before you insert the plug into the mains
supply.
The only way to disconnect your box from the mains is to remove the mains lead. Your box must
therefore be installed near to the mains socket-outlet, which should be easily accessible.
If you are in any doubt about the mains lead, its plug or its connection, consult a competent electrician.
Note
If you have a VCR connected to your box via an RF lead (as in connection method 1), to be able to
record satellite programmes, you may need to perform RF tuning for your VCR - see page 15.
Page 15

15
Installation
ENGLISH
❖ RF Tuning
If you have connected up your equipment via RF leads, you may need to perform RF tuning before
you can watch digital satellite TV.
RF tuning your TV (and VCR) to your box
1. Make sure your box is active (the standby light on the front panel should be green).
2. Consulting your TV’s user guide if necessary, tune the TV until you can see the Welcome screen
(see page 14) on your TV screen.
3. Store your new ‘channel for digital satellite TV’ on a TV channel number of your choice. For
example, if your terrestrial channels are channels 1 to 5, and your ‘VCR channel’ is channel 8,
you may wish to use TV channel 9 as your ‘channel for digital satellite TV’.
4. If you have a VCR, set your TV to its ‘VCR channel’, then tune your VCR until you can again see
the Welcome screen.
If you cannot RF tune your TV (or VCR) to your box...
Your box’s factory preset RF output channel is channel 38. (This is not the same as a TV channel).
If channel 38 is not compatible with your TV, for example if it is already being used as your VCR’s
output channel, or for a terrestrial channel, you may find you cannot tune your TV to your box
because of interference.
Changing the RF output channel is covered in the setup section (see page 54).
RF channels may also be known as UHF channels.
❖ Making the installation settings
Choosing your country
If you have completed the installation instructions up to this point, the Welcome screen is displayed
on your TV screen. (See page 14 for a picture of the Welcome screen.)
1. Take your remote control. If you have not already inserted the batteries, do so now (see
page 3).
2. Press U or D until the country you want is highlighted, then press OK.
Note
If you have previously had an analogue satellite receiver connected to your TV (and/or VCR), you
may find that your ‘channel for satellite TV’ still works for your new digital channels. Try it to see - if
it works you do not need to perform RF tuning.
Page 16
16
Using your Viasat box
Installation
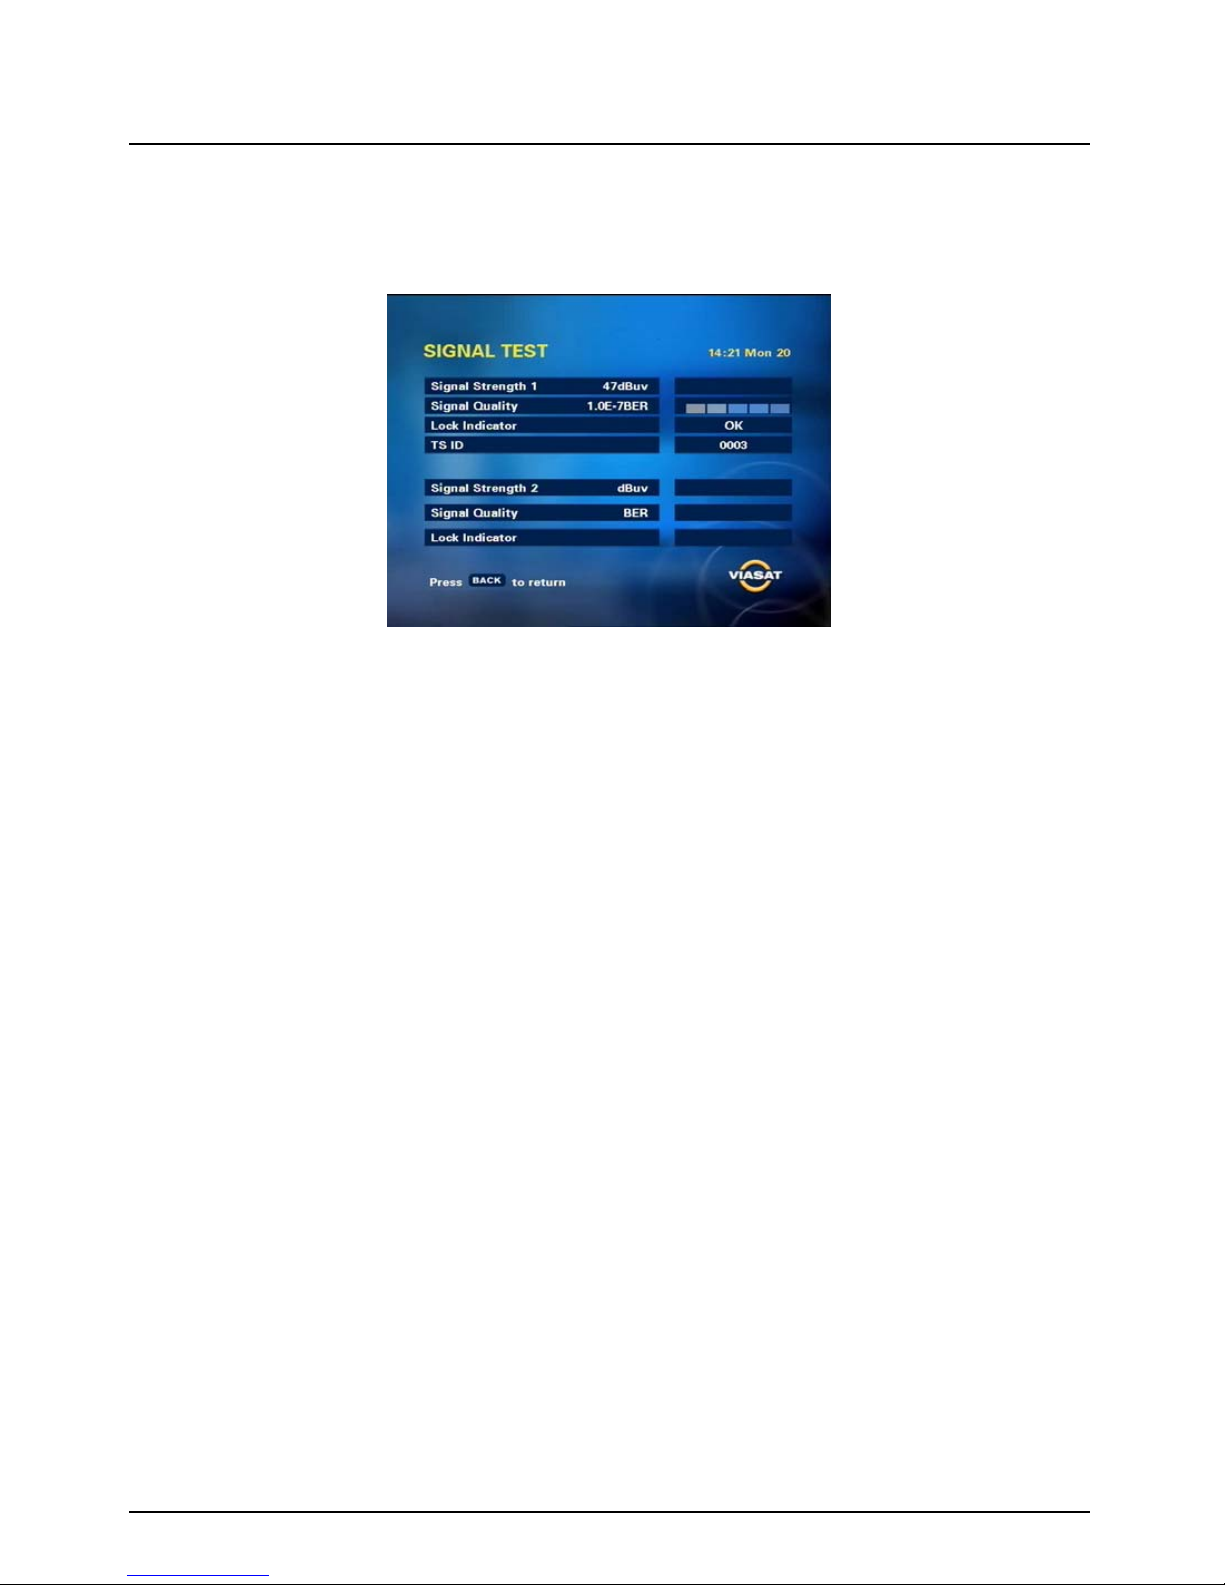
Checking the signal
The Signal Test screen is now displayed. You use this screen to confirm that your box is receiving a
satellite signal.
The details on the screen show the satellite input numbers, together with a bar showing the strength
and quality of the signal being received from the satellite.
Your box must receive a signal strength between 49-79 dBuV, preferably above 64 dBuV. If the signal
strength is lower the picture quality is more easily affected by bad weather, such as rain, thunder
storms, etc. The signal quality should be 1.0E-7BER and the Lock Indicator should display ‘OK’ in order
to successfully find channels.
If there is no signal, check your installation. Check all the connections are properly made. See also the
section ‘Solving problems’ on page 61.
If the signal strength or quality is poor, adjust your dish/LNB as required, referring to the information
provided with the equipment.
◆ When you are satisfied that there is an adequate signal, press OK.
When you have completed the installation, a Subscription Activation screen is displayed. See
“Activating your subscription” on page 8.
❖ Switching on and off
Whenever you are not using your box you should put it into standby. You should not unplug it at the
mains socket.
◆ To put your box into standby, press S.
◆ To make your box active, press S.
Page 17

17
Getting Started
ENGLISH
❖ Using the Viasat Guide
Your box has an on-screen digital guide to your digital satellite services. It is designed to help you get
the most out of your box. You use it to:
◆ watch programmes and at the same time find out what is showing on other channels, both now
and later on;
◆ see on-screen TV programme listings seven days ahead via the EPG;
◆ order movies, sports and events using Ticket;
◆ set reminders for programmes you want to watch using the Planner ;
◆ set your box to record programmes on now or showing in the future;
◆ watch programmes you have recorded;
◆ access a range of interactive services, such as games you can play using your remote control;
◆ change settings on your box, including the Parental Control settings, to make sure your box
works how you want it to.
❖ Changing channel
You can change channel by using:
◆ the number buttons;
◆ the ch + and – buttons; or
◆ one of the on-screen methods described in the following sections.
❖ Unlocking a locked channel
If you have used Parental Control to lock any channels (see page 42), these channels will not be
available to view without being unlocked first. In addition, if you have used Parental Control to set
viewing restrictions based on age category ratings (see page 43), then programmes broadcast with
an age rating at the same level or above will be locked. If you have used Parental Control to lock any
channels (see page 42), these channels will not be available to view without at first unlocking them.
If you want to watch a locked channel or programme, you will need to enter your PIN code (see
page 41).
If the message ‘Please enter PIN code to unlock channel’ appears when you change channel:
1. Use the number buttons to enter the correct PIN code.
2. If you make a mistake, press BACK to delete the numbers you have entered.
If the PIN code is correct, the programme you want to watch displays.
◆ If the PIN code is not correct, you will see a message to tell you. You can either try again, or
change channel to a channel that is not locked.
Note
When you unlock a channel using this method, the channel remains unlocked for as long as you are
viewing it. The channel is relocked when you change to a different channel, put your box into
standby, or turn off your box.
Page 18
18
Using your Viasat box
Getting Started
❖ Changing the volume on your TV
◆ To change the volume on your TV set, press vol + or vol -.
◆ To turn your TV’s sound on or off, press mute.
❖ Using the channel banner
You can display the channel banner to find out:
◆ what is showing on any channel, now and later on;
◆ more about a programme you are interested in.
You can then use the channel banner to:
◆ tune to a programme you want to watch;
◆ record the programme you are watching, or a programme on a different channel;
◆ set a reminder for a future programme;
◆ set your box to record a future programme.
While the channel banner is displayed, you can continue to watch the current channel.
Displaying the channel banner
◆ To display the banner, press OK.
Information about the programme on now displays.
◆ To display information about the programme on next, press R.
◆ To redisplay information about the programme on now, press L.
◆ To display extra programme information (see page 19), press i.
◆ To change which channel is highlighted by the channel banner, press U or D.
◆ To remove the banner, press BACK.
Note
This banner also displays briefly when you change channel. To set the length of time that the channel
banner displays on-screen, see page 49.
Page 19
19
Getting Started
ENGLISH
Watching a programme
If you see a programme you want to watch, press OK.
If the programme is on now, your box tunes to it automatically; if it is on at a later time, a reminder
will be set.
Instantly recording a programme
If you see a programme in the channel banner that you want to record, press R to record it.
If the programme is on now, your box starts recording instantly. If it is on at a later time, your box will
record the programme when it starts.
An R symbol (see page 20) displays on the channel banner, next to the programme, to show you the
programme is selected for recording. The programme is also added to your Planner (see page 30).
For more information about recording programmes and using your Planner, see ‘Planner’ on page 30
and ‘Recording Programmes’ on page 34.
Setting a reminder
If you see a programme in the channel banner that you want to watch, but it is on at a later time,
press OK.
Your box sets a reminder for you. This means, the programme is added to your Planner (see page 30)
and a clock symbol (see page 20) displays on the channel banner, next to the programme, to show
you the programme has been added to your Planner.
When the programme is about to start, a reminder message displays to let you know.
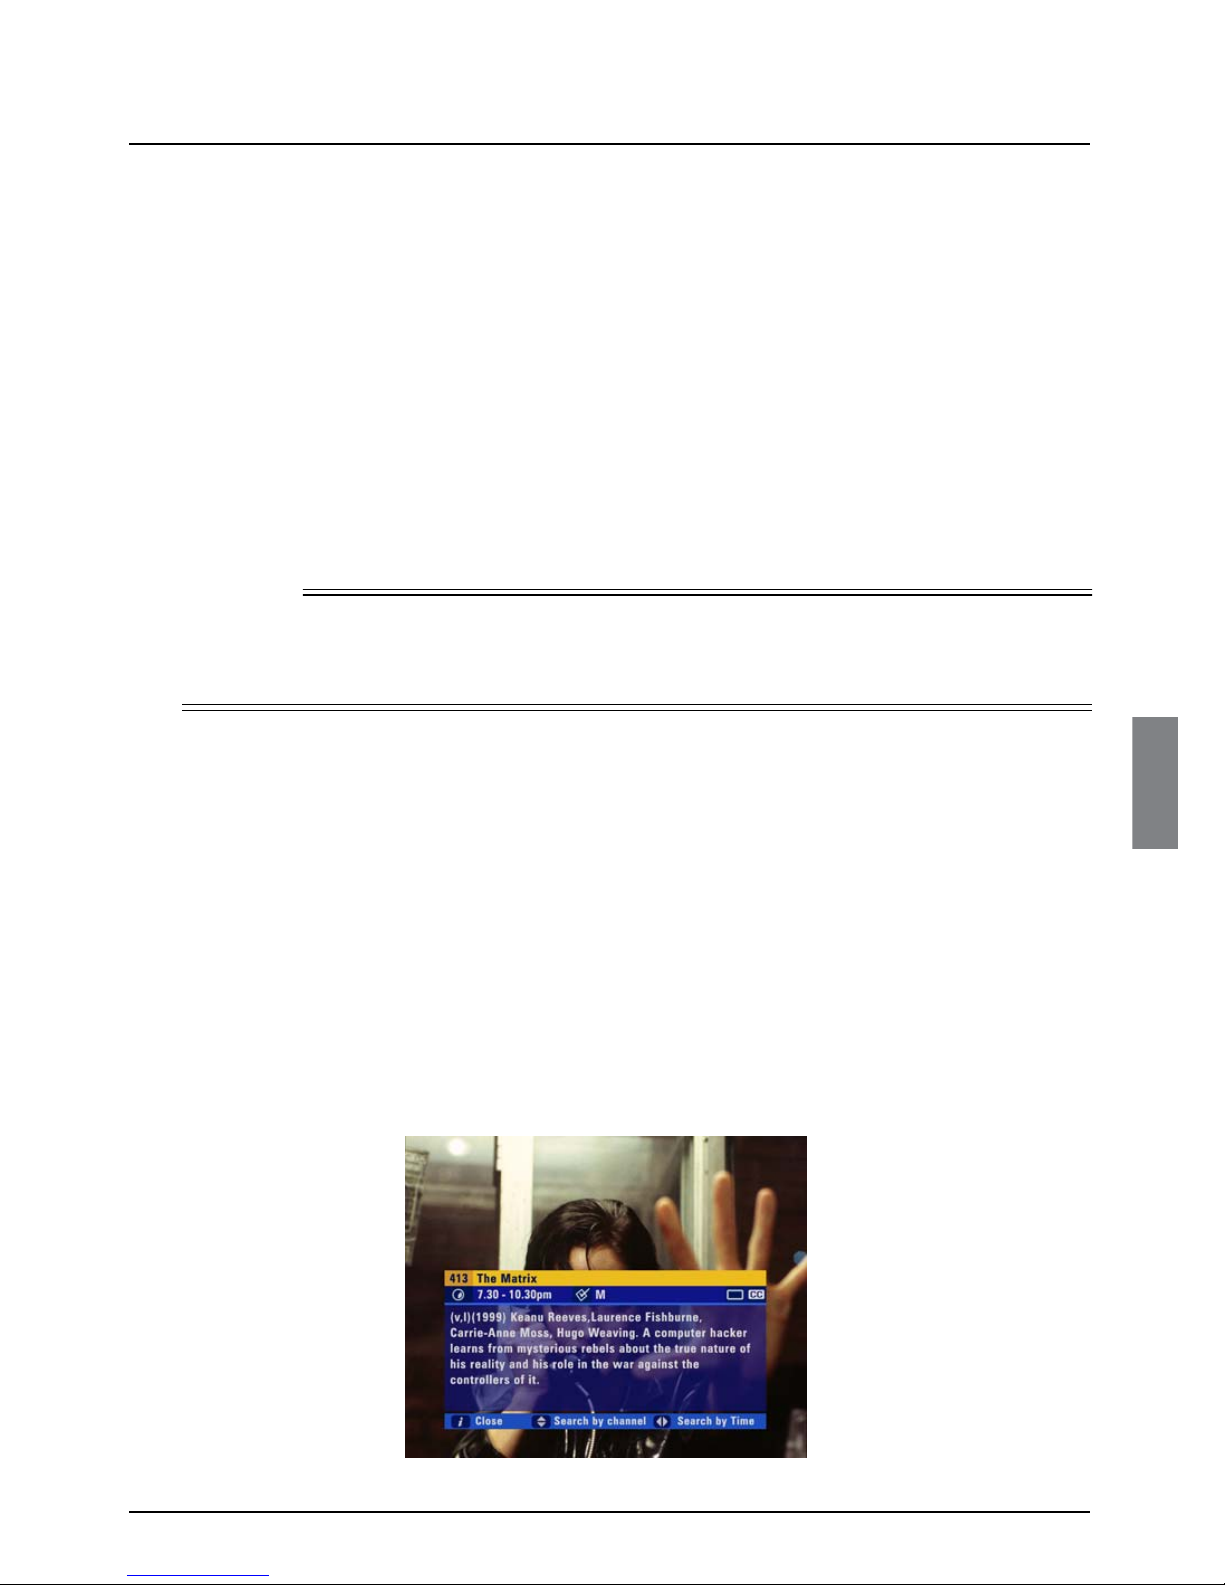
Displaying extra programme information
While the channel banner is on screen, you can display extra information about the programme listed
in the banner.
◆ While the channel banner is on screen (see page 18), to display extra programme information,
press i.
Note
If you are using Instant Rewind (see page 22) when you press R, the recording will start from the
earliest point in the programme that you could rewind to. Depending on your settings, this may be
up to 60 minutes before live TV (see ‘Review buffer’ on page 47).
Page 20

20
Using your Viasat box
Getting Started
The extra information includes a programme summary and codes and symbols which provide you
with additional information about the programme. These are explained below.
◆ To remove the extra programme information, press i again.
❖ Symbols in the channel banner and extra
information screens
The channel banner and extra information screens may include symbols giving particular information
about programmes.
Symbols Explanations
The ‘7 or under’ age category rating for this programme.
The ‘11 or under’ age category rating for this programme.
The ‘15 or under’ age category rating for this programme.
The ‘18 or under’ age category rating for this programme.
The programme is a radio broadcast.
A reminder is set for the programme.
The programme is selected for recording.
7
11
11
15
15
18
18
R
Page 21

21
Getting Started
ENGLISH
❖ Using Live Pause
◆ While you are watching a TV programme, you can pause it at any moment you want - just press
pause on your remote control.
The TV picture and sound ‘freeze’, and your box starts recording the programme.
◆ When you want to continue watching the programme from the Live Pause point, press pause
again, or press play.
A symbol briefly displays on-screen (see page 23). This shows the number of minutes you are ‘behind’
the actual live TV programme.
While you are watching the Live Pause recording, you can use pause, play, fast forward and
rewind to move through the recording. Symbols display on your TV screen to show you what is
happening (see page 23). If you rewind back to the start of the recording, the picture freezes. If you
fast forward to the end of the recording, your box takes you back to normal TV viewing.
While you are watching the Live Pause recording, your box continues recording the programme until
it finishes. However, you can press VIASAT at any point to stop Live Pause and resume normal TV
viewing. When you stop Live Pause, the recording is deleted.
If you change channel, or launch an interactive application, this will also stop and delete the Live Pause
recording.
Using other VIASAT on-screen features while you are using Live Pause
While you are using Live Pause, you can use the channel banner (see page 18) to find out what is
showing now and later. However, you cannot display extra information (see page 19) about other
programmes - you can only display information for the Live Pause programme.
While you are using Live Pause, you cannot use the EPG, Ticket, iTV or your Planner. If you want to
use these you must stop (exit) Live Pause.
Note
When you use Live Pause your box records the programme, but it is not added to your Planner. This
means, once you return to normal TV, or launch an interactive application, the Live Pause recording
is deleted. To record the programme to your Planner, to watch it in the future, press the record
button (see page 19).
Page 22

22
Using your Viasat box
Getting Started
If you select one of these options while you are using Live Pause, a message displays.
◆ To continue Live Pause, press BACK.
◆ To stop Live Pause (and delete your Live Pause recording) press OK. The screen for EPG,
Ticket, iTV or your Planner displays.
❖ Using Instant Rewind
If the Instant Rewind feature is turned on (see page 47), at any moment while you are watching TV,
you can rewind the programme you are watching to catch something you missed.
◆ To star t Instant Rewind, press rewind on your VIASAT remote control. Depending on your
settings, you can rewind up to 60 minutes before live TV. You can increase the rewind speed by
pressing rewind again. (To slow down the rewind speed, press fast forward.)
◆ When you reach the point you want to watch from, press play. A symbol briefly displays on-
screen (see ‘On-screen symbols’ on page 23). This shows the number of minutes you are
‘behind’ the actual live TV programme.
You can continue watching the entire programme from that point - your box will continue recording
until the end of the programme. Or, you can press fast forward to catch up with normal TV again.
While you are watching an Instant Rewind recording, symbols display on your TV screen to show you
what is happening (see ‘On-screen symbols’ on page 23).
You can press VIASAT at any point to stop Instant Rewind and resume normal TV viewing. When
you stop Instant Rewind, the recording is deleted.
If you change channel, or select EPG, Ticket, iTV or your Planner, this will also stop and delete the
Instant Rewind recording.
Subtitles are not available whilst you are using Instant Rewind.
Note
The Instant Rewind feature is set to 60 minutes by default. To change the maximum amount of time
that you can rewind, or to turn off the Instant Rewind feature, see page 47.
Page 23

23
Getting Started
ENGLISH
❖ On-screen symbols
The following symbols appear on your TV screen while you are using your box. They are referred to
throughout this User Guide, but here is a handy reference of what each symbol means.
Play (during playback from your Planner)
The blue ring rotates clockwise.
The number, shown with a plus sign, is the number of minutes since the start of the
recording.
Slow-motion play
The blue ring rotates clockwise at half the speed of normal play.
Play (during Live Pause or Instant Rewind)
The blue ring rotates clockwise.
The number, shown with a minus sign, is the number of minutes before live TV.
Slow-motion play
The blue ring rotates clockwise at half the speed of normal play.
Pause (during playback from your Planner)
The blue ring does not move.
The number, shown with a plus sign, is the number of minutes since the start of the
recording.
Bookmarked (during Pause of playback from your Planner)
Shows you have just selected that point to be a Bookmark.
Pause (during Live Pause or Instant Rewind)
The blue ring does not move.
The number, shown with a minus sign, is the number of minutes before live TV.
Fast forward (during playback from your Planner)
The blue ring rotates clockwise at double-speed, containing the selected fast-
forward speed (x2, x6, x12 or x30).
If the number is a minus number, fast forward is taking place in Live Pause or Instant
Rewind.
Rewind (during playback from your Planner)
The blue ring rotates anti-clockwise at double-speed, containing the selected
rewind speed (x2, x6, x12 or x30).
If the number is a minus number, rewind is taking place in Live Pause or Instant
Rewind.
+10Min
-10Min
+23Min
Bookmarked
-10Min
+12Min
x6
x6
+35Min
x12
12
Page 24

24
Using your Viasat box
Getting Started
Skip forward
The blue ring does not move.
The number shows the number of minutes since the start of the recording.
Skip back
The blue ring does not move.
The number shows the number of minutes since the start of the recording.
Note
No playback symbols appear on-screen while the channel banner or extra programme information
is displayed.
+7Min
+28Min
Page 25

25
ENGLISH
❖ EPG
The EPG (Electronic Programme Guide) provides you with a listing of all programmes available on all
channels for the next seven days.
◆ To see your EPG, press EPG on your Viasat remote control.
TV listings are displayed as follows:
◆ All Channel Listings - all programmes on all channels for today and the week ahead, listed
by channel number.
◆ Channels by Genre Listings - programmes for the next seven days, in the channel genres
shown, listed by channel number. The channel genres are: Movies & Series, News &
Documentaries, Entertainment, Sports, Children, Music and Science & Culture.
◆ Programs Listed by Time - programmes on all channels, sorted into the programme
genres, listed by start time.
Finding a programme
There are a number of ways to search for a programme. You can search by full listings, channel genre
by channel, or programme genre by time.
Note
Occasionally, for example if you are recording two programmes at the same time, you will not be
able to use the EPG to see listings for a full seven days. However, you can still display information
about the current programme.
Viasat EPG
Page 26

26
Using your Viasat box
Searching by All Channels
◆ To choose a programme from the full listings, press EPG on your Viasat remote control,
highlight ‘All Channel Listings’ then press OK. The All Channels screen displays.
The start times and the day are shown at the top of the listings.
◆ To see what programmes are on at different times, press R or L.
◆ To move through the list of channels, press U or D.
◆ You can use the red (page up) and green (page down) buttons on your remote control to see
the previous or next section of the channel listing.
◆ Use the yellow (+24 hours) and blue (-24 hours) buttons on your remote control to move
forward and backwards by 24 hours through the listings.
◆ To display extra programme information (see page 19), press i.
◆ To remove the All Channels listing, press BACK or VIASAT.
Searching by Channel Genre
If you know what type of channel you want to watch, you can search by channel genre, such as Sports.
1. To choose a programme by channel genre, press EPG on your Viasat remote control, highlight
‘Channels by Genre Listings’ then press OK. The Genre Listings screen displays.
2. Highlight a channel genre then press OK. The listings screen for that channel genre displays.
You use this screen in the same way as the All Channels screen.
Viasat EPG
Page 27

27
ENGLISH
Searching by Time
If you want to see a list of all the programmes showing at a particular time, you can search by
programme time.
◆ To choose a programme by time, press EPG, highlight ‘Programs Listed by Time’ then press
OK.
The Programs by Time screen displays.
◆ Highlight one of the programme genres listed, then press OK.
The listings screen for that programme genre displays, with the programmes listed in the order they
are showing.
◆ To move through the list of programmes, press U or D.
◆ On some screens you can choose to view by sub-genre. Press a colour button (shown below
the listings) to choose the sub-genre you want.
◆ Different sub-genres may be available. Press L or R to view all the available sub-genres.
Choosing a programme to watch or set a reminder for
◆ When you see a programme you want to watch, highlight it then press OK.
If the programme is on now, your box tunes to it immediately.
Viasat EPG
Page 28

28
Using your Viasat box
If the programme is on later, your box sets a reminder for you. Your Planner displays, showing the
programme you have just added, together with a reminder symbol next to it (see page 31). For more
information about your Planner, see page 30.
If a programme you have selected for a reminder is on at the same time as another reminder you
have previously selected, a message will appear asking you what you want to do - See “Reminder
clashes” on page 34.
Choosing a programme to record
◆ When you see a programme you want to record, highlight it then press R.
If the programme is on now, your box starts recording instantly. If it is on at a later time, your box will
record the programme when it starts.
Your Planner displays, showing the programme you have just added, together with an R symbol next
to it (see page 31). For more information about your Planner, see page 30. For more information
about recording programmes, see page 34.
◆ To redisplay the EPG, press EPG.
❖ Ticket
You can use your remote control to order movies, sports, events and adult programmes through
Ticket.
When ordering, you must specify the Ticket programme you want to view. Currently, after you have
ordered the programme, you can access the Ticket channel at any time from 10am on the day the
programme is broadcast until 10am the following day.
◆ To view the Ticket screen, press TICKET.
You may select from:
◆ Now Showing - movies on now or starting within the next 24 hours;
◆ Session Times - movies showing over the next three days.
Notes
Some programmes may be ‘Ticket’ programmes, which means you need to purchase the
programme before you can watch or record it. If this is the case, you will see a message with the
programme details and purchase price. For more information, see ‘Ticket’, below.
Viasat Ticket
Page 29

29
ENGLISH
Purchasing a Ticket programme
You can order a Ticket programme to watch or record as follows:
1. From the Ticket screen, choose a Ticket listings screen, (highlight your choice then press OK).
2. Use the arrows to highlight a programme.
3. If you want to display extra programme information (see page 19), press i. To remove the extra
programme information, press i again.
4. If you want to watch the programme, press OK. (If the programme is starting later, your box
will set a reminder for it.)
If you want to record the programme, press R.
Information about the Ticket programme you have selected will then be displayed, including the start
time and purchase price.
5. Press OK.
If you have used Parental Control (see page 41) to set viewing or purchase restrictions, you may need
to enter your PIN.
6. If you need to enter your PIN, use the number buttons to enter it.
Watching a Ticket programme
If you pressed OK, and the Ticket programme is about to start, your box tunes to it.
If the programme is on at a later time, it is added to your Planner. A reminder will appear when the
programme is about to start.
◆ Press OK to watch the programme. (If you prefer, you can press R to record the programme
instead - see the next section.)
Recording a Ticket programme
If you pressed R, and the Ticket programme is about to start, your box starts recording.
If the programme is on at a later time, it is added to your Planner. Your box then records it at the
chosen time.
For full information about recording programmes, see page 34.
Watching recordings of Ticket programmes
If you have recorded a Ticket programme, but not yet watched it, it remains in your Planner for a fixed
amount of time before it is deleted. Some programmes may remain in your Planner for up to seven
days if you do not view them.
You will be charged for the programme when you begin playing back the recording. After you start
playing back a Ticket recording, you will have a period of time in which you can watch it as many times
as you like, at no extra charge. When this time period is up, your box will automatically delete the
recording.
Note
If you do not watch the programme, your box will automatically delete the recorded programme at
the specified time.
Viasat Ticket
Page 30

30
Using your Viasat box
The amount of time you have left to watch, or begin watching a recording is shown on the
programme’s extra information box.
❖ Planner
Your Planner helps you plan all your TV viewing. It shows:
◆ all the programmes you have recorded, and tells you whether or not you have watched them;
◆ all the programmes you have set your box to record in the future;
◆ all the programmes for which you have set a reminder.
It also allows you to select programmes to ‘Keep’. You need to enter your PIN code before you can
delete a Kept programme.
Whenever you record a programme, choose a programme to record later, or set a reminder, it is
automatically added to your Planner (unless there is a clash - see pages 34 and 35).
◆ To view your Planner, press PLANNER on your remote control.
Your Planner provides the following information about the listed programmes:
◆ The name of the programme and the channel it is on;
◆ The day and start time for future programmes;
◆ If the programme has been recorded, information about the recording is shown, as follows:
Recording - the programme is currently being recorded.
Recorded - the programme has been recorded in full (but has not yet been watched).
Part recorded - part of the programme was recorded (but has not yet been watched). To find
out why only part of the programme was recorded, highlight the programme, then press i.
Viewed - you have watched all or part of a programme. This may be a fully-recorded or partrecorded programme, or even one that is still recording.
Notes
As an alternative to using the Ticket listings, you can use the EPG (see page 25) or channel banner
(see page 18) to choose a Ticket programme. Press OK to choose the programme and then follow
the instructions above starting from step 3.
To order Ticket programmes with your remote control, your box must be connected to your
telephone line (see page 12).
Planner
Page 31

31
ENGLISH
Failed - you selected the programme for recording, but the programme did not record. To find
out why, highlight the programme, then press i.
Clashed - you selected the programme for recording, but it did not record because it clashed
with another recording. For more information about recording clashes, see page 35.
You can display extra information about a highlighted programme:
◆ Press i.
More details about extra programme information are on page 19. In addition to the standard
information, the extra information for a recorded programme shows information about the status of
the recording, the time the recording was made, and the disk space used by the recording.
◆ To remove the extra information, press i again.
Symbols in your Planner
The following symbols may appear next to items in your Planner:
Using your Viasat remote control’s colour buttons
Depending on the programme that is highlighted in your Planner, you may be able to use the colour
buttons on your remote control to select one or more of the following. If a colour button is available,
the option is shown at the bottom of the screen.
◆ If the programme is part of a series, you can press the green ‘Series Link’ button to make sure
the following episodes are automatically added to your Planner (see page 32).
Note
The maximum number of reminders you can set is 50; the number of recordings is limited only by
the disk space available.
Symbols Explanations
Reminder symbol - shows that a reminder has been set for the programme.
Record symbol - shows that the programme has been selected for recording.
Keep symbol - shows that a recorded programme or a programme selected for future
recording has been marked to ‘Keep’. This means that the programme will not be
automatically deleted, for example when your box’s disk is nearly full.
Series Link symbol - shows that the programme is one of a series and you have selected
it for Series Link. For more information, see page 32.
Series Link Record symbol - shows that the programme currently being recorded is one
of a series and you have selected it for Series Link.
Series Link Keep symbol - shows that a recorded programme or a programme selected
for future recording is one of a series and has been marked to ‘Keep’. This means that
the recordings of programmes in the series will not be automatically deleted, for
example when your box’s disk is nearly full.
Series Link Reminder symbol - shows that the programme is one of a series and you
have selected it for Series Link, and you have also set for a reminder for it.
R
R
Planner
Page 32

32
Using your Viasat box
◆ You can press the yellow ‘Delete’ button to remove any programme from your Planner (see
below).
◆ You can press the record button to change a programme reminder into a future recording or
a future recording into a reminder.
◆ If the highlighted programme is a recorded programme, or has been selected for future
recording, you can press the blue ‘Keep’ button to mark it to ‘Keep’. This means that the
programme will not be automatically deleted, for example when your box’s disk is nearly full. You
can also press the blue button to remove the ‘Keep’ setting, but note that Kept programmes
are PIN-protected - you must enter your PIN to delete them.
Your box’s disk space
At the top of your Planner there is disk space indicator (a yellow line). The length of the line shows
you the total amount of space that is already used, and the number above tells you the percentage
of disk space that is still available.
To find out exactly how much space each programme takes up (or an estimate of how much space
it will take up, if it is a programme selected for future recording), press i.
For more information about disk space, see page 36.
Schedule changes
If the start time of a programme changes by up to 6 hours, your Planner is automatically updated. So,
if you have set a reminder for a programme, you still see the reminder when the programme is about
to start; or if you have selected a programme to record, your box will still start recording at the
correct time.
However, if the programme start time changes by more than six hours, the programme will be
removed from your Planner and you will need to set a new reminder, or set the programme to record
again. See also Recording Clashes on page 35.
Using Series Link
If the green ‘Series Link’ colour button option appears on-screen when you highlight a programme
in your Planner, this means the programme is one episode of a series, on that channel.
◆ If you want to watch or record future episodes in the series, press the green ‘Series Link’
button.
The Series Link symbol (see page 31) is then shown next to the programme, indicating that the link
is set.
If you selected the programme for future recording, the future episodes in the series will also be set
for recording.
Deleting a programme from your Planner
If you wish to remove a programme from your Planner, you can do so as follows:
◆ Highlight the programme, then press the yellow button.
◆ To remove a series link, highlight an unrecorded episode in the Planner that is part of the Series
Link and press the green button: the series link icon will be removed. Deleting the last episode
in the Planner that is part of a series link also removes the series link
If the programme is one that has been selected for a reminder, or for future recording, it is deleted
immediately.
Planner
Page 33

33
ENGLISH
If the programme is a recorded programme, it is deleted immediately.
For some programmes, for example those which have been marked for ‘Keep’, a message appears
asking you to confirm the deletion.
◆ To cancel the deletion and redisplay your Planner, press BACK.
◆ To confirm the deletion, use the number buttons to enter your PIN code.
Watching a programme when you see the reminder
One minute before a programme for which you have set a reminder is due to start, your Planner
displays a reminder message on your TV screen.
◆ To watch the programme, press OK.
◆ To record the programme, press R.
◆ To carry on watching the programme you are already watching, without changing channel or
recording the programme, press BACK.
Note
After you have deleted a recorded programme from your Planner, you cannot recover it.
Notes
In order for reminders to be displayed, your box must be switched on and you must be watching
Viasat.
You can change the settings for when the reminder displays (see page 45).
Planner
Page 34

34
Using your Viasat box
Reminder clashes
If a programme you have selected for a reminder is on at the same time as another reminder you
have previously set, a message will appear asking you what you want to do.
◆ To keep all the programmes in your Planner, press OK.
◆ To cancel the programme you have just selected, but keep the previously-set reminder(s), press
BACK.
❖ Recording programmes
As explained in other sections in this User Guide, recording a programme is usually as simple as
pressing R on your remote control.
◆ While you are watching TV, to record the programme you are watching, press R once to display
the channel banner, then press R again to start the recording. Your box starts recording. Also, a
Record symbol (see page 23) displays next to the programme and your box adds the
programme to your Planner (although your Planner does not display).
◆ While you are looking at the channel banner, highlight a programme then press R. A Record
symbol (see page 20) displays next to the programme and your box adds the programme to
your Planner (although your Planner does not display). If the programme is on now, your box
starts recording.
◆ While you are looking at the EPG or Ticket, highlight a programme then press R. Your Planner
displays, with the programme added to it. (For more information about recording Ticket
programmes, see page 29.)
◆ While you are looking at your Planner, if you decide to record a programme for which you have
set a reminder, highlight the programme and press R.
Note
If you are using Instant Rewind (see page 22) when you press R, the recording will start from the
earliest point in the programme. Depending on your settings, this may be up to 60 minutes before
live TV.
Recording Programmes
Page 35

35
ENGLISH
Cancelling a recording
◆ To cancel recording the programme you are watching, press R twice.
◆ To cancel a recording in the channel banner, highlight the programme then press R.
◆ While you are looking at your Planner, if you decide to set a reminder for a programme which
you have set to record, highlight the programme and press R. If you want to remove the
recording completely, highlight the programme then press the yellow ‘Delete’ button.
Using your box while you are recording a programme
Your box is very versatile! All the following combinations are possible. You can:
◆ record one programme, and at the same time watch a different programme.
◆ record one programme, watch a different programme, and use Live Pause or Instant Rewind, if
you wish to.
◆ record one programme and at the same time use an iTV interactive application, such as playing
a game.
◆ record two programmes at the same time, and watch one of the programmes that is recording.
◆ record two programmes, and at the same time, watch any recorded programme.
However, if you are recording two programmes at the same time, you cannot change to a different
channel other than those two recording, view Ticket listings or use an interactive application.
Recording clashes
When you select a programme to record, your box checks whether it is on at the same time as any
other programmes you have previously selected for recording. If more than two selected
programmes are on at the same time, this creates a clash. Your box lets you know about the clash
and suggests which previous selections you should cancel in order to record your new selection.
Note
You cannot record iTV applications; however, you can record subtitles if these are displayed.
Note
If you cancel a current recording, the programme remains listed in your Planner, but it is marked as
‘Part recorded’.
Recording Programmes
Page 36

36
Using your Viasat box
◆ If you want to cancel the suggested recordings, so that you can record your new selection, press
OK.
◆ If you would prefer to keep your previous selections, and cancel the new selection, press
BACK.
Recording clashes caused by changes to the schedule
If a programme’s start time changes, your Planner is automatically updated. If the new time(s) cause
a recording clash, your box automatically records in full whichever programme starts earlier, then it
will part-record any other programme(s) if they are still showing.
If you want to make sure a particular programme will be recorded in full, even if there are recording
clashes, you can do so by selecting the programme to ‘Keep’ in your Planner (see page 31).
Disk space warning
When you select a programme to record, your box checks whether there is enough disk space to
record it. If the disk is nearly full, your box may need to delete some programmes to make space for
the new programme.
Depending on your settings (see page 46), your box may do this automatically. However, if you have
set ‘Disk Space Management (see page 47) to ‘Manual’, then you will see the message shown overleaf:
Press BACK to remove the message, then use your Planner to delete some recorded programmes
(see page 32).
Note
Sometimes a recording clash may occur when the programme is about to be recorded, for example
if you are using Live Pause or Instant Rewind. If this happens, a message displays to inform you about
the clash, and to ask you what you want to do. You can then either cancel or confirm the recording.
Note
As explained on page 32, you can use the disk space indicator to find out how much of your box’s
disk space is being used.
Recording Programmes
Page 37

37
ENGLISH
❖ Manual recording
Some channels, for example radio channels, do not provide programme listings in the channel banner
or EPG. However, you can still use your box to record these channels, by using the Setup screens to
set up the recording.
◆ Press the SETUP button on your remote control. The System Setup screen displays (see also
page 41).
◆ Press D to highlight ‘Manual Recording’ then press OK. The Manual Recording screen displays.
You set up the recording as follows:
1. Select the channel to record by using L or R to look through the channel names.
2. Press D to highlight ‘Day’, then use L or R to select the day on which you want to record the
channel you have chosen.
3. Press D to highlight ‘Start Time’, then use the number buttons to enter the time you want the
recording to start using the ‘24-hour clock’.
While ‘Start Time’ is highlighted, if you make a mistake, you can press BACK to delete the
numbers you have entered and start again.
4. Press D to highlight ‘End Time’, then, in the same way as you entered the Start Time, use your
remote control to enter the time you want the recording to finish.
5. Press D to highlight ‘Frequency’, then use L or R to choose how often you want to record this
channel at the time you have chosen. You can choose from Once, Daily (every day star ting from
the day you chose in step 2), Mon-Fri (every weekday) or Weekly (once a week on the same
day).
6. Press D to highlight ‘Add Manual Recording’ then press OK. Your Planner displays, with the new
Manual Recording added to it. If you want to set up any more recordings, redisplay the Manual
Recording screen then start again from step 1.
Note
If you selected Daily, Mon-Fri or Weekly in step 5, the Series Link symbol (see page 20) displays next
to the Record symbol to show that the recording will take place more than once. You can press i to
check details of when the recordings will take place.
Recording Programmes
Page 38

38
Using your Viasat box
❖ Watching recordings
You use your Planner (see page 30) to choose recorded programmes you want to watch.
1. Press PLANNER.
2. Use U and D to choose a recorded or recording programme. Note that these may be marked
as Recorded, Part recorded, Recording or Viewed (see page 30).
3. Press play or OK. The Playback screen displays.
This shows you extra information about the programme, including when the programme was
recorded and how much disk space it uses.
This screen also allows you to choose the Start Position - the point from which you want to start
watching the recorded programme.
You can choose from:
◆ Start - to begin playback from the start of the recording.
◆ Last Viewed - to continue playback from the point where you last stopped it.
◆ Viewer Define - to start playback from any point in the programme. You use the number
buttons to enter a time, in minutes, from the star t of the recording.
◆ Viewer Bookmark - to start playback from a ‘bookmark’ (marker point) that you have
previously set (see ‘Using Bookmarks’ on page 40).
◆ End - to start playback a few moments before the end of the recording, for example if you
want to rewind to a particular point.
4. When you have chosen your start position, press play or OK. The programme star ts playing
back.
Playback symbol
When you first start watching a recorded programme, the playback symbol (see page 23) displays
briefly on your TV screen. The number shows how many minutes have passed since the start of the
recording.
You can display the playback symbol at any moment by pressing play. To remove it press BACK.
On-screen symbols also display whenever you fast forward, pause, rewind or stop playback - for more
information, see page 23.
Watching Recordings
Page 39

39
ENGLISH
During playback
During playback, (or fast forward or rewind) your box’s front panel lights up to show you what is
happening. For more information about the front panel, see page 5.
Showing information
◆ While you are watching a recording, you can press OK to display the channel banner to find
out what is showing on other channels. (Note that if you change channel, playback of your
recording will stop.)
◆ You cannot display extra information for programmes on other channels - you can only display
extra information for the recording you are watching.
◆ If you want to see extra information for the programme you are watching, press i.
Pausing and stopping
◆ If you change channel, playback of your recording will stop.
◆ To pause playback at any moment, press pause. To start playback again, press pause again, or
press play.
◆ To stop playback at any moment, and return to normal TV, press stop or VIASAT.
◆ To stop playback at any moment, and return to your Planner, press BACK.
◆ When the recorded programme ends, a message displays to tell you. To return to your Planner,
press BACK, or to return to digital TV, press VIASAT.
Fast forward and rewind
Whenever a programme is playing back or is paused, you can fast forward and rewind at any of four
different speeds.
◆ To rewind, press the rewind button on your Viasat remote control (see page 4).
The rewind x2 symbol displays on the front panel of the box. The number shows you the speed
(number of times faster than normal playback) the programme is rewinding, and the direction (anticlockwise) that the symbol is spinning shows you that it is rewinding.
◆ To increase the speed, press rewind again, up to 3 times (x6, x12, x30).
◆ To decrease the speed, press the fast forward button.
◆ To return to normal playback, press play.
You can fast forward in the same way as you rewind, just use the fast forward button to increase the
fast forward speed, and the rewind button to decrease the fast forward speed.
If you reach the end of the recording, the playback pauses at that point. You can then either rewind
or stop the recording.
Slow motion playback
You can play back a programme in slow motion, by pressing and holding down the play button for
at least 2 seconds. While the programme is showing in slow motion, the playback symbol displays,
spinning in slow motion.
To return to the normal speed, press play again.
Watching Recordings
Page 40

40
Using your Viasat box
Watching recordings of restricted programmes or locked channels
If you choose a recording to watch that:
◆ was broadcast on a channel that is currently locked, or
◆ is subject to a viewing restriction,
you will need to enter your PIN in order to watch it. For more information see ‘Using the Parental
Control menu’ on page 41.
Using Bookmarks
Bookmarks are points, within a recorded programme, to which you can quickly return.
◆ While you are watching a recorded programme, to set a bookmark, press pause, then press
the red ‘Bookmark’ button. The pause symbol is displayed with the message Bookmarked
underneath - See “On-screen symbols” on page 23.
◆ To skip forward to the next bookmark, and then continue watching the programme from that
point, press and hold fast forward for at least three seconds.
◆ To skip backward to the previous bookmark, press and hold rewind for at least three seconds.
❖ Interactive TV
Viasat iTV (Interactive TV) allows you to:
◆ play games;
◆ use additional interactive services, when these are available;
◆ display the Setup screens.
The Setup screens are described in the next section - see page 41.
Playing games
You can use your Viasat remote control to play games provided by Viasat.
1. To play games, press iTV.
The iTV screen displays.
2. Highlight ‘Games’, then press OK.
3. Follow the on-screen instructions.
4. When you have finished playing games, press Viasat to return to watching digital TV.
Active
Page 41

41
Setup
ENGLISH
❖ Using the Setup menus
You use the Setup menus to:
◆ control who can watch or purchase certain programmes;
◆ change your Planner settings;
◆ change your PVR recording settings;
◆ change the language and subtitle settings;
◆ change the TV settings;
◆ look at on-screen help on using your Viasat digital guide;
◆ view information about your box.
To display the System Setup menu:
1. Press iTV, then press D to highlight ‘System Setup’, and then press OK.
2. Press D or U to highlight the item you want, then press OK.
◆ While you are using any of the setup menus, you can press BACK to cancel any changes and
return to the previous menu.
◆ To cancel changes and redisplay digital satellite TV, press VIASAT.
◆ On some menus you can press the red button to reset all settings on that menu to their
factory defaults.
◆ To save changes, highlight ‘Save New Settings’ and then press OK.
❖ Using the Parental Control menu
You use the Parental Control menu to:
◆ lock channels;
◆ set viewing restrictions based on a programme’s age rating;
◆ set purchase restrictions, to control whether your PIN is needed to purchase Ticket channels;
◆ change your PIN code.
Note
If you do not have a smart card inserted in your box, you cannot use the Parental Control menu.
Page 42

42
Using your Viasat box
Setup
About your PIN code
To use the Parental Control menu, you need to enter your PIN code. When you first use your box,
your PIN code is 0000. In order to make your PIN code secret, you should change it to another
number that you find easy to remember (see below).
To display the Parental Control menu:
1. On the Setup menu, highlight ‘Parental Control’, then press OK.
You will see a message asking you to enter your PIN code.
2. Use the number buttons to enter your PIN.
If you enter the correct PIN, the Parental Control screen displays.
Locking Channels
The Locked Channel screen lets you lock certain channels. Whenever you are watching digital TV, in
order to view a locked channel, you must enter your PIN. You must also use your PIN to watch a
recording of a programme on a locked channel.
1. From the Parental Control screen, highlight ‘Locked Channel’, then press OK.
The Locked Channel screen displays.
Note
If you enter an incorrect PIN three times in a row, your PIN will be blocked for 10 minutes. You will
not be able to use any feature requiring PIN entry during that time.
Page 43

43
Setup
ENGLISH
◆ A symbol next to the channel name indicates that the channel is not locked.
◆ A symbol next to the channel name indicates that it is locked.
2. From the list of channels, use U or D to highlight a channel you want to lock or unlock, then
press L or R to select the setting you want.
3. Repeat step 2 to lock or unlock all the channels you want.
4. You can also unlock all the channels at once by pressing the yellow button. Or, you can lock all
the channels at once by pressing the blue button.
When you have finished selecting channels to lock or unlock, press BACK.
Setting viewing restrictions
The Viewing Restrictions screen lets you set an age limit, so that people who do not know the PIN
code (for example young children) cannot watch programmes that have an age category rating that
is older than the age lock level you have set.
For example, if you set this to ‘11+’, then programmes rated for viewers 11 years old or older will
be locked, and you will need to enter your PIN code to watch them. Age lock only works if the
broadcaster provides rating category information.
For more information on age rating category symbols see ‘Symbols in the channel banner and extra
information screens’ on page 20.
To set viewing restrictions:
1. On the Parental Control menu, highlight ‘Viewing Restrictions’, then press OK.
The Viewing Restrictions screen is displayed.
◆ A symbol next to the age rating category indicates that it is not restricted.
◆ A symbol next to the age rating category indicates that it is restricted.
If you restrict an age rating category, this means that whenever a programme is broadcast with that
age rating, you must enter your PIN before you can watch it. You must also use your PIN to watch a
recording of a programme with a restricted age rating category.
When you restrict an age rating category, all the age rating categories below it are automatically
restricted.
Page 44

44
Using your Viasat box
Setup
2. To restrict an age rating category, use U and D to highlight it, then press L or R to select the
symbol. To remove the restriction, press L or R to select the symbol.
3. Repeat step 2 to make all the changes you want.
4. To save your changes, highlight ‘Save New Settings’ then press OK, or to cancel, press BACK.
Setting purchase restrictions
The Purchase Restriction screen lets you choose whether or not you need to enter your PIN code
to purchase a Ticket programme.
To set purchase restrictions:
1. From the Parental Control screen, highlight ‘Purchase Restriction’, and then press OK.
The Purchase Restriction screen displays.
2. On the ‘Purchase by PIN Code’ item, press L or R to select the setting you want - ‘On’ or ‘Off ’.
If you select ‘On’, you must enter your PIN code to purchase a Ticket programme.
3. To save your changes, highlight ‘Save New Settings’ then press OK, or to cancel, press BACK.
Changing your PIN code
You can change your PIN code to another number which you find easy to remember. Please make
sure you do not forget your PIN code.
To change your PIN code:
1. From the Parental Control screen, highlight ‘Change PIN Code’ then press OK.
Notes
If you press the red button to reset all the settings, the settings will change to the standard settings.
The standard setting is that any programme broadcast with an age rating of any sort will be
restricted, but you can remove this restriction if you wish by following the steps above.
Viewing restrictions work only if the broadcaster provides classification category information. Viasat
is not responsible for channels providing incorrect age rating information.
Page 45

45
Setup
ENGLISH
The Change PIN Code screen displays.
2. Use the number buttons to enter a new 4-digit PIN code of your choice. As you enter
numbers, the dashes change to asterisks. You can press BACK once to cancel your changes. If
you press BACK a second time, the Parental Control screen redisplays.
When you have entered your new 4-digit PIN code once, the Change PIN Code screen displays
again, so you can enter it a second time to confirm the change.
3. Enter your new 4-digit PIN code again.
A message displays to confirm that your new PIN code is valid.
❖ Changing your Planner settings
You use this screen to change the display of your reminders for programmes in your Planner (see
page 30).
◆ Reminder Advanced Time is the length of time before a programme starts that its reminder
appears.
◆ Reminder Timeout is the length of time a reminder will display on screen before it disappears
automatically.
You can change your Planner settings as follows:
1. On the System Setup screen, highlight ‘Planner Settings’ and then press OK.
Page 46

46
Using your Viasat box
Setup
2. Press D or U to highlight the item you want.
3. Use L or R to select the setting you want: 30, 60 or 90 seconds.
4. To save your changes, highlight ‘Save New Settings’ then press OK, or to cancel, press BACK.
❖ Changing your PVR recording settings
You use this screen to change various settings relating to how your box records programmes, to:
◆ change the way in which your box manages your recordings, when disk space is running low;
◆ change the length of time of the Instant Rewind recording;
◆ add extra time to the start and end of recordings.
The items on the Recordings Settings menu are explained in more detail in the following sections,
starting with ‘Disk Space Management’ on page 47.
You can change your PVR settings as follows:
1. Press iTV on your remote control.
2. On the iTV screen, highlight ‘System Setup’ and then press OK.
3. On the System Setup screen, highlight ‘Recording Settings’ and then press OK.
4. Use U or D to highlight the item you want to change.
5. Use L or R to select the setting you want.
6. Repeat steps 4 and 5 until you have made all the changes you want to make.
7. To save your changes, highlight ‘Save New Settings’ then press OK, or to cancel, press BACK.
Notes
Setting up recordings for channels without programme listings is described in the Manual
Recording section, on page 37.
Page 47

47
Setup
ENGLISH
Disk Space Management
You use this item to change the way in which your box manages your recordings when disk space is
running low.
You can choose one of two settings:
◆ Automatic – recorded programmes will be deleted automatically when there is not enough
space to record new programmes.
Your box will first delete recorded programmes you have previously watched, then recorded
programmes that you have not watched.
Your box will not delete recorded programmes marked as ‘Keep’ or any Ticket programmes.
◆ Manual – recorded programmes will never be deleted automatically. Shortly before your box
runs out of disk space, a message displays to let you know.
To continue the new recording and delete the old recording(s), press OK. Or, to keep the old
recording(s), press BACK - the new recording will stop when there is no more disk space.
If you do not press any button, the old recording(s) are not deleted and the new recording will
stop when there is no more disk space.
Review buffer
This is the length of time of the recording your box automatically makes of the channel you are
currently viewing. For more information, see ‘Using Instant Rewind’ on page 22.
You can choose one of five settings: ‘Off,’ ‘5’, ‘15’, ‘30’ or ‘60’ minutes.
Add to Start of Recording / Add to End of Recording
If you wish, you can add extra time to the start and/or end of recordings. The same six settings are
available for both of these items:
◆ Automatic – 2 minutes extra recording time will be added to the scheduled start or end time
of recordings;
◆ 0, 1, 2, 5 or 10 minutes – the extra recording time that will be added to the scheduled star t
or end time of recordings.
❖ Using the System Settings
Use the System Settings menu to change the TV settings and view information about your box.
1. To use the System Settings screens, press iTV on your remote control.
2. Highlight ‘System Setup’, then press OK.
3. Highlight ‘System Settings’, then press OK.
Note
If, even after deleting previous recordings, there is still not enough disk space available for a new
recording, your box will only record part of your selected programme.
Note
If one recording immediately follows another, any extra time added to the start and/or end of
recordings may be dropped in favour of the next recording.
Page 48

48
Using your Viasat box
Setup
The System Settings screen displays on your TV.
4. To display one of the Settings screens, highlight it and press OK.
The details of each screen are described in the following sections.
Changing the Picture settings
You use the Picture Settings menu to change the following settings, to control how your box works
with your other equipment:
◆ Picture Format;
◆ Presentation Mode;
◆ Video Output;
◆ Contrast;
◆ Banner Timeout;
◆ Closed Captions.
To change the Picture Settings:
1. Press U or D to highlight the setting you want to change (for more information on the settings,
see the table overleaf).
2. Press L or R to change the setting.
3. To save your changes, highlight ‘Save New Settings’ then press OK, or to cancel, press BACK.
Page 49

49
Setup
ENGLISH
Make your choice according to the following table.
Changing the Sound settings
You use the Sound Settings menu to change the following settings:
◆ Audio Output;
◆ Audio Format;
◆ Volume;
◆ Background Music.
Item Settings Comments
Picture Format 4:3 Setting for ‘standard’ (4:3) TVs.
16:9 Setting for ‘widescreen’ (16:9) TVs.
Presentation Mode
(Setting for how
widescreen (16:9)
programmes display on
a standard (4:3) TV This setting is only
available if the picture
format has been set to
4:3)
Pan & Scan The centre por tion only of any widescreen (16:9)
transmissions will display on a standard (4:3) TV.
Letterbox The whole of any widescreen transmissions will display on a
standard (4:3) TV, but the picture does not fill the screen.
Video Output PAL If your system is connected via RF leads, you should select
this setting.
RGB If your system is connected via SCART to SCART leads, you
should select this setting for a better quality picture.
Contrast Low, Medium,
High
Select your preferred setting for the contrast of your TV
display.
Banner Timeout Off, 5 secs,
10 secs
Select your preferred setting for the length of time that the
channel banner displays on-screen when you change
channel.
Closed Captions On, Off Select whether or not you want Closed Captions to be
displayed when they are available.
Page 50

50
Using your Viasat box
Setup
To change the Sound Settings:
1. Press U or D to highlight the setting you want to change (for more information on the settings,
see the table below).
2. Press L or R to change the setting.
3. To save your changes, highlight ‘Save New Settings’ then press OK, or to cancel, press BACK.
Make your choice according to the following table.
Changing the Language & Subtitles settings
You use the Language & Subtitles menu to change the following settings:
◆ Audio Language - your first choice of language for programmes which are broadcast with more
than one audio soundtrack;
◆ Subtitles - your first choice of language for subtitles, when programmes are broadcast with
subtitles in more than one language.
Item Settings Comments
Audio Output Stereo, Mono Controls the audio output on the SCART lead.
Audio Format AC3, MPEG Controls the digital audio output from the connector
marked ‘OPTICAL AUDIO OUT’. Select AC3 if your
equipment has Dolby Digital decoding capabilities. The
setting ‘MPEG’ is for digital stereo sound. Note: Dolby Digital
is only available on some programmes. If Dolby Digital is not
available, the audio output will be digital stereo.
Volume - Controls your box’s default volume level.
Background Music On, Off Controls whether or not music will play while you look at
your Viasat Digital Guide.
Page 51

51
Setup
ENGLISH
To change the Language and Subtitle Settings:
1. Press U or D to highlight the setting you want to change.
2. Press L or R to change the setting.
3. To save your changes, highlight ‘Save New Settings’ then press OK, or to cancel, press BACK.
Viewing the box information
You can view technical information about your box.
To display the information:
1. On the System Settings menu, highlight ‘System Details’, then press OK.
2. To redisplay the System Settings menu, press BACK.
Viewing the Signal Test screen
You use the Signal Test screen to check that your box is receiving satellite signals, and check the
strength and quality of the signals.
To display the Signal Test screen:
1. On the System Settings menu, highlight ‘Signal Test’, then press OK.
The Signal Test screen displays:
The screen shows bars indicating the strength and quality of the signal being received at each
satellite input.
Page 52

52
Using your Viasat box
Setup
Your box must receive a signal strength between 49-79 dBuV, preferably above 64 dBuV. If the
signal strength is lower the picture quality is more easily affected by bad weather, such as rain,
thunder storms, etc. The signal quality should be 1.0E-7BER and the Lock Indicator should
display ‘OK’ in order to successfully find channels. See “Checking the signal” on page 16.
2. When you have finished viewing the Signal Test screen, press BACK to redisplay the System
Settings menu.
Installation Setup
You use the Installation Setup menu to change the following settings:
◆ LNB setup;
◆ Default transponder;
◆ Modem setting;
◆ RF output.
The items on the Installation Setup menu are explained in more detail in the following sections.
To access the Installation Setup menu:
1. Press iTV on your remote control.
2. Highlight ‘System Setup’, then press OK.
3. Highlight ‘System Settings’, then press OK.
4. Highlight ‘Installation Setup’, then press OK.
The Installation Setup menu displays:
Changing the LNB Setup
This is the number of LNBs available in your dish installation. Default values (shown on the image on
page 53) are already entered for this setting; under normal circumstances you do not need to change
these. If you change your satellite dish installation, you may need to change this setting so that your
box can tune to all the satellites available.
To change the LNB Setup:
1. On the Installation Setup menu, highlight ‘LNB Setup’, then press OK.
Page 53

53
Setup
ENGLISH
The LNB Setup menu displays.
2. Highlight ‘Number of LNBs’, then press L or R to select the number of LNBs you have in your
set-up.
3. Highlight ‘Low Band LO Frequency (GHz)’, then use the number buttons to enter the
appropriate frequency. If the number is below 10.000, add a leading zero (for example, 09.750).
4. Highlight ‘High Band LO Frequency (GHz)’, then use the number buttons to enter the
appropriate frequency. If the number is below 10.000, add a leading zero (for example, 09.750).
5. Highlight ‘LNB is powered by STB’, then press L or R to select either ‘On’ or ‘Off ’. The default
setting is ‘On’.
6. If you selected ‘2 LNBs’ in step 2, highlight ‘DiSEqC port A is connected to’ then press L or R
to select the correct satellite for the LNB connected to DiSEqC™ port A, either Sirius or Thor.*
7. ‘DiSEqC port B is connected to’ is set to whichever satellite was not selected in step 5
8. To save your changes, highlight ‘Save New Settings’ then press OK, or to cancel, press BACK.
9. If you have changed your LNB setup configuration must then check the signal quality (see
page 51).
You can press the red button to reset all settings on the LNB setup menu to their factory defaults.
The default values are shown on the image above.
Setting the Default Transponder
Default values (shown on the image on page 54) are already entered for this setting; under normal
circumstances you do not need to change these. If you change your satellite dish installation, you may
need to change this setting so that your box can tune to all the satellites available.
To change the Default Transponder settings:
1. On the Installation Setup menu, highlight ‘Default Transponder’, then press OK.
*DiSEqC™ is a trademark of Eutelsat.
Page 54

54
Using your Viasat box
Setup
The Default Transponder menu displays.
2. Highlight ‘Frequency (GHz)’, then use the number buttons to enter the appropriate frequency.
3. Highlight ‘Polarization’, then press L or R to select the either ‘H’ (Horizontal) or ‘V’ (Vertical).
4. Highlight ‘Symbol Rate (Kbaud)’, then use the number buttons to enter the appropriate value.
5. Highlight ‘FEC’, then press L or R to select the correct type: 1/2, 2/3, 3/4 or 5/6.
6. To save your changes, highlight ‘Save New Settings’ then press OK, or to cancel, press BACK.
7. If you have changed your Default Transponder settings you must then check the signal quality
(see page 51).
The default values for the Default Transponder menu are shown on the image above.
Changing the Modem Settings
The Modem Settings control how your box connects to Viasat via the telephone line. These settings
are made automatically when you select your country during the installation process; under normal
circumstances you do not need to change them.
To change the Modem Settings:
1. On the Installation Setup menu, highlight ‘Modem Settings’, then press OK.
The Modem menu displays.
2. Highlight ‘Telephone Dial Type’, then press L or R to select either ‘Tone’ or ‘Pulse’.
3. Highlight ‘Dialing Prefix’, then use the number buttons to enter the dialling prefix.
4. To save your changes, highlight ‘Save New Settings’ then press OK, or to cancel, press BACK.
Setting the RF output channel
The RF Output screen lets you select the RF output channel for your box.
The factory preset RF output channel is channel 38. If channel 38 is not compatible with your TV or
VCR, for example if it is already being used as your VCR’s output channel, or for a terrestrial channel,
you may find you cannot tune your equipment to your box because of interference.
You can therefore use this setting to enter a different number. You may find this easier if you
disconnect your external antenna and/or your VCR from your system while you make the changes,
but if you do so, make sure you follow all the safety advice on pages 7 to 13. You will then need to
tune any equipment that is connected to your box via an RF lead to this new channel number - see
the section on RF tuning on page 15.
Page 55

55
Setup
ENGLISH
RF channels may also be known as UHF channels.
To change the RF output channel:
1. From the Installation Setup menu, highlight ‘RF Output’, and then press OK.
The RF Outlets screen displays.
2. On the ‘RF Channel Number’ item, press L or R to select the channel you want.
To save your changes, highlight ‘Save New Settings’ then press OK, or to cancel, press BACK.
❖ Setting up your remote control for your TV
You can set up your remote control to operate the basic features of your TV. This enables you to
control your TV and your box with just one remote control.
Code search
To program your remote control to operate your television, you must first use the remote control
to find the four-digit code the corresponds to your television brand. During this code search you will
run through every available code in the remote control’s library.
To search for your television code:
1. Make sure that you television is switched on.
2. Press the TV button on your remote control and release it.
3. Press and hold down SETUP, until the red LED under the TV button blinks twice.
4. Use the number buttons to enter 9 9 1. The red LED under the TV button blinks twice.
5. Aim the remote control at your television and press S.
6. Aim the remote control at your television, and press ch + repeatedly, until your television turns
off (each time you press ch + the remote control sends a POWER (TV off) signal using the
next TV code contained in the remote control’s library).
You may have to press ch + many times (up to 150 times). The code search can take up to 15
minutes. If you skip a code, you can search through the previous code(s) by pressing ch -.
Remember to keep pointing the remote control at your television during the code search.
7. As soon as the television switches off, press SETUP to store this code. The red LED under the
TV button blinks twice.
Page 56

56
Using your Viasat box
Setup
8. Once it is set up, you can switch the remote control to operate your TV by first pressing the TV
button. To switch back to operating your box, press the VIASAT button.
Code blink out
Once you have found the correct code, you can use your remote control to perform a ‘code blink
out’ to determine what this code is.
1. Press the TV button on your remote control and release it.
2. Press and hold down SETUP, until the red LED under the TV button blinks twice.
3. Use the number buttons to enter 9 9 0. The red LED under the TV button blinks twice.
4. Press 1 and count the LED blinks.
5. Press 2 and count the LED blinks.
6. Press 3 and count the LED blinks.
7. Press 4 and count the LED blinks. Now you have found the 4-digit code.
If, during step 4, 5, 6 or 7, the LED does not blink at all, the code digit is 0.
8. For future reference, write down the code in the space provided in the remote control battery
compartment.
Using the TV code table
If, after performing a code search, your remote control still does not operate your television, you may
be using the wrong code. Try repeating the search again to locate the correct code. If this fails, you
can use the TV code table available for download from the Viasat website.
1. Download the TV code table from the Viasat website (www.viasat.se), find the brand of your
television in the TV code table and select the first 4 digit code in the list.
2. Make sure your television is fully on (not in standby), and then press the TV button on your
remote control and release it.
3. Press and hold down SETUP, until the red LED under the TV button blinks twice.
4. Use the number buttons to enter the 4-digit code for your television (the TV button will blink
twice after you have entered the fourth digit).
5. Press S to see if you are able to switch off your television.
If your television does not respond, repeat steps 1 to 5 with each code listed for your brand. If
none of the codes operate your television, or if your brand is not listed, retry the code search
described on page 55.
6. Switch your television back on by pressing a number button (or ch +) and check if all the
functions are working correctly.
7. For future reference, write down the code in the space provided in the remote control battery
compartment.
Resetting your remote control
To clear all the settings you have made to your remote control and apply the factory defaults:
1. Press and hold down SETUP, until the red LED under the TV button blinks twice.
2. Use the number buttons to enter 9 8 1. The red LED under the TV button blinks twice.
The factory default values are applied to your remote control.
Page 57

57
ENGLISH
❖ Recording a digital satellite programme
If you have a VCR you can use it to record satellite programmes from your box.
To record a satellite programme:
1. Make sure your box is switched on and tuned to the channel you wish to record.
2. Set your VCR correctly to record at the appropriate time, making sure that your VCR is set to
record its ‘channel for digital satellite TV’, or if your box is connected to your VCR via a SCART
lead, making sure your VCR is set to record its appropriate AV channel.
For further information about your VCR, refer to your VCR’s user guide.
Watching other channels while you are recording a digital satellite programme
If your equipment is connected using RF leads, as in connection methods 1 or 2, you can watch any
terrestrial channel while you record digital satellite TV, by changing channel with your TV’s remote
control. You can also watch any digital channel while you record a terrestrial channel.
However, you cannot watch one digital channel while you record a different digital channel. If you use
your box’s remote control to change channel while you are recording, your VCR will record the
channel change.
❖ Switching between digital satellite TV and terrestrial TV
If your TV automatically shows digital satellite TV whenever your box is switched on, you can use your
remote control to switch between digital satellite TV and terrestrial TV.
This is also useful if you are using your VCR, for example to record a digital channel, but you want to
watch a terrestrial channel.
◆ To switch between digital satellite TV and terrestrial TV, press the TV button on your remote
control. (Please do not press the S button - this will switch your box off.)
❖ Error messages
If there is a temporary problem with a channel you are watching, you may see an error message on
your TV screen. If this happens, you can still change channel, in the usual way, to a channel that is not
experiencing problems.
Notes
Your VCR must be correctly connected to your box. For fur ther information, see pages 9 and 10.
Some programmes are copy-protected and may not play back correctly if you record them.
While you are setting the recording up, you may wish to make sure your TV is switched to its ‘VCR
channel’ or the AV channel that you use when you are watching videos, so you can check that the
VCR is showing what you want to record.
Note
In order for this feature to work, your digital box must be connected to your TV via a SCART lead,
and your TV must also be receiving the terrestrial channels from your TV aerial. For information
about connecting up, see pages 9 to 11.
Some TVs may not allow you to use this feature.
Extra Information
Page 58

58
Using your Viasat box
Solving problems
❖ On-screen messages
If one of the following messages appears on your TV screen, make a note of the number that appears with
the message (for example, 01). If you need to call customer service for assistance, please have the number
handy so they can help you as quickly as possible.
Message Possible cause Suggested solution
Please insert your
Viasat viewing card in
the smart card slot.
For instructions
please refer to your
user manual.
There is no Viasat
viewing card in the
smart card slot in your
box.
Insert your Viasat viewing card in the smart card
slot.
Your viewing card is
invalid or inserted in
the wrong direction.
For instructions on
how to insert you
Viasat card please
refer to your user
manual.
Your box cannot
recognise your Viasat
viewing card.
Check it is the correct Viasat viewing card. Check it
is in the right way up. Check that your card is not
damaged.
If the problem continues, call customer service for
assistance.
This service is not
included in your
subscription. Please
call customer service
to purchase.
You may need to
update your
subscription, or there
may be an unexpected
problem with your
subscription.
Please call customer service to upgrade your
subscription.
Transmission error in
your smart card.
Please call customer
service to purchase.
Your smar t card has
developed a problem.
Call customer service for assistance.
Welcome to Viasat.
You need to activate
your subscription to
get access to your
channels. Please call
customer service to
activate.
Your card ID is [...]
Your STB ID is [...]
You also need your
Agreement number
available.
This is normal prior to
the smart card’s first
authorization.
To activate your subscription, call Viasat’s interactive
telephone service using the number appropriate for
your country:
Sweden 08 5620 3300
Norway 8005 3020
Denmark 7012 1151
Finland 09 4249 7700
Page 59

59
Solving problems
ENGLISH
This service is not
available in your
region.
The channel is not
available in your
region.
You cannot watch this channel. Select a different
channel to watch.
You have insufficient
credit on your smart
card. Please connect
your receiver to the
telephone line to
update your credit. It
is done automatically
at the next purchase
of a PPV event.
There is not enough
credit left on your
smart card to buy this
programme, or you
telephone line is not
correctly connected to
your box.
Check that the telephone lead between your box
and the telephone point is properly plugged in (see
page 12). Always switch your box off at the power
supply before plugging or unplugging any other
equipment.
Your credit is updated automatically at the next
purchase of a PPV event.
If the problem continues, call customer service.
You have insufficient
credit on your smart
card. Please connect
your receiver to the
telephone line to
update your credit. It
is done automatically.
There is not enough
credit left on your
smart card to buy this
programme, or you
telephone line is not
correctly connected to
your box.
Check that the telephone lead between your box
and the telephone point is properly plugged in (see
page 12). Always switch your box off at the power
supply before plugging or unplugging any other
equipment.
If the problem continues, call customer service.
You are not
authorized to watch
this channel on this
receiver. Wrong
smart card for this
receiver.
Your card ID is [...]
Your STB ID is [...]
You have more than
one Viasat box and
have inserted the
wrong smart card for
this box.
Insert the right smart card for this box.
If the problem continues, call Viasat’s interactive
telephone service using the number appropriate for
your country:
Sweden 08 5620 3300
Norway 8005 3020
Denmark 7012 1151
Finland 09 4249 7700
You cannot purchase
this event using your
receiver. Please call
customer service to
purchase this event.
A problem occurred
while you were trying
to purchase the
programme.
Please call customer service for assistance.
This card is not valid
any more. Please use
you new Viasat
viewing card.
You have inserted an
old or invalid smart
card.
Insert the your new Viasat smart card.
If the problem continues, call customer service.
It is not possible to
purchase this event.
For more info tune
to the Viasat Guide.
You cannot purchase
Ticket channels
between 8.00-10.00.
Please try again later.
Message Possible cause Suggested solution
Page 60

60
Using your Viasat box
Solving problems
Purchase not
possible.
A problem occurred
while you were trying
to purchase the
programme.
Please call customer service for assistance.
Preparation of the
new card - please
wait.
You have only just
inserted your new
Viasat smart card into
your box and your
card is still being
checked.
Initialisation and authorisation may take up to 5
minutes. Please wait.
If the problem continues, call customer service.
Inserted card is being
initialised - please
wait.
You have only just
inserted your new
Viasat smart card into
your box and your
card is still being
authorised.
Initialisation and authorisation may take up to 5
minutes. Please wait.
If the problem continues, call customer service.
Unviewable service waiting for approval.
Your box is attempting
to gain approval for
the selected service.
Wait for your box to resolve the problem; if it is not
resolved call customer service for assistance.
Please call customer
service.
An unknown error has
occurred.
Please call customer service.
Message Possible cause Suggested solution
Page 61

61
Solving problems
ENGLISH
Problem Possible cause Suggested solution
Your box doesn’t
seem to be working,
and there are no
lights on the front
panel.
Your box is not
receiving power.
Make sure that the mains lead is properly plugged in
and that the mains supply is switched on.
Check that the mains wall socket has power (try
plugging in a lamp).
Your box doesn’t
seem to be working,
and the front-panel
standby light is red.
Your box is switched
off.
Press standby on the front panel, or S on your
remote control.
Your box doesn’t
seem to be working,
and the front-panel
standby light is green.
Your box is not
correctly connected to
your other equipment,
or your other
equipment is not
correctly set up.
Check that all the connections are properly made.*
Check that your TV is plugged into the mains and
that it is switched on.
Your TV is not
switched to show
digital satellite
channels.
If your box is connected to your TV via a SCART
lead, tr y selecting the appropriate AV channel on
your TV.
If your box is connected to your TV via an RF lead
only, try selecting the appropriate ‘channel for digital
satellite TV’. If you do not have a ‘channel for digital
satellite TV’, you need to perform RF tuning (see
page 15).
Your box doesn’t
seem to be working,
and the front-panel
standby light is
orange.
There is a problem
with the satellite signal.
Check that the lead from your satellite dish is
correctly connected to your box.*
Check that your satellite dish and LNB(s) are
correctly set up and directed towards the correct
satellite(s) (see page 8).
Check that nothing is blocking your satellite dish, for
example a tree or high building.
There may be a temporary problem with the
reception, caused, for example, by bad weather; try
again later. If adverse weather conditions cause your
dish and/or LNB(s) to move, you may need to readjust them (see the information supplied with this
equipment).
❖ G
eneral Problems
f you are experiencing difficulty with your box, check the troubleshooting table below – this may provide
t
he answer you are looking for.
*Before you check connections between your equipment, make sure you disconnect all your equipment
from the mains supply. When you have finished checking and making connections, safely reconnect all the
equipment to the mains supply (see page 13).
Page 62

62
Using your Viasat box
Solving problems
You can see onscreen interference
Your TV or VCR is not
correctly tuned.
Check that your TV and VCR are correctly tuned to
your box.
For further information, refer to your TV and VCR
instruction books.
In some cases your box may need RF tuning. See
page 15 or call customer service for further
advice.
Your remote control
isn’t working.
Something is between
the remote control
and your box.
Make sure you point your remote control directly at
your box and that nothing is between it and your
box. The indicator light on your box’s front panel
should flash each time you press a remote control
button.
The batteries are flat
or inserted the wrong
way round.
Check the batteries and replace them if necessary.
You’ve forgotten
your PIN.
Call customer service for advice.
You have received a
new smart card but
you don’t know how
to activate it.
Follow the instructions on ‘Inserting your smart
card’ on page 8. The Subscription Activation screen
should appear - see the instructions on page 8.
Problem Possible cause Suggested solution
Page 63

63
ENGLISH
Due to continued product improvement, this specification may change without notice.
General
Operating voltage: 230V AC ± 15%; 50 Hz
Power consumption: 30W (max.)
Weight: 1.35kg
Dimensions (W x H x D): 390mm x 62 mm x 265mm
UHF modulator: CCIR PAL System B/G;
Ch 21 to 69 (factory setting is 38)
Operating temperature range: 0°C to +40° C
Storage temperature range: –20°C to +60°C
Rear panel connectors
MAINS INPUT: IEC 320 2-pin reversible
TELEPHONE LINE: RJ11 female
TV SCART: SCART (composite video out; RGB out)
VCR SCART: SCART (composite video in/out; RGB in)
AUDIO L + R: Phono (RCA) audio out
S-VIDEO: 4-way mini-DIN
ANTENNA IN: IEC 129-2 female
RF-1 OUT: IEC 169-2 male
RF-2 OUT: IEC 169-2 male
OPTICAL AUDIO OUT: Optical S/PDIF digital-audio out
INPUT 1 and 2: 2 x IEC 60169-24 F-type female
Specification
Page 64

64
Using your Viasat box
The Product to which this documentation relates (the “Product”) incorporates software which is owned by Pace Micro
Technology plc (or its licensors). Before using the Product please read the End-User Licence Conditions detailed below. If you
do not agree to the terms and conditions of the End-User Licence please do not proceed to use the Product – repack the Product
unused and return it to your supplier who will refund the amount you paid for it to you.
1. Definitions
The following expressions have the meanings given here:
“Pace” means Pace Micro Technology plc, being either owner of all intellectual property rights in the Software, or having the
right to grant licences for the use of the Software.
“Software” means the software applications, utilities and modules embedded within the Product.
“Product” means the equipment or appliance to which this documentation relates and which incorporates the Software.
“Viasat” means Viasat AB, being the commercial broadcaster whose broadcasts this product has been designed to receive.
2. Licence Grant, Conditions and Restrictions
(a) Pace grants you a non-exclusive, world-wide (subject to export controls), non-transferable (except as permitted by 2(b)
below), royalty free licence to use the Software upon and with the Product.
(b) You may not transfer any of your licence rights in the Software without the written consent of Pace and if consent is provided
then the Software shall only be transferred in conjunction with the transfer of the Product AND provided that the transferee
has read and agreed to accept the terms and conditions of this licence.
(c) You must ensure that the copyright, trademark and other protective notices contained in the Software are maintained and
not altered or removed and that all such notices are reproduced and included in any copy of the Software.
(d) The Software provided hereunder is copyrighted and licensed (not sold). Pace especially does not transfer title or any
ownership rights in the Software to you. The Software provided hereunder may contain or be derived from portions of
materials provided to Pace under licence by a third party supplier.
(e) Except as authorised above or expressly permitted by statute you may not: use the Software in conjunction with any other
computer hardware other than the Product; copy all or part of the Software; incorporate all (or any of) the Software into
other programs developed by (or on behalf of) you and/or used by you; reverse engineer, decompile or disassemble the
Software; make the Software available, or permit its redistribution, for use with any other computer hardware than the
Product; rent, lease, gift, loan, sell, distribute or transfer possession of the Software in whole or in part.
(f) You will grant to Pace and/or Viasat, access to your Pace/Viasat digital decoder product, to enable Pace and/or Viasat to
upgrade, service and otherwise adapt the Software in such decoder, by (for example) remote downloading of updated
Software.
3. Termination
This licence is effective until terminated. You may terminate the licence by destroying the Software (and all copies thereof).
This licence will terminate automatically without notice if you fail to comply with any of its provisions. Upon termination you
must destroy the Software (and all copies thereof).
4. Disclaimer
(a) The Software is (to the extent permitted by law) supplied “as is” and Pace and its suppliers expressly exclude all warranties,
express or implied, including (but not limited to) warranties of satisfactory quality, fitness for purpose and non-infringement
(save to the extent that the same are not capable of exclusion at law).
(b) In no circumstances will Pace be liable for any direct, indirect, consequential, or incidental damage (including loss of profits,
business interruption, loss of data or the cost of procurement of substitute goods, technology or services) arising out of the
use or the inability to use the Software (save to the extent that such liability is not capable of exclusion at law).
5. General
(a) This End User Licence will be governed by the laws of Sweden and the User may only bring claims in the Swedish Courts
and Pace shall be entitled to bring a claim in the courts of any jurisdiction.
(b) The above terms and conditions supersede any prior agreement, oral or written, between you and Pace relating to the
Software.
End User Licence Terms
 Loading...