

Page 1
Ethernet Crossover cable, or
straight cable through a hub.
Ethernet address 00.A0.94.00.7B.EA
100-240V60Hz/50Hz
2.0A/1.0A
ViaSat
Made in USA
4356 Communications Drive
Norcross, GA 30093
P/N:CL0005472-01
Rev: C Tracking ID: 2036847
S/N: SN32538
Eth Addr: 00.A0.94.00.7B.EA
RX IN
10/100 BASE-T
AUX ODU PWR
TX OUT
+
24VDC 4A
To
Power
Source
To LNBTo
Ethernet
To
External
Power
Supply
(if used)
To
BUC
External Power
Supply (if used)
L
i
nk
S
t
ar
™
P
W
R
A
L
M
C
O
U
S
A
T
Power
Cord
Antenna
and Mount
LNB
(Typical)
RCST
Tx and Rx
IFL Cable
BUC
(Typical)
Ethernet Cable
(not supplied)
L
i
n
k
S
t
a
r
™
P
W
R
A
L
M
C
O
U
S
A
T
LinkStar RCST Installation
Guide (not supplied)
RCST Rack Mounting
Brackets (optional)
LinkStar RCST QuickStart
Guide
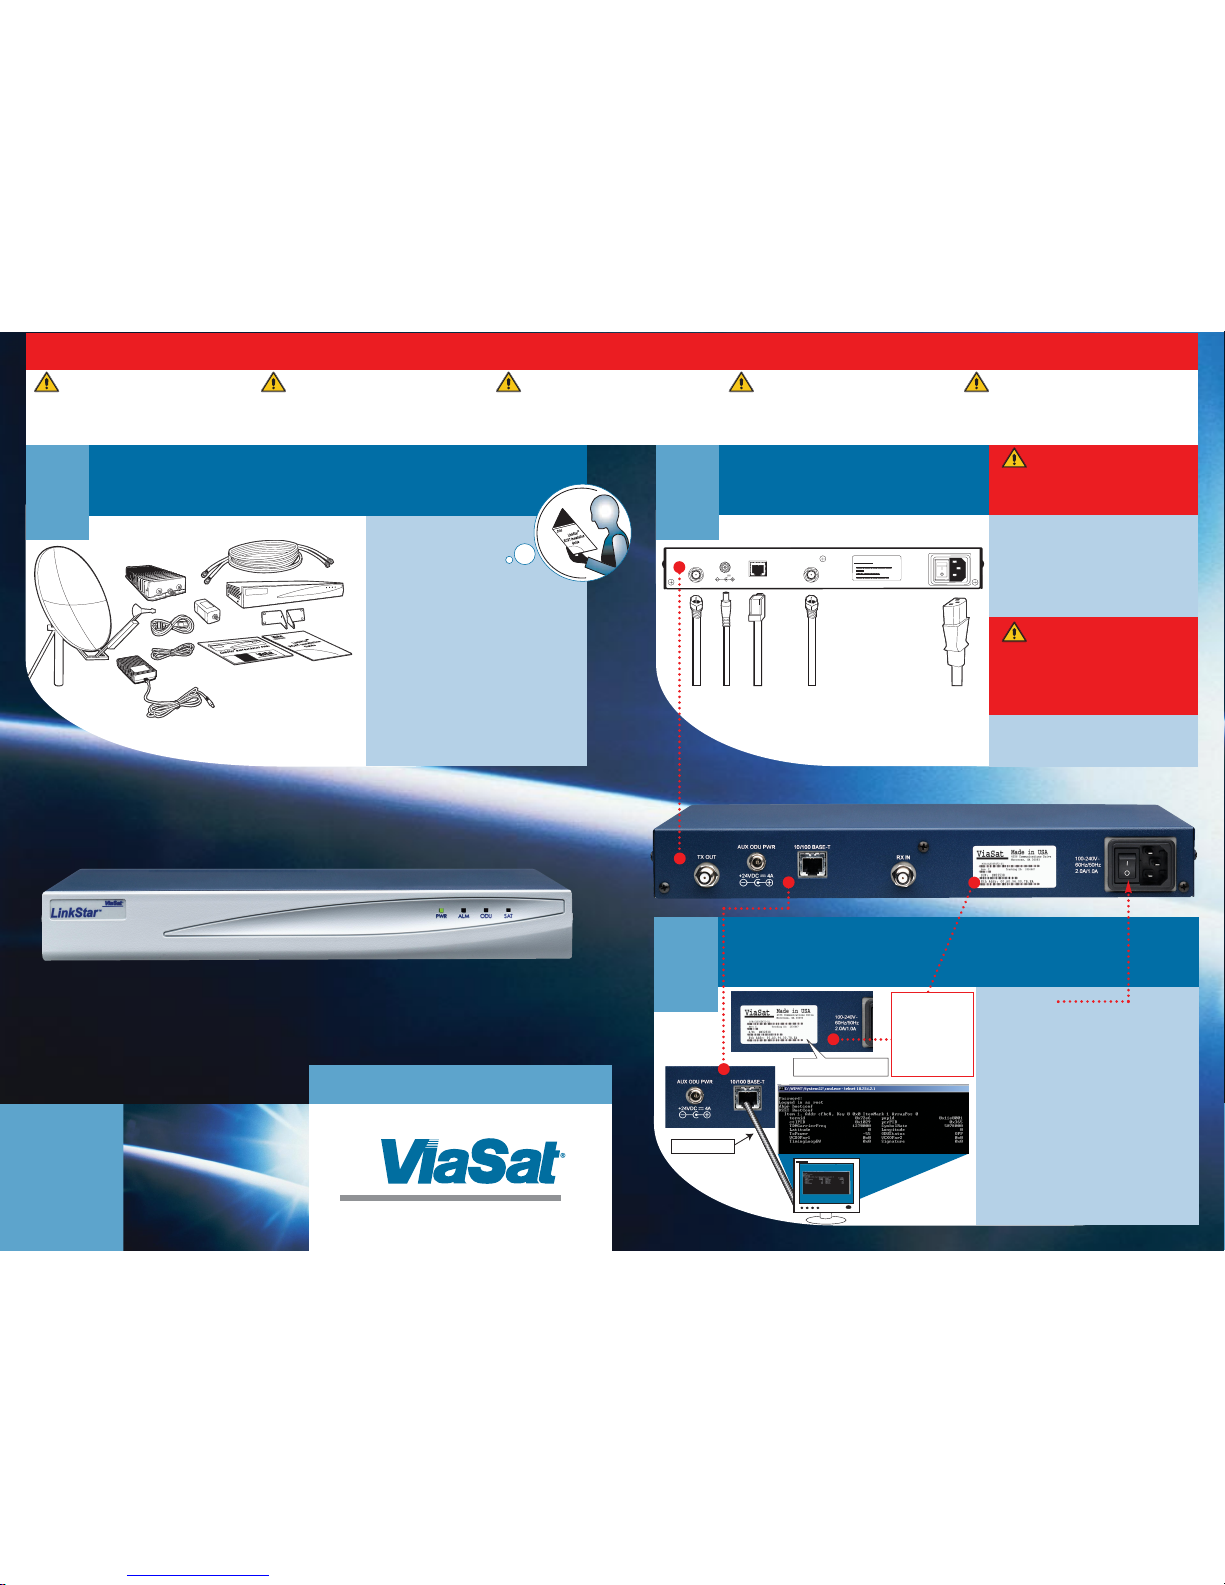
1a.
Verify all equipment has been received
and is of the correct type. (Refer to
Section 4, LinkStar Remote Site
Components, and Section 6, IFL
Requirements, of the
LinkStar RCST
Installation Guide
):
• Antenna
• Antenna Mount
• BUC
• External Power Supply (if used)
• LNB
• Return Channel Satellite Terminal (RCST)
• RCST Rack Mounting Brackets (optional)
• Tx/Rx IFL Cable(s)
Required Items (Not supplied with RCST):
•
LinkStar RCST Installation Guide (one per installation
team; also available at www.viasat.com/skynet)
• Ethernet Cable (Crossover or Straight, if using hub)
•Windows
®
PC
?
LinkStar
™
RCST QuickStart Guide
1. Inventory
INSTALLATION WARNINGS
2a.
Install the RCST on a table top or in a rack.
DO NOT block the side air vents or the unit will
overheat.
2b.
Make sure power is OFF to RCST (and to External
Power Supply, if used).
2c.
Install antenna, LNB, BUC (and External Power
Supply, if used).
2d.
Connect the Rx IFL cable from the LNB to the RCST
Rx In, using the unlabeled cable of the Siamese
cable pair.
3. RCST Setup
3a.
Power ON RCST.
3b.
Connect crossover cable (or straight cable through a hub)
to 10/100 base-T port. Telnet to the RCST default IP
address (see note at the left).
3c.
Set boot parameters with
save
command:
save -t (Tx power (1/2 dB steps)) -c (control PID)
-f (TDM carrier (in KHz)) -pcr (PCR PID)
-pop (population ID) -o (ODU status)
-s (symbol rate)
Example:
save -t -60 -c 0x1029 -f 125000 -pcr 0x365
-pop Ox11e0004 -o 2 -s 27500000
ODU status parameters
-o
1 If the RCST will power the BUC.
-o
2 If using an External Power Supply.
3d.
Enter
dbpr bootconf
to check parameters.
3e.
Enter hwto reboot terminal.
CAUTION!!
TO AVOID DAMAGING THE UNIT
DO NOT short center pin of RCST Rx connector or center pin
of Rx IFL cable to ground.
DO NOT connect the Tx IFL cable to the BUC until receive
synchronization is established.
Always power off the RCST (and External
Power Supply if used) whenever connecting
or disconnecting IFL cables. Failure to do so
can result in damage to the RCST power supply.
Do not connect the transmit IFL to the RCST
receive IF port. The BUC will pull excessive
current and damage the power supply. Obtain
receive synchronization before connecting
the transmit IFL cable to the BUC.
Do not short the center pin of the receive
IF connector or receive IFL cable to ground.
This will cause excessive current and will
damage both the power supply and the RCST.
If an External Power Supply is installed with
the RCST, ensure the RCST boot parameter is
set for "External." If this boot parameter is
not set correctly, the internal power supply
could fail after a few hours of operation due
to excessive current drain.
Verify IFL cable type, length, and need for
External Power Supply as defined in the
Linkstar RCST Installation Guide, Section 6,
IFL Requirements. Failure to comply with these
requirements can cause the RCST power supply
to fail or shorten the life of the supply.
2. Installation
W ARNING!!
Before connecting or disconnecting any IFL cables,
the power to the RCST and External Power
Supply MUST BE TURNED OFF.
Note: The default IP address
is always 10.0 plus the last two
hex octets converted to decimal.
In this example, 7B.EA hex
converted to decimal is 123.234,
therefore this RCST’s default IP
address is 10.0.123.234. The
subnet is 255.255.255.0.
Page 2
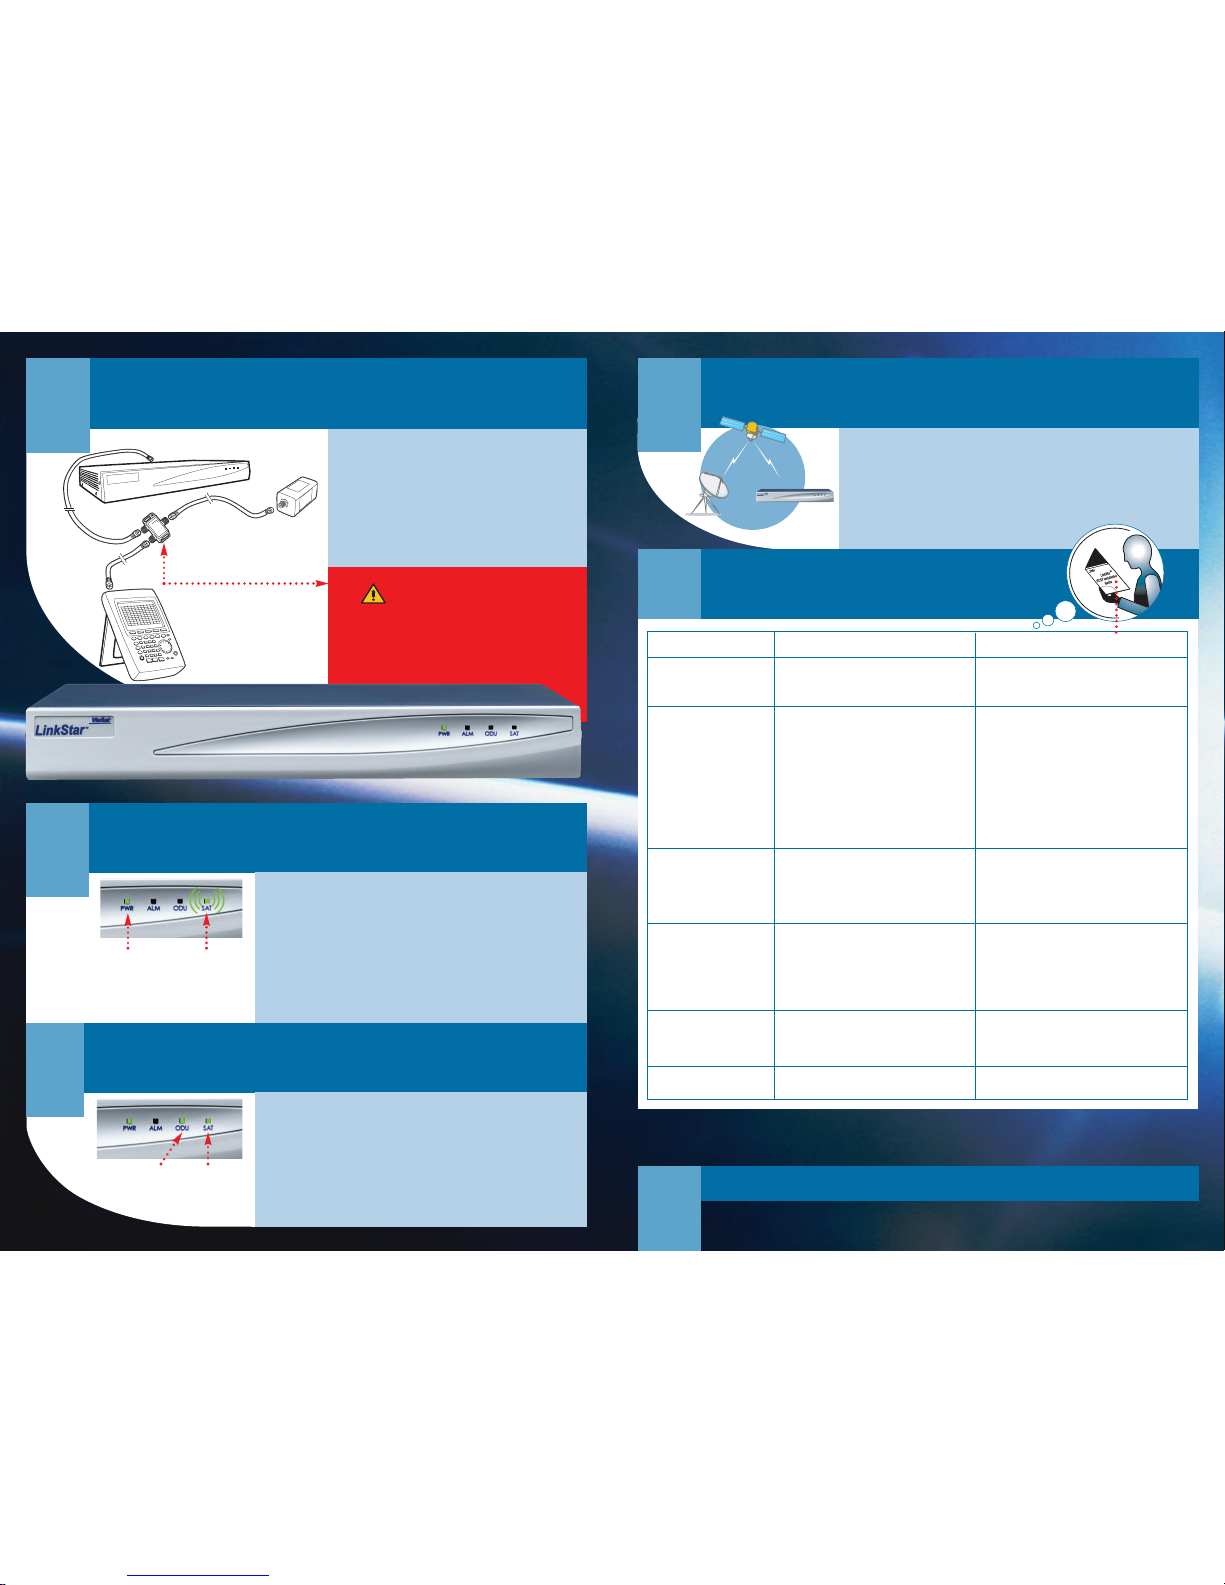
INPUT
OUT
OUT
DC PASS
L
i
nkS
ta
r
™
P
W
R
A
L
M
C
O
U
S
A
T
LNB
2-way splitter
with one DC pass
Spectrum Analyzer
RCST
Connect IFL cable to RF IN
on spectrum analyzer
or peaking meter
L-band
950-1750 MHz
Connect IFL cable to RX IN
on rear of RCST
4. Antenna Pointing
5. Receive Synchronization
5a.
Turn OFF power to RCST (and unplug External Power Supply, if used).
5b.
Disconnect cables from spectrum analyzer and DC block/splitter.
5c.
Connect the Rx IFL cable from the LNB to the RCST Rx In. DO NOT connect the Tx IFL
cable from the BUC to Tx Out.
5d.
Turn ON power to RCST (and plug in power cord for External Power Supply, if used).
5e.
Check SAT LED:
Blinking slowly indicates Rx sync.
Blinking quickly indicates NCR sync (1.0.8 and later). If Rx sync is not acquired,
refer to Troubleshooting, Item B in this QuickStart Guide.
6. Transmit Synchronization
6a.
Turn OFF power to RCST (and unplug the External Power Supply, if used).
6b.
Connect Tx IFL cable from BUC to RCST Tx Out.
6c.
Turn ON power to RCST. ODU LED should be steady ON. After 5 minutes, SAT LED
should be steady ON to indicate Tx sync. If SAT LED is OFF or blinking, refer to
Troubleshooting, Item D in this QuickStart Guide.
Verify ODU LED
is ON Green,
indicating ODU
Power
Verify SAT LED
is ON Green,
indicating transmit
synchronization
Verify PWR
LED is ON
Verify SAT LED is
blinking Green,
indicating receive/NCR
synchronization
7. Final Check
7a.
Contact the Hub operator to verify:
- RCST status (
ps, tcmp
commands).
- Ping from Hub to RCST.
- Software version (
Imep
command).
7b.
If the ping fails,
refer to Troubleshooting, Item F in this QuickStart Guide.
If the ping was successful, congratulations! You have
installed your RCST!
How to Contact Us
e-mail
noc-support@viasat.com
web
www.viasat.com/skynet
CAUTION!!
DC VOLTAGE IS PRESENT ON THE IFL CABLES
To prevent damage to the spectrum analyzer, be sure to use
a splitter that blocks the DC to the spectrum analyzer.
Reorder Information:
Item No. 1004772 Rev.001
HUB
4a.
Power OFF RCST (and External Power Supply, if used).
4b.
Connect cables, spectrum analyzer (or peaking meter), and
DC block/splitter, as shown.
4c.
Turn ON power to RCST (and plug in External Power Supply, if used).
4d.
Point antenna to elevation and azimuth specified for satellite.
4e. Perform azimuth sweeps at different elevations until satellite beacon is
found. Call the satellite operator to verify the polarization adjustment.
If satellite beacon is not found, refer to Troubleshooting, Item B in this
QuickStart Guide.
24/7 customer support
+1 (888)272-7232 (U.S.)
+1 (760)476-2600 (Outside U.S.)
Troubleshooting
Problem Things You Should Check For more detail, refer to the LinkStar RCST
Installation Guide (Item No. ING00076)
, Section...
A. RCST does not power on
B. No Receive Synchronization
C. High Receive BER
D. No Transmit Synchronization
E. High RCST Transmit BER
F. No IP Traffic
1. AC power wired to 110/220 VAC.
2. Blown fuse.
3. Bad AC power cable.
If the RCST still does not power ON, replace the RCST.
1. Boot parameters:
• TDM frequency.
• TDM symbol rate.
2. IFL cable connectors.
3. Receive IFL cable type, length.
4. LNB frequency.
5. TDM signal level.
6. Noise level.
7. Interfering signal.
8. Obstructions.
9. Antenna polarization.
10. Antenna pointing.
1. Weather conditions.
2. TDM signal level.
3. Cable attenuation.
4. Antenna polarization.
5. Antenna pointing.
6. Interference.
1. Boot parameters:
• Terminal ID.
• Population ID.
• Control PID.
• Tx power.
2. Transmit IFL Cable type, length.
3. BUC output power.
1. Weather conditions.
2. TDMA signal level at GCU.
3. BUC output power.
4. Antenna polarization.
1. Allocated bandwidth.
2. IP Status.
(SAT LED is not blinking.)
(LED is not solid
steady green.)
13.3 RCST Power ON Failure
“
“
13.5.5
TDM Frequency and Symbol Rate
“
“
13.5.3
Receive IFL Cable
“
13.5.2
LNB
13.5.1 Receive TDM Signal
13.5.4 Antenna
“
“
“
“
13.6
Receive TDM BER
“
“
“
“
“
13.7.2
RCST Boot Parameters
“
“
“
“
13.7.4
TDMA Transmit Level
“
13.8
RCST Transmit BER
“
“
“
13.9
Traffic Test
“
?
© 2003 ViaSat, Inc. All rights reserved.
LinkStar
™
is a trademark of ViaSat, Inc.
ViaSat Proprietary.
No part of this document may be reproduced or transmitted in any form or by any means,
electronic or mechanical, for any purpose, without the express written permission of ViaSat, Inc.
 Loading...