

Page 1

Instruction Manual
MODEL . CUC—25PM
VIANTE PASTA MAKER
VIANTE HOME PRODUCT COMPANY
SUFFERN,NY 10901
WWW.VIANTEUSA.COM
Page 2

1
Viante is very safety conscious.
We ask that you exercise a degree of care when using any electrial appliance and adhere to the following
precautions:
IMPORTANT SAFEGUARDS FOR YOUR VIANTE PASTA MAKER
Carefully read all instructions before operating
the Pasta Maker and save for future reference.
Remove and safely discard any packaging
material and promotional labels before using
the Pasta Maker for the first time.
To eliminate a choking hazard for young
children, remove and safely discard the
protective cover fitted over the pins of the
power plug when unpacking this Pasta
Maker for the first time.
Do not place the Pasta Maker near the
edge of a bench top, counter or table during
operation. Ensure the surface is level, clean
and free of water, flour and other substances.
Do not place this Pasta Maker on or near a
hot gas or electric burner, or where it could
touch a heated oven.
Do not place any part of the Pasta Maker in
a gas, electric or microwave oven or on a hot
gas or electric burner.
The Pasta Maker is not intended to be
operated by means of an external timer or
separate remote control system.
Do not use the Pasta Maker on a sink drain
board
Do not leave the Pasta Maker unattended
when in use.
Do not attempt to operate the Pasta Maker
by any method other than those described in
this booklet.
Always ensure the Pasta Maker is
completely assembled before operating. The
Pasta Maker will not operate unless properly
assembled.
Do not use attachments other than those
provided with the Pasta Maker.
•
•
•
•
•
•
•
•
•
•
•
•
Ensure the on/off switch has been pressed
to the off position, and the Pasta Maker
is switched off at the power outlet and
unplugged before assembling.
Vibration during operation may cause the
Pasta Maker to move.
Do not push food into the extrusion chamber
with your fingers or other utensils.
Do not place hands, fingers or utensils in the
mixing bin of the Pasta Maker unless the
motor and mixing paddle have come to a
complete stop. Ensure the ON/OFF switch has
been pressed to off and the Pasta Maker
is switched off at the power outlet and
unplugged before removing the mixing bin lid
from the mixing bin.
Ensure the motor and the mixing paddle have
completely stopped before disassembling.
Ensure the ON/OFF switch has been pressed
to off and the appliance is switched off at the
power outlet and unplugged when not in use,
if left unattended and before disassembling,
cleaning or storing.
Do not move the Pasta Maker while in
operation.
Do not remove the mixing chamber from the
motor base whilst in operation.
Ensure care is taken when emptying the
mixing chamber and cleaning the mixing
chamber.
Do not use harsh abrasive or caustic cleaners
when cleaning this Pasta Maker.
•
•
•
•
•
•
•
•
•
•
Page 3

2
CAUTION : ENSURE THAT PASTA MAKER IS SWITCHED OFF BEFORE REMOV ING IT FROM THE
MOTOR BASE .
CAUTION : SWITC H OFF THE PASTA MAKER AND DISCONNECT FROM POWER SUPP L Y BEFORE
CHANGING ACCESSORIES OR APPROAC HING PARTS THAT MOV E IN USE.
IMPORTANT SAFEGUARDS FOR ALL ELECTRICAL APPLIANCES
Fully unwind the power cord before use.
Do not let the power cord hang over the edge
of a table counter, touch hot surfaces or
become knotted.
To protect against electric shock do not
immerse power cord, power plug or motor
base in water or any other liquid
This appliance is not intended for use by
persons (including children) with reduced
physical, sensory or mental capabilities, or
lack of experience and knowledge, unless
they have been given supervision or
instruction concerning use of the appliance by
a person responsible for their safety.
Children should be supervised to ensure they
do not play with the appliance.
It is recommended to regularly inspect the
appliance. Do not use the appliance if power
cord, power plug or appliance becomes
damaged in any way. Return the entire
appliance to the nearest authorised Viante
Service Centre for examination and/or repair.
•
•
•
•
•
•
This appliance is for household use only. Do
not use this appliance for anything other than
its intended use. Do not use in moving
vehicles or boats. Do not use outdoors. Misuse
may cause injury.
During the mixing process, ingredients may stick
to the sides of the mixing chamber. To free sticky
ingredients from sticking, press the ON/OFF
switch to the ‘ OFF’ position and switch the
power ‘OFF’ at the power outlet. Unplug the
power cord. Remove mixing chamber lid and
use a plastic spatula to scrape down the sides
of the mixing chamber. Replace lid before
recommencing mixing.
If the mixing paddle become stuck, immediately
press the ON/OFF switch to the ‘ OFF’ position
and switch the power ‘ OFF’ at the power outlet
and unplug the power cord. Remove the lid and
use a plastic spatula to dislodge the food from
mixing paddle. Replace lid before
recommencing mixing.
•
Page 4

3
Learn About Your Viante Pasta Maker
Pasta cutting knife
Disc cleaning accessory
Transparent viewing window
Pasta discs
Built-in removable measuring spoon
10 discs
DISCO TIPO DE PASTA
LINGUNIE
FETTUCCINE
TAGLIATELLE
VERMICELLI
SPAGHETTINI
SPAGHETTI
ZITI
RIGATONI
LASAGNETTE
BISCOTTI
Page 5

4
Disc holder - holds the pasta disc in
place. Turn clockwise to tighten and
counter clockwise to remove
Learn About Your Viante Pasta Maker
Mixing chamber lid
Mixing chamber - removable
Paddle mixes the dough
Steel rod - inserted into the mixing
paddle
Spiral extruding rod - pushes dough
through the extrusion chamber
Extrusion chamber - dough enters
this chamber once it has reached
the correct consistency and the
slider has been pulled
Slider - keeps dough in the mixing
chamber until ready to extrude
Page 6

5
It isrecommended to begin by using a basic
pasta recipe first to master the pasta making
techniques.
Important due to the levelsof moisture content
in different brands of flour,
it may be necessary to either add or subtract
water from the quantity indicated in the recipe.
Your first use
Wash the mixing chamber, chamber lid, pasta
discs, mixing paddle, spiral extruding rod, disc
holder, steel rod, cleaning tool, knife, measuring
spoon and slider in warm, soapy water.
Rinse and dry thoroughly
Step 1
Place the Pasta maker on a dry, level work
surface.
Step 2
Insert the indented end of the mixing paddle into
the front end of the mixing chamber.
Push the opposite end onto the back opening of
the mixing chamber so that it sits into place.
Insert the thin end of the steel rod into the
opening of the mixing paddle. Push the steel rod
through until it is fully inserted. You may need
to rotate the steel rod slightly in order for it to fit
into place.
Step 3
Guide the mixing chamber into the motor base.
Align the steel rod and the clear arrow to the
hole at the rear of the motor base.
Twist and slightly lift the mixing paddle until
it fits comfortably into the slot. Once correctly
inserted, it will “click” into place.
Page 7

6
Step 4 - The spiral extruding rod
Fully insert the steel end of the spiral extruding
rod into the opening of the extruding chamber
and twist it into place.
When inserted correctly, the spiral extruding
rod should not be sticking out of the extruding
chamber.
Note:
Note:
Note:
Note
Note
Step 5 - The pasta disc
Select your desired pasta disc and position the
disc on the opening of the extrusion chamber so
that the grooves of the disc fit comfortably on
the three tabs of the extrusion chamber.
Pasta disc will sit firmly in position on the
opening of the extrusion chamber when inserted
correctly.
Secure the disc holder over the opening of
the extrusion chamber by tightening it in a
clockwise direction.
Be careful not to over tighten the disc holder.
Step 6 – The slider
Insert the slider (rectangular opening side first)
into the slot on the side of the motor base.
Fully push the slider all the way into the motor
base. The slider is now in the ‘mixing position’
as labelled on the slider.
Step 7 – Adding ingredients
Insert the power plug into a 230/240 volt power
outlet and switch the power outlet on.
Ensure the switch on the motor body is in the
‘OFF’ position before turning the power on at the
outlet.
Add flour, egg, oil and/or flavourings (with the
exception of water) (using Basic recipe steps 1
and 2). Ensure slider is fully inserted and in the
‘MIXING’ position.
Water should not be added until the mixing
process has started and the egg and oil are well
combined.
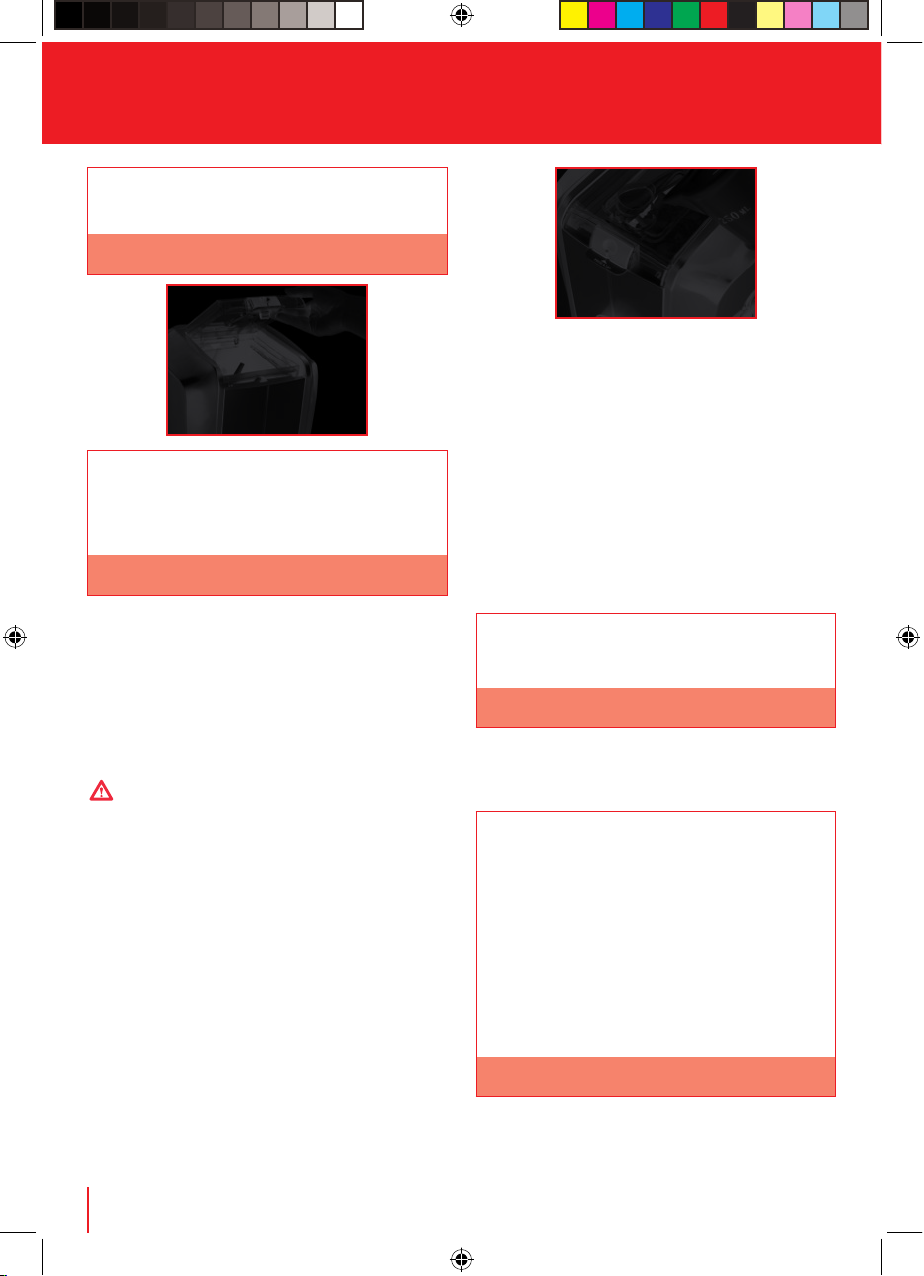
Step 8 - The mixing chamber lid
Ensure the removable measuring spoon is in
position.
Insert the chamber lid by tilting it into the slots
on the chamber lock. Lock the lid by pushing it
down. The lid will ‘click’ into place.
Page 8
7
Measuring spoon can be inserted into the lid at
any stage of the assembly process.
Note:
Note
Note
Note:
The Pasta Maker has a safety feature so that
the appliance will not work unless the mixing
chamber and lid have been securely locked into
position.
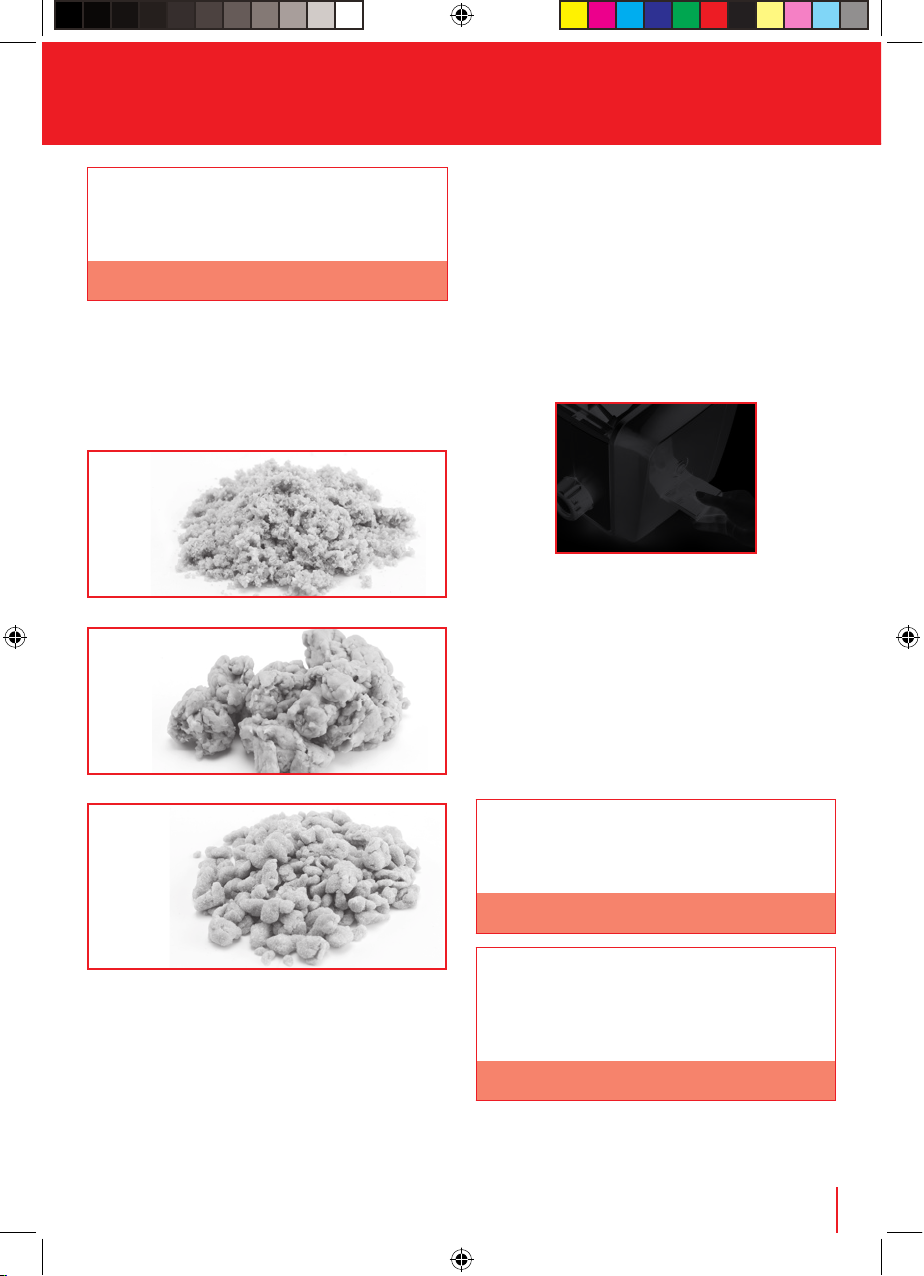
Step 9 - Adding water
Ensure the mixing chamber lid is locked in
position and the power outlet is switched on.
Switch the power ‘ON’ using the ON/OFF
switch to start the mixing process. Mix for
approximately 1 minute.
WARNING: THE MIXING PADDLES TURN
EXTREMELY FAST. DO NOT PLACE YOUR HANDS
INTO THE MI XING CHAMBER UNTIL THE MIXING
PADDLE HAS COMPLETELY STOPPED MOVING.
Remove the measuring spoon and add water
in a slow steady stream using the quantity
required in your recipe (see recipe section of
this booklet).
Do not add all of the water. Hold about 20% of
the water in reserve.
When adding water to the flour mixture, pour
water along the entire length of the opening in
the lid. This ensures that the water is distributed
evenly.
Be sure to replace the removable measuring
spoon when you are finished adding ingredients
to the mixing chamber. This will prevent
ingredients from escaping.
Suggestion : To prevent ingredients from escaping
the mixing chamber while adding water,
partially cover the opening with the
measuring spoon.
Not all water may need to be added due to
varying moisture contents in different flours. Be
careful not to add too much water.
Allow the Pasta Maker to mix and knead the
dough for approximately 3 minutes or until the
dough resembles small “pea sized” pieces.
It is important to add extra water to the mixing
bin slowly so that the correct dough consistency
can be achieved. If too much water is added, the
dough will begin to stick into a large mass. If
this occurs turn the Pasta Maker to the ‘ OFF’
position and push the slider into the closed
position so flour cannot enter the chamber. Break
the dough up into small pieces, sprinkle it with a
little flour and allow the Pasta Maker to re-mix
and knead until it resembles the required “pea
sized” pieces of dough (see trouble shooting
page 14).
Using Your Pasta Maker
Page 9
8
Using Your Pasta Maker
If flour accidentally gets into the extrusion
chamber, remove the mixing chamber from the
motor body and clear the extruding chamber
using a soft dry cloth and or a pastry brush.
Note:
Note
Note
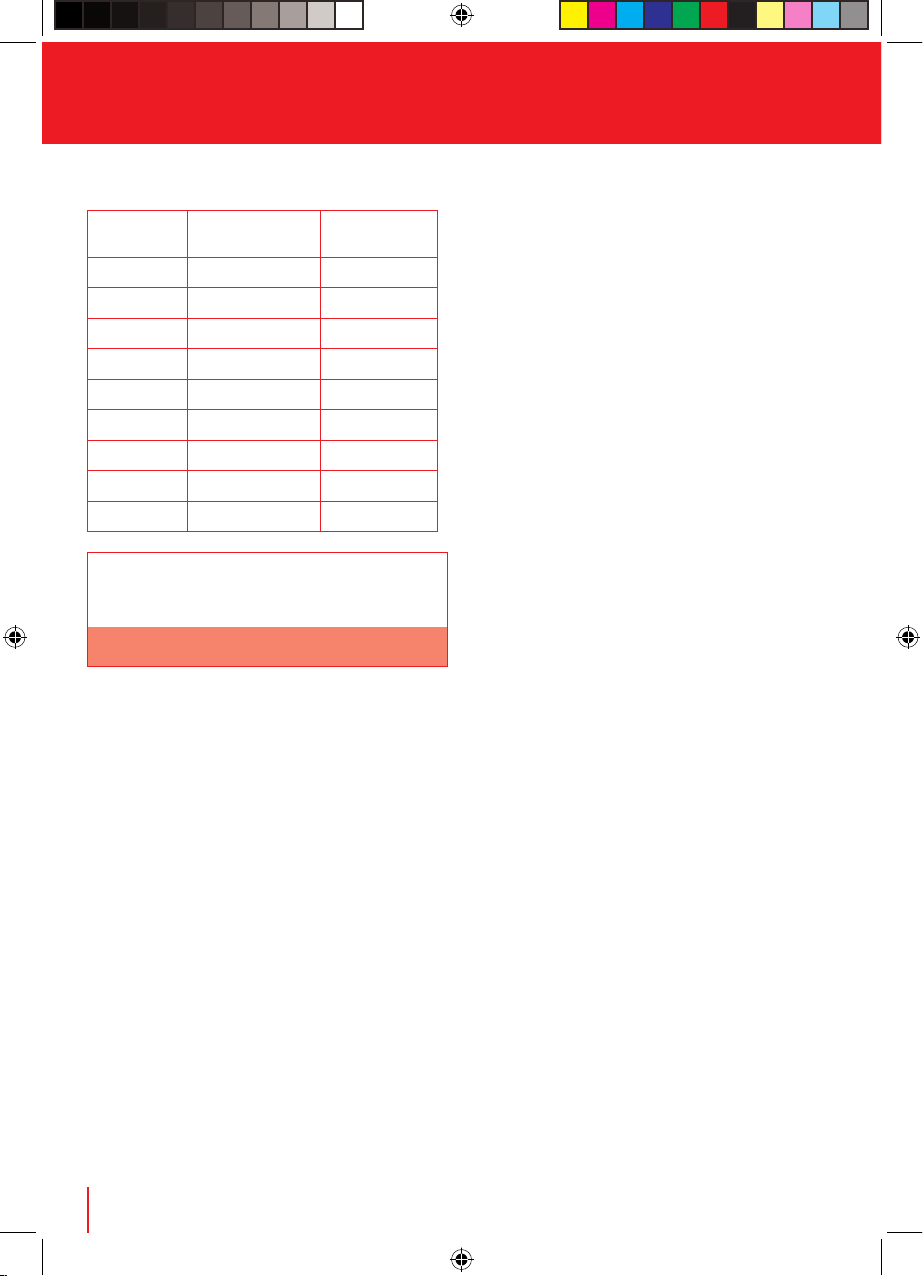
Suggestion: If the pasta dough is too dry and not
resembling small “pea sized” pieces of
dough, simply add a little bit of water
until the correct consistency is achieved
(see trouble shooting page 14).
DRY
WET
CORRECT
“PEA SIZE”
Step 10 - Extruding Pasta
Once the dough has reached the correct
consistency, you can begin extruding pasta.
Suggestion: Adding one or two teaspoons of flour
prior and during extruding will help
maintain the “pea size” dough pieces
required for the correct pasta dough
consistency. When adding flour to the
mixing chamber always ensure the
slider is in the ’mixing’/fully closed
position.
Pull out the slider from the motor base to the
‘extruding’ position.
The Pasta Maker should begin extruding
pasta within approximately 1 minute. Continue
to extrude the pasta and cut it to the desired
length’s with the included plastic knife.
Suggestion: To prevent pasta from sticking,
immediately sprinkle a little flour on
the pasta as it extrudes and ensure the
fresh pasta is placed on a well floured
surface.
Ensure the slider always stays in the extruding/
open position during operation. If the slider
closes, reposition it back into the extruding
position.
The dough mixing and extruding process should
take approximately 30 minutes for each batch.
To avoid the Pasta Maker overheating, wait
approximately 15 minutes before starting
a new batch.
Page 10
9
Using Your Pasta Maker
Cooking and Extruding Times - Guide Only
Pasta Extruding time
(serves 4)
Cooking time
Linguine 20mins 4-5mins
Fettucine 20mins 4-5mins
Lasagnette 16mins 5-6mins
Spaghetti 16mins 4-5mins
Spaghettini 20mins 4-5mins
Vermicelli 18mins 4mins
Rigatoni 30mins 4mins
Ziti 20mins 5-6mins
Biscotti 25mins 8mins
The above extruding times are for four full sized
serves of pasta. Extruding time will be halved if
only 2 serves are required.
Note:
Page 11
10
Dismantling Instruction
Step 1 - Unlocking and removing the
lid
Ensure the switch on the motor base is in the ‘off
‘position before switching the power off at the
power outlet and disassembling the appliance.
To unlock the lid of the mixing chamber, place
one hand on the rear of the motor base as
support. Use your thumb on your other hand to
push the indent of the mixing chamber lid lock.
While pushing in, lift the chamber lock ‘UP’.
Remove the lid from the mixing chamber.
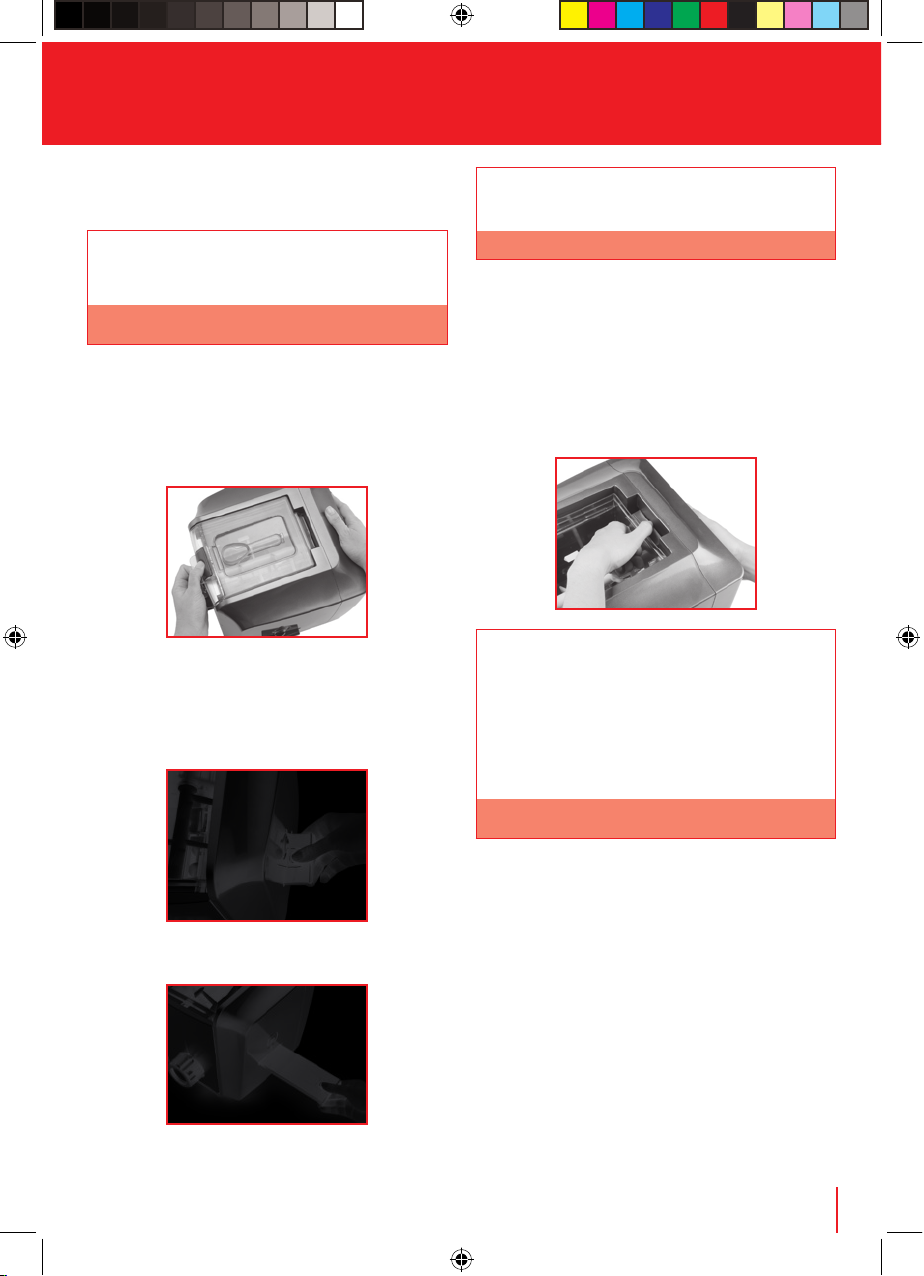
Step 2 - Removing the slider
To completely remove the slider from the Pasta
Maker, pull the slider out until the release
button is exposed.
Once the release button is exposed, press down
on the release button while pulling the slider out.
The mixing chamber will not be able to be
removed unless the slider has been removed
first.
Step 3 - Disassembling the mixing
chamber
To remove the mixing chamber, press down on
the mixing chamber release button.
While pressing the mixing chamber release
button, pull the mixing chamber out of the motor
base.
During the extruding process, the mixing
chamber may move forward from the motor base
due to the force of the pasta dough pressing
against the pasta disc. If this happens push the
mixing chamber back into the motor body and
then press the mixing chamber release button
to remove the mixing chamber from the motor
base.
Remove the steel rod from inside the mixing
paddle.
Lift the mixing paddle out of the mixing chamber
by pulling it up.
Page 12
11
Dismantling Your Pasta Maker
Step 4 - Extruding chamber
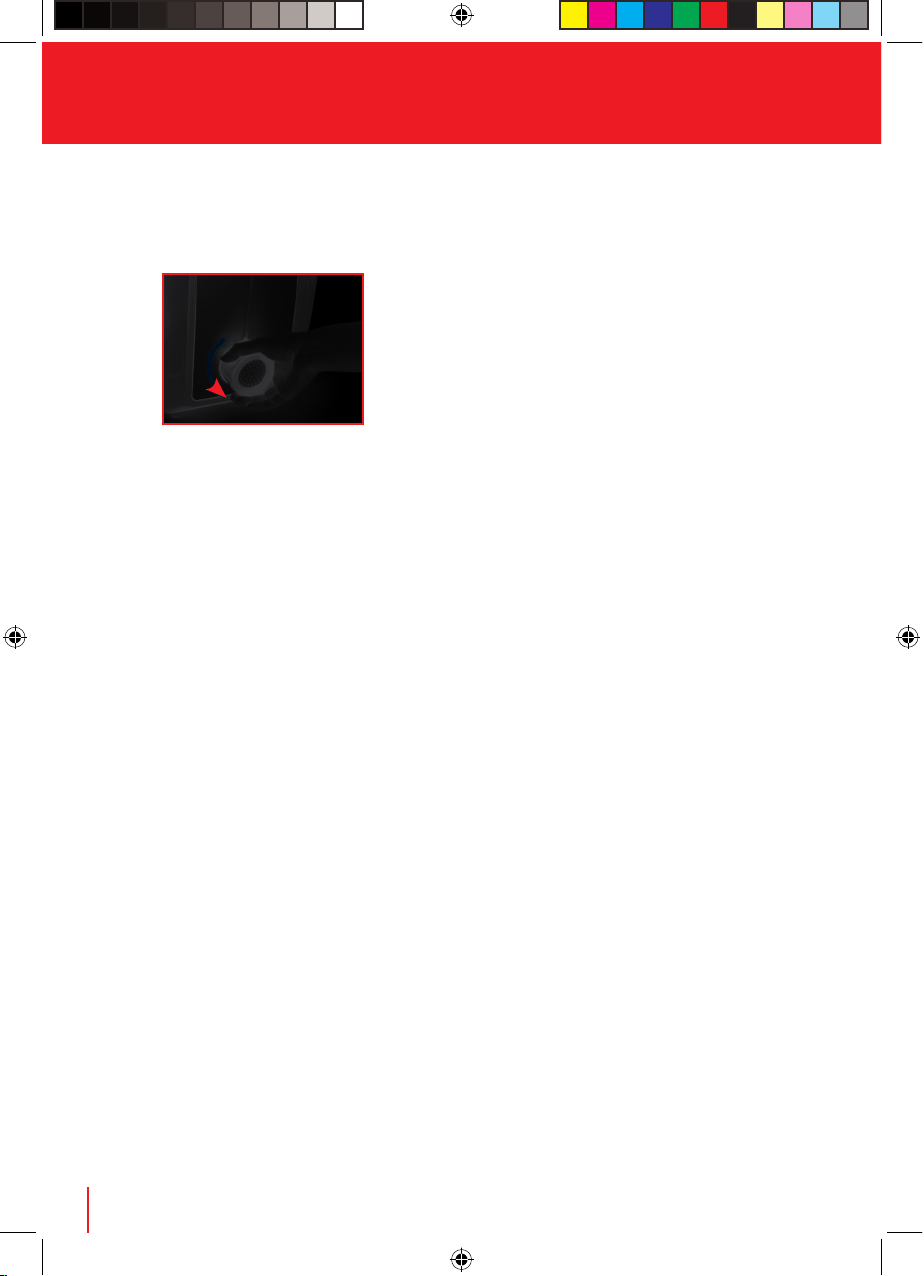
Using your hand, unscrew the disc holder by
turning it in a counter clockwise motion until it
is fully removed.
Remove the pasta disc and pull the spiral
extruding rod from the extrusion chamber.
Ensure the ON/OFF switch is in the ‘OFF’
position and the power has been turned off at
the power outlet.
Page 13
12
How To Clean & Care
Cleaning the motor base
Wipe the motor base with a clean, damp cloth
after each use. Dry thoroughly with a soft, clean
cloth.
Use a dry soft bristle pastry brush to clean any
excess flour off the motor base.
Cleaning the pasta discs, extruding
and mixing chambers, mixing paddle,
spiral extruding rod, slider, disc holder,
measuring spoon and lid
Use the pointed end of the cleaning tool
provided to remove excess pasta dough from
these parts, especially the fine holes of the
pasta discs.
Hand wash parts in warm to hot, soapy
water using a mild detergent. Rinse and dry
thoroughly.
The mixing chamber, plastic mixing paddle,
spiral extruding rod, pasta discs and the slider
can also be washed in the dishwasher (top shelf
only). It is not recommended to put the steel rod
into the dishwasher.
Food stains and odours
Foods such as carrot or roasted capsicum
may leave a stain on plastic parts whilst other
foods such as garlic may leave a strong odor.
To remove either, soak the plastic parts for 5
minutes in 2 litres of water with ½ cup lemon
juice added. Rinse and wash as normal.
SUGGESTION: To remove stubborn dough, use
a piece of excess dough to rub over areas
where pasta dough or flour has stuck to
the surface.
The mixing chamber may need to be left
overnight to completely dry.
CAUTION: DO NOT IMMERSE THE MOTOR
BASE, POWER CORD OR POWER PLUG IN WATER
OR ANY OTHER LIQUID.
Do not use a scourer or abrasive cleaners as
these will scratch the plastic surface.
CAUTION: TO PREVENT DAMAGE TO THE
APPLIANCE DO NOT USE ALKALINE CLEANING
AGENTS WHEN CLEANING . ONLY USE A SOFT
CLOTH AND MILD DETERGENT.
CAUTION: DO NOT PUT ANY PART OF
THE PASTA MAKER IN THE MICRO WAVE OVEN.
WARNING: TH E MIXING PADDLES DURING
PROCESSING ARE TURNING EXTREMELY FAST, DO
NOT PLACE YOUR HANDS INTO MIXING CHAMBER
UNTIL THE MIXING PADDLE HAS STOPPED .
Page 14
13
Trouble Shooting
Problem Solution
Pasta begins to
extrude too slowly,
is delayed and/or
has stopped
extruding.
This may occur because the pasta is not the correct consistency. To
“repair” the dough, close the slider into the ‘mixing’ position. This will shut
the extruding chamber. Make adjustments to the dough by adding either
flour or water until small “pea size” pieces have formed. Re-open the slider
and continue the extruding process.
Check to see if pasta has accumulated around the opening of the extrusion
chamber (underneath the slider). If this occurs, close the slider into the
‘mixing’/closed position and then reopen the slider to the ‘extruding’/open
position. This will clear any accumulated dough at the opening of the
extrusion chamber.
The pasta dough in the mixing chamber may be too wet and has formed
into pieces that are too large to fall into the extrusion chamber. To “repair”
the dough, ensure the slider is fully closed and in the ‘mixing’ position.
Switch the appliance off using the on/off switch. Ensure that the mixing
paddle has stopped before placing hands into mixing chamber. Remove
lid. Break the dough up into small pieces and sprinkle it with a little flour,
re-open slider and resume mixing process.
•
•
•
Dough
accumulates
and sticks to the
mixing chamber
During extrusion, switch the Pasta Maker ‘OFF’ using the ON/OFF switch
Ensure the mixing paddle has stopped rotating. Remove the lid and clear any
accumulated dough from the corners of the mixing chamber and the mixing
paddle. Resume mixing.
A loud popping
noise is heard or
appliance appears
to be under heavy
strain
Switch the Pasta Maker to the ‘OFF’ position using the ON/OFF switch.
Fully disassemble the Pasta Maker and remove all dough from the extrusion
chamber and mixing chamber.
It is likely that the reason for the noise is because the dough has not reached
the correct consistency.
The dough that has been removed from the extrusion chamber can be
returned to the mixing chamber for re-mixing.
Place dough back in the mixing chamber and correct using the steps below.
If dough is too dry, add a little water and re-mix dough for approximately
1 minute before re-opening the slider and continuing to extrude.
If too wet, add a little flour and break the large pieces of dough into smaller
pieces and re-mix for approximately 1 minute.
Then, check mixing chamber - ensure dough consistency is small “pea size”
pieces before continuing to extrude.
If problem continues contact your Viante Customer Service Centre.
Page 15
14
TROUBLE SHOOTING
Problem Solution
Flour accidentally
falls into the
extrusion chamber
Ensure that the slider is in the mixing position before adding ingredients.
To remove excess flour from the extrusion chamber:
Switch the Pasta Maker ‘OFF’ using the ON/OFF switch. Ensure that the
mixing paddle has stopped rotating.
Disassemble the Pasta Maker and remove excess flour from the extrusion
chamber by using a dry soft cloth or a pastry brush. Re-assemble the Pasta
Maker and continue using as normal.
Adding all
ingredients at once
(flours, egg, oil,
water, flavourings)
Ensure that the power is in the ‘OFF’ position using the ON/OFF switch.
Switch the power off at the power outlet, remove the power cord.
Disassemble the mixing chamber .
Remove all ingredients, wash all parts (except motor base) in warm to hot
soapy water, rinse and thoroughly dry.
Ensure the motor base is clean and dry.
Re-assemble all of the parts.
Add flour egg, oil and/or flavouring (no water) and start the mixing process
again following directions in the recipe section of this booklet.
Dough is too wet If too wet, add a little flour and break the large pieces of dough into smaller
pieces and re-mix for approximately 1 minute before continuing to extrude.
Dough is too dry If dough is too dry, add a little water and re-mix dough for approximately
1 minute before re-opening the slider and continuing to extrude.
Extruded pasta is
sticking together
Immediately sprinkle a little flour on the pasta as it extrudes and ensure fresh
pasta is placed on a well floured surface.
The mixing
chamber release
button can not be
pushed down to
release the mixing
chamber
During the extruding process, the mixing chamber may move forward from
the motor base due to the force of the pasta dough pressing against the
pasta disc. If this happens push the mixing chamber back into the motor
body and then press the mixing chamber release button to remove the mixing
chamber from the motor base.
Page 16

15
Basic Pasta
Makes 4 Servings
31⁄3 cups/500g plain flour
2 x 60g eggs
1 tablespoon olive oil
120-150ml water
1
⁄2 teaspoon salt
Extra flour for dusting
Add flour and salt into the mixing chamber.
Lightly whisk eggs and oil together and add
egg mixture to the flour mixture and lock on
the lid.
Start the mixing process and combine flours
and egg mixture together for approximately
1-2 minutes. With the Pasta Maker running
remove the spoon from the lid and add ¾ of
the water in a steady stream ensuring even
distribution of water along entire length of
the lid cut out.
Allow the dough to mix for another 1-2mins
until dough resembles small pea size pieces.
During the mixing process, check the progress
of the dough. If the dough is too dry, add 1
teaspoon water at a time, continue to mix until
correct consistency is achieved.
During the mixing process, check the progress of
the dough. If the dough is too wet, stop mixing.
Ensure that the mixing paddle and motor has
completely stopped. Remove lid, break the larger
dough balls into smaller pieces, add 1 tablespoon
of flour at a time, resume mixing and check
dough until correct consistency is achieved.
1.
2.
3.
4.
Once the correct dough consistency is achieved,
add 1-2 teaspoons of flour, this will help to keep
dough in small pieces throughout the mixing
process.
Pull the slider out into the ‘extruding’ position.
It should take no longer than 1 minute until
dough starts extruding through the pasta disc.
If the process is delayed refer to the trouble
shooting section
Total dough mixing time will take approximately
5 minutes and total extruding time will take
approximately 25 minutes, if using the full recipe.
When approximately 3cm of pasta dough
has been extruded, cut with the plastic knife
provided and discard.
Cut pasta to the desired length as it comes
out of the Pasta Maker, dusting lightly with
flour, and place on to a lightly floured board
or tray.
If extruded pasta sticks together dust lightly with
a little flour.
SUGGESTION: Cook fresh pasta in boiling salted
water and/or store
These recipes can be adapted to half quantities,
by simply reducing ingredients in half.
5.
6.
7.
PASTA RECIPES
Page 17

16
Wholemeal pasta
Makes 2-3 Servings
11⁄4 cups/ 185g plain flour
3
⁄4 cup/130g wholemeal flour
2 x 60g eggs
1 tablespoon olive oil
1
⁄2 teaspoon salt
60ml water
Follow assembly instructions (page 8).
Select a pasta disc and assemble.
Add dry ingredients into mixing chamber.
Lightly whisk eggs and oil together and add to
the flour mix.
Switch Pasta Maker on and mix egg mixture
until well combined with the flour mixture.
While Pasta Maker is mixing add water until
correct consistency is achieved.
Start extruding pasta and cut to desired length.
1.
2.
3.
4.
5.
6.
7.
Pasta Recipes
Page 18
17
Gluten Free pasta
Make 2-3 Servings
11⁄2 cups/ 225g amaranth flour
11⁄4 cups/125g tapioca flour (Arrowroot)
1 x 60g egg
1 tablespoon olive oil
150ml water
Follow assembly instructions (page 8).
Select a pasta disc and assemble.
Add dry ingredients into mixing chamber.
Lightly whisk egg and oil together and add
to the flour mix.
Switch Pasta Maker on and mix egg
mixture until well combined with the flour
mixture.
While Pasta Maker is mixing add water
until correct consistency is achieved.
Start extruding pasta and cut to desired
length.
This pasta is best cooked after extruding due to
its delicate texture.
Tip: Best suited to soup and sauce based
dishes.
These recipes makes approximately 2 serves,
however ingredients can be doubled to make 4
serves.
1.
2.
3.
4.
5.
6.
7.
Page 19

18
Pasta Recipes
Spinach pasta
Makes 2 serves
11⁄3 cups/250g flour
1
⁄2 teaspoon salt
120g English spinach leaves, blanched and pureed
(60g spinach puree)
1x 60g egg
1
⁄2 tablespoon olive oil
20-30ml water
Follow assembly instructions (page 8).
Select a pasta disc and assemble.
Add flour, salt, and chopped spinach into
mixing chamber.
Lightly whisk egg and oil together and add
to the flour mix.
Switch Pasta Maker on and mix egg
mixture until well combined with the flour
mixture.
While Pasta Maker is mixing add the water
until desired consistency is achieved.
Start extruding pasta and cut to desired
length.
Suggestion
Spinach pasta, tossed quickly with shredded
poached chicken breast, broccoli, ricotta
cheese, garnish with fresh basil leaves for a
healthy alternative.
1.
2.
3.
4.
5.
6.
7.
•
Page 20
19
Biscotti
11⁄4 cup/210g flour
11⁄4 cup/130g caster sugar
1
⁄2 teaspoon salt
1
⁄4 teaspoon cinnamon
20ml hot water
100g butter, melted
1 teaspoon vanilla extract
50-55ml water
Preheat oven to 180ºC/375F. Line two
baking trays with greaseproof paper.
Follow assembly instructions (page 8).
Select biscuit disc and assemble.
Add flour, sugar, salt and cinnamon into
mixing chamber.
Lightly whisk 20ml hot water, with melted
butter and vanilla, add to the flour mix.
Switch Pasta Maker on and mix the liquid
mixture until well combined with the flour
mixture.
While Pasta Maker is mixing add water
until correct consistency is achieved.
Start extruding biscuits and cut to desired
length and place approx. 20 biscuits per tray
spacing 1-2cm apart.
Bake for 8-10 minutes or until golden
brown. Allow to cool on wire rack, when cold
transfer to airtight container and store for
1-2 days.
Flavour Variations: Add any of these flavours in
step 4 of the recipe above.
If using honey or a liquid ingredient as a
variation, use a little less water.
1.
2.
3.
4.
5.
6.
7.
8.
9.
TIP:
Vanilla butter cookie: add 1 teaspoon
vanilla paste
Chocolate: add ¼ cup cocoa powder
Spice: add 1 tablespoon all spice powder
Honey:
add 1 tablespoon honey
Ginger: add 1 teaspoon ginger powder
Sesame: roll biscuits in sesame seeds
before baking
1.
2.
3.
4.
5.
6.
Recipe
Page 21
20
Notes
Page 22
21
Notes
 Loading...