

Page 1

Blood Pressure ECG Monitor
ECG Pen
OmniPAP
Quick Start Guide
BP700X/BP700X1 02
BP750X/BP750X1 09
880E 16
BP ECG Studio 20
OP700 / OH850 22
TABLE OF CONTENTS
Page 2
Preparation Before Taking
Measurement
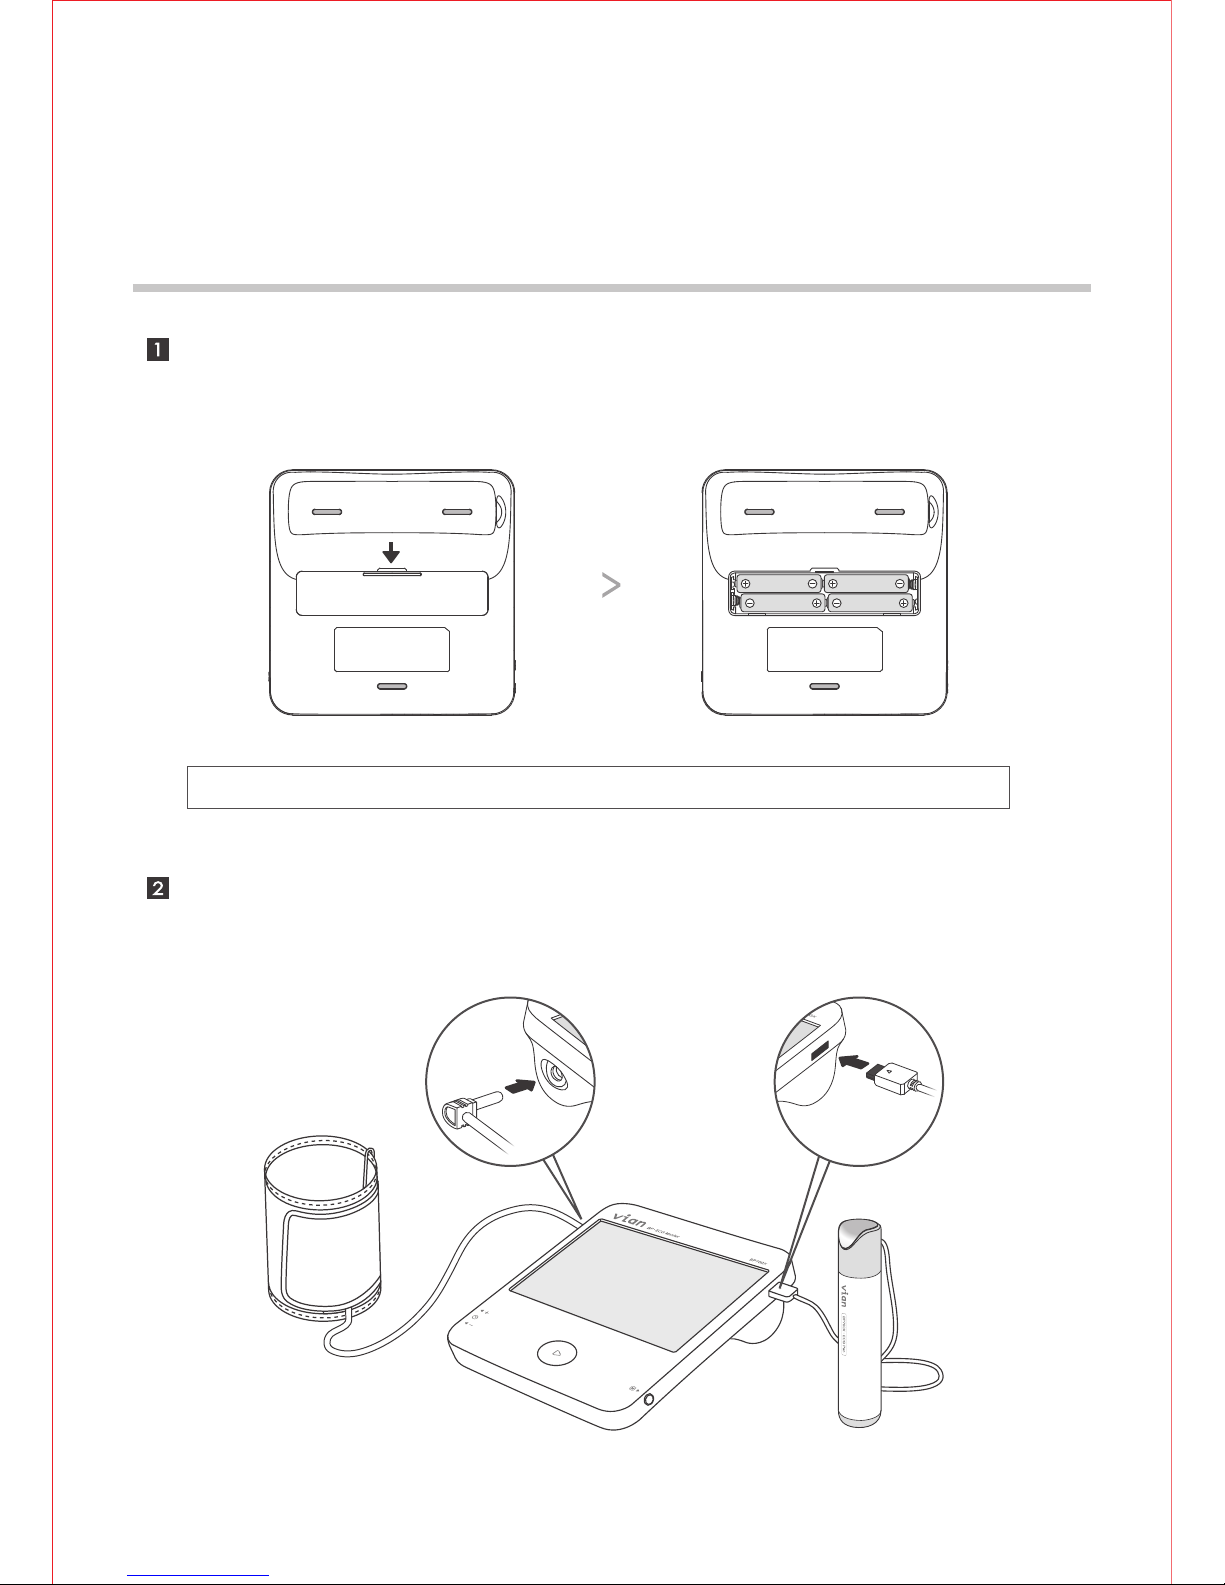
Install four “AAA” alkaline batteries by following the + (positive) and
- (negative) polarities indicated on the battery compartment.
02
Insert the air plug into air jack on the left side of main unit. Insert the cable
connector of ECG Pen to ECG port on the right side of main unit.
BP700X / BP700X1
Note : Four new “AAA” alkaline batteries will last for approximately 300 measurements.
Page 3
Date, Time & Alarm Settings
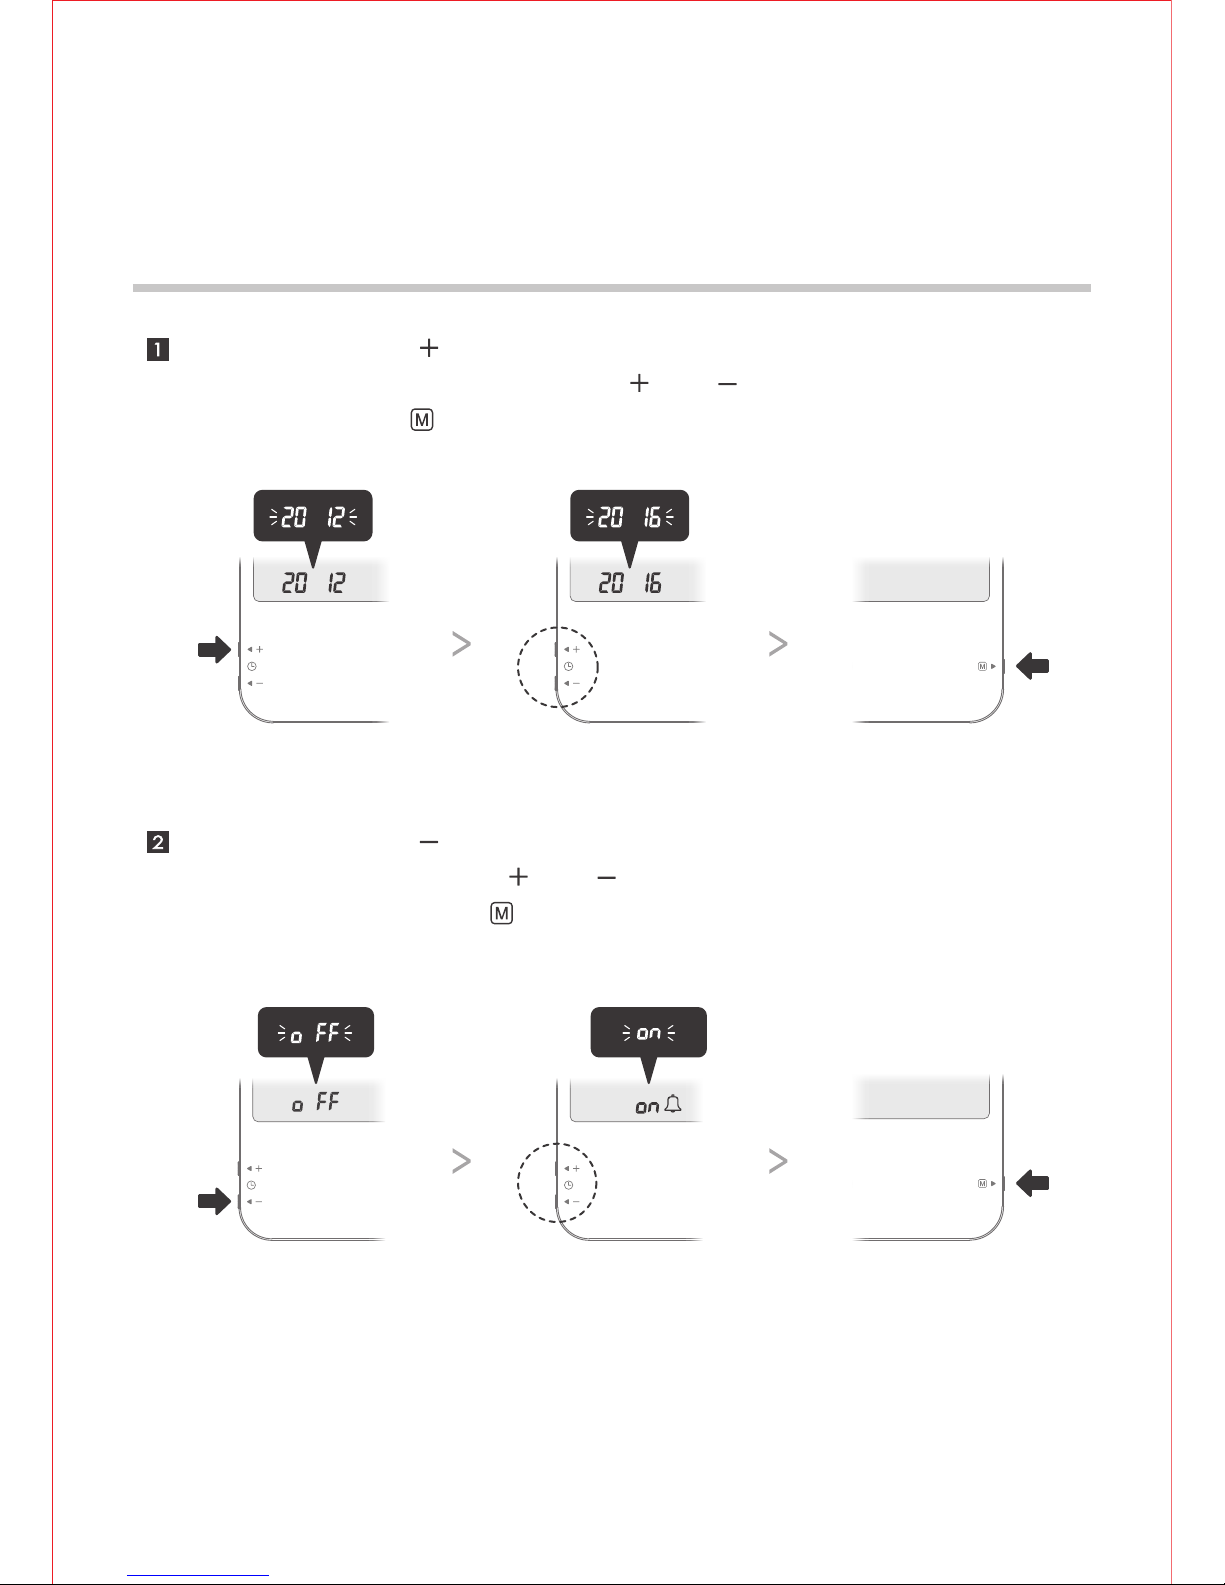
Press and hold the button on the left side for more than 3 seconds to enter
Alarm setting mode. Press and buttons to turn on the alarm function and
adjust values, then press button to apply your settings.
Press and hold the button on the left side for more than 3 seconds to
enter Date/Time setting mode. Press and buttons to adjust the
values, then press button to apply your settings.
03
BP700X / BP700X1
Page 4
Blood Pressure
Cautions & Components Introduction
To assure accurate blood pressure measurement, please:
Rest for at least 20~30 minutes after exercising, bathing, eating, smoking
or drinking alcohol before taking measurement.
Take the measurement in a quiet place and under appropriate temperature.
Relax for 5~10 minutes before taking measurement.
Make sure the center of arm cuff is at the same level with your heart.
Do not move or talk during the measurement.
Wait at least 5 minutes before taking another blood pressure measurement.
04
Components
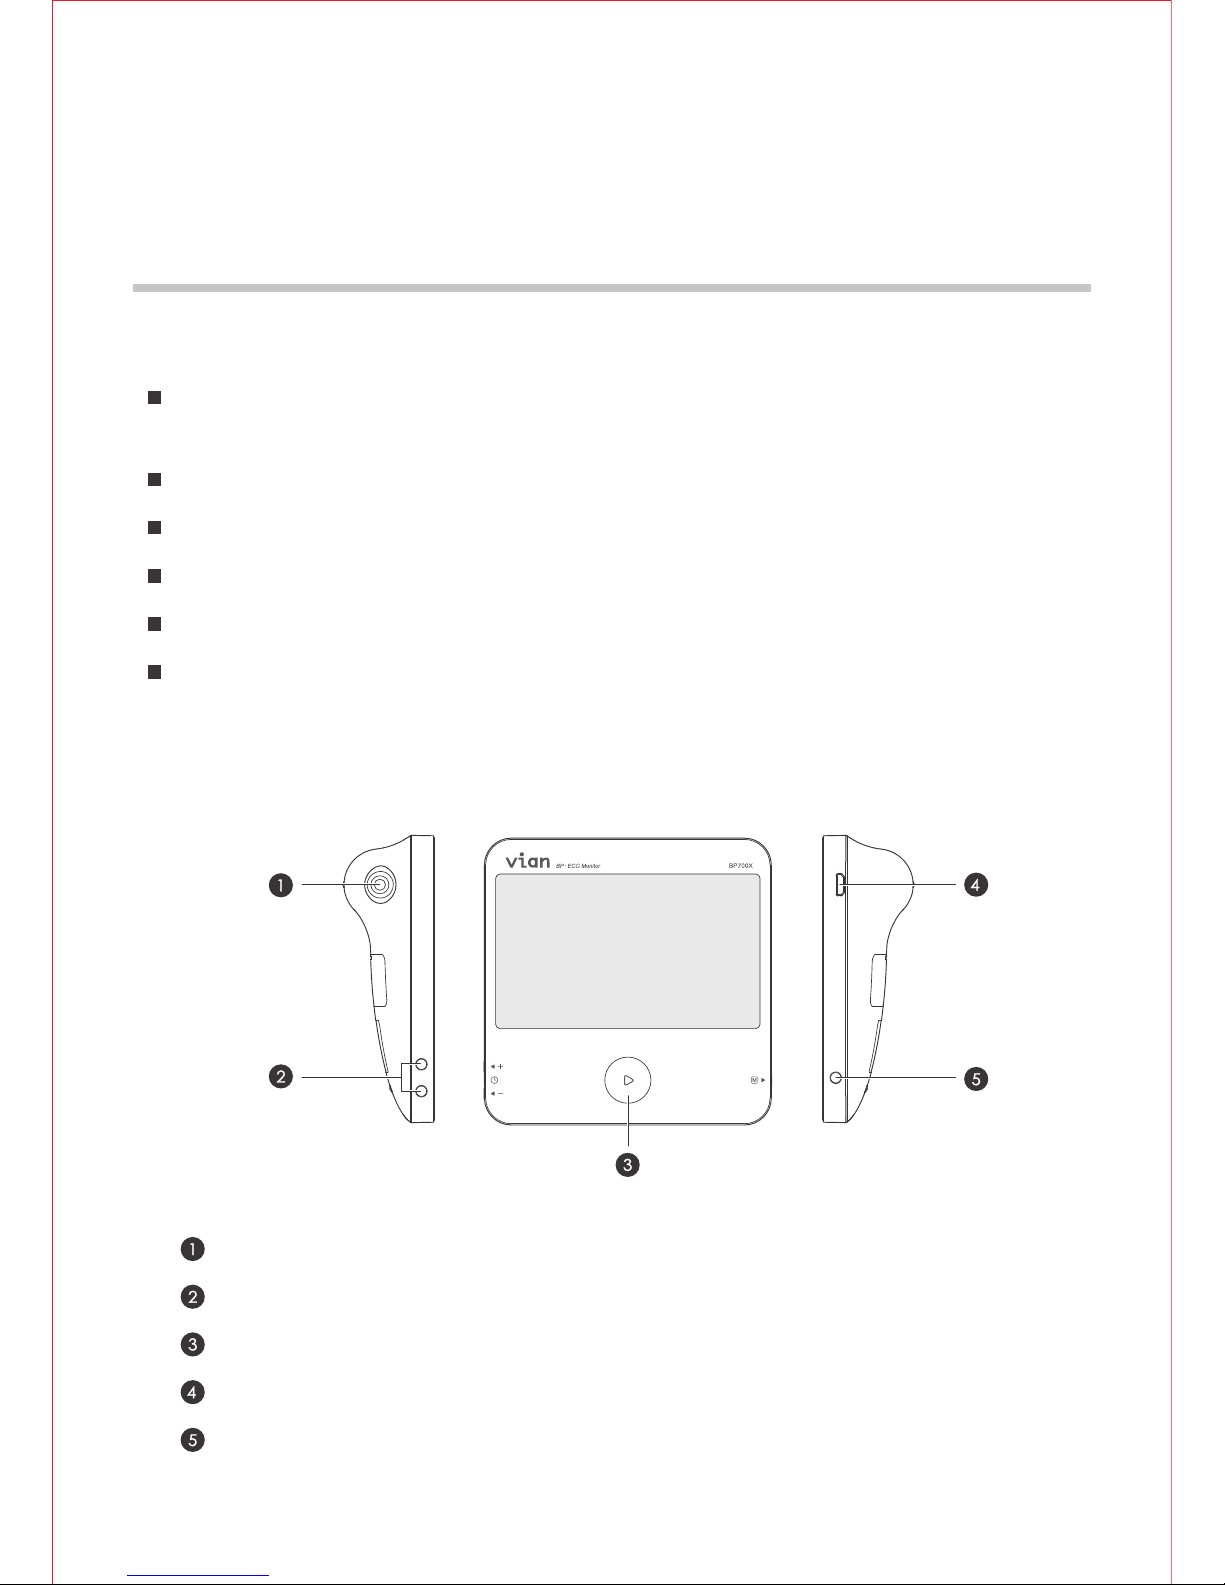
Air Jack: connect air tube of arm cuff.
Adjust Button: increase/decrease values of settings.
Main Button: start the inflation, power off the device.
ECG/USB Port: connect ECG Pen/USB extension cord.
Memory Key: review records, switch user account and apply settings.
BP700X / BP700X1
Page 5
Taking Blood Pressure Measurement
05
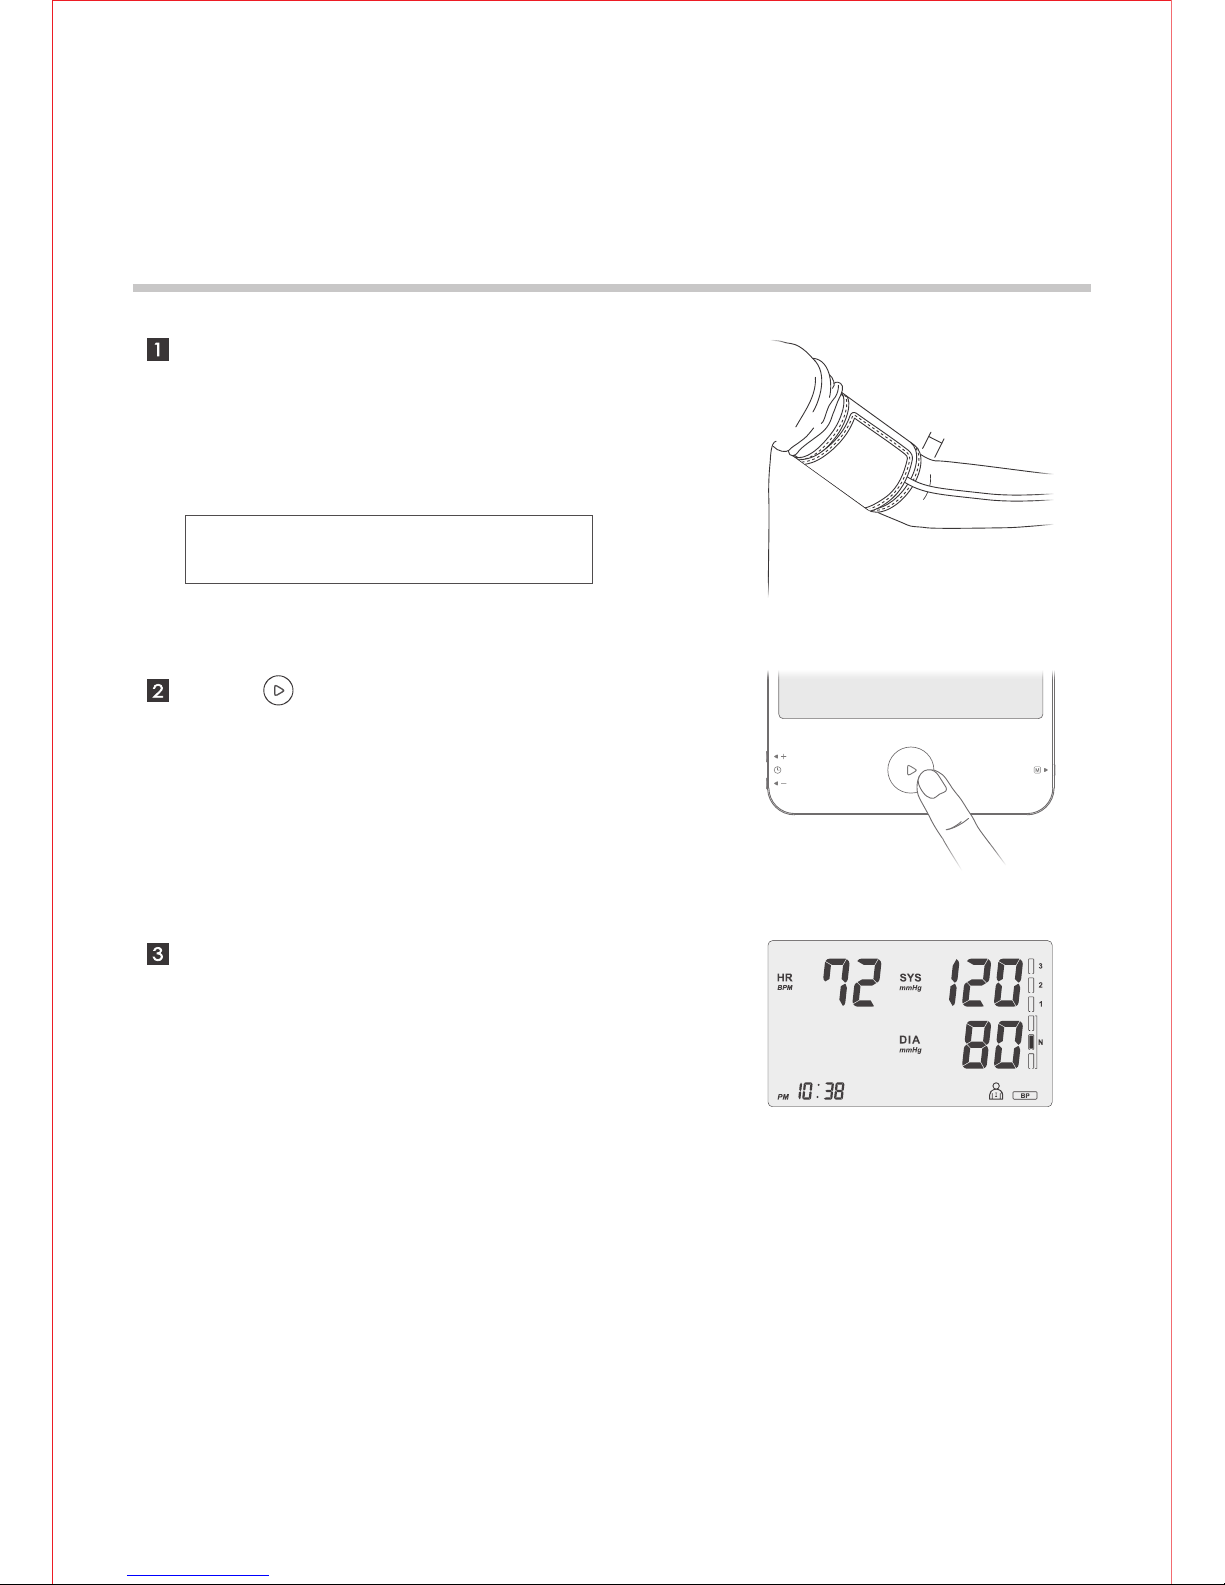
The measurement result will be
displayed on LCD after the
measurement is completed.
Position the arm cuff 1~2 cm
above your elbow with the air tube
running down inside of your
forearm.
1~2 cm
Press button to start your
measurement automatically.
Note : Avoid lying your arm on the air tube
and not over tighten the cuff.
BP700X / BP700X1
Page 6
ECG
Cautions & Components Introduction
To assure accurate ECG measurement, please:
Remove the foil on the top and bottom electrodes.
Make sure the electrodes are directly contacting your skin.
If your skin or hands are dry, moisten them with damp cloth before taking
measurement.
Do not let your right hand in contact with your body and avoid heavily
pressing the top and bottom electrodes while taking measurement.
Do not use the ECG Pen in upside down direction.
Do not talk while taking measurement and keep the balance of your body to
avoid influencing the accuracy of measurement result.
06
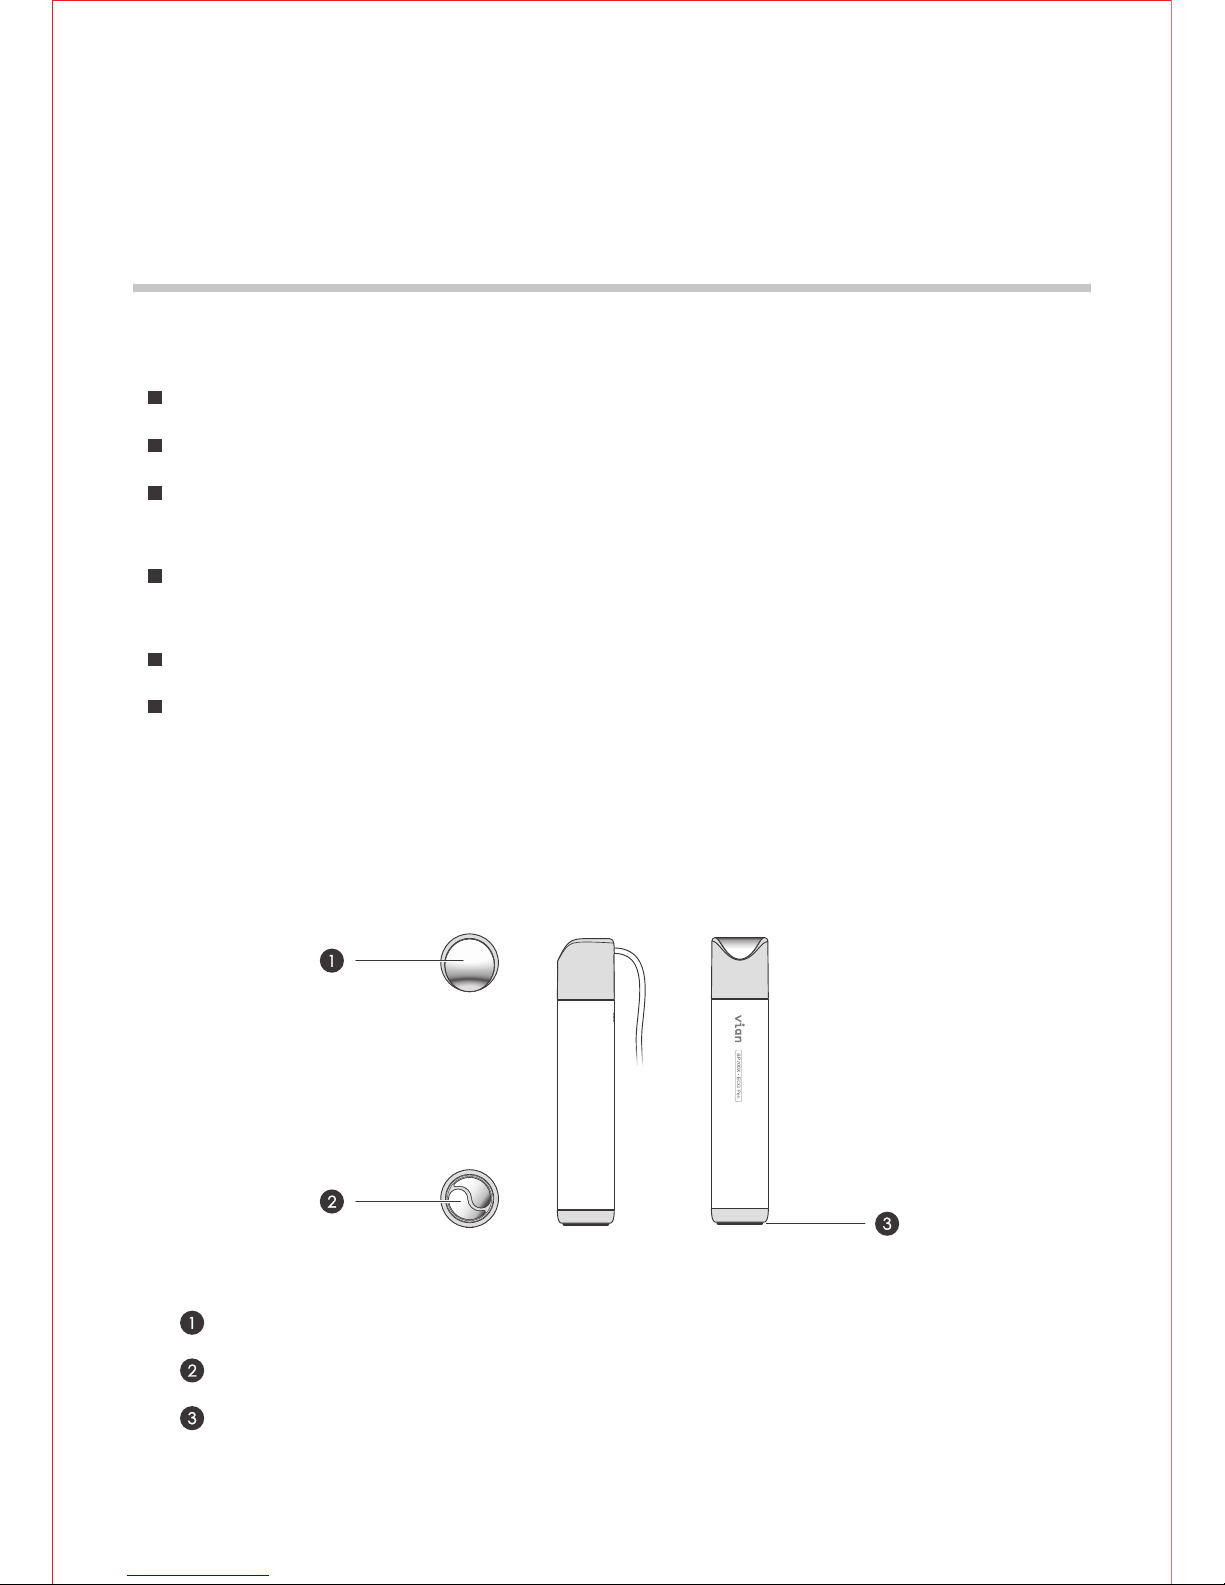
Components
Top Electrode
Bottom Electrodes
Detection Switch
BP700X / BP700X1
Page 7
5 cm
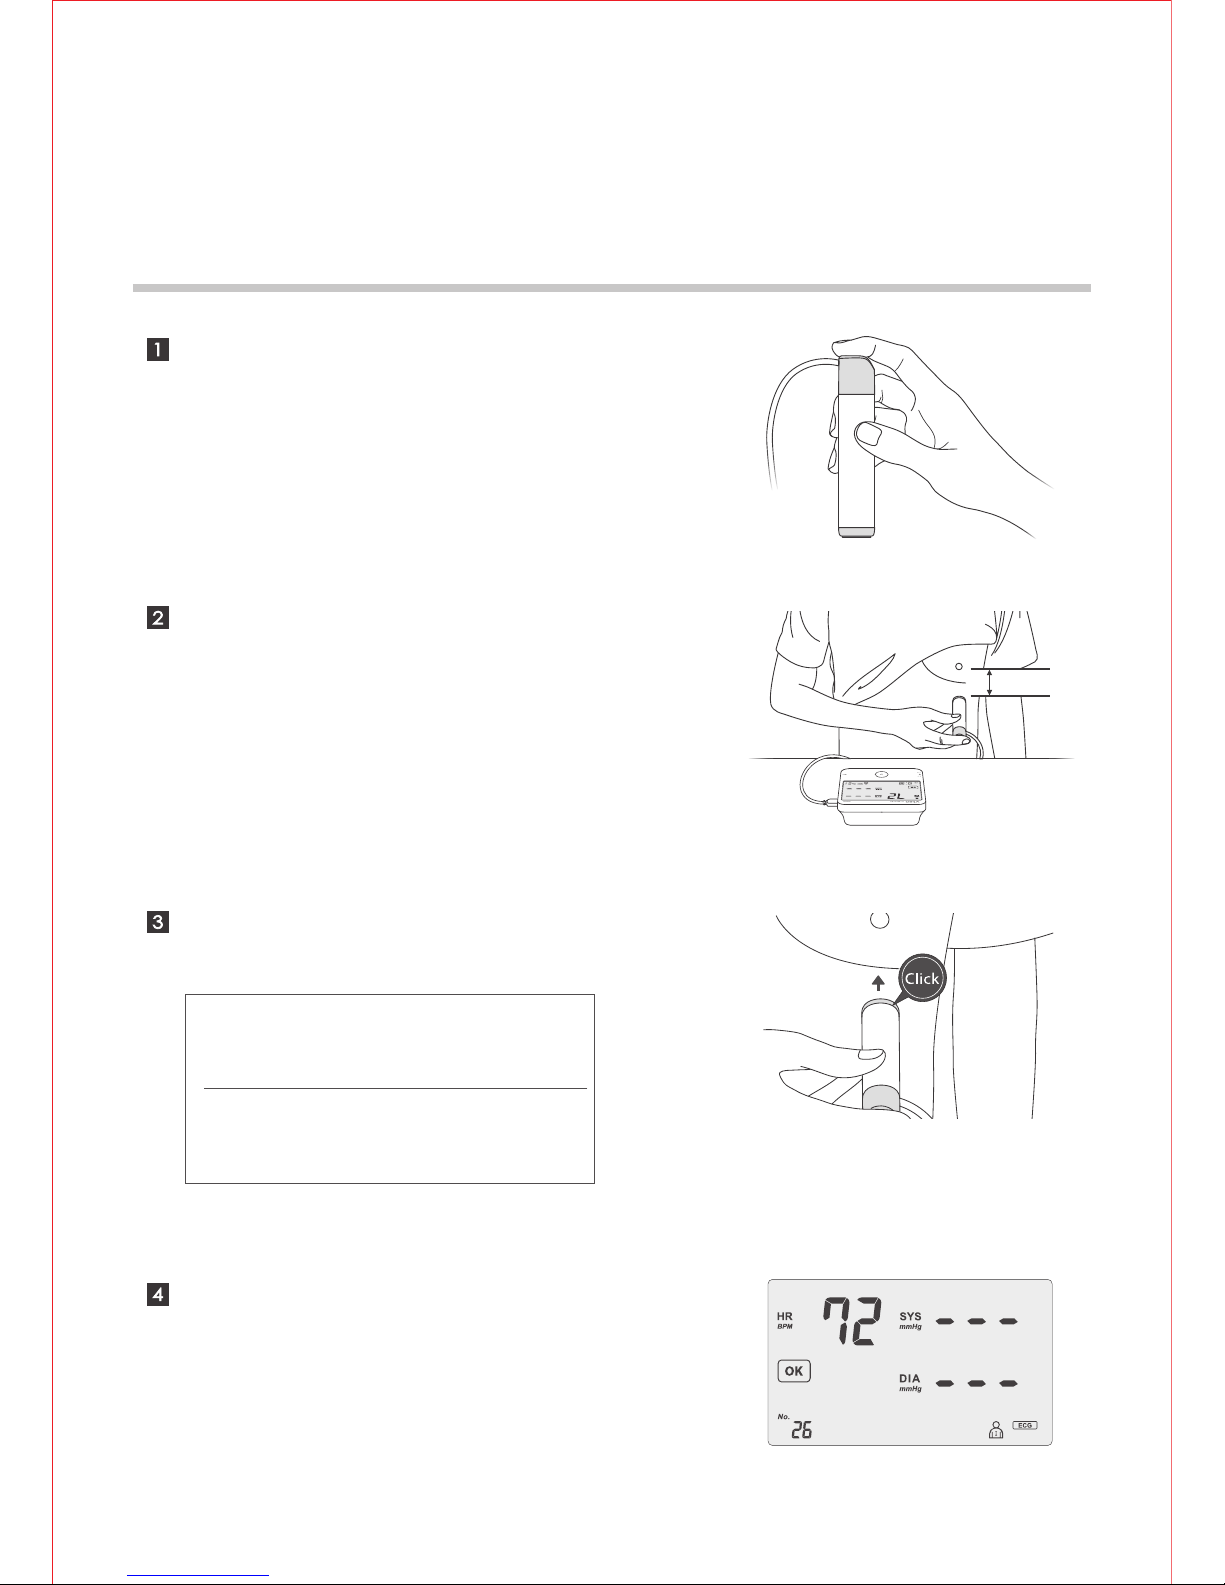
Taking ECG Measurement
07
Place your right index finger on
the top electrode.
Press the ECG Pen GENTLY until
you hear the click sound.
Place the bottom electrodes on
your lower-left chest supported
by the ribcage.
After 30 seconds measurement,
the result will be displayed on
LCD.
BP700X / BP700X1
Note1 : Avoid heavily pressing the
electrodes. Excessive muscle tension will
affect the accuracy of measurement.
Note2 : If the bottom electrodes are
released within 3 seconds, the
measurement will be aborted.
Page 8
BP700X / BP700X1
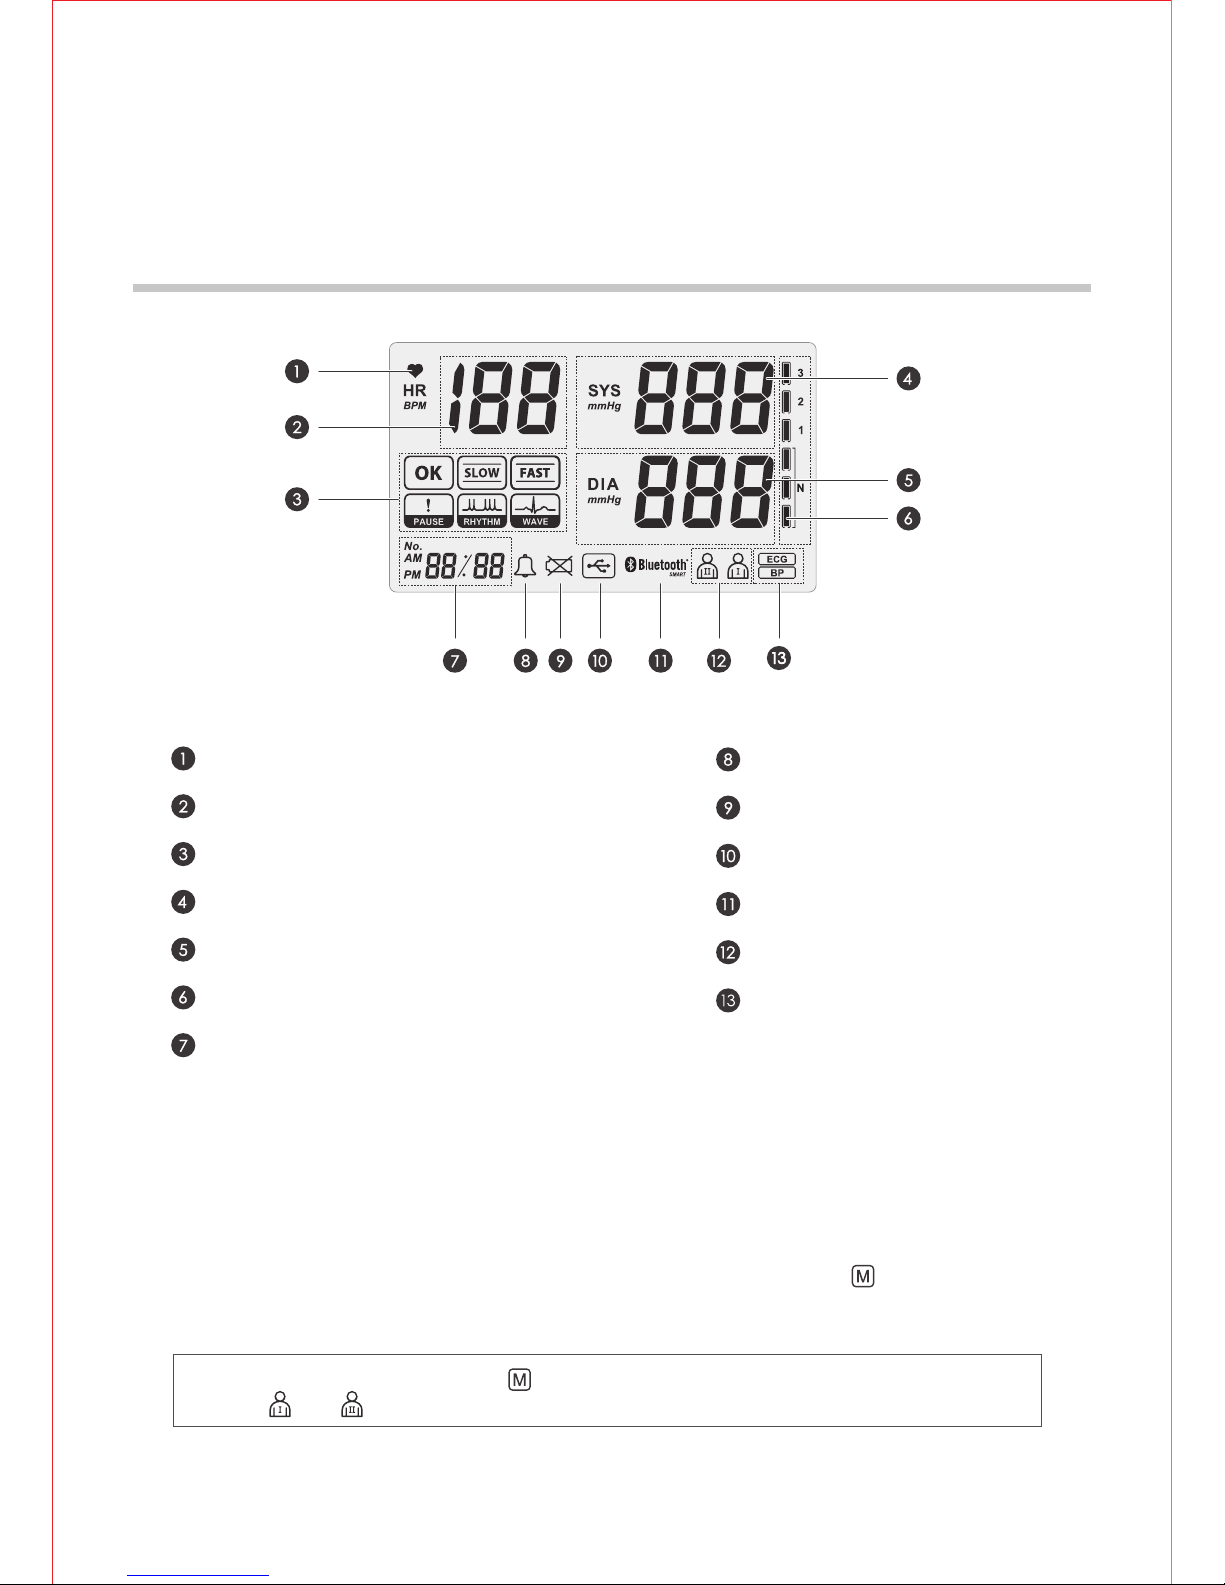
LCD Display
08
Heartbeat Indicator
Heart Rate
ECG Result Display
Systolic Blood Pressure
Diastolic Blood Pressure
WHO Classification Indicator
Time/Records No./Countdown
Alarm Indicator
Low Battery Indicator
USB Connection
Bluetooth Connection
User Account
Type of Measurement
Reviewing Measurement Records
When the device is shut down or in standby mode, you may review the
previous measurement results in cyclic order by pressing button
repeatedly.
Note : You may press and hold the button for more than 3 seconds to switch between user
account and .
Page 9
BP750X / BP750X1
Note : Four new “AAA” alkaline batteries will last for approximately 300 measurements.
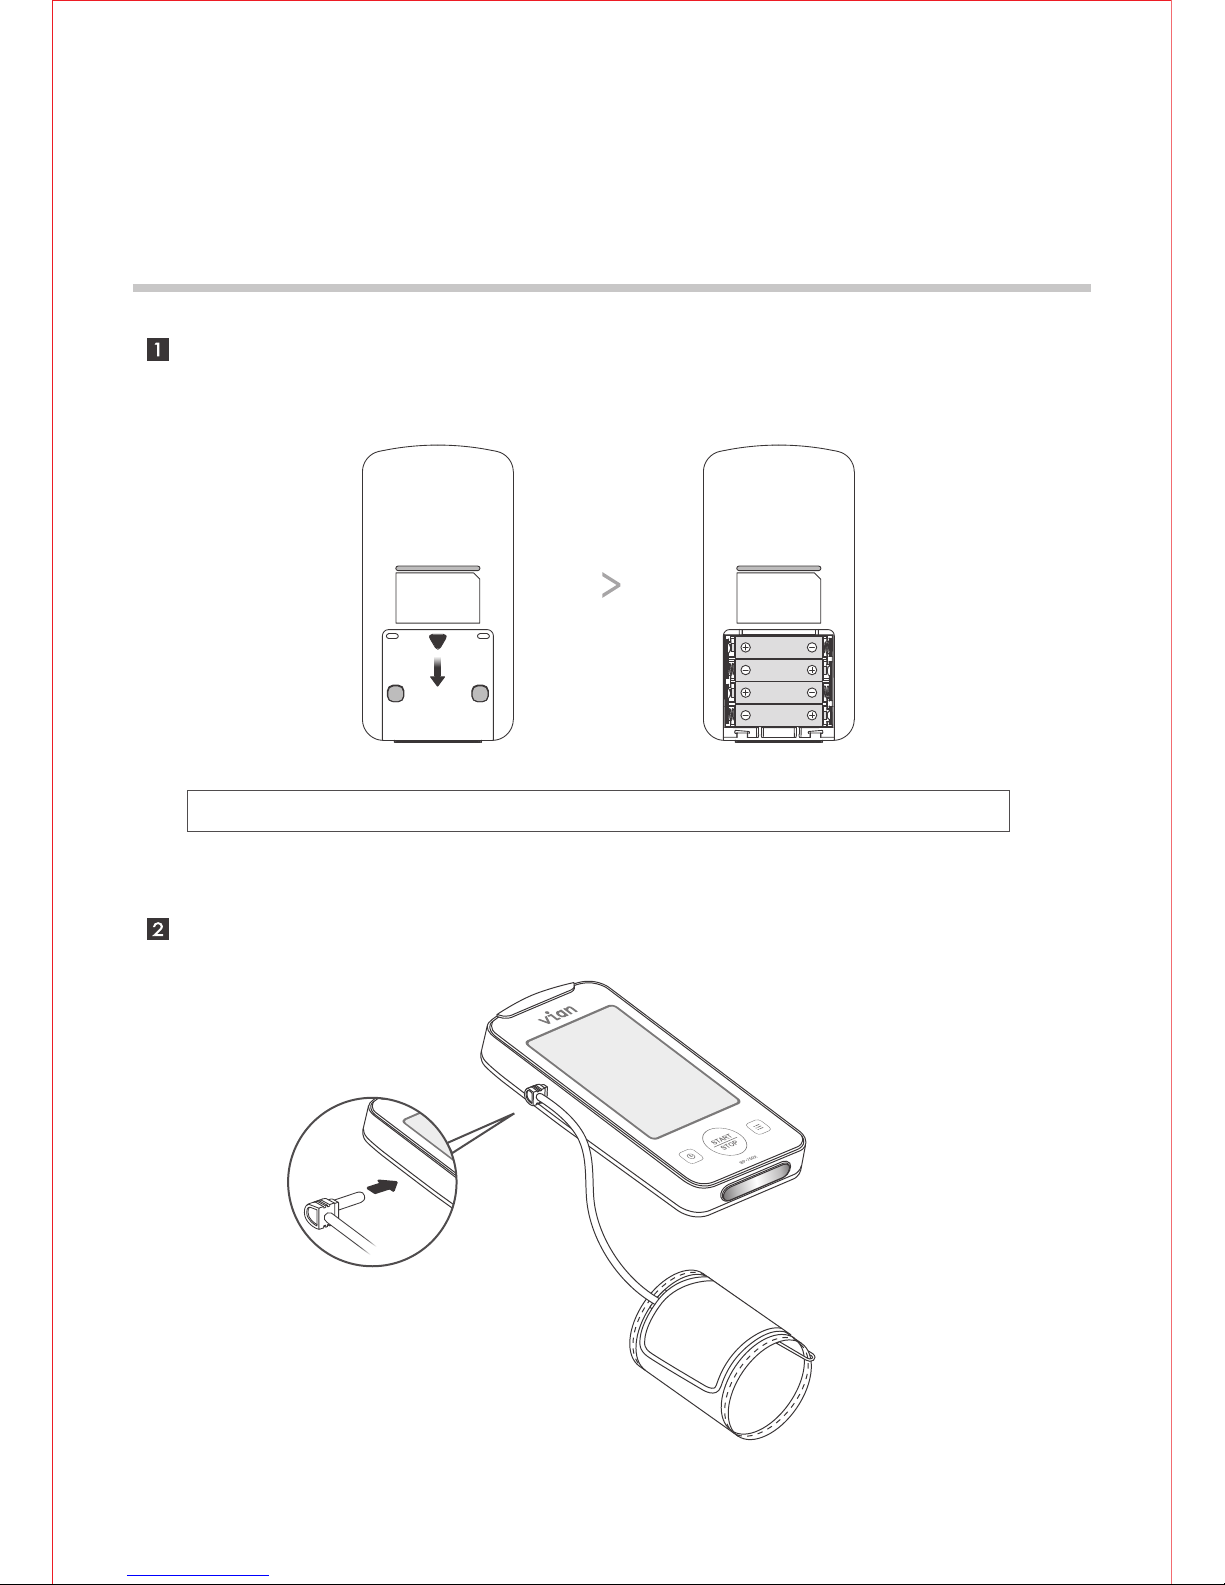
Preparation Before Taking
Measurement
Install four “AAA” alkaline batteries by following the + (positive) and
- (negative) polarities indicated on the battery compartment.
09
Insert the air plug into air jack on the left side of the main unit.
Page 10
BP750X / BP750X1
Date, Time & Alarm Settings
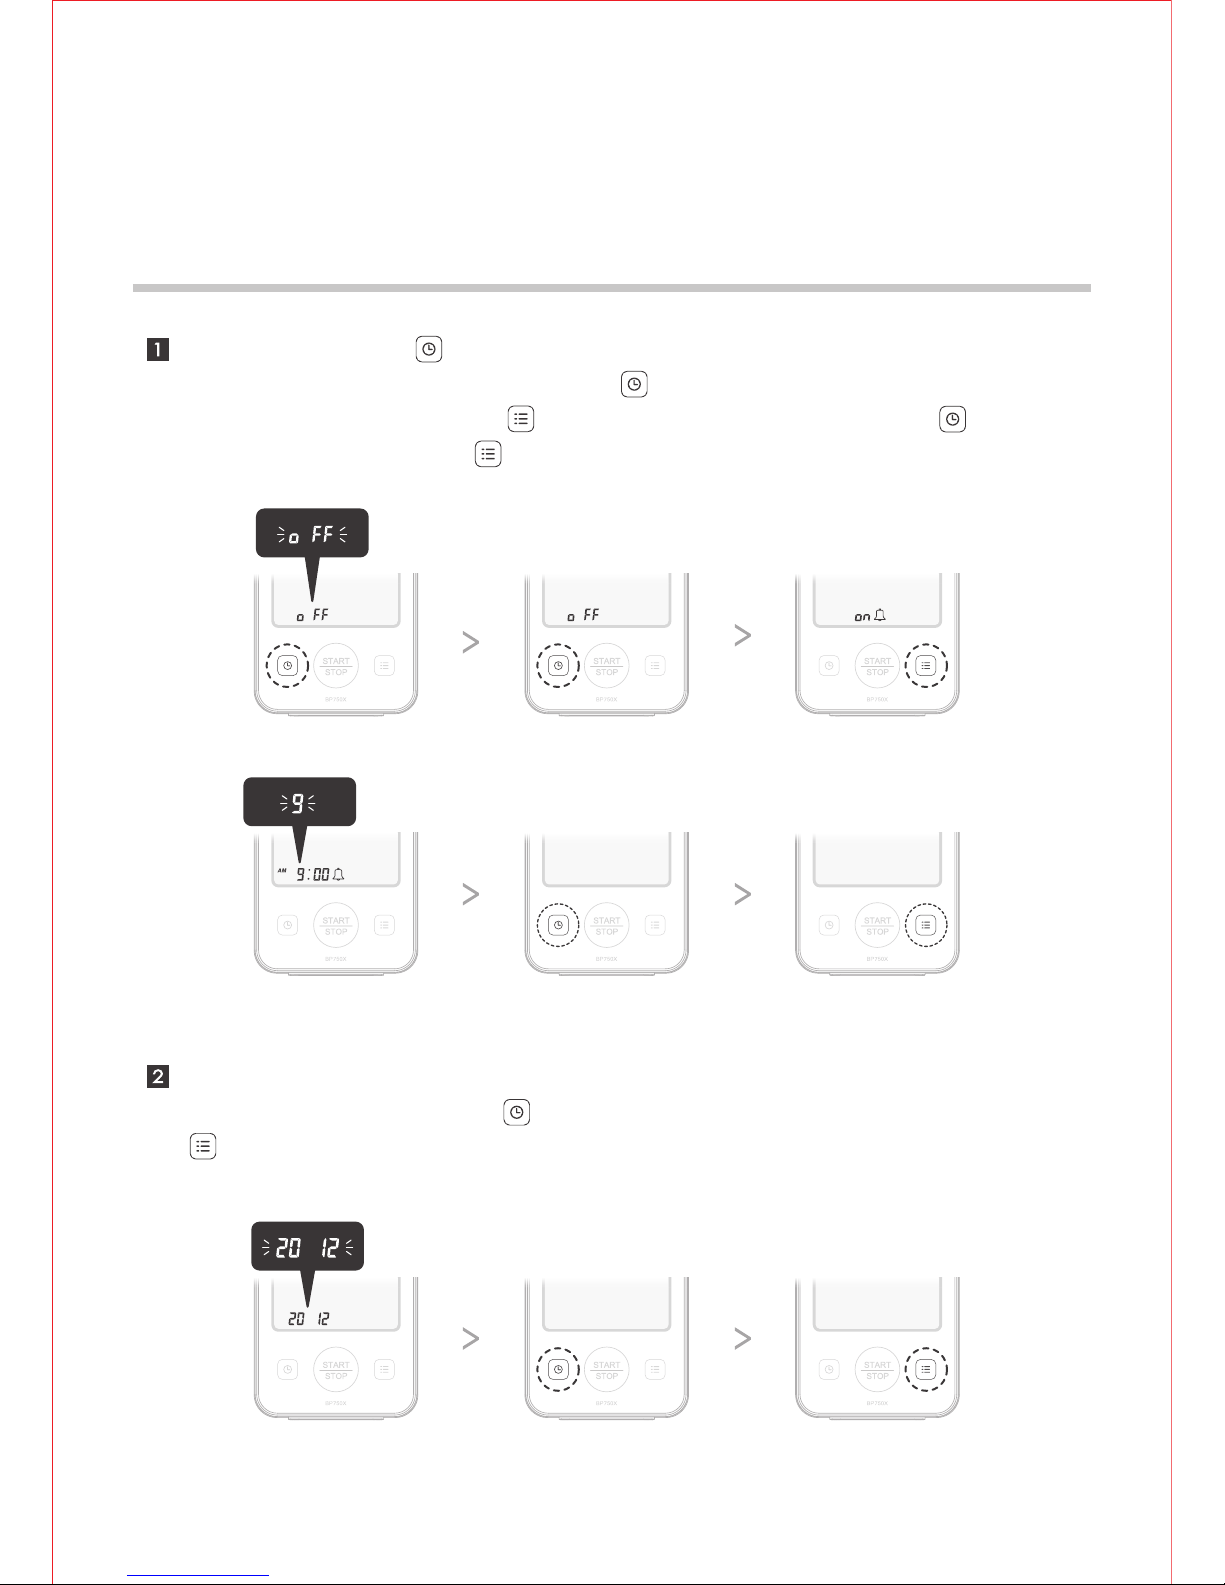
The display will turn to Date and Time Setting mode after completing the
setting of alarm. Press the button to adjust the values, then press the
button to apply your settings.
Press and hold the button for more than 3 seconds and the device will
enter Alarm Setting mode. Press the button again to switch the alarm
function on, then press the button to apply setting. Press the button
to adjust values and the button to apply your alarm settings.
10
Page 11
BP750X / BP750X1
Blood Pressure
Cautions & Components Introduction
To assure accurate blood pressure measurement, please:
Rest for at least 20~30 minutes after exercising, bathing, eating, smoking
or drinking alcohol before taking measurement.
Take the measurement in a quiet place and under appropriate temperature.
Relax for 5~10 minutes before taking measurement.
Make sure the center of arm cuff is at the same level with your heart.
Do not move or talk during the measurement.
Wait at least 5 minutes before taking another blood pressure measurement.
11
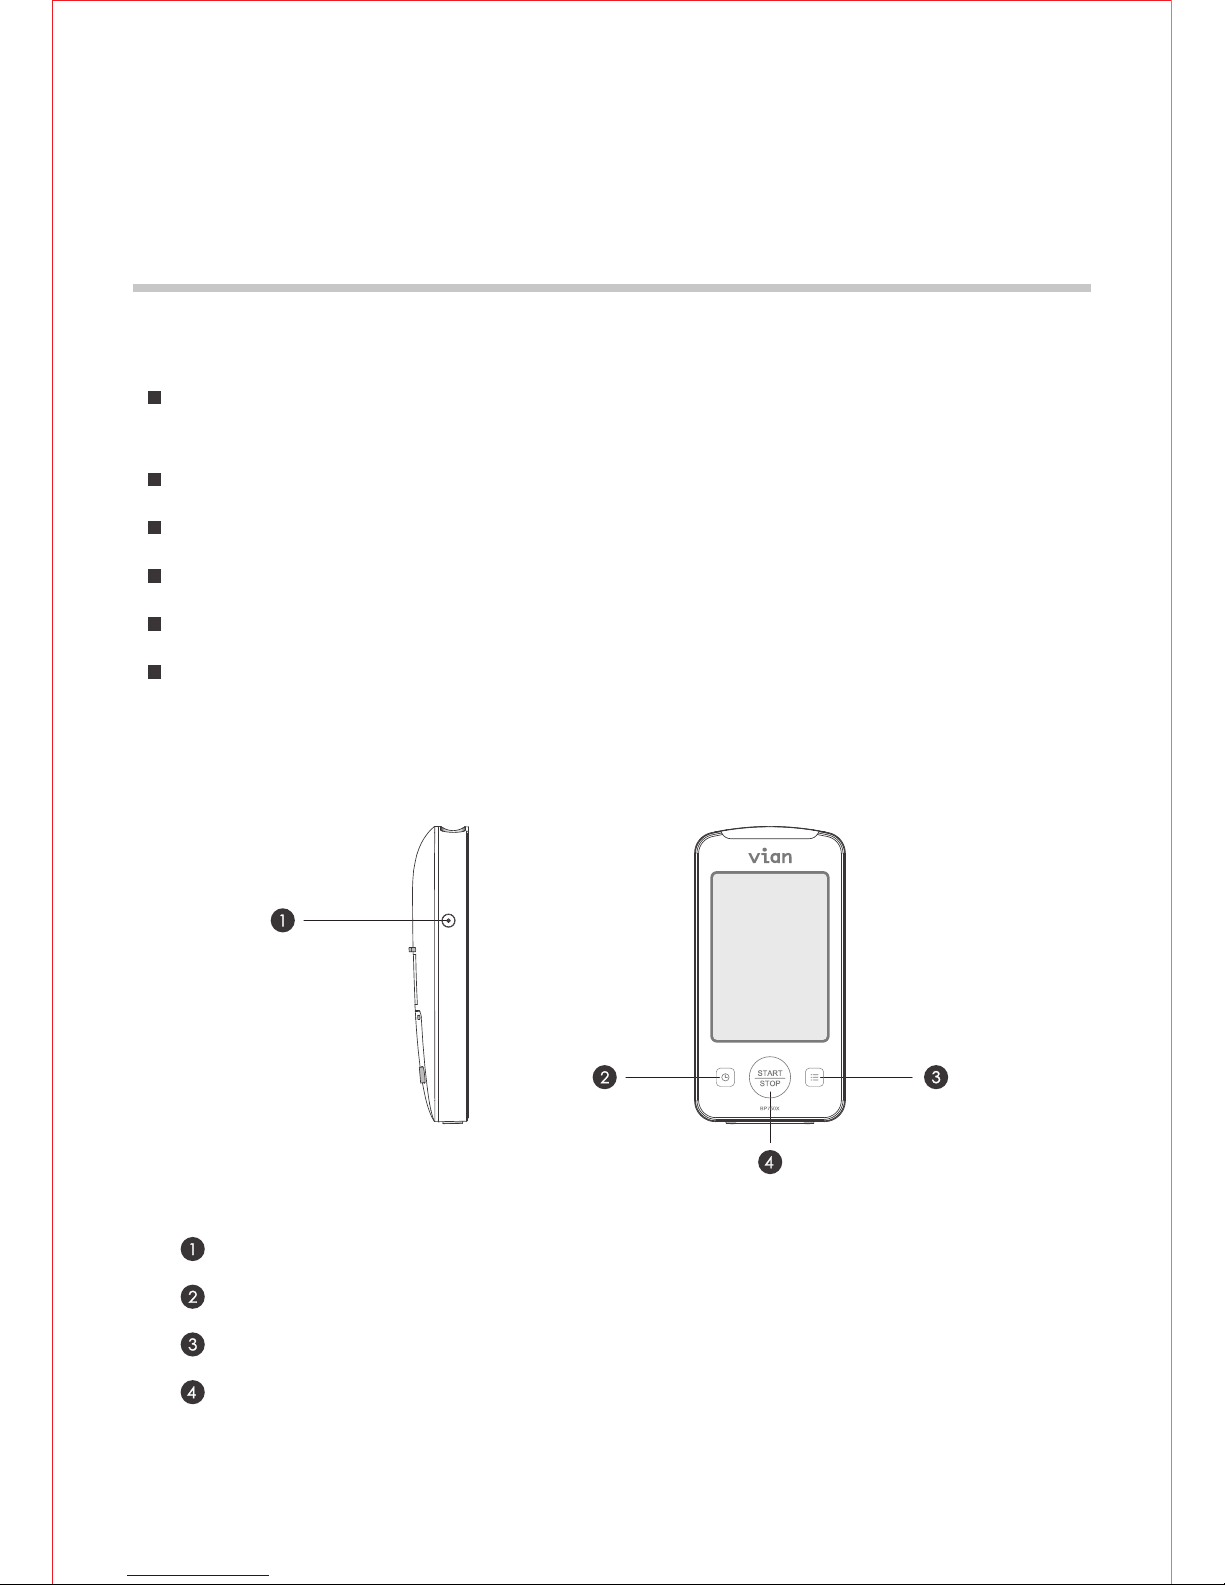
Components
Air Jack: connect air tube of arm cuff.
Adjust Button: increase/decrease values of alarm/time settings.
Memory Key: review records, switch user account and apply settings.
Main Button: start inflation, power off the device.
Page 12
Taking Blood Pressure Measurement
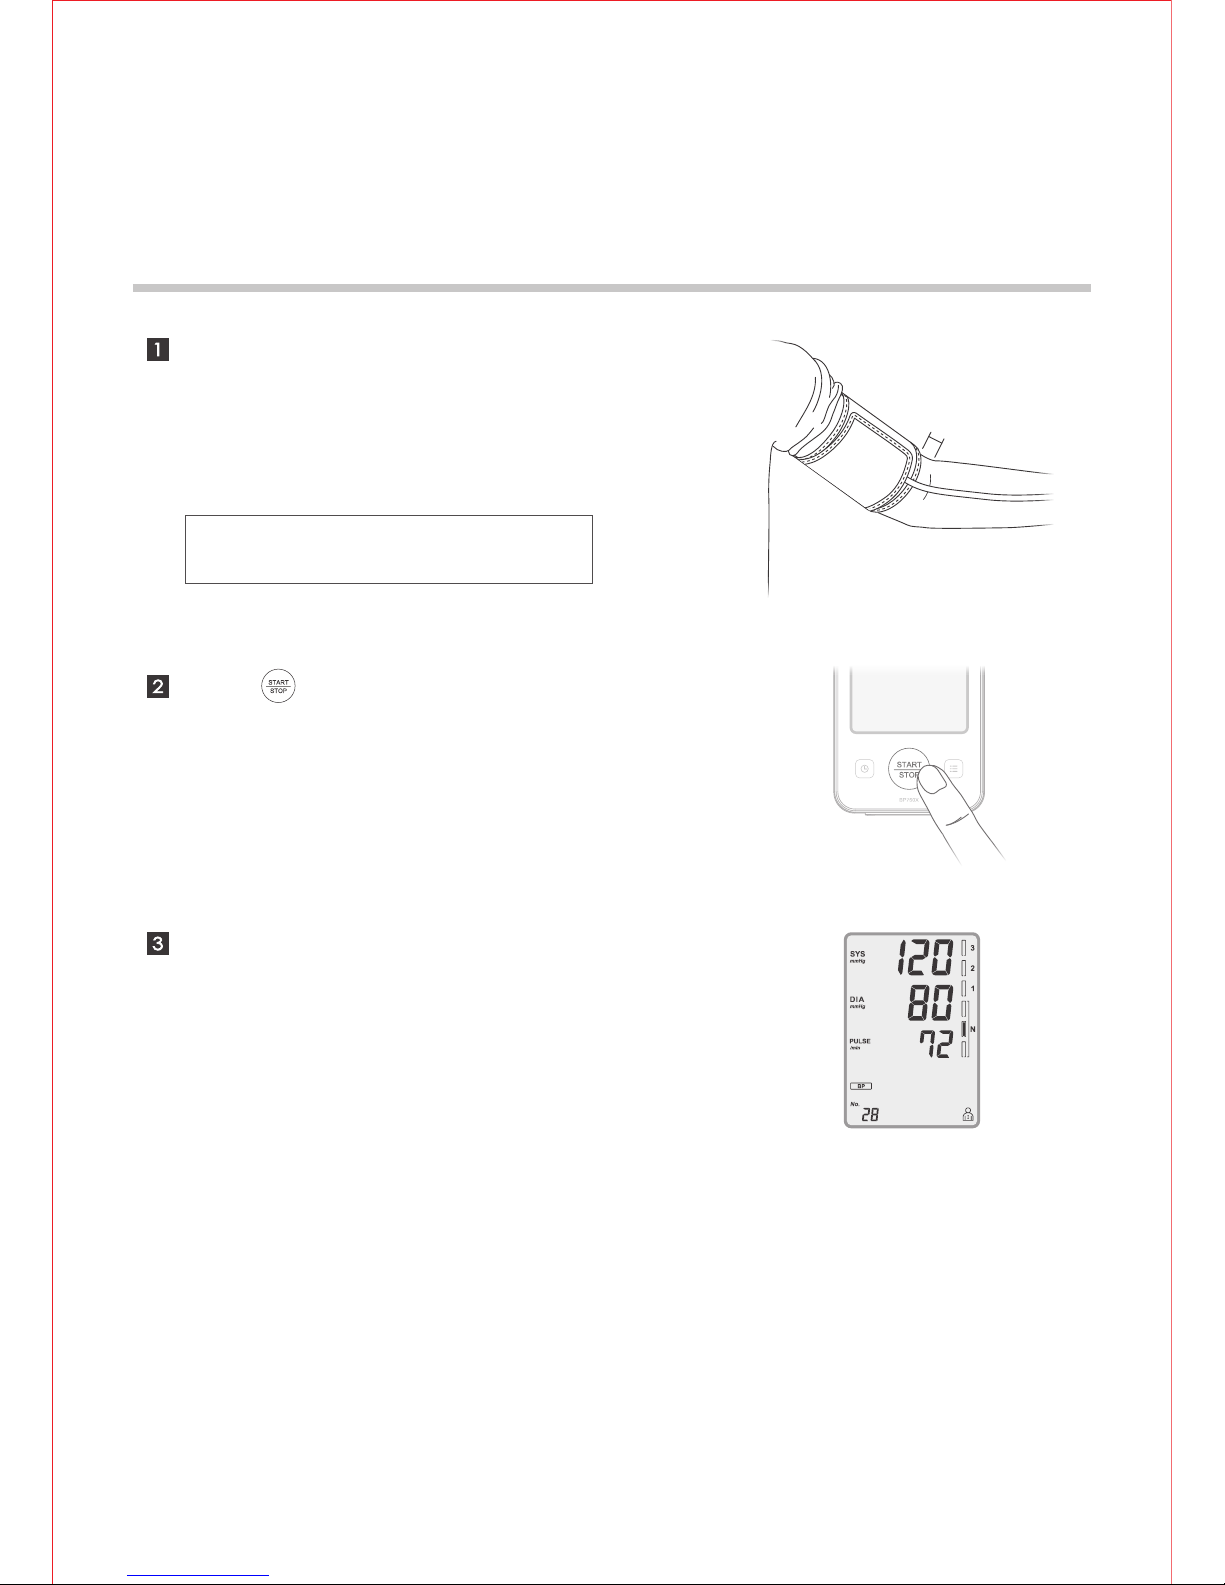
The measurement result will be
displayed on LCD after the
measurement is completed.
Position the arm cuff 1~2 cm
above your elbow with the air tube
running down inside of your
forearm.
1~2 cm
Press button to start your
measurement automatically.
Note : Avoid lying your arm on the air tube
and not over tighten the cuff.
BP750X / BP750X1
12
Page 13
ECG
Cautions & Components Introduction
To assure accurate ECG measurement, please:
Remove the foil on the top and bottom electrodes.
Make sure the electrodes are directly contacting your skin.
If your skin or hands are dry, moisten them with damp cloth before taking
measurement.
Do not let your right hand in contact with your body and avoid heavily
pressing the top and bottom electrodes while taking measurement.
Do not use the ECG Pen in upside down direction.
Do not talk while taking measurement and keep the balance of your body to
avoid influencing the accuracy of measurement result.
13
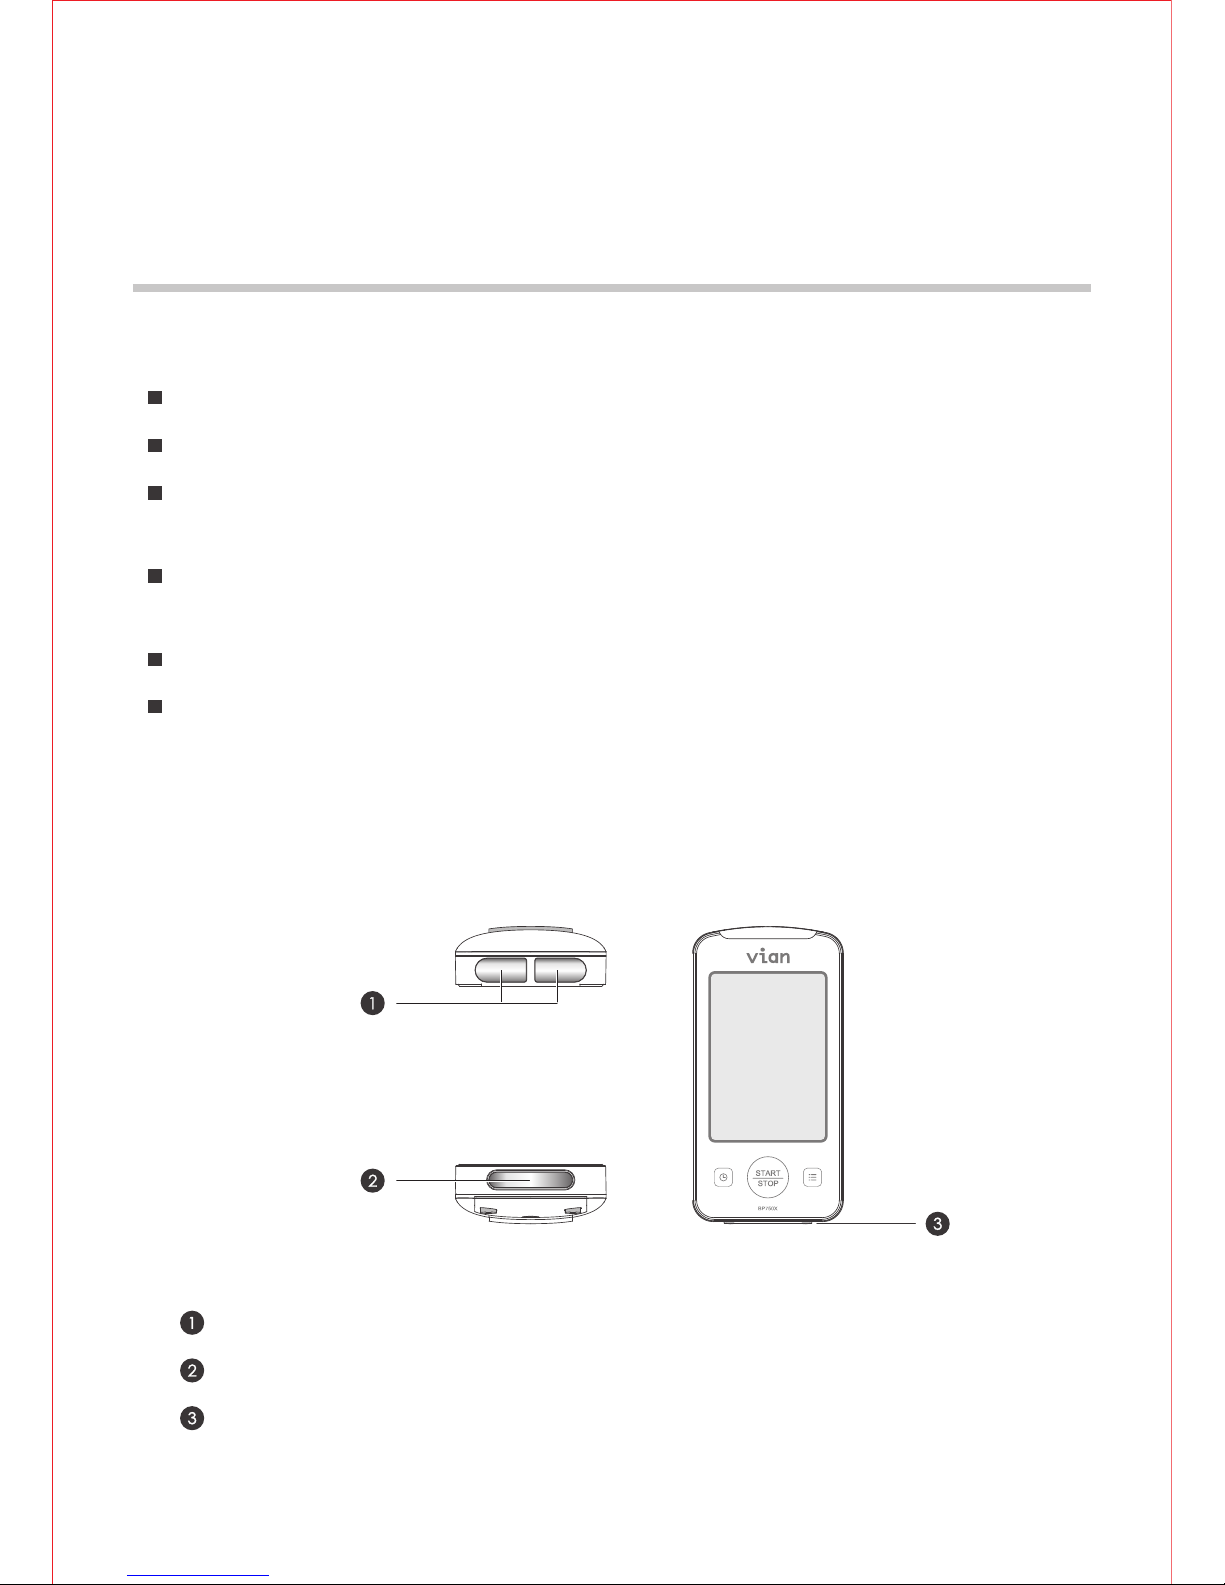
Components
Top Electrodes
Bottom Electrode
Detection Switch
BP750X / BP750X1
Page 14
BP750X / BP750X1
Taking ECG Measurement
14
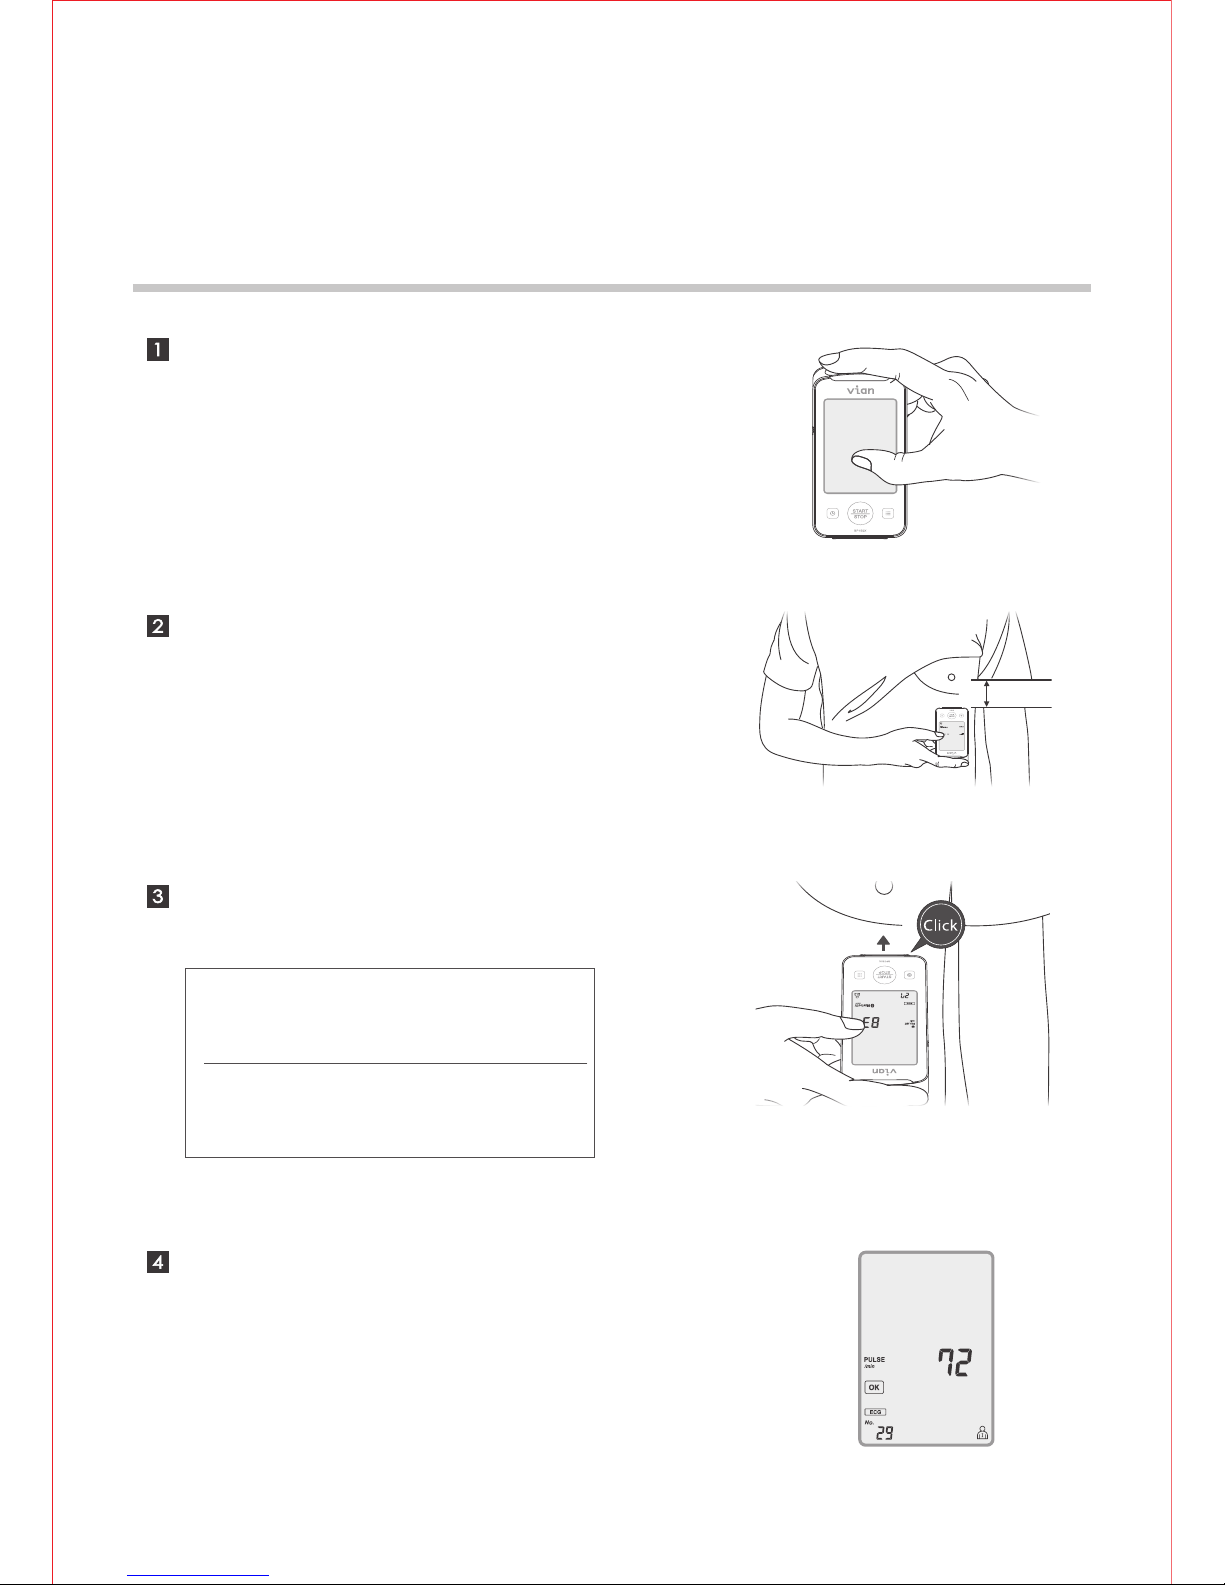
Place your right index finger on
the top electrodes.
Place the bottom electrode on
your lower-left chest supported
by the ribcage.
After 30 seconds measurement,
the result will be displayed on
LCD.
5 cm
Press the device GENTLY until you
hear the click sound.
Note1 : Avoid heavily pressing the
electrodes. Excessive muscle tension will
affect the accuracy of measurement.
Note2 : If the bottom electrode is released
within 3 seconds, the measurement will be
aborted.
Page 15
Note : You may press and hold the button for more than 3 seconds to switch between user
account and .
BP750X / BP750X1
LCD Display
15
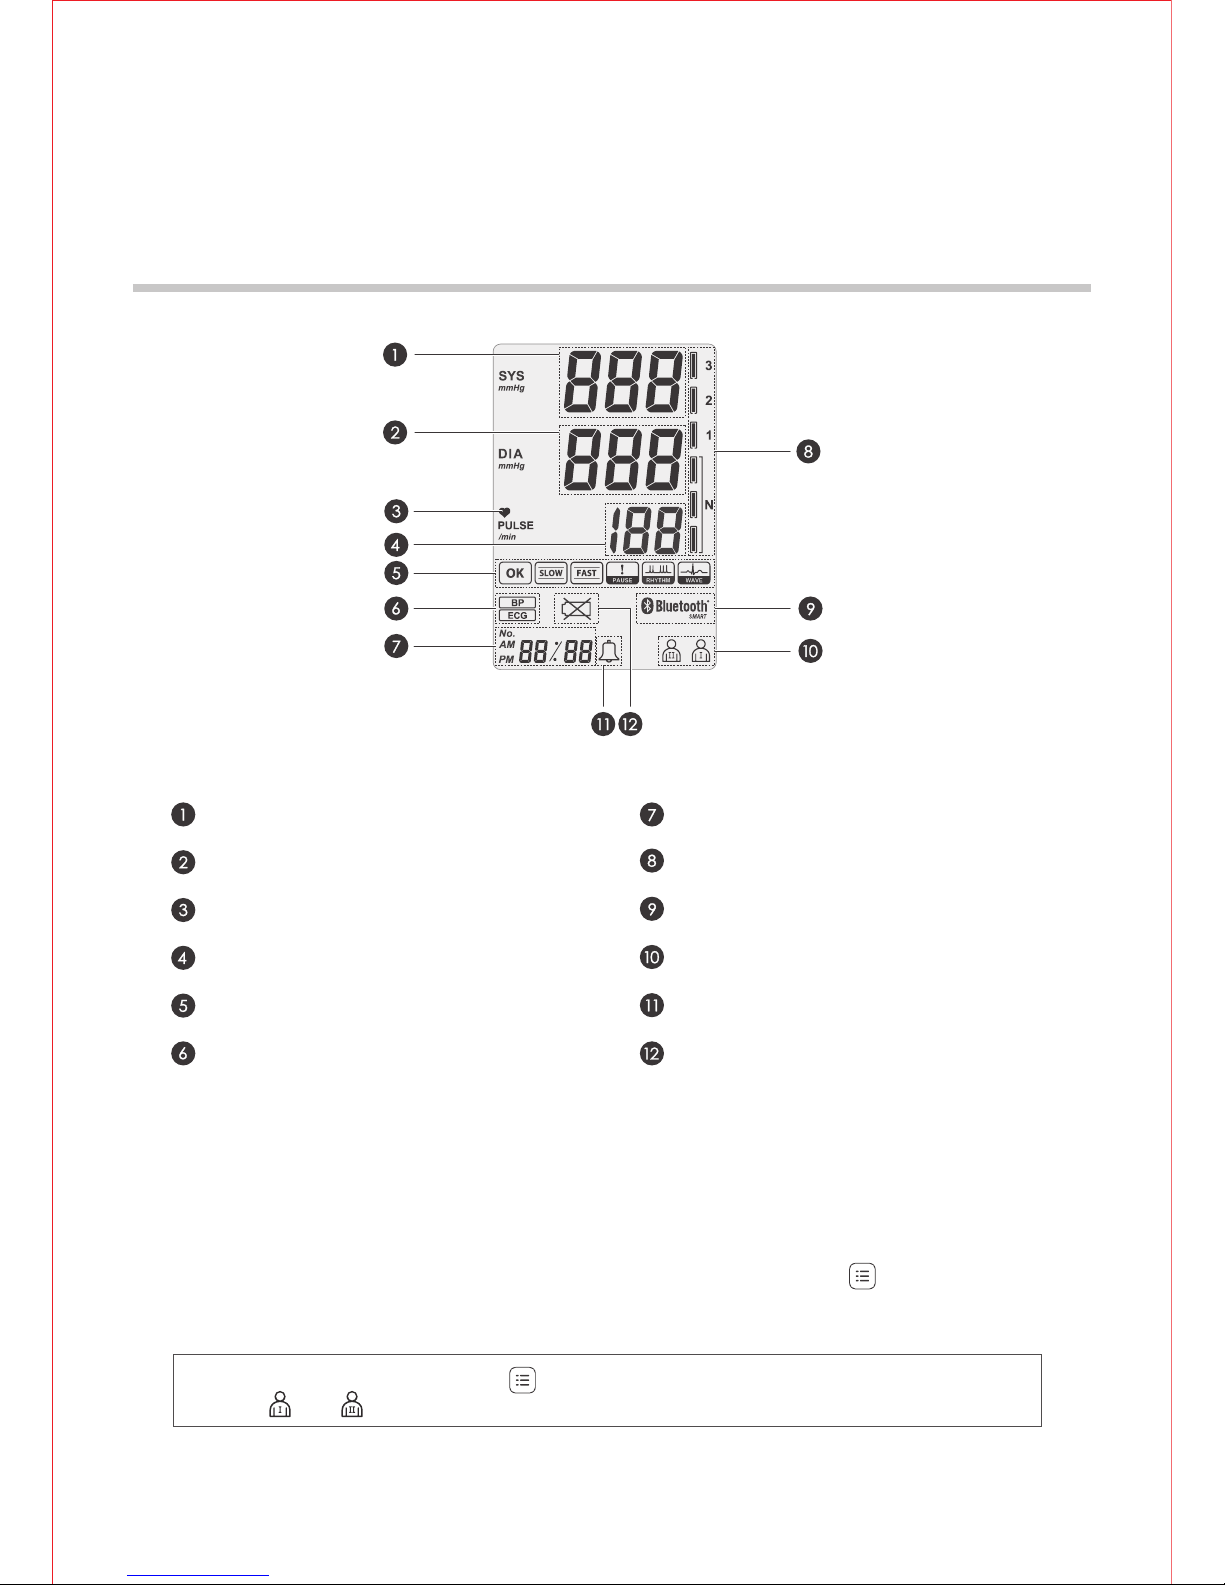
Systolic Blood Pressure
Diastolic Blood Pressure
Heartbeat Indicator
Heart Rate
ECG Result Display
Type of Measurement
Time/Records No./Countdown
WHO Classification Indicator
Bluetooth Connection
User Account
Alarm Indicator
Low Battery Indicator
Reviewing Measurement Records
When the device is shut down or in standby mode, you may review the
previous measurement results in cyclic order by pressing button
repeatedly.
Page 16
Preparation Before Taking
Measurement
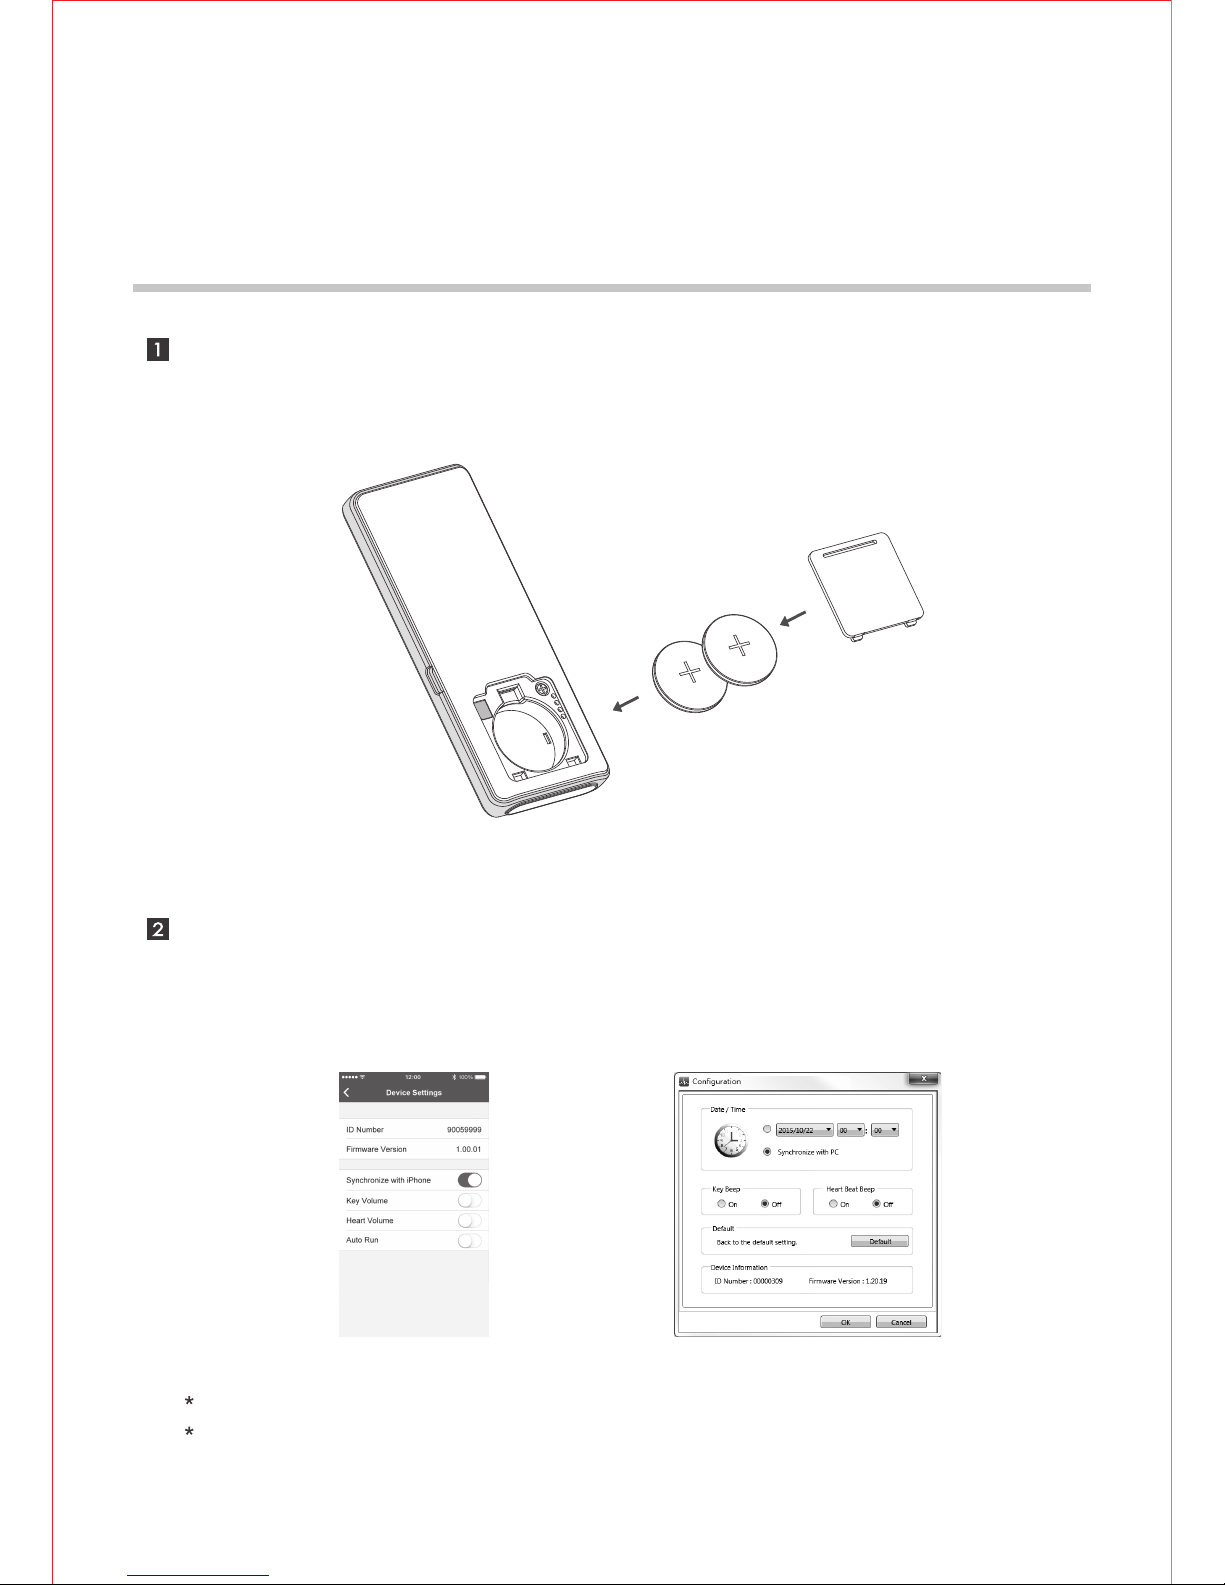
Remove the battery cover and install two coin-typed battery by following
the + (positive) and - (negative) polarities indicated on the battery
compartment.
16
Connect the device with iBP Monitor APP* on your Smartphone/pad, or
connect with BP ECG Studio* on your computer, You may change the time
setting of the device by entering [Setting] mode.
880E
iBP Monitor APP : Please refer to page 22 for further introduction.
BP ECG Studio : Please refer to page 20 for further introduction.
Page 17
880E
ECG
Cautions & Components Introduction
To assure accurate ECG measurement, please:
Remove the foil on the top and bottom electrodes.
Make sure the electrodes are directly contacting your skin.
If your skin or hands are dry, moisten them with damp cloth before taking
measurement.
Do not let your right hand in contact with your body and avoid heavily
pressing the top and bottom electrodes while taking measurement.
Do not use the ECG Pen in upside down direction.
Do not talk while taking measurement and keep the balance of your body to
avoid influencing the accuracy of measurement result.
17
Components
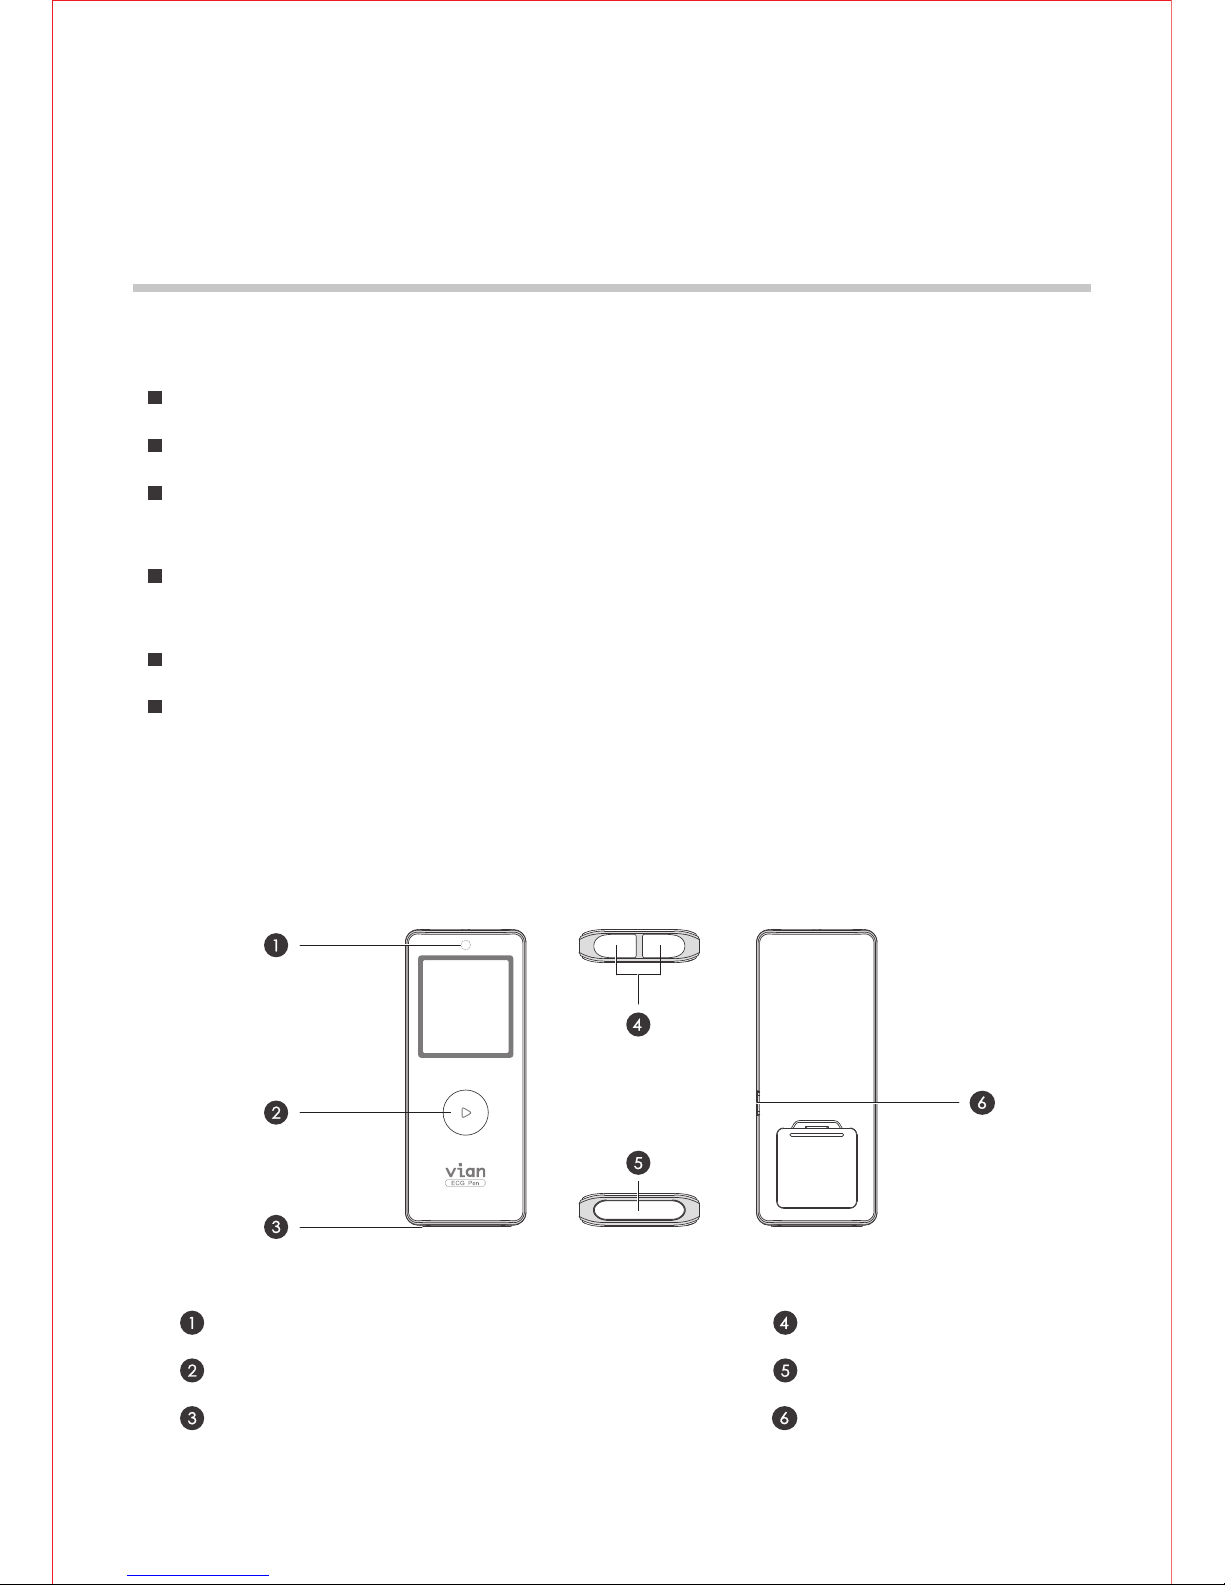
Heartbeat LED
Power Button: Press 3 sec to turn on/off.
Detection Switch
Top Electrodes
Bottom Electrode
Micro USB Port
Page 18
5 cm
880E
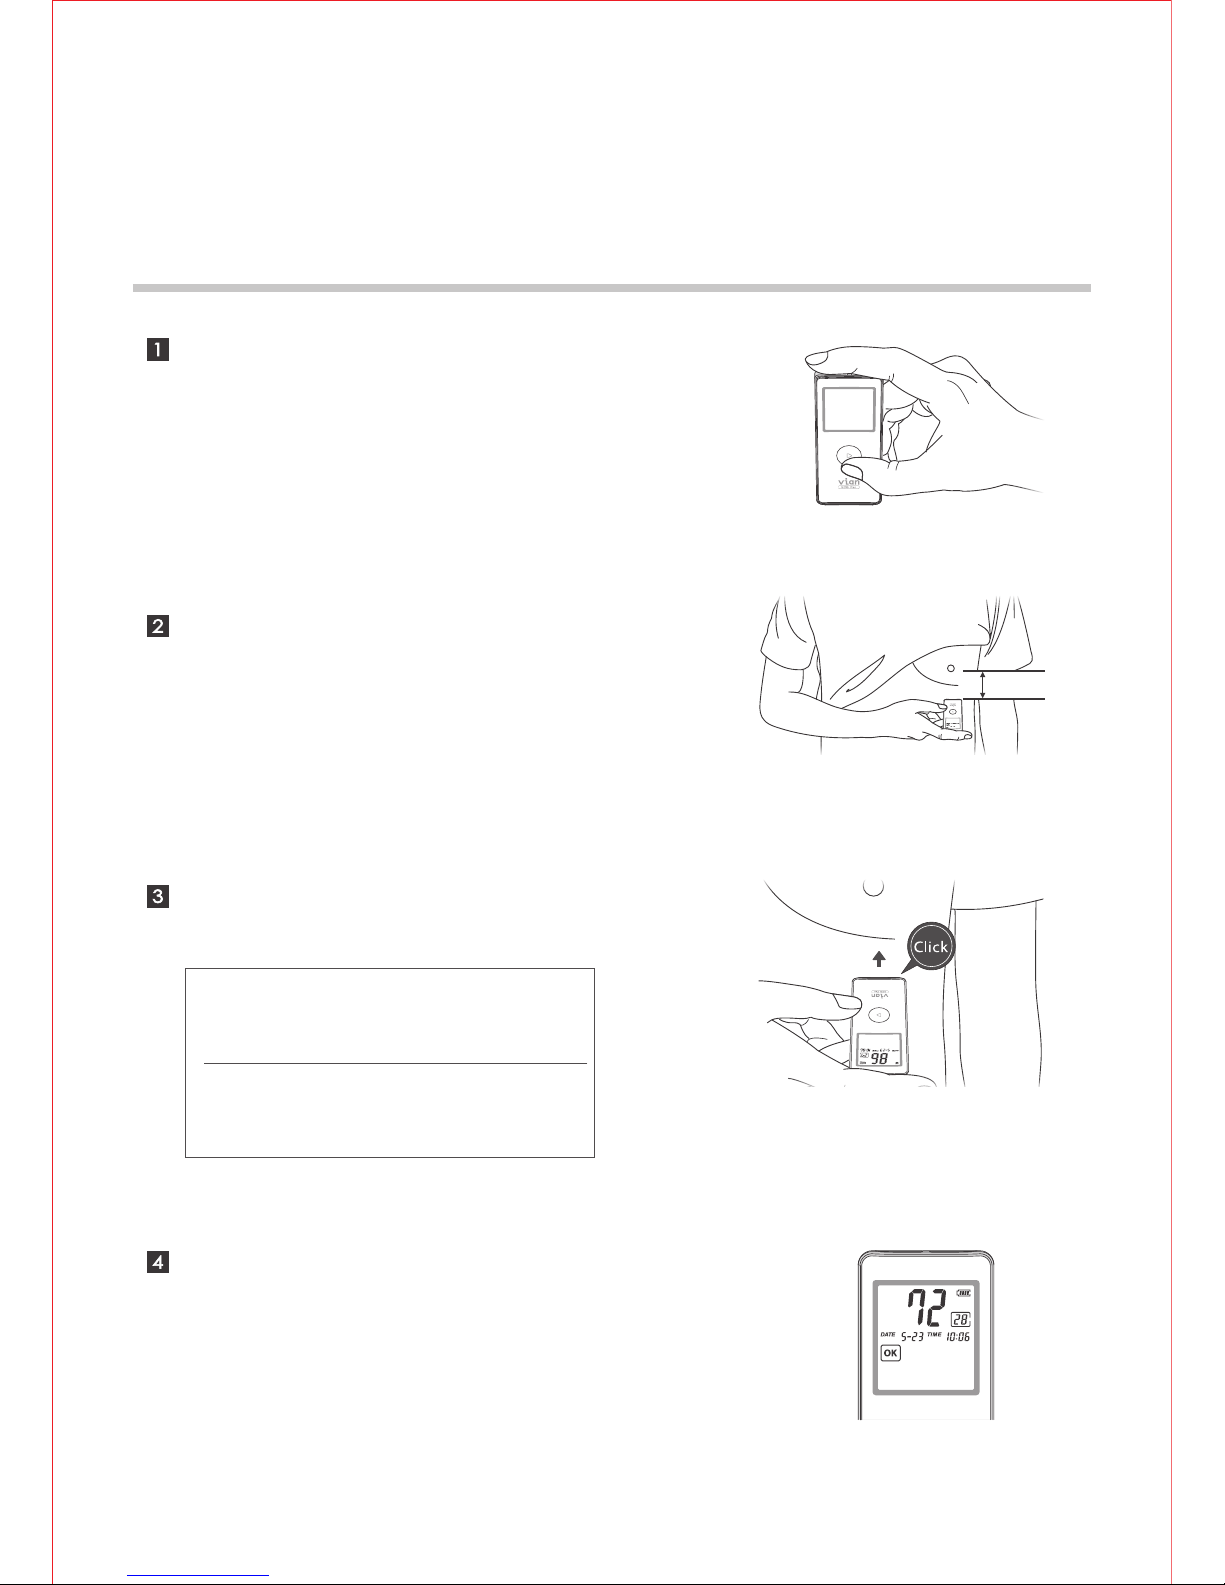
Taking ECG Measurement
18
Place your right index finger on
the two top electrodes of the
device and hold the ECG Pen
face up in your hand.
Place the bottom electrode of the
ECG Pen on your lower-left chest
supported by the ribcage.
After 30 seconds measurement,
the result will be displayed on
LCD.
Press the ECG Pen GENTLY until
you hear the click sound.
Note1 : Avoid heavily pressing the
electrodes. Excessive muscle tension will
affect the accuracy of measurement.
Note2 : If the bottom electrode is released
within 3 seconds, the measurement will be
aborted.
Page 19
880E
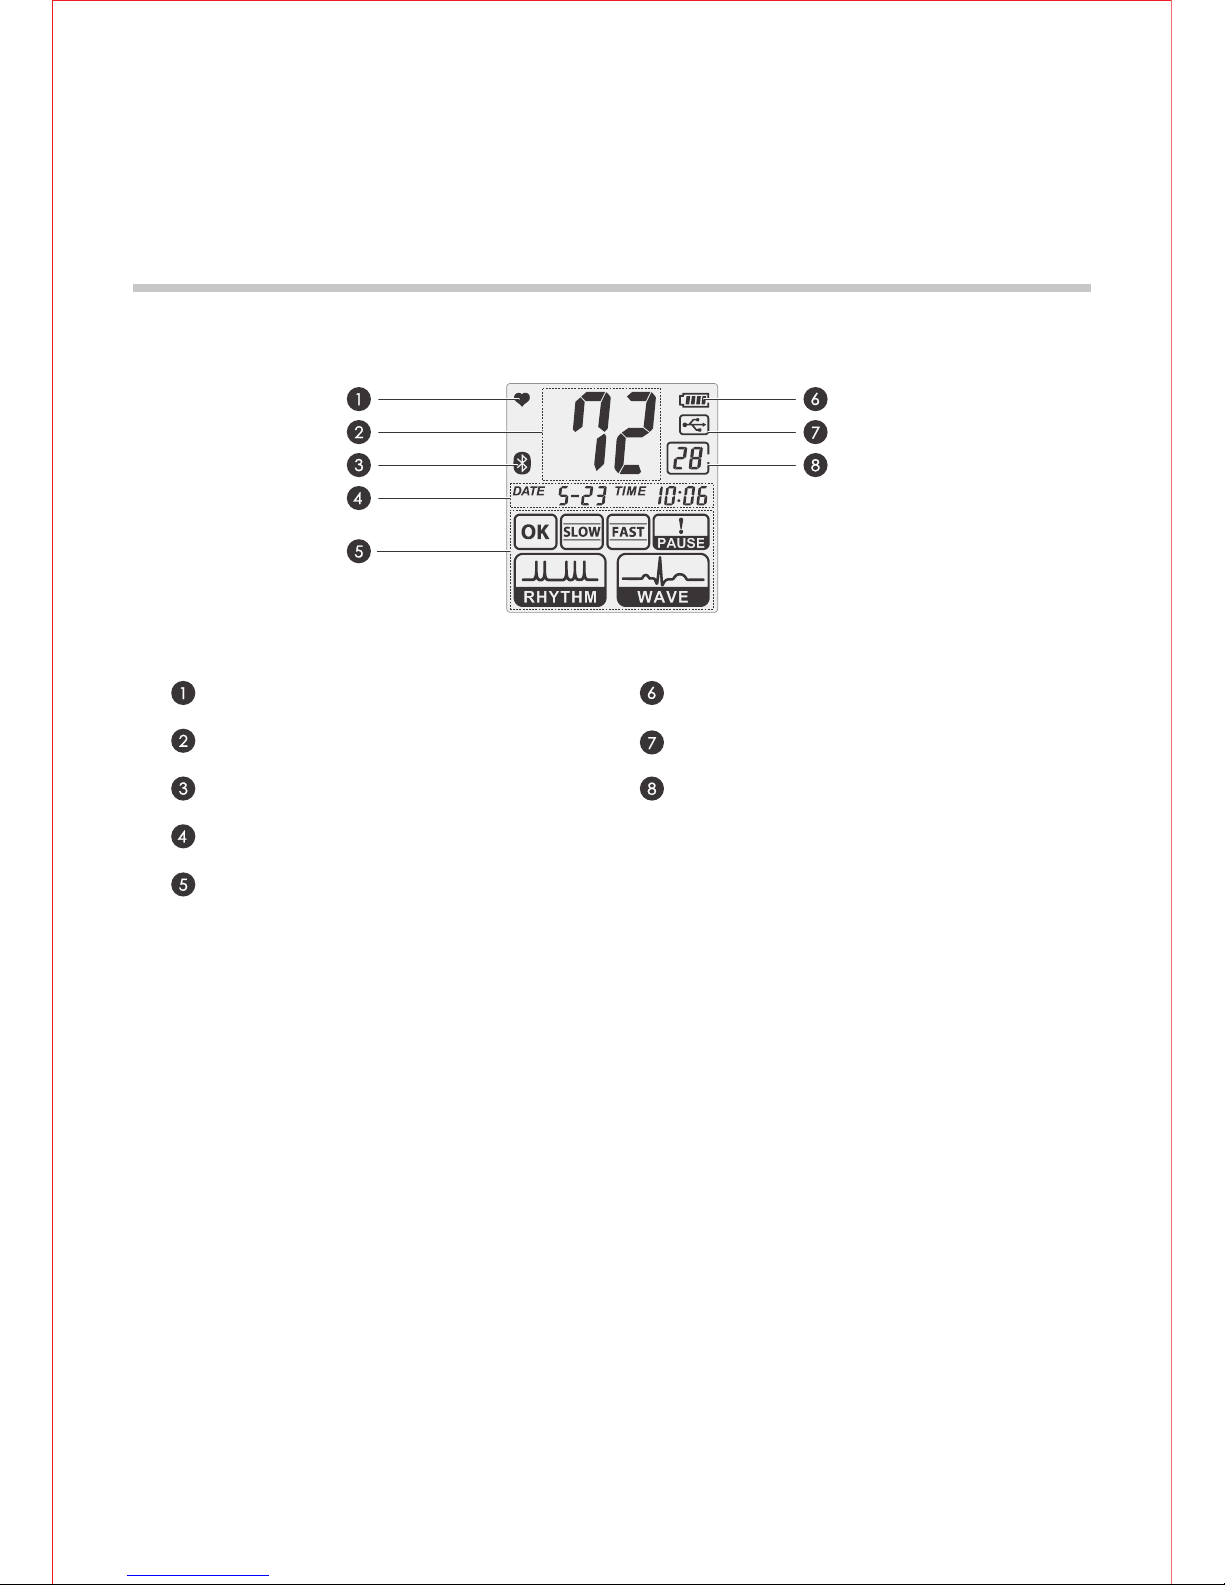
LCD Display
19
Heartbeat Indicator
Heart Rate
Bluetooth Connection
Time and Date
ECG Result Display
Battery Level Indicator
USB Connection
Records No./Countdown
Reviewing Measurement Records
When the ECG Pen is on, you may review the previous measurement
results in cyclic order by pressing the power button repeatedly.
Page 20
BP ECG Studio
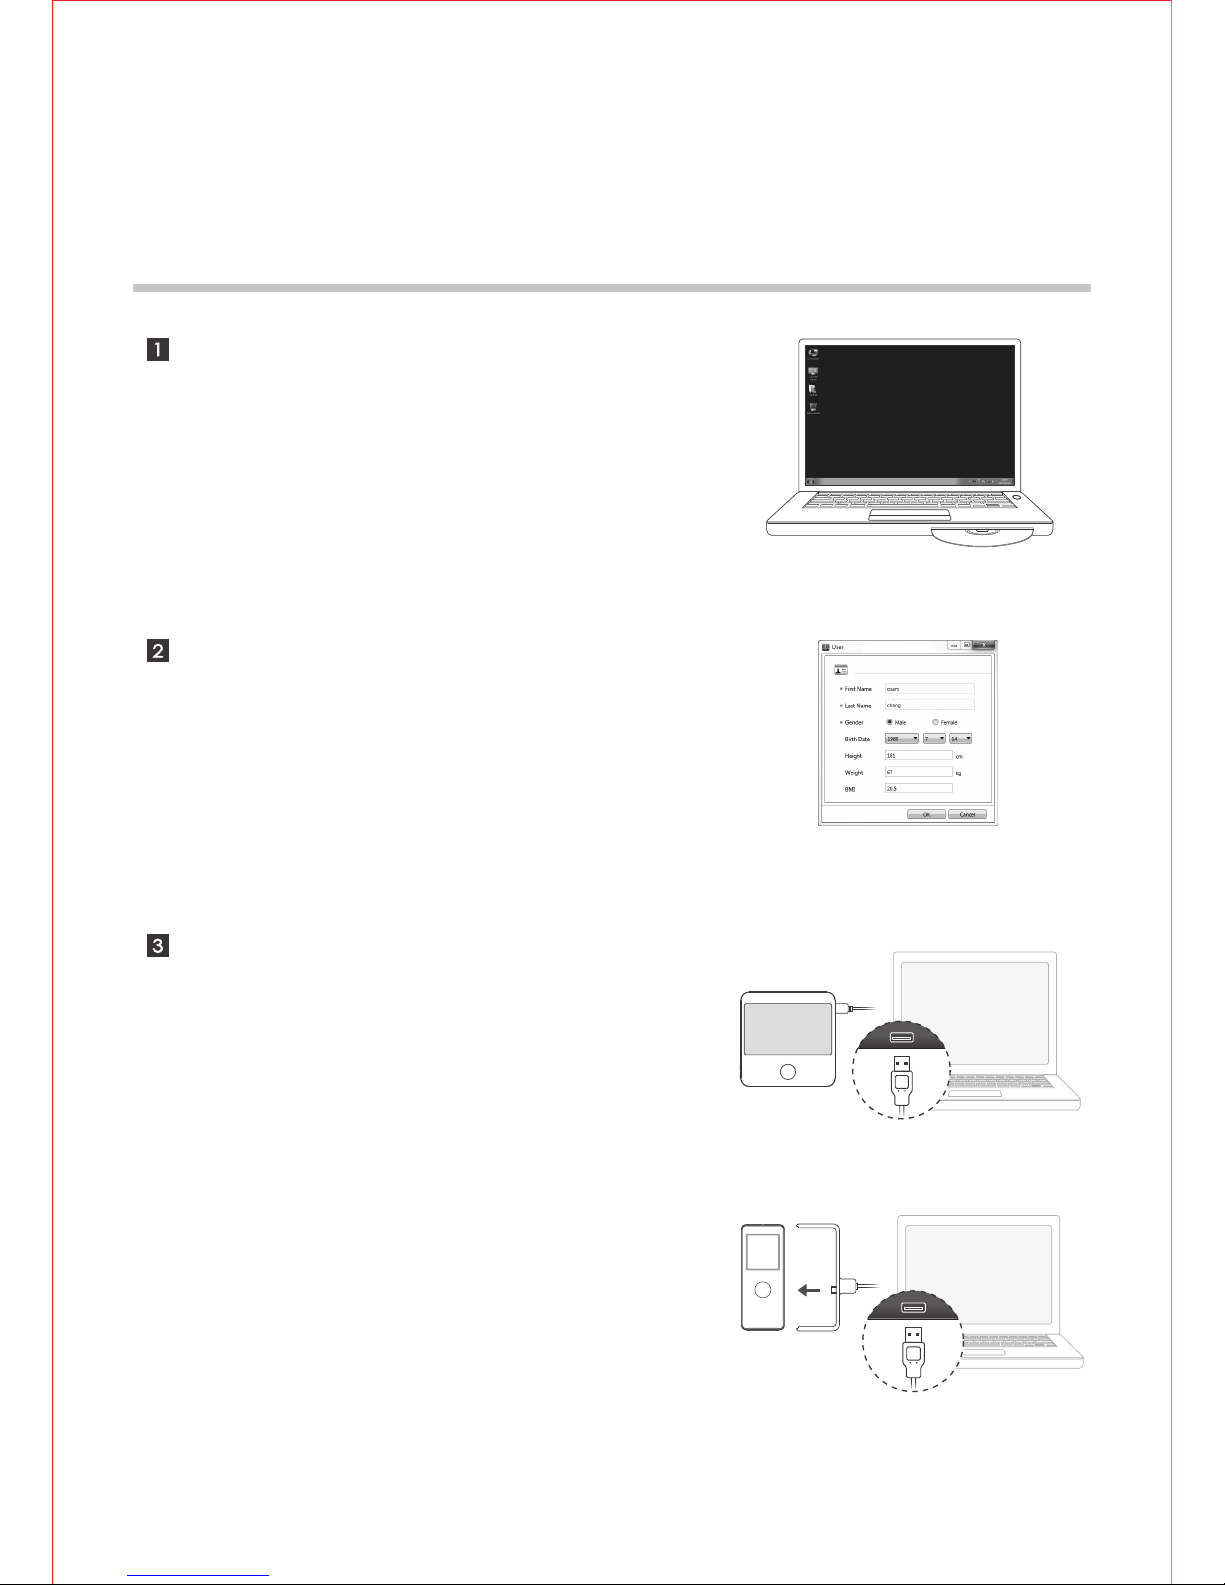
BP ECG Studio
20
Use the companion CD to install
BP ECG Studio.
Create/select a user account
and log in.
Plug the connector of USB
extension cord into USB port of
your computer.
Page 21
BP ECG Studio
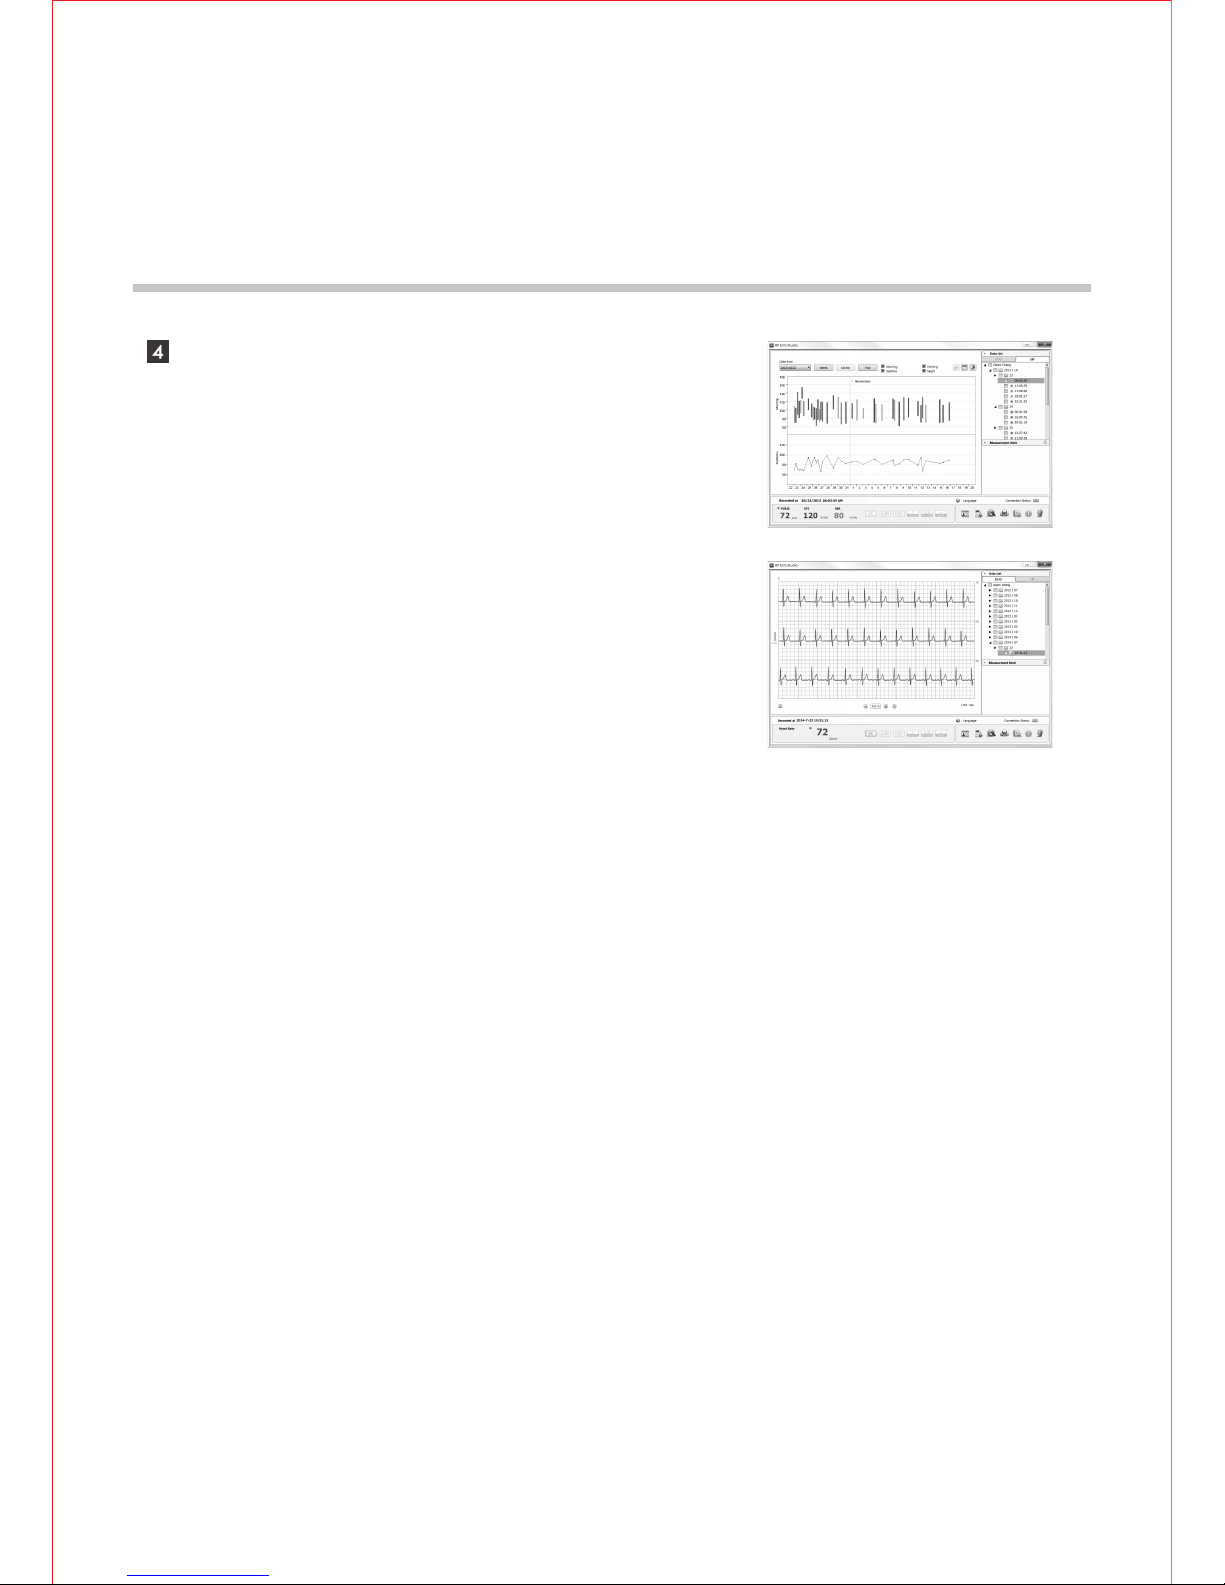
BP ECG Studio
21
You may review, manage and
generate reports of your BP/ECG
records after downloading.
Page 22

OP700 / OH850
OmniPAP Description
Main Features
22
Intended Use
The OmniPAP system is intended to be used in the treatment of adult OSA
(Obstructive Sleep Apnea).
Upgradable Function
By connecting with the Integrated Upgrading Component, the OmniPAP CPAP
system can be easily upgraded to APAP system with more powerful function.
The air pressure delivered can change from only one constant air pressure to
automatically increasing/decreasing the pressure depending on the condition of
airway for you to experience a much more comfortable treatment in an
economical way.
Ramp Feature
OmniPAP system provides "Ramp Function," which gradually increases the
pressure to the prescription pressure setting in a preset period of time to allow
you to fall asleep more comfortably.
Auto ON/OFF
When Auto ON/OFF is enabled, air delivery will start automatically after you
breathe into the mask for 3 to 5 times, and the air delivery will automatically
stop and return to Standby Mode after you remove the mask from your face for
30 to 60 seconds.
Altitude Compensation
The altitude where the OmniPAP system is used may influence the output
pressure. Altitude Compensation can help OmniPAP system deliver pressure
closer to the prescription pressure setting at higher altitude.
Page 23
OP700 / OH850
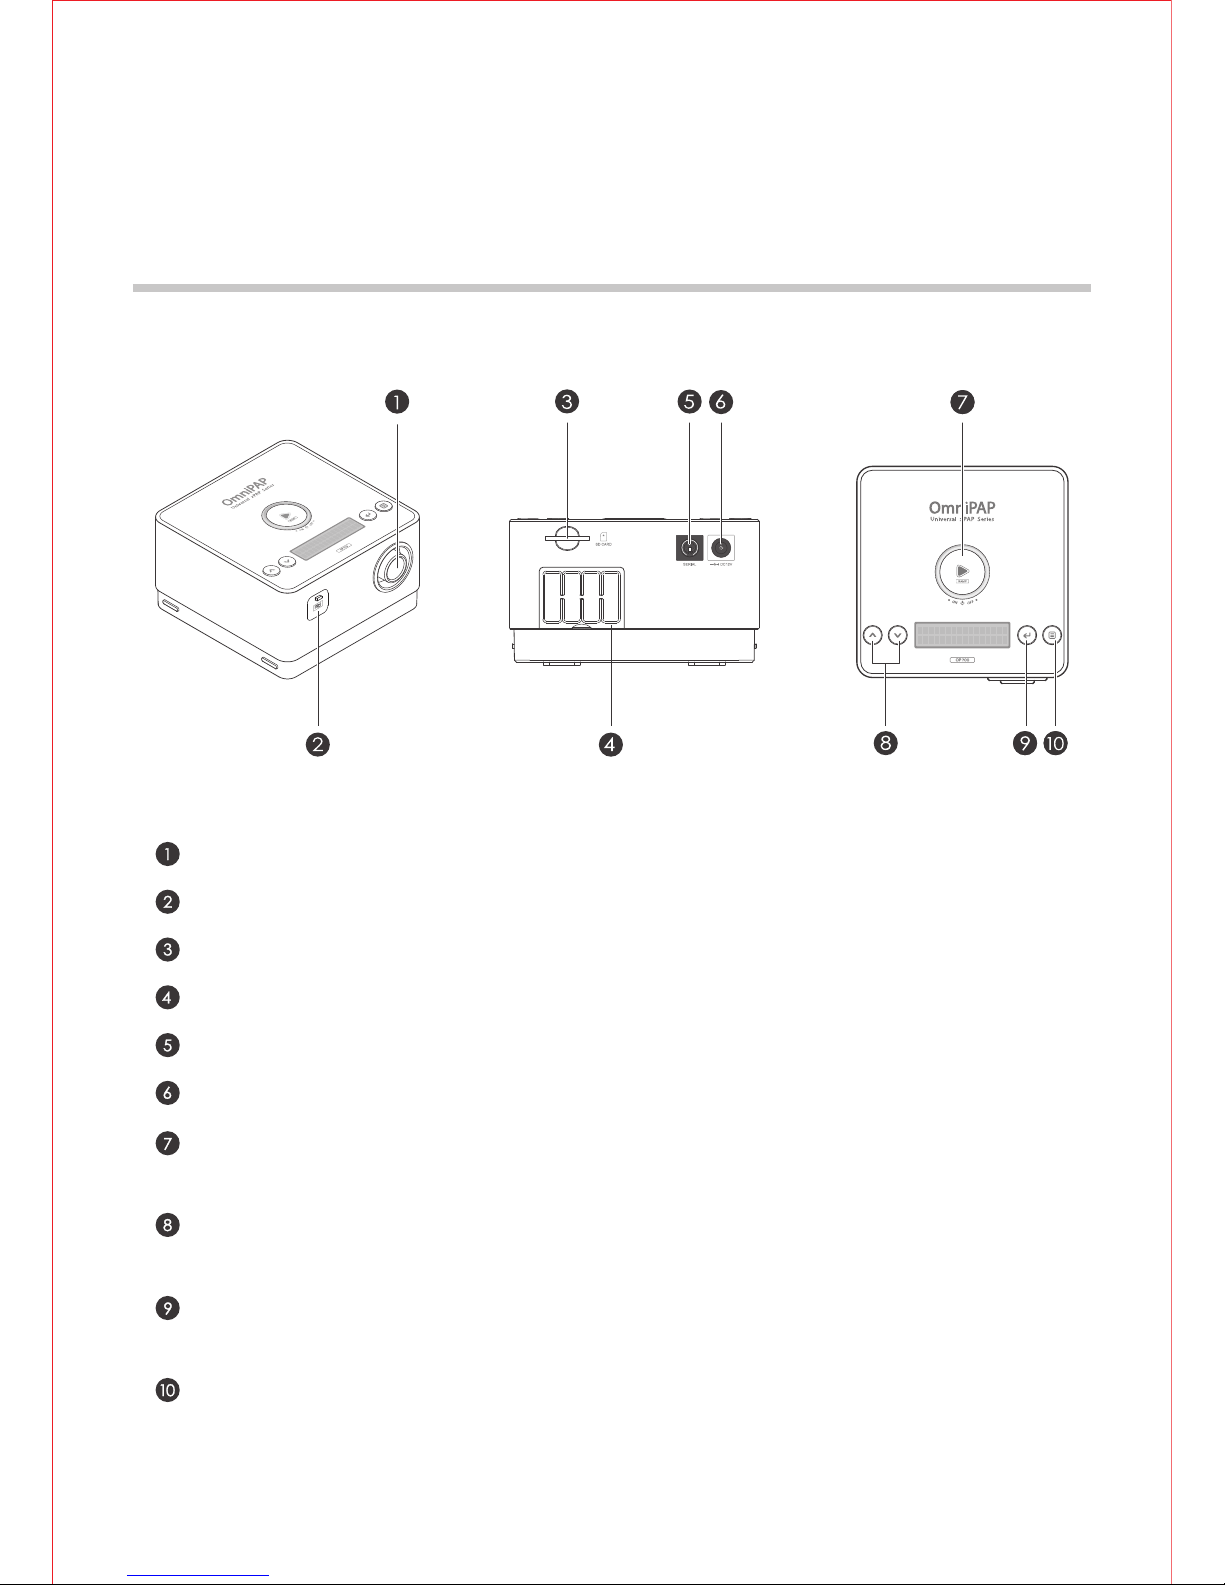
Main Unit Description
23
Air outlet
Integrated Upgrading Component extension port (for OH850)
SD card slot (for OH850)
Filter cover
Serial port
Power socket
START / RAMP / POWER OFF
To start the treatment or the ramp period.
UP and DOWN
To scroll selection options or adjust values in menu operation.
ENTER
To apply the selected option/value in menu operation.
MENU
To enter menu operation.
Page 24
OP700 / OH850
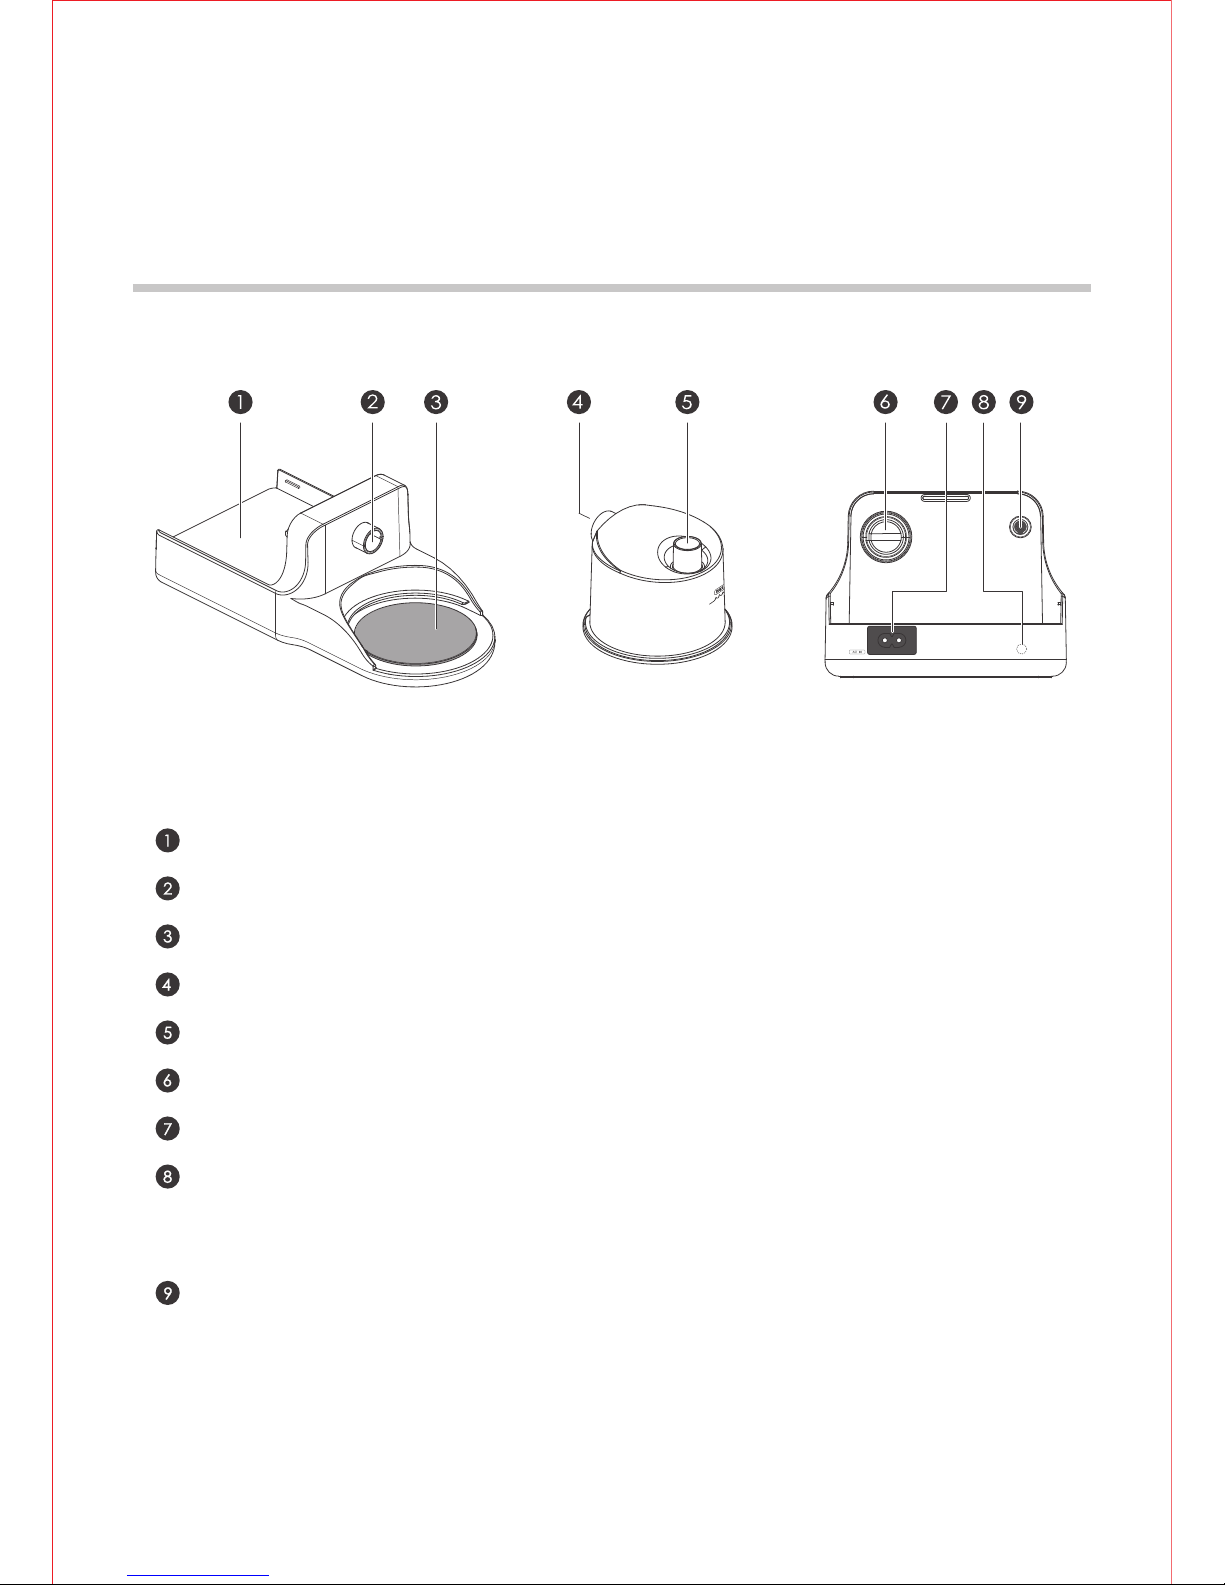
Integrated Upgrading Component
Description
24
OmniPAP main unit placed area
Air outlet
Chamber placed area (heater)
Chamber inlet
Chamber outlet
Air inlet
Power plug port
Humidifier indicator
Green light : Humidifier is on
Orange light : the heater is heating
Connection port with main unit
Page 25
OP700 / OH850
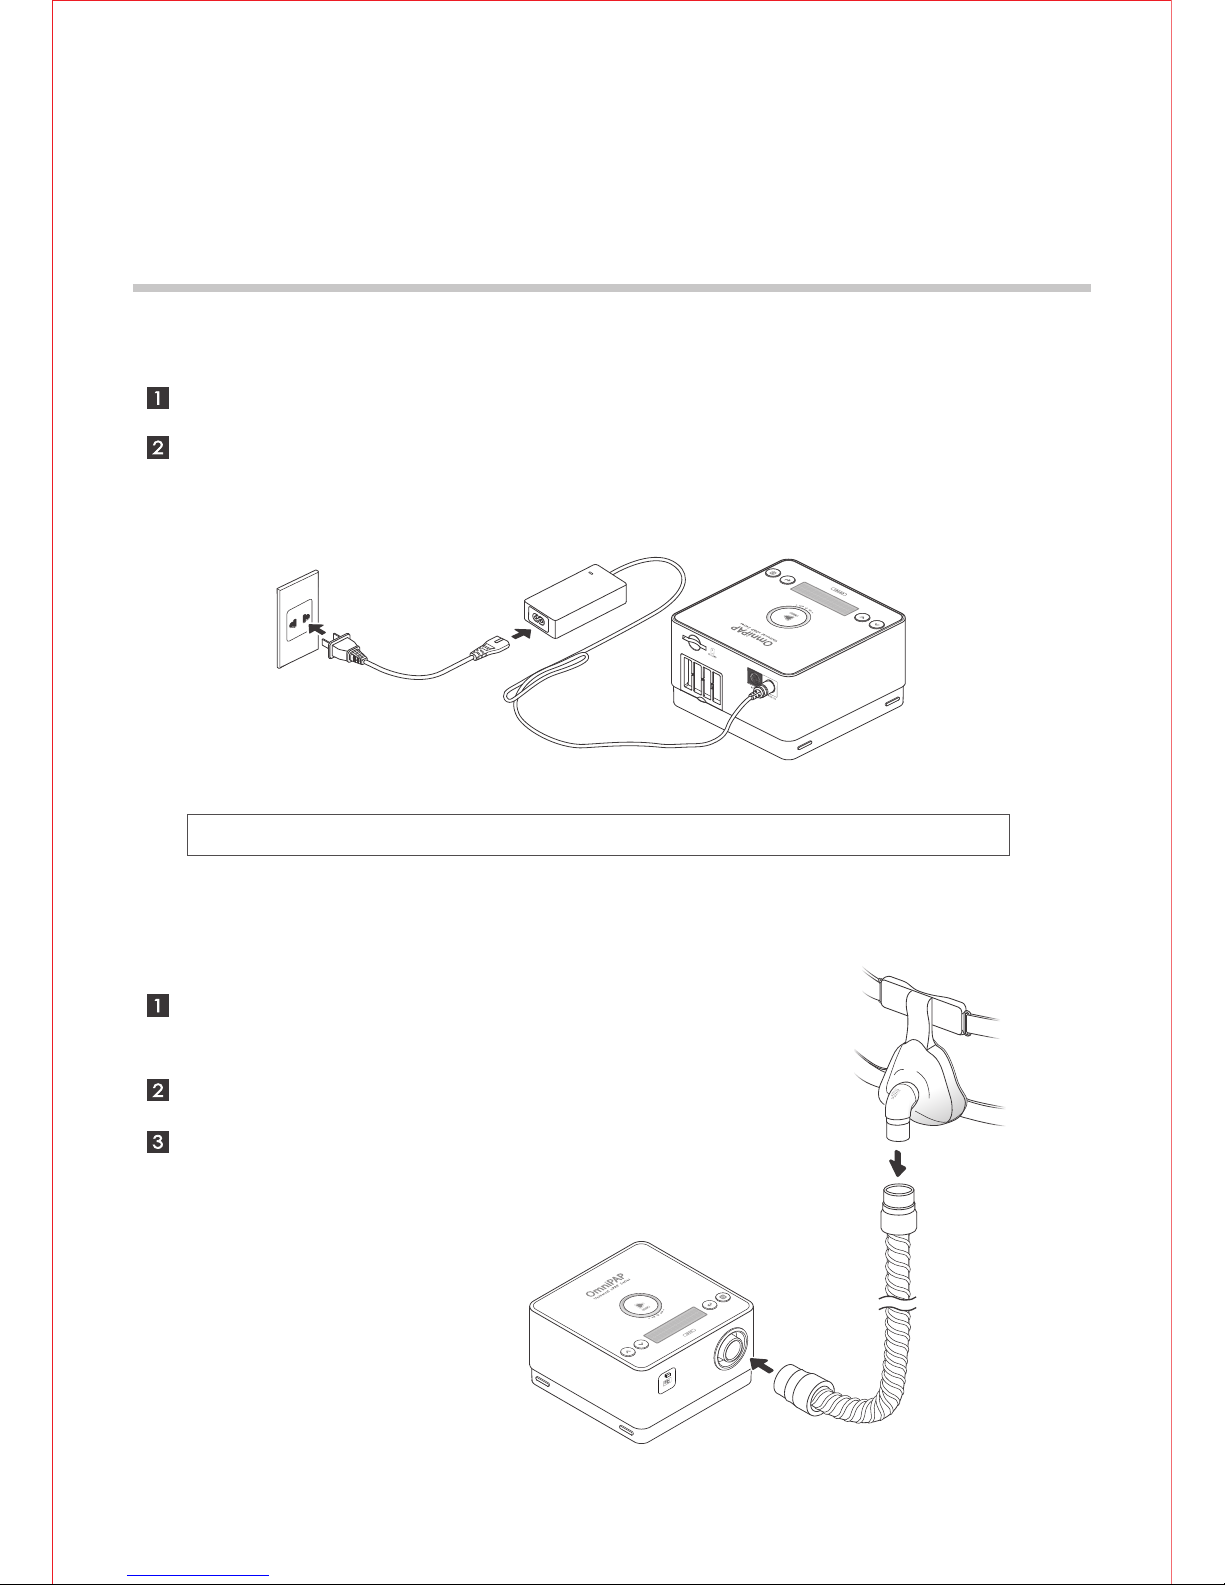
OP700
OmniPAP CPAP SETUP
25
Note : Make sure the power adapter will not be pulled during your treatment.
Place the device on a stable surface beside the bed.
Connect the power adapter to the power supply connector at the rear end of
the device, and plug the power cord to the wall outlet.
Intended Use
Assemble your mask system according to the
mask user’s manual.
Connect your mask to one end of the air tubing.
Set up the Mask
Connect the other end of the air tubing to the
air outlet of the device.
Page 26
OP700 / OH850
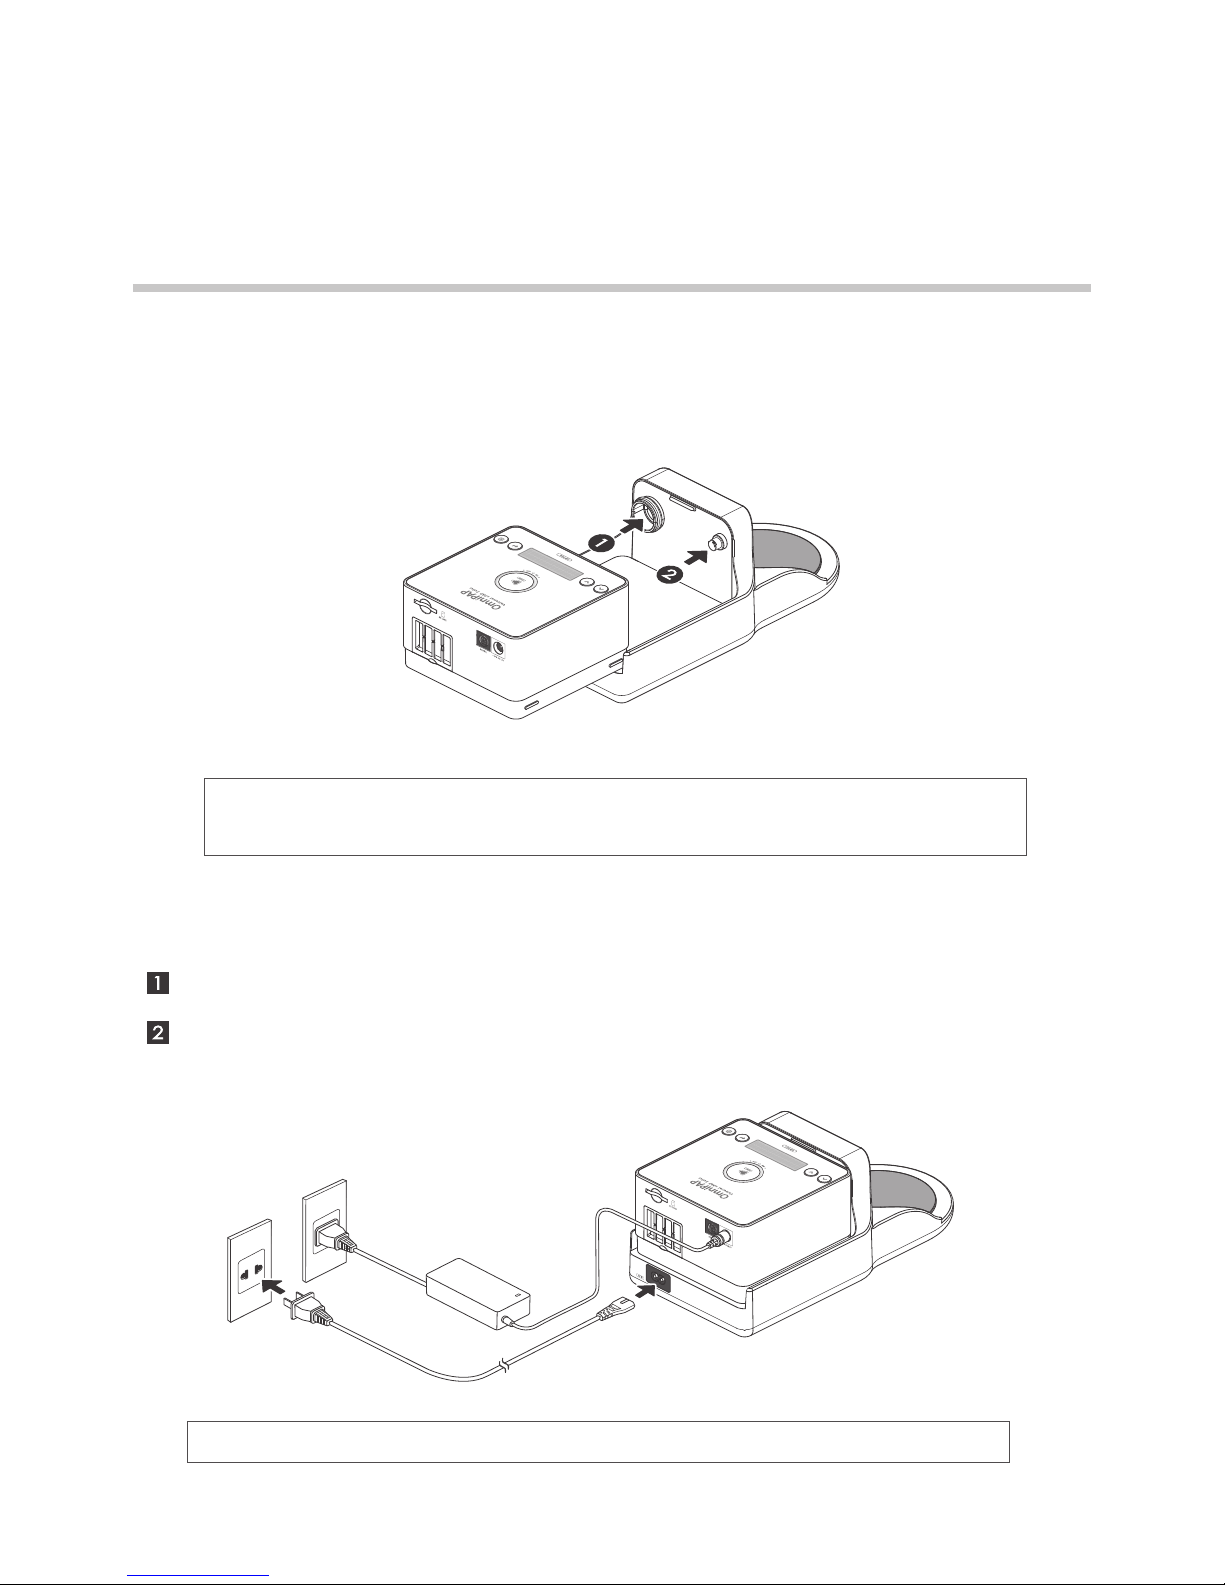
OH850
OmniPAP APAP SETUP
26
Note : Make sure the device is unplugged when you insert/remove the Integrated
Upgrading Component.
Connect the Integrated Upgrading Component to the extension port of the
device.
Set up the Integrated Upgrading Component
Note : Make sure the power adapter will not be pulled during your treatment.
Place the device on a stable surface beside the bed.
Connect the power adapter to the power supply connector at the rear end
of the device, and plug the power cord to the wall outlet.
Install the System
Page 27
OP700 / OH850
OH850
OmniPAP APAP SETUP
27
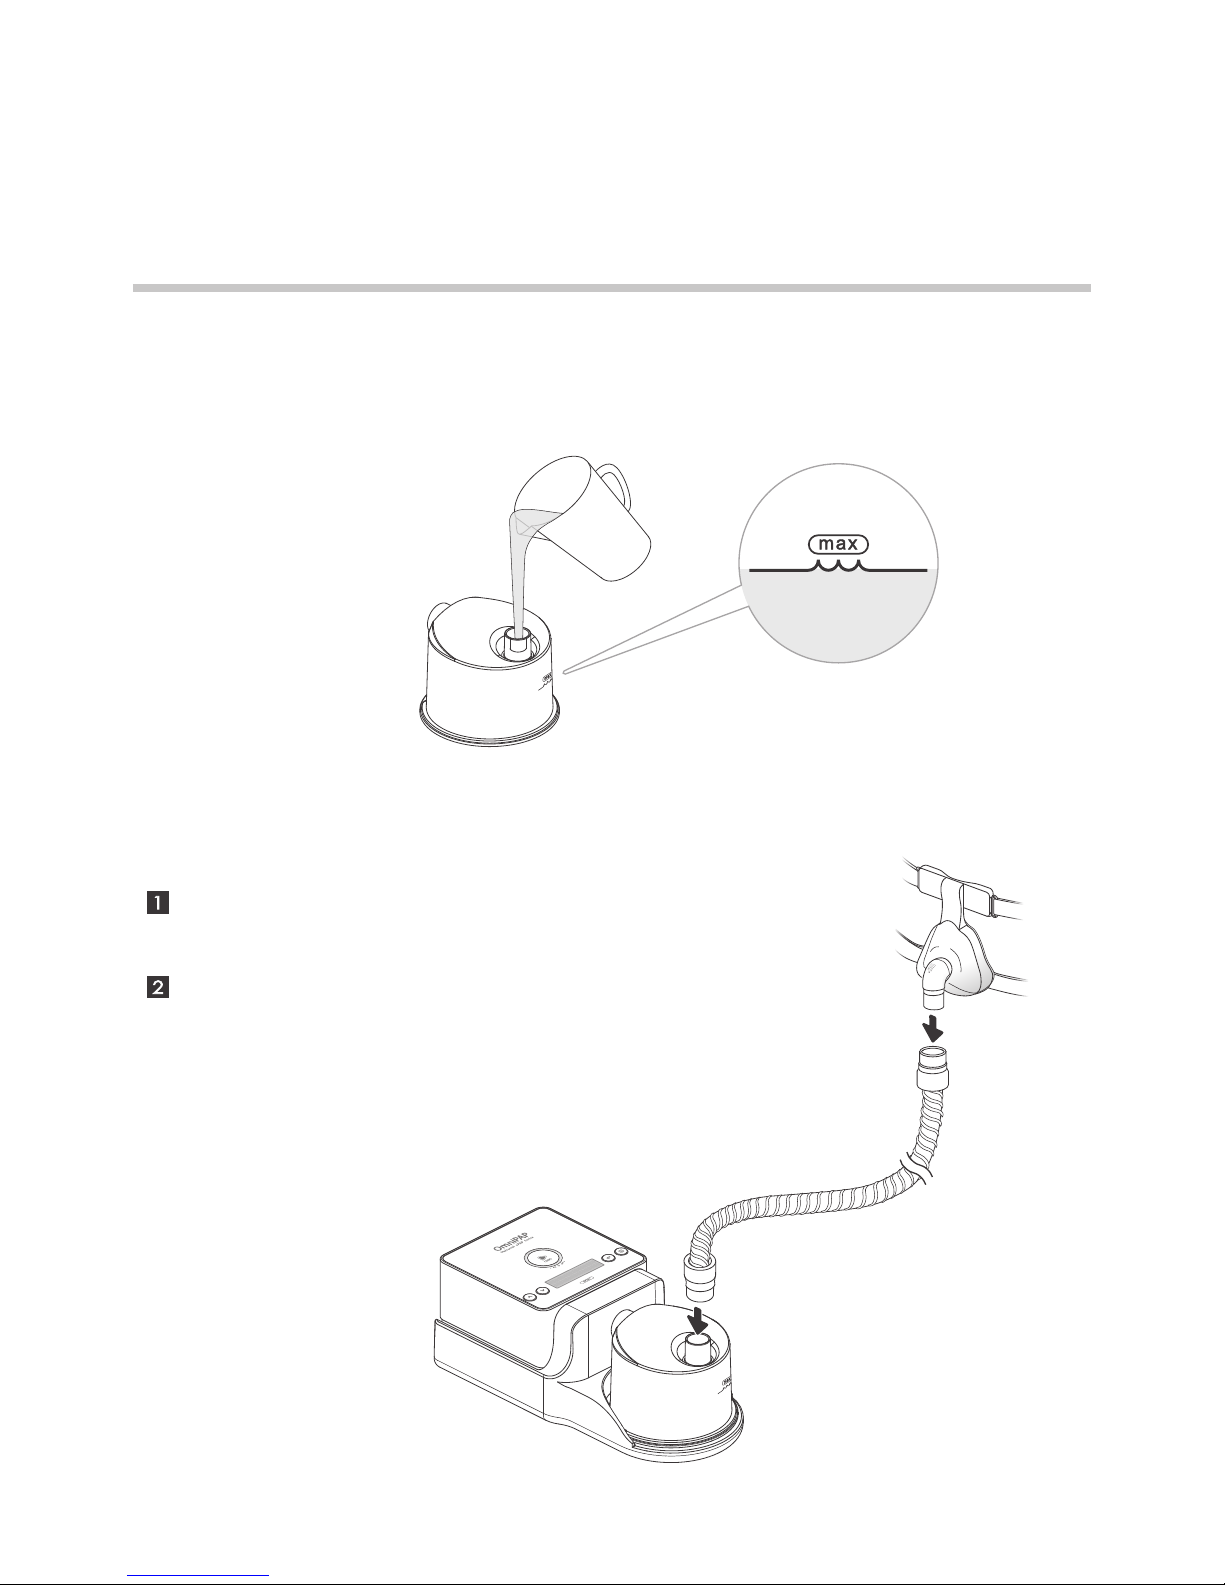
Pour the drinking water into the chamber, and do not exceed the maximum
level.
Chamber
Assemble your mask system according
to the mask user’s manual.
Connect your mask to the other end of
the tubing.
Set up the Mask
Page 28
OP700 / OH850
HOW TO USE OmniPAP
28
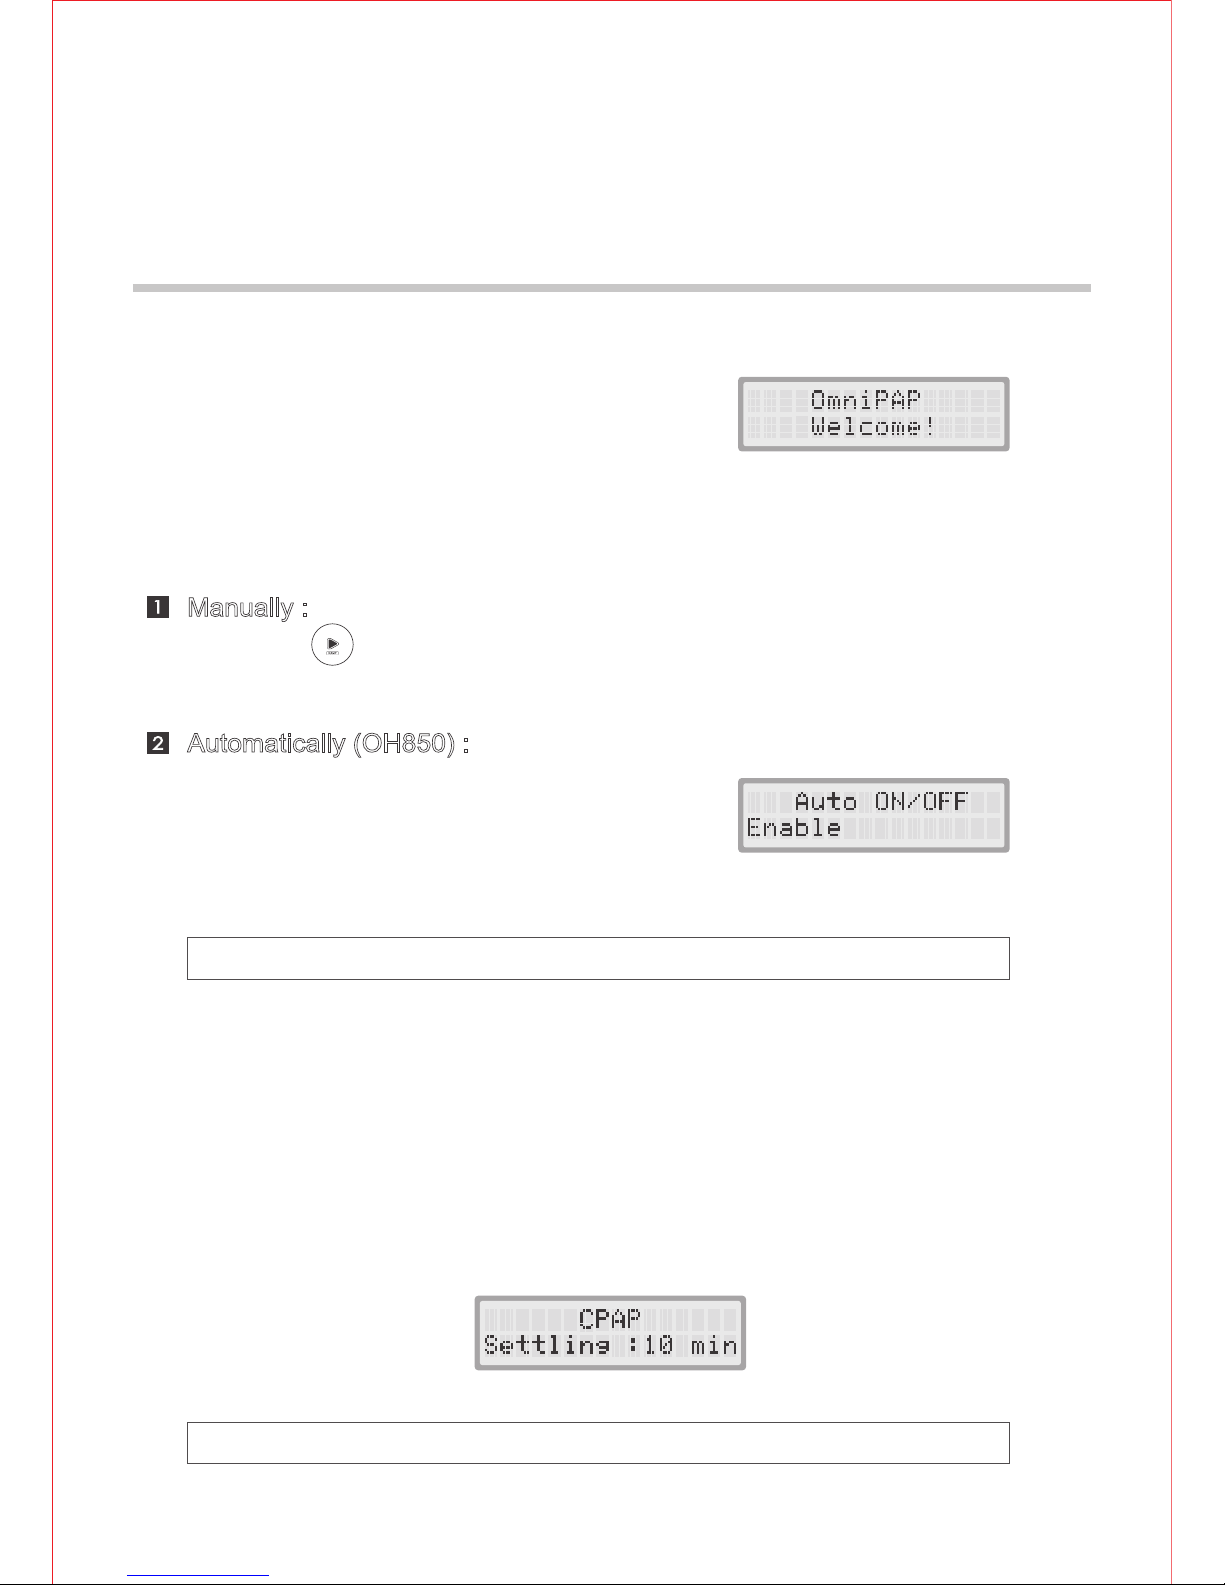
Enter Standby Mode
After connecting to the power source, the
device will enter the Standby Mode and
LCD will display the welcome message.
Note : To enable the Auto ON/OFF function, please refer to Menu Introduction.
Start Air Delivery
Manually :
Press the button and the air delivery
will start immediately.
Automatically (OH850) :
When the Auto ON/OFF function is enabled,
the air delivery will start automatically after
you breathe into your mask directly for 3 to
5 times.
Note : To adjust the ramp period, please refer to Menu Introduction.
Using the Ramp Feature
At the beginning of treatment, the "Ramp Function" will enable pressure to
gradually increase to the prescription pressure setting in a preset period of
time. The default ramp period is 10 minutes, and the delivered pressure will
increase proportionally (OP700) or remain at the minimum pressure
(OH850) during ramp period.
Page 29
OP700 / OH850
29
HOW TO USE OmniPAP
Mask Fitting
Attach the mask to your face and adjust the mask position to ensure minimum
or no leakage.
Start Treatment
Lie on your bed to start the treatment.
Note : To enable the Auto ON/OFF function, please refer to Menu Introduction.
Stop Treatment
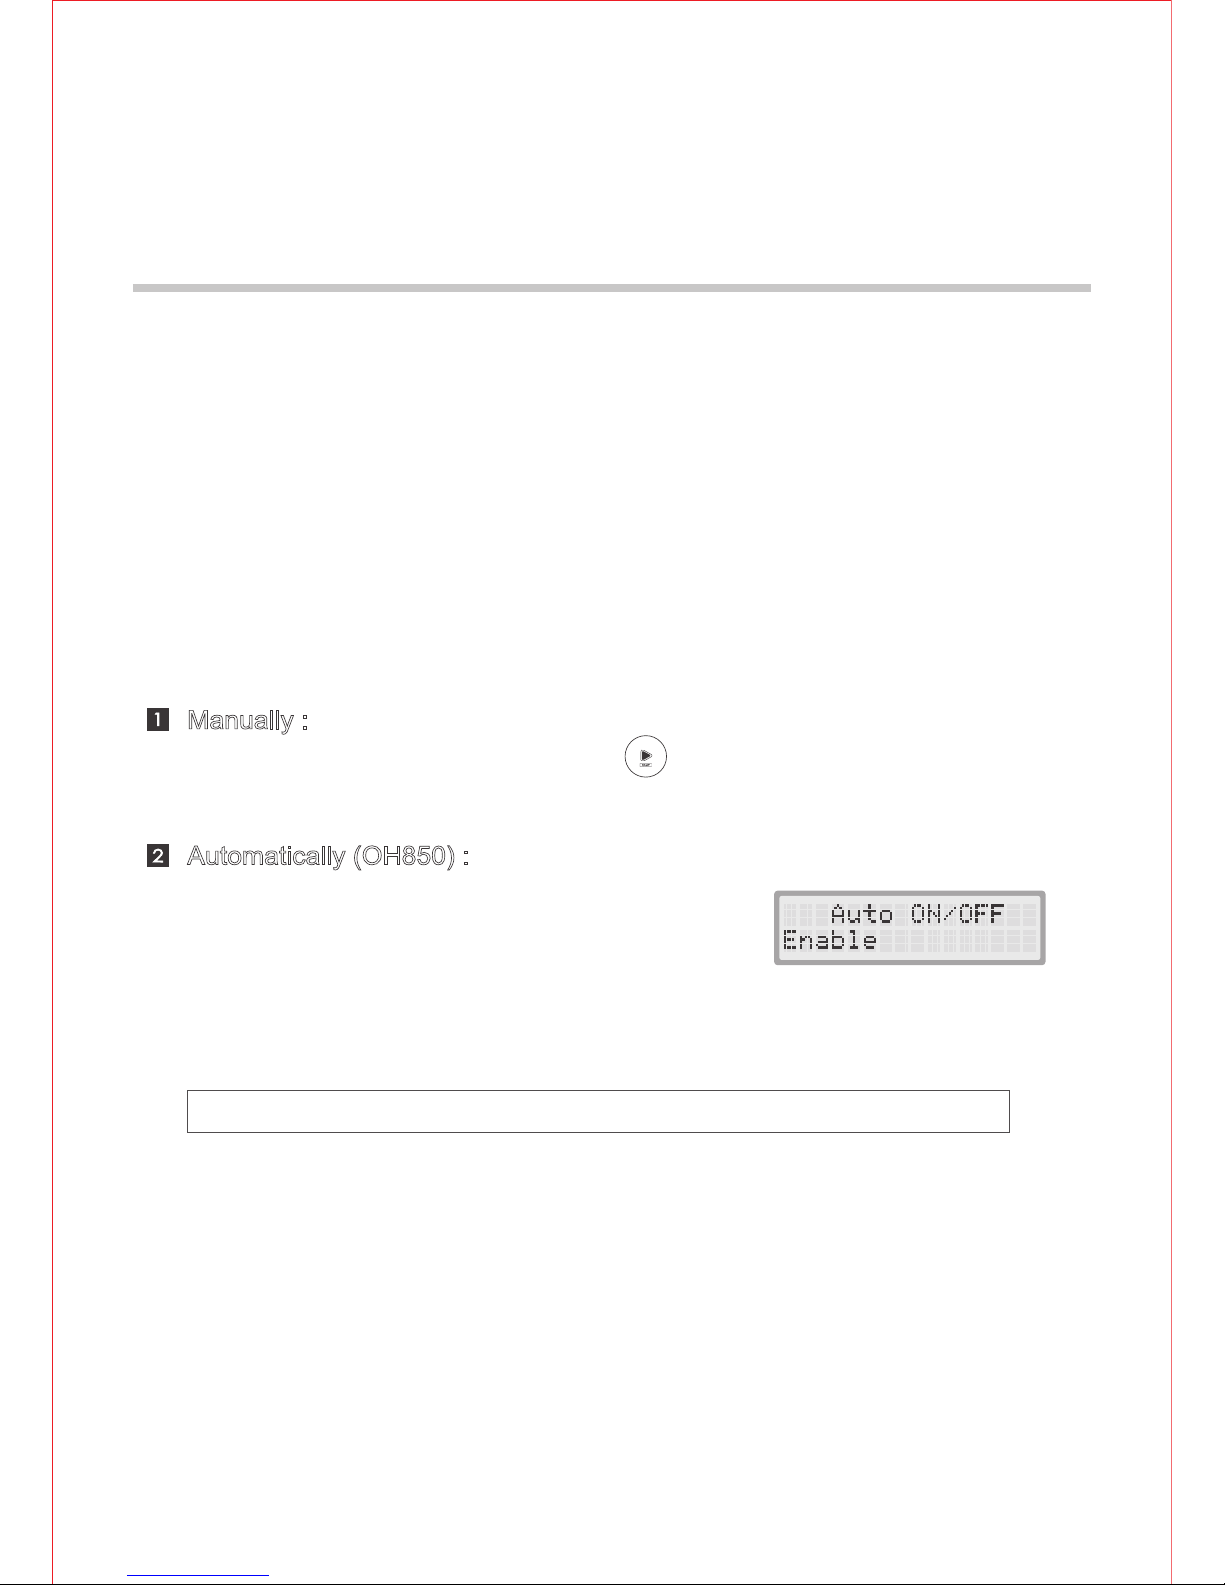
Manually :
After taking off your mask, press the button for 3 seconds and the air
delivery will stop immediately. The device will then return to Standby Mode.
Automatically (OH850) :
When the Auto ON/OFF function is enabled,
the air delivery will stop automatically after
you take off the mask for 30 to 60 seconds.
The device will then return to Standby
Mode.
Page 30
OP700 / OH850
30
MENU INTRODUCTION
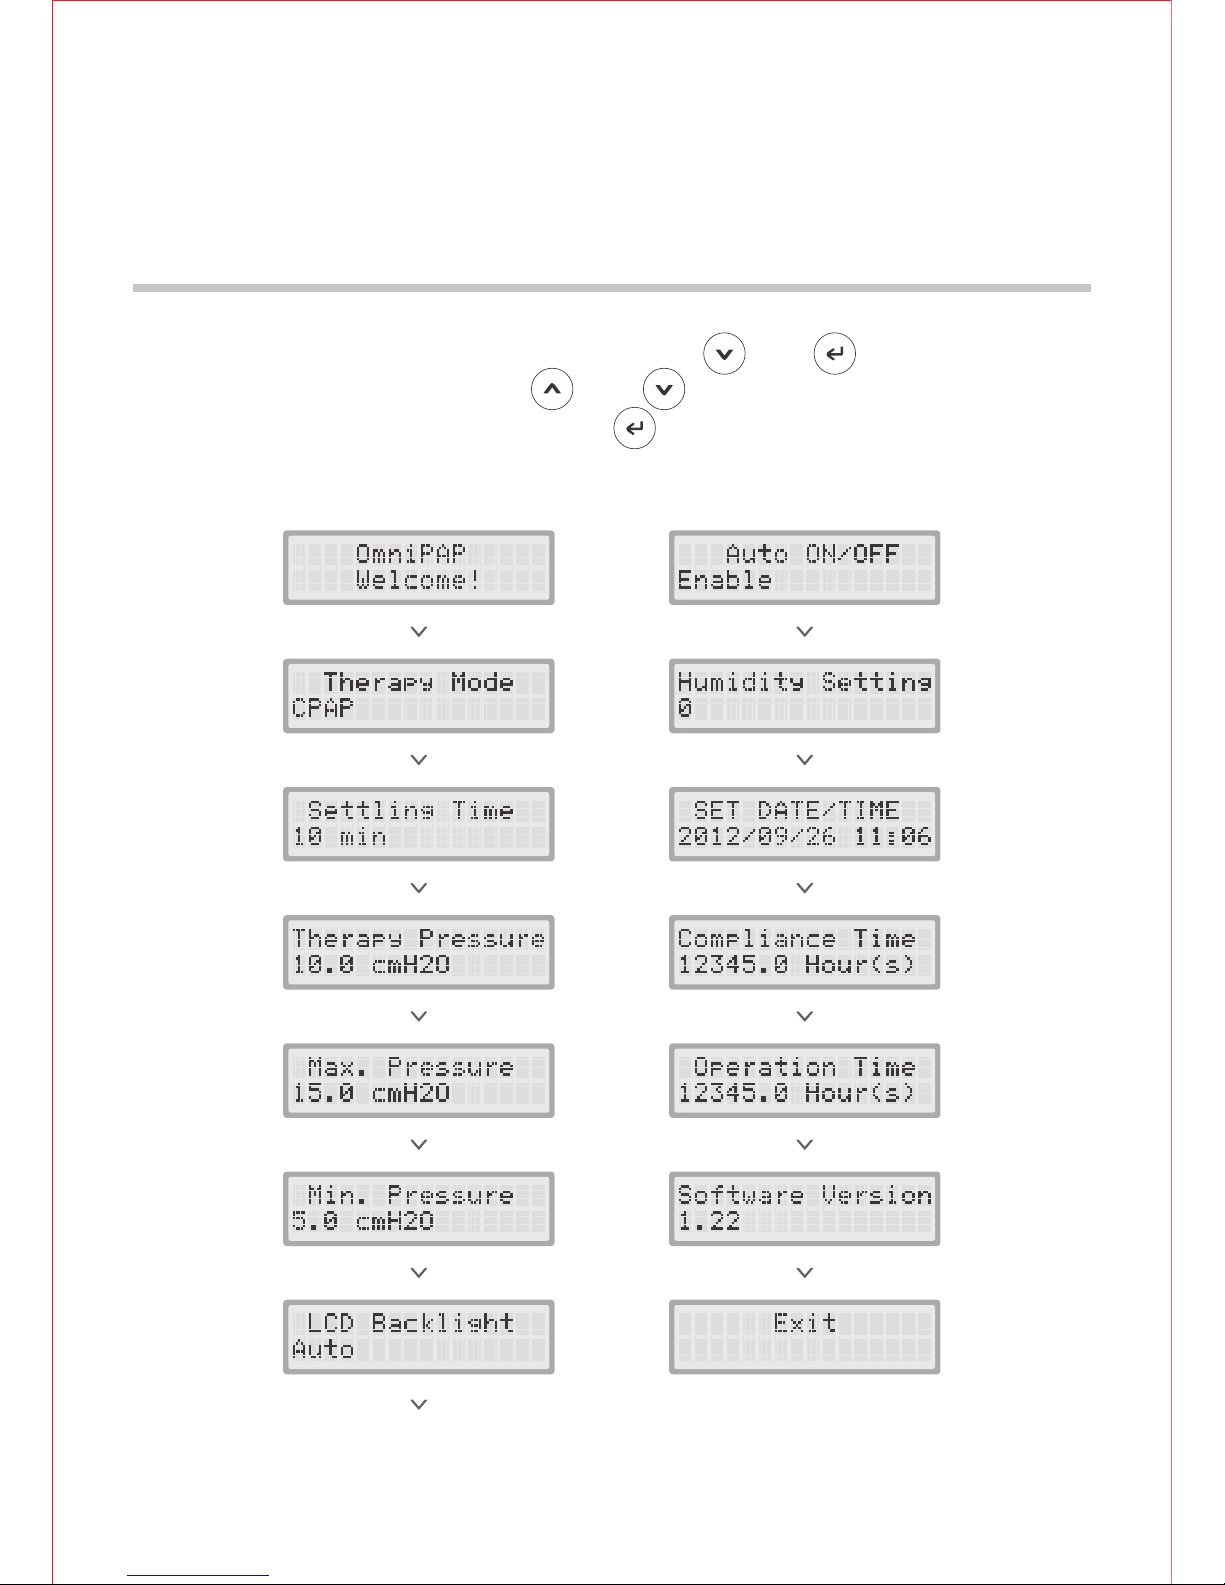
To enter Clinician Menu, simultaneously press and keys for 3
seconds at standby mode. Use and keys to scroll the options and
increase/decrease the values, and use key to enter the selected option
and to apply your selection.
Page 31

OP700 / OH850
MENU INTRODUCTION
Settling Time is adjustable between 0 and 45 minutes
in 5-minute increments. Settling function is disabled
when the value is 0. The default value is 10 minutes.
This option sets the pressure level at the start of
ramp. It is adjustable between 4 cmH2O and
Therapy Pressure in 0.5-cmH2O increments. The
default value is 4 cmH2O.
The setting of OmniPAP working mode to be CPAP
or APAP.
Option for CPAP. This is a prescription setting which
controls the operating pressure. It is adjustable
between 4 and 20 cmH2O in 0.5-cmH2O increments.
The default value is 10.0 cmH2O.
Option for APAP. This is a prescription setting which
controls the maximum operating pressure. It is
adjustable between 4 and 20 cmH2O in 0.5-cmH2O
increments. The default value is 15.0 cmH2O.
Option for APAP. This is a prescription setting which
controls the minimum operating pressure. It is
adjustable between 4 and 20 cmH2O in 0.5-cmH2O
increments. The default value is 5.0 cmH2O.
This option controls the backlight. Auto indicates the
LCD backlight lasts for 15 seconds no matter which
key is pressed. Enable indicates the backlight will
shine eternally, and Disable indicates to turn it off.
The default setting is Auto.
31
Page 32
OP700 / OH850
MENU INTRODUCTION
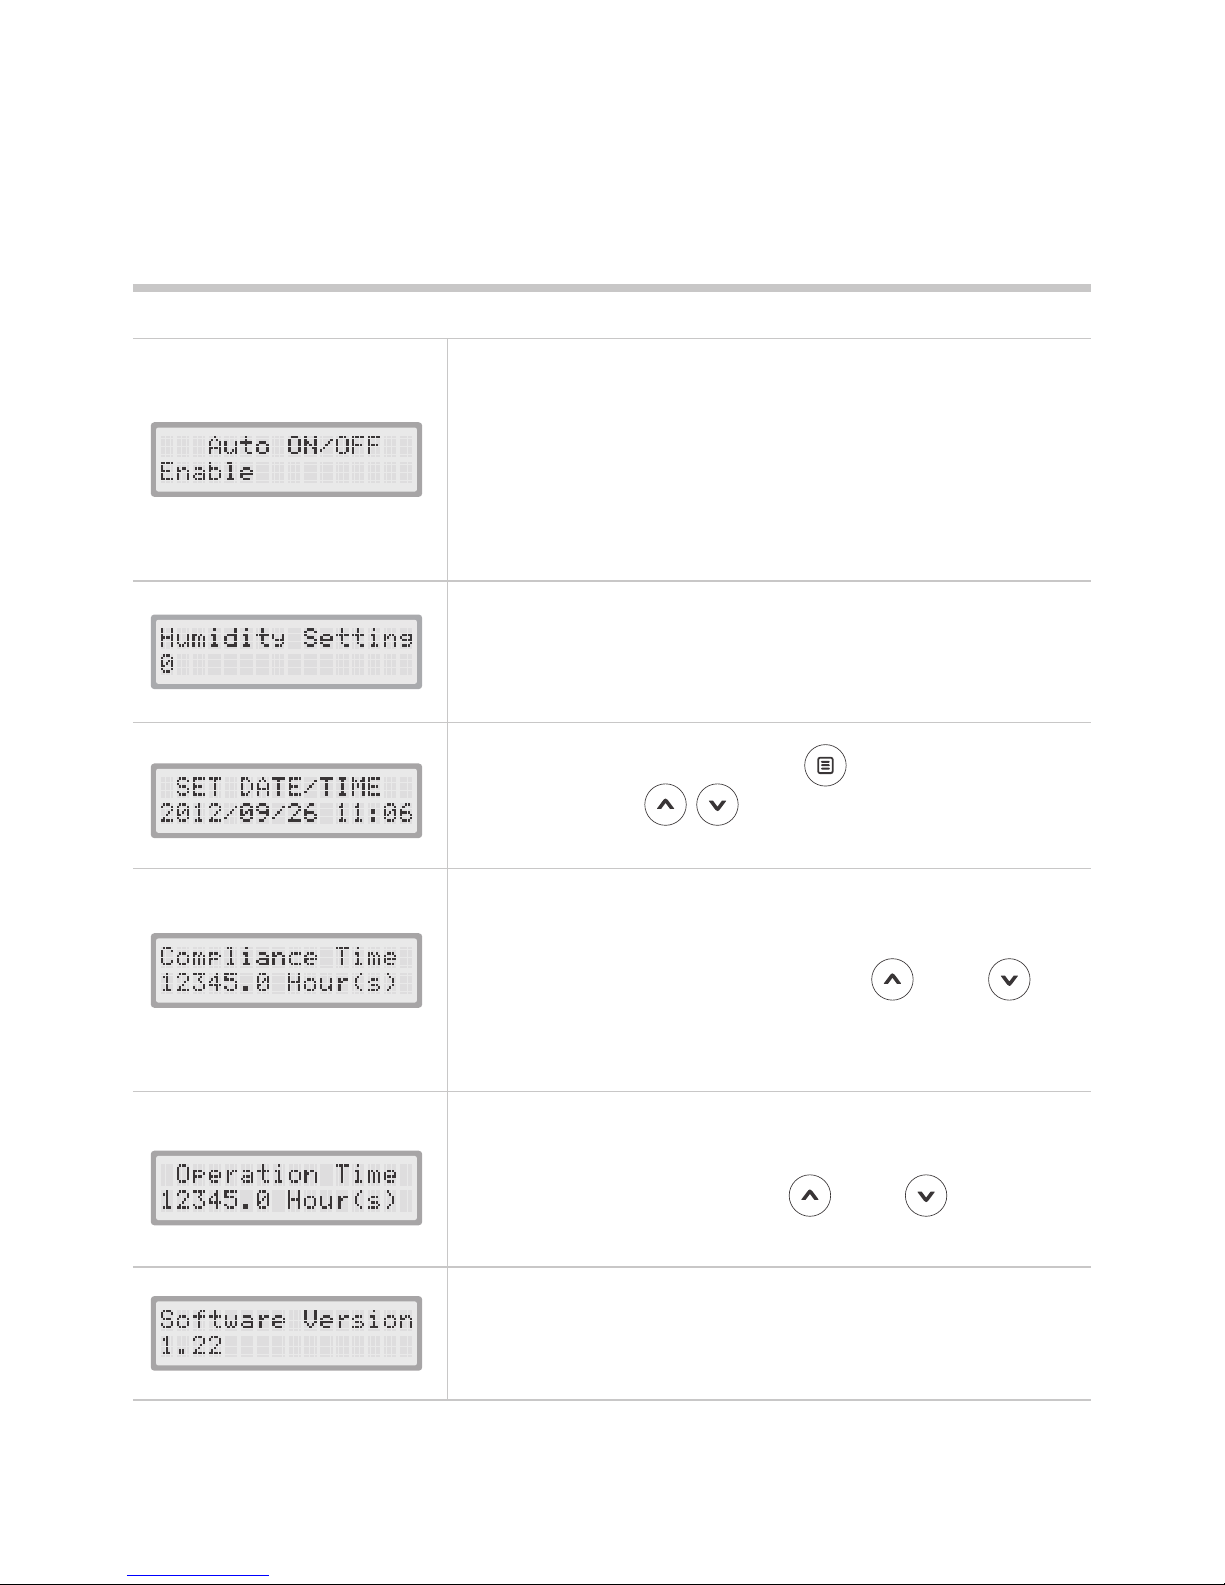
Operation Time shows total number of hours
(in 1/10 hour increments) that the device has been
in operation. By pressing and keys
simultaneously for 3 seconds, it can be cleared.
Compliance Time shows total number of hours
(in 1/10 hour increments) that the device has been
used with mask on. By pressing and
keys simultaneously for 3 seconds, it can be
cleared.
For setting Date/Time, use key to select the
item and use keys to increase/decrease
the value.
Displays the version of installed software.
Option for APAP. When the device is connected
with the Integrated Upgrading Component, this
function controls the automatic start/stop of the
air delivery. “Enable” indicates to turn on the
function, and “Disable” indicates to turn it off. The
default setting is “Disable”.
To set 1~6 scale of humidity setting when
operating with Integrated Upgrading Component.
Set at O scale when not in use.
32
Page 33
OP700 / OH850
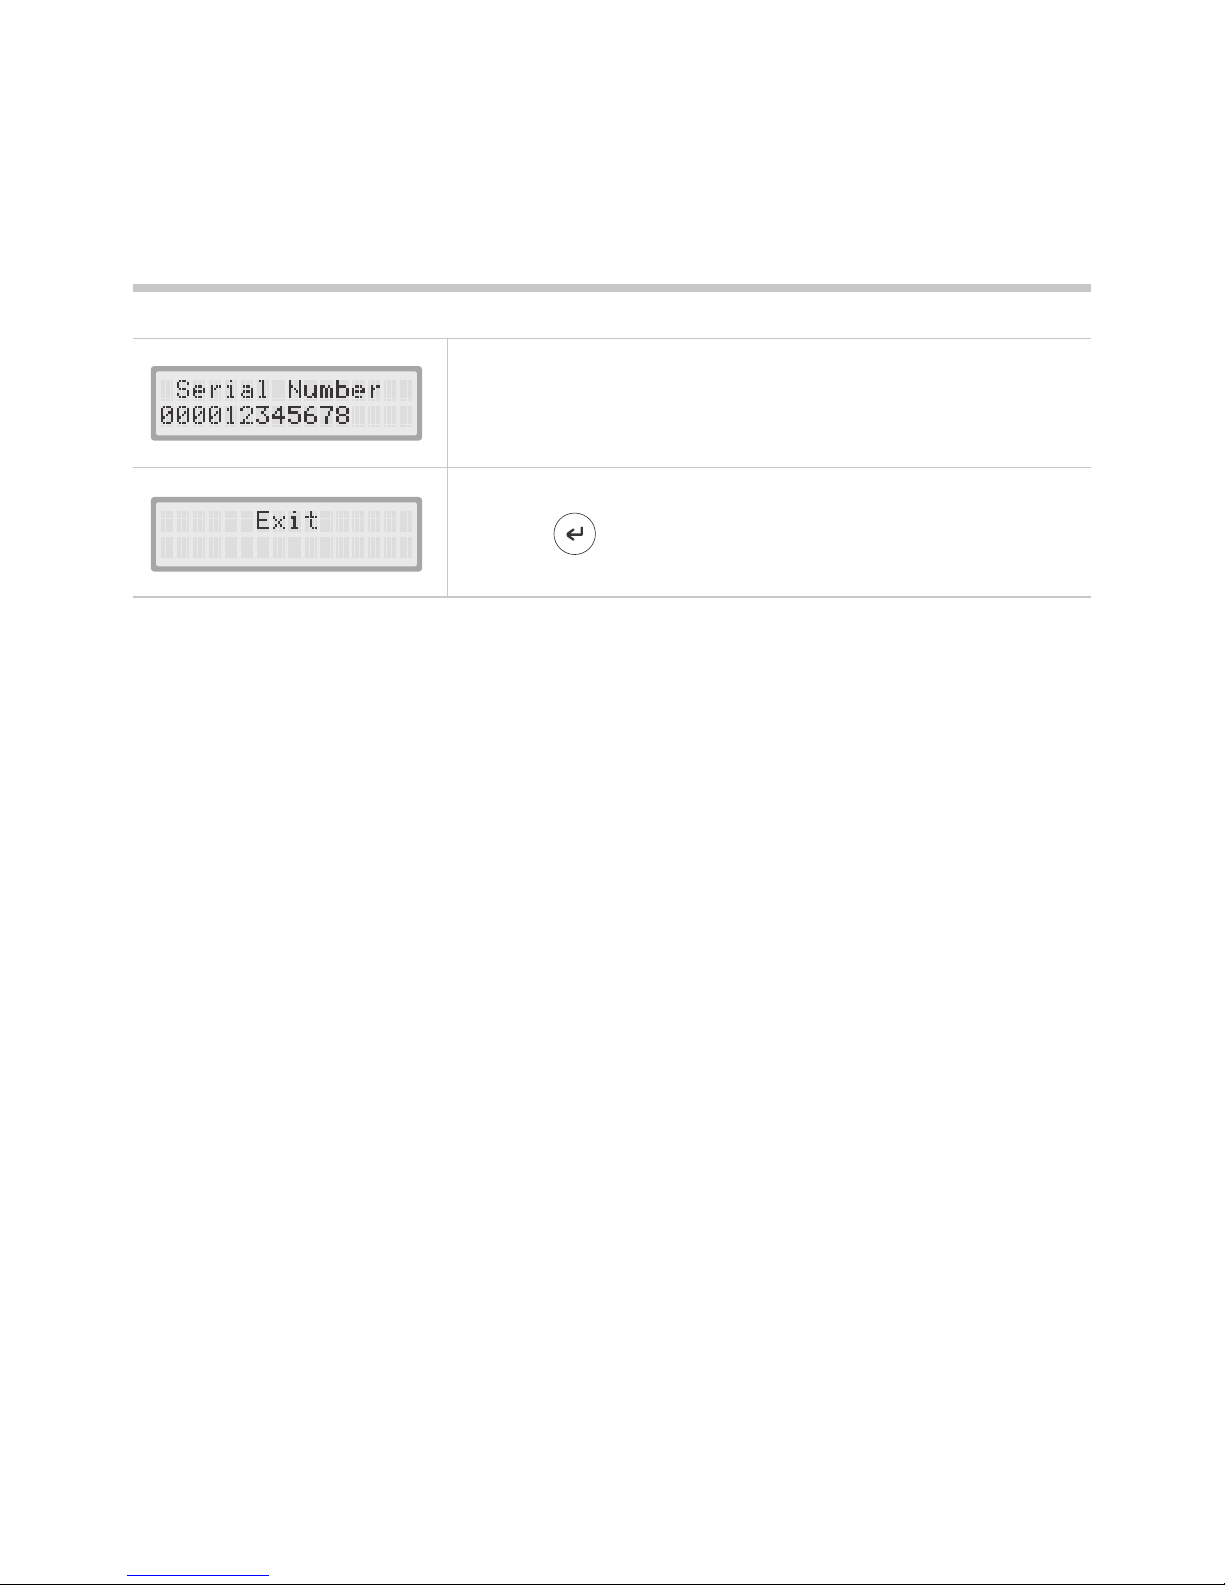
Press key to exit Menu Operation.
MENU INTRODUCTION
Displays the serial number of the device.
33
Page 34

www.mdbiomedical.com
8F., No.222, Sec 4, Chengde Rd.,
Taipei City 111, Taiwan
MD Biomedical, Inc.
 Loading...