

Vialta VISTAFRAME VF-100 Series User Manual
User’sGuideVF-100Series
For the latest tips, special offers, and easy online
registration, visit www.vialta.com/owners
Please read this User’s Guide.
www.vialta.com


Table of Contents
Important Safety Precautions................................................3
Introduction............................................................................4
What’s Included with your VistaFrame..................................4
Setting up your VistaFrame...................................................5
Locating VistaFrame’s Features............................................6
Using VistaFrame’s Features................................................8
Brightness Adjustment .....................................................8
My Album .........................................................................8
Power Saving Mode .........................................................8
Motion Sensor ..................................................................8
Power Button ....................................................................9
Menu Button .....................................................................9
Save Button ......................................................................9
Slideshow Button ............................................................10
Rotate Button .................................................................10
Directional Buttons .........................................................10
Select Button ..................................................................10
Exit Button ......................................................................10
4-in-1 Memory Card Slot ................................................11
Insert a Memory Stick®, SD™, or MultiMediaCard™ 11
Insert a SmartMedia™ Card ......................................12
CompactFlash® Card Slot .............................................12
Insert a CompactFlash® Card ....................................12
Displaying Pictures with VistaFrame...................................13
Displaying Pictures Using the Menu Button ...................13
Saving Pictures with VistaFrame.........................................16
Saving Pictures from a Memory Card ........................16
Replacing a Picture in My Album ...............................18
Displaying a Slideshow on VistaFrame...............................19
Saving a Picture During a Slideshow .............................20
Pausing and Resuming a Slideshow ..............................20
Changing Settings...............................................................20
Power Saving .................................................................20
Changing the Interval Between Slides ...........................22
Choosing a Transition Type ...........................................23

Setting Slideshow to Play Once or Repeat ....................24
Erasing Pictures from My Album.........................................25
Creating a Custom Slideshow.............................................26
Create/Edit Custom Slideshow .......................................26
Playing a Custom Slideshow...............................................28
Tips......................................................................................29
Custom Slideshow Tip ....................................................29
My Album Tip .................................................................29
Compatibility........................................................................30
Care and Maintenance........................................................31
Troubleshooting Guide........................................................32
Specifications ......................................................................32
Service ................................................................................33
Limited Warranty ............................................................34
Electronic Emission Notices................................................35
FCC Part 15 Information ................................................35
CE Statement .................................................................35

Important Safety Precautions
Always f ollow t hese basic safety precautions when using
your VistaFr ame. This will reduce the risk of fire, electric
shock, and injury.
• Unplug VistaFrame from the power outlet
before performing care and maintenance.
• Should any object or liquid fall into the
housing, unplug VistaFrame and have it
checked by qualified personnel before
operating it again.
• Do not use VistaFrame near water or when
you are wet.
• Slots and openings on the VistaFrame are for
ventilat ion to prevent overheating. Do not
cover them up.
• Do not place VistaFrame near a heat source
or in direct sunlight.
• Do not disassemble VistaFrame. There are
no user-serviceable parts inside.
Disassembly of VistaFrame will void your
warranty.
• Only use the AC power adapter included with
VistaFrame. Using any other power
adapter will void your warrant y.
3

Introduction
Welcome to VistaFrame. Now you can display your digital
pictures directly from a memory card without the need for a
computer. Simply insert a memory card into a card r eader
slot and select a single picture for a continuous viewing or
create your own Custom Slideshow. VistaFrame supports
CompactFlash®, Memory Stick®, SmartMedia
and MultiMediaCard
Do you want to save some pictures directly to your
VistaFrame? No problem! VistaFrame allows you to store
up to eight digital pictures in its internal memory
(My Album).
To learn more about VistaFrames features and to get the
maximumbenef it from yournew VistaFrame.Please take a
few minutes to read this User's G uide. Also, please fill out
the enclosed WarrantyCardand mailit to Vialta, to activate
your product warranty. As a convenientoption you can also
register online at www.vialta.com/owners.
™
™
,SD™,
What’s Included with your VistaFrame
Everything you need to begin using your VistaFrame is
included in the package:
•OneVistaFrame
• AC Power Adapter
• This User’s Guide
• Warranty Card
4
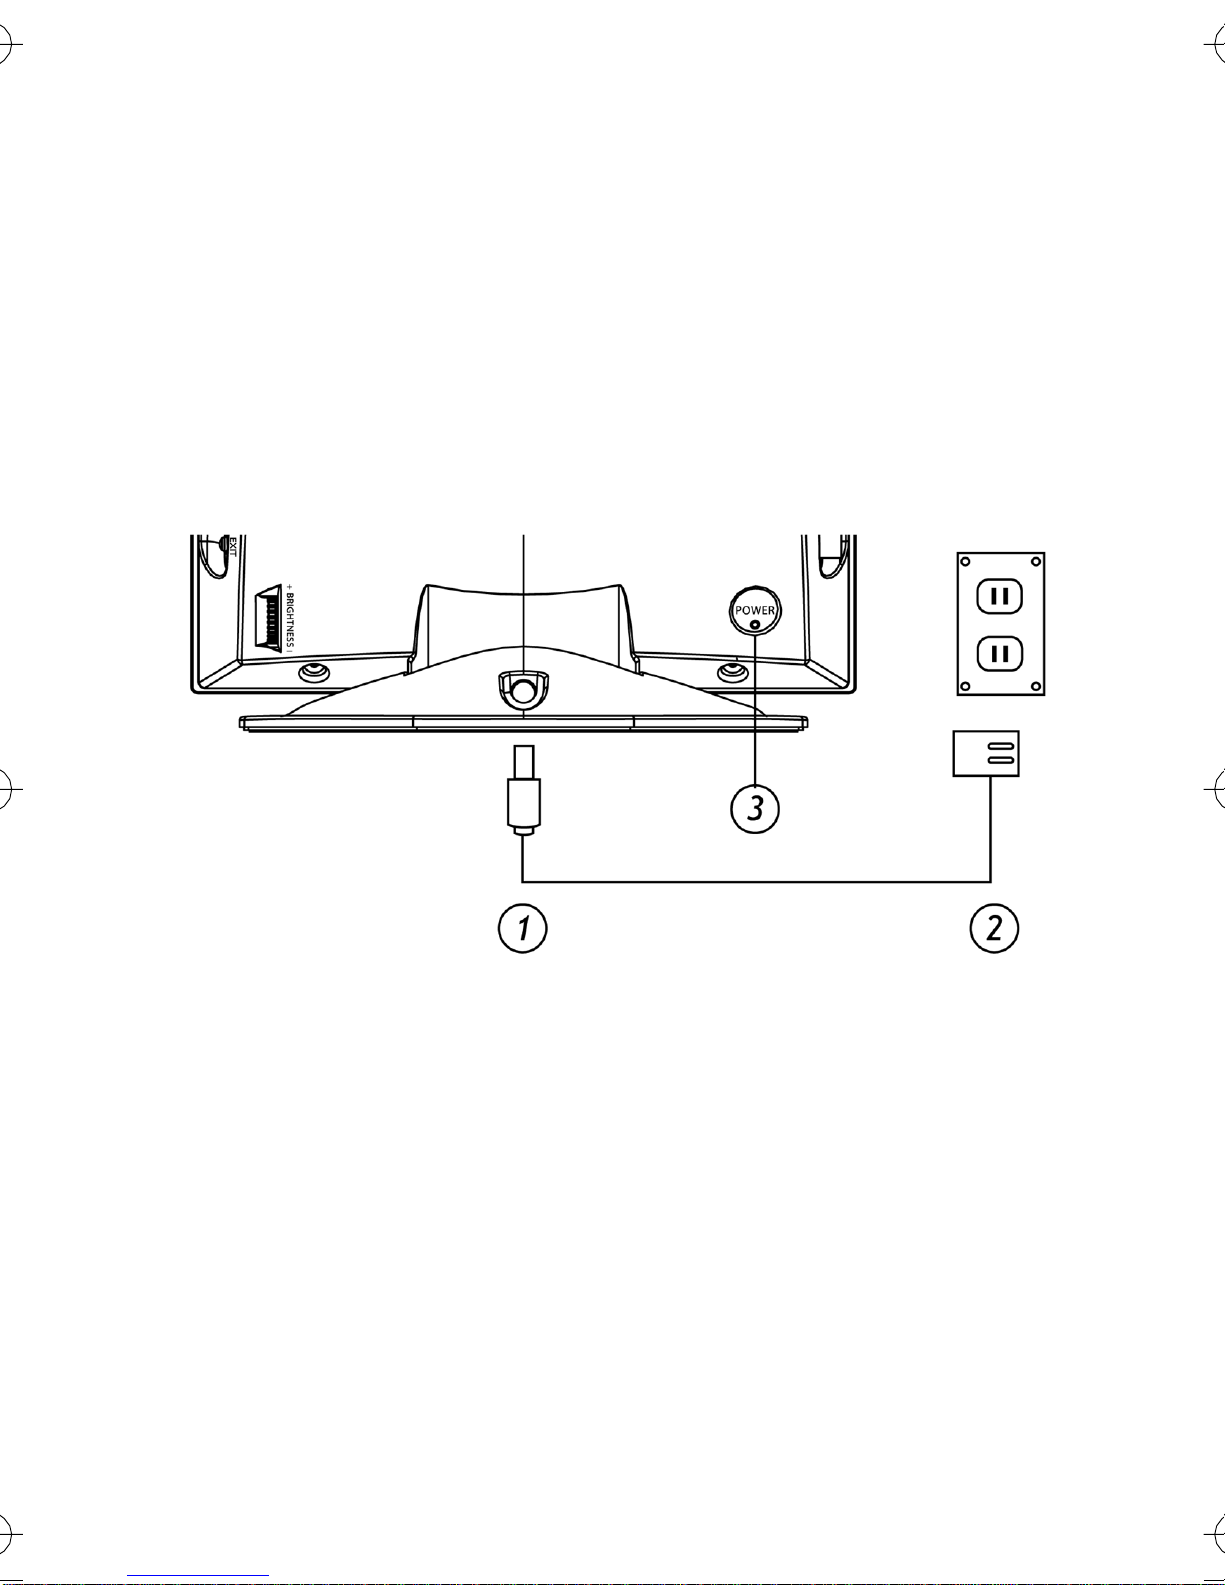
Setting up your VistaFrame
You can use your VistaFrame in any location, as long as a
power outlet is available.
1) Plug the AC power adapter ’s pin i nto the POWER IN
jack on the back of your VistaFrame.
2) Plug the power cord into a wall socket .
3) Press the POWER button on the back of VistaFrame
to turn VistaFrame on.
Your screen will briefly display the message
“VistaFrame is now ready” to let you know that it is
ready for you to insert a memory card.
5
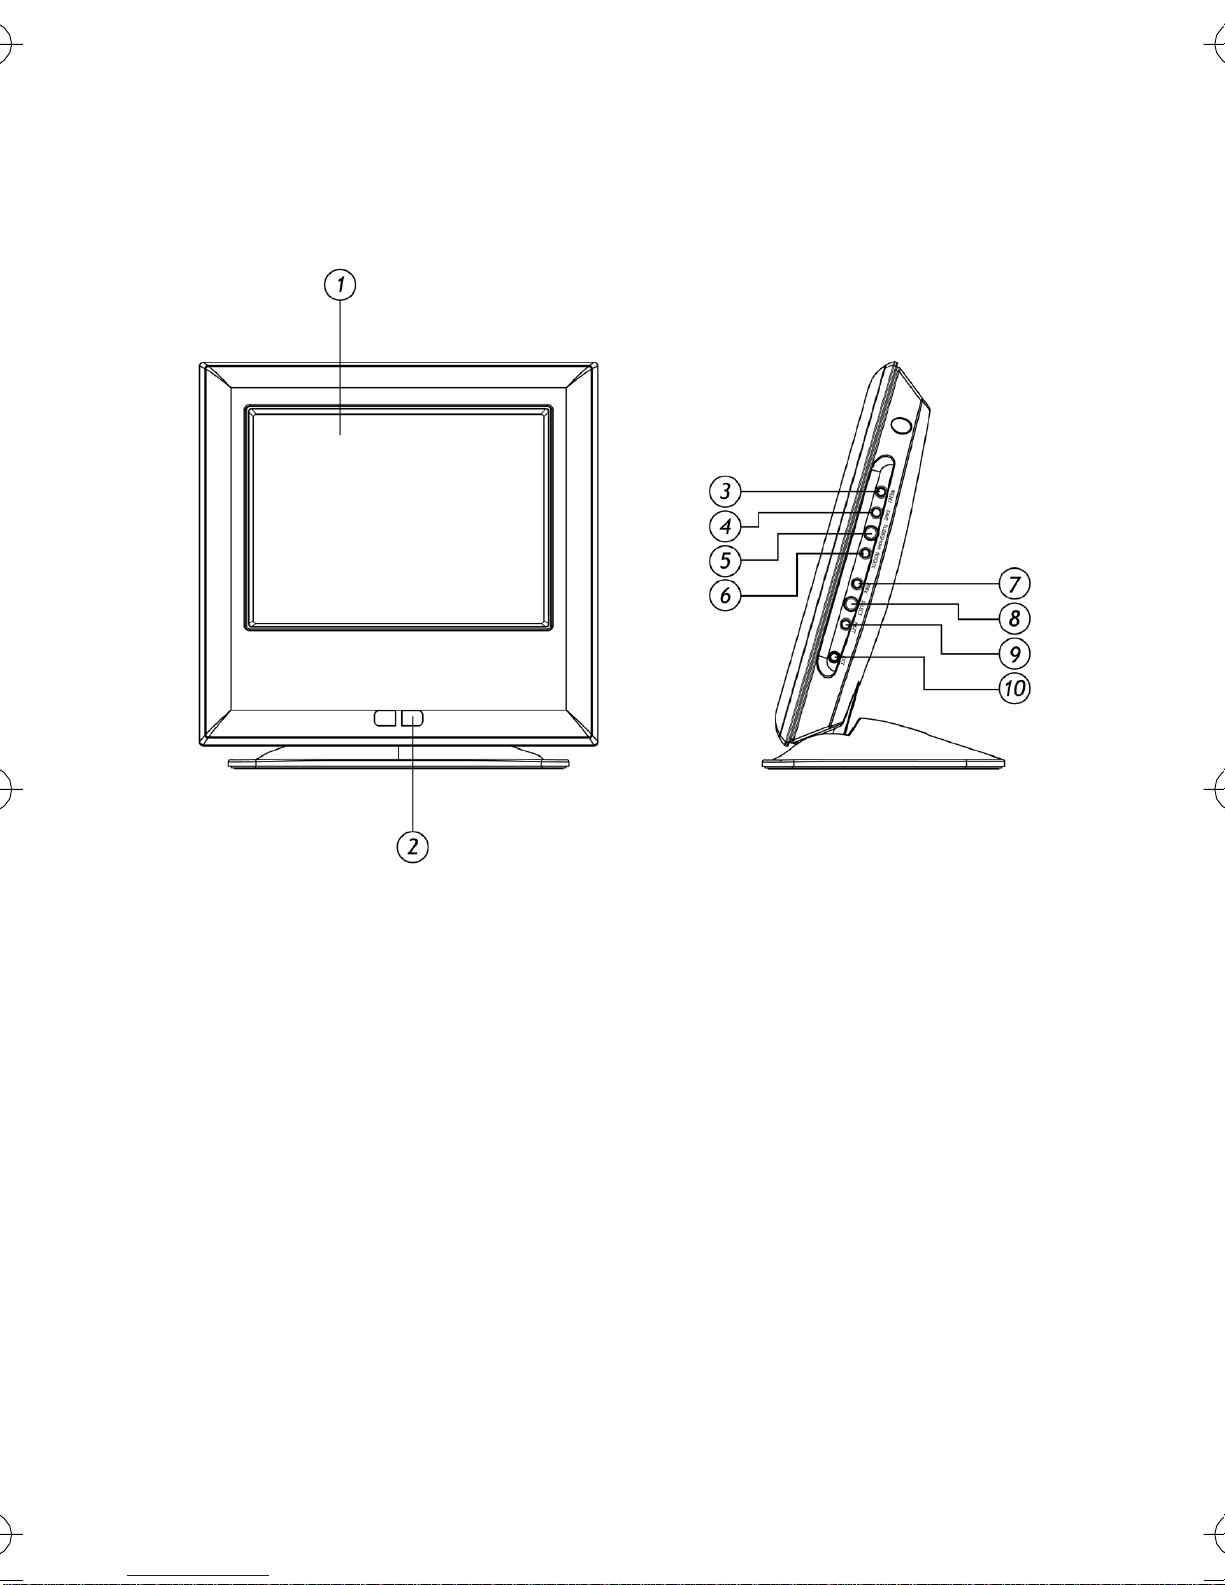
Locating VistaFrame’s Features
Your VistaFrame places everything you need right at your
fingertips.
1
Screen
2
Motion Sensor
3 Menu Button
4
Save Button
5
Slideshow Button
6
Rotate Button
7
Prev (Previous) Button
8
Select Button
9
Next Button
10
Exit Button
6
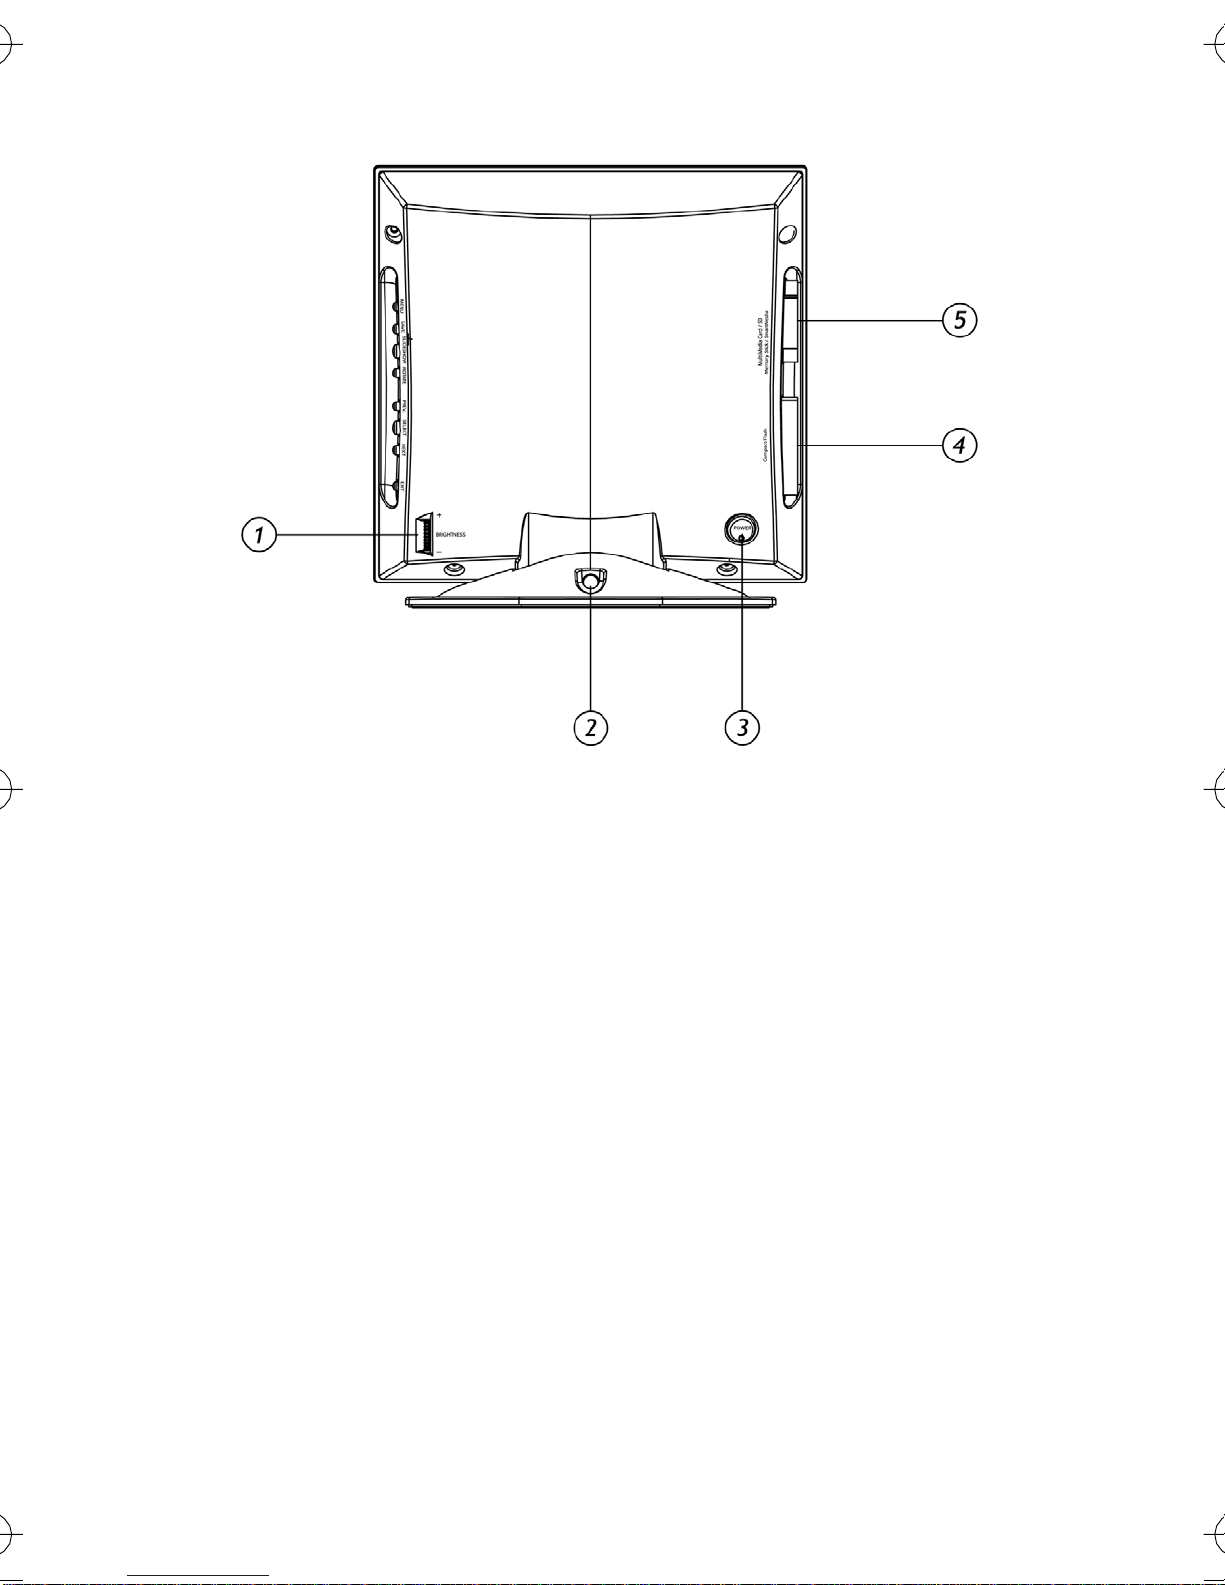
1
Brightness Adjustment
2
Power In
3
Power Button
4
CompactFlash® Card Slot
5
4-in-1 Memory Card Slot
7

Using VistaFrame’s Features
The following section describes your VistaFrame features.
Brightness Adjustment
You can adjust the brightness of the screen with the scroll
wheel on the back of your VistaFrame.
My Album
VistaFramecansaveupto8picturesinitsinternal
memory. Pictures saved in My Album can be viewed even
if you remove the memory card.
Power Saving Mode
VistaFrame has a power saving mode that will
automatically turn off the LCD screen after 120 minutes of
inactivi ty (no movement detected or button pressed for 120
minutes). You can wake VistaFrame from power saving by
pressing any button or if the motion sensor detects any
movement. (See Power Saving on page 20 to disabl e
power saving).
Motion Sensor
VistaFrame uses a motion sensor l ocated on the front of
VistaFrame to wake from power savingmode. Slowly wave
your hand 4-6 inches away from the sensor to wake
VistaFrame up and continue displayi ng the previous
picture(s).
8

Power Button
Turn on your VistaFrame by pressing the POWER button.
TheLEDlocatedonthePOWER button will light up when
the power is on.
Menu Button
Press t he MENU button to display the Menu. By selecting
View Pictures, you can access My Album or memory card
pictures. From the Menu you can also create or play a
Custom Slideshow, Change Settings, and Erase Pictures
from My Album.
Save Button
Press t he SAVE button to save JPEG pictures from a
memory card into My Album.
Menu Screen
9

Slideshow Button
Press t he SLIDESHOW button to start, pause or resume
playing a slideshow. VistaFrame’s slideshow feature
displays pictures one after the other. (See Displaying a
Slideshow on VistaFrame on page 19.)
Rotate Button
Press t he ROTATE button to turn the current picture
clockwise 90 degrees. Continue to press the button until
the picture is displayed properly. You will not be able to use
the rotate feature whi le playing a slideshow or while
displaying thumbnails.
Directional Buttons
The PREV (PREVIOUS) and NEXT but tons, above and
below the SELECT button, move the yellow highlight box
to a different position. Using the directional buttons during
a slideshow will immediately display the next or previous
picture.
Select Button
Use the SELECT button to choose a highlight ed thumbnail
or option on your VistaFrame.
Exit But ton
Press the EXIT button to stop the current action and retur n
to the previous display. Pressing the EXIT button while the
Menu i s displayed will put VistaFrame in power-saving
mode.
10

4-in-1 Memory Card Sl ot
VistaFrame can display pictures from several types of
memory cards. The 4- in-1 memory card slot can read the
following types of me mo ry cards: Memory Stick®,
SmartMedia
™
, SD™, and MultiMediaCard™.
If t he card doesn’t slide in easily, or Vis taFrame doesn’t
read the card, remove the card. Make sure t he label is
facing you and the notched corner is pointing toward the
side of VistaFrame and try inserting the card again.
Note: The 4-in-1 reader only reads one memory card at a
time. Do not insert more than one card into the
memory card slot or damage may occur.
Note: If you insert your memory card directly from your
digital camera, most cameras will put the pictures in
a folder under t he DCIM folder. Please check with
your camera’s user guide for more information.
InsertaMemoryStick®,SD
™,
or MultiMediaCard
™
1) With VistaFrame’s display facing you, hold the
memory card with the label facing you and the
notched corner pointing toward VistaFrame.
2) Gently slide the card into the 4-in-1 memory card slot
on the side of VistaFrame. The card should slide in
easily and VistaFrame should display “Loading”.
11
 Loading...