

Page 1
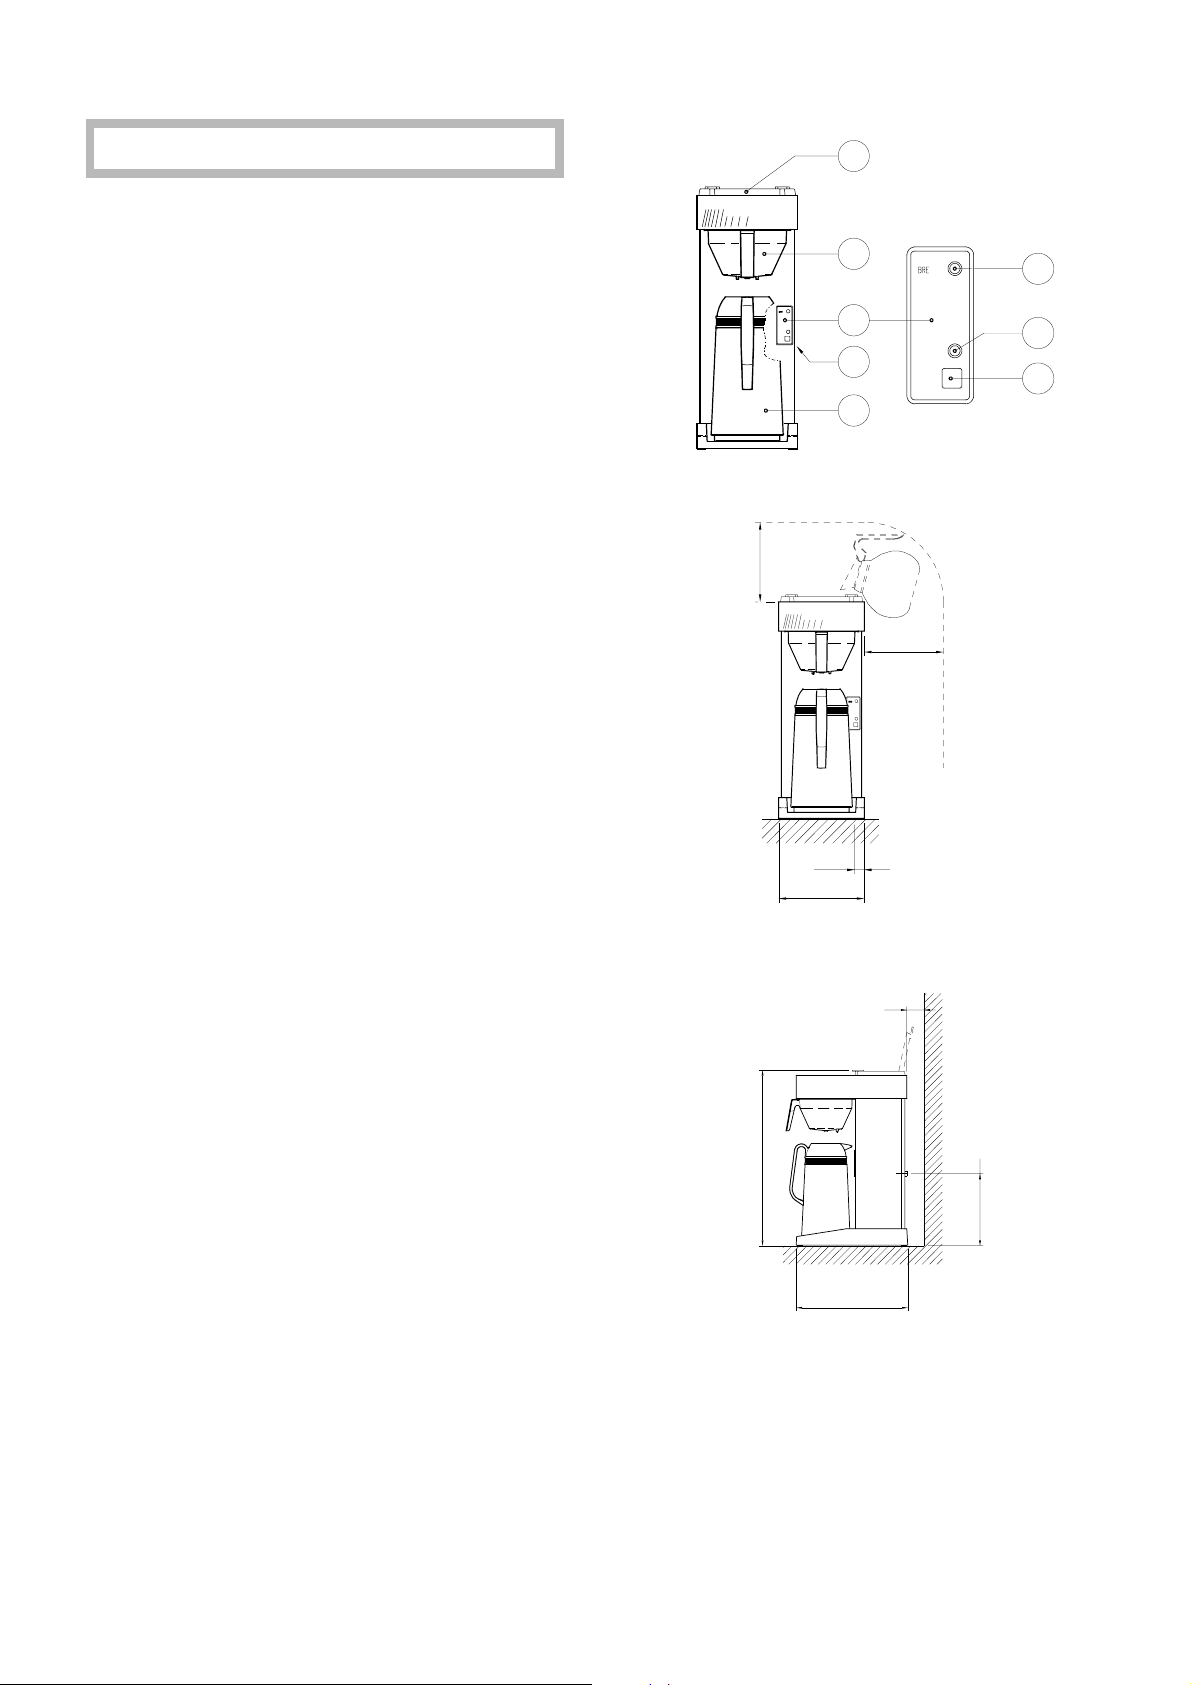
COFFEE BREWING MACHINE
1. Water container
2. Filter pan
3. Connection cable
4. Switch
4.1. Indicator light "BREW"
4.2. Pilot light on/off
4.3. Start push button
5. Vacuum flask
TECHNICAL DATA
Coffee brewing machine for 12 cups or 1.9 litre
of coffee.
Model : ISO Novo system th
Voltage : 110V/230V, 50/60 Hz
Rating : 2080 W
Protection : min. 10 A
Capacity : 120 cups/hour
Fig. 1
190
1
2
4
3
4.1
4.2
4.3
5
190
VHH
COFFEE BREWING MACHINES
MACHINES A CAFÉ
KAFFEEBRÜHMASCHINEN
KOFFIEZETAPPARATEN
©
08-1998
700.403.162 B
Fig. 2
530
23.7
205
E
50
E
221.3
Fig. 3
340
Page 2
INSTRUCTIONS FOR USE
Read the following instructions carefully for a good and safe use of the coffee brewing machine.
The main components and operating devices are indicated in figure 1. The dimensions of the coffee
brewing machine are indicated in figure 2 and 3.
WARNING
The following instructions and warnings have to be observed for a safe use of the coffee brewing
machine:
− If the coffee brewing machine is not used for a
longer period the electric power supply should
be disconnected.
− A small quantity of water remains in the
machine. Please, take this fact into account if
the machine is used or stored in environments
with temperature below 0°C.
− When the machine has to be opened for repairs
or maintenance, the electric power supply must
to be disconnected.
BEFORE A NEW MACHINE IS BROUGHT INTO OPERATION
− Clean the decanter and the filterpan with hot water.
− Pour a decanter of cold water into the machine and wait 5 minutes before the machine is connected to
the electric power supply.
− Insert the plug into a socket and let the water circulate once, see "OPERATION". As soon as the water
has circulated and the indicator light (4.1) has switched off, the coffee brewing machine is ready for
normal use.
OPERATION
− Switch the coffee brewing machine on. To this end start button (4.3) has to be depressed. The pilot
light (4.2) will illuminate.
− Insert a new filter into the filter pan and fill it with the desired quantity of ground coffee.
− Fix the filter pan correctly to the coffee brewing machine.
− Position the decanter under the filter.
− Use a decanter to fill the water container with the desired quantity of water. The indicator light (4.1) will
illuminate.
− The hot water will start to circulate.
− As soon as the indicator light (4.1) has been switched off the hot water will stop to circulate and it will
take another minute for the coffee to pass the filter. Only then the coffee will be ready for consumption.
− Some components will get very hot when the
coffee brewing machine is used.
− If all water has been removed from the machine
the instructions that are applicable "before a
new machine is brought into operation" have to
be observed again.
− Stay with the machine during maintenance
operations, such as descaling.
− All repairs should to be carried out by qualified
electrical engineer.
Page 3
MAINTENANCE
− The coffee brewing machine can be cleaned with a moist cloth. The decanter and the filter pan can be
washed with hot water.
− Scale will accumulate in the brewing machine as a result of its use. Consequently the machine has to
be descaled regularly in order to make it work properly. A descaling agent may be used for this
purpose. The instructions for the use of this descaling agent always have to be observed. Pour 1,5
litres descaling solution into the container and switch the machine on. As soon as
1
/3 of the solution
has passed through the system, the machine has to be switched off for one minute. Switch the
machine on again and finish the process.
− To flush the system of the descaling agent pour a decanter of cold water into the container and let it
pass through the system. Repeat this procedure at least twice.
WARNING
− The machine must never be submerged in
water.
− If a decalcifying agent is applied the use of
protective goggles and gloves is advisable.
− Stay with the machine during the descaling
process.
− Wash your hands at the end of the descaling
process.
The machine must be descaled at least twice a year.
POWER SUPPLY
The machine has to be earthed!
The machine has to be protected by a fuse of at least 10 A (230V~). Moreover it has been equipped with
a rim-earth plug. This plug has to be connected to an earthed socket. If the plug does not fit into the
socket, it has to be removed and replaced by a plug that fits.
IMPORTANT
If a new plug is fitted, the following instructions will have to be observed: The supply cord is a triple-core
wire;
− The green/yellow core (earth) has to be connected to the terminal which is marked by the letter E or
the earth symbol (
) or which is green/yellow.
− The blue core (neutral) has to be connected to the terminal which is marked by the letter N or which is
black.
− The brown core (live) has to be connected to the terminal which is marked by the letter L or which is
red.
 Loading...