

VHD iCast AC8170 User Manual

AC1870 iCast Quick Guide
1
AC8170 iCast
User Manual
Version
V1.0
Release
2017-7
Content

AC1870 iCast Quick Guide
2
1.Specification ......................................................... 6
2.Application ........................................................... 9
3.Feature ............................................................... 9
4.Operation ............................................................ 11
5.Function and Operation ............................................... 13
5.1 Main Interface .......................................................................................................... 16
5.1.1 Startup Interface ............................................................................................ 16
5.1.2 Main Interface .................................................................................................. 16
5.2 Guick Guide ................................................................................................................ 17
5.2.1 Recording ............................................................................................................ 17
5.2.2 Live Streaming .................................................................................................. 17
5.2.3 Division .............................................................................................................. 18
5.2.4 Effect .................................................................................................................. 19
5.2.5 Switch .................................................................................................................. 20
5.2.6 Quick Settings .................................................................................................. 21
5.2.7 Channels .............................................................................................................. 22
5.2.8 Quick Start ........................................................................................................ 24
5.2.9 PTZ control ........................................................................................................ 24
5.2.10 PGM & PGM2 Channel switch ......................................................................... 26
5.3 System Function ........................................................................................................ 26
5.3.1 Channel Mode ...................................................................................................... 27
5.3.2 Meeting Setting ................................................................................................ 28
5.3.3 File Operation .................................................................................................. 29
5.3.4 Smart Classroom ................................................................................................ 29
5.3.5 User Operation .................................................................................................. 30
5.3.6 System Setting .................................................................................................. 31
5.3.6.1 Recording Setting ........................................................................................ 32
5.3.6.1.1 Encoding Setting ...................................................................................... 32
5.3.6.1.2 Audio Encoding .......................................................................................... 33
5.3.6.1.3 Time Recording .......................................................................................... 34

AC1870 iCast Quick Guide
3
5.3.6.1.4 Stock Position .......................................................................................... 34
5.3.6.1.5 Recording Stratigy .................................................................................. 35
5.3.6.2 Casting Setup ................................................................................................ 36
5.3.6.2.1 Class Content Info .................................................................................. 37
5.3.6.2.2 Superscript/On-screen graphic ............................................................ 38
5.3.6.2.3 Prologue/Epilogue .................................................................................... 39
5.3.6.2.4 Casting Mode .............................................................................................. 40
5.3.6.2.5 Subtitle Setting ...................................................................................... 41
5.3.6.2.6 Mouse Setting ............................................................................................ 42
5.3.6.3 Live Streaming Setting .............................................................................. 43
5.3.6.3.1 RTMP Setting .............................................................................................. 43
5.3.6.3.2 TS Setting .................................................................................................. 44
5.3.6.4 FTP Setting .................................................................................................... 45
5.3.6.4.1 FTP Upload .................................................................................................. 46
5.3.6.4.2 FTP Download .............................................................................................. 46
5.3.6.5 System Setting .............................................................................................. 47
5.3.6.5.1 WIFI Setting .............................................................................................. 48
5.3.6.5.2 HDD .............................................................................................................. 48
5.3.6.5.3 Network Setting ........................................................................................ 49
5.3.6.5.4 System Info ................................................................................................ 49
5.3.6.5.5 System Time ................................................................................................ 50
5.3.6.6 Project Setting ............................................................................................ 51
5.3.6.6.1 R&D .............................................................................................................. 51
5.3.6.6.2 Factory Setting ........................................................................................ 52
5.3.6.6.2.1 logo Setting .......................................................................................... 52
5.3.6.6.2.2 Power Setting ........................................................................................ 53
5.3.6.6.2.3 Advanced Setting .................................................................................. 53
5.3.6.6.2.4 Dual Graphics Card Setting .............................................................. 54
5.3.6.6.2.5 Quick Start Setting ............................................................................ 55
5.3.6.7 On-site Setting ............................................................................................ 56

AC1870 iCast Quick Guide
4
5.3.6.7.1 Display Setting ........................................................................................ 56
5.3.6.7.2 Import/Export ............................................................................................ 57
5.3.6.7.3 Network Test .............................................................................................. 57
5.3.6.7.4 Tracking ...................................................................................................... 58
5.3.6.7.5 Integrated Setting .................................................................................. 62
5.3.6.7.6 Serial Setting .......................................................................................... 63
5.3.6.7.7 Switch Stratigy ........................................................................................ 64
5.3.6.7.8 Tracking Network ...................................................................................... 66
1.Specification
Item
Sub-Item
Spec.

AC1870 iCast Quick Guide
5
System
Language
Chinese/English
Interface
Graphic operation interface
Structure
Linux
Video
Video Input
7 channel video signal inputs:4 SDI input+2 HDMI
+1 HDMI/VGA input
Video Output
4 video outputs:
VGA-OUT:recording and casting output;
HDMI-OUT:Recording video output;
SDI-OUT-1/2:Video output
Video Display
Touch Screen
Video Signal
HD video signal
Format
1080P@60
Resolution
HDMI/VGA:1024*768p@60fps、1280*720p@50/60fps、
1920*1080i@60/50fps、1920*1080p@30/25fps、
1920*1080p@60/50fps
3G/HD-SDI:1920*1080p@60/50/30/25fps、
1920*1080i@60/50fps、1280*720p@60/50/30/25fps
Audio
Audio Input
3 audio in
Audio Output
3 audio out
Audio
Encoding
AAC
Recording
Method
Audio & Video synchronous recording
Video Process
and Storage
Video Output
Format
MP4

AC1870 iCast Quick Guide
6
Video Frame
1~30fps
Video Frame
Rate
50kbps~40Mbps
Audio Rate
8~420KB
Data Storage
SATA hard disk (optional,max 4TB)
Combined
parts
Touch Screen
11.6 inch touch screen
Joystick
Joystick controlling
Communication
Connector
RS485
connector
4 RS485
RS232
connector
4 RS232
RJ45
1 802.3ab 1000Base-T
USB
1 USB3.0
Function
Casting
Function
Preview / Broadcast screen monitoring / video
switching / pre-live screen monitoring / live
screen multi-split screen display / dual movie
guide mode / audio adjustment / screen segmentation
/ title / PTZ operation / special effects /
subtitles, OSD information, angular logo logo /
support IE Lead / Support Client Guide / Support
Network Trace Receive Send Code
Recording
Function
Real-time streaming / synchronous recording /
movie mode recording / resource mode recording /
resource mode and movie mode at the same time work
/ manual and fully automatic guide / a key to open
the flow and video / local channel playback /

AC1870 iCast Quick Guide
7
built-in player / dual mode A movie mode works at
the same time
Updating
Support network upgrade, RS232 serial port upgrade
Storage mode
Support internal hard disk, external USB storage,
NAS disk mapping; support USB video export; support
SAMBA shared download; support FTP download video,
FTP upload video
Live
streaming
protocol
Standard RTMP protocol, support RTSP real-time
protocol flow, UDP multicast flow, TCP unicast
stream
Network
protocol
TCP、UDP、RTMP、RTSP、RTP、NFS、FTP、DHCP
Working
Environment
Working
Voltage
12V
Working
Temperature
(℃)
-10℃-85℃
Working
humidity
85%RH
Weight(KG)
3.41KG
Size(mm)
390mm*205mm*121mm
AC1870 iCast Quick Guide
8
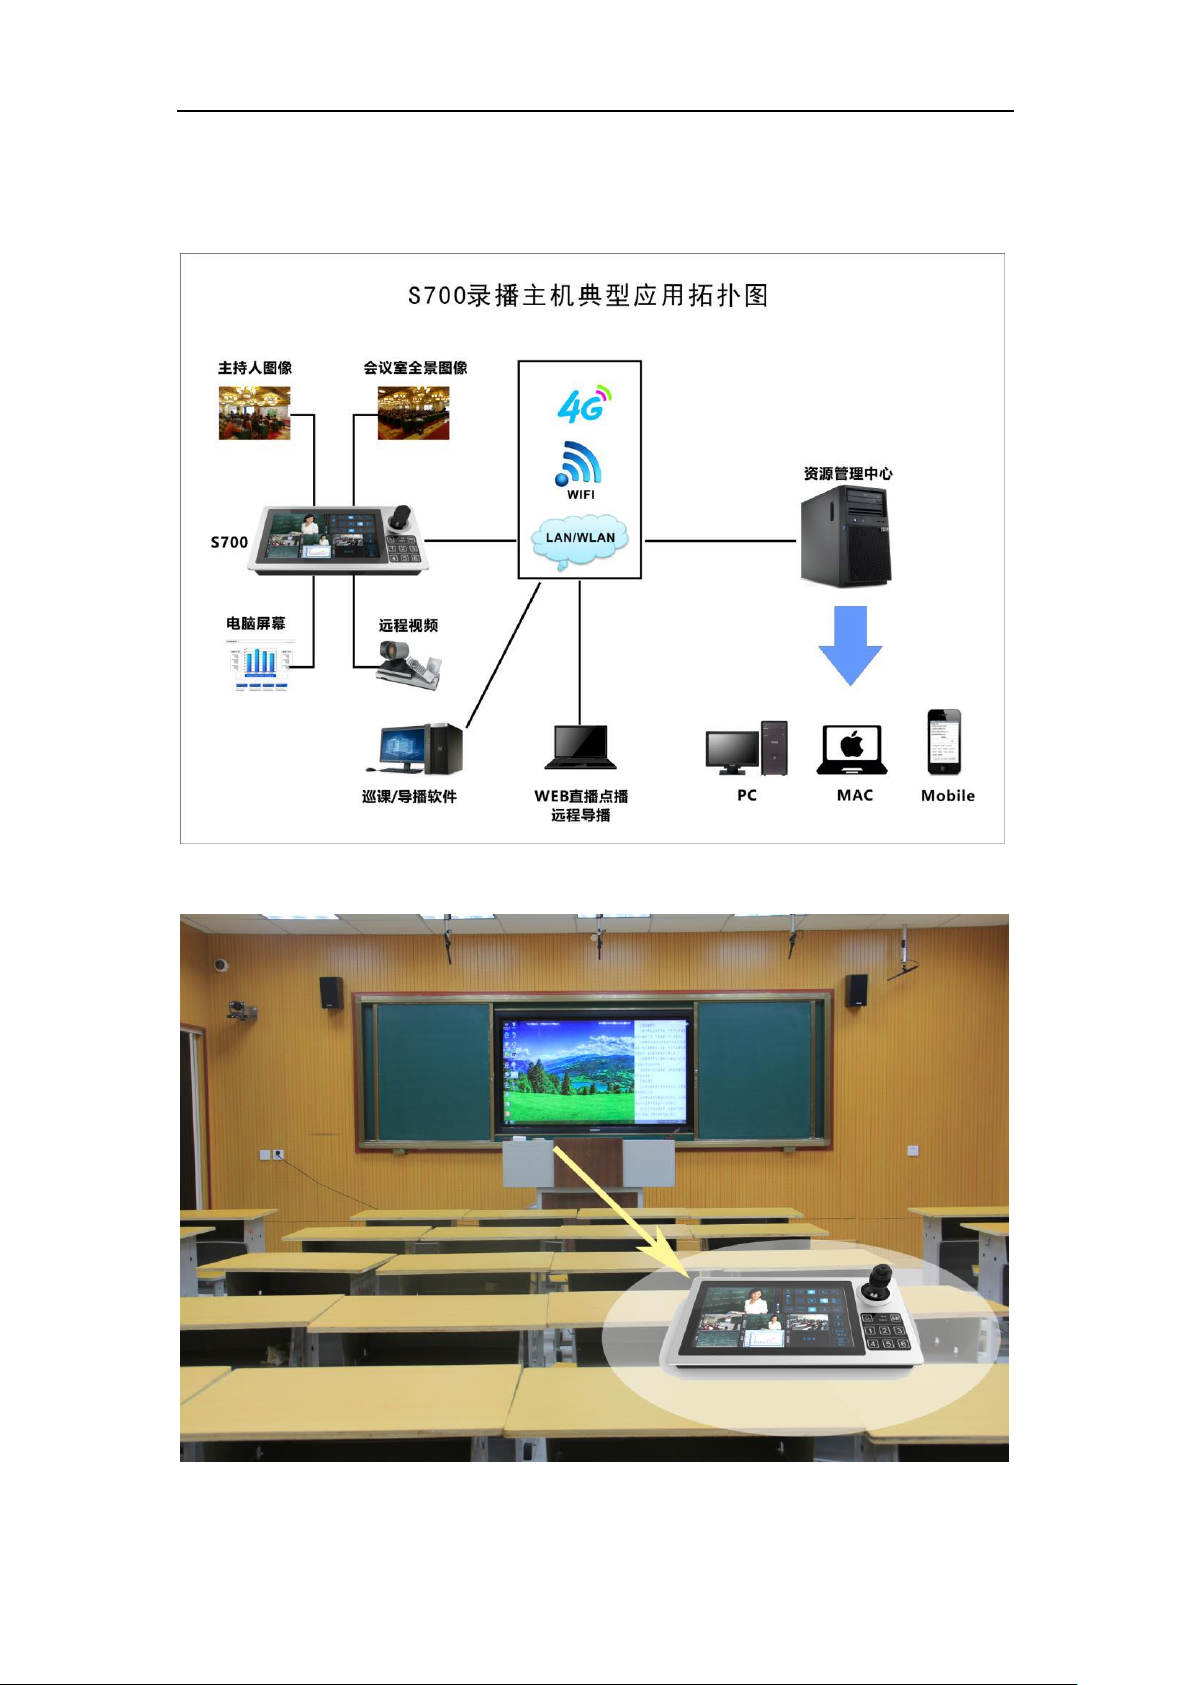
2.Application
Figure 1 Topology
Figure 2 Classroom Application
AC1870 iCast Quick Guide
9
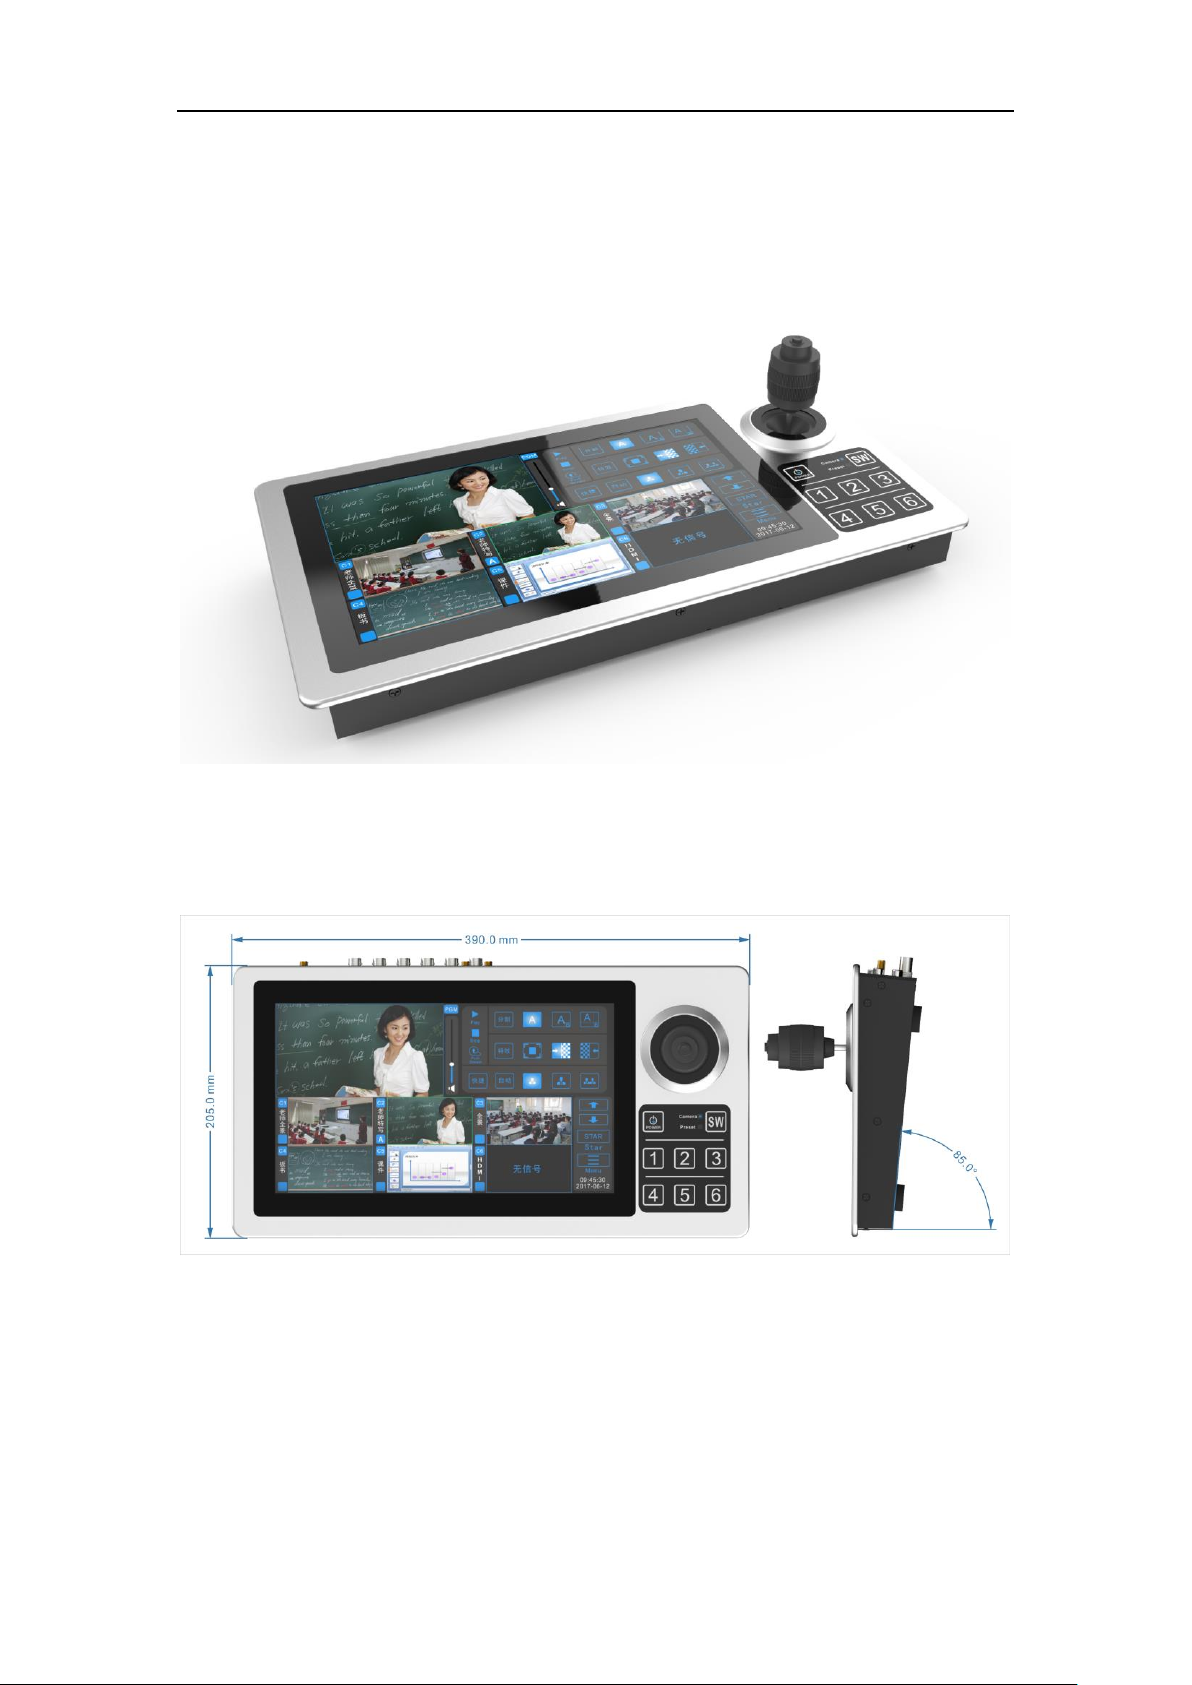
3.Exterior Feature
1)
2)Size
3)Connection
AC1870 iCast Quick Guide
10
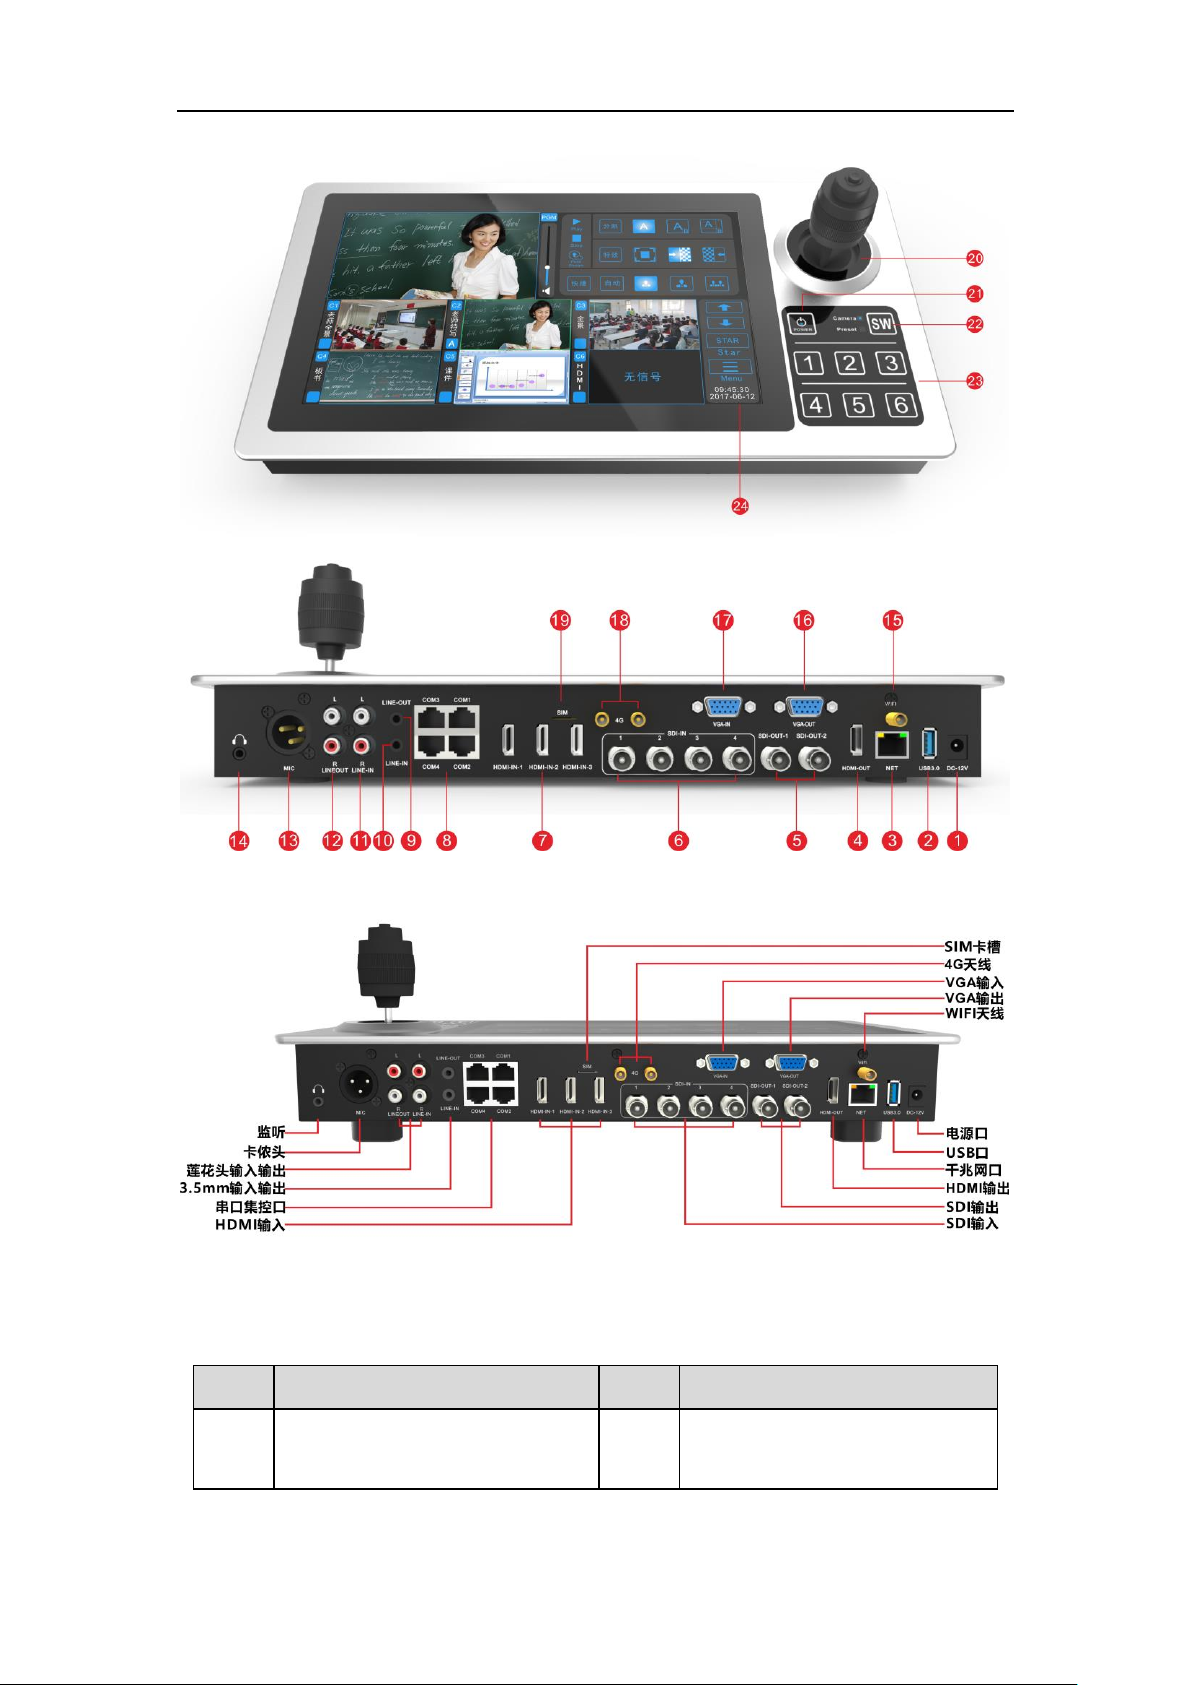
No.
Connection
No.
Connection
1
Power:DC 12V
13
MIC-IN: Audio input, standard
3-pin 6.5 XLR header

AC1870 iCast Quick Guide
11
4. Connection
1)Before Connection
2
USB3.0: connect to
mouse,keyboard,etc.
14
Listening Interface: 3.5mm
Audio output interface, can be
accessed by listening to
headphones
3
NET: Gigabit Ethernet interface
15
WIFI: WIFI antenna interface,
2.4G signal
4
HDMI-OUT : 1080p60 video
output
16
VGA-OUT:VGA output.
5
SDI-OUT-1/2:3G-SDI
17
VGA-IN : VGA input ,
1920*1080P60
6
SDI 1 /2 /3 /4 -IN:4 SDI in
18
4G:4G
7
HDMI-IN-1/2/3:3 HDMI
input,max support 1920*1080P60
input. HDMI-IN-1 and VGA-IN
using the same channel,cannot
input at the same time.
19
SIM
8
COM:COM1-COM4 connect to 4
serial port,can be connected to
tracking camera,PTZ
camra,integrated system,etc. COM
port with RS232 and RS485
20
Joystick controll
9
LINE-OUT: Audio out, 3.5mm
port.
21
POWER
10
LINE-IN: Audio input, 3.5mm
headphone jack.
22
SW : Function switch button,
camera channel and preset
function switch
11
LINE-IN-L/R: Audio input,
standard lotus head interface.
23
Digi button:
12
LINE-OUT-L/R: Audio output,
standard lotus head interface.
24
11.6 inch touch screen

AC1870 iCast Quick Guide
12
Get below items ready:
AC8170 iCast (with adaptor),USB3.0U Disk 1pcs,PC 1pcs (Graphics card with HDMI AND
VGA output), Display 1pcs (with HDMI and VGA input,with 1920X1080@60MHz resolution
as best),HDMI cable 4pcs,VGA cable 2pcs, network cable 1pcs, SDI cable 4pcs,PTZ
cameras with 1080P25 to P60 SDI output(with RS232 and RS485 output,with HDMI output),
Two head 3.5mm headphone connector audio input line 1 (then computer sound input),
audio speakers 1, a double lotus a 3.5mm audio output line 2, in addition to the
need to produce a number of serial lines in accordance with the interface line (1
is RJ45 And the other one is a RS232 female or male interface) for the connection
of peripheral devices (camera PTZ control lines, laptops). One camera PTZ control
line for the detection of recording and output 232 and 485 signals, notebook
computers with a USB to serial cable connection to do 1 is RJ45 port 1 is the RS232
female interface cable for testing peripheral equipment ( Computer) to send the
command code to the recording and broadcasting, check the recording and control set
the serial port to receive.
2)Before power on
1、AC8170 need to get the above cables ready.
2、Connect VGA-OUT and HDMI-OUT to two 1920 * 1080P60 HD monitors
3、Connect the SDI camera to the SDI-IN-1 to SDI-IN-4 interface
4、Connected to the audio cable, U disk and so on
5、To confirm all the wire connection is correct, with S700 comes with 12V 3A power
adapter access recording DC 12V interface
6、After properly connected to the power supply, press the POWER button on the right
side of the LCD touch screen, the S700 will automatically start running
7、Connect to VGA-OUT display and connect to HDMI-OUT display with welcome logo.
8、 About 10s seconds later,VGA-OUT show cast interface ,HDMI-OUT to show PGM
interface.
9、Welcome page show and wait for the system to load the interface after the end
of the user can use the mouse or manually touch the LCD screen on the recording and
broadcasting host the appropriate operation
AC1870 iCast Quick Guide
13
Remark:
IP 192.168.100.66
User can do touch screen controlling or using mouse.
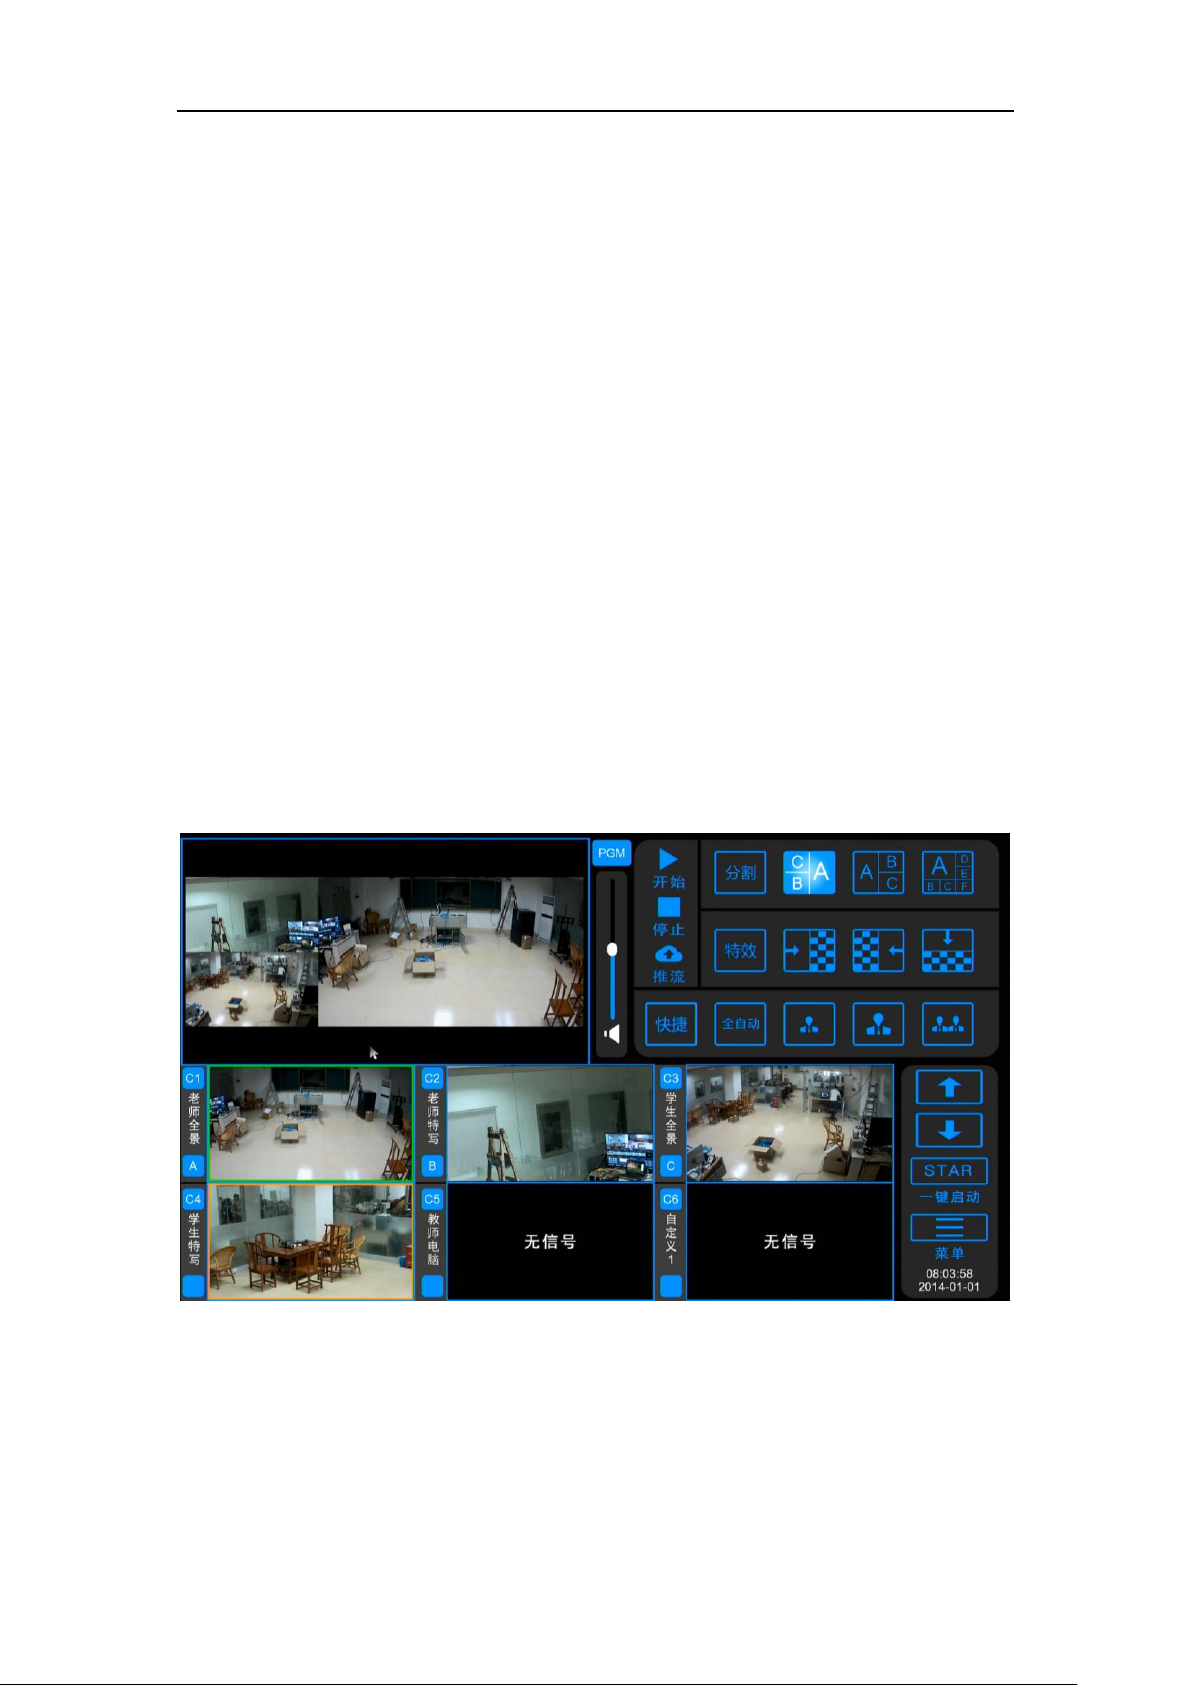
5.Function and Operation
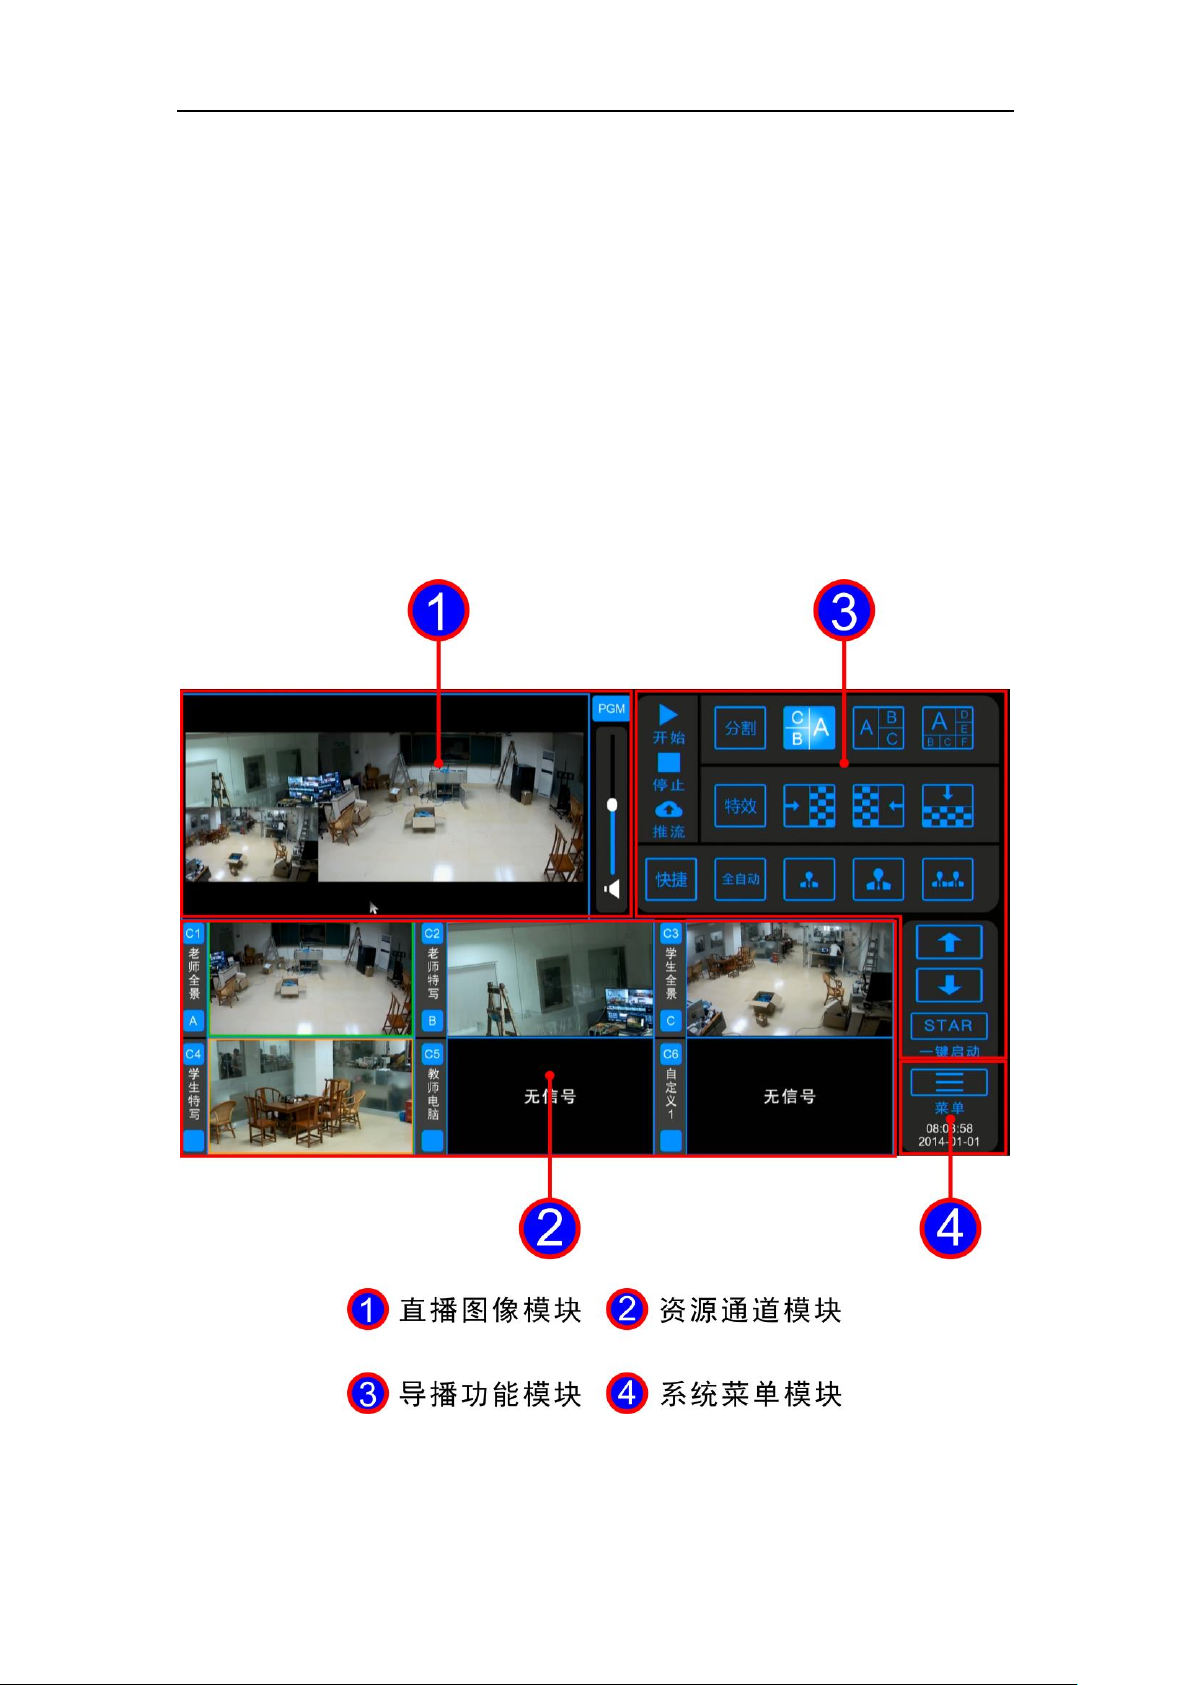
The guide interface includes four modules: live image channel, resource video
channel, manual guide function, system function settings. As shown in Figure 8 below.
Figure 8 Guide interface 4 large module
(1) Live image module:电影模式最终录制和直播效果界面。(PGM、PGM2)

AC1870 iCast Quick Guide
14
(2) resource channel module:The input video channel display interface can be
saved as a resource video.
(3) guide function module:One-touch recording / start / push / switch effects /
screen split / guide mode switch and so on.
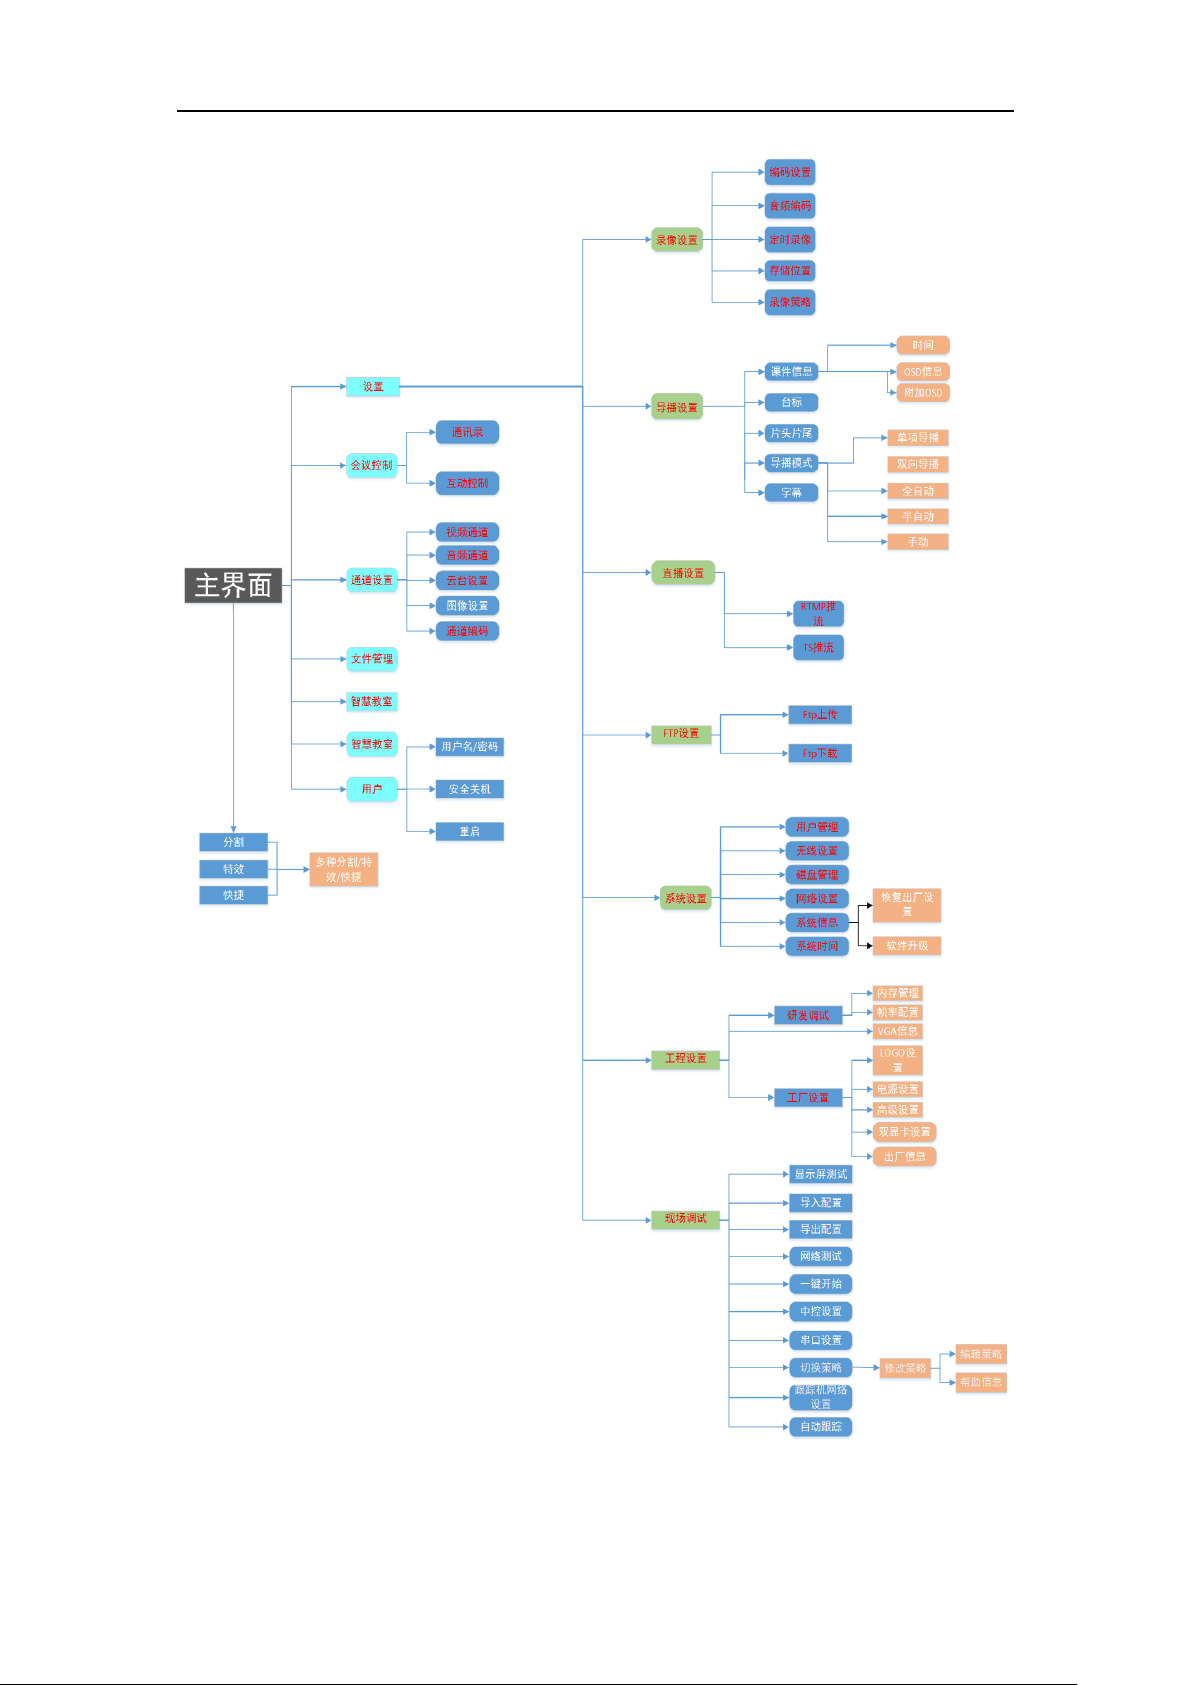
(4) System menu module:Enter the system settings and other secondary menu.
The structure of the detailed system function menu is shown in Figure 9 below.
AC1870 iCast Quick Guide
15
Figure 9 functional tree
AC1870 iCast Quick Guide
16
5.1 Main interface
5.1.1 Boot interface
After the power cord is connected, press the main panel power button POWER to
boot, comes with 11.6 LCD touch screen and HDMI-OUT, VGA-OUT interface to connect
the high-definition display and will display the recording and playback logo interface. The
format is JPG, the resolution is 1024 * 768,72dpi, the bit depth is 24, the size is not more
than 128KB. Note: logo picture The name can not be named after Chinese and special
symbols.)
5.1.2 Main interface
Boot logo interface to stay about 20 seconds or so, the system will enter the main
interface. The main interface is the "welcome to use the embedded recording and
broadcasting, the system is loading" and other words welcome interface, after loading, the
user can operate the main interface.
Figure 10 recording the main interface

AC1870 iCast Quick Guide
17
5.2 Getting Started
5.2.1 Recode
In the main interface, click the [Start] button, you can start recording live channel
recording, recording the top right of the live channel will appear recording time. When you
start recording, the icon changes to [END] and clicks again to pause recording .
Click the [Stop] button to stop recording the live channel. Video file in the main
interface [Settings] menu → [File Management] to view, available U disk copy or FTP
download to the local computer. FTP format: open my computer, in the address bar above
enter ftp: / / recording host IP, enter the user after login, enter the user name ftp, password
empty. Log in to find the video folder, according to the recording time to find the
corresponding video.
Note
The recording of the resource channel needs to be done with a one-button start
button. The operation is described in Section 5.2.7 below.
5.2.2 Push stream
In the main interface, click the [push] button, you can start streaming live channel
image, the normal push to the live platform, push the flow icon turns red, click the push
button again will stop pushing. Push the need to properly set up before the push address
and release mode, the default is Live. The push flow address is set in the [Settings] menu
→ [Settings] → [Live Settings] → [RTMP Push Flow] menu, and push the main and
subcode streams according to the different network environment. Default master stream
for the 4000kbsp, resolution Blu-ray 1080; sub-stream for the 400kbps, resolution HD 480.
The PGM and PGM2 channel stream sizes are changed in the [Settings] menu →
[Settings] → [Video Settings] → [Encoding Settings]. Note: S700 supports simultaneous
AC1870 iCast Quick Guide
18
streamer PGM and PGM2 two live channels, can provide different users to watch a
different live screen.
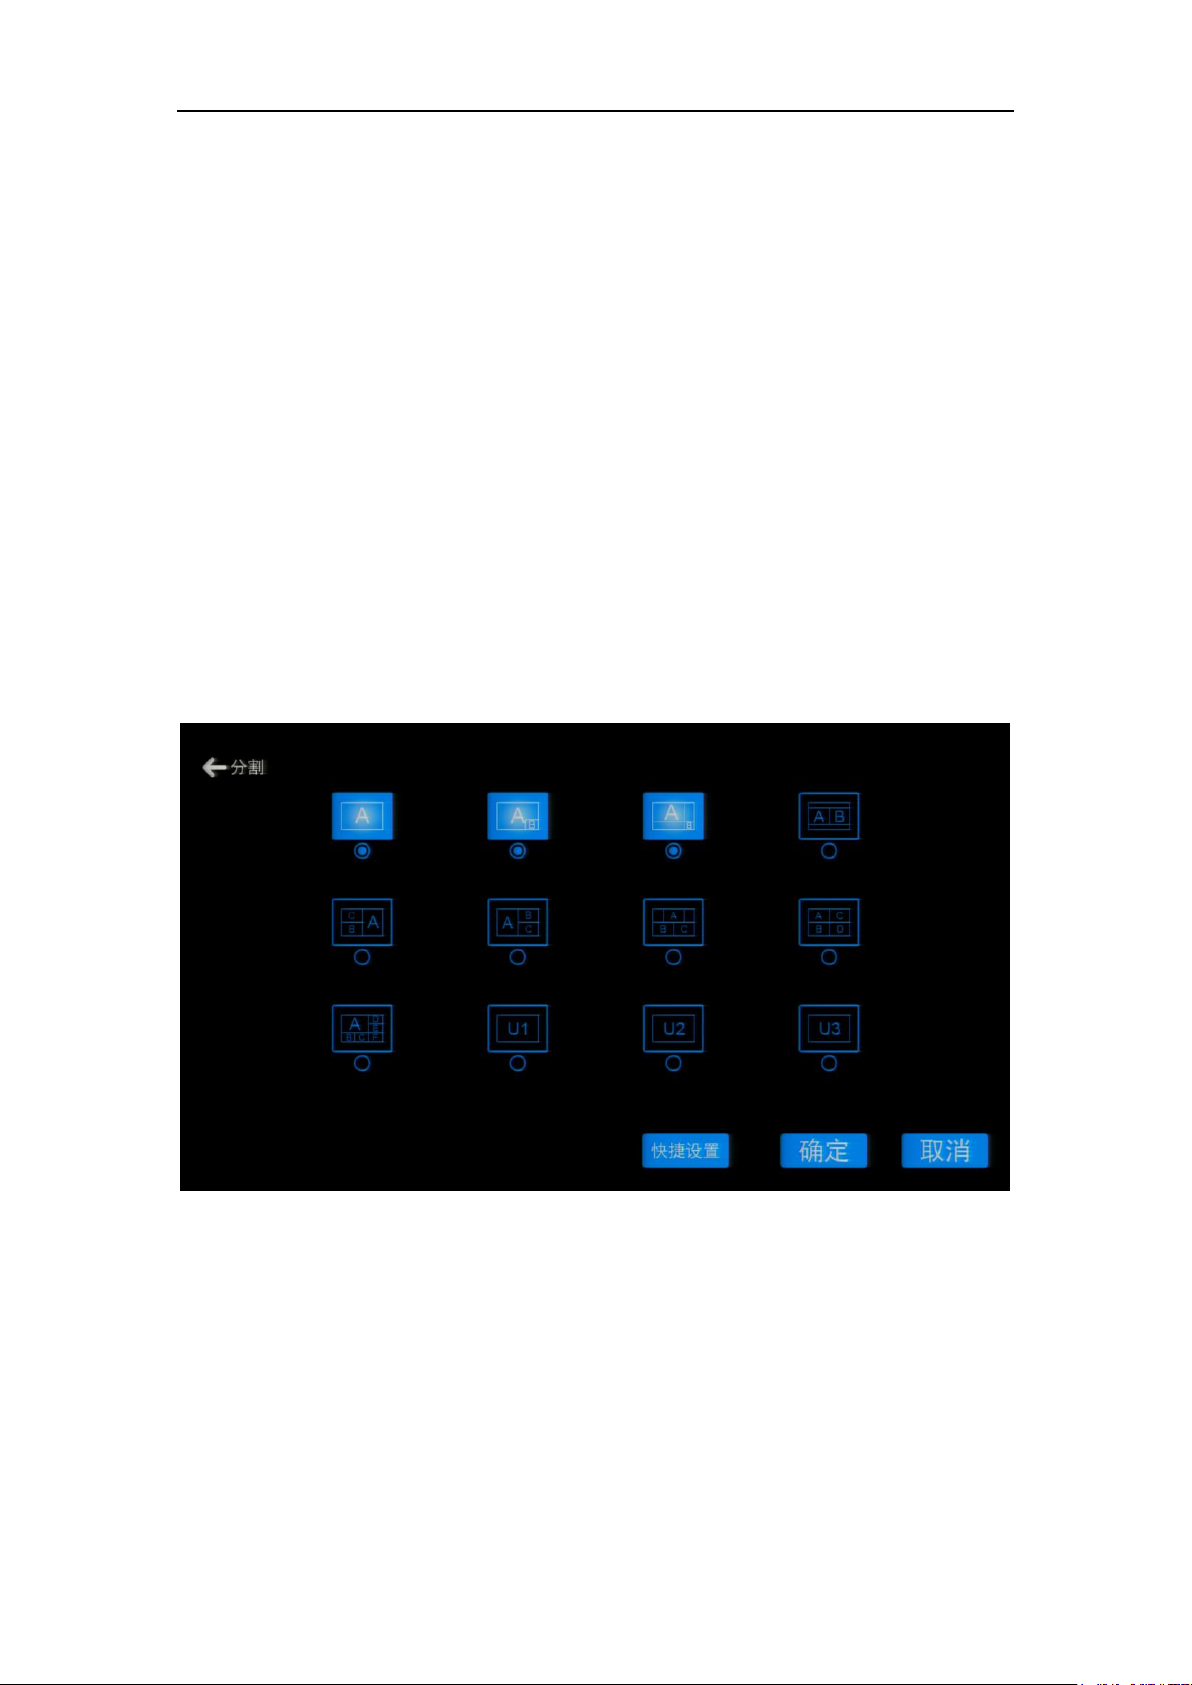
5.2.3 Split
The main interface on the right side of the split type shortcut button, the default home
page shows 3, for manual switching when the rapid switch. A total of 12 split type
selection, click the split button to enter the changes. Each split type can be fixed channel
image display, picture-in-picture, the default display large A for students close-up, small B
for the teacher close-up. Recording support for maximum 6-segment display, A / B / C / D
/ E / F and other location display can be customized. Click the split button to enter the
shortcut settings custom. As shown below:
Figure 11 Split Type Home Show Changes
AC1870 iCast Quick Guide
19
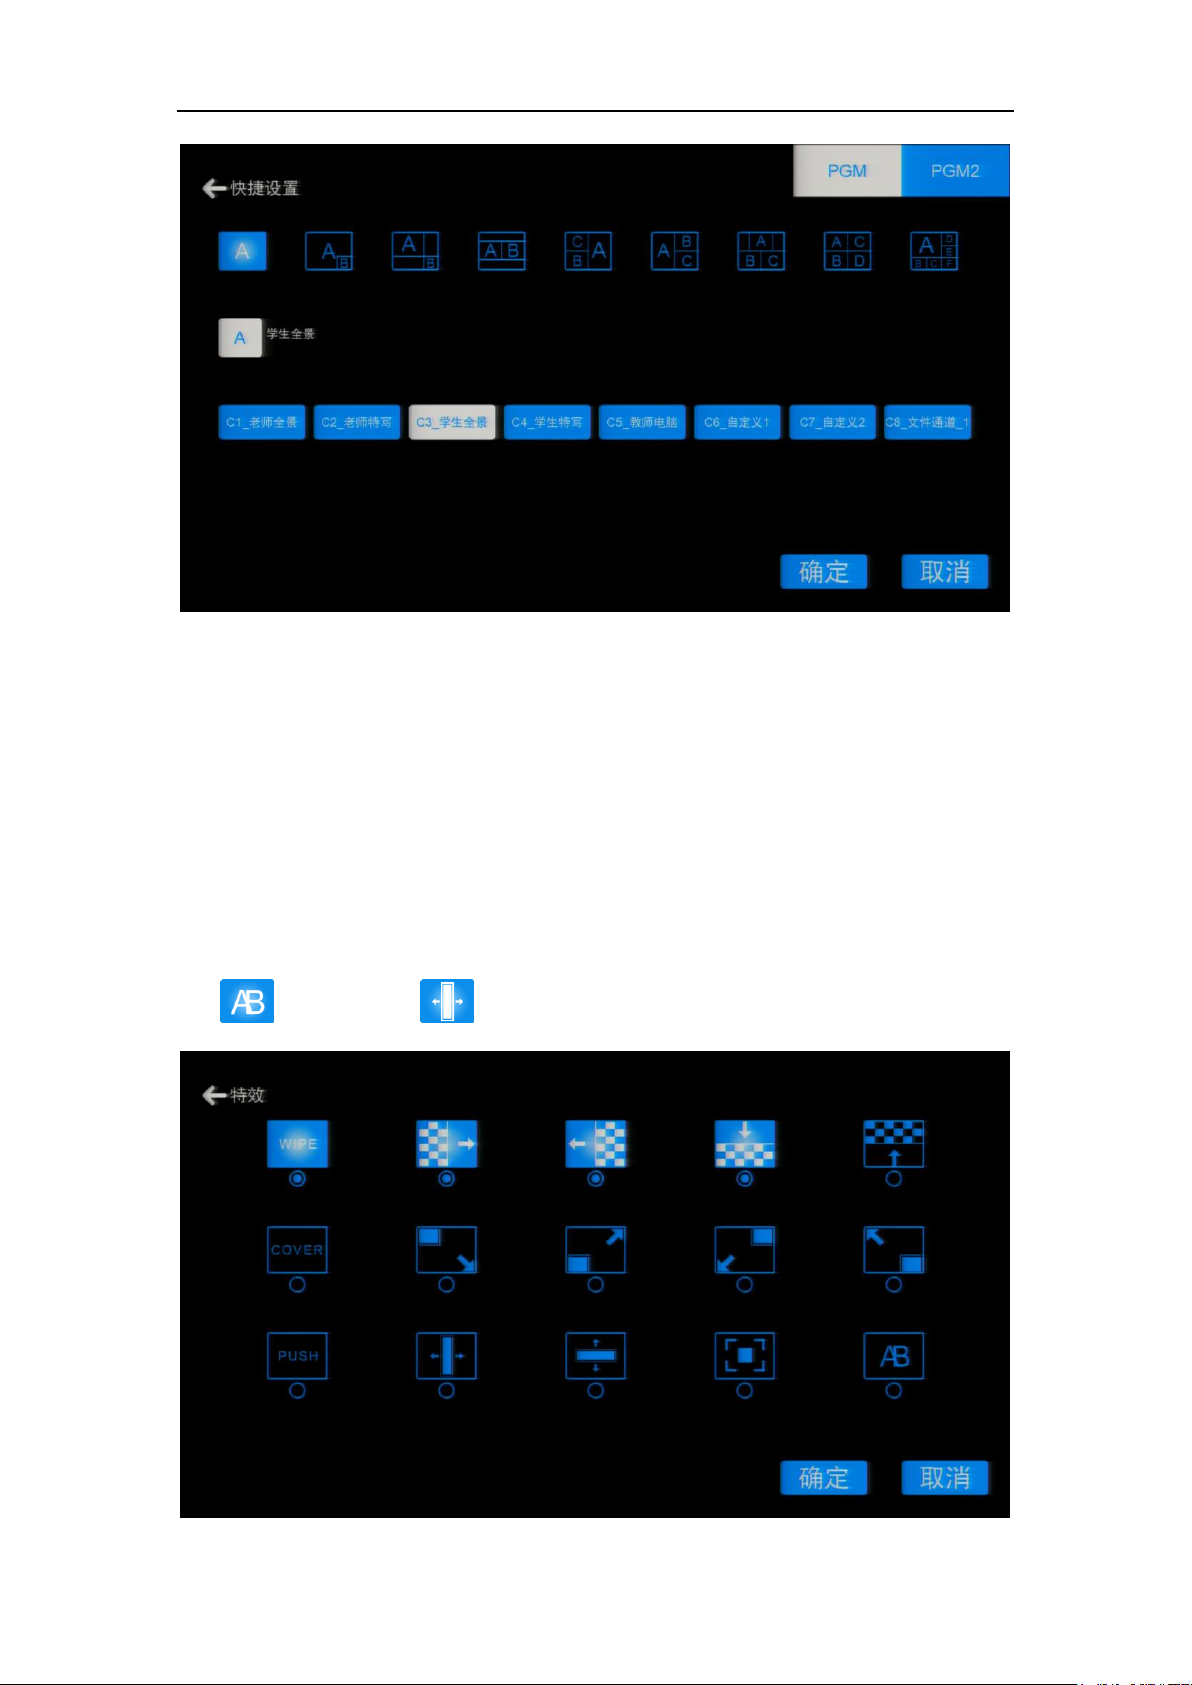
Figure 12 Split channel custom image selection
5.2.4 Special effects
Manual guidance and automatic guide can be set to switch effects, for smooth
transition image switching, enhance the viewing of the screen. Recorded a total of 28
kinds of switching effects, users can set the main interface effects bar display three effects
button for quick guidance operation. Home can only display three effects, click the special
effects button to enter the menu to modify, commonly used Wipe (erase), Cover (cover),
fade , sliding window .

AC1870 iCast Quick Guide
20
Figure 13 Special effects selection
5.2.5 Switch
S700 recording and broadcasting host in manual guidance and automatic guided
mode are supported manually click the touch resource channel for PGM live channel
image switching. Automatic boot mode, the user can not do any operation, recording and
recording the entire host automatically switch. Manual switch to switch to automatic
navigation, the recording and broadcasting host will default to the teacher close-up
channel to switch to PGM. In the special effects button below the default display automatic
and manual guide switch button, the user click the button to guide the mode switch.
Recording and tracking external tracking equipment (tracking camera or tracking
host), tracking equipment for classroom scene behavior of the image analysis, detect the
signal sent after the command code to the recording, recording and recording after the
corresponding channel switch. The current strategy is to track the device to send the start
command code and the end of the command code, such as students standing up to
answer the question of this action, the need to send students to stand up to the beginning
of the action, the action strategy is to record the manual command code to switch the
corresponding channel; And students sit down and record the student received the
command code, the corresponding automatic tracking menu SDI-4 channel command
code in the alarm appears, correspond to the query strategy inside the switch strategy
table, according to the table to switch the strategy. When the student sat down, the
recording of the student's standing command code, the corresponding automatic tracking
menu SDI-4 channel command code in the alarm disappeared, PGM channel image
returned to the student before the start of a previous image (teacher close-up).
Action strategy and status strategy is different, the action strategy is hard cut, the
code to switch; state strategy is in accordance with the switch after the policy table to
switch, the policy table can be customized to switch the type of segmentation, effects and
so on. According to the different tracking equipment selection of different switching
strategies, under normal circumstances, recording and recording external tracking host
need to select the action strategy, external binocular tracking camera needs to select the
AC1870 iCast Quick Guide
21
state strategy.
Automatic tracking menu to enter: the main interface [menu] → [set] → [field
debugging] → [automatic tracking]; Switch strategy to enter: the main interface [menu] →
[set] → [field debugging] → [switching strategy], the password is 1. Non-professional
technicians do not modify parameters.
Computer signal automatically switches to support VGA plug-ins and automatic
image detection. Use the VGA plug-in detection of mouse movements, automatic tracking
menu in the computer channel selection network, continuous mode; teachers need to
install VGA plug-in computer. The use of automatic image detection, computer channel
selection can automatically detect, as long as the computer desktop image changes, the
computer channel will automatically cut into the PGM.
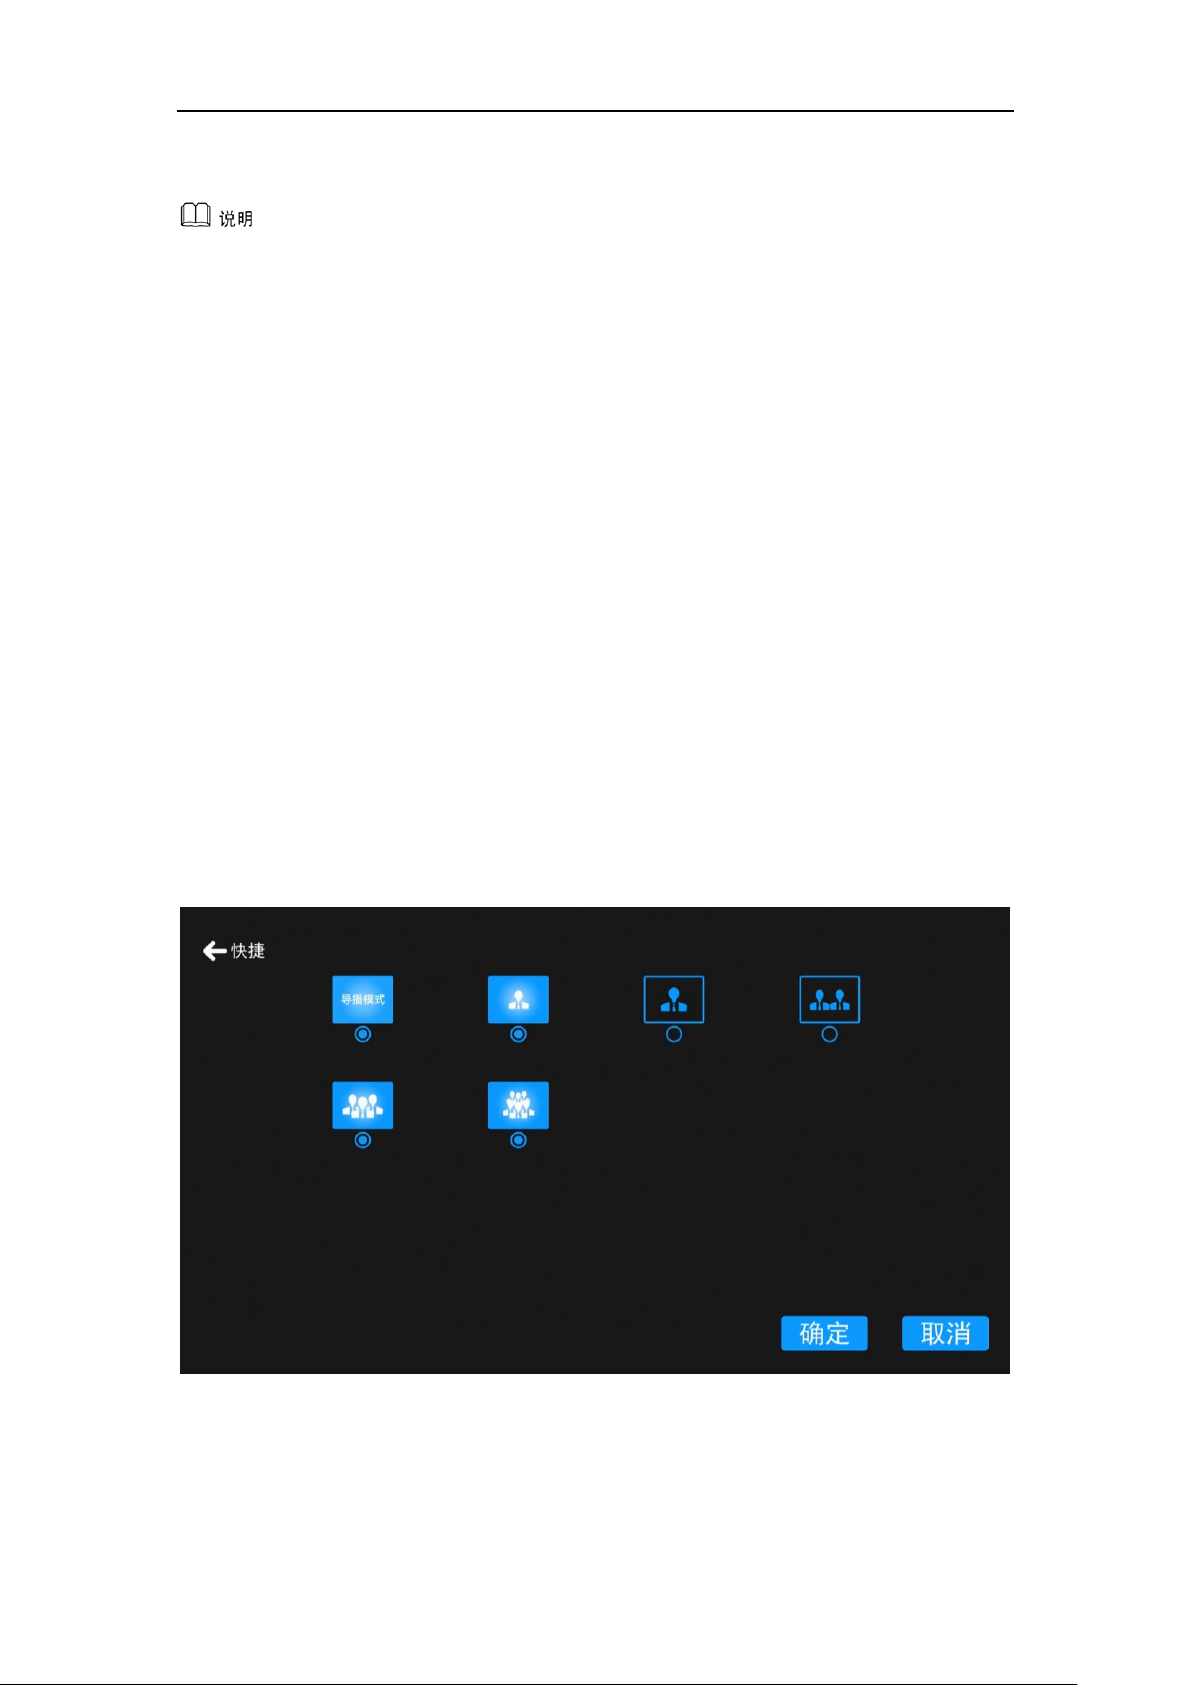
5.2.6 Shortcut settings
Shortcut settings button to select the home page shows the four shortcut buttons, the
general display 【guide mode switch button】 and three [preset] button.
Figure 14 Shortcut button settings
 Loading...