

Veyo HVR5004HF, HVR5008HF, HVR5016HF, HVR008H, HVR8004U User Manual
...
Hybrid Network Digital Video Recorder (HVR) User Manual
- 1 -
Foreword
Notice:
Welcome to use our video recorder (HVR). For your safety, please read the manual carefully. Here
are the right method to use our HVR, preventing danger and the loss of your property. Please
follow when use it.
1. 1. Installation environment:
Please place and use the HVR from 0℃-50℃.
While install and use the HVR , it should be placed horizontally. Avoid tilt, and not invert.
Avoid placing or installing in a high temperature, damp, dusty or smoking situation.
HVR should not be suffered from the water-drop or water splash. Do not put something filled
with liquid like vase on it. Also, do not put other devices on it.
To make sure the HVR cool properly, please install it in a well ventilated environment.
(cooling fan is installed inside)
Please maintain a gap of 6CM or more between the back and the wall to cool fast during
installation.
Please install the lightning arrester when use at high-lightning areas to avoid being damaged
by thunderstroke.
2. Notice :
Please do not touch the power switch with your wet hands or wet items to avoid the electric
shock.
Make sure the product lying on the ground after finish installation. To avoid the video and
voice signal being disrupted, and damaging the product.
Please make sure the stable power supply for HVR. Try to use stable voltage, less ripple
interference power to input. Do not disconnect the main switch to turn off HVR.
Do not spill liquid or metal on HVR to avoid internal short circuit or fire.
HVR does not include the hard disk, please install the hard disk correctly before use it. Or it
can not playback.
HVR PCB board will cause short circuit after the dusts settle on damp. To make it work well
for long hours,
Please use the brush to clear the dust regularly for the PCB board, accessory, inside
housing and the cooling fan.
When shut down HVR, do not turn off the power switch directly. Please press the panel’s

Hybrid Network Digital Video Recorder (HVR) User Manual
shutdown button to make HVR power off automatically to avoid damaging the hard disk.
HVR system supports formatting function. If the hard disk is already used, please note the
formatting. Please format the hard disk when first use our HVR, or it causes error.
Do not open the housing while HVR is working.
To ensure the video integrity, please change the hard disk timely when it breaks down.(there
is wrong record about the hard disk). Or use HardDiskSentinel to check the hard disk by
computer.
2. 3. Description:
Please comply with the actual instrument. The instruction is for reference only.
HVR version updates in time. Please understand there is no any notice if update.
Please contact our technology department for the newest program and supplementary
documentation.
Our company has the final power of interpretation if there is doubt or controversy in the
product description,
This instruction is provided for a number series products for reference. So, the specific
management won’t be listed one by one. If any questions, please contact our technology
department.

Contents
Chapter 1 Product Introduction
....................................................................................... ERROR! BOOKMARK NOT DEFINED.
1.1 Product Overview ............................................................................................................. 7
1.2 Main functions .................................................................................................................. 7
Chapter 2 Installation Guide
.................................................................................................................................................. 8
2.1 Unboxing ......................................................................................................................... 8
2.2 Hard Disk Installation ....................................................... ERROR! BOOKMARK NOT DEFINED.
Chapter 3 Local Operation Guide
....................................................................................... ERROR! BOOKMARK NOT DEFINED.
3.1 Powering on And off Operations
.............................................................................................. ERROR! BOOKMARK NOT DEFINED.
3.1.1 Powering on ............................................................... Error! Bookmark not defined.
3.1.2 Powering off ............................................................... Error! Bookmark not defined.
3.1.3 Power Off Recovery ................................................... Error! Bookmark not defined.
3.2 System Login
.................................................................................................. ERROR! BOOKMARK NOT DEFINED.
3.3 Menu Operation ............................................................... ERROR! BOOKMARK NOT DEFINED.
3.3.1 Sign out ..................................................................... Error! Bookmark not defined.
3.3.2 Add Camera ............................................................... Error! Bookmark not defined.
3.3.3 Real Time Preview ..................................................... Error! Bookmark not defined.
3.3.3.1 Preview Related Functions Introduction .............. Error! Bookmark not defined.
3.3.3.2 PTZ Control ........................................................ Error! Bookmark not defined.
3.3.4 Video Playback .......................................................... Error! Bookmark not defined.
3.3.4.1 Playback
...................................................................................... Error! Bookmark not defined.
3.3.4.2 Local Capture ..................................................... Error! Bookmark not defined.
3.3.5 Backup .................................................................................................................. 20
3.3.6 Video Configuration ................................................................................................ 22
3.3.6.1 Video Program ............................................................................................... 23

- 4 -
3.3.6.2 Extended Function Application........................................................................ 23
3.3.6.3 Output Configuration ...................................................................................... 25
3.3.7 Hard Disk Management
....................................................................................................................................... 26
3.3.8 System Configuration
....................................................................................................................................... 27
3.3.8.1 Time Setting ................................ ................................................................... 28
3.3.8.2 Network Parameters ....................................................................................... 29
3.3.8.3 Alarm Management ........................................................................................ 31
3.3.8.4User Management ........................................................................................... 31
3.3.9 System Maintenance .............................................................................................. 32
3.3.9.1 System Info-Stream Statistics ................................................................ ......... 33
3.3.9.2 System Info-Log Info ...................................................................................... 33
3.3.9.3 System Info-Export Configuration ................................................................... 33
3.3.9.4 System Info-Import Configuration ................................................................... 34
3.3.9.5 System Update................................................... Error! Bookmark not defined.
Chapter 4 Network Operation Guide ................................ ERROR! BOOKMARK NOT DEFINED.
Chapter 5 Mobile Operation Guide ................................................ Error! Bookmark not defined.
Chapter 6 FAQ ................................................................ ERROR! BOOKMARK NOT DEFINED.

Hybrid Network Digital Video Recorder (HVR) User Manual
- 5 -
Parameters
Model
HVR5004HF_5008HF_5016
HF
HVR6004H_HVR008
H
HVR8004
U
Operating system
Embedded Linux Operating System
Video
Analog input
4CH/8CH/16CH
4CH/8CH
4CH
Analog input
Support 60Mbps access bandwidth ONVIF protocol, H.264 coding
type
CVBS output
1CH HMDI, 1CH VGA, 1CH CVBS
Output
resolution
1024×768/1280×1024/1440×900/1920×1080
Input resolution
960H/720P/1080P/3MP/4MP
Audio
Analog input
4CH/8CH/16CH
4CH/8CH
4CH
Digital input
4CH_8CH_16CH G.711 network digital audio input (ONVIF), RJ45
interface
Coding
Compression
H.264, Support VBR and variable frame rate, support set video
quality and compressed stream
Video coding
960H 25FPS
720P 25FPS
H1080P 25FPS
960H 25FPS
720P 25FPS
1080P 25FPS
960H 25FPS
720P 25FPS
1080P 25FPS
3MP 25FPS
4MP 25FPS
Video bitrate
128Kbps-5Mbps, can be customized (Max 5Mbps)
AAC
ADPCM
Stream type
Video stream and composite stream(video and audio stream)
Video loss detect
Linkage mode, email, PTZ, alarm output
Image dynamic detection
each channel supports 192 areas setting, can set level 3 sensitivity
Image playback quality
the analog channel is related with code rate, the network channel is
synchronized with the previewed main stream
Area occlusion setting
each channel supports 4 area occlusion setting
record mode
support manual, auto, motion detection, alarm
backup mode
Support hard disk, USB, network storage and backup

Hybrid Network Digital Video Recorder (HVR) User Manual
- 6 -
operation mode
Mouse, remoter, front panel keypad
local login
user name and password, user name: admin password: 123456
video save
local hard drive, network
External
interface
video input
① 4CH Analog input
② 2CH Analog + 2CH IP
③ 4CH IP
④ 8CH Analog
⑤ 4CH Analog + 4CH IP
⑥ 8CH IP
⑦ 16CH Analog
⑧ 8CH Analog + 8CH IP
⑨ 16CH IP
Audio input
4CH/8CH/16CH analogue input / audio input, RJ45 port
4CH/8CH/16CH Analog/ network audio, RJ45 interface
Video output
1CH HDMI,1CH VGA, 1CH CVBS
Audio output
HDMI audio output,RCA audio output HDMI, RCA
network
interface
10/100M adaptive
RS485
1 RS485
USB
2USB ports for mouse and USB drive
alarm input
no
alarm output
no
WLAN
Via USB mount 7601 NIC chip support
Hard disk
SATA
1/2SATA
Max capacity
each supports up to 8TB
mobile monitor
Support iPhone, Android smart phone, APP: N_EYE PRO, V12
Power
DC12V
Consumption
3W
temperature
-10℃~+55℃

Hybrid Network Digital Video Recorder (HVR) User Manual
- 7 -
humidity
10%-90%
size
HVR:
packing:
weight(without hard disk)
net weight: gross weight:
Container
Installation mode
On desk
hardware configure
CPU:HI3520DV2_HI3520DV3_HI3521AV1
Board Models:HVR5004HF_5008HF_5016HF_6004H_6008H_8004U
PCB board model:NVP6134C
Coding chip: HI3520DV2_HI3520DV3_HI3521AV1
Encoding chip:
Power: DC12V
Hard disk: WD/ST_SV35 the best
Dongle: support
Chapter 1 Product Introduction
1.1 Product Overview
This product is only designed for video surveillance, which is used for encoding and recording.
It’s combined with H.264 video compression, max capacity hard disk, TCP/IP, embedded Linux
operating system and other advanced electronic information technology. This achieves high
quality image, low bitrate recording and good system stability.
This product has a variety of functions: record, playback and monitor simultaneously. Also, it
can achieve the synchronization of video and audio. It has advanced control technology and
powerful network data transmission capability.
1.2 Main Functions
The following functions are different because of the different products and hardware versions.
real time monitor
compression function
record

Hybrid Network Digital Video Recorder (HVR) User Manual
- 8 -
video playback and backup
PTZ control
alarm management and control
communication interface
network
Chapter 2 Installation Guide
2.1 Unboxing
When you receive this product, please check according to the "Network Digital Video Recorder
List" in the box.
2.2 Hard Disk Installation
Installation preparation:
Please prepare a cross screwdriver. 1 to 9 hard disks can be installed in this series of network
digital video recorders, hard disk capacity unlimited.
Hard disk installation steps:
3.1 Hard disk installation steps:
1.Unscrew screws at the side of the housing, open the upper shell.
2.onnect the hard disk data cable and wire.
3.Fix the hard disk to the lower shell of the
housing with screws.

Hybrid Network Digital Video Recorder (HVR) User Manual
- 9 -
4.Cover up and upper shell with screws.

Hybrid Network Digital Video Recorder (HVR) User Manual
- 10 -
Chapter 3 Local Operation Guide
3.1 Start Up and Shutdown
3.1.1 Start Up
Plug in the power cable, press the start up button, power indicator light on, video recorder
powering up. After starting up, default video outputting mode as multi-screen output, if powering
time is in the preset video recording time, the system will automatically start the timing recording
function.
Notice: Please use the power/adapter supplied with the network digital video recorder. Do not
use other types or brands of power supply instead of the original power adapter.
3.1.2 Shutdown
*To shutdown the device, long press the start up button at the front panel
*Go to 【Right-click menu】 → 【Shut down system】, select 【shutdown】. (Hint: It is
recommended to use this method when shutting down to avoid damage to equipment and hard
disk when accidental power off).
Note: Before replacing the hard disk, make sure the device has been shut done.
3.1.3 Power Off Recovery
When the video recorder is recording, if the system power is cut off or forced to shut down,
you can turn on the DVR, then it will automatically save the video before powering off, and
automatically resume to the status before the powering off.
3.2 Login System
After normal start up, click the right mouse button to select the main menu will pop up the user
login interface, please enter the correct user name and password to log into the system (default
user name: admin password: 123456).
3.3 Menu Operation
After the user successfully login, follow the menu bar on the interface for the relevant settings:
3.3.1 Sign out
Click on the [Close System] icon on the menu, the interface will be shown on the right:
Cancellation" button to log out of the current user;

Hybrid Network Digital Video Recorder (HVR) User Manual
- 11 -
Reboot" button to restart the device automatically;
Close" button to shutdown the device.
3.3.2 Camera Adding
Analogue camera:
Connect the analog camera / coaxial camera directly to the VIDEO IN port of the DVR.
Support inputting devices are AHD (720P 1080P 3MP 4MP)
TVI (720P 1080P)
CVI (720P 1080P)
Analogue (960H)
IP Camera:
Please switch to the mixed mode or IPC mode by this order: 【Right-click Menu】 → 【Main
Menu】 → 【System Setting】 → 【Mode Switch】
This product supports multi-version of ONVIF protocol, compatible with most popular brand
IPC on the market.
Before connecting to HVR, please ensure that the IPC’s IP address and HVR are in the same
network segment, and the main stream and sub-stream need to be adjusted to the recommended
value, otherwise it may have the following issues: unable to search IPC, no image showing, image
hanging,low picture quality, black image, beyond the decoding capacity and so on.
Connect the HVR with Internet and connect to LAN switch. After powering on, click the icon
on the main menu and set the NVR IP address, subnet mask and gateway on the basic
configuration page. You can use the ping command on the PC host in the LAN to ping the HVR to
detect whether the NVR is connected to the LAN.
Automatically adding IPC:
In the [right-click menu] → [Add auto] icon, click OK, the device will automatically search and
add the IPC.
Hybrid Network Digital Video Recorder (HVR) User Manual
- 12 -
To add a IPC manually:
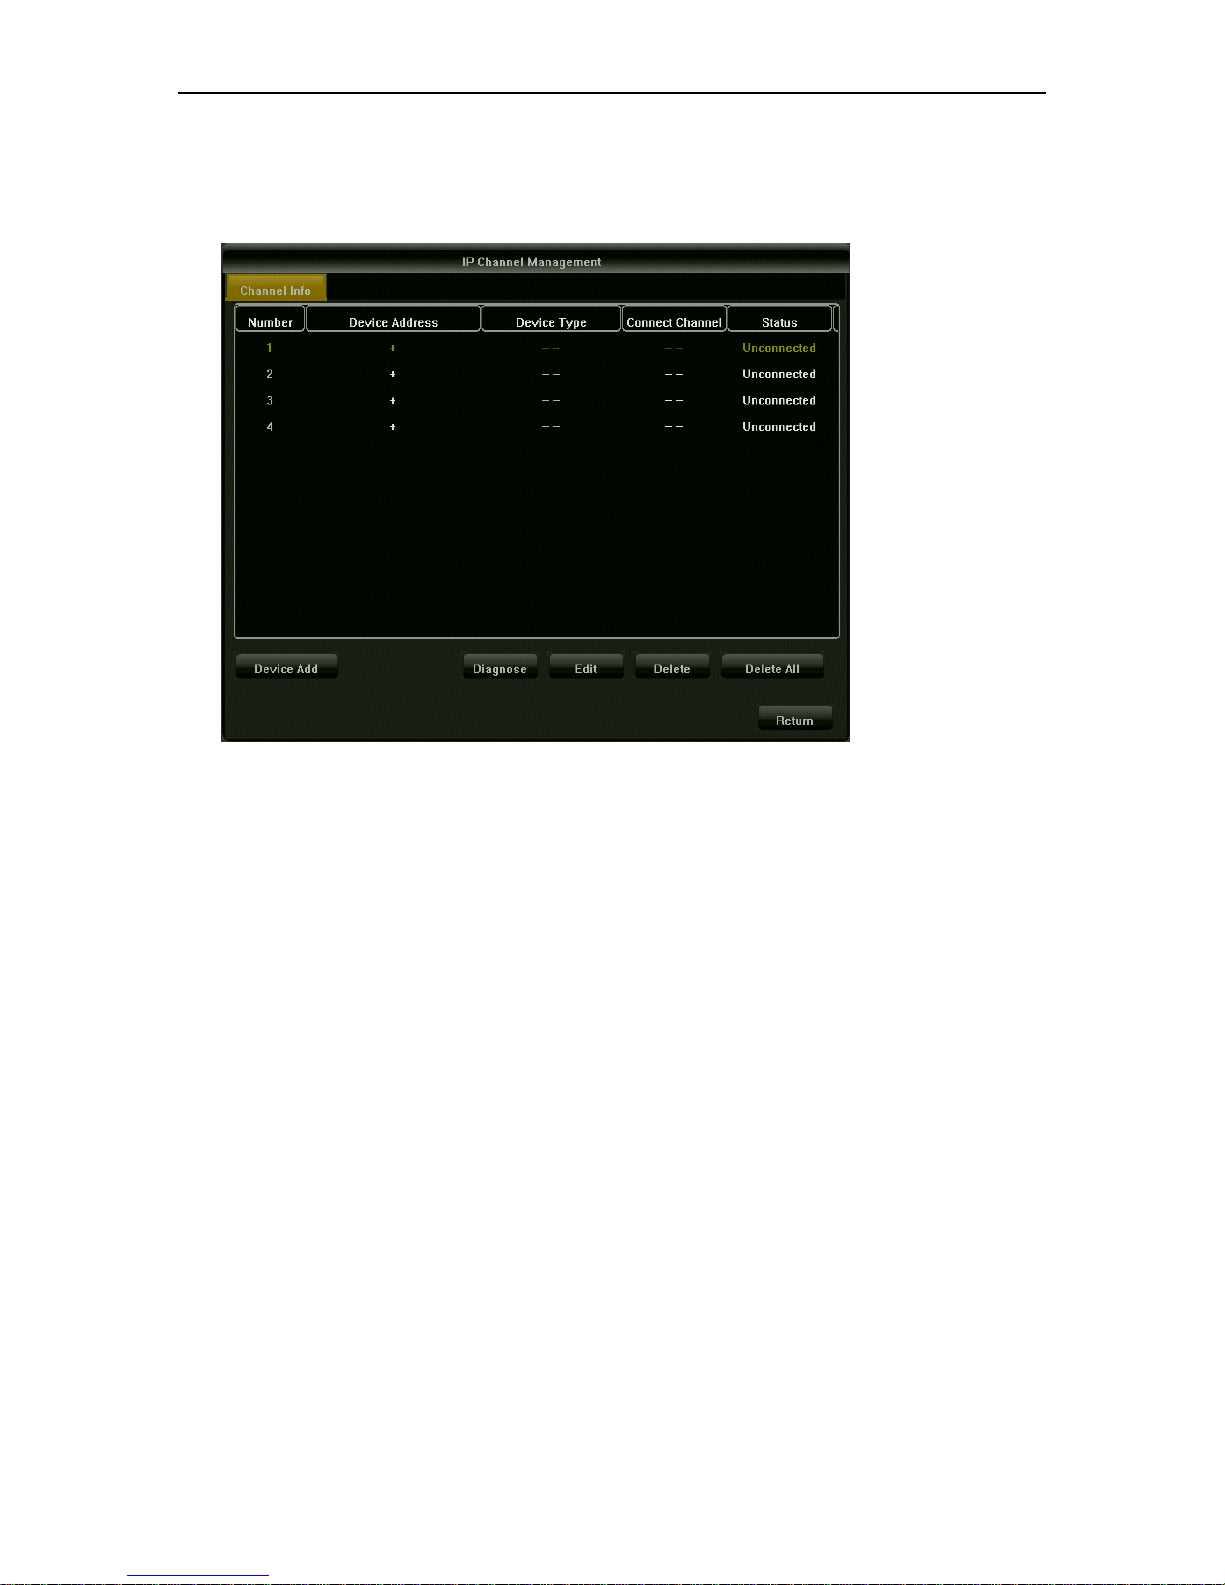
In the [right-click menu] → [network channel] icon, enter the IP channel management
interface, as shown below:
Click on the channel "+" button, HVR will automatically search all IPC in the LAN , search
completed, double-click the IP address which is needed to add to the HVR. You can also click on
the manual adding, manually enter the IP address and port to add the IP camera.
 Loading...