

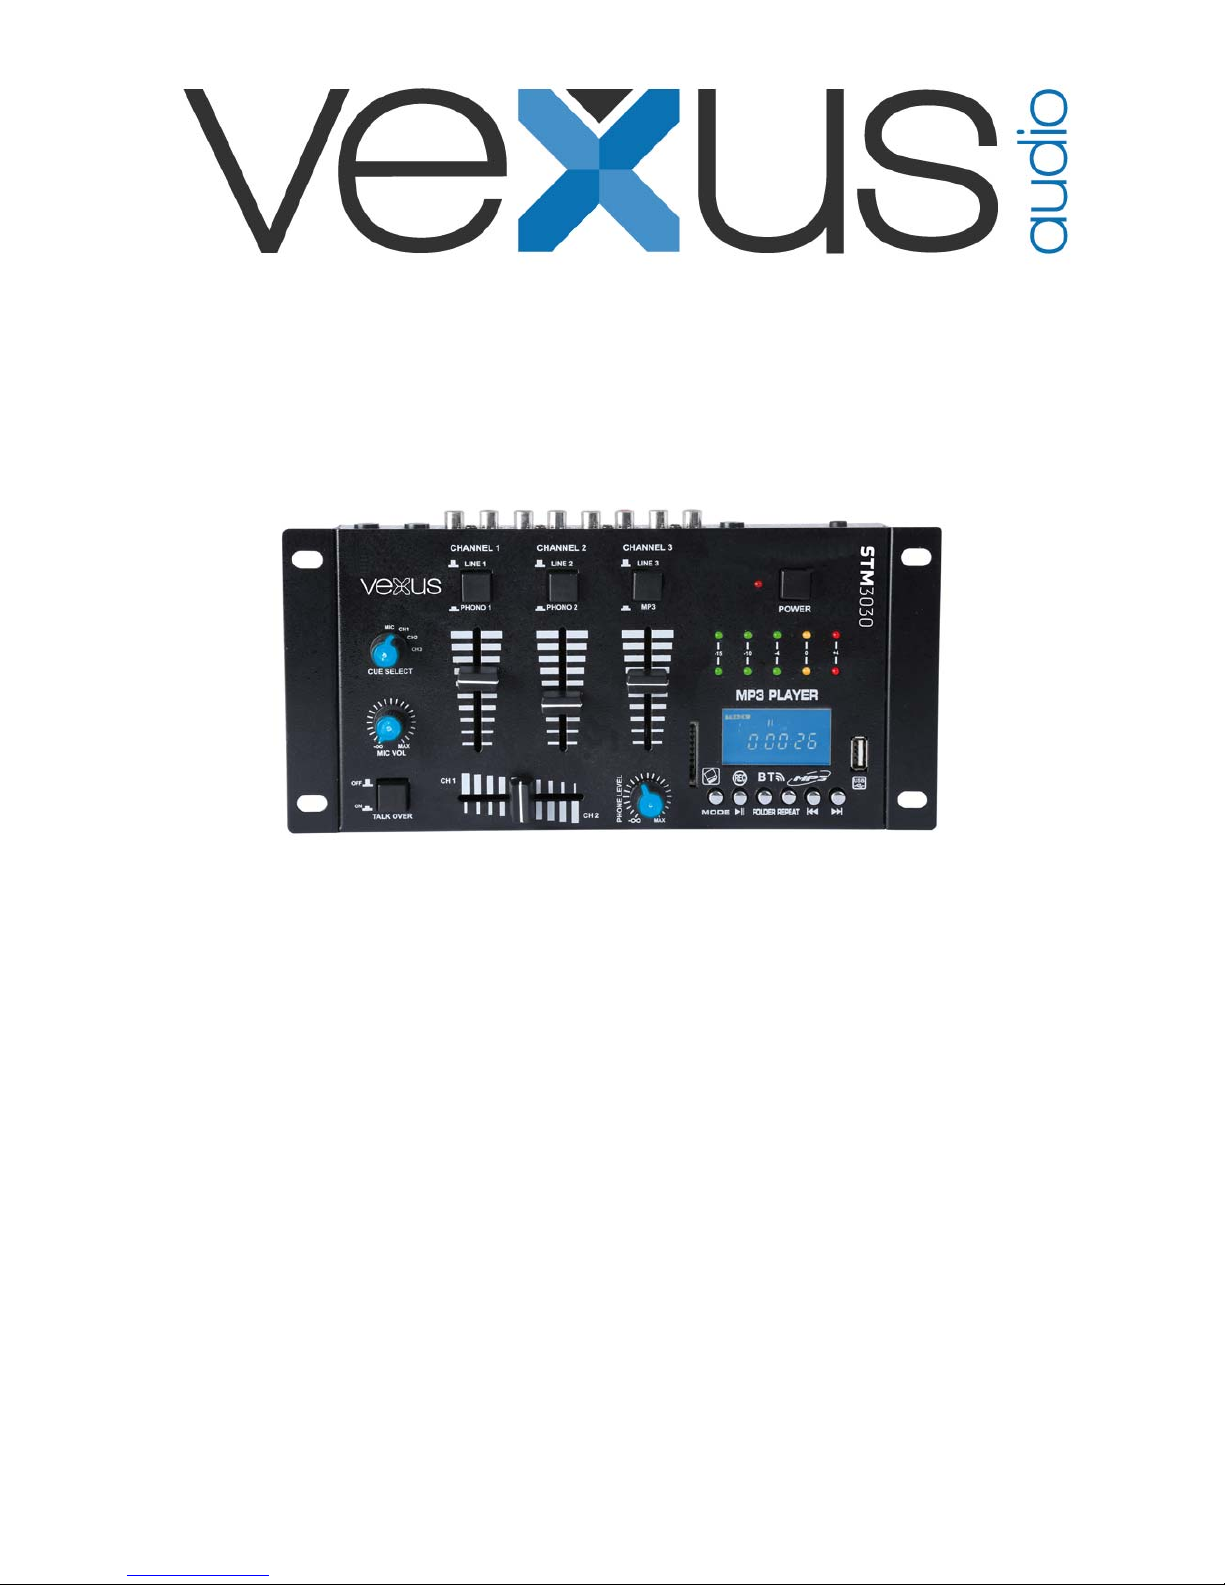
STM3030 Mixer 4 Channel, BT, MP3/Rec/LED
Ref. nr.: 172.990
INSTRUCTION MANUAL
GEBRUIKSAANWIJZING
GEBRAUCHSANLEITUNG
MANUAL DE INSTRUCCIONES
MANUEL D'INSTRUCTIONS
V1.0
2
ENGLISH
Congratulations to the purchase of this Vexus product. Please read this manual thoroughly prior to using the unit in order
to benefit fully from all features.
Read the manual prior to using the unit. Follow the instructions in order not to invalidate the warranty. Take all
precautions to avoid fire and/or electrical shock. Repairs must only be carried out by a qualified technician in order to
avoid electrical shock. Keep the manual for future reference.
- Prior to using the unit, please ask advice from a
specialist. When the unit is switched on for the first
time, some smell may occur. This is normal and will
disappear after a while.
- The unit contains voltage carrying parts. Therefore do
NOT open the housing.
- Do not place metal objects or pour liquids into the unit
This may cause electrical shock and malfunction.
- Do not place the unit near heat sources such as
radiators, etc. Do not place the unit on a vibrating
surface. Do not cover the ventilation holes.
- The unit is not suitable for continuous use.
- Be careful with the mains lead and do not damage it.
A faulty or damaged mains lead can cause electrical
shock and malfunction.
- When unplugging the unit from a mains outlet, always
pull the plug, never the lead.
- Do not plug or unplug the unit with wet hands.
- If the plug and/or the mains lead are damaged, they
need to be replaced by a qualified technician.
- If the unit is damaged to such an extent that internal
parts are visible, do NOT plug the unit into a mains
outlet and DO NOT switch the unit on. Contact your
dealer. Do NOT connect the unit to a rheostat or
dimmer.
- To avoid fire and shock hazard, do not expose the
unit to rain and moisture.
- All repairs should be carried out by a qualified
technician only.
- Connect the unit to an earthed mains outlet (220240Vac/50Hz) protected by a 10-16A fuse.
- During a thunderstorm or if the unit will not be used
for a longer period of time, unplug it from the mains.
The rule is: Unplug it from the mains when not in use.
- If the unit has not been used for a longer period of
time, condensation may occur. Let the unit reach
room temperature before you switch it on. Never use
the unit in humid rooms or outdoors.
- To prevent accidents in companies, you must follow
the applicable guide lines and follow the instructions.
- Do not repeatedly switch the fixture on and off. This
shortens the life time.
- Keep the unit out of the reach of children. Do not
leave the unit unattended.
- Do not use cleaning sprays to clean switches. The
residues of these sprays cause deposits of dust and
grease. In case of malfunction, always seek advice
from a specialist.
- Do not force the controls.
- This unit is with speaker inside which can cause
magnetic field. Keep this unit at least 60cm away
from computer or TV.
- This unit is with built-in lead-acid rechargeable
battery. Please recharge the battery every 3 months if
you are not going to use the unit for a long period of
time. Or the battery may be damaged.
- If the battery is damaged please replace with same
specifications battery. And dispose the damaged
battery environment friendly.
- If the unit has fallen, always have it checked by a
qualified technician before you switch the unit on
again.
- Do not use chemicals to clean the unit. They damage
the varnish. Only clean the unit with a dry cloth.
- Keep away from electronic equipment that may cause
interference.
- Only use original spares for repairs, otherwise
serious damage and/or dangerous radiation may
occur.
- Switch the unit off prior to unplugging it from the
mains and/or other equipment. Unplug all leads and
cables prior to moving the unit.
- Make sure that the mains lead cannot be damaged
when people walk on it. Check the mains lead before
every use for damages and faults!
- The mains voltage is 220-240Vac/50Hz. Check if
power outlet match. If you travel, make sure that the
mains voltage of the country is suitable for this unit.
- Keep the original packing material so that you can
transport the unit in safe conditions.
This mark attracts the attention of the user to high voltages that are present inside the housing and that are of sufficient
magnitude to cause a shock hazard.
This mark attracts the attention of the user to important instructions that are contained in the manual and that he should
read and adhere to.
The unit has been certified CE. It is prohibited to make any changes to the unit. They would invalidate the CE certificate and
their guarantee!
NOTE: To make sure that the unit will function normally, it must be used in rooms with a temperature between 5°C/41°F and
35°C/95°F.
Electric products must not be put into household waste. Please bring them to a recycling centre. Ask your local authorities or your
dealer about the way to proceed. The specifications are typical. The actual values can slightly change from one unit to the oth er.
Specifications can be changed without prior notice.
Do not attempt to make any repairs yourself. This would invalid your warranty. Do not make any changes to the unit. This would also invalid
your warranty. The warranty is not applicable in case of accidents or damages caused by inappropriate use or disrespect of the warnings
contained in this manual. Vexus cannot be held responsible for personal injuries caused by a disrespect of the safety recommendations
and warnings. This is also applicable to all damages in whatever form.
3
UNPACKING INSTRUCTION
CAUTION! Immediately upon receiving of the equipment, carefully unpack the carton, check the contents to ensure that all parts
are present, and have been received in good condition. Notify the shipper immediately and retain packing material for inspecti on
if any parts appear damage from shipping or the package itself shows signs of mishandling. Save the package and all packing
materials. In the event that an equipment must be returned to the factory, it is important that the equipment be returned in the
original factory box and packing.
If the equipment has been exposed to drastic temperature fluctuation (e.g. after transportation), do not switch it on immediately.
The arising condensation water might damage your device. Leave the device switched off until it has reached room
temperature.
POWERSUPPLY
On the label on the backside of the equipment is indicated on this type of power supply must be connected. Check that the
mains voltage corresponds to this, all other voltages than specified, the equipment can be irreparably damaged. The equipment
must also be directly connected to the mains and may be used. No dimmer or adjustable power supply.
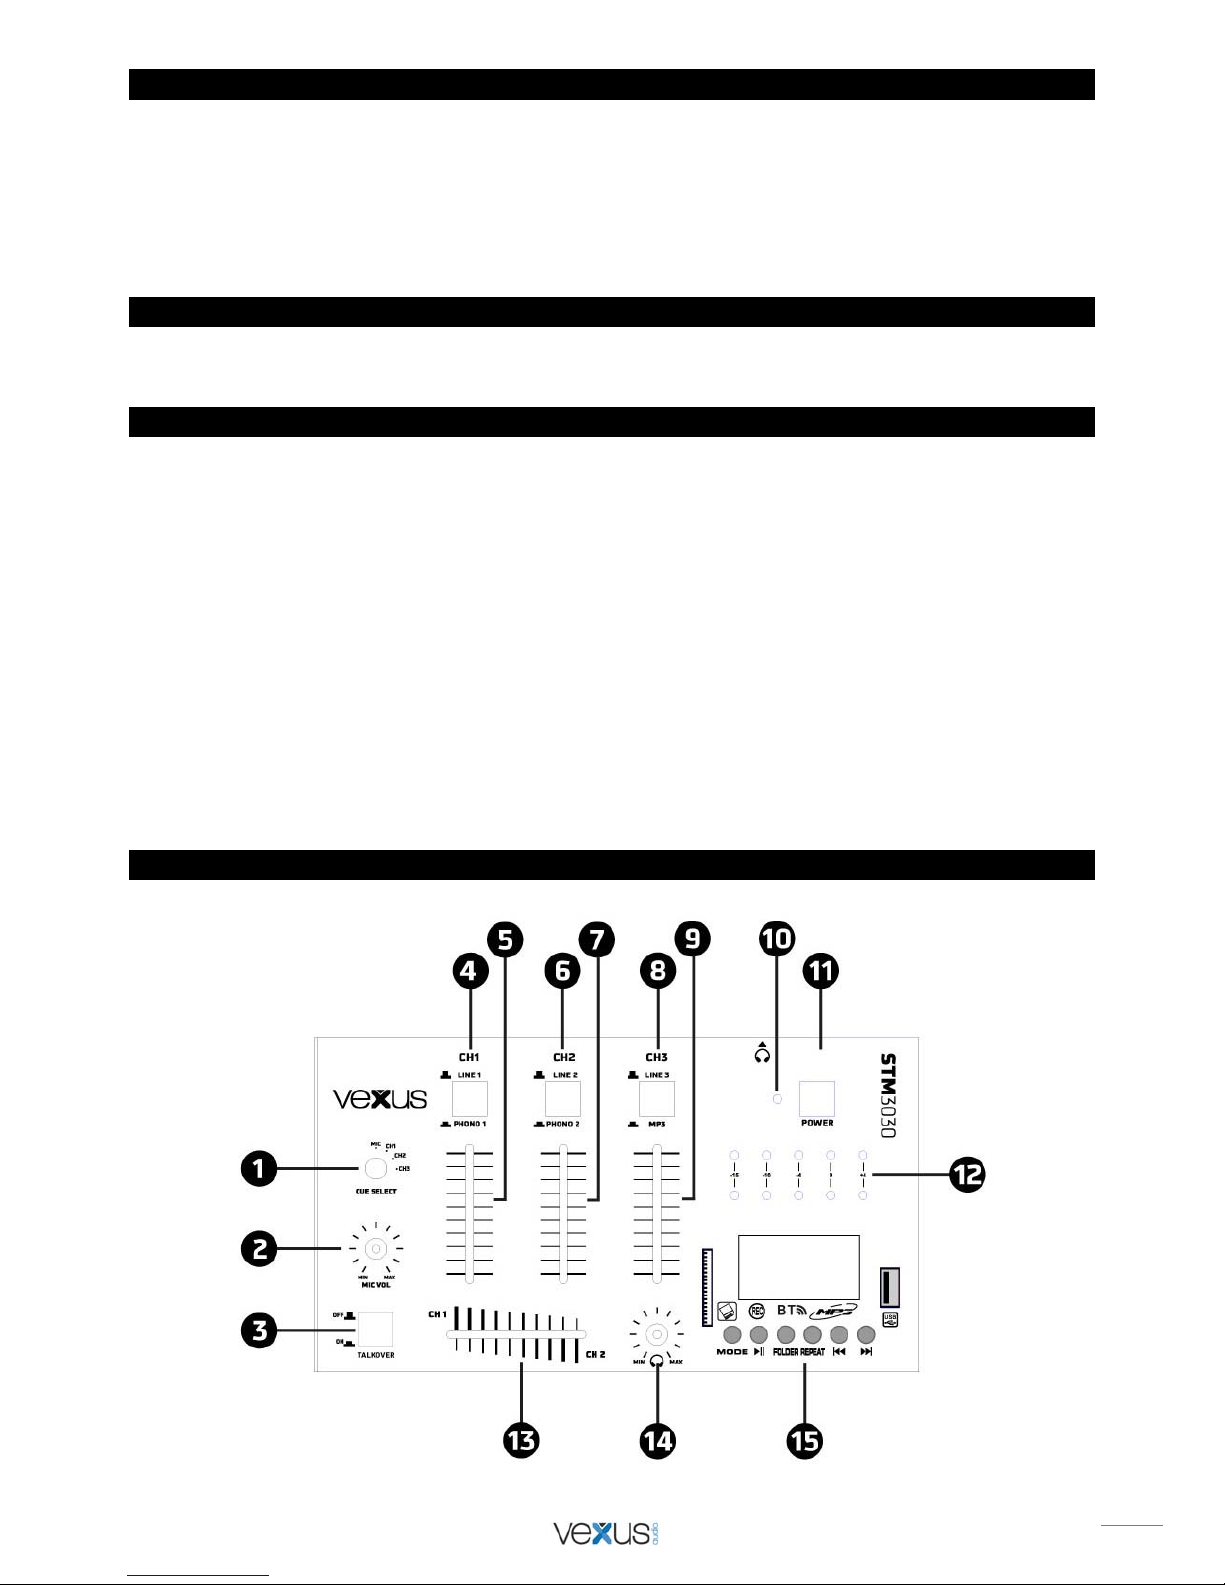
OPERATION
1. POWER ON - Once you have made all the equipment connections to your DJ-mixer, press the POWER (11). T he power
will turn on and the POWER LED (10) will glow RED.
2. CHANNEL 1 - SWITCH (4) allows you to select the PHONO 1/LINE 1 (18) jack to input phono or line level. T he CHANNEL
SLIDE (5) controls the output level of this channel.
3. CHANNEL 2 - SWITCH (6) allows you to select the PHONO 2/LINE 2 (19) jack to input phono or line level. T he CHANNEL
SLIDE (7) controls the output level of this channel.
4. CHANNEL 3 - SWITCH (8) allows you to select the MP3 OR LINE 3 (20) jack to input p hono or line level. The CHAN NEL
SLIDE (9) controls the output level of this channel.
5. CROSSFADER - The CROSSFADER (13) allows you to the Mixing CH1/CH2 source into another.
6. MIC – Connect the microphone with a 1/4” connector at the rear panel (16 and 17). The volume of microphone 1 and 2 ca n
be controlled with the microphone volume control (2).
7. TALKOVER (3 ) - The purpose of the talkover section is to allo w the program playing to be muted so that the mic can be
heard above the music. When you press the SWITCH, the talk over will be on and the volume of all sour ces except the Mic
inputs are lowered by 12dB. The MIC VOL (2) allow you to control the level of MIC1/MIC2.
8. PHONE - Connect your headphones to the headphones socket (22) and select the desired channel (channel 1-3 or MIC)
for monitoring with the Cue switch(1). With this knob PHONE(14), you can adjust the headphones volume
9. VU-Meter - The VU-meter (12) indicates either the MASTER output left and right levels.
10. MP3 PL AYER (15) - SD / USB / BT-Player. See explanation later.
FRONT PANEL
4
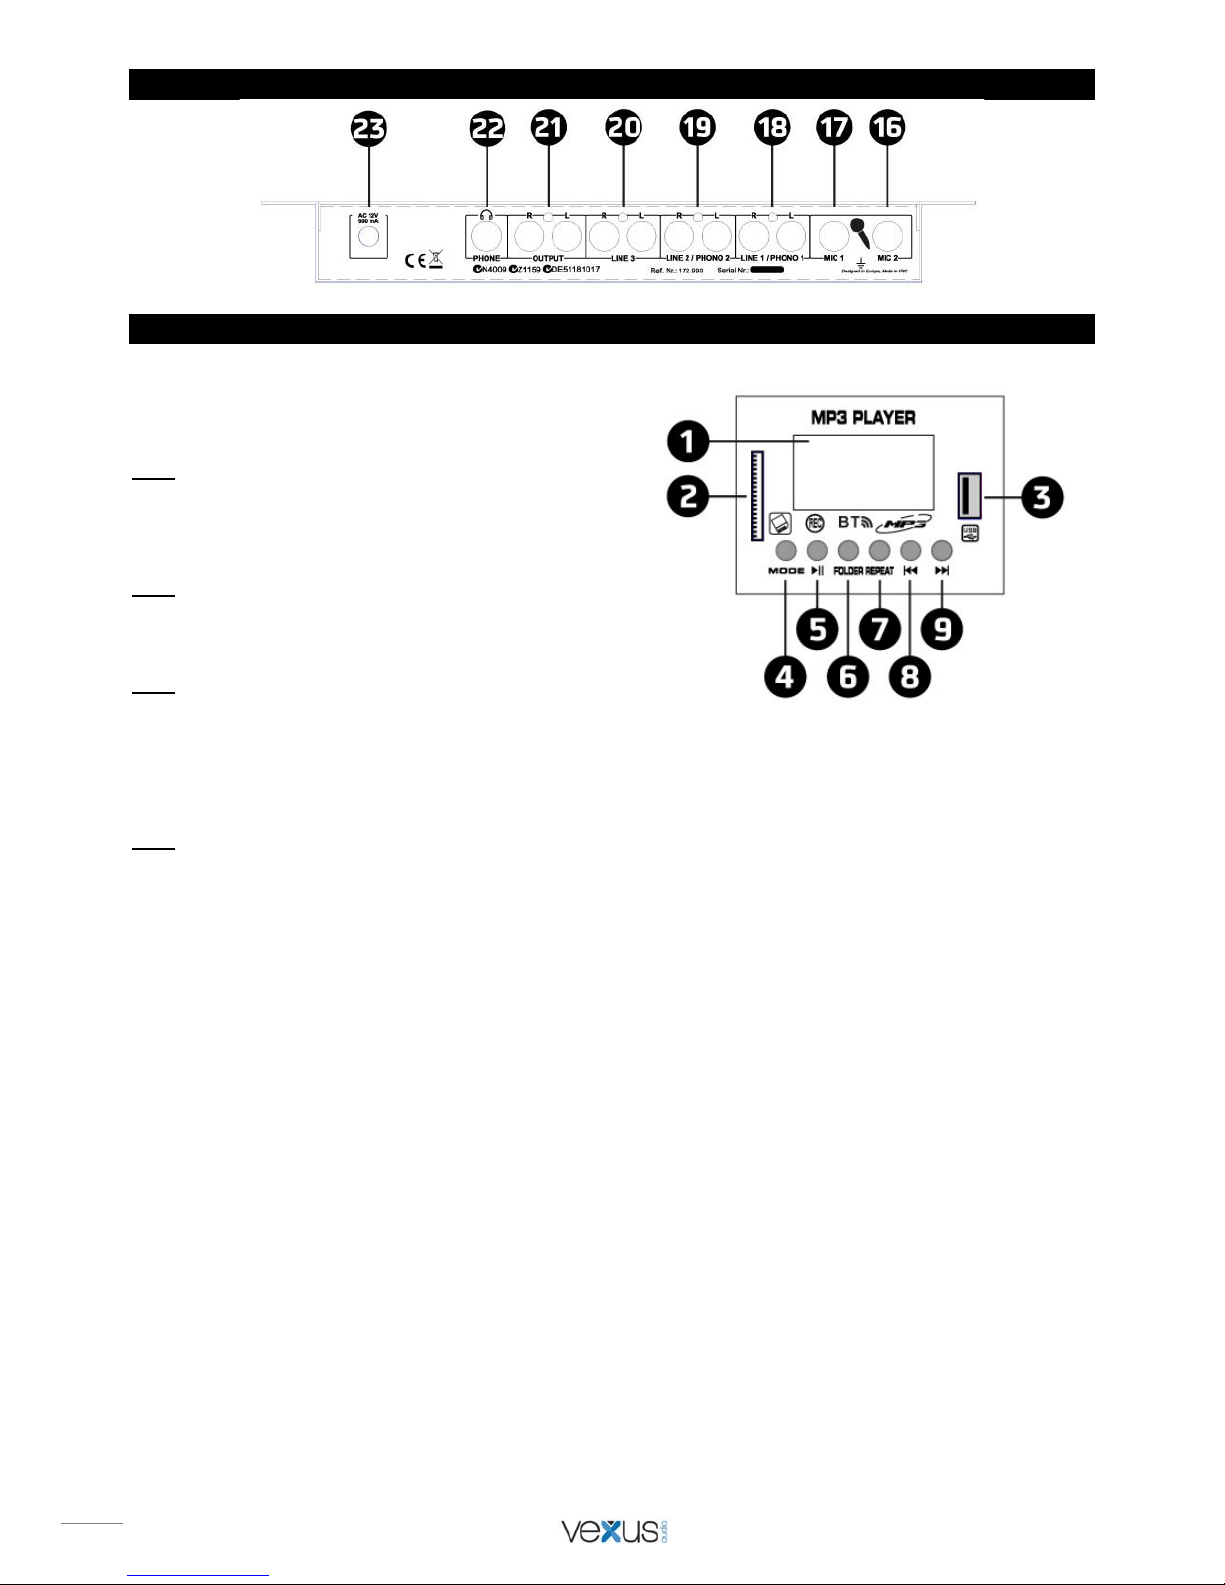
REAR PANEL
USB / SD / BT PLAYER
1. LCD DISPLAY
The LCD display show you some information as playback
support, file name, elapsed time, total time, file number, total file
number, file system (MP3 or WAV ) and playback mode (Repeat
one, repeat all, random or repeat intro).
Note: In BT-mode, LCD display show only connexion status
(connected or disconnected). All playback information are on the
BT-device.
2. SD CARD
Connect on this slot your SD card.
Note: Before to eject SD card, please set the playback in pause
mode or select another playback support (USB or BT).
3. USB
Connect on this slot your USB key.
Note: Before to eject the USB key, please set the playback in
pause mode or select another playback support (SD card or BT).
4. MODE
This button have two functions :
- A short press allows you to choose the playback support : SD, USB or BT.
- A long press allows you to switch the MP3-player ON or OFF.
Note: If you choose BT-mode, the MP3-player will enable BT-connexion system. You can join your BT-device with the player.
For that, you must to enable your BT-system on your device. You device will search the player and find the BT-system
called (BLUETOOTH). To link your device to the player, you must to enter PIN code 0000. Now, your device and the MP3player are linked. You must to start playback on your device to listen it on the mixer.
5. PLAY / PAUSE
This button is used to start the playback or to enter in pause mode.
6. FOLDER / RECORD
This button have two functions :
- A short press allows you to select a directory on the playback support (SD card or USB). For that , select a directory in using
track selection buttons ( 8 and 9 ). Then press folder button to enter in the directory. After select the file you want to listen in
using track selection buttons ( 8 and 9 ) than press folder button to start the playback.
- A long press allows you to record your mix. The master signal will be recorded (all input except SD / USB player). The record
will be done on the playback support you use before to start the record.
7. REPEAT / DELETE
This button have two functions :
- A short press allows you to choose play mode (repeat all file, repeat one file, repeat intro or random play).
- A long press allows you to delete one of your recorded file. For that select the file you want to delete in using track selection
buttons (8 and 9) then press (and hold the press) the repeat button to delete the file.
8. TRACK / SEARCH
This button have two functions :
- A short press allows you to select the previous file.
- A long press allows you to do the fast back search on the file.
9. TRACK / SEARCH
This button have two functions :
- A short press allows you to select the next file.
- A long press allows you to do the fast search on the file.
5
NEDERLANDS
Hartelijk dank voor de aanschaf van dit Vexus product. Neemt U a.u.b. een paar momenten de tijd om deze handleiding
zorgvuldig te lezen, aangezien wij graag willen dat u onze producten snel e n volledig gebruikt.
Lees deze handleiding eerst door alvorens het product te gebruiken. Volg de instructies op anders zou de garantie wel eens
kunnen vervallen. Neem ook altijd alle veiligheidsmaatregelen om brand en/of een e lektrische schok te voorkomen. Tevens is
het ook raadzaam om reparaties / modificaties e.d. over te laten aan gekwalificeerd personeel om een elektrische schok te
voorkomen. Bewaar deze handleiding ook voor toekomstig gebruik.
- Bewaar de verpakking zodat u indien het apparaat defect is,
dit in de originele verpakking kunt opsturen om
beschadigingen te voorkomen.
- Voordat het apparaat in werking wordt gesteld, altijd eerst
een deskundige raadplegen. Bij het voor de eerste keer
inschakelen kan een bepaalde reuk optreden. Dit is normaal
en verdwijnt na een poos.
- In het apparaat bevinden zich onder spanning staande
onderdelen; open daarom NOOIT dit apparaat.
- Plaats geen metalen objecten en mors geen vloeistof in het
effect. Dit kan leiden tot elektrische schokken of defecten.
- Toestel niet opstellen in de buurt van warmtebronnen zoals
radiatoren etc. en niet op een vibrerende onder- grond
plaatsen. Dek ventilatieopeningen nooit af.
- Het apparaat is niet geschikt voor continu gebruik.
- Wees voorzichtig met het netsnoer en beschadig deze niet.
Als het snoer kapot of beschadigd is, kan dit leiden tot
elektrische schokken of defecten.
- Als u de stekker uit het stopcontact neemt, trek dan niet aan
het snoer, maar aan de stekker.
- Om brand of elektrische schok te voorkomen, dient u dit
apparaat niet bloot te stellen aan regen of vocht.
- Verwijder of plaats een stekker nooit met natte handen resp.
uit en in het stopcontact.
- Indien zowel de stekker en/of netsnoer als snoeringang in het
apparaat beschadigd zijn dient dit door een vakman hersteld
te worden.
- Indien het apparaat zo beschadigd is dat inwendige
(onder)delen zichtbaar zijn mag de stekker NOOIT in het
stopcontact worden geplaatst en het apparaat NOOIT
worden ingeschakeld. Neem in dit geval contact op met de
dealer.
- Sluit het apparaat nooit op een dimmer aan.
- Reparatie aan het apparaat dient te geschieden door een
vakman of een deskundige.
- Sluit het apparaat alleen aan op een 220-240VAC / 50Hz
(geaard) stopcontact, verbonden met een 10-16A
meterkastgroep.
- Bij onweer altijd de stekker uit het stopcontact halen, zo ook
wanneer het apparaat voor een langere tijd niet gebruikt
wordt. Stelregel: Bij geen gebruik stekker verwijderen.
- Als u het apparaat lang niet gebruikt heeft en het weer wil
gebruiken kan er condens ontstaan; laat het apparaat eerst
op kamertemperatuur komen alvorens het weer in werking
te stellen.
- Apparaat nooit in vochtige ruimten en buiten gebruiken.
- Om ongevallen in bedrijven te voorkomen moet rekening
worden gehouden met de daarvoor geldende richtlijnen en
moeten de aanwijzingen/waarschuwingen worden gevolgd.
- Het apparaat buiten bereik van kinderen houden.
Bovendien mag het apparaat nooit onbeheerd gelaten
worden.
- Gebruik geen schoonmaakspray om de schakelaars te
reinigen. Restanten van deze spray zorgen ervoor dat
smeer en stof ophopen. Raadpleeg bij storing te allen tijde
een deskundige.
- Gebruik geen overmatige kracht bij het bedienen van het
apparaat.
- Dit apparaat kan magnetisch veld veroorzaken. Houd dit
apparaat ten minste 60 cm afstand van de computer of tv.
- Laad de accu elke 3 maanden als u het apparaat voor een
langere periode niet gebruikt. De batterij kan worden
beschadigd.
- Bij een ongeval met dit product altijd eerst een deskundige raadplegen alvorens opnieuw te gebruiken.
- Tracht het apparaat niet schoon te maken met chemische
oplossingen. Dit kan de lak beschadigen. Gebruik een
droge doek om schoon te maken.
- Blijf uit de buurt van elektronische apparatuur die
bromstoringen zouden kunnen veroorzaken.
- Bij reparatie dienen altijd originele onderdelen te worden
gebruikt om onherstelbare beschadigingen en/of
ontoelaatbare straling te voorkomen.
- Schakel eerst het toestel uit voordat u het netsnoer
verwijdert. Verwijder netsnoer en aansluitsnoeren voordat u
dit product gaat verplaatsen.
- Zorg ervoor dat het netsnoer niet beschadigd/defect kan
raken wanneer mensen erover heen lopen. Het netsnoer
vóór ieder gebruik controleren op breuken/defecten!
- In Nederland/België is de netspanning 220-240Vac/50Hz.
Indien u reist (en u neemt het apparaat mee) informeer dan
naar de netspanning in het land waar u verblijft.
Deze markering wordt weergegeven om u erop attent te maken dat een levensgevaarlijke spanning in het product
aanwezig is en dat bij aanraking van deze delen een elektrische schok wordt verkregen.
Deze instructiemarkering wordt weergegeven om u erop te wijzen dat de instructie zeer belangrijk is om te lezen en/of op
te volgen.
OPMERKING: Om zeker te zijn van een correcte werking, dient u dit apparaat in een ruimte te gebruiken waar de temperatuur
tussen de 5°C/41°F en 35°C/95°F ligt.
Raadpleeg eventueel www.wecycle.nl en/of www.vrom.nl v.w.b. het afdanken van elektronische apparaten in het kader van de
WEEE-regeling. Vele artikelen kunnen worden gerecycled, gooi ze daarom niet bij het huisvuil maar lever ze in bij een gemeentelijk
depot of uw dealer. Lever ook afgedankte batterijen in bij uw gemeentelijk depot of bij de dealer, zie www.stibat.nl
Alle (defecte) artikelen dienen gedurende de garantieperiode altijd retour te worden gezonden in de originele verpakking. Voer zelf geen
reparaties uit aan het toestel; in élk geval vervalt de totale garantie. Ook mag het toestel niet eigenmachtig worden gemodificeerd, ook in dit
geval vervalt de totale garantie. Ook vervalt de garantie bij ongevallen en beschadigingen in élke vorm t.g.v. onoordeelkundig gebruik en
het niet in achtnemen van het gestelde in deze gebruiksaanwijzing. Tevens aanvaardt Vexus geen enkele aansprakelijkheid in geval van
persoonlijke ongelukken als gevolg van het niet naleven van veiligheidsinstructies en waarschuwingen . Dit geldt ook voor gevolgschade in
wélke vorm dan ook.

6
UITPAKKEN
LET OP! Onmiddellijk na ontvangst, zorgvuldig uitpakken van de doos, controleer de inhoud om ervoor te zorgen dat alle
onderdelen aanwezig zijn en zijn in goede staat zijn ontvangen. Bij transportschade of ontbreke n van onderdelen onmiddellijk
de verkopende partij inlichten. Bewaar de verpakking en het verpakkingsmateriaal. Indien het apparaat moet worden
teruggestuurd, is het belangrijk dat de apparatuur in originele verpakking wordt geretourneerd.
Als het apparaat is blootgesteld aan drastische temperatuurverschillen (bv. na het transport), schakel het apparaat niet
onmiddellijk in. De ontstane condensatie kan het apparaat beschadigen. Zorg ervoor dat het apparaat op kamertemperatuur
komt en steek vervolgens de voeding stekker in het stopcontact/wandcontactdoos.
AANSLUITSPANNING
Op het label aan de achterzijde van het apparaat staat aangegeven op welke netspanning deze moet worden aangesloten.
Controleer of de netspanning hiermee overeenkomt, bij alle andere netspanningen dan aangegeven kan het apparaat
onherstelbaar worden beschadigd. Tevens moet het apparaat direct op de netspanning worden aangesloten en mag géén
dimmer of regelbare voeding worden gebruikt.
BEDIENING
1. POWER ON - Wanneer u alle apparatuur hebt aangesloten op uw DJ-mixer, drukt u op de POWER-toets
(11). De stroom wordt ingeschakeld en de POWER LED (10) brandt ROOD.
2. CHANNEL 1 - Schakelaar (4) kunt u de ingang signaal Phono of Line-niveau (18) selecteren. De
schuifregelaar (5) regelt het uitgangsniveau van kanaal 1.
3. CHANNEL 2 - Schakelaar (6) kunt u de ingang signaal Phono of Line-niveau (19) selecteren. De
schuifregelaar (7) regelt het uitgangsniveau van kanaal 2.
4. CHANNEL 3 - Schakelaar (8) kunt u de ingang signaal Line of MP3-niveau (20) selecteren. De
schuifregelaar (9) regelt het uitgangsniveau van kanaal 3.
5. CROSSFADER - Met de crossfader (13) kunt u de geluidsweergave mixen tussen CH1 / CH2.
6. TALKOVER - Het doel van de Talk over is, weergegeven muziek wordt gedempt zodat de microfoon boven
de muziek kan worden gehoord. Wanneer u de Talk-over toets (3) indrukt, word alle volumes met
uitzondering van de microfoon verlaagd met 12dB.
7. MIC - Sluit de microfoon aan op de 6.35mm Jack aansluiting op het achterpaneel (16 en 17). De volume
van microfoon 1 en 2 kunt u regelen met de volumeregelaar (2).
8. PHONE - Sluit uw hoofdtelefoon aan op de hoofdtelefoonaansluiting (22) en selecteer het gewenste voor
luister kanaal (kanaal 1-3 of MIC) door Cue-schakelaar af te stellen (1). Met deze volumeregelaar PHONE
(14), kunt u de hoofdtelefoon volume aanpassen.
9. VU-Meter - De VU-meter (12) geeft de uitgangssignaal van de MASTER-uitgang weer in zowel linker en
rechter geluidniveau.
10. MP3-speler - SD / USB / BT-speler (15). Zie verklaring later.
FRONT PANEL

7
REAR PANEL
USB / SD / BT PLAYER
1. LCD SCHERM
Het LCD-scherm laat informatie zien zoals, bestandsnaam, verstreken
tijd, totale tijd, aantal bestanden, totale aantal bestanden, het
bestandssysteem (MP3 of WAV) en de afspeelmodus (herhalen, alles
herhalen, willekeurig of herhalen intro).
Opmerking: In de BT-modus, LCD-scherm toont alleen de verbinding
status (verbonden of niet verbonden). Alle weergave-informatie staat op
de BT-apparaat.
2. SD KAART
Poort voor de SD-kaart.
Opmerking: Voordat u de SD-kaart uitneemt, stelt u de weergave in de
pauzestand of selecteer een andere weergave ondersteuning (USB of
BT).
3. USB
Poort voor de USB-stick.
Opmerking: Voordat u de USB-stick uitneemt, stelt u de weergave in de pauzestand of selecteer een andere weergave
ondersteuning (SD of BT).
4. MODE
Deze toets heeft twee functies:
- Kortstondig indrukken, kunt u kiezen tussen: SD, USB of BT.
- Lang indrukken, kunt u de MP3-speler in of uitschakelen.
Opmerking: Als u BT-modus kiest, zal de MP3-speler zo snel mogelijk een BT-verbinding maken. U kunt uw BT-apparaat
verbinden met de MP3-speler. Hiervoor moet u uw BT-functie inschakelen op uw apparaat. Uw apparaat zoekt de MP3-spel er
en vind de BT-systeem genoemd (BLUETOOTH). Als u uw apparaat koppelt aan de MP3-speler, moet u de PIN-code 0000
gebruiken. Nu is uw apparaat en de MP3-speler gekoppeld.
5. PLAY / PAUZE
Deze knop wordt gebruikt om het muzieknummer te starten of in de pauzestand te zetten.
6. FOLDER / RECORD
Deze toets heeft twee functies:
- Kortstondig indrukken, kunt u een map op de SD-kaart of USB-stick selecteren. Selecteer eerst de juiste map doormiddel van
toetsen 8 en 9. Druk vervolgens op de map knop (6) om in de map te gaan. Selecteer het bestand dat u wilt luisteren
doormiddel van toetsen 8 en 9, druk vervolgens op de play-knop (5) om de weergave te starten.
- Lang indrukken, opname van uw DJ-mix. Het master-signaal zal worden opgenomen (alle ingang signalen met uitzondering
van SD / USB-speler).
7. REPEAT / DELETE
Deze toets heeft twee functies:
- Kortstondig indrukken, u kunt de afspeel modus kiezen (herhaal alle bestanden, herhaal één bestand, herhaal intro of
willekeurig afspelen)
- Lang indrukken, u kunt uw opname bestand verwijderen. Daarvoor selecteert u het best and dat u wilt verwijderen door middel
van de knop 8 en 9 en druk op de repeat-knop (ingedrukt houden) om het bestand te verwijderen.
8. TRACK / SEARCH
Deze toets heeft twee functies:
- Kortstondig indrukken, om het vorige bestand te selecteren.
- Lang indrukken, om versneld terug te zoeken.
9. TRACK / SEARCH
Deze toets heeft twee functies:
- Kortstondig indrukken, om het volgende bestand te selecteren.
- Lang indrukken, om versneld vooruit te zoeken.

8
DEUTSCH
Vielen Dank für den Kauf dieses Vexus gerat. Nehmen Sie sich einen Augenblick Zeit, um diese Anleitung sorgfältig
durchzulesen, damit sie die Möglichkeiten, die unser Produkt bietet, sofort voll ausnutzen könn en.
Lesen Sie erst die Anleitung vollständig vor der ersten Inbetriebnahme durch. Befolgen Sie die Anweisung, da sonst jeglicher
Garantieanspruch verfällt. Treffen Sie stets alle Sicherheits-vorkehrungen um Feuer und/oder Stromschlag zu vermeiden.
Reparaturen dürfen nur von qualifiziertem Fachpersonal ausgeführt werden, um Stromschlag zu vermeiden. Bewahren Sie
diese Anleitung für spätere Bezugnahme auf.
- Bewahren Sie die Verpackung auf, um das Gerät im
Bedarfsfall sicher transportieren zu können.
- Bevor das Gerät in Betrieb genommen wird, muss es erst
von einem Fachmann überprüft werden. Bei der ersten
Benutzung kann etwas Geruch auftreten. Das ist normal und
verschwindet nach einer Weile
- Das Gerät enthält unter Spannung stehende Teile. Daher
NIEMALS das Gehäuse öffnen.
- Keine Metallgegenstände oder Flüssigkeiten ins Gerät
dringen lassen. Sie können zu Stromschlag und Defekten
führen.
- Gerät nicht in der Nähe von Wärmequellen wie Heizkörpern
aufstellen. Nicht auf eine vibrierende Oberfläche stellen.
Niemals die Belüftungsschlitze abdecken.
- Das Gerät ist nicht für Dauerbetrieb geeignet.
- Gehen Sie vorsichtig mit dem Netzkabel um und
beschädigen Sie es nicht. Eine beschädigte Netzschnur kann
zu Stromschlag und Defekten führen.
- Wenn Sie das Gerät vom Netz trennen, immer am Stecker
ziehen, niemals an der Schnur.
- Um Feuer und Stromschlag zu vermeiden, das Gerät vor
Regen und Feuchtigkeit schützen.
- Den Stecker nie mit nassen Händen in eine Netzsteckdose
stecken oder abziehen.
- Wenn sowohl der Stecker und/oder die Netzschnur bzw. der
Kabeleintritt ins Gerät beschädigt sind, müssen sie von
einem Fachmann repariert werden.
- Wenn das Gerät so beschädigt ist, dass Innenteile sichtbar
sind, darf der Stecker NICHT in eine Steckdose gesteckt
werden und das Gerät darf NICHT eingeschaltet werden.
Wenden Sie sich in dem Fall an Ihren Fachhändler. Das
Gerät darf nicht an einen Dimmer angeschlossen werden.
- Reparaturen dürfen nur von einem Fachmann oder
Sachverständigen ausgeführt werden.
- Das Gerät nur an eine geerdete 10-16A Netzsteckdose mit
220-240V AC/50Hz Spannung anschließen.
- Bei Gewitter oder längerem Nichtgebrauch den Netzstecker
abziehen. Die Regel gilt: Bei Nichtgebrauch Netzstecker
abziehen.
- Wenn das Gerät längere Zeit nicht benutzt wurde, kann
sich Kondenswasser gebildet haben. Lassen Sie das Gerät
erst auf Zimmertemperatur kommen, bevor Sie es
einschalten. Das Gerät nicht in feuchten Räumen oder im
Freien benutzen.
- Um Unfällen in der Öffentlichkeit vorzubeugen, müssen die
geltenden Richtlinien beachtet und die
Anweisungen/Warnungen befolgt werden.
- Niemals das Gerät kurz hintereinander ein- und
ausschalten. Dadurch verkürzt sich die Lebensdauer
erheblich.
- Das Gerät außerhalb der Reichweite von Kindern halten.
Das Gerät niemals unbeaufsichtigt lassen.
- Die Regler nicht mit Reinigungssprays reinigen. Diese
hinterlassen Rückstände, die zu Staub- und
Fettansammlungen führen. Bei Störungen immer einen
Fachmann um Rat fragen.
- Das Gerät nur mit sauberen Händen bedienen.
- Das Gerät nicht mit Gewalt bedienen.
- Nach einem Unfall mit dem Gerät immer erst einen
Fachmann um Rat fragen, bevor Sie es wieder einschalten.
- Keine chemischen Reinigungsmittel benutzen, die den
Lack beschädigen. Das Gerät nur mit einem trockenen
Tuch abwischen.
- Nicht in der Nähe von elektronischen Geräten benutzen,
die Brummstörungen verursachen können.
- Bei Reparaturen nur die Original-Ersatzteile verwenden,
um starke Schäden und/oder gefährliche Strahlungen zu
vermeiden.
- Bevor Sie das Netz- und/oder Anschlusskabel abziehen,
erst das Gerät ausschalten. Netz- und Anschlusskabel
abziehen, bevor Sie das Gerät umstellen.
- Sorgen Sie dafür, dass das Netzkabel nicht beschädigt
werden kann, wenn Menschen darüber laufen. Das
Netzkabel vor jedem Einsatz auf Brüche/Schadstellen
überprüfen.
- In Deutschland beträgt die Netzspannung 220-240V AC /
50Hz. Wenn Sie das Gerät auf Reisen mitnehmen, prüfen
Sie, ob die örtliche Netzspannung den Anforderungen des
Geräts entspricht.
Dieses Zeichen weist den Benutzer darauf hin, dass lebensgefährliche Spannung en im Gerät anliegen, die bei
Berührung einen Stromschlag verursachen.
Dieses Zeichen lenkt die Aufmerksamkeit des Benutzers auf wichtige Hinweise in der Anleitung hin, die unbedingt
eingehalten werden müssen.
HINWEIS: Um einen einwandfreien Betrieb zu gewährleisten, muss die Raumtemperatur zwischen 5° und 35°C.
liegen.
Tronios BV Registrierungsnummer : DE51181017 (ElektroG).
Dieses Produkt darf am Ende seiner Lebensdauer nicht über den normalen Haushaltsabfall entsorgt werden, sondern muss an einem
sammelpunkt für das Recycling abgegeben werden. Hiermit leisten Sie einen wichtigen Beitrag zum Schutze unserer Umwelt.
Tronios BV Registrierungsnummer : 21003000 (BatterieG).
Lithiumbatterien und Akkupacks sollten nur im entladenen Zustand in die Altbatteriesammelgefäße bei Handel und bei öffentlich-rechtlichen
Entsorgungsträgern gegeben werden. Bei nicht vollständig entladenen Batterien Vorsorge gegen Kurzschlüß treffen durch Isolieren der Pole mit
Klebestreifen. Der Endnutzer ist zur Rückgabe von Altbatterien gesetzlich verpflichtet.
Reparieren Sie das Gerät niemals selbst und nehmen Sie niemals eigenmächtig Veränderungen am Gerät vor. Sie verlieren dadurch den
Garantieanspruch. Der Garantieanspruch verfällt ebenfalls bei Unfällen und Schäden in jeglicher Form, die durch unsachgemäßen
Gebrauch und Nichtbeachtung der Warnungen und Sicherheitshinweise in dieser Anleitung entstanden sind. Vexus ist in keinem Fall
verantwortlich für persönliche Schäden in Folge von Nichtbeachtung der Sicherheitsvorschriften und Warnungen. Dies gilt auch für
Folgeschäden jeglicher Form.

9
VOR DER INBETRIEBNAHME
Packen Sie das Gerät sofort nach Empfang aus und prüfen Sie den Inhalt. Wenn Teile fehlen oder beschädigt sind,
benachrichtigen Sie sofort den Spediteur und bewahren Sie die Verpackung auf. Falls ein Gerät ins Werk zurückgeschickt
werden muss, ist es wichtig, dass es in der Originalverpackung versandt wird.
Das Gerät darf nicht in Betrieb genommen werden, nachdem es von einem kalten in einen warmen Raum gebracht wurde. Das
dabei entstehende Kondenswasser kann unter Umständen Ihr Gerät zerstören. Lassen Sie das Gerät solange uneingeschaltet,
bis es Zimmertemperatur erreicht hat!
NETZANSCHLUSS
Die benötigte Versorgungsspannung steht auf dem Typenschild auf der Rückseite des Geräts. Die angegebenen Stromwerte
entsprechen einem Durchschnittswert bei normalem Betrieb. Alle Geräte müssen direkt ans Netz angeschlossen werden und
dürfen nicht nicht über Dimmerpacks geschaltet werden. Bevor Sie eine Spannung anlegen, prüfen Sie, ob der Wert der
zulässigen Spannung entspricht.
BEDIENUNG
1. POWER ON - Wenn Sie alle Geräte auf Ihre DJ-Mixer angeschlossene haben, drücken Sie die POWER-
Taste (11). Das Gerät schaltet sich ein und die POWER LED (10) leuchtet rot.
2. CHANNEL 1 - Schalter (4) können Sie das Eingangssignal Phono oder Line-Level (18) wählen. Der Fader
(5) regelt den Ausgangspegel von Kanal 1.
3. CHANNEL 2 - Schalter (6), das Eingangssignal Phono oder Line-Level (19) wählen. Der Fader (7) regelt
den Ausgangspegel von Kanal 2.
4. CHANNEL 3 - Schalter (8) auf der Eingangssignalleitung von MP3-Ebene (20) wählen. Der Fader (9) regelt
den Ausgangspegel von Kanal 3.
5. CROSSFADER - Mit dem Crossfader (13) können Sie den Ton zwischen CH1 / CH2 mischen.
6. TALKOVER - Der Zweck der Talkover-Funktion wird das abgespielte Programm gedämpft, so dass das
Mikrofon kann über der Musik zu hören. Wenn Sie den Schalter drücken, wird die Talkover eingeschaltet,
und Lautstärken aller Tonquellen, außer des MIC-Eingänge sind um 12dB abgesenkt.
7. MIC - Schließen Sie das Mikrofon an die 6,35 mm Klinkenbuchse an der Rückseite (16 und 17). Die
Lautstärke des Mikrofons 1 und 2 kann mit dem Lautstärkeregler (2) gesteuert werden.
8. PHONE- Schließen Sie Ihren Kopfhörer an die Kopfhörerbuchse (22) und wählen Sie den gewünschte n
Kanal (Kanal 1-3 oder MIC) durch Drehen mit dem Cue-Schalter (1). Dieser Lautstärkeregler PHONE (14),
können Sie die Kopfhörerlautstärke einzustellen.
9. VU-Meter - Die VU-Anzeige (12) zeigt das Ausgangssignal des MASTER-Ausgang wieder in den linken
und rechten augang.
10. MP3-speler - SD / USB / BT-Spieler (15). Siehe Aussage später.
VORDERSEITE

10
RÜCKSEITE
USB / SD / BT SPIELER
1. LCD BILDSCHIRM
Der LCD-Bildschirm zeigt Informationen wie Name, Dateiname,
verstrichene Zeit, Gesamtzeit, Anzahl der Dateien, Gesamtzahl der
Dateien, die Datei (MP3 oder WAV) und den Wiedergabemodus
(Repeat, Alles wiederholen, Zufälliges oder wiederholen intro).
Hinweis: In der BT-Modus, LCD-Display zeigt nur den
Verbindungsstatus (verbunden oder getrennt). Alle
Wiedergabeinformationen befinden sich auf der BT-Gerät.
2. SD KARTE
Schließen Sie in diesem Steckplatz der SD-Karte.
Hinweis: Bevor Sie auf SD-Karte herausnehmen, stellen Sie bitte die
Wiedergabe im Pause-Modus oder wählen Sie einen anderen
Wiedergabeunterstützung (USB oder BT).
3. USB
Schließen Sie auf diesem Slot Ihren USB-Stick.
Hinweis: Bevor Sie auf den USB-Stick herausnehmen, stellen Sie bitte die Wiedergabe im Pause-Modus oder wählen Sie
einen anderen Wiedergabeunterstützung (SD-Karte oder BT ).
4. MODE BUTTON
Diese Taste hat zwei Funktionen:
- Ein kurzes Drücken können Sie die Wiedergabeunterstützung wählen: SD, USB oder BT.
- Ein langer Druck ermöglicht es Ihnen, den MP3-Player ein- oder auszuschalten
Hinweis: Wenn Sie BT-Modus wählen, wird der MP3-Player-BT-Verbindung System zu ermöglich en. Sie können Ihre BT-Gerät
anzuschließen mit dem MP3-Spieler. Dazu müssen Sie auf Ihre BT-System auf Ihrem Gerät zu aktivieren. Sie Gerät wird den
Spieler suchen und finden Sie das BT-System genannt (Bluetooth). Um Ihr Gerät auf den MP3-Spieler zu verbinden, müssen
Sie die PIN-Code 0000 zu verwenden. Jetzt ist Ihr Gerät und MP3-Spieler angeschlossen.
5. PLAY / PAUSE
Diese Taste wird verwendet, um die Wiedergabe zu starten oder im Pause-Modus zu gelangen.
6. FOLDER / RECORD
Diese Taste hat zwei Funktionen:
- Ein kurzes Drücken, können Sie ein Verzeichnis auf der SD-Karte oder USB-Stick Auswählen. Wählen Sie zunächst den
entsprechenden Verzeichnis mit den Tasten 8 und 9. Drücken Sie dann die Folder-Taste (6), um in den Verzeichnis zu
verschieben. Wählen Sie die Datei, die Sie durch die Tasten 8 und 9 hören möchten, drücken Sie die Play-Taste (5), um die
Wiedergabe zu starten.
- Ein langer Druck ermöglicht es Ihnen, Ihren Mix aufzunehmen. as Master-Signal wird aufgenommen (alle E ing änge außer SD /
USB-Spieler).
7. REPEAT / DELETE
Diese Taste hat zwei Funktionen:
- Ein kurzes Drücken, können Sie Wiedergabemodus (Wiederholung alle Datei, Wiederholung eine Datei wiederholen Intro oder
Zufallswiedergabe) wählen.
- Ein langer Druck ermöglicht es Ihnen, einen der aufgenommenen Datei zu löschen. Dazu wählen Sie die Datei, die Sie im
Umgang mit Track-Auswahl-Taste gelöscht werden soll (8 und 9) und drücken Sie dann (und halten Sie die Taste) die
Wiederholungstaste , um die Datei zu löschen.
8. TRACK / SEARCH
Diese Taste hat zwei Funktionen:
- Ein kurzes Drücken,
So wählen Sie die vorherige Datei.
- Ein langer Druck, schnelle Rück Suche auf die Datei.
9. TRACK / SEARCH KNOP
Diese Taste hat zwei Funktionen:
- Ein kurzes Drücken, um die nächste Datei auszuwählen.
- Ein langer Druck, um schnell vorwärts zu suchen.

11
ESPAÑOL
Felicitaciones a la compra de este producto Vexus. Por favor lea atentamente este manual antes de usar el aparato para
disfrutar al completo de sus prestaciones.
Seguir las instrucciones le permite no invalidar la garantía. Tome todas las precauciones para evitar que se produzca fuego o
una descarga eléctrica. Las reparaciones solo deben llevarse a cabo por técnicos cualificados para evitar descargas eléctricas.
Guarde el manual para futuras consultas.
Antes de usar el aparato, por favor pida consejo a un profesional. Cuando el aparato se enciende por primera vez, suel e
sentirse cierto olor. Esto es normal y desaparece al poco tiempo.
- Este aparato contiene piezas que llevan voltaje. Por lo
tanto NO abra la carcasa.
- No coloque objetos metálicos o vierta líquidos dentro del
aparato Podría producir descargas eléctricas y fallos en
el funcionamiento.
- No coloque el aparato cerca de fuentes de calor tipo
radiadores, etc. No coloque el aparato en superficies
vibratorias. No tape los agujeros de ventilación.
- Este aparato no está preparado para un uso continuado.
- Tenga cuidado con el cable de alimentación y no lo
dañe. Un daño o defecto en el cable de alimentación
puede producir una descarga eléctrica o fallo en el
funcionamiento.
- Cuando desconecte el aparato de la toma de corriente,
siempre tire de la clavija, nunca del cable.
- No enchufe o desenchufe el aparato con las manos
mojadas.
- Si la clavija y/o el cable de alimentación están dañados,
necesitan reemplazarse por un técnico cualificado.
- Si el aparato está dañado de modo que puedan verse
sus partes internas, NO conecte el aparato a la toma de
corriente y NO lo encienda. Contacte con su distribuidor.
NO conecte el aparato a un reostato o dimmer.
- Para evitar un fuego o peligro de descarga, no exponga
el aparato a la lluvia y a la humedad.
- Todas las reparaciones deben llevarse a cabo
exclusivamente por técnicos cualificados.
- Conecte el aparato a una toma de corriente con toma de
tierra (220-240Vca/50Hz) protegida por un fusible de 1016A.
- Durante una tormenta o si el aparato no va a usarse
durante un periodo largo de tiempo, desconéctelo de la
toma de corriente. La regla es: Desconéctelo si no lo va
a usar.
- Si el aparato no se ha usado en mucho tiempo puede
producirse condensación. Deje el aparato a temperatura
ambiente antes de encenderlo. Nunca utilice el aparato
en ambientes húmedos o en el exterior.
- Para prevenir accidentes en las empresas, debe seguir
las directrices aplicables y seguir las instrucciones.
- No lo apague y encienda repetidamente. Esto acorta su
tiempo de vida.
- Mantenga el aparato fuera del alcance de los niños. No
deje el aparato sin vigilancia.
- No utilice sprays limpiadores para limpiar los
interruptores. Los residuos de estos sprays producen
depósitos de polvo y grasa. En caso de mal
funcionamiento, siempre consulte a un profesional.
- No fuerce los controles.
- Si el aparato se ha caído, siempre haga que lo verifique
un técnico cualificado antes de encenderlo otra vez.
- NO utilice productos químicos para limpiar el aparato.
Dañan el barniz. Tan solo límpielo con un trapo seco.
- Manténgalo lejos de equipos electrónicos ya que pueden
producir interferencias.
- Solo utilice recambios originales para las reparaciones,
de otro modo pueden producirse daños serios y/o
radiaciones peligrosas.
- Apague el aparato antes de desconectarlo de la toma de
corriente y/o de otros equipos. Desconecte todos los
cables y conexiones antes de mover el aparato.
- Asegúrese de que el cable de alimentación no puede
dañarse cuando la gente lo pise. Compruebe el cable de
alimentación antes de cada uso por si hay daños o
defectos.
- El voltaje de funcionamiento es 220-240Vca/50Hz.
Compruebe que la toma de corriente coincide. Si tiene
que viajar, asegúrese de que el voltaje del país es el
adecuado para este aparato.
- Guarde el embalaje original para poder transportar el
aparato en condiciones seguras.
Esta señal advierte al usuario de la presencia de alto voltaje en el interior de la carcasa y que es de la suficiente
magnitud como para producir una descarga eléctrica.
Esta señal advierte al usuario de que el manual contiene instrucciones importantes que han de leerse y seguirse al pie
de la letra.
NOTA: Para asegurarse de que el aparato funcione correctamente, debe usarse en ambientes a una temperatura de entre
5°C/41°F y 35°C/95°F.
Los productos electrónicos no pueden tirarse a la basura normal. Por favor lleve este producto a un centro de reciclaje. Pregunte
a la autoridad local en caso de duda. Las especificaciones son generales. Los valores actuales pueden variar de una unidad a
otra. Las especificaciones pueden variar sin previo aviso.
Nunca intente reparar usted mismo este equipo. Esta manipulación anulará la garantía. No realice cambios en la unidad. Esta
manipulación anulará la garantía. Esta garantía no es aplicable en caso de accidente o daños ocasionados por uso indebido del aparato
o mal uso del mismo. Vexus no se hace responsable de daños personales causados por el no seguimiento de las normas e instrucciones
de este manual. Esto es aplicable también a los daños de cualquier tipo.

12
INSTRUCCIONES DESEMBALAJE
PRECAUCIÓN! Inmediatamente después de recibir el equipo, desempaque cuidadosamente la caja de cartón,
compruebe el contenido para asegurarse de que todas las partes están presentes, y se han recibido en buenas
condiciones. Notificar al remitente de inmediato y retener el material de embalaje para la inspección si en alguna pieza
aparecen daños causados por el transporte o el propio envase muestra signos de mal manejo. Guarde el paquete y
todos los materiales de embalaje. En el caso de que el equipo deba ser devuelto a la fábrica, es importante que el
equipo sea devuelto en la caja original de la fábrica y el embalaje.
Si el equipo ha estado expuesto a grandes cambios de temperatura (p.e. tras el transporte), no lo enchufe
inmediatamente. La condensación de agua producida podr ía dañar su dispositivo. Deje el dispositivo apagado hasta que
se haya alcanzado la temperatura ambiente.
FUENTE DE ALIMENTACIÓN
En la etiqueta de la parte trasera del equipo se indica a que tipo de fuente de alimentación debe estar conectado.
Compruebe que la tensión de la red corresponde a esto, todas las otras tensiones pueden dañar el equipo. El equipo
también debe estar conectado directamente a la red para ser utilizado. No usar dimmer o fuente de alimentación
ajustable.
OPERACIÓN
1. Encendido - Una vez que haya realizado todas las conexiones de los equipos a su DJ-mezclador, pulse el
POWER (11). Se encenderá y el LED POWER (10) se iluminará en ROJO.
2. Canal 1 - botón (4) le permite seleccionar la entrada PHONO 1 / LINE 1 (18) Toma de phono de entrada o de
línea. Deslice el control CHANNEL (5) controla el nivel de entrada de este canal.
3. Canal 2 – botón (6) le permite seleccionar la entrada PHONO 1 / LINE 1 (19) Toma de phono de entrada o de
línea. Deslice el control CHANNEL (7) controla el nivel de entrada de este canal.
4. Canal 3 - botón (8) le permite seleccionar la entrada PHONO 1 / LINE 1 (20) Toma de phono de entrada o de
línea. Deslice el control CHANNEL (9) controla el nivel de entrada de este canal.
5. Crossfader - Use crossfader (13) para obtener un control de volumen suave entre los canal es 1 y 2 sin volver a
ajustar los volúmenes de canal. Si el crossfader está en la posición central. Ambos canales se pueden
escuchar.
6. Mic – Conecte el micrófono con un "conector de 1/4 en el panel posterior (16 y 17). El volumen de micróf ono 1
y 2 se puede controlar con el control de volumen (2).
7. Talkover (3) - El propósito de la sección talkover es el de permitir bajar el volumen de la mezcla para que el
micrófono se puede oír por encima de la música. Al pulsar el interruptor, el talkover estará encendido y el
volumen de todas las fuentes, excepto las entradas de micrófono están rebajadas en 12 dB.
8. Auriculares - Conecte sus auriculares a la toma de auriculares (22) y seleccione el canal des eado (canal 1-3 o
MIC) para el seguimiento con el interruptor de Cue (1). Con este mando de control de nivel(14), se puede
ajustar el volumen de los auriculares
9. Volumen Maestro: La pantalla LED (12) muestra el nivel de la salida principal izq uierda y derecha.
10. Reproductor MP3(15) – Reproductor SD / USB / BT-Player. Ver explicación posterior.
PANEL FRONTAL

13
PANEL TRASERO
REPRODUCTOR USB / SD / BT
1. PANTALLA LCD
La pantalla LCD le muestra alguna información como soporte de
reproducción, nombre de archivo, el tiempo transcurrido, el
tiempo total, número de expediente, número total de archivos,
sistema de archivos (MP3 o WAV) y el modo de reproducción
(repetir una, repetir todo, aleatorio o repetir intro).
Nota: En modo-BT, la pantalla LCD muestra únicamente la
condición de conexión (conectado o desconectado). Toda la
información de reproducción están en el dispositivo BT.
2. ENTRADA SD CARD
Conectar en esta entrada la tarjeta SD.
Note: Antes de expulsar la tarjeta SD, ajuste la reproducción en
modo de pausa o seleccionar otro soporte de reproducción (USB
o BT)
3. PUERTO USB
Conectar en este Puerto el USB.
Note: Antes de expulsar el USB, ajuste la reproducción en modo
de pausa o seleccionar otro soporte de reproducción (SD o BT)
4. BOTÓN MODE
Este botón tiene dos funciones:
- Una simple pulsación le permite elegir el soporte de reproducción: SD, USB o BT.
- Una pulsación larga permite cambiar el reproductor de encendido o apagado.
Nota: Si elige modo-BT, el reprductor permitirá la conexión BT. Usted puede unirse a su dispositivo-BT con el
reproductor. Para eso, debe habilitar el sistema de BT en su dispositivo. Su dispositivo buscará el reproductor y
encontrará el sistema-BT llamado (BLUETOOTH). Para enlazar el dispositivo con el reproductor, debe introducir el
código PIN 0000. Ahora, su dispositivo y el reproductor están vinculados. Usted debe ini ciar la reproducción en el
dispositivo para escuchar en la mesa de mezclas..
5.BOTÓN PLAY / PAUSE
Este botón se utiliza para iniciar la reproducción o para entrar en modo de pausa.
6. BOTÓN FOLDER / RECORD
Este botón tiene dos funciones: - Una simple pulsación le permite seleccionar un directorio en el soporte de
reproducción (tarjeta SD o USB). Para ello, seleccione un directorio en el uso de botones de selección de pista (8 y 9). A
continuación, pulse el botón de carpeta para entrar en el directorio. Después de seleccionar el archivo que desea
escuchar en el uso de la selección de pista botones (8 y 9) que botón de la carpeta pulse para iniciar la reproducción. Una pulsación larga le permite grabar su mezcla. Se grabará la señal principal (todas las entradas excepto reproductor
SD / USB). El registro se realizará en el medio multimedia que se utiliza antes de iniciar el registro.
7. BOTÓN REPEAT / DELETE
Este botón tiene dos funciones: - Una simple pulsación le permite elegir el modo de reproducción (repeti r todos los
archivos, repetir un archivo, repetir la introducción o el juego de rescate) - Una pulsación larga le permite borrar uno de
sus archivos grabados. Para eso, seleccionar el archivo que desea eliminar usando el botó n de selección de pista (8 y
9) a continuación, pulse (y mantenga pulsado) el botón de repetición para eliminar el archivo.
8. BOTÓN TRACK / SEARCH
Este botón tiene dos funciones:
- Una simple pulsación le permite seleccionar el archivo anterior
- Una pulsación larga le permite hacer la búsqueda de vuelta rápida en el archivo
9. BOTÓN TRACK / SEARCH
Este botón tiene dos funciones:
- Una simple pulsación le permite seleccionar el archivo posterior
- Una pulsación larga le permite hacer la búsqueda de vuelta rápida en el archivo

14
FRANCAIS
Nous vous remercions d’avoir acheté un appareil Vexus. Veuillez lire la présente notice avant l’utilisation afin de pouvoir
en profiter pleinement.
Veuillez lire la notice avant utilisation. Respectez impérativement les instructions afin de continuer à bénéficier de la
garantie. Prenez toutes les précautions nécessaires pour éviter tout incendie ou décharge électrique. Seul un technici en
spécialisé peut effectuer les réparations. Nous vous conseillons de conserver la présente notice pour pouvoir vous y
reporter ultérieurement.
- Avant d’utiliser l’appareil, prenez conseil auprès d’un
spécialiste. Lors de la première mise sous tension, il est
possible qu’une odeur soit perceptible. C’est normal,
l’odeur disparaîtra peu de temps après.
- L’appareil contient des composants porteurs de tension.
n’ouvrez jamais le boîtier.
- Ne placez pas des objets métalliques ou du liquide sur
l’appareil, cela pourrait causer des décharges
électriques et dysfonctionnements.
- Ne placez pas l’appareil à proximité de sources de
chaleur, par exemple radiateur. Ne positionnez pas
l’appareil sur une surface vibrante. N’obturez pas les
ouïes de ventilation.
- L’appareil n’est pas conçu pour une utilisation en
continu.
- Faites attention au cordon secteur, il ne doit pas être
endommagé. Tout cordon secteur endommagé peut
engendrer une décharge électrique et un
dysfonctionnement.
- Lorsque vous débranchez l’appareil de la prise secteur,
tenez-le par la prise, ne tirez jamais sur le cordon.
- Ne branchez pas et ne débranchez pas l’appareil avec
les mains mouillées.
- Seul un technicien spécialisé peut remplacer la fiche
secteur et / ou le cordon secteur.
- Si l’appareil est endommagé et donc les éléments
internes sont visibles, ne branchez pas l’appareil, ne
l’allumez pas. Contactez votre revendeur. NE branchez
pas l’appareil à un rhéostat ou un dimmer.
- Pour éviter tout risque d’incendie ou de décharge
électrique, n’exposez pas l’appareil à la pluie ou à
l’humidité.
- Seul un technicien habilité et spécialisé peut effectuer
les réparations
- Branchez l’appareil à une prise 220-240 V/50 Hz avec
terre, avec un fusible 10-16 A.
- Pendant un orage ou en cas de non utilisation prolongée
de l’appareil, débranchez l’appareil du secteur.
- En cas de non utilisation prolongée de l’appareil, de la
condensation peut être créée. Avant de l’allumer, laissez
l’appareil atteindre la température ambiante. Ne l’utilisez
jamais dans des pièces humides ou en extérieur.
- Afin d’éviter tout accident dans des lieux publics, vous
devez respecter les conseils et instructions.
- N’allumez pas et n’éteignez pas l’appareil de manière
répétée. Cela réduit sa durée de vie.
- Conservez l’appareil hors de la portée des enfants. Ne
laissez pas l’appareil sans surveillance.
- N’utilisez pas d’aérosols pour nettoyer les interrupteurs.
Les résidus créent des dépôts et de la graisse. En cas
de dysfonctionnement, demandez conseil à un
spécialiste.
- Ayez toujours les mains propres pour utiliser l’appareil.
- Ne forcez pas les réglages.
- Cet appareil utilise un haut-parleur qui peut engendrer
un champ magnétique. Placez toujours l'appareil à 60
cm au moins d'un ordinateur ou téléviseur.
- L'appareil contient un accumulateur au plomb
rechargeable. Rechargez l'accumulateur tous les trois
mois en cas de non utilisation prolongée de l'appareil
sinon l'accumulateur pourrait être endommagé.
- Si l'accumulateur est endommagé, remplacez-le par un
accumulateur de même type. Déposez la pièce usagée
dans un container spécifique.
- Si l’appareil est tombé, faites-le toujours vérifier par un
technicien avant de le rallumer.
- Pour nettoyer l’appareil, n’utilisez pas de produits
chimiques qui abîment le revêtement, utilisez
uniquement un tissu sec.
- Tenez toujours l’appareil éloigné de tout équipement
électrique pouvant causer des interférences.
- Pour toute réparation, il faut impérativement utiliser des
pièces d’origine, sinon il y a risque de dommages graves
et / ou de radiations dangereuses.
- Eteignez toujours l’appareil avant de le débrancher du
secteur et de tout autre appareil. Débranchez tous les
cordons avant de déplacer l’appareil.
- Assurez-vous que le cordon secteur n’est pas abîmé si
des personnes viennent à marcher dessus. Avant toute
utilisation, vérifiez son état.
- La tension d’alimentation est de 220-240 V~/50 Hz.
Vérifiez la compatibilité. Si vous voyagez, vérifiez que la
tension d’alimentation du pays est compatible avec
l’appareil.
- Conservez l’emballage d’origine pour pouvoir transporter
l’appareil en toute sécurité
.
Ce symbole doit attirer l’attention de l’utilisateur sur les tensions élevées présentes dans le boîtier de l’appareil, pouvant
engendrer une décharge électrique.
Ce symbole doit attirer l’attention de l’utilisateur sur des instructions importantes détaillées dans la notice, elles doivent
être lues et respectées.
Cet appareil porte le symbole CE. Il est interdit d’effectuer toute modification sur l’appareil. La certification CE et la garantie
deviendraient caduques !
NOTE: Pour un fonctionnement normal de l’appareil, il doit être utilisé en intérieur avec une plage de température maximale
autorisée entre 5°C/41°F et 35°C/95°F.
Ne jetez pas les produits électriques dans la poubelle domestique. Déposez-les dans une déchetterie. Consultez votre revendeur ou
les autorités locales. Les valeurs mentionnées peuvent différer légèrement d'un appareil à l'autre. Les caractéristiques techniques
peuvent être modifiées sans notification préalable.
N’essayez pas de réparer l’appareil vous-même. Vous perdriez tout droit à la garantie. Ne faites aucune modification sur l’appareil. Vous perdriez tout droit à la
garantie La garantie deviendrait également caduque en cas d’accidents ou dommages causes par une utilisation inappropriée de l’appareil ou un non respect
des consignes présentes dans cette notice. Vexus ne pourrait être tenu responsable en cas de dommages matériels ou corporels causés par un non respect
des consignes de sécurité et avertissements. Cela est également valable pour tous les dommages quelle que soit la forme.

15
INSTRUCTIONS DE DEBALLAGE
ATTENTION ! A réception de l'appareil, déballez-le avec précaution, vérifiez le contenu et assurez-vous que tous les
éléments sont bien présents et en bon état. Emettez immédiatement des réserves au transporteur si vous constatez des
dommages. Conservez l'emballage d'origine et les accessoires d'emballage. Si l'appareil doit être retourné chez le
fournisseur, il doit être emballé dans les éléments d'origine.
Si l'appareil a été soumis à des fluctuations importantes de températures (par exemple pendant le transport), ne
l'allumez pas immédiatement. De la condensation pourrait endommager l'appareil. Laissez-le éte int jusqu'à ce qu'il
atteigne la température ambiante.
ALIMENTATION
Vous trouverez sur l'étiquette à l'arrière de l'appareil, le type d'alimentation à utiliser. Vérifiez que la tension secteur
corresponde bien à la tension indiquée. Si vous utilisez une tension d'alimentation différente, l'appareil sera
irrémédiablement endommagé. L'appareil doit être directement relié au sect eur, en aucun cas, vous ne pouvez utiliser
de dimmer ou d'alimentation réglable.
FONCTIONNEMENT
1. Power On - Une fois tous les branchements effectués sur votre table de mixag e, appuyez sur l'i nterrupteur POWER
(11). La LED POWER (10) brille en ROUGE.
2. Channel 1 - L'interrupteur SWITCH (4) vous permet de sélectionner la prise PHONO 1/LINE 1 (18) sur Phono ou
niveau ligne. Le potentiomètre CHANNEL SLIDE (5) permet de régler le niveau d'entrée de ce canal.
3. Channel 2 - L'interrupteur SWITCH (6) vous permet de sélectionner la prise PHONO 1/LINE 1 (19) sur Phono ou
niveau ligne. Le potentiomètre CHANNEL SLIDE (7) permet de régler le niveau d'entrée de ce canal.
4. Channel 3 - L'interrupteur SWITCH (8) vous permet de sélectionner la prise USB O R LINE 2 (20) sur Phono ou
niveau ligne. Le potentiomètre CHANNEL SLIDE (9) permet de régler le niveau d'entrée de ce canal.
5. Crossfader - Utilisez le crossfader (13) pour régler le volume entre le c anal 1 et le canal 2 sans m odifier le réglag e
de volume de canal. si le crossfader est sur la position centrale, les deux canaux peuvent être écoutés
6. Mic – Reliez le micro avec une fiche jack 6,35 sur la face arrière ( 16 et 17). Vous pouvez régler le volume de
microphone 1 et microphone 2 avec le réglage de volume (2).
7. Talkover (3) - La section Talkover permet de couper le son du programme en cours de lecture pour que le
microphone soit prioritaire sur la musique. Lorsque vous appuyez sur SW ITCH, le talkover est allumé, le volume de
toutes les sources sauf les entrées Mic est diminué de 12 dB. Le réglag e (2) vous permet de régler le niveau de
MIC1/MIC2.
8. Phone - Reliez votre casque à la prise casque (22) et sélect ionnez le canal souh aité (canal 1-3 ou MIC ) pour gérer
avec l'interrupteur Cue (1). Avec le bouton Phone Level (14), vous pouvez régler le volume du casque.
9. Master Level VU-Meter: Ce VU-mètre (12) indique le niveau de la sortie master gauche et droite.
10. MP3 Player (15) - Lecteur SD / USB / BT. Voir ci-dessous
F ACE AVANT

16
F ACE ARRIERE
LECTEUR USB / SD / BT
1. LCD DISPLAY : affichage LCD
L'affichage LCD affiche les informations telles que support de lecture,
nom du fichier, durée écoulée, durée totale, numéro du fichier, nombre
total de fichiers, système de fichiers (MP3 ou WAV) et mode de
lecture (Repeat one, repeat all, aléatoire ou répétition introduction).
Note: en mode BT, l'affichage LCD indique uniquement le statut de
branchement (relié ou déconnecté). Toutes les informations de lecture
sont sur l'affichage BT.
2. SD CARD SLOT : insert carte SD
Mettez ici votre carte SD.
Note: Avant d'éjecter la carte SD, assurez-vous que la lecture est en
mode Pause ou sélectionnez un autre support de lecture (USB ou BT)
3. USB PORT (port USB)
Branchez ici votre clé USB.
Note: avant d'éjecter la clé USB, mettez la lecture en mode pause ou sélectionner un autre support de lecture (carte SD
ou BT)
4. MODE BUTTON (touche MODE)
Cette touche a deux fonctions :
- simple pression pour choisir le support de lecture : SD, USB ou BT.
- Longue pression pour allumer (ON) et éteindre (OFF) le lecteur.
Note: si vous choisissez le mode BT, le lecteur établi une connexion BT. Vous pouvez appairer votre appareil BT avec le
lecteur. Vous devez autoriser la connexion. Votre appareil recherche le lecteur et trouve le système BT, appelé
(BLUETOOTH). Pour appairer votre appareil au lecteur, vous devez enter le code PIN, 0000. Le lecteur et votre appareil
sont désormais appairés, vous pouvez démarrer la lecture sur votre appareil pour écouter la musique sur la table de
mixage.
5. PLAY / PAUSE
Pour démarrer la lecture et passer en mode pause.
6. TOUCHE FOLDER / RECORD
Cette touche a deux fonctions :
- Simple pression pour sélectionner un répertoire sur le support de lecture (carte SD ou USB). Sélectionnez un ré pertoire
en utilisant les touches de sélections de voies (8 et 9). Ensuite, appuyez sur la touche du dossier pour entrer dans le
répertoire. Une fois le fichier souhaité, utilisez les touches de sélection de voies (8 et 9) puis appuyez sur la touche du
dossier pour démarrer la lecture.
- Par une longue pression, vous pouvez enregistrer votre mixage. Le signal master est enregistré (toutes les entres sauf
lecteur SD/USB). L'enregistrement se fait sur le support de lecture utilisé avant de démarrer l'enregistrement.
7. TOUCHE REPEAT / DELETE
Cette touche a deux fonctions :
- Simple pression pour choisir le mode de lecture (répétition de tous les fichiers, répétition d' un fichier, répétition de
l'introduction ou lecture aléatoire).
- Longue pression pour effacer un de vos fichiers enregistrés. Utilisez les touches de sélection de voies (8 et 9), appuyez
(maintenez enfoncé) sur la touche Repeat pour effacer le fichier.
8. TOUCHE TRACK / SEARCH
Cette touche a deux fonctions :
- Simple pression pour sélectionner le fichier précédent.
- Longue pression pour faire un retour rapide dans le fichier.
9. TOUCHE RACK / SEARCH
Cette touche a deux fonctions :
- Simple pression pour sélectionner le fichier suivant.
- Longue pression pour faire une avance rapide dans le fichier.

17
Declaration of Conformity
Importer: TRONIOS BV
Bedrijvenpark Twente 415
7602 KM - ALMELO
Tel : 0031546589299
Fax : 0031546589298
The Netherlands
Product number: 172.990
Product Description: STM3030 Mixer 4ch, BT, MP3/Rec/LED
Regulatory Requirement: EN 61558
EN 55013
EN 55020
EN 6100-3-2/-3-3
The product meets the requirements stated in Directives 2006/95 and 2004/108/EC and
conforms to the above mentioned Declarations.
Almelo,
07-05-2015
Signature: B. Kosters


Specifications and design are subject to change without prior notice..
www.tronios.com
Copyright © 2015 by TRONIOS the Netherlands
 Loading...