

Page 1
Control System User Guide
Ohjausjärjestelmän käyttöopas
Ver. 1.1
Page 2

Charge & Install Batteries
.........................................................................3
Robot Battery Charging & Usage
Controller Battery Charging & Usage
Install Radios & Pair Controller
..............................................................7
Radio Installation & Removal
Pairing Robot Brain & Controller
Connecting Smart Devices
........................................................................9
Smart Device Ports
Smart Device Overview
Using the Robot Brain
................................................................................11
Robot Brain & LED Lights Overview
Robot Brain LCD Screen
Using the Controller
..................................................................................12
Controller & LED Lights Overview
Using Controller to Navigate Robot Brain
Using Built in Programs
...........................................................................13
Driver Control Program
Autopilot Program
Robot Brain Screen Menus
........................................................................................................................16
Firmware Update & Programming
..........................................................17
Updating Firmware
Own Program Creation
Battery Safety Information
......................................................................18
......................................................................................19
1
2
3
4
5
6
8
7
1.1
1.2
2.1
3.1
4.1
5.1
5.2
6.1
6.2
7.1
7.2
6.3
2.2
3.2
4.2
Akkujen lataaminen ja paikoilleen asentaminen
Robotin akun lataaminen ja käyttö
Ohjaimen akun lataaminen ja käyttö
Radioiden asentaminen ja ohjaimen pariuttaminen
Radion asentaminen ja poistaminen
Keskusyksikön ja ohjaimen yhdistäminen
Laitteiden kytkeminen
Laitteiden liitäntäportit
Laitteiden yleiskuvaus
Keskusyksikön käyttö
Keskusyksikön ja LED-valojen yhteenveto
Keskusyksikön LCD-näyttö
Käsiohjaimen käyttäminen
Käsiohjaimen ja LED-valojen yleiskatsaus
Keskusyksikön ohjaaminen käsiohjaimella
Valmisohjelmien käyttäminen
Driver Control -ohjelma
Autopilottiohjelma
Keskusyksikön näytön valikot
Laiteohjelmiston päivittäminen ja ohjelmoiminen
Ohjelmiston päivittäminen
Omien ohjelmien luominen
Turvallisuusohjeita akkujen ja laturin käyttöön
Sisältö / Table of contents
Anturien kalibrointi
Sensor Calibration
Page 3
3
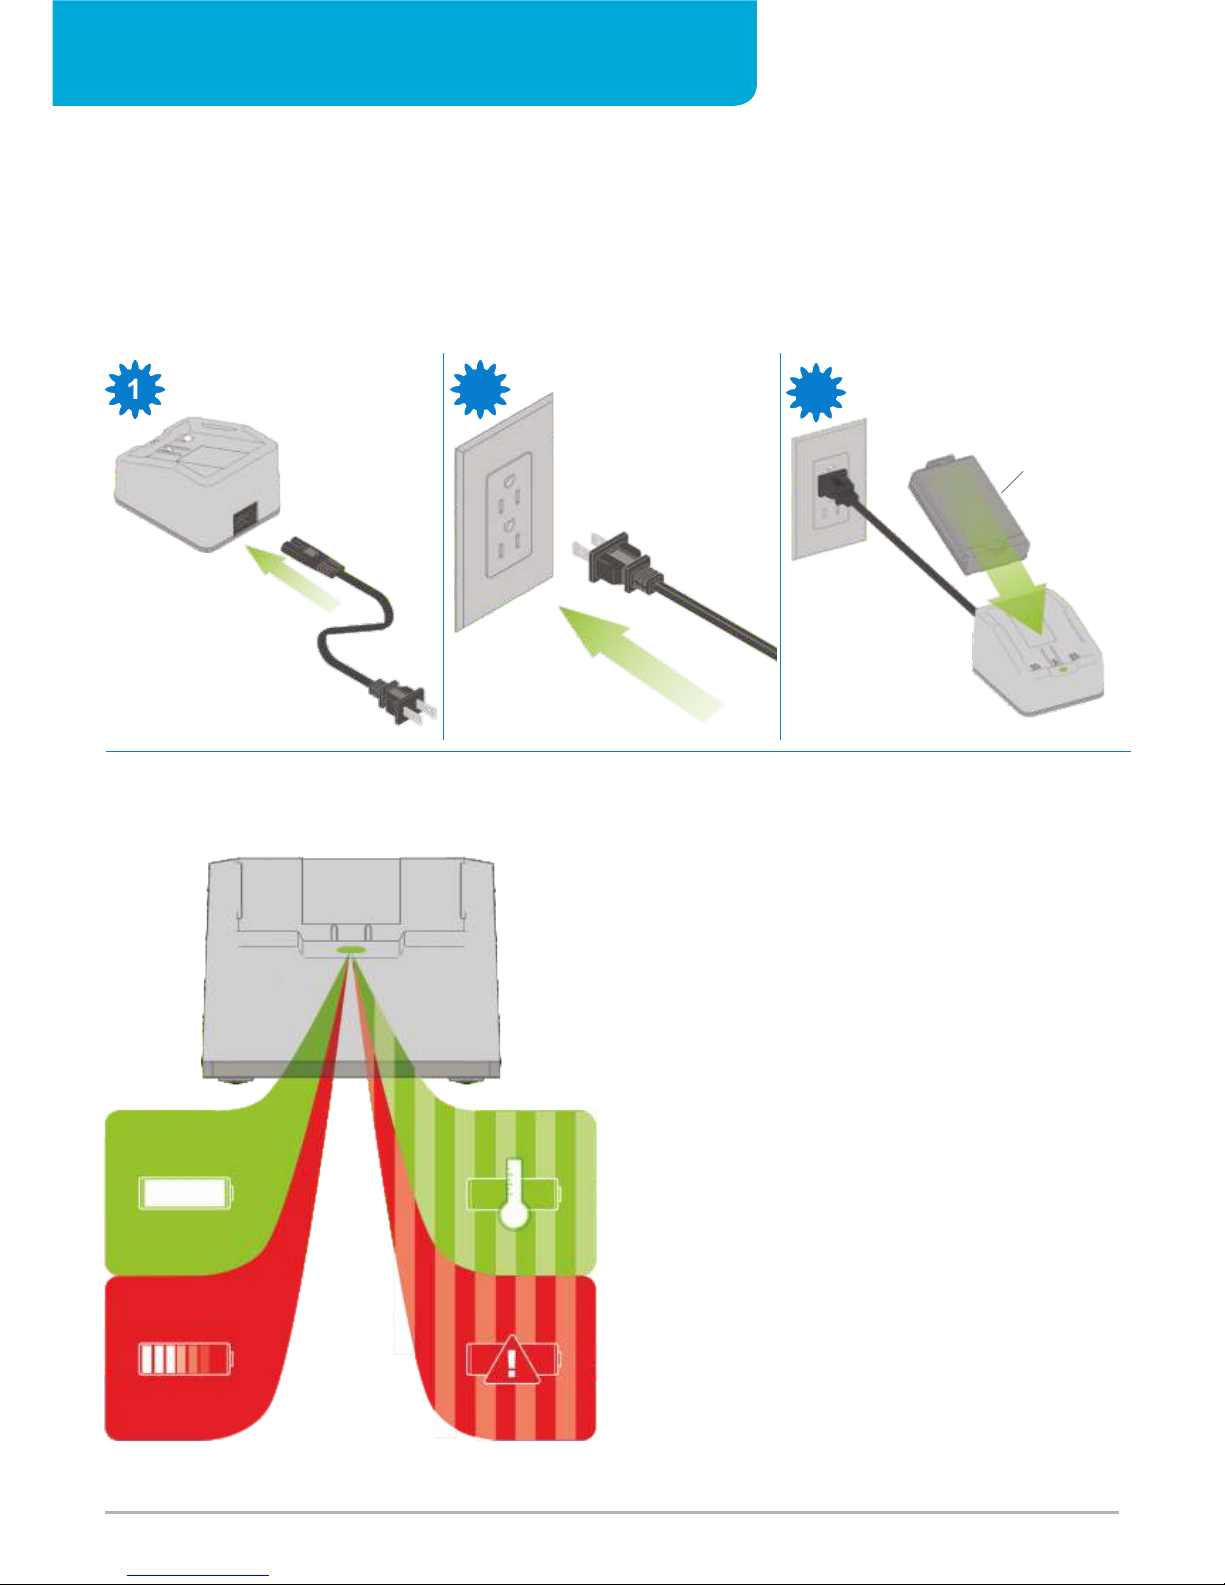
Robot Battery Charging & Usage
Battery Charger LED Status
1 2
3
Charge & Install Batteries
1
Use of the Robot Battery Charger is only to be done under the close
supervision of an adult.
To charge a Robot Battery, use your region-specific Battery Charger
Power Cord
(US/Canada: 276-2520; EU: 276-2521; UK: 276-276-2522)
to connect the Robot Battery Charger to an AC electrical outlet.
Insert the Robot Battery into the charger.
While charging, the LED will illuminate red. When fully charged, the
LED will illuminate green. To extend battery life, let the Robot Battery
cool down to room temperature before charging. If the Robot Battery Charger LED is blinking green, remove the Robot Battery, wait
for it to cool down, and then resume charging.
Fully charge the Robot Battery before its first use.
See the Battery Safety information in the Appendix for additional handling and safety
information.
SOLID
SOLID
BLINKING
BLINKING
Battery is Fully Charged
Battery Charge in Progress
Over Temperature Fault
Battery Fault
228-2604
Keskusyksikön voimanlähteenä on akku,
jota voidaan ladata uudelleen ja uudelleen.
Akun kapasiteetti on 7.2 V / 2000 mAh.
Akku ladataan mukana tulleella laturilla.
Akkujen lataaminen ja asentaminen
1.1 Keskusyksikön akun lataaminen ja käyttäminen
Lataa akkuja ainoastaan aikuisen henkilön ollessa paikalla.
Liitä laturi pistorasiaan mukana tulleella kaapelilla.
LED-valo palaa yhtäjaksoisesti punaisena, kun akku latautuu.
Kun akku on latautunut täyteen, alkaa LED-valo palaa
yhtäjaksoisesti vihreänä. Pidennät akun ikää, kun annat
akun jäähtyä huoneenlämpöiseksi ennen latausta. Jos laturin
vihreä valo vilkkuu, on akku kuumentunut liikaa. Poista
tällöin akku laturista ja jatka latausta vasta sitten, kun akku on
jäähtynyt. Lataa akku täyteen aina ennen käyttöä.
PALAA JATKUVASTI
VILKKUU
PALAA JATKUVASTI
VILKKUU
Akku on täyteen latautunut
Akku latautuu
Akku on ylikuumentunut
Akun vikatila
Akkulaturin LED-merkkivalon tila
The Robot Brain is powered by the Robot Battery (228-2604)
The Battery is a 7.2v 2000mAh rechargeable battery pack
that is recharged by the Robot Battery Charger (228-2743)
VEX IQ Ohjausjärjestelmän käyttöopas FIN Ver. 1.0. ©www.vexrobotics.fi & www.vexrobotics.com
Page 4
4
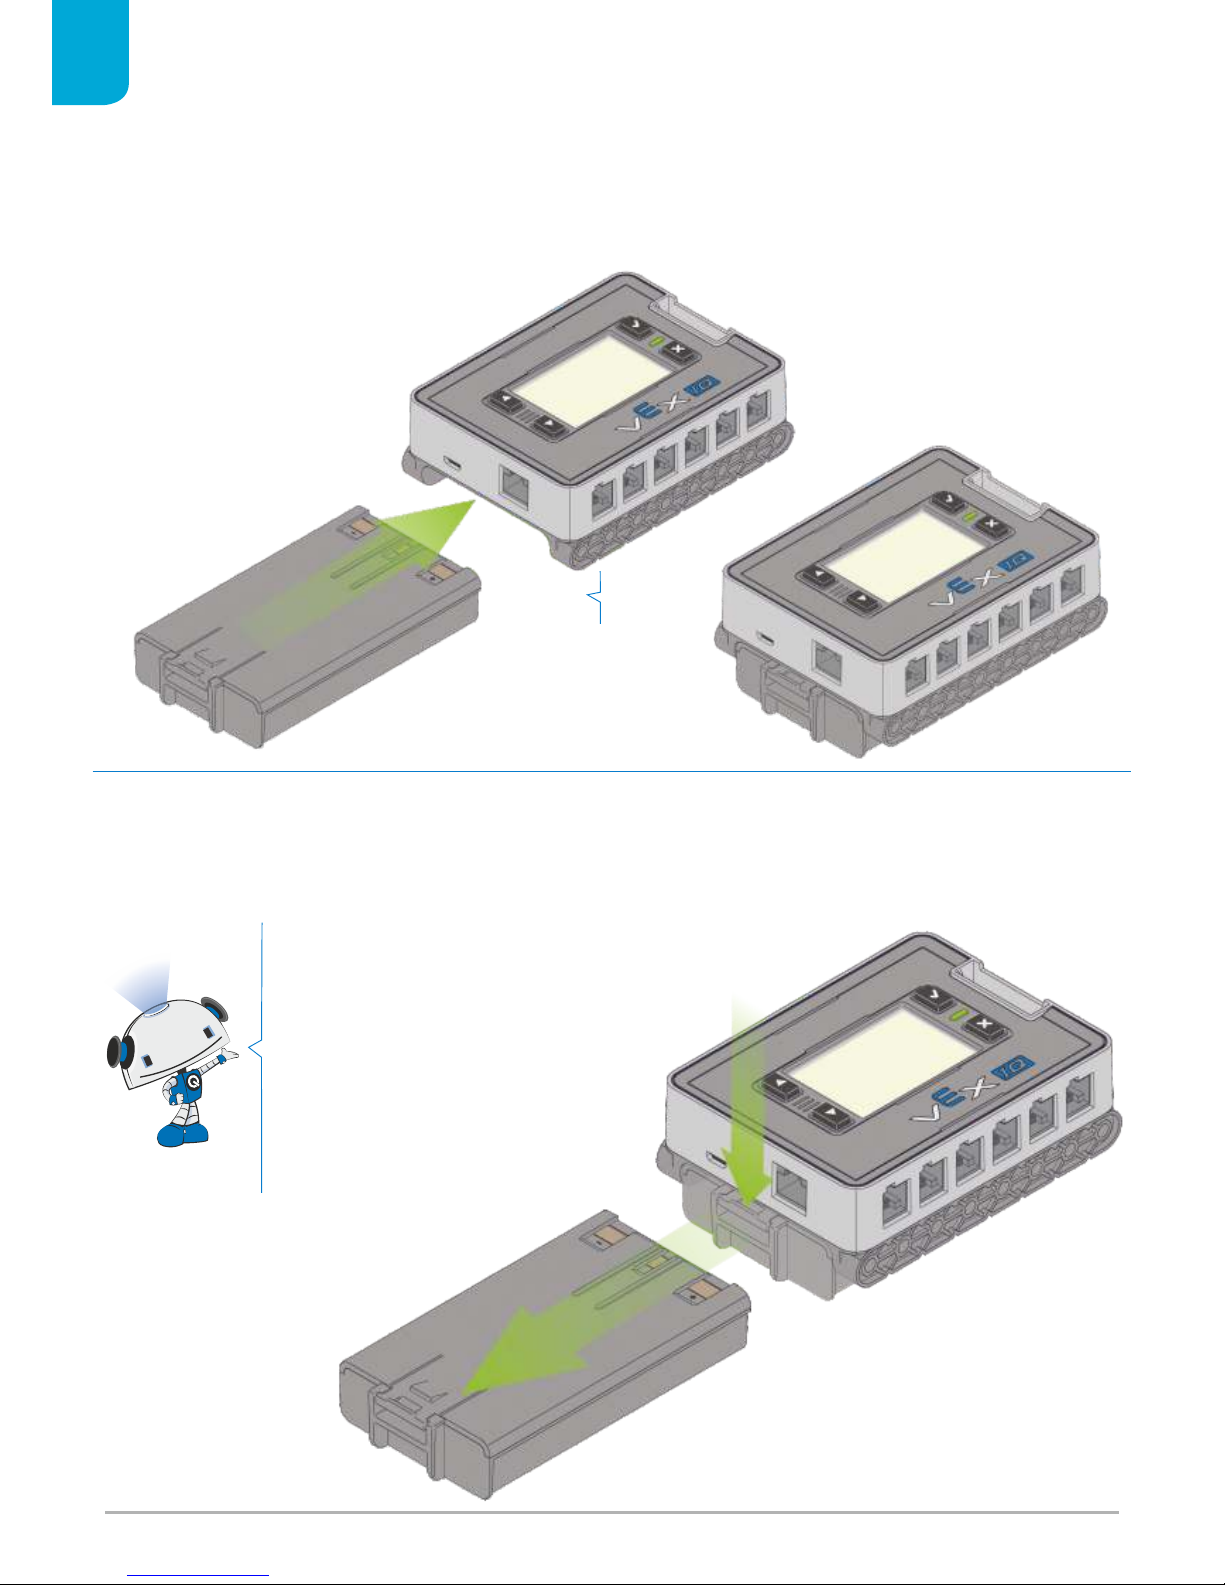
Removing Robot Battery
Installing Robot Battery
1
Click
Orient the Robot Battery or Robot AA Battery Holder to match the
illustration image below and slide the Robot Battery into the
Robot
Brain - listen for a click to ensure the Robot Battery is fully inserted.
To remove the Robot Battery or Robot AA Battery Holder from the
Robot Brain, press down on the release latch then slide the Robot
Battery outwards. Remove the Robot Battery or Robot AA Battery
Holder from the Robot Brain during storage.
When building your own robots
and mechanisms, keep the area
around the end of the Robot
Brain open. This will make it easier
to swap a dead battery for a fully
charged one.
Klik
Käännä akku siten, että se menee keskusyksikköön,
kuuntele ”klik” ääntä ja varmista, että akku on kokonaan
kiinni.
Paina lukitusvipua ja vedä akku ulos.
Irrota akku keskusyksiköstä aina säilytyksen ajaksi.
Kun rakennat omia robotteja ja
mekanismeja, niin jätä
rakenteeseen tilaa, että
akku saadaan irrotettua latausta varten.
Akun irrottaminen keskusyksiköstä
Keskusyksikön akun asentaminen
VEX IQ Ohjausjärjestelmän käyttöopas FIN Ver. 1.0. ©www.vexrobotics.fi & www.vexrobotics.com
Page 5
5
1
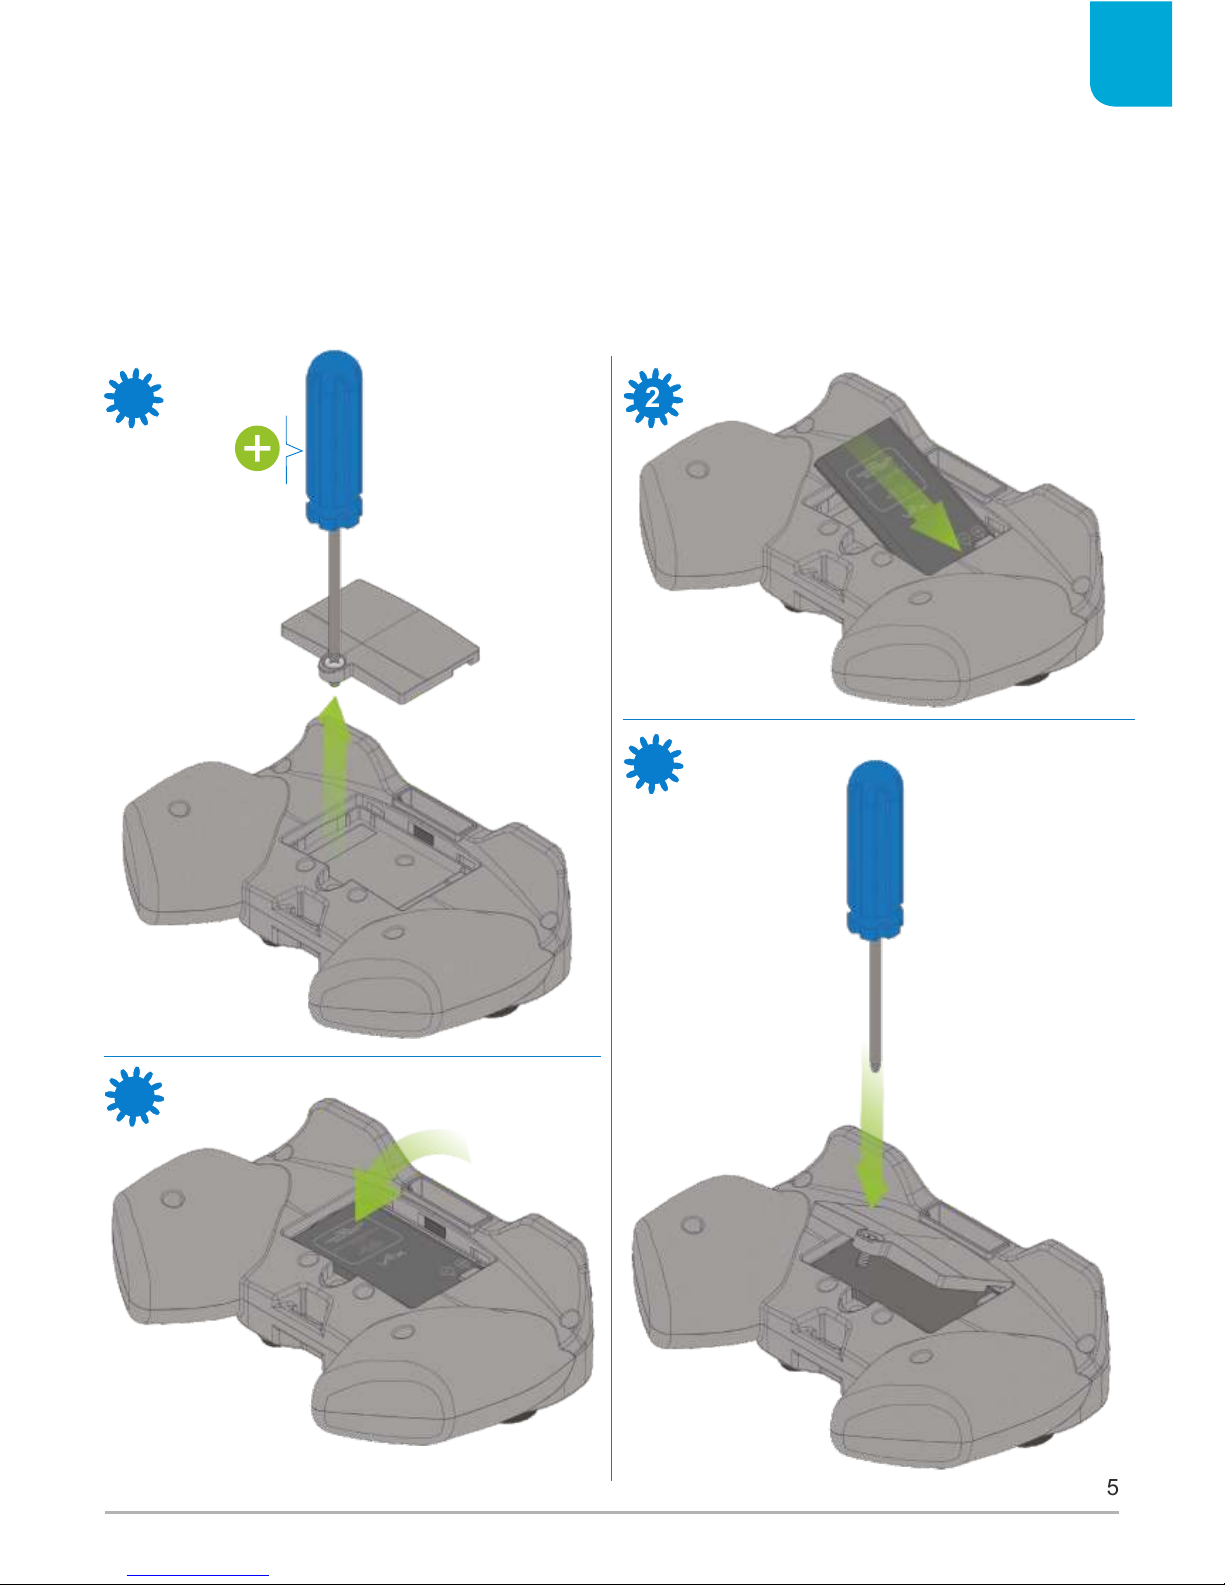
Installing Controller Battery
1.2 Controller Battery Charging & Usage
1
3
2
4
The
Controller (228-2530) is powered by the
Controller Battery
(228-2779)
.
The Controller Battery is a rechargeable 3.7v 800 mAh Li-Ion
battery cell, and is charged inside the Controller.
To install the Controller Battery, remove the Controller battery
door using a Phillips head screwdriver. Align the Controller Battery
to the correct orientation, gently slide under the plastic tab on the
Controller and press flat. Reinstall the Controller battery door
before charging and use.
Käsiohjaimessa on ladattava Li-Ion -akku (litiumioniakku),
joka voidaan ladata poistamatta sitä ohjaimesta.
Poista akun kotelon kansi avaamalla lukitusruuvi
ristiuraruuvitaltalla (kuva 1). Aseta akku kuvan 2 mukaiseen
asentoon ja liu´uta akku varovasti paikalleen (kuva 3). Kiinnitä
kansi paikalleen ja varmista ruuvilla (kuva 4) ennen
akun lataamista ja laitteen käyttöönottoa.
1.2 Käsiohjaimen akun lataaminen ja käyttäminen
Akun asentaminen ohjaimeen
VEX IQ Ohjausjärjestelmän käyttöopas FIN Ver. 1.0. ©www.vexrobotics.fi & www.vexrobotics.com
Page 6
6
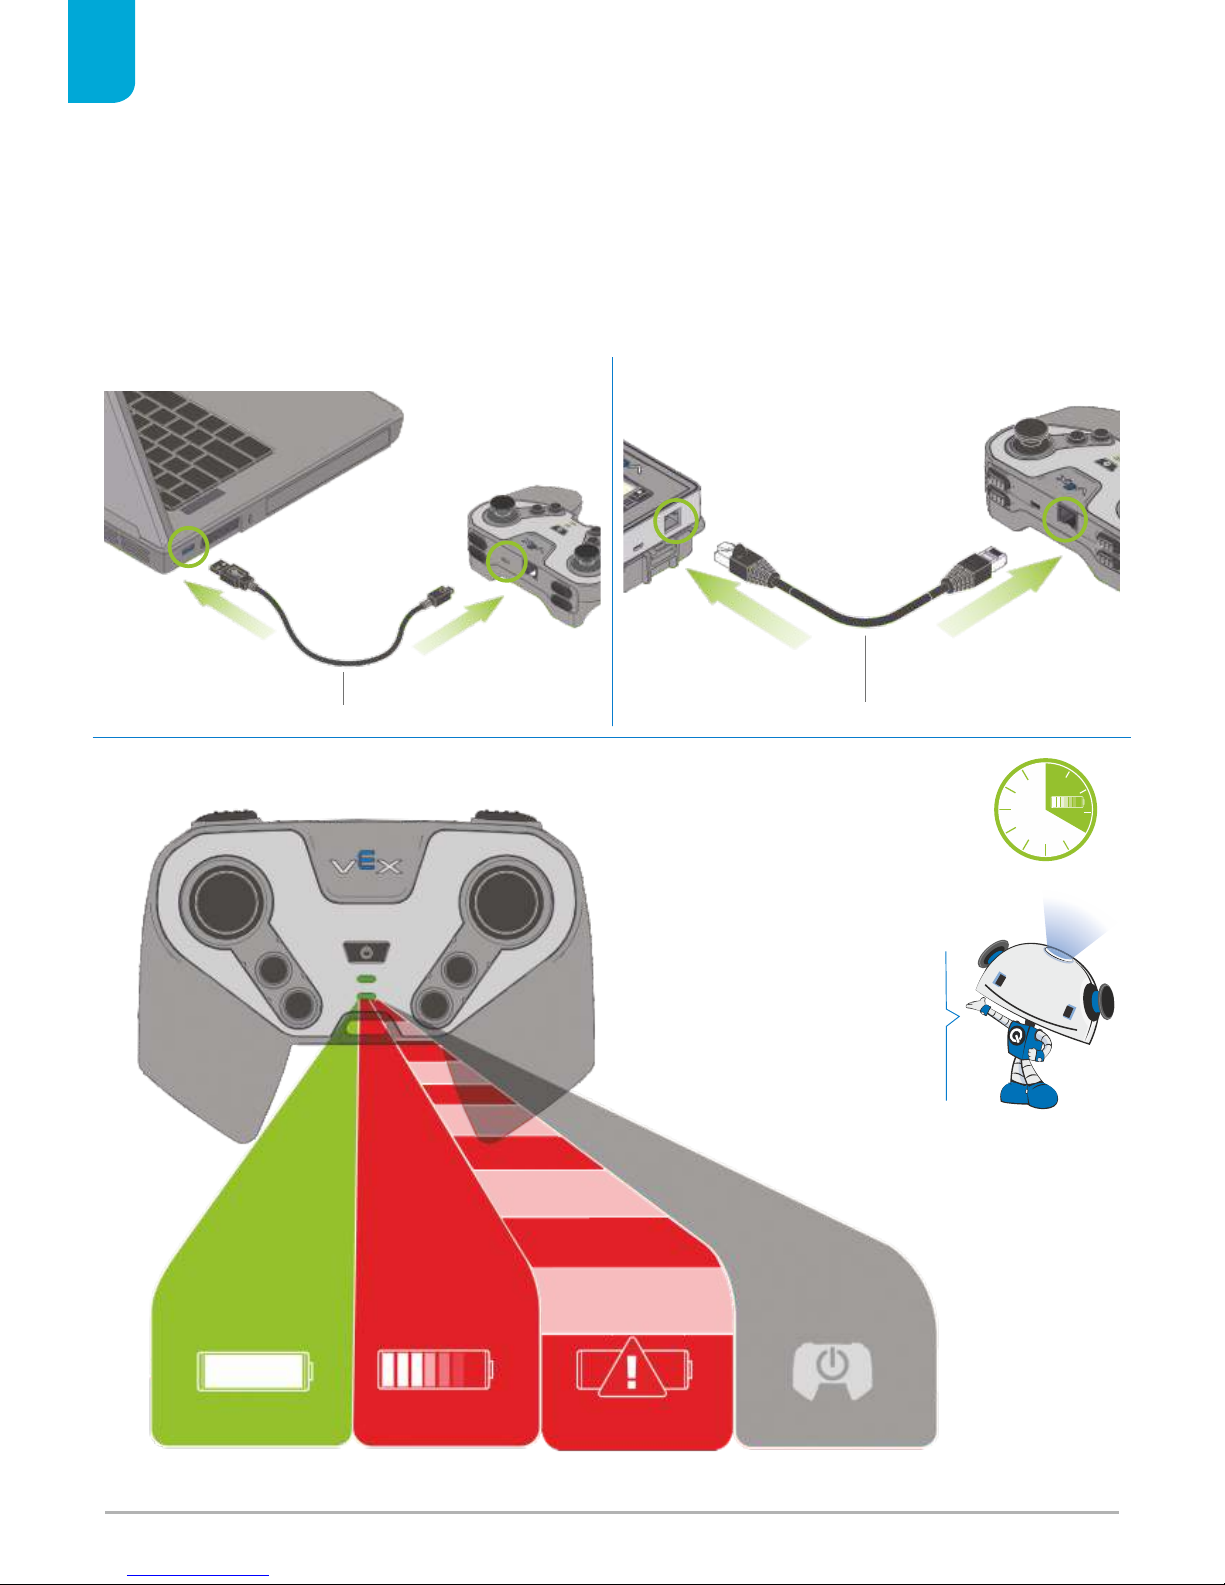
Charging Controller Battery
Controller Charge LED Status
1
SOLID
SOLID
BLINKING
NO LIGHT
Plug the Controller into a USB port on your computer using the
USB Cable. The Controller will immediately begin charging.
The recommended method for fully charging the Controller Battery
is to use the USB Cable.
The Controller Battery will also charge when it is connected to the Robot
Brain using the Tether Cable and the Robot Brain is powered on.
Battery is Fully Charged
Battery Charge in Progress
Battery Fault
Not Charging
Optional Charging Method
A fully charged Controller
Battery will run for about 50
hours of continuous use.
228-2785
228-2786
4 Hours to fully charge
Akku on täyteen latautunut
Akku latautuu
Akun vikatila
Ei lataa
PALAA JATKUVASTI
PALAA JATKUVASTI
EI VALOA
VALO VILKKUU
Liitä käsiohjain tietokoneen USB-porttiin USB-kaapelilla.
Käsiohjaimen akku alkaa välittömästi latautua. Tämä on
suositeltavin tapa ladata käsiohjaimen akku. Voit käyttää
myös useimpia muita USB-latureita, kuten puhelimien
latureita.
Käsiohjaimen akun lataaminen
Vaihtoehtoinen tapa ladata käsiohjaimen akku
Voit ladata käsiohjaimen akun myös kytkemällä se
keskusyksikköön anturi/moottori -kaapelilla. Tällöin
se ottaa lataamisen tarvittavan energian keskusyksikön akusta.
Käsiohjaimen LED-valon merkitys
Akun täyteen lataaminen
kestää 4 tuntia
Täyteen ladattu akku kestää
noin 50 tuntia jatkuvassa
käytössä.
VEX IQ Ohjausjärjestelmän käyttöopas FIN Ver. 1.0. ©www.vexrobotics.fi & www.vexrobotics.com
Page 7
7
Install Radios & Pair Controller
2
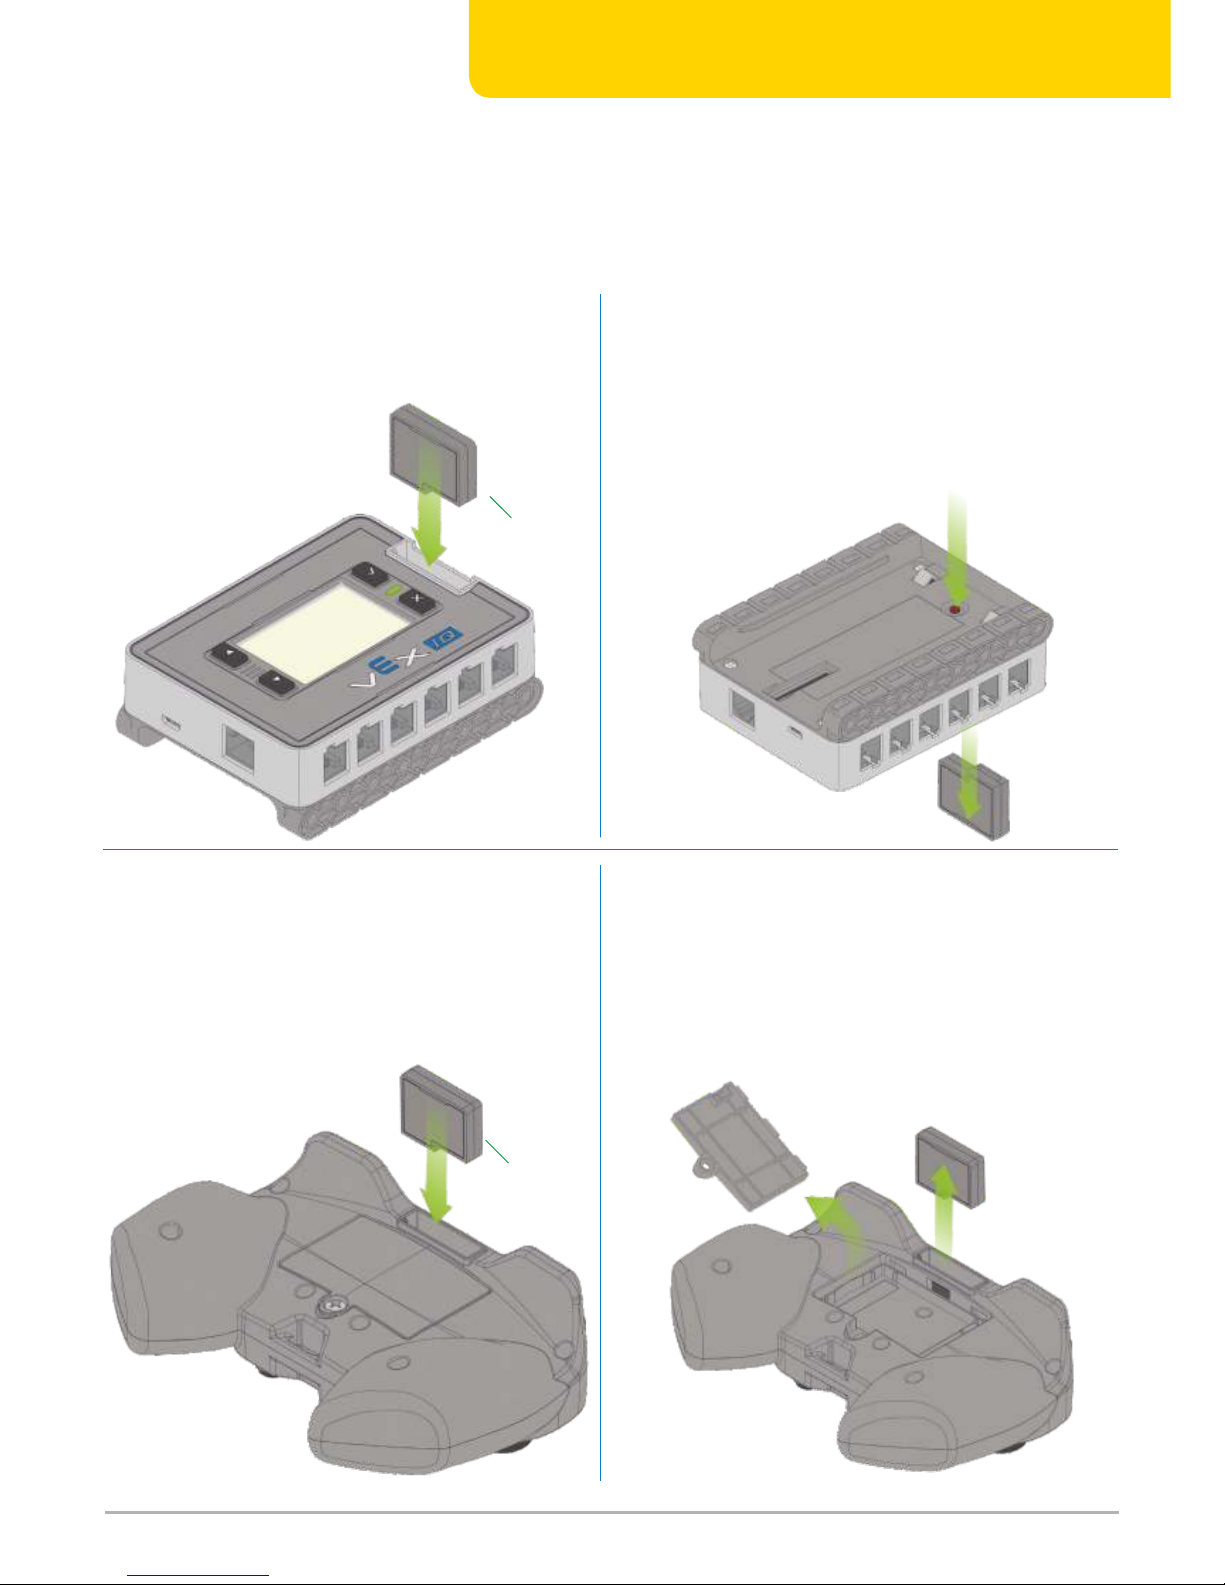
Radio Installation
Radio Installation
Radio Removal
Radio Removal
Firmly push radio into Robot Brain.
Firmly push radio into Controller.
Press and hold red Release Button on Robot Brain while firmly
removing Radio. Do not attempt to remove Radio without pressing
the Release Button.
Remove the battery door using a Phillips head screwdriver. Firmly
pull out radio. Do not attempt to remove Radio without removing
Battery Door.
The Controller and Robot Brain wirelessly communicate with each
other using a pair of either 900 MHz Radio or 2.4 GHz Radio. The
same type of radio must be used on the Robot Brain and Controller.
The 900 MHz Radio (228-2621) is only available in North, Central, and South America;
the 2.4 GHz Radio (228-3015) is available worldwide.
2.1 Radio Installation and Removal
228-2621
or/tai
228-3015
228-2621
or tai
228-3015
2.1 Radion asentaminen ja poisto
Radioiden asentaminen ja
ohjaimen pariuttaminen
Radion irrottaminen
Radion asentaminen
Jotta ohjain ja keskusyksikkö viestisivät keskenään, ne pitää
yhdistää käyttämällä 2.4 GHz radiota.
Samantyyppiset radiot on oltava molemmissa,
sekä keskusyksikössä että ohjaimessa.
Paina radiomoduli varovasti keskusyksikköön.
Paina pohjassa olevaa punaista nappia irrottaaksesi radion
keskusyksiköstä. Älä koskaa yritä irrottaa radiomodulia painamatta
punaista nappia!
Radion asentaminen
Radion irrottaminen
Paina radiomoduli varovasti ohjaimeen.
Irrottaaksesi radion, ota akkukotelon kansi pois käyttämällä Phillips
ristipääruuvitalttaa. Vedä varovasti radiomoduli ulos. Älä koskaan
yritä irrottaa radiota ottamatta ensin akkukotelon kantta pois.
VEX IQ Ohjausjärjestelmän käyttöopas FIN Ver. 1.0. ©www.vexrobotics.fi & www.vexrobotics.com
Page 8
8
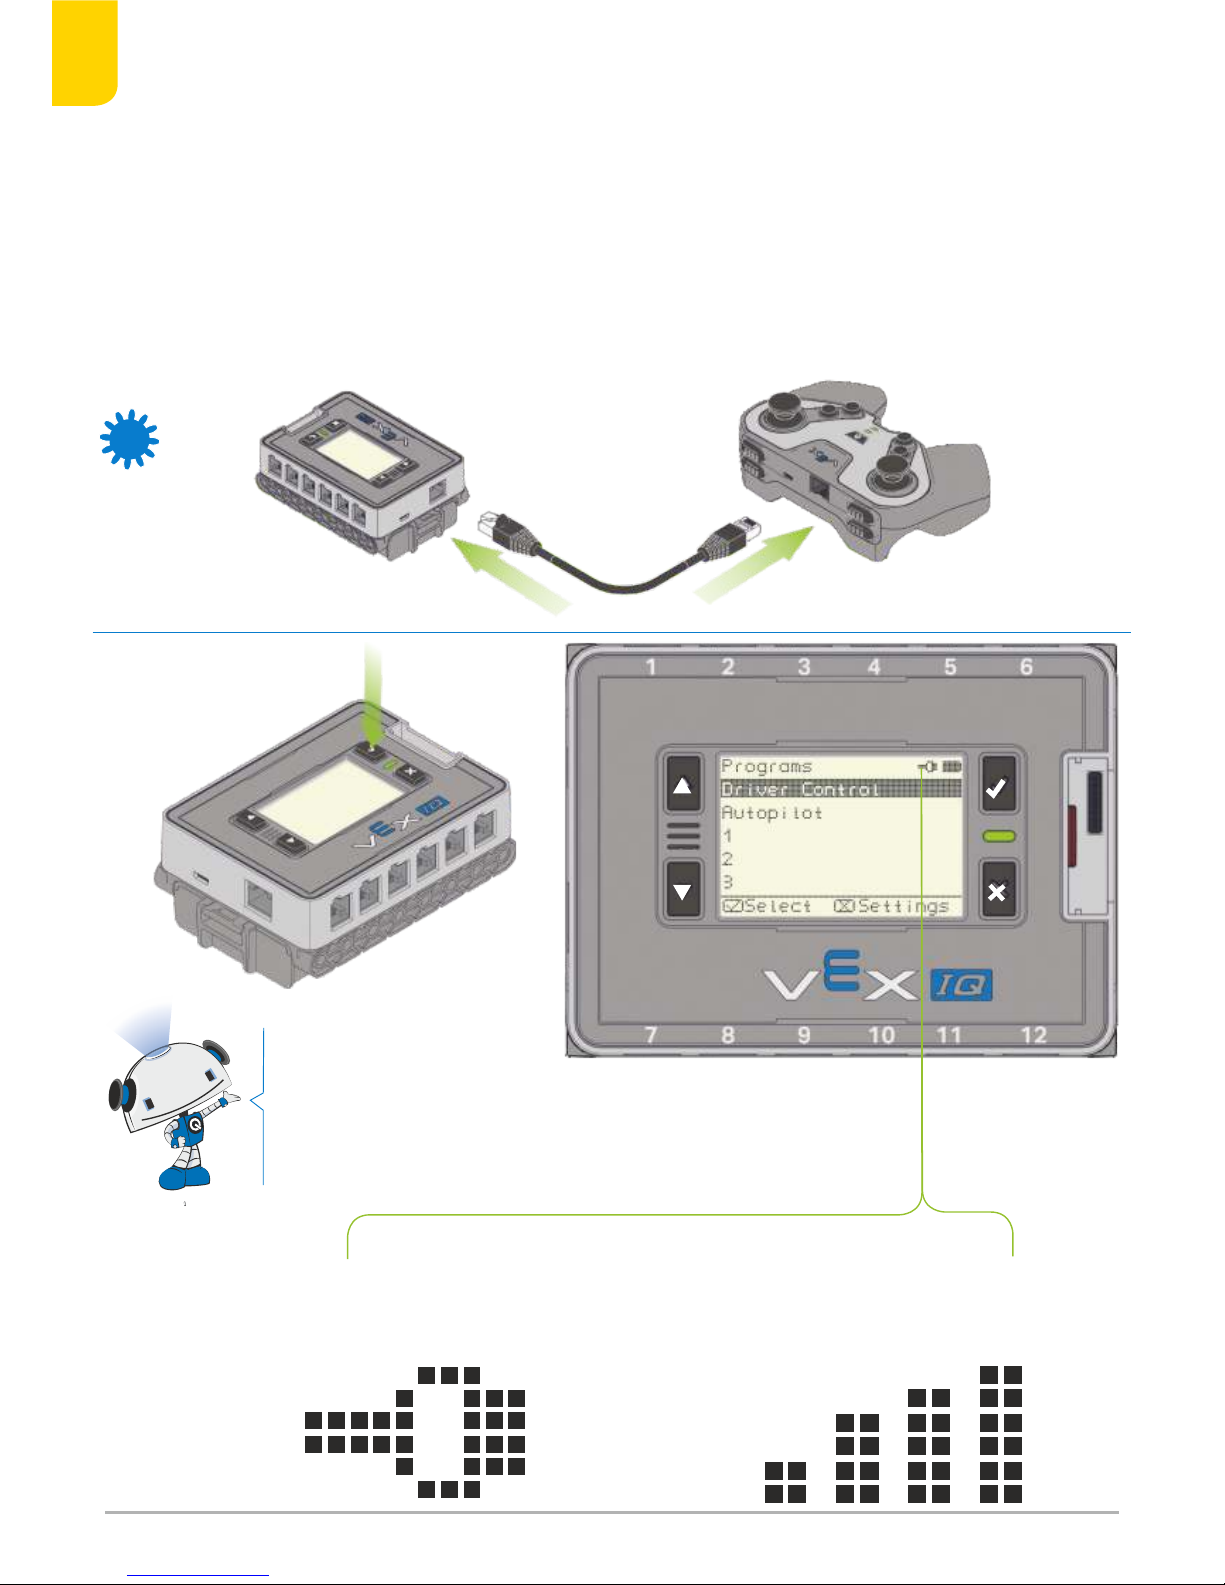
2.2 Pairing Robot Brain and Controller
1
2
Before first use, the Robot Brain and Controller must be paired to
each other to enable wireless communication.
Ensure both the Robot Brain and Controller are powered of with the
same type of Radio (either 900 MHz or 2.4 GHz) in each one. Connect the Robot Brain and Controller using the Tether Cable, and turn
on the Robot Brain by pressing the [√] Check Button. Once the Tether Icon appears on the LCD Screen, disconnect the Tether Cable
from both. Restart both the Robot Brain and Controller to enable
wireless communication.
Robot Brain and Controller are Tethered
.
Robot Brain and Controller are connected by
Radio.
Once a Robot Brain and Controller
are paired together they will stay
linked even after being turned of
and back on.
Ennen ensimmäistä käyttöä, keskusyksikkö ja käsiohjain
tulee pariuttaa yhdistämällä ne toisiinsa hetkeksi kaapelilla.
Vain tämä mahdollistaa langattoman yhteyden muodostamisen.
Varmista aluksi, että sekä keskusyksikkössä että käsiohjaimessa
on radiomoduli (2.4 GHz) asennettuna paikalleen ja, että
molemmissa laitteissa on virta kytkettynä.
Liitä keskusyksikkö ja käsiohjain toisiinsa kaapelilla
ja paina [√] -painiketta. Kun kaapeliliittimen kuva ilmestyy näytön
oikeaan yläkulmaan, irrota kaapeli molemmista laitteista.
Käynnistä sekä keskusyksikkö että käsiohjain uudelleen.
Nyt langaton yhteys on muodostettu.
2.2 Keskusyksikön ja ohjaimen yhdistäminen
Pariuttamisen jälkeen keskusyksikön ja käsiohjaimen yhteys
säilyy, vaikka virta välillä
katkaistaan.
Keskusyksikkö ja ohjain ovat kytkettynä toisiinsa kaapelilla.
Keskusyksikkö ja ohjain ovat yhdistettynä toisiinsa
radioyhteydellä.
VEX IQ Ohjausjärjestelmän käyttöopas FIN Ver. 1.0. ©www.vexrobotics.fi & www.vexrobotics.com
Page 9
9
Connecting Smart Devices
3
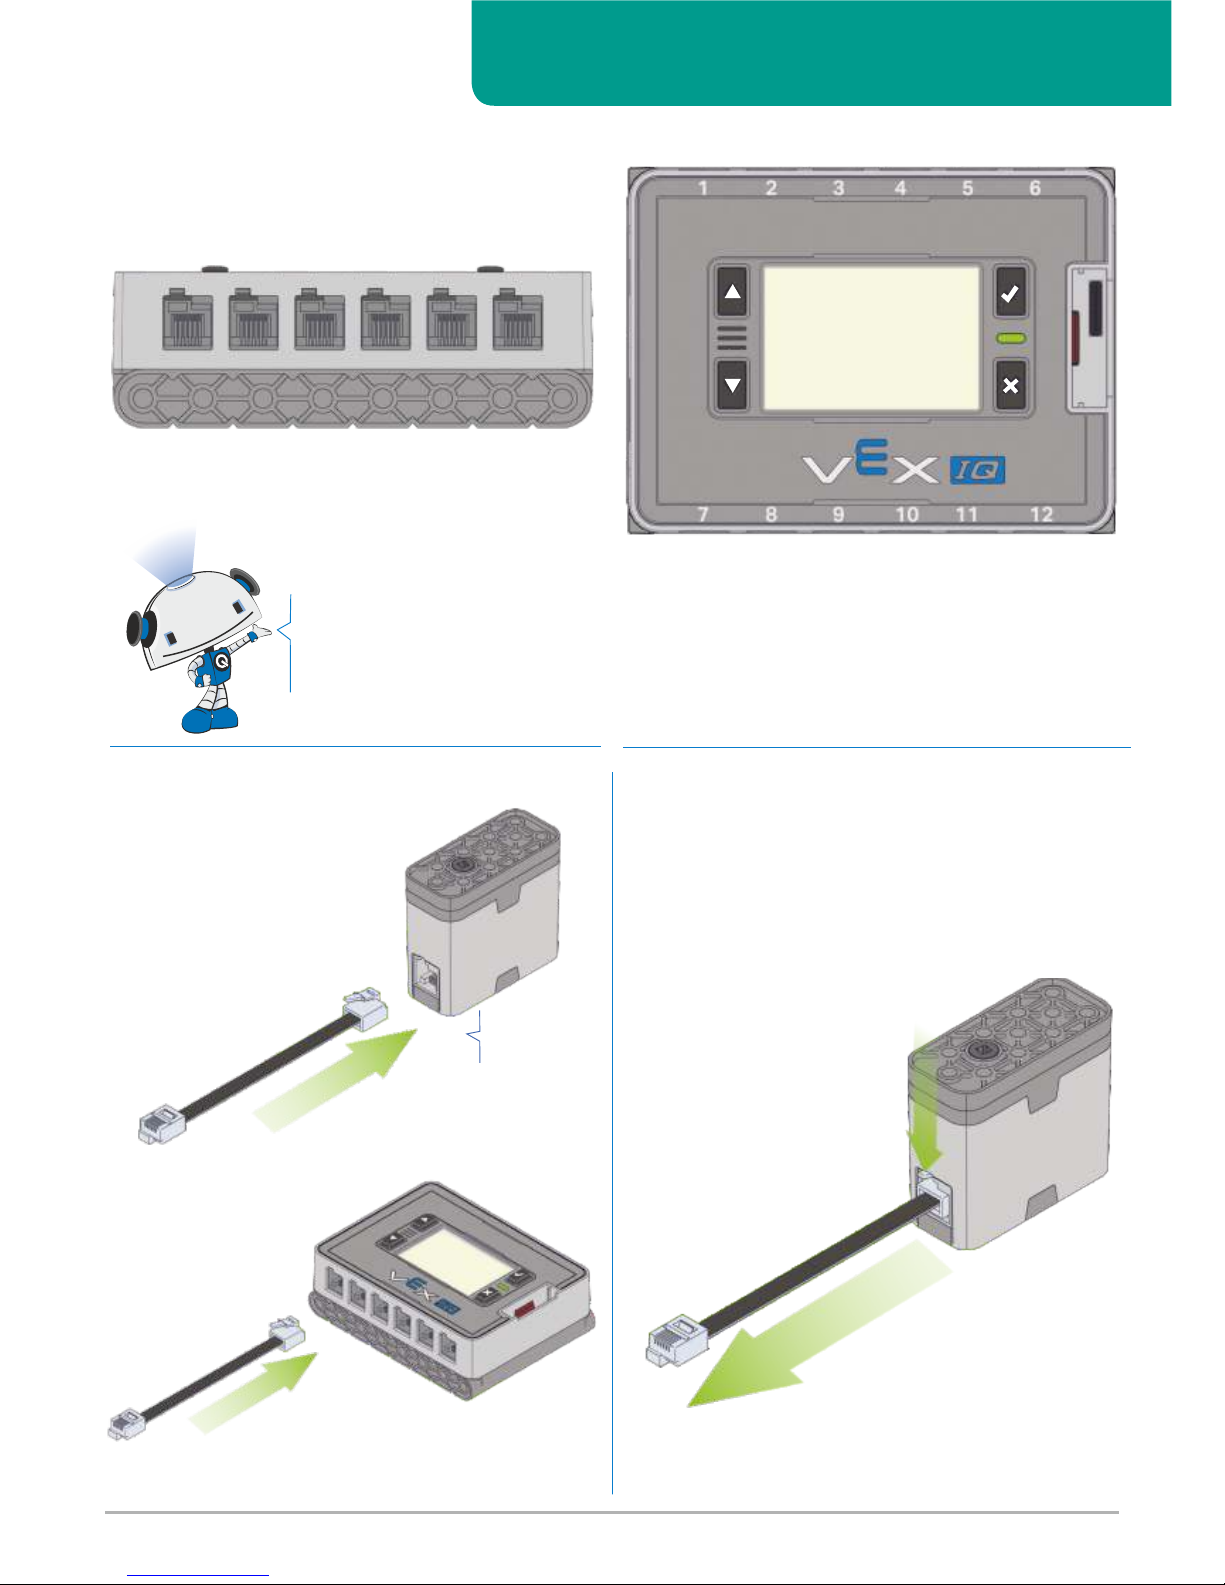
Connect Smart Device
3.1 Smart Device Ports
Remove Smart Device
To remove cable push down on tab while pulling gently.
Gently push the cable into its port until it
clicks into place.
Click
Any Smart Motor or Sensor can be plugged into any port. For more information on which Smart
Device should be plugged into which port for the Built In Programs please see section 6
3.1 Keskusyksikön portit
Laitteiden kytkeminen
Minkä tahansa moottorin tai anturin voi kytkeä mihin tahansa porttiin. Keskusyksikön
esiohjelmoiduissa ohjelmissa anturien paikat on määrätty. Katso kappale 6.
Näin kiinnität kaapelin moottoriin ja anturiin
Työnnä kaapelin liitin varovasti
vastakkeeseen, kunnes se
naksahtaa paikoilleen.
Kaapelin irrottaminen
Paina liittimen lukitusvipua kevyesti ja vedä liitin pois vastakkeesta.
VEX IQ Ohjausjärjestelmän käyttöopas FIN Ver. 1.0. ©www.vexrobotics.fi & www.vexrobotics.com
Page 10
10
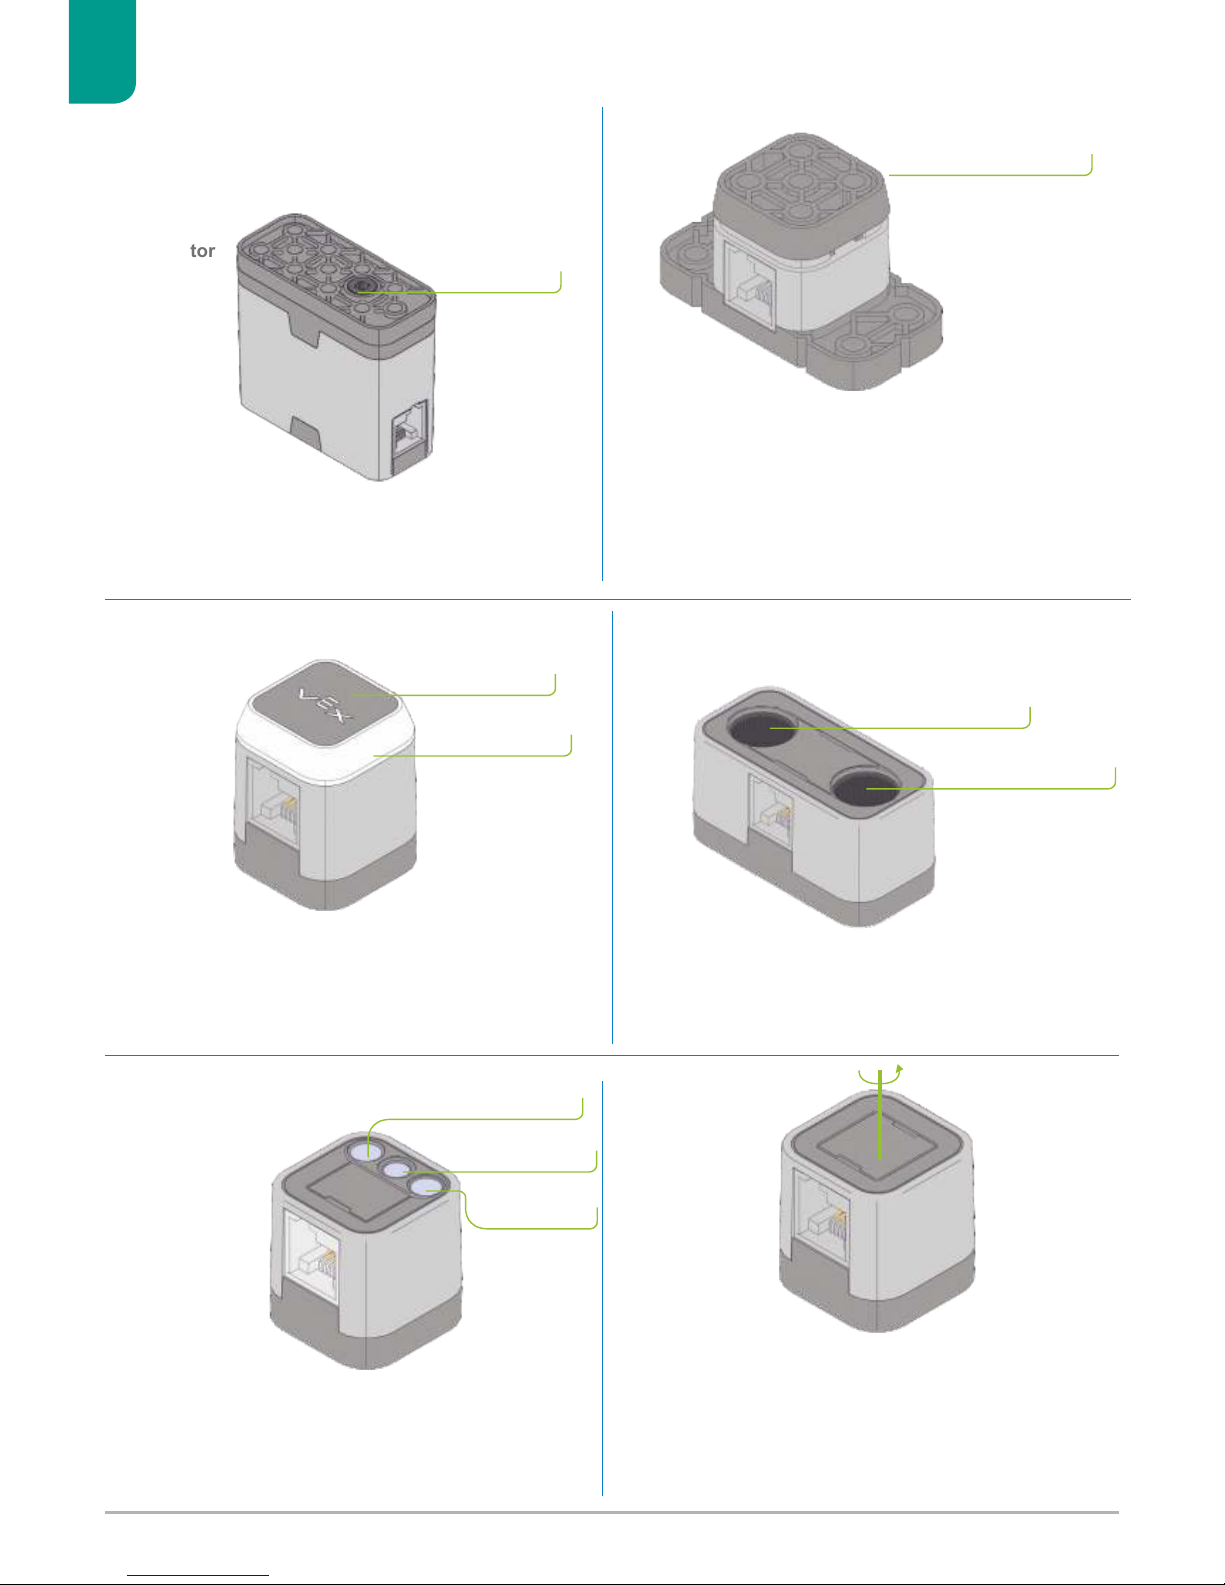
3.2 Smart Device Overview
Smart Motors contain built-in encoders to provide accurate and
intelligent rotational motion.
The Touch LED glows in millions of colors, and responds when the
top surface is touched by a person.
The Color Sensor detects the color hue and greyscale value of
objects in close proximity.
The Gyro Sensor measures the turn rate and calculates the current
heading. This makes it easier to perform specific tasks like a
robot turning exactly 90 degrees.
The Distance Sensor uses ultrasonic (above audible human
hearing range) sound waves to detect the distance to objects.
Bumper Switches give the Robot Brain a signal when they are
pressed, such as from a robot hitting a wall or an arm mechanism
hitting its end.
Smart Motor
Bumper Switch
228-2560
228-3012
228-3010
228-2677
Not every sensor is in every kit.
228-3014
228-3011
Touch LED
Color Sensor
Distance Sensor
Gyro Sensor
Rotation measured
about this axis.
Infrared LED
Ultrasonic Receiver
Ultrasonic Transmitter
Color Sensor
White LED
3
+
Touch Sensor
Touch LED
Press to Activate
Motor Output
3.2 Laitteiden yleiskuvaus
Kaikkia antureita ei välttämättä ole kaikissa myyntikokoonpanoissa.
Moottori
Voiman ulosotto
Aktivoi painamalla
Painokytkin
Kytkin antaaa keskusyksikölle signaalin, kun se on
painettuna. Esimerkiksi, kun robotti osuu seinään tai
käsi osuu robottiin.
Kosketusanturi
Kosketus LED
Kosketus LED
Etäisyysanturi
Ultraäänivastaanotin
Ultraäänilähetin
Kosketus LED valaisee miljoonissa eri väreissä ja reagoi, kun
sitä koskettaa päältä.
Etäisyysanturi käyttää ultraääniaaltoja (ylittää ihmisen
kuuloalueen) tunnistaakseen etäisyyden esineisiin.
Värianturi
Valkoinen LED
Värianturi
Infrapuna LED
Värianturi tunnistaa lähellä olevien esineiden värin
ja harmaasävyn.
Gyroanturi mittaa tarkasti kääntymiskulmaa ja laskee suunnan.
Tämän ansiosta robotti voidaan määrätä kääntymään vaikka
täsmälleen 90 astetta.
Kierros mitataan
akselista.
Gyroanturi
Moottori sisältää enkoodereita, joilla se säätää
tarkan kääntymisliikkeen.
VEX IQ Ohjausjärjestelmän käyttöopas FIN Ver. 1.0. ©www.vexrobotics.fi & www.vexrobotics.com
Page 11
11
Using the Robot Brain
4
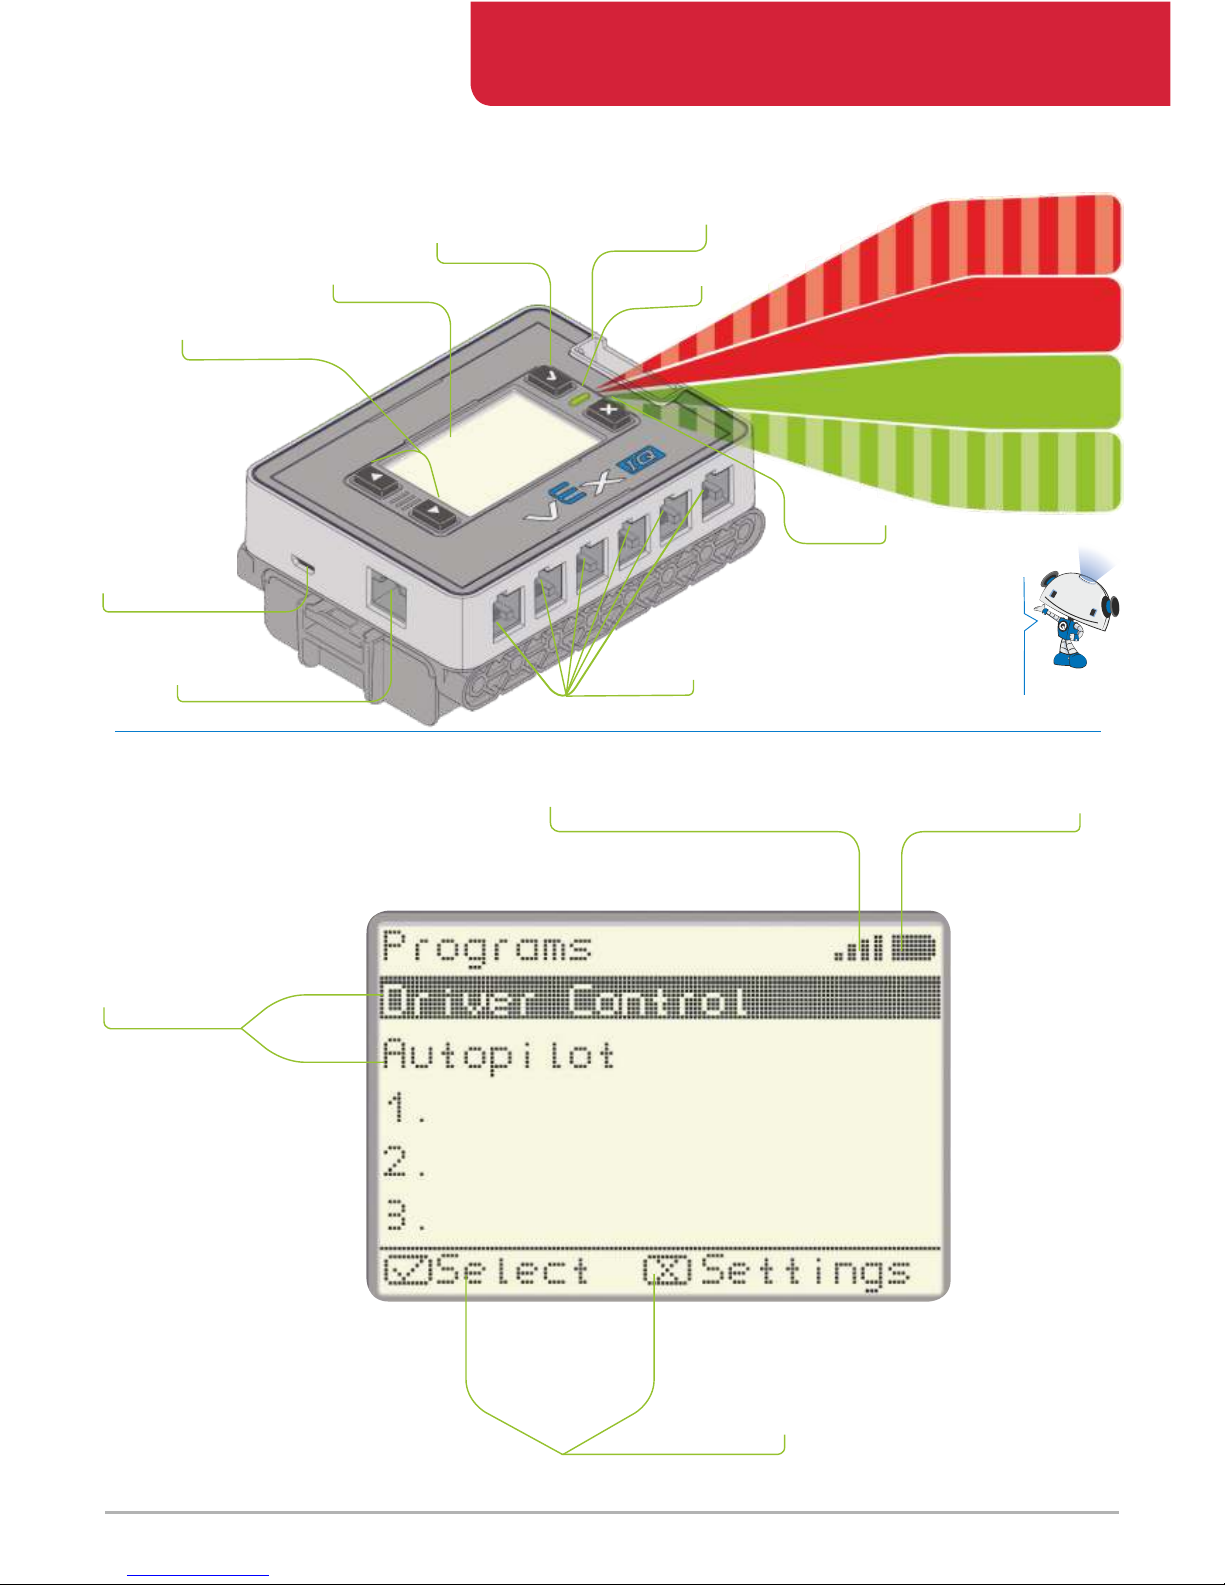
Radio Slot
X Button
Check Button
LCD Screen
LED Status
Download Port
Smart Ports
Tether Port
Radio / Tethered Status
Battery Status
Up/Down Buttons
SOLID
SOLID
BLINKING
BLINKING
ON with no
radio link
(searching)
ON with radio
link
Battery low with
no radio link
Battery low
with radio link
Menu Instruction
Menu Options
4.1 Robot Brain and LED Lights Overview
4.2 Robot Brain LCD Screen
Press the Check Button to turn ON.
Valikon toiminnot
Valikon vaihtoehdot
Radioyhteyden / kaapeliyhteyden tila
Akun tila
Latausportti
Liitäntäportti
Ylös/Alas näppäimet
LCD näyttö
LED valo
X näppäin
Paina ”hyväksy” näppäintä
laittaaksesi päälle.
Pidä X näppäintä pohjassa
sammuttaaksesi.
Smart portit
Radiopaikka
Hyväksy näppäin
VILKKUU
PALAA
VILKKUU
Akku vähissä radioyhteydessä
Akku vähissä ilman radioyhteyttä
Päällä radioyhteydessä
PALAA
Päällä ilman radioyhteyttä
(etsii)
4.1 Keskusyksikön ja LED valojen yleiskatsaus
Keskusyksikön käyttö
4.2 Keskusyksikön LCD-näyttö
Press and hold X Button to turn OFF
VEX IQ Ohjausjärjestelmän käyttöopas FIN Ver. 1.0. ©www.vexrobotics.fi & www.vexrobotics.com
Page 12
12
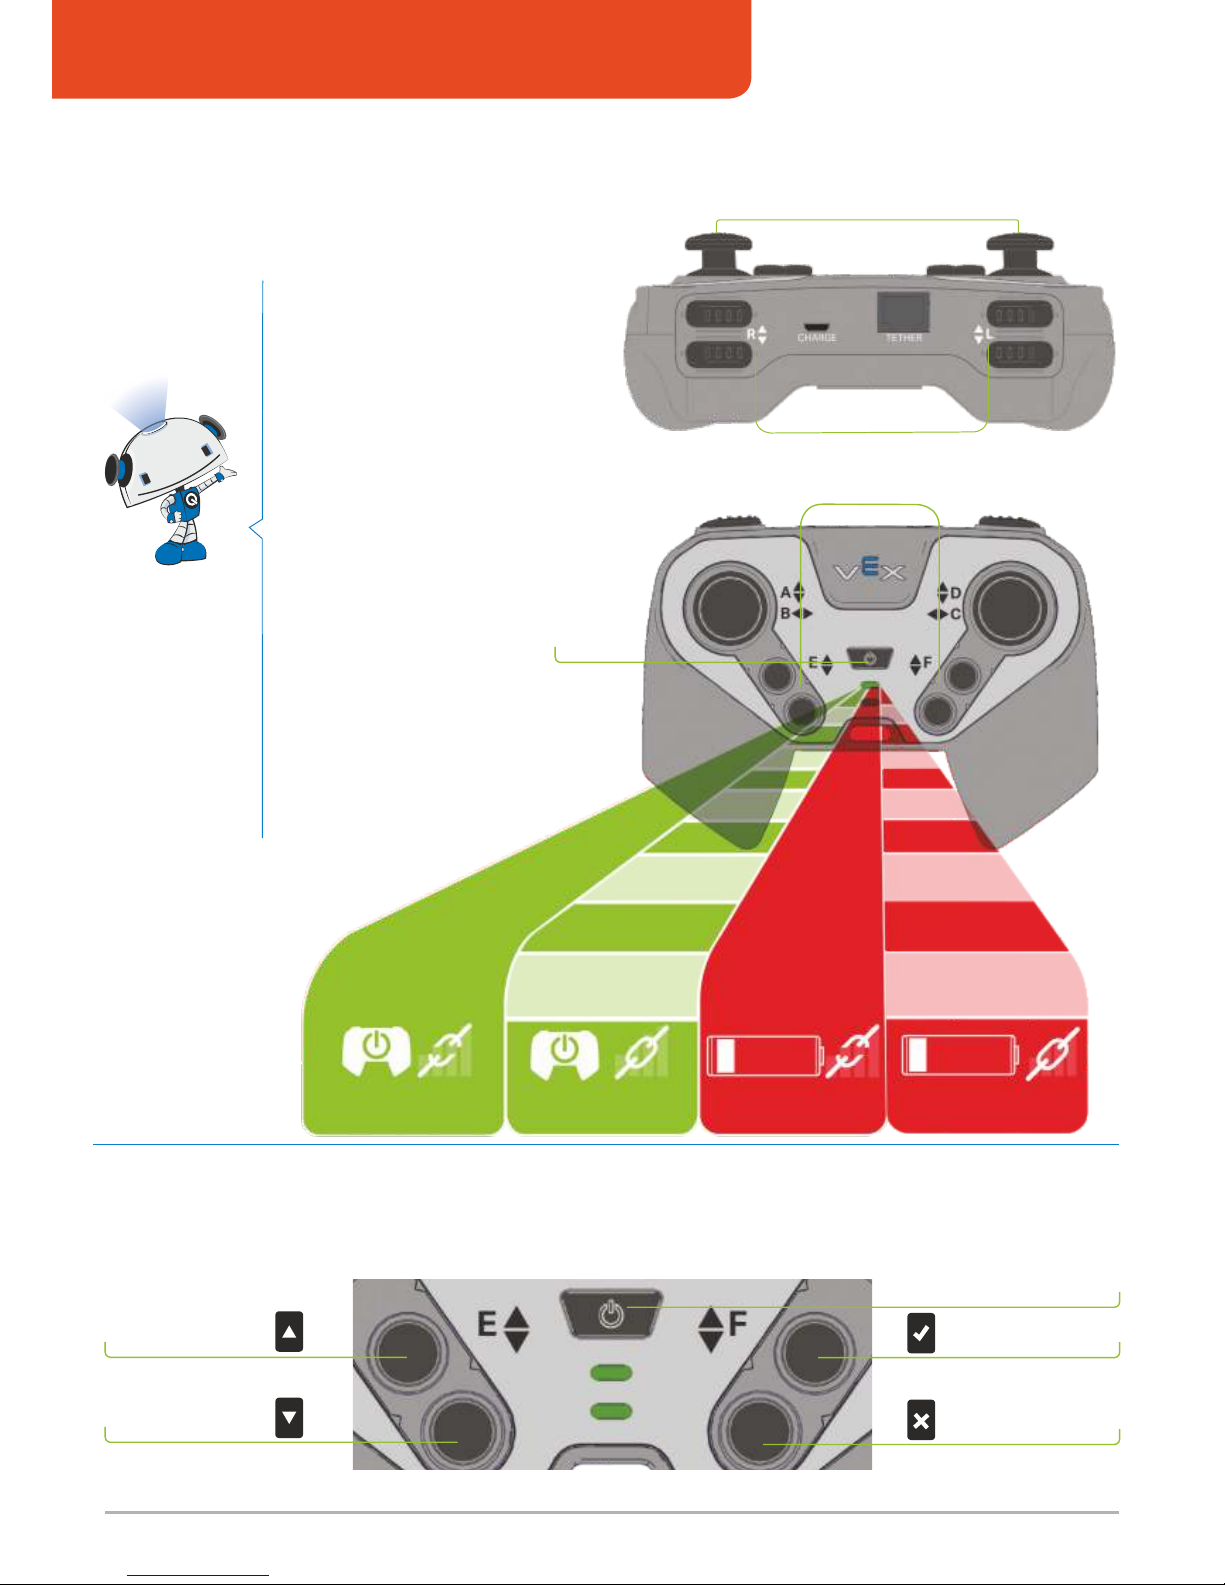
5.1 Controller and LED Lights Overview
SOLID
SOLID
BLINKING
BLINKING
ON with NO Radio Link
Battery level low with NO Radio Link
Battery level low with good Radio Link
ON with Good Radio Link
Using the Controller
5
The farther the joysticks are moved in one direction, the faster the
motor will spin.
These buttons turn the motors on at full speed in one direction.
Power
Press the Power Button to turn
ON. Press and hold the Power
Button for 3 seconds to turn
OFF
LED Color shows you battery
status, Blinking shows you
Radio Link status
If a Controller and Robot Brain
are linked by Radio, turning one
of will turn the other of as well
5.2 Using Controller to Navigate Robot Brain
When connected by Radio or Tether you can use the Controller buttons
to navigate the Robot Brain menus.
Up Button
Check Button
Double tap to exit Program
X Button
Down Button
Käsiohjaimen käyttö
5.1 Käsiohjaimen ja LED valojen käyttö
Mitä pidemmälle ohjainsauvaa liikutetaan yhteen suuntaan, sitä
nopeammin moottori pyörii.
Nämä näppäimet pyörittävät moottoreita täydellä nopeudella,
yhteen suuntaan.
Virta
Käsiohjain käynnistetään painamalla
virtakytkintä.
Käsiohjain sammutetaan painamalla
virtakytkintä kolmen sekunnin ajan.
LED valo ilmaisee akun tilan.
Vilkkuminen ilmaisee radioyhteyden
tilan.
Jos ohjain ja keskusyksikkö ovat
radioyhteydessä, sammuttamalla
toisen laitteista, sammuu myös
toinen automaattisesti.
PALAA
VILKKUU
VILKKUU
VILKKUU
Päällä ilman radioyhteyttä
Päällä hyvällä radioyhteydellä
Akku vähissä ilman radioyhteyttä
Akku vähissä hyvällä radioyhteydellä
5.2 Keskusyksikön käyttäminen
Kun käsiohjain on yhteydessä keskusyksikköön radiolla tai
kaapelilla, voit käyttää käsiohjaimella keskusyksikön
valikoita aivan kuten keskusyksikön omilla painikkeilla.
Hyväksy -näppäin
X -näppäin
Ylös näppäin
Alas näppäin
Tuplanäpäytä poistuaksesi ohjelmasta
VEX IQ Ohjausjärjestelmän käyttöopas FIN Ver. 1.0. ©www.vexrobotics.fi & www.vexrobotics.com
käsiohjaimella
Page 13
13
Using Built in Programs
6
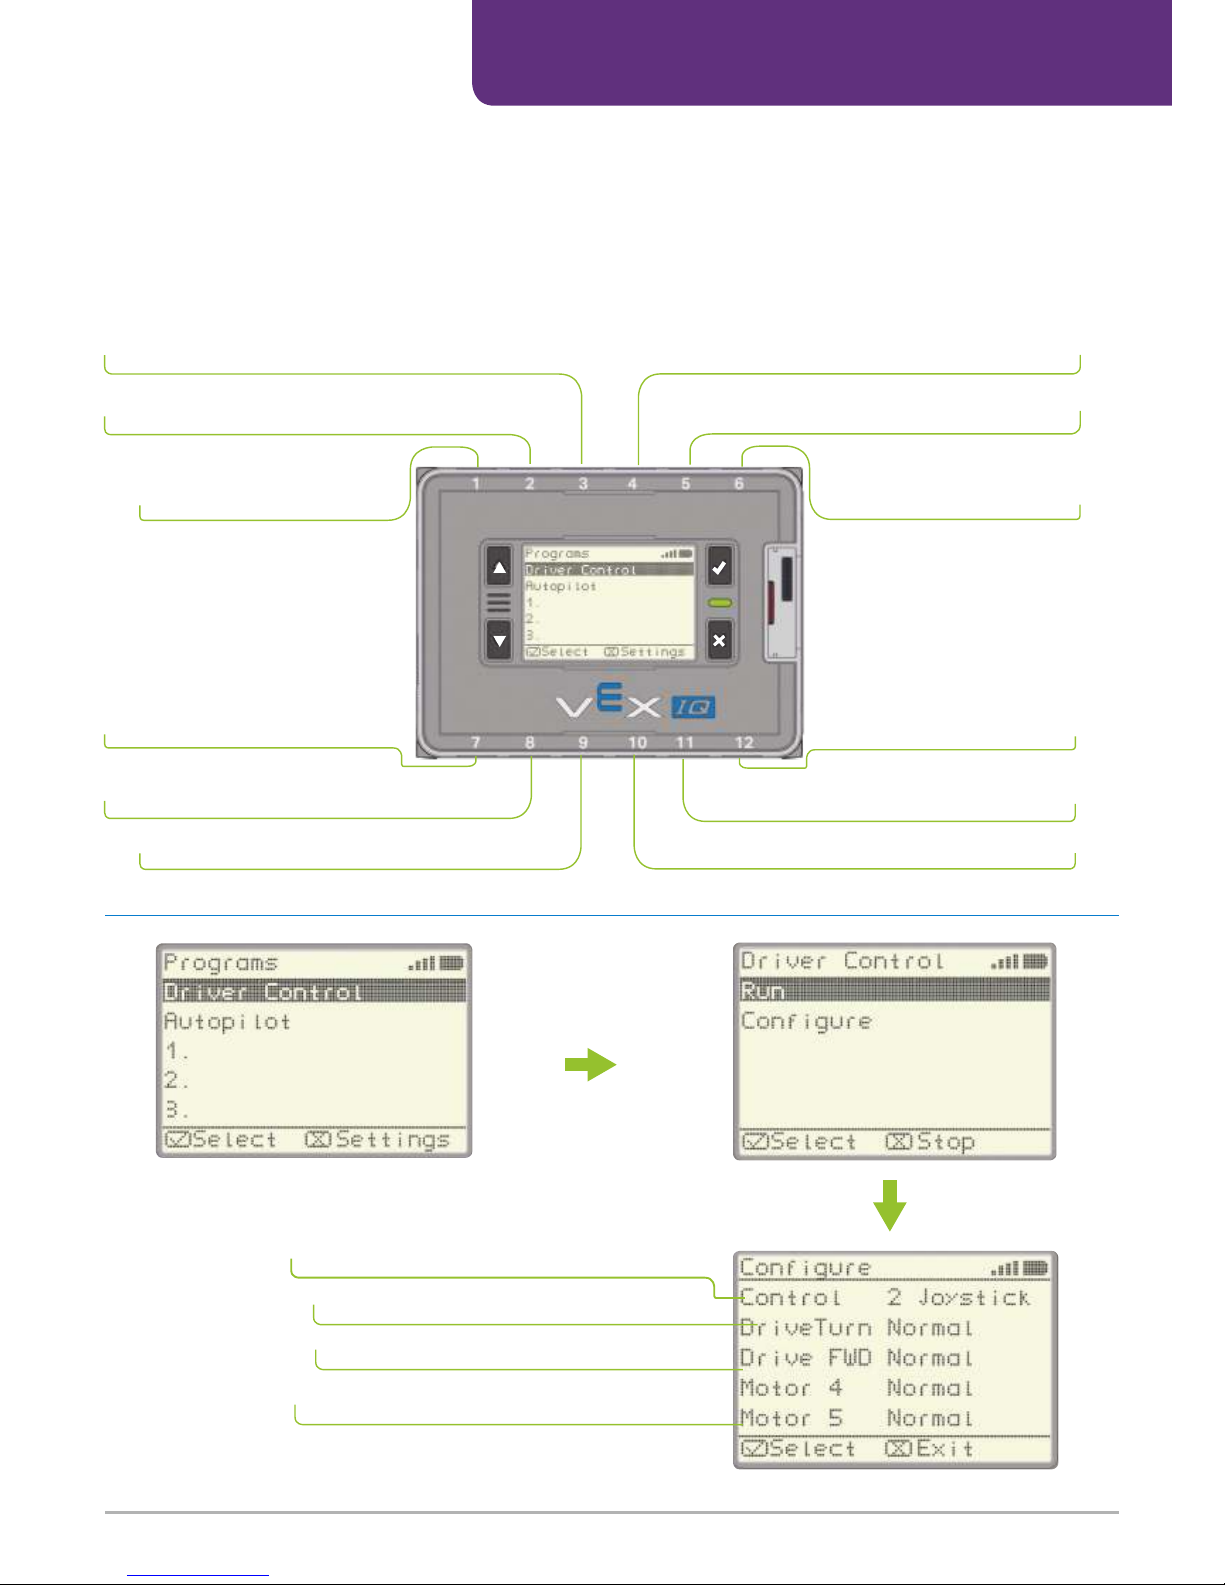
Left Drive Motor
Left Drive Motor
Distance
Right Drive Motor
Right Drive Motor
Bumper Stops M4 in Fwd
Touch LED
Bumper Stops M4 in Rev
Bumper Stops M4 in Fwd
Switch between 2 Joystick, Left Stick and
Right Stick mode for the robot drive train.
Invert the left/right steering setting
Invert the forward/backward drive setting
Invert the direction of motors M4, M5, M10 and M11
Bumper Switch
Bumper Stops M4 in Rev
Color Sensor
or
or
or
Motor M4
Gyro Sensor
Motor M5
Motor M11
Claw Motor
Motor M10
Arm Motor
6.1 Driver Control Program
Clawbot IQ with Sensors
Standard Configuration
Go to “Run” or
“Configure”
“Configure”
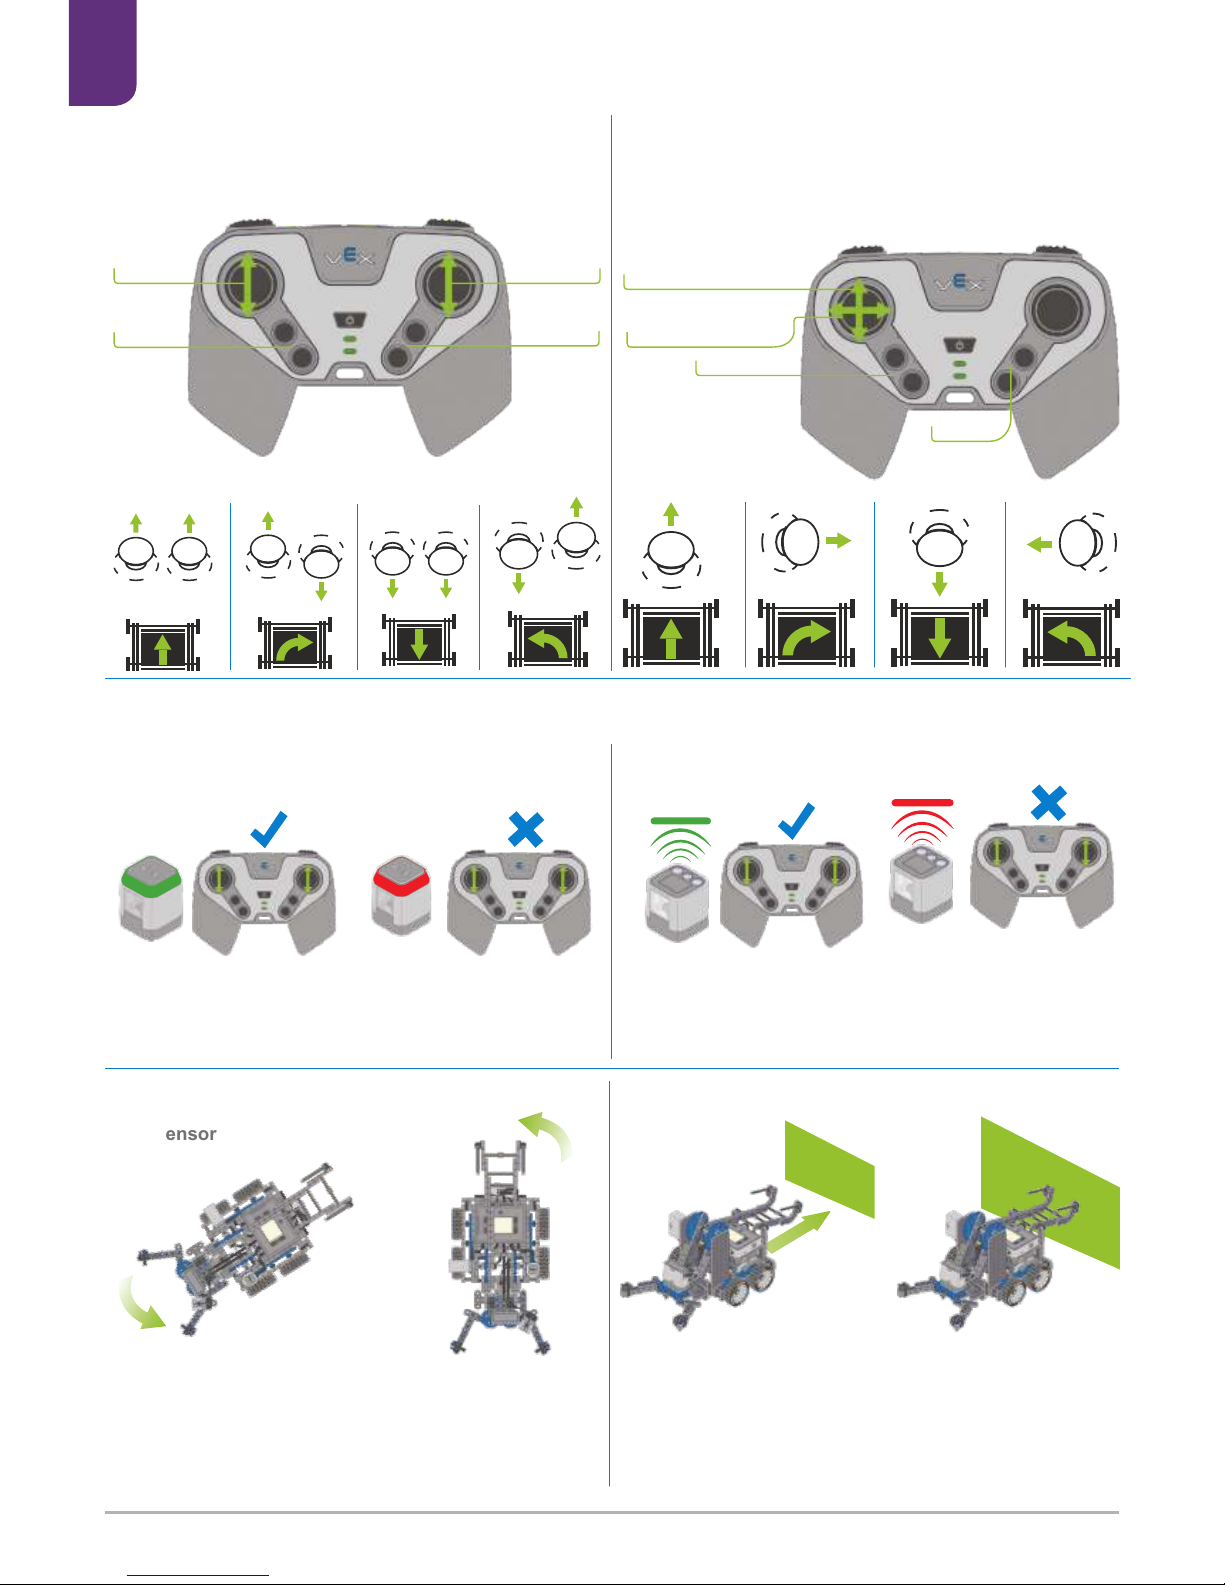
The Driver Control program allows you to drive the Clawbot IQ and
Standard Drive Base, as well as robots and mechanisms of your own
creation, using the Controller. There are several options to conigure
and customize the Driver Control program to your speciic robot.
or
or
or
or
Valmisohjelmien käyttö
6.1 Driver Control -ohjelma
Driver Control -ohjelma antaa sinulle mahdollisuuden ajaa Clawbot
IQ:ta, vakioajopohjaa ja tietenkin omia luomuksiasi suoraan
ohjaimella. Driver Control -ohjelmaa voi myös muokata hieman
sinun robottiasi varten.
Normaali määritys
Clawbot IQ Kourarobotti antureilla
Gyroanturi
Kouran moottori
Käsivarren moottori
Kytkin
Etäisyysanturi
Kosketus LED
Värianturi
Valitse ”Run” tai
”Configure”
Moottori M4
Moottori M5
tai
Oikea moottori
Kytkin pysäyttää moottorin M4
ajettaessa taaksepäin
tai
Kytkin pysäyttää moottorin M4
ajettaessa eteenpäin
tai
Vasen moottori
Moottori M11
Moottori M10
tai
tai
Oikea moottori
Vasen moottori
tai
tai
Kytkin pysäyttää M4:sen eteenpäin
Kytkin pysäyttää M4:sen taaksepäin
Vaihda kahden ohjainsauvan - vasemman sauvan
ja oikean sauvan - tilaa robotin kääntämisessä.
Käännä vasemman/oikean ohjauksen asetus
Käännä eteenpäin/taaksepäin ajamisen asetus
Käännä moottorien M4, M5, M10 ja M11 asetus
VEX IQ Ohjausjärjestelmän käyttöopas FIN Ver. 1.0. ©www.vexrobotics.fi & www.vexrobotics.com
Page 14
14
6
Touch LED
Color Sensor
Gyro Sensor
Distance Sensor
Left Drive
M11
M10
M4
M5
Right Drive
Clawbot IQ with Sensors
2 Joystick Mode
Left Stick Drive
In Right Stick mode, the Drive
and Turn controls are switched
to the right joystick.
M11
M11
Turn Left/ Right
Drive Forward/Reverse
Tap the top dome of the Touch
LED to change between enabled
(glowing green) and disabled
(glowing red) mode.
When the Color Sensor sees
a red or green object, it will
switch between disabled and
enabled respectively.
When the Distance Sensor
sees an object that is too close
to the robot, it will stop the robot
from hitting that object.
When you stop driving, the
robot will automatically turn
back to the original direction.
The Driver Control program contains sample behavior for all
advanced sensors used on Clawbot IQ.
Vasen ajo
Oikea ajo
Ajaminen eteen ja taakse
Kääntyminen
vasen/oikea
Oikean sauvan tilassa,
ajaminen ja kääntyminen
ovat kokonaan vain
oikeassa sauvassa.
Vasemman sauvan ohjaus
2 Ohjainsauvan tila
Driver Control -ohjelma sisältää näytteen
antureiden käyttäytymisestä
Clawbot Kourarobotti -IQ antureilla
Kosketus LED
Värianturi
Hipaise Kosketus LEDin
pintaa vaihtaaksesi
päällä (hohtaa vihreänä) ja
pois (hohtaa punaisena) tilan
välillä.
Kun Värianturi havaitsee
punaisen tai vihreän esineen,
se vaihtaa päälle ja pois tilan
välillä.
Gyroanturi
Etäisyysanturi
Kun lopetat ajamisen,
robotti kääntyy
automaattisesti
alkuperäiseen asentoonsa.
Kun etäisyysanturi näkee
esineen, joka on liian lähellä se
pysäyttää robotin, jotta se ei
osuisi siihen.
VEX IQ Ohjausjärjestelmän käyttöopas FIN Ver. 1.0. ©www.vexrobotics.fi & www.vexrobotics.com
Page 15
15
6.2 Autopilot Program
6.2 Autopilottiohjelma
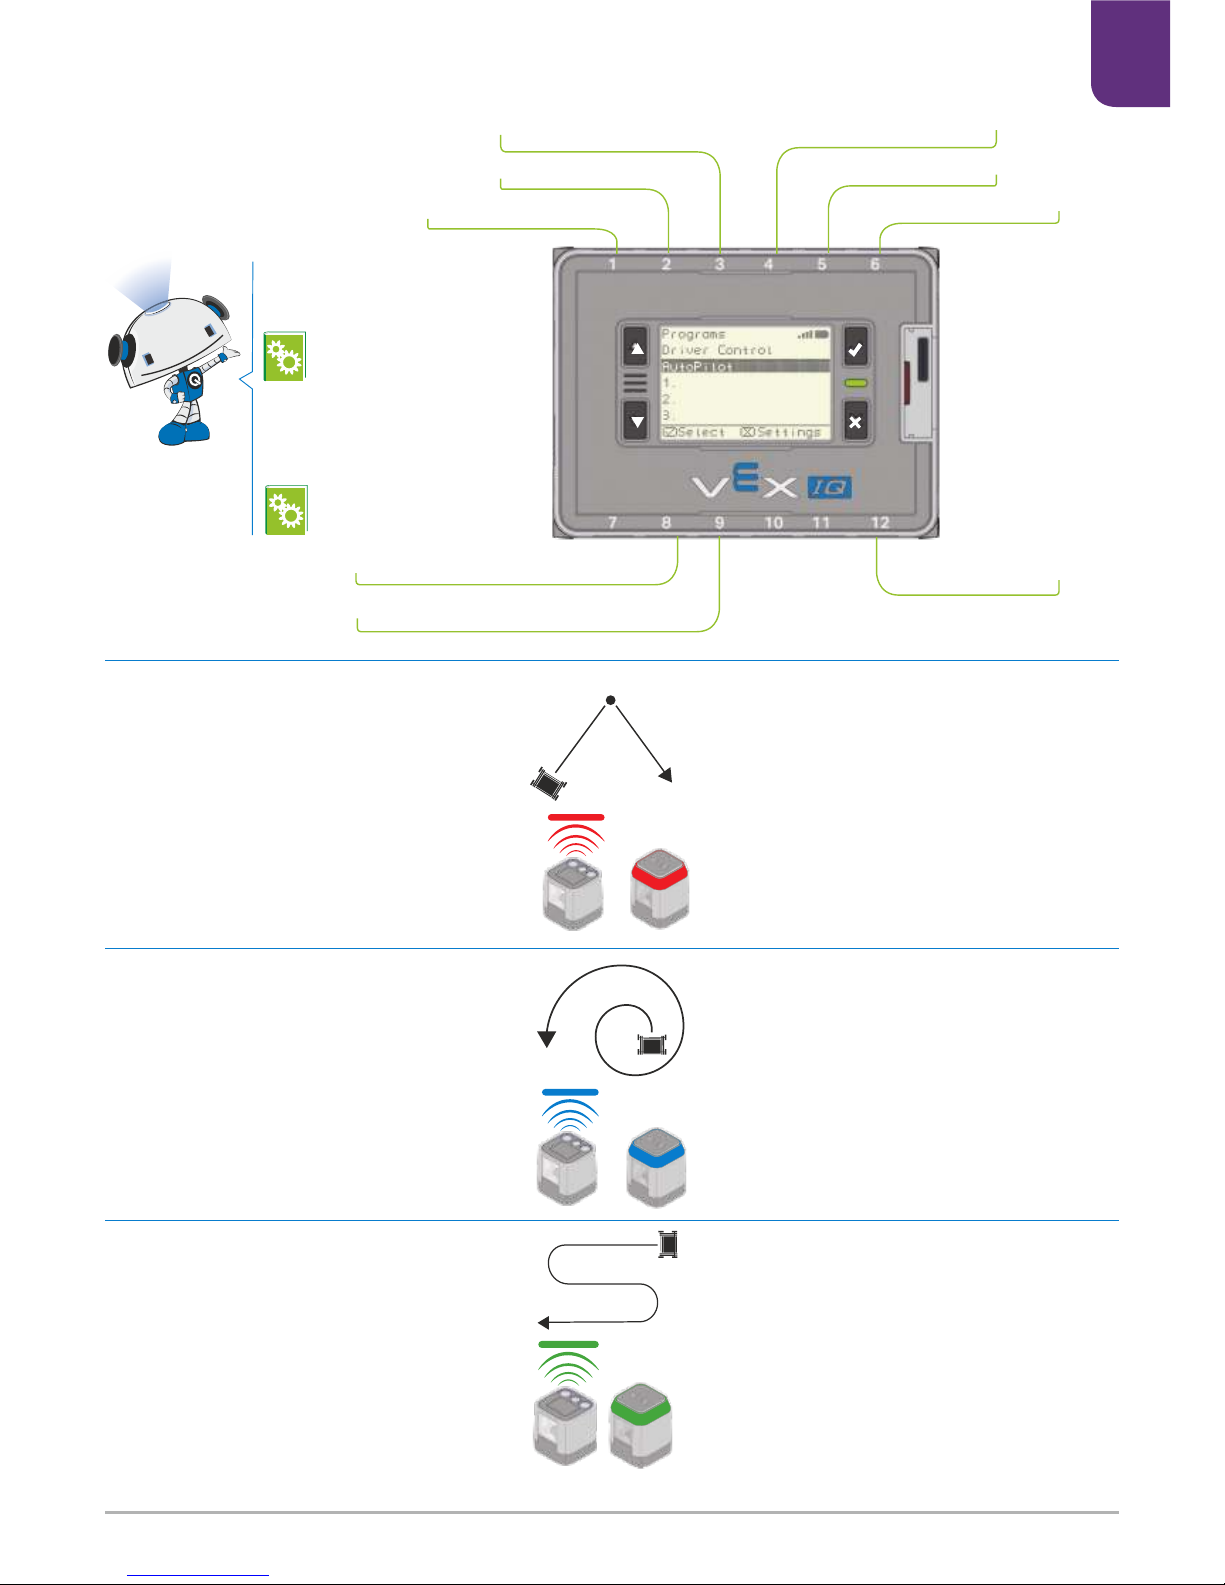
Random Mode
Spiral Mode
Lawnmower Mode
The robot will explore by driving in a straight
line. When it encounters an obstacle it will
back up, spin a random amount and
proceed in a new direction.
When the Touch LED is tapped or the
Color Sensor sees blue the robot will
switch to Spiral Mode.
The robot will explore by driving in a spiral.
When it encounters an obstacle, the robot
will drive to a new location and begin to
spiral again.
When the Touch LED is tapped or the
Color Sensor sees green the robot will
switch to Lawnmower Mode.
The robot will explore by driving back
and forth as if mowing a lawn. When it
encounters an obstacle it will turn away
and proceed in the opposite direction.
When the Touch LED is tapped or the
Color Sensor sees red the robot will
switch to Random Mode.
6
Left Drive Motor
Right Drive Motor
Right Drive Motor
Distance Sensor
Back Left Bumper Switch
Back Right Bumper Switch
Color Sensor
Gyro Sensor
Touch LED
The Autopilot program works
only with the Autopilot robot.
For building instructions see:
1+4
1+4
Värianturi
Etäisyysanturi
Vasemman puoleinen moottori
Gyroanturi
Kosketus-LED
Oikean puoleinen moottori
Vasemman puoleinen takakytkin
Oikeanpuoleinen takakytkin
Oikean puoleinen moottori
Robotti tutkii huonettasi ajelemalla satunnaisesti
suoraan. Kun se huomaa kohteita edessään
se peruuttaa, kääntyy satunnaisesti ja jatkaa
taas suoraan eteenpäin.
Kun Kosketus LEDiä hipaisee tai
Värianturi näkee sinistä väriä, niin tila vaihtuu
spiraalitilaan.
Satunnaistila
Robotti aloittaa tutkimisen ajamalla
spiraalia kasvavalla säteellä. Kun se
saavuttaa esteen, niin se ajaa uuteen
paikkaan ja aloittaa pyörimisen
uudestaan.
Kun hipaiset Kosketus LEDiä tai
Värianturi näkee vihreää, niin tila
vaihtuu ruohonleikkuritilaan.
Spiraalitila
Robotti aloittaa huoneesi
tutkimisen ajelemalla edestakaisin
aivan kuin se olisi leikkaamassa
nurmikkoa.
Kun se havaitsee esteen, se
vaihtaa suuntaa.
Kun hipaiset Kosketus LEDiä tai
Värianturi näkee punaista, niin tila
vaihtuu satunnaistilaan.
Ruohonleikkuritila
Autopilottiohjelma toimii vain
autopilottirobotin kanssa.
Katso rakennusohjeet:
VEX IQ Ohjausjärjestelmän käyttöopas FIN Ver. 1.0. ©www.vexrobotics.fi & www.vexrobotics.com
Page 16
16
6
6.3 Robot Brain Screen Menus
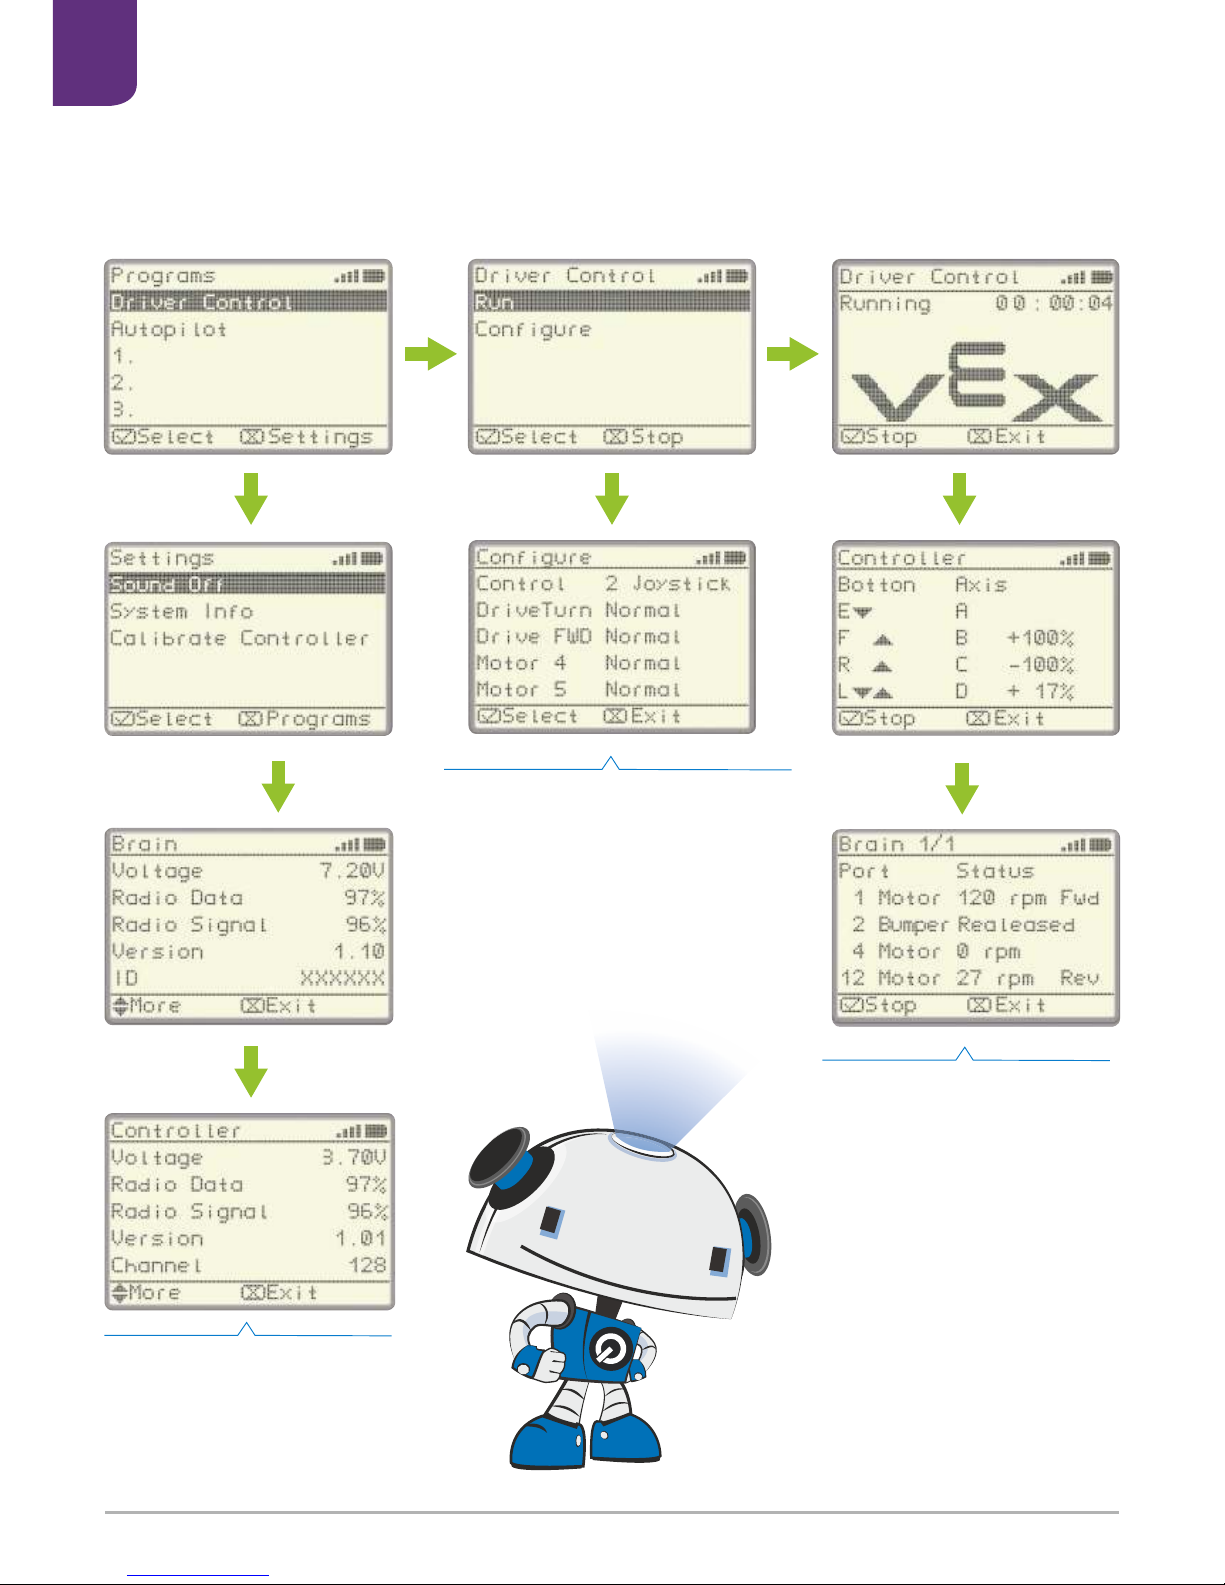
While Driver Control is running, pressing
the Up or Down buttons will cause it to
cycle through up to four status screens.
This will show the current status of all
motors, sensors, or controller buttons.
Follow the on-screen directions to
calibrate your controller
This screen allows you to reverse motors
in the Driver Control Program. This is handy
when you want to drive your own creation
without programming it.
“Driver
Control”
“Settings”(Asetukset)
“Configure”(Määritä)
“System Info”
Status
Screen 1
Up/Down
Button
“Run”
Status
Screen 2
Up/Down
Button
Up/Down
Button
6.3 Keskusyksikön näytön valikot
Näytön tila 1
Ylös/alas näppäin
(Järjestelmän tiedot)
Tämän ruudun avulla voit määrittää
moottoreiden pyörimissuunnan Driver Control
-ohjelmassa. Kätevä ominaisuus, jonka avulla
voit ajaa omaa robottiasi ilman ohjelmoinnin
tarvetta.
Ylös/alas näppäin
Näytön tila 2
Kun Driver Control -ohjelma on
käynnissä, painamalla ylös tai alas
näppäintä, näet neljä eri ruutua,
jotka näyttävät moottoreiden,
antureiden ja ohjaimen
näppäinten tilan.
Seuraa ruudulla näkyviä suuntia
kalibroidaksesi ohjaimen
Ylös/alas
näppäin
VEX IQ Ohjausjärjestelmän käyttöopas FIN Ver. 1.0. ©www.vexrobotics.fi & www.vexrobotics.com
Page 17
17
Firmware Update & Programming
Laiteohjelman päivittäminen
7
7.1 Updating Firmware7.1 Laiteohjelman päivittäminen
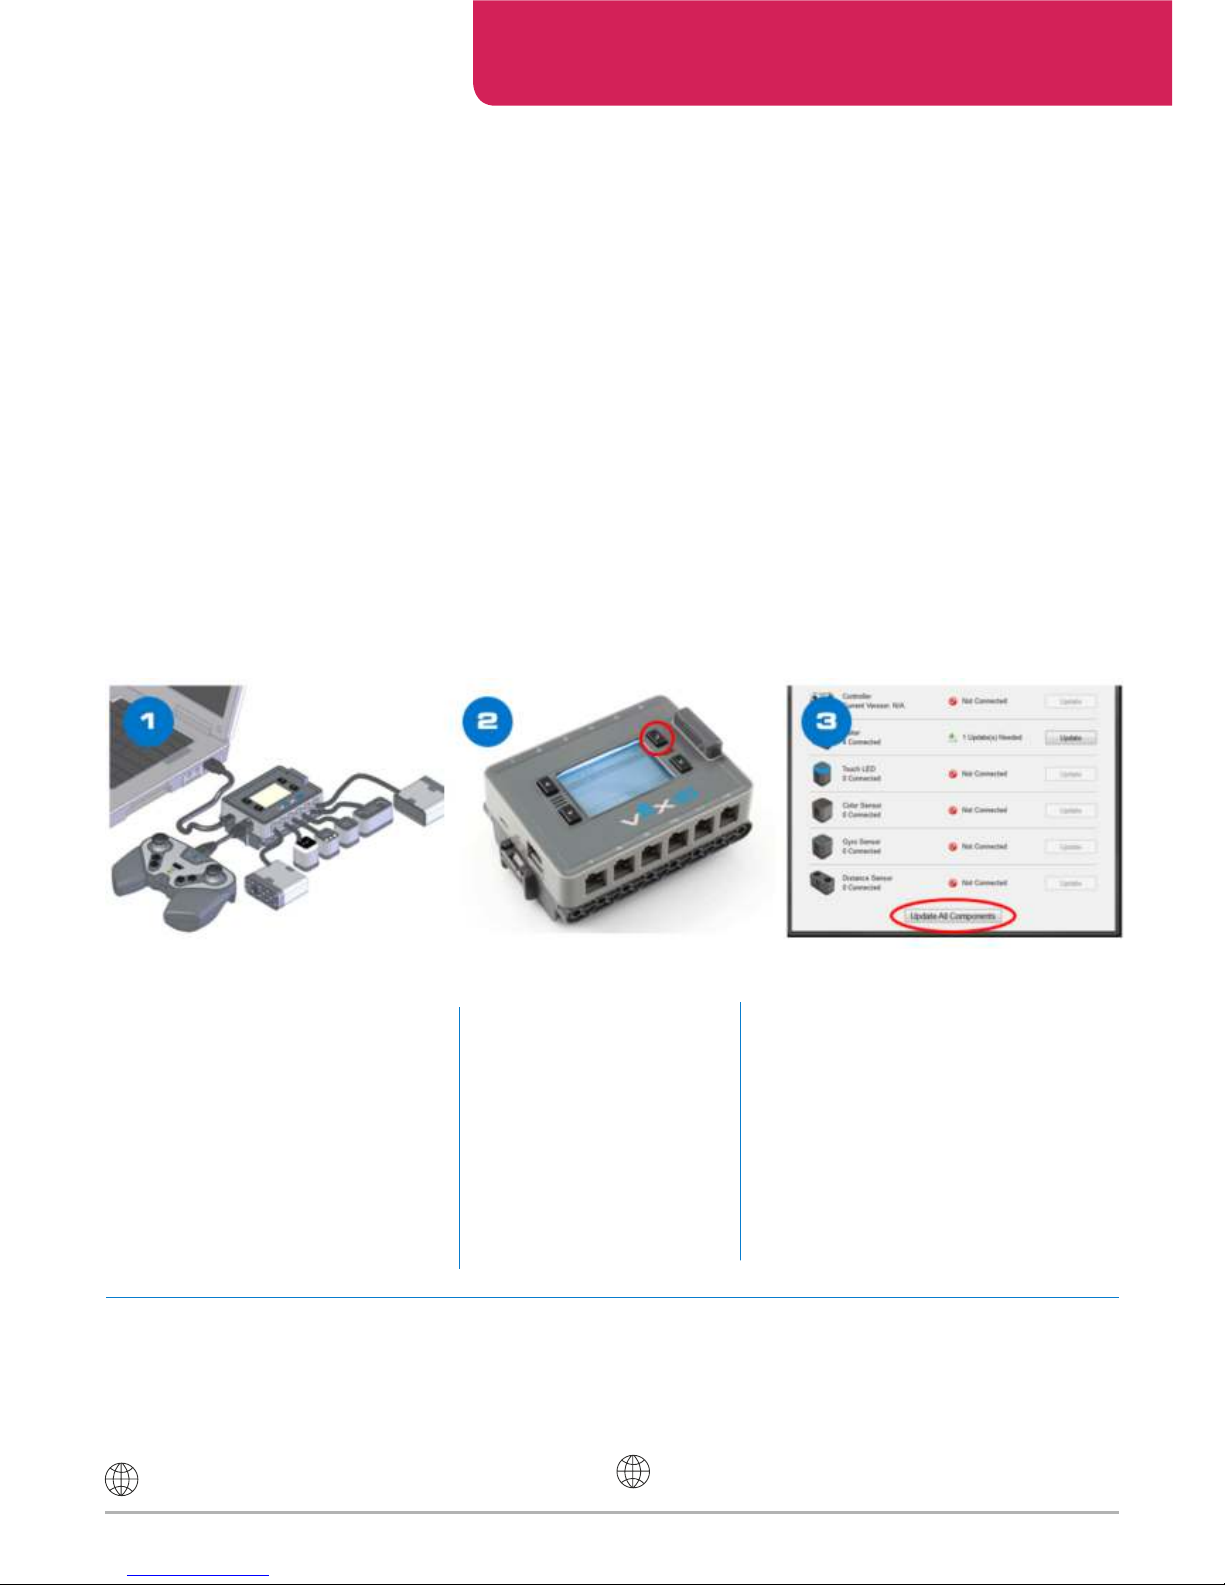
The Robot Brain, Controller, Smart Motor, Touch LED, Distance
Sensor, Color Sensor and Gyro Sensor all contain their own internal processors that run special software called firmware. Periodic
firmware updates may add new features and/or improve system
performance.
The best way to ensure your VEX IQ system is functioning properly
is to keep your firmware up to date. You can update the firmware
on all of these devices by downloading the free VEX IQ Firmware
Update Utility to your PC or Mac.
There are several options available for creating advanced
and customized programs for your Robot Brain.
To learn more about the different software development
environments available, please visit
Important Note: When the firmware on the Robot Brain is updated,
all sensors and motors must also be updated by plugging them in
to the Brain during the update.
To download and update Firmware please visit:
Turn on the Robot Brain.
7.2 Creating Custom Programming
7.2 Omien ohjelmien luonti
vexiq.com/programming
vexiq.com/programming
Open the VEX IQ Firmware Updater, and
click “Update All Components”.
On olemassa monia mahdollisuuksia ohjelmien luomiseksi
VEX IQ -robotille.
Lisätietoja erilaisista ohjelmakehitysympäristöistä löydät
osoitteesta:
VEX IQ Ohjausjärjestelmän käyttöopas FIN Ver. 1.0. ©www.vexrobotics.fi & www.vexrobotics.com
VEX IQ Firmware Updater -päivitysohjelman käyttö - kolme vaihetta:
Kytke kaikki anturit ja toimilaitteet
VEX IQ -keskusyksikköön ja
kytke keskusyksikkö kaapelilla
tietokoneen USB-porttiin.
Käynnistä keskusyksikkö.
Käynnistä VEX IQ Firmware Update -ohjelma
Valitse, kumpaa ohjelmointiympäristöä käytät:
Modkit vai ROBOTC
ja klikkaa:
"Update All Components"
(=Päivitä järjestelmän kaikki komponentit)
VEX IQ -keskusyksikkö, Käsiohjain, Moottori, Kosketus LEDi,
Etäisyysanturi sekä Gyroanturi sisältävät kaikki oman sisäisen
mikroprosessorinsa ja jokainen niistä sisältää oman laiteohjelman, jota
kutsutaan nimellä "firmware".
Varmistaaksesi koko järjestelmän parhaan mahdollisen toimivuuden ja
uusimmat ominaisuudet, pidä laitteiden firmware -ohjelmat ajan tasalla
jatkossakin.
Päivitä firmware -ohjelmat lataamalla ilmainen päivitysohjelma: "VEX IQ
Firmware Update Utility" osoitteesta:
http://www.vexrobotics.com/vexiq/software/firmware
Tärkeää! Kun päivität VEX IQ -keskusyksikön (Robot Brain), tulee
samalla päivittää myös kaikki anturit ja toimilaitteet kytkemällä ne
keskusyksikköön päivityksen ajaksi.
TÄRKEÄÄ!
Kun VEX IQ -järjestelmä otetaan ensimmäistä kertaa
käyttöön, tulee aluksi päivittää kaikkien järjestelmään
sisältyvien laitteiden Firmware -ohjelmat !
Plug all devices into the Robot Brain,
Robot Brain into your
and plug the
computer via USB.
http://www.vexrobotics.com/vexiq/software/firmware
Page 18

18
228-2779 Controller Battery Information
228-2779 Käsiohjaimen akku
228-2604 Robot Brain Battery Information
- Avoid letting children play with the battery.
- Dispose of the battery properly.
- Do not use, leave, store or charge the battery close to any
heat source or at very high temperatures (for example, in
strong direct sunlight or in a vehicle in extremely hot weather).
- Do not heat or set the battery on fire.
- Do not puncture, cut, beat, throw, drop or chisel the battery.
- Do not put the battery in water or allow it to get wet.
- Do not disassemble or refit battery.
- Do not connect the battery to any other instrument or device.
- Do not try to connect the battery to anything other than the Controller.
- Do not short circuit battery terminals together.
- If the battery gives off an odor, generates heat, or leaks
chemicals, immediately remove the battery from the charger
or device and stop using it.
- Do not touch battery leakage. Chemicals inside the battery
can burn your skin or eyes. If battery leakage comes into con
tact with your eyes, DO NOT RUB THEM! Rinse immediately
with clean running water and seek medical attention at once.
- Avoid letting children play with the battery. Adults should in struct children how to use the battery correctly during all usages.
- Avoid letting children take the battery out of the VEX IQ Ro
bot Brain (Part #228-2540) or VEX IQ Charging Dock (Part #
228-2743) so as to play with battery.
- Dispose of the battery properly.
- Recharge the battery only with the VEX IQ Robot Battery
Charger (Part # 228-2743), sold separately. Only recharge
the battery under adult supervision.
- Do not use, leave, store or charge the battery close to any
heat source or at very high temperatures (for example, in
strong direct sunlight or in a vehicle in extremely hot weather.).
Do not heat or set the battery on fire.
- Do not store or move the battery with metal objects.
- Do not puncture, cut, beat, throw, drop or chisel the battery.
- Do not put the battery in water or allow it to get wet.
- Do not disassemble and refit battery.
- Do not connect the battery to any other instrument or device
- Do not short circuit battery terminals together. If the battery
gives off an odor, generates heat, or leaks electrolyte, imme
diately remove battery from charger or device and stop using.
- Do not touch battery leakage. Chemicals inside the battery
can burn your skin or eyes. If battery leakage comes into con
tact with your eyes, DO NOT RUB THEM! Rinse immediately
with clean running water and seek medical attention at once.
Battery Safety Information
Turvallisuusohjeita akkujen ja laturin käyttöön
8
Pidä lasten ulottumattomissa.
Hävitä akku huolellisesti.
Älä käytä, jätä, säilytä tai lataa minkään lämmönlähteen
lähettyvillä tai korkeissa lämpötiloissa (älä jätä kuten esim.
suoraan auringonpaisteeseen tai autoon erittäin kuumalla
ilmalla).
Älä kuumenna tai heitä akkua avotuleen.
Älä puhkaise, leikkaa, lyö, heitä, tiputa tai veistä akkua.
Älä laita akkua veteen tai altista kosteudelle.
Älä pura tai muuntele akkua.
Älä kytke akkua mihinkään muuhun kojeeseen tai
laitteeseen.
Älä yritä kytkeä akkua mihinkään muuhun kuin ohjaimeen.
Älä oikosulje akkua.
Jos akussa ilmenee haju, lämmöntuottoa, tai se alkaa vuotaa
kemikaaleja, poista akku välittömästi laturista tai laitteesta
ja lopeta sen käyttö.
Älä koske vuotavaan akkuun: sen sisältämät kemikaalit
voivat polttaa ihoasi tai silmiäsi. Jos akusta lentää roiskeita silmiin,
ÄLÄ HIERO SILMIÄ! Mene heti juoksevan veden alle
ja hakeudu sen jälkeen lääkäriin.
228-2604 Keskusyksikön akku
Pidä akku lasten ulottumattomissa. Aikusten pitää ohjeistaa lapsia
akun käytössä.
Älä anna lasten irrottaa akkua VEX IQ -keskusyksiköstä tai
laturista leikkiäkseen sillä.
Hävitä akku huolellisesti.
Lataa akku vain VEX IQ:n laturilla.
Lataa vain aikuisen valvonnassa.
Älä käytä, jätä, säilytä tai lataa minkään lämmönlähteen
lähettyvillä tai korkeissa lämpötiloissa (älä jätä akkua
esim. suoraan auringonpaisteeseen tai autoon erittäin
kuumalla ilmalla).
Älä kuumenna tai heitä avotuleen.
Älä säilytä tai siirrä akkua metalliesineiden kanssa.
Älä puhkaise, leikkaa, lyö, heitä, tiputa tai veistä akkua.
Älä laita akkua veteen tai altista kosteudelle.
Älä pura tai muuntele akkua.
Älä kytke akkua mihinkään muuhun kojeeseen tai
laitteeseen.
Älä oikusulje akkua.
Jos akussa ilmenee haju, lämmöntuottoa, tai se alkaa vuotaa
kemikaaleja, poista akku välittömästi laturista tai laitteesta
ja lopeta sen käyttö.
Älä koske vuotavaan akkuun. Sen sisältämät kemikaalit
voivat polttaa ihoasi tai silmiä. Jos akusta tullut vuoto
osuu silmiin, ÄLÄ HIERO SILMIÄ! Mene heti juoksevan
veden alle ja hakeudu sen jälkeen lääkäriin.
228-2743 Robot Battery Charger
TRANSFORMER-CAUTION-ELECTRIC-TOY.
Adults are recommended to periodically examine the
transformer and power cable for conditions that may result
in the risk of fire, electric shock, or injury (such as damage
to the output cord, plug, housing or other parts) and in the
event of such conditions, the transformer should not be
used until properly repaired or replaced. The transformer
is for indoor use only. Never connect outputs from two or
more transformers – or to other systems where they could
be interconnected. This transformer is specially designed
for use solely with VEX IQ Brain Battery (Part # 228-2604)
and must never be connected to any other electronics.
The transformer should not be played with as a toy. The
transformer is not to be cleaned with liquid or exposed
to water. Disconnect power cord and Robot Battery from
transformer before cleaning.
Not recommended for children under eight years of
age. Care should be taken during handling and use to
prevent electric shock. For indoor use only.
228-2743 Robotin akkulaturi
Aikuisten on suositeltavaa tarkastaa määräajoin laturin ja sen
ja virtakaapelin kunto, koska ne voivat aiheuttaa tulipalon,
sähköiskun, tai muun vaurion (kuten vaurio ulkoiseen
johtoon, pistokkeeseen, koteloon tai muihin osiin) ja siinä
tapauksessa laturia ei saa käyttää, kunnes se on
korjattu tai vaihdettu. Laturin käyttö on sallittu vain sisätiloissa. Älä
koskaan kytke ulostuloja kahdesta tai useammasta
laturista järjestelmään, jossa ne voisivat olla yhteydessä
toisiinsa. Tämä laturi on suunniteltu käytettäväksi yksinomaan
VEX IQ:n akulle, jota ei saa kytkeä mihinkään muihin laitteisiin
tai elektroniikkaan. Laturilla ei koskaan saa leikkiä: se ei ole lelu.
Laturia ei ole tarkoitettu puhdistettavaksi millään nestemäisellä
aineella. Pyyhi puhtaaksi kuivalla kankaalla tai mikrokuituliinalla.
Irrota virtajohto ja akku laturista ennen puhdistusta.
Valmistaja ei suosittele laturia alle 8-vuotiaitten lasten käyttöön.
Käsittele laitetta huolellisesti ja käytä ohjeiden mukaisesti.
Näin vältyt mahdolliselta sähköiskulta. Laite on tarkoitettu
käytettäväksi ainoastaan sisätiloissa.
VEX IQ Ohjausjärjestelmän käyttöopas FIN Ver. 1.0. ©www.vexrobotics.fi & www.vexrobotics.com
Page 19
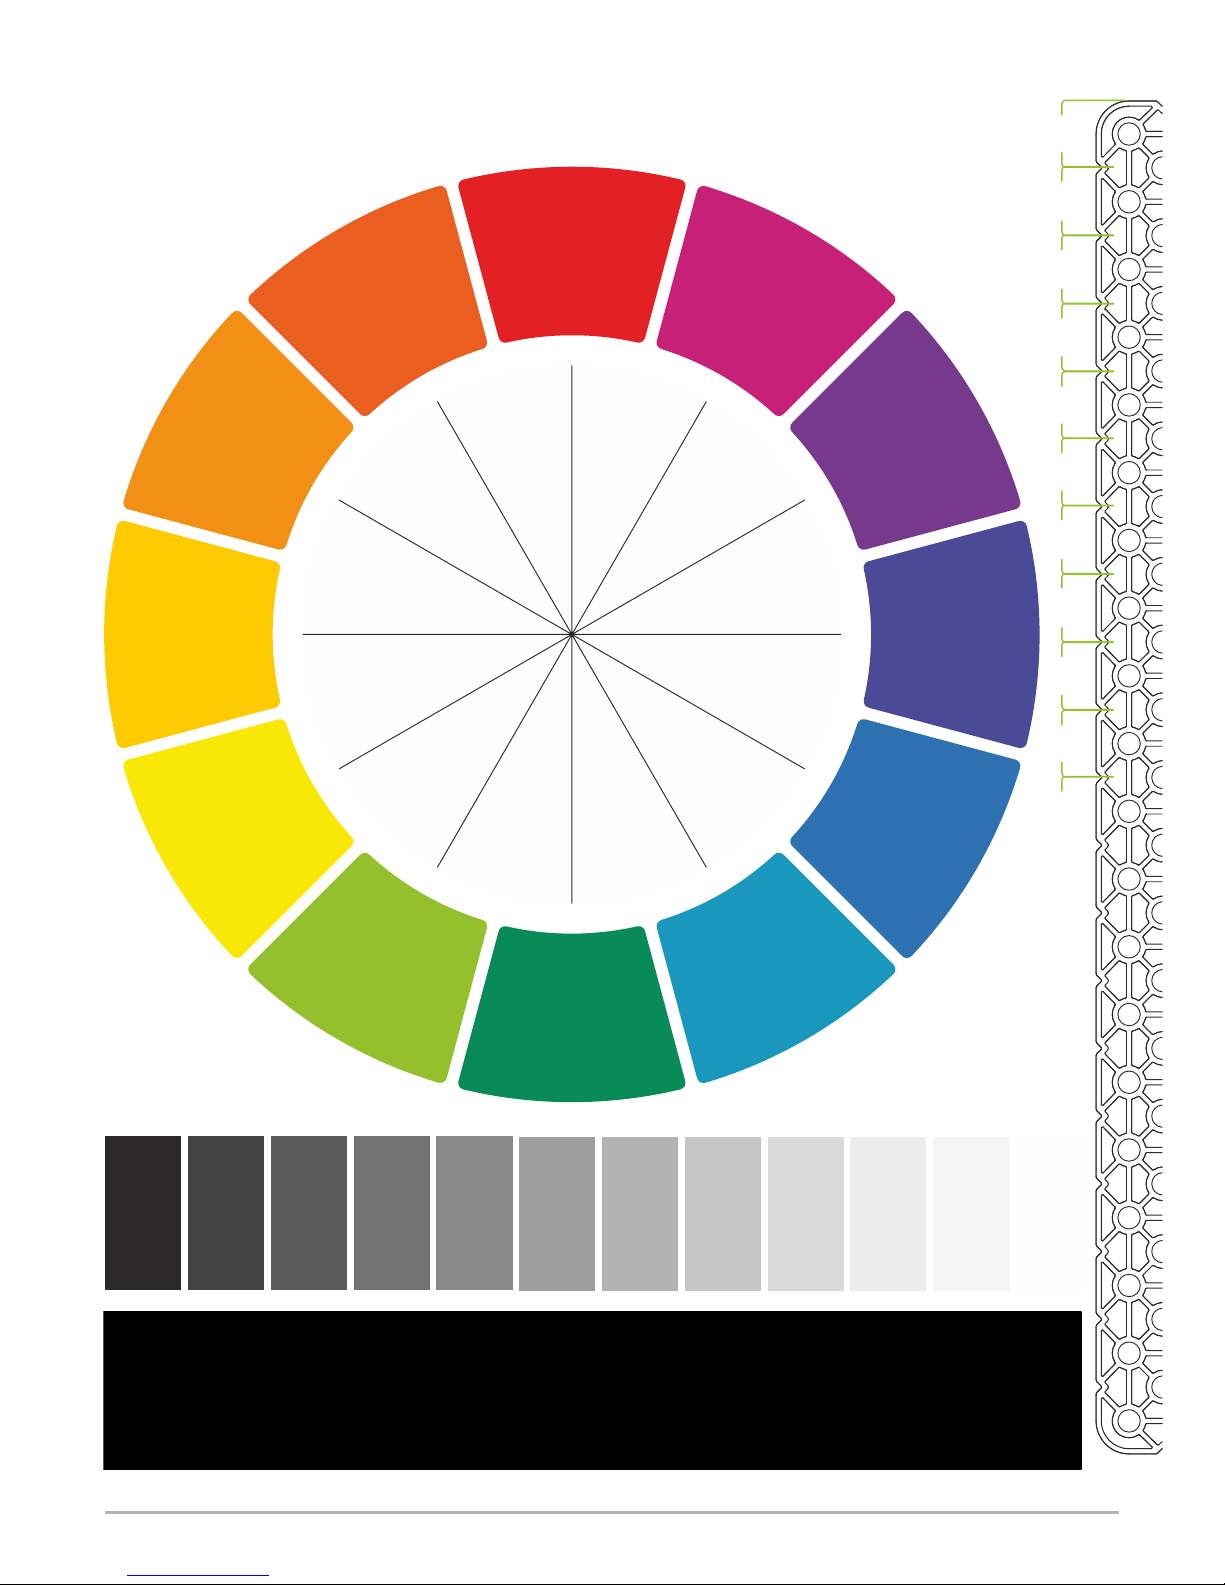
Sensor Calibration
1x
5x
3x
7x
9x
2x
6x
4x
8x
10x
100% 60% 20%90% 50% 10%80% 40% 5%70% 30% 0%
0°
180°
150°
120°
210°
240°
30°
60°
90°
330°
310°
270°
Anturien kalibrointi
VEX IQ Ohjausjärjestelmän käyttöopas FIN Ver. 1.0. ©www.vexrobotics.fi & www.vexrobotics.com
Page 20
Ohjausjärjestelmän käyttöopas
K8
Ages 8+
Control System User Guide
www.vexrobotics.fi
8 1
 Loading...