

Page 1

Technical Support and E-Warranty Certificate www.vevor.com/support
We continue to be committed to provide you tools with competitive price.
"Save Half", "Half Price" or any other similar expressions used by us only represents an
estimate of savings you might benefit from buying certain tools with us compared to the major
top brands and doses not necessarily mean to cover all categories of tools offered by us. You
are kindly reminded to verify carefully when you are placing an order with us if you are
actually saving half in comparison with the top major brands.
STEREO MICROSCOPE
USER MANUAL
Page 2

Page 3
1
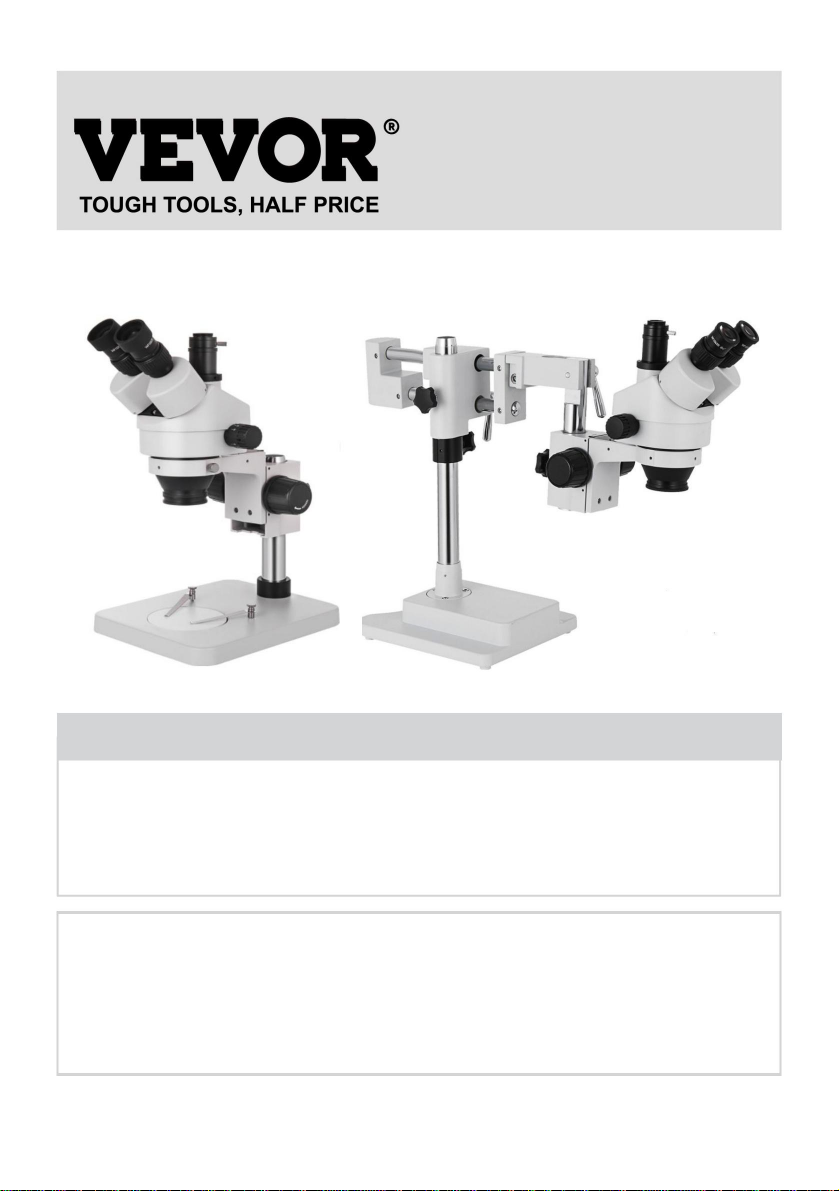
MODEL: 7045P-B1 7045P-STL2
Have product questions? Need technical support? Please feel free to
contact us:
Technical Support and E-Warranty Certificate
www.vevor.com/support
NEED HELP? CONTACT US!
This is the original instruction, please read all manual instructions
carefully before operating. VEVOR reserves a clear interpretation of our
user manual. The appearance of the product shall be subject to the
product you received. Please forgive us that we won't inform you again if
there are any technology or software updates on our product.
STEREO MICROSCOPE
Page 4

2
INSTRUCTIONS
Thank you very much for choosing this product. Please read all of the
SAFETY TIPS
instructions before using it.The information will help you achieve the best
possible results.
1. Microscope ought to be placed in a dry and clean place. Do not expose
the microscope in the sun directly. Avoid high temperature and violent
vibration.
2. As microscope is a precision instrument, handle with care, avoiding
impact or abrupt movement during transportation.
3. To keep the image clear, do not leave fingerprints or stains on the
surfaces of the lens.
4. Never turn the left and right Zoom control knob in the adverse direction
at the same time, otherwise the microscope will be damaged.
5. When removing the film from camera, use one hand to hold the camera
so that it does not fall over.
Page 5

3
SAVE THESE INSTRUCTIONS.
TECHNICAL PARAMETERS
Eyepiece
(Standard
Configuration)
(Auxiliary objectives)
0.5X
1.5X
2X
Working Distance
100mm
Working Distance
165mm
Working Distance
45mm
Working Distance
30mm
Magnifi
cation
Field Of
View
Magnifi
cation
Field Of
View
Magnifi
cation
Field Of
View
Magnific
ation
Field Of
View
10x/20
7x
28.6
3.5x
57.1
10.5x1914x
14.3
50x
4.4
22.5x
8.9
67.5x390x
2.2
15x/15
10.5x
21.4
5.25x
42.8
15.75x
14.3
21x
10.7
67.5x
3.3
33.75x
6.7
101.25x
2.2
135x
1.7
20x/10
14x
14.3
7x
28.6
21x
9.5
28x
7.7
90x
2.2
45x
4.4
135x
1.5
180x
1.1
1. Technical Specification
Page 6
4
PARTS LIST
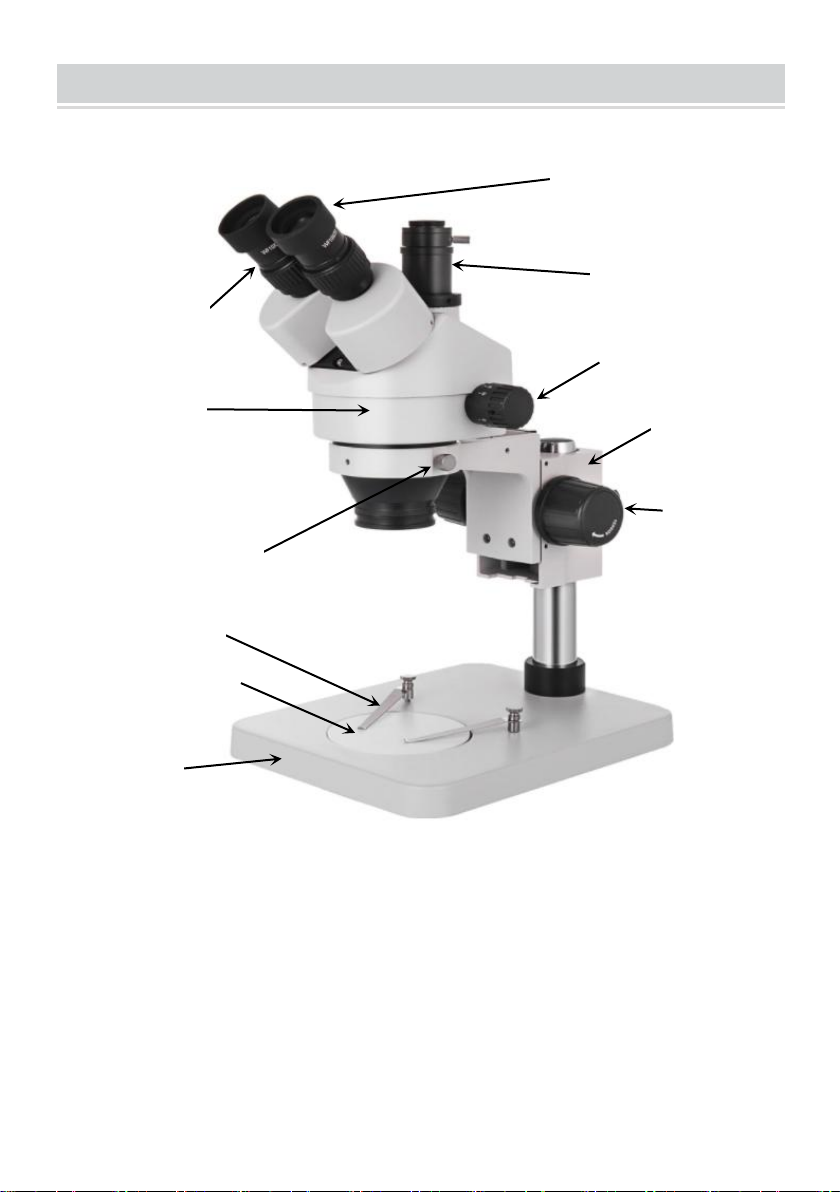
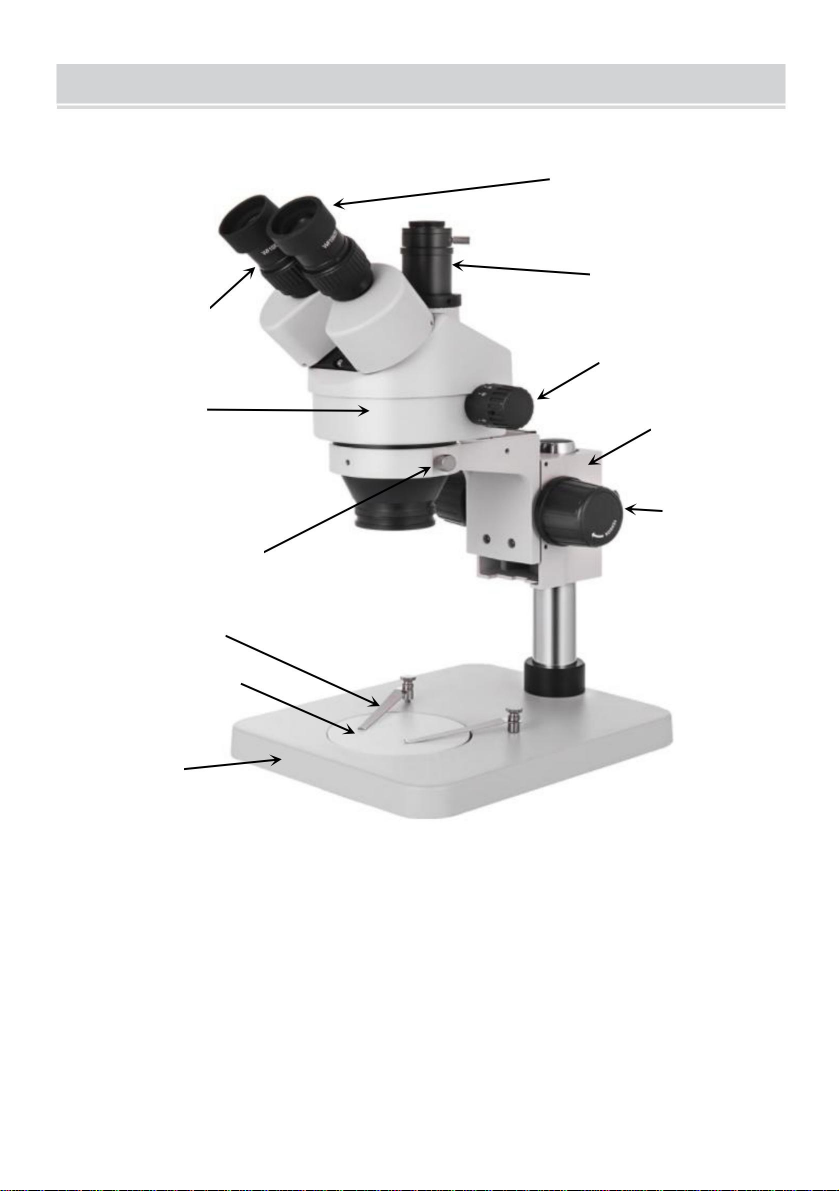
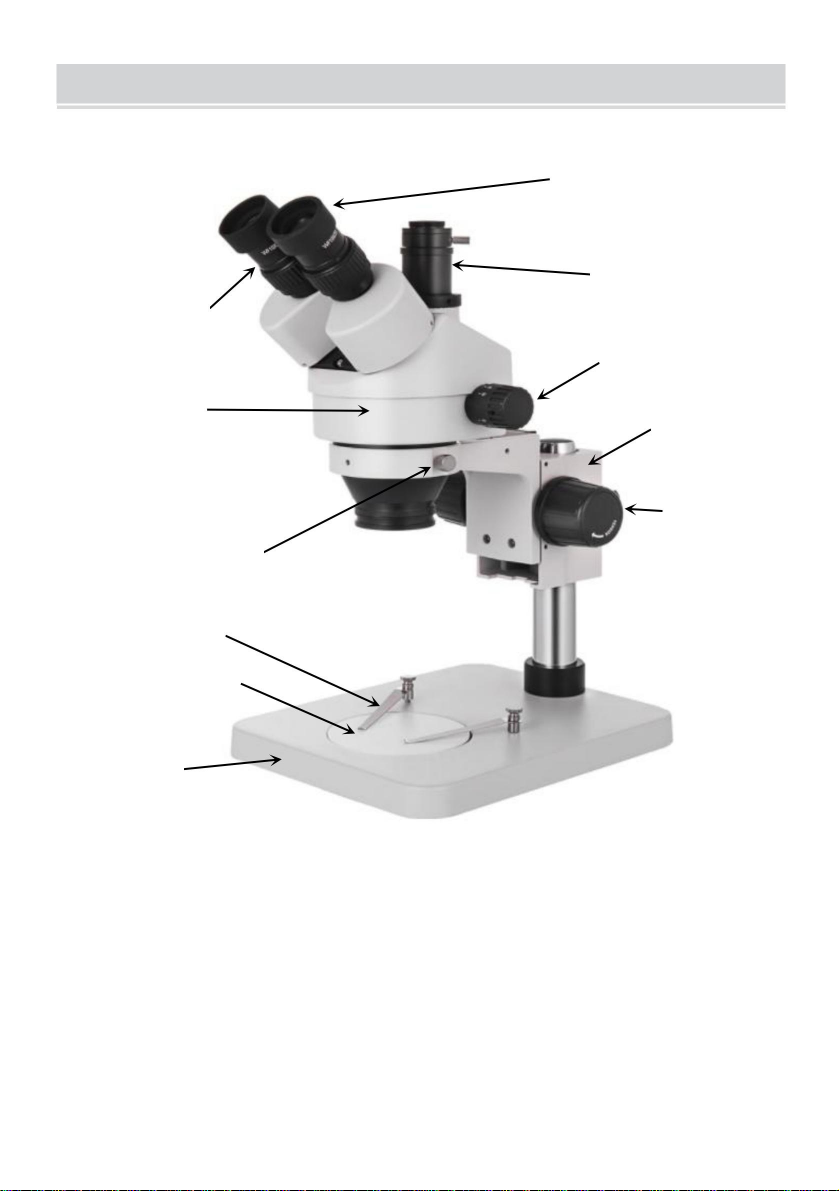
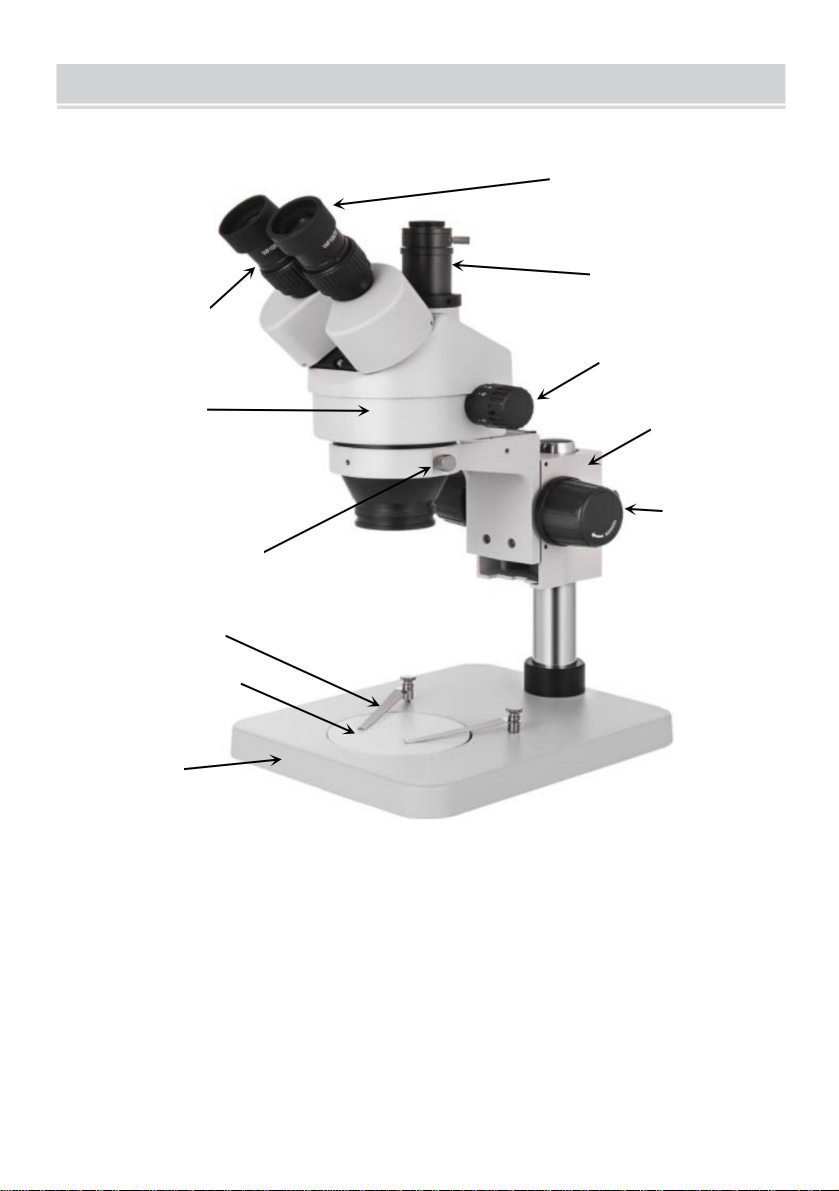
2. Part list
Ca m er a
po s it io n
Zoom Control
Knob
Ca m er a
po s it io n
Head
Head Lock-screw
Eyepiece Shield
Focusing
knob
Br a ck et
Glass stage
Base
Clip
Notice:
The main difference between model 7045P-STL2 and 7045P-B1
Is the base.
Page 7
5
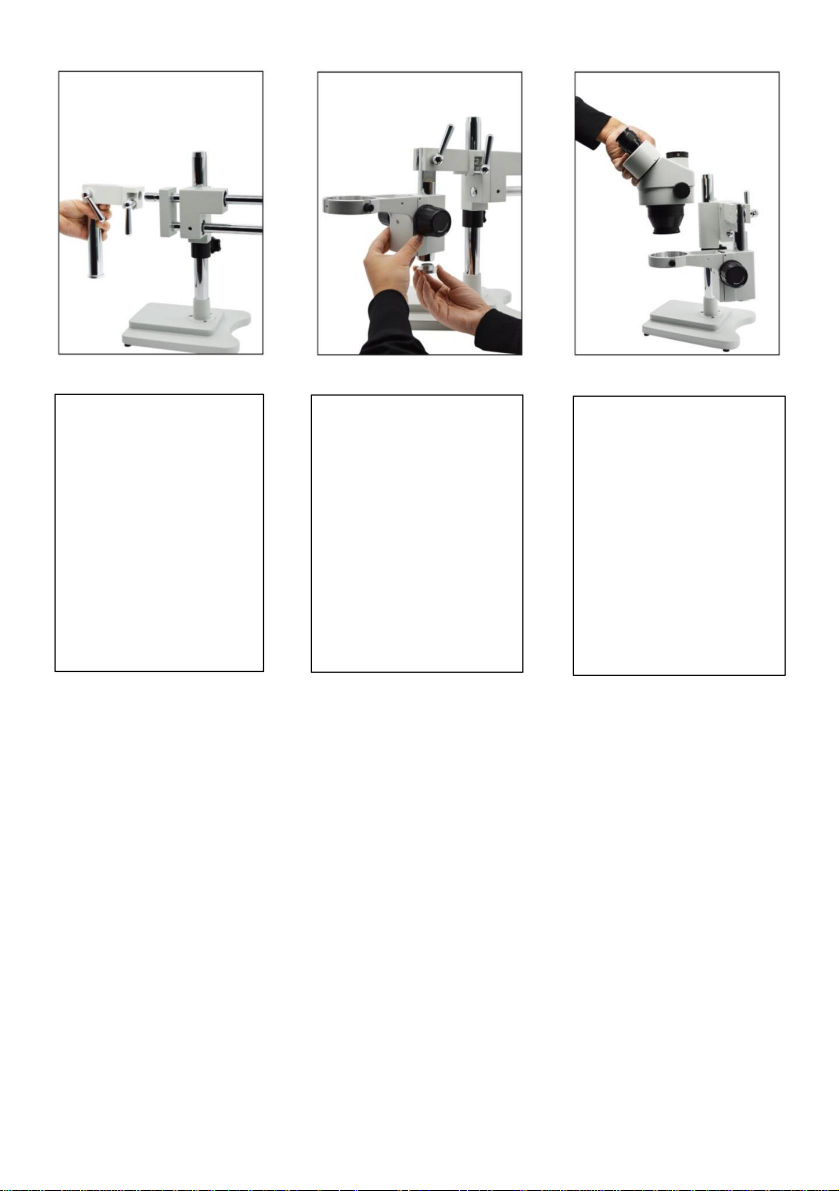
INSTALLATION
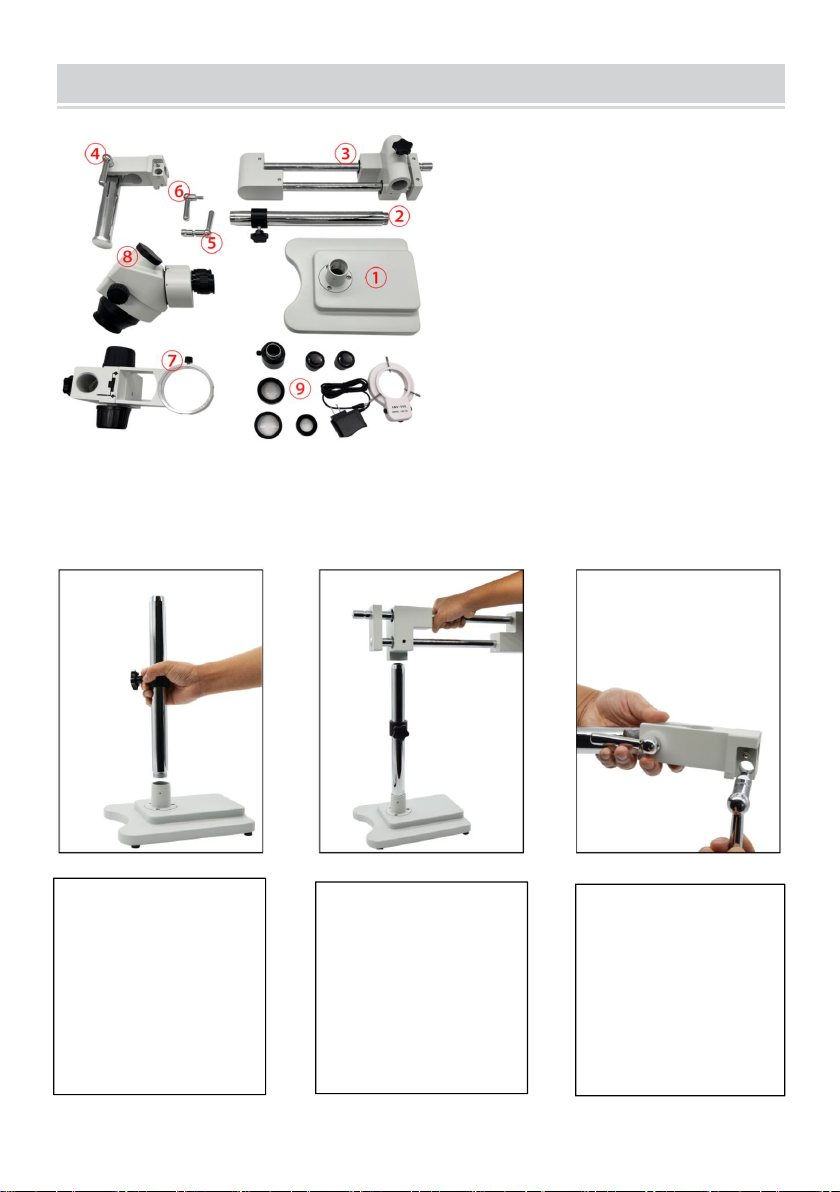
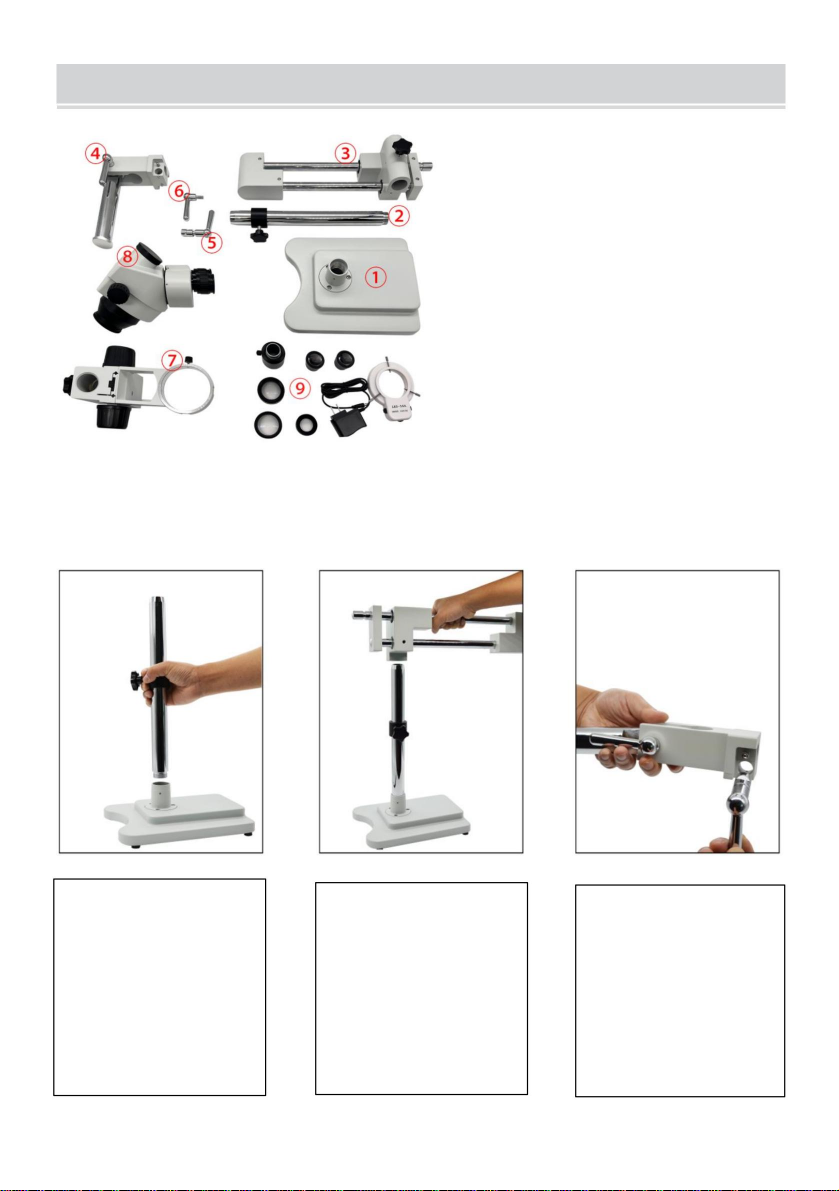
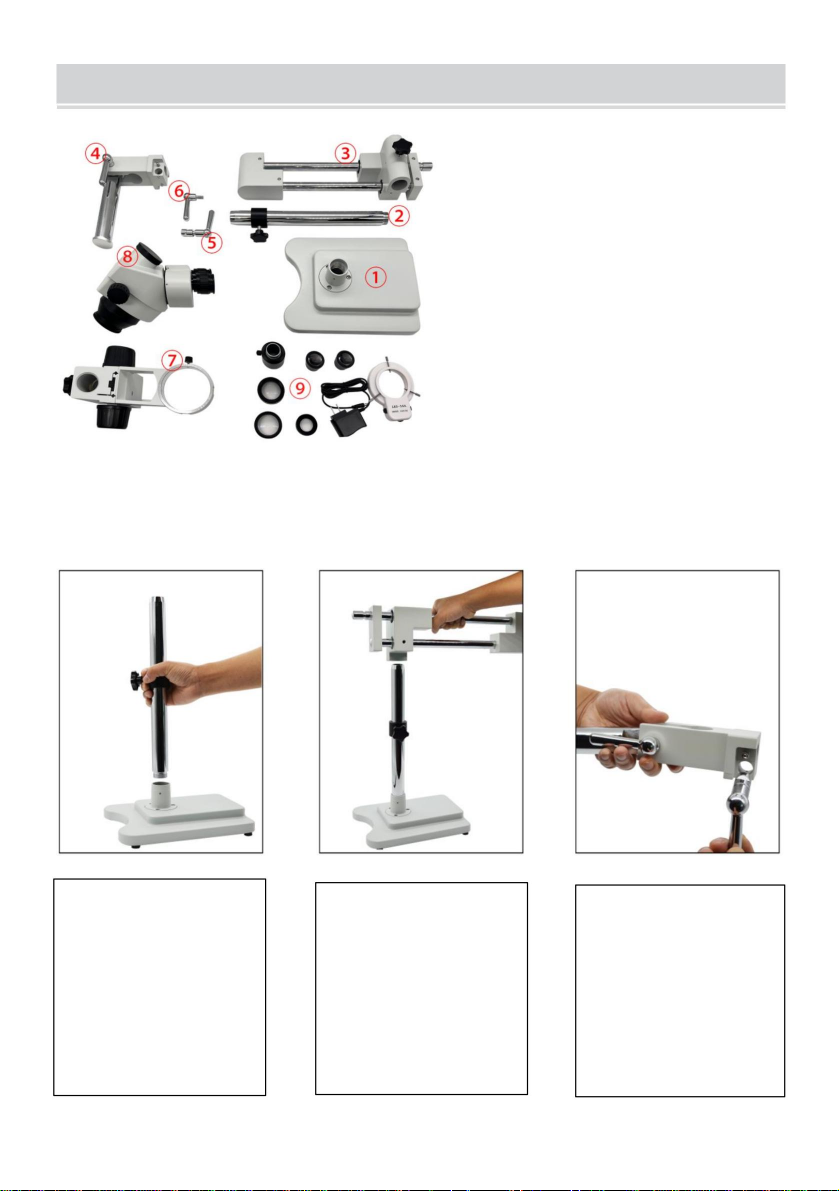
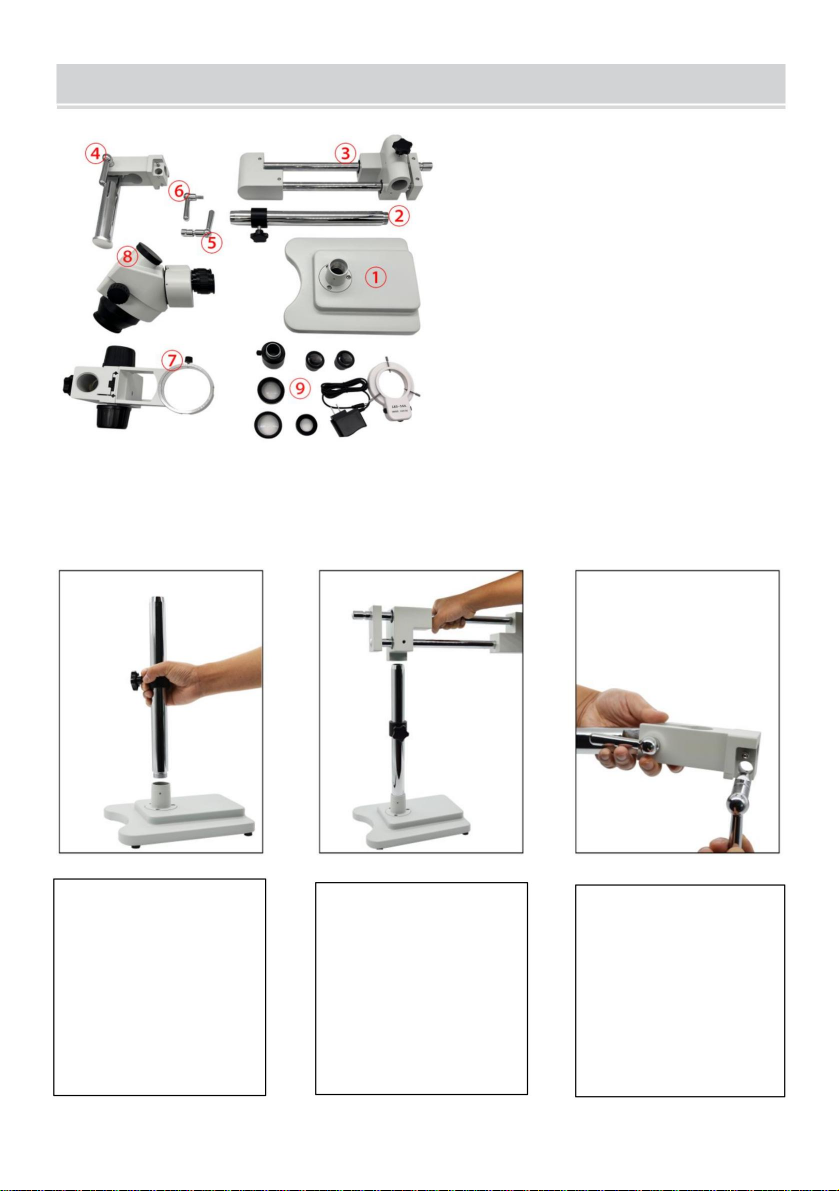
Step3 :
Insert wrench A(5)
into the hole of the
bracket
connection rod(4).
1. Base
2. Stand column
3. Double arm boom stand
4. Bracket connection rod
5. Wrench A
6. Wrench B
7. A1 Bonder arm
8. Simul-Focal trinocular
stereo head
9. Accessories
Step1:
lnsert the stand
column(2) into the
base(1) and
tighten it.
Step2:
Insert the double
arm boom
stand(3) into the
column(2) and fix
it with the knob.
Page 8
6
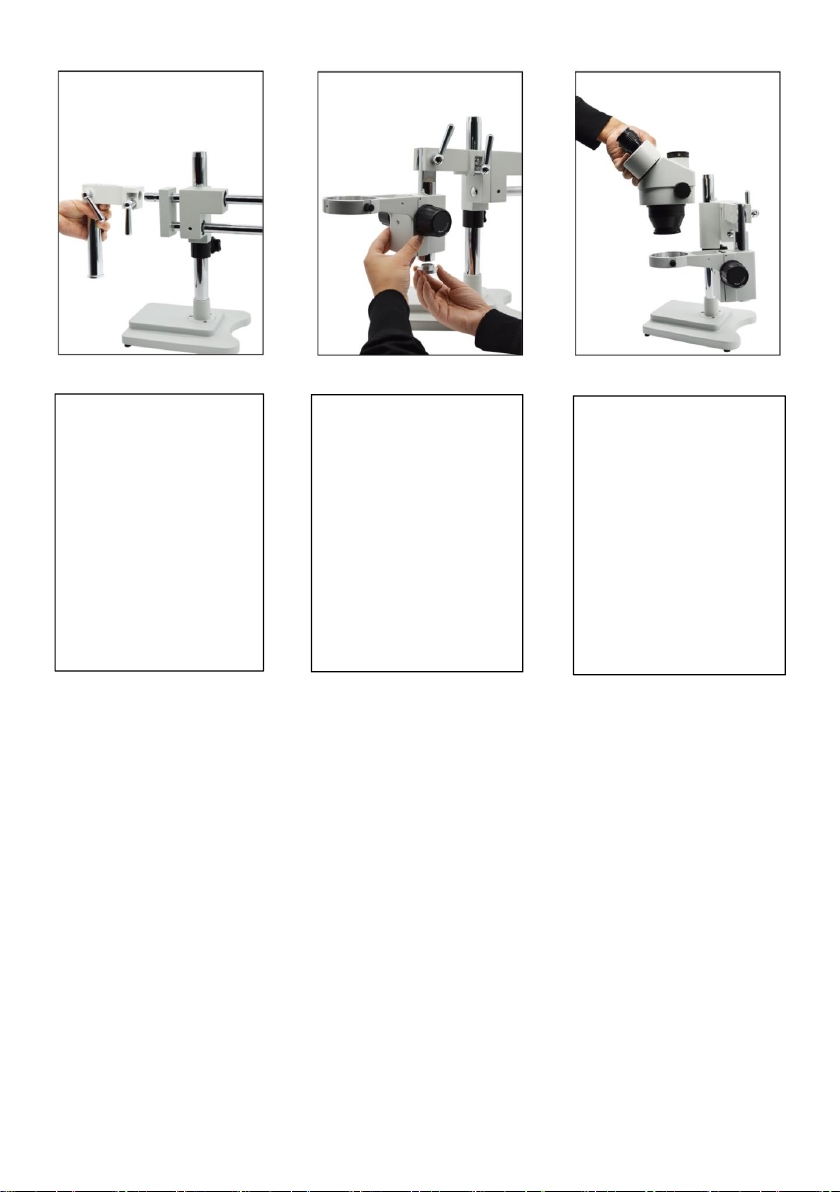
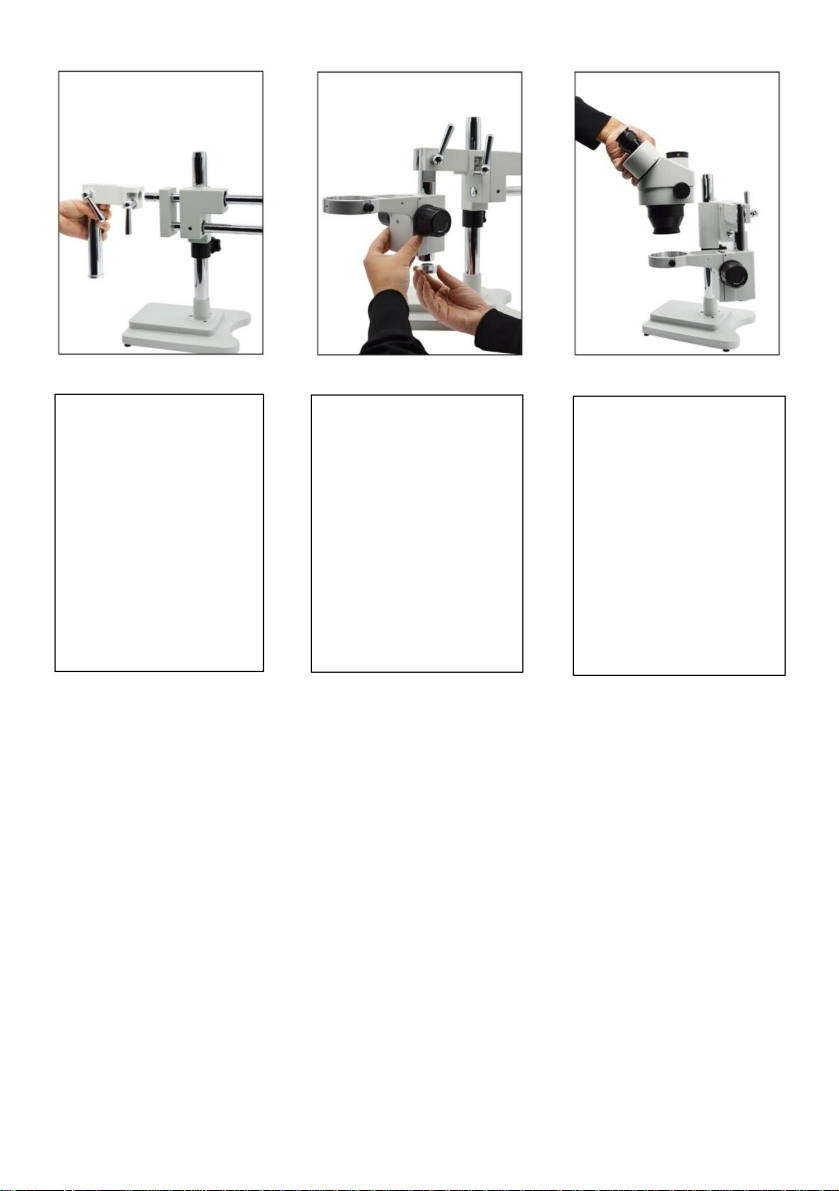
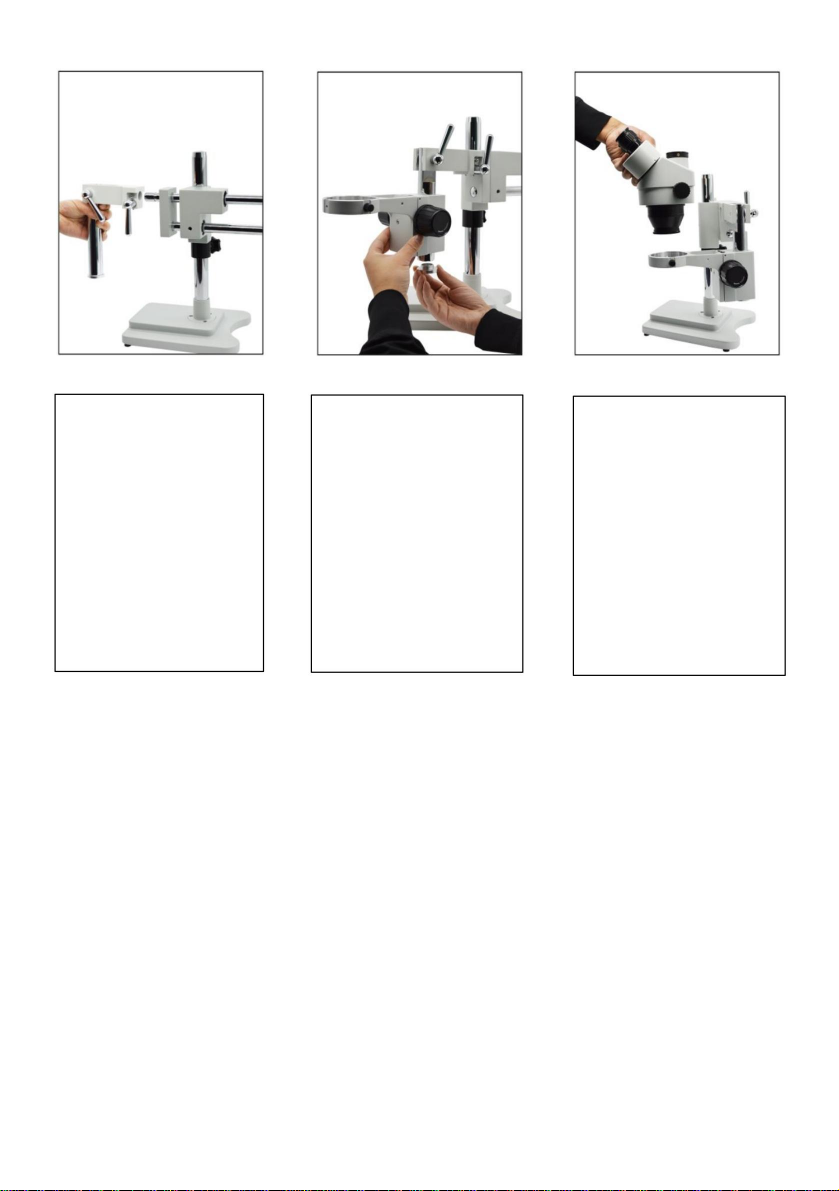
Step4:
lnsert the bracket
connection rod(4)
into the boom
stand(3) and
make it firm by
wrench A(5).
Step5:
Loose the cover
on connection
rod(4),lnsert A1
bonder arm(7) into
the connection
arm and tighten
the cover.
Step6:
Insert the
simul-focal
trinocular stereo
head(8) into the
hole of A1 bonder
arm(7) and fix it
with the screw.
Page 9
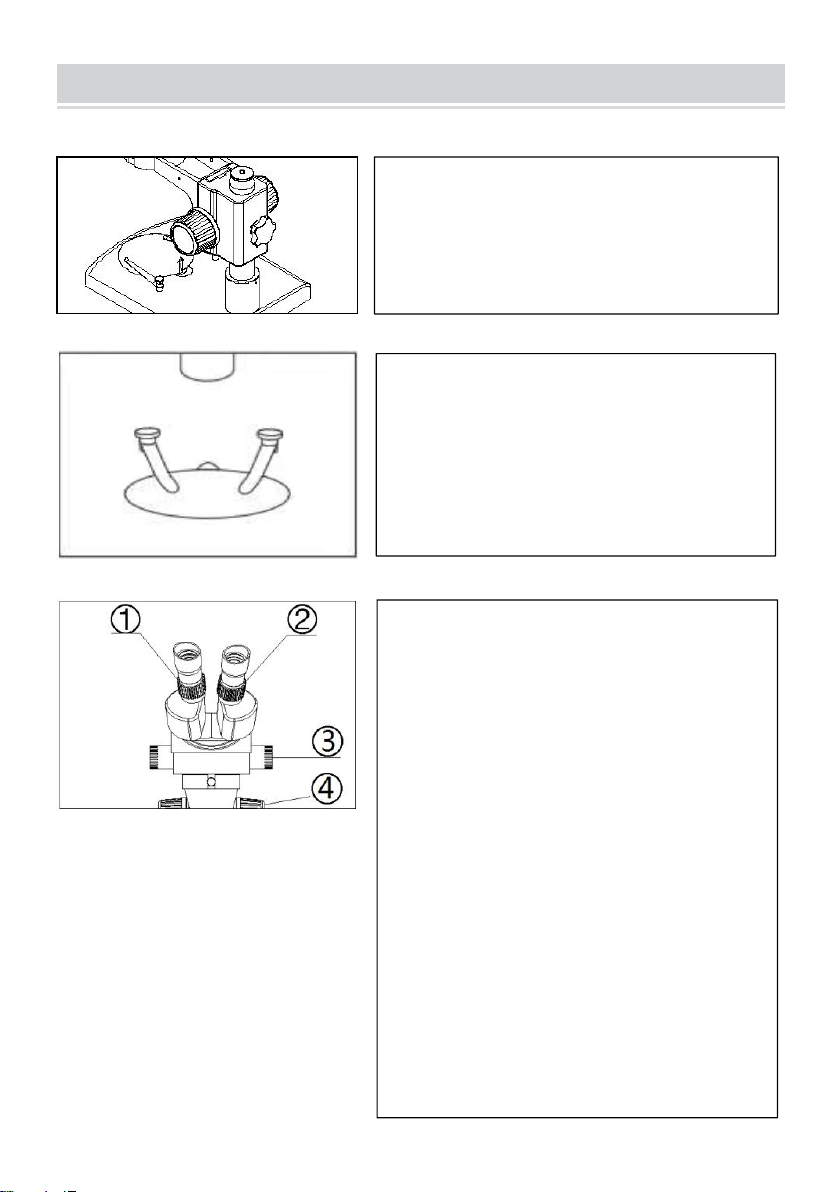
INSTALLATION AND USE
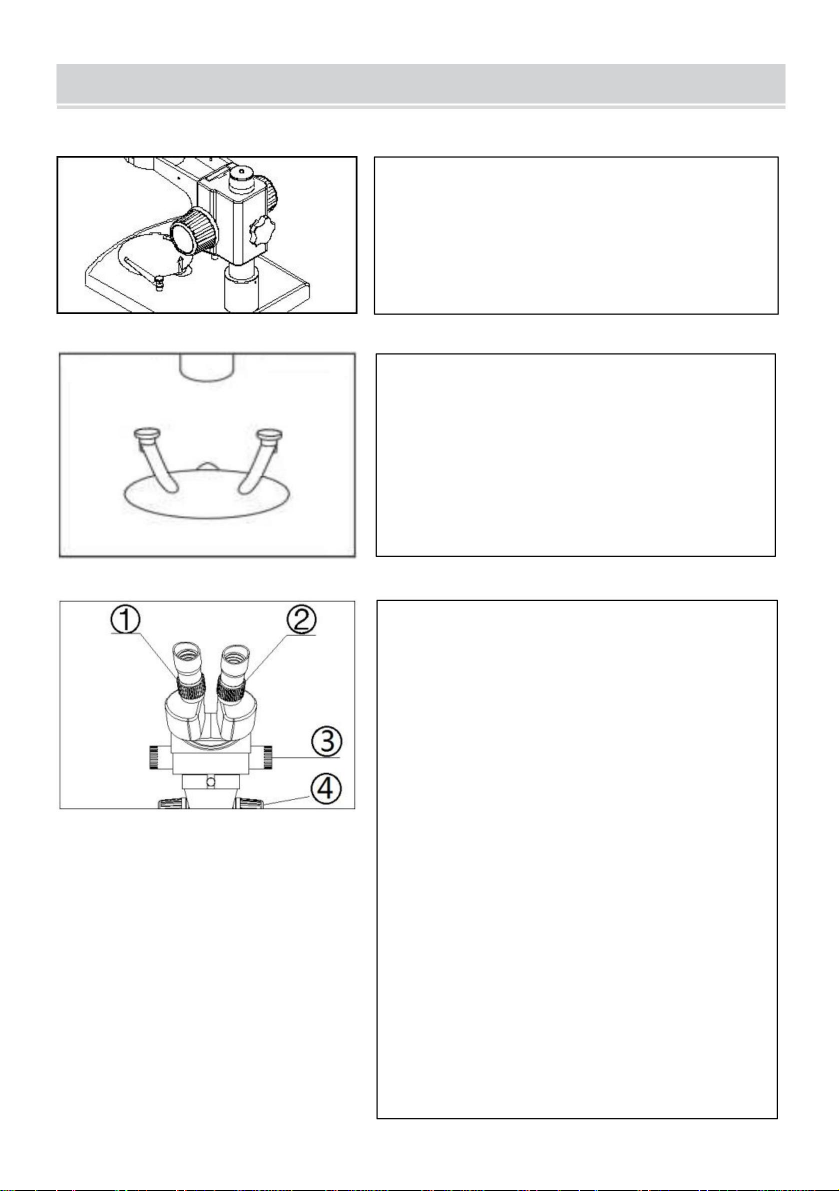
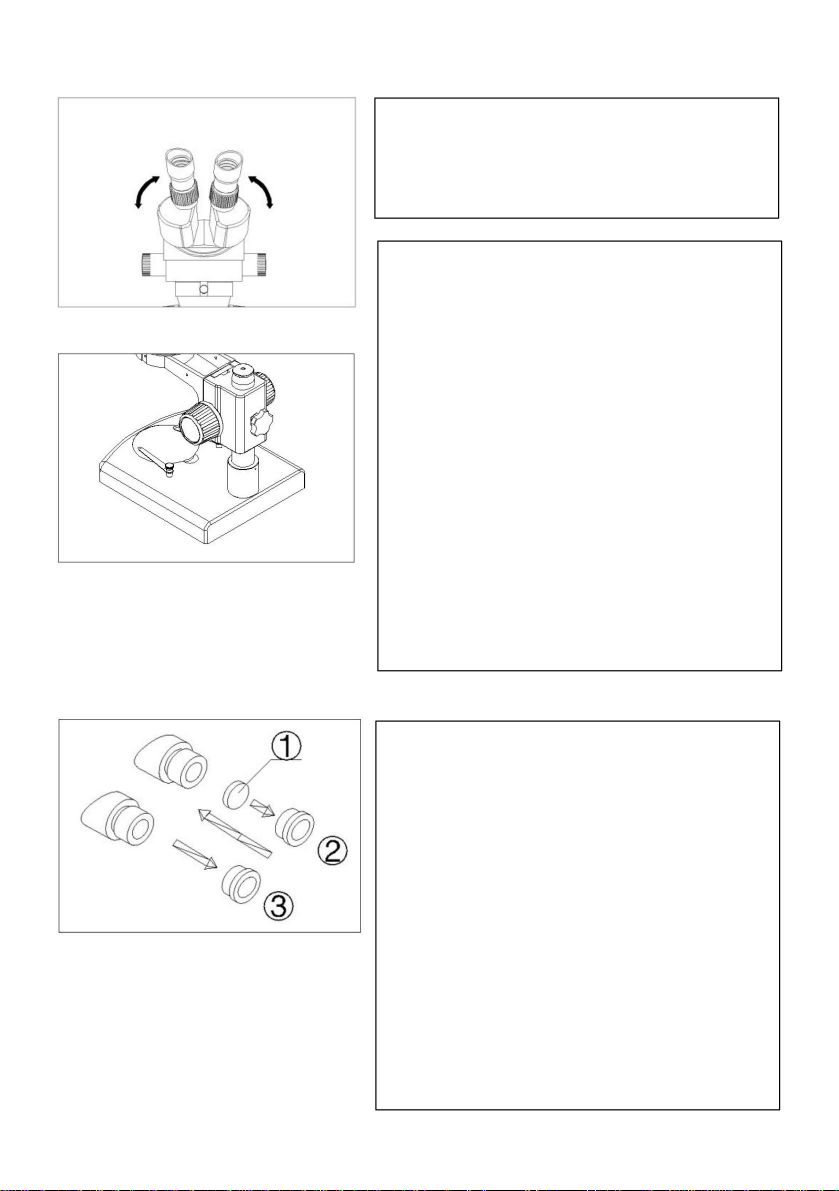
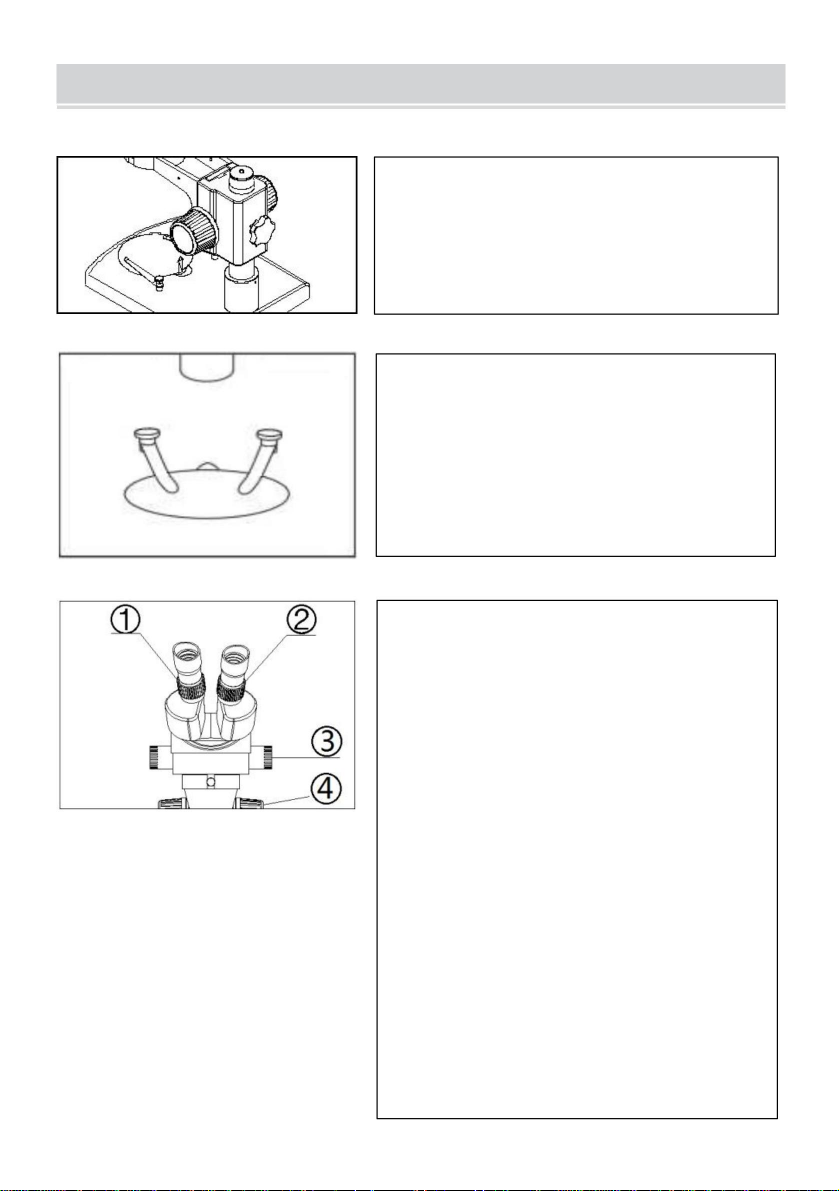
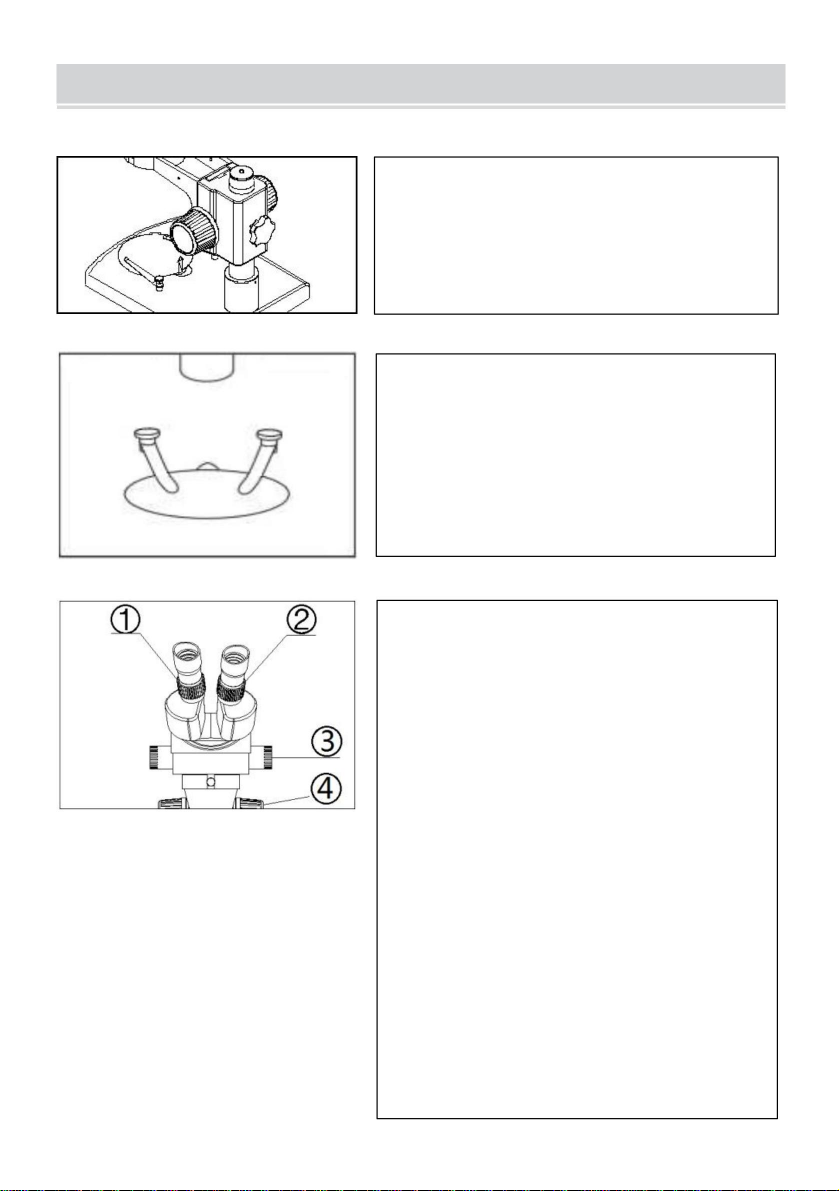
3-1. Use the glass stage
Press the glass stage on the sunken
place then the other side of the glass
stage will be lifted.
Set the specimen on the center of
stage plate. If necessary, clamp the
slide with the clips
1. Turn the zoom control knob ③to the
maximum magnification.
2. Turn the diopter adjusting rings to
the zero.
3. Observe the specimen through the
right eyepiece and make the image
clear by turning the focusing knob④.
4. Rotate the zoom control knob to the
minimum magnification.
5. Observe the specimen through the
right eyepiece and make the image
clear by turning the right diopter
adjusting ring②.
3-2. Set the specimen slide
3-3. Adjust the specimen slide
Page 10
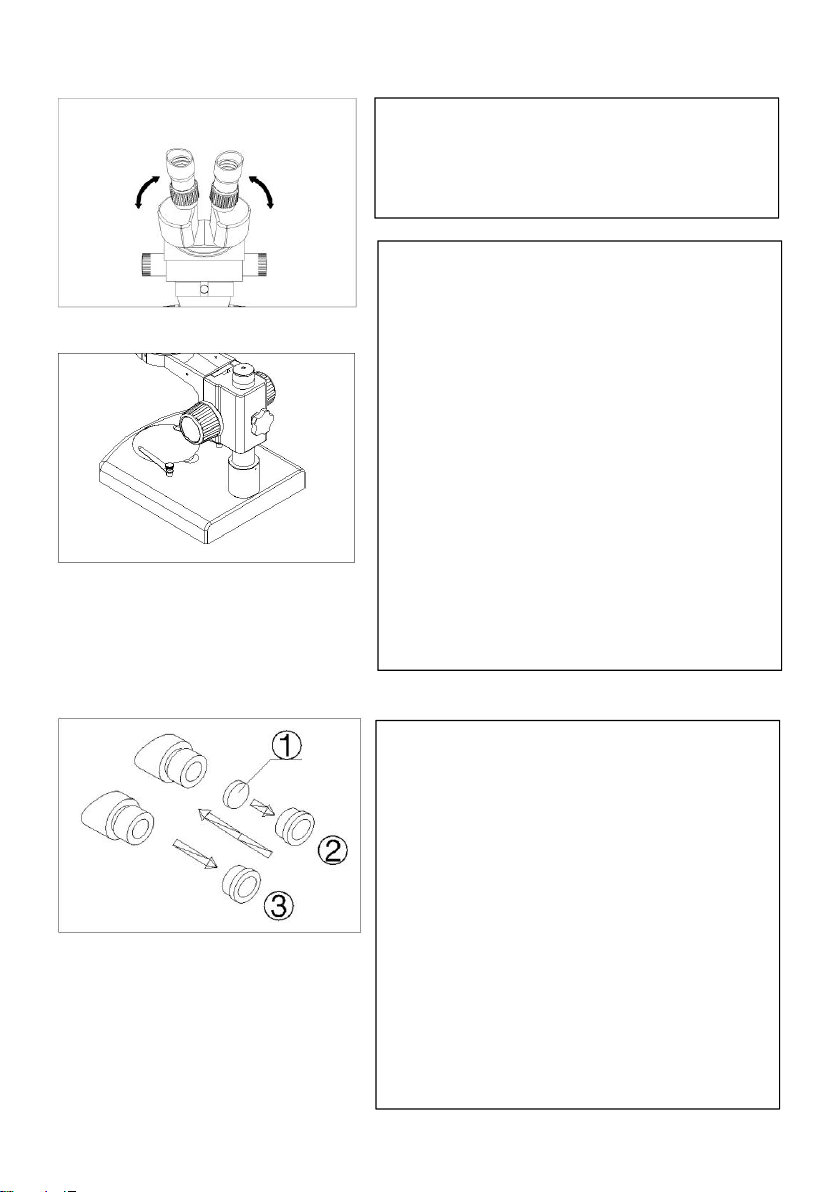
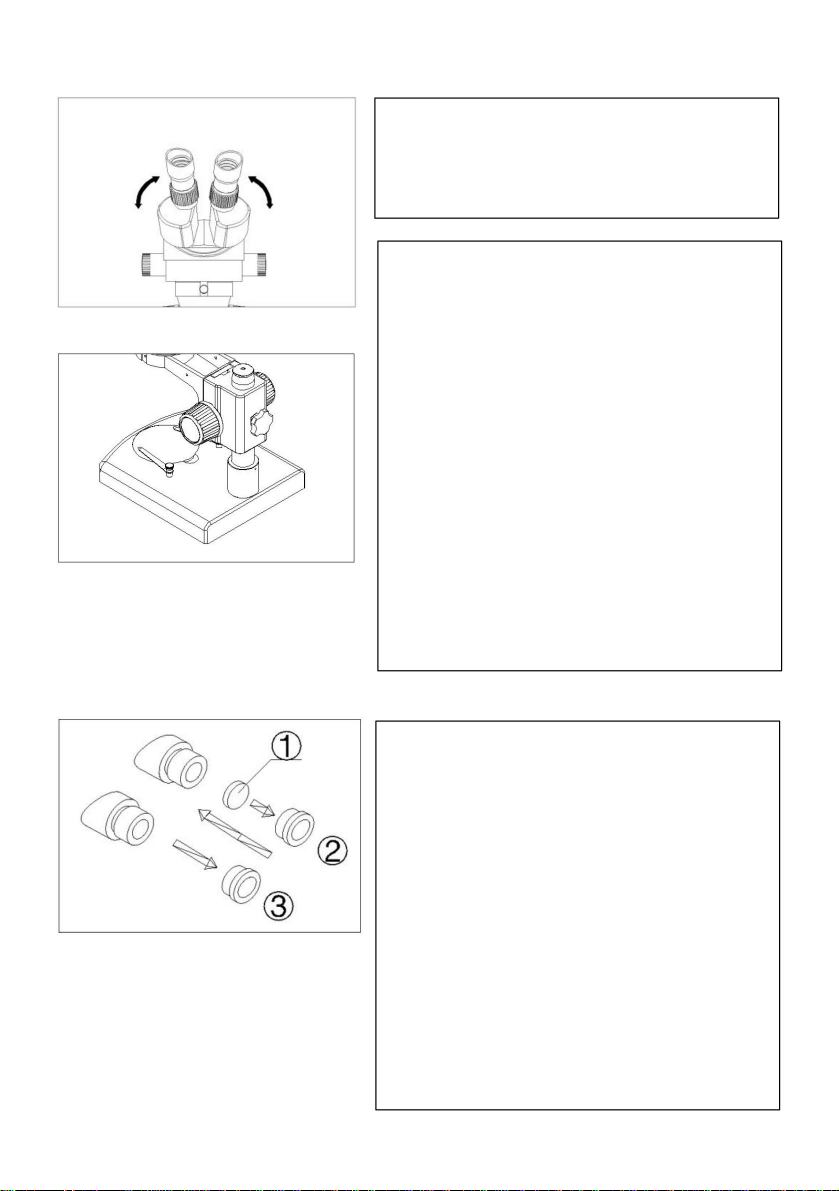
3-4. Adjust the interpupillary distance
Adjust the prism housing along the
direction of arrowhead of the (Fig.4) till
the observation is comfortable.
1.If you want to adjust degree of
tightness of the focusing arm, you
can hold one of the focusing knobs
and turn another one to attain a
suitable position. The degree of
tightness relies on the direction to
be turned. The clockwise direction is
tight, otherwise, is loose.
2.The suitable position of tightness
can make the adjustment more
comfortable and prevent the
focusing bracket from slipping down
by its weight during the observation.
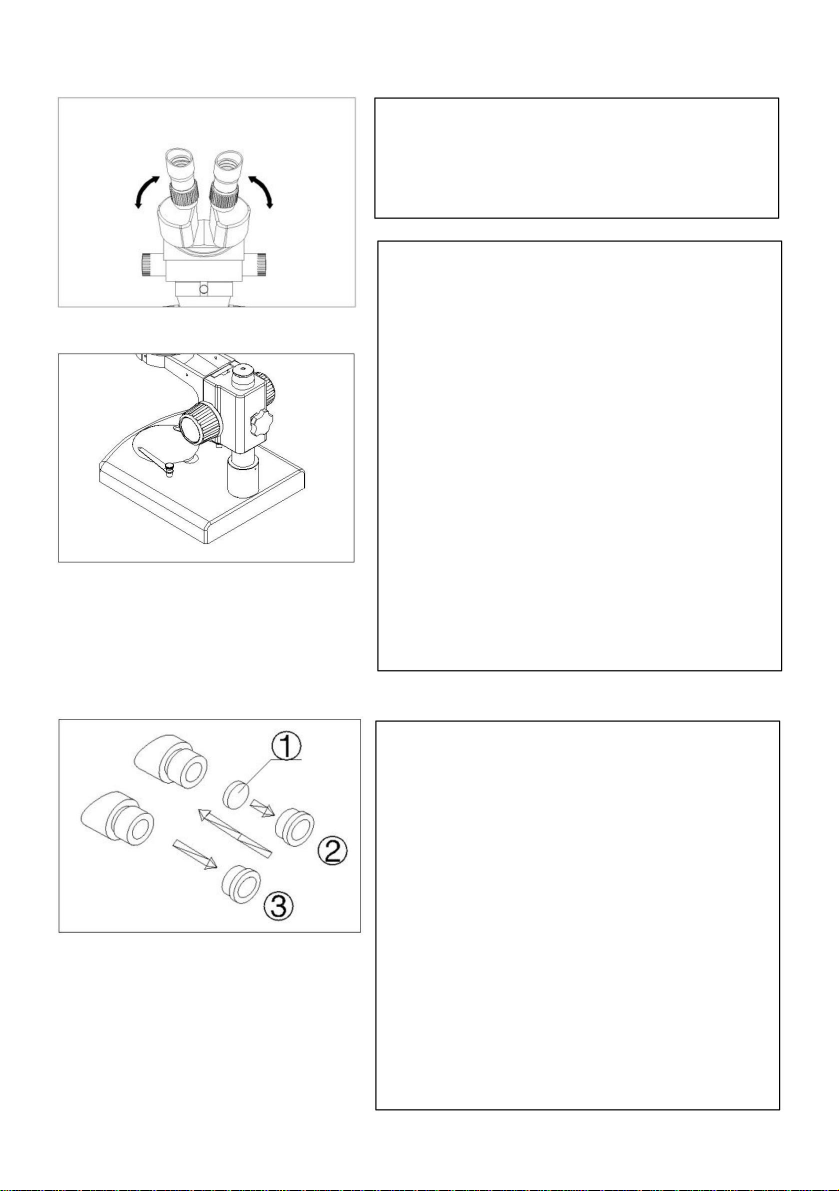
1. Turn and remove the mounting ring
② from the eyepiece.
2. Clean the eyepiece micrometer①
and mount it to the mounting ring with
the inscription side downward.
3. Gently twist the mounting ring with
the eyepiece micrometer into the
eyepiece till tightening② securely.
4. To remove the eyepiece
micrometer, take down the mounting
ring③ by twisting and take out of the
micrometer, and then wrap it.
3-5. Hand wheel adjustment
3-6. Mount and Remove the Optional Eyepiece Micrometer
Page 11
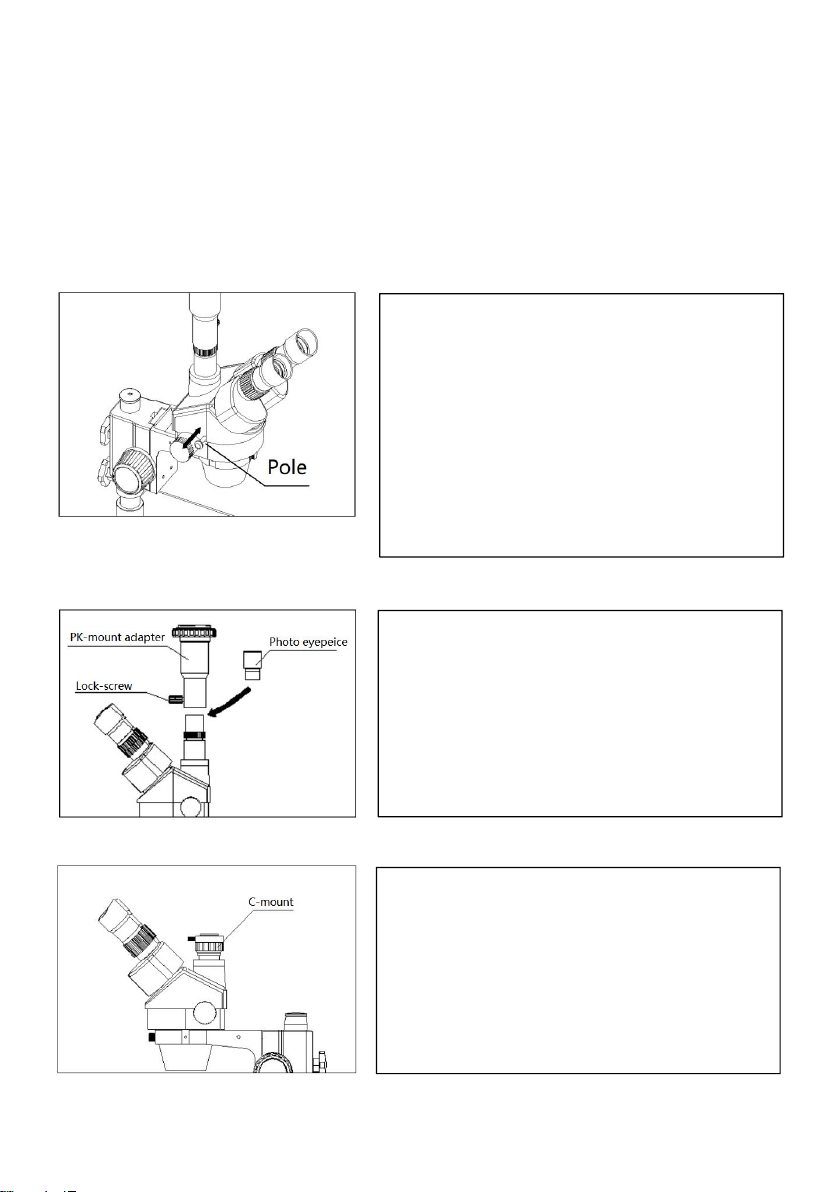
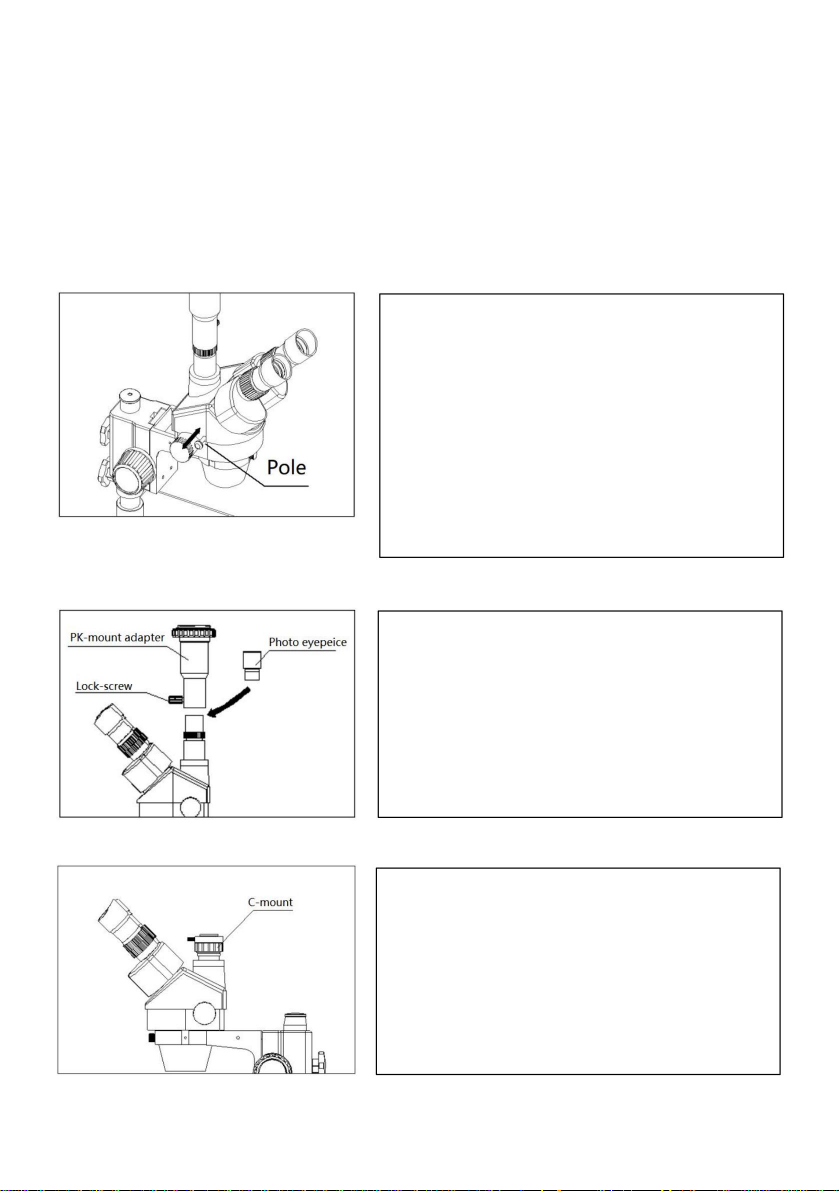
3-7. Use Eyepiece shields
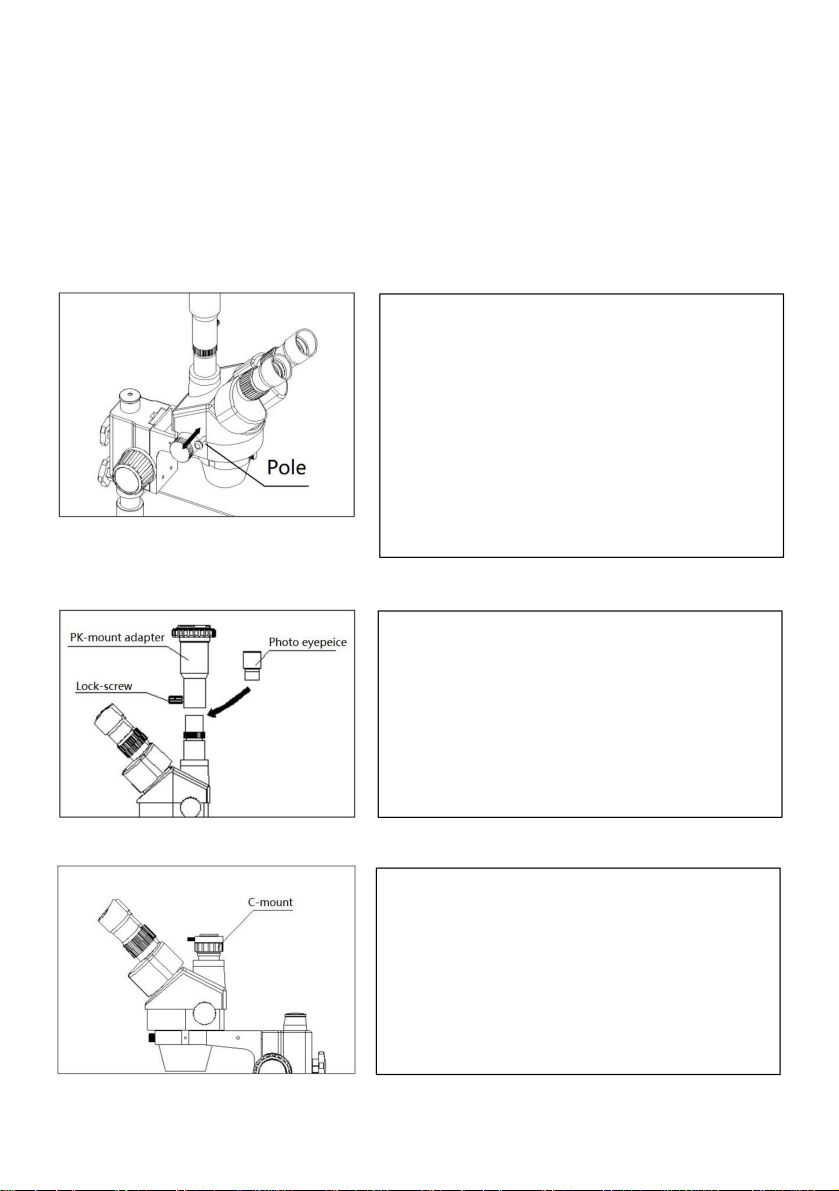
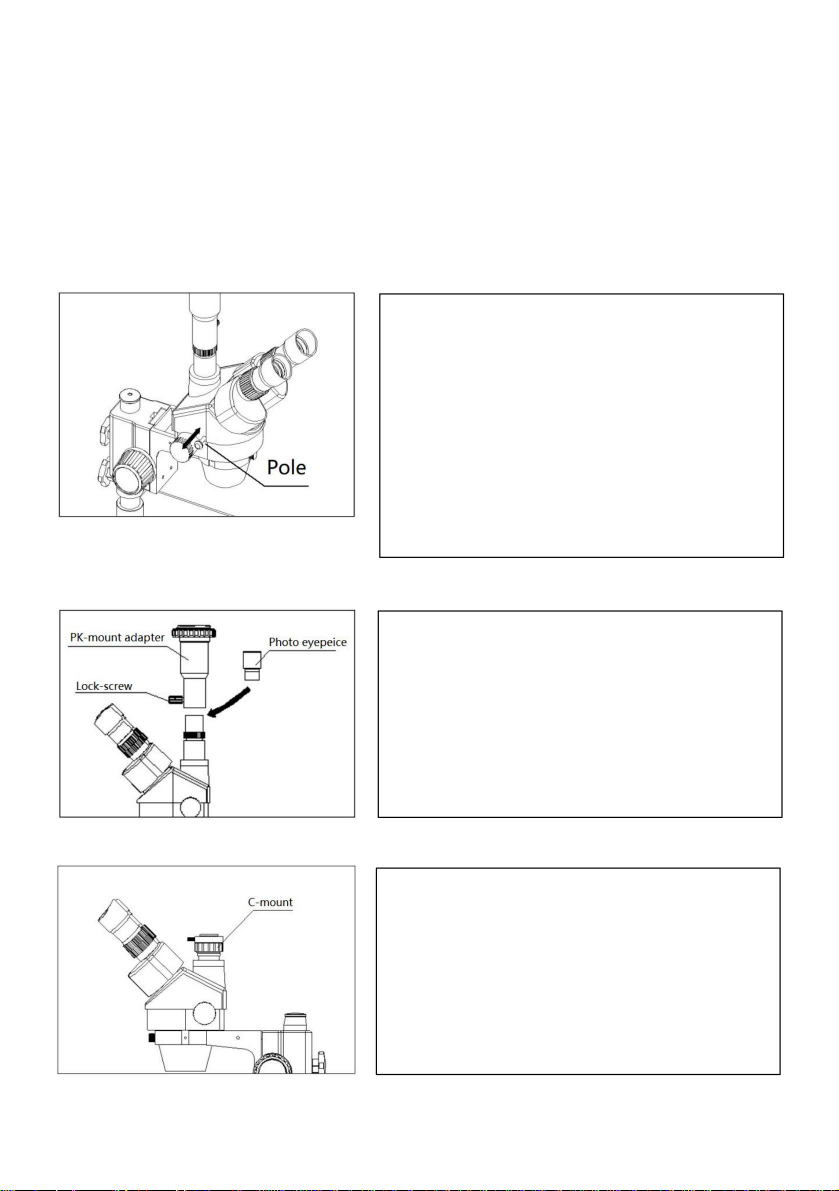
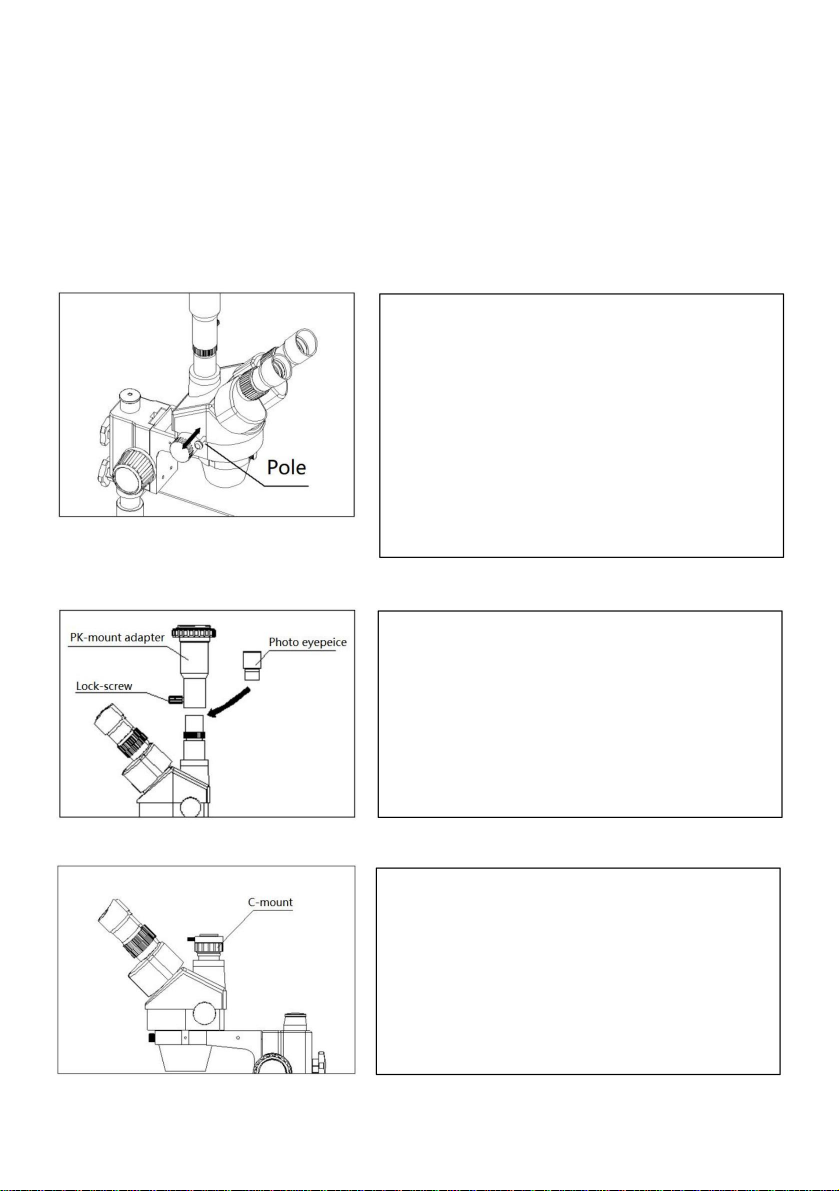
You can alternate the binocular
observation and video capture by
pushing or pulling the pole. You can
attain binocular observation by
pushing the pole inside, or attain video
capture by pulling it outside. No matter
what optical system is chosen, push or
pull the pole thoroughly.
1.Put the photo eyepieces socket of
the trinocular.
2.Connect the PK-mount adapter with
the photo eyepiece, and then tighten
the lock-screw.
1. Adjust the CTV to a suitable
position by rotating C-mount.
2. Note: The range of the
adjustment:1~2mm in general.
3-7-1. For user who does not wear glasses, hold the diopter-adjusting ring
to prevent them from rotating and turn the eyepiece till the eyepiece shields
fit the observer well.
3-7-2. For user who wears glasses,take the eyepiece shields off before
observation.
3-8. Choose the optical system
3-9. Mount the photo eyepiece and the PK-mount adapter.
3-10. Adjust the CTV
Page 12

MAINTENANCE
1. All lenses must be kept clean. Fine dust on the surface of the lens
should be blown off with hand blower or wiped off gently with a soft lens
tissue; Fingerprints or oil marked on it should be wiped off with a tissue
moistened with a small amount of xylene or a 3:7 mixture of alcohol and
ether.
2. Never use the organic solution to clean the other surface (especially
the plastic surfaces). If necessary, please choose the neutral detergent.
3. Do not take the microscope apart for fearing that it is damaged.
4. After using, cover the microscope with the dust-cover provided and
store it in a dry and clean place free from moisture to prevent rust.
5. To keep the performance of the microscope, please check it periodically.
The detail can be gotten from the agent nearby.
Page 13

TOUBLESHOOTING SCHEDULE
The performance of the microscope can’t be made fully because of
Trouble
Cause
Remedy
1、
Double images
Interpupillary distance is not
correct
Readjust it
Diopter adjustment is not correct
Readjust it
Magnification of each eyepiece is
not the same size
Mount the same size
eyepiece
2、
Dirt appears in the field of
view
Dirt on the specimen
Clean the specimen
Dirt on the surfaces of eyepiece
Clean the surface
3、
Image is not clear
Dirt on the surfaces of the
objectives
Clean the objectives
4、
Image is not clear while
the focus changing
Diopter adjustment is not correct
Readjust the diopter
Focus is not correct
Readjust the focus
5、
The focusing knob is not
The focusing knob is too tight
Loosen it to a suitable
position
6、
The image is obscure
because of the head
slipping down by itself
The focusing knob is too loose
Loosen it to a suitable
position
7、
Eyes fell tired easily
Diopter adjustment is not correct
Adjust the diopter
Brightness of light is not correct
Adjust the brightness
8
、
Incision image appears
in the field of view or of
the video view
The pole is not in correct position
Pull or push it to the correct
position
unfamiliar using, this table will give some advices.
Page 14

Address: Baoshanqu Shuangchenglu 803long 11hao 1602A-1609shi
9、
The image on the
monitor is not clear
when the focusing
knob is turned.
The focus of video is not
correct
Readjust the focus of video to a
correct position
REP
EC
SHUNSHUN GmbH
Römeräcker 9 Z2021,76351
Linkenheim-Hochstetten,Germany
REP
UK
Pooledas Group Ltd
Unit 5 Albert Edward House, The Pavilions
Preston, United Kingdom
Shanghai
Imported to AUS: SIHAO PTY LTD. 1 ROKEVA STREETEASTWOOD NSW
2122 Australia
Imported to USA: Sanven Technology Ltd. Suite 250, 9166 Anaheim Place,
Rancho Cucamonga, CA 91730
Made In China
Page 15

Page 16

Technical Support and E-Warranty Certificate
www.vevor.com/support
Page 17

Machine Translated by Google
Assistancetechniqueetcertificatdegarantieélectroniquewww.vevor.com/support
MICROSCOPESTÉRÉO
MANUELD'UTILISATION
Nouscontinuonsànousengageràvousfournirdesoutilsàdesprixcompétitifs.
«Économisezlamoitié»,«Moitiéprix»outouteautreexpressionsimilaireutiliséeparnousnereprésente
qu'uneestimationdeséconomiesquevouspourriezréaliserenachetantcertainsoutilscheznousparrapport
auxgrandesmarquesetnecouvrepasnécessairementtouteslescatégoriesd'outilsquenousproposons.Nous
vousrappelonsdebienvouloirvérifiersoigneusementlorsquevouspassezunecommandecheznous
sivouséconomisezréellementlamoitiéparrapportauxgrandesmarques.
Page 18

Machine Translated by Google
Page 19
Machine Translated by Google
MICROSCOPESTÉRÉO
MODÈLE:7045PB1
7045PSTL2
BESOIND'AIDE?CONTACTEZNOUS!
Vousavezdesquestionssurnosproduits?Vousavezbesoind'assistancetechnique?N'hésitezpasà
nouscontacter:
Assistancetechniqueetcertificatdegarantie
électroniquewww.vevor.com/support
Ils'agitdelanoticed'utilisationd'origine.Veuillezlireattentivementtoutesles
instructionsdumanuelavantdel'utiliser.VEVORseréserveledroitd'interpréter
clairementnotremanueld'utilisation.L'apparenceduproduitdépendduproduit
quevousavezreçu.Veuilleznousexcuser,nousnevousinformeronsplusencasde
miseàjourtechnologiqueoulogicielledenotreproduit.
1
Page 20

Machine Translated by Google
INSTRUCTIONS
Mercibeaucoupd'avoirchoisiceproduit.Veuillezliretoutesles
instructionsavantdel'utiliser.Lesinformationsvousaiderontàobtenirlemeilleur
résultatspossibles.
CONSEILSDESÉCURITÉ
1.Lemicroscopedoitêtreplacédansunendroitsecetpropre.Nel'exposezpas
lemicroscopedirectementausoleil.Évitezlestempératuresélevéesetlesviolences
vibration.
2.Lemicroscopeétantuninstrumentdeprécision,manipulezleavecprécaution,enévitant
chocoumouvementbrusquependantletransport.
3.Pourgarderl'imageclaire,nelaissezpasd'empreintesdigitalesoudetachessurle
surfacesdelalentille.
4.Netournezjamaislesboutonsdecommandedezoomgaucheetdroitdanslesensinverse.
enmêmetemps,sinonlemicroscopeseraendommagé.
5.Lorsquevousretirezlefilmdel'appareilphoto,utilisezunemainpourtenirl'appareilphoto
pourqu'ilnetombepas.
2
Page 21

Machine Translated by Google
CONSERVEZCESINSTRUCTIONS.
1.Spécificationstechniques
PARAMÈTRESTECHNIQUES
Oculaire
10x/20
15x/15
20x/10
(Standard
Configuration)
Distancedetravail
100mm
7x
50x
Champde
Voir
28,6
4.4
Magnifique
cation
10,5x21,45,25x
67,5x
14x
90x
3,333,75x6,7101,25x
14.3
2.2
Magnifique
cation
3,5x
22,5x
7x
45x
0,5X
165mm
Champde
Objectifsauxiliaires
DistancedetravailDistancedetravail
8.9
Magnifique
cation
10,5x
67,5x
Voir
57.1
42,8x15,75x
28,6
4.4
21x
135x
1,5X
45mm
Champde
Voir
14.3
2.2
9.5
1,5
19
3
2X
Distancedetravail
30mm
Magnifique
Champde
ation
14x
90x
21x
135x
28x
180x
Voir
14.3
2.2
10.7
1.7
7.7
1.1
3
Page 22
Machine Translated by Google
2.Listedespièces
LISTEDESPIÈCES
Protectionoculaire
Caméra
Caméra
position
Tête
Visdeblocagedelatête
Agrafe
Scèneenverre
Base
position
Contrôleduzoom
Bouton
Support
Seconcentrer
bouton
Avis:
Laprincipaledifférenceentrelemodèle7045PSTL2etle7045PB1
C'estlabase.
4
Page 23
Machine Translated by Google
INSTALLATION
1.Base
2.Colonnedesupport
3.Supportdeflècheàdoublebras
4.Tigedeconnexiondusupport
5.CléA
6.CléB
7.BrasdeliaisonA1
8.Trinoculaireàfocalesimulée
têtestéréo
9.Accessoires
Étape1:
insérezlesupport
lacolonne(2)dansla
base(1)et
serrezla.
Étape2:
Insérerledouble
flèchedebras
insérezlesupport(3)
danslacolonne(2)et
fixezleaveclebouton.
5
Étape3:
InsérezlacléA(5)
dansletroudela
support
bielle(4).
Page 24
Machine Translated by Google
Étape4:
insérezlatigede
connexiondusupport(4)
danslaflèche
support(3)etle
fixeraveclacléA
(5).
Étape5:
Desserrezlecouvercle
surlatigede
connexion(4),insérez
lebrasdeliaisonA1(7)
danslaconnexion
brasetserrezle
couvercle.
Étape6:
Insérerle
simulationfocale
stéréotrinoculaire
tête(8)dansletrou
dubonderA1
bras(7)etfixezle
aveclavis.
6
Page 25
Machine Translated by Google
31.Utilisezlaplatineenverre
32.Placerlalameporteéchantillon
33.Ajusterlalameporteéchantillon
INSTALLATIONETUTILISATION
Appuyezsurlaplatineenverresurlapartieenfoncée
placezensuitel'autrecôtéduverre
lascèneseralevée.
Placezl'échantillonaucentrede
plaquedescène.Sinécessaire,serrezla
glisseraveclesclips
1.Tournezleboutondecommandeduzoomversla
Grossissementmaximal.
2.Tournezlesbaguesderéglagedioptriquespour
lezéro.
3.Observezl'échantillonàtraversle
oculairedroitetfairel'image
effacerentournantleboutondemiseaupoint.
4.Tournezleboutondecommandeduzoomversla
grossissementminimum.
5.Observezl'échantillonàtraversle
oculairedroitetfairel'image
clairentournantladioptriedroite
baguederéglage.
6.Refaiteslesétapes(1),(3),(4)et(5)jusqu'à
Page 26
Machine Translated by Google
34.Ajusterladistanceinterpupillaire
35.Réglageduvolantàmain
Ajustezleboîtierduprismedanslesensde
lapointedelaflèche(Fig.4)jusqu'àceque
l'observationsoitconfortable.
1.Sivoussouhaitezréglerledegréde
serragedubrasdemiseaupoint,vous
pouveztenirl'undesboutonsdemiseau
pointetentournerunautrepourobtenirun
positionappropriée.Ledegrédeserrage
dépenddusensderotation.Lesens
horaireest
serré,sinon,c'estlâche.
2.Lapositiondeserrageappropriéepeut
rendreleréglageplusconfortableet
empêcherlesupportdemiseau
pointdeglisserverslebassoussonpoids
pendantl'observation.
36.Montageetretraitdumicromètreoculaireenoption
1.Tournezetretirezlabaguedemontage
del'oculaire.
2.Nettoyezlemicromètreoculaireetmontez
lesurlabaguedemontageaveclecôté
d'inscriptionverslebas.
3.Tournezdoucementlabaguedemontage
aveclemicromètreoculairedansl'oculaire
jusqu'àcequ'ellesoitbienserrée.
4.Pourretirerlemicromètre
oculaire,retirezlabaguedemontageenla
tournantetretirezladumicromètre,puis
enroulezla.
Page 27
Machine Translated by Google
37.Utiliserdesprotectionsoculaires
371.Pourlesutilisateursquineportentpasdelunettes,maintenezlabaguederéglagedioptrique
pourlesempêcherdetournerettournerl'oculairejusqu'àcequelesprotectionsdel'oculaire
s'adaptebienàl'observateur.
372.Pourlesutilisateursquiportentdeslunettes,retirezlesprotectionsoculairesavant
observation.
38.Choisirlesystèmeoptique
Vouspouvezalternerlesjumelles
observationetcapturevidéopar
enpoussantouentirantlepoteau.Vouspouvez
obteniruneobservationbinoculaireen
pousserlepoteauàl'intérieurouatteindrelavidéo
capturerenletirantversl'extérieur.Peuimporte
quelsystèmeoptiqueestchoisi,pousserou
tirerlepoteauàfond.
39.Montezl'oculairephotoetl'adaptateurdemonturePK.
310.RéglerleCTV
1.Placezlaprisedesoculairesphotode
letrinoculaire.
2.Connectezl'adaptateurdemonturePKavec
l'oculairephoto,puisserrez
lavisdeblocage.
1.RéglezleCTVsurunevaleurappropriée
positionparrotationdelamontureC.
2.Remarque:Laportéedela
Réglage:1~2mmengénéral.
Page 28

Machine Translated by Google
ENTRETIEN
1.Toutesleslentillesdoiventêtremaintenuespropres.Definespoussièressetrouventàlasurfacedelalentille.
doitêtresouffléavecunsouffleuràmainouessuyédoucementavecunchiffondoux
tissu;Lesempreintesdigitalesoulestracesd'huiledoiventêtreessuyéesavecunmouchoir
humidifiéavecunepetitequantitédexylèneouunmélange3:7d'alcoolet
éther.
2.N'utilisezjamaislasolutionorganiquepournettoyerl'autresurface(enparticulier
lessurfacesenplastique).Sinécessaire,veuillezchoisirundétergentneutre.
3.Nedémontezpaslemicroscopedepeurdel'endommager.
4.Aprèsutilisation,couvrezlemicroscopeaveclecachepoussièrefourniet
Conservezledansunendroitsecetpropre,àl'abridel'humidité,pouréviterlarouille.
5.Pourmaintenirlesperformancesdumicroscope,veuillezlevérifierpériodiquement.
Lesdétailspeuventêtreobtenusauprèsdel'agentàproximité.
Page 29

Machine Translated by Google
CALENDRIERDEDÉPANNAGE
Lesperformancesdumicroscopenepeuventpasêtrepleinementréaliséesenraisonde
utilisationpeufamilière,cetableauvousdonneraquelquesconseils.
Inquiéter
1.
Ladistanceinterpupillairen'estpas
Cause
correct
Remède
Réajustezle
Imagesdoubles
2.
Lasaletéapparaîtdanslechampde
voir
3
L'imagen'estpasclaire
4.
L'imagen'estpasclairependant
lefocuschange
5.
Leboutondemiseaupointn'estpas
6.
lisse
L'imageestobscure
àcausedelatête
glissertoutseul
pendantl'observation
7.
Lesyeuxsefatiguentfacilement
Leréglagedioptriquen'estpascorrect
Legrossissementdechaqueoculaireest
paslamêmetaille
Saletésurlespécimen
Saletésurlessurfacesdel'oculaire
Saletésurlessurfacesdela
Objectifs
Leréglagedioptriquen'estpascorrect
Lamiseaupointn'estpascorrecte
Leboutondemiseaupointesttropserré
Leboutondemiseaupointesttroplâche
Leréglagedioptriquen'estpascorrect
Laluminositédelalumièren'estpascorrecte
Réajustezle
Monterlamêmetaille
oculaire
Nettoyerl'échantillon
Nettoyerlasurface
Nettoyerlesobjectifs
Réajusterladioptrie
Réajusterlamiseaupoint
Desserrezleàunniveauapproprié
position
Desserrezleàunniveauapproprié
position
Ajusterladioptrie
Réglerlaluminosité
8
L'imagedel'incisionapparaît
danslechampdevisionoude
lavuevidéo
Lepoteaun'estpasdanslabonneposition
Tirezleoupoussezleverslebonendroit
position
Page 30

Machine Translated by Google
9.
L'imagesurlemoniteur
n'estpasclairelorsque
leboutondemiseau
pointesttourné.
L'objectifdelavidéon'estpas
correct
Réajusterlamiseaupointdelavidéoà
unepositioncorrecte
Adresse:BaoshanquShuangchenglu803long11hao1602A1609shiShanghaiImporté
enAustralie:
SIHAOPTYLTD.1ROKEVASTREETEASTWOODNSW2122Australie
ImportéauxÉtatsUnis:SanvenTechnologyLtd.Suite250,9166AnaheimPlace,Rancho
Cucamonga,CA91730
SHUNSHUNGmbH
REPRÉSENTANTDELACE
Römeräcker9Z2021,76351
LinkenheimHochstetten,Allemagne
GroupePooledasLtd
REPRÉSENTANTDUROYAUMEUNI
Unité5MaisonAlbertEdward,LesPavillons
Preston,RoyaumeUni
FabriquéenChine
Page 31

Machine Translated by Google
Page 32

Machine Translated by Google
Assistancetechniqueetcertificatdegarantie
électroniquewww.vevor.com/support
Page 33

Machine Translated by Google
Technischer Support und E-Garantie-Zertifikat www.vevor.com/support
STEREOMIKROSKOP
BENUTZERHANDBUCH
Wir sind weiterhin bestrebt, Ihnen Werkzeuge zu wettbewerbsfähigen Preisen anzubieten.
„Sparen Sie die Hälfte“, „Halber Preis“ oder andere ähnliche Ausdrücke, die wir verwenden, stellen nur eine
Schätzung der Ersparnis dar, die Sie beim Kauf bestimmter Werkzeuge bei uns im Vergleich zu den großen
Topmarken erzielen können, und bedeuten nicht unbedingt, dass sie alle von uns angebotenen Werkzeugkategorien
abdecken. Wir möchten Sie freundlich daran erinnern, bei Ihrer Bestellung bei uns sorgfältig zu prüfen, ob
Sie im Vergleich zu den großen Topmarken tatsächlich die Hälfte sparen.
Page 34

Machine Translated by Google
Page 35
Machine Translated by Google
STEREOMIKROSKOP
MODELL: 7045P-B1
7045P-STL2
Brauchen Sie Hilfe? Kontaktieren Sie uns!
Sie haben Fragen zu unseren Produkten? Sie benötigen technischen Support? Dann kontaktieren
Sie uns gerne:
Technischer Support und E-Garantie-Zertifikat
www.vevor.com/support
Dies ist die Originalanleitung. Bitte lesen Sie alle Anweisungen sorgfältig durch, bevor Sie
das Gerät in Betrieb nehmen. VEVOR behält sich eine klare Auslegung unserer Bedienungsanleitung
vor. Das Erscheinungsbild des Produkts richtet sich nach dem Produkt, das Sie erhalten
haben. Bitte verzeihen Sie uns, dass wir Sie nicht erneut informieren, wenn es Technologie- oder
Software-Updates für unser Produkt gibt.
1
Page 36

Machine Translated by Google
ANWEISUNGEN
Vielen Dank, dass Sie sich für dieses Produkt entschieden haben. Bitte lesen Sie alle
Lesen Sie vor der Verwendung die Bedienungsanleitung sorgfältig durch. Die Informationen helfen Ihnen, die
mögliche Ergebnisse.
SICHERHEITSTIPPS
1. Das Mikroskop sollte an einem trockenen und sauberen Ort aufgestellt werden. Setzen Sie es nicht
Setzen Sie das Mikroskop nicht direkt der Sonne aus. Vermeiden Sie hohe Temperaturen und heftige
Vibration.
2. Da das Mikroskop ein Präzisionsinstrument ist, gehen Sie vorsichtig damit um und vermeiden Sie
Stöße oder plötzliche Bewegungen während des Transports.
3. Um das Bild klar zu halten, hinterlassen Sie keine Fingerabdrücke oder Flecken auf dem
Oberflächen der Linse.
4. Drehen Sie den linken und rechten Zoom-Regler niemals in die entgegengesetzte Richtung
gleichzeitig, sonst wird das Mikroskop beschädigt.
5. Wenn Sie den Film aus der Kamera nehmen, halten Sie die Kamera mit einer Hand fest
damit es nicht umfällt.
2
Page 37

Machine Translated by Google
BEWAHREN SIE DIESE ANWEISUNGEN AUF.
1. Technische Daten
TECHNISCHE PARAMETER
Okular
10x/20
15x/15
20x/10
(Standard
Konfiguration)
Arbeitsabstand
100 mm
Herrlich
Fachgebiet
Kation
7x
50x
10,5x 21,4 5,25x
67,5x
14x
90-fach
0,5X
165 mm
Fachgebiet
3,5x
Sicht
28,6
4.4
Herrlich
Kation
22,5x
3,3 33,75x 6,7 101,25x
14.3
2.2
7x
45x
(Hilfsziele)
ArbeitsabstandArbeitsabstand
Herrlich
Sicht
Kation
57.1
8.9
42,8 x 15,75x
28,6
4.4
10,5x
67,5x
21x
135x
1,5X
45 mm
Fachgebiet
Sicht
19
3
14.3
2.2
9,5
1.5
2X
Arbeitsabstand
30 mm
Herrlich
ation
14x
90-fach
21x
135x
28x
180-fach
Fachgebiet
Sicht
14.3
2.2
10.7
1.7
7.7
1.1
3
Page 38
Machine Translated by Google
2. Stückliste
TEILELISTE
Okularschutz
Kamera
Kamera
Position
Kopf
Kopfsicherungsschraube
Ausschneiden
Glasbühne
Base
Position
Zoom-Steuerung
Knopf
Klammer
Fokussierung
Knopf
Beachten:
Der Hauptunterschied zwischen Modell 7045P-STL2 und 7045P-B1
Ist die Basis.
4
Page 39
Machine Translated by Google
INSTALLATION
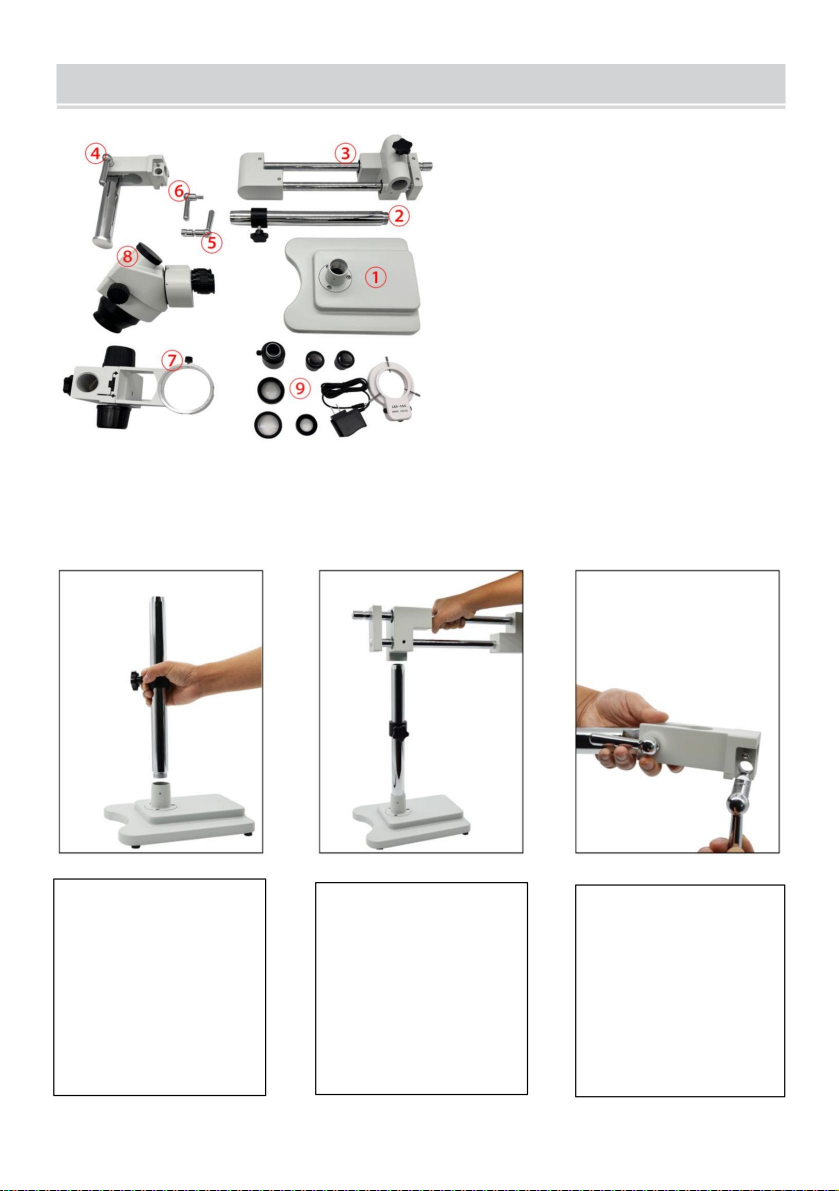
1. Basis
2. Standsäule
3. Doppelarm-Galgenständer
4. Halterung Verbindungsstange
5. Schraubenschlüssel A
6. Schraubenschlüssel B
7. A1 Bonder-Arm
8. Simulfokales Trinokular
Stereokopf
9. Zubehör
Schritt 1:
Den Ständer einsetzen
Säule (2) in den Sockel
(1) einsetzen
und festziehen.
Schritt 2:
Legen Sie die doppelte
Armausleger
Ständer (3) in die Säule
(2) einsetzen und mit
dem Drehknopf fixieren.
5
Schritt 3:
Den Schlüssel A(5) in die
Öffnung des
Halterung
Verbindungsstange (4).
Page 40
Machine Translated by Google
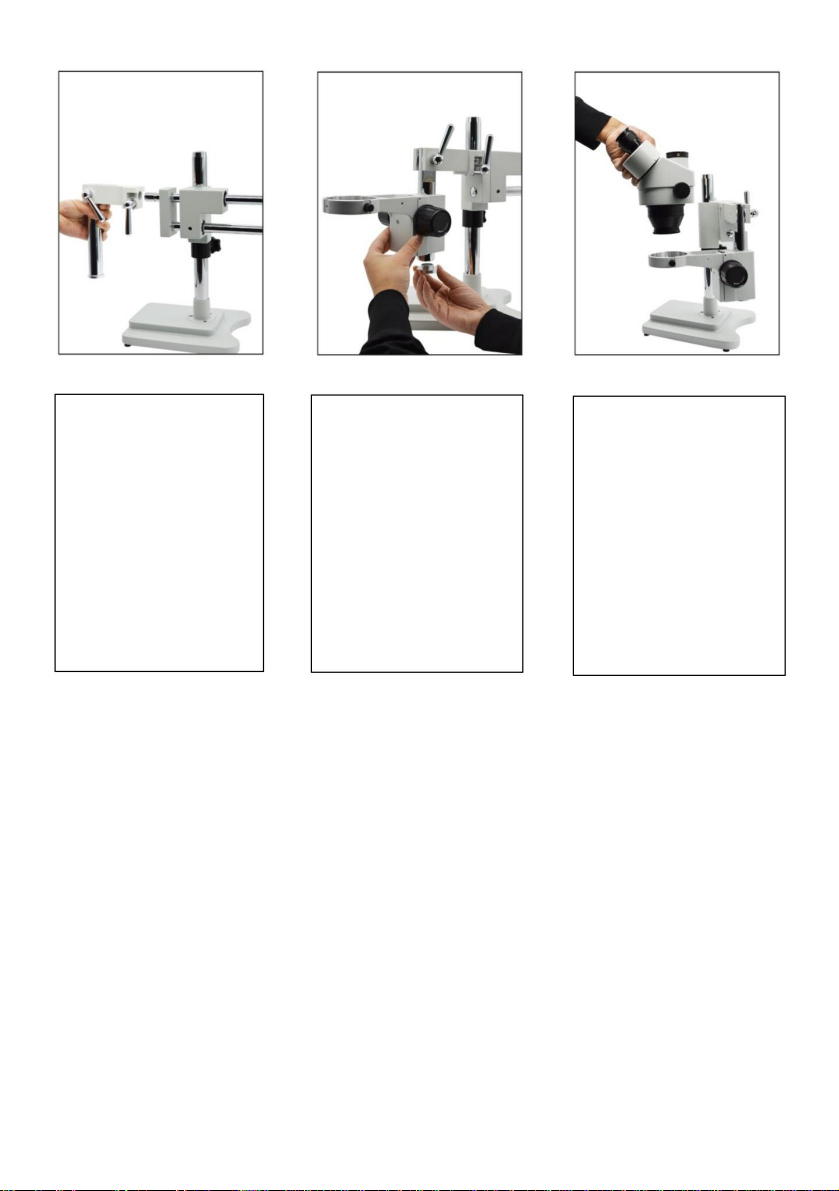
Schritt 4:
Stecken Sie die
Verbindungsstange (4) in
den Ausleger
(3) und befestigen
Sie ihn mit dem
Schraubenschlüssel A (5).
Schritt 5:
Lösen Sie die Abdeckung
An der
Verbindungsstange (4)
den A1-Bonderarm (7) in die
Verbindungsstange einsetzen.
Arm und ziehen Sie die
Abdeckung fest.
Schritt 6:
Legen Sie den
simultan
trinokulares Stereo
Kopf (8) in das Loch des
A1-Bonders
(7) und befestigen Sie
ihn mit der Schraube.
6
Page 41
Machine Translated by Google
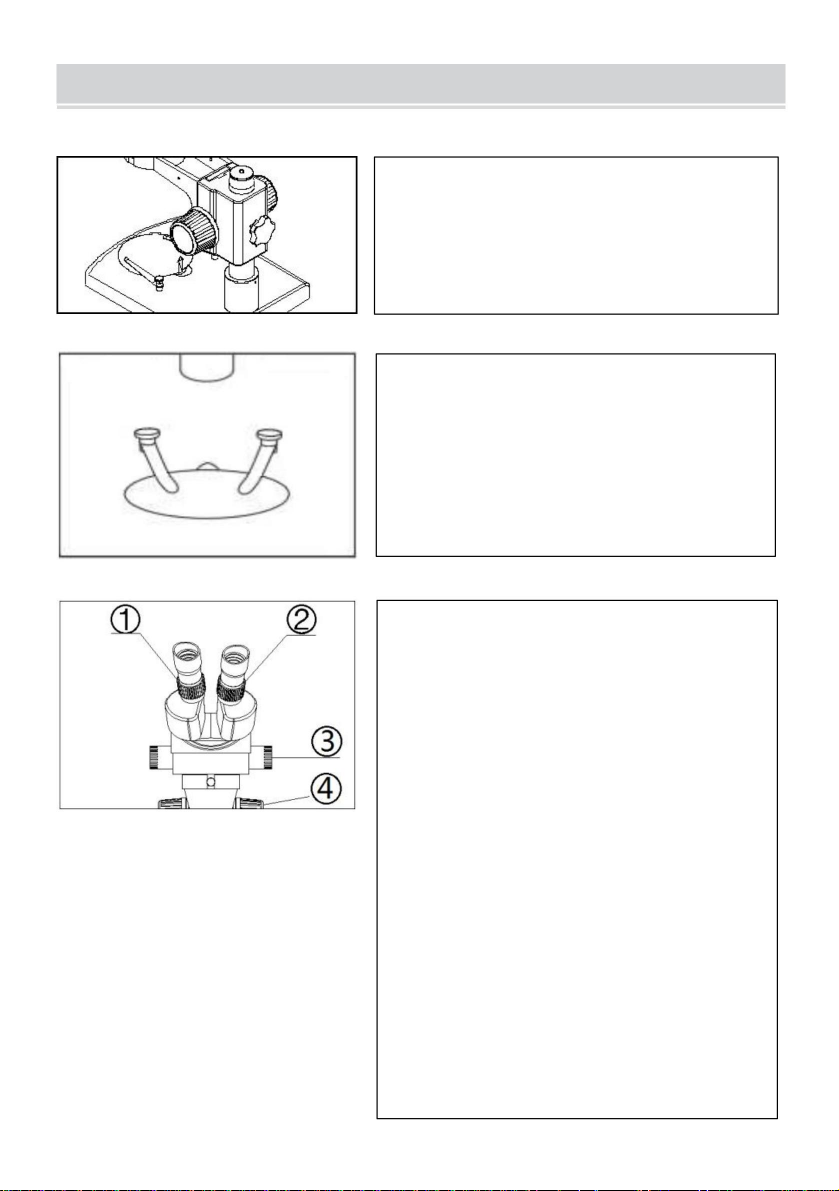
3-1. Verwenden Sie die Glasbühne
3-2. Objektträger einsetzen
3-3. Objektträger einstellen
INSTALLATION UND VERWENDUNG
Drücken Sie die Glasplatte auf die versenkte
Platzieren Sie dann die andere Seite des Glases
Bühne wird aufgehoben.
Legen Sie die Probe auf die Mitte
Tischplatte. Klemmen Sie ggf. die
Schieben Sie mit den Clips
1.Drehen Sie den Zoom-Regler ÿ auf die
maximale Vergrößerung.
2.Drehen Sie die Dioptrien-Einstellringe auf
die Null.
3.Beobachten Sie die Probe durch die
rechten Okular und machen Sie das Bild
durch Drehen des Fokussierknopfes ÿ klar.
4. Drehen Sie den Zoom-Regler auf die
minimale Vergrößerung.
5.Beobachten Sie die Probe durch die
rechten Okular und machen Sie das Bild
klar durch Drehen der rechten Dioptrie
Einstellring ÿ.
6. Wiederholen Sie die Schritte (1), (3), (4) und (5) bis
Page 42
Machine Translated by Google
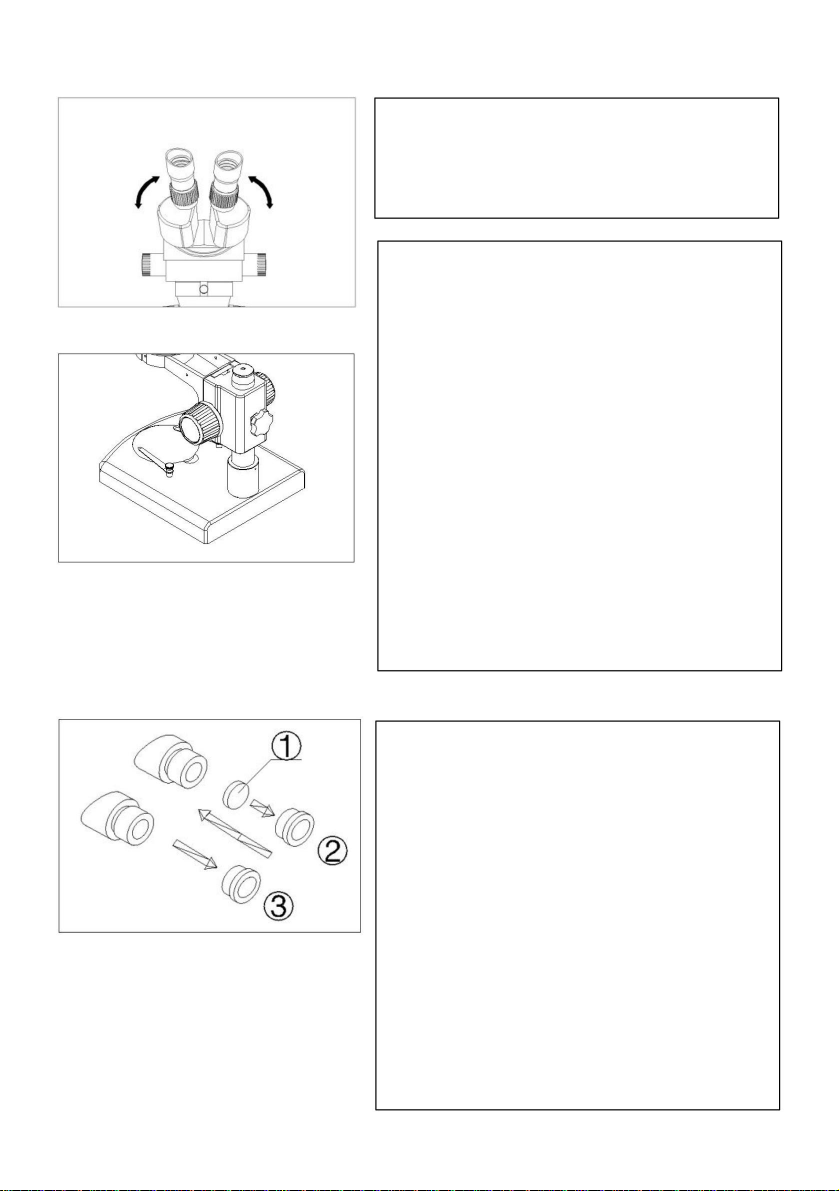
3-4. Den Augenabstand einstellen
3-5. Einstellung mit dem Handrad
Passen Sie das Prismengehäuse in
Pfeilrichtung (Abb. 4) an, bis die Beobachtung
angenehm ist.
1.Wenn Sie den Grad der
Um die Spannung des Fokussierarms zu
überprüfen, können Sie einen der Fokussierknöpfe
festhalten und einen anderen drehen, um eine
geeignete Position. Der Grad der
Festigkeit hängt von der Drehrichtung ab.
Die Drehrichtung im Uhrzeigersinn ist
fest, andernfalls ist es locker.
2. Die geeignete Feststellposition kann die
Einstellung komfortabler machen und
verhindern, dass die Fokussierhalterung
während der Beobachtung durch ihr Gewicht
nach unten rutscht.
3-6. Montieren und Entfernen des optionalen Okularmikrometers
1. Drehen und entfernen Sie den Montagering ÿ
vom Okular.
2. Reinigen Sie das Okularmikrometer ÿ und
montieren Sie es mit der Beschriftungsseite nach
unten am Montagering.
3. Drehen Sie den Montagering mit dem
Okularmikrometer vorsichtig in das Okular,
bis er fest sitzt ÿ.
4. Um das Okularmikrometer zu
entfernen, lösen Sie den Montagering ÿ durch
Drehen, nehmen Sie ihn aus dem Mikrometer
heraus und wickeln Sie ihn anschließend ein.
Page 43
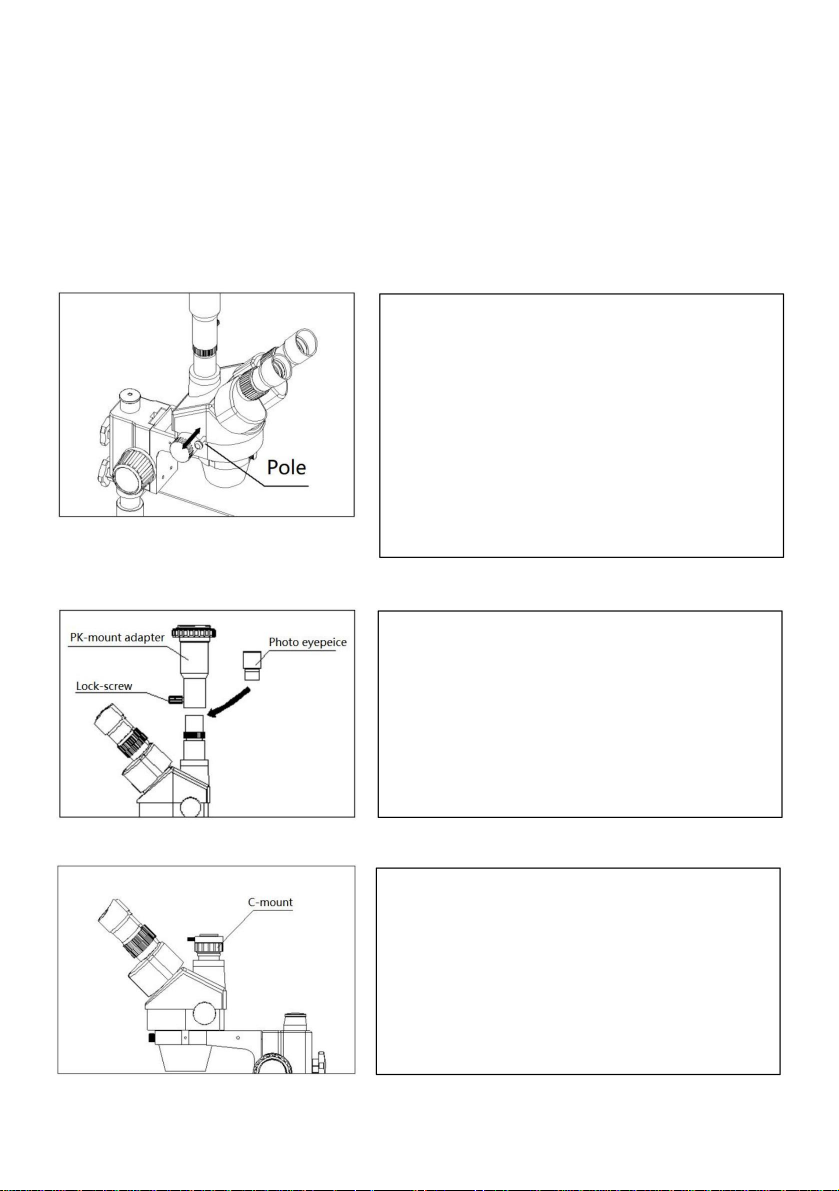
Machine Translated by Google
3-7. Verwenden Sie Okularblenden
3-7-1. Für Benutzer, die keine Brille tragen, halten Sie den Dioptrien-Einstellring
um ein Verdrehen zu verhindern und drehen Sie das Okular, bis das Okular
passen gut zum Beobachter.
3-7-2. Brillenträger sollten vor dem Gebrauch die Okularabdeckungen abnehmen.
Beobachtung.
3-8. Wählen Sie das optische System
Sie können das Fernglas wechseln
Beobachtung und Videoaufzeichnung durch
Drücken oder Ziehen der Stange. Sie können
binokulare Beobachtung erreichen durch
Schieben Sie die Stange hinein, oder erreichen Sie Video
fangen, indem man es nach draußen zieht. Egal
welches optische System gewählt wird, drücken oder
Ziehen Sie die Stange gründlich heraus.
3-9. Montieren Sie das Fotookular und den PK-Mount-Adapter.
3-10. Passen Sie das CTV an
1.Setzen Sie die Fotookularbuchse des
das Trinokular.
2. Verbinden Sie den PK-Mount-Adapter mit
das Fotookular und ziehen Sie dann fest
die Feststellschraube.
1. Stellen Sie das CTV auf eine geeignete
Position durch Drehen des C-Mounts.
2. Hinweis: Die Reichweite der
Einstellung: im Allgemeinen 1–2ÿmm.
Page 44

Machine Translated by Google
WARTUNG
1. Alle Linsen müssen sauber gehalten werden. Feiner Staub auf der Oberfläche der Linse
sollte mit einem Handgebläse abgeblasen oder mit einer weichen Linse sanft abgewischt werden
Tuch; Fingerabdrücke oder Ölflecken sollten mit einem Tuch abgewischt werden
angefeuchtet mit einer kleinen Menge Xylol oder einer 3:7-Mischung aus Alkohol und
Äther.
2. Verwenden Sie niemals die organische Lösung zum Reinigen anderer Oberflächen (insbesondere
die Kunststoffoberflächen). Wählen Sie bei Bedarf ein neutrales Reinigungsmittel.
3. Nehmen Sie das Mikroskop nicht auseinander, da Sie befürchten, es könnte beschädigt werden.
4. Decken Sie das Mikroskop nach Gebrauch mit der mitgelieferten Staubschutzhülle ab und
Lagern Sie es an einem trockenen und sauberen Ort ohne Feuchtigkeit, um Rost zu vermeiden.
5. Um die Leistung des Mikroskops aufrechtzuerhalten, überprüfen Sie es bitte regelmäßig.
Nähere Informationen erhalten Sie bei Ihrem nächstgelegenen Vertreter.
Page 45

Machine Translated by Google
ZEITPLAN ZUR FEHLERSUCHE
Die Leistung des Mikroskops kann nicht voll ausgeschöpft werden, da
Wenn Sie mit der Verwendung nicht vertraut sind, gibt diese Tabelle einige Ratschläge.
Problem
1.
Der Augenabstand ist nicht
Ursache
richtig
Abhilfe
Passen Sie es an
Doppelbilder
2.
Schmutz erscheint im Bereich der
Sicht
3.
Das Bild ist nicht klar
4.
Das Bild ist unscharf, während
der Fokus ändert sich
5.
Der Fokussierknopf ist nicht
6.
glatt
Das Bild ist unklar
wegen des Kopfes
rutscht von selbst nach unten
während der Beobachtung
7.
Die Augen ermüden schnell
Die Dioptrieneinstellung ist nicht korrekt
Die Vergrößerung jedes Okulars beträgt
nicht die gleiche Größe
Schmutz auf der Probe
Schmutz auf den Oberflächen des Okulars
Schmutz auf den Oberflächen der
Ziele
Die Dioptrieneinstellung ist nicht korrekt
Fokus ist nicht korrekt
Der Fokussierknopf ist zu fest
Der Fokussierknopf ist zu locker
Die Dioptrieneinstellung ist nicht korrekt
Die Helligkeit des Lichts stimmt nicht
Passen Sie es an
Montieren Sie die gleiche Größe
Okular
Reinigen Sie die Probe
Reinigen Sie die Oberfläche
Reinigen Sie die Objektive
Stellen Sie den Dioptrienwert neu ein
Fokus neu einstellen
Lösen Sie es auf eine geeignete
Position
Lösen Sie es auf eine geeignete
Position
Passen Sie die Dioptrie an
Passen Sie die Helligkeit an
8.
Das Schnittbild erscheint
im Sichtfeld oder von
die Videoansicht
Die Stange ist nicht in der richtigen Position
Ziehen oder drücken Sie ihn in die richtige
Position
Page 46

Machine Translated by Google
9.
Beim Drehen des
Fokussierknopfs ist das
Bild auf dem Monitor
nicht klar.
Der Fokus des Videos liegt nicht
richtig
Stellen Sie den Fokus des Videos auf die
richtige Position ein
Adresse: Baoshanqu Shuangchenglu 803long 11hao 1602A-1609shi Shanghai Importiert
nach AUS:
SIHAO PTY LTD. 1 ROKEVA STREETEASTWOOD NSW 2122 Australien
Importiert in die USA: Sanven Technology Ltd. Suite 250, 9166 Anaheim Place, Rancho
Cucamonga, CA 91730
SHUNSHUN GmbH
Vertreter der EG
Römeräcker 9 Z2021,76351
Linkenheim-Hochstetten,Germany
Pooledas Group Ltd
UK REP
Einheit 5 Albert Edward House, Die Pavillons
Preston, Vereinigtes Königreich
In China hergestellt
Page 47

Machine Translated by Google
Page 48

Machine Translated by Google
Technischer Support und E-Garantie-Zertifikat
www.vevor.com/support
Page 49

Machine Translated by Google
Supporto tecnico e certificato di garanzia elettronica www.vevor.com/support
MICROSCOPIO STEREO
MANUALE D'USO
Continuiamo a impegnarci per fornirvi strumenti a prezzi competitivi.
"Risparmia la metà", "Metà prezzo" o qualsiasi altra espressione simile da noi utilizzata rappresenta
solo una stima del risparmio che potresti ottenere acquistando determinati utensili con noi rispetto ai
principali marchi principali e non necessariamente intende coprire tutte le categorie di utensili da noi
offerti. Ti ricordiamo cortesemente di verificare attentamente quando effettui un ordine con noi se
stai effettivamente risparmiando la metà rispetto ai principali marchi principali.
Page 50

Machine Translated by Google
Page 51
Machine Translated by Google
MICROSCOPIO STEREO
MODELLO: 7045P-B1
HAI BISOGNO DI AIUTO? CONTATTACI!
Hai domande sui prodotti? Hai bisogno di supporto tecnico? Non esitare a contattarci:
7045P-STL2
Supporto tecnico e certificato di garanzia
elettronica www.vevor.com/support
Questa è l'istruzione originale, si prega di leggere attentamente tutte le istruzioni del
manuale prima di utilizzare. VEVOR si riserva una chiara interpretazione del nostro manuale
utente. L'aspetto del prodotto sarà soggetto al prodotto ricevuto. Vi preghiamo di
perdonarci se non vi informeremo di nuovo se ci sono aggiornamenti tecnologici o software sul
nostro prodotto.
1
Page 52

Machine Translated by Google
ISTRUZIONI
Grazie mille per aver scelto questo prodotto. Si prega di leggere tutte le
istruzioni prima di utilizzarlo. Le informazioni ti aiuteranno a ottenere il meglio
possibili risultati.
SUGGERIMENTI PER LA SICUREZZA
1. Il microscopio deve essere posizionato in un luogo asciutto e pulito. Non esporre
il microscopio direttamente al sole. Evitare alte temperature e violente
vibrazione.
2. Poiché il microscopio è uno strumento di precisione, maneggiarlo con cura, evitando
impatto o movimento brusco durante il trasporto.
3. Per mantenere l'immagine nitida, non lasciare impronte digitali o macchie sulla
superfici della lente.
4. Non girare mai la manopola di controllo dello zoom sinistra e destra nella direzione opposta
allo stesso tempo, altrimenti il microscopio verrà danneggiato.
5. Quando si rimuove la pellicola dalla fotocamera, utilizzare una mano per tenere la fotocamera
in modo che non cada.
2
Page 53

Machine Translated by Google
CONSERVARE QUESTE ISTRUZIONI.
1. Specifiche tecniche
PARAMETRI TECNICI
Oculare
10x/20
15x/15
20x/10
(Standard
Configurazione)
Distanza di lavoro
100mm
7x
50 volte
Campo di
Visualizzazione
28.6
Magnifico
cation
10,5x21,4 5,25x
67,5x
14x
14.3
90x
0,5X
Distanza di lavoro
165mm
Magnifico
Campo di
cation
3,5x
4.4
22,5x
3,3 33,75x 6,7 101,25x
7x
2.2
45x
(Obiettivi ausiliari)
1,5X
Visualizzazione
57.1
8.9
42,8x15,75x
Distanza di lavoro
45mm
Magnifico
Campo di
cation
10,5x
67,5x
Visualizzazione
14.3
Distanza di lavoro
Magnifico
19
3
2.2
28.6
4.4 1.1
21x
135x
9.5
1.5
2X
30mm
Campo di
azione
14x
90x
21x
135x
28x
180x
Visualizzazione
14.3
2.2
10.7
1.7
7.7
3
Page 54
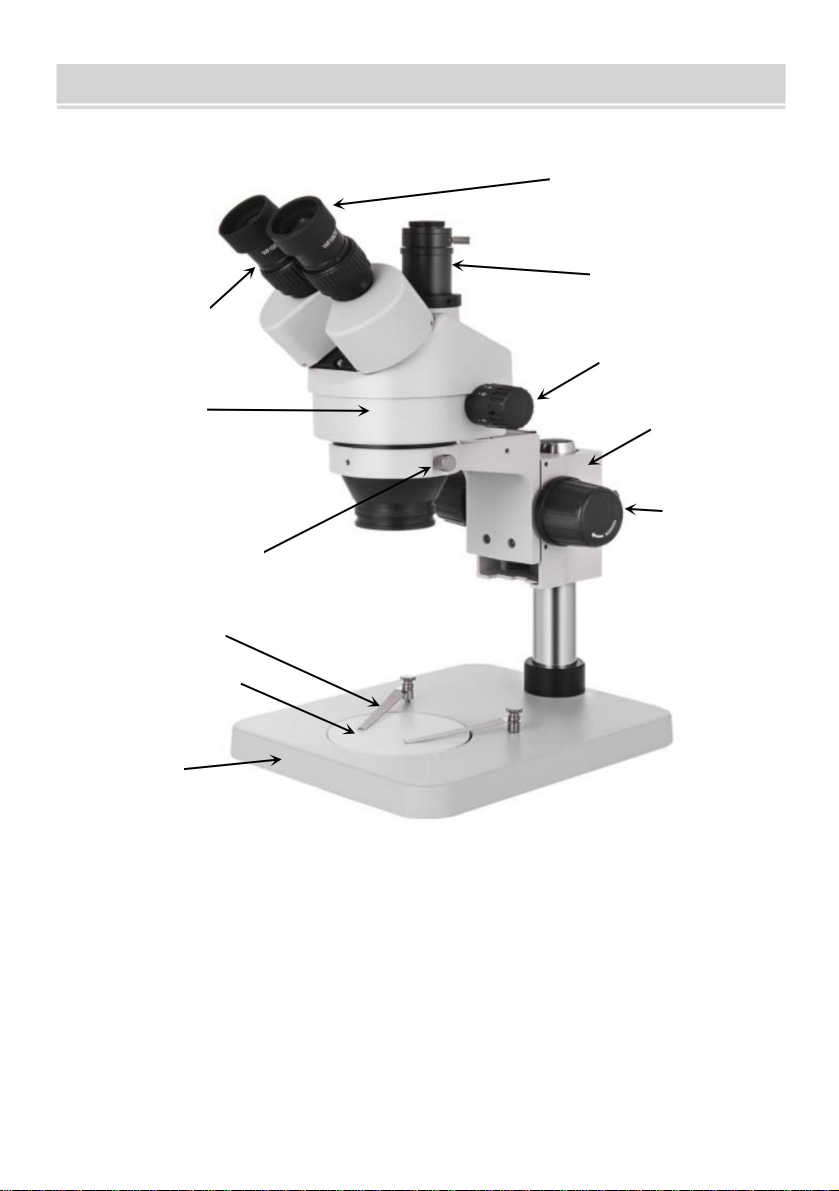
Machine Translated by Google
2. Elenco delle parti
ELENCO DELLE PARTI
Protezione oculare
Telecamera
Telecamera
posizione
Testa
Vite di bloccaggio della testa
Clip
Palco in vetro
Base
posizione
Controllo dello zoom
Manopola
Staffa
Messa a fuoco
manopola
Avviso:
La differenza principale tra il modello 7045P-STL2 e 7045P-B1
È la base.
4
Page 55
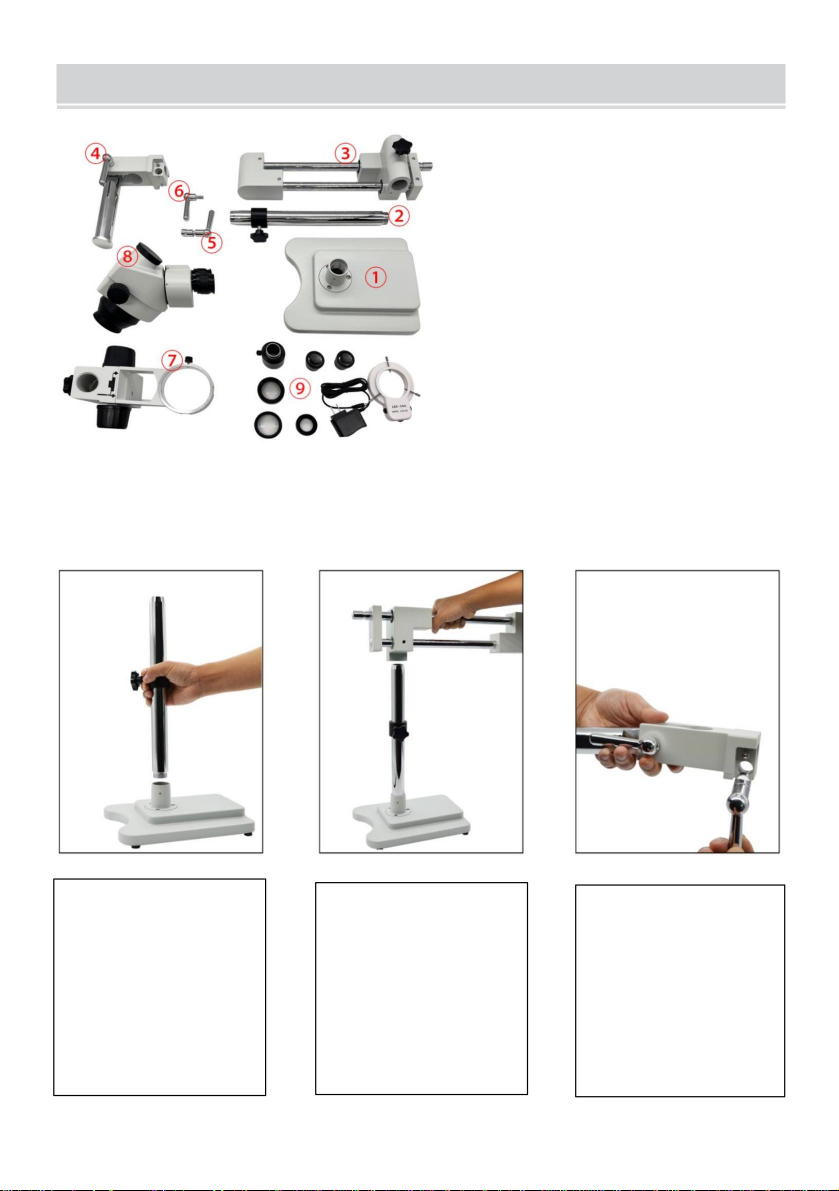
Machine Translated by Google
INSTALLAZIONE
1. Base
2. Colonna di supporto
3. Supporto a braccio doppio
4. Asta di collegamento della staffa
5. Chiave A
6. Chiave B
7. Braccio incollatore A1
8. Simul-Focal trinocular
testa stereo
9. Accessori
Fase 1:
inserire il supporto
colonna(2) nella
base(1) e
serrarla.
Fase 2:
Inserisci il doppio
braccio di spinta
supporto(3) nella
colonna(2) e fissarlo
con la manopola.
5
Fase 3:
Inserire la chiave A(5)
nel foro del
parentesi
biella(4).
Page 56
Machine Translated by Google
Fase 4:
inserire la barra di
collegamento della
staffa (4) nel braccio
supporto(3) e
fissarlo saldamente
con la chiave A(5).
Passaggio 5:
Allentare la copertura
sulla biella (4),
inserire il braccio di
collegamento A1 (7)
nella connessione
braccio e stringere il
coperchio.
Fase 6:
Inserire il
simul-focale
stereo trinoculare
testa(8) nel foro del
legante A1
braccio(7) e fissarlo
con la vite.
6
Page 57

Machine Translated by Google
3-1. Utilizzare il palco di vetro
3-2. Posizionare il vetrino portacampione
3-3. Regolare il vetrino del campione
INSTALLAZIONE E UTILIZZO
Premere il piano di vetro sul fondo
posiziona poi l'altro lato del vetro
il palco verrà sollevato.
Posizionare il campione al centro di
piastra di fase. Se necessario, bloccare la
scivolare con le clip
1.Ruotare la manopola di controllo dello zoom ÿsu
ingrandimento massimo.
2.Ruotare gli anelli di regolazione diottrica su
lo zero.
3.Osservare il campione attraverso il
oculare destro e creare l'immagine
chiara ruotando la manopola di messa a fuocoÿ.
4. Ruotare la manopola di controllo dello zoom verso
ingrandimento minimo.
5.Osservare il campione attraverso il
oculare destro e creare l'immagine
chiaro ruotando la diottria destra
anello di regolazioneÿ.
6. Ripetere i passaggi (1), (3), (4) e (5) fino a
Page 58
Machine Translated by Google
3-4. Regolare la distanza interpupillare
3-5. Regolazione del volantino
Regolare l'alloggiamento del prisma lungo la
direzione della freccia (Fig. 4) fino a quando
l'osservazione risulta confortevole.
1.Se si desidera regolare il grado di
serraggio del braccio di messa a fuoco, è
possibile tenere una delle manopole di messa
a fuoco e girarne un'altra per ottenere una
posizione adatta. Il grado di tenuta
dipende dalla direzione in cui deve essere
ruotato. La direzione oraria è
stretto, altrimenti è largo.
2. La posizione di serraggio appropriata può
rendere la regolazione più comoda ed
evitare che la staffa di messa a
fuoco scivoli verso il basso a causa del suo
peso durante l'osservazione.
3-6. Montare e rimuovere il micrometro oculare opzionale
1. Ruotare e rimuovere l'anello di montaggio ÿ
dall'oculare.
2. Pulire il micrometro dell'oculareÿ e montarlo
sull'anello di montaggio con il lato con l'iscrizione
rivolto verso il basso.
3. Ruotare delicatamente l'anello di montaggio
con il micrometro dell'oculare nell'oculare
fino a stringerlo saldamenteÿ.
4. Per rimuovere il micrometro
dell'oculare, smontare l'anello di montaggioÿ
ruotandolo ed estraendolo dal micrometro,
quindi avvolgerlo.
Page 59
Machine Translated by Google
3-7. Utilizzare protezioni oculari
3-7-1. Per gli utenti che non indossano occhiali, tenere l'anello di regolazione diottrica
per evitare che ruotino e girare l'oculare finché gli schermi dell'oculare
si adattano bene all'osservatore.
3-7-2. Per gli utenti che indossano occhiali, togliere le protezioni degli oculari prima
osservazione.
3-8. Scegli il sistema ottico
È possibile alternare il binocolo
osservazione e cattura video da parte
spingendo o tirando il palo. Puoi
ottenere l'osservazione binoculare tramite
spingendo il palo all'interno, o raggiungere il video
cattura tirandolo fuori. Non importa
quale sistema ottico viene scelto, spingere o
tirare il palo con forza.
3-9. Montare l'oculare fotografico e l'adattatore con attacco PK.
3-10. Regolare il CTV
1. Inserire la presa degli oculari fotografici
il trinoculare.
2. Collegare l'adattatore PK-mount con
l'oculare fotografico, quindi stringere
la vite di bloccaggio.
1. Regolare il CTV su una posizione adatta
posizione ruotando il supporto C.
2. Nota: la gamma del
regolazione: 1~2mm in generale.
Page 60

Machine Translated by Google
MANUTENZIONE
1. Tutte le lenti devono essere tenute pulite. Polvere sottile sulla superficie della lente
dovrebbe essere soffiato via con un soffiatore a mano o pulito delicatamente con una lente morbida
fazzoletto; Le impronte digitali o l'olio che vi è rimasto impresso devono essere rimossi con un fazzoletto
inumidito con una piccola quantità di xilene o una miscela 3:7 di alcol e
etere.
2. Non utilizzare mai la soluzione organica per pulire l'altra superficie (specialmente
superfici in plastica). Se necessario, scegliere il detergente neutro.
3. Non smontare il microscopio per timore che possa danneggiarsi.
4. Dopo l'uso, coprire il microscopio con la copertura antipolvere fornita e
conservarlo in un luogo asciutto, pulito e al riparo dall'umidità per prevenire la ruggine.
5. Per mantenere le prestazioni del microscopio, controllarlo periodicamente.
Per maggiori dettagli rivolgersi all'agente più vicino.
Page 61

Machine Translated by Google
PROGRAMMA DI RISOLUZIONE DEI PROBLEMI
Le prestazioni del microscopio non possono essere realizzate completamente a causa di
Se non si ha familiarità con l'uso, questa tabella fornirà alcuni consigli.
Guaio
1ÿ
Immagini doppie
2ÿ
Lo sporco appare nel campo di
visualizzazione
3ÿ
L'immagine non è chiara
4ÿ
L'immagine non è chiara mentre
il focus cambia
5ÿ
La manopola di messa a fuoco non è
6ÿ
L'immagine è oscura
a causa della testa
scivolare giù da solo
durante l'osservazione
7ÿ
Gli occhi si stancavano facilmente
liscio
Causa
La distanza interpupillare non è
corretto
La regolazione diottrica non è corretta
L'ingrandimento di ciascun oculare è
non della stessa dimensione
Sporcizia sul campione
Sporcizia sulle superfici dell'oculare
Sporcizia sulle superfici del
obiettivi
La regolazione diottrica non è corretta
La messa a fuoco non è corretta
La manopola di messa a fuoco è troppo stretta
La manopola di messa a fuoco è troppo allentata
La regolazione diottrica non è corretta
La luminosità della luce non è corretta
Rimedio
Riaggiustarlo
Riaggiustarlo
Montare la stessa dimensione
oculare
Pulisci il campione
Pulisci la superficie
Pulisci gli obiettivi
Regolare nuovamente la diottria
Regolare nuovamente la messa a fuoco
Allentarlo a una distanza adatta
posizione
Allentarlo a una distanza adatta
posizione
Regolare la diottria
Regola la luminosità
8ÿ
Appare l'immagine dell'incisione
nel campo visivo o di
la vista video
Il palo non è nella posizione corretta
Tirarlo o spingerlo nella posizione corretta
posizione
Page 62

Machine Translated by Google
9ÿ
L'immagine sul monitor
non è nitida quando si
gira la manopola di
messa a fuoco.
Il focus del video non è
corretto
Regolare nuovamente la messa a fuoco del video
nella posizione corretta
Indirizzo: Baoshanqu Shuangchenglu 803long 11hao 1602A-1609shi Shanghai Importato
in AUS:
SIHAO PTY LTD. 1 ROKEVA STREETEASTWOOD NSW 2122 Australia
Importato negli USA: Sanven Technology Ltd. Suite 250, 9166 Anaheim Place, Rancho
Cucamonga, CA 91730
Azienda
Rappresentante della CE
Römeräcker 9 Z2021,76351
Linkenheim-Hochstetten, Germania
Gruppo Pooledas Ltd
RAPPRESENTANZA DEL REGNO UNITO
Unità 5 Albert Edward House, I padiglioni
Preston, Regno Unito
Made in China
Page 63

Machine Translated by Google
Page 64

Machine Translated by Google
Supporto tecnico e certificato di garanzia
elettronica www.vevor.com/support
Page 65

Machine Translated by Google
Soportetécnicoycertificadodegarantíaelectrónicawww.vevor.com/support
MICROSCOPIOESTÉREO
MANUALDELUSUARIO
Seguimoscomprometidosabrindarleherramientasaprecioscompetitivos.
"Ahorrelamitad","mitaddeprecio"ocualquierotraexpresiónsimilarqueutilicemossolorepresenta
unaestimacióndelahorroquepodríaobteneralcomprarciertasherramientasconnosotrosencomparación
conlasprincipalesmarcasynonecesariamentesignificaquecubratodaslascategoríasdeherramientas
queofrecemos.Lerecordamosque,alrealizarunpedidoconnosotros,verifiquecuidadosamentesi
realmenteestáahorrandolamitadencomparaciónconlasprincipalesmarcas.
Page 66

Machine Translated by Google
Page 67
Machine Translated by Google
MICROSCOPIOESTÉREO
MODELO:7045PB1
¿NECESITAAYUDA?¡CONTÁCTENOS!
¿Tienepreguntassobreelproducto?¿Necesitaasistenciatécnica?Nodudeenponerseencontacto
connosotros:
7045PSTL2
Soportetécnicoycertificadodegarantía
electrónicawww.vevor.com/support
Estassonlasinstruccionesoriginales,leaatentamentetodaslas
instruccionesdelmanualantesdeutilizarelproducto.VEVORsereservauna
interpretaciónclaradenuestromanualdeusuario.Laaparienciadel
productoestarásujetaalproductoquerecibió.Perdónenospornoinformarle
nuevamentesihayactualizacionesdetecnologíaosoftwareennuestroproducto.
1
Page 68

Machine Translated by Google
INSTRUCCIONES
Muchasgraciasporelegiresteproducto.Leatodaslasinstrucciones.
Instruccionesantesdeusarlo.Lainformaciónleayudaráalograrelmejorresultado.
Posiblesresultados.
CONSEJOSDESEGURIDAD
1.Elmicroscopiodebecolocarseenunlugarsecoylimpio.Noloexponga
Elmicroscopioseexponedirectamentealsol.Evitelasaltastemperaturasylosambientesviolentos.
vibración.
2.Comoelmicroscopioesuninstrumentodeprecisión,manipúleloconcuidado,evitando
Impactoomovimientobruscoduranteeltransporte.
3.Paramantenerlaimagenclara,nodejehuellasdactilaresnimanchasenla
superficiesdelalente.
4.Nuncagirelaperilladecontroldezoomizquierdayderechaenladirecciónopuesta.
Almismotiempo,delocontrarioelmicroscopiosedañará.
5.Alretirarlapelículadelacámara,useunamanoparasujetarlacámara.
paraquenosecaiga.
2
Page 69

Machine Translated by Google
GUARDEESTASINSTRUCCIONES.
1.Especificacionestécnicas
PARÁMETROSTÉCNICOS
Ocular
10x/20
15x/15
20x/10
(Estándar
Configuración)
Distanciadetrabajo
100mm
Magnífico
catión
Campode
Vista
7x
50x
10,5x21,45,25x
67,5x
14x
90x
28.6
4.4
3,333,75x6,7101,25x
14.3
2.2
Magnífico
catión
3,5x
22,5x
7x
45x
0,5X
165mm
Campode
(Objetivosauxiliares)
Vista
57.1
8.9
42,8x15,75x
28.6
4.4
DistanciadetrabajoDistanciadetrabajo
Magnífico
catión
10,5x
67,5x
21x
135x
1,5X
45mm
Campode
Vista
19
3
14.3
2.2
9.5
1.5
2X
Distanciadetrabajo
Magnífico
ación
14x
90x
21x
135x
28x
180x
30mm
Campode
Vista
14.3
10.7
2.2
1.7
7.7
1.1
3
Page 70
Machine Translated by Google
2.Listadepiezas
LISTADEPIEZAS
Protectorocular
Cámara
Cámara
posición
Cabeza
Tornillodebloqueodecabeza
Acortar
Escenariodecristal
Base
posición
Controldezoom
Perilla
Soporte
Enfoque
perilla
Aviso:
Laprincipaldiferenciaentreelmodelo7045PSTL2yel7045PB1
Eslabase.
4
Page 71
Machine Translated by Google
INSTALACIÓN
1.Base
2.Columnadesoporte
3.Soportedebrazoarticuladodoble
4.Varilladeconexióndelsoporte
5.LlaveA
6.LlaveB
7.BrazoadhesivoA1
8.Trinocularsimulfocal
cabezalestereo
9.Accesorios
Paso1:
Inserteelsoporte
columna(2)enla
base(1)y
apriétela.
Paso2:
Insertareldoble
brazodeauge
Coloque(3)enla
columna(2)yfíjelo
conlaperilla.
5
Paso3:
InsertelallaveA(5)en
elorificiodel
soporte
varilladeconexión(4).
Page 72

Machine Translated by Google
Paso4:
Insertelavarillade
conexióndelsoporte
(4)enlapluma.
soporte(3)y
asegúreloconla
llaveA(5).
Paso5:
Sueltelatapa
Enlavarillade
conexión(4),
inserteelbrazode
uniónA1(7)enlaconexión.
brazoyapretarla
tapa.
Paso6:
Insertarel
simultáneofocal
estéreotrinocular
cabeza(8)enel
orificiodelconectorA1
brazo(7)yfíjelocon
eltornillo.
6
Page 73
Machine Translated by Google
31.Utilizarelescenariodecristal
32.Colocarelportaobjetos
33.Ajusteelportaobjetos
INSTALACIÓNYUSO
Presionelaplatinadevidriosobreelfondohundido.
Coloqueluegoelotroladodelcristal.
Elescenarioselevantará.
Coloquelamuestraenelcentrode
placadeescenario.Siesnecesario,sujetela
Desliceconlosclips
1.Girelaperilladecontroldelzoomala
aumentomáximo
2.Girelosanillosdeajustedeladioptríaa
Elcero.
3.Observelamuestraatravésdela
ocularderechoyhacerlaimagen
Limpiargirandolaperilladeenfoque.
4.Girelaperilladecontroldelzoomhaciala
aumentomínimo.
5.Observelamuestraatravésdela
ocularderechoyhacerlaimagen
Limpiargirandoladioptríaderecha
Anillodeajuste.
6.Repitalospasos(1),(3),(4)y(5)hastaque
Page 74
Machine Translated by Google
34.Ajusteladistanciainterpupilar
35.Ajustedelvolante
Ajustelacarcasadelprismaalolargodela
direccióndelapuntadeflecha(Fig.4)hastaque
laobservaciónseacómoda.
1.Sideseaajustarelgradode
Paraajustarlatensióndelbrazode
enfoque,puedesujetarunadelasperillas
deenfoqueygirarlaotraparalograrun
Posiciónadecuada.Elgradodeapriete
dependedeladirecciónenlaquesegire.
Ladirecciónenelsentidodelasagujasdelrelojes
apretado,delocontrario,estásuelto.
2.Laposiciónadecuadadeajustepuede
hacerqueelajusteseamáscómodoy
evitarqueelsoportedeenfoquese
deslicehaciaabajoporsupesodurantela
observación.
36.Montajeyextraccióndelmicrómetroocularopcional
1.Gireyretireelanillodemontajedelocular.
2.Limpieelmicrómetroocularymóntelo
enelanillodemontajeconelladodeinscripción
haciaabajo.
3.Giresuavementeelanillodemontajeconel
micrómetroocularenelocularhastaque
quedebienapretado.
4.Paraquitarelmicrómetro
ocular,retireelanillodemontajegirándolo
ysáquelodelmicrómetro,luegoenvuélvalo.
Page 75
Machine Translated by Google
37.Utiliceprotectoresoculares
371.Parausuariosquenousananteojos,sujeteelanillodeajustededioptrías
paraevitarquegirenygireelocularhastaquelosprotectoresdelocular
Seadaptabienalobservador.
372.Paralosusuariosqueusananteojos,retirelosprotectoresocularesantes
observación.
38.Elegirelsistemaóptico
Puedesalternarlosbinoculares
observaciónycapturadevideopor
Empujandootirandodelposte.Puedes
lograrlaobservaciónbinocularmediante
Empujandoelpostehaciaadentro,olograrvideo
Capturatirandodeélhaciaafuera.Noimporta
¿Quésistemaópticoseelige,pusho?
Tiredelposteconcuidado.
39.MonteelfotoocularyeladaptadordemonturaPK.
310.AjustedelCTV
1.Coloqueelzócalodelosfotoocularesen
Eltrinocular.
2.ConecteeladaptadordemontajePKcon
elfotoocularyluegoapriete
Eltornillodebloqueo.
1.AjusteelCTVaunniveladecuado.
posicióngirandolamonturaC.
2.Nota:Elrangodela
Ajuste:1~2mmengeneral.
Page 76

Machine Translated by Google
MANTENIMIENTO
1.Todaslaslentesdebenmantenerselimpias.Elpolvofinoenlasuperficiedelalente
Debesoplarseconunsopladordemanoolimpiarsesuavementeconunpañosuaveparalentes.
Lashuellasdactilaresolasmarcasdeaceitedebenlimpiarseconunpañuelodepapel.
humedecidoconunapequeñacantidaddexilenoounamezcla3:7dealcoholy
éter.
2.Nuncauselasoluciónorgánicaparalimpiarotrassuperficies(especialmente
lassuperficiesdeplástico).Siesnecesario,elijaundetergenteneutro.
3.Nodesmonteelmicroscopioportemoradañarlo.
4.Despuésdeusarlo,cubraelmicroscopioconlafundaantipolvoprovistay
Guárdeloenunlugarsecoylimpiolibredehumedadparaevitarlaoxidación.
5.Paramantenerelrendimientodelmicroscopio,compruébeloperiódicamente.
Losdetallessepuedenobtenerdelagentecercano.
Page 77

Machine Translated by Google
CRONOGRAMADESOLUCIÓNDEPROBLEMAS
Elrendimientodelmicroscopionosepuedeaprovecharalmáximodebidoa
Sinoestáfamiliarizadoconsuuso,estatablalebrindaráalgunosconsejos.
1
Problema
Ladistanciainterpupilarnoes
Causa
correcto
Recurso
Reajústalo
Imágenesdobles
2
Aparecesuciedadenelcampode
vista
3
Laimagennoesclara
4
Laimagennoesclaramientras
Elenfoqueestácambiando
5
Laperilladeenfoquenoestá
6
liso
Laimagenesoscura
porlacabeza
deslizándosehaciaabajoporsísolo
Durantelaobservación
7
Losojossecansanfácilmente
Elajustedeladioptríanoescorrecto
Elaumentodecadaoculares
noesdelmismotamaño
Suciedadenlamuestra
Suciedadenlassuperficiesdelocular
Suciedadenlassuperficiesdela
objetivos
Elajustedeladioptríanoescorrecto
Elenfoquenoescorrecto
Laperilladeenfoqueestádemasiadoapretada
Laperilladeenfoqueestádemasiadofloja
Elajustedeladioptríanoescorrecto
Elbrillodelaluznoescorrecto
Reajústalo
Montarelmismotamaño
ocular
Limpiarlamuestra
Limpiarlasuperficie
Limpiarlosobjetivos
Reajustarladioptría
Reajustarelenfoque
Aflójelohastaunvaloradecuado.
posición
Aflójelohastaunvaloradecuado.
posición
Ajusteladioptría
Ajustarelbrillo
8
Aparecelaimagendelaincisión
enelcampodevisiónode
Lavistadelvideo
Elpostenoestáenlaposicióncorrecta
Tireoempújelohacialaposicióncorrecta.
posición
Page 78

Machine Translated by Google
9
Laimagenenel
monitornoesclara
cuandosegiralaperilla
deenfoque.
Elenfoquedelvídeonoes
correcto
Reajustarelenfoquedelvídeoauna
Dirección:BaoshanquShuangchenglu803long11hao1602A1609shiShanghai
Importado
aAUS:SIHAOPTYLTD.1ROKEVASTREETEASTWOODNSW2122Australia
posicióncorrecta
ImportadoaEE.UU.:SanvenTechnologyLtd.Suite250,9166AnaheimPlace,Rancho
Cucamonga,CA91730
SHUNSHUNGmbH
REPRESENTANTECE
Römeräcker9Z2021,76351
LinkenheimHochstetten,Alemania
GrupoPooledasLtd.
REPRESENTANTEDELREINOUNIDO
Unidad5CasaAlbertEdward,LosPabellones
Preston,ReinoUnido
Hechoenchina
Page 79

Machine Translated by Google
Page 80

Machine Translated by Google
Soportetécnicoycertificadodegarantía
electrónicawww.vevor.com/support
Page 81

Machine Translated by Google
Wsparcie techniczne i certyfikat gwarancji elektronicznej www.vevor.com/support
MIKROSKOP STEREO
INSTRUKCJA OBSŁUGI
Nadal staramy się oferować Państwu narzędzia w konkurencyjnych cenach.
„Oszczędź połowę”, „Połowa ceny” lub inne podobne wyrażenia używane przez nas stanowią
jedynie szacunkowe oszczędności, jakie możesz uzyskać kupując u nas określone narzędzia w
porównaniu z głównymi markami i niekoniecznie oznaczają one objęcie wszystkich kategorii narzędzi
oferowanych przez nas. Uprzejmie przypominamy, aby dokładnie sprawdzić, czy składając u
nas zamówienie faktycznie oszczędzasz połowę w porównaniu z głównymi markami.
Page 82

Machine Translated by Google
Page 83
Machine Translated by Google
MIKROSKOP STEREO
MODEL: 7045P-B1
POTRZEBUJESZ POMOCY? SKONTAKTUJ SIĘ Z NAMI!
Masz pytania dotyczące produktu? Potrzebujesz wsparcia technicznego? Skontaktuj się z
nami:
Wsparcie techniczne i certyfikat gwarancji
elektronicznej www.vevor.com/support
7045P-STL2
To jest oryginalna instrukcja, przed użyciem należy uważnie przeczytać
wszystkie instrukcje. VEVOR zastrzega sobie jasną interpretację naszej instrukcji
obsługi. Wygląd produktu będzie zależał od produktu, który otrzymałeś.
Prosimy o wybaczenie, że nie poinformujemy Cię ponownie, jeśli w naszym
produkcie pojawią się jakiekolwiek aktualizacje technologiczne lub oprogramowania.
1
Page 84

Machine Translated by Google
INSTRUKCJE
Dziękujemy bardzo za wybranie tego produktu. Przeczytaj proszę wszystkie
przed użyciem zapoznaj się z instrukcją. Informacje te pomogą Ci osiągnąć najlepszy efekt
możliwe wyniki.
WSKAZÓWKI DOTYCZĄCE BEZPIECZEŃSTWA
1. Mikroskop należy umieścić w suchym i czystym miejscu. Nie wystawiać
mikroskop bezpośrednio na słońcu. Unikać wysokiej temperatury i gwałtownych
wibracja.
2. Ponieważ mikroskop jest precyzyjnym instrumentem, należy obchodzić się z nim ostrożnie, unikając
uderzenie lub nagły ruch podczas transportu.
3. Aby zachować wyraźny obraz, nie pozostawiaj na nim odcisków palców ani plam.
powierzchni soczewki.
4. Nigdy nie obracaj pokrętła regulacji zoomu w lewo i w prawo w kierunku przeciwnym.
w przeciwnym razie mikroskop ulegnie uszkodzeniu.
5. Podczas wyjmowania filmu z aparatu trzymaj aparat jedną ręką
aby się nie przewróciło.
2
Page 85

Machine Translated by Google
ZACHOWAJ TE INSTRUKCJE.
1. Specyfikacja techniczna
PARAMETRY TECHNICZNE
Okular
10x/20
15x/15
20x/10
(Standard
Konfiguracja)
Odległość robocza
100mm
7x
50x
Pole
Pogląd
28.6
4.4
Wspaniały
kation
10,5x 21,4 5,25x
67,5x
14x
90x
3,3 33,75x 6,7 101,25x
14.3
2.2
Wspaniały
kation
3,5x
22,5x
7x
45x
0,5X
165 mm
Pole
Cele pomocnicze
Odległość roboczaOdległość robocza
8.9
Wspaniały
kation
10,5x
67,5x
Pogląd
57.1
42,8x15,75x
28.6
4.4
21x
135x
1,5X
45mm
Pole
Pogląd
19
3
14.3
2.2
9,5
1,5
2X
Odległość robocza
30mm
Wspaniały
akcja
14x
90x
21x
135x
28x
180x
Pole
Pogląd
14.3
2.2
10.7
1.7
7.7
1.1
3
Page 86

Machine Translated by Google
2. Lista części
LISTA CZĘŚCI
Osłona okularu
Kamera
Kamera
pozycja
Głowa
Śruba blokująca głowicę
Klips
Scena szklana
Opierać
pozycja
Kontrola powiększenia
Pokrętło
Nawias
Skupienie
pokrętło
Ogłoszenie:
Główna różnica pomiędzy modelem 7045P-STL2 i 7045P-B1
To jest baza.
4
Page 87
Machine Translated by Google
INSTALACJA
1. Podstawa
2. Kolumna stojaka
3. Podwójny stojak z wysięgnikiem
4. Pręt łączący wspornika
5. Klucz A
6. Klucz B
7. Ramię Bondera A1
8. Trójokular Simul-Focal
głowica stereo
9. Akcesoria
Krok 1:
Włóż podstawkę
kolumnę (2) do
podstawy (1) i
dokręć ją.
Krok 2:
Włóż podwójną
wysięgnik ramienia
Wstaw podstawkę (3)
do kolumny (2) i zamocuj
ją za pomocą pokrętła.
5
Krok 3:
Włóż klucz A(5) do
otworu
nawias
pręt łączący (4).
Page 88
Machine Translated by Google
Krok 4:
Włóż pręt łączący
wspornika (4) do
wysięgnika
podstawkę (3) i
dokręć ją kluczem
A (5).
Krok 5:
Zdejmij pokrywę
na pręcie łączącym
(4) włóż ramię
łączące A1 (7) do
połączenia
Załóż ramię i dokręć
pokrywę.
Krok 6:
Włóż
jednoogniskowa
stereoskop trójokularowy
głowica (8) w otwór
kleju A1
ramię (7) i przymocuj
je śrubą.
6
Page 89
Machine Translated by Google
3-1. Użyj szklanej sceny
3-2. Ustaw szkiełko z próbką
3-3. Dostosuj szkiełko z próbką
INSTALACJA I UŻYTKOWANIE
Naciśnij szklany stolik na zagłębienie
następnie umieść drugą stronę szkła
scena zostanie podniesiona.
Umieść próbkę na środku
płyta sceniczna. W razie potrzeby zaciśnij
przesuń za pomocą klipsów
1. Obróć pokrętło sterowania zoomem na pozycję
maksymalne powiększenie.
2. Obróć pierścienie regulacji dioptrii na
zero.
3. Obserwuj okaz przez
prawy okular i zrób obraz
wyczyść, obracając pokrętło ostrości.
4. Obróć pokrętło sterowania zoomem w kierunku
minimalne powiększenie.
5. Obserwuj okaz przez
prawy okular i zrób obraz
wyczyść, obracając prawą dioptrię
pierścień regulacyjny.
6. Powtórz kroki (1), (3), (4) i (5) aż do
Page 90

Machine Translated by Google
3-4. Dostosuj odległość między źrenicami
3-5. Regulacja pokrętła ręcznego
Dostosuj obudowę pryzmatu wzdłuż kierunku
strzałki (rys.4) tak, aby obserwacja była komfortowa.
1. Jeśli chcesz dostosować stopień
aby uzyskać odpowiedni poziom ostrości,
możesz przytrzymać jedno z pokręteł
ustawiania ostrości i przekręcić drugie,
odpowiednia pozycja. Stopień szczelności
zależy od kierunku, w którym należy się
przekręcić. Kierunek zgodny z ruchem wskazówek zegara to
ciasne, w przeciwnym razie luźne.
2. Odpowiednie położenie dokręcenia
sprawia, że regulacja jest wygodniejsza
i zapobiega ześlizgiwaniu się
uchwytu ostrości pod wpływem jego ciężaru
podczas obserwacji.
3-6. Montaż i demontaż opcjonalnego mikrometru okularowego
1. Obróć i zdejmij pierścień montażowy z
okularu.
2. Wyczyść mikrometr okularowy i zamontuj
go na pierścieniu montażowym stroną z napisem
skierowaną w dół.
3. Delikatnie wkręć pierścień montażowy z
mikrometrem okularowym w okular, aż
do pewnego dokręcenia.
4. Aby wyjąć mikrometr okularowy,
należy przekręcić pierścień montażowy i
wyjąć go z mikrometru, a następnie owinąć go.
Page 91
Machine Translated by Google
3-7. Używaj osłon okularów
3-7-1. W przypadku użytkowników, którzy nie noszą okularów, należy trzymać pierścień do regulacji dioptrii
aby zapobiec ich obracaniu się i obrócić okular, aż osłona okularu się zakryje
dobrze pasuje do obserwatora.
3-7-2. Użytkownicy noszący okulary powinni zdjąć osłony okularów przed
obserwacja.
3-8. Wybierz układ optyczny
Można zmieniać lornetkę
obserwacja i nagrywanie wideo przez
pchanie lub ciągnięcie drążka. Możesz
uzyskać obserwację obuoczną za pomocą
wpychając drążek do środka lub uzyskując wideo
złapać, wyciągając go na zewnątrz. Nieważne
jaki układ optyczny wybrać, pchający czy
pociągnij drążek dokładnie.
3-9. Zamontuj okular fotoelektryczny i adapter mocowania PK.
3-10. Dostosuj CTV
1. Umieść gniazdo okularów fotoelektrycznych
trójokularowy.
2. Podłącz adapter montażowy PK do
okular fotoelektryczny, a następnie dokręć
śruba blokująca.
1. Dostosuj CTV do odpowiedniego
pozycję poprzez obrót uchwytu C.
2. Uwaga: zakres
regulacja: ogólnie 1~2mm.
Page 92

Machine Translated by Google
KONSERWACJA
1. Wszystkie soczewki muszą być czyste. Drobny kurz na powierzchni soczewki
należy zdmuchnąć ręczną dmuchawą lub delikatnie przetrzeć miękką soczewką
chusteczka; Odciski palców lub ślady oleju na niej należy zetrzeć chusteczką
zwilżyć niewielką ilością ksylenu lub mieszaniną alkoholu i alkoholu w proporcjach 3:7
eter.
2. Nigdy nie używaj organicznego roztworu do czyszczenia innej powierzchni (zwłaszcza
powierzchnie plastikowe). W razie potrzeby wybierz neutralny detergent.
3. Nie rozbieraj mikroskopu, ponieważ obawiasz się, że może ulec uszkodzeniu.
4. Po użyciu należy przykryć mikroskop dołączoną osłoną przeciwkurzową i
Przechowywać w suchym i czystym miejscu, wolnym od wilgoci, aby zapobiec rdzewieniu.
5. Aby zachować prawidłowe działanie mikroskopu, należy go okresowo sprawdzać.
Więcej szczegółów można uzyskać u najbliższego agenta.
Page 93

Machine Translated by Google
HARMONOGRAM ROZWIĄZYWANIA PROBLEMÓW
Z powodu niemożności pełnego wykorzystania możliwości mikroskopu
Jeśli nie znasz się na korzystaniu z tej tabeli, znajdziesz w niej kilka wskazówek.
Kłopoty
1.
Odległość między źrenicami nie jest
Przyczyna
prawidłowy
Zaradzić
Dostosuj to
Podwójne obrazy
2.
W polu pojawia się brud
pogląd
3
Obraz nie jest wyraźny
4
Obraz nie jest wyraźny,
zmiana ostrości
5.
Pokrętło ustawiania ostrości nie jest
6
gładki
Obraz jest niejasny
z powodu głowy
zsuwający się sam
podczas obserwacji
7
Oczy łatwo się męczą
Regulacja dioptrii jest nieprawidłowa
Powiększenie każdego okularu wynosi
nie ten sam rozmiar
Brud na okazie
Brud na powierzchniach okularu
Brud na powierzchniach
cele
Regulacja dioptrii jest nieprawidłowa
Ostrość jest nieprawidłowa
Pokrętło ustawiania ostrości jest zbyt ciasne
Pokrętło ustawiania ostrości jest zbyt luźne
Regulacja dioptrii jest nieprawidłowa
Jasność światła jest nieprawidłowa
Dostosuj to
Zamontuj ten sam rozmiar
okular
Wyczyść próbkę
Wyczyść powierzchnię
Wyczyść cele
Wyreguluj dioptrię
Ponownie wyreguluj ostrość
Rozluźnij go do odpowiedniego
pozycja
Rozluźnij go do odpowiedniego
pozycja
Dostosuj dioptrię
Dostosuj jasność
8
Pojawia się obraz nacięcia
w polu widzenia lub
widok wideo
Słup nie jest w prawidłowej pozycji
Pociągnij lub pchnij w odpowiednim kierunku
pozycja
Page 94

Machine Translated by Google
9.
Obraz na monitorze
nie jest wyraźny po
przekręceniu pokrętła
ostrości.
Tematem przewodnim filmu nie jest
prawidłowy
Ponownie ustaw ostrość obrazu wideo w
odpowiedniej pozycji
Adres: Baoshanqu Shuangchenglu 803long 11hao 1602A-1609shi Szanghaj Importowane
do AUS:
SIHAO PTY LTD. 1 ROKEVA STREETEASTWOOD NSW 2122 Australia
Importowane do USA: Sanven Technology Ltd. Suite 250, 9166 Anaheim Place, Rancho Cucamonga,
CA 91730
SHUNSHUN GmbH
Przedstawiciel UE
Römeräcker 9 Z2021,76351
Linkenheim-Hochstetten, Niemcy
Grupa Pooledas Ltd.
REP WIELKIEJ BRYTANII
Jednostka 5 Dom Alberta Edwarda, Pawilony
Preston, Wielka Brytania
Wyprodukowano w Chinach
Page 95

Machine Translated by Google
Page 96

Machine Translated by Google
Wsparcie techniczne i certyfikat gwarancji
elektronicznej www.vevor.com/support
Page 97

Machine Translated by Google
Technische ondersteuning en e-garantiecertificaat www.vevor.com/support
STEREOMICROSCOOP
GEBRUIKERSHANDLEIDING
Wij streven er voortdurend naar om u gereedschappen tegen concurrerende prijzen te leveren.
"Bespaar de helft", "halve prijs" of andere soortgelijke uitdrukkingen die wij gebruiken, geven alleen een schatting
van de besparingen die u kunt behalen door bepaalde gereedschappen bij ons te kopen in vergelijking met de grote
topmerken en doseringen betekenen niet noodzakelijkerwijs dat ze alle categorieën gereedschappen dekken die wij
aanbieden. Wij herinneren u eraan om zorgvuldig te controleren of u daadwerkelijk de helft bespaart in
vergelijking met de grote topmerken wanneer u een bestelling bij ons plaatst.
Page 98

Machine Translated by Google
Page 99
Machine Translated by Google
STEREOMICROSCOOP
MODEL: 7045P-B1
HULP NODIG? NEEM CONTACT MET ONS OP!
Heeft u vragen over het product? Heeft u technische ondersteuning nodig? Neem dan gerust
contact met ons op:
7045P-STL2
Technische ondersteuning en e-
garantiecertificaat www.vevor.com/support
Dit is de originele instructie, lees alle handleidingen zorgvuldig door
voordat u het product gebruikt. VEVOR behoudt zich een duidelijke interpretatie
van onze gebruikershandleiding voor. Het uiterlijk van het product is
afhankelijk van het product dat u hebt ontvangen. Vergeef ons dat we u niet
opnieuw zullen informeren als er technologie- of software-updates voor ons product zijn.
1
Page 100

Machine Translated by Google
INSTRUCTIES
Hartelijk dank voor het kiezen van dit product. Lees alle
instructies voordat u het gebruikt. De informatie zal u helpen om het beste te bereiken
mogelijke resultaten.
VEILIGHEIDSTIPS
1. De microscoop moet op een droge en schone plaats worden geplaatst. Stel hem niet bloot
de microscoop in de zon direct. Vermijd hoge temperaturen en gewelddadige
trilling.
2. Omdat een microscoop een precisie-instrument is, moet u er voorzichtig mee omgaan en moet u
impact of plotselinge beweging tijdens het transport.
3. Om het beeld helder te houden, laat u geen vingerafdrukken of vlekken achter op de
oppervlakken van de lens.
4. Draai de linker- en rechterzoomknop nooit in de tegenovergestelde richting
tegelijkertijd, anders raakt de microscoop beschadigd.
5. Wanneer u de film van de camera verwijdert, houdt u de camera met één hand vast
zodat het niet omvalt.
2
 Loading...