

Page 1
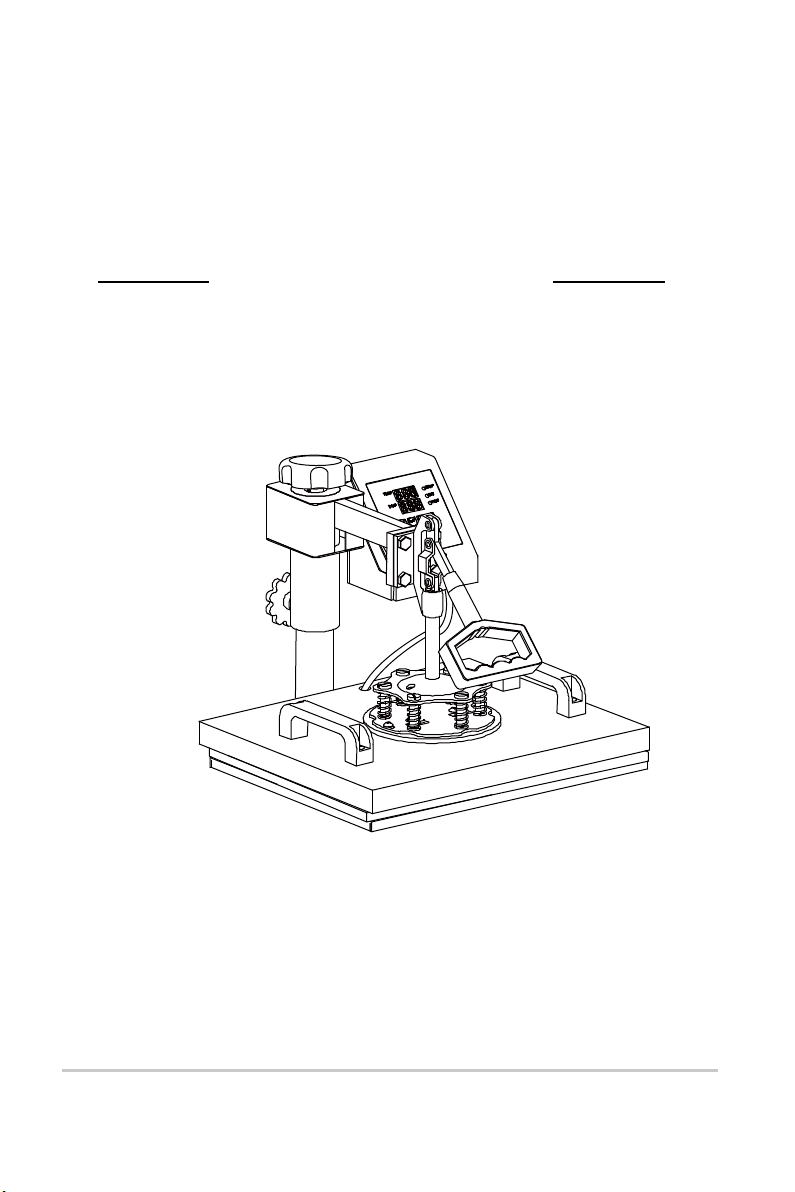
Multifunctional Digital
Heat Press Machine
User Guide
- 1 -
Page 2

CATALOGUE
Heat Press Machine Parts Introduction
Parts List
Assembly & Use Steps
Intelligent temperature controller operation method
Ⅰ. Preparation before Using
Ⅱ. Set temperature required
Replace Baking Tray Mat
Replace Baking Cap Mat
3
4
5
6
6
6
8
10
Replace Baking Coaster
Ⅲ.Printing methods
Ⅳ.Trouble shooting for transfer quality
- 2 -
13
14
14
Page 3
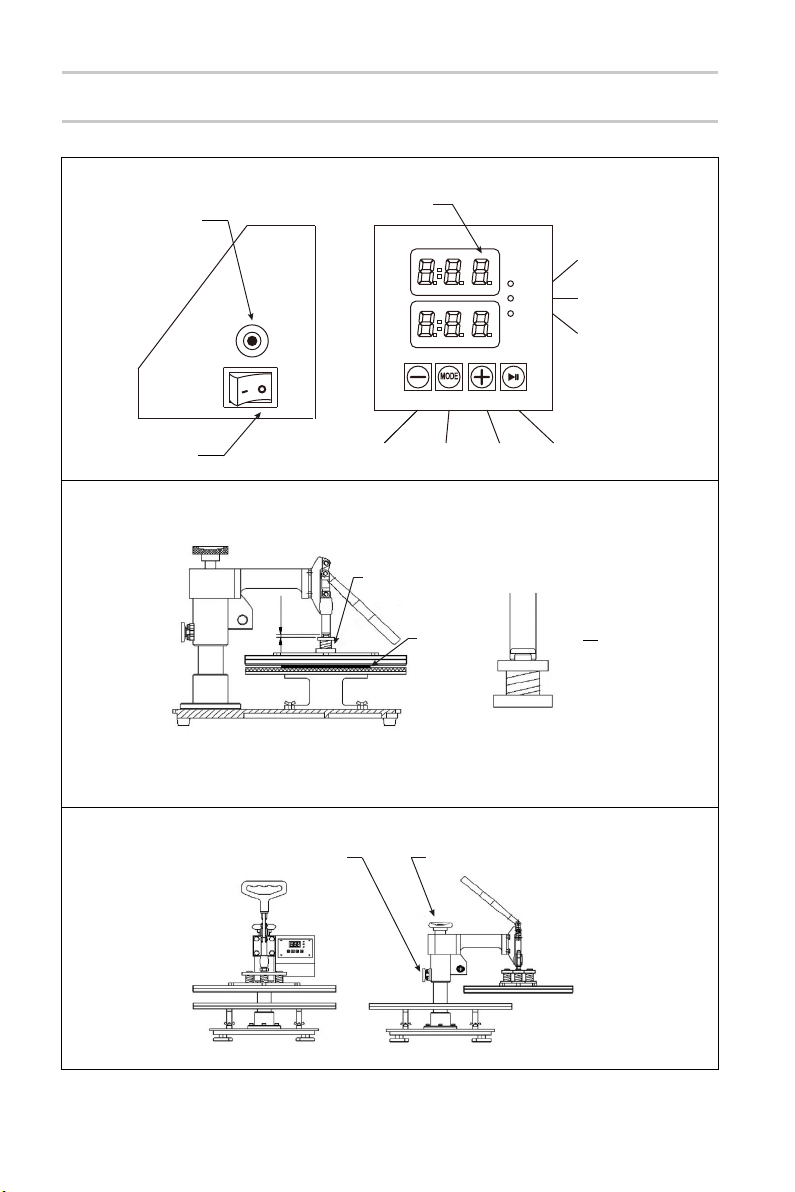
Heat Press Machine Parts Introduction
overload
protector design
power switch
3/16”
T-shirt: 3/8-1/2”
other object: 3/16”
display
TEMP
TEMP
TIME
SET
TIME
minus mode plus start
best pressure for heat press
spring
object
temperature light
set light
time light
spring
rotation lock screw swiveling pressure adjustment
- 3 -
Page 4
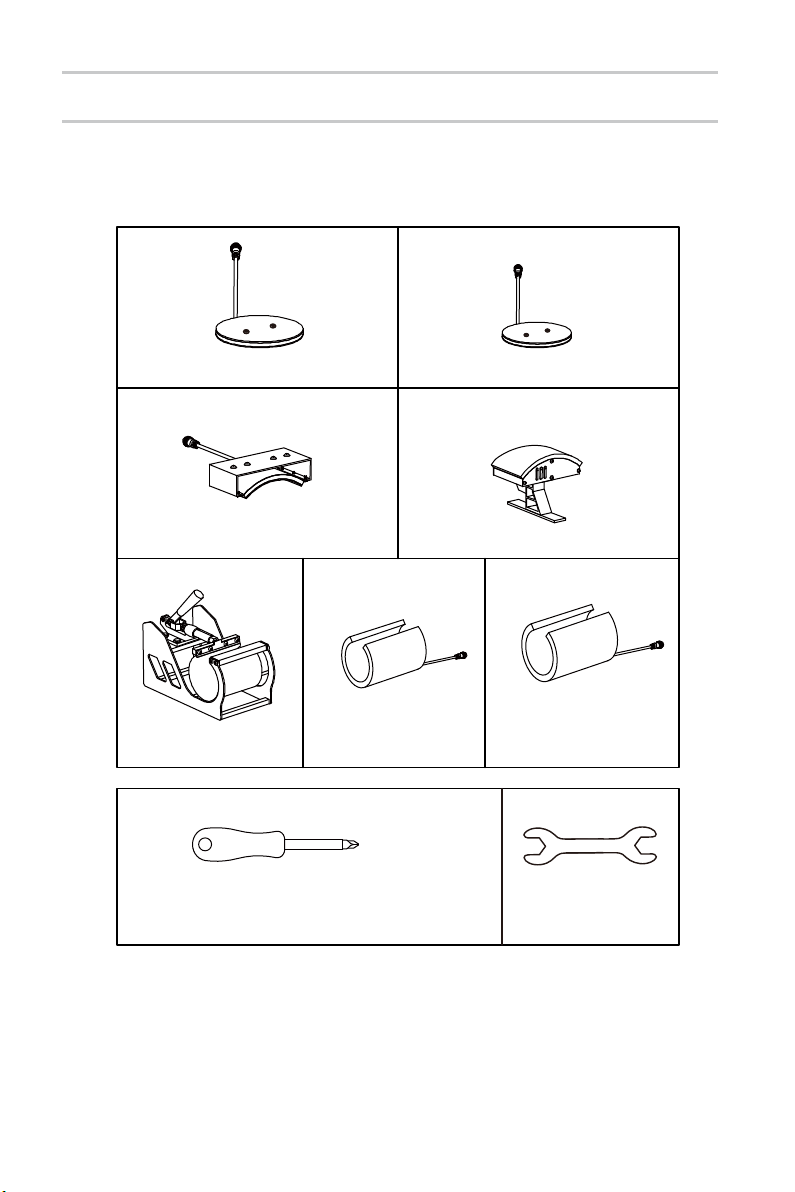
Parts List
A. B.
1PC 1PC
C.
1PC
D.
E. F. G.
1PC 1PC
1PC
A Phillips screwdriver can be turned into a
slotted screwdriver by rotating it 180 degrees
Only 6 in 1 Heat Press
1PC
1PC
has Part G
1PC
- 4 -
Page 5
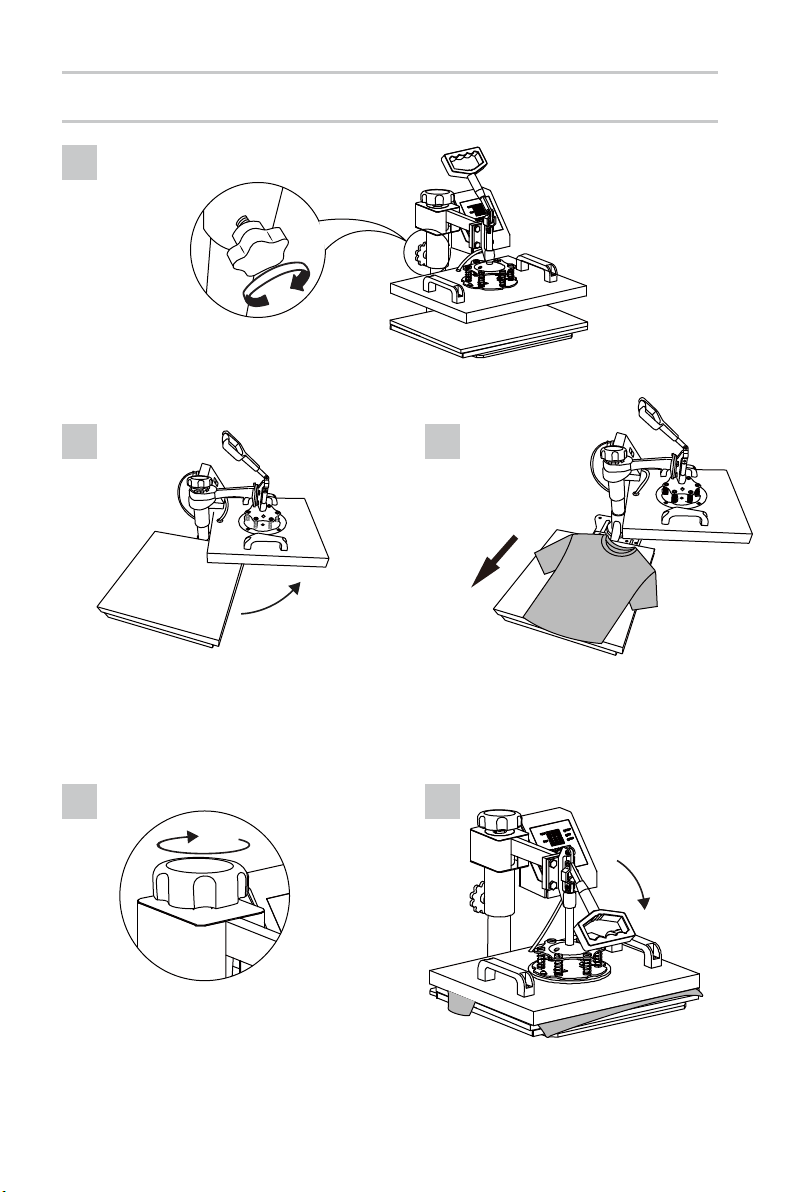
Assembly & Use Steps
1
Tighten knob.
2 3
Rotate the heat transfer board
to the side.
4 5
Turn this adjustment switch
to adjust the pressure.
- 5 -
Pull out the mat below, place the
clothes flat on the mat, and place
the pattern on the clothes.
Page 6

Intelligent temperature controller operation method
Ⅰ. Preparation before Using:
Check the connection between power plug and electrical socket of electri-
1.
cal cabinet.Be sure to operate with safe ground wire!!!
Heat press element must be securely plugged into the machine before you
2.
switch the machine on.Plug your electrical cord into the machine.Plug
electrical socket into wall plug.Turn the power on by flipping the On/Off
Switch on.( Nominal voltage:220V, Max.input power:1250W )
Ⅱ.Set temperature required
Set the temperature and time according to the table below and get the
specific corresponding temperature and timing setting.(Temperature is
measured in Degrees Fahrenheit.)
Press
Object
Mugs
Tiles
Metal board
Plate
T-shirt
Initial
Temperature
230
230
230
230
230 355
Highest
Temperature
330
330
300
355
Proper Heating
Time ( s )
40
40
40
150
Sublimation paper:30-50s
T-shirt Paper:10-20s
A.Initial Temperature Setting ( Range:200-450℉)
Press the “MODE”button ONCE,see the “set light” turning red.Then press the
“plus/minus key” to set the initial heating temperature.
B.Highest Temperature Setting ( Range:200-450℉)
Press the “MODE” button for THE SECOND TIME;see the “temperature light”
turning red.Then press the “plus or minus key” to set the highest heating temperature.
C.Proper Heating Time Setting ( Range:0-999 sec.)
Press the “MODE” button for THE THIRD TIME;see the”time light” turning red.
Then press the “plus or minus key” to set the proper heating time.
- 6 -
Page 7
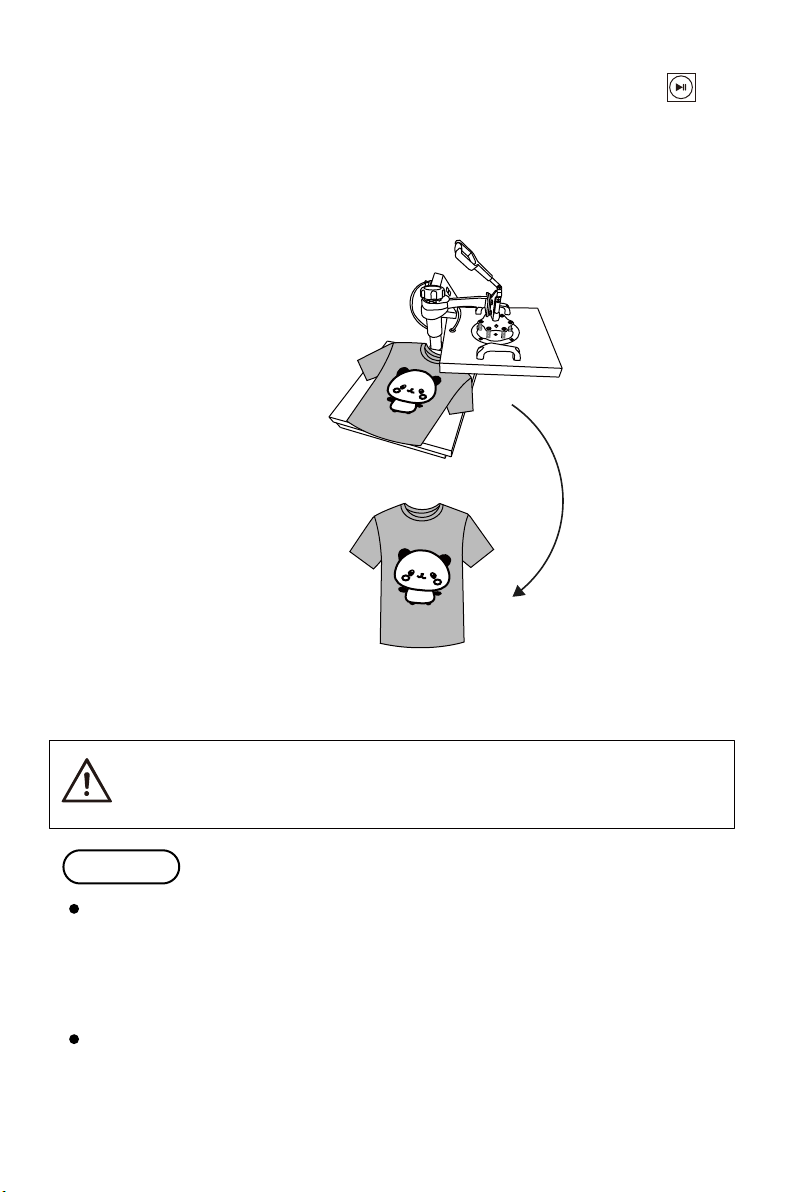
D.Finish the Setting and Stands by to Work
Press the “MODE”button for THE FOURTH TIME;finish the setting , The
set light is on, and the temperature will continue to rise. When the set maximum
temperature is reached, the countdown starts. After the countdown ends, the
"BEEF" sound will be emitted, the indicator light will turn off, and the operation
is complete.and the machine stands by to work.
Printed pattern
Printed clothes
Turn off the power and pull out the mat. It is recommended to wear
heat-resistant gloves when removing clothes or remove them after 2-3
minutes. Be careful of hot heat.
Note
The machine has a self -locking function for temperature setting.
---If the starting temperature is set to 340°F,the machine will automatically limit the
maximum temperature setting range from 340 to 430°F.
---Conversely,if setting the maximum temperature as 250°F at first,the machine will
automatically limit the starting temperature setting range from 200 to 250°F.
Initial heating temperature always=<Highest heating temperature
- 7 -
Page 8
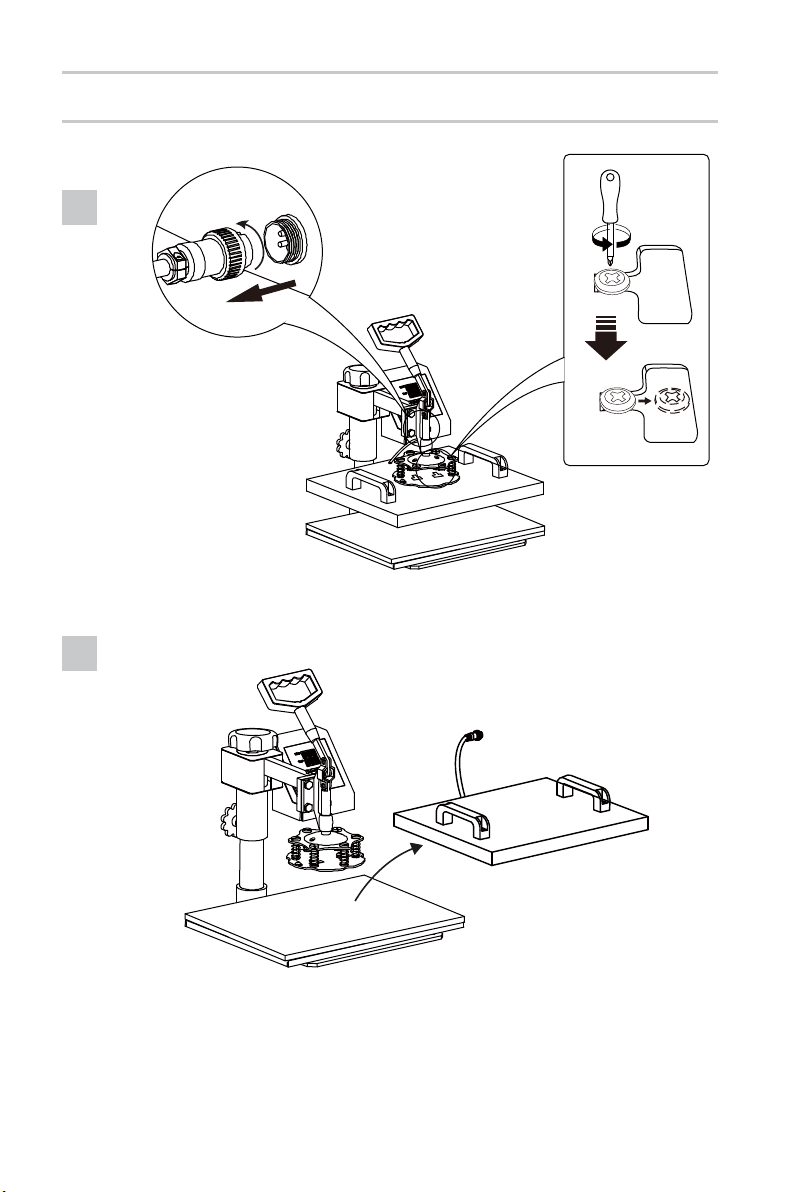
Replace Baking Tray Mat
1
Pluck the plug.
2
Rotate the heat transfer board to the side.
- 8 -
Page 9
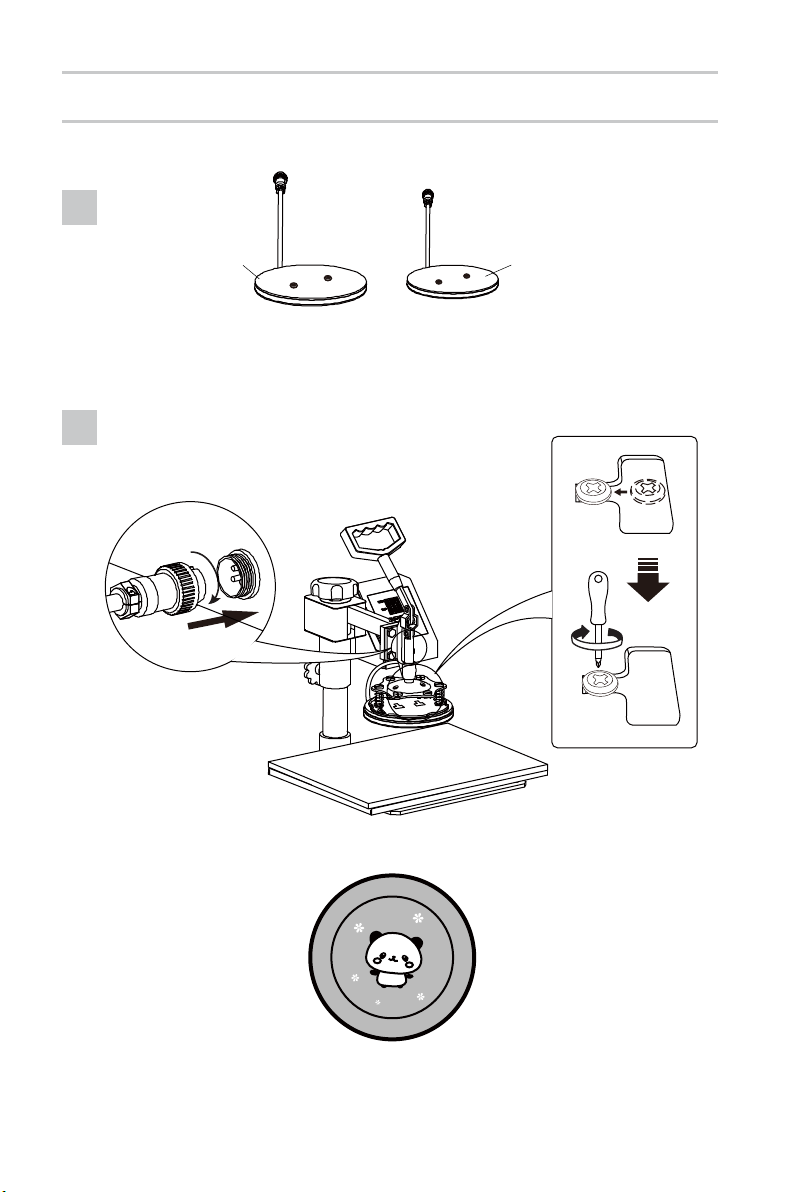
Replace Baking Tray Mat
3
A. B.
Select the appropriate size
baking pan mat ( Part A or B ).
4
Plug in.
Patterned plate.
- 9 -
Page 10
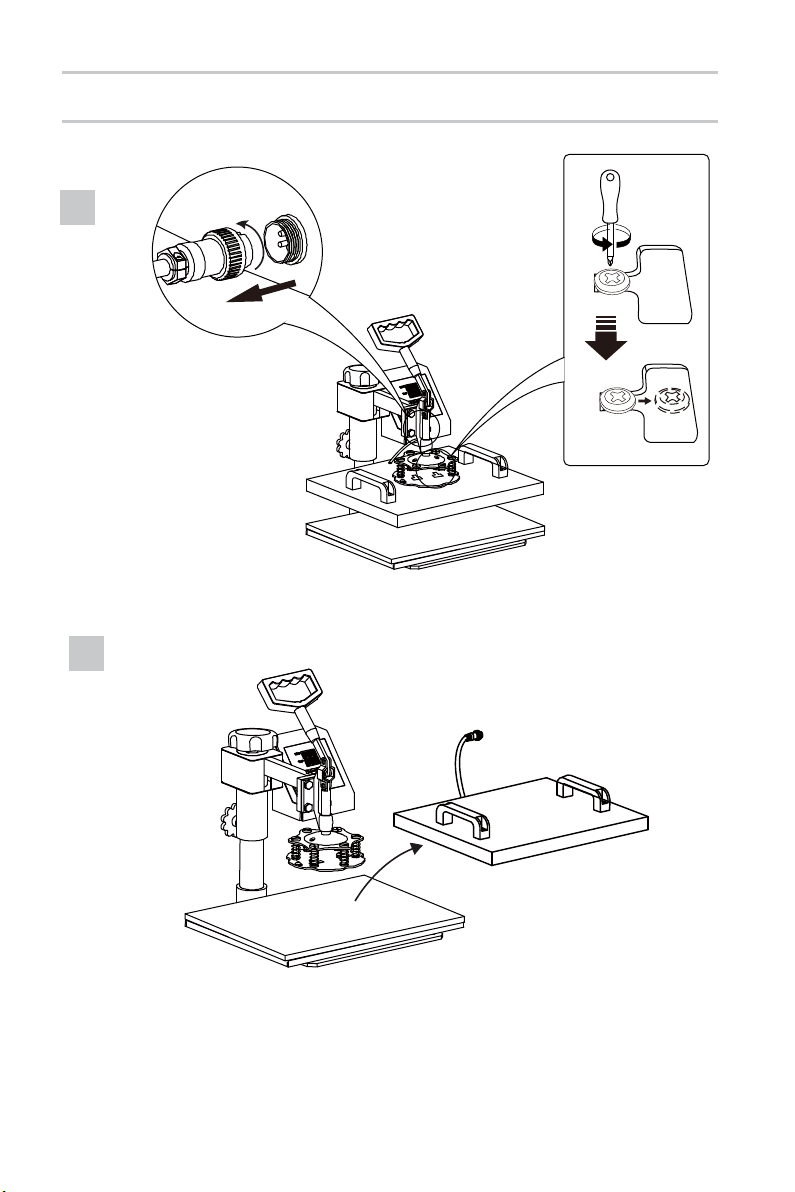
Replace Baking Cap Mat
1
Pluck the plug.
2
Rotate the heat transfer board to the side.
- 10 -
Page 11
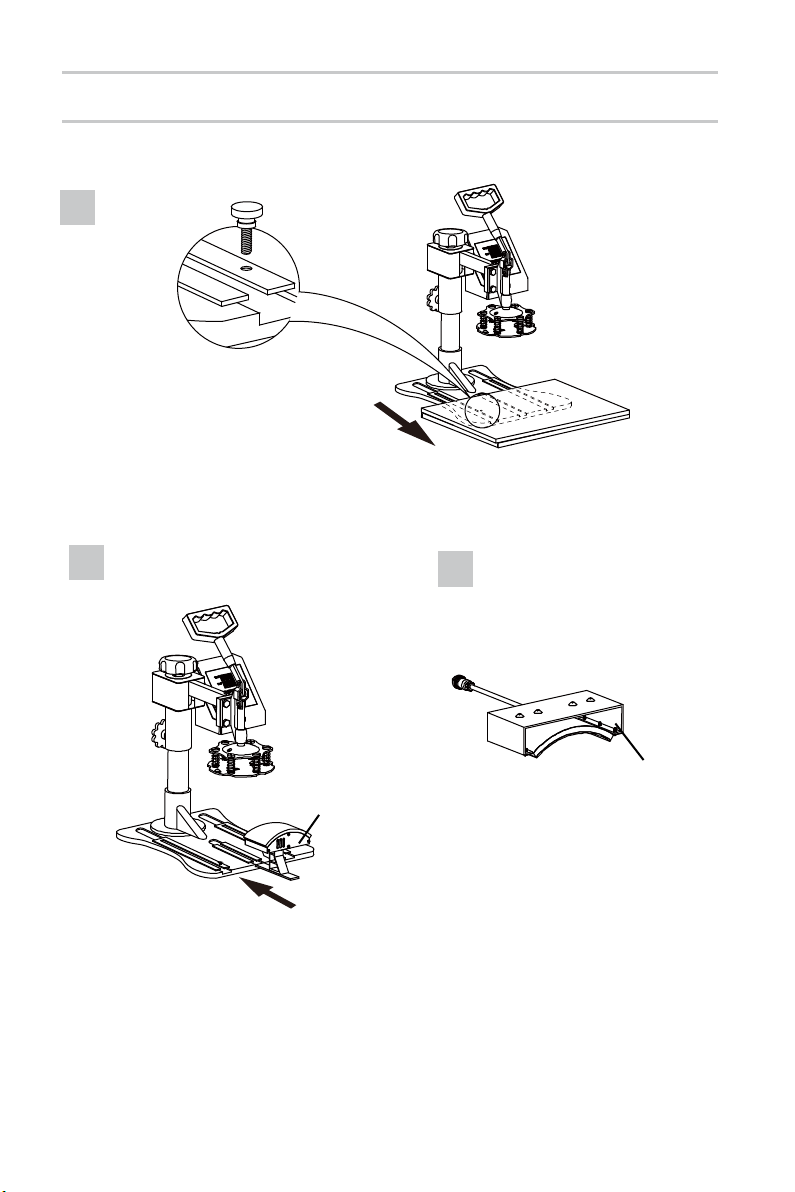
Replace Baking Cap Mat
3
Loosen the bottom
screw and remove.
Move the cushion aside.
4
D.
Slide the baking mat ( Part D ) in.
5
C.
- 11 -
Page 12
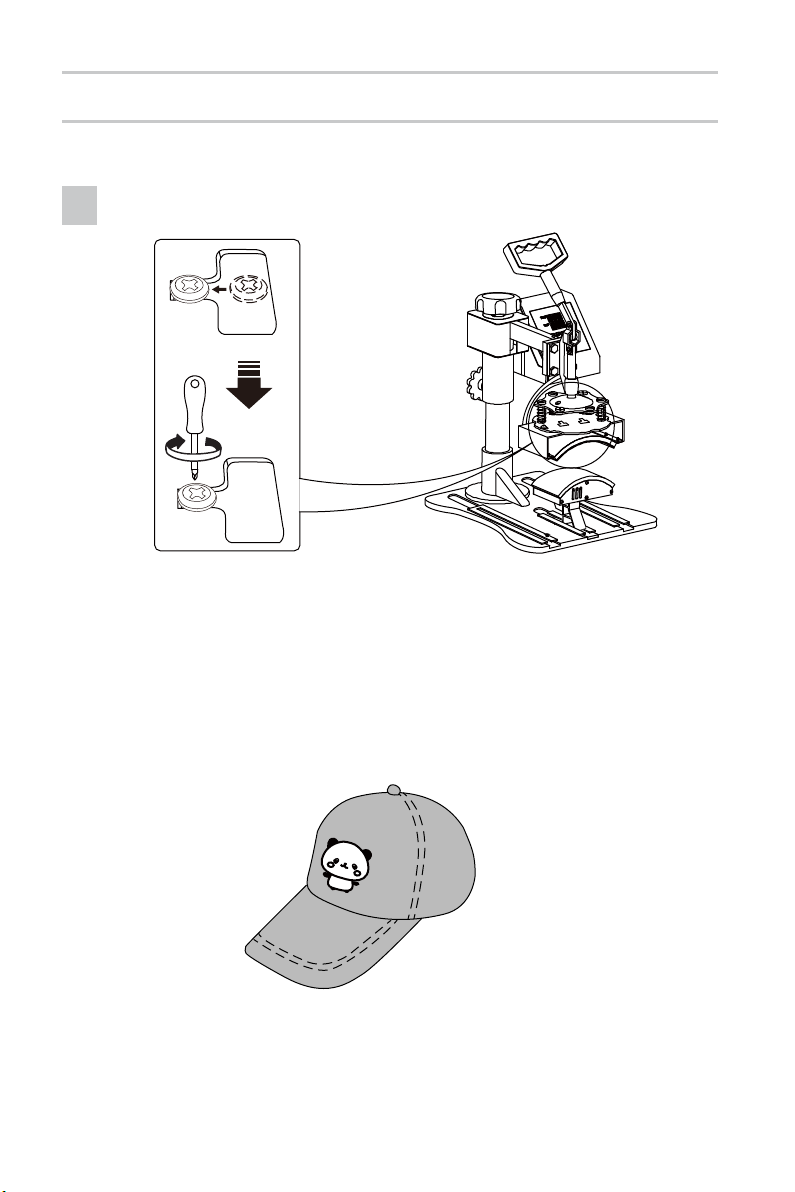
Replace Baking Cap Mat
6
6
Use the screwdriver 4 to tighten the 2 screws just
removed and put the cap on.
- 12 -
Shaped hat
Page 13
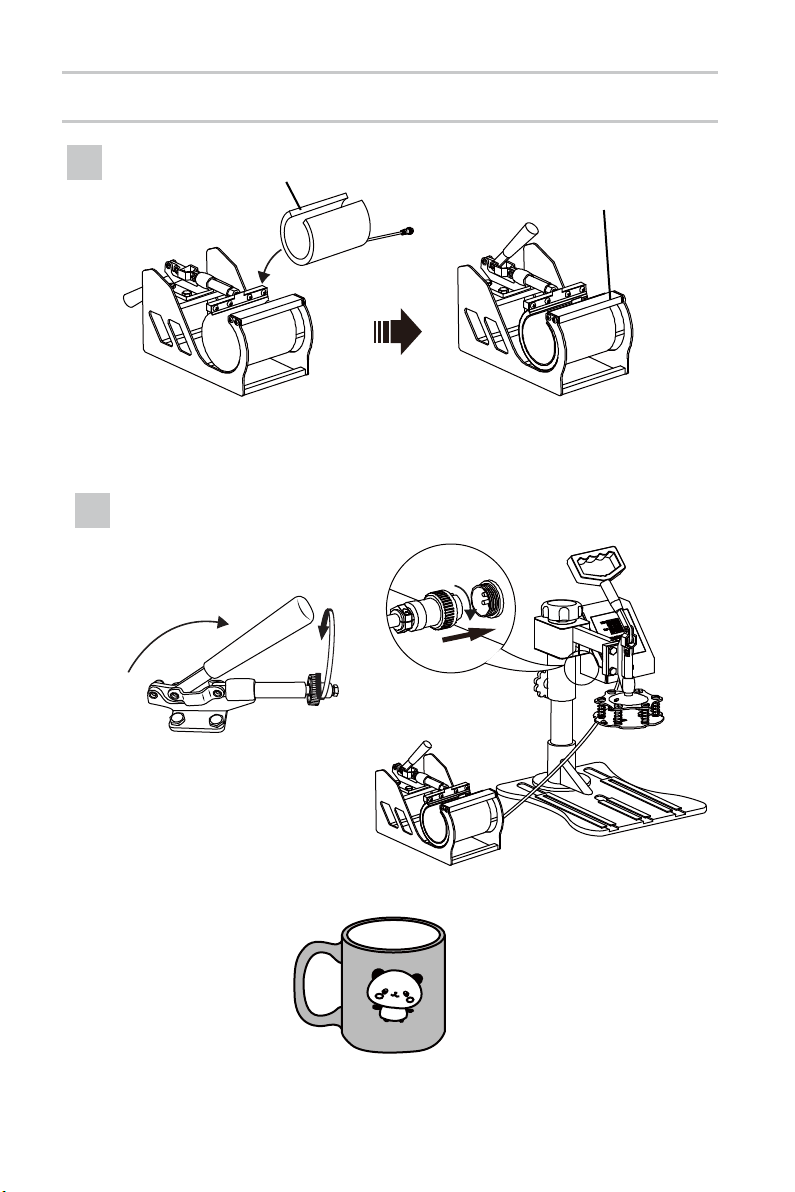
Replace Baking Coaster
1
Select the appropriate size
baking coaster ( Part F or G ).
F. or G.
2
E.
Put the cup in Part E.
Plug in.
Adjust the tightness.
Shaped cup
- 13 -
Page 14

Ⅲ.Printing methods
1.
Adjust pressure to your requirement (Neither too tight nor too loose),
Plug in the power cord and turn the power switch ON.
2.
The temperature starts to rise.Set the Initial temperature,Highest Temperature an
press time.
3.
Once the temperature rise to the Initial temperature,the buzzer will send out a shot
“BEEF” sound.
4.
Press the button once.Then Place the object (i.e. T shirt) on press bed.Pull
down the handle to press the object.
5.
Wait for the time ends up with a long buzzer sound.(Note: There will be about 5s
time for long buzzer to notify you it has finished,and after that will appear 5s for
short buzzer to notify you whether you still go on the next work,if not the
temperature will fall down to the Initial temperature )
6.
Work finish and take out object.
7.
Turn off the power switch.
Ⅳ.Trouble shooting for transfer quality
1.
Pale Color:The temperature is too low/the pressure is not correct/or not pressed
long enough.
2.
Blurring Pattern:Too much transfer time causes proliferation.
3.
Part Blurring of Pattern:Heat was not distributed correctly through heat plate.
Allow more time between press operations.Pressure distribution can also be the
cause,which can be set on the four plate surface adjusters.Please note that it has
been factory set and there should be no need to adjust them.
4.
Dull Surface of Pattern:The pressure is too lager or the temperature is too high.
5.
Scarred Pattern:Transfer time is too long.
6.
Different Pattern Color:The pressure is not correct or the transfer paper is poor quality.
7.
Adhesive Paper:the temperature is too high or poor printing ink.
- 14 -
Page 15

CAUTION
CHECK the correct voltage before using the machine.Be SURE to operate
with reliable grounded protection connections.
TURN OFF the machine,and then DISCONNECT the power-supply before
replacing the heat units.DO NOT forget to wearing insulated gloves if the unit
is still under high-temperature.
AVOID prolonged burning of the heating parts.If not turning the power
off,please place a hot stamping replacement ( it could be a scrap and can be
used repeatedly ).AVOID damaging the heating units with sharp parts of the
stamping object.
AVOID touching the heating units and the compression spring without
protection in case of potential damage,of body during use.
If it’s hard to pushing the grasp,please adjust the rotation lock screw in order to
reduce the pressure of compression spring.Or, it will damage to the strength of
the machine.
Before lifting the machine,please lock the machine head by rotation lock screw
and loosen the handle(don’t screw the rotation lock screw too tight).Besides,do
not put down the machine beyond the limit.When meeting the falling limit,you
can feel an obvious pressure on the swiveling pressure adjustment wheel.
Keep children away from the machine!!!
DO NOT attempt to press products that are not intended for normal heat
transfer. Baking pads should be avoided of empty burning.
- 15 -
 Loading...