

Page 1

INSTRUCTIONS FOR USE:
THE INTELLIGENT CYCLE
COMPUTERS.
Page 2

LADY-COMP®.
YOUR ULTRA-PRECISE DAILY COMPANION.
LADY-COMP®
AT A GLANCE
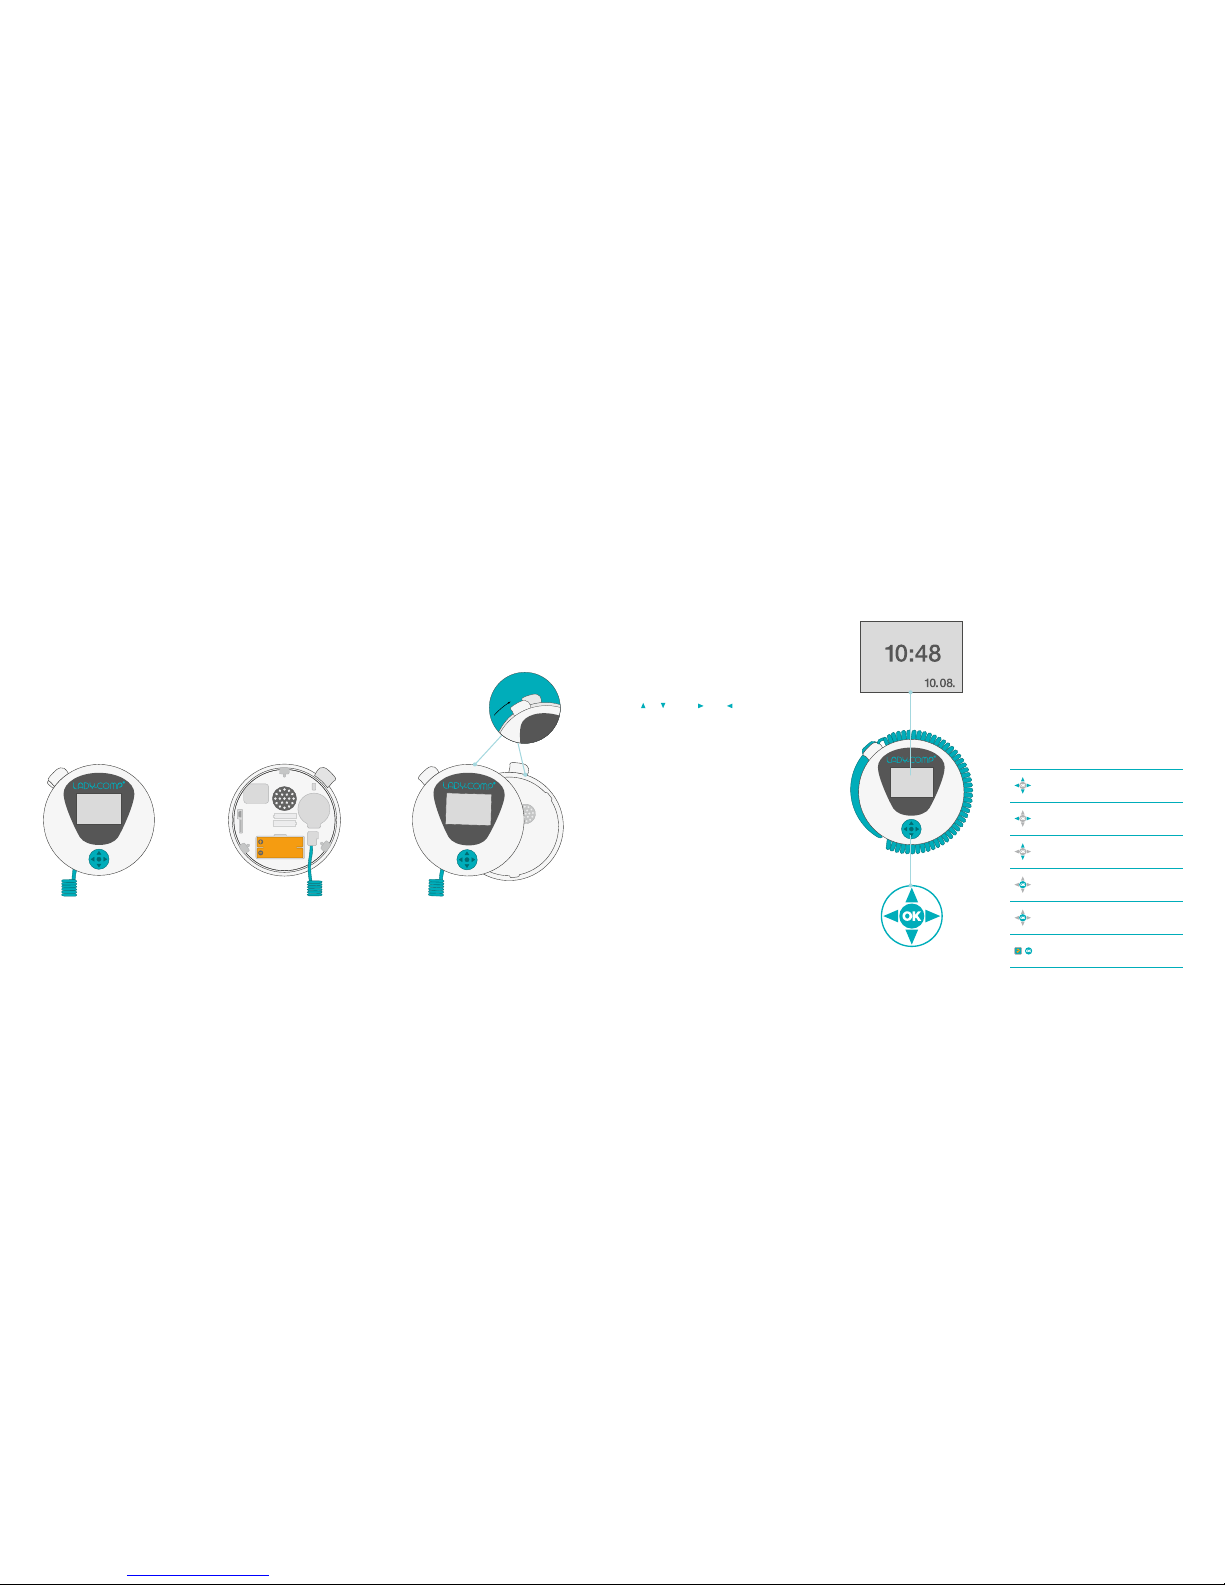
• Cycle compute r
• Measuring sensor
• 2 A AA power accus /
batteries (optional)
• Sl ip cas e
• Instruction manual
• USB cable for re ading out dat a
• Accu ch arger (optional )
Measuring sensor
Sensor with cable
Control button
Display screen
Sensor holder
Thank you for choosing the natural opti on as your way of planning a family in the
future. Wh ether LADY-COMP®, LADY-COMP® basic or LADY-COMP® baby, whet her
controlli ng pregnancy t he natural way or planning for a family – in a ny case
you have ma de a good dec ision. And ten thousands of women have done so before
you. They have all been satisfied wit h this method that is both n atural and safe.
Please re ad these inst ructions carefu lly and completely, fo r your own safety. Fo r
comprehe nsive details about this devi ce, refer to the Tabl e of Contents o r the
Alphabet ical Index. Sh ould you have any more questions about a techni cal term or
two, then go to our L ADYp edia at ww w. lady-comp.de for a comprehensi ve answer.
Now you a re ready to go!
LADY-COMP – 2 3 – LADY-COMP
Page 3

TABLE OF CONTENTS
1. LADY-CO MP® at a gla nce
Product c ontents 03
2. Befor e you begin
Opening the device 06
Inserti ng the batter y 06
Closing t he device 06
Home scree n 07
Control button 07
Default v alues 07
Menu level s 08
3. Time/date
Setting the time 09
Setting the date 10
4. Alarm
Alarm on /of f 11
Setting the alarm 11
5. Menst ruation
Activatin g «M» / correct ing «M» 12
Menstruation data 12
Post-hoc « M» inputs 12
6. Measu rement
Measurem ent in the mor ning 13
Measurement period 14
Fertilit y indicator 16
Review/preview 16
Fever indic ator 1 7
Skippin g a measuremen t 17
Cancell ing a measurement 17
7. Cycle calen dar
Cycle calen dar 18
8. Planni ng pregnanc y
LA DY-CO MP
®
baby displ ay 19
Sexual in tercourse (SI) 19
Gender prognosis
20
Pregnancy indicator 21
Concepti on date & birt h date 21
Restart a fter pregnancy 21
9. Cycle & planning st atistics
Cycle stati stics 22
Planning statistics
(L ADY-C OMP
®
baby only) 23
Cycle cur ve 24
Personal inputs 26
10. Setting s
Body Ma ss Index (BMI) 27
Default s ettings 29
Temperature/time unit 30
Personal comments 30
Gender prognosis on/off 31
Erasing dat a 32
Test measurement 33
Informatio n about the dev ice 33
Luminosity 34
Volu me 34
Alarm si gnal 35
Button cl ick tone on/off 35
11. Impo rtant infor mation
Analysing cycle data/reading out data 36
Mini USB ca ble 36
Micro SD card 36
AAA p ower accu charge r 36
Loss of d ata 37
After th e pill 37
Pearl Ind ex 37
Softwar e program 37
Prognosis 37
Travel and time zones 3 7
Summer a nd winter time 37
Nightshifts 37
Restart ing after a pause 37
12. Erro r messages & corrective ac tions
M input: check 38
Charge powe r accus/batteri es 38
Power accus /batteries empt y (112-11) 38
Clock bat tery running out (112-12) 38
Clock bat tery empty (1 12-13) 38
USB: no function (117-1) 39
Storage n early full (111-11) 39
Storage f ull (111-12) 39
Error boot loader (120-1) 39
Technics, m aintenance, safe ty 40
Servic e and support 42
Electromagnetic compatibility 43
Index 48
Addresses 52
12
39
6
LADY-COMP – 4 5 – LADY-COMP
Page 4
2. BEFORE YOU BEGIN
1. Remove th e measuring
sensor
2. Open the device
Screw the dev ice open in
counter-clockwise fashion.
Home scr een
You will receive your cycle compu ter with
the time, d ate and year, alread y pre-set.
Control button / swit ch on
Keep the con trol button pres sed until you s ee
the time/date come up on screen. All menus
can be acce ssed by pushin g the control bu tton
up/ down or r ig ht / left. To activate
the menus a nd conrm inpu ts click the c entre
of the butto n.
Back to h ome screen
Keep the cen tre button pres sed for 3 secon ds
to return to th e time/date home scre en.
Automati c switch off
The device w ill completely s witch o within
60 seconds if no button is pressed. The
screen wil l then go dark u ntil a button is
pressed or the alarm rin gs.
Default values
Your cycle compu ter comes with d efault
values pre- set before you st art. These
are automatic ally erased as soo n as you do
your rst m easurement or input your own
menstruat ion data. The default values
will reapp ear as soon as your own data is
erased.
3. Inser t the batte ries
Insert th e power accus/bat teries
as require d.
4. Close the device
Put the two p arts togethe r at
the notches and screw the dev ice
closed clockwise.
Select the me nus via the control b utton
left, right , up, down
Forward/backward
Select left, right
Select yes, n o
Date/time set ahead/set back
Select up, down
Conrm
Conrm inpu t
Keep button pre ssed for 3 seco nds
= back to home
+
«Return» = on (bl ue square) and
«OK button« (co nrm)
= return to prior m enu level
AAA
AAA
COMP-N-MB RK.500
Power accus/batteries
Before you st art using the device, you will have to insert t he batteries.
2 (AAA type) power accus are included w ith your LADY-COMP®
computer. You may al so use normal AAA batter ies that are avail able
anywhere ( 1.5V). The two ( AAA type) power accus must be charged
for 12 hour s before inser ting them. The serial numbe r of the device i s
written in t he battery co mpartment.
LADY-COMP – 6 7 – LADY-COMP
Page 5
THE MAIN MENUS OF THE DIFFERENT LADY-COMP
®
MODELS AND THEIR SYMBOLS
3. TIME/DATE
12
39
6
12
39
6
12
39
6
12
39
6
12
39
6
12
39
6
12
39
6
12
39
6
10:48
12
39
6
10:48
12
39
6
10:48
12
39
6
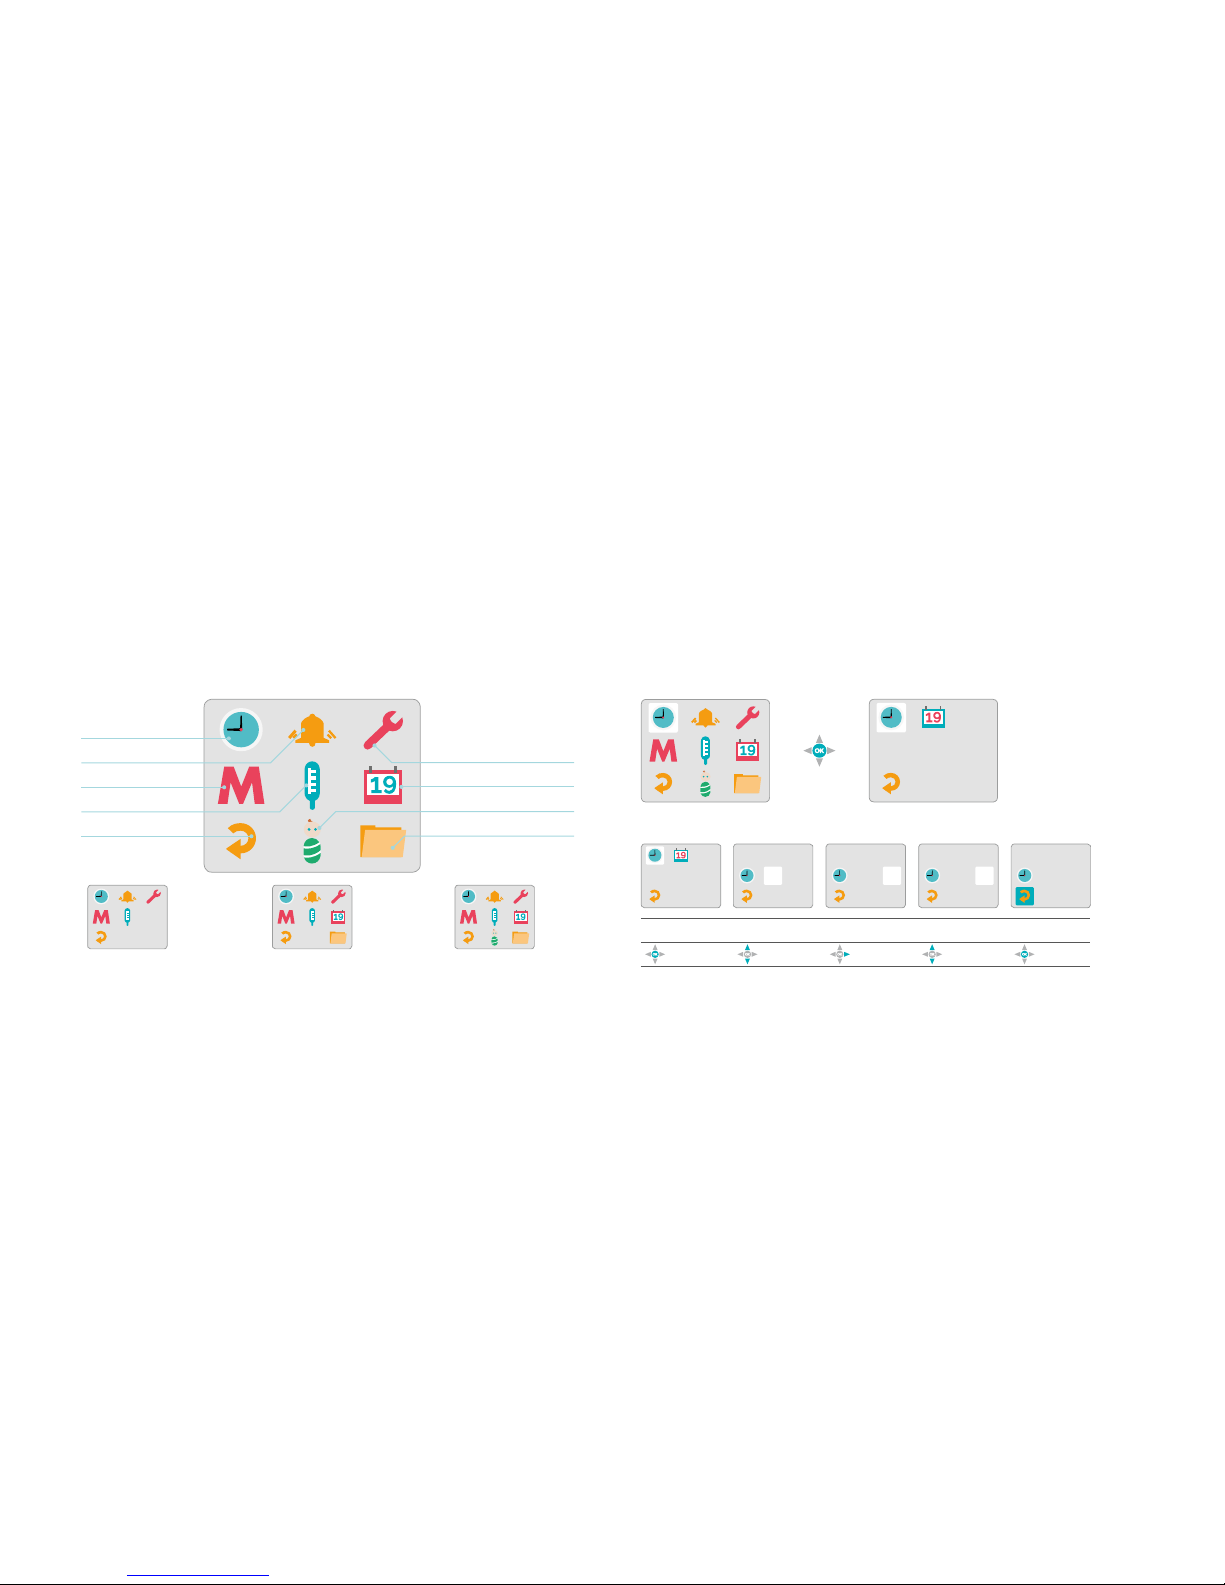
10:50
Time/ da te
Alarm
Menstruation
Measurement
Return
Settings
Cycle calendar
Pregnancy planning
Cycle & planning statistics
The availab le menu levels may vary depen ding
on which L ADY-COMP® model you use.
LADY- COMP® basic LADY-CO MP
®
LADY- COMP® baby
«Return» is on
Click Set the hour Go to minutes S et the minutes
Press
«Return»
Setting the time
LADY-COMP – 8 9 – LADY-COMP
Page 6

4. AL ARM
12
39
6
12
39
6
12
39
6
12
39
6
12
39
6
:
00
07
.09 08
2012
07:29
.10
2012
08
07:30
10 08
2012
.
07:30
«Return» is on
Click Set the hour Go to minutes Set the minutes
Press
«Return»
«Return» is on
Click
Alarm on
Alarm o
Conrm
Press
«Return»
«Return» is on
Click Se t the day Click
Press
«Return»
Alarm on/off
Setting the alarm
Setting the date
Please no te:
Once your de vice has stored one
measureme nt or more, you may set
back the dat e by only one day. If
you set the d ate back, no me asurement can be recorded the n ext day.
You can also s et the date ahea d
by only one day. I t is thus impos sible to enter a f alse date. Thi s enables
you to correc t the date when
travelling t o other time zon es. Make
sure, thoug h, to skip the m easurement on the travelling day.
Please no te:
To enter any previo us menstruat ion
data, make s ure you do this t he
day before you r rst measure ment
(before 11 pm , see page 12 ).
Good to know:
An alarm in dicator appe ars on
the home sc reen once the a larm
has been a ctivated.
Before you be gin with your r st measureme nt,
you should s et and activate t he alarm.
10.08.07:30
07:30
TIME/DATE ALARM
LADY-COMP – 10 11 – LADY-COMP
Page 7
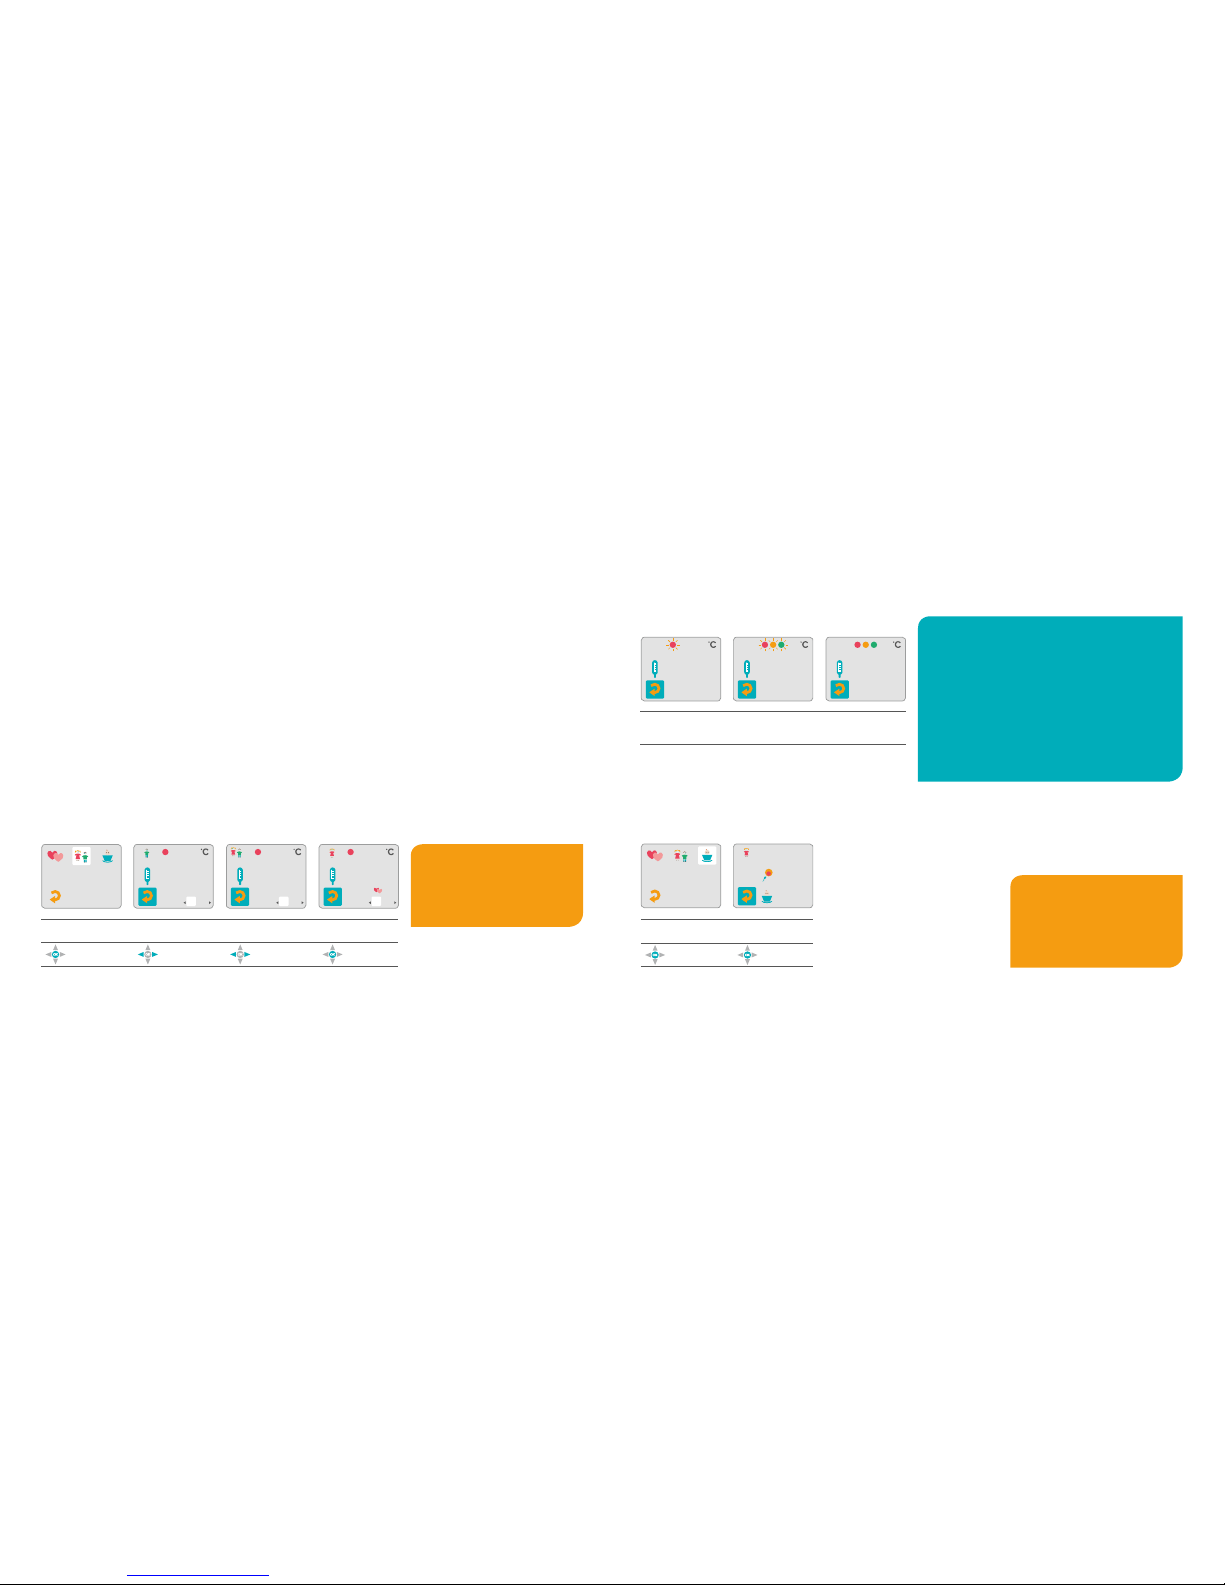
5. MENSTRUATION 6. MEASURING YOUR TEMPERATURE
10.08.07 :30
07:30
09.08.
12
39
6
09.08.
10 .08.14
36 28
.
10.08.07 :30
07:30
10.08.
10.08..10.08.
10.08.20
36 28
.
10.08.
10.08.20
36 28
.
Measurement symbol
is on, alarm ri ngs
Measurement symbol
blinking
Audible signal marks the
end of the measurement
Is switched o automatically or «Return » is on
Click button to
switch o ala rm
Click button to
start measurement
Place sensor under tongue
Measurement value and
fertility are displayed
Click
«Return»
«Return» is on
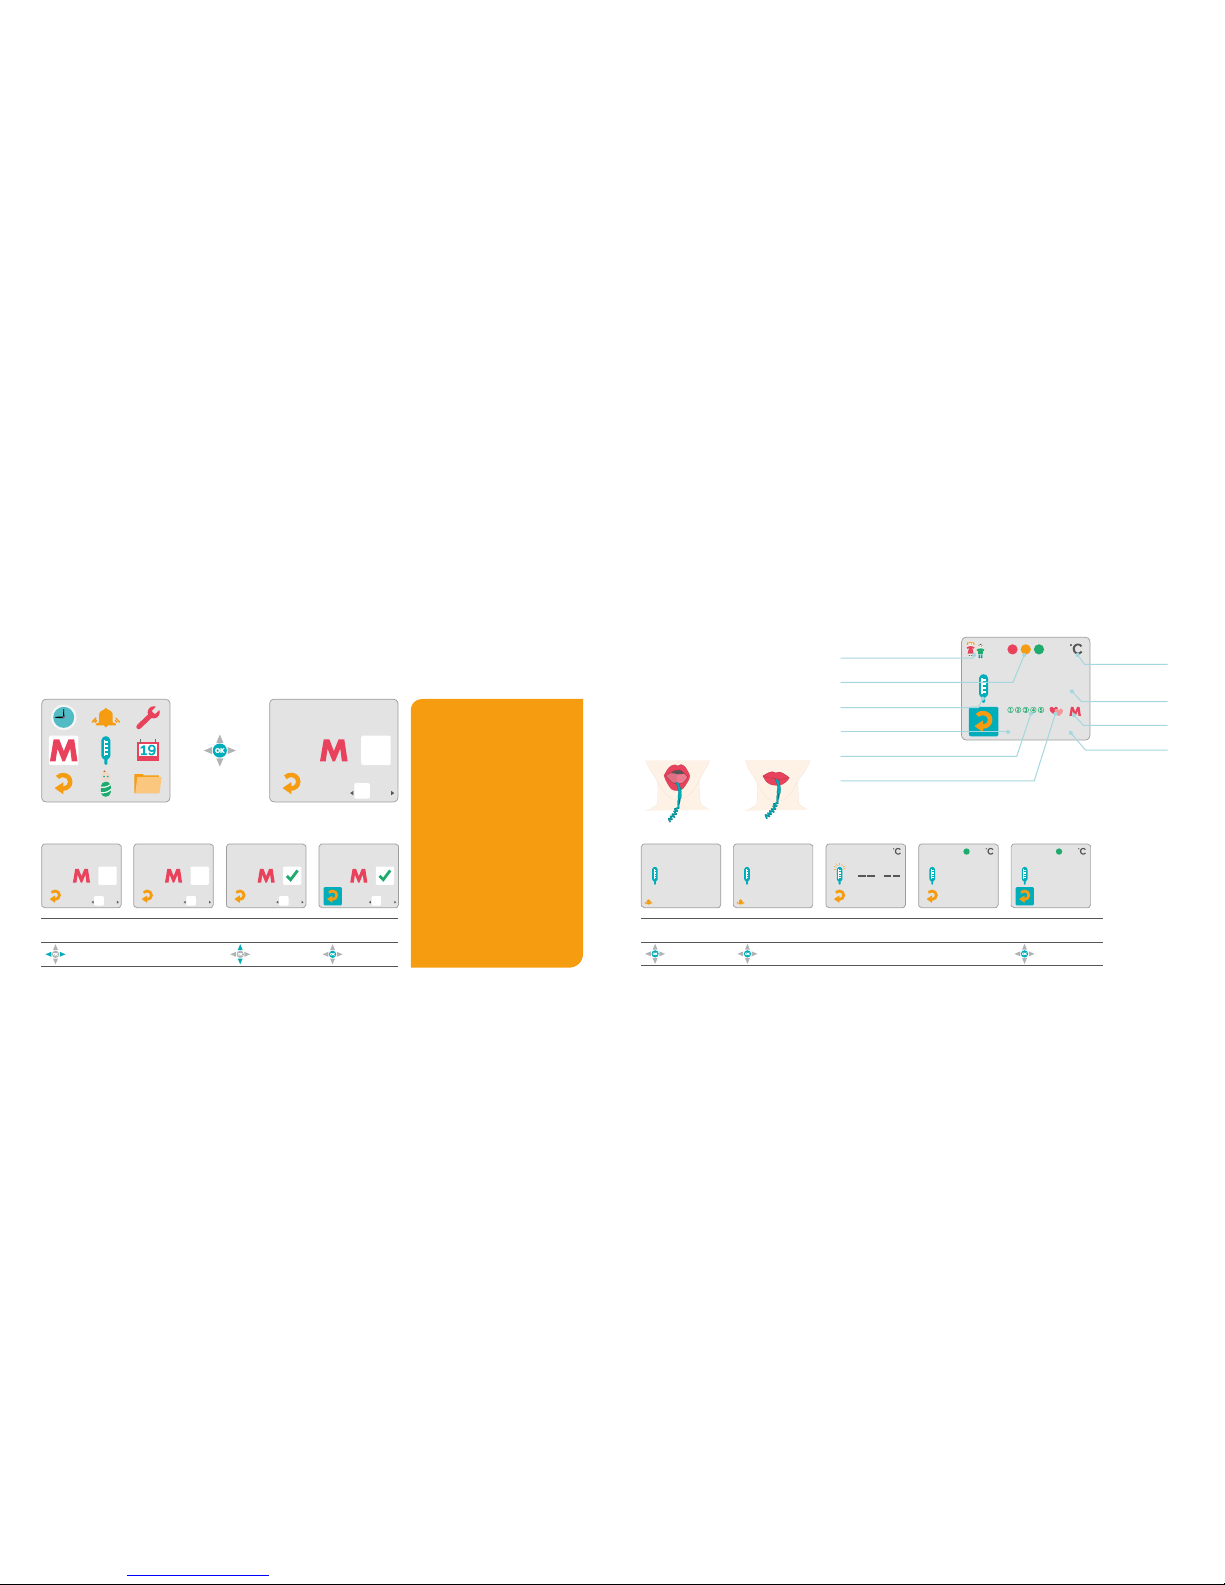
Select the dat e
«M» yes
«M» no
Press
«Return»
Activati ng «M» or co rrecting « M» Measuri ng your temp erature in the mornin g
Menstruation data:
If you have prev iously recorde d your «M»= men struation dat a, please
enter them before your first measurement. Activate «M » as describe d
above.
Inputti ng «M» post hoc:
If you have not taken a measure ment for quite s ome time (e.g. b ecause
you forgot to) a nd you have meanwh ile had your per iod, you may inp ut
«M» retrosp ectively. Please d o this with ca re since errone ous inputs
may only be co rrected 3 days ba ck. Start wit h the most remot e mens-
truation date.
Please no te:
«M» input: check (?M) If you r device
has not rece ived any measu rement
or «M» inpu t for some time (4 days)
and a new cycl e was expected
to begin du ring this time period, this
warning wi ll remind you to c atch
up with your inputs. To do: acti vate
«M» post h oc.
In the event o f such a retrospe ctive
menstruat ion input, on ly the rst
«M» day nee ds to be activate d per
cycle. The dev ice will automa tically
save three «M » days. Begin w ith
the most re mote menstruat ion date.
«M» input a fter disconti nuing the
pill: the rst period af ter discontin uing the pil l is a pill-indu ced withdrawal blee ding, not a real period.
Do not input «M» in this ca se.
Our system ultimately relie s on the daily
measurement of your basal body temperature.
The basal body temperatu re is the tempe rature you have immediately af ter waking up,
i.e. before get ting up and before bei ng
active in wh atever form. The m ore regularly
you measure your temperatu re – especially
in the rst months gettin g started – th e quicker
your device w ill become fa miliar with you r
personal c ycle. Place the measuring se nsor
left or rig ht under your to ngue and close
your mouth. The sensor sh ould not be moved
during the measurement p rocess.
*LA DY-CO MP
®
, LADY-COMP® baby only
**LAD Y-COM P® baby
Boy/girl indicator**
Fertility indicator
Measurement icon
Cycle day
Sensitivities*
Intercourse
Measurement
unit
Measurement
value
Menstruation
Date
LADY-COMP – 12 13 – LADY-COMP
Page 8

10.08.
36 20
.
10.08.
36 20
.
10.08.
36 20
.
1
«M» blinks wh en «M»
is expected
«Return» is on «Return» is on
«M» yes
«M» no
Display
«M» no
Display
«M» yes
«M» inp ut after mea surement
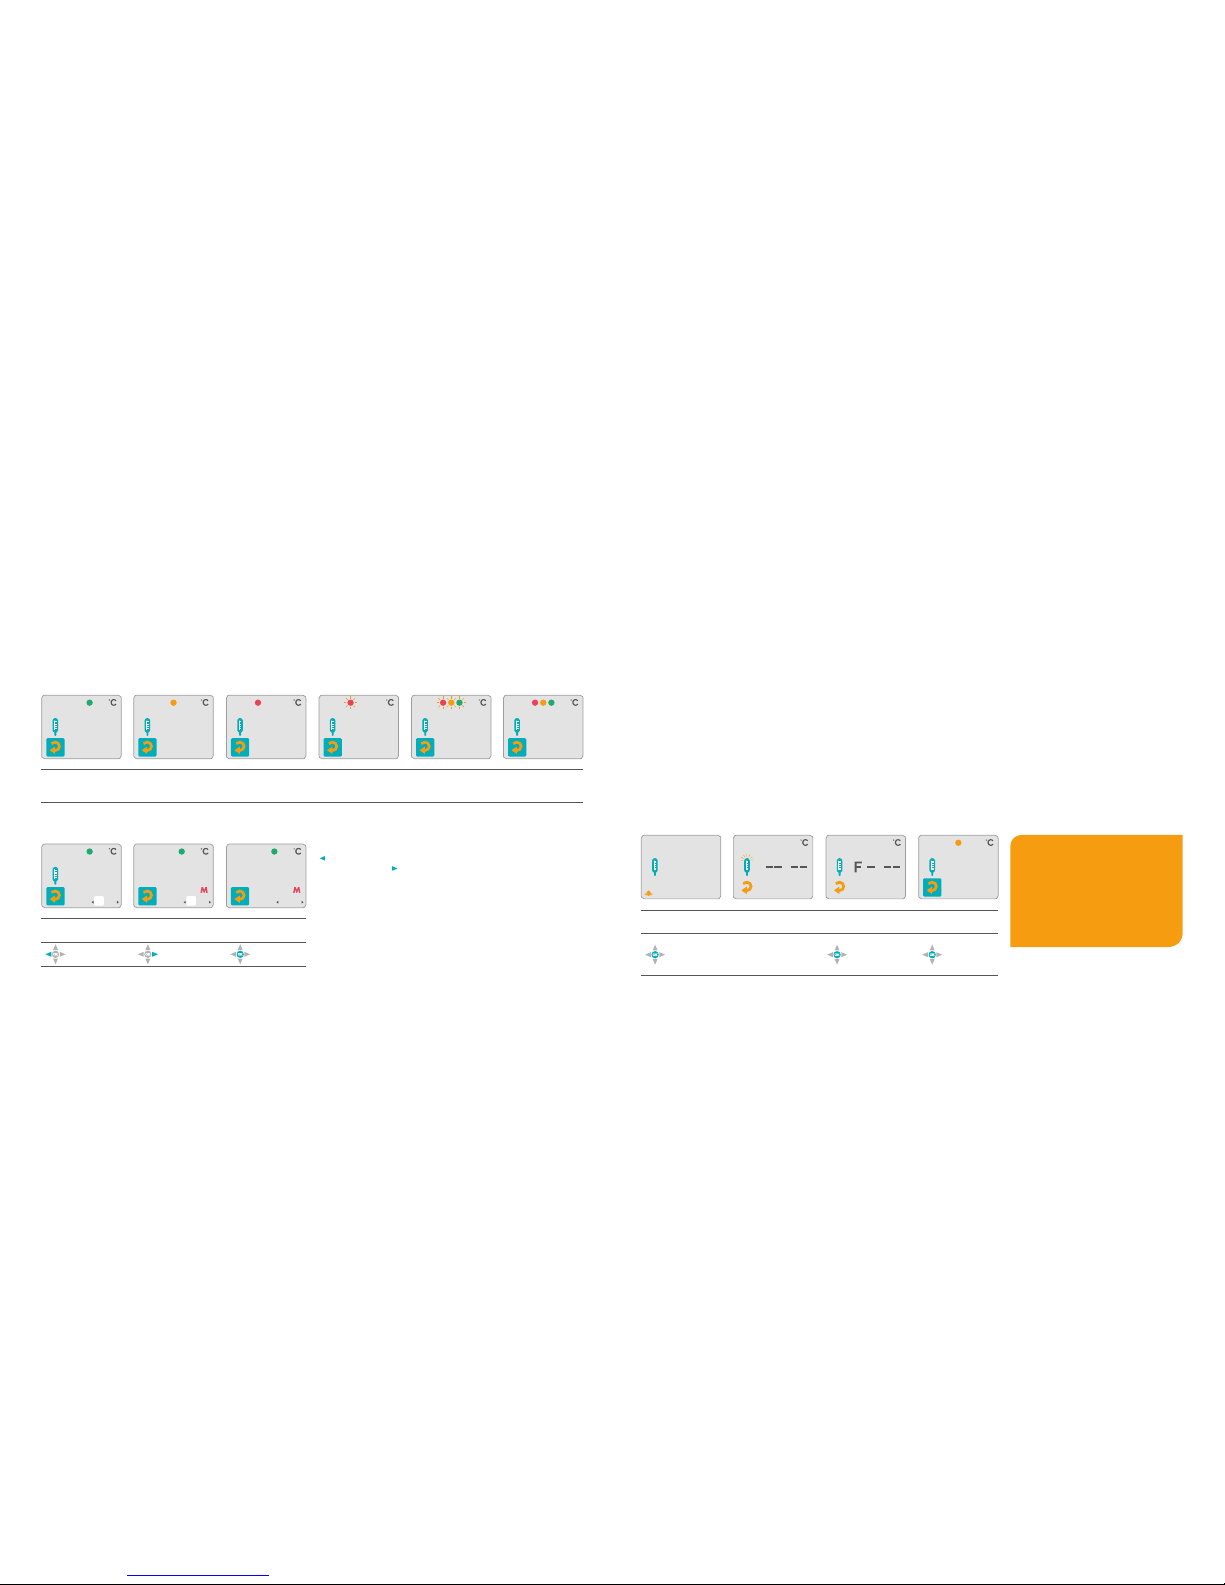
Tips for measuring your temper ature
LAD Y-COM P® will wake yo u up with a tone. To switch o the tone,
click the c ontrol button. To measure your temp erature, just p ress any
button on th e home screen . LADY-COMP® will be rea dy to measure
when the “ Measurement” symbol star ts to blink.
– Now place t he sensor und er your tongue a nd close your mo uth.
– Me asurement wil l take approx. 6 0 seconds. If no measureme nt
value can b e determined af ter 3 minutes, the measurem ent will be
cancelled automatically.
– The displ ay shows measur ement values fro m 34.5 to 41.0°C.
– From 37.8°C upwards, the mea surement value will alternate
with F for feve r.
– On ce the measur ement is comple ted, you will h ear a tone and
your current temperature wi ll appear on th e screen. It w ill also
show your fer tility statu s for that day.
Measurement period
The measu rement period is the time spa n in which
you may proceed t o measure your basa l body temperature every day. This time spa n is monitored b y the
LAD Y-COM P® device. Th e measurement period is inde pendent of the alarm and i s calculated b ased on the
time you too k your measurem ent on the previ ous day
(-3/+3 hours). The measu rement period extends over
6 hours and begins/ends three hours before an d after
the last m easurement ti me, if this poi nt in time does
not coinci de with the time you wake up the n ext day.
Tips for the measure ment perio d:
- The measu rement perio d is displayed i n form of
a measurem ent symbol on t he home scree n.
- Within th e measurement period, pres sing any button
on the home screen will st art the meas uring process .
- We recommen d using the L ADY-COMP® alarm
to wake you.
- Should you wake up any time w ithin the mea surement
period, e .g. because yo u have to nurse you r child, star t
to measure your temperature.
- Should you get up after th e measurement period is
over, skip that m easurement.
- You may redene the measurem ent period at a ny time
by resetting the alarm (e.g. on weekends or i n case of
working nightshifts).
After measurement, you will possibly see
«M» = menstruation blinking.
– In case of «M» yes, conr m «M» with «up » yes.
– In case of «M» no, reject «M» with «down» no.
As soon as LADY-CO MP
®
knows everything about your cycle, the
device will pr ompt you for «M» on days tha t «M» is expected.
– The prompt ing for «M» («M» b linking) sta rts two days pr ior to «M».
– Once «M» is over, LADY-COMP® will stop p rompting for «M ».
After th ree measure ment-free d ays, the mea surement p eriod will b e cleared a gain and
measure ment will on ly be possib le the day af ter, in conj unction wit h an activat ed alarm.
The measu rement per iod will th en again de pend on the wake-up ti me (-3/+3 hours).
Please no te:
Conrm «M» on at least thr ee
successive days. If you have «M »
without be ing prompted by yo ur
device, act ivate «M» as des cribed.
Should you h ave erroneously
input «M», yo u may correct «M »
on the sam e day and three day s
backwards.
MEASURING YOUR TEMPERATUREMEASURING YOUR TEMPERATURE
LADY-COMP – 14 15 – LADY-COMP
Page 9
11.01.20
36 59
.
20
36 60
.
05.08.
01.01.06
36 25
.
25 10.08.
06.01.11
36 30
.
25 10.08.
10.01.15
36 34
.
25.01.30
36 80
.
29.01.34
36 80
.
«green» is on
= not fertile
«yellow» is on
= computer learning phase
«red» is on
= fertile
«red» blinking
= ovulation day
«red» «yellow» «g reen»
blinking
= probable pregnancy
«red» «yellow»
«green» on constantly
= pregnancy
«Return» is on
Go back
= Prognosis
Go forward
= Prognosis
Press
«Return»
Review / Previe w - Fertilit y indicator / Prognose s
Fertility indicator
The device s hows your measu rement value an d fertility fo r that day,
these rema in valid for 24 ho urs and are safe f rom day 1 onwards .
The number of «green» days w ill increase s lowly though syst ematically.
«Red» days wi ll be increasi ngly narrowed down . The Pearl Ind ex is
To display all p revious measu rement values, press the butto n
«left» several times. You may also call u p a six-day progno sis by
pressing t he button «right» severa l times.
Fever indicator
From 37.8°C upward, the measurement v alue will alter nate with «F» for
fever. Fever will t hen be stored a s measurement value and als o shown
in the review. Th e fever values wil l, however, not be u sed for analysis .
No measu rement take n
The device c alculates the e xpected cycle cu rve and your fer tility
status, ba sed on existi ng values. Tempera ture increases due to the u,
a lack of sle ep, excessive alc ohol consumpt ion and/or the use o f
medicinal drugs with a th ermal eect are «misleading» and are identi ed by the de vice. It is gen erally recomme nded to interru pt your daily
measureme nts in case of a cold with fever, th e use of medici ne, or a late
night to avoid the input of «mi sleading» val ues.
Cancel t he measurem ent proces s
You may cancel t he measureme nt process by hol ding the «OK»
button down fo r 3 seconds; t his will take you back to the mai n
menu. You may th en repeat the m easurement at any time within
the measurement period.
07:3010. 08.
07:30
10.08..10.08.
.
36
10.08.
38 45
.
Measurement symbol
is on - Alarm is on
Measurement symbol
blinking
«Fever» alternates with
the temperature value
«Return» is on
Press button to
switch o ala rm +
start measurement
Place the sens or under
your tongue
To cancel a measuring process, keep
button pressed for
3 sec.
Press
«Return»
Please no te:
LAD Y-COM P® is not intende d for
controllin g the body temp erature
as part of a self-health che ck,
this shoul d be done with a ther-
mometer.
MEASURING YOUR TEMPERATUREMEASURING YOUR TEMPERATURE
0.7 (99.3pc) from d ay 1 onward. If th e device receive s no input or rec eives informati on that cannot be evaluated, t he number of «ye llow» days
will increa se.
LADY-COMP – 16 17 – LADY-COMP
Page 10

If you are pl anning for preg nancy, then infor m
your LADY-COMP® baby when s exual intercourse has taken place « SI»:
- Enter «SI» the day after you r measuremen t.
- You may enter «S I» up to three d ays
backwards.
05 2012
1
8765
12 13 14 15 16 17
24232221201918
2725 2826 2930
411910
23
05 2012
41
111098
15 16 17 18 19 20
27262524232221
3028 3129
71412 13
523 6
04 2012
2
6543
10 11 12 13 14 15
22292128202719181716
23302425 26
2978
35141
«Return» is on
Flip through
months
Press
«Return»
The cycle ca lendar shows you the fertilit y
curve of you r cycles as meas ured in the
last mont hs. You may also ca ll up a menstr uation progn osis for the com ing 6 months.
Since the i ntroduction of LADY-COMP
®
baby in
1986, we have sup ported count less couples
in planni ng a child. LA DY-COMP® baby shows
you the idea l time to becom e pregnant.
10.08.
09.08.
09.08.
7. CYCLE CALENDAR 8. PLANNING PREGNANCY
12
39
6
12
39
6
06 2012
1
8765
12 13 14 15 16 17
24232221201918
25 26 2728 29 30
4
11
910
23
Inputti ng intercou rse «GV»
«Return» is on
Click Select date Click
Press
«Return»
LADY-COMP – 18 19 – LADY-COMP
Page 11
The possib le conception date and expecte d
birth date will blink – as a forecast – fro m day
4 of your cycle until ovulatio n has taken pl ace
and been c onrmed. Afte r ovulation, t hey
no longer b link and the co lours will rem ain on.
If a SI inpu t is available, g ender progno sis
will appea r (if it was act ivated under Se ttings).
In case of m ono-phase a nd/or atypical cycl es,
or of late ovu lation, the d isplay will on ly show
a line.
Restart after pregn ancy
In the rst weeks after bi rth, fertil ity is down
to zero. There after and in al l other cases , we
recommend to resume your me asurements s ix
weeks afte r giving birt h at the latest.
Gender prognosis
To rather plan for a boy, restrict s exual intercour se to the two days in
which the « boy» symbol is d isplayed alone . To rather plan for a girl,
restrict in tercourse to th e two days in whic h the «girl» sy mbol is
displayed . The rst «boy» symbol will ap pear two days befo re the ideal
conceptio n date. The «girl » symbol appe ars on the day af ter the
ideal conc eption date. «B oy» and «girl» c ome up on the id eal conception dat e itself. This p rognosis is ba sed on calcul ation.
02.02.
05.05.
11
36 30
.
08.08.
11
36 30
.
09.08.
11
36 30
.
10.08.
Concept ion date and birth date
Pregnancy indicator
«Return» is on
Click
Press
«Return»
«Return» is on
Click
Flip through
dates
Flip through
dates
Click
«Return»
PLANNING PREGNANCY PLANNING PREGNANCY
Please no te:
LAD Y-COM P® baby displ ays the
boy/girl gender pro gnosis in
addition to the fertilit y indicator.
Please no te:
To display the g ender prognos is on
the screen , activate this item in the
«Settings menu» (see pa ge 31).
Good to know:
- «Preventio n» is indicate d after 4-5 days . «Red - yellow green» alte rnate (if sexual i ntercourse SI i nput was made).
This early i ndication is p articularly important si nce the user
may wish to ch ange her lifes tyle and e.g. d o without alcoh ol
or certain medicines.
- After day 1 5, LADY-COMP® baby indic ates a «probabl e
pregnancy ». The fertilit y symbols bl ink simultane ously
«red - yellow - green».
- If pregna ncy is conrme d, this will b e displayed sta rting
from day 18 af ter fertiliza tion. All thre e colours are on
continuously.
15
36 80
.
10.01.
30
36 80
.
25.01.
34
36 80
.
29.01.
«Red» «yellow» «green»
blinking alternatingly
= prevention
«Red» «yellow» «green»
blinking
= probable pregnancy
«Red» «yellow»
«green» o n
= pregnancy
LADY-COMP – 20 21 – LADY-COMP
Page 12
1. Averag e cycle lengt h
Displays th e average cycle le ngth of your
measured cycles.
2. Averag e temperatu re increase
after ovu lation
Displays th e average tempe rature increas e
after ovul ation.
5. Numbe r of mono- phase cycles
Displays th e mono-phas e cycles. If no ov ulation takes pl ace in a parti cular cycle, thi s will be
shown on the screen. The i ndicator will r emain
on «red» in t his case.
7. Planning hits*
This feature records the pl anning hits (n umber
of hits in t he last 20 cycle s). This is, howeve r,
only displ ayed on your LADY-COM P® baby if
you have sexual intercourse «S I» activated.
*LA DY-CO MP® baby only
4. Averag e length of h igh-tempe rature pha se
Displays th e average lengt h of the high-te mperature phase.
3. Ovulat ion spread in days
Displays th e ovulation sp read in days.
6. Numbe r of cycles w ith CLI*
(CLI = cor pus luteum i nsufficien cy)
LAD Y-COM P® baby is able to id entify corpus
luteum insu ciency (CLI). T his phenomen on
is characte rized by a short er high-tempe rature
phase and /or a lower temperature increase.
This inform ation is impor tant when pl anning
for a child, and for an exact a nalysis of your
cycle curve.
The cycle and planning st atistics provi de you
with valuab le information a bout your cycle
or informati on for plannin g a child. Stat istical
values are s ignicant aft er three measu red
cycles. The The overview in cludes all cycle s
from when yo u started your measurement s.
All other vi sualizations relate to the la st 20
cycles since any older data wo uld be irrelevan t
for analysis.
Cycle sta tistics
LAD Y-COM P® and LADY-COM P® baby only
9. CYCLE AND PLANNING STATISTICS
12
39
6
M
C
L
24
M
34
M
C
0.34
M34M
C
2
M34M
C
11
M
34
HL
C 340C 340C 34
1
1. Length of cyc le 2. Temperature in crease
3. Ovulation –
uctuation m argin
4. Length of hig h-
temperature phase
Click
Flip through
statistics
Flip through
statistics
Flip through
statistics
Flip through
statistics
5. Mono-pha se cycles 6. C LI*
7. Planning hits*
«Return» is on
Flip through
statistics
Flip through
statistics
Press
«Return»
LADY-COMP – 22 23 – LADY-COMP
Page 13

This feature allows you to moni tor your temper ature curve.
Cycle cur ve
LAD Y-COM P® and LADY-COM P® baby only
CYCLE AND PLA NNING STATISTICS CYCLE AND PLA NNING STATISTICS
37.5
36.5
37.0
36.0
06.07.04.05.
Temperature curve
Fertility
First day displayed
Last day displayed
Lunar phase
Ovulation day
Menstruation
Intercourse
37.5
36.5
37.0
36.0
06.07.04.05.
37.5
36.5
37.0
36.0
06.07.04.05.
37.5
36.5
37.0
36.0
09.10.07.07.
37.5
36.5
37.0
36.0
09.08.07.07.
Display: 50 d ays
Time line
zoom in/out
Display: 100 d ays
Display options:
25 days/14 days/7 days
Click
Forward-/back
+/- 7 days
Show more
show less
Show more
Show less,
1x = 25 days
LADY-COMP – 24 25 – LADY-COMP
Page 14

PARTY
SCHICHT
MEDIKAMENT
MEDIKAMENT
10.08.
Setting the Body Ma ss Index (BM I)
Body Mass Index: date of bi rth, height a nd weight.
This feature allows you to calcu late your body m ass index.
This menu l ets you set 5 mar kers. You may dene the comments
yourself un der «Persona l comments» (p age 30) and chang e
them if req uired. These inp uts have no impact on yo ur cycle analysis.
Inputs may b e given up to thr ee days later.
10. SETTINGS
MEDIKAMENT
08.08.
PARTY
SCHICHT
MEDIKAMENT
MEDIKAMENT
08.08.
MEDIKAMENT
08.08.
Click
Select
input eld
Click Select date Yes
«Return» is on
Click
Press
«Return»
Personal inputs
12
39
6
BMI – En ter name
BMI
DEMO
kg
cm
ABCDEFGHIJ
KLMNOPQRST
UVWXYZ–.
ABCDEFGHIJ
KLMNOPQRST
UVWXYZ–.
NAME
BMI
kg
cm
NAME
Arrow to the left de letes
one character.
«Return» is on
Click Click Enter text
Conrm character
by character
Click
CYCLE AND PLA NNING STATISTICS
LADY-COMP – 26 27 – LADY-COMP
Page 15

BMI
kg
cm
NAME
BMI
kg
cm
1982
NAME
176
BMI
NAME
kg
cm
1982
BMI
kg
cm
NAME
BMI
kg
cm
1982
NAME
176
BMI
NAME
kg
cm
1982
BMI
kg
cm
1980
NAME
170
BMI
NAME
kg
cm
1982
BMI
kg
cm
60
19.4
176
NAME
1982
BMI
kg
cm
1982
NAME
176
BMI
NAME
kg
cm
1982
BMI
kg
cm
64
20.7
176
NAME
1982
Default setti ng 1980
Select year Click Input year Conrm year
Default setti ng 170
Select
height
Click
Enter
height
Conrm
height
Default setti ng 60 To calculate the BMI
Select
weight
Click
Enter
weight
Press
«Return»
BMI – En ter birth y ear
Factory settingsBMI – En ter high
12
39
6
Good to know:
Home scree n Fahrenheit
12 h am/pm | Mo nth/day
Home screen Celsius
24 h | Day/Month
06/18
pm
am
07:15
02:42
07:15
14:42
18.06.
SETTINGSSETTINGS
BMI – En ter weight
LADY-COMP – 28 29 – LADY-COMP
Page 16
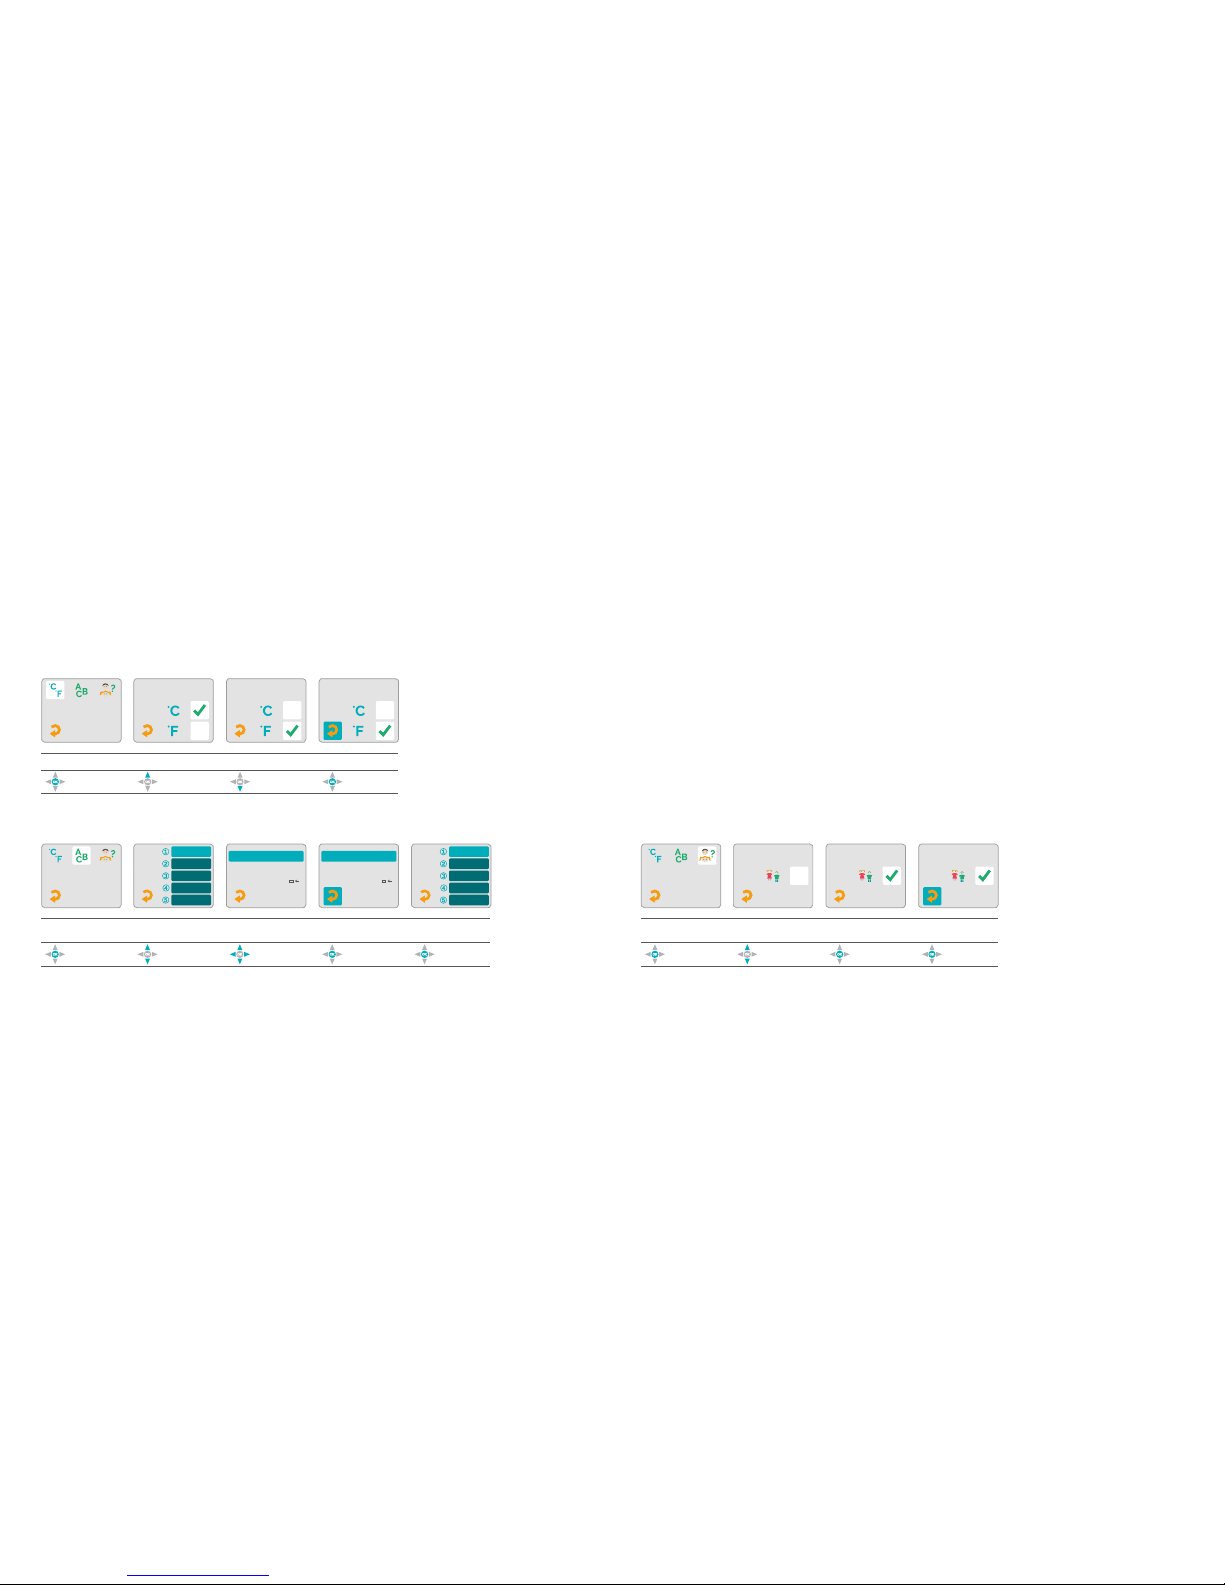
This feature enables you to se t your device
to Celsiu s or Fahrenheit. Once set, the time
and date form at will be adapt ed automatical ly.
°C: Time in 24h format and date w ith
day/month (e.g. 13:25 and 25.03.).
°F: Time in 1 2h format and dat e with
month/day (e.g. 01:3 5 pm and 03/25).
This feature allows you to input personal info rmation abo ut what might in uence your cycle .
If you are ta king medicin e that you suppo se
might inue nce your cycle you may enter
it here. Thi s menu allows you to set 5 markers .
We recommend not to change th e comments
after you in put them in ord er to avoid any
erroneous a llocation of your in puts.
°C = Celsius °F = Fahrenheit «Return» is on
Click Celsius Fahrenheit
«Return»
Select
Temperature/time unit
Personal comments Gender p rognosis o n/off
«Return» is on
Click
Indicator on
indicator o
Conrm Press«Return»
SETTINGSSETTINGS
ABCDEFGHIJ
KLMNOPQRST
UVWXYZ–.
ABCDEFGHIJ
KLMNOPQRST
UVWXYZ–.
BEFINDEN 1
BEFINDEN 1
«Return» is on
Click
Select
input eld
Enter text
Conrm character
by character
Press
«Return»
You may input the se comments u p to three
days later. You may ac tivate the input options
if needed , under the me nu Cycle curve/
personal inputs.
The «ferti lity» indica tor comes with t he
option of di splaying a boy/girl prog nosis.
To display this prognosis, sw itch on this
option her e.
LADY-COMP – 30 31 – LADY-COMP
Page 17

To erase all inp ut data, you wi ll have to press «O K» ten times in a row
in the «De lete» menu. In s o doing, the d isplay bar will shrink step
by step. If yo u input any other data (left, ri ght, up, down), th e display bar
jumps back to the initial p osition and you will have to pres s «OK»
10 times aga in in order to er ase all your dat a. After eras ing the data,
you will nd the very defau lt values in the various indic ators that
were there wh en the device w as new. Once you st art measurin g again,
the default values will dis appear automa tically.
You may do a test m easurement to c heck whether the measurem ent
process is functioning. To cancel the mea surement proce ss, keep the
«OK» butto n pressed for 3 s econds.
Erase da ta
Test measurement
Product information
10.08..10.08.
36 48
.
10.08.
36 48
.
Starts automatically Measurement symbol
is blinking
Audible signal indicates
end of measurement
«Return» is on
Now measure your
temperature
Press
«Return»
«Return» is on
Press
«Return»
SETTINGSSETTINGS
«Return» is on
Select cancel
«Return»
Conrm 10 time s
with «OK» to era se
all data
Press
«Return»
12345678-31
55%
SNR
Good to know:
The produc t information co ntains:
– The seria l number of the device (13547206)
– The soft ware status, sh own by the last two digits (-31)
– The power ac cu / battery s tatus
– The surrou nding brightn ess in per cen t
Any device er ror or alert si gnal is displ ayed.
For a list of possible erro rs, please refe r to page 38.
LADY-COMP – 32 33 – LADY-COMP
Page 18

Use this fea ture to change th e luminosity o f the screen.
Use this fea ture to change th e volume of the L ADY-COMP
®
device.
Use this fea ture to activate a c ustomized ala rm tone.
Use this fea ture to switch on/o the button click to ne.
Luminosity*
Volum e* Button c lick tone*
Alarm to ne*
SETTINGSSETTINGS
«Return» is on
Displa ce
luminosity control
Press
«Return»
«Return» is on
Displace volume
control
Press
«Return»
*LA DY-CO MP® and LADY-COM P® baby only *LA DY-CO MP® and LADY-COM P® baby only
«Return» is on
Click
Button cl ick
tone on
Button cl ick
tone o
Conrm
Press
«Return»
«Return» is on
Click Select tone
Press
«Return»
LADY-COMP – 34 35 – LADY-COMP
Page 19

AAA
AAA
Insert S D card
11. IMPORTANT INFORMATION
Battery compartment
and serial number
Mini USB po rt
Serial interface
(for servicing only)
Recesse d SD card
compartment
Notches for closing
the device
Measuring sensor port
The measu ring sensor c an
be replaced a t any time by
unpluggin g it from the p ort.
Analysin g cycle data – reading ou t data:
Register at www.lady-co mp.de. You will rece ive your person al access
code. You can re ad out your data via a mini USB c able from there .
Our experi enced suppor t team will hel p you with analys ing your data
and be happy to advise you on your personal cycle curve.
info@LAD Y-CO MP.de or call us f or any further quer ies
Mini US B cable
Your LADY-COMP® comes wit h a mini USB
cable incl uded in the pro duct box. This c able
allows you to t ransfer your dat a to a PC.
You can also h ave your cycle data analysed by
your local ret ailer or by VE Valley Elect ronics
GmbH. To do thi s, go to our web site or e-mail-
Risk of d ata loss excl uded
Any risk of lo ss of data store d on your computer due to em pty accu charge rs / batteries can
be excluded .
Software programme
The softw are uses previou sly input base d ata,
right from t he start. Th e more regular ly you
measure you r temperature, the faster the
device will become famil iar with your in dividual cycle an d be able to inte rpret it. It wil l
show more an d more green (inf ertile)
days and the r ed (fertile) days w ill be increasingly narrowe d down.
Nightshifts
Set and act ivate the alarm by entering the
required m easurement ti me. Let yourself be
woken by the to ne the next mo rning and
measure you r temperature a s usual. Do l ikewise the nex t time you cha nge shifts.
Upgrade s: Micro SD c ard
Should you w ish to update th e software at
a later sta ge or to upgrad e it for furthe r
functiona lity, we will sen d you an SD card .
- Open devi ce as describe d on page 6.
- Remove batte ries.
- Insert S D card.
- After com pleting your up date/upgrade, we
recommend removing the SD card in order
to avoid unne cessary power consumption a nd
ensure a qu ick reboot of th e device.
After th e pill
(or other hormone pre parations)
Before you be gin, you must d iscontinue ta king
the pill. The rst blee ding after dis continuing
the pill is a pill-induced withdrawal ble eding,
not a perio d. Do not input «M» in this ca se.
Prognosis
The indic ators used to pre dict ovulati on and/
or for family planning (boy/girl) a re forecasts
and based on the data gath ered from previ ous
cycles. Onc e a cycle is comp lete and the
next peri od commences, the device rec alculates the previ ous cycle, as it is now possible
to dene the exact time of ovu lation. This i s
done on day 4 of the new cycle.
Restart after inter ruption
The date, yea r, and time will co ntinue to run
automatically. The measurement period will be
unblocked fo r a new input as soon as you
stop measu ring, and has to be re-set by se tting
the alarm . To do this, set the alarm for the
following mo rning (before 1 2pm) and contin ue
the use as u sual.
AAA powe r accu char ger
You may order the required charg er from us.
Insert 2 A AA accus in the charger. The p rogress will t hen be displ ayed on the charg er.
Pearl In dex
The Pearl I ndex is a medic al value that in dicates the s afety of a parti cular contrac eption
method. O ur daily fertil ity indicator has
a Pearl Ind ex of 0.7 or, to put it sim ply, is a
99.3pc safe.
Travel and t ime zones
When travel ling to other ti me zones you may
reset the da te and time to th e current local
time. Your comp uter will be rea dy for measuring the nex t day, at the desire d time of day.
Example:
If one woman out of 100 who use s contraception for a year becomes pregnant, thi s
correspond s to a Pearl Ind ex of 1.0.
Summer a nd winter t ime
Set the clo ck to summer or w inter time,
as describ ed on page 9.
LADY-COMP – 36 37 – LADY-COMP
Page 20

12. ERROR MESSAGES & CORRECTIVE ACTIONS
Clock bat tery empty (112-13)
If the clock battery is em pty, the device ca nnot
be used.
Chargin g the power a ccus
As the power accus / batteri es start to ru n out,
you will see an alert on th e home screen .
Batteries running out. P lease charge
or replace the batteries .
Clock bat tery runni ng out (112-12)
The device i ncludes a clock battery to kee p
the time ru nning even when the batteries
are empty o r not installe d. The capacit y is
dimensio ned for a use of a pprox. 7 years b ased
on a normal utilization ra te. As the batte ry
voltage dec reases toward th e end of the pro duct life cyc le, an alarm wi ll come up:
Device can not be used.
What to do:
- You should se nd in the device for servicing
as soon as possible to have t he clock batter y
replaced.
- This aler t can also ap pear if the devi ce is
exposed to ex tremely low temp eratures and
the voltage is strongly redu ced. In this c ase,
store the de vice at room tem perature for ab out
an hour. The d evice can then b e used as usu al
once the ale rt has gone o .
Batterie s empty (112-11)
The power acc us / batteries are completely
empty and t he device no lon ger function s
reliably. If th is alert come s up, the device
cannot be f urther used .
What to do:
- Charge the power accus /
replace th e batteries
- Should th e alert come u p again despite
freshly charg ed accus or new ly replaced
batteries , the batteries are probably defe ctive
or empty an d should be cha rged/replaced .
Normal bat teries can be e asily removed an d
replaced . Please make su re to insert th em
with the ri ght +/- orientation (see p. 6). Make
sure not to sh ort-circuit th e batteries.
Storage n early full (111-11)
What to do:
You should save t he existing dat a by reading
them out or transferring t hem via the US B
port. Th ereafter, the dat a on the device m ay
be deleted a nd the compact ed data may
be read in again.
Error message/
bootload er error (120-1 )
This error m essage will a ppear if a sof tware
update is in terrupted and t he software c annot
be complete ly restored (e.g. b ecause the
power accus a re empty). The co de following
the dash in dicates the exa ct error cause .
Error message:
For errors 1 20-2 to 120-7 pleas e refer to our
technical support.
What to do:
Use the boo tloader to repro gram the device
even without the applicat ion software i n place.
To do this, ins ert the enclo sed SD card to
update the d evice and repl ace the power accus / batter ies. The boot loader will r st delete
the progra m memory and t hen complete
the update. You will be able to fo llow progress
on the disp lay bar. Please ma ke sure to use
fully charge d power accus / b atteries for th e
update so th e process can be successful ly
completed.
Storage f ull (111-12)
The storag e of the device ha s been dimen sioned fo r a recording time of approx . 20 years.
This error m essage appe ars if this tim e span
is exceeded .
What to do:
Any existin g data should be saved by reading
them out vi a USB. Thereaf ter the data c an
be erased and the compac ted data be rea d in
again. For f urther inform ation please r efer
to our websit e or call our te chnical supp ort.
USB: No function (117-1)
The device w as connected t o a USB port bu t it
was not pos sible to establ ish a connect ion.
What to do:
If no data t ransfer via USB is intended for the
time being , you may simply d isconnect the
USB cable. Should the devi ce not reboot
automatica lly, please remove t he power accus
/ batteries for a moment an d reinsert th em
after a whi le. To transfer data via USB, chec k
if the cabl e is function ing and connec ted
properly. USB c ommunicatio n will only func tion with mas ter devices com patible with a
USB mass s torage devic e and FAT data system.
This appli es e.g. to PCs u sing Windows or
Linux and m any other devic es.
«M» inp ut: check
If your devic e has not recei ved any measure ment or «M» input for some t ime (4 days) and
a new cycle wa s expected to be gin during thi s
time perio d, this warni ng will remind you to
catch up wit h your inputs.
What to do:
- activate « M» post hoc
10.08.
10:15
112-12
112-13
112-11
111-11
12 0-1
111-12
117-1
PC
LADY-COMP – 38 39 – LADY-COMP
Page 21

TECHNICS, MAINTENANCE AND SAFETY
Device
- Dimensi ons: diameter 9 cm,
height app rox. 2.7 cm
- Weight: app rox. 130 grs incl . batteries
- Housing: reinforced ABS p lastic
- Measurem ent range: from 34.5 to 41.0°C
- Precisio n of measureme nt:
device 0.06°C; s ensor 0.08°C
- Storage an d transport c onditions:
at -10 to +60° C, ma x. air pressu re 1500 hPa
rel. 25 to 90% .
- Conditio ns of use: + 5°C to + 40°C at a humidit y
of 15% to 93% .
- Applica tion checked fo r a max. altitud e of
2000 m. Acco rding to experie nce, it is poss ible
to use the a pplication at altitudes high er
than 2000 m. Air pressure 75 0 hPa up to a
maximum of 1500 hPa.
USB
- To read out the d ata, you shoul d only use
devices that are capable to read a USB mass
storage dev ice. This appl ies to most PCs ,
laptops an d many tablet co mputers availab le
on the marke t. The USB por t may only be use d
for connec tion to such devi ces. LADY-COMP®
cannot be us ed as long as it is conne cted
via USB.
All instru ctions given ab ove likewise apply
to the meas uring sensor, th e power accus /
batteries a nd the charger. S hould one of th ese
parts fai l, please refer to our d istribution pa rtners for qu ick and reliab le support.
Safety
- Strong ele ctromagnetic elds (e.g. from
mobile pho nes, CB radio or microwaves)
may make the d evice functio n improperly.
The safety d istance shou ld be 1.5m.
- The compu ter may only be con nected to the
devices lis ted above. These should comply
with the IEC 60950-1 standard in order to avoid
any damage t o the device or ot her hazards
(such as el ectrocution h azards or other).
- Keep toddle rs and pets away from the
computer.
- Do not make any modicati ons to the
computer yourself.
- Use the dev ice only in the s pecied ser vice
and temperature range.
- On red days , classical barrier methods –
and by no means h ormonal method s such as
the pill – should be used for contraception!
- LADY-COMP® is not intende d for controlling
the body te mperature as pa rt of a selfhealth che ck, this shou ld be done with a
thermomet er, e.g. when you ar e ill.
Cleaning
- Measurin g sensor: Ple ase only use lukew arm
water to clea n the sensor; ke ep away from
water; avoid a ggressive clean ing products .
- Housing: Wipe with a sli ghtly moist clot h and
glass cleaner.
- Please kee p water or any oth er liquids ge tting on/in t he device or se nsor as this c an lead
to a defect or malf unction.
- Do not use irritating che micals, cle aner
liquids, or aggressive c leaning produc ts to
clean your cycle c omputer.
Maintenance
Your computer h as been desig ned and produced with great care and s hould thus be u sed
with care. I f you adhere to th e instructio ns
below, your LA DY-COMP® will las t for many
years.
- The device has a guarante ed minimum lif e
of 7 years.
- Do not let yo ur computer get moist or wet
to avoid dama ge to the device. Do not place
the device o nto/into a heat sou rce (not
even to dry), s uch as a microwave, an oven,
or a radiator.
- Do not stor e your computer i n a hot environment. Do n ot expose it to th e sun or other
UV light so urces for a long er period of ti me.
Batteries
- 2 micro A AA NiMH power a ccus are includ ed.
- AAA 1. 5 V micro-batte ries may be use d.
- Please ad here to the reco mmended disp osal
method!
Accu cha rger - opti onal
An accu char ger with count ry-specic ad apter
plugs for Eur ope, the US, t he UK, and Aus tralia
is availabl e as an accesso ry.
Disposal
Public col lecting point s for electron ic devices.
Risk of d ata loss excl uded
Your data will b e safe even when t he power
accu is empty.
Disposal Maintenance-safety
High tempe ratures can sho rten the life o f
electroni c devices, dam age the batteri es, and
deform or melt ce rtain plasti cs.
- Do not kee p the device in a cold environme nt.
While it he ats up to normal service temp e-
rature, condensation may occur and cause
damage ins ide the device.
- Do not drop the computer o n the oor or
expose it to s hocks or impa cts, to prevent it
from damage.
- Do not use the device in th e event of damage
to the sens or, the sensor ca ble, or housin g.
Instead order a replacement sensor from
our suppor t team if it is d efective, dirt y, or
smudged.
- If you have lo st the instruc tion manual, you
may download it from our home page at any
time or ord er it per teleph one.
- Please us e the device in c losed rooms on ly.
The temper ature sensor is the most sens itive
part.
- A damaged sensor and exce ssive dust on t he
sensor may ke ep the device f rom functioni ng
corre ctly.
LADY-COMP – 40 41 – LADY-COMP
Page 22

Product labelling:
- Name of ma nufacturer -
VE Valley Electronics GmbH
- Applica tion type BF
- Power supply : 1.2 V – 1.5 V
- Read the i nstructions c arefully
- Do not dis pose of with ho usehold waste !
- Product s afety in compli ance with Europ ean
directives (declaration o f conformity)
- Made in Ge rmany
Guidance and manufacturer’s declaration – electromagnetic emissions
LAD Y-COM P® devices are intended for us e in the elect romagnetic envi ronment given b elow.
The client or user of a LA DY-COMP® device sho uld ensure that it is used in th is type of envi ronment.
Purpose and description:
The LADY-COMP® cycle compu ter is a batter ypowered mini computer used to measure a
woman’s daily w ake-up temper ature (basal
body tempe rature) in order t o determine her
fertile days . The fertili ty period is v isualized
using gree n and/or red LCDs (li quid crystal
display). The fertile peri od is calculate d based
on the body temperature th at is measured
orally right after waking u p using the se nsor
of the cycle c omputer, then save d and automatically a nalysed. Together with the manual
input of dat a on menstruat ion and sexual
intercourse (LADY-COMP® baby only), th e devices help to determine th e fertile and i nfertile
cycle phase s by calculatio n in order to ens ure
natural contraception and natural family
planning.LADY-COMP® baby has ad ditional
functions to display the ideal moment fo r
a planned pregnancy, gender prognosis, and
the concep tion date, as wel l as to calcula te
the birth date.
Service and suppor t
- To replace a de fective measur ing sensor,
you may order it fro m our distributi on partner
in your home country.
- For any fur ther questio ns about your cyc le,
please refe r to the distrib ution partn er in your
home country.
- To nd out abou t your distribu tion partne r,
go to www.l ady-comp.de
Name of manufacturer
Production date
Application elements of the BF type
Please read the in structions for u se carefully
Do not dispose of w ith household wa ste!
Protection from foreign bodi es: nger-sized o bjects.
Protection aga inst the ingress of w ater: water
dripping on th e device when tilted
Product safety p ursuant to European D irectives
EN6060
IP22
ELECTROMAGNETIC COMPATIBILITY
TECHNICS, MAINTENANCE AN D SAFETY
Emission measurements Conformity Elec tromagneti c environme nt – guidel ines
HF Emissions
acc. CISPR 11
Group 1 The LADY-C OMP® devices us e HF energy sol ely for their
internal fu nctions. As a result, HF emi ssions are ver y
low and it is u nlikely that ne arby electroni c equipment
will be aec ted.
HF Emissions
acc. CISPR 11
Harmonic oscillations
acc. IEC 6100-3 -2
Voltage uctuations /
icker acc . IEC 6100-3-3
Class B
Class A
fullled
The LA DY-CO MP
®
devices are intended for us e in all struct ures
including homes and such which are conne cted directly t o
a public el ectricity su pply network tha t also suppli es buildings
which are u sed for residen tial purposes .
LADY-COMP – 42 43 – LADY-COMP
Page 23

ELECTROMAGNETIC COMPATIBILITY
Nominal
Transmitter
Output «W»
Protecti ve Spacing a ccording to
Transmissi on Frequenc y «M»
150 kHz to
80 MHz d = 1,2√ P
80 MHz to
800 MHz d = 0,35 √P
800 MHz to
2,5 GHz d = 0,7√P
0,01
0,1
1
10
100
0,12
0,38
1,20
3,79
12,00
0,04
0,11
0,35
1,11
3,50
0,07
0,22
0,70
2,21
7,00
Interference test I EC 60601 –
Test level
Conformity level Electrom agnetic en vironment -
guidelines
Electrostatic
discharge (ESD)
acc. IEC 61000- 4-2
± 6 kV contact discharge
(indirect)
± 8 kV air disc harge
± 6 kV contact discharge
± 8 kV air disc harge
Floors shoul d be made of wood or concrete or co vered
with ceramic tiles. If the oor is covered w ith synthetic
material, th e relative air h umidity must be at
least 30 %.
Rapid transient electrical
disturbances /
bursts acc.
IEC 61000-4-4
± 2 kV for mains
connections
± 1 kV for input and
output wires
± 2 kV for mains
connections
± 1 kV for input and
output wires
The quality of the supply volt age should cor respond
to that of a typ ical busines s or hospital e nvironment.
Surges acc.
IEC 61000-4-5
=> not applica ble
± 1 kV push-p ull voltage
(symmetrical)
=> not applica ble
± 1 kV push-p ull voltage
(symmetrical)
The quality of the supply volt age should cor respond
to that of a typ ical busines s or hospital e nvironment.
Voltage interruptions,
short term
interruptions and
uctuations i n the
supply voltage acc.
IEC 61000-4-11
< 5 % UT for ½ pe riod
(> 95 % interru ption)
40 % UT for 5 pe riods
(60 % interrupt ion)
70 % UT for 25 per iods
(30 % interrupt ion)
< 5 % UT for 5 s
(> 95 % interru ption)
< 5 % UT for ½ pe riod
(> 95 % interru ption)
40 % UT for 5 pe riods
(60 % interrupt ion)
70 % UT for 25 per iods
(30 % interrupt ion)
< 5 % UT for 5 s
(> 95 % interru ption)
The quality of the supply volt age should cor respond
to that of a typ ical busines s or hospital e nvironment.
If the user of the LAD Y-COM P
®
or
LAD Y-COM P® baby
device wishe s to continue us ing the device d uring
a power cut, we re commend conn ecting the L ADY-C OMP
®
or
LAD Y-COM P® baby
device to an u ninterruptible
power supply or a battery.
ELECTROMAGNETIC COMPATIBILITY
Recomme nded safety distances b etween port able and mob ile devices , HF
telecommunication appliances and LADY-COMP® computers
LAD Y-COM P® computers are intended fo r use in electro magnetic envi ronments as gi ven below.
The client or user of LADY-CO MP® devices ca n help to avoid e lectromagneti c interference s
by respecti ng the minimum distance bet ween portabl e and mobile HF telecommunic ation
appliance s (transmitter s) and the LADY-CO MP® device, de pending on th e rated output of the
communic ation applian ce as given below.
Annotati on 1
To calculate th e recommended distance from
transmitte rs operating in a frequency range
between 80M Hz and 2.5GHz, we used an
additiona l factor of 10/3 in orde r to reduce the
likelihoo d of a mobile/port able communication app liance involunt arily introduce d into
the patien t area causing interference.
Annotati on 2
This guida nce may not apply to all cases. T he
diusion of electromagn etic waves may be
inuenced by absorption a nd reection fr om
buildings , objects, a nd human bodi es.
For any other transmitters the rated outpu t of which is not listed in the a bove table, the distance
may be calcu lated using th e equation in t he relevant colu mn, with P bein g the rated out put of the
transmitte r in Watt (W) a s indicated by t he manufacture r of the transm itter.
Guidanc e and manuf acturer dec laration – e lectromag netic immun ity
The LADY-COMP® devices are intended for us e in the elect romagnetic envi ronment descr ibed
below. The cli ent or user of a L ADY-COMP® device sho uld ensure that it is used in su ch an
environment.
LADY-COMP – 44 45 – LADY-COMP
Page 24

ELECTROMAGNETIC COMPATIBILITY
Magnetic e ld at the
supply freque ncy
(50 / 60 Hz) acc .
IEC 61000-4-8
3 A/m 3 A/m Mag netic elds at mains frequen cy should corre spond to the ty pical
values seen i n a typical bu siness or hos pital environm ent.
Directed HF i nterference
acc. IEC 61000- 4-6
Radiated HF i nterference
acc. IEC 61000- 4-3
3 Ve
150 kHz
to 80 MHz
3 V/m
80 MHz
to 2,5 GHz
3 Ve
3 V/m
Portable an d mobile commu nications dev ices may be used a short dist ance
from the L ADY-C OMP and
LAD Y-COM P® baby
device provid ed that the
recommende d protective spa cing is used, as calculated according to th e
transmissi on frequency e quivalent. Re commended pro tective spacin g:
d = [3,5/3]√P = 1,2 √P
d = [3,5/10]√P = 0,35√P
for 80 MHz to 800 M Hz
d = [7,0/10]√P = 0,7√P
for 800 MHz to 2, 5 GHz
with P being t he nominal out put of the tran smitter in Watts (W) accordin g to
the transmit ter manufactu rer’s informatio n and d as the re commended
protective spa cing in metres ( m). The eld stre ngths of stati onary radio t rans
mitters shou ld be lower than t he agreed level at all frequenc ies according
to on site test s. Interferen ce is possible in the vicinit y of equipment that carries
the following symbol.
Annotati on 1
UT is the alt ernating supp ly voltage prior to applicatio n of test levels .
Annotati on 2
In case of 8 0MHz and 800MHz, the higher fre quency range applies.
Annotati on 3
This guida nce may not apply to all cases. T he diusion o f electromagnetic waves i s inuenced by a bsorption and reection from buildings,
objects , and human bod ies.
a) The eld intensity of st ationary tr ansmitters, s uch as base st ations
of wireless telephones an d mobile radio equipment, C B radio statio ns,
AM and FM rad io and TV bro adcasts can not be exactly pre dicted.
To determine the electromagne tic environmen t with regard to s tationary tran smitters, you may wish to evaluat e the site. If th e eld intensit y
measured a t the location of use exceeds t he conformity l evel, the
device shou ld be monitored in order to ens ure the intende d function.
In the event o f unusual char acteristics i n behaviour, addit ional measur es
may be requi red such as the modication of the device or i ts use at a
dierent lo cation.
b) Across the frequency ran ge 150kHz to 80M Hz, the eld inte nsity
should be l ower than [V1] V/m.
ELECTROMAGNETIC COMPATIBILITY
LADY-COMP – 46 47 – LADY-COMP
Page 25

INDEX
Activatin g «M» 12
Alarm 10, 11, 14
Alarm on /of f 11
Alarm ri ng tone 35
Analysing cycle data 36
Automatic switch-off 7
Batteries 6, 38, 4 0
Battery compartment 6, 36
Body Ma ss Index, BMI 27, 28, 29
Button cl ick tone 35
Cancelling a measurement 17
Charging the power accus , batteries 38
Cleaning 40
CLI (corpu s luteum insuff iciency) 23
Clock bat tery empty 38
Clock bat tery running out 38
Concepti on date and bir th date 21
Control button 7
Corpus l uteum insuffi ciency (CLI) 23
Correcti ve actions & er ror messages 38
Correcti ng «M» 12
Cycle and planning statistics 22
Cycle calen dar 18
Cycle cur ve 24
Cycle leng th 23
Data loss excluded 37, 40
Default values 7
Device l abelling 42
Device settings 29
Display screen 3, 7
Disposal 40
Electromagnetic compatibility 43
Erasing data 32
Error message 39
Fertility indicator 16
Fertilit y preview 16
Fertilit y review 16
Fever 17
Gender prognosis 20, 31
Getting started 6
Handling instructions 7
Home screen 7
Informatio n about the dev ice 33
Inputtin g «M» after me asurement 15
Inputtin g «M» post ho c 12
Inserti ng the batteri es 6
Intended use 4 2
LADY-COMP
®
8, 22
LADY-COMP baby
®
8, 19, 20, 21 , 22, 23
LADY-COMP basic
®
8
Length of high temperatu re phase 22 , 23
Luminosity 34
Main menu 8
Maintenance 40, 41
Measuring period 14
Measuring sensor 3,6,13,14,17,40,41,42
Measuring tips 14
Menstruation 12
Menstruation data 12
Menu level 8
Monophases 23
Nightshifts 14, 37
Opening /clo sing the device 6
Ovulation 23
Pearl Ind ex 16, 37
Personal comments 30
Pill 12, 37
Planning hits 23
Planning statistics 22
Plannin g pregnancy 19
Power accus 6
Power accu , batteries empt y 38
Power accu charger 36, 40
Pregnanc y confirmed 21
Pregnancy indicator 21
Pregnancy indicator LADY-COMP
®
baby 21
Prognosis 16, 37
Reading out data 36
Restarting after a measuring pause 37
Restarting after pregnancy 21
Safety 40
Safety information 41
SD micro card 36
Servic e and support 42
Set time 9
Settings 27
Setting the alarm 11
Setting the date 10
Sexual in tercourse (SI) 19
Skippin g a measuremen t 17
Softwar e program 37
Storage space 39
LADY-COMP – 48 49 – LADY-COMP
Page 26
INDEX
Summer a nd winter time 37
Switching on the device 7
Taking a mea surement 13 , 14
Tec hni cs 40
Temperature increase 23
Test measurement 33
Temperature / time unit 30
Travelling / time zones 37
USB 41
USB mini ca ble 36
USB not functioning correctly 38
Upgrade 36
Volu me 3 4
LADY-COMP – 50 51 – LADY-COMP
Page 27

Development, production, sales
Germany and worldwide
VE Valley Electronics GmbH
Breite 2
D-82418 Murnau
Phone: +49 (0) 8841 48928-0
Fax: +49 (0) 8841 48928-24
info@lady -comp.de
www.lady-comp.de
Sales Switzerland
Valley Electronics AG
Marienstrasse 16
CH-8003 Zürich
Phone: +41 44 577 68 69
Fax: +41 44 577 68 70
info@lady -comp.ch
www.lady -comp.ch
Rev. Nr. 01/17
 Loading...