

Page 1
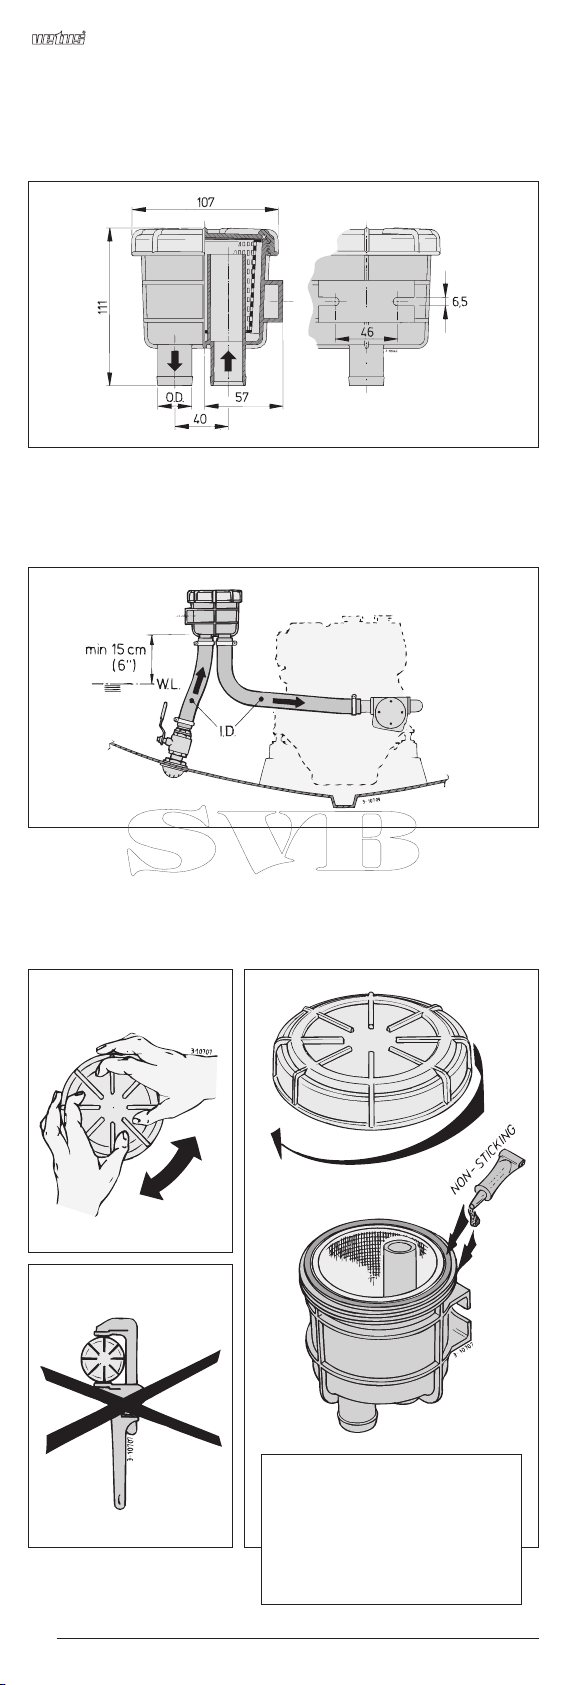
Cooling water strainer model 140
Hoofdafmetingen
Overall dimensions
Hauptmaße
Installatievoorbeeld
Installation example
Montage-Beispiel
1
Dimensions pricipales
Dimensions generales
Misure pricipali
Exemple d’installation
Ejemplo de instalación
Esempio di installazione
Gebruik en onderhoud
Use and maintenance
Betrieb und wartung
2
3
Emploi et entretien
Uso y mantenimiento
Uso e manutenzione
4
Niet te vast draaien!
Do not overtighten!
Nicht zu fest drehen!
Ne pas serrer trop fort!
¡No apretar excesivamente!
Non stringere troppo!
1
030505.01
Page 2

Koelwaterfilter type 140
NEDERLANDS
Inleiding
De Vetus koelwaterfilters type 140 hebben een doorzichtig deksel, hetgeen inspectie van het filter mogelijk maakt zonder het
te openen.
Dankzij het grote actieve oppervlak behoeft het filterelement
zelden schoongemaakt te worden.
In de standaard opstelling (zie ‘Installatievoorbeeld’, tek.1)
heeft het filter een capaciteit zoals bij de technische gegevens
is aangegeven, de capaciteit is afhankelijk van de diameter van
de slangaansluiting.
Installatie
Monteer het waterfilter altijd boven de waterlijn. Bevestig het
waterfilter tegen een vertikaal schot.
Installeer op het waterinlaatschepje altijd een buitenboordafsluiter!
Pas voor beide verbindingen, waterinlaatschepje naar waterfilter en waterfilter naar motor, altijd flexibele slang toe.
Gebruik uitsluitend water en/of zeep, dus geen vet- of oliehoudende producten, om het monteren van de slang op de slangaansluitingen te vereenvoudigen.
Monteer elke slangverbinding met 2, roestvaststalen, slangklemmen.
Gebruik en onderhoud
Inspecteer het filterelement regelmatig op vervuiling.
N.B. Het deksel behoeft hiervoor niet te worden verwijderd.
Reinig het filterelement indien hier zich vuil heeft opgehoopt.
Sluit de buitenboordafsluiter en schroef het deksel los, zie tek.
2. Neem het filterelement uit het huis en spoel het uit. Plaats het
filterelement terug, vet de O-ring en de schroefdraad in met b.v
siliconen-olie of teflon spray, zie tek. 4, en monteer het deksel
weer.
N.B. Draai het schroefdeksel altijd met de hand los of vast.
Gebruik hiervoor nooit gereedschap, zie tek. 2 en 3.
Controleer na het monteren van het deksel de afdichting van
het deksel op het filterhuis. Bij een niet goed afgedicht deksel
zuigt de buitenwaterpomp van de motor tevens lucht aan; dit
kan leiden tot een te hoge motortemperatuur.
Om kapot vriezen van het waterfilter, tijdens vorst gedurende de
winter, te voorkomen dient of het water te worden afgetapt of de
installatie met anti-vries te worden gevuld.
Om af te tappen dienen de slangverbindingen te worden losgenomen; het filterhuis is niet voorzien van een aftap.
Bij het vullen met anti-vries dient er voor te worden gezorgt dat
dit niet in het buitenwater terecht komt. Anti-vries is giftig!
Technische gegevens
Materiaal huis : Polypropeen GF
Materiaal filterelement : Polyamide
Materiaal deksel : Styrol/Acrylnitril SAN
Gewicht : ca. 0,25 kg
Max. omgevingstemperatuur : 75 °C
Max. watertemperatuur : 55 °C
Max. overdruk : 0,5 bar (50 kPa, 0,5 kgf/cm
2
)
Type Slangaansluiting
normaal gebruik
FTR140/13 13 mm (1/2”) 50 l/min 23 l/min
FTR140/16 16 mm (5/8”) 80 l/min 35 l/min
FTR140/19 19 mm (3/4”) 120 l/min 51 l/min
Maximale
capaciteit
2
Aanbevolen
capaciteit tijdens
030505.01
Page 3

Cooling water strainer model 140
ENGLISH
Introduction
The Vetus cooling water strainers model 140 are equipped with
a transparant lid, inspection therefore, can be carried out without opening of the strainer.
Due to the large active surface the strainer seldom needs to be
cleaned.
In a standard installation situation (see ‘Installation example’,
drwg 1) the capacity is as per technical data, the capacity
depends of the diameter of the hose connection.
Installation
Install the water strainer always above the waterline. Mount the
strainer against a vertical bulkhead.
Install always a sea-cock on the water inlet scoop!
Use for both connections, water scoop to strainer and strainer
to engine, always flexible hose.
Use only water and/or soap to ease fitting the hoses to the hose
pillars and never products containing grease or oil.
Fit each hose connection with 2 stainless steel hose clamps.
Use and maintenance
Inspect the strainer element regularly for contaminents.
N.B. The lid doesn’t need to be removed for inspection.
Clean the strainer element if dirt has accumulated. Close the
seacock before unscrewing the lid of the water strainer, see
drwg 2. Remove the strainer element out of the housing and
flush the strainer with clean water. Re-install the strainer element, grease the O-ring and the thread with e.g. silicone oil or
teflon based spray, see drwg 4, and reinstall the lid.
N.B. Secure or loosen the lid always manually. Never use tools
for this purpose, see drwg 2 and 3.
Check the seal between lid and housing after cleaning and reassembling the strainer. An improperly sealed lid will result in
air sucked in by the sea water pump of the engine which again
will result in overheating of the engine.
To prevent damage of the water strainer, during frost in the
winter time, either the water must be drained or the installation
must be filled with anti-freeze.
Remove the hoses to drain the strainer; the housing is not
equipped with a drain plug.
Take care that during filling with anti-freeze no anti-freeze is
spilled into the waterway. Anti-freeze is poisonous.
Technical data
Material housing : Polypropylene GF
Material strainer element : Polyamide
Material lid : Styrol/Acrylnitrile SAN
Weight : approx. 0.25 kg (0.55 lb)
Max. ambient temperature : 75 °C (167°F)
Max. water temperature : 55 °C (131°F)
Max. pressure : 0,5 bar (50 kPa, 7 psi)
Model
normal use
FTR140/13 13 mm (1/2”) 50 11 13 23 5 6
FTR140/16 16 mm (5/8”) 80 18 21 35 8 9
FTR140/19 19 mm (3/4”) 120 26 32 51 11 13
connection
3
Hose
Maximum
capacity
l/min Imp.Gal/min US Gal/min l/min Imp.Gal/min US Gal/min
Recommended
capacity in
030505.01
Page 4

Kühlwasserfilter Typ 140
DEUTSCH
Einführung
Die Vetus-Kühlwasserfilter des Typen 140 besitzen einen durchsichtigen Deckel, der es ermöglicht, den Filter zu kontrollieren,
ohne ihn öffnen zu müssen.
Dank der großen aktiven Oberfläche des Filterelements ist eine
Reinigung nur selten erforderlich.
In der Standardaufstellung (siehe ‘Montage-Beispiel’, Abb. 1)
entspricht die Filterkapazität den Angaben im Abschnitt
‘Technische Daten’. Die Kapazität hängt vom Durchmesser des
Schlauchanschlusses ab.
Installation
Der Wasserfilter ist immer oberhalb der Wasserlinie zu montieren und an einem senkrechten Schott zu befestigen.
Am Wassereinlaßflügelrad stets ein Außenbordabsperrventil
anbringen!
Für beide Verbindungen, also vom Wassereinlaßflügelrad zum
Wasserfilter und vom Wasserfilter zum Motor, immer einen flexiblen Schlauch verwenden.
Keine fett- oder ölhaltigen Produkte, sondern ausschließlich
Wasser und/oder Seife benutzen, um den Schlauch leichter an
die Schlauchanschlüssen montieren zu können.
Alle Schlauchverbindungen mit Hilfe von 2 Schlauchklemmen
aus rostfreiem Stahl befestigen.
Betrieb und Wartung
Das Filterelement regelmäßig auf Verschmutzung hin kontrollieren.
Anmerkung: Es ist nicht erforderlich, den Deckel dafür zu entfernen.
Das Filterelement reinigen, wenn sich dort Schmutz angesammelt hat. Das Außenbordabsperrventil schließen und den
Deckel aufschrauben (siehe Abb. 2). Das Filterelement aus
dem Gehäuse nehmen und ausspülen. Das Filterelement
wieder anbringen, sowohl Dichtungsring als Gewinde mit beispielsweise Silikonöl oder Teflonspray schmieren (siehe Abb. 4)
und den Deckel wieder festdrehen.
Anmerkung: Den Deckel niemals mit Werkzeugen, sondern
immer mit der Hand lösen oder festdrehen (siehe Abb. 2
und 3).
Nach dem Anbringen des Deckels die Dichtung des Deckels
am Filtergehäuse überprüfen. Schließt der Deckel nicht gut, so
saugt die Außenwasserpumpe des Motors auch Luft an, was zu
einer Überhitzung des Motors führen kann.
Um zu vermeiden, daß während der Wintermonate Frostschäden
am Wasserfilter auftreten, ist das Wasser abzuzapfen oder die
Anlage mit Frostschutzmittel zu füllen.
Zum Abzapfen sind die Schlauchverbin-dungen zu lösen, da
das Filtergehäuse mit keinem Abzapfhahn ausgestattet ist.
Beim Füllen mit einem Frostschutzmittel ist darauf zu achten,
daß dieses nicht in das Außenwasser gelangen kann. Frostschutzmittel sind giftig!
Technische Daten
Material Gehäuse : Polypropylen GF
Material Filterelement : Polyamid
Material Deckel : Styrol/Acrylnitril SAM
Gewicht : etwa 0,25 kg
Max. Außentemperatur : 75°C
Max. Wassertemperatur : 55°C
Max. Überdruck : 0,5 bar
Typ Schlauchanschluß
normalem Betrieb
FTR140/13 13 mm (1/2”) 50 l/min 23 l/min
FTR140/16 16 mm (5/8”) 80 l/min 35 l/min
FTR140/19 19 mm (3/4”) 120 l/min 51 l/min
4
(50 kPa, 0,5 kp/cm2)
Empfohlene
Höchst
Kapazität
Kapazität bei
030505.01
Page 5

Filtre à eau froide type 140
FRANÇAIS
Introduction
Les filtres à eau froide, type 140, de Vetus sont dotés d’un couvercle transparent permettant l’inspection du filtre sans avoir à
l’ouvrir.
Grâce à sa large superficie active, l’élément de filtrage ne
nécessite d’être nettoyé que très rarement.
Avec une configuration standard (voir ‘Exemple d’installation’,
plan 1), la capacité du filtre est celle qui est indiquée dans les
spécifications techniques. La capacité dépend du diamètre du
raccord flexible.
Installation
Monter toujours le filtre à eau au-dessus de la ligne de flottaison. Fixer le filtre à eau contre une paroi verticale.
Installer toujours un obturateur d’eau de mer sur le dispositif
d’admission d’eau !
Pour les deux connexions, l’admission d’eau vers le filtre à
eau et le filtre à eau vers le moteur, utiliser toujours des tuyaux
flexibles.
Utiliser uniquement de l’eau et du savon, donc pas de produits
gras ni huileux, pour faciliter le montage des tuyaux sur les
raccords.
Fixer chaque connexion flexible avec 2 colliers en acier inoxydable.
Emploi et entretien
S’assurer régulièrement que l’élément de filtre n’est pas
encrassé.
N.B. Pour ce faire il n’est pas nécessaire d’enlever le couvercle.
Nettoyer l’élément de filtre si des saletés s’y sont accumulées.
Fermer l’obturateur d’eau de mer et dévisser le couvercle, voir
le plan 2. Sortir l’élément de filtre de son logement et le rincer.
Replacer l’élément de filtre, graisser la rondelle et le filetage
avec par exemple de l’huile au silicone ou du téflon en bombe,
voir le plan 4, puis remettre le couvercle.
N.B. Visser toujours le couvercle à visse à la main. Ne jamais
serrer avec un outil. Voir les plans 2 et 3.
Après avoir monté le couvercle, vérifier son étanchéité avec le
logement du filtre. Si le couvercle n’est pas parfaitement hermétique, la pompe à eau de mer du moteur aspirera de l’air ce
qui pourrait entraîner une surchauffe du moteur.
Pour éviter que le filtre à eau ne soit détérioré par le gel pendant
l’hiver, il faut soit vidanger l’eau soit mettre de l’antigel dans
l’installation.
Pour faire la vidange il est nécessaire de détacher les raccords
flexibles; le boîtier du filtre ne possède pas de vidange.
En versant l’antigel veiller à ne pas le répandre dans l’eau de
mer. L’antigel est un produit toxique !
Spécifications techniques
Matériau du corps : Polypropylène GF
Matériau du filtre : Polyamide
Matériau du couvercle : Styrolène/Acrylenenitril SAN
Poids : ± 0,25 kg
Température ambiante max. : 75°C
Température de l’eau max. : 55°C
Pression max. : 0,5 bar
Type Raccord
males de fonctionnement
FTR140/13 13 mm (1/2”) 50 l/min 23 l/min
FTR140/16 16 mm (5/8”) 80 l/min 35 l/min
FTR140/19 19 mm (3/4”) 120 l/min 51 l/min
5
(50 kPa, 0,5 kgf/cm2)
Capacité
maximale
Capacité recommande
dans des conditions nor-
030505.01
Page 6

Filtro de agua de enfriamiento tipo 140
ESPAÑOL
Introducción
Los filtros de enfriamiento vetus tipo 140 llevan una tapa transparente, permitiendo la inspección del filtro sin abrirlo.
Gracias a la superficie grande activa el elemento de filtración
raras veces requiere una limpieza.
En la ubicación estándar (véanse los ‘Ejemplo de instalación’,
fig. 1) el filtro tiene una capacidad como la indicada bajo las
especificaciones técnicas, dicha capacidad depende del diámetro de la conexión de manguera.
Instalación
Montar el filtro de agua siempre por encima de la línea de flotación. Fijar el filtro de agua en un tabique vertical.
¡Instalar siempre una válvula fuera borda en la cuchara de
admisión de agua!
Aplicar siempre para ambas conexiones, de la cuchara de
admisión de agua al filtro de agua y del filtro de agua al motor,
una manguera flexible.
Utilizar exclusivamente agua y/o jabón, o sea, no usar productos que contienen grasas o aceite, para facilitar el montaje de
la manguera en las conexiones para ésta.
Montar cada conexión de manguera con 2 abrazaderas de
manguera de acero inoxidable.
Uso y mantenimiento
Inspeccionar con frecuencia si se ha ensuciado el elemento
de filtración.
Nota. Para ello no es necesario retirar la tapadera.
Limpiar el elemento de filtración cuando lleva suciedad acumulada. Cerrar la válvula de fuera borda y desenroscar la
tapadera, ver fig. 2. Sacar el elemento de filtración de la caja y
enjuagarlo. Volver a colocar el elemento de filtración, engrasar
el anillo en O y la rosca con, por ejemplo, aceite de siliconas
o un pulverizador teflon, véase la fig. 4, y volver a montar la
tapadera.
Nota. Siempre apretar o soltar a mano la tapadera de rosca.
Nunca utilizar herramientas para ello, véanse las figuras 2 y 3.
Después de montar la tapadera controlar el aislamiento de la
tapadera en la caja del filtro.
Cuando la tapadera no está bien cerrada, la bomba de agua
exterior del motor aspira también aire; lo cual puede llevar a
una temperatura excesiva del motor.
Para evitar roturas por heladas del filtro de agua, durante heladas o en el invierno, es preciso bien vaciar el agua o bien llenar
la instalación con una sustancia anticongelante.
Para vaciar se soltarán las conexiones de manguera; la caja del
filtro no está equipada con un grifo de drenaje.
Al llenar con la sustancia anticongelante asegurar que ésta no
se derrame en el agua exterior. ¡Las sustancias anticongelantes
son tóxicas!
Especificaciones técnicas
Material caja : Polipropileno GF
Material elemento de filtración : Poliamida
Material tapadera : Stirol/Acrilnitril SAN
Peso : aprox. 0,25 kg
Temperatura ambiente máxima : 75°C
Temperatura de agua máxima : 55°C
Sobrepresión máxima : 0,5 bar
Tipo
durante uso normal
FTR140/13 13 mm (1/2”) 50 l/min 23 l/min
FTR140/16 16 mm (5/8”) 80 l/min 35 l/min
FTR140/19 19 mm (3/4”) 120 l/min 51 l/min
Conexión
manguera
Capacidad
máxima
6
(50 kPa, 0,5 kgf/cm2)
Capacidad
recomendada
030505.01
Page 7

Filtro per acqua di raffreddamento tipo 140
ITALIANO
Introduzione
I filtri per acqua di raffreddamento della Vetus sono dotati di un
coperchio trasparente che rende possibile ispezionare il filtro
senza aprirlo.
Grazie all’ampiezza della superficie attiva, l’elemento filtrante
necessita raramente di essere pulito.
Nella sua sistemazione standard (vd. ‘esempio di installazione’,
disegno 1) il filtro ha una capacità corrispondente a quella
descritta nei dati tecnici e dipendente dal diametro del tubo di
collegamento.
Installazione
Montare il filtro dell’acqua sempre al di sopra del livello dell’acqua. Assicurare il filtro dell’acqua ad un divisorio verticale.
Installare in ogni caso un sistema di chiusura esterno sulla valvola di immissione dell’acqua.
Collegare sempre un tubo flessibile sia per il collegamento tra
valvola di immissione e filtro dell’acqua che per quello tra quest’ultimo ed il motore.
Usare esclusivamente acqua e/o sapone, e non prodotti contenenti grasso o olio, per semplificare l’operazione di collegamento del tubo alla sua connessione.
Aggiungere a ciascuna connessione del tubo due pinze apposite in acciaio inossidabile.
Uso e manutenzione
Ispezionare di frequente l’elemento filtrante per verificarne il
grado di pulizia.
N.B. Non occorre a tale scopo rimuovere il coperchio.
In caso di accumulo di sporcizia, pulire l’elemento filtrante. Chiudere la chiusura esterna e svitare il coperchio, vd.
disegno 2. Prelevare l’elemento filtrante dall’alloggiamento e
lavarlo. Rimetterlo quindi al suo posto, applicare all’anello ad
O e alla filettatura della vite ad esempio olio-silicone o teflon in
spray, vd. disegno 4, e montare nuovamente il coperchio.
N.B. Ruotare la vite del coperchio, sia per chiudere che per
aprire, sempre a mano. Non usare mai utensili, vd. disegni 2
e 3. Dopo il montaggio del coperchio, controllare che esso
aderisca perfettamente all’alloggiamento.
In caso contrario, la pompa esterna dell’acqua del motore aspirerà aria; ciò può dar luogo ad un innalzamento eccessivo della
temperatura del motore.
Col gelo invernale, allo scopo di evitare rotture del filtro dell’acqua dovute a congelamento, occorre svuotare la condotta
idrica o, altrimenti, riempire l’impianto con antigelo.
Per lo svuotamento è necessario staccare i tubi, poichè l’alloggiamento del filtro non dispone di un sistema di scarico.
Se si aggiunge antigelo, bisogna evitare che esso raggiunga
l’acqua esterna. L’antigelo è velenoso!
Dati tecnici
Materiale dell’alloggiamento : polipropilene GF
Materiale elemento filtrante : poliammide
Materiale del coperchio : stirene/ acrilonitrile SAN
Peso : ca. 0,25 kg
Temperatura max. ambiente : 75°C
Temperatura max. dell’acqua : 55°C
Sovrappressione max. : 0,5 bar
Tipo
il normale uso
FTR140/13 13 mm (1/2”) 50 l/min 23 l/min
FTR140/16 16 mm (5/8”) 80 l/min 35 l/min
FTR140/19 19 mm (3/4”) 120 l/min 51 l/min
Collegamento
tubo
Capacità
massima
7
(50 kPa, 0,5 kgf/cm2)
Capacità consigliata
massima durante
030505.01
Page 8

Koelwaterfilter
Cooling water strainer
Kühlwasserfilter
Installatieinstructies
Installation instructions
Installationsanleitung
Instructions d’installation
Instrucciones de instalación
Istruzioni per l’installazione
NEDERLANDS
ENGLISH
DEUTSCH
FRANÇAIS
ESPAÑOL
ITALIANO
Filtre à eau froide
Filtro de agua de enfriamiento
Filtro per acqua di raffreddamento
Co pyr ight © 2 006 Ve tus den Ouden n.v. Schiedam Hol lan d
140
FOKKERSTRAAT 571 - 3125 BD SCHIEDAM - HOLLAND - TEL.: +31 10 4377700
TELEX: 23470 - TELEFAX: +31 10 4152634 - 4153249 - 4372673 - 4621286
Printed in the Netherlands
030505.01 (I.FTR140) 08-06
 Loading...