

Vetta PathFinder II Wireless Quick Start Manual
PathFinder II Wireless (#500-108)
& PathFinder II (#500-109)
Patent NO.: 7.988.344
Warning: Inseting the mini-CD into a slot-loading
drive may damage your drive.
1
2
3
Step 1:
Press the notch at the
bottom of the computer
to detach the cover on
the computer.
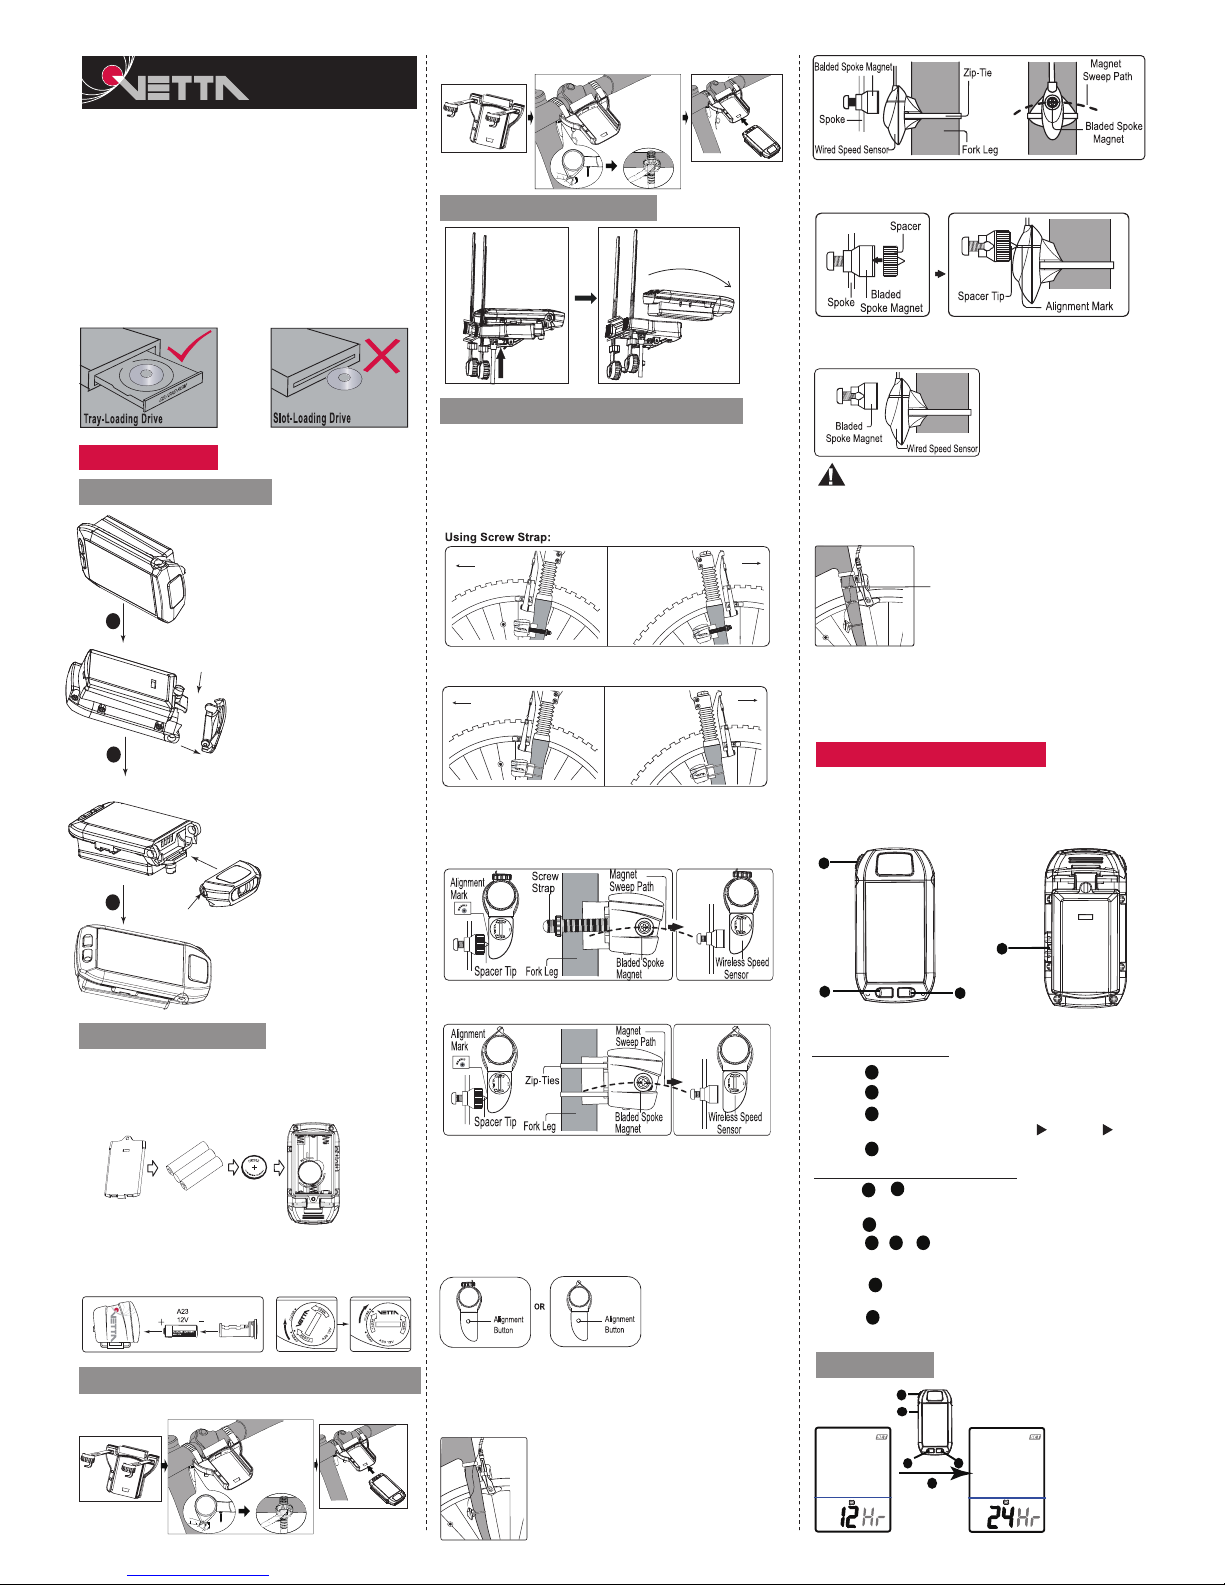
Step 1:
Attach the wireless speed sensor & rubber
pad to the front of the left fork or the back
of the right fork leg using screw strap or
zip-ties provided.
Step 2:
Adjust the sensor and magnet spacing with
the spacer. Remove the spacer after fixing
the sensor in its final position.
Step 3: Press the Alignment Button to check if
the speed sensor has been aligned correctly
with the magnet. If successfully aligned,
the speed sensor will produce a beeping
sound when the magnet moves over the
speed sensor.
Attach the wired speed sensor with the
zip-ties supplied and tighten the bladed
spoke magnet to the bicycle.
Step 2: Align the notches on the
light with the holes on the
computer. Press and lock
the light housing to the
computer.
Step 3:
The light and the computer
are now ready to use.
The head unit of PathFinder II series computer
uses a CR2032, 3-Volt Lithium button cell battery
while the headlight is powered by 3xAAA batteries.
For PathFinder II Wireless:
The wireless speed sensor uses an A23, 12-Volt
battery.
For PathFinder II:
Installing Speed Sensor & Magnet
Installation
Installing the Headlight
Installing the Battery
Installing the Mounting Bracket & Head Unit
For PathFinder II Wireless:
For PathFinder II Wireless:
For PathFinder II:
Note:
Mount the sensor as high up
on the fork leg as possible.
Step 2: Adjust the sensor and magnet spacing
with the spacer.
Step 3: Remove the spacer after tightening the
zip-tie down to hold the sensor in its final position.
To avoid damaging or cutting the wires
accidentally, use the tape provided with the
package (NOT the zip-ties) to secure wires to
the frame, fork, bars or stem.
Make sure excess wire is taped down or wrapped
around brake cable housing. Be sure to leave
enough slack in the wire to accommodate the
movement of fork and handbar.
Button : Freeze Frame Memories
Button : Mode-Advance to next mode
Button : Enter Setup Mode
Button :
Headlight Mode-Scroll different modes
of the headlight (ON FLASH OFF)
Button & :
Reset Ride Date Including Frozen
Screens
Button : Recall Freeze Frame Memories
Button , & : Total Clear Reset
In Normal Operation
In Initial Setup
Button is used to toggle between different
settings and to confirm the selected value.
Button is used to scroll through the values
(0~9) (press & hold for fast advance).
Button Function and Setup
PathFinder II series cycling computer is programmed
to enter the Intial Setup Mode after replacement
of new battery or All Clear Total Reset.
1
2
3
4
Press Momentarily:
Press & Hold for 2 Seconds:
1
1
1
1
1
2
2
2
2
3
4
4
3
1
2
2
4
12 / 24 Clock
Front
Front
Front
Front
Using Zip-Ties:
Using Screw Strap:
OR
Using Zip-Ties:
OR
Using Screw Strap: Using Zip-Ties:
Detaching the Computer
Press
Wire Securing Tape
QUICK START MANUAL
Step 1:
For more details, please refer to the full manual
inside the mini-CD included with the product.

Time
1
2
2
Speed / Distance Unit
1
1
1
1
2
2
2
1
1
2
2
Service Timer
Service Timer could be programmed with a selected
number of ride time (hours or days) or distance
as the interval for servicing the bicycle or any
component on it, such as front or rear shock.
Step 1: Choose Service Timer Unit
Step 2: Set the Service Timer (Maximum
settings: hour/day/distance = 1999/199/9999)
Wheel / Tire Size
Press Button to scroll through the flashing
700c, 650c, 27in, 26in, 24in, 20in, 16in and
select the wheel size.
Set circumference or wheel size (see the table
of Tire Szie Vs Circ.)
Choose (Circumference) to set it
manually.
Press Button to adjust the flashing digit to the
desired number.
If you choose (Tire Size)
TIRE
SIZE
TIRE
SIZE
TIRE
SIZE
CIRC
CIRC
CIRC
700C x 38mm
2180
700C x 35mm 2168
700C x 32mm 2155
700C x 30mm 2145
700C x 28mm 2136
700C x 25mm 2124
700C x 23mm 2105
700C x 20mm 2074
700C Tubular 2130
650C x 23mm 1990
650C x 20mm 1945
27" x 1-1/4" 2161
27" x 1-1/8" 2155
26" x 2.25" 2115
26" x 1.0" 1913
26" x 2.10" 2095
26" x 2.00" 2074
26" x 1.90" 2055
26" x 1.75" 2035
26" x 1.50" 1985
26" x 1.25" 1953
24" x 1.9/1.95" 1916
20" x 1-1/4" 1618
16" x 1.75" 1195
16" x 1.50" 1185
1
1
2
4
Odometer
Auto Start / Stop (For PathFinder II Wireless)
SmartLite
(Maximum setting: 99999)
To restore the previous data, you can set odometer
in order to accurately record the accumulative
distance.
1
When the Auto Start / Stop function is set on, the
computer will exit the Sleep Mode and display the
last normal screen when it receives signals from
wheel or button.
2
When the SmartLite function is set on, the night
light will turn on for 3 seconds during pre-set
intervals when any button is pressed.
1
1
2
1
1
2
2
Press Button to exit the Setup Mode.
Testing
Warranty
Your Installation
Pick up the front of the bicycle and spin the front
wheel. The LCD should display a speed reading
within 2-3 seconds. If there is no speed reading,
check the alignment and spacing between the
magnet and the sensor. Make sure that the Head
Unit is completely locked into position. If the problem
has not been fixed,
talk to an authorized
Vetta
retailer for further
assistance.
Now your PathFinder II or PathFinder
II Wireless is ready for use!
1
2
Once the sensor is aligned correctly, tighten the
magnet locking screw or zip-ties and the bike
mount strap.
VETTA WARRANTS ALL VETTA (The Company)
PRODUCTS AGAINST MANUFACTURER DEFECTS FOR
A PERIOD OF 3 YEARS. Subject to the following
limitations, terms and conditions, components will be free of
manufacturing defects in materials and workmanship. The 3
year limited warranty is conditioned upon the components
being used and operated in normal riding conditions. This
warranty does not cover normal wear and tear (i.e. battery
replacement, broken wire), rider abuse, acts of God,
improper installation or product alteration.
This warranty is void if the components were
not purchased (new) from or through an
authorized VETTA retailer or dealer. Examples
of unauthorized dealers are online auction
sites or online retailers.
VETTA at its sole discretion will repair or replace items at
its own cost. Users are responsible for all freight and
shipping charges when returning items for warranty service.
In USA, you must either contact the retailer where the
product was originally purchased from, or contact VETTA
distributor in your country for customer service.
Outside USA, you should contact the local dealer or
VETTA distributor in your country for customer service.
The Company shall not be held responsible for replacing
items with new items for greater than the amount of the
original item purchase price. This limited warranty does
provide the original owner with certain legal rights and
recourse. The original owner may possess other rights or
recourse, depending on the state or country. Please check
the web to help answer any question and service manual.
P/N:81-121601-00
When the Auto Start / Stop function is set off, it
will only exit sleep mode when button is pressed.
 Loading...