

Page 1

5000/5100 » INSTRUCTION BOOK
08/ 2017
Page 2

Page 3
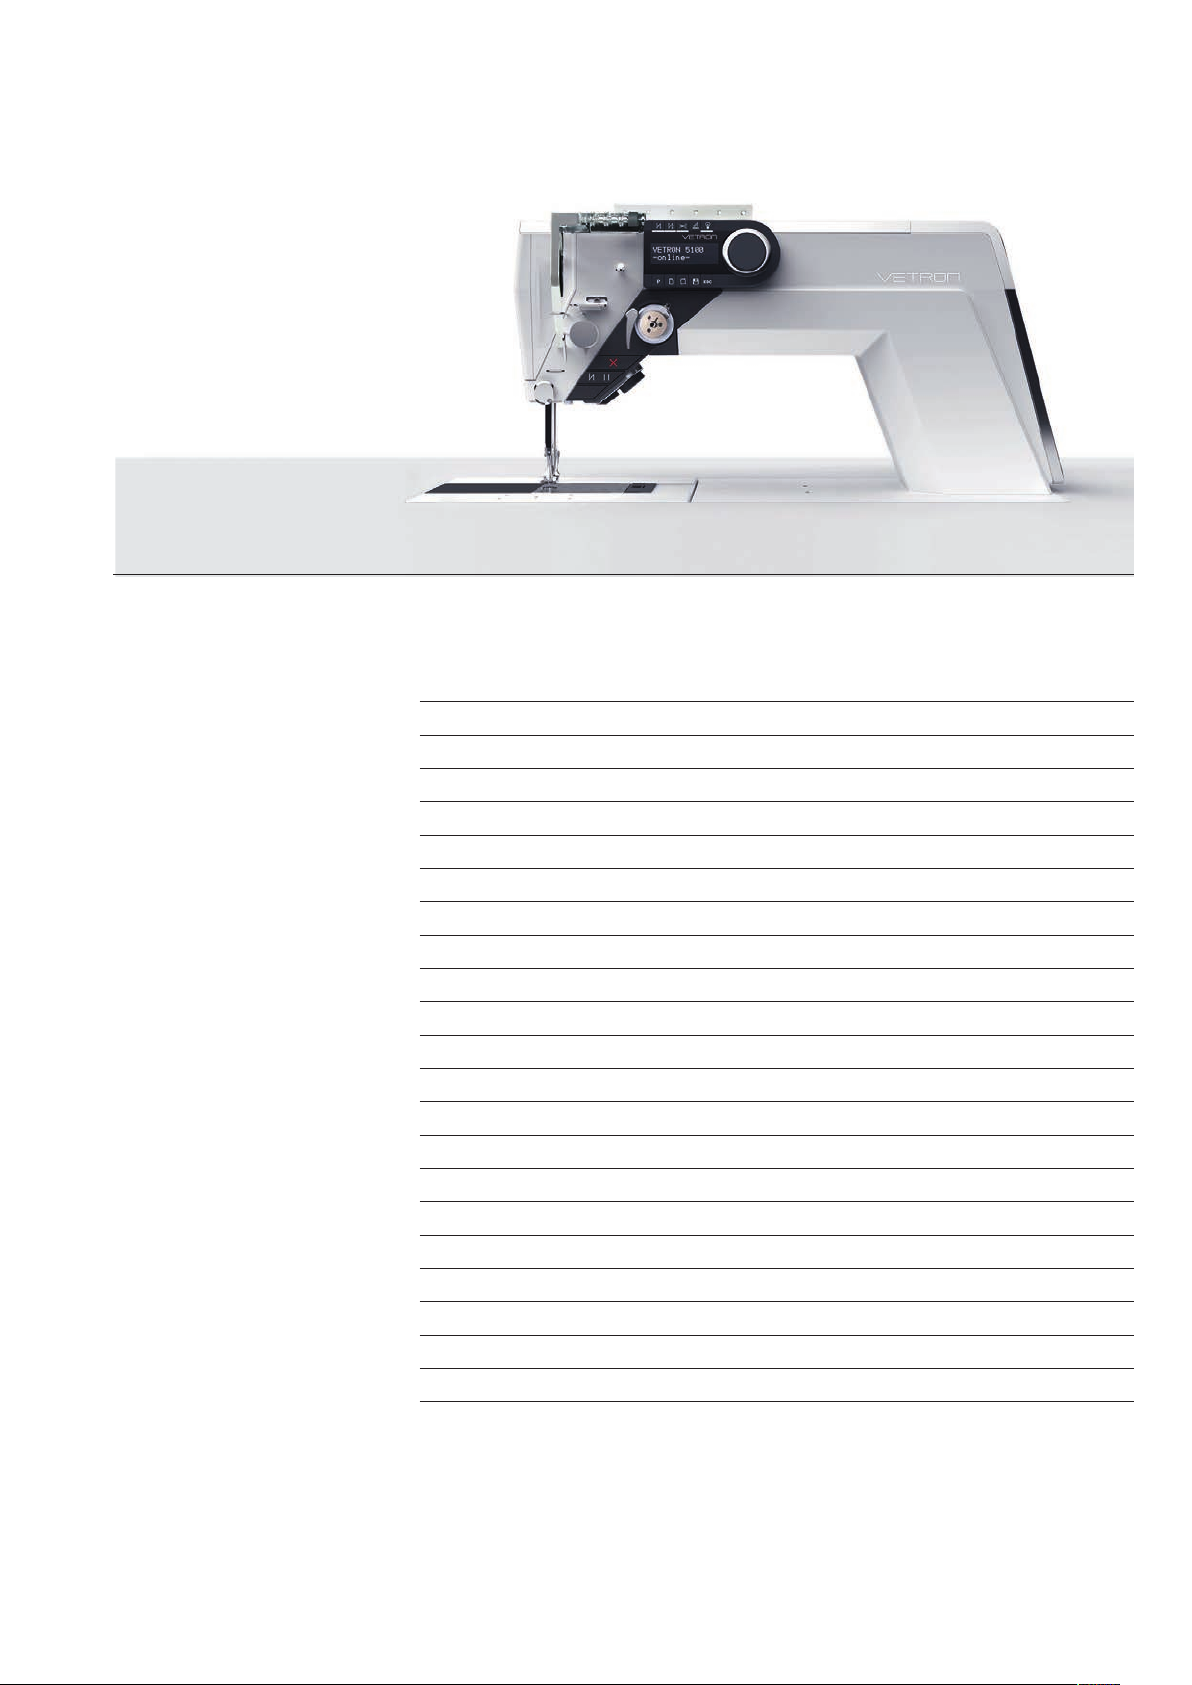
INSTRUCTION BOOK
VETRON 5000/5100 - FLAT BED MACHINE
05 01. OVERVIEW
06 02. OPERATING PANEL
07 03. HOTKEYS
08 04. ELECTRONIC HANDWHEEL & REVERSE SEWING
09 05. CONTROL & MAIN SWITCH
10 06. PEDAL
11 07. LIGHT
12 08. GENERAL INFORMATION IMPORTANT FOR SAFETY
13 09. MACHINE START
14 10. PROGRAM CHANGE
15 11. DIRECT ACCESS
16 12. INSERTING THE NEEDLE (ONE NEEDLE MACHINE)
17 12.01. INSERTING THE NEEDLE (TWO NEEDLE MACHINE)
18 13. SEWING FEET EXCHANGE
19 14. THREADING THE MACHINE (ONE/TWO NEEDLE MACHINE)
20 15. EXCHANGING THE BOBBBIN AND ADJUSTING THE BOBBIN THREAD TENSION
21 15.01. EXCHANGING THE BOBBBIN AND ADJUSTING THE BOBBIN THREAD TENSION
(SHORT THREAD CUTTER)
22 16. WINDING THE BOBBIN THREAD
23 17. ENGAGING THE SAFET Y CLUTCH
24 18. OIL LEVEL CHECK
25 19. CLEANING THE MACHINE
08 / 20 17
VETRON 5000/5100 - FLAT BED MACHINE
Page 4

08 / 20 17
08 / 20 17
04
VETRON 5000/5100 - FLAT BED MACHINE
04
VETRON 5000/5100 - FLAT BED MACHINE
Page 5
INSTRUCTION BOOK
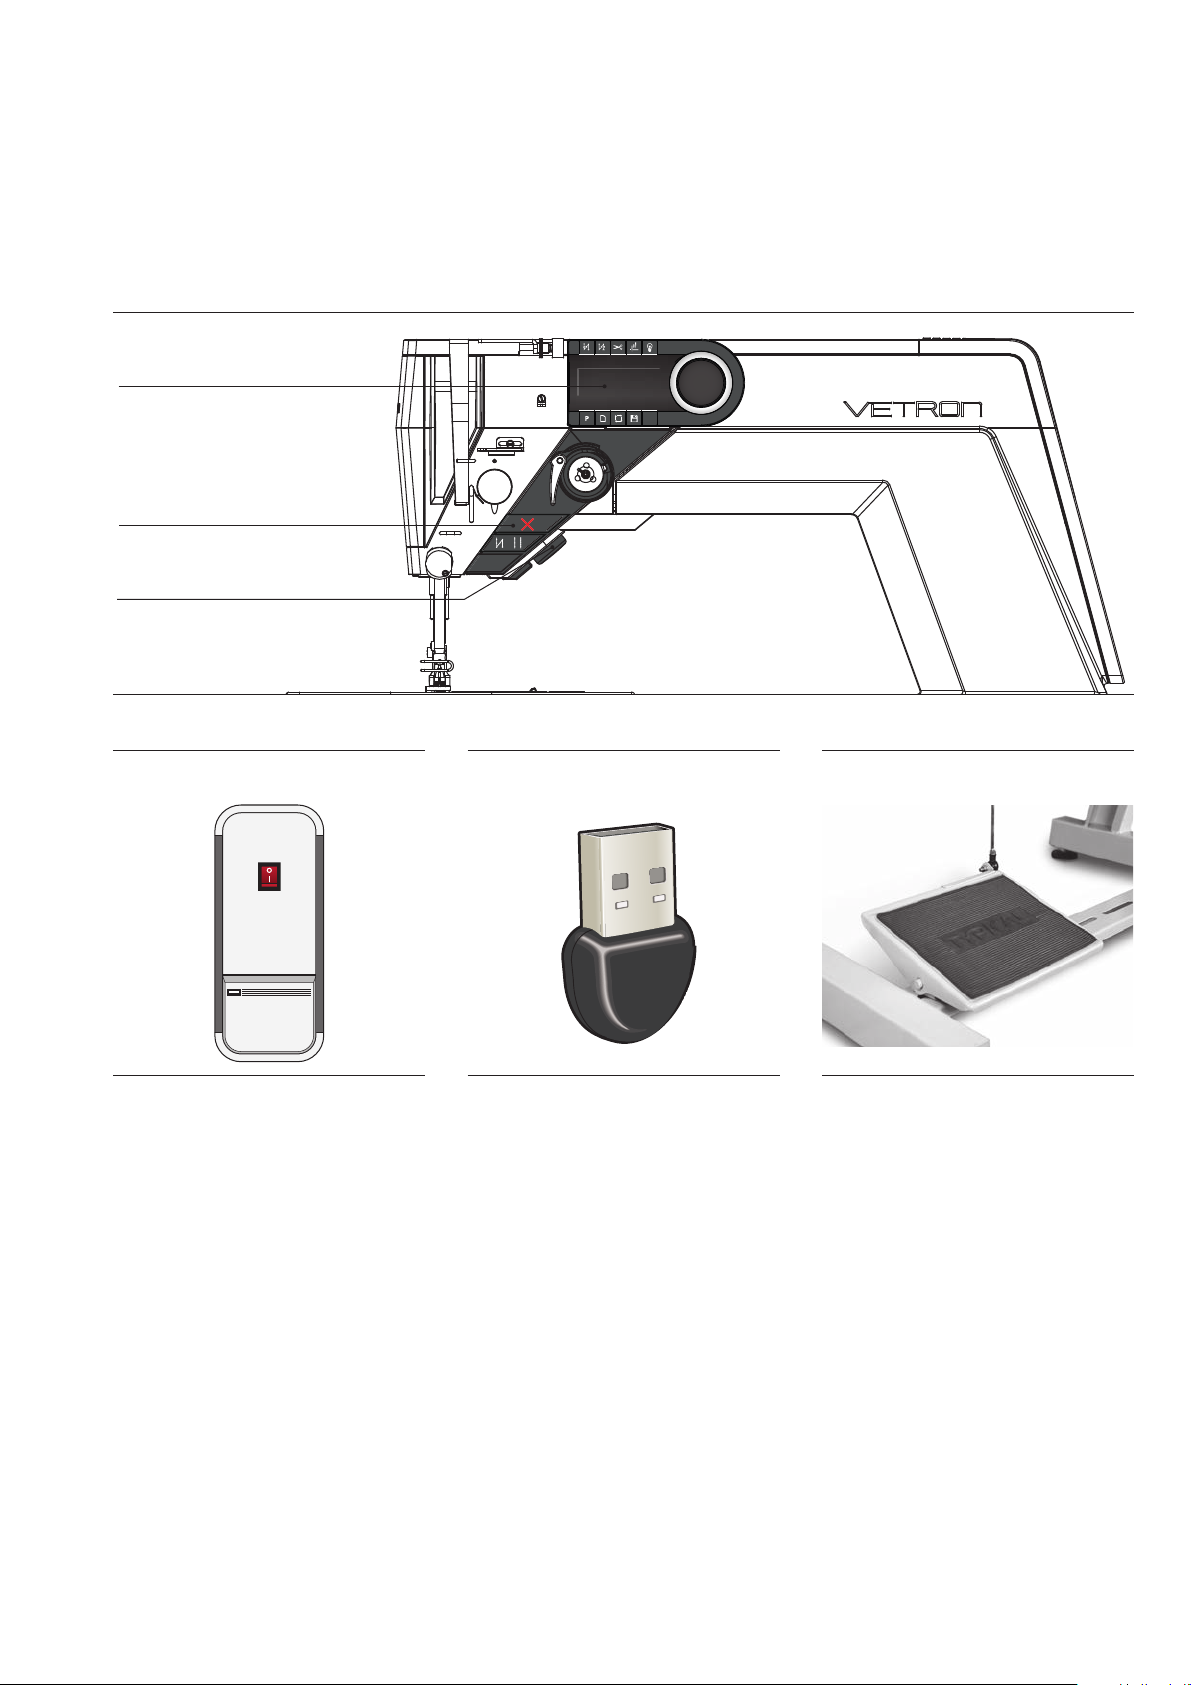
01. OVERVIEW
OPERATING PANEL
P000 30%
TEST
ESC
HOTKEYS
ELECTRONICS AND
SEWING REVERSE
CONTROL DONGLE PEDAL
08 / 20 17
08 / 20 17
VETRON 5000/5100 - FLAT BED MACHINE
VETRON 5000/5100 - FLAT BED MACHINE
05
05
Page 6
INSTRUCTION BOOK
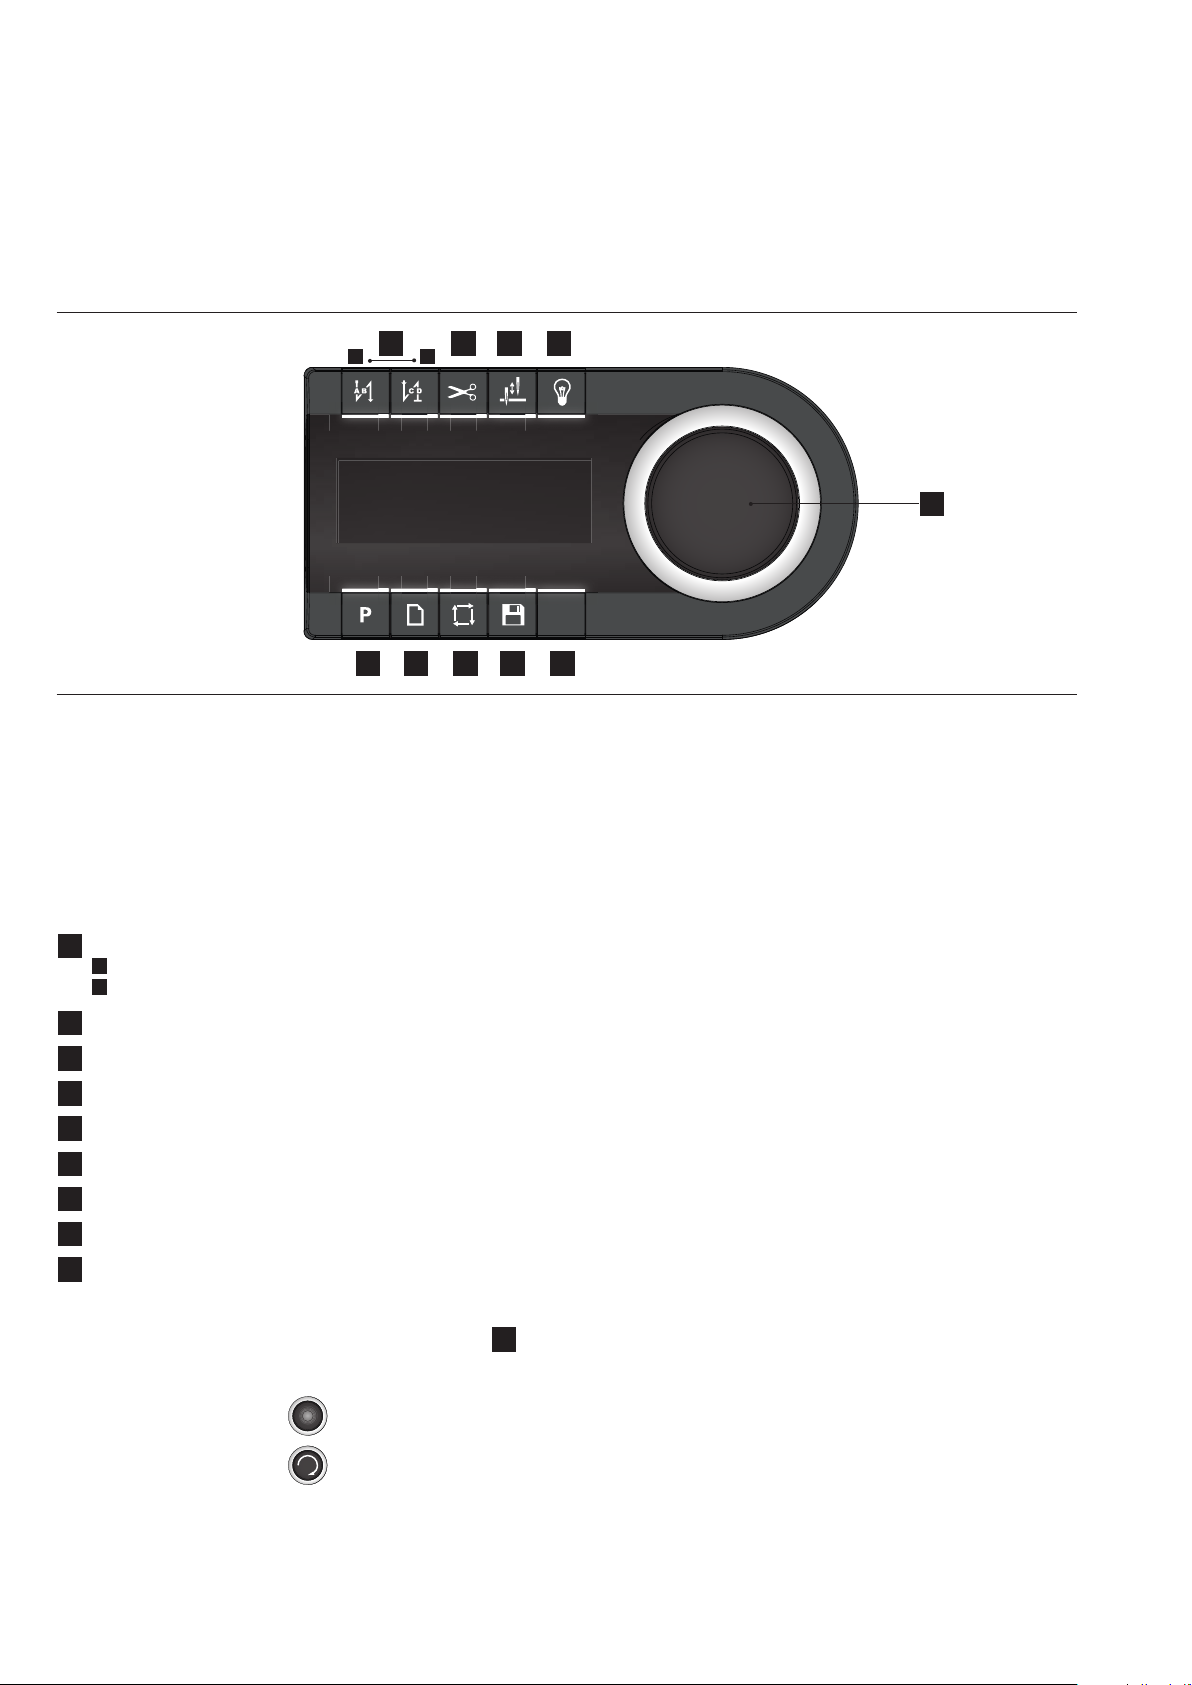
02. OPERATING PANEL
1 2 3 4
A B
000
SE T
T
5 6 7 8 9
The operating fi eld indicates the current operating states.
Operation takes place via continuous dialog between control and operator.
Depending on the operating state, di erent texts are displayed.
The following functions are assigned to the BUTTONS ABOVE AND BELOW THE DISPLAY:
1
BACKTACK (from left to right):
A
Start backtack
B
End backtack
2
THREAD TRIMMING
3
NEEDLE UP/DOWN AFTER STOP
30%P
ESC
10
4
LIGHT ON/OFF
5
PARAMETERS
6
NEW PROGRAM
7
PROGRAMMED SEAM
8
SAVE
9
CANCEL
If a function is activated, this is indicated by illuminating the corresponding LED.
In order to CHANGE OR SET VALUES, use the JOG KEY (
Turning changes the values; pressing the JOG KEY enters the value.
In the following, the operating type is indicated by the following icons:
Input = Press the JOG KEY:
Change = Turn the JOG KEY:
08 / 20 17
06
VETRON 5000/5100 - FLAT BED MACHINE
10
):
Page 7
INSTRUCTION BOOK
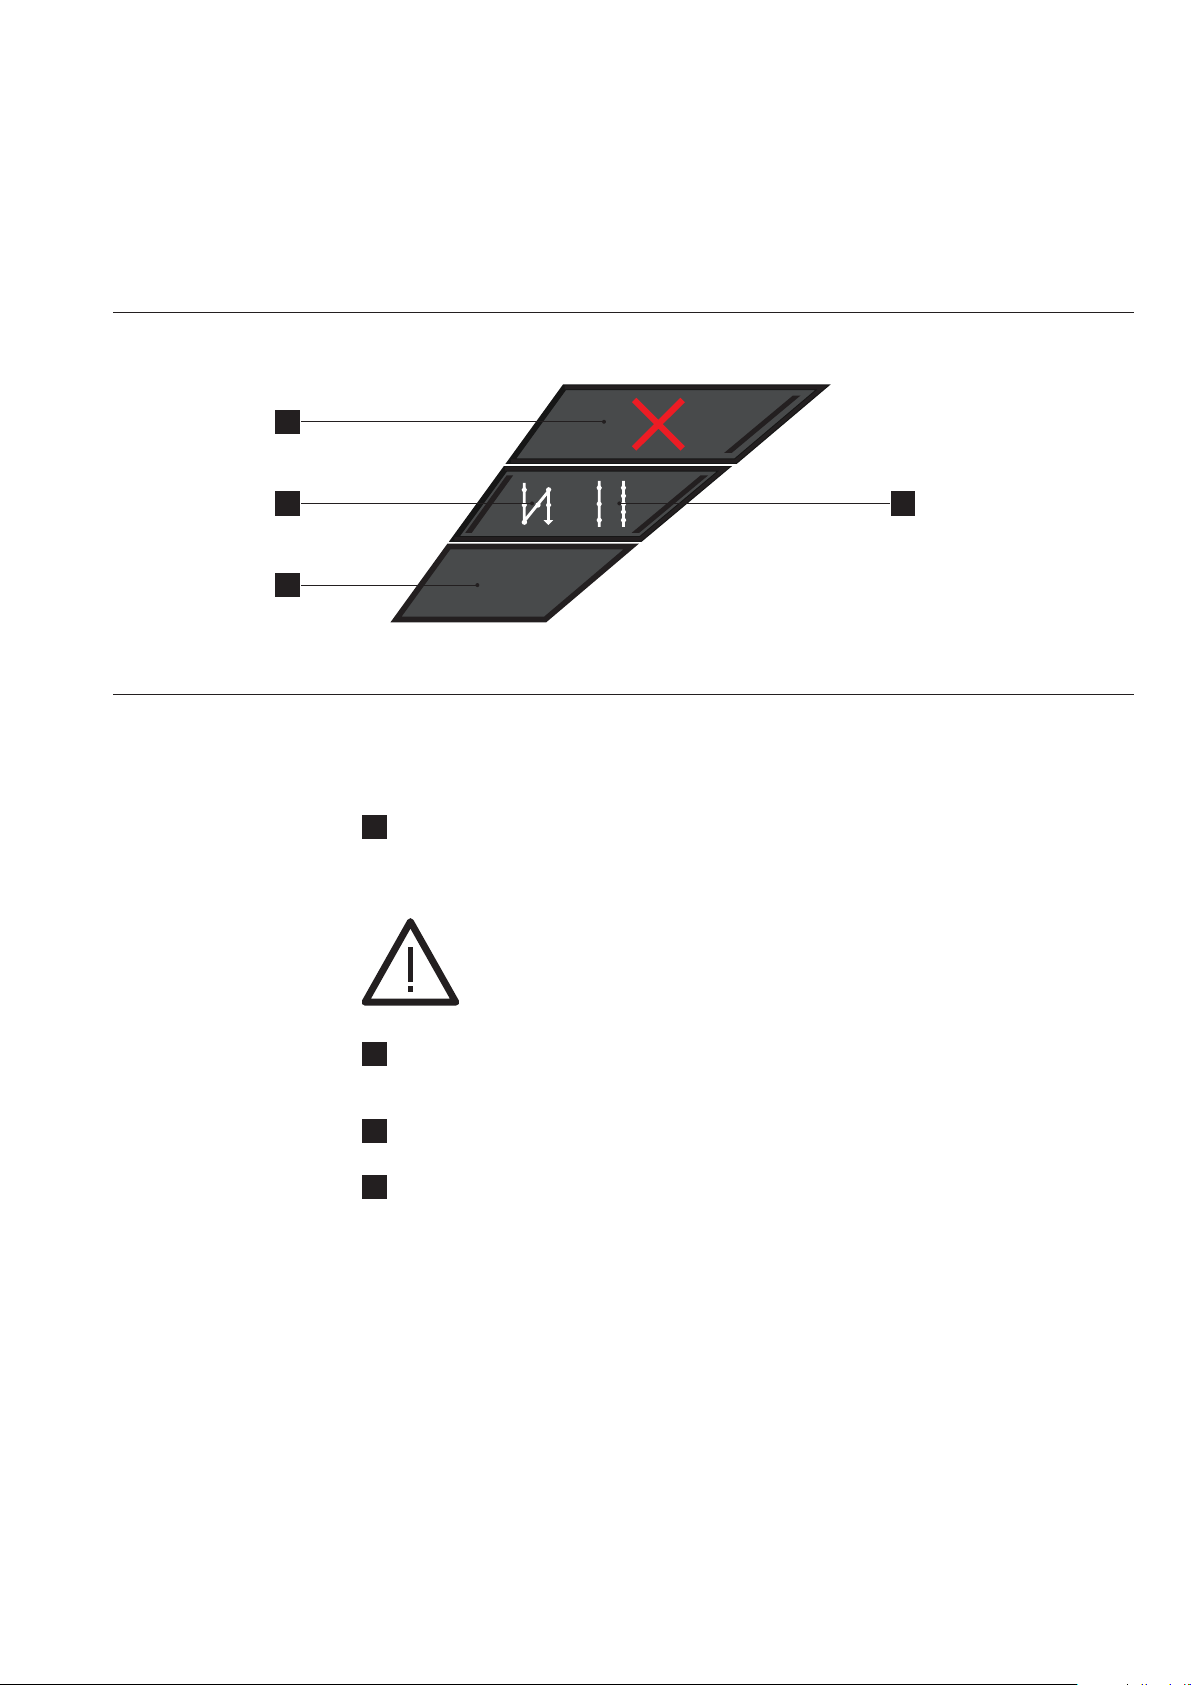
03. HOTKEYS
1
2
4
1
SAFETY SWITCH
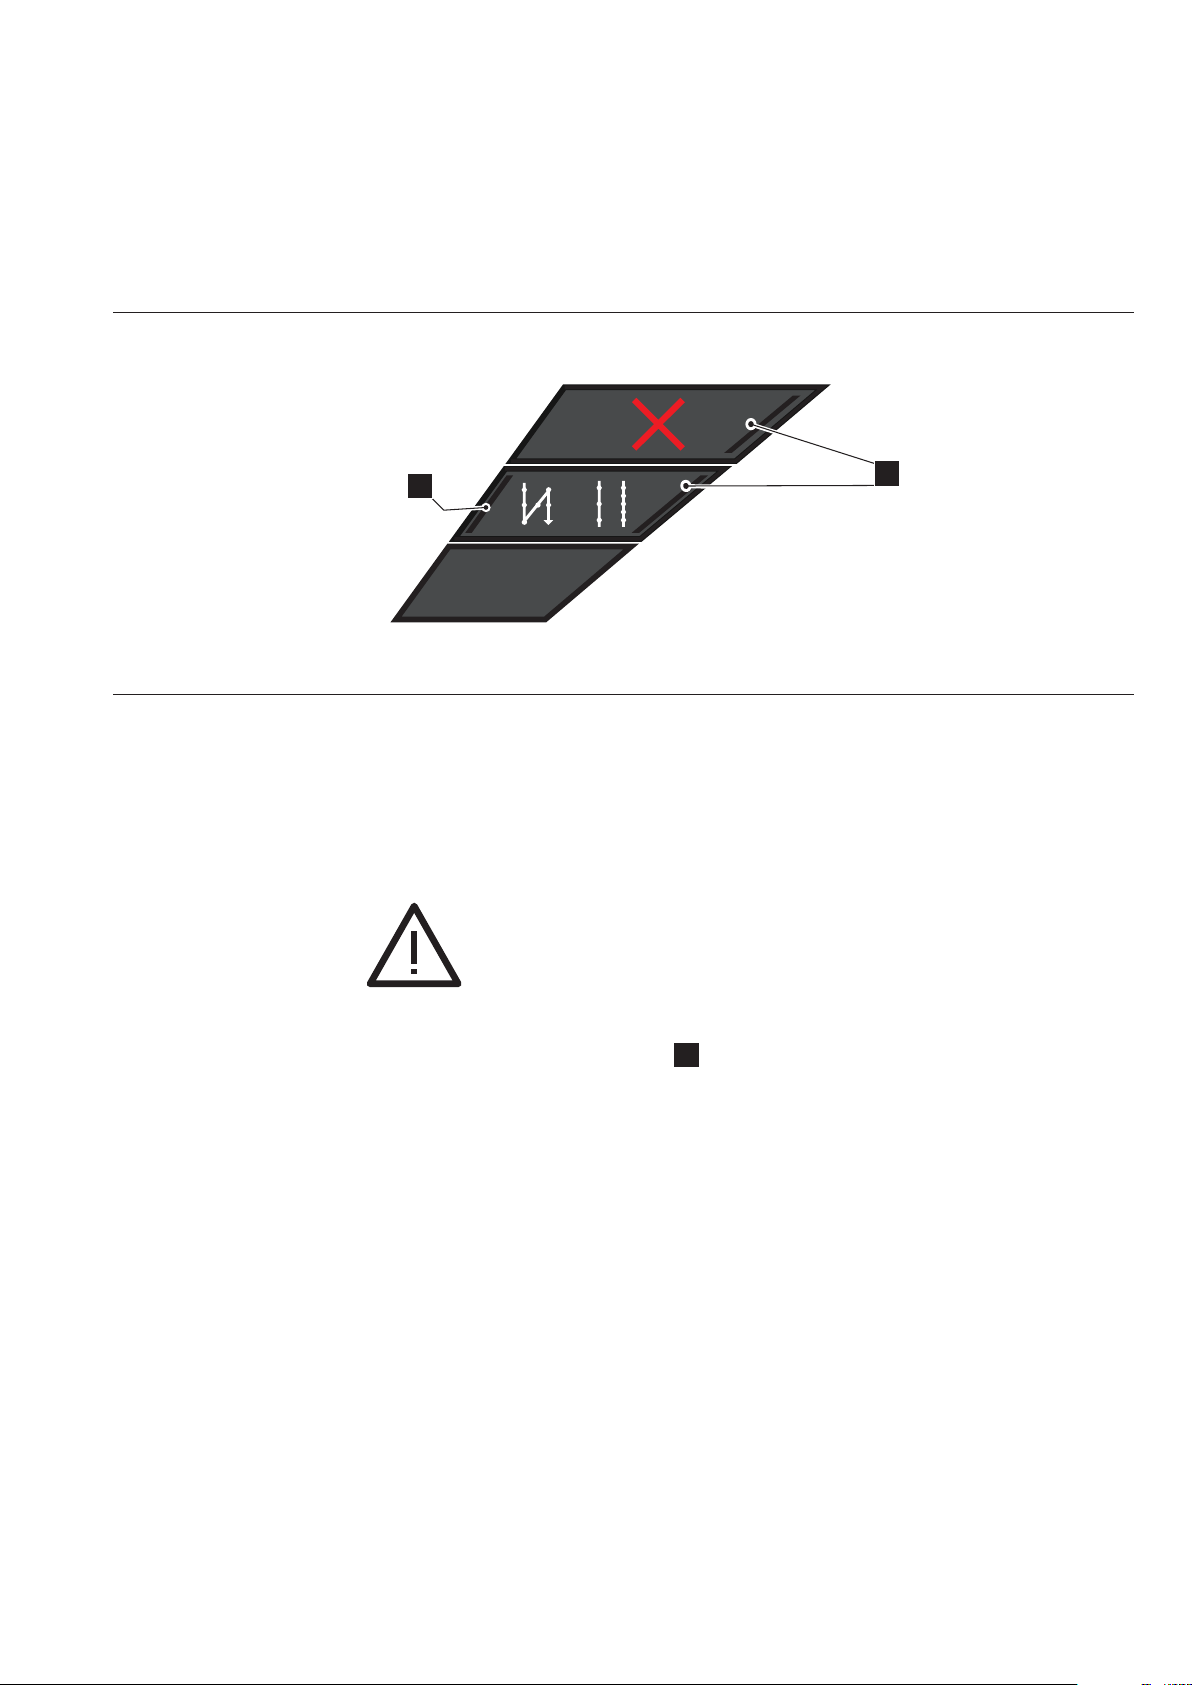
If the safety switch is triggered, all functions are locked. The LED lights up red.
The “BLOCKED MODE” is active.
CAUTION:
Before activating the machine by the X-button make sure to remove sewing material or other items below the sewing feet if necessary and follow the instructions
displayed in the control panel.
2
SINGLE BACKTACK SUPRESSION
If the backtack function is activated, the following backtack is switched o once
by pushing the key.
3
3
2ND STITCH LENGTH
If the second stitch length is activated, the corresponding LED is lit up.
4
CUSTOMIZABLE BUTTON
Default: Toggle foot stroke level
(see parameter M085)
VETRON 5000/5100 - FLAT BED MACHINE
08 / 20 17
Page 8
INSTRUCTION BOOK
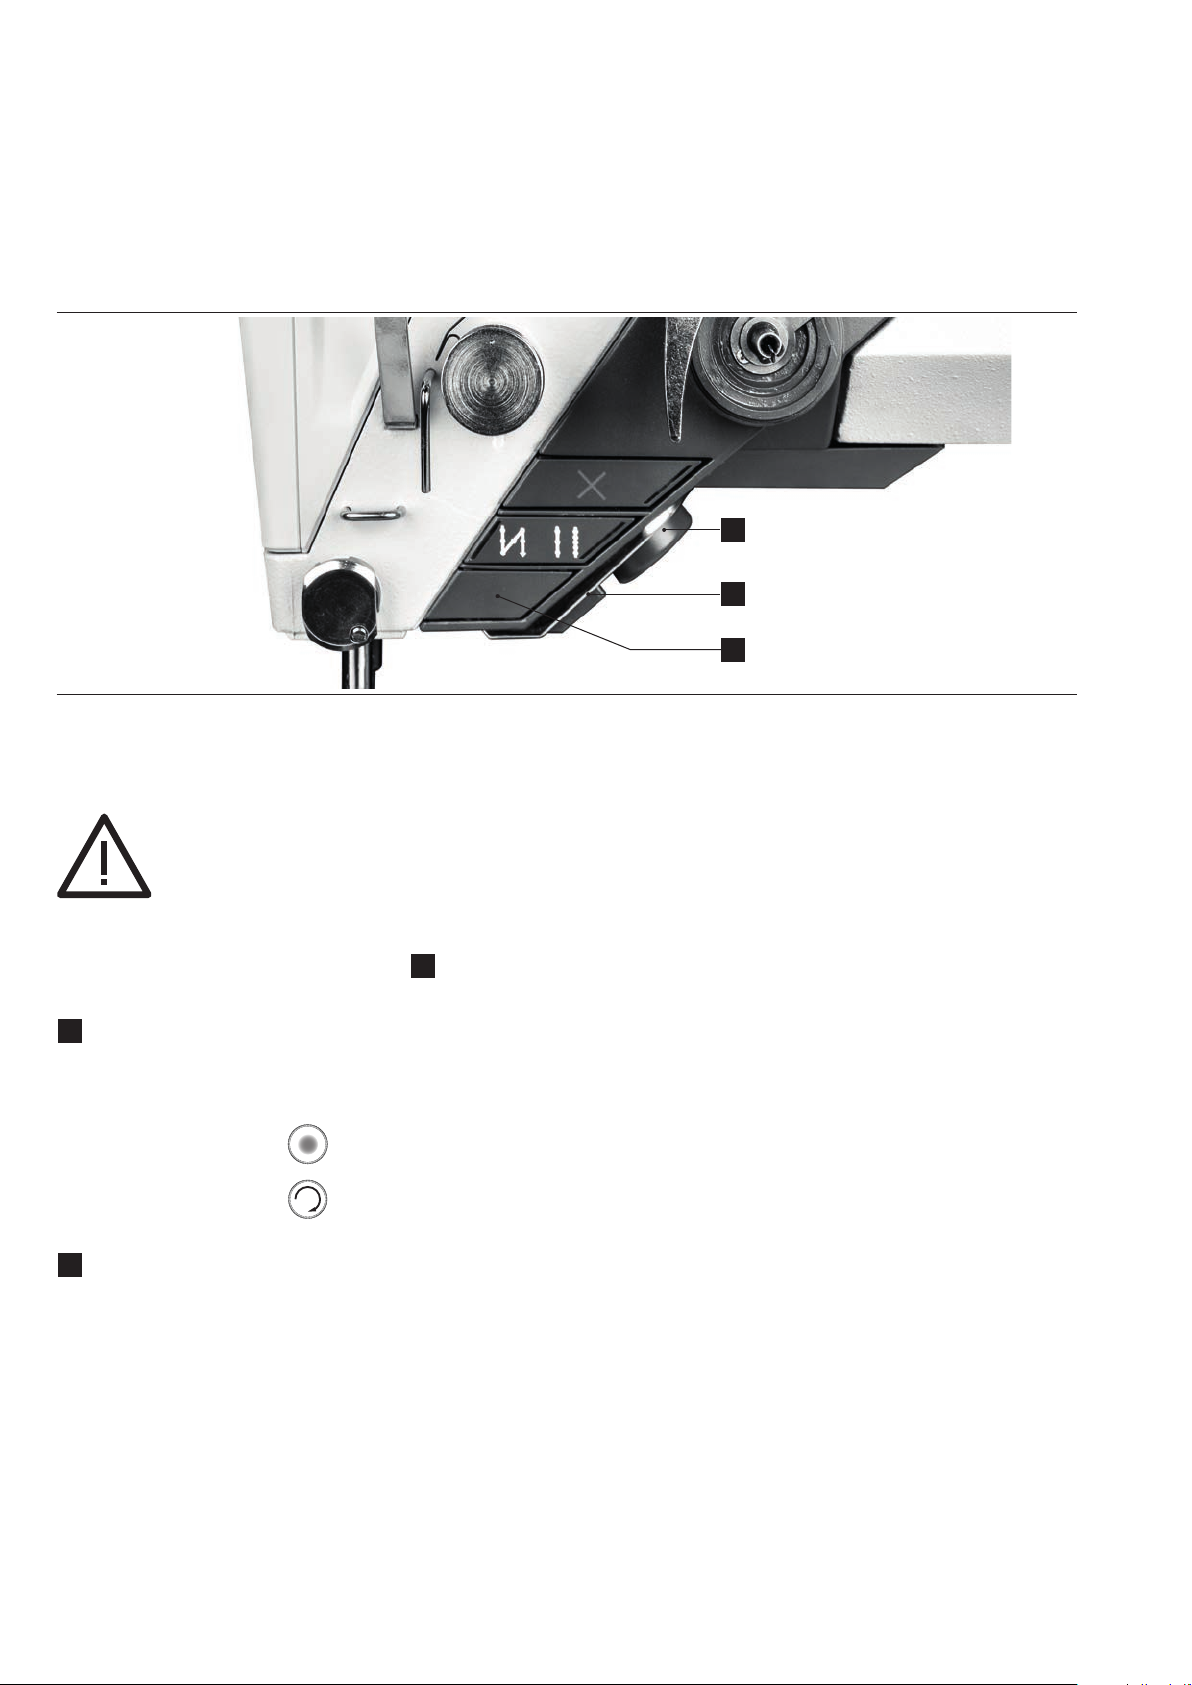
04. ELECTRONIC HANDWHEEL & REVERSE SEWING
1
2
3
NOTE!
The electronic handwheel is not active unless the machine has performed at least
one stitch.
For safety reasons it is necessary during “BLOCKED MODE” to push and hold
the programmable button (the lowest button)
1
ELECTRONIC HANDWHEEL – FUNCTION
By turning the handwheel, you can move the needle bar up or down.
In the following, the operating type is indicated by the following icons:
Pressing the handwheel:
Turning the handwheel:
2
R E V E R S E SEWING
Pulling the button changes the sewing direction.
stitch-for-stitch function / needle positioning
to activate the electronic handwheel.
3
08 / 20 17
08
VETRON 5000/5100 - FLAT BED MACHINE
Page 9
INSTRUCTION BOOK
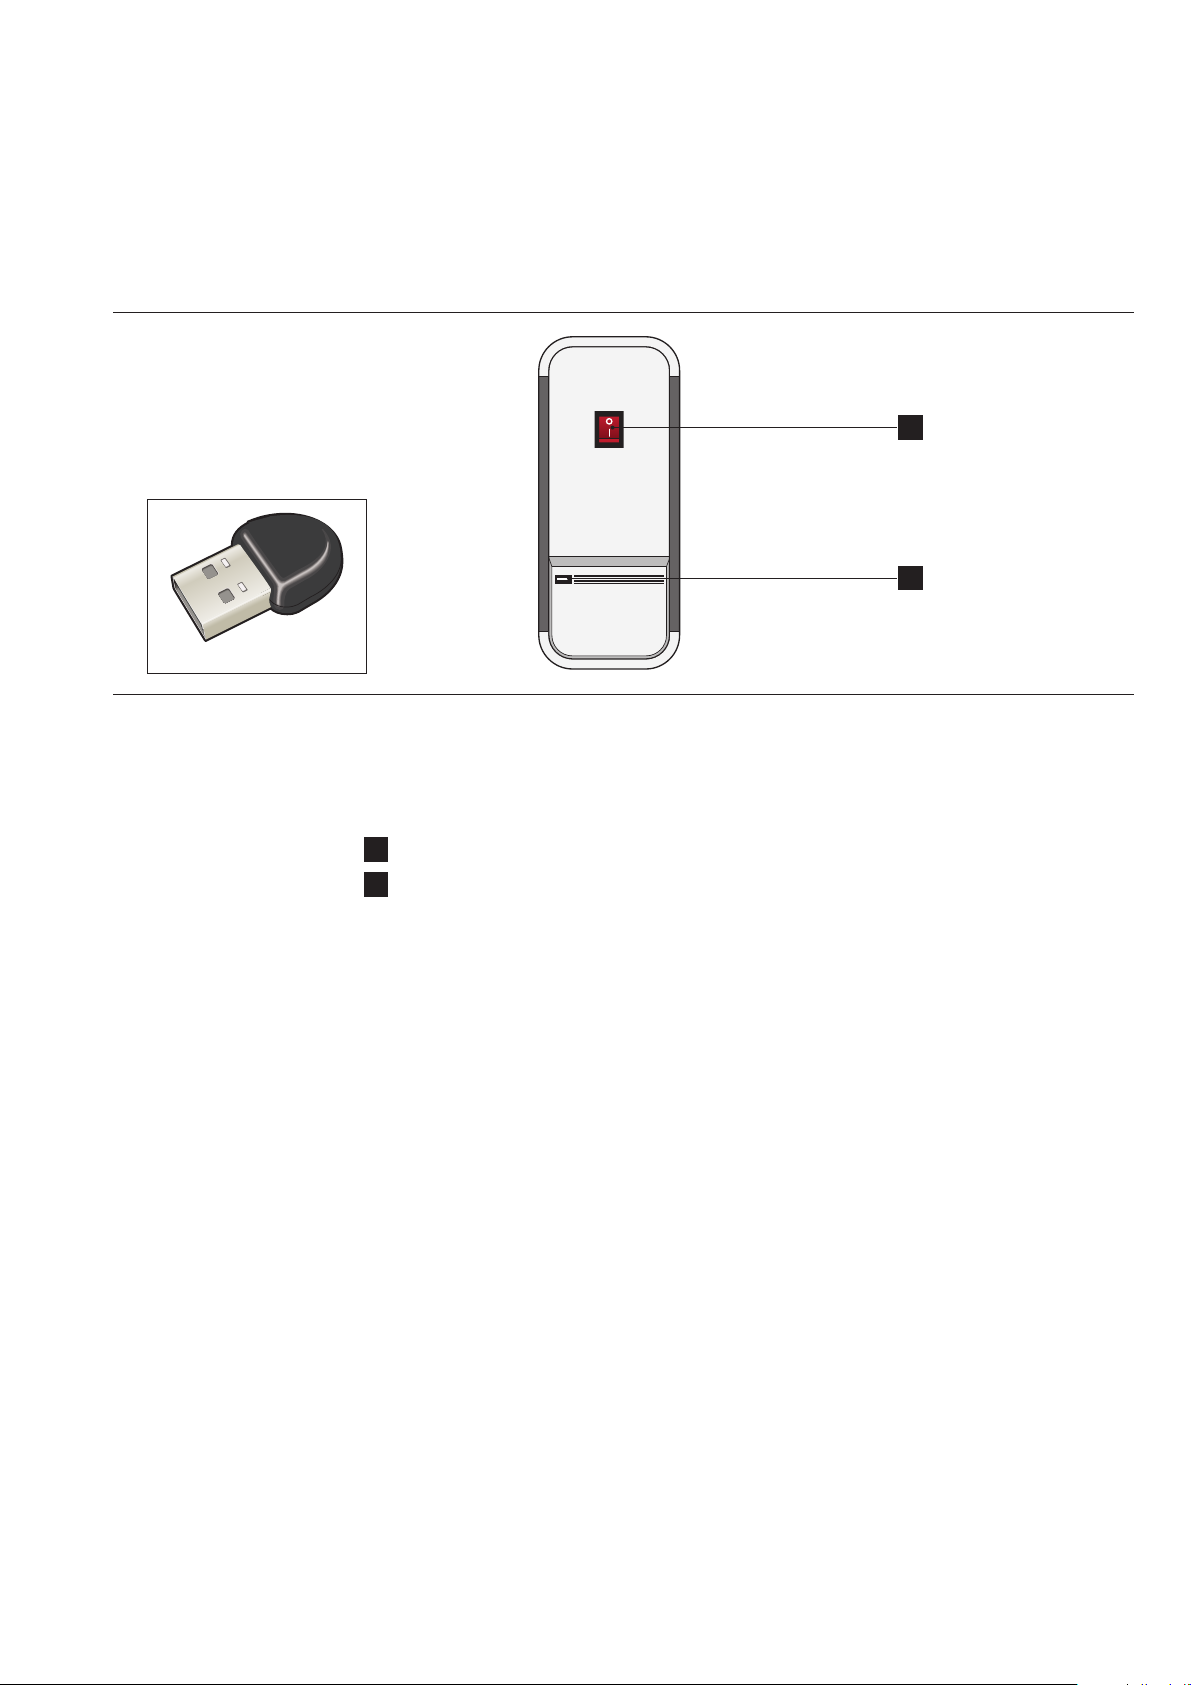
05. CONTROL & MAIN SWITCH
1
2
1
MACHINE MAIN SWITCH ON/OFF
2
USB-PORT
Identify yourself using the provided USB dongle.
08 / 20 17
VETRON 5000/5100 - FLAT BED MACHINE
09
Page 10
INSTRUCTION BOOK
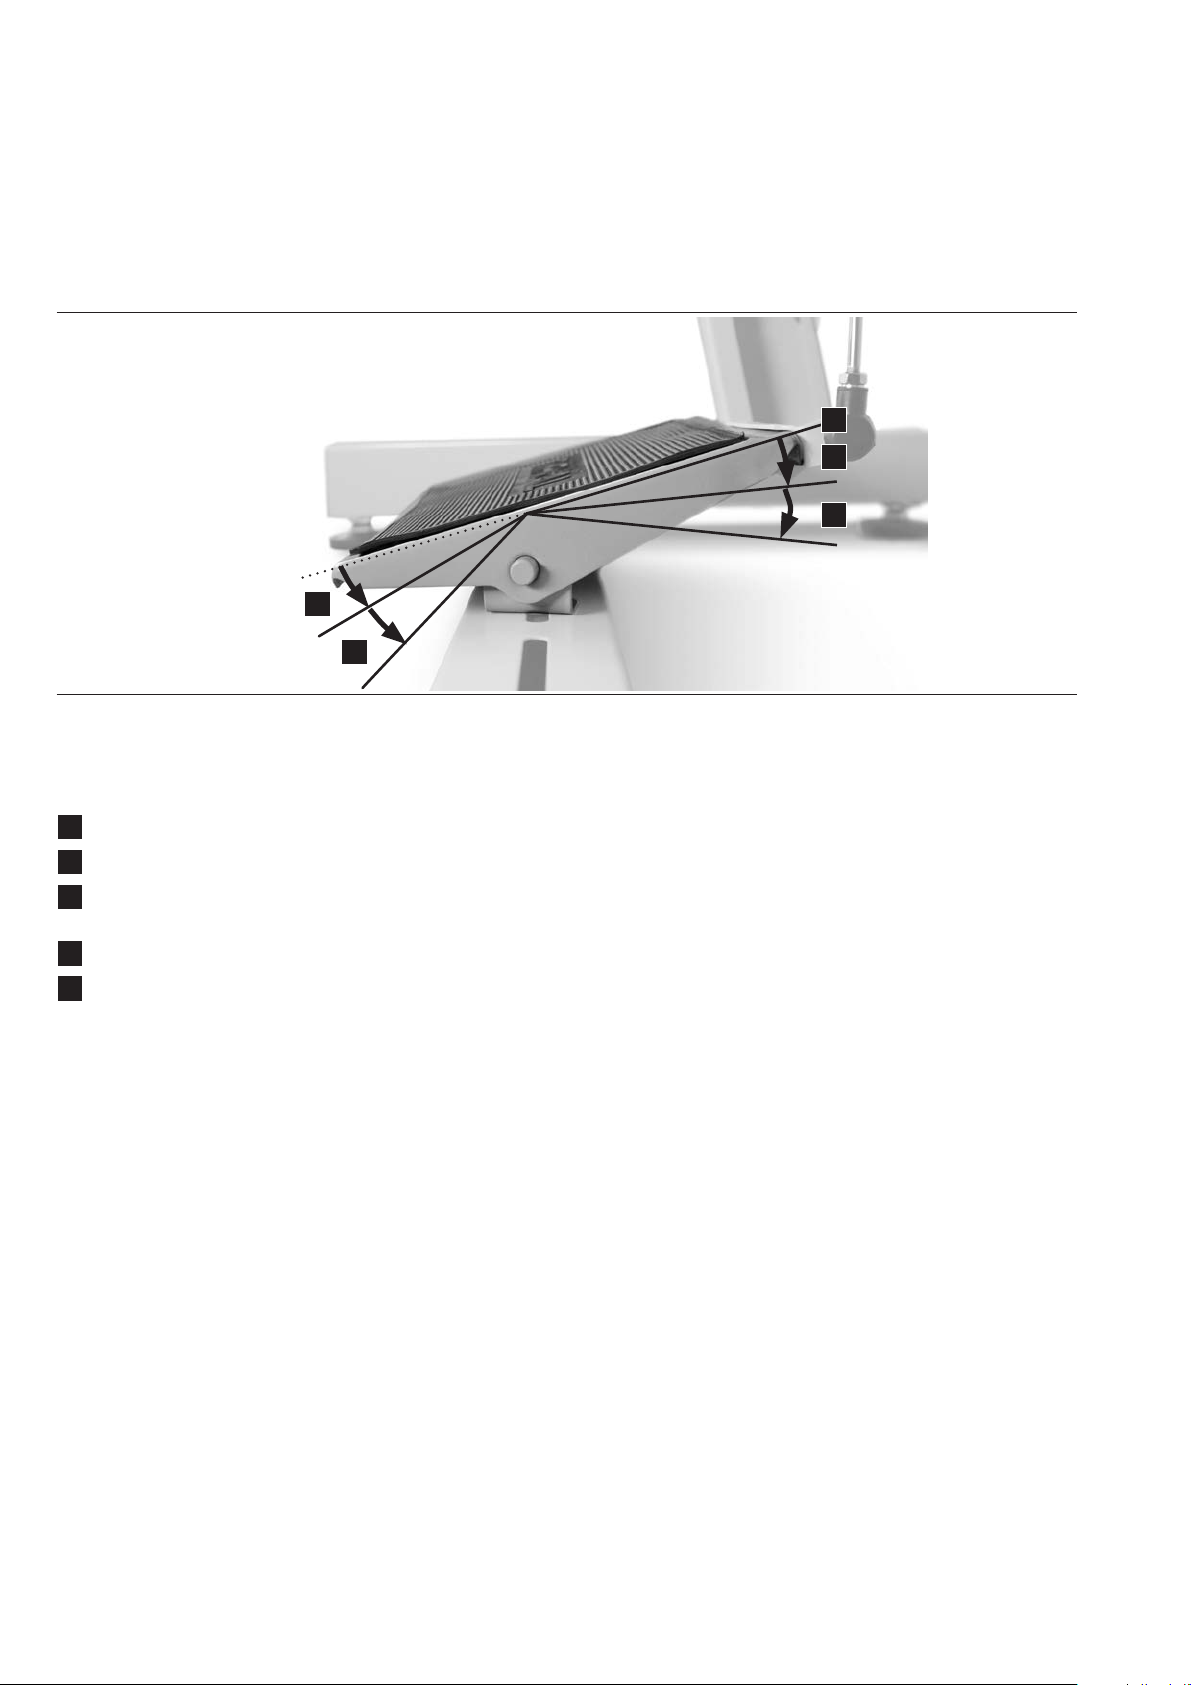
06. PEDAL
-1
-2
0
+1
+2
0
IDLE POSITION
+1
CONSTANT SEWING SPEED (adjustable via parameter M502)
+2
VARIABLE SEWING SPEED FROM 0-100%
OF THE CHOSEN MAXIMUM SPEED (depending on sewing program)
-1
SEWING FEET LIFT
-2
SEAM END PROCEDURE ACTIVATION (depending on sewing program)
08 / 20 17
08 / 20 17
10
VETRON 5000/5100 - FLAT BED MACHINE 11
VETRON 5000/5100 - FLAT BED MACHINE 11
Page 11
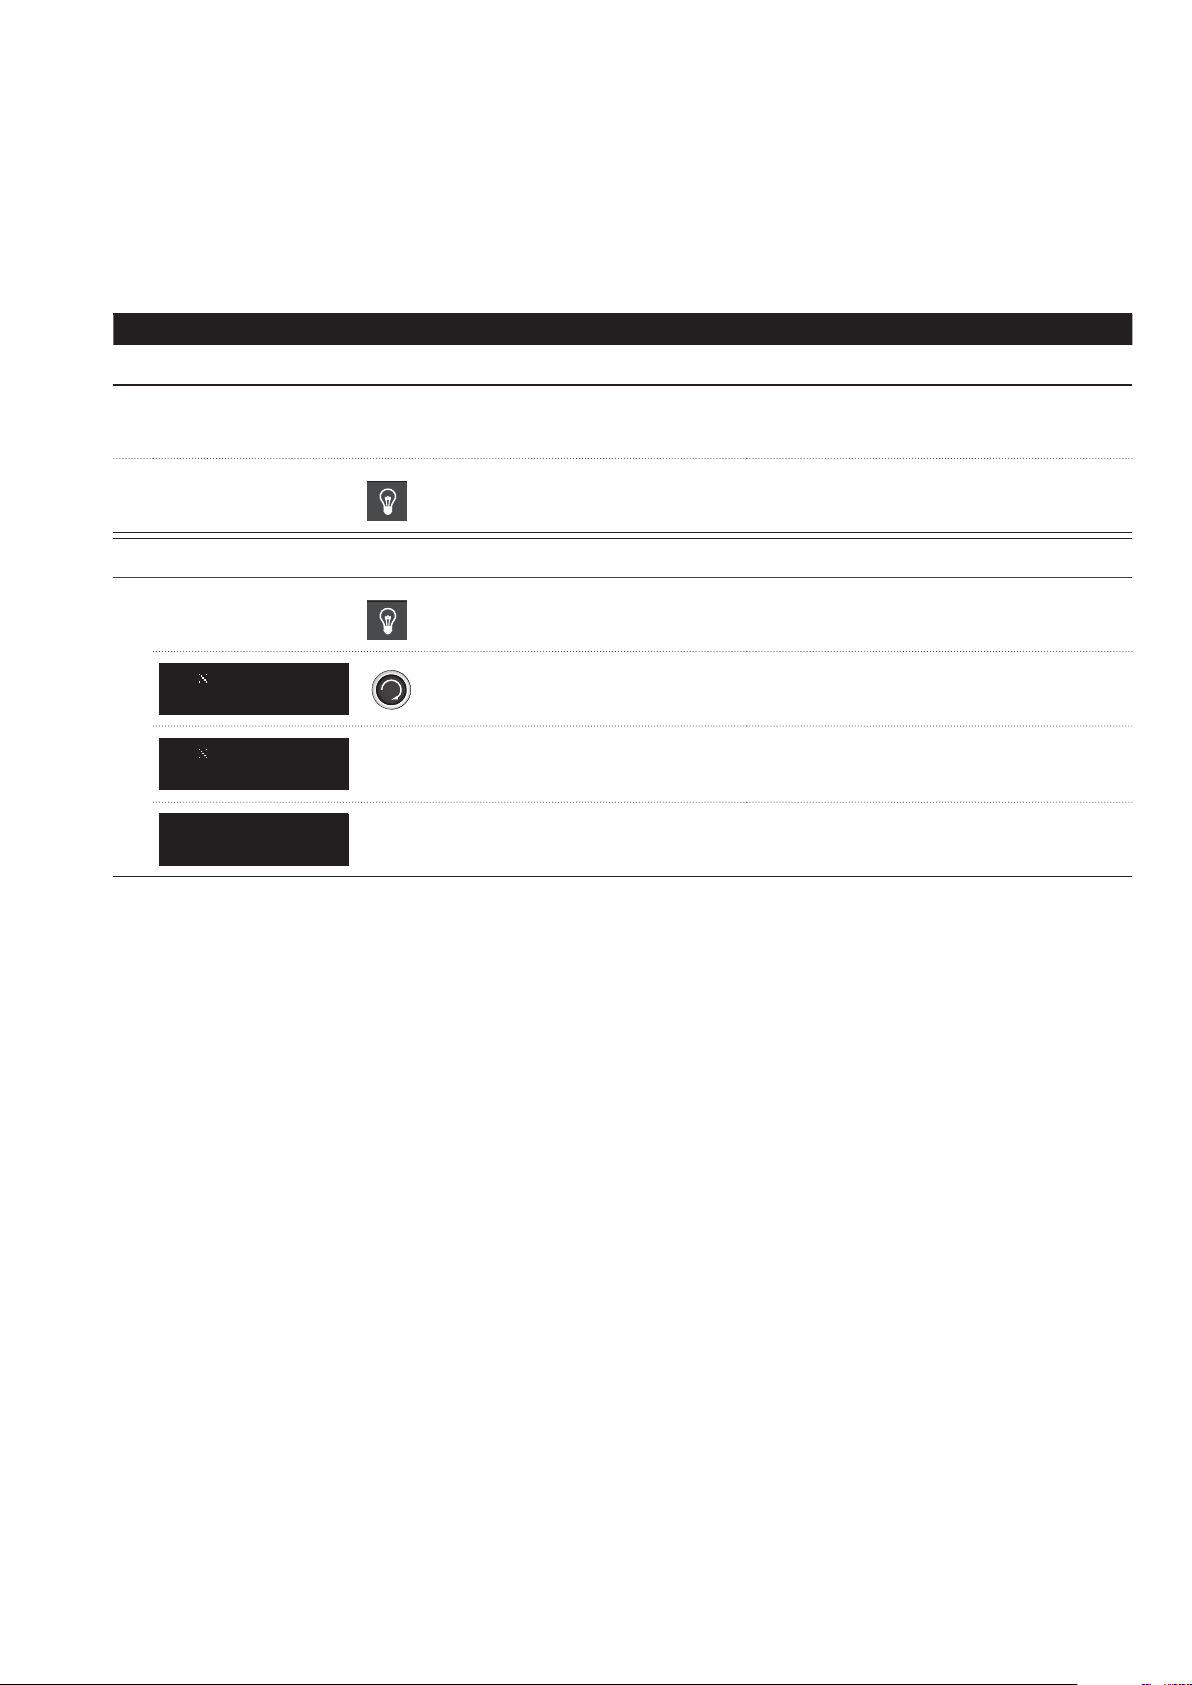
DISP L AY STEP DESCRIPTION
» LIGHT ON/OFF
The VETRON head module is equipped with LED
lighting.
INSTRUCTION BOOK
07. LIGHT
» ADJUST LIGHT INTENSITY
01
1A0
0
02
03
04
J IS H
D LU GT T
0 06
A J IS HD LU GT T
P 2 2W 41 3 31 5
P MO NR MR G AA E
Press the LIGHT button
Press the LIGHT button
Change LIGHT INTENSITY
Machine is ready for operation.
The corresponding LED on
the display lights up.
Die entsprechende LED leuchtet auf
dem Display.
Percentage on the display and
light intensity of the light are changed.
After 2 seconds without further input,
the value is set and the current program
number is shown.
08 / 20 17
08 / 20 17
VETRON 5000/5100 - FLAT BED MACHINE10
VETRON 5000/5100 - FLAT BED MACHINE
Page 12

INSTRUCTION BOOK
08. GENERAL INFORMATION IMPORTANT FOR SAFETY
General Safety Instructions
This manual and the warning symbols on the machine should
ensure the safe use of the machine, so that no accidents and injuries may occur. Please read this instruction and also the safety
instructions of the motor manufacturer carefully.
The machine may only be set into operation after this instruction
manual has been read and the operator has been trained by authorized personnel/sta.
The machine may only be used as specified and with the appropriate safety devices. General safety instructions must be
applied.
Take note of the danger and safety instructions on the machine.
The machine must be switched o, or plug pulled during maintenance and oth er work e. g. chan ging of needle, sewing foot , need le plate, feed dog, bobbin or threading is done, also when leaving
the working place.
Daily maintenance work may only be taken out by properly trained personnel.
Repairs and special maintenance may only be done by technical
personnel or specially trained sta.
Only a qualified mechanic may perform work on the electrical
equipment.
Working on movable parts is not allowed. Conversions or modifications to the machine may only be done with the common
safety measures.
Only original VETRON spare parts or parts which are cleared
by VETRON are allowed to be used when repairing the machine.
Failure to comply will void the warranty.
The machine can only be used when the whole unit complies
with the EC-Directive.
Notice to the owner
This manual must be available at all times for the operator as
it is part of the machine. Make sure the persons working on the
machine read it before starting the machine for the first time.
The owner must make sure that the machine is in good working
or d e r.
The owner must check that all safety devices are in place and in
working order.
The owner must make sure that only authorized, trained persons are working on the machine.
Operators and Technical Sta
It is the operator´s responsibility to take care of small adjustments, operating and cleaning of the machine.The operator has
to refrain from any actions that can interfere with the safety
of the machine. There is no jewelry, chains or rings to be worn
while working on the machine. The clothing should be tight fitting. Only authorized personnel is allowed on the workplace. The
occurence of an error on the machine that can interfere with the
safety must be reported to the supervisor.
The skilled technical sta is responsible for lubricating, maintenance, repairing and adjusting of the machine. The machine
must be switched o before starting any work on the machine
and should be secured that it can´t be switched on unintentionally.
Exceptions are listed in the regulation EN 50110. The safety
guards must be replaced after finishing the repair and maintenance work.
Operators and technical sta must take attention of the safety
and operating instructions in this manual.
The connecting cable must be equipped with a country-specific
connecting plug. This must be done by an electrician.
08 / 20 17
08 / 20 17
12
VETRON 5000/5100 - FLAT BED MACHINE 13
VETRON 5000/5100 - FLAT BED MACHINE 13
Page 13
INSTRUCTION BOOK
09. MACHINE START
1
Press the main switch at the control box to turn on the machine.
01. Wait some seconds until the machine is initialized.
DANGER!
Make sure that no sewing material or other items are below the sewing feet
before pushing the pedal.
02. Push the pedal. The sewing feet are moving and finally positioning on the needle plate.
NOTE: The red and white control lights
during automatic movement.
at the machine head are flashing
1
1
03. The sewing light is automatically switched on.
04. The machine is now ready for use.
08 / 20 17
08 / 20 17
VETRON 5000/5100 - FLAT BED MACHINE12
VETRON 5000/5100 - FLAT BED MACHINE
Page 14
INSTRUCTION BOOK
10. PROGRAM CHANGE
000
SE T
T
NOTE!
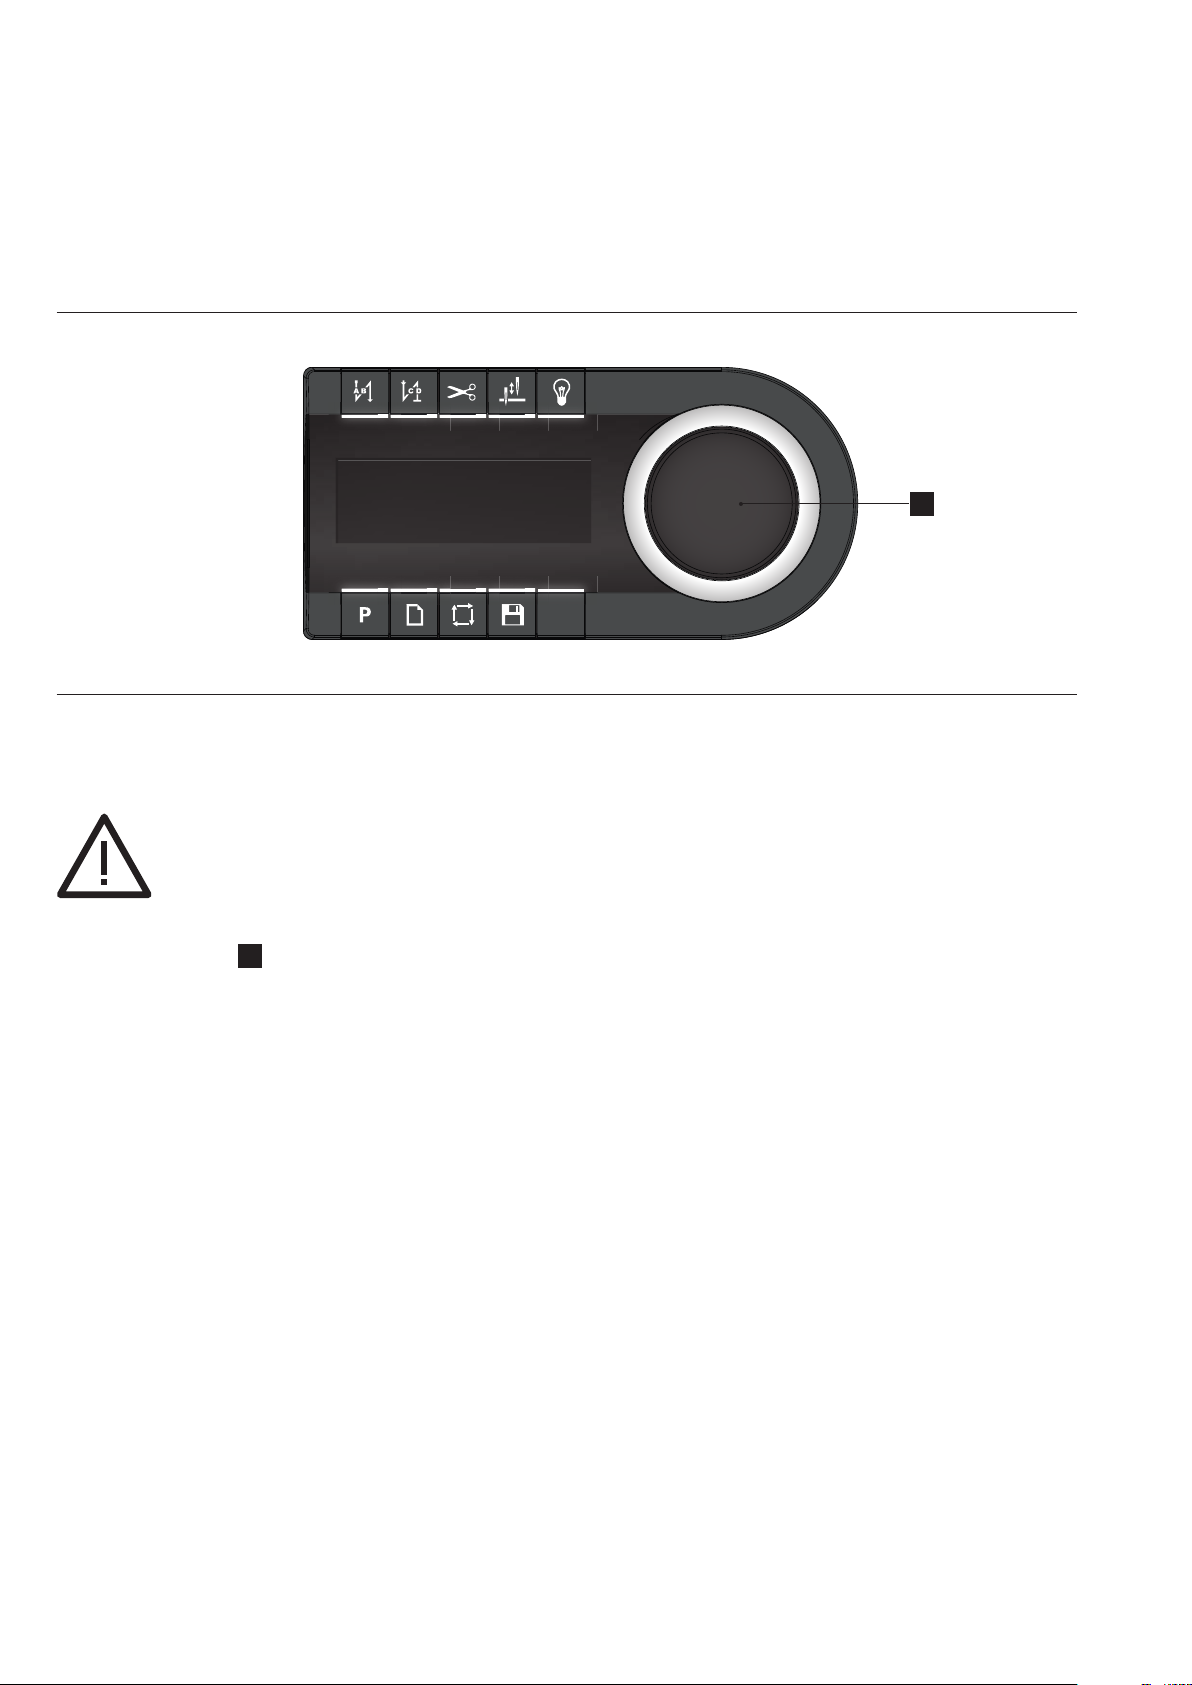
Inside the seam it is not possible to change the program. Press the pedal back to
thread trimming position to activate the function if necessary.
01. Push the JOG KEY
02. The current program number is fl ashing.
03. Turn the JOG KEY to the left or right to choose the desired program number.
04. Confi rm your choice by pushing the JOG KEY again.
05. The machine is now ready for use.
10
.
30%P
ESC
10
08 / 20 17
14
VETRON 5000/5100 - FLAT BED MACHINE
Page 15
INSTRUCTION BOOK
11. DIRECT ACCESS
000
SE T
T
N O T E !
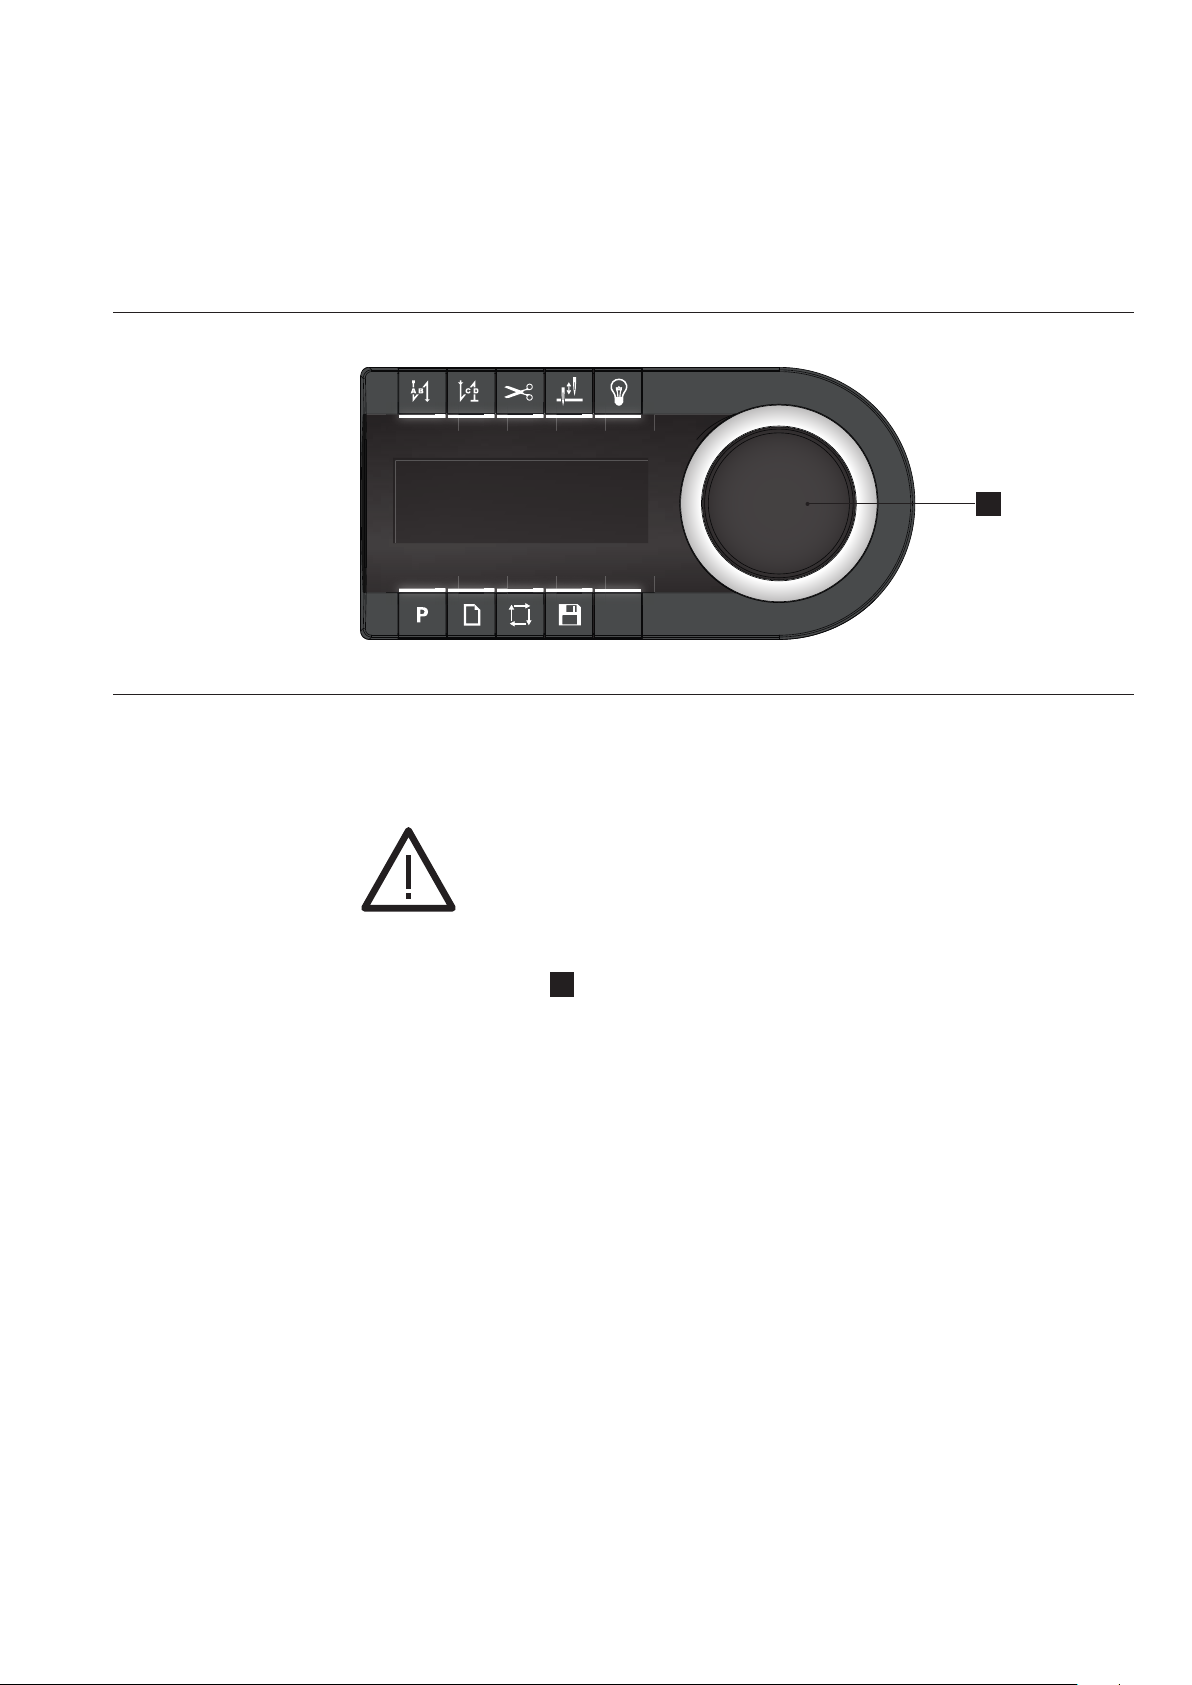
It is possible to create operator´s direct access to one program parameter via the
control panel.
The direct access parameter is permanently shown in the display. The manipulations
by the operator are not saved in the program and will be reset after program change
or when the machine is turned o .
By turning the JOG KEY
The following parameters can be displayed:
OFF
» Thread tension
» Stitch length
» Maximum speed
» Top feed stroke
» Top feed pressure
» Bobbin thread counter (only display)
» Edge guide distance
» Current sewing speed (only display)
» Current needle position in degrees (only display).
30%P
ESC
10
the value can be adjusted directly.
10
08 / 20 17
VETRON 5000/5100 - FLAT BED MACHINE
15
Page 16
INSTRUCTION BOOK
12. INSERTING THE NEEDLE (ONE NEEDLE MACHINE)
-1-2
1
2
3
CAUTION! RISK OF INJURY!
Push the X-button at the machine head, the red light illuminates showing the active
“BLOCKED MODE“ or turn the machine o, before inserting the needle. Failure to
comply produces a risk of injury in case of an unintentional machine operation.
CAUTION!
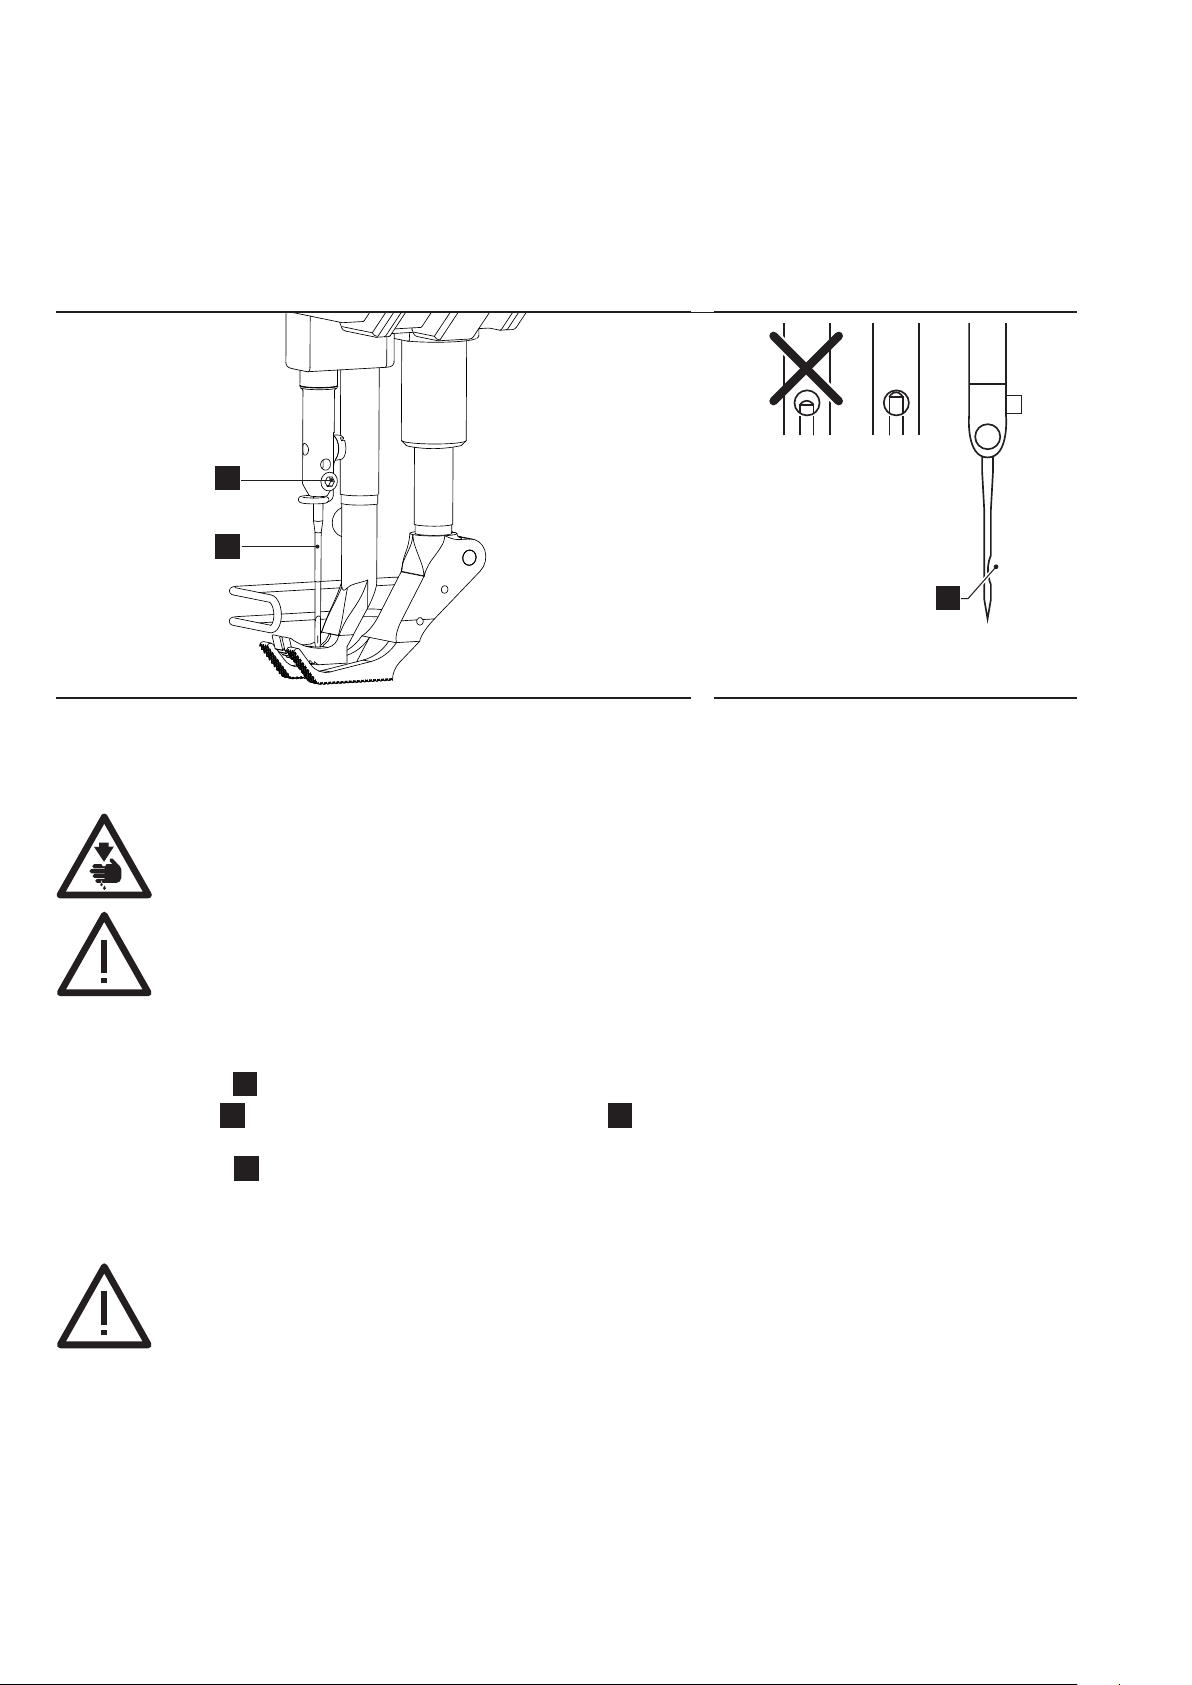
Only use needles from the system intended for the machine.
(Needle lsystem 134-35)
01. Push the X-button at the machine head, the red light illuminates showing
the active “BLOCKED MODE”, or turn the machine o.
02. Loosen the screw
03. Push the needle
on the needle is to the right side.
04. Tighten the screw
05. Push the X-button or switch the machine on again and follow the instructions
displayed in the control panel.
CAUTION:
Before activating the machine by the X-button make sure to remove sewing material or other items below the sewing feet if necessary and follow the instructions
displayed on the control panel.
.
1
fully in until it stop. Make sure that the groove 3
2
again.
1
08 / 20 17
16
VETRON 5000/5100 - FLAT BED MACHINE 17
Page 17
INSTRUCTION BOOK
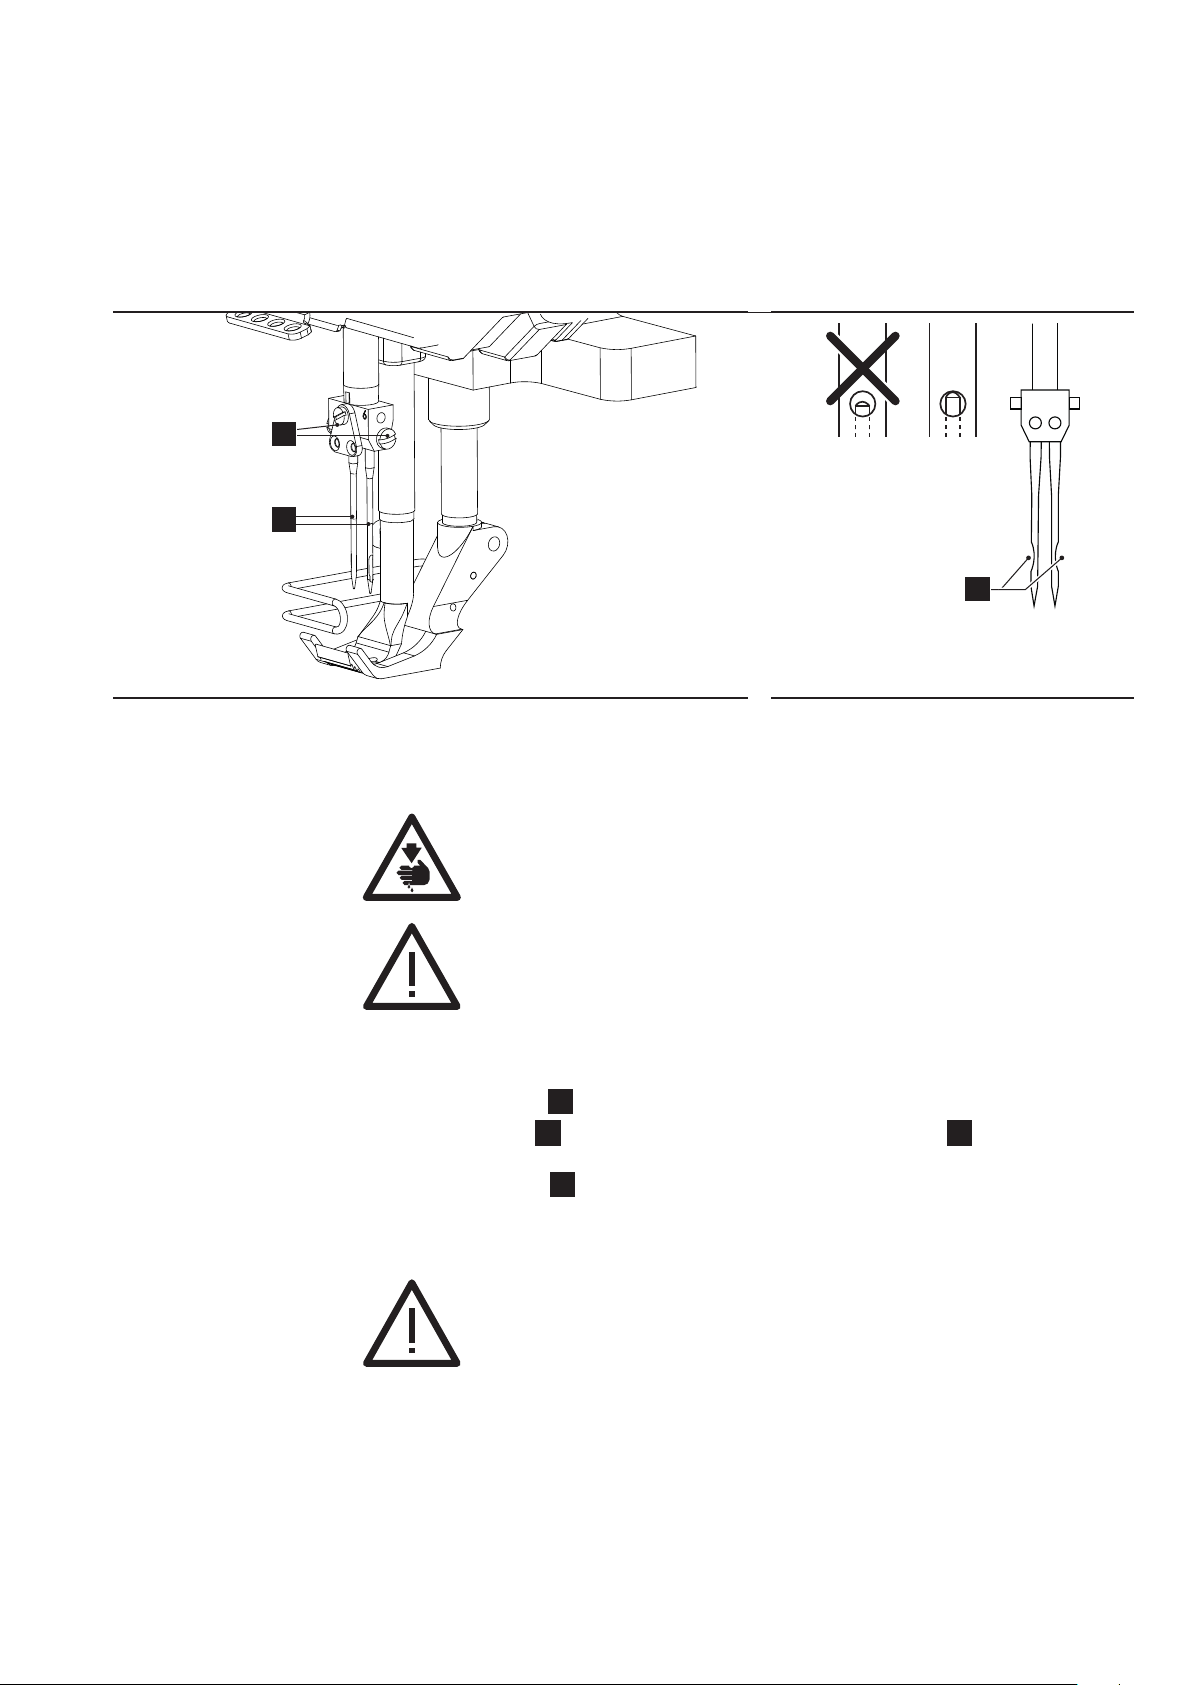
12.01. INSERTING THE NEEDLE (TWO NEEDLE MACHINE)
-2-2
1
2
3
CAUTION! RISK OF INJURY!
Push the X-button at the machine head, the red light illuminates showing the active
“BLOCKED MODE“, or turn the machine o before inserting the needles. Failure to
comply produces a risk of injury in case of an unintentional machine operation.
CAUTION!
Only use needles from the system intended for the machine.
(Needle lsystem 134-35)
01. Push the X-button at the machine head, the red light illuminates showing
the active “BLOCKED MODE”, or turn the machine o.
02. Loosen the screws
03. Push the needles 2 fully in until they stop. Make sure that the groove 3
of the right needle points to the right and the left needle to the left.
04. Tighten the screws
05. Push the X-button or switch the machine on again and follow the instructions
displayed on the control panel.
CAUTION:
Before activating the machine by the X-button make sure to remove
sewing material or other items below the sewing feet if necessary and
follow the instructions displayed on the control panel.
1 .
1 again.
08 / 20 17
VETRON 5000/5100 - FLAT BED MACHINE
Page 18
INSTRUCTION BOOK
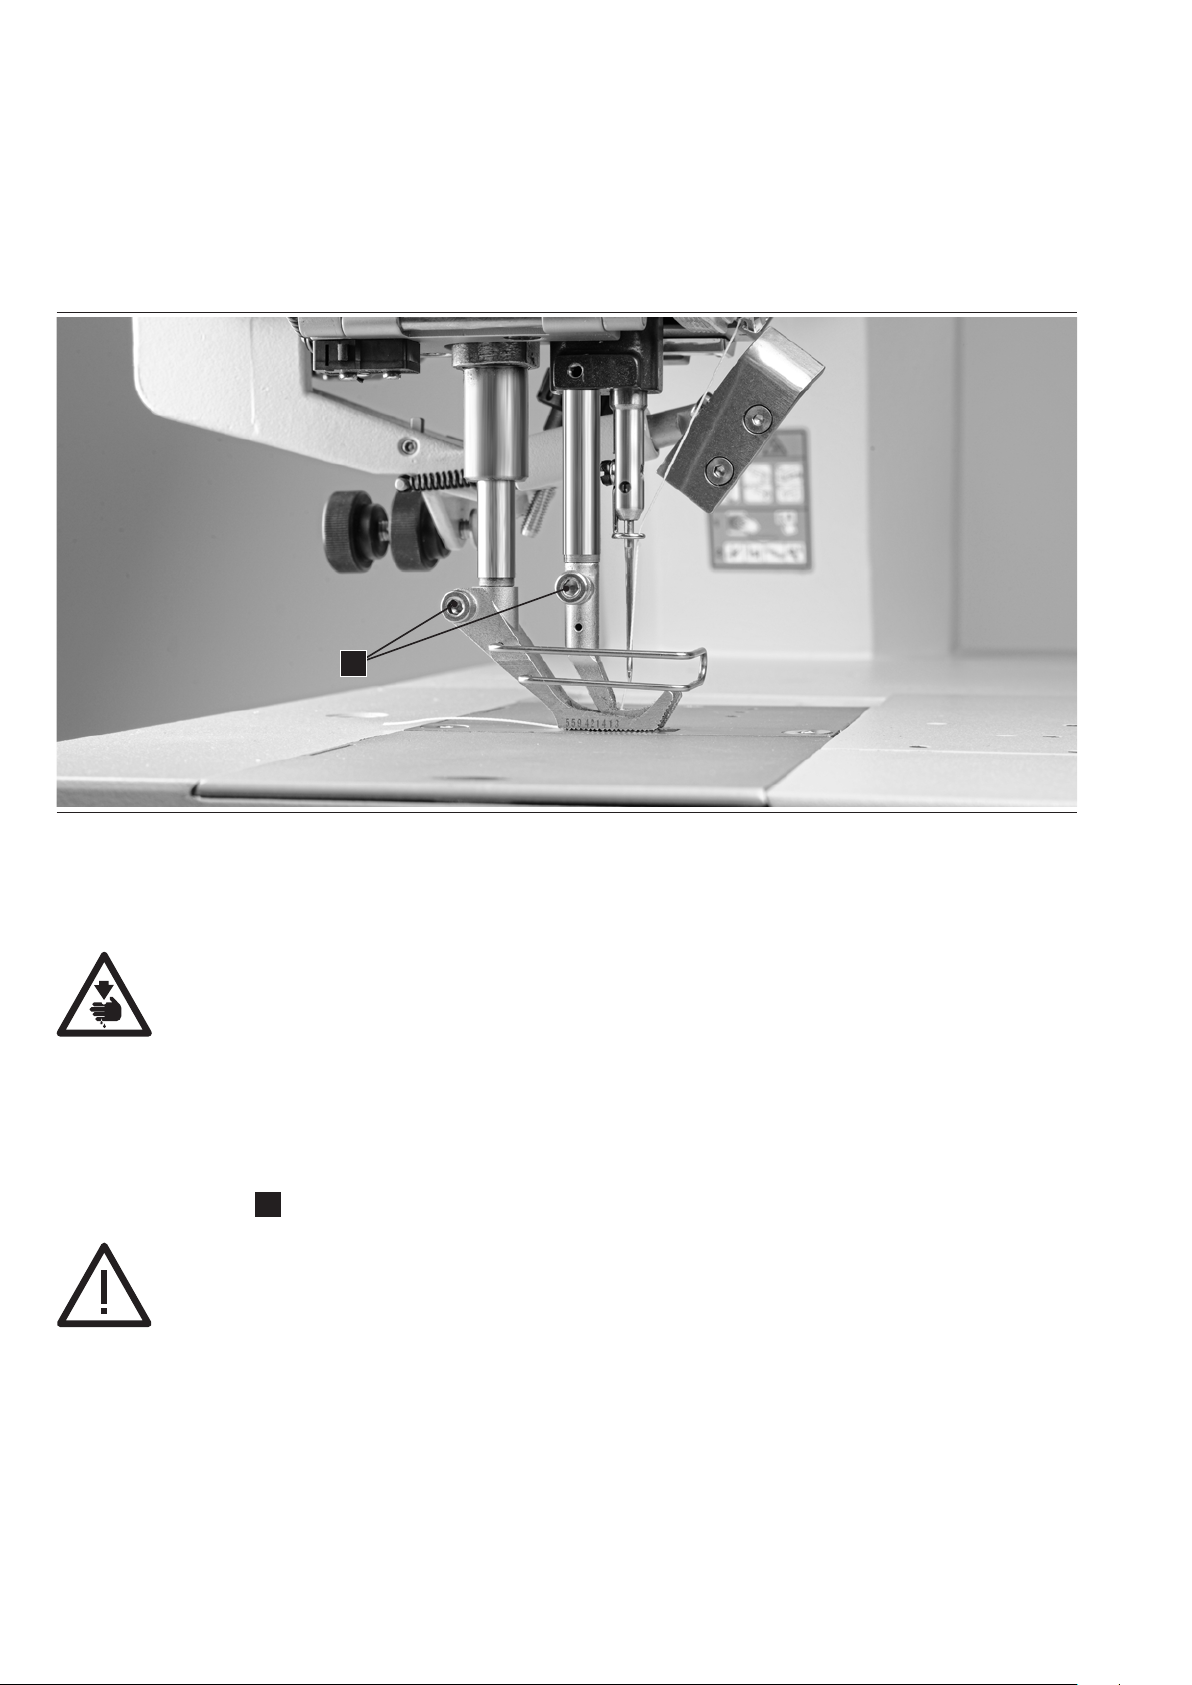
13. SEWING FEET EXCHANGE
1
CAUTION! RISK OF INJURY!
Push the X-button at the machine head, the red light illuminates showing the active
“BLOCKED MODE“, or turn the machine o before you change the sewing feet.
Failure to comply produces a risk of injury in case of an unintentional machine
operation.
During „BLOCKED MODE“ the sewing feet have no pressure or position control.
They can be moved by the following method:
01. Press and hold the programmable button on the machine head (lowest button).
02. By turning the JOG KEY the sewing feet can be moved.
03. By loosening screws
the sewing feet can be exchanged.
1
08 / 20 17
18
VETRON 5000/5100 - FLAT BED MACHINE 19
NOTE!
Push the X-button or switch the machine on again and follow the instructions
displayed on the control panel.
Page 19
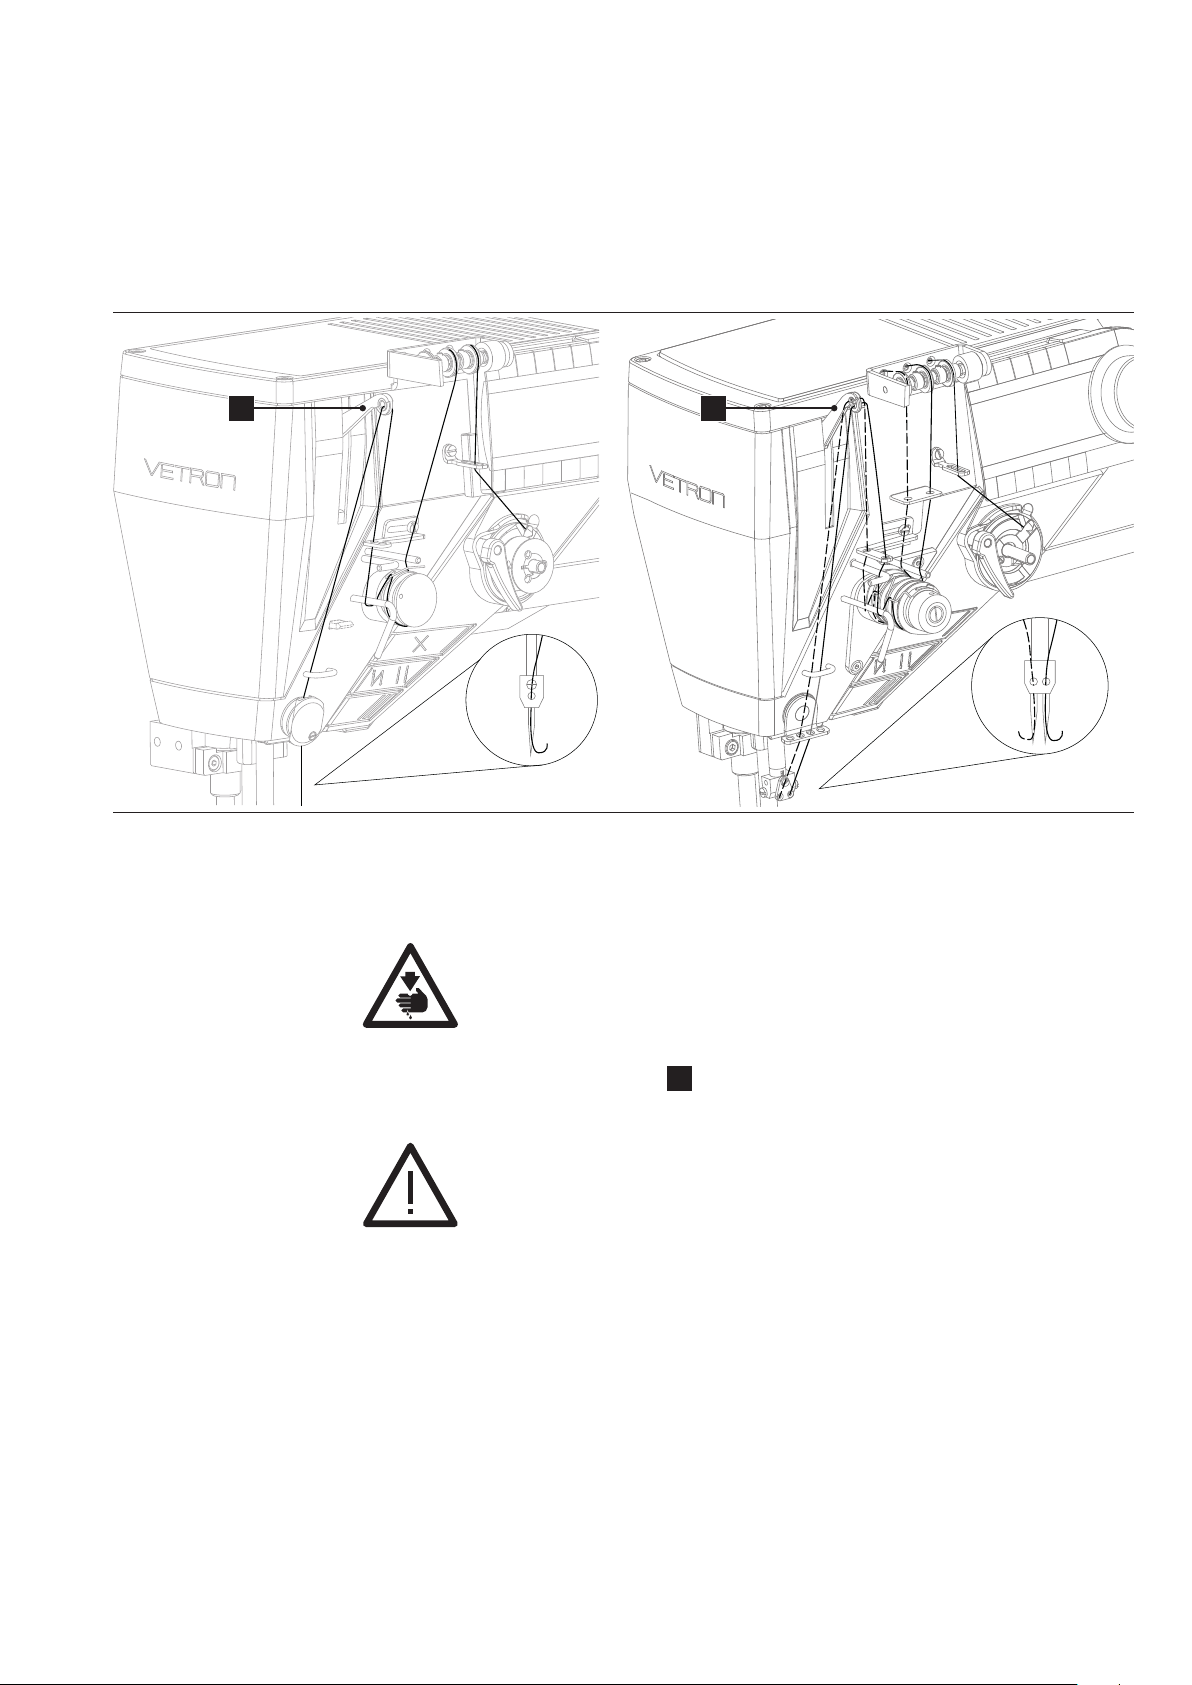
14. THREADING THE MACHINE (ONE/TWO NEEDLE MACHINE)
1 1
INSTRUCTION BOOK
CAUTION! RISK OF INJURY!
Push the X-button at the machine head, the red light illuminates showing the
active“BLOCKED MODE“, or turn the machine o . Failure to comply produces a risk
of injury in case of an unintentional machine operation.
Make sure that the thread takeup lever
Now you can thread the machine according to the picture.
N O T E !
Push the X-button or switch the machine on again and follow the instructions
displayed on the control panel.
is in its top dead position.
1
08 / 20 17
VETRON 5000/5100 - FLAT BED MACHINE
19
Page 20
INSTRUCTION BOOK
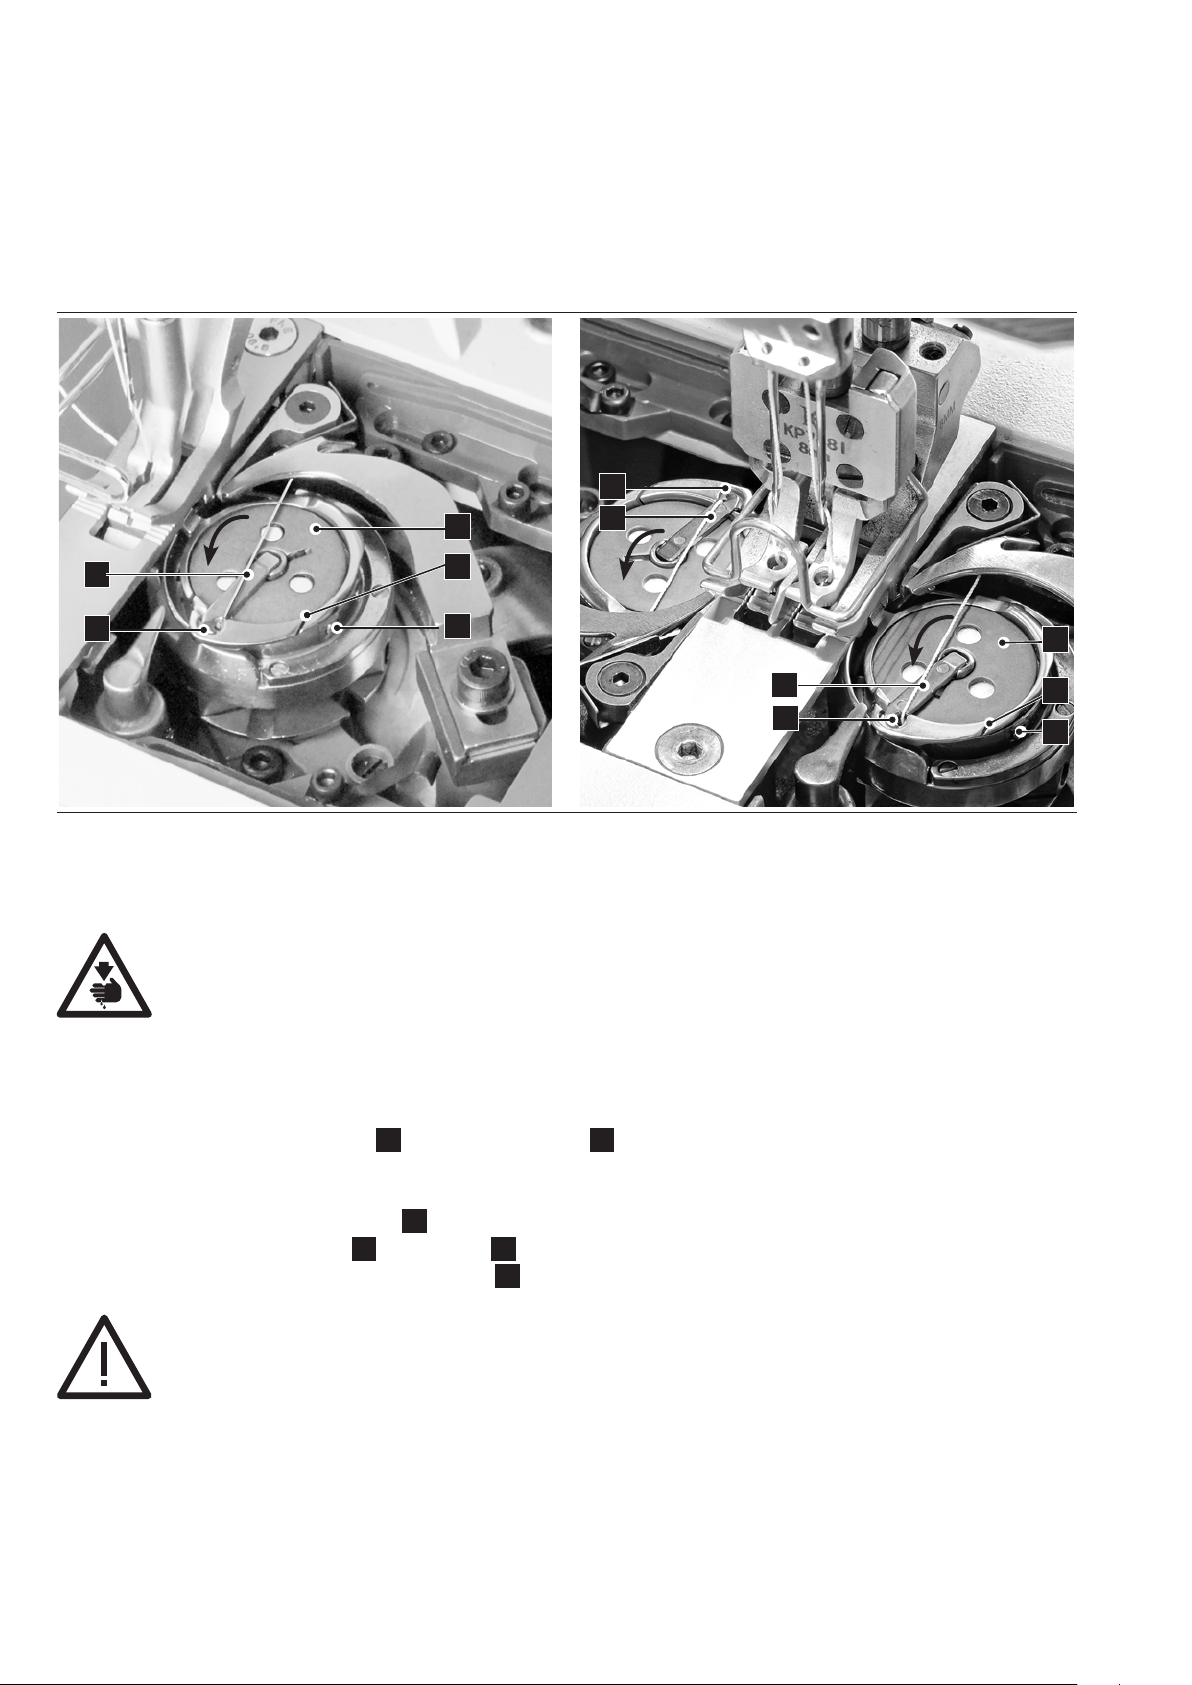
15. EXCHANGING THE BOBBBIN AND ADJUSTING THE BOBBIN THREAD TENSION
(ONE/TWO NEEDLE MACHINE)
5
2
1
1
5
CAUTION! RISK OF INJURY!
Push the X-button at the machine head, the red light illuminates showing the active
“BLOCKED MODE“, or turn the machine o before removing the bobbin. Failure to
comply produces a risk of injury in case of an unintentional machine operation.
If the machine is equipped with the special feature “bobbin cover detection” it is
automatically entering the “blocked mode” after opening the bobbin cover.
01. Push the X-button at the machine head, the red light illuminates showing
the active “BLOCKED MODE”, or turn the machine o.
02. Open the hook cover. Fold up the tab
03. Insert the filled bobbin. Check the correct direction by pulling the thread end
and assuring the rotation of the bobbin is counter-clockwise.
04. Pass the bobbin thread through the slot
and pull it out of the thread guide
05. The bobbin thread tension can be adjusted at screw
1
. Close the tab 1 and the hook cover.
5
3
4
and remove the bobbin 2.
, then pass the tension spring below
3
.
4
2
1
5
3
4
NOTE!
Push the X-button or switch the machine on again and follow the instructions
displayed on the control panel.
08 / 20 17
20
VETRON 5000/5100 - FLAT BED MACHINE 21
Page 21
INSTRUCTION BOOK
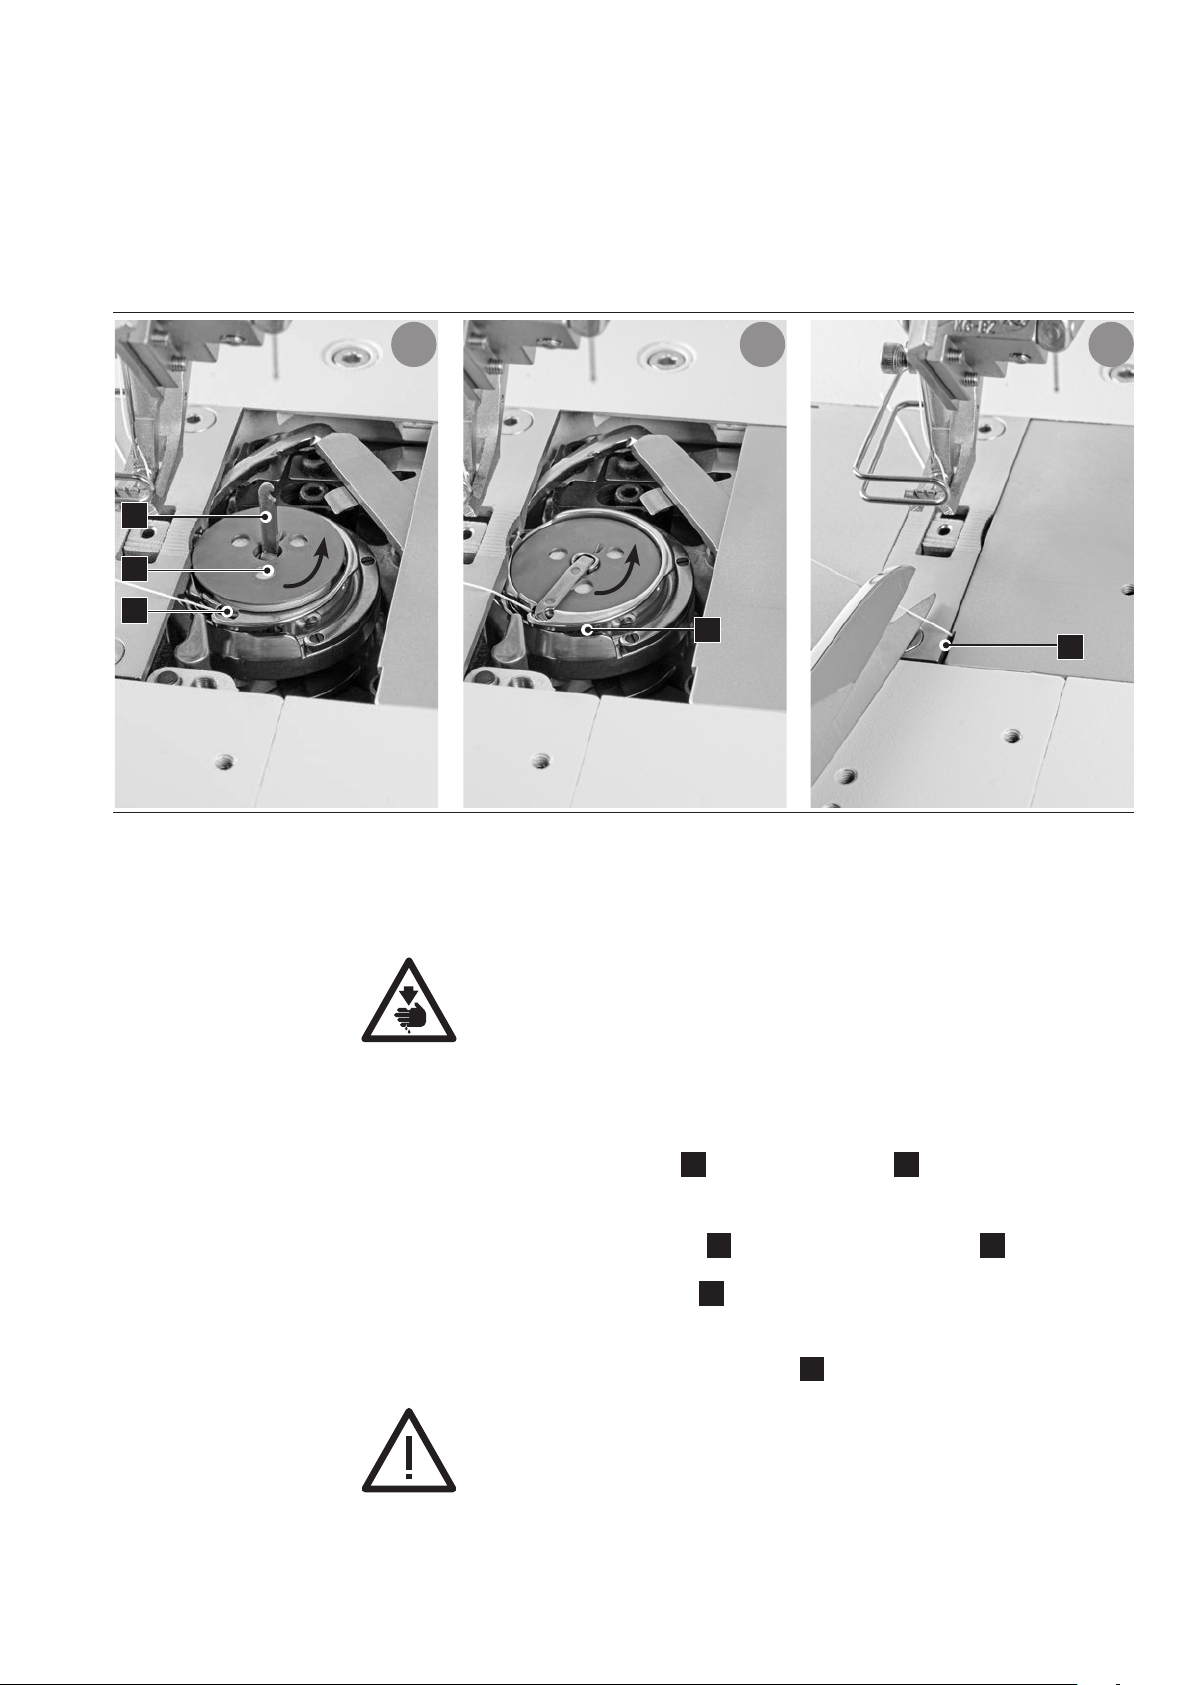
15.01. EXCHANGING THE BOBBBIN AND ADJUSTING THE BOBBIN THREAD TENSION
(SHORT THREAD CUTTER)
21 3
1
2
3
CAUTION! RISK OF INJURY!
Push the X-button at the machine head, the red light illuminates showing the active
“BLOCKED MODE“, or turn the machine o before removing the bobbin. Failure to
comply produces a risk of injury in case of an unintentional machine operation.
If the machine is equipped with the special feature “bobbin cover detection” it is
automatically entering the “BLOCKED MODE” after opening the bobbin cover.
01. Push the X-button at the machine head. The red light illuminates showing
the active “BLOCKED MODE”. Or turn the machine o.
02. Open the hook cover. Fold up the tab
03. Insert the filled bobbin. Check the correct direction by pulling the thread end
and assuring the rotation of the bobbin is counter-clockwise.
04. Pass the bobbin thread through the slot
ATTENTION: Make sure the bobbin thread is not pulled over the tab (see image 2)
05. Pull the bobbin thread through the slot
Then cut the thread according image 3.
ATTENTION: Is the bobbin thread to long, sewing disturbances and thread breakage occures.
06. The bobbin thread tension can be adjusted at screw
5
and remove the bobbin 2.
1
(see image 1) and close the tab 1.
3
of the stitch plate and close the bobbin cover.
4
.
5
4
NOTE!
Push the X-button or switch the machine on again and follow the instructions
displayed on the control panel.
08 / 20 17
VETRON 5000/5100 - FLAT BED MACHINE
Page 22
INSTRUCTION BOOK
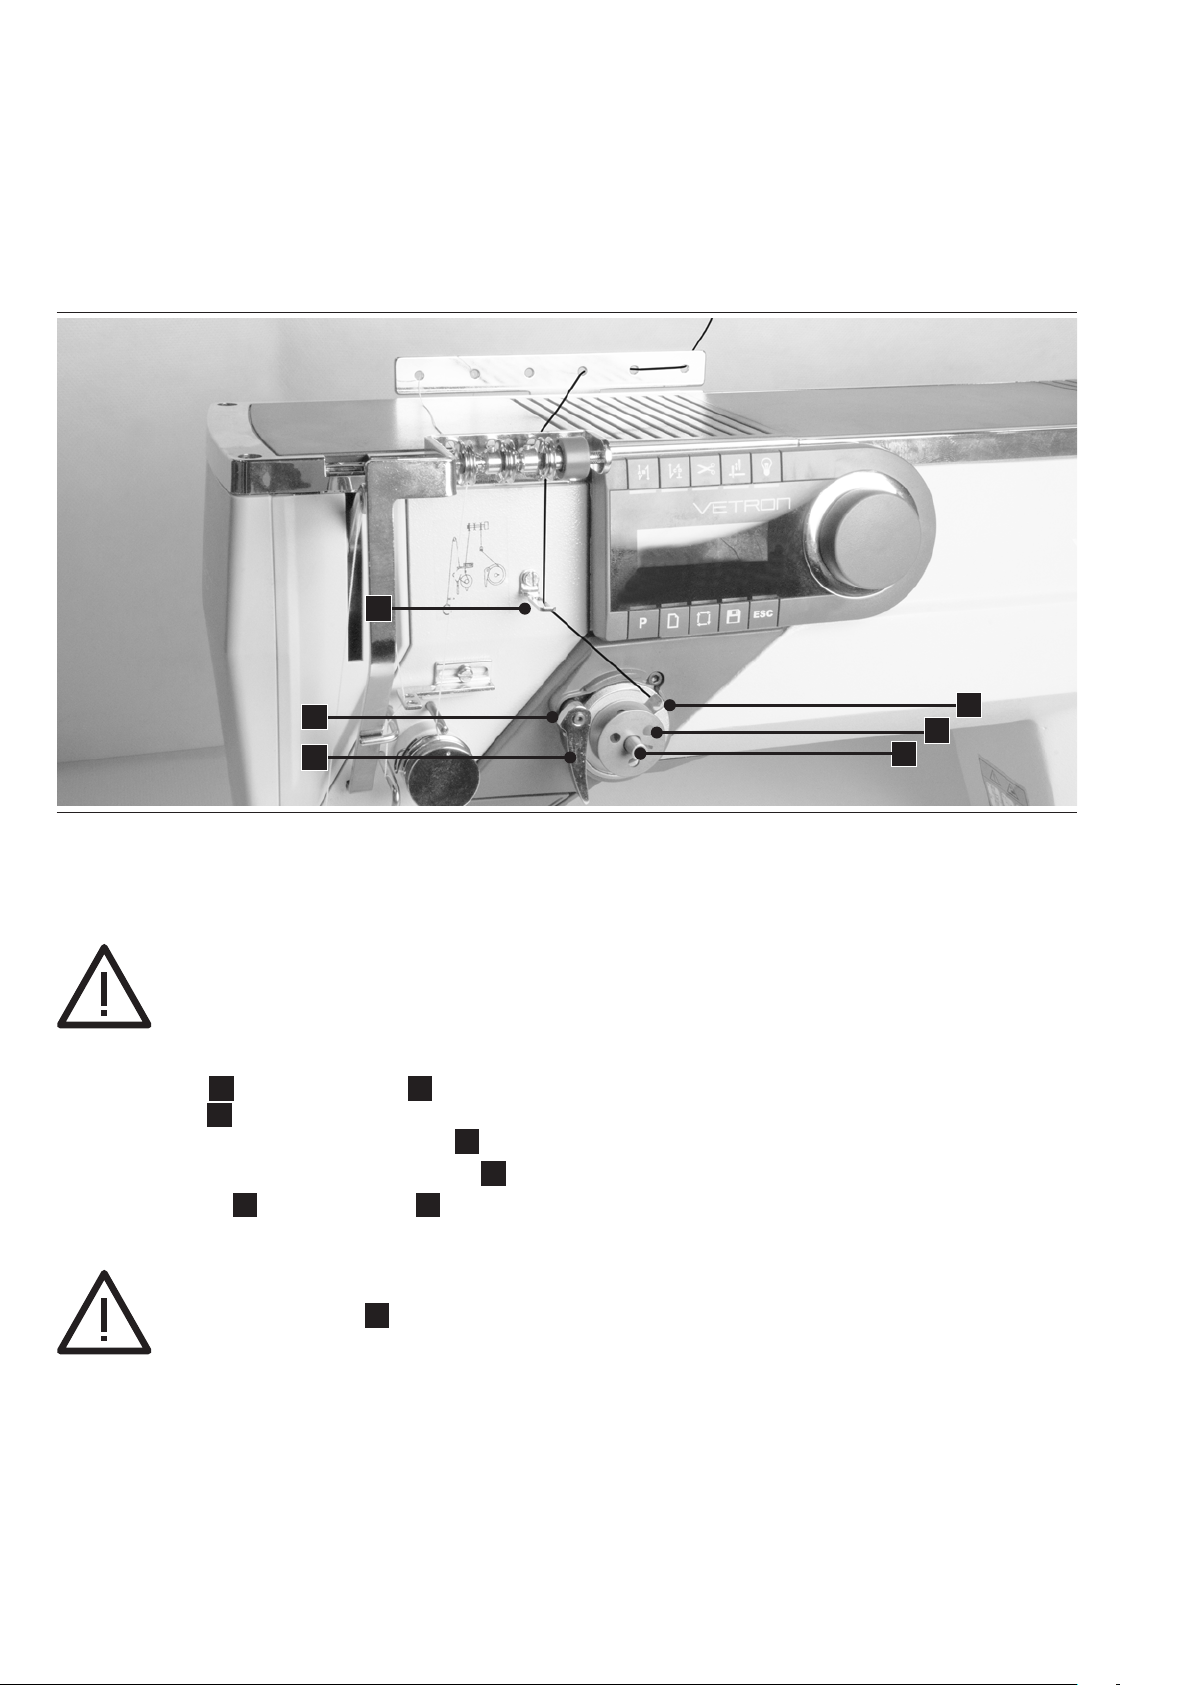
16. WINDING THE BOBBIN THREAD
6
5
3
CAUTION!
Avoid touching rotating parts to avoid the risk of injury or damage of the machine.
01. Turn the machine on.
02. Place a bobbin
03. Push the lever
04. After the winding process is finished, the lever
05. Remove the bobbin and cut the thread at the knife
06. Loosen the screw
on the bobbbin. There should be a gap from 1 mm between thread and bobbin edge.
on the bobbin winder 2.
1
towards the bobbin.
3
automatically moves back.
3
.
4
and move the lever 3 to adjust the amount of thread
5
4
1
2
NOTE!
If necessary, the bracket
thread flow to the bobbin.
08 / 20 17
22
VETRON 5000/5100 - FLAT BED MACHINE 23
can be slightly bended to the left or right to optimize the
6
Page 23
INSTRUCTION BOOK
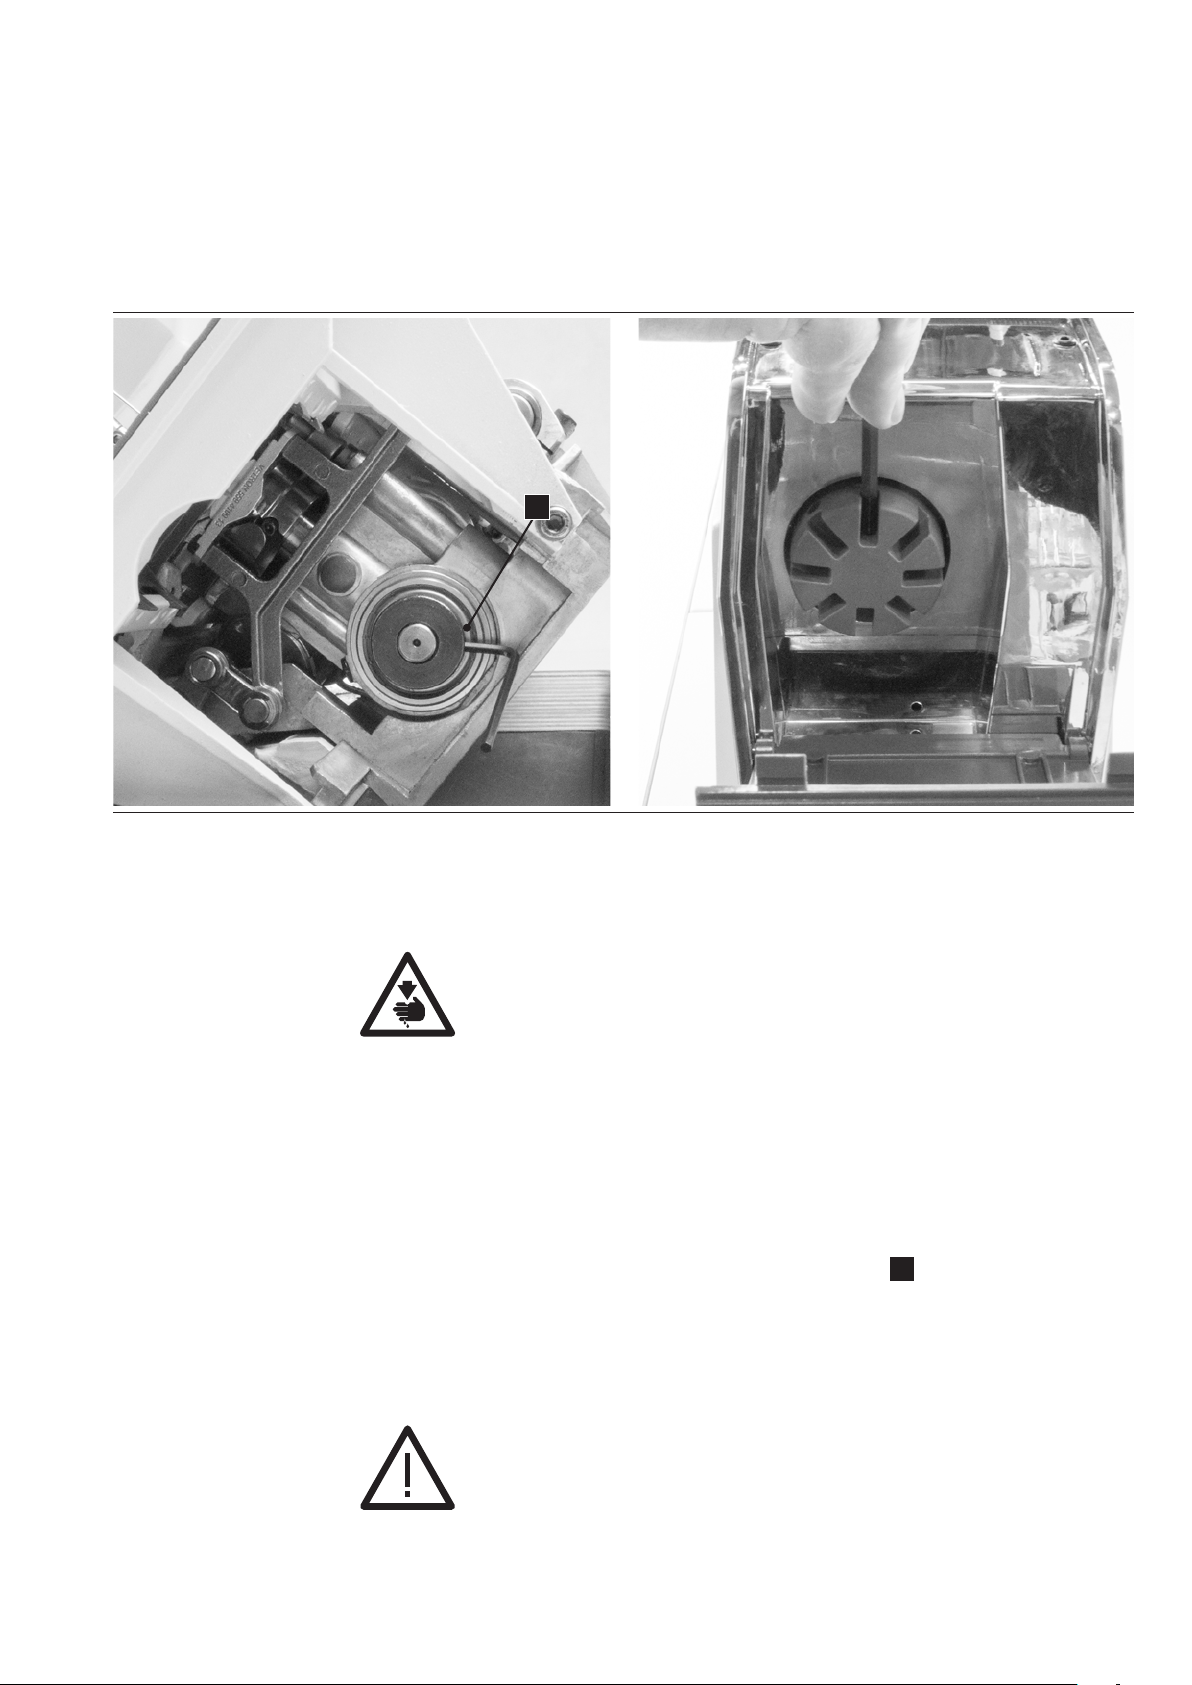
17. ENGAGING THE SAFETY CLUTCH
1
DANGER! RISK OF INJURY!
Push the X-button at the machine head, the red light illuminates showing the active
“BLOCKED MODE“, or turn the machine o.
Failure to comply produces a risk of injury in case of an unintentional machine
operation.
The safety clutch is integrated in the main drive module to protect the hook from damage.
Causes of damage could be for example thread jamming, needle breakage or incorrect operation.
If the safety clutch has released, perform the following procedure:
01. Turn the machine o at the main switch.
02. Remove the cause of the disorder.
03. Tilt the machine to the back, open the right cover to get access to the mechanical handwheel.
1
04. Take the 3 mm allen key of the accessories and stick it in screw
Turn the handwheel until the key is touching the machine housing (picture left).
05. Take the 5 mm allen key of the accessories and put it in the handwheel gap (picture right).
Turn the handwheel until the safety clutch is noticeably engaging.
06. Check the needle bar rise. (refer to chapter 3.12. of the adjustment manual).
If confirmed, the machine is ready for use again.
NOTE!
Push the X-button or switch on the machine again and follow the instructions
displayed on the control panel.
.
08 / 20 17
VETRON 5000/5100 - FLAT BED MACHINE
Page 24
INSTRUCTION BOOK
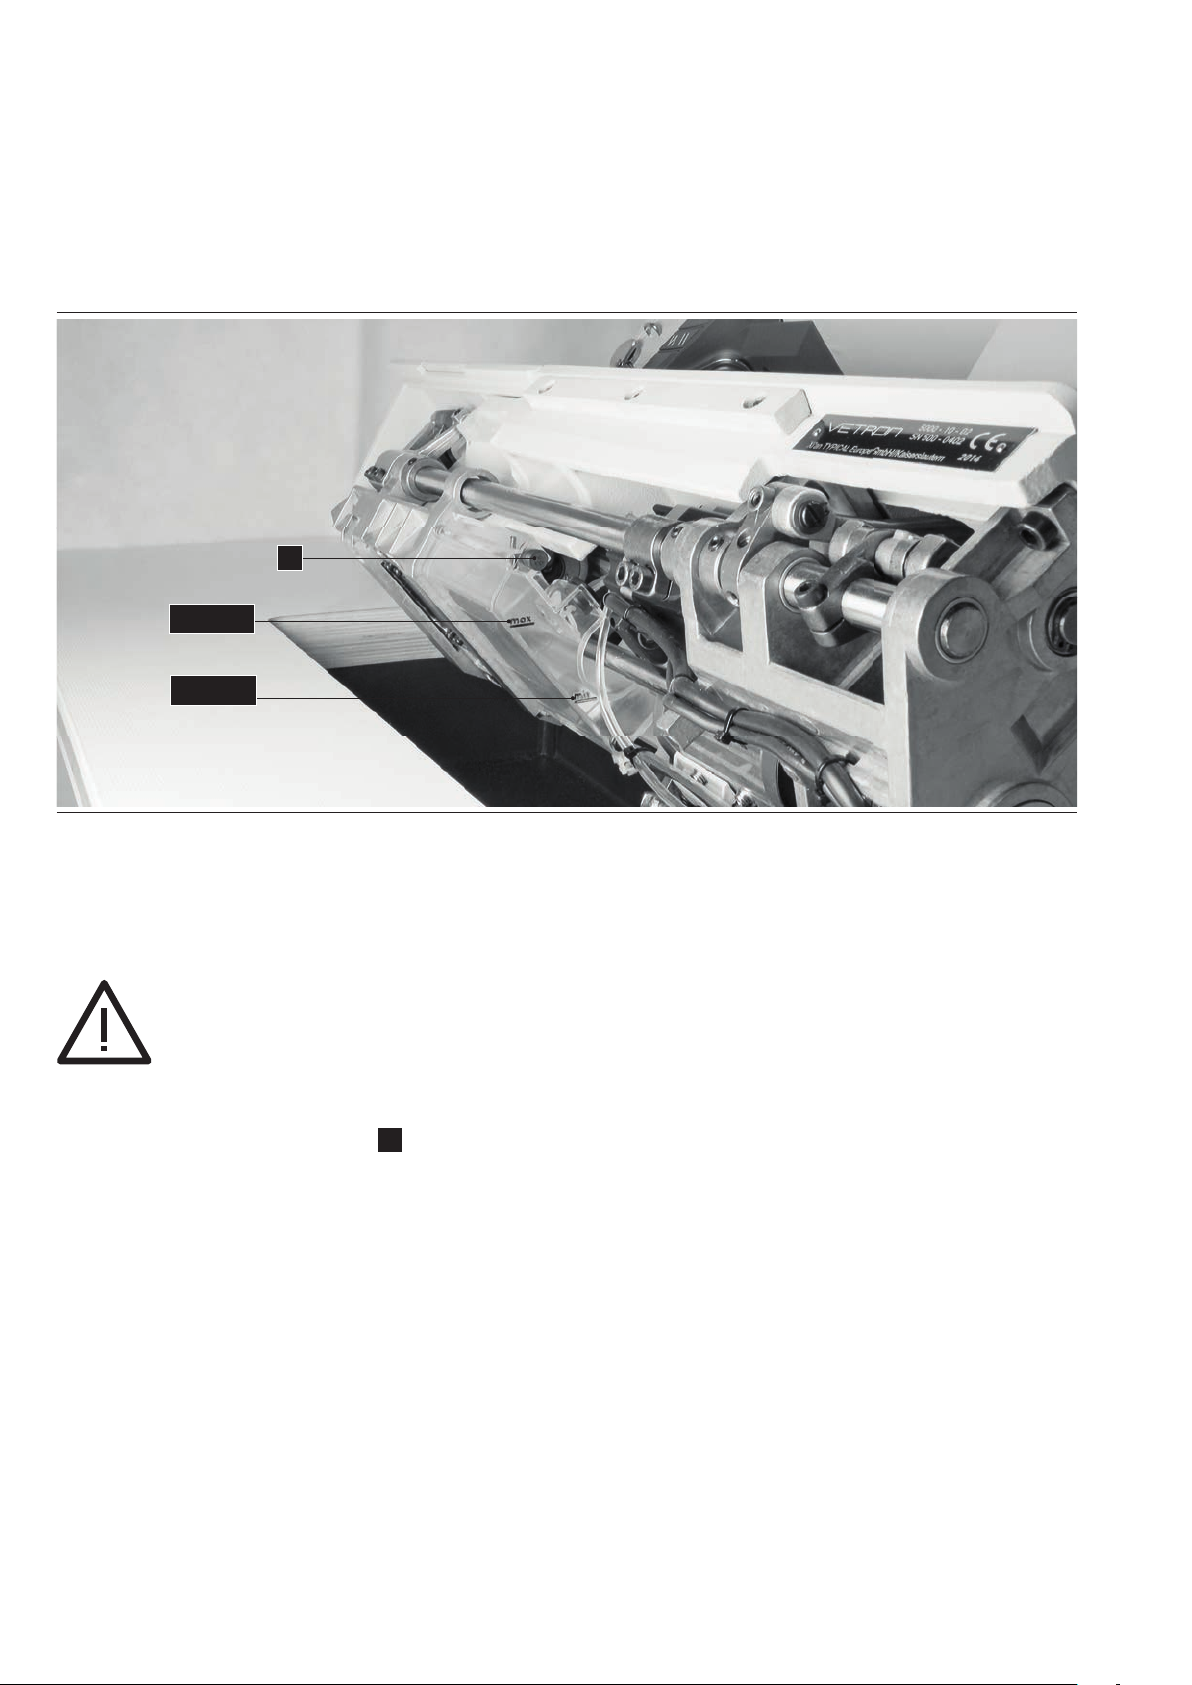
18. OIL LEVEL CHECK
1
Maximum
Minimum
Check the oil level before starting!
NOTE!
If you tilt the machine during power on, a gravity sensor automatically switches the
machine into “BLOCKED MODE”. This is noted on the display.
01. Tilt the machine to the back. The oil tank is located below the base plate.
1
02. If necessary, slightly pull the oil plug
03. Please use only oil types recommended by VETRON.
and fi ll the tank up to the “max” marking.
08 / 20 17
24
VETRON 5000/5100 - FLAT BED MACHINE
Page 25
INSTRUCTION BOOK
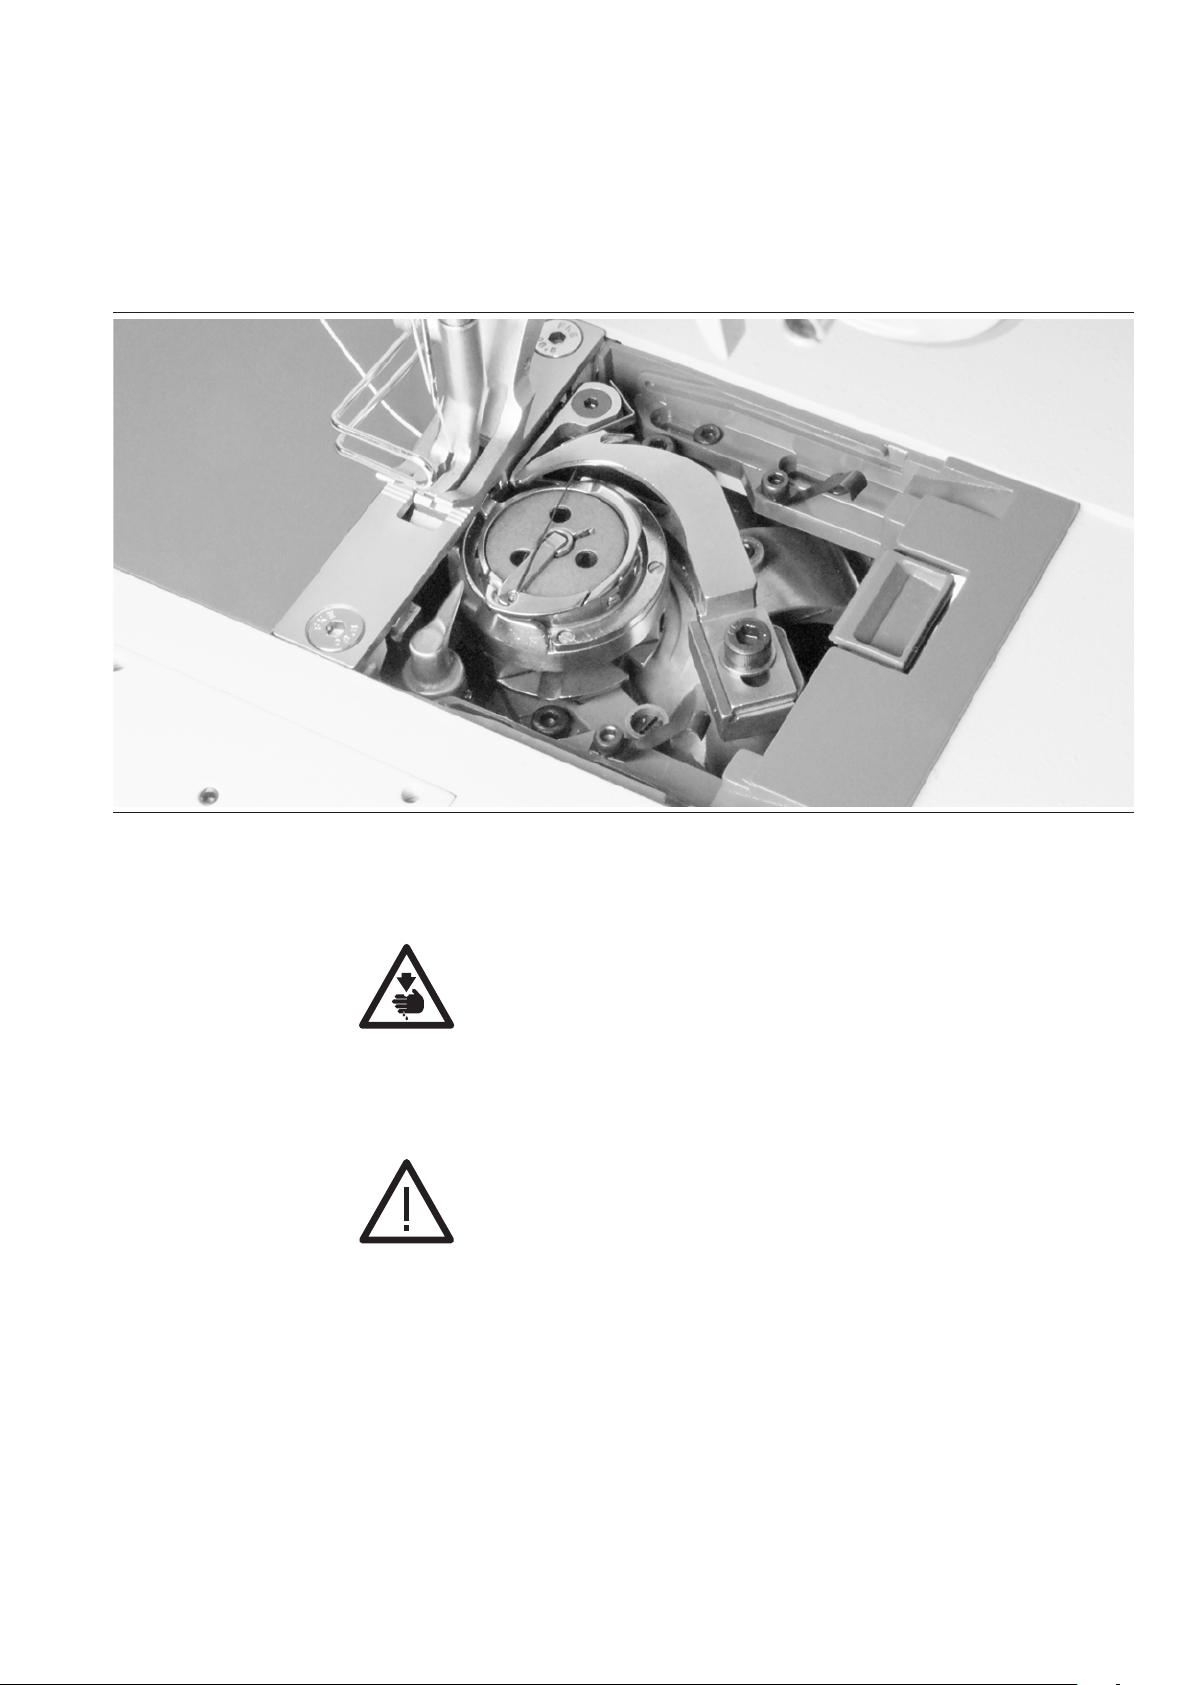
19. CLEANING THE MACHINE
CAUTION! RISK OF INJURY!
Push the X-button at the machine head, the red light illuminates showing the active
“BLOCKED MODE“, or turn the machine o before cleaning the hook area. Failure to
comply produces a risk of injury in case of an unintentional machine operation.
Clean the hook area daily.
With increased lint depending on materials, clean the hook area several times a day.
For more cleaning tilt the machine back and clean the guard tank.
NOTE!
If you tilt the machine during power on, a gravity sensor automatically switches the
machine into “blocked mode”. This is noted on the display.
08 / 20 17
VETRON 5000/5100 - FLAT BED MACHINE
Page 26

VETRON TYPICAL EUROPE GmbH
Clara-Immerwahr-Str. 6
67661 Kaiserslautern,
Germany
Tel.: +49 6301 320 75-0
Fax: +49 6301 320 75-11
E-mail: [email protected]
www.vetrontypical.com
VETRON Instruction Book EN 08/2017
 Loading...