

Page 1
08/2010 rev. 11/16/2012 FMDL manual, operation instructions.doc
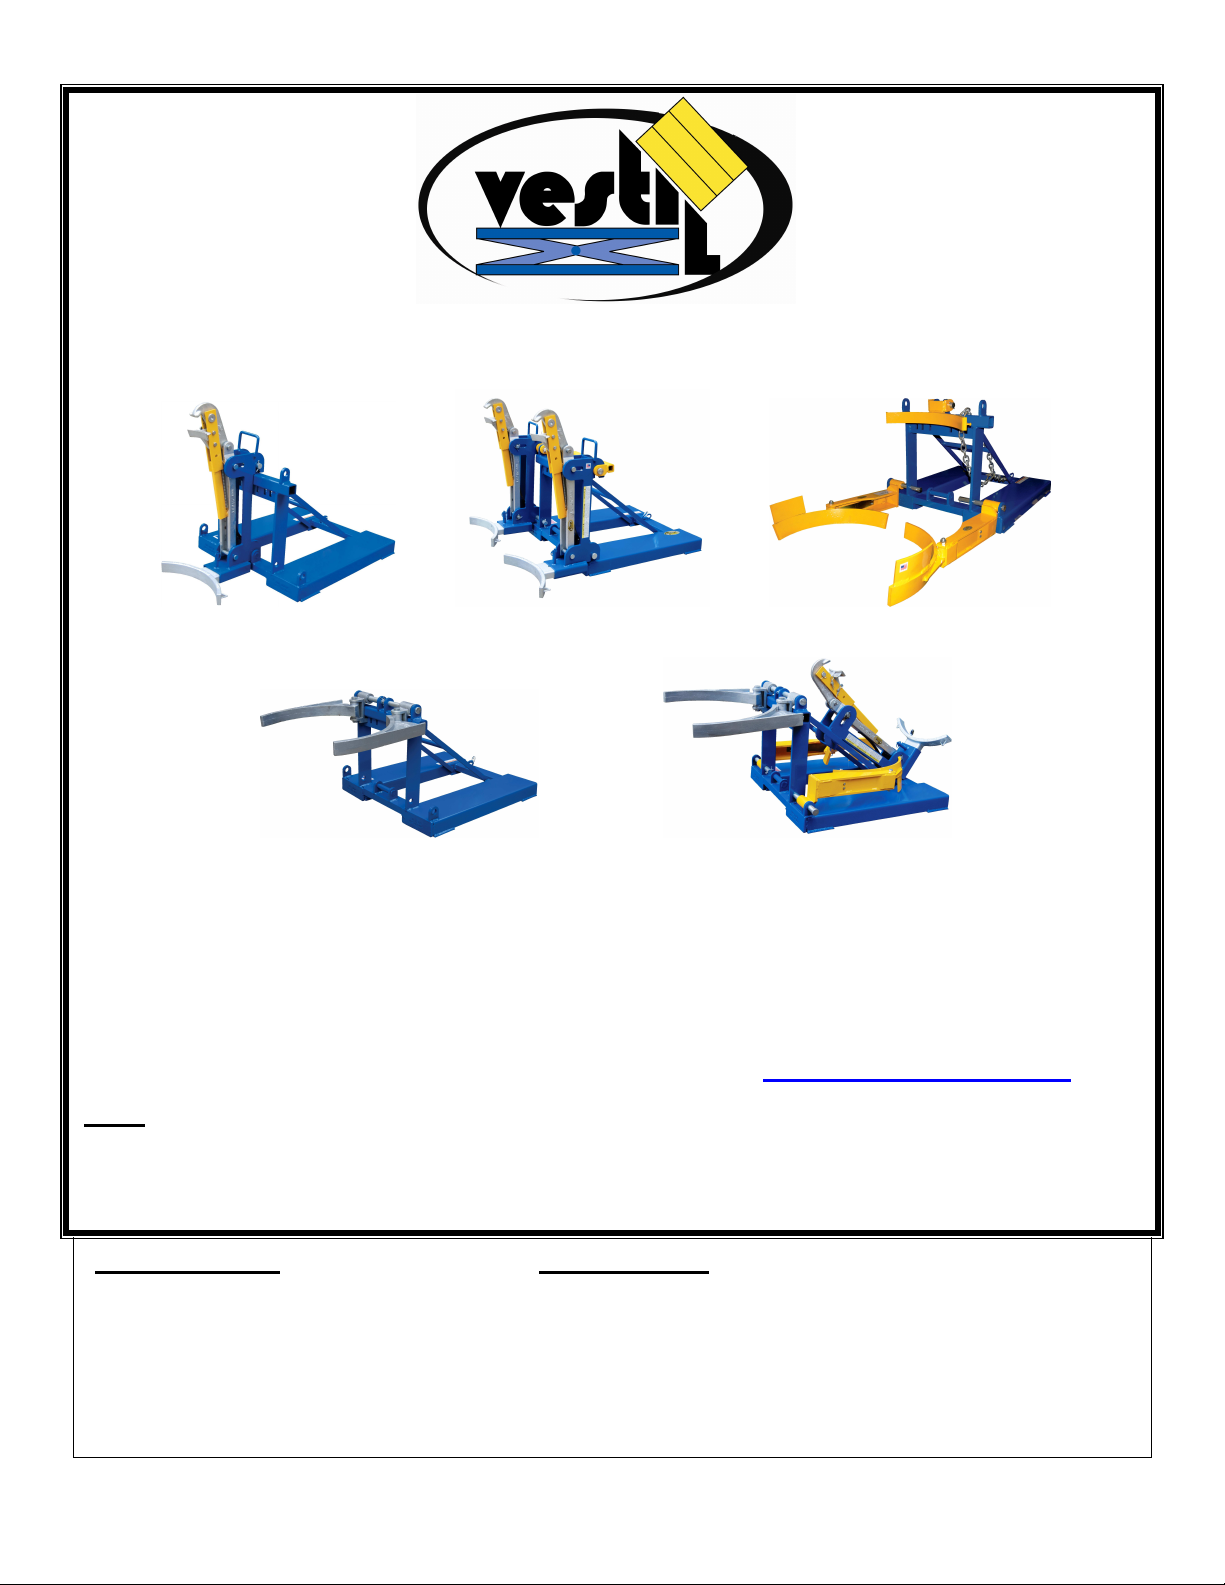
FMDL-S
PLASTIC BARREL HANDLER
BARREL HANDLER) ENGAGING BARREL HANDLER
ERIES SINGLE & DOUBLE EAGLE BEAK FORK-MOUNTED DRUM LIFTERS
U
SE AND MAINTENANCE MANUAL
FMDL-1 (E
FPDL-11-H (T
AGLE BEAK™)
OP ENGAGING PLASTIC
FMDL-2 (E
AGLE BEAK™)
DFDL-3 (E
FPDL-8-L (B
AGLE BEAK™, TOP, & BASE
ASE ENGAGING
)
)
V
2999 N
T
ORTH WAYNE STREET,
ELEPHONE:
ESTIL MANUFACTURING CORP
P.O. B
(260) 665-7586 -OR- T
OX
507, A
OLL FREE
NGOLA, IN
.
46703
(800) 348-0868
FAX: (260) 665-1339
URL:
NOTE: C
IN THE LOCATION WHERE THE DEVICE IS USED IS EXCLUSIVELY THE RESPONSIBILITY OF THE END-USER
ENFORCED WHERE THE DRUM LIFTER IS USED, CONTRADICTS AN INSTRUCTION(S) OR PART OF AN INSTRUCTION(S)
AND THEREFORE REQUIRES YOU TO DEPART FROM THESE DIRECTIONS, VESTIL IS NOT RESPONSIBLE FOR ANY
CONSEQUENTIAL DAMAGES SUSTAINED AS A RESULT OF THE INSTALLATION
Table of Contents Table of Figures
Product Introduction…………………... 2 Fig. 1 “FMDL-1 Exploded parts diagram and parts list”……… 4
Safety Principles…………………….....3 Fig. 2 “FMDL-2 Exploded parts diagram and parts list”…....... 5
Safety Guidelines…………………....... 3 Fig. 3 “FPDL-11-H Exploded parts diagram and parts list”….. 6
Use Instructions……………………….. 11 Fig. 4 “FPDL-8-L Exploded parts diagram and parts list”….… 7
Maintenance Recommendations……. 11 - 12 Fig. 5 “DFDL-3 Exploded parts diagram and parts list”…........ 8
Fig. 6 “Center of gravity diagrams”…………………………….. 9 - 10
Fig. 7 “Product label placement diagram”……………………... 12
WWW.VESTILMFG.COM EMAIL: SALES@VESTIL.COM
OMPLIANCE WITH REGULATIONS, CODES, AND/OR STATUTORY (NON-VOLUNTARY) STANDARDS ENFORCED
.
. I
F LAW,
Copyright 2010 Vestil Manufacturing Corp.
Page 1 of 12
Page 2

08/2010 rev. 11/16/2012 FMDL manual, operation instructions.doc
P
RODUCT INTRODUCTION
Thank you for purchasing an FMDL-series fork-mounted drum lifter (“drum lifter” or “lifter”)
made by Vestil Manufacturing Corporation. Our drum lifters are durable, high-quality products
rigorously engineered for dependability and simplicity. Although use and maintenance procedures
are relatively intuitive, any person who might use or maintain this product must be familiar with the
instructions provided in this manual. Dimensions and other product specifications appear in the
following table:
Model Description Compatible Drums
Eagle Beak™
FMDL-1
single drum
carrier
FMDL-2
Eagle Beak™
two drum carrier
Deluxe 3-mode
DFDL-3
drum lifter: Eagle
beak, Bottom
grip & Top grip
FPDL-8-L
(“L” = low
attachment
FPDL-11-H
(
“H” = high
attachment
Bottom gripping
drum handler for
oddly shaped
)
plastic drums
Top gripping
drum handler for
oddly shaped
)
plastic drums
• 30 & 55 gallon
• Open & closed head
T:
• Steel, plastic, & fiber
• 30 & 55 gallon
• Open & closed head
• Steel, plastic, & fiber
• 30 & 55 gallon
• Open & closed head
• Steel, plastic, & fiber
• 55 gallon
• Open & closed head
• Plastic
• 30 & 55 gallon
• Closed head
• Steel, plastic, & fiber
Maximum Rated
Load in Pounds
(~kg)
1,000
(~455kg)
2,000
(~909kg)
Eagle Beak™ =
1,000 (~455kg)
Bottom grip =
800 (~364kg)
Top grip =
1,100 (~455kg)
800
(~364kg)
1100
(~500kg)
Overall
Dimensions in
Inches (~cm)
26½ x 46½ x 29
(67 x 118 x 74)cm
42 x 49½ x 29
(107 x 126 x 74)cm
26½ x 52 x 30
(67 x 132 x 76)cm
26½ x 56½ x 23
(67 x 144 x 58)cm
26½ x 48½ x 23
(67 x 123 x 58)cm
Net Weight in
Pounds (~kg)
240
(~109kg)
340
(~155kg)
313
(~142kg)
160
(~73kg)
185
(~84kg)
Vestil Manufacturing Corp. created this manual to acquaint persons authorized to use and/or maintain this drum
handling device with safe use and maintenance procedures. Employers are responsible for instructing employees to
use the product properly. An employee and any other person, who might use or perform maintenance on the drum
lifter, must read and understand every instruction BEFORE using or performing maintenance activities. Users
should have access to the manual at all times and should routinely review the directions.
Although Vestil diligently strives to identify foreseeable, hazardous situations, this manual cannot address every
conceivable danger. The end-user is ultimately responsible for exercising sound judgment at all times.
Copyright 2010 Vestil Manufacturing Corp.
Page 2 of 12
Page 3
08/2010 rev. 11/16/2012 FMDL manual, operation instructions.doc
S
S
AFETY PRINCIPLES
Vestil manufactures several kinds of fork-mountable drum handling equipment. This manual
addresses the specifications, features, and capabilities of 3 product lines: 1) FMDL-series; 2) FPDL-series; and 3) DFDL-3.
Each lifter conforms to the generalized specifications disclosed in this manual and fulfills our demanding standards for
quality, safety and durability.
Vestil Manufacturing Corp. recognizes the critical importance of workplace safety. Each person who might participate
in the use or maintenance of the product must read this manual and fully understand the directions BEFORE using or
performing maintenance on the drum lifter. If you do not understand an instruction, ask your supervisor or
employer for assistance. Failure to adhere to the directions in this manual might result in serious personal injury or
even death.
Vestil is not liable for any injury or property damage that occurs as a consequence of failing to apply either: 1) the
instructions that appear in this manual; or 2) the information provided on labels affixed to the product. Furthermore, failure
to exercise good judgment and common sense might result in property damage, serious personal injury or death. Such
failure is solely the fault of the person(s) who acted without good judgment; it is not another responsibility delegated to
manufacturers.
This manual uses SIGNAL WORDS to classify personal injury risks and situations that might lead to property damage,
as well as to draw attention to safety message(s). The reader must understand that each signal word indicates the
seriousness of the described hazard.
Identifies a hazardous situation which, if not avoided, WILL result in DEATH or SERIOUS
Identifies a hazardous situation which, if not avoided, COULD result in DEATH or SERIOUS
Indicates a hazardous situation which, if not avoided, COULD result in MINOR or MODERATE
Identifies practices likely to result in product/property damage, such as operation that might damage the
INJURY. Use of this signal word is limited to the most extreme situations.
INJURY.
injury.
drum lifter.
AFETY GUIDELINES
Failure to read and understand the instructions included in this manual before using
or servicing the drum lifter constitutes misuse of the product. Study the entire manual before you install the
product. Read the manual to refresh your understanding of the safe use and inspection procedures explained on p. 9. DO
NOT attempt to resolve any problem(s) with the lifter unless you are both authorized to do so and certain that it will be safe
to use afterwards.
Electrocution might result if any part of the lifter or fork truck contacts electrified wires. Reduce the likelihood
of electrocution by applying common sense:
DO NOT contact electrified wires with any part of the drum lifter, drum or fork truck;
DO NOT use or store the drum lifter in an area where contact with electrified wires is likely or possible;
Before engaging or using the lifter, inspect the usage area for unusual conditions and implement precautions that account
for those conditions.
If this product is used improperly or carelessly, the operator and/or bystanders might sustain serious personal
injuries or even be killed. To reduce the likelihood of injury:
• DO NOT exceed the maximum rated load of your lifter (see Label on product; also see table on p. 2).
• DO NOT use a structurally compromised drum lifter. Examples of structural damage include: 1) missing, broken or
significantly bent drum-engaging arms; 2) broken, missing, or deformed safety chain/strap; 3) damaged or broken fork
pockets. Inspect the drum lifter according to the inspection instructions on p. 9-10. Replace each part that fails to pass an
inspection. DO NOT use the drum lifter until authorized maintenance personnel approve the lifter for service.
• DO NOT stand, or allow other persons to stand, beneath any part of the lifter or drum.
• DO NOT use the lifter to transport anything but drums matched to the specific lifter according to the table on p. 2.
• ONLY transport drums in accordance with the fork truck training you received.
• DO NOT use the lifter to transport a drum(s) over rough, uneven, or damaged terrain UNLESS the drum is secured to the
lifter with a ratchet strap.
• DO NOT modify the drum lifter or any component of the lifter in any way UNLESS you first obtain written approval from
Vestil. Unauthorized modifications might make the lift unsafe to use.
• DO NOT use the lifter UNLESS all product labels (see FIG. 6 on p. 10) are readable and undamaged.
• In order for the Eagle Beak™ mechanism to work properly, each drum (including its contents) must weigh AT LEAST
50lbs (~22.7kg).
Copyright 2010 Vestil Manufacturing Corp.
Page 3 of 12
Page 4
08/2010 rev. 11/16/2012 FMDL manual, operation instructions.doc
&24
NOTE:
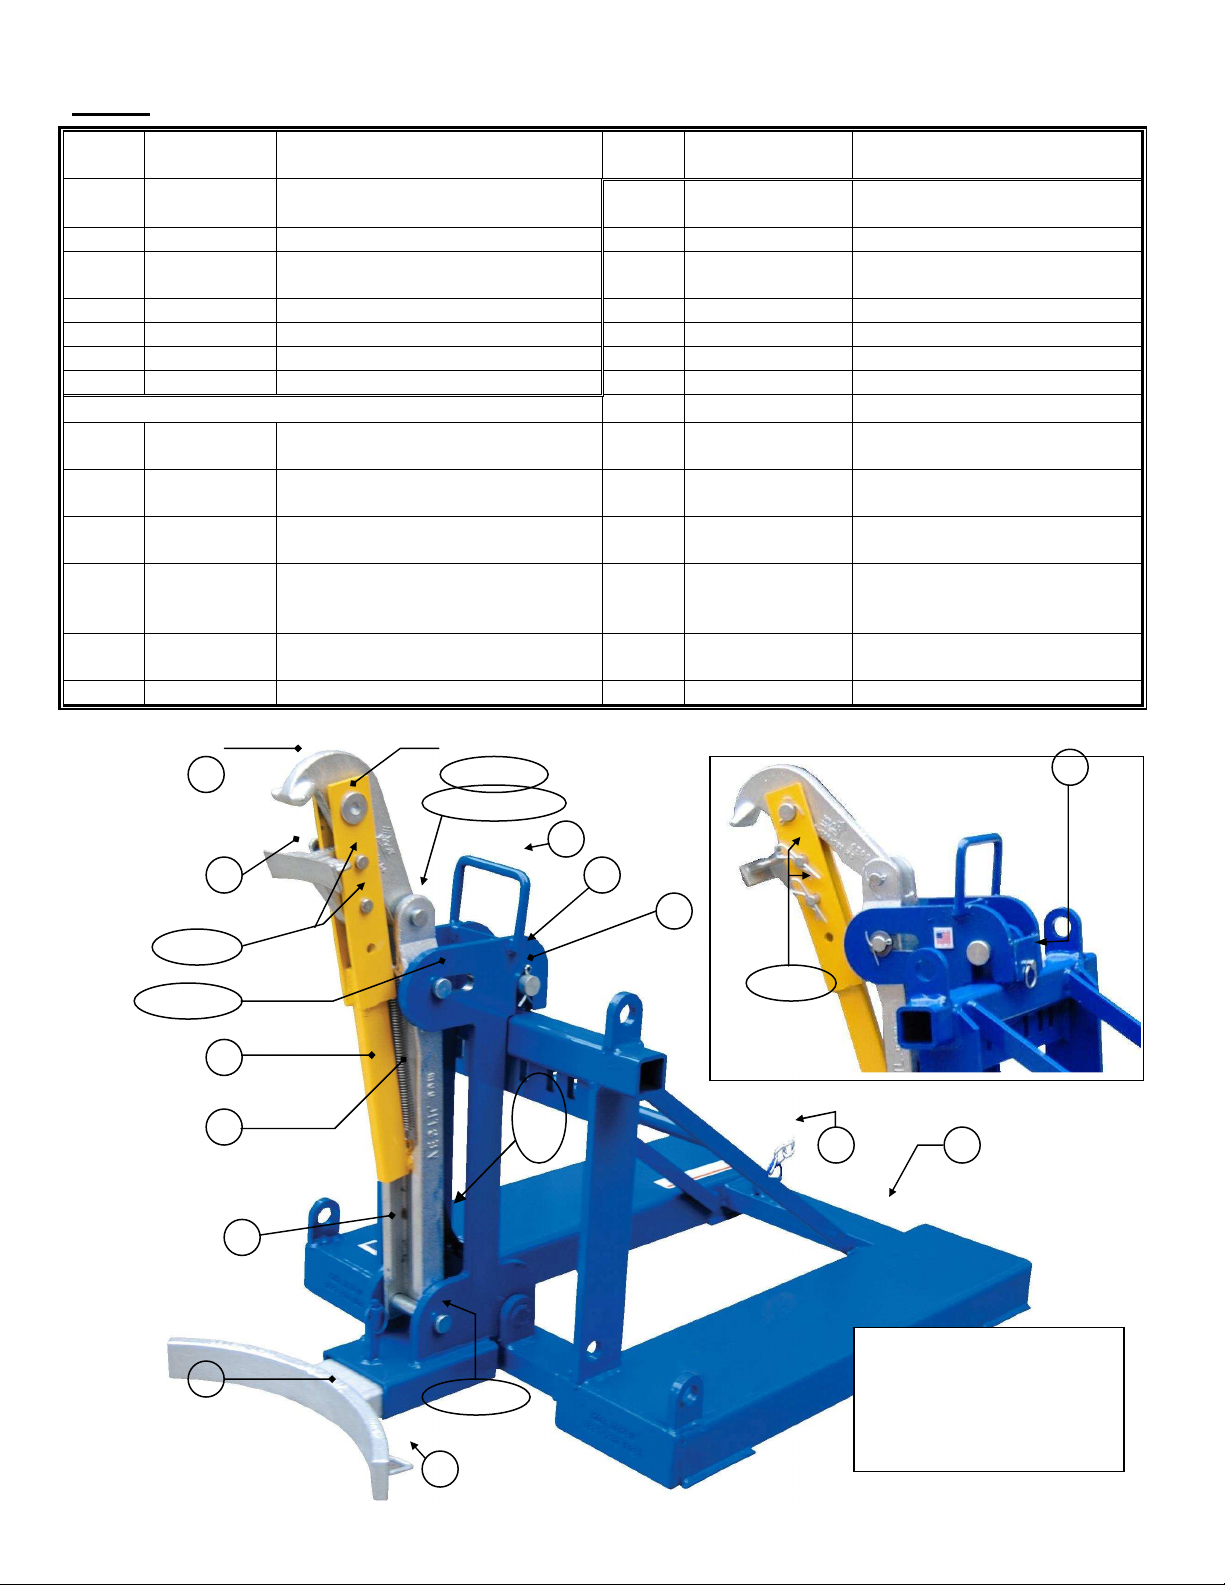
FIG. 1: FMDL-1 Exploded parts diagram and parts list
Item
No.
1 40-514-008
2 DIR-99 ½ in. x 2¾ in. hitch pin 15 CP-3/4x4-1/2-Z ¾ in. x 4½ in. pin
3 15-112-014
4 I-RS Ratchet strap [not shown] 17 65078
5 65125 3/16 in. x 1½ in. cotter pin 18 CP-1/2x1-3/4-Z ½ in. x 1½ in. pin
6 37-145-004 5/16 in. x 48 in. chain 19 45286 Trade size 11 hitch pin clip
7 N/A Cast loop for ratchet strap 20
Part No. Description
Eagle Beak™ base frame
weldment
1 in. diameter x 4½ in. main clevis
pin
Eagle Beak drum lip gripping mechanism (8-26)
8 40-514-006
9 40-514-018
10 40-514-011
11 40-516-001 Eagle Beak™ lower jaw casting 25 33474
12 40-016-052 Eagle Beak™ upper jaw casting 26 40-514-010
13 40-612-004 7/8 in. x 1-3/4 in. pin weldment
Eagle Beak™ handle frame
weldment
Eagle Beak™ channel frame
casting
Eagle Beak™ tube frame
13, 16, 25
14, 17, 17, 21
Item
No.
14 CP-5/8 x 2½-Z
16 65125 3/16 in. x 1-1/4 in. cotter pin
21
22 40-014-029
23 11003
24 37018 ¼ in. – 20 UNC nylock hex nut
Part No. Description
5
/8 in. x 2½ in. clevis pin
1
/8 in. x 1½ in. cotter pin
FMDL-SPG Tension spring
33016 5/8 in. flat washer
5/64 in. x 1½ in. x 10 spring
steel frame
¼ in. - 20 UNC x 5/8 in. hex
head bolt
1½ in. (outer diameter) x ¾ in.
(inner diameter) x 14 GA
machinery bushing
Drum side wall support
casting
18, 19
22,
23
15, 16, 25
Beak™ mechanism to work
properly, the drum and its
contents must weigh AT
LEAST 50 lbs. (~22.7kg).
In order for the Eagle
Copyright 2010 Vestil Manufacturing Corp.
Page 4 of 12
Page 5

08/2010 rev. 11/16/2012 FMDL manual, operation instructions.doc
&24
NOTE:
to work properly, each drum
FIG. 2: FMDL-2 Exploded parts diagram and parts list
Fork pocket
13, 16, 25
18, 19
22,
23
15, 16, 25
Item No. Part No. Description
1 40-514-008 Eagle Beak™ base frame weldment
2 DRI-99 ½ x 2¾ in. hitch pin
3 40-112-001 1in. diameter x 8-5/8 in. pin
4 I-RS Ratchet strap
5 65125 3/16 x 1½ in. cotter pin
6 37-145-004 5/16 x 48 in. chain
7 N/A Ratchet strap attachment loop (part of item no. 26)
Eagle Beak drum lip-gripping mechanism
8 40-514-006 Eagle Beak™ handle frame weldment
9 40-514-018 Eagle Beak™ channel frame weldment
10 40-514-011 Eagle Beak™ tube frame casting
11 40-516-001 Eagle Beak™ lower jaw casting
12 40-516-002 Eagle Beak™ upper jaw casting
13 40-612-004 7/8 in. x 1-3/4 in. pin weldment
14 CP-5/8 x 2½-Z 5/8 in. x 2½ in. clevis pin
15 CP-3/4x4-1/2-Z ¾ in. x 4½ in. pin
16 65125 3/16 in. x 1-1/4 in. cotter pin
17 65078
18 CP-1/2x1-3/4-Z ½ in. x 1½ in. pin
19 45286 Trade size 11 hitch pin clip
20 FMDL-SPG Tension spring
21 33016 5/8 in. flat washer
22 40-014-029 5/64 in. x 1½ in. x 10 spring steel frame
23 11003 ¼ in. - 20 UNC x 5/8 in. hex head bolt
24 37018 ¼ in. – 20 UNC nylock hex nut
25 33474 1½ in. (outer diameter) x ¾ in. (inner diameter) x 14
26 40-014-066 Drum side wall support casting
14, 17, 17, 21
1
/8 in. x 1½ in. cotter pin
GA machinery bushing
In order for the
Eagle Beak™ mechanism
and its contents must weigh
AT LEAST 50 lbs.
(~22.7kg).
Copyright 2010 Vestil Manufacturing Corp.
Page 5 of 12
Page 6

08/2010 rev. 11/16/2012 FMDL manual, operation instructions.doc
FIG. 3: FPDL-11-H Exploded parts diagram and parts list
Item No. Part No. Description
1 40-514-008 Eagle Beak™ base frame casting
2 40-514-016 Left side upper drum gripper casting
3 40-512-002 Left side hinge casting
4 40-112-001 1 in. diameter 8-5/8 in. main clevis pin
5 15-112-014 1 in. diameter x 4½ in. pin
6 N/A Fork pockets
7 65125 3/16 in. x 1½ in. cotter pin
8 37-145-004 5/16 in. x 48 in. chain
9 65125 3/16 in. x 1½ in. cotter pin
10 40-514-017 Right side upper drum gripper casting
11 40-512-001 Right side hinge casting
Copyright 2010 Vestil Manufacturing Corp.
Page 6 of 12
Page 7

08/2010 rev. 11/16/2012 FMDL manual, operation instructions.doc
FIG. 4: FPDL-8-L Exploded parts diagram and parts list
7, 8, 9
7, 8, 9
Item No. Part No. Description
1 40-514-008 Eagle Beak base frame weldment
2 40-514-020 Left side lower drum gripper weldment
3 40-514-019 Left side lower drum gripper arm weldment
4 40-014-029 Spring steel bar frame
5 11003 ¼ in. – 20 UNC x ¾ in. hex head bolt
6 37018 ¼ in. -20 UNC nylock hex nut
7 11219 ½ in. – 13 UNC x 4 in. hex head bolt
8 37030 ½ in. - 13 UNC nylock hex nut
9 SPMSIRJ ¾ in. (outer diameter) x ½ in. (inner diameter) 8-
5/8 in. axle sleeve tube
10 40-112-001 1 in. diameter x 8-5/8 in. main clevis pin
11 65125 3/16 in. x 1½ in. cotter pin
12 40-514-021 Upper side wall support weldment
13 15-115-014 1 in. diameter x 4½ in. retaining pin
14 N/A Fork pockets
15 37-145-001 5/16 in. x 48 in. chain
16 40-514-005 Right side lower drum gripper weldment
17 40-514-009 Right side lower drum gripper arm weldment
Copyright 2010 Vestil Manufacturing Corp.
Page 7 of 12
Page 8

08/2010 rev. 11/16/2012 FMDL manual, operation instructions.doc
NOTE:
FIG 5: DFDL-3 exploded parts diagram and parts list (2 views)
Item No. Part No. Description
1 40-514-008 Eagle Beak™ base frame weldment
2 40-514-022 Eagle Beak drum lip gripping assembly [corresponds to
item no’s 8-26 on p. 4]
3 40-514-012 Right side lower drum gripper assembly [corresponds to
item no’s 4 - 9, 16, 17on p. 7]
4 40-514-013 Left side lower drum gripper assembly [corresponds to item
no’s 2 – 9 on p. 7]
5 40-514-014 Right side upper drum gripper assembly [corresponds to
item no’s 5, 9-11 on p. 6]
6 40-514-015 Left side upper drum gripper assembly [corresponds to item
no’s 2, 3, 5 & 9 on p. 6]
7 n/a Fork pocket
8 37-145-004 5/16 in. x 48 in. chain (not shown)
9 40-112-001 1 in. diameter x 8-5/8 in. main clevis pin
10 n/a 3/16 in. x 1½ in. cotter pin
In order for the
Eagle Beak™ mechanism
to work properly, the drum
and its contents must weigh
AT LEAST 50 lbs.
(~22.7kg).
Copyright 2010 Vestil Manufacturing Corp.
Page 8 of 12
Page 9

08/2010 rev. 11/16/2012 FMDL manual, operation instructions.doc
cm) from the outer edge of each fork pocket (halfway between the fork
In order for the Eagle Beak™ mechanism to work properly, the drum and its contents must weigh AT LEAST
from the outer edge of each fork pocket (halfway between the fork
drum and its contents must weigh AT
FIG. 6A: FMDL-1 center of gravity diagrams
13 ¼ ”
281/8”
Horizontal center of gravity (HCG):
• 281/8 inches (~71.4 cm) from the open ends of the fork pockets; and
• 141/4 inches (~36.2
pockets).
Vertical center of gravity:
• 13¼ inches (~33.7cm) from the bottom of the fork pockets.
NOTE:
50 lbs. (~22.7kg).
FIG. 6B: FMDL-2 center of gravity diagrams
141/4”
13 ¼”
111/8”
281/8”
141/4”
Horizontal center of gravity (HCG):
• 281/8 inches (~71.4 cm) from the open ends of the fork pockets; and
• 141/4 inches (~36.2cm)
pockets).
Vertical center of gravity:
• 111/8 inches (~28.3cm) from the bottom of the fork pockets.
NOTE: In order for the Eagle Beak™ mechanism to work properly, each
LEAST 50 lbs. (~22.7kg).
Copyright 2010 Vestil Manufacturing Corp.
Page 9 of 12
111/8”
Page 10

08/2010 rev. 11/16/2012 FMDL manual, operation instructions.doc
from the outer edge of each fork pocket (halfway between the fork
edge of each fork pocket (halfway between the fork
14 ¼“
FIG. 6C: FPDL-8-L center of gravity diagrams
14 ¼”
Horizontal center of gravity (HCG):
• 27 inches (~68.6cm) from the open ends of the fork pockets; and
• 14¼ inches (~36.2cm)
pockets).
Vertical center of gravity:
• 9 inches (~22.9cm) from the bottom of the fork pockets.
FIG. 6D: FPDL-11-H center of gravity diagrams
Horizontal center of gravity (HCG):
• 24 inches (~61cm) from the open ends of the fork pockets; and
• 14¼ inches (~36.2cm) from the outer
pockets).
Vertical center of gravity:
• 15 inches (~38.1cm) from the bottom of the fork pockets.
Copyright 2010 Vestil Manufacturing Corp.
Page 10 of 12
Page 11

08/2010 rev. 11/16/2012 FMDL manual, operation instructions.doc
Use Instructions
Step 1: Adjust the positions of the forks/tines of your lift truck to match the locations of the fork pockets. Apply the
operation procedures learned during your lift truck training program to properly adjust fork position.
Step 2: Mount the drum lifter on the forks of your lift truck. Slowly drive the truck forward until the forks contact the ends
of the fork pockets.
Step 3: Connect the drum lifter to the fork truck by attaching the safety chain to the fork carriage. Wrap the chain around
the fork carriage and then fasten the snap hook to the chain or cold shut (the loop welded to the supporting frame that
attaches to the fixed end of the chain) without slack. The chain must not be able to disconnect from the carriage without
deliberate effort. For instance, the chain must not be able to slide free of the carriage. If different procedures are applied
at your worksite, follow those procedures instead of these directions.
The chain is an essential safety-enhancing feature. Use the chain to connect the drum lifter to the
carriage of your fork truck. Wrap the chain around the carriage and fasten the free end to the chain with no slack. The
chain will not prevent the drum lifter from sliding off of the forks if it is improperly connected to the fork carriage.
Slowly lower the forks to avoid damaging impacts between the floor/ground and the drum or lifter.
Eagle Beak™ and DFDL-3 models:
NOTE: In order for the Eagle Beak™ mechanism to work properly, the drum and its contents must weigh AT LEAST 50
lbs. (~22.7kg).
Step 4 Engage the selected drum with the lifter: Raise the forks just a few inches off of the ground/floor, and tilt the mast
of you fork truck forward. Drive slowly towards the selected drum until the lower jaw of the Eagle Beak™ ((item no. 11 in
Fig. 1, p. 4) contacts the side of the drum directly beneath the lip of the drum.
Step 5 Grasp the lip of the drum: Slowly raise the forks until the upper jaw engages the top of the drum lip. Continue to
raise the forks until the drum is elevated a few inches above the floor/ground. Attach one end of the ratchet strap to one
cast loop on the drum side wall casting (Fig. 1, item 26, p. 4). Attach the other end of the ratchet strap to the other cast
loop on the side wall casting; then work the ratchet mechanism until the strap is tight.
Step 6 Transport the drum: Straighten the mast and transport the drum to the desired unloading location. Raise the forks
when/as required by conditions along the travel path.
Step 7 Release the drum: Lower the forks until the drum is just a few inches above the floor, and then remove the ratchet
strap. Tilt the fork truck mast forward. Slowly lower the forks until the Eagle Beak™ disengages the lip of the drum and the
drum is fully supported by the floor/ground.
FPDL-11-H and DFDL-3 models:
Step 4 Position the fork lift and drum lifter: Raise the forks and adjust the location of the fork lift to position the drum
grippers above the top of the drum. Tilt the mast forward, i.e. point the forks toward the floor.
Step 5 Position drum grippers: Lower the forks; the drum grippers will slide over the lip of the drum. Position the grippers
below the lip or the middle rim as desired.
Step 6 Transport the drum: Straighten the mast and raise the forks until the gripper engages the lip or rim, and then slowly
raise the forks until the drum is elevated a few inches above the floor. Tilt the mast back; then transport the drum to the
desired location.
Step 7 Release the drum: First tilt the mast forward and then slowly lower the forks until the drum is fully supported by the
floor. To finish disengaging the drum, back the fork truck away from it.
FPDL-8-L and DFDL-3 models:
Step 4 Position fork lift and drum lifter: Adjust the mast position so that the drum grippers are parallel to the ground.
Slightly elevate the forks above the floor.
Step 5 Prepare the engage the drum: Adjust the position of the fork truck to center the drum lifter on the drum; then drive
forward until the side of the drum contacts the upper side wall support weldment (FIG. 4, item no. 4, on p. 7).
Step 6 Transport drum: Raise the forks until the lower drum gripper weldments (FIG. 4, item no’s 2 & 16, on p. 7) engage
the base of the drum. Raise the drum a few inches above the ground; secure it to the lifter by attaching the ratchet strap to
the cast loops of the side wall support (FIG. 4, item no. 12, p. 7); then transport it to the desired unloading point.
Step 7 Release the drum: First tilt the mast forward; then slowly lower the forks until the drum is fully supported by the
ground/floor. Slowly back the fork lift away from the drum until the drum and lifter disengage.
Maintenance Recommendations
Before each use, inspect the listed components:
1. Safety chain and snap hook (attached to the free end of the safety chain): confirm that the spring latch
automatically closes securely against the hook. DO NOT use the lifter if the hook, chain, cold shut (the loop
welded to the lifter frame, which connects to one end of the chain), or ratchet strap loop castings are damaged.
Copyright 2010 Vestil Manufacturing Corp.
Page 11 of 12
Page 12

08/2010 rev. 11/16/2012 FMDL manual, operation instructions.doc
Label #
218
2. Product labels: all labels should be readable and located as shown in FIG. 6. If a label(s) is unreadable or
missing, contact Vestil to order a replacement.
At least 1 time per month, inspect:
1. Fasteners (hardware):
Bolts, nuts, washers, pins, cotter pins;
Chain and snap hook.
2. Fork pockets: confirm that each pocket is structurally sound, uncorroded and free of rust. Do not use the lifter if
the fork pockets are structurally compromised, rusted or corroded.
3. Welds: confirm that all welds are intact.
4. Drum grippers, Eagle Beak® upper and/or lower jaw, fork pockets, and supporting frame: must be undamaged.
For example, no structural deformation, warps, or cracks.
5. Overall condition of drum lifter: the structure should be clean, square and rigid, and free of rust and corrosion.
Remove dirt and debris. Do not use the lifter if the supporting frame and/or one or both grippers are excessively
rusted or corroded.
FIG. 7: Product label placement diagram
Label #218:
Copyright 2010 Vestil Manufacturing Corp.
Page 12 of 12
 Loading...