

Page 1
VESTEL REFRIGERATOR
SERVICE MANUAL
TECHNICAL DEPARTMENT WHITE GOODS TECHNICAL DOCUMENT : 50024370
VESTELMODEL : MODEL : CODE :
RT 345S RD 36T ( GREECE / CARAD ) 10010455
RT 400S RD 40T ( GREECE / CARAD ) 10010451
RT 455S RD 46T ( GREECE / CARAD ) 10010450
VESTEL WHITE GOODS
CONSUMER SERVICE
Page 2

CONTENTS PAGE
1. SPECIFICATIONS 1-2
2. ASSEMBLE & DISASSEMBLE
A - Changing the doorway direction to right hand 3-5
B - Changing the thermostat 5
C - Thermostat knob 6
3. REFRIGERANT CYCLE DIAGRAM 7
4. MACHINE ROOM VIEW 8
5. CIRCUIT DIAGRAM 9
6. EXTERIOR PARTS 10
7. EXTERIOR PARTS LIST 11
8. INTERIOR PARTS 12
9. INTERIOR PARTS LIST 13
10. DOOR ASSY. PARTS 14
11. DOOR ASSY. PARTS LIST 15
12. UNIT PARTS – RD 36T-RD 40T 16
13. UNIT PARTS – RD 46T 17
14. UNIT PARTS LIST 18-19
Printed Date : 21 / 12 / 2001 Document No : 50024370
Page 3
VESTEL
WHITE GOODS CONSUMER SERVICE
1
VESTEL
WHITE GOODS
VESTEL REFRIGERATOR
TECHNICAL
DEPARTMENT
Printed Date : 21 / 12 / 2001 Document No : 50024370
DECEMBER
2001
SPECIFICATIONS
RD 36T - RD 40T - RD 46T
SPECIFICATIONS -RD 36T - RD 40T - RD 46T
RD 36T
RD 40T
RD 46T
CLIMATE TYPE
NNN
DOOR COLOR
WHITE
WHITE
WHITE
DOOR
2 SIDE AVAILABLE
2 SIDE AVAILABLE
2 SIDE AVAILABLE
DOOR INSULATION
CYCLOPENTAN
CYCLOPENTAN
CYCLOPENTAN
INSULATION
CYCLOPENTAN
CYCLOPENTAN
CYCLOPENTAN
LEVELLING FOOT
222
REFRIGERATOR GASKET
WHITE
WHITE
WHITE
FREEZER GASKET
WHITE
WHITE
WHITE
ELECTRICAL SPECIFICATIONS
RD 36T
RD 40T
RD 46T
VOLTAGE/FREQUENCY
220-240 V / 50Hz
220-240 V / 50Hz
220-240 V / 50Hz
POWER OUTPUT
215 W
245 W
290 W
LAMP TYPE
E14
E14
E14
POWER CONSUMPTION
1.29 kWh / 24h
1.9 kWh / 24h
1.72 kWh / 24h
CURRENT
1.3 A
1.5 A
1.8 A
ENERGY CLASS
CCC
COMPRESSOR
RD 36T RD 40T RD 46T
COMPRESSOR
FG75HAK,NL7FT
FG75HAK,NL7FT
FG85HAK,NL9FT
OVERLOAD RELAY
RD 36T
RD 40T
RD 46T
RELAY TYPE
PTC 8EA 501
PTC 8EA 501
PTC 8EA 501
THERMIC TYPE
4TM276RFBYY-53
4TM276RFBYY-53
4TM276RFBYY-53
REFRIGERATING SYSTEM
RD 36T RD 40T RD 46T
PERFORMANCE ( Star Rating )
444
FREEZING CAPACITY
3.5 kg / 24 h
3.5 kg / 24 h
5.0 kg / 24 h
THERMOSTAT TYPE DNFS077B6575 DNFS077B6575 DNFS077B6575
DRYER
10 gr.
10 gr.
10 gr.
DEFROST TYPE
Semi - automatic
Semi - automatic
Semi - automatic
CAPILLARY TUBE
0.71x3500 mm
0.71x3500 mm
0.71x3500 mm
REFRIGERANT
R 134a
R 134a
R 134a
REFRIGERANT CHARGE
155 gr
140 gr
180 gr
Page 4
VESTEL
WHITE GOODS
VESTEL
WHITE GOODS CONSUMER SERVICE
TECHNICAL
DEPARTMENT
VESTEL REFRIGERATOR
2
Printed Date : 21 / 12 / 2001 Document No : 50024370
DECEMBER
2001
SPECIFICATIONS
RD 36T - RD 40T - RD 46T
TEMPERATURE CONTROL MAX.
RD 36T
RD 40T
RD 46T
CUT - IN
+ 3.5 C
+ 3.5 C
+ 3.5 C
CUT - OUT
- 29 C
- 29 C
- 29 C
TEMPERATURE CONTROL MIN.
RD 36T
RD 40T
RD 46T
CUT - IN
+ 3.5 C
+ 3.5 C
+ 3.5 C
CUT - OUT
- 16.7 C
- 16.7 C
- 16.7 C
DIMENSIONS
RD 36T RD 40T RD 46T
REFRIGERANT PART CAPACITY GROSS (l)
258
282
348
FREEZER PART CAPACITY GROSS (l)
7474101
WEIGHT (kg)
59.3
61.7
69.2
HEIGHT (mm)
1713
1813
1818
DEPTH (mm)
600
600
620
WIDTH (mm) 595 595 700
PACKAGED DIMENSIONS
RD 36T
RD 40T
RD 46T
WEIGHT (kg)
62.2
65.1
73.3
HEIGHT (mm)
1795
1895
1895
DEPTH (mm)
667
668
701
WIDTH (mm)
665
665
770
FREEZER ACCESSORY
RD 36T
RD 40T
RD 46T
ICE SCRAPER
111
ICE TRAY
222
SHELF
111
REFRIGERANT ACCESSORY
RD 36T RD 40T RD 46T
CRISPER
112
CRISPER COVER
111
SHELF
444
TUNNEL DRAIN PLUG
111
DOOR ACCESSORY
RD 36T
RD 40T
RD 46T
SHELF
667
SHELF SECTION
999
SHELF COVER
111
EGG HOLDER
111
Page 5
VESTEL
WHITE GOODS CONSUMER SERVICE
3
VESTEL
WHITE GOODS
VESTEL REFRIGERATOR
TECHNICAL
DEPARTMENT
Printed Date : 21 / 12 / 2001 Document No : 50024370
DECEMBER
2001
ASSEMBLE & DISASSEMBLE
RD 36T - RD 40T - RD 46T
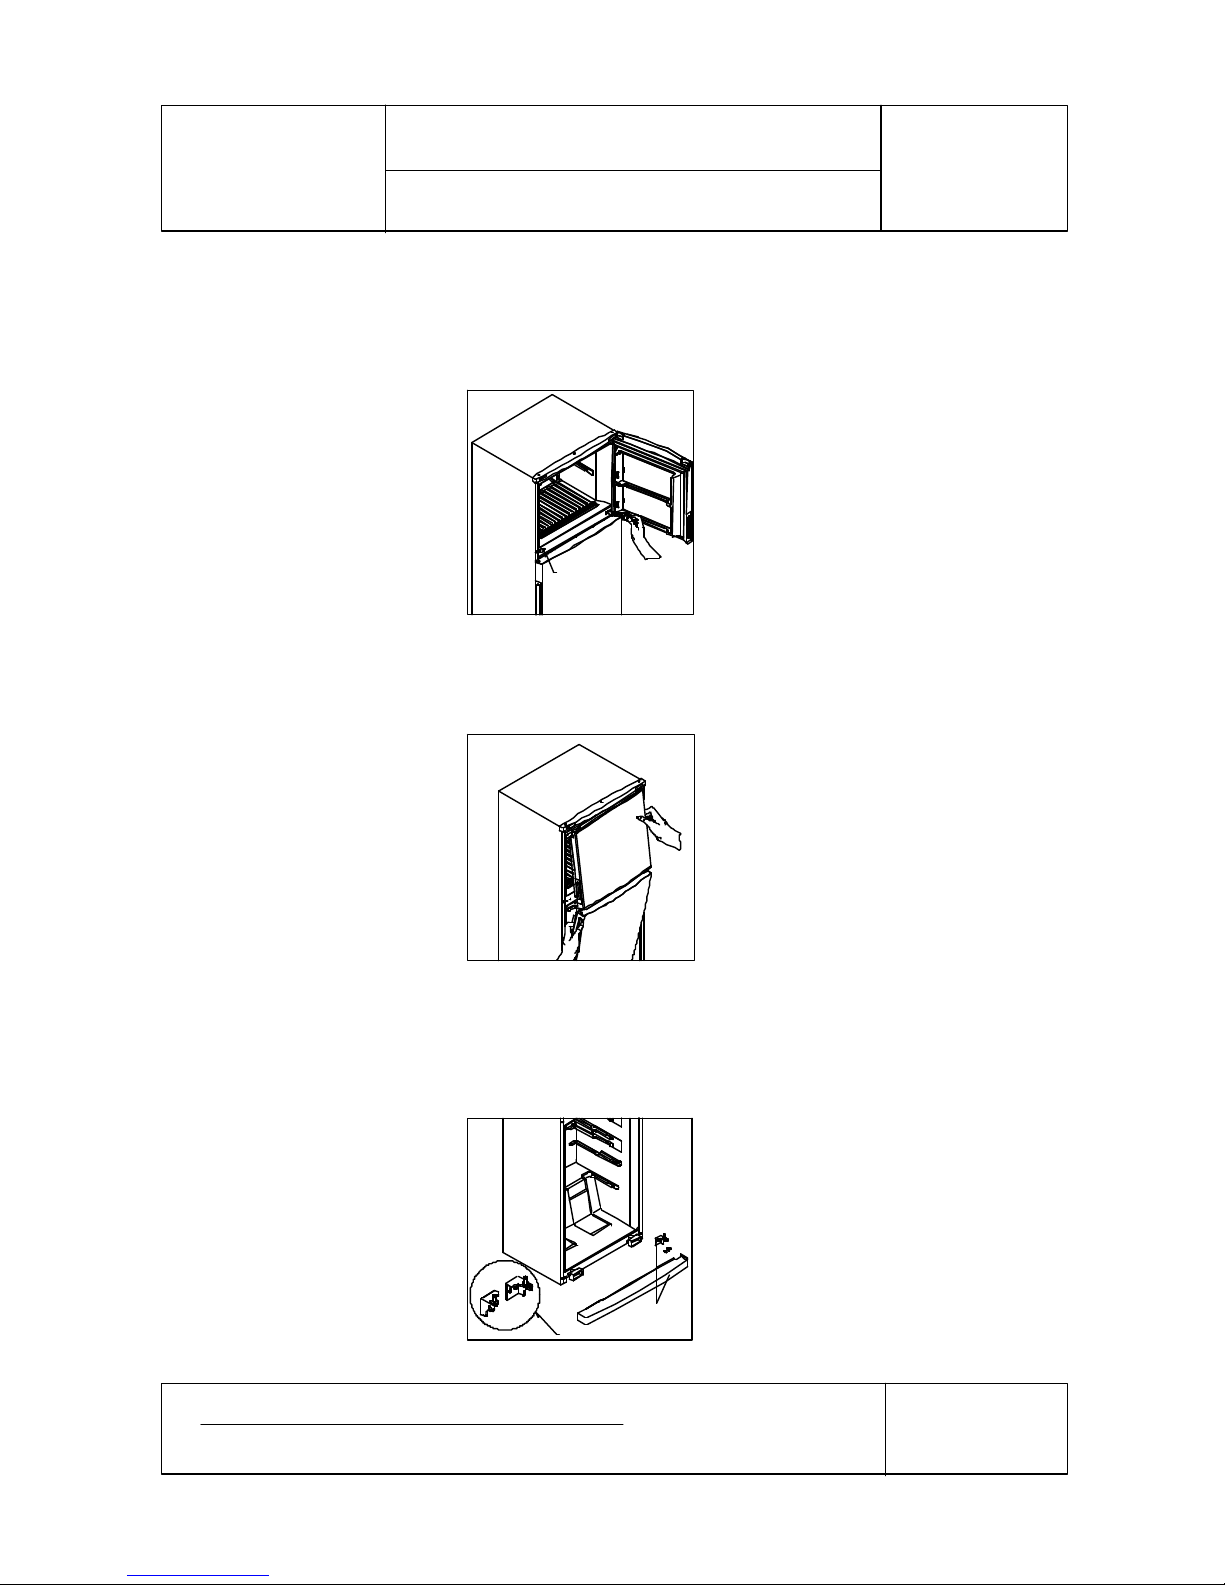
A- Changing The Doorway Direction to Right Hand
1- Unscrew the two screws which are fixing the middle hinge and one screw where
located near the middle hinge. (FIG-1)
Figure - 1
Figure - 2
3- Take off the kick plate by pulling forward.Unscrew the bottom hinge fixing screws
and remove it.Unscrew the pin of hinge and screw again changing the direction.(See
Detail A)Then assemble the hinge to bottom left side of refrigerator. (FIG-
Figure - 3
DETAIL-A
Bottom hinge
and Kick plate
2- Dismantle the refrigerator and freezer door from cabinet by pulling towards to you
together with the middle hinge. (FIG-2)
Cap holes
Page 6
VESTEL
WHITE GOODS
VESTEL
WHITE GOODS CONSUMER SERVICE
TECHNICAL
DEPARTMENT
VESTEL REFRIGERATOR
4
Printed Date : 21 / 12 / 2001 Document No : 50024370
DECEMBER
2001
ASSEMBLE & DISASSEMBLE
RD 36T - RD 40T - RD 46T
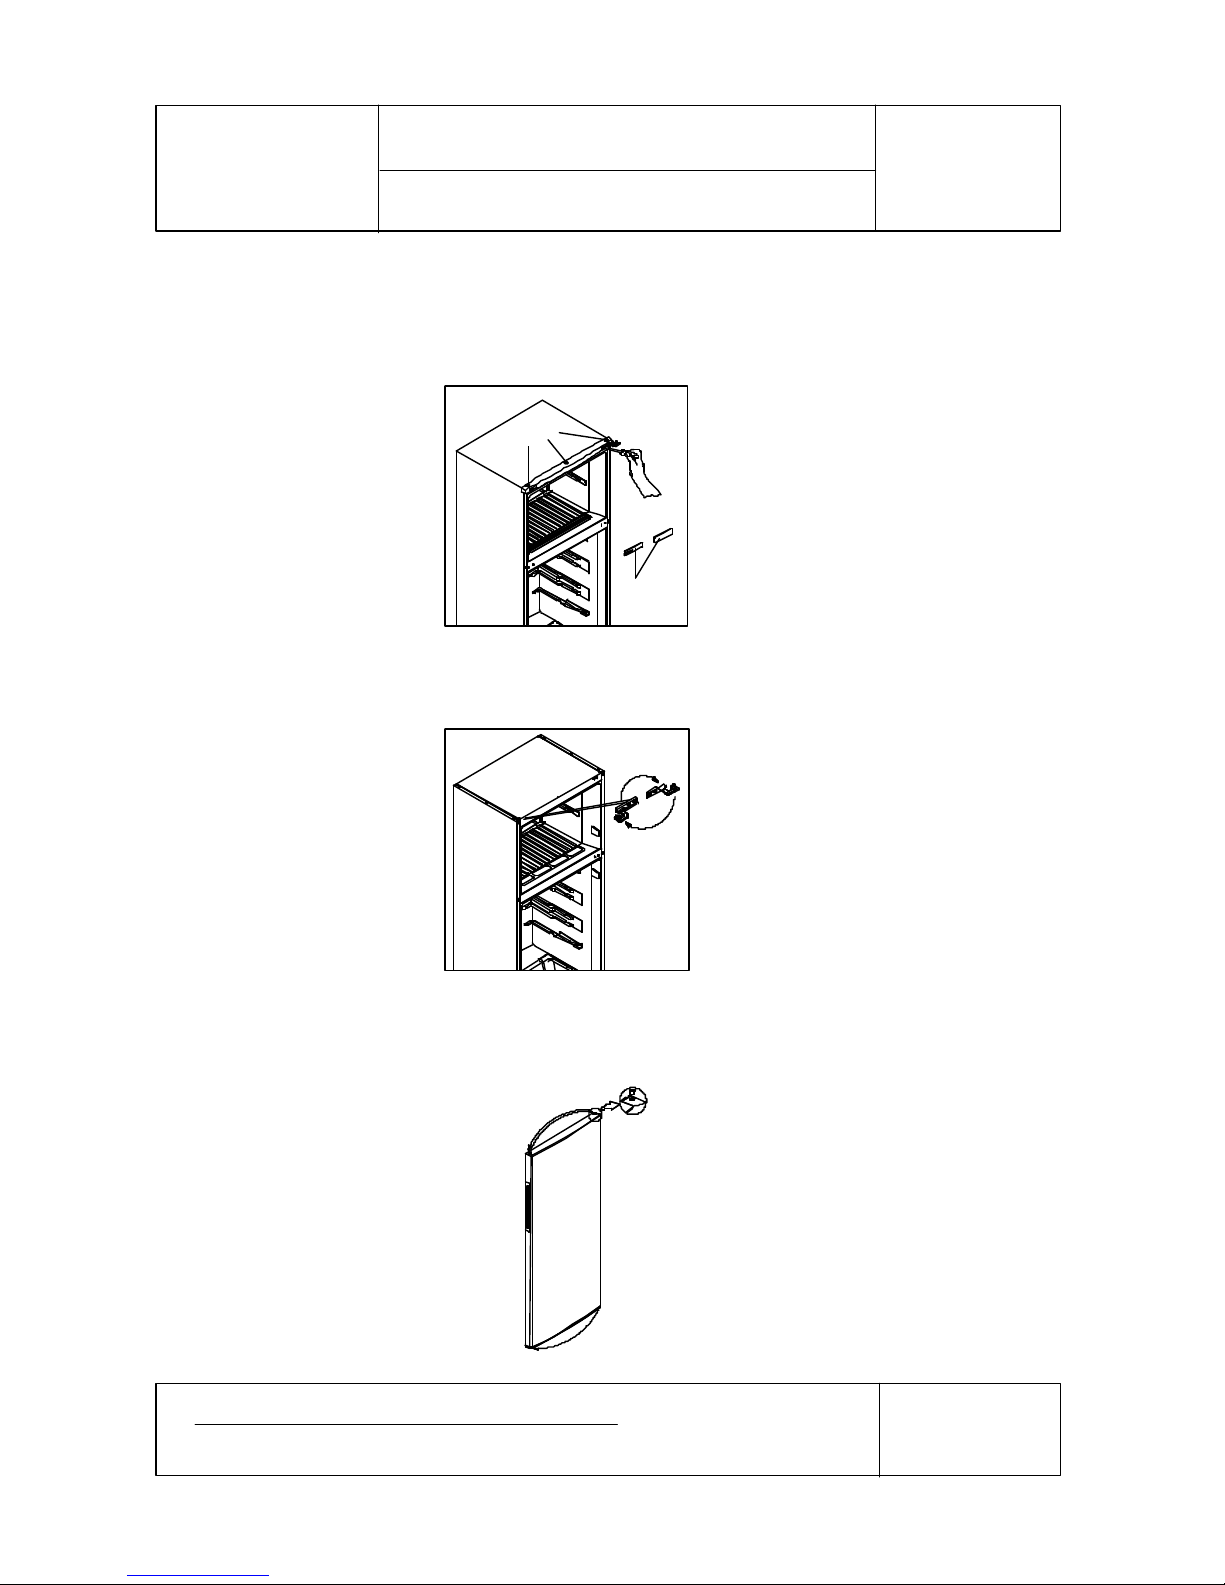
4- Remove the head panel hinge cover and dismantle the upper hinge then unscrew
the pin of hinge and screw again changing the direction and then unscrew the three
screws which are fixing the head panel. (FIG-4)
Figure - 4
A- Changing The Doorway Direction to Right Hand
5- Assemble the upper hinge to the left side and assemble the head panel and take out
the caps and reassemble them by changing their places. (FIG-5)
Figure - 5
Head panel
screws
Hinge covers
Turn the top
hinge 180°
clockwise
direction.
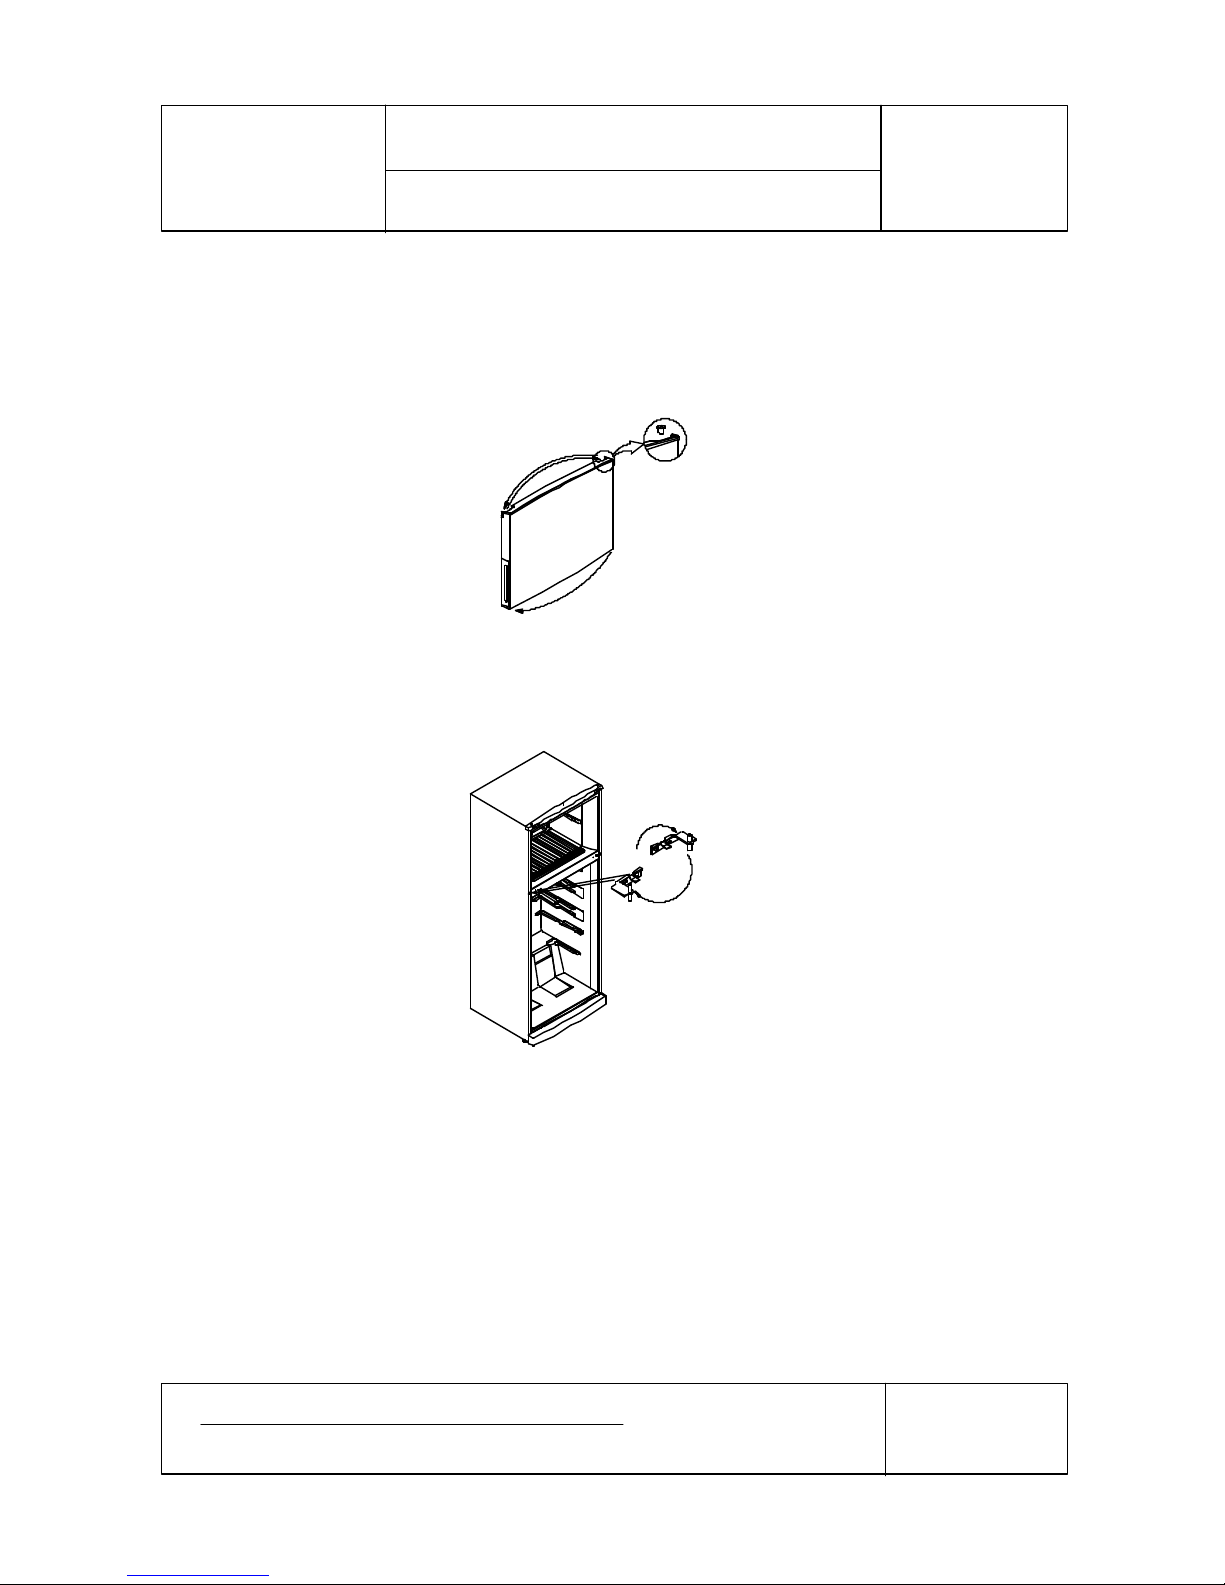
6- Take out the bushing and bushing caps and reassemble they by changing their
places. (FIG-6)
Take out bush and stopper and reassemble them changing their places. (FIG-6)
Figure - 6
Page 7
VESTEL
WHITE GOODS CONSUMER SERVICE
5
VESTEL
WHITE GOODS
VESTEL REFRIGERATOR
TECHNICAL
DEPARTMENT
Printed Date : 21 / 12 / 2001 Document No : 50024370
DECEMBER
2001
B - Changing The Thermostat :
1) Take off the lamp cover and unscrew the fixing screw.
2) Take off the thermostat box by pulling it and take off the wire connector.
3) Pull out the thermostat bulb from the cabinet.
4) Take off the thermostat knob pulling forward. Loosen the nut which is fixing the thermostat.
5) Replace the thermostat with the new one and assemble the thermostat box following the steps
backwards.
ASSEMBLE & DISASSEMBLE
RD 36T - RD 40T - RD 46T
7- Take out the bushing and bushing caps and reassemble they by changing their
places. (FIG-7)
Take out the bush and reassemble it by changing it places and remove the right stopper and reassemble it to the left side by using left stopper. (FIG-7)
A- Changing The Doorway Direction to Right Hand
Figure - 7
8- Assemble the freezer door and refrigerant door together with middle hinge and fix
the middle hinge by tighting the screws finally,by using a knife cut left side of the kick
plate and assemble it. (FIG-8)
Figure - 8
Turn the middle hinge 180°
clockwise direction.
Page 8

VESTEL
WHITE GOODS
VESTEL
WHITE GOODS CONSUMER SERVICE
TECHNICAL
DEPARTMENT
VESTEL REFRIGERATOR
6
Printed Date : 21 / 12 / 2001 Document No : 50024370
DECEMBER
2001
ASSEMBLE & DISASSEMBLE
RD 36T - RD 40T - RD 46T
C - Thermostat Knob
v This knob is used to control the temperature of the freezer and refrigerant parts automatically. It can be
set to any value between the “1“ and “5“positions.
v “ 0 “ position indicates that the thermostat is off and so in this position no cooling is done.
v By turning the knob from “1“ to “5”, you can increase the cooling degree.
v The refrigerator is designed to get optimum perforformance when the thermostat knob is set in the
middle position (between “1” and “5” . )
Page 9

VESTEL
WHITE GOODS CONSUMER SERVICE
7
VESTEL
WHITE GOODS
VESTEL REFRIGERATOR
TECHNICAL
DEPARTMENT
Printed Date : 21 / 12 / 2001 Document No : 50024370
DECEMBER
2001
REFRIGERANT CYCLE DIAGRAM
RD 36T - RD 40T - RD 46T
DRYER
DRYER
F EVAPORATOR CONDENSER HOT PIPE
R EVAPORATOR
COMPRESSOR
COMPRESSOR
HOT PIPE
CONDENSER
CAPILLARY
F EVAPORATOR
R EVAPORATOR
Page 10

VESTEL
WHITE GOODS
VESTEL
WHITE GOODS CONSUMER SERVICE
TECHNICAL
DEPARTMENT
VESTEL REFRIGERATOR
8
Printed Date : 21 / 12 / 2001 Document No : 50024370
DECEMBER
2001
MACHINE ROOM VIEW
RD 36T - RD 40T - RD 46T
RD 36T - RD 40T
RD 46T
Page 11

VESTEL
WHITE GOODS CONSUMER SERVICE
9
VESTEL
WHITE GOODS
VESTEL REFRIGERATOR
TECHNICAL
DEPARTMENT
Printed Date : 21 / 12 / 2001 Document No : 50024370
DECEMBER
2001
CIRCUIT DIAGRAM
RD 36T - RD 40T - RD 46T
RD 46T
RD 36T - RD 40T
Page 12

VESTEL
WHITE GOODS
VESTEL
WHITE GOODS CONSUMER SERVICE
TECHNICAL
DEPARTMENT
VESTEL REFRIGERATOR
10
Printed Date : 21 / 12 / 2001 Document No : 50024370
DECEMBER
2001
EXTERIOR PARTS
RD 36T - RD 40T - RD 46T
1
8 9
6
3
5
2
4
20 7
18
19
7
12
10
11
17
14
16
15
13
7
21
Page 13

VESTEL
WHITE GOODS CONSUMER SERVICE
11
VESTEL
WHITE GOODS
VESTEL REFRIGERATOR
TECHNICAL
DEPARTMENT
Printed Date : 21 / 12 / 2001 Document No : 50024370
DECEMBER
2001
EXTERIOR PARTS LIST
RD 36T - RD 40T - RD 46T
NO CODE PARTS NAME RD 36T RD 40T RD 46T
1 20025108 ASSY URT CAB/345T 1
1 20030891 ASSY URT CAB/400T 1
1 20056049
ASSY URT CAB/455T(HEATING RESIST.)
1
2 40007001 HEAD PANEL ASSY./345 1 1
2
40007004
HEAD PANEL ASSY./455 1
3 35000743 SCREW DYED 4.2*9.5 DIN 7981 YSB 3 3 3
4
40002258
HEAD PANEL CAP LEFT 1 1 1
5 40002257 HEAD PANEL CAP RIGHT 1 1 1
6 35001710 TOP HINGE DYED/345P 1 1 1
7 35000714 SCREW M5*14 WN 1342-H EJOT 8 8 8
8 40004842 CAP SMALL 1 1 1
9 40004843 CAP BIG 2 2 2
10 35003181 MIDDLE HINGE/345S 1 1 1
11 35001709 SCREW M5*14 WN 1342-H EJOT DYED 2 2 2
12 40002216 TUNNEL DRAIN PLUG 1 1 1
13
35003056
FRONT WHEEL GR.
2
14 35000732 FRONT WHEEL HOLDER 2
15
40002217
WHEEL 2
16 35000733 FRONT WHEEL PIN 2
17 45000563
STATIONARY FOOT
2 2 2
18 40002262 KICK PLATE HOLDER 2 2 2
19
35000707
SCREW 3.5*13 DIN 7981 YSB 2 2 2
20 40002292 KICK PLATE/345P 1 1
20
40002261
KICK PLATE/455P 1
21
35000735
BOTTOM HINGE/345
111
Page 14

VESTEL
WHITE GOODS
VESTEL
WHITE GOODS CONSUMER SERVICE
TECHNICAL
DEPARTMENT
VESTEL REFRIGERATOR
12
Printed Date : 21 / 12 / 2001 Document No : 50024370
DECEMBER
2001
INTERIOR PARTS
RD 36T - RD 40T - RD 46T
11
6
2
5 4
3
1
23
10
7
12
9
8
7
242022 21 19
13
14 16 17 18
Page 15

VESTEL
WHITE GOODS CONSUMER SERVICE
13
VESTEL
WHITE GOODS
VESTEL REFRIGERATOR
TECHNICAL
DEPARTMENT
Printed Date : 21 / 12 / 2001 Document No : 50024370
DECEMBER
2001
INTERIOR PARTS LIST
RD 36T - RD 40T - RD 46T
NO CODE PARTS NAME RD 36T RD 40T RD 46T
1
40002276
ICE SCRAPER 1 1 1
2 40002236 ICE TRAY 2 2 2
3
45000572
F COMPARTMENT SHELF/345 1 1
3 45000567 F COMPARTMENT SHELF/455 1
4 40002224
SHELF TRIM F/345
1 1
4 40002274 SHELF TRIM F/455 1
5 30007915
DOOR LAMP SWITCH
1 1 1
6 45000571 R COMPARTMENT SHELF/345 3 3
6
45000566
R COMPARTMENT SHELF/455 3
7 40002204 SHELF TRIM R/345 4 4
7 40002205
SHELF TRIM R/455
4
8 45000573 CRISPER COVER SRGF/345 1 1
8 45000561 CRISPER COVER SRGF/455 1
9 40002297 CRISPER COVER TRIM/345 1 1
9 40002275 CRISPER COVER TRIM/455 1
10 40002295 CRISPER SRGF/345 1 1
10 40002272 CRISPER SRGF/455 2
11 20073529 NAME PLATE/345T CARAD-ENG 1
11 20073140 NAME PLATE/400T CARAD-ENG 1
11 20073139 NAME PLATE/455T CARAD-ING(RD46T) 1
12 45000574 MAGIC SHELF/345 1 1
12 45000565
MAGIC SHELF/455
1
13 30007919 THERMOSTAT BOX GR./345T 1 1
13
30014340 THERMOSTAT BOX GR./455T 1
14 45000560 HEAT REFLECTOR FOIL 1 1 1
16
30007906
LAMP 1 1 1
17 30007907 LAMP HOLDER 1 1 1
18
30007908
WIRING ASSY./THERM./345T
1 1
18 30014361 WIRING ASSY./THERM./455T 1
19
30007921
THERMOSTAT(DNFS077B6575) 1 1 1
20 40002254 THERMOSTAT BOX/345 1 1 1
21
35000743
SCREW 4.2*9.5 DIN 7981 YSB 1 1 1
22 35000730 THERMOSTAT KNOB SPRING 1 1 1
23
40002300
THERMOSTAT KNOB SRGF / 345 1 1 1
24
40002255
LAMP COVER
111
Page 16

VESTEL
WHITE GOODS
VESTEL
WHITE GOODS CONSUMER SERVICE
TECHNICAL
DEPARTMENT
VESTEL REFRIGERATOR
14
Printed Date : 21 / 12 / 2001 Document No : 50024370
DECEMBER
2001
DOOR ASSY. PARTS
RD 36T - RD 40T - RD 46T
11
10
9
14
8
7
6
122 13
5
2
15
1
2
4
3
4
Page 17

VESTEL
WHITE GOODS CONSUMER SERVICE
15
VESTEL
WHITE GOODS
VESTEL REFRIGERATOR
TECHNICAL
DEPARTMENT
Printed Date : 21 / 12 / 2001 Document No : 50024370
DECEMBER
2001
DOOR ASSY. PARTS LIST
RD 36T - RD 40T - RD 46T
NO CODE PARTS NAME RD 36T RD 40T RD 46T
1
20051058
F DOOR ASSY./345S SRGF 1
1 20062053 F DOOR ASSY./400S SRGF 1
1
20051055
F DOOR ASSY./455S SRGF 1
2 40002242 BUSHING / 345P 3 3 3
3 45002336 LOGO CARAD 1 1 1
4 40002243 BUSHING CAP 2 2 2
5
20051059
R DOOR ASSY./345S
1
5 20062052 R DOOR ASSY./400S 1
5
20051075
R DOOR ASSY./455S 1
6 40002298 SHELF COVER/345 1 1
6
20048146
SHELF COVER/455 (BLUE) 1
7 40002310 SHELF/BUTTER/345 1 1
7 20026196
SHELF/BUTTER/455
1
8 40007081 EGG HOLDER(I+II)345 1 1
8
40007082
EGG HOLDER(I+II)455 1
9 40002299 EGG SHELF SRGF/345 4 4
9
40002265
EGG SHELF SRGF/455 4
10 20026197 BOTTLE SHELF SRGF/345 1 1
10
20026195
BOTTLE SHELF SRGF/455 1
11 40002316 BOTTOM SHELF SRGF/455 1
12
35000714
SCREW M5*14 WN 1342-H EJOT 2 2
2
13 35000712 R DOOR STOPPER 1 1 1
14 40002267 BOTTLE HOLDER 1 1 1
15
40006640
BUSHING/345S
111
Page 18

VESTEL
WHITE GOODS
VESTEL
WHITE GOODS CONSUMER SERVICE
TECHNICAL
DEPARTMENT
VESTEL REFRIGERATOR
16
Printed Date : 21 / 12 / 2001 Document No : 50024370
DECEMBER
2001
UNIT PARTS
RD 36T- RD40T
3
3
18
15
13
14
17
12
10
11
16
9
7
5
4
6
8
29
30
21
19
20
21
Page 19

VESTEL
WHITE GOODS CONSUMER SERVICE
17
VESTEL
WHITE GOODS
VESTEL REFRIGERATOR
TECHNICAL
DEPARTMENT
Printed Date : 21 / 12 / 2001 Document No : 50024370
DECEMBER
2001
UNIT PARTS
RD 46T
6
2
7
9
18
20
5
21
19
15
14
13
12
8
17
16
3
4
1 6
22
23
2624 25 28
27
11
10
29
Page 20

VESTEL
WHITE GOODS
VESTEL
WHITE GOODS CONSUMER SERVICE
TECHNICAL
DEPARTMENT
VESTEL REFRIGERATOR
18
Printed Date : 21 / 12 / 2001 Document No : 50024370
DECEMBER
2001
UNIT PARTS LIST
RD 36T - RD 40T - RD 46T
NO CODE PARTS NAME RD 36T RD 40T RD 46T
1 35004210 MAIN CONDANSER/345(D50) 1 1
1 35000751 MAIN CONDANSER/455 1
2
40002180
SPACER 2 2
2 40002263 UNIT COVER 1
3
35001817
SCREW 4.2*9.5 WITH WASHER
4 4
3 35000728 SCREW KA 50*14 WN 1412 EJOT 4
4
35001697
DRYER(XH9,10GR) 1 1 1
5 40002264 EVAPORATING TRAY 1 1 1
6 35000743 SCREW 4.2*9.5 DIN 7981 YSB 2 2 5
7 30007916 COMPRESSOR (FG75HAK,NL7FT) 1 1
7 30007910 COMPRESSOR (FG85HAK,NL9FT) 1
8 40007341 COMP.RUBBER 4 4 4
9 20020023 COMP FIXING BRACKET 2 2 2
10
20020103
COMP.BASEMENT GROUP/345
1 1
10 20020050 COMP.BASEMENT GROUP/455 1
11
20020108
COMP BASEMENT/345
1 1
11 20020020 COMP BASEMENT/455 1
12 30007904
GROUNDING WIRE
1 1 1
13 35000721 NUT M4*3.2 DIN 934 ZNK 2 2 2
14
35000722
WASHER 4.3*8*0.9 DIN 6798 ZNK 2 2 2
15 35000723 SCREW M4*16 DIN 933 ZNK 1 1 1
16
40002217
WHEEL 2 2 2
17 35000738 REAR WHEEL PIN 2 2 2
18 35000728 SCREW KA 50*14 WN 1412 EJOT 2 2 2
19 30007918 POWER CORD GR.FG85HAK/455-345 1 1 1
20 30007911 POWER CORD (2.1m) 1 1 1
21 30007909 OVER LOAD RELAY GR.FG85HAK/455-345 1 1 1
22 20020051 FAN MOTOR GR./455 1
23
30007905
WIRING HARNESS/FAN MOTOR/455 1
24 35002921 SCREW M4*10 DIN 7985 YSB 2
25
40002214
FAN BRACKET RUBBER 1
26 35000725 FAN MOTOR BRACKET 1
27
30007901
FAN MOTOR ASSY./455 1
28 40004182 COVER FAN MOTOR 1
29
40002210
ANTI - VIBRATION COND. 2 2 2
30
40004702
CONDENSER TRIM/345
1
1
Page 21

VESTEL
WHITE GOODS CONSUMER SERVICE
19
VESTEL
WHITE GOODS
VESTEL REFRIGERATOR
TECHNICAL
DEPARTMENT
Printed Date : 21 / 12 / 2001 Document No : 50024370
DECEMBER
2001
UNIT PARTS LIST
RD 36T - RD 40T - RD 46T
NO CODE PARTS NAME RD 36T RD 40T RD 46T
50018979
USER'S MANUEL/GREEK 1 1 1
20020107 PACKAGE GR.345 (SHRINK) 1
20030965 PACKAGE GR.400 (SHRINK) 1
20020064 PACKAGE GR.455 (SHRINK) 1
50007466
STRAFOR BOTTOM/345 1 1
50007457 STRAFOR BOTTOM/455 1
50007468
STRAFOR BACK CORNER/345 2
50007459 STRAFOR BACK CORNER/455 2 2
50007467
STRAFOR FRONT CORNER/345 2
50007458 STRAFOR FRONT CORNER/455 2 2
50007465
STRAFOR UPPER/345 1 1
50007460 STRAFOR UPPER/455 1
50020708 PACKAGE LABEL/345S(T)CARAD-ENG
1
50020667 PACKAGE LABEL/400S(T)CARAD-ENG(RD40T) 1
50020665 PACKAGE LABEL/455S(T)CARAD-ENG(RD46T)
1
50008335 CIRCUIT DIAGRAM/345T ENG 1 1
50016024 CIRCUIT DIAGRAM/455T(WITH RESISTANCE)
1
50020664 WARRANTY LABEL/CARAD 1 1 1
50020709 ENERGY LABEL/345S(T)CARAD
1
50020668 ENERGY PLATE STICKER/400S(T)CARAD(RD40T) 1
50020666 ENERGY LABEL/455S(T)CARAD(RD46T)
1
50007618
OZON FRIENDLY LABEL
111
Page 22

PRINTED DATE : 21 DECEMBER 2001
DOCUMENT NO : 50024370
PREPARED BY : Sirma KARAKAYA
APPROVED BY: Filiz KUNURALP
REVISION SHORT HISTORY:
NO: REV. NO: REV. DATE: PAGE NO: REV. REASON
01 00 21.12.2001 All First publication
DISTRIBUTION :
Greece-Carad Date: 28.12.2001
 Loading...