

Page 1

OPS
USER MANUAL
BEDIENUNGSANLEITUNG
MANUEL D’UTILISATION
MANUAL DEL USUARIO
MANUALE UTENTE
PODRECZNIK UZYTKOWNIKA
OPS-KL756V
ENGLISH - DEUTSCH - FRANCAIS - ESPANOL - ITALIANO - POLISH
Page 2

Page 3
CONTENTS
SIGNS USED IN THIS MANUAL ............................1
SAFETY PRECAUTIONS .......................................1
INTRODUCTION .................................................... 2
USING YOUR PRODUCT MORE EFFECTIVELY 4
TROUBLESHOOTING ..........................................4
IMPORTANT NOTIFICATIONS ..............................4
OPS PC SPECIFICATION ......................................6
CONNECTION SCHEME ...................................... 7
PIN CONNECTIONS (JAE TX25-80) .....................8
SIGNS USED IN THIS MANUAL
Some words and phrases are written in a dierent
format to get your attention.
Warning: Serious injury or death risk
Important: Important instructions should be read
carefully in order to prevent yourself, stored data and
computer parts from any damage
Note: Notes are being used to put emphasis on
useful information and critical points regarding the
product.
SAFETY PRECAUTIONS
In order to prevent the product from being damaged,
extend its service time, and ensure your normal use
and personal safety, please carefully read the whole
guide and the related safety precautions and strictly
follow the requirements in it.
Do not shake the product. Ensure that it stays in a
balanced stance on its position.
Do not throw or drop any object on the product.
Do not interfere on the product’s surface with a sharp
object.
Do not keep the product in a humid environment.
Do not spill water or other liquids onto the product.
Do not keep your product in an extremely cold or hot
environment.
Do not keep pressing the power switch or the reset
button(if available). Avoid interrupt power failure
during system's running, which might also physically
damage the operating system.
Power
Rated Supply: DC 12V – DC 19V
Warning
The product must be fed from an appropriate SELV
power supply according to IEC/EN 60950-1 standard
and power supply shall comply with Limited Power
Source requirements.
Do not unplug the device while it is running on any
DS product.
Do not cut the power of the device while it’s running.
At rst, shut down the device then, unplug it from the
platform in which the device is plugged.
Warning
Disconnect your system from the power source in
case of a long period of disuse.
RTC Battery
A button cell lithium battery is used as a continuous
voltage supply for RTC Power. A CR2032 battery is
used rated at 3.0 volts.
CAUTION
RISK OF EXPLOSION IF BATTERY IS REPLACED
BY AN INCORRECT TYPE. DISPOSE OF
USED BATTERIES ACCORDING TO THE
INSTRUCTIONS.
Important
Do not change the battery by yourself. It should be
changed by customer service with the same ratings
and battery model.
Batteries must not be exposed to excessive heat such
as sunshine, re or the like.
Never dispose of batteries in re or with hazardous
or ammable materials as this can cause them to
explode.
Recycle dead batteries; do not put with the normal
household waste.
Warning
Do not ingest the battery, Chemical Burn Hazard.
This product or the accessories supplied with the
product may contain a coin/button cell battery. If the
coin/button cell battery is swallowed, it can cause
severe internal burns in just 2 hours and can lead
to death.
Keep new and used batteries away from children.
If the battery compartment does not close securely,
stop using the product and keep it away from chil-
dren.
If you think batteries might have been swallowed or
placed inside any part of the body, seek immediate
medical attention.
Cleaning
Important
Disconnect your product from the power supply before
cleaning it.
English - 1 -
Page 4

Do not clean your the product while it is switched on.
Use a soft and damp cloth to clean the product. Do
not use chemical cleaners, liquid, sprayed cleaning
agents or wet cloth to clean the product. Do not apply
cleanser directly on your computer.
Vent holes of your product
Vent holes on the cabin of the product ensures stable
performance of your computer without overheating.
Do not block these openings in anyway.
Important
Do not put any objects in the vent holes of your
product. This may cause re or short circuit of the
inner parts of your product.
Temperature & Fire
Do not place the product near re or excessive heat
sources.
Lightning
In order to prevent a potential electrical shock, unplug
the device and remove your product’s power cords
during lightning.
Repair
Unless a basic implementation on the product is
specied by the producer’s technical department on
a document, do not repair the product by yourself.
Otherwise, your guarantee may get suspended and
you may risk your health or your product. In case of
need, consult your authorized service.
INTRODUCTION
Thank you for choosing our product. This guide will
help you to better understand the device. Therefore,
please carefully read the whole Guide before you
operate the device.
We believe that you will get extremely satised with
this product and hope that you will have pleasant and
productive times with it.
This product provides a modern design that is
compatible with all OPS Standardized Digital Signage
products.
Since all essential components that compose the
product are all together, it is easy to use and user-
friendly.
Note
Informations in this manual are for reference only.
Images and descriptions may slightly vary between
this manual and the actual product you have.
English - 2 -
Page 5
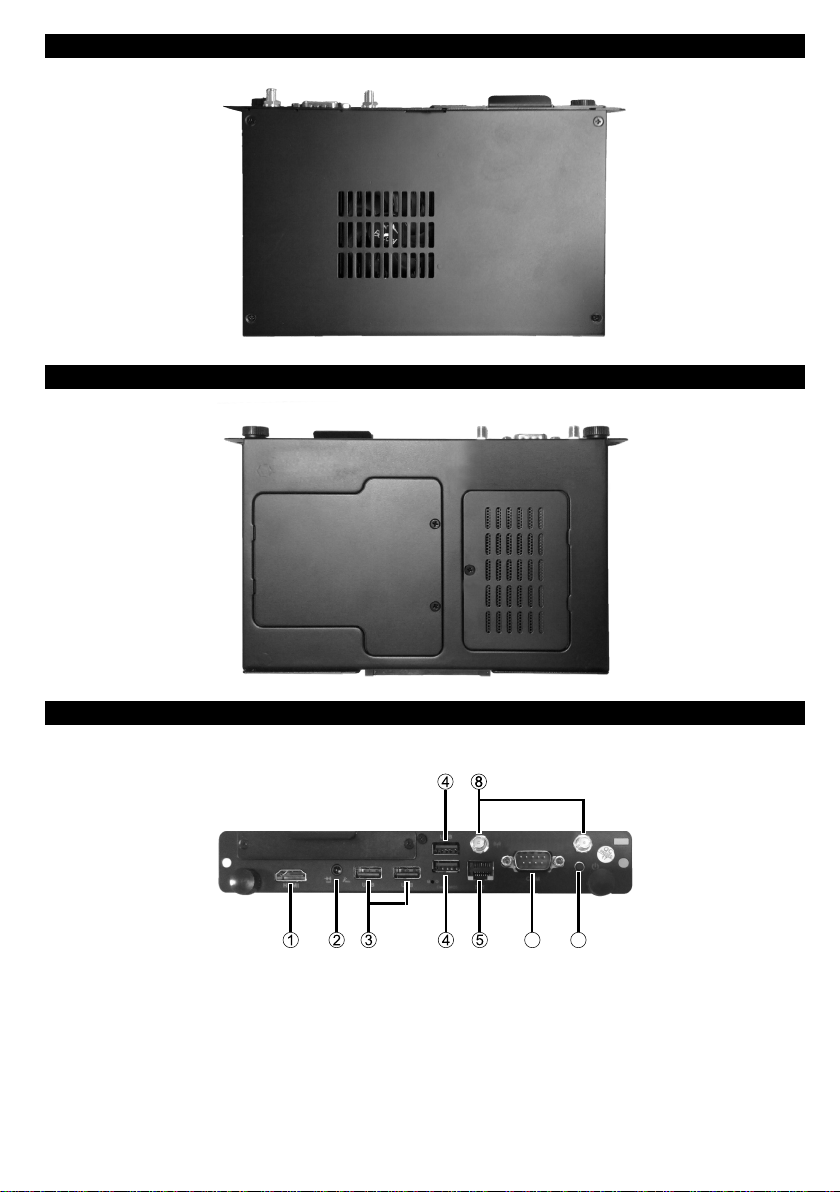
Top view
6 7
Bottom view
Input/Output Connections
The connections are illustrated as shown below.
1. HDMI Out
2. Audio (In & Out)
3. 2 x USB 2.0 ports
4. 2 x USB 3.0 ports
5. RJ45 10/100/1000 Mbps Ethernet
6. RS232
7. On/O Button
8. 2 x WiFi Antenna Connectors
English - 3 -
Page 6

USING YOUR PRODUCT MORE EFFECTIVELY
Paying attention to the following points with respect
to your product will provide a stable performance and
also prolong its life.
• Ensuring security of your product
• Daily care of your product
Daily Care
Environmental Factors
Ambient temperature must be between 0°C - 40°C
while the product is running. Do not directly expose
the product to humidity, high temperature, re, direct
sun light and dust while using it. The vent holes of
the product will allow it perform safer without system
overheating. Do not cover these holes or do not
prevent air ow with an object. Position the product
at least 15 cm away from strong magnetic field
generating electrical devices such as TV, refrigerator
or large speakers. Do not suddenly take your product
from a cold environment and suddenly put it in a warm
environment. A sudden temperature change of 10°C
may cause some of the internal parts to malfunction.
Do not put your product on an uneven surface.
Points to be taken into consideration while cleaning the product
Your system must be turned o while cleaning the
product. Please use a soft and damp piece of cloth for
cleaning its surface. Do not use chemical cleansers to
clean the product. Do not directly apply the cleaning
material on your product.
TROUBLESHOOTING
Some troubleshooting issues are mentioned in this
chapter under the following titles:
• Points to be checked rst
• Frequently asked questions
Points to be checked rst
When a problem occurs, it is very important to
diagnose this problem correctly. Try to nd out what
it is. Determine what causes the problem and under
which category it falls. Write down the error codes
and messages displayed on the screen, if possible.
Contact technical support to get support.
Frequently Asked Questions
Sound Issues
Problem: Sound system is not working.
Check the following:
English - 4 -
Be sure that sound volume is not low and sound
is not muted. Ensure that the sound driver and
its application are installed properly. Check cable
connections.
Problem: External microphone and auditory devices
are not working
Check the following:
Make sure that the cables are properly and rmly
connected. Check that the driver is installed. Check
sound settings and whether the system is muted
or not.
Issues about turning on the system
Problem: System does not start.
Check The Following:
Be sure that power voltage is in a range of DC
12V – DC 19V.
IMPORTANT NOTIFICATIONS
• Wake-on-Wireless LAN (WoWLAN) is not supported
• Hot plug and audio via the HDMI Out port is not
supported. If you want to extend the image via HDMI
cable, plug the HDMI cable into the HDMI Out port
rst and then turn on the OPS.
• In order to use RTC alarm, make sure that your
Windows conguration is set correctly. Enter the
Control Center > Power Options menu and click
on “Choose what the power buttons do” rst.
Then click on “Change settings that are currently
unavailable” and make sure that the “Turn on fast
startup(recommended)” option is unchecked.
• If only admin password is set, you can enter the
BIOS by simply clicking on “Enter” when password
window pops up to avoid a deadlock in case the
password has been forgotten. If you do not want that,
you should set both admin and user passwords. This
way, you will not be able to enter BIOS by clicking on
“Enter” when password window pops up.
• Ubuntu Usage
In some versions of Ubuntu Operating System
the platform in which the OPS is plugged may be
detected as a second screen due to the HDMI Out
port on the OPS.
In case of no signal or no menu is displayed
on settings screen or only the background is
displayed after Ubuntu installation, enter the BIOS
> Advanced > Power Conguration menu and
disable EDP to HDMI option. In this case, you can
see Ubuntu screen normally but you will not be able
to use HDMI Out port of the OPS.
Alternatively, you can keep the Windows button
pressed down and press the button “P” consecutively
Page 7
until you see the Ubuntu screen and then set the
resolution to 1920x1080.
• The cases mentioned below may change the boot
priority of the SSD/HDD and thus the Operating
System may not be able to boot.
- after 3 wrong BIOS password entries
- after the installation of a new type of SSD/HDD
- after the Sata Controller option in the BIOS >
Chipset > Sata and RST Conguration menu is
disabled/enabled
In order to boot the Operating System normally,
enter the BIOS > Boot menu and set your SSD/
HDD as Boot Option#1 or simply enter the BIOS,
select Optimized Defaults (F9) and press Enter.
Then select Save and Exit (F10) and press Enter
again. Alternatively, you can press the “F9” and “F10”
buttons for the same functions.
Information for Users on Disposal of Old Equipment and Batteries
Equipment bearing these symbols should not be
disposed as general household waste.
You should look for appropriate recycling facilities and
systems for the disposal of these products.
For more information, please contact the local
authority or the dealer where you purchased the
product.
Notice: The sign Pb below the symbol for batteries indicates
that this battery contains lead.
Products
Battery
English - 5 -
Page 8

OPS PC SPECIFICATION
Model OPS-KL756V
®
Intel
CPU
GPU
SYSTEM MEMORY
NETWORK
2 cores, 4 threads
3MB smart cache
15W TDP
®
Intel
Max. 4K @30Hz
2 x SO-DIMM DDR4
Up to 32GB
LAN: 10/100/1000 Mbps LAN support
WLAN: 802.11 a/c wireless support (optional)
Bluetooth 4.0 (optional)
CoreTM i5-7300U with vPro Support
HD Graphics 620, Integrated
STORAGE
2.5” 500GB HDD
256GB SSD
1 x RS232
1 x RJ45
2 x USB 3.0 (5V DC, 900mA)
I/O Ports
2 x USB 2.0 (5V DC, 500mA)
1 x HDMI Out (only video, no hot plug)
1 x Audio (In & Out)
2 x WiFi antenna (optional)
SOFTWARE SPECIFICATION
OPERATING SYSTEM Windows 10
MECHANICAL SPECIFICATION
Dimensions 180 x 119 x 30 mm (WxDxH)
Weight 800 gr
POWER CONSUMPTION
Rated Supply: DC 12V – DC 19V
DC 12V – 3.3A DC 19V – 2.2A
ACCESSORIES
IB, QSG, Antenna
English - 6 -
Page 9
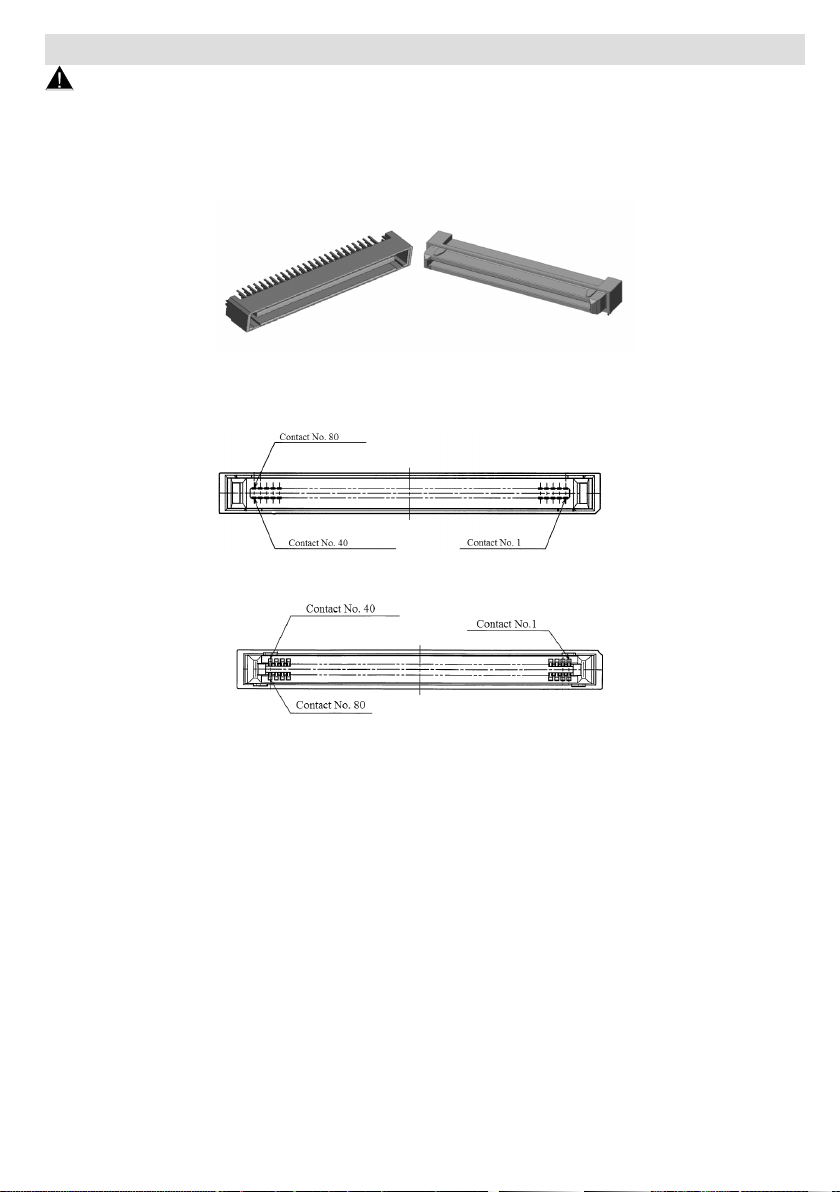
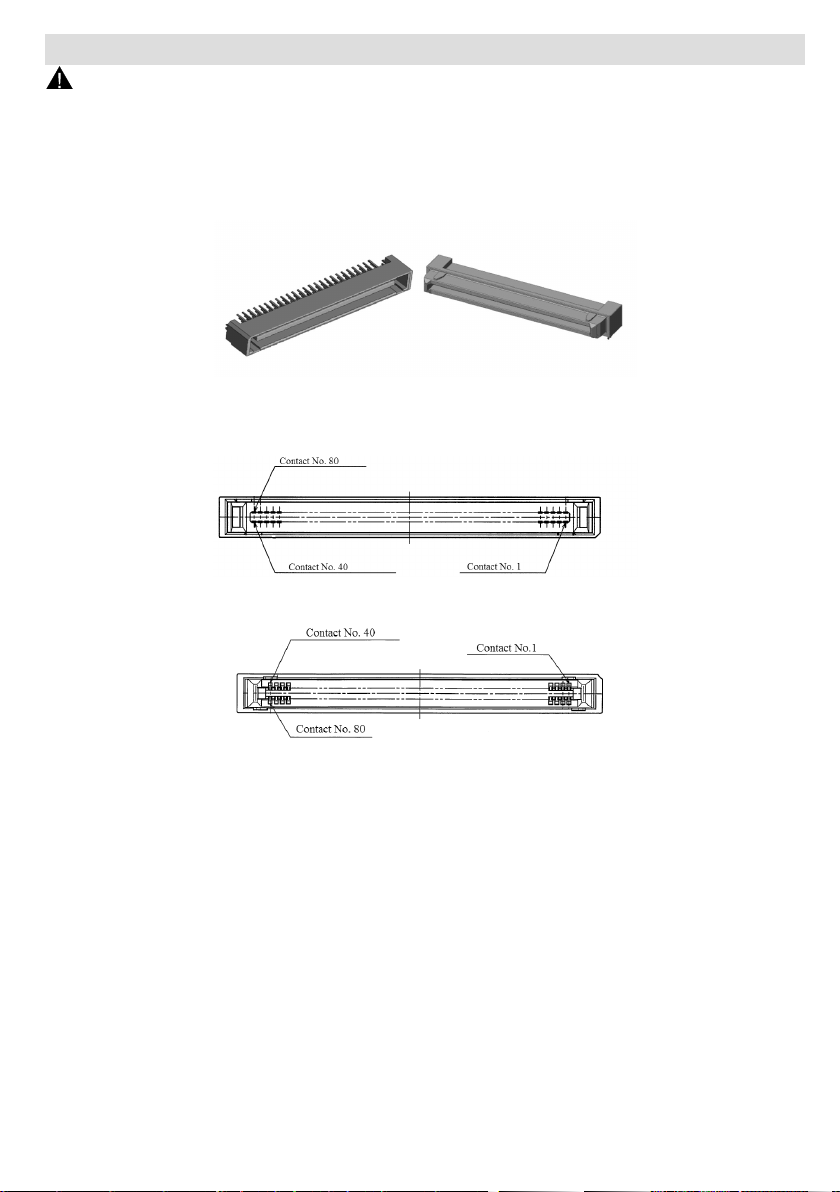
CONNECTION SCHEME
Warning
Insert the OPS into the slot with the “This Side Out” warning label facing outside.
Your product has an 80 pin OPS standard connection interface. Interconnection of the product and another
board (i.e. docking board, monitor board or main board…) is provided by JAE TX/24TX25 plug and receptacle
connectors.
Left: Plug connector (p/n: TX25-80P)
Right: Receptacle connector (p/n: TX24-80P)
Plug Connector / TX25 Pinout
Receptacle Connector / TX24 Pinout
*Connector series image, reference only.
English - 7 -
Page 10

PIN CONNECTIONS (JAE TX25-80)
PIN
NO
1 NC DisplayPort OUT
2 NC DisplayPort OUT
3 GND Ground -
4 NC DisplayPort OUT
5 NC DisplayPort OUT
6 GND Ground -
7 NC DisplayPort OUT
8 NC DisplayPort OUT
9 GND Ground -
10 NC DisplayPort OUT
11 NC DisplayPort OUT
12 GND Ground -
13 NC DisplayPort OUT
14 NC DisplayPort OUT
15 NC DisplayPort IN
16 GND Ground -
17 TMDS_CLK- DVI-D OUT
18 TMDS_CLK+ DVI-D OUT
19 GND Ground -
20 TMDS0- DVI-D OUT
21 TMDS0+ DVI-D OUT
22 GND Ground -
23 TMDS1- DVI-D OUT
24 TMDS1+ DVI-D OUT
25 GND Ground -
26 TMDS2- DVI-D OUT
27 TMDS2+ DVI-D OUT
28 GND Ground -
29 DVI_DDC_DATA DVI_D I/O
30 DVI_DDC_CLK DVI_D I/O
31 DVI_HPD DVI_D IN
32 GND Ground -
33 +12V~+19V Power -
34 +12V~+19V Power -
35 +12V~+19V Power -
36 +12V~+19V Power -
37 +12V~+19V Power -
38 +12V~+19V Power -
39 +12V~+19V Power -
40 +12V~+19V Power -
41 PWROK System power OK OUT
42 WAKE System wake OUT
43 RSVD Reserved pins -
Signal Description I/O
44 RSVD Reserved pins -
45 RSVD Reserved pins -
46 RSVD Reserved pins -
47 RSVD Reserved pins -
48 RSVD Reserved pins -
49 RSVD Reserved pins -
50 SYS_FAN System Fan Control OUT
51 UART_RXD UART 3.3V IN
52 UART_TXD UART 3.3V OUT
53 GND Ground -
54 StdA_SSRX- USB3.0 IN
55 StdA_SSRX+ USB3.0 IN
56 GND Ground -
57 StdA_SSTX- USB3.0 OUT
58 StdA_SSTX+ USB3.0 OUT
59 GND Ground -
60 USB_PN2 USB I/O
61 USB_PP2 USB I/O
62 GND Ground -
63 USB_PN1 USB I/O
64 USB_PP1 USB I/O
65 GND Ground -
66 USB_PN0 USB I/O
67 USB_PP0 USB I/O
68 GND Ground -
69 AZ_LINEOUT_L Audio-Lch OUT
70 AZ_LINEOUT_R Audio-Rch OUT
71 CEC Consumer Electronic Control I/O
72 PB_DET Pluggable Board Detect OUT
73 PS_ON Pluggable Signal ON IN
74 PWR_STATUS PowerGood
75 GND Ground -
76 GND Ground -
77 GND Ground -
78 GND Ground -
79 GND Ground -
80 GND Ground -
OUT
(OC)
English - 8 -
Page 11
INHALT
IN DIESEM HANDBUCH
VERWENDETE ZEICHEN .....................................1
SICHERHEITSMASSNAHME ................................ 1
EINFÜHRUNG ........................................................2
EFFEKTIVERE VERWENDUNG DES GERÄTS ..4
FEHLERSUCHE UND -BEHEBUNG .....................4
WICHTIGE BENACHRICHTIGUNGEN .................. 4
TECHNISCHE DATEN DES OPS PC ....................6
ANSCHLUSSSCHEMA .........................................7
SOCKELVERBINDUNGEN (JAE TX25-80) ...........8
IN DIESEM HANDBUCH VERWENDETE
ZEICHEN
Einige Wörter und Phrasen sind in einem anderen
Format gehalten, um Ihre Aufmerksamkeit zu wecken.
Warnung: Schweres oder tödliches
Verletzungsrisiko
Wichtig: Wichtige Anweisungen sind aufmerksam
zu lesen, damit Sie sich selber, Ihre gespeicherten
Daten sowie den Computer und dessen Teile vor
möglichen Schäden schützen können.
Hinweis: Hinweise dienen dazu, um auf nützliche
Informationen und wichtige Fragen zu diesem Produkt
hinzuweisen.
SICHERHEITSMASSNAHME
Für die Vermeidung von Schäden am Gerät,
die Verlängerung seiner Lebensdauer sowie die
Gewährleistung einer reibungslosen Nutzung lesen
Sie sich bitte die gesamte Bedienungsanleitung sowie
die dazugehörigen Sicherheitshinweise durch und
befolgen Sie diese auf das Genauste.
Das Gerät darf nicht geschüttelt werden. Sorgen
Sie dafür, dass das Gerät in einer ausbalancierten
Position steht.
Werfen Sie keine Objekte gegen das Gerät, und
lassen Sie nichts darauf fallen.
Wirken Sie nicht mit einem scharfen Gegenstand auf
die Oberäche des Geräts ein.
Stellen Sie das Gerät nicht in einer feuchten
Umgebung auf.
Schütten Sie kein Wasser oder andere Flüssigkeiten
auf das Gerät.
Stellen Sie das Gerät nicht in einer sehr kalten bzw.
sehr heißen Umgebung auf.
Halten Sie den Netzschalter bzw. die Reset-Taste
(sofern vorhanden) nicht gedrückt. Vermeiden Sie
Unterbrechungen der Stromzufuhr bei laufendem
Gerät, da diese auch das Betriebssystem physikalisch
beschädigen könnten.
Deutsch - 1 -
Netzstrom
Nennspeisespannung: Gleichstrom 12 V – 19 V
Warnung
Das Gerät muss über ein passendes, dem Standard
IEC/EN 60950-1 entsprechendes SELV-Netzteil
versorgt werden und die Stromversorgung muss
den Anforderungen der Begrenzten Stromquelle
entsprechen.
Trennen Sie das Gerät niemals vom Stromnetz,
solange es auf einem DS-Gerät läuft.
Trennen Sie das Gerät niemals vom Stromnetz,
solange es im Betrieb ist. Schalten Sie stets zuerst
das Gerät ab, trennen Sie dann das Gerät von der
Plattform, an das es angeschlossen ist.
Warnung
Ziehen Sie bitte den Netzstecker, wenn Sie die Anlage
über einen längeren Zeitraum nicht benutzen wollen.
RTC Akku
Eine Lithium-Knopfzelle wird als kontinuierliche
Spannungszufuhr für die RTC-Stromversorgung
verwendet. Eine auf 3,0 Volt ausgelegte CR2032Batterie wird verwendet.
VORSICHT
BEI DER VERWENDUNG DES
FALSCHEN BATTERIETYPS BESTEHT
EXPLOSIONSGEFAHR. ENTSORGEN SIE
DIE GEBRAUCHTEN BATTERIEN DEN
ANWEISUNGEN ENTSPRECHEND.
Wichtig
Wechseln Sie niemals die Batterie selbständig aus.
Der Austausch gegen eine Batterie mit den gleichen
Leistungswerten und des gleichen Modells darf nur
durch den Kundendienst erfolgen.
Batterien dürfen nicht zu großer Hitze wie direkter
Sonneneinstrahlung, Feuer oder Vergleichbarem
ausgesetzt werden.
Werfen Sie Batterien niemals ins Feuer bzw. in
Gefahrenstoe oder entammbare Materialien, da
dies zu Explosionen führen kann.
Recyceln Sie Batterien gemäß den geltenden
gesetzlichen Vorschriften. Entsorgen Sie diese nicht
in den normalen Hausmüll.
Warnung
Batterien dürfen niemals verschluckt werden. Es besteht chemische Verätzungsgefahr.
Dieses Gerät bzw. das zum Gerät mitgelieferte Zubehör enthält möglicherweise eine Knopfzellbatterie.
Wenn die Knopfzellenbatterie verschluckt wird, führt
dies innerhalb 2 Stunden zu schweren internen Ver-
Page 12

ätzungen mit möglicher Todesfolge.
Halten Sie gebrauchte und neue Batterien von Kindern fern.
Wenn das Batteriefach nicht sicher geschlossen.
stoppen Sie die Verwendung des Geräts und halten
Sie Kinder fern.
Falls Sie den Verdacht haben, dass Batterien verschluckt wurden oder in irgendeinen Körperteil platziert wurde, suchen Sie sofort medizinische Hilfe auf.
Reinigung
Wichtig
Trennen Sie das Gerät vom Netz, bevor Sie es
reinigen.
Reinigen Sie Ihr Gerät niemals im eingeschalteten
Zustand. Verwenden Sie zur Reinigung der
Geräteoberächen ein weiches, leicht angefeuchtetes
Tuch. Verwenden Sie keine chemischen
Reinigungsmittel, Reinigungssprays oder nasse
Tücher zum Putzen des Bildschirms. Tragen Sie
niemals direkt Reinigungsmittel auf Ihren Computer
auf.
Lüftungslöcher des Geräts
Lüftungslöcher am Gerätegehäuse sorgen für eine
stabile Leistung Ihres Computer, ohne dass sich
dieser überhitzt. Blockieren Sie keinesfalls diese
Önungen.
Wichtig
Stecken Sie keine Objekte in die Lüftungslöchern Ihres
Geräts. Dies könnte zu Bränden oder Kurzschlüssen
an den Innenteilen des Geräts führen.
Bewahren Sie dieses Handbuch für ein späteres
Nachschlagen auf. Die Abbildungen und
Beschreibungen in dieser Bedienungsanleitung
können sich leicht von Ihrem tatsächlichen Gerät
unterscheiden.
EINFÜHRUNG
Vielen Dank, dass Sie sich für unser Gerät entschieden
haben. Diese Anleitung wird Ihnen helfen, die
Funktionsweise des Geräts besser zu verstehen.
Lesen Sie sich diese daher in Gänze sorgfältig durch,
bevor Sie das Gerät in Betrieb nehmen.
Wir glauben, dass Sie äußerst zufrieden mit diesem
Gerät sein werden, und hoen, dass es Ihnen eine
angenehme und produktive Nutzung ermöglicht.
Dieses Gerät verfügt über ein modernes Design,
das mit allen standardisierten OPS-Digital SignageProdukten kompatibel ist.
Da alle essentiellen Komponenten des Geräts
vorhanden sind, lässt es sich einfach und bequem
verwenden.
Temperatur & Brände
Setzen Sie das Gerät keinem direkten Sonnenlicht
oder Hitze aus.
Blitzschlag
Ziehen Sie den Netzstecker des Geräts und entfernen
Sie dessen Netzkabel während eines Gewitters, um
einen möglichen Stromschlag zu vermeiden.
Reparieren
Sofern nicht eine grundlegende Implementierung des
Geräts von der technischen Abteilung des Herstellers
auf einem Dokument speziziert ist, dürfen Sie das
Gerät nicht selbständig reparieren. Andernfalls könnte
Ihre Garantie erlöschen, bzw. könnten Sie Schäden für
Gesundheit oder an dem Gerät riskieren. Falls nötig,
konsultieren Sie Ihren zuständigen Kundendienst.
Hinweis
Deutsch - 2 -
Page 13

Ansicht von oben
6 7
Ansicht von unten
Eingang/Ausgang-Anschlüsse
Die Verbindungen sind wie unten gezeigt angeordnet.
1. HDMI-Ausgang
2. Audio (Eingangs- und Ausgangsport)
3. 2 x USB 2.0-Anschlüsse
4. 2 x USB 3.0-Anschlüsse
Deutsch - 3 -
5. RJ45, 10/100/1000 Mbps Ethernet
6. <RS232
7. Ein-/Ausschalter
8. 2 x WLAN-Antennenanschlüsse
Page 14

EFFEKTIVERE VERWENDUNG DES
GERÄTS
Die Beachtung der folgenden Punkte gewährleistet
den stabilen Betrieb des Geräts und verlängert dessen
Lebensdauer.
• Die Sicherheit Ihres Geräts gewährleisten
• Tägliche Pege Ihres Geräts
Tägliche Pege
Umwelteinüsse
Die Umgebungstemperatur muss zwischen 0°C–40°C
liegen, wenn das Gerät in Betrieb ist. Setzen Sie
das in Betrieb befindliche Gerät nicht direkter
Feuchtigkeit, hohen Temperaturen, oenem Feuer,
direkter Sonneneinstrahlung oder Staub aus.
Die Lüftungsschlitze des Geräts sichern des
Betriebsbereitschaft und verhindern, dass es zu
einer Überhitzung des Systems kommt. Decken
Sie diese Löcher nicht ab, und behindern Sie den
Luftuss nicht, indem Sie etwas davor stellen. Stellen
Sie das Gerät mit einem Mindestabstand von 15 cm
zu allen elektrischen Geräten auf, die ein starkes
elektromagnetisches Feld erzeugen, dazu zählen
beispielsweise Fernsehgeräte, Kühlschränke oder
größere Lautsprecher. Bringen Sie das Gerät nicht
plötzlich aus einer kalten in eine warme Umgebung.
Eine plötzliche Temperaturänderung von mehr als
10°C kann zu Fehlfunktionen einzelner interner
Baugruppen führen. Platzieren Sie Ihr Produkt nicht
auf einer unebenen Oberäche.
Punkte, die bei der Reinigung des Geräts zu
beachten sind
Ihr System muss abgeschaltet sein, während
Sie das Gerät reinigen. Verwenden Sie bitte zur
Reinigung der Geräteoberflächen ein weiches,
leicht angefeuchtetes Tuch. Verwenden Sie keine
chemischen Reinigungsmittel zur Reinigung des
Geräts. Tragen Sie niemals direkt Reinigungsmittel
auf das Gerät auf.
FEHLERSUCHE UND -BEHEBUNG
Einige mögliche Probleme bei der Fehlersuche
werden in diesem Kapitel unter den folgenden Titeln
aufgeführt:
• Punkte, die zuerst zu prüfen sind
• Häug gestellte Fragen
Punkte, die zuerst zu prüfen sind
Wenn ein Problem auftritt, ist es sehr wichtig, dessen
Natur und Ursache korrekt festzustellen. Versuchen
Sie herauszunden, worum es sich handelt. Stellen
Sie die Ursache für das Problem fest und unter welche
Kategorie es fällt. Notieren Sie sich, wenn möglich,
die auf dem Bildschirm gezeigten Fehlercodes und
Meldungen. Kontaktieren Sie den Technischen
Kundendienst für weitere Hilfe.
Häug gestellte Fragen
Soundprobleme
Problem: Das System arbeitet nicht.
Prüfen Sie Folgendes:
Stellen Sie sicher, dass die Tonlautstärke nicht sehr
niedrig bzw. der Ton nicht stummgeschaltet ist.
Kontrollieren Sie, ob der Soundtreiber und dessen
Anwendungsprogramms ordnungsgemäß installiert
worden sind. Überprüfen Sie die Anschlüsse.
Problem: Das externe Mikrofon und die
Aufnahmegeräte funktionieren nicht
Prüfen Sie Folgendes:
Stellen Sie sicher, dass die Kabel richtig und sicher
angeschlossen sind. Überprüfen Sie, ob der Treiber
installiert ist. Prüfen Sie die Soundeinstellungen
und ob das System stumm gestellt ist oder nicht.
Probleme beim Einschalten des Systems
Problem: Das System startet nicht.
Prüfen Sie Folgendes:
Stellen Sie sicher, dass die Versorgungsspannung
bei Gleichstrom 12 V – 19 V liegt.
WICHTIGE BENACHRICHTIGUNGEN
• Wake-on drahtlose LAN (WoWLAN) wird nicht
unterstützt.
• Einbau im laufenden Betrieb und Audio über HDMI
Eingangsport wird nicht unterstützt. Wenn Sie das
Bild über ein HDMI-Kabel verlängern möchten,
stecken Sie das HDMI-Kabel zuerst in den HDMIAusgang und schalten Sie dann den OPS ein.
• Stellen Sie sicher, dass Ihre Windows-Konguration
richtig eingestellt ist, um den RTC-Alarm verwenden
zu können. Rufen Sie das Menü Control Center>
Energieoptionen auf und klicken Sie zuerst
auf „Wählen Sie aus was die Ein / Aus-Tasten
tun“. Klicken Sie dann auf „Einstellungen ändern,
die derzeit nicht verfügbar sind“ und stellen Sie
sicher, dass die Option „Schnellstart einschalten
(empfohlen)“ deaktiviert ist.
Deutsch - 4 -
Page 15
• Wenn nur das Administrator-Passwort festgelegt ist,
können Sie das BIOS aufrufen, indem Sie einfach
auf „Enter“ klicken, wenn das Passwortfenster
erscheint, um einen Deadlock zu vermeiden, falls
das Passwort vergessen wurde. Wenn Sie das
nicht möchten, sollten Sie sowohl ein AdministratorPasswort als auch ein Benutzerpasswort festlegen.
Dadurch können Sie das BIOS nicht aufrufen, indem
Sie auf „Enter“ klicken, wenn das Passwortfenster
erscheint.
• Nutzung von Ubuntu
In einigen Versionen des Ubuntu-Betriebssystems
wird die Plattform, an der der OPS angeschlossen ist,
möglicherweise aufgrund des HDMI-Ausgangsports
des OPS als ein zweiter Bildschirm erkannt.
Wenn auf dem Einstellungsbildschirm kein
Signal oder kein Menü angezeigt wird oder
nach der Installation von Ubuntu nur der
Hintergrund angezeigt wird, rufen Sie das Menü
BIOS>Erweitert>Leistungskonguration auf und
deaktivieren Sie die Option EDP zu HDMI. In diesem
Fall können Sie den Ubuntu-Bildschirm so sehen wie
der normalerweise angezeigt wird, aber Sie können
den HDMI-Ausgangsport des OPS nicht verwenden.
Alternativ, können Sie die Windows-Taste gedrückt
halten und die Taste „P“ hintereinander drücken, bis
der Bildschirm von Ubuntu angezeigt wird und die
Auösung auf 1920x1080 eingestellt wird.
• Bei den unten genannten Fälle kann die
Startreihenfolge der SSD/HDD geändert werden
und das Betriebssystem kann möglicherweise
nicht booten.
- nach 3 falschen BIOS-Passworteingaben
- nach der Installation von einem neuen Typ von
SSD/HDD
- nachdem die Option Sata Controller im Menü
BIOS>Chipsatz>Sata und RST-Konfiguration
deaktiviert/aktiviert ist
Um das Betriebssystem normal zu booten, rufen
Sie das Menü BIOS>Boot auf und stellen Sie Ihre
SSD/HDD auf die Boot Option#1 ein oder rufen Sie
einfach das BIOS auf, wählen Sie Standardwerte
(F9) und drücken Sie die Eingabetaste. Wählen Sie
dann Speichern und Beenden (F10) und drücken
Sie erneut die Eingabetaste. Alternativ, können Sie
die Tasten „F9“ und „F10“ für die gleichen Funktionen
drücken.
Verwenderinformationen zur Entsorgung von
Altgeräten und Batterien
Geräte, die diese Symbole tragen, dürfen nicht als
Haushaltsmüll entsorgt werden.
Für die Entsorgung dieser Produkte müssen Sie
sich nach geeigneten Recycling-Einrichtungen oder
Systeme umsehen.
Für weitere Informationen kontaktieren Sie bitte die
örtlich zuständigen Stellen oder den Händler, bei dem
Sie das Produkt gekauft haben.
Hinweis: Das unten abgebildete Pb-Symbol für Akkus zeigt
an, dass dieser Akku Blei enthält.
Batterie
Produkte
Deutsch - 5 -
Page 16

TECHNISCHE DATEN DES OPS PC
Modell OPS-KL756V
®
CoreTM i5-7300U mit vPro Unterstützung
Intel
CPU
Grakprozessor
SYSTEMSPEICHER
NETZWERK
2 Kerne, 4 Threads
3MB Smart Cache
15W TDP
®
Intel
HD Graphics 620, Integriert
Max. 4K @30Hz
2 x SO-DIMM DDR4
Bis zu 32GB
LAN: 10/100/1000 Mbps LAN-Unterstützung
WLAN: 802.11 a/c drahtlose Unterstützung (optional)
Bluetooth 4.0 (optional)
SPEICHER
2,5” 500GB HDD
256GB SSD
1 x RS232
1 x RJ45
2 x USB 3.0 (5V DC, 900mA)
E/A-Anschlüsse
2 x USB 2.0 (5V DC, 500mA)
1 x HDMI Ausgang (nur video, kein Einbau im laufenden Betrieb)
1 x Audio (Eingangs- und Ausgangsport)
2 x WLAN-Antennenanschlüsse (optional)
SOFTWAREBESCHREIBUNG
BETRIEBSSYSTEM Windows 10
MECHANISCHE EIGENSCHAFTEN
Maße 180 x 119 x 30 mm (BxTxH)
Gewicht 800 g
Nennspeisespannung: Gleichstrom 12 V – 19 V
Gleichstrom 12V – 3,3A Gleichstrom 19V – 2,2A
ZUBEHÖR
IB, QSG, Antenne
LEISTUNGSAUFNAHME
Deutsch - 6 -
Page 17
ANSCHLUSSSCHEMA
Warnung
Stecken Sie die OPS-Einheit in den Steckplatz mit dem Hinweisetikett „Diese Seite nach außen“ nach außen
gerichtet ein.
Das Gerät hat eine OPS Standard-Verbindungsschnittstelle mit 80 Stiften. Die Zusammenschaltung des Geräts
und einer weiteren Platine (z. B. Dockingplatine, Monitorplatine oder Hauptplatine …) erfolgt durch den JAE
TX/24TX25-Stecker und Buchsenstecker.
Links: Steckverbinder (p/n: TX25-80P)
Rechts: Steckverbinder (p/n: TX24-80P)
Steckverbinder / TX25 Pinbelegung
Buchsenstecker / TX24 Pinbelegung
*Abbildung der Verbinderserie, nur zu Referenz.
Deutsch - 7 -
Page 18

SOCKELVERBINDUNGEN (JAE TX25-80)
STECKERNR. Signal Beschreibung E/A
1 NC DisplayPort AUSGANG
2 NC DisplayPort AUSGANG
3 GND Masse -
4 NC DisplayPort AUSGANG
5 NC DisplayPort AUSGANG
6 GND Masse -
7 NC DisplayPort AUSGANG
8 NC DisplayPort AUSGANG
9 GND Masse -
10 NC DisplayPort AUSGANG
11 NC DisplayPort AUSGANG
12 GND Masse -
13 NC DisplayPort AUSGANG
14 NC DisplayPort AUSGANG
15 NC DisplayPort IN
16 GND Masse -
17 TMDS_CLK- DVI-D AUSGANG
18 TMDS_CLK- DVI-D AUSGANG
19 GND Masse -
20 TMDS0- DVI-D AUSGANG
21 TMDS0+ DVI-D AUSGANG
22 GND Masse -
23 TMDS1- DVI-D AUSGANG
24 TMDS1+ DVI-D AUSGANG
25 GND Masse -
26 TMDS2- DVI-D AUSGANG
27 TMDS2+ DVI-D AUSGANG
28 GND Masse -
29 DVI_DDC_DATA DVI_D E/A
30 DVI_DDC_CLK DVI_D E/A
31 DVI_HPD DVI_D IN
32 GND Masse -
33 +12V~+19V Netzstrom -
34 +12V~+19V Netzstrom -
35 +12V~+19V Netzstrom -
36 +12V~+19V Netzstrom -
37 +12V~+19V Netzstrom -
38 +12V~+19V Netzstrom -
39 +12V~+19V Netzstrom -
40 +12V~+19V Netzstrom -
41 PWROK Systemschaltung OK AUSGANG
42 WAKE System-wake AUSGANG
43 RSVD Reservierte Stecker -
44 RSVD Reservierte Stecker -
45 RSVD Reservierte Stecker -
46 RSVD Reservierte Stecker -
47 RSVD Reservierte Stecker -
48 RSVD Reservierte Stecker -
49 RSVD Reservierte Stecker -
50 SYS_FAN
51 UART_RXD UART 3.3V IN
52 UART_TXD UART 3.3V AUSGANG
53 GND Masse -
54 StdA_SSRX- <USB3.0 IN
55 StdA_SSRX+ <USB3.0 IN
56 GND Masse -
57 StdA_SSTX- <USB3.0 AUSGANG
58 StdA_SSTX+ <USB3.0 AUSGANG
59 GND Masse -
60 <USB_PN2 USB E/A
61 <USB_PP2 USB E/A
62 GND Masse -
63 <USB_PN1 USB E/A
64 <USB_PP1 USB E/A
65 GND Masse -
66 <USB_PN0 USB E/A
67 <USB_PP0 USB E/A
68 GND Masse -
69 AZ_LINEOUT_L Audio-Lch AUSGANG
70 AZ_LINEOUT_R Audio-Rch AUSGANG
71 CEC
72 PB_DET Steckplatineerkennung AUSGANG
73 PS_ON
74 PWR_STATUS PowerGood AUS (OC)
75 GND Masse -
76 GND Masse -
77 GND Masse -
78 GND Masse -
79 GND Masse -
80 GND Masse -
Systemeigene
Lüftungssteuerung
Consumer
Electronic Control
(komponentenüber
greifende
Ansteuerung)
Einsteckbares Signal
EIN
AUSGANG
E/A
IN
Deutsch - 8 -
Page 19

CONTENU
SYMBOLES UTILISÉS DANS CE MANUEL ..........1
PRÉCAUTIONS DE SÉCURITÉ ............................1
INTRODUCTION .................................................... 2
UTILISATION PLUS EFFICACE
DE VOTRE APPAREIL ..........................................4
DÉPANNAGE ........................................................4
NOTIFICATIONS IMPORTANTES .........................4
SPÉCIFICATION OPS POUR PC ..........................6
SCHÉMA DE CONNEXION ...................................7
CONNEXIONS DE BROCHE (JAE TX25-80) ........8
SYMBOLES UTILISÉS DANS CE
MANUEL
Certains mots et phrases sont écrits dans un format
diérent an d’attirer votre attention.
Avertissement : Blessures graves ou risque
de mort
Important : Désigne les instructions importantes
à lire attentivement an de vous éviter tout préjudice
corporel ou des dommages sur les données
enregistrées et les pièces de l’ordinateur.
Remarque : Les remarques sont utilisées pour
mettre l'accent sur les informations utiles et les points
pertinents concernant l’appareil.
PRÉCAUTIONS DE SÉCURITÉ
Pour éviter que l’appareil ne subisse des dommages,
pour prolonger sa durée de vie et pour assure votre
utilisation normale et votre sécurité, lisez attentivement
tout le guide et les précautions de sécurité y associées
et suivez strictement les exigences y aérentes.
Évitez de secouer l’appareil. Assurez-vous qu’il est
placé dans une position stable.
Ne jetez pas ou ne laissez pas tomber des objets
sur l’appareil.
Évitez de frotter tout objet tranchant sur la surface
de l’appareil.
Ne conservez pas l’appareil dans un endroit humide.
Ne versez pas de l’eau ou tout autre liquide sur
l’appareil.
Évitez de conserver votre appareil dans un
environnement très froid ou très chaud.
N’appuyez pas l’interrupteur d’alimentation ou le
bouton de réinitialisation en le maintenant enfoncé (si
disponible). Évitez les interruptions dues aux pannes
de courant lorsque le système est en marche, car cela
pourrait causer des dommages physiques au système
de fonctionnement.
Alimentation
Alimentation nominale : CC 12 V – CC 19 V
Avertissement
Le produit doit être alimenté par une source
d'alimentation SELV appropriée conforme à la norme
IEC / EN 60950-1 et doit être conforme aux exigences
relatives à la source d'alimentation limitée.
Ne débranchez pas l’appareil lorsqu'il est en cours
d'exécution sur tout produit DS.
Ne coupez pas l’alimentation de l’appareil lorsqu'il
est en cours d'exécution. Tout d’abord, éteignez
l’appareil, puis, débranchez-le de la plate-forme à
laquelle il est branché.
Avertissement
Déconnectez votre système de la source d’alimentation
en cas d’inactivité prolongée.
Batterie RTC
Une pile de type bouton au lithium fournit une
alimentation continue pour l'horloge en temps réel.
Une pile CR2032 est utilisée avec une tension
nominale de 3,0 volts.
ATTENTION:
RISQUE D’EXPLOSION EN CAS DE
REMPLACEMENT DES PILES PAR UN
TYPE INAPPROPRIÉ. METTEZ AU REBUT
LES PILES USÉES CONFORMÉMENT À LA
RÉGLEMENTATION LOCALE.
Important
Ne changez pas la pile vous-même. Faites-la
changer par le service client avec le modèle et les
caractéristiques correspondants.
N'exposez pas les piles à une chaleur excessive telle
que celle du soleil, du feu ou autre.
Ne vous débarrassez pas des piles en les jetant au feu
ou avec des matières dangereuses ou inammables.
Elles pourraient exploser.
Veuillez faire recycler les piles usées ; ne les mettez
pas au rebut avec les autres ordures ménagères.
Avertissement
N'avalez pas la pile. Les produits chimiques y contenus pourraient vous brûler.
Ce produit ou les accessoires fournis avec celui-ci
pourraient contenir une pile bouton. L'ingestion
d'une pile bouton peut causer non seulement de sévères brûlures internes en seulement 2 heures, mais
aussi le décès.
Gardez les nouvelles et anciennes piles hors de portée des enfants.
Si le compartiment à piles ne se ferme pas correcte-
Français - 1 -
Page 20

ment, arrêtez d'utiliser le produit et tenez-le hors de
la portée des enfants.
Si vous pensez que des piles ont été avalées ou logées n'importe où à l'intérieur du corps, consultez de
toute urgence un médecin.
Nettoyage
Important
Débranchez votre l'appareil de l'alimentation
électrique avant de le nettoyer.
Ne nettoyez pas votre appareil lorsqu'il est allumé.
Utilisez un chion doux et humide pour nettoyer
l’appareil. N’utilisez pas d’agents nettoyant chimiques,
liquides, en spray ou un chion humide pour nettoyer
l’appareil. Évitez d’appliquer le produit de nettoyage
directement sur l’ordinateur.
Orices d’aération de votre appareil
Les orifices d’aération du meuble de l’appareil
assurent une performance stable de votre ordinateur
sans le surchauer. N'obstruez en aucun cas ces
orices.
Important
Ne placez aucun objet dans les orices d'aération de
l'appareil. Ceci pourrait entraîner un incendie ou un
court-circuit des pièces internes de votre appareil.
Remarque
Les informations contenues dans ce manuel sont
uniquement à titre de référence. Les images et les
descriptions contenues dans ce manuel peuvent
légèrement être diérentes de votre appareil.
INTRODUCTION
Nous vous remercions d'avoir choisi notre produit. Ce
guide vous permet de mieux comprendre l’appareil.
Toutefois, veuillez lire attentivement le guide tout
entier avant de mettre votre appareil en marche.
Nous pensons que vous serez très satisfait de cet
appareil et nous espérons que vous passerez des
moments et un temps d’exploitation agréables.
Cet appareil propose un design moderne, qui est
compatible avec tous les produits de signalisation
numérique normalisé OPS.
La mise en commun de tous les composants
essentiels de l’appareil fait qu’il soit facile à utiliser
et convivial.
Température et incendie
Ne placez pas l’appareil à proximité du feu ou à des
sources de chaleur excessives.
Foudre
Pour éviter un éventuel choc électrique, débranchez
et retirez les cordons d’alimentation de votre appareil
pendant la foudre.
Réparation
Sauf disposition expresse écrite par le département
technique du fabricant sur une exécution de base
de l’appareil, évitez de réparer vous-même votre
appareil. Autrement, votre garantie peut être
suspendue et vous mettrez en péril votre santé ou
votre appareil. Consultez le service compétent dans
le domaine, le cas échéant.
Français - 2 -
Page 21

Vue de dessus
6 7
Vue de dessous
Connexions d’entrée/de sortie
Les connexions sont mises en évidence comme illustré ci-dessous.
1. Sortie HDMI
2. Audio (Entrée & Sortie)
3. 2 x ports USB 2.0
4. 2 x ports USB 3.0
5. RJ45 10/100/1 000 Mbps Ethernet
6. RS232
7. Bouton Marche/Arrêt
8. 2 x connecteurs d’antenne WiFi
Français - 3 -
Page 22

UTILISATION PLUS EFFICACE DE
VOTRE APPAREIL
Prêtez une attention aux points suivants de votre
appareil permet d’obtenir une performance stable et
de prolonger sa durée de vie.
• D’assurer la sécurité de votre appareil
• Entretien quotidien de votre ordinateur
Entretien quotidien
Facteurs liés à l’environnement
La température ambiante doit se situer entre 0° C et
40° C lorsque l'appareil est sous tension. N’exposez
pas directement votre appareil à l'humidité, à une
température élevée, au feu, au soleil et à la poussière
lorsque vous l'utilisez. Les orifices d'aération de
l'appareil lui permettront de fonctionner en toute
sécurité sans surchauffe du système. Évitez de
boucher les orifices ou d’y placer un objet pour
empêcher l’entrée de l’air. Positionnez l’appareil à une
distance au moins 15 cm de tout appareil électrique
générant un champ magnétique fort tel que les
téléviseurs, les réfrigérateurs ou les haut-parleurs de
grande dimension. Évitez le déplacement subit de votre
appareil d’un environnement froid à un environnement
chaud. Un changement subit de température de 10°C
peut entraîner le dysfonctionnement de certaines
pièces internes. Évitez de poser votre appareil sur
une surface irrégulière.
Points à prendre en compte pendant le nettoyage
de l’ordinateur
Votre système doit être hors tension lorsque vous
nettoyez l’appareil. Veuillez utiliser un chion doux et
humide pour nettoyer la surface de l’appareil. Évitez
d’utiliser les produits chimiques pour le nettoyage de
l’appareil. Évitez d’appliquer directement le produit
de nettoyage sur l’appareil.
DÉPANNAGE
Certains problèmes de dépannage sont mentionnés
dans ce chapitre sous les titres suivants :
• Points à vérier au préalable
• Foire aux questions
Points à vérier au préalable
Lorsqu'un problème survient, il est très important de
le diagnostiquer correctement. Essayez de trouver le
problème. Déterminez les causes du problème et sa
catégorie. Notez les codes d’erreurs et les messages
achés à l’écran, le cas échéant. Contactez le support
technique pour obtenir de l’aide.
Foire aux questions
Problèmes sonores
Problème : Le système de son ne fonctionne pas.
Vériez les éléments suivants :
Vérifiez que le volume n’est pas faible ou
muet Assurez-vous que le pilote de son et son
application sont correctement installés. Vériez les
branchements de câble.
Problème : Le microphone externe et les périphériques
d’écoute ne fonctionnent pas
Vériez les éléments suivants :
Assurez-vous que les câbles sont correctement
et fermement connectés. Vériez que le pilote
est correctement installé. Vériez les paramètres
sonores et si le système est en sourdine ou non.
Problèmes relatifs au démarrage du système
Problème : Le système ne démarre pas.
Vériez les éléments suivants :
Assurez-vous que la tension d'alimentation est dans
un intervalle de 12 V CC - 19 V CC.
NOTIFICATIONS IMPORTANTES
• Wake-on-Wireless LAN (WoWLAN) n'est pas pris
en charge
• Le branchement à chaud et le son via le port de
Sortie HDMI ne sont pas pris en charge. Si vous
souhaitez étendre l’image via un câble HDMI,
branchez d’abord le câble HDMI sur le port de Sortie
HDMI, puis allumez l’OPS.
• Pour utiliser l’alarme RTC, assurez-vous que votre
conguration Windows est correctement dénie.
Ouvrez le menu Centre de Contrôle> Options
d'Alimentation, puis cliquez sur «Choisissez les
fonctions des boutons d'alimentation». Ensuite,
cliquez sur "Modier les paramètres actuellement
indisponibles“ et assurez-vous que l'option
”Activer le démarrage rapide(recommandé)"
n'est pas cochée.
• Si seul le mot de passe administrateur est déni,
vous pouvez entrer le BIOS en cliquant simplement
sur “Entrer” lorsque la fenêtre du mot de passe
apparaît pour éviter une impasse dans le cas où
le mot de passe a été oublié. Si vous ne voulez
pas cela, vous devriez dénir les mots de passe
administrateur et utilisateur. De cette façon, vous
ne pourrez pas entrer dans le BIOS en cliquant sur
“Entrer” lorsque la fenêtre de mot de passe apparaît.
• Utilisation d'Ubuntu
Dans certaines versions du système d'exploitation
Ubuntu, la plate-forme sur laquelle l'OPS est
Français - 4 -
Page 23

branché peut être détectée en tant que deuxième
écran en raison du port de sortie HDMI de l'OPS.
Dans le cas où aucun signal ou aucun menu n'est
aché sur l'écran paramètres ou seulement l'arrièreplan est aché après l'installation Ubuntu, entrez
le BIOS > Avancé > Menu de Conguration de
puissance et désactiver EDP à l'option HDMI.
Dans ce cas, vous pouvez voir l'écran Ubuntu
normalement, mais vous ne pourrez pas utiliser le
port de Sortie HDMI de l'OPS.
Alternativement, vous pouvez garder le bouton
Windows enfoncé vers le bas et appuyez sur le
bouton “P” consécutivement jusqu'à ce que vous
voyez l'écran Ubuntu et puis réglez la résolution à
1920x1080.
• Les cas mentionnés ci-dessous peuvent changer
la priorité de démarrage du SSD/HDD et donc le
Système d'Exploitation peut ne pas être en mesure
de démarrer.
- après 3 entrées de mot de passe BIOS erronées
- après l'installation d'un nouveau type de SSD /
HDD
- après que l'option Contrôleur Sata du BIOS> Jeu
de puces> Menu de Conguration Sata et RST
est désactivée / activée
Afin de démarrer le système d'exploitation
normalement, entrez dans le menu BIOS> Boot
(Démarrage) et dénissez votre SSD / HDD sur
Boot Option # 1 ou entrez simplement dans le
BIOS, sélectionnez Optimized Defaults (F9)
(Préférences par défaut) et appuyez sur Entrée.
Sélectionnez ensuite Enregistrer et Quitter (F10),
puis appuyez à nouveau sur Entrée. Vous pouvez
aussi appuyer sur les boutons ”F9“ et ”F10" pour les
mêmes fonctions.
Informations applicables aux utilisateurs
concernant la mise au rebut de l’ancien appareil
et des piles
L'équipement portant ces symboles ne doit pas être
mis au rebut comme les ordures ménagères.
Vous devriez chercher des méthodes et des systèmes
de recyclage appropriés pour l'élimination de ces
produits.
Pour plus d'informations, veuillez contacter les
autorités locales ou le distributeur chez qui vous avez
acheté l’article.
Remarque : Le symbole Pb en dessous du symbole pour les
piles indique que ces piles contiennent du plomb.
Batterie
Produits
Français - 5 -
Page 24

SPÉCIFICATION OPS POUR PC
Modèle OPS-KL756V
®
CoreTM i5-7300U avec le Support vPro
Intel
CPU
GPU
MÉMOIRE DU
SYSTÈME
RÉSEAU
2 cœurs, 4 threads
Mémoire cache intelligente de 3 Mo
15W TDP
®
Intel
HD Graphics 620, Intégré
Max. 4K @30Hz
2 x SO-DIMM DDR4
Jusqu'à 32GB
LAN Prise en charge LAN 10/100/1 000 Mbps
WLAN: 802.11 c/a support sans l (en option)
Bluetooth 4.0 (en option)
STOCKAGE
Disque dur interne HDD 2.5 pouces 500 Go
Disque dur interne SSD 256 Go
1 x RS232
1 x RJ45
2 x USB 3.0 (5 V CC, 900 mA)
Ports E/S
2 x USB 2.0 (5 V CC, 500mA)
1 x Sortie de HDMI Out (seulement vidéo, pas de branchement à chaud)
1 x Audio (Entrée & Sortie)
2 x Antenne WiFi (en option)
SPÉCIFICATION DU LOGICIEL
SYSTÈME
D’EXPLOITATION
Windows 10
SPÉCIFICATIONS MÉCANIQUES
Dimensions 180 x 119 x 30 mm (l x p x h)
Poids 800 gr
ACCESSOIRES
Antenne IB, QSG
CONSOMMATION ÉLECTRIQUE
Alimentation nominale : CC 12 V – CC 19 V
12 VCC – 3,3 A 19 VCC – 2,2 A
Français - 6 -
Page 25

SCHÉMA DE CONNEXION
Avertissement
Insérer l’OPS dans la fente en veillant à ce que l’étiquette d’avertissement « Côté extérieur » soit orienté
vers l’extérieur.
Votre appareil possède une interface de connexion standard OPS à 80 broches. L’interconnexion de l’appareil
et un autre tableau (c.-à-d. tableau d’amarrage, tableau de contrôle ou tableau principal…) est assurée par
les connecteurs de che et de réceptacle JAE TX/24TX25 .
Gauche : Connecteur enchable (p/n : TX25-80P
Droite : Connecteur du réceptacle (p/n : TX24-80P
Connecteur enchable / Brochage TX25
Connecteur du réceptacle / Brochage TX24
*Image de séries de connecteur, uniquement pour référence.
Français - 7 -
Page 26

CONNEXIONS DE BROCHE (JAE TX25-80)
N° de
broche
1 NC Port d'achage SORTIE
2 NC Port d'achage SORTIE
3 TERRE Terre -
4 NC Port d'achage SORTIE
5 NC Port d'achage SORTIE
6 TERRE Terre -
7 NC Port d'achage SORTIE
8 NC Port d'achage SORTIE
9 TERRE Terre -
10 NC Port d'achage SORTIE
11 NC Port d'achage SORTIE
12 TERRE Terre -
13 NC Port d'achage SORTIE
14 NC Port d'achage SORTIE
15 NC Port d'achage DANS
16 TERRE Terre -
17 TMDS_CLK- DVI-D SORTIE
18 TMDS_CLK+ DVI-D SORTIE
19 TERRE Terre -
20 TMDS0- DVI-D SORTIE
21 TMDS0+ DVI-D SORTIE
22 TERRE Terre -
23 TMDS1- DVI-D SORTIE
24 TMDS1+ DVI-D SORTIE
25 TERRE Terre -
26 TMDS2- DVI-D SORTIE
27 TMDS2+ DVI-D SORTIE
28 TERRE Terre -
29 DVI_DDC_DATA DVI_D E/S
30 DVI_DDC_CLK DVI_D E/S
31 DVI_HPD DVI_D DANS
32 TERRE Terre -
33 +12 V~+19 V Alimentation -
34 +12 V~+19 V Alimentation -
35 +12 V~+19 V Alimentation -
36 +12 V~+19 V Alimentation -
37 +12 V~+19 V Alimentation -
38 +12 V~+19 V Alimentation -
39 +12 V~+19 V Alimentation -
40 +12 V~+19 V Alimentation -
41 ALIMENTATION OK
42 SORTIE DE VEILLE
43 RSVD Broches réservées -
44 RSVD Broches réservées -
Signal Description E/S
Alimentation du système
OK
Sortie de veille du
système
SORTIE
SORTIE
45 RSVD Broches réservées -
46 RSVD Broches réservées -
47 RSVD Broches réservées -
48 RSVD Broches réservées -
49 RSVD Broches réservées -
50 SYS_FAN
51 UART_RXD UART 3,3 V DANS
52 UART_TXD UART 3,3 V SORTIE
53 TERRE Terre -
54 StdA_SSRX- USB3.0 DANS
55 StdA_SSRX+ USB3.0 DANS
56 TERRE Terre -
57 StdA_SSTX- USB3.0 SORTIE
58 StdA_SSTX+ USB3.0 SORTIE
59 TERRE Terre -
60 USB_PN2 USB E/S
61 USB_PP2 USB E/S
62 TERRE Terre -
63 USB_PN1 USB E/S
64 USB_PP1 USB E/S
65 TERRE Terre -
66 USB_PN0 USB E/S
67 USB_PP0 USB E/S
68 TERRE Terre -
69 AZ_LINEOUT_L Audio-Lch SORTIE
70 AZ_LINEOUT_R Canal audio droit SORTIE
71 CEC
72 PB_DET
73 PS_ON Signal enchable Allumé DANS
74 PWR_STATUS PowerGood
75 TERRE Terre -
76 TERRE Terre -
77 TERRE Terre -
78 TERRE Terre -
79 TERRE Terre -
80 TERRE Terre -
Commande du système
de ventilation
Commande
d'électronique grand
public
Détection de la carte
enchable
SORTIE
E/S
SORTIE
SORTIE
(OC)
Français - 8 -
Page 27

CONTENIDO
SIGNOS UTILIZADOS EN ESTE MANUAL ...........1
PRECAUCIONES SOBRE SEGURIDAD ............... 1
INTRODUCCIÓN .................................................... 2
USANDO SU PRODUCTO
MÁS EFECTIVAMENTE ........................................4
SOLUCIÓN DE PROBLEMAS ..............................4
NOTIFICACIONES IMPORTANTES ......................4
ESPECIFICACIÓN DEL PC OPS ...........................6
ESQUEMA DE CONEXION ...................................7
CONEXIONES DE PIN (JAE TX25-80) ..................8
SIGNOS UTILIZADOS EN ESTE
MANUAL
Algunas palabras y frases se escriben en un formato
diferente para llamar su atención.
Advertencia: Riesgo de lesiones graves o muerte
Importante: Las instrucciones importantes se
deben leer cuidadosamente para evitar que los datos
almacenados y las piezas de computadora sufran
cualquier daño
Nota: Las notas se están utilizando para poner
énfasis en la información útil y puntos críticos al
respecto.
PRECAUCIONES SOBRE SEGURIDAD
Para evitar que el producto se dañe, prolongue
su tiempo de servicio y asegure su uso normal y
seguridad personal, lea atentamente toda la guía y
las precauciones de seguridad relacionadas y siga
estrictamente los requisitos en ella.
No agite el producto. Asegúrese de que se mantiene
en una postura equilibrada.
No arroje ni deje caer ningún objeto sobre su
producto.
No interera la supercie de su producto o cualquier
otra supercie con un objeto punzante.
No guarde su producto en un ambiente húmedo.
No derrame agua ni líquidos sobre el producto.
No mantenga su producto en un entorno
extremadamente caliente.
No presione el interruptor de encendido o el botón de
reinicio (si está disponible). Evite interrumpir el corte
de energía durante el funcionamiento del sistema,
lo que también podría dañar físicamente el sistema
operativo.
Energía
Alimentación nominal: CC 12V – CC 19V
Advertencia
El producto debe usarse con una fuente de
alimentación SELV apropiada de acuerdo con la
norma IEC/EN 60950-1 y fuente de alimentación
debe cumplir con los requisitos de la Fuente de
Alimentación Limitada.
No desenchufe el dispositivo mientras se está
ejecutando en cualquier producto DS.
No corte la alimentación del dispositivo mientras
se está ejecutando. En primer lugar, apague el
dispositivo, desenchúfelo de la plataforma en la que
está conectado.
Advertencia
Desconecte el sistema de la fuente de energía en
caso de un largo período de inactividad.
Pila RTC
Una pila de botón de litio de la batería se utiliza como
una fuente de alimentación continua para energía
RTC. Se utiliza una batería CR2032 de 3,0 voltios.
PRECAUCIÓN:
RIESGO DE EXPLOSIÓN SI LA BATERÍA SE
REEMPLAZA POR UN TIPO INCORRECTO.
DESHÁGASE DE LAS PILAS USADAS
SIGUIENDO LAS INSTRUCCIONES.
Importante
No cambie la batería por usted mismo. Debe ser
cambiada por el servicio de atención al cliente con
las mismas clasicaciones y el modelo de la pila.
Nunca exponga las pilas a una fuente de calor excesiva como por ejemplo la luz solar, el fuego o similares.
Nunca arroje las pilas al fuego o con materiales
peligrosos o inamables ya que esto puede provocar
su explosión.
Por favor, recicle las pilas agotadas, no las ponga con
la basura normal del hogar.
Advertencia
No ingiera la pila, peligro de quemaduras químicas.
Este producto o los accesorios suministrados con
el producto pueden contener una pila tipo moneda /
botón. Si la pila de botón es ingerida, puede causar
quemaduras internas graves en solo 2 horas y puede llevar a la muerte.
Mantenga las pilas nuevas y usadas lejos de los niños.
Si el compartimiento de las pilas no se cierra de forma segura, deje de usar el producto y manténgalo
alejado de los niños.
Espanol - 1 -
Page 28

Si usted piensa que las pilas podrían haber sido ingeridas o estar dentro de cualquier parte del cuerpo,
busque atención médica inmediata.
Limpieza
Importante
Desconecte el producto de la fuente de alimentación
antes de limpiarlo.
No limpie su producto mientras está encendido. Utilice
un paño húmedo y suave para limpiar el producto.
No use limpiadores químicos, líquidos, productos
de limpieza rociados o paños húmedos para limpiar
el producto. No limpie el ordenador aplicándole
directamente el limpiador.
Oricios de ventilación de su producto
Los oricios de ventilación en el gabinete de su
producto garantizan un rendimiento estable de su
computadora sin sobrecalentamiento. No bloquee
estas aberturas de ninguna manera.
Importante
No coloque ningún objeto en los oricios de ventilación
de su producto. Esto podría provocar un incendio o
cortocircuito de las partes internas de su producto.
Temperatura e incendios
No coloque su producto cerca de fuego o fuentes
altas de calor
Nota
La información de este manual es solo de referencia.
Las imágenes y las descripciones pueden variar
levemente entre este manual y el producto real que
usted tiene.
INTRODUCCIÓN
Gracias por haber elegido nuestro producto. Esta
guía le ayudará a entender mejor el dispositivo. Por
lo tanto, lea atentamente toda la Guía antes de utilizar
el dispositivo.
Creemos que va a estar extremadamente satisfecho
con este producto y esperamos que usted pase
tiempos agradables y productivos con él.
Este producto proporciona un diseño moderno que es
compatible con todos los productos de señalización
digital normalizada de OPS.
Dado que todos los componentes esenciales que
componen el producto están juntos, es fácil de usar
y es intuitivo.
Rayos
Con el n de evitar un posible choque eléctrico,
desconecte los cables de alimentación de su producto
durante tormentas eléctricas.
Reparación
A menos que una aplicación básica sobre el producto
se especique por el departamento técnico de los
productores en un documento, no repare el producto
por usted mismo. De otro modo, su garantía puede ser
suspendida y pone en riesgo su salud o su producto.
En caso de necesidad, consulte a su centro de
servicio autorizado.
Espanol - 2 -
Page 29

Vista superior
6 7
Vista inferior
Puertos de entrada/salida
Las conexiones se ilustran como se muestra a continuación.
1. Salida HDMI
2. Audio (Entrada y Salida)
3. 2 Puertos USB 2.0
4. 2 Puertos USB 3.0
5. RJ45 10/100 Mbps Ethernet
6. RS232
7. Botón de Encendido/Apagado
8. 2 Conectores de antena WiFi
Espanol - 3 -
Page 30

USANDO SU PRODUCTO MÁS EFECTIVAMENTE
Prestar la atención a los puntos siguientes con respecto
a su producto proporcionará un funcionamiento
estable y también prolongará su vida.
• Garantizar la seguridad de su producto
• El cuidado diario de su producto
Cuidado diario
Factores ambientales
La temperatura ambiente debe estar entre 0°C - 40°C,
mientras que su aparato está en funcionamiento. No
exponga directamente su producto a la humedad, la
temperatura alta, el fuego, la luz directa del sol y el
polvo mientras que lo usa. Los oricios de ventilación
de su producto le permiten funcionar más seguro
sin sobrecalentamiento del sistema. No cubra estos
oricios o no impida el ujo de aire con un objeto.
Su aparato debe estar por lo menos a 15 cm de
distancia de un fuerte campo magnético generado
por dispositivos eléctricos, como el refrigerador o
altavoces grandes. No cambie repentinamente su
aparato de un ambiente frío a uno caliente. Un cambio
brusco de temperatura de 10°C puede causar que
algunos de los componentes internos funcionen mal.
No coloque el producto sobre una supercie irregular.
Puntos a tener en cuenta durante la limpieza del
producto
El sistema debe ser apagado mientras limpia
el aparato. Use un pedazo suave y húmedo de
paño para la limpieza de su supercie. No utilice
limpiadores químicos para limpiar la pantalla. No
aplique directamente el material de limpieza en su
monitor.
SOLUCIÓN DE PROBLEMAS
Algunos temas de solución de problemas se
mencionan en este capítulo en virtud de los siguientes
títulos:
• Puntos a inspeccionar primero
• Preguntas frecuentes
Puntos a inspeccionar primero
Cuando se produce un problema, es muy importante
diagnosticar dicho problema correctamente. Trate
de averiguar qué es. Determine cuál es la causa del
problema y dentro de qué categoría cae. Anote los
códigos de error y los mensajes que aparecen en la
pantalla, si es posible. Póngase en contacto con el
soporte técnico para obtener ayuda.
Espanol - 4 -
Preguntas frecuentes
Problemas de sonido
Problema: El sistema de sonido no funciona.
Revise lo siguiente:
Asegúrese de que el volumen del sonido no esté
bajo y que el sonido no esté silenciado. Asegúrese
de que el controlador de sonido y su aplicación
estén instalados correctamente. Revise las
conexiones de los cables.
Problema: Micrófono externo y dispositivos de audio
que no están trabajando
Revise lo siguiente:
Asegúrese de que los cables están conectados
correctamente y con rmeza. Compruebe que el
controlador está instalado. Revise los ajustes de
sonido y si el sistema se silencia o no.
Problemas relacionados con el encendido del
sistema
Problema: El sistema no se inicia.
Revise lo siguiente:
Asegúrese de que la tensión de alimentación esté
en un rango de CC 12V – CC 19V.
NOTIFICACIONES IMPORTANTES
• Despertar-Inalámbrico LAN (WoWLAN) no es
compatible
• No se admite la conexión hot plug y audio a través
del puerto de Salida de HDMI. En caso de necesitar
extender la imagen a través del cable HDMI, primero
conecte el cable HDMI al puerto de salida HDMI y
luego encienda el OPS.
• A n de utilizar la alarma RTC, asegúrese de que
la conguración de Windows esté congurada de
manera correcta. Ingrese el menú de Centro de
Control > Opciones de Potencia y primero haga
clic en “Elige lo que harán botones de potencia”.
Luego, haga clic en “Cambiar conguraciones
que actualmente no están disponibles” y
asegúrese de que la opción “Activar inicio rápido
(recomendedado)” no esté marcada.
• Solo cuando la contraseña de administrador esté
congurada, puede ingresar al BIOS simplemente
haciendo clic en “Enter (Intro)” cuando aparece
la ventana de contraseña a n de evitar un punto
muerto en caso de que la contraseña se haya
olvidado. Si desea eso, debe establecer tanto la
contraseña de admin y como la de usuario. De esta
manera, no podrá ingresar al BIOS haciendo clic
en “Enter (Intro)” cuando se aparece la ventana
de contraseña.
• Uso de Ubuntu
Page 31

En algunas versiones del sistema operativo Ubuntu,
debido al puerto de salida HDMI en el OPS, la
plataforma en la que está conectado el OPS puede
detectarse como una segunda pantalla.
Cuando no existe señal o no se muestre ningún
menú en la pantalla de conguración o solo se
muestre el fondo después de la instalación de
Ubuntu, ingrese al menú BIOS > Avanzado >
Conguración de potencia y desactive la opción
EDP a HDMI. En este caso, es posible ver la pantalla
de Ubuntu normalmente pero no podrá utilizar el
puerto de salida HDMI del OPS.
Como una alternativa, es posible mantener
pulsado el botón de Windows y pulsar el botón
“P” consecutivamente hasta que vea la pantalla
de Ubuntu y luego configurar la resolución a
1920x1080.
• Los casos mencionados a continuación pueden
cambiar la prioridad de arranque de la SSD/HDD
y, por lo tanto, es posible que el sistema operativo
no pueda iniciarse.
- después de 3 entradas erróneas de contraseña de
BIOS
- después de instalación de un tipo nuevo de SSD/
HDD
- después de que la opción Controlador de Sata en
el menú BIOS > Chipset > Sata y Conguración
RST esté deshabilitada/habilitada
A n de arrancar el sistema operativo de manera
normal, ingrese en menú BIOS > Iniciar y
congure su SSD/HDD como Opción de Inicio#1
o simplemente ingrese al BIOS, seleccione Valores
Predeterminados Optimizados (F9) y pulse Entrar
(Intro). Después seleccionar Guardar y Salir
(F10) y pulsar otra vez Enter (Intro). Como una
alternativa, puede pulsar los botones “F9” y “F10”
para mismas funciones.
Información al usuario sobre el desecho de
baterías y equipos viejos
No debería tirar junto a la basura normal aquellos
equipos que tengan estos símbolos.
Considere los sistemas de recolección o las
instalaciones de reciclaje apropiadas, si quiere
deshacerse del producto
Para más información, contacte con las autoridades
locales o el vendedor donde adquirió este aparato.
Aviso: El símbolo Pb de abajo para la pilas indica que dicha
batería contiene plomo.
Pila
Productos
Espanol - 5 -
Page 32

ESPECIFICACIÓN DEL PC OPS
Modelo OPS-KL756V
®
CoreTM i5-7300U con vPro Support
Intel
CPU
GPU
MEMORIA DE SISTEMA
RED
2 núcleos, 4 hilos
Smart cache 3MB
15W TDP
Grácos Intel
Máx. 4K @30Hz
2 x SO-DIMM DDR4
Hasta 32GB
LAN: Soporte para LAN 10/100/1000 Mbps
WLAN: 802.11 a/c apoyo inalámbrico (opcional)
Bluetooth 4.0 (opcional)
®
HD 620, Integrados
ALMACENAMIENTO
2.5” 500GB HDD
256GB SSD
1 Puerto RS232
1 Puerto RJ45
2 Puertos USB 3.0 (5V CC, 900mA)
Puertos de E/S
2 Puerto USB 2.0 (5V CC, 500mA)
1 x HDMI Salida (solo video, no hot plug)
1 x Audio (Entrada y Salida)
2 x Antena WiFi (opcional)
ESPECIFICACIONES DE SOFTWARE
SISTEMA OPERATIVO Windows 10
ESPECIFICACIONES MECÁNICAS
Dimensiones 180 x 119 x 30 mm (AlxPxAn)
Peso 800 gr/h
Antena IB, QSG
CONSUMO ELÉCTRICO
Alimentación nominal: CC 12V – CC 19V
CC 12V – 3.3A CC 19V – 2.2A
ACCESORIOS
Espanol - 6 -
Page 33

ESQUEMA DE CONEXION
Advertencia
Inserte el OPS en la ranura con la etiqueta de advertencia "Este lado hacia afuera" mirando hacia afuera.
Su producto tiene una interfaz de conexión estándar OPS de 80 pines. La interconexión del producto y otro
tablero (es decir, la placa de acoplamiento, la tarjeta de monitorización o la placa principal ...) es proporcionada
por conectores de enchufe y receptáculo JAE TX / 24TX25.
Izquierda: Conector macho (núm. parte: TX25-80P)
Derecha: Conector hembra (núm. parte: TX24-80P)
Conector macho / TX24 Pinout
Conector hembra / TX24 Pinout
*Imagen de la serie del conector, solo referencia.
Espanol - 7 -
Page 34

CONEXIONES DE PIN (JAE TX25-80)
NRO.
DE PIN
1 NC DisplayPort SALIDA
2 NC DisplayPort SALIDA
3 TOMA DE TIERRA Tierra -
4 NC DisplayPort SALIDA
5 NC DisplayPort SALIDA
6 TOMA DE TIERRA Tierra -
7 NC DisplayPort SALIDA
8 NC DisplayPort SALIDA
9 TOMA DE TIERRA Tierra -
10 NC DisplayPort SALIDA
11 NC DisplayPort SALIDA
12 TOMA DE TIERRA Tierra -
13 NC DisplayPort SALIDA
14 NC DisplayPort SALIDA
15 NC DisplayPort ENTRADA
16 TOMA DE TIERRA Tierra -
17 TMDS_CLK- DVI-D SALIDA
18 TMDS_CLK+ DVI-D SALIDA
19 TOMA DE TIERRA Tierra -
20 TMDS0- DVI-D SALIDA
21 TMDS0+ DVI-D SALIDA
22 TOMA DE TIERRA Tierra -
23 TMDS1- DVI-D SALIDA
24 TMDS1+ DVI-D SALIDA
25 TOMA DE TIERRA Tierra -
26 TMDS2- DVI-D SALIDA
27 TMDS2+ DVI-D SALIDA
28 TOMA DE TIERRA Tierra -
29 DVI_DDC_DATA DVI_D E/S
30 DVI_DDC_CLK DVI_D E/S
31 DVI_HPD DVI_D ENTRADA
32 TOMA DE TIERRA Tierra -
33 +12V~+19V Energía -
34 +12V~+19V Energía -
35 +12V~+19V Energía -
36 +12V~+19V Energía -
37 +12V~+19V Energía -
38 +12V~+19V Energía -
39 +12V~+19V Energía -
40 +12V~+19V Energía -
41 PWROK
42
43 RSVD Pines reservados -
44 RSVD Pines reservados -
Señal Descripción E/S
Encendido del sistema
OK
WAKE
(DESPERTAR)
Despertar sistema SALIDA
SALIDA
Espanol - 8 -
45 RSVD Pines reservados -
46 RSVD Pines reservados -
47 RSVD Pines reservados -
48 RSVD Pines reservados -
49 RSVD Pines reservados -
50 SYS_FAN
51 UART_RXD UART 3,3V ENTRADA
52 UART_TXD UART 3,3V SALIDA
53 TOMA DE TIERRA Tierra -
54 StdA_SSRX- USB3.0 ENTRADA
55 StdA_SSRX+ USB3.0 ENTRADA
56 TOMA DE TIERRA Tierra -
57 StdA_SSTX- USB3.0 SALIDA
58 StdA_SSTX+ USB3.0 SALIDA
59 TOMA DE TIERRA Tierra -
60 USB_PN2 USB E/S
61 USB_PP2 USB E/S
62 TOMA DE TIERRA Tierra -
63 USB_PN1 USB E/S
64 USB_PP1 USB E/S
65 TOMA DE TIERRA Tierra -
66 USB_PN0 USB E/S
67 USB_PP0 USB E/S
68 TOMA DE TIERRA Tierra -
69 AZ_LINEOUT_L Audio-Lch SALIDA
70 AZ_LINEOUT_R Audio-Rch SALIDA
71 CEC
72 PB_DET
73 PS_ON
74 PWR_STATUS PowerGood
75 TOMA DE TIERRA Tierra -
76 TOMA DE TIERRA Tierra -
77 TOMA DE TIERRA Tierra -
78 TOMA DE TIERRA Tierra -
79 TOMA DE TIERRA Tierra -
80 TOMA DE TIERRA Tierra -
Control de ventilador
del sistema
Control de electrónicos
de consumo
Tarjeta con conector
detectada
Señal del conector
ENCENDIDA
SALIDA
E/S
SALIDA
ENTRADA
SALIDA
(OC)
Page 35

INDICE
SIMBOLI USATI NEL PRESENTE MANUALE ....... 1
PRECAUZIONI DI SICUREZZA .............................1
INTRODUZIONE ....................................................2
USO PIÙ EFFICACE
DEL PROPRIO PRODOTTO .................................4
RISOLUZIONE DEI PROBLEMI ............................4
NOTIFICHE IMPORTANTI .....................................4
SPECIFICHE TECNICHE PC OPS ........................6
SCHEMA DI COLLEGAMENTO ............................7
COLLEGAMENTI PIN (JAE TX25-80) ....................8
SIMBOLI USATI NEL PRESENTE
MANUALE
Alcune parole e frasi sono scritte in un formato diverso
per attirare la vostra attenzione.
Avvertenza: Rischio di gravi lesioni o morte
Importante: Le istruzioni importanti vanno lette
con attenzione per evitare danni a sé stessi, ai dati
archiviati e alle componenti del computer
Nota: Le note vengono usate per porre enfasi
su informazioni utili e punti critici relativamente al
prodotto.
PRECAUZIONI DI SICUREZZA
Per evitare che il prodotto venga danneggiato,
estendere il tempo di servizio, e garantire la propria
incolumità in fase di utilizzo, leggere con attenzione
tutta la guida e le relative precauzioni di sicurezza.
Quindi attenersi scrupolosamente alle indicazioni
fornite.
Non scuotere il prodotto. Vericare che mantenga la
sua posizione.
Non lanciare o lasciar cadere oggetti sul prodotto.
Non toccare lo schermo del dispositivo con oggetti
appuntiti.
Non tenere il prodotto in ambienti caratterizzati da
forte umidità.
Non versare acqua o liquidi sul prodotto.
Non tenere il prodotto in ambienti estremamente
caldi o freddi.
Non continuare a premere l’interruttore di
alimentazione o il pulsante di reset (ove disponibile).
Evitare le interruzioni di corrente mentre il sistema
è in funzione; ciò potrebbe danneggiare anche il
sistema operativo.
Alimentazione
Tensione di alimentazione: CC 12V – CC 19V
Avvertenza
Il prodotto va alimentato con un'alimentazione
adeguata SELV conformemente allo standard IEC/EN
60950-1 e la fonte di alimentazione deve rispettare i
requisiti di Fonte di Alimentazione Limitata.
Non scollegare il dispositivo mentre funziona su
qualsiasi prodotto DS.
Non interrompere l'alimentazione del dispositivo
mentre è in funzione. Come prima cosa spegnere
il dispositivo, poi scollegare il dispositivo dalla
piattaforma alla quale è collegato.
Avvertenza
Scollegare il sistema dalla presa di corrente nel caso
in cui si preveda di non usarlo a lungo.
Batteria RTC
Una batteria a bottone alle celle di litio viene
usata come fonte di alimentazione continua per
alimentazione RTC. Una batteria CR2032 viene usata
con potenza 3.0 volt.
ATTENZIONE
RISCHIO DI ESPLOSIONE SE LA BATTERIA
È SOSTITUITA CON UNA DI TIPO NON
CORRETTO. SMALTIRE LE BATTERIE USATE
SECONDO LE ISTRUZIONI.
Importante
Non cambiare la batteria da soli. Dovrebbe essere
sostituita dall'assistenza clienti, acquistandone una
con le stesse specifiche tecniche e dello stesso
modello.
Le batterie non devono essere esposte a calore eccessivo, come luce solare, fuoco o simili.
Non smentire mai le batterie nel fuoco o con materiali
pericolosi o inammabili, dato che ciò può causarne
l’esplosione.
Riciclare le batterie scariche. Non smaltirle insieme
ai normali riuti domestici.
Avvertenza
Non ingerire batterie, pericolo di esplosione chimica.
Il prodotto o gli accessori forniti in dotazione col prodotto potrebbero contenere una batteria a moneta/
bottone. Se la batteria a cella, modello moneta/bot-
tone viene ingoiata, può causare gravi lesioni interne
in sole 2 ore e può portare al decesso.
Tenere lontano dalla portata dei bambini batterie
nuove e batterie usate.
Se lo scomparto batterie non si chiude in modo sicuro, smettere di usare il prodotto e tenerlo lontano
Italiano - 1 -
Page 36

dalla portata dei bambini.
Qualora si ritenga che le batterie vengano ingoiate o
collocate all'interno del corpo, rivolgersi immediatamente a un medico.
Pulizia
Importante
Scollegare il prodotto dall'alimentazione prima di
eettuare la pulizia.
Non pulire il dispositivo mentre è acceso. Servirsi
di un panno morbido e umido per pulire il prodotto.
Non usare detergenti chimici, liquidi, agenti di pulizia
a spruzzo o panni umidi per pulire il prodotto. Non
applicare il detergente direttamente al computer.
Fori di ventilazione del prodotto
I fori di ventilazione sulla struttura del dispositivo
garantiscono prestazioni stabili del computer senza
surriscaldarlo. Non bloccare queste aperture in alcun
modo.
Importante
Non mettere oggetti nei fori di ventilazione del prodotto.
Ciò potrebbe provocare incendi o cortocircuiti alle
componenti interne del prodotto.
Temperatura & Fuoco
Non mettere il prodotto vicino a fonti di calore
eccessivamente elevate.
Nota
Le informazioni nel presente manuale sono
unicamente a ni di riferimento. Le immagini e le
descrizioni potrebbero variare leggermente fra il
contenuto del manuale e il prodotto eettivo.
INTRODUZIONE
Grazie per aver scelto il nostro prodotto. Questa
guida vi aiuterà a capire meglio il dispositivo. Leggere
quindi con attenzione tutta la Guida prima di azionare
il dispositivo.
Riteniamo che resterete estremamente soddisfatti
del prodotto, e speriamo che possiate trascorrere dei
momenti piacevoli con il vostro prodotto.
Questo dispositivo offre un design moderno
compatibile con tutti i prodotti OPS Standardized
Digital Signage.
Dato che tutte le componenti essenziali del prodotto
sono riunite in un unico prodotto, il monitor è facile e
immediato da usare.
Fulmini
Per evitare potenziali scosse elettriche, scollegare
il dispositivo e togliere i cavi del prodotto in caso di
temporali.
Riparazione
A meno che un’implementazione di base del prodotto
non sia indicata dal dipartimento tecnico su un
apposito documento, non riparare il prodotto da soli.
In caso contrario, la garanzia potrebbe venire sospesa
e si corrono gravi rischi a livello di salute o danni al
prodotto. In caso di necessità, rivolgersi al centro
assistenza autorizzato.
Italiano - 2 -
Page 37

Vista dall’alto
6 7
Vista dal basso
Collegamenti ingresso/uscita
I collegamenti vengono illustrati come qui di seguito.
1. Uscita HDMI
2. Audio (uscite ed entrate)
3. 2 x porte USB 2.0
4. 2 x porte USB 3.0
Italiano - 3 -
5. Ethernet RJ45 10/100/1000 Mbps
6. RS232
7. Pulsante On/O
8. 2 connettori antenna WiFi
Page 38

USO PIÙ EFFICACE DEL PROPRIO
PRODOTTO
Prestare attenzione ai seguenti punti relativamente al
prodotto: in questo modo si garantiranno prestazioni
stabili e una lunga durata di vita del dispositivo.
• Garantire la sicurezza del prodotto
• Manutenzione quotidiana del prodotto
Manutenzione quotidiana
Fattori ambientali
La temperatura ambiente deve essere compresa
fra 0°C - 40°C mentre il prodotto è in funzione.
Non esporre direttamente il prodotto a umidità,
temperature elevate, fuoco, luce solare diretta e
polvere mentre è in fase di utilizzo. I fori di ventilazione
del prodotto consentono un utilizzo più sicuro senza
surriscaldamento del sistema. Non coprire questi
fori e non impedire la fuoriuscita dell'aria servendosi
di eventuali oggetti. Posizionare il prodotto ad
almeno 15 cm da forti campi magnetici generati da
dispositivi elettrici quali ad esempio TV, frigoriferi o
grandi altoparlanti. Non prendere improvvisamente il
prodotto da ambienti freddi per collocarlo in ambienti
più caldi. Un'improvvisa variazione di temperatura di
10°C potrebbe causare malfunzionamenti ad alcune
delle componenti interne. Non mettere il prodotto su
superci non stabili.
Punti da prendere in considerazione in fase di
pulizia del prodotto
Il sistema va spento in fase di pulizia del prodotto.
Usare un panno morbido e umido per pulire la
supercie. Non usare detergenti chimici per pulire il
prodotto. Non applicare direttamente il materiale per
la pulizia sul prodotto.
RISOLUZIONE DEI PROBLEMI
Alcuni problemi vengono indicati nei seguenti capitolo
sotto ai seguenti titoli:
• Punti da controllare per primi
• Domande più frequenti
Punti da controllare per primi
Quando si verifica un problema è importante
diagnosticarlo correttamente. Provare a capire di
cosa si tratta. Determinare le cause del problema
nonché la categoria in cui rientra. Annotare i codici di
errore e i messaggi visualizzati a video, ove possibile.
Contattare l'assistenza tecnica per ricevere supporto.
Domande più frequenti
Problematiche di suono
Problema: L'impianto audio non funziona.
Controllare quanto segue:
Vericare che il volume non sia basso e che l'audio
non sia stato disattivato. Vericare che il driver
audio e l'applicazione siano installati correttamente.
Controllare i collegamenti dei cavi.
Problema: Il microfono esterno e i dispositivi per
l'emissione del suono non funzionano
Controllare quanto segue:
Vericare che i cavi siano ssati in modo adeguato
e saldo. Controllare che il driver sia installato.
Controllare le impostazioni audio e vericare che
l'audio del sistema non sia stato disattivato.
Problemi relativamente all'accensione del sistema
Problema: Il sistema non si avvia.
Controllare quanto segue:
Vericare che la tensione di alimentazione sia
compresa nella gamma CC 12V – CC 19V.
NOTIFICHE IMPORTANTI
• Wake-on-Wireless LAN (WoWLAN) non supportato
• Hot plug e audio tramite la porta HDMI Out non sono
supportati. Se si desidera estendere l'immagine
tramite cavo HDMI, collegare prima il cavo HDMI alla
porta HDMI Out e quindi accendere l'OPS.
• Per poter utilizzare l'allarme RTC, assicurarsi
che la congurazione di Windows sia impostata
correttamente. Accedere al menù Centro di
Controllo> Opzioni risparmio energetico e
fare clic su "Scegli cosa faranno i pulsanti
di accensione". Quindi fare clic su "Modifica
impostazioni attualmente non disponibili" e
assicurarsi che l'opzione "Attiva avvio rapido
(consigliato)" sia deselezionata.
• Se è impostata solo la password dell'amministratore,
è possibile accedere al BIOS semplicemente
facendo clic su "Invio" quando viene visualizzata
la nestra della password per evitare un deadlock
nel caso in cui la password sia stata dimenticata.
Se non lo si desidera, impostare sia la password
amministratore che quella utente. In questo modo,
non si potrà accedere al BIOS facendo clic su
"Invio" quando viene visualizzata la nestra della
password.
•Uso Ubuntu
In alcune versioni del sistema operativo Ubuntu,
la piattaforma in cui è collegato l'OPS può essere
Italiano - 4 -
Page 39

rilevata come una seconda schermata a causa della
porta HDMI Out dell'OTP.
In caso di assenza di segnale o di menù non
visualizzato nella schermata delle impostazioni
o dopo lo spostamento di Ubuntu, o se
viene visualizzato solo lo sfondo, accedere
al menù BIOS> Avanzate> Configurazione
alimentazione e disabilitare l'opzione EDP a HDMI.
In questo caso, è possibile visualizzare lo schermo
di Ubuntu normalmente ma non sarà possibile
utilizzare la porta HDMI Out dell'OPS.
In alternativa, è possibile tenere premuto il
pulsante Windows e premere il pulsante "P"
consecutivamente, no a visualizzare la schermata
di Ubuntu e quindi impostare la risoluzione su
1920x1080.
• I casi menzionati di seguito possono cambiare
la priorità di avvio SSD/HDD e quindi il sistema
operativo potrebbe non essere in grado di avviarsi.
- dopo 3 voci errate della password del BIOS
- dopo l'installazione di un nuovo tipo di SSD/HDD
- dopo che l'opzione Sata Controller nel BIOS>
Chipset> Configurazione SATA e RST è
disabilitata/abilitata
Per avviare normalmente il sistema operativo,
accedere al menù BIOS> Boot e impostare SSD/
HDD come Opzione di avvio #1 o semplicemente
accedere al BIOS, selezionare Default ottimizzati
(F9) e premere Invio. Quindi selezionare Salva
ed Esci (F10) e premere nuovamente Invio. In
alternativa, è possibile premere i pulsanti "F9" e
"F10" per le stesse funzioni.
Informazioni per gli utenti sullo smaltimento di
dispositivi e batterie usati
La strumentazione che reca l'indicazione di questi
simboli non va smaltita come normali riuti domestici.
Rimandiamo alle strutture di riciclaggio e ai sistemi
adeguati per lo smaltimento di questi prodotti.
Per maggiori informazioni, contattare le autorità locali
o il rivenditore presso cui è stato acquistato il prodotto.
Avviso: La dicitura Pb posta al di sotto del simbolo delle
batterie indica che queste contengono piombo.
Batteria
Prodotti
Italiano - 5 -
Page 40

SPECIFICHE TECNICHE PC OPS
Modello OPS-KL756V
®
CoreTM i5-7300U con supporto vPro
Intel
CPU
GPU
MEMORIA DI SISTEMA
RETE
2 core, 4 thread
3MB smart cache
15W TDP
®
Intel
HD Graphics 620, Integrata
Max. 4K @30Hz
2 x SO-DIMM DDR4
Fino a 32GB
LAN: Supporto LAN 10/100/1000 Mbps
WLAN: 802.11 a/c supporto wireless (optional)
Bluetooth 4.0 (optional)
ARCHIVIAZIONE
2.5” 500GB HDD
256GB SSD
1 x RS232
1 x RJ45
2 x USB 3.0 (5V CC, 900mA)
Porte I/O
2 x USB 2.0 (5V CC, 500mA)
1 x uscita HDMI (solo video, senza hot plug)
1 x audio (entrata e uscita)
2 x antenna WiFi (optional)
SPECIFICHE SOFTWARE
SISTEMA OPERATIVO Windows 10
SPECIFICHE MECCANICHE
Dimensioni 180 x 119 x 30 mm (LxPxH)
Peso 800 gr
CONSUMO ENERGETICO
Tensione di alimentazione: CC 12V – CC 19V
CC 12V – 3.3A CC 19V – 2.2A
ACCESSORI
IB, QSG, Antenna
Italiano - 6 -
Page 41

SCHEMA DI COLLEGAMENTO
Avvertenza
Inserire l’OPS nell’alloggiamento con l’etichetta di avvertenza “Questo lato verso l’esterno” rivolta verso
l’esterno.
Il prodotto dispone di un’interfaccia di collegamento standard OPS da 80 pin. L'intercollegamento del prodotto
e di un'altra scheda (ad esempio scheda di docking, scheda monitor o scheda principale) è fornita dalla presa
JAE TX/24TX25 e dai connettori della presa.
Sinistra: Connettore presa (p/n: TX25-80P)
Destro: Connettore presa (numero prodotto: TX24-80P)
Connettore presa / TX25 Pinout
Connettore presa / TX24 Pinout
*Immagine della serie di connettori, unicamente a scopo di riferimento.
Italiano - 7 -
Page 42

COLLEGAMENTI PIN (JAE TX25-80)
NUMERO
PIN
1 NC DisplayPort USCITA
2 NC DisplayPort USCITA
3 GND Terra -
4 NC DisplayPort USCITA
5 NC DisplayPort USCITA
6 GND Terra -
7 NC DisplayPort USCITA
8 NC DisplayPort USCITA
9 GND Terra -
10 NC DisplayPort USCITA
11 NC DisplayPort USCITA
12 GND Terra -
13 NC DisplayPort USCITA
14 NC DisplayPort USCITA
15 NC DisplayPort IN
16 GND Terra -
17 TMDS_CLK- DVI-D USCITA
18 TMDS_CLK+ DVI-D USCITA
19 GND Terra -
20 TMDS0- DVI-D USCITA
21 TMDS0+ DVI-D USCITA
22 GND Terra -
23 TMDS1- DVI-D USCITA
24 TMDS1+ DVI-D USCITA
25 GND Terra -
26 TMDS2- DVI-D USCITA
27 TMDS2+ DVI-D USCITA
28 GND Terra -
29 DVI_DDC_DATA DVI_D I/O
30 DVI_DDC_CLK DVI_D I/O
31 DVI_HPD DVI_D IN
32 GND Terra -
33 +12V~+19V Alimentazione -
34 +12V~+19V Alimentazione -
35 +12V~+19V Alimentazione -
36 +12V~+19V Alimentazione -
37 +12V~+19V Alimentazione -
38 +12V~+19V Alimentazione -
39 +12V~+19V Alimentazione -
40 +12V~+19V Alimentazione -
41 PWROK
42 WAKE Risveglio sistema USCITA
43 RSVD Pin riservati -
Segnale Descrizione I/O
Alimentazione sistema
OK
USCITA
44 RSVD Pin riservati -
45 RSVD Pin riservati -
46 RSVD Pin riservati -
47 RSVD Pin riservati -
48 RSVD Pin riservati -
49 RSVD Pin riservati -
50 SYS_FAN
51 UART_RXD UART 3.3V IN
52 UART_TXD UART 3.3V USCITA
53 GND Terra -
54 StdA_SSRX- USB3.0 IN
55 StdA_SSRX+ USB3.0 IN
56 GND Terra -
57 StdA_SSTX- USB3.0 USCITA
58 StdA_SSTX+ USB3.0 USCITA
59 GND Terra -
60 USB_PN2 USB I/O
61 USB_PP2 USB I/O
62 GND Terra -
63 USB_PN1 USB I/O
64 USB_PP1 USB I/O
65 GND Terra -
66 USB_PN0 USB I/O
67 USB_PP0 USB I/O
68 GND Terra -
69 AZ_LINEOUT_L Audio-Lch USCITA
70 AZ_LINEOUT_R Audio-Rch USCITA
71 CEC
72 PB_DET
73 PS_ON Segnale collegabile ON IN
74 PWR_STATUS CorrenteBuona
75 GND Terra -
76 GND Terra -
77 GND Terra -
78 GND Terra -
79 GND Terra -
80 GND Terra -
Controllo ventola
sistema
Controllo elettronico del
consumo
Rilevamento scheda
collegabile
USCITA
I/O
USCITA
OUT
(OC)
Italiano - 8 -
Page 43

SPIS TREŚCI
OZNACZENIA UŻYTE W TEJ INSTRUKCJI ..........1
ZASADY BEZPIECZEŃSTWA................................1
WPROWADZENIE .................................................2
BARDZIEJ EFEKTYWNE
WYKORZYSTANIE URZĄDZENIA. .......................4
ROZWIĄZYWANIE PROBLEMÓW .......................4
WAŻNE POWIADOMIENIA .................................... 4
SPECYFIKACJA OPS PC ......................................6
SCHEMAT POŁĄCZEŃ ......................................... 7
POŁĄCZENIA STYKOWE (JAE TX25-80) .............8
OZNACZENIA UŻYTE W TEJ
INSTRUKCJI
Niektóre wyrazy i zwroty napisane są w innym
formacie, aby przyciągnąć Twoją uwagę.
Ostrzeżenie: Ryzyko poważnych obrażeń lub
śmierci
Ważne: Ważne instrukcje należy uważnie
przeczytać, aby zapobiec zranieniu się, uszkodzenia
części elektronicznych i przechowywanych danych.
Uwaga: Uwagi są po to, aby podkreślić użyteczne
informacje i krytyczne punkty dotyczące urządzenia.
ZASADY BEZPIECZEŃSTWA
Aby zapobiec uszkodzeniu urządzenia, przedłużyć
jego żywotność oraz zapewnić normalne użytkowanie
i bezpieczeństwo osobiste, należy uważnie przeczytać
cały przewodnik i odnośne środki ostrożności i ściśle
przestrzegać zawartych w nim wymagań.
Nie potrząsaj urządzeniem. Upewnij się, że stoi on
stabilnie na swoim miejscu.
Nie rzucaj, ani nie upuszczaj żadnych przedmiotów
na urządzenie.
Nie dotykaj żadnej powierzchni urządzenia ostrymi
przedmiotami.
Nie trzymaj swojego urządzenia w wilgotnym
otoczeniu.
Nie rozlewaj wody ani innych płynów na urządzenie.
Nie trzymaj urządzenia w skrajnie zimnym lub
gorącym otoczeniu.
Nie naciskaj ciągle włącznika zasilania ani przycisku
resetowania (jeśli jest dostępny). Unikaj przerwania
zasilania podczas pracy systemu, co może również
zycznie uszkodzić system operacyjny.
Zasilanie
Znamionowe zasilanie: DC 12V – DC 19V
Ostrzeżenie
Urządzenie musi być zasilane odpowiednim
zasilaczem SELV zgodnie z normą IEC 609501 i zasilacz musi być zgodny z wymaganiami
Ograniczonego Źródła Zasilania.
Nie odłączaj urządzenia, gdy pracuje ono z
urządzeniem DS.
Nie odcinaj zasilania urządzenia DS podczas jego
pracy. Najpierw wyłącz urządzenie, a następnie
odłącz urządzenie od platformy, do której jest
podłączone.
Ostrzeżenie
Odłącz system od zasilania w przypadku dłuższych
okresów jego nieużytkowania.
Bateria RTC
Bateria litowa guzikowa jest używana jako ciągłe
źródło zasilania dla systemu sterowania w czasie
rzeczywistym RTC. Używana jest bateria CR2032 o
napięciu 3,0V.
OSTROŻNIE
RYZYKO WYBUCHU W RAZIE ZASTĄPIENIA
BATERII BATERIAMI NIEWŁAŚCIWEGO TYPU.
POZBĄDŹ SIĘ ZUŻYTYCH BATERII ZGODNIE Z
TYMI ZALECENIAMI.
Ważne
Nie wymieniaj baterii samodzielnie. Powinna ona
zostać wymieniona przez obsługę klienta na baterię
tego samego typu.
Baterii nie wolno wystawiać na działanie źródeł ciepła
takich jak promieniowanie słoneczne, ogień itp.
Nigdy nie wrzucaj baterii do ognia lub wraz z
niebezpiecznymi i łatwopalnymi materiałami,
ponieważ może to spowodować ich wybuch.
Proszę recyklingować zużyte baterie; nie wyrzucaj ich
z odpadami komunalnymi.
Ostrzeżenie
Nie połykaj baterii, ryzyko poparzeń chemicznych
Produkt ten lub dołączone do niego akcesoria mogą
zawierać baterię pastylkową. Jeśli zostanie ona połknięta, może spowodować groźne wewnętrzne poparzenia już w czasie 2 godzin i może doprowadzić
do śmierci.
Trzymaj nowe i zużyte baterie z dala od dzieci.
Jeśli przegródki na baterie nie da się bezpiecznie
zamknąć, przestań korzystać z urządzenia i trzymaj
go z dala od dzieci.
Jeśli podejrzewasz, że baterie mogły zostać połknię-
Polish - 1 -
Page 44

te lub umieszczone w jakiejkolwiek części ciała, natychmiast udaj się do lekarza.
Czyszczenie
Ważne
Przed czyszczeniem urządzenia odłącz go od
zasilania.
Nie czyść swojego urządzenia, gdy jest ono włączone.
Do czyszczenia urządzenia używaj miękkiej i
wilgotnej ściereczki. Do czyszczenia urządzenia nie
należy używać chemicznych środków czyszczących,
płynnych, rozpylonych środków czyszczących ani
mokrej szmatki. Nie nakładaj środka czyszczącego
bezpośrednio na komputer.
Otwory wentylacyjne urządzenia
Otwory wentylacyjne w obudowie urządzenia
zapewniają stabilną pracę komputera i zapobiegają
jego przegrzaniu. Nie blokuj tych otworów w żaden
sposób.
Ważne
Nie wkładaj żadnych przedmiotów do otworów
wentylacyjnych urządzenia. Może to spowodować
pożar lub spięcie we wnętrzu urządzenia.
Temperatura i ogień
Nie umieszczaj urządzenia w pobliżu ognia lub źródeł
nadmiernego ciepła.
Uwaga
Informacje zawarte w tej instrukcji są jedynie
orientacyjne. Ilustracje i opisy w niej zawarte mogą
się nieznacznie różnić od rzeczywistego urządzenia,
które posiadasz.
WPROWADZENIE
Dziękujemy za wybór tego urządzenia. Ten przewodnik
pomoże ci lepiej zrozumieć urządzenie. Dlatego przed
rozpoczęciem korzystania z urządzenia uważnie
przeczytaj cały przewodnik.
Wierzymy, że będziesz niezwykle zadowolony/a z
tego urządzenia i mamy nadzieję, że spędzisz z nim
miłe i produktywne chwile.
Twoje urządzenie posiada nowoczesny design, który
jest kompatybilne ze wszystkimi standardowymi
cyfrowymi urządzeniami informacyjno-reklamowymi
OPS.
Jako że wszystkie istotne części składowe urządzenia
są zgrupowane razem, jest on łatwy i przyjazny użyciu.
Błyskawice
Aby zapobiec możliwemu porażeniu elektrycznemu,
podczas burzy z piorunami, odłącz urządzenie i
wyciągnij wtyczkę z kontaktu .
Naprawa
Poza podstawowymi czynnościami określonymi
przez dział techniczny producenta w dokumencie,
samemu nie naprawiaj urządzenia. W takim
przypadku, gwarancja na produkt może zostać
zawieszona i ryzykujesz przy tym swoim zdrowiem
oraz uszkodzeniem urządzenia. Jeśli to konieczne,
skonsultuj się z autoryzowanym serwisem.
Polish - 2 -
Page 45

Widok z góry
6 7
Widok z dołu
Porty wejść/wyjść
Połączenia są przedstawione w sposób pokazany poniżej.
1. Wyjście HDMI
2. Wejście/wyjście audio
3. 2 x porty USB 2.0
4. 2 x porty USB 3.0
Polish - 3 -
5. RJ45 10/100/1000 Mb/s Ethernet
6. RS232
7. Przycisk włączania/wyłączania
8. 2 złączki anteny WiFi
Page 46

BARDZIEJ EFEKTYWNE WYKORZYSTANIE URZĄDZENIA.
Zwracanie uwagi na poniższe punkty odnoszące
się do Twojego urządzenia zapewni jego stabilne
funkcjonowanie i przedłuży jego żywotność.
• Zapewnienie bezpieczeństwa urządzenia
• Codzienna dbałość o urządzenie
Codzienna dbałość
Czynniki środowiskowe
Podczas korzystania z urządzenia temperatura
otoczenia musi być w przedziale od 0°C do 40°C.
Podczas użytkowania nie wystawiaj urządzenia na
bezpośrednie działanie wilgoci, wysokiej temperatury,
ognia, promieni słonecznych i kurzu. Otwory
wentylacyjne urządzenia pozwolą na jego bezpieczne
działanie bez przegrzewania systemu. Nie zakrywaj
tych otworów i blokuj przepływu powietrza żadnymi
przedmiotami. Umieść swoje urządzenie co najmniej
15 cm od silnego pola magnetycznego wytwarzanego
przez takie urządzenia, jak TV, lodówka lub duże
głośniki. Nie przenoś raptownie urządzenia z zimnego
do ciepłego otoczenia. Nagła zmiana temperatury o
10°C może spowodować awarie niektórych części
wewnętrznych. Nie umieszczaj urządzenia na
nierównej powierzchni.
Co należy wziąć pod uwagę podczas czyszczenia
urządzenia
System musi być wyłączony podczas czyszczenia
urządzenia. Do czyszczenia powierzchni używaj
miękkiej i wilgotnej ściereczki. Nie używaj środków
chemicznych do czyszczenia urządzenia. Nie nakładaj
środka czyszczącego bezpośrednio na urządzenie.
ROZWIĄZYWANIE PROBLEMÓW
Niektóre problemy wspomniane w tym rozdziale
wymienione są pod następującymi tytułami:
• Punkty, które należy sprawdzić w pierwszej
kolejności
• Często zadawane pytania
Punkty, które należy sprawdzić w pierwszej
kolejności
Po wystąpieniu problemu, ważne jest jego poprawne
zdiagnozowanie. Spróbuj dowiedzieć się, na czym on
polega. Dowiedz się, co powoduje problemy i do jakiej
kategorii można je przyporządkować. O ile to możliwe,
zapisz kody błędów i wiadomości wyświetlane na
ekranie. Aby uzyskać pomoc, skontaktuj się z pomocą
techniczną.
Często zadawane pytania
Problemy z dźwiękiem
Problem: System audio nie działa.
Sprawdź następujące rzeczy:
Upewnij się, że głośność nie jest zbyt niska i
że dźwięk nie zastał wyłączony. Upewnij się,
że sterownik dźwięku i jego aplikacja zostały
poprawnie zainstalowane. Sprawdź połączenia
kablowe.
Problem: Mikrofon zewnętrzny i urządzenia
nasłuchujące nie działają
Sprawdź następujące rzeczy:
Upewnij się, że kable są poprawnie i solidnie
podłączone. Sprawdź, czy zainstalowany został
sterownik. Sprawdź ustawienia dźwięku i czy
system nie został wyciszony.
Problemy związane z włączaniem systemu
Problem: System nie uruchamia się.
Sprawdź następujące rzeczy:
Upewnij się, że napięcie zasilania mieści się w
zakresie DC 12V - DC 19V.
WAŻNE POWIADOMIENIA
• Funkcja Wake-on-Wireless LAN (WoWLAN) nie
jest obsługiwana
• Gorąca wtyczka i dźwięk przez port wyjściowy HDMI
nie jest obsługiwany. Jeśli chcesz przedłużyć obraz
za pomocą kabla HDMI, najpierw podłącz kabel
HDMI do portu wyjściowego HDMI, a następnie
włącz tryb OPS.
• Aby użyć alarmu RTC, upewnij się, że twoja
konguracja Windows jest poprawnie ustawiona.
Wejdź do menu Centrum kontrolne>Opcje
zasilania i najpierw kliknij „Wybierz funkcje
przycisków zasilania”. Następnie kliknij „Zmień
ustawienia, które są obecnie niedostępne”
i upewnij się, że opcja „Włącz szybki start
(zalecane)” nie jest zaznaczona.
• Jeśli ustawione jest tylko hasło administratora,
możesz wejść do BIOS-u, klikając „Enter”, gdy
pojawi się okno hasła, aby uniknąć zakleszczenia
w przypadku zapomnienia hasła. Jeśli nie chcesz
tego, powinieneś ustawić hasło administratora
i użytkownika. W ten sposób nie będziesz mógł
wejść do BIOS-u, klikając „Enter”, gdy pojawi się
okno hasła.
• Wykorzystanie Ubuntu
W niektórych wersjach systemu operacyjnego
Ubuntu platforma, w której podłączony jest OPS,
Polish - 4 -
Page 47

może zostać wykryta jako drugi ekran ze względu
na port wyjściowy HDMI na OPS.
W przypadku braku sygnału lub gdy na ekranie
ustawień nie wyświetla się żadne menu lub po instalacji
systemu Ubuntu wyświetlane jest tylko tło, przejdź
do menu BIOS>Zaawansowane>Konfiguracja
zasilania i wyłącz opcję EDP do HDMI. W tym
przypadku możesz normalnie zobaczyć ekran
Ubuntu, ale nie będziesz mógł używać portu
wyjściowego HDMI OPS.
Możesz też przytrzymać przycisk Windows i
naciskać przycisk „P”, aż zobaczysz ekran Ubuntu,
a następnie ustaw rozdzielczość na 1920x1080.
• Przypadki wymienione poniżej mogą zmienić
priorytet rozruchowy dysku SSD/HDD, przez co
system operacyjny może nie uruchomić się.
- po 3 błędnych hasłach BIOS-u
- po instalacji nowego typu dysku SSD/HDD
- po włączeniu/wyłączeniu opcji Sata Controller
w menu BIOS>Chipset>Konfiguracja Sata i
RSTConguration
Aby normalnie uruchomić system operacyjny, wejdź
do menu BIOS> Boot i ustaw SSD/HDD jako Boot
Option # 1 lub po prostu wejdź do BIOS, wybierz
Zoptymalizowane ustawienia domyślne (F9) i
naciśnij Enter. Następnie wybierz opcję Zapisz
i wyjdź (F10) i naciśnij ponownie klawisz Enter .
Można również nacisnąć przyciski „F9” i „F10” dla
tych samych funkcji.
Informacje dla użytkowników odnośnie utylizacji
zużytych urządzeń i baterii
Sprzętu noszącego ten symbol nie wolno wyrzucać
razem ze zwykłymi odpadami komunalnymi.
Aby pozbyć się tych wyrobów, należy poszukać
przeznaczonych do tego celu obiektów i systemów.
Więcej informacji uzyskają Państwo w Urzędzie
Miasta lub w sklepie, w którym zakupili Państwo to
urządzenie.
Uwaga: Litery Pb pod symbolem baterii oznaczają, że bateria
zawiera ołów.
Bateria
Produkty
Polish - 5 -
Page 48

SPECYFIKACJA OPS PC
Model OPS-KL756V
®
Intel
Procesor:
GPU
PAMIĘĆ SYSTEMOWA
SIEĆ
2 rdzenie, 4 wątki
Inteligentna pamięć podręczna 3MB
15W TDP
Zintegrowana karta graczna Intel
Maks. 4K przy 30Hz
2 x SO-DIMM DDR4
Do 32GB
LAN: Obsługa sieci LAN 10/100/1000Mb/s
WLAN : Obsługa bezprzewodowa 802.11 a/c (opcjonalnie)
Bluetooth 4.0 (opcja)
CoreTM i5-7300U z obsługą vPro
®
HD Graphics 620
PAMIĘĆ
Dysk twardy 2,5” o pojemności 500GB
256GB SSD
1 x RS232
1 x RJ45
2 x USB 3.0 (5V DC, 900mA)
Porty I/O
2 x USB 2.0 (5V DC, 500mA)
1 x wyjście HDMI (tylko wideo, bez gorącej wtyczki)
1 wejście/wyjście audio
2 x antena WIFI (opcja)
SPECYFIKACJA OPROGRAMOWANIA
SYSTEM OPERACYJNY Windows 10
Wymiary 180 x 119 x 30 mm (Sz.xG.xW.)
Waga 800g
Znamionowe zasilanie: DC 12V – DC 19V
DC 12V – 3,3A DC 19V – 2,2A
DANE MECHANICZNE
AKCESORIA
IB, QSG, Antena
ZUŻYCIE PRĄDU
Polish - 6 -
Page 49

SCHEMAT POŁĄCZEŃ
Ostrzeżenie
Włóż OPS do gniazda etykietą ostrzegawczą „Ta strona na zewnątrz” na zewnątrz.
Twoje urządzenie posiada standardowy interfejs 80-stykowy OPS. Połączenie między urządzeniem i inną
płytą (tj. płytą dokowania, płytą monitora lub płytą główną...) jest zapewnione przez wtyczki JAE TX/24TX25
i złącza gniazd.
Po lewej: Złącze wtykowe (p/n: TX25-80P)
Po prawej: Złącze gniazda (p/n: TX24-80P)
Złącze gniazda/pinout TX25
Złącze wtyczki/pinout TX24
*Obraz serii złącza, tylko jako odniesienie.
Polish - 7 -
Page 50

POŁĄCZENIA STYKOWE (JAE TX25-80)
Styk
NR
10 NC DisplayPort WYJŚCIE
11 NC DisplayPort WYJŚCIE
12 GND Uziemienie -
13 NC DisplayPort WYJŚCIE
14 NC DisplayPort WYJŚCIE
15 NC DisplayPort WEJŚCIE
16 GND Uziemienie -
17 TMDS_CLK- DVI-D WYJŚCIE
18 TMDS_CLK+ DVI-D WYJŚCIE
19 GND Uziemienie -
20 TMDS0- DVI-D WYJŚCIE
21 TMDS0+ DVI-D WYJŚCIE
22 GND Uziemienie -
23 TMDS1- DVI-D WYJŚCIE
24 TMDS1+ DVI-D WYJŚCIE
25 GND Uziemienie -
26 TMDS2- DVI-D WYJŚCIE
27 TMDS2+ DVI-D WYJŚCIE
28 GND Uziemienie -
29 DVI_DDC_DATA DVI_D I/O
30 DVI_DDC_CLK DVI_D I/O
31 DVI_HPD DVI_D WEJŚCIE
32 GND Uziemienie -
33 +12V~+19V Zasilanie -
34 +12V~+19V Zasilanie -
35 +12V~+19V Zasilanie -
36 +12V~+19V Zasilanie -
37 +12V~+19V Zasilanie -
38 +12V~+19V Zasilanie -
39 +12V~+19V Zasilanie -
40 +12V~+19V Zasilanie -
41 PWROK Zasilanie systemu OK WYJŚCIE
42 BUDZENIE Budzenie systemu WYJŚCIE
43 RSVD Styki zarezerwowane -
Sygnał Opis I/O
1 NC DisplayPort WYJŚCIE
2 NC DisplayPort WYJŚCIE
3 GND Uziemienie -
4 NC DisplayPort WYJŚCIE
5 NC DisplayPort WYJŚCIE
6 GND Uziemienie -
7 NC DisplayPort WYJŚCIE
8 NC DisplayPort WYJŚCIE
9 GND Uziemienie -
44 RSVD Styki zarezerwowane -
45 RSVD Styki zarezerwowane -
46 RSVD Styki zarezerwowane -
47 RSVD Styki zarezerwowane -
48 RSVD Styki zarezerwowane -
49 RSVD Styki zarezerwowane -
50 SYS_FAN System Fan Control WYJŚCIE
51 UART_RXD UART 3,3V WEJŚCIE
52 UART_TXD UART 3,3V WYJŚCIE
53 GND Uziemienie -
54 StdA_SSRX- USB3.0 WEJŚCIE
55 StdA_SSRX+ USB3.0 WEJŚCIE
56 GND Uziemienie -
57 StdA_SSTX- USB3.0 WYJŚCIE
58 StdA_SSTX+ USB3.0 WYJŚCIE
59 GND Uziemienie -
60 USB_PN2 USB I/O
61 USB_PP2 USB I/O
62 GND Uziemienie -
63 USB_PN1 USB I/O
64 USB_PP1 USB I/O
65 GND Uziemienie -
66 USB_PN0 USB I/O
67 USB_PP0 USB I/O
68 GND Uziemienie -
69 AZ_LINEOUT_L Audio-Lch WYJŚCIE
70 AZ_LINEOUT_R Audio-Rch WYJŚCIE
71 CEC
72 PB_DET Pluggable Board Detect WYJŚCIE
73 PS_ON Pluggable Signal ON WEJŚCIE
74 PWR_STATUS PowerGood
75 GND Uziemienie -
76 GND Uziemienie -
77 GND Uziemienie -
78 GND Uziemienie -
79 GND Uziemienie -
80 GND Uziemienie -
Consumer Electronic
Control
I/O
WYJŚCIE
(OC)
Polish - 8 -
Page 51

TR: İşbu belgede; VESTEL Elektronik Sanayi ve Ticaret A.Ş.,
telsiz ekipmanı tipi OPS’in 2014/53/AB sayılı direktife uygun
olduğunu beyan eder. AB uygunluk beyanının tam metni
internet adresinde mevcuttur: doc.vosshub.com
EN: Hereby, VESTEL Elektronik Sanayi ve Ticaret A.Ş., declares
that the radio equipment type OPS is in compliance with
Directive 2014/53/EU. The full text of the EU declaration of
conformity is available at the following internet address: doc.
vosshub.com
BG: С настоящото VESTEL Elektronik Sanayi ve Ticaret A.Ş.,
декларира, че този тип радиосъоръжение OPS е в
съответствие с Директива 2014/53/ЕС. Цялостният текст
на ЕС декларацията за съответствие може да се намери
на следния интернет адрес: doc.vosshub.com
CS: Tímto VESTEL Elektronik Sanayi ve Ticaret A.Ş., prohlašuje,
že typ rádiového zařízení OPS je v souladu se směrnicí
2014/53/EU. Úplné znění EU prohlášení o shodě je k dispozici
na této internetové adrese: doc.vosshub.com
DA: Hermed erklærer VESTEL Elektronik Sanayi ve Ticaret A.Ş.,
at radioudstyrstypen OPS er i overensstemmelse med direktiv
2014/53/EU. EU-overensstemmelseserklæringens fulde tekst
kan ndes på følgende internetadresse: doc.vosshub.com
DE: Hiermit erklärt VESTEL Elektronik Sanayi ve Ticaret A.Ş., dass
der Funkanlagentyp OPS der Richtlinie 2014/53/EU entspricht.
Der vollständige Text der EU-Konformitätserklärung ist unter
der folgenden Internetadresse verfügbar: doc.vosshub.com
EL: Με την παρούσα ο/η VESTEL Elektronik Sanayi ve Ticaret
A.Ş., δηλώνει ότι ο ραδιοεξοπλισμός OPS πληροί την οδηγία
2014/53/ΕΕ. Το πλήρες κείμενο της δήλωσης συμμόρφωσης
ΕΕ διατίθεται στην ακόλουθη ιστοσελίδα στο διαδίκτυο: doc.
vosshub.com
ES: Por la presente, VESTEL Elektronik Sanayi ve Ticaret
A.Ş., declara que el tipo de equipo radioeléctrico OPS es
conforme con la Directiva 2014/53/UE. El texto completo
de la declaración UE de conformidad está disponible en la
dirección Internet siguiente: doc.vosshub.com
ET: Käesolevaga deklareerib VESTEL Elektronik Sanayi ve Ticaret
A.Ş., et käesolev raadioseadme tüüp OPS vastab direktiivi
2014/53/EL nõuetele. ELi vastavusdeklaratsiooni täielik tekst
on kättesaadav järgmisel internetiaadressil: doc.vosshub.com
FI: VESTEL Elektronik Sanayi ve Ticaret A.Ş., vakuuttaa, että
radiolaitetyyppi OPS on direktiivin 2014/53/EU mukainen. EUvaatimustenmukaisuusvakuutuksen täysimittainen teksti on
saatavilla seuraavassa internetosoitteessa: doc.vosshub.com
FR: Le soussigné, VESTEL Elektronik Sanayi ve Ticaret A.Ş.,
déclare que l’équipement radioélectrique du type OPS est
conforme à la directive 2014/53/UE. Le texte complet de
la déclaration UE de conformité est disponible à l’adresse
internet suivante: doc.vosshub.com
HR: VESTEL Elektronik Sanayi ve Ticaret A.Ş., ovime izjavljuje da
je radijska oprema tipa OPS u skladu s Direktivom 2014/53/
EU. Cjeloviti tekst EU izjave o sukladnosti dostupan je na
sljedećoj internetskoj adresi: doc.vosshub.com
HU: VESTEL Elektronik Sanayi ve Ticaret A.Ş., igazolja, hogy
a OPS típusú rádióberendezés megfelel a 2014/53/EU
irányelvnek. Az EU-megfelelőségi nyilatkozat teljes szövege
elérhető a következő internetes címen: doc.vosshub.com
IT: Il fabbricante, VESTEL Elektronik Sanayi ve Ticaret A.Ş.,
dichiara che il tipo di apparecchiatura radio OPS è conforme
alla direttiva 2014/53/UE. Il testo completo della dichiarazione
di conformità UE è disponibile al seguente indirizzo Internet:
doc.vosshub.com
LT: Aš, VESTEL Elektronik Sanayi ve Ticaret A.Ş., paOPSirtinu,
kad radijo įrenginių tipas OPS atitinka Direktyvą 2014/53/
ES. Visas ES atitikties deklaracijos tekstas prieinamas šiuo
interneto adresu: doc.vosshub.com
LV: Ar šo VESTEL Elektronik Sanayi ve Ticaret A.Ş., deklarē,
ka radioiekārta OPS atbilst Direktīvai 2014/53/ES. Pilns ES
atbilstības deklarācijas teksts ir pieejams šādā interneta
vietnē: doc.vosshub.com
MT: B’dan, VESTEL Elektronik Sanayi ve Ticaret A.Ş., niddikjara
li dan it-tip ta’ tagħmir tar-radju OPS huwa konformi madDirettiva 2014/53/UE. It-test kollu tad-dikjarazzjoni ta’
konformità tal-UE huwa disponibbli f’dan l-indirizz tal-Internet
li ġej: doc.vosshub.com
NL: Hierbij verklaar ik, VESTEL Elektronik Sanayi ve Ticaret
A.Ş., dat het type radioapparatuur OPS conform is met
Richtlijn 2014/53/EU. De volledige tekst van de EUconformiteitsverklaring kan worden geraadpleegd op het
volgende internetadres: doc.vosshub.com
PL: VESTEL Elektronik Sanayi ve Ticaret A.Ş., niniejszym
oświadcza, że typ urządzenia radiowego OPS jest zgodny
z dyrektywą 2014/53/UE. Pełny tekst deklaracji zgodności
UE jest dostępny pod następującym adresem internetowym:
doc.vosshub.com
PT: O(a) abaixo assinado(a) VESTEL Elektronik Sanayi ve Ticaret
A.Ş., declara que o presente tipo de equipamento de rádio
OPS está em conformidade com a Diretiva 2014/53/UE. O
texto integral da declaração de conformidade está disponível
no seguinte endereço de Internet: doc.vosshub.com
RO: Prin prezenta, VESTEL Elektronik Sanayi ve Ticaret
A.Ş., declară că tipul de echipamente radio OPS este în
conformitate cu Directiva 2014/53/UE. Textul integral al
declarației UE de conformitate este disponibil la următoarea
adresă internet: doc.vosshub.com
SK: VESTEL Elektronik Sanayi ve Ticaret A.Ş., týmto vyhlasuje,
že rádiové zariadenie typu OPS je v súlade so smernicou
2014/53/EÚ. Úplné EÚ vyhlásenie o zhode je k dispozícii na
tejto internetovej adrese: doc.vosshub.com
SL: VESTEL Elektronik Sanayi ve Ticaret A.Ş., potrjuje, da je tip
radijske opreme OPS skladen z Direktivo 2014/53/EU. Celotno
besedilo izjave EU o skladnosti je na voljo na naslednjem
spletnem naslovu: doc.vosshub.com
SV: Härmed försäkrar VESTEL Elektronik Sanayi ve Ticaret A.Ş.,
att denna typ av radioutrustning OPS överensstämmer med
direktiv 2014/53/EU. Den fullständiga texten till EU-försäkran
om överensstämmelse nns på följande webbadress: doc.
vosshub.com
Page 52

Page 53

Page 54

Page 55

Page 56

Vestel Trade Co.
Organize Sanayi Bölgesi, 45030 Manisa/Türkiye
Phone: 90 - 236 233 25 82
Fax: 90 - 236 233 25 84
vesteltrade@vestel.com.tr
www.vestel.com.tr
Vestel Benelux B.V.
P.O. Box 29179 3001 GD - Rotterdam / Netherlands
Phone: 31 - 10 235 1000
Fax: 31 - 10 235 1003
info@vestelbenelux.nl
www.vestelbenelux.nl
Vestel France S.A.
17 Rue de la Couture-Silic BP 10190-94563 RUNGIS
Cedex/France
Phone: 33 - 1 46 75 00 29
Fax: 33 - 1 41 80 99 31
vestel@vestel-france.fr
Vestel Germany GmbH
Parkring 6, D-85748 Garching b. München/Germany
Phone: 49 - 89 55295 - 0
Fax : 49 - 89 55295 - 2000
info@vestel-germany.de
www.vestel-germany.de
Vestel Iberia
Spain
Phone: 34-91 320 63 98
Fax: 34-91 320 52 58
vestel@vestel.es www.vestel.es
Gruppo Industriale Vesit S.P.A
Società Unipersonale Via Polidoro da Caravaggio,
6 20156 Milano (MI)
Phone: +39 02 842 48577
Fax: +39 02 842 48617
info@givesit.it www.givesit.it
Vestel Scandinavia
Postikatu 4, FI-04400 Jârvenpââ / Finland
Phone: +358 46 712 2262
Fax: +358 (0) 9 251 7 8222
Vestel CIS Ltd.
1-st Graivoronovsky Proezd, No.20 Building 16, 109518,
Moscow /Russia Phone: 7 - 095 956 8230
Fax: 7 - 095 956 8233
Vestel Electronica
Str Zidarului nr 9-11, Sector 5 Bucuresti, ZIP 051765
Bucharest/Romania
Phone: 40- 31 425 42 93
Fax: 40-31 425 42 95
Vestel UK Ltd
Vestel House, Waterside Drive
Langley, Berkshire SL3 6EZ
Phone: 44 3330 146 400
info@vestel-uk.com
www.vestel.co.uk
 Loading...