

Page 1
TELEViZYON
KULLANIM KILAVUZU
OPERATING INSTRUCTIONS
SATELLITE 40FA5000 40” LED TV
Page 2
İçindekiler
GüvenlikBilgileri............................................ 1
Başlangıç....................................................... 2
Bilgiler&Özellikler&Aksesuarlar.......................... 2
PilleriUzaktanKumandanızaYerleştiriniz.............. 2
FişiTakın............................................................... 3
AntenBağlantısı..................................................... 3
Özellikler................................................................. 4
UzaktanKumanda................................................. 5
Bağlantılar.............................................................. 6
MedyaTarayıcıMenüsü......................................... 8
TVMenüÖzellikleriveİşlevleri.............................. 9
GenelTVÇalışması..............................................11
KanalListesininKullanılması.................................11
YetişkinAyarlarınıYapılandırma............................11
ElektronikProgramRehberi(EPG).......................11
YazılımYükseltme................................................ 12
SorunGidermeveİpuçları.................................... 12
AVveHDMISinyalUyumu.................................. 13
Güvenlik Bilgileri
Sert hava şartlarında (fırtına, yıldırımlar)ve
DİKKAT
ELEKTRİK ÇARPMA RİSKİ
AÇMAYINIZ
DİKKAT: ELEKTRİKÇARPMARİSKİNİAZALTMAKİÇİNKAPAĞI
(VEYAARKAKISMI)ÇIKARMAYINIZ.İÇERİDE
KULLANICITARAFINDANBAKIMYAPILABİLECEK
HERHANGİBİRPARÇABULUNMAMAKTADIR.
SERVİSİŞLEMLERİNİUZMANSERVİS
PERSONELİNEYAPTIRINIZ.
uzunsürekullanılmayacağızamanlarda(tatil),
TV'ninşiniçekin.ElektrikkablosuTV’setinin
elektrikşebekesiileolanbağlantısınınkesilmesi
içinkullanılır,dolayısıile halihazırdaişleyebilir
kalacaktır.
Buişaret,cihazlabirlikteverilendokümanlarda,
cihazınişletimvebakımıylailgiliönemlibilgilerin
olduğunubelirtir.
TV’nizi aşırı ortam koşullarında çalıştırmak cihaza
zarar verebilir.
Not: Özellikleri kullanmak için ekranda verilen talimatları
izleyiniz.
ÖNEMLİ - Kurulum veya Çalıştırma Öncesinde Bu Talimatları Tam Olarak Okuyunuz
• TV'yi direktgüneş ışığına, ateşe maruz
UYARI: Fiziksel, algısal veya zihinsel olarak
yetersiz veya deneyimsiz kişiler (çocuklar dahil)
güvenliklerinden sorumlu olan bir kişinin gözetimi
olmadan elektrikli bu cihazı kullanmamalıdır.
•Havalandırmaamacıylaaletetrafındaenaz10cm
boşalanbırakınız.
• Hiçbir havalandırma deliğini engellemeyiniz.
• TV’yieğimliveyadengesizyüzeylerekoymayınız;
TVdevrilebilir.
•Bucihazıılımaniklimlerdekullanınız.
•Güç kablosu kolaylıkla erişilebilir olmalıdır.Güç
kablosuüzerine TV,mobilya,vs. yerleştirmeyiniz
veyakabloyubükmeyiniz.Hasargörmüş bir güç
kablosu/şyangınaveyaelektrikçarpmasınaneden
olabilir.Güç kablosunu şten tutunuz,kablodan
çekerekprizdençıkarmayınız.Güçkablosuna/şe
aslaıslakellerledokunmayınız;bunuyapmakkısa
bırakmayın, elektrikli ısıtıcılar gibi ısı
kaynaklarının yakınına yerleştirmeyin.
Kulaklıklarıyüksek seviyeleriyle kullanmak,
duymakaybınanedenolabilir.
• TV’nin üzerine, yananmumlar gibi hiçbir çıplak
ateşkaynağınınkoyulmadığındaneminolunuz.
• Yaralanmalarıönlemekiçin,kurulumtalimatlarınauygunolarak
sağlamşekildeduvaratutturulmalıdır(buseçenekmevcutsa).
• Ara sıra ekranda sabit noktalar halinde mavi,yeşil
veyakırmızı bir kaç ölü pikselbelirebilir.Lütfen bunun
ürününüzünçalışmasını etkilemediğini göz önünde
bulundurunuz. Ekranı tırnaklarınızla veya sertcisimlerle
çizmemeyeözengösteriniz.
• Ürünün montajı tüketici veya yetkili servis tarafından
yapılabilir.
• Temizlemedenönce TV’nin fişiniprizden çekiniz. Temizlik
yaparkensadeceyumuşakvekurubirkumaşkullanınız.
Uyarı
Ciddiyaralanmaveyaölümtehlikesi.
devreye veya elektrik çarpmasına neden olabilir.
Güç kablosunu asla düğümlemeyiniz veya başka
kablolarlabirliktebağlamayınız.Hasargördüğünde,
yalnızcayetkilipersoneltarafındandeğiştirilmelidir.
•Başka biramaçlakullanmayınız.TV’yidoğrudan
sıvıya maruz bırakmayınız. Eğer kabinin üzerine
sıvıdökülecekolursa,TV’ninşiniçekinizvetekrar
çalıştırmadanöncevasııelemantarafındankontrol
ettiriniz.
Elektrikçarpması
tehlikesi
Dikkat
Önemli
Uyarı
Tehlikelivoltaj.
Yaralanmaveya eşyalara zarar
gelmeriski.
Sistemidüzgünbiçimdeçalıştırma.
Eknotlarişaretlenmiştir.
Türkçe- 1 -
Page 3
Başlangıç
Bilgiler & Özellikler & Aksesuarlar
Çevresel Bilgi
Butelevizyonçevreninkorunmasınayardımcıolmak
içindaha azenerjitüketecekşekildetasarlanmıştır.
Enerji tüketimini azaltmak için aşağıdaki adımları
gerçekleştirmelisiniz:
EğerGüçTasarrufModunuEcoolarakayarlarsanız,
TVenerji tasarrufmodunageçecektir.GüçTasarruf
Modu ayarları, ana Menünün 'Görüntü' bölümünde
bulunabilir.Bazıgörüntüayarlarınınkullanılabilirveya
değiştirilebilirolmadığınıunutmayın.
GörüntüKapalıfonksiyonuseçiliyse,“Ekran 3 saniye
sonra kapanacak.” mesajıekranda görüntülenir.
DEVAM ET’iseçinizvedevametmekiçinOKtuşuna
basınız.Ekranhemenkapanacaktır.
KullanılmadığındaTV’yi kapatınız veşini prizden
çekiniz.Budaenerjitüketiminiazaltacaktır.
Bekleme Bildirileri
1)Eğer5dakikaboyuncahiçbirgirişsinyalialmazsa
(örneğin,karasalantenyadaHDMIkaynaktan),TV
bekleme moduna geçecektir. Bir sonrakiaçılışta,
aşağıdaki mesaj görüntülenecektir.“Uzunca bir
süre boyunca sinyal alınamaması nedeniyle TV
otomatik olarak bekleme moduna geçti.” Devam
etmekiçinOKtuşunabasın.
2)EğerTV açık bırakılırsave 4 saatboyunca
çalışıyorsa,TV bekleme moduna geçecektir. Bir
sonrakiaçılışta,aşağıdakimesajgörüntülenecektir.
“Uzunca bir süre boyunca işlem yapılmaması
nedeniyle TV otomatik olarak bekleme moduna
geçti.” DevametmekiçinOKtuşunabasın.
Aksesuarlar
•UzaktanKumanda
•Piller:2XAAA
•KullanmaKılavuzu
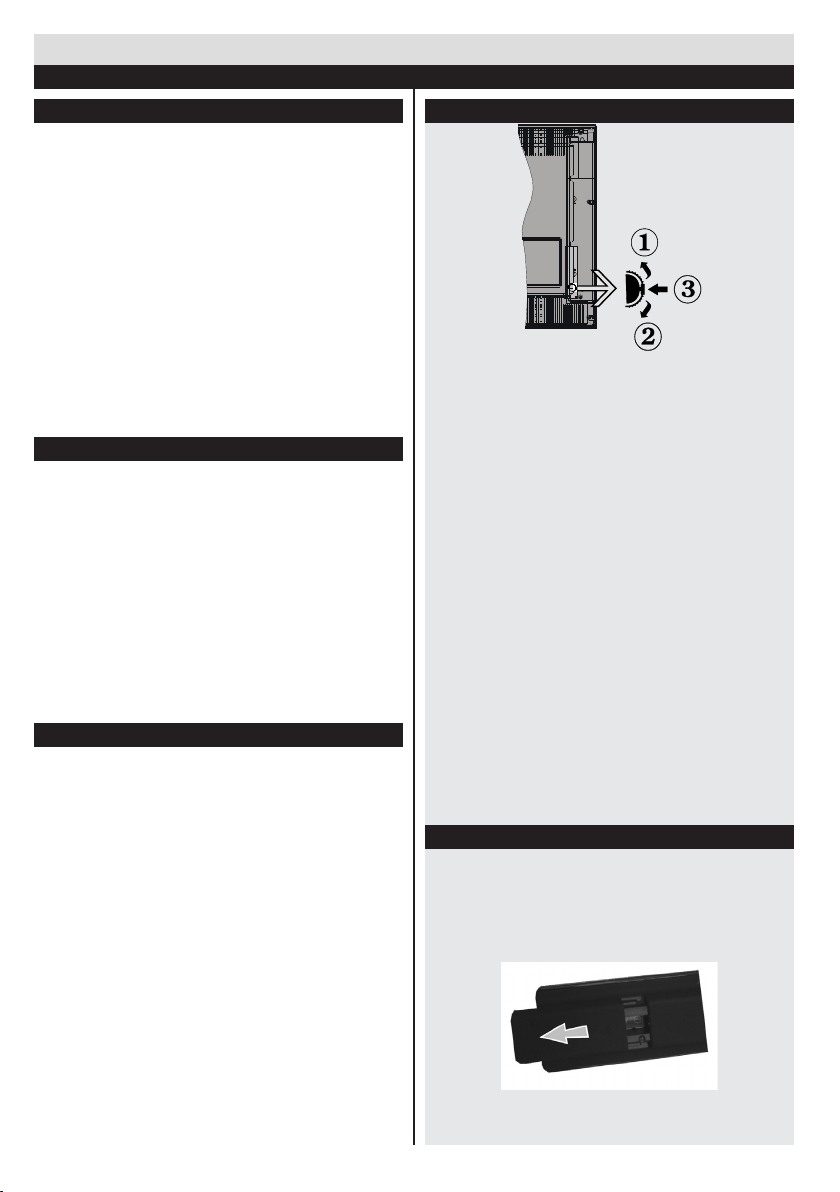
TV Kontrol Tuşu ve Çalıştırma
1. Yukarı
2.Aşağı
3.Program/Ses/AV/Bekleme-Açıkseçimdüğmesi
Kontrol düğmesi, Ses/Program/Kaynak kontrolü
yapmanızı ve TV'nin Bekleme-Açık fonksiyonlarını
kontroletmenizisağlar.
Ses seviyesini değiştirmek için: Yukarıdüğmesine
basarak ses seviyesini artırın. Aşağı düğmesine
basaraksesseviyesiniazaltın.
Kanal değiştirmek için: Düğmenin ortasına
bastığınızda ekranda kanal bilgisi sembolü
görüntülenecektir.Yukarı ve aşağı düğmelerine
basarakkayıtlıkanallararasındagezinin.
Kaynağı değiştirmek için:Düğmeninortasınaikikere
bastığınızdaekrandakaynaklistesigörüntülenecektir.
Yukarıve aşağı düğmelerine basarakmevcut
kaynaklararasındagezinin.
TV'yi kapatmak için:Ortadüğmeyebasınvebirkaç
saniyebasılıtutun,TVbeklememodunageçecektir.
Pilleri Uzaktan Kumandanıza Yerleştiriniz
Kumandanınarkasındakikapakçığınazikçeyukarı
doğrukaldırınız.İkiadetAAApilyerleştiriniz.Pilin
+ve–uçlarıilepilbölmesindekilerineşleştiğinden
eminolunuz(doğrukutuplaradikkatediniz).Kapağı
kapatınız.
Türkçe- 2 -
Page 4
Fişi Takın
ÖNEMLİ: Bu TV,220-240V AC, 50 Hz prizile
çalışacakşekilde tasarlanmıştır. Kutuyu açtıktan
sonraelektrikşebekesinebağlamadanönceTV'nin
oda sıcaklığına kadarçıkmasını bekleyiniz. Güç
kablosunu,anasoketçıkışınatakınız.
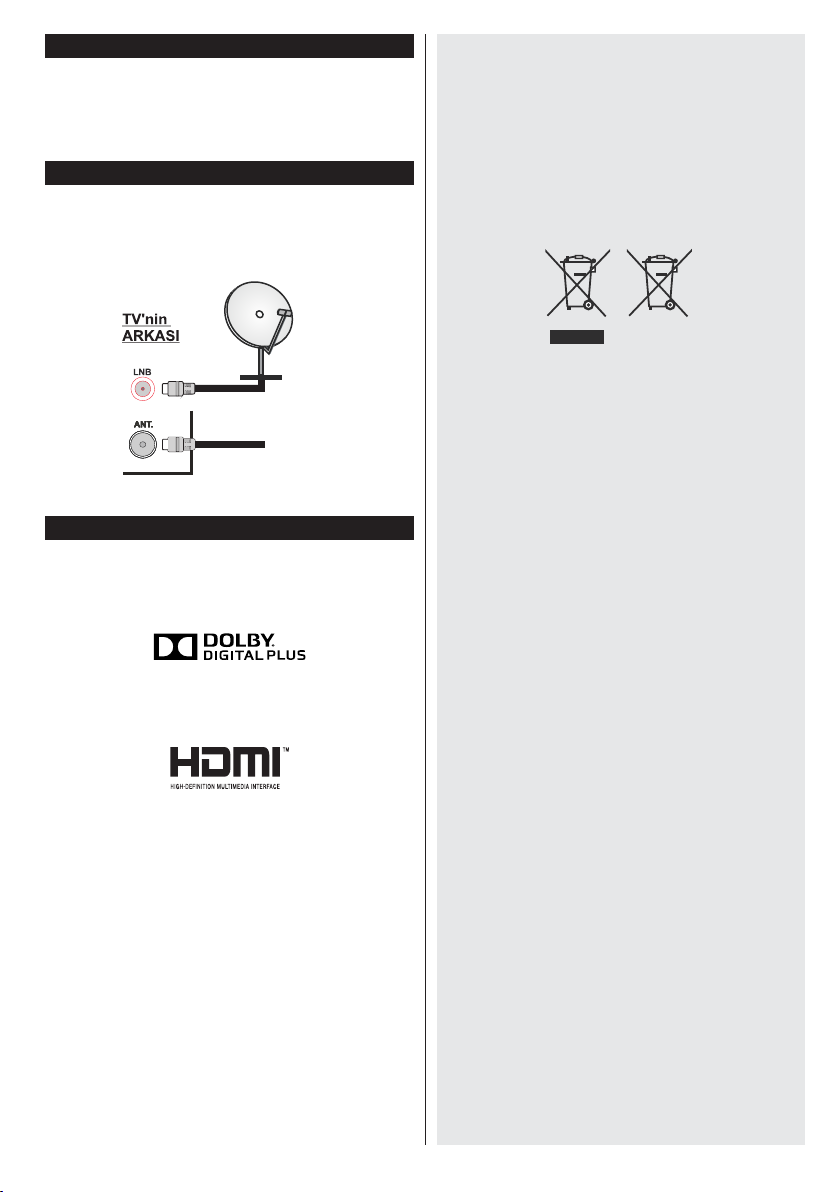
Anten Bağlantısı
AntenveyakabloluTVşini,TV'ninarkasındabulunan
ANTENGİRİŞİ(ANT)soketineveyauyduşiniUYDU
GİRİŞİ(LNB)soketinetakınız.
Uydu
Anten
veya
kablo
Bilgi
DolbyLaboratories’inlisansıileüretilmiştir.
TİCARİ MARKA BİLGİSİ
“Dolby”veçiftD-sembolü,DolbyLaboratories’inticari
markalarıdır.
Kullanıcılar için Eski Donanım ve Pillerin Atılması
Üzerine Bilgi
Bu sembollere sahipdonanım sıradan ev
atıklarıylaaynı şekilde bertaraf edilmemelidir.
Ürünüveyapilibertarafetmekistiyorsanızlütfen
uygun geri dönüşümiçin toplama sistemlerini
veyatesislerinikullanınız.
Dikkat:Pilinkurşuniçermesidurumunda,pilleriçin
aşağıdaverilentekerleklikonteynerşeklialtında
“Pb”işaretiyeralır.
Pil
Ürünler
"HDMI,HDMIlogosuveHighDenitionMultiMedia
Interface,HDMI licensing, LLC firmasının ticari
markalarıveyatescillimarkalarıdır."
Türkçe- 3 -
“AEEE Yönetmeliğine uygundur.”
Page 5
Özellikler Özellikler
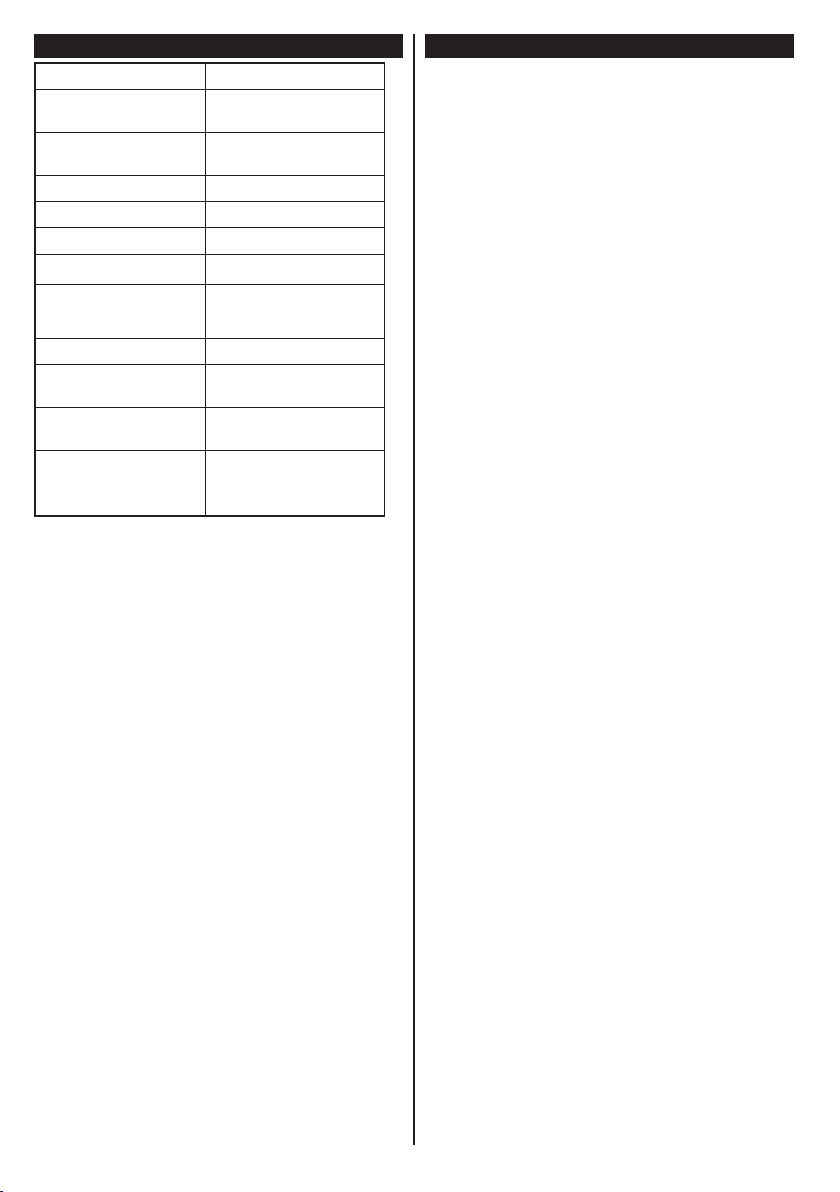
TV Yayını PALB/GD/KKI/I’
Alınan Kanallar
Kayıtlı Kanalların
Sayısı
Kanal Göstergesi EkranGörüntüsü
RF Anten Girişi 75Ohm(dengesiz)
Çalışma voltajı 220-240VAC,50Hz.
Ses German+NicamStereo
Ses Çıkış Gücü
(WRMS.) (%10 THD)
Güç Tüketimi 75 W
TV Boyutları DxLxH
(ayak ile)
TV Boyutları DxLxH
(ayak olmadan)
VHF(BANDI/III)-UHF
(BANDU)-HYPERBAND
10000
2 x 6
220x923x588
39/68x923x544
•UzaktankumandalırenkliTV.
•Tamentegredijital/kablolu/uyduTV(DVB-T/C/S-S2)
•HDMI girişleri, HDMI yuvası olan bir cihaza
bağlanmakiçindir.
•USBgirişi.
•OSDmenüsüsistemi.
•Harici aygıtlar için scartsoketi vardır.(DVD
oynatıcılar,PVR,videooyunları,vb.).
•Stereosessistemi.
•Teletext.
•Kulaklıkbağlantısı.
•OtomatikProgramlamaSistemi.
•Manuelayarlama.
•Altısaatekadarotomatikkapanma.
•OtomatikKapanma
•Çocukkilidi.
•İletimyokkenotomatikseskısma.
İşletim sıcaklığı ve
nemi
0ºCila40ºC,maks.%85
bağılnem
Yukarıda gösterilen ürün teknik özellikleri, ürün fonksiyonlarının yükseltilmesinden dolayı önceden
haber vermeksizin değiştirilebilir.
Türkçe- 4 -
Page 6
TV
Başlangıç
Uzaktan Kumanda
Teleteks
Girmek için, “
etkinleştirmekiçinyenidenbasın.Çıkmakiçinbirkezdaha
basın.Dijitalteletekstekranındagörüntülenentalimatlarıtakip
ediniz.
Dijital Teleteks (sadece İngiltere için)
Dijital teletext bilgilerini görüntülemek için,“
basınız.Renklituşları,imleçtuşlarınıveOKtuşunukullanınız.
Kullanımyöntemi, dijital teletekstin içeriğine bağlıolarak
farklılıkgösterebilir.Dijitalteletekstekranındagörüntülenen
talimatlarıtakip ediniz. “ ”tuşuna basıldığında, TV
televizyonyayınınageridöner.
Tuşum 1 kullanımı (*)
İstenilenbir kaynak, kanalveya bağlantı üstünde
ekranda“TUŞUMAYARLANDI”mesajı gösterilene
kadarbeşsaniyeboyuncaTUŞUM1’ebasın.Busayede
seçilenTUŞUM’unartıkseçilenfonksiyonlaeşleştirildiği
doğrulanır.
”tuşuna basınız. Karışık modunu
”tuşuna
Türkçe- 5 -
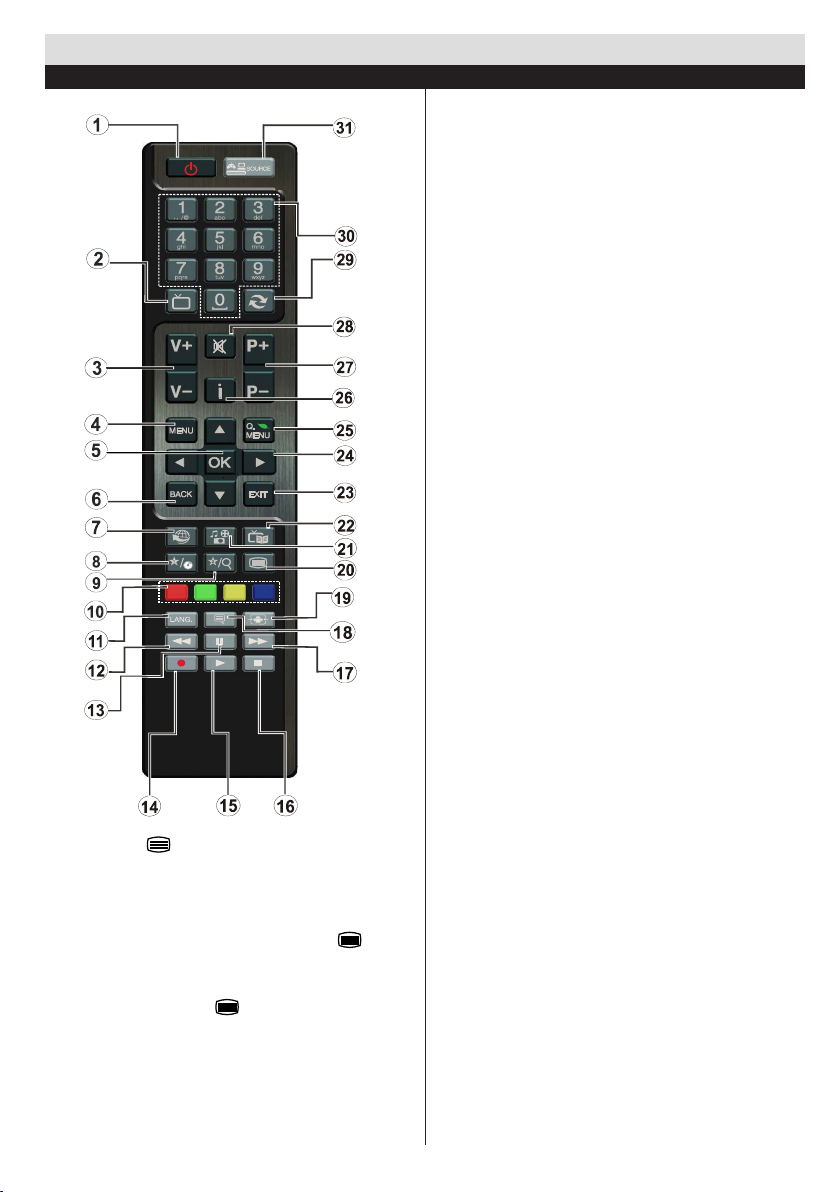
1. Bekleme/Açma
2. TV-AV/TVKanallistesi
3. SesiAzalt/Arttır
4. Menüaçık/kapalı
5. OK(Onayla)/Tut(TXTmodunda)
6. Geri/DizinSayfaları(TXTmodunda)
7. İşlevyok
8. Tuşum1(*)
9. Tuşum2(**)
10. RenkliTuşlar(Kırmızı/Yeşil/Sarı/Mavi)
11. Mono-StereoDualI-II/Mevcutdil(DVB
kanalları)
12. Hızlıgerisarma(OrtamTarayıcıvideo
modunda)
13. Duraklat(Ortamtarayıcıvideomodunda)
14. İşlevYok
15. Oynat(ortamtarayıcıvideomodunda)
16. Durdur(ortamtarayıcıvideomodunda)
17. Hızlıilerisarma(Ortamtarayıcıvideomodunda)
18. Altyazıaçık-kapalı(DVBkanallarında&ortam
tarayıcıvideomodunda)
19. ResimBoyutu
20. Teleteks-Miks
21. OrtamTarayıcı
22. Elektronikprogramrehberi(DVBkanallarında)
23. Çıkış
24. Yöntuşları
25. HızlıMenü
26. Bilgi/Göster(TXTmodunda)
27. ProgramYukarı–Aşağı
28. Sessiz
29. Biröncekiprogram
30. Rakamtuşları
31. AV/Kaynak
Tuşum 2 kullanımı (**)
Bu tuşun ana fonksiyonuDVB-T, DVB-C veDVB-S
yayınlarıarasındageçişyapmaktır.Ancak,TUŞUM2’ye
beş saniye boyunca basarsanızbir fonksiyonu Tuşum
1’deaçıklananşekildebunaayarlayabilirsiniz.
İlk kurulumu yapıyorsanız TUŞUM 2’ninvarsayılan
fonksiyonageri dönerek DVB-T,DVB-C ve DVB-S
yayınlarıarasındageçişyapacağınıunutmayın.
Page 7
HEADPHONE
Başlangıç
Bağlantılar
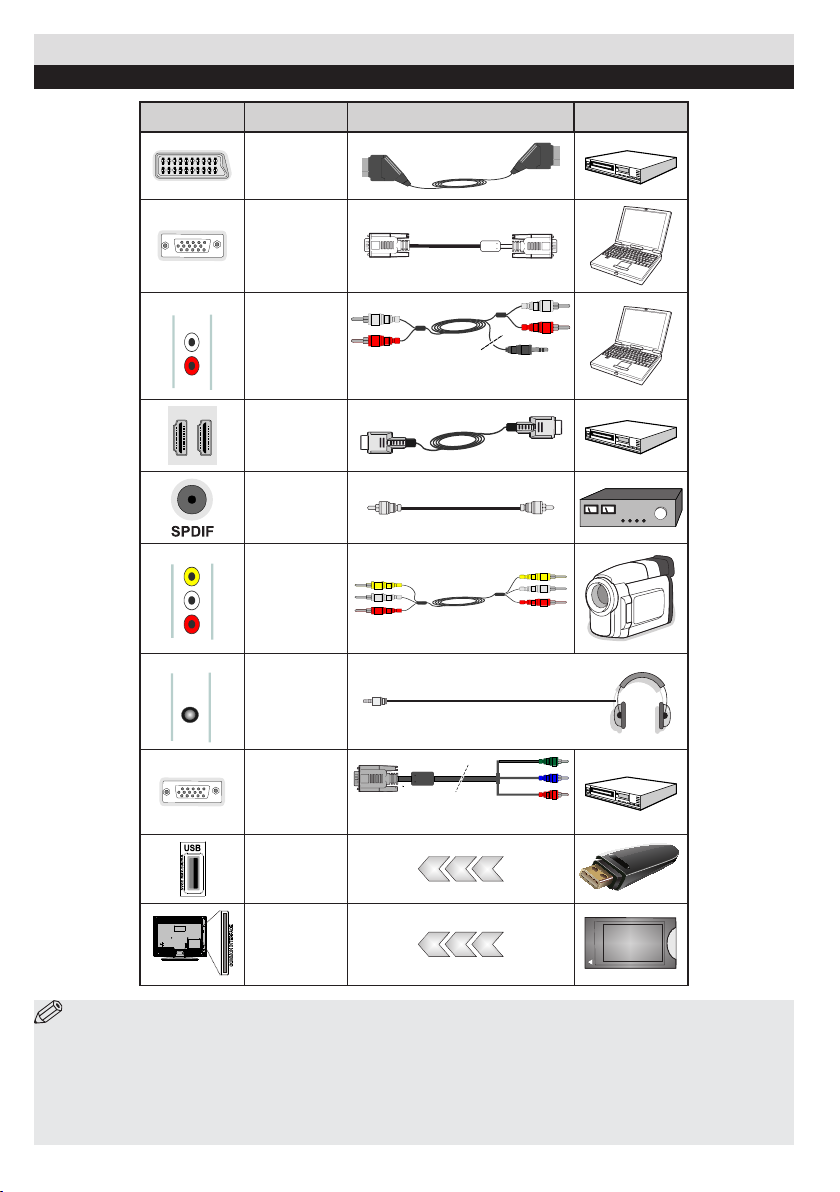
Konektör Tip Kablolar Cihaz
Skart
Bağlantı
(arka)
VGA
Bağlantı
(arka)
YAN AV
YAN AV
KULAKLIK
PC/YPbPr
Ses
Bağlantı
(yan)
HDMI
Bağlantı
(arka)
SPDIF
Bağlantı
(arka)
YAN AV
(Ses/Video)
Bağlantı
(yan)
Kulaklık
Bağlantı
(yan)
YPbPr Video
Bağlantı
(arka)
USB
Bağlantı
(yan)
CI
Bağlantı
(yan)
YanSesYPbPrveyaPC
BağlantıKablosu
YPbPrBağlantı
Kablosu
CAM
module
NOT: YPbPr veya Yan AV girişi yoluyla bir cihaz bağlarken, bağlantıyı gerçekleştirebilmek için, bağlantı
kablolarını kullanmalısınız. Yukarıdaki çizime bakınız. | PC sesini devreye sokmak için, YAN AV BAĞLANTISI
kablosunun BEYAZ ve KIRMIZI girişlerini kullanmalısınız. | SCART soketi yoluyla harici bir cihaz bağlanmışsa, Tv
otomatik olarak AV moduna geçer. | DTV kanalları (Mpeg4 H.264) alırken veya Ortam Tarayıcı modundayken, çıkış
skart soketinden mümkün olmayacaktır. | Duvara montaj kiti (opsiyonel) kullanılırken, duvara montaj yapmadan
önce tüm kablolarınızı TV’nin arkasına takmanızı öneririz. | CI modülünü sadece TV KAPALI konumdayken takınız
veya çıkartınız. Ayarlarla ilgili ayrıntılar için modül talimatları kılavuzuna başvurunuz.
Türkçe- 6 -
Page 8
Başlangıç
İlk Kurulum - USB Bağlantıları
Açma/Kapatma
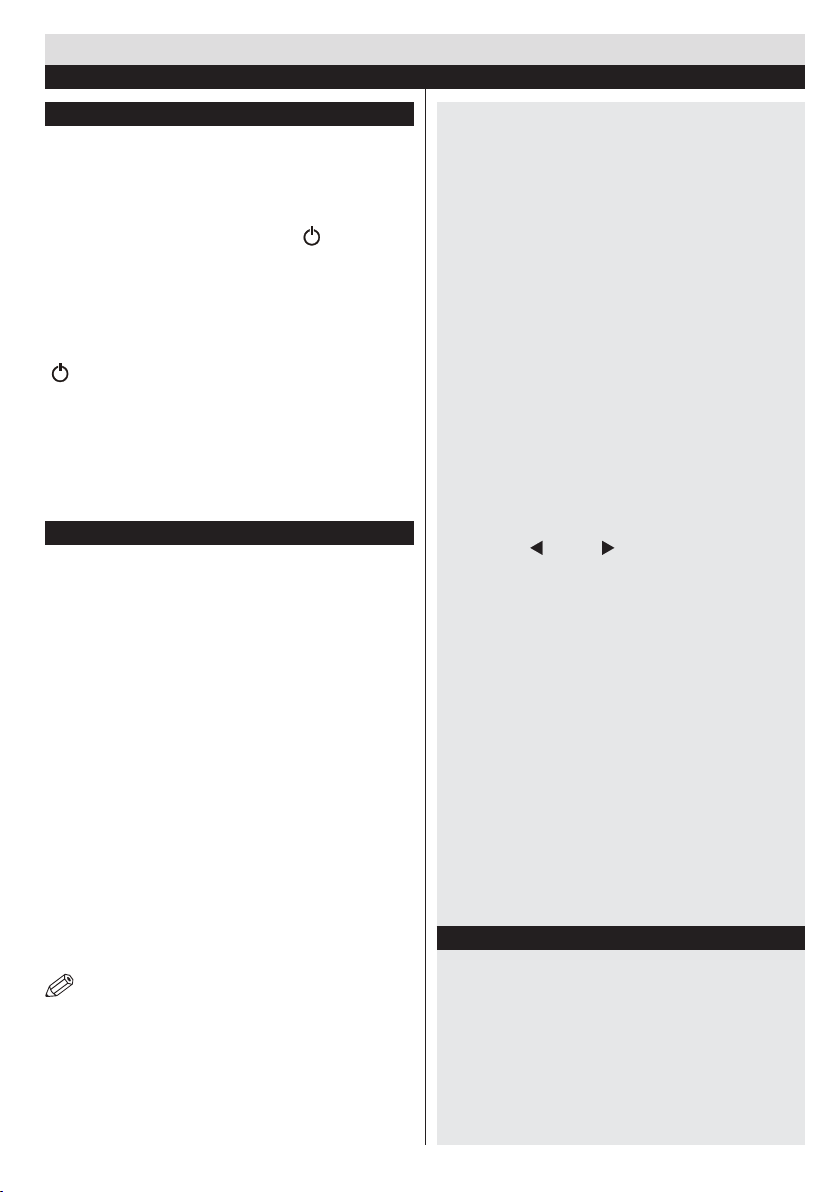
TV’yi Açmak için
Güçkablosunu220-240VAC50Hz’ebağlayınız.
Beklemekonumundan çıkıp TV’yiaçabilmek için
aşağıdakilerdenbiriniyapınız:
Uzaktankumandaüzerindebulunan“
P- veyabirsayıtuşunabasınız.
TVbeklemedurumundançıkanakadaryanfonksiyon
düğmesinebasınız.
Televizyonu kapatmak için
TVbeklememodunagirenekadaruzaktankumandadaki
“
"tuşunaveyayanfonksiyondüğmesinebasınız.
Televizyonu tamamen kapatmak için elektrik şini
prizden çekiniz.
Not: TV bekleme moduna getirildiğinde, bekleme LED’i Bekleme
Modunda Arama, Uydudan Otomatik Yazılım İndirme ya da
Zamanlayıcı gibi özelliklerin aktif olduğunu belirtmek için yanıp
söner. LED, TV’yi bekleme modundan açtığınızda da yanıp
sönebilir.
İlk Kurulum
İlkdefaaçılırken,dilseçimimenüsügörünür.Lütfen
istenilendosyatürünüseçinizveOKtuşunabasınız.
DahasonraİlkKurulum(FTI)ekranıgörüntülenecektir.
Gezinmetuşlarınıkullanaraktercihleriniziseçinizve
tamamladığınızdadevam etmek için OK tuşuna
basınız.
Mağaza modu,TV sadece bayilerde ya da
mağazalardasergilenme amaçlı kullanılacaksa
etkinleştirilmelidir.Mağaza Modunuseçmek
istediğinizdebir onay ekranı belirecektir.Devam
etmekiçinEVET’iseçiniz.BumodTVmağazadaya
dabayidekullanılacakiseönerilir.
Ev moduilk kurulum esnasında seçilebilmektedir.
EğerTV evde kullanılacakise, ev modunun
etkinleştirilmesiönerilir.EtkinleştirildiğindeTVeviçin
uygunkurulumageçecektir.TVevdekullanılacakise
bumodönerilir.
Anten Yayın kurulumu
EğerArama TipiekranındaANTENseçeneğiniseçerseniz
dijitaltelevizyon,dijitalantentelevizyonyayınıarayacaktır.
NOT: İptal etmek için MENU tuşuna basabilirsiniz.
Tümmevcutkanallarkaydedildiktensonra,ekranda
KanalListesigörüntülenecektir.EğerkanallarıLCN’ye
(*)göresıralamakisteseniz“EVET”seçeneğiniseçiniz
vesonraOKtuşunabasınız.
”tuşuna,P+/
Kanal listesinden çıkmak veTV'yi seyretmek için
MENUtuşunabasınız.
(*) LCN, mevcut yayınları tanınabilir bir kanal sırasına
(eğer varsa) göre düzenleyen Mantıklı Kanal Sayı
sistemidir.
Kablolu Yayın Kurulumu
KabloluYayınseçeneğini seçiniz ve uzaktan
kumandadakiOKtuşunabasınız.Devametmekiçin
lütfenEVETseçiminiyapıpOKtuşunabasınız.İşlemi
iptal etmek için HAYIRseçiminiyapıp OK tuşuna
basınız.Frekansaralığınıbuekrandanseçebilirsiniz.
Sayısaltuşlarıkullanarakellefrekansaralığınıgiriniz.
Not:Aramasüresi,seçilenaramaadımlarınabağlı
olarakdeğişiklikgösterecektir.
Uydu Kurulumu
AramaTipiekranınındanUyduseçeneğiniseçerseniz
bir uydu ayarlayıpuydukanallarınıizleyebilirsiniz.
Uydukurulumunuseçtiğinizde,Anten Türümenüsü
görüntülenir.
Üç tür anten seçimi vardır. Anten tipiseçimini
Doğrudan,Tek kablo veya DiSEqC arasından
seçmekiçin“
Doğrudan: Tekbiralıcınızvedoğrudanuyduçanağınız
varsa bu anten tipini seçiniz. Doğrudan seçeneğini
seçtiktensonrabaşkabirmenüekranıgörüntülenecektir.
Uygunbiruyduyuseçinizveservistaramasıyapmakiçin
OKtuşunabasınız.
Tek Kablolu:Birden çok alıcınız ve tekkablolu
sisteminiz varsa bu anten tipini seçiniz.Devam
etmekiçinOK tuşunabasınız.Ekrandakitalimatları
takipederekayarlarıyapılandırınız.Servistaraması
yapmakiçinOKtuşunabasınız.
DiSEqC anahtarı:Birdençokuyduçanağınızvebir
DiSEqC anahtarınız varsa bu anten tipiniseçiniz.
DiSEqC anahtar seçeneğini seçtikten sonra başka
birmenü ekranı görüntülenecektir.DörtDiSEqC
seçeneği (varsa) ayarlayabilirsiniz. Tümuyduları
taramakiçin YEŞİL tuşa basınız veya sadece
vurgulananuyduyutaramakiçinSARItuşabasınız.
KaydedipçıkmakiçinOKtuşunabasınız.
USB Girişi Yoluyla Medya Oynatma
TV'nizin USB girişlerini kullanarak 2.5” ve 3.5” (harici
güç kaynağına sahip hdd) harici sabit diskler ya da USB
bellekleri TV'nize bağlayabilirsiniz.
ÖNEMLİ!TV'nizeherhangibirbağlantıyapmadan
öncedosyalarınızıyedekleyin.Üreticiherhangibir
dosya hasarından veya veri kaybından sorumlu
tutulamaz. Belirli USB cihazı türlerinin buTV ile
uyumlu olmaması olası bir durumdur (ör.MP3
Çalarlar).TV FAT32ve NTFSdisk formatlarını
”yada“ ”tuşlarınıkullanabilirsiniz.
Türkçe- 7 -
Page 9
destekler fakat NTFSformatlı disklerle kayıt
mümkünolmayacaktır.
1TB(Terabayt)yadadahafazladosyakapasitesine
sahipbirUSBharddiskiformatlarken,formatlama
süreciile ilgili problemler yaşayabilirsiniz. Tekrar
tekrarhızlıbirşekildesürücüyütakıpçıkarmayınız.
BuUSB oynatıcıda ve USB cihazın kendisinde
zikselhasarayolaçar.BirdosyayıoynatırkenUSB
kartınıçekipçıkarmayınız.
BazıhariciHarddiskleridesteklemeyebilir.
Medya Tarayıcı Menüsü
İçinde fotoğraf, müzik ve film dosyalarıkayıtlı
olan bir USB diskini TV'nize takarakbu dosyaları
çalabilirsiniz.TV’ninyanındakiUSBgirişlerindenbirine
birUSBdisktakın.OrtamTarayıcısımodundayken
Menu düğmesine bastığınızda,Görüntü, Ses ve
Ayarlarmenü seçenekleri çıkar.Menu düğmesine
tekrar basıldığında bu ekrandan çıkılır.
Ayarlar
menüsünü kullanarak OrtamTarayıcısı tercihlerini
ayarlayabilirsiniz.
Yeniden Çal/Karıştır Modunda Çalışma
Oynatmayı oynat tuşu ile
başlatınveetkinleştirin
Oynatmayı OK ile başlatın ve
etkinleştirin
Oynatmayı OK/oynat tuşu ile
başlatınveetkinleştirin
Monitör bir sonraki dosyayı
oynatırvelisteyiyenidençalar.
Aynıdosyayeniden çalınır
(tekrarlama).
Dosyakarışıkolarakçalınır.
HızlıMenü
HızlıAyarlarmenüsü,bazıseçeneklerehızlıbirşekilde
ulaşabilmenizi sağlar.Bu menüde, GüçTasarruf
Modu,ResimModu,EkolayzırAyarları,Favorilerve
OtomatikKapanmaseçeneklerivardır.Hızlımenüyü
görmekiçin uzaktankumandadakiQ.MENUtuşuna
basınız.Listelenenözelliklerinayrıntılarıiçinsonraki
bölümlerebakınız.
Türkçe- 8 -
Page 10
TV Menü Özellikleri ve İşlevleri
Resim Menüsü İçeriği
Tercihlerinize ya da gerekliliklere uyması için resim modunu değiştirebilirsiniz. Resim modu aşağıdaki
seçeneklerdenherhangibirisineayarlanabilir:Sinema,Oyun,Dinamik veDoğal.
Modu
Kontrast Ekranınaydınlıkvekaranlıkdeğerleriniayarlar.
Parlaklık Ekranınparlaklıkdeğeriniayarlar.
Keskinlik Ekrandagörüntülenencisimlerinkeskinlikdeğeriniayarlar.
Renk Renkdeğerinigirer,renkleriayarlar.
Güç Tasarrufu
Modu
Arka Işığı
(Opsiyonel)
Gürültü Azaltma Eğeryayınsinyalizayıfsavegörüntükarlıise,düzeltmekiçinGürültü Azaltmaayarınıkullanınız.
Gelişmiş Ayarlar
Dinamik
Kontrast
Renk Sıcaklığı İstenenrenktonunuayarlar.
Görüntü
Yakınlaştırma
HDMI Gerçek
Siyah
(opsiyonel)
Film Modu
Ten Rengi Dışgörünüm-5ile5arasındadeğiştirilebilir.
Renk Geçişi İstenenrenktonunuayarlar.
RGB Kazanç RGBKazançözelliğinikullanarakrenksıcaklıklarınıayarlayabilirsiniz.
Sıfırlama Resimayarlarınıfabrikaayarlarınasıfırlar.(Oyunmodudışında)
Otomatik
Konumlandırma
(PC modunda)
H Konumu (PC
modunda)
V Konumu (PC
modunda)
Nokta Saati (PC
modunda)
Faz (PC
modunda)
VGA (PC) modunda, Görüntü menüsündeki bazı öğeler kullanılmaz. Bunun yerine, VGA mod ayarları, PC moddayken
Görüntü Ayarlarına eklenecektir.
Mode seçeneği seçili hale getirildiğinde, Pixellence demosu menü ekranının altında görüntülenecektir.
Pixellence Demo fonksiyonu TV’nin video ayarlarını optimize eder ve daha iyi bir görüntü kalitesi
alınmasını sağlar. Pixellence kalitesini yaşamak için Pixellence demo Modunu başlatmak üzere OK
tuşuna basınız. İptal etmek için OK tuşuna basınız. (OyunModuhariç)
GüçTasarrufuModunuEco,ResimKapalıveyaDevredışıolarakayarlar.
(ModDinamikolduğunda,GüçTasarrufuotomatikolarakdevredışıkalır.)
Buayar,arkaaydınlatmaseviyesini kontrol eder.Arkadanaydınlatmafonksiyonu Güç TasarrufModuaçıksa
etkinolmaz.ArkaAydınlatmaVGAveyaMedyaTarayıcısımodundaveyaresimmoduOyunolarakayarlanmışsa
etkinleştirilemez.
DinamikKontrastoranınıistediğinizdeğeredeğiştirebilirsiniz.
Resimyakınlaştırmamenüsündenistediğinizresimölçüsünüayarlar.
Not: Oto (sadece SCART PIN8 yüksek gerilim/düşük gerilim anahtarlamalı Scart modunda kullanılabilir)
HDMIkaynağındanizlerkenbuözellikGörüntüAyarlarımenüsündegösterilecektir.Görüntüdekisiyahlığı
iyileştirmekiçinbuözelliğikullanabilirsiniz.
Filmlernormal televizyonprogramlarından farklısayıdasaniye başınadüşen karemiktarına
sahiptir.Buözelliği,hızlıhareketlerinetbirşekildegörmekistediğinizfilmleriizlerkenaçınız.
Ekranıotomatikolarakenuygunhalegetirir.EnuygunhalegetirmekiçinOKtuşunabasınız.
Buözellik,görüntüyüekranınsağveyasoltarafınayatayolarakkaydırır.
Buözellik,görüntüyüekranınüstüneveyaaltınadoğrudikeyolarakkaydırır.
DotClock(NoktaSaati)ayarlamaları,hesap çizelgesigibi yoğunnokta içerensunumlarveyaküçük
karakterlerinkullanıldığıparagraaryadametinlerdedikeyşeritolarakgörünenparazitidüzeltir.
TVsetine girdiğinizçözünürlüğeve taramasıklığınabağlı olarakekrandabulanık veyagürültülübir
görüntügörebilirsiniz.Böylebirdurumda,denemeyanılmayöntemiyledahanetbirgörüntüalmakiçin
buözelliğikullanabilirsiniz.
Türkçe- 9 -
Page 11
Ses Menüsü İçeriği
Ses Sesseviyesiniayarlar.
Ekolayzır Ekolayzırmodunuseçer.Sadecekullanıcımodundaözelayarlaryapılabilir.
Balans Buayar,solveyasağhoparlördengesinibelirtmekiçinkullanılır.
Kulaklık Kulaklıksesiniayarlar.
Ses Modu Birsesmoduseçebilirsiniz.(Eğerseçilenkanaldestekliyorsa).
AVL (Otomatik Ses
Sınırlama)
Dijital Çıkış Dijitalçıkışsestürünüayarlar.
Buözellikprogramlararasındasabitbirsesçıkışıeldeedilebilmesineolanak
sağlar.
Ayarlar Menüsü İçeriği
Koşullu Erişim Mevcutolmasıhalindekoşulluerişimmodüllerinikontroleder.
Dil
Yetişkin
Zamanlayıcılar
Tarih/Saat Tarihvezamanıayarlar.
Kaynaklar Seçilenkaynakseçeneklerinietkinleştirirveyadevredışıbırakır.
Uydu ayarları Uyduayarlarınıgösterir.
Dilayarlarınıyapılandırır(seçilenülkeyegöredeğişebilir)Tercih e dilen v emevc ut
ay a rlar kullanılabilecektir.Mevcutayarlarsadeceyayıncıdesteklersedeğiştirilebilir.
Çocukkilidiayarlarınıdeğiştirmekiçindoğruparolayıgirin.Menükilidini
kolaylıklaayarlayabilirsiniz,yetişkinkilidi(seçilenülkeyegöredeğişebilir)
veçocukkilidibumenüdedir.Yenibirpinnumarasıdabelirlenebilir.
TV'nizibelirli bir süre sonunda kapatmak için uyku zamanlayıcısınıayarlar.Seçilen
programlariçinzamanlayıcılarıayarlar.
Diğer Ayarlar TV setinin diğer ayar seçeneklerini görüntüler.
Menü Zaman Aşımı Menüekranlarınınzamanaşımısüresinideğiştirir.
Şifreli Kanalları
Tara
Mavi Arkaplan Sinyalzayıfsaveyayoksamaviarkaplansisteminietkinleştirirveyadevredışıbırakır.
Yazılım Yükseltme Üründekiuydualıcınındaimaensongüncellemebilgisinesahipolduğundaneminolunuz..
Uygulama sürümü Uygulamasürümünügörüntüler.
İşitme Zorluğu Yayıncıdangönderilenözelbiryayınıetkinleştirir.
Sesli Açıklama
Otomatik TV
Kapama
Bekleme Modunda
Arama (Opsiyonel)
Mağaza Modu
Buayardayken,aramaişlemişifrelikanallarıdatespitedecektir.
Sesliaçıklama,televizyonve lmleri de içeren görsel medyada körvegörme
engelliizleyicileriçinekbiranlatımıifadeeder.Buözelliğiyalnızcayayıncınınek
anlatımıdesteklemesihalindekullanabilirsiniz.
Not:Sesliaçıklamasesözelliğikaydetmesırasındayadazamankaydırmadakullanılamaz.
Otomatik kapanma özelliğinin zaman aşımı değerinibelirleyebilirsiniz. Zaman aşımı
süresineulaşıldığındaveTVseçilen süre boyunca çalışmışsa, TV bekleme moduna
geçecektir.
EğerTVbeklememodundaikenBeklemeKonumdaAramaaçıkolarakayarlanmışsa,
mevcutyayınlararanacaktır.TVyeniveyaeksikyayınlarıbulursa,budeğişiklikleri
uygulamakisteyipistemediğinizisoranbirmenuekranıgörüntülenecektir.Busüreçten
sonrakanallistesigüncellenecekvedeğiştirilecektir.
Eğertelevizyonunuzubirmağazadagösteriyorsanızbumoduaktifedebilirsiniz
Mağazamodu etkin olduğunda, televizyon menüsündeki bazı öğeler
ayarlanamayabilir.
Türkçe-10-
Page 12
Güç Modu Buayar,açılmamodutercihiniziyapılandırır.
Biss, bazı yayınlarda kullanılan bir uydu sinyali şifreleme sistemidir.Eğer bir yayın için
Biss Anahtarı
Kurulum ve Geri Dönüş Menüsü İçeriği
Otomatik Kanal Arama
(uygunsa)
El ile Kanal Tarama Buözellikdoğrudanyayıngirişiiçinkullanılabilir.
Şebeke kanalarını arama Yayınsistemindekibağlantılıkanallarıarar.
Analog İnce Ayar
İlk Kurulum Kayıtlıtümkanallarıveayarlarısiler,TV'yifabrikaayarlarınasıfırlar.
Biss anahtarınıgirmeniz istenirse, Diğer Ayarlar menüsündeki BissAnahtarı ayarını
kullanabilirsiniz.Anahtarıgirmek içinistediğinizyayınüzerindeykenBissAnahtarınıseçin
veOktuşunabasın.
Otomatikkanal arama seçeneklerinigörüntüler.DijitalAnten:Havadan
yayınlanan DVB kanallarını ararve hafızaya alır.Dijital Kablo:Kablodan
yayınlananDVBkanallarınıararvehafızayaalır.Analog:Analogkanallarıarar
vehafızayaalır.DijitalAntenveAnalog:HavadanyayınlananDVBkanallarını
veanalogkanallarıararvehafızayaalır.DijitalKabloveAnalog:KabloluDVB
kanallarınıveanalogkanallarıararvehafızayaalır.Uydu:Uydukanallarınıarar
vehafızayaalır.
Buayarı,analog kanalların ince ayarını yapmak içinkullanabilirsiniz.Buözellik,
kaydedilenanalogkanalyoksamevcutdeğildir.
Genel TV Çalışması
Kanal Listesinin Kullanılması
TV, Kanal Listesindeyer alan tüm kaydedilmiş
istasyonları sıralar.Kanal Listesi seçeneklerini
kullanarak bu kanal listesini düzenleyebilirsiniz,
favorileri ayarlayabilirsiniz veyalistelenecek etkin
istasyonlarayarlayabilirsiniz.
Yetişkin Ayarlarını Yapılandırma
Belli programların görüntülenmesini engellemek için kanallar
ve menüler Yetişkin kontrol sistemiyle kilitlenebilir.
YetişkinkilitmenüseçeneklerinigöstermekiçinPIN
numarasıgirilmelidir.PINnumarasıvarsayılanolarak
0000’dır.DoğruPINkodugirildiktensonra,Yetişkin
ayarlarımenüsügörüntülenir.
Menü Kilidi:Menükilitayarımenüerişiminietkinleştirir
veyadevredışıbırakır.
Yetişkin Kilidi:Buseçenekayarlandığında,yayından
yetişkinbilgisialınırveyetişkinseviyesinindevredışı
bırakılmasıhalindegörüntüvesesalınmaz.
Çocuk Kilidi: Çocuk kilidi ayarlandığında,
televizyonunuz yalnızca uzaktankumanda aleti ile
kumanda edilebilir.Bu durumda, kumandapaneli
tuşlarıişlemez.
PIN Ayarlama:YenibirPINnumarasıtanımlar.
Not: Ülke seçeneği olarak Fransa seçilmişse, varsayılan kod
olarak 4725’i kullanınız.
Elektronik Program Rehberi (EPG)
Kanallarınbazıları,oandakivesıradakiprogramlarla
ilgilibilgilerigönderirler.EPGmenüsünügörüntülemek
için“
”tuşunabasınız.
Kırmızı tuş (Önceki Gün): Öncekigününprogramlarını
görüntüler.
Yeşil tuş (Sonraki gün):Sonrakigününprogramlarını
görüntüler.
Sarı tuş (Yakınlaştırma):Programbilgilerinigenişletir.
Mavi tuş (Filtre): Filtrelemeseçeneklerinigösterir.
ALT YAZI: TürSeçmenüsünügörüntülemekiçin“
tuşunabasınız.Buözelliğikullanarakseçilenkonuylailgili
olarakprogramrehberiveritabanındaaramayapabilirsiniz.
Program rehberinde mevcut olan bilgi aranacakve
kriterlerinizeuyansonuçlarlistelenecektir.
INFO(İ):Seçilenprogramlailgilidetaylıbilgigörüntüler.
Rakam tuşları (Atla):İstenen kanala sayısal tuşlar
aracılığıyladoğrudangider.
OK:Programseçeneklerinigörüntüler.
Metin (Arama): “Rehber Arama”menüsünügörüntüler.
(Şimdi):Mevcutprogramıgösterir.
”
Türkçe- 11 -
Page 13

Yazılım Yükseltme
TV'nizAnten/Kablosinyali ile otomatik bulma ve
güncellemeözelliğinesahiptir.
Kullanıcı arayüzüyle yazılım yükseltme
araması
Anamenüyegeliniz.AyarlarseçiminiyapınveDiğer
Ayarlarmenüsünü seçin. Diğer Ayarlarmenüsü
Yazılım Yükseltme öğesinegeçecektir,yeniyazılım
güncellemesikontrolüyapmakiçinOKtuşunabasınız.
Sorun Giderme ve İpuçları
TV açılmıyor
Elektrik kablosunun duvarprizine takılı olduğundan
eminolunuz.Uzaktankumandanınpilleribitmişolabilir.
TV’dekiAçma/kapamadüğmesinebasınız.
Kötü görüntü
•DoğruTVsisteminiseçtinizmi?
•Düşük sinyal seviyesi resimdebozulmaya neden
olabilir.Lütfenantenbağlantısınıkontroledin.
•Eğer manüel ayarlama yapıyorsanız, kanal
frekansınıdoğrugirdiğinizikontroledin.
•İki cihazı televizyona aynıanda bağladığınızda
görüntü kalitesi düşebilir. Böyle bir durumda
cihazlardanbirininbağlantısınıkesiniz.
Görüntü yok
•Görüntü YokTV’nizin herhangi bir yayın almadığı
anlamına gelmektedir.Uzaktan kumandada doğru
tuşlarabastınızmı?Birkezdahadeneyiniz.Ayrıca,
doğrugirişkaynağınınseçiliolduğundaneminolunuz.
•Antendoğrutakılmışmı?
•Antenkablosuhasarlımı?
•Antenibağlamakiçindoğruşlerkullanılmışmı?
•Şüpheniz var ise lütfen yetkili servis veya danışma
merkeziileiletişimegeçin.
Ses yok
• TVsessizolarakmıayarlandı?Sessizseçeneğini iptal
etmekiçin“
• Ses,hoparlörlerinsadecebirindengeliyor.Dengeayarı
uçlardanbirisinemiayarlanmış?SesMenüsükısmına
bakınız.
”tuşunabasınveyasesiyükseltin.
Uzaktan kumanda aleti çalışmıyor
•Pillerbitmişolabilir.Pillerideğiştiriniz.
Giriş kaynakları - seçilemez
•Eğerbir girişkaynağıseçemiyorsanız,hiçbircihazın
bağlıolmamasıolasıdır.
•Eğerbircihazbağlamayıdenediyseniz,AVkablolarını
vebağlantılarıkontrolediniz.
Türkçe- 12 -
Page 14

Aşağıdaki tablo bazı tipik video ekran konumlarının bir örneğidir.
Medya
(Ortam)
Format
Görüntü
Ses
MPEG1: 768x576 @30P
MPEG2:1920x1080 @ 30P
H.264/VP6:1920x1080 @ 30P
Sorenson: 352x288 @30P
jpg,jpeg
Temel JPEG
-
maks WxH = 17000x10000 4147200bayt
İleri JPEG
-
maks WxH = 4000x4000 3840000bayt
Altyazı
sub,srt--
-
TV’niz tüm çözünürlükleri desteklemiyor olabilir. TV’niz 1920x1080’e
kadar desteklemektedir.
Dizin Çözünürlük Frekans
1 640x480 60Hz
2 800x600 56Hz
3 800x600 60Hz
4 1024x768 60Hz
5 1024x768 66Hz
6 1280x768 60Hz
7 1280x960 60Hz
8 1280x1024 60Hz
9 1360x768 60Hz
10 1400x1050 60Hz
11 1600x1200 60Hz
12 1920x1080 60Hz
AV ve HDMI Sinyal Uyumu PC Girişi Tipik Ekran Modları
Kaynak Desteklenen Sinyaller Mevcut
PAL50/60 O
HARİCİ
(SKART)
YAN AV
PC/YPbPr
HDMI1
HDMI2
(X: Mevcut değil, O: Mevcut)
Bazı durumlarda LCD TV sinyali düzgün görüntülenemeyebilir.
Sorun kaynak ekipmandaki standartlarla uyumsuzluk olabilir
(DVD, Alıcı, vb.). Eğer böyle bir sorun yaşarsanız, satıcınızla
ve de kaynak cihazın üretici rmasıyla irtibata geçiniz.
NTSC60 O
RGB50 O
RGB60 O
PAL50/60 O
NTSC60 O
480I,480P 60Hz O
576I,576P 50Hz O
720P 50Hz,60Hz O
1080I 50Hz,60Hz O
1080P 50Hz,60Hz O
480I 60Hz O
480P 60Hz O
576I,576P 50Hz O
720P 50Hz,60Hz O
1080I 50Hz,60Hz O
24Hz,25Hz
1080P
30Hz,
50Hz,60Hz
O
Dosya Uzantısı
mpg, mpeg MPEG1, MPEG2
vob MPEG2
mp4 MPEG4, Xvid , H.264
Film
Müzik
mkv H.264, MPEG4,VC-1
avi MPEG2, MPEG4, Xvid , H.264
v H.264/VP6/Sorenson
3gp MPEG4, H.264 1920x1080 @ 30P
.mp3 -
Fotoğraf
bmp - - maks WxH = 5760x4096 3840000bayt
MPEG 1 Layer 2
MPEG 1 Layer 3
Türkçe- 13 -
Notlar (Maksimum çözünürlük/Bit değeri vs.)
1920x1080 @ 30P
32Kbps ~ 320Kbps(Bit hızı)32K, 44.1k, 48k Hz,16K,
22.05K, 24K Hz,8K, 11.025K, 12K Hz(Örnekleme hızı)
32Kbps ~ 320Kbps(Bit hızı)32K, 44.1k, 48k Hz,16K,
22.05K, 24K Hz,8K, 11.025K, 12K Hz(Örnekleme hızı)
Page 15
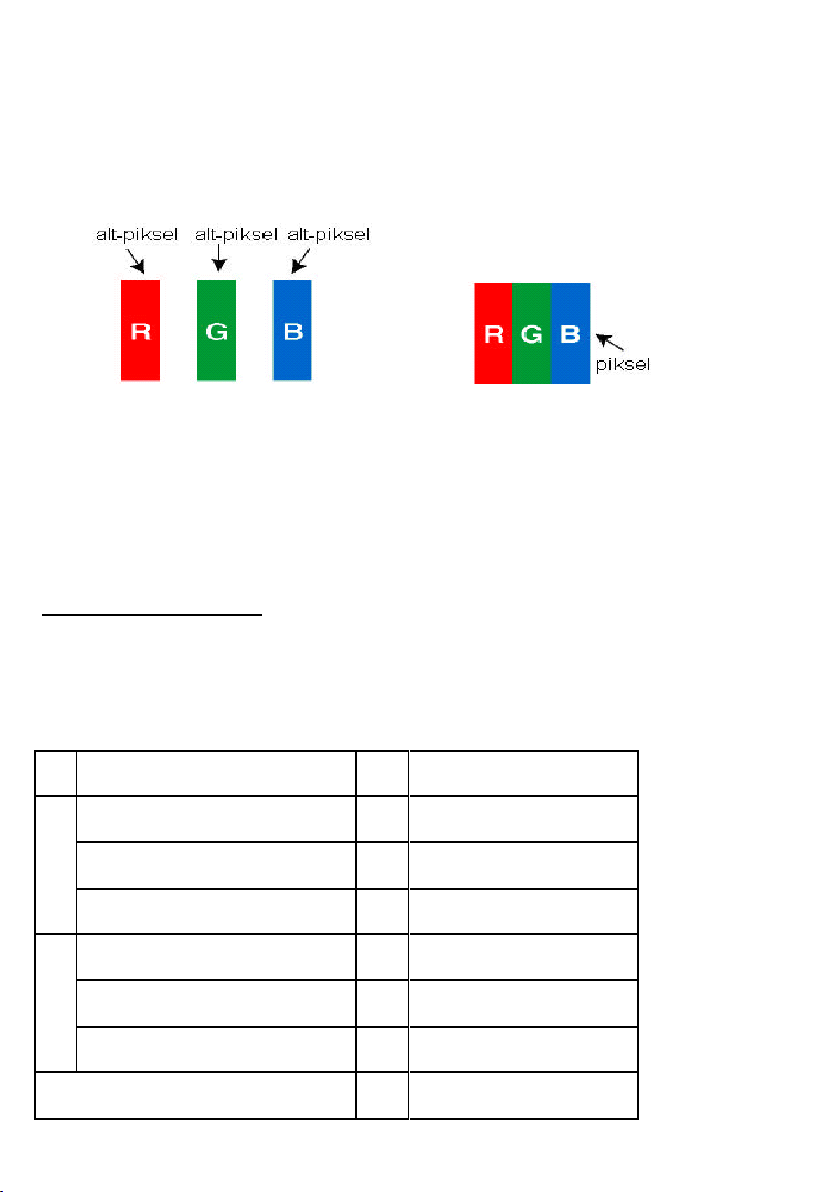
Sayın Müterimiz;
Bu üründe TFT LCD Display teknolojisi kullanılmıtır.
TFT-LCD ürünlerde görüntü piksel adı verilen renkli ıık noktaları ile oluturulur.
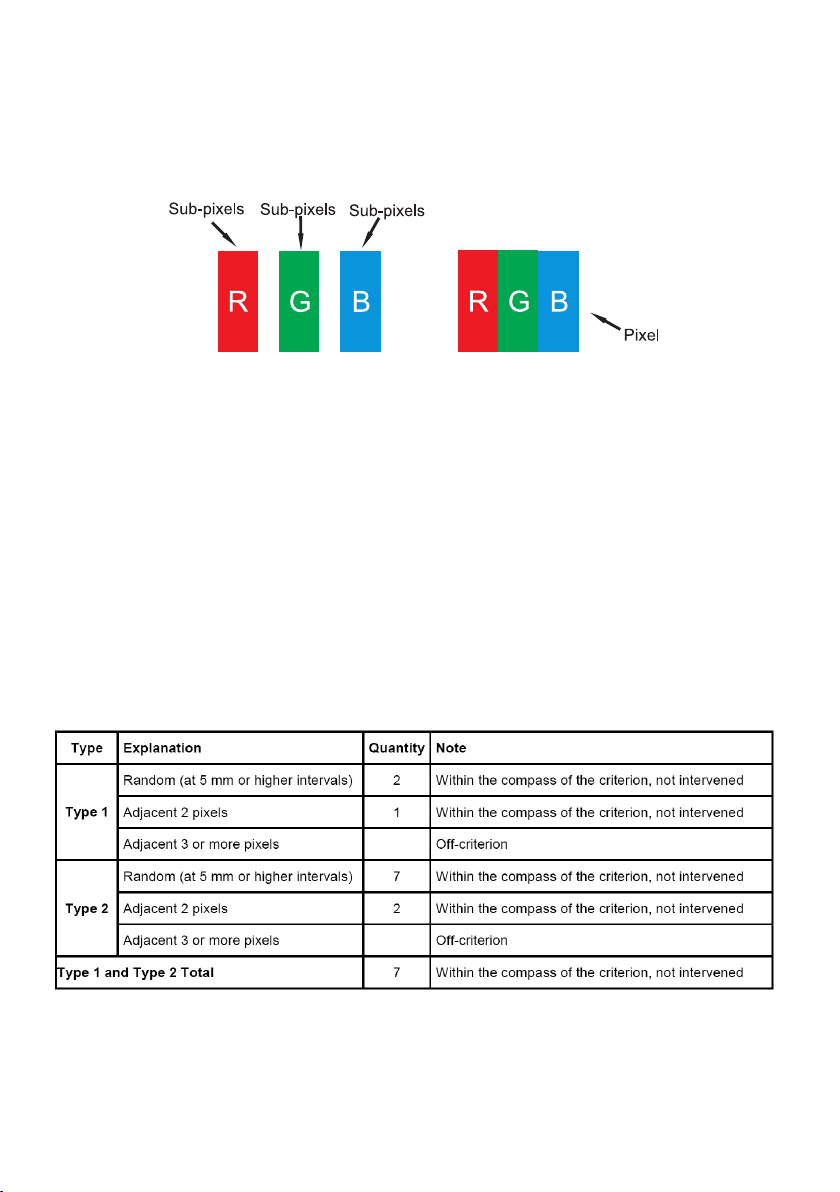
Her bir piksel 3 adet alt-pikselden [sabit renkli (kırmızı, yeil, mavi) ıık noktası] olumaktadır.
Üretim teknolojileri gerei söz konusu alt-pikseller sürekli sönük olarak kalmak eklinde “alt-piksel hatasına”
neden olabilirler.
Olası bir alt piksel hatası ile ilgili aaıdaki açıklamayı dikkate almanızı rica ederiz.
Bu problem ile ürünün üretimi aamasında karılaılacaı gibi, kullanım sürecinde de karılaılabilinir.
Alt-piksel hataları 2 ana çeittir.
Tip 1 : Sürekli yanan alt-piksel (Kırmızı, yeil veya mavi olabilir.)
Tip 2 : Sürekli sönük alt-piksel (Siyah bir ekilde görünür.)
ISO 13406-2 standardına göre aaıdaki özet tablo alt-piksel hataları için belirlenmitir.
Tipi
Açıklama Adet Not
Tip1
Rastgele (5 mm ya da daha fazla aralıklı) 2 adet
Kriter dahilidir, müdahale
edilmez.
Bitiik 2 pixel 1 adet
Kriter dahilidir, müdahale
edilmez.
Bitiik 3 ya da daha fazla pixel Kriter haricidir.
Tip2
Rastgele (5 mm ya da daha fazla aralıklı) 7 adet
Kriter dahilidir, müdahale
edilmez.
Bitiik 2 pixel 2 adet
Kriter dahilidir, müdahale
edilmez.
Bitiik 3 ya da daha fazla pixel Kriter haricidir.
Tip1 ve Tip2 Toplam
7 adet
Kriter dahilidir, müdahale
edilmez.
Türkçe- 14 -
Page 16

ÖNEML UYARILAR
1. Üreticinin saklı bulundurduu haklar:
Üretici firma, üründe ya da ürünün kullanım kılavuzunda belirtilen özellikleri, teknolojideki
ilerlemenin gerei olarak, herhangi bir bilgilendirme yapmadan deitirme hakkını saklı tutar.
2. Ekran Teknolojisi ile lgili Uyarılar:
TFT ve Plazma teknolojisi gerei, ekranda aktif olmayan ya da sürekli parlayan beyaz,
kırmızı ya da mavi noktacıklar (pixeller) bulunabilir. Bu ürünün performansını etkilemez, bu
bir arıza deildir. Bununla ilgili detaylar kullanım kılavuzunun ilgili sayfalarında belirtilmitir.
Kriterler dahilindeki durumlarda üretici firma herhangi bir sorumluluk taımaz.
3. Ekranda sürekli sabit görüntünün kalması:
TFT ve Plazma teknolojisi gerei, ekranda sürekli sabit görüntünün kalması, sürekli aynı
arka planın ekranda gösterilmesi ya da 16:9 bir televizyonda, uzun süre 4:3 görüntü
izlenmesi sonrası, ekranda “yanma” etkisi meydana gelebilir. Bu etkinin olumaması için
aaıdakilere uymanız önemle tavsiye edilir.
• Sürekli sabit görüntü izlemeyiniz.
• 16:9 formattaki televizyonunuzda 4:3 formatta görüntü izlemeyiniz.
• Kontrast ve parlaklıı en düük seviyede kullanmaya çalıınız.
4. Full HD ürünlerde;
TV yayını yada dier kaynaklardan verilen yüksek çözünürlük destei olmayan uydu alıcısı,
DVD player ya da kablolu kanal yayınlarında beklenen performans alınamayabilir ve bu
yayınlarda resimde mozaiklenme veya resim netlik ve keskinlii az, görüntüde ekranda bazı
efektler oluabilir. Bu bir arıza deildir. Yüksek çözünürlüü (1920x1080) destekleyen
TV'nizin iyi bir performans ile çalıabilmesi için Full HD teknolojisi gerei, yüksek
çözünürlüklü yayın (HD yayın) ile izlenilmesi tavsiye edilir. TV yayını ya da dier
kaynaklardan verilen yüksek çözünürlük destei olmayan uydu alıcısı, DVD player ya da
kablolu kanal yayınlarında beklenen performans alınamayabilir ve bu yayınlarda resimde
mozaiklenme veya resim netlik ve keskinlii az, görüntüde ekranda bazı efektler oluabilir.
Bu bir arıza deildir. Eer ürününüz yüksek çözünürlüü destekleyen bir ürün ise, iyi bir
görüntü performansı alabilmeniz için; yüksek çözünürlük (HD) teknolojisi gerei; yüksek
çözünürlüklü yayın kaynaı kullanmanız tavsiye edilir.
5. Cihazın çalıma sesi hakkında:
Cihazınızdaki elektronik devrelerde, teknolojisi gerei; çalıma ya da bekleme durumunda,
üzerinden geçen akıma balı olarak bir çalıma sesi oluabilmektedir. Oluan bu ses,
standartlar dahilinde olsa dahi, insan kulaının hassasiyetine ve izleme mesafesine göre
bazen duyulabilir. Duyulan bu ses, cihazınızın performansını etkilemez ve bu bir arıza
deildir.
6. Cihazınızın paneline (ekranına) dıarıdan hiçbir ekilde mekanik bir darbe
uygulanmamasına dikkat ediniz:
TFT-LCD televizyonların panelleri (ekranlar) yekpare bir cam parçası deildir ve
katmanlardan olumaktadır. Cihazınız, dıarıdan uygulanan bir darbe sonucu ön kısım olan
panelden (ekrandan) darbe alırsa, ekranın dı dünyaya en yakın katmanında
kırılma/çatlama olumadan içerisindeki katman kırılabilir/çatlayabilir ve bu durumun yetkili
servis tarafından teknik olarak tespiti mümkündür. Bu nedenle, cihazınızın paneline
(ekranına) dıarıdan hiçbir ekilde mekanik bir darbe uygulanmamasına dikkat ediniz. Aksi
halde, “dı kaynaklı bir darbe sonucu meydana gelen” bir hasar, kullanım hatası
sayılacaından, üretici firmanın hukuken hiçbir sorumluluu olmayacaktır.
7. Cihaz kullanımı hakkında:
Aldıınız cihaz, ev tipi kullanım için üretilmi olup, sadece evde ve belirtilen amaçlar için
kullanılabilir. Ticari ya da toplu kullanıma uygun deildir. Tüketicinin buna aykırı
kullanımında, TKHK hükümlerinde belirlenmi, ücretsiz onarım ve garanti süresi içinde
arızalardan üretici ve satıcının mesuliyetinin kalktıını önemle belirtiriz.
Türkçe- 15 -
Page 17

TAŞIMA VE NAKLİYE SIRASINDA DİKKAT EDİLECEK HUSUSLAR
Taşımavenakliyesırasındacihazınız,aksamlarınazarargelmemesiiçinorjinalkutusundatutulmalıdır.
Taşımasırasındaürününormalkonumundatutun.
Cihazınakliyesırasındadüşürmeyinvedarbelerekarşıkoruyun.
Ürününmüşteriyeteslimindensonrataşımasırasındaoluşanarızalarvehasarlargarantikapsamınagirmez
MÜŞTERİ’NİN SEÇİMLİK HAKLARI:
Müşteri; malın 6502 sayılıTüketicinin Korunması Hakkında Kanun hükümleriuyarınca ayıplı olduğunun
anlaşılmasıdurumunda,ayıpdahasonraortayaçıkmışolsabile,malınmüşteriyeteslimtarihindenitibaren
ikiyıllıkzamanaşımısüresiiçinde;
1. Satılanıgerivermeyehazırolduğunubildirereksözleşmedendönme,
2. Satılanıalıkoyupayıporanındasatışbedelindenindirimisteme,seçimlikhaklarındanbiriniSatıcıya
karşı;
3. Aşırıbirmasrafgerektirmediğitakdirde,bütünmasraarısatıcıyaaitolmaküzeresatılanınücretsiz
onarılmasınıisteme,
4. İmkânvarsa,satılanınayıpsızbirmisliiledeğiştirilmesiniisteme,
seçimlikhaklarındanbiriniiseSatıcıya,üreticiveyaithalatçıyakarşıkullanılabilir.
Ücretsizonarımveyamalınayıpsızmisliiledeğiştirilmesininsatıcıiçinorantısızgüçlükleriberaberindegetirecek
olmasıhâlindetüketici,sözleşmedendönmeveyaayıporanındabedeldenindirimhaklarındanbirinikullanabilir.
Müşteri;şikâyetveitirazlarıkonusundakibaşvurularınıTüketiciMahkemelerineveTüketiciHakemHeyetlerine
yapabilir.
Türkçe- 16 -
Page 18
Contents
Safety Information ........................................ 17
Getting Started ............................................. 18
Notications&Features&Accessories ................ 18
Inserting the Batteries into the Remote ................ 18
Connect Power .................................................... 19
Antenna Connection ............................................. 19
Features ............................................................... 20
Remote Control ................................................... 21
Connections.......................................................... 22
Safety Information
CAUTION
RISK OF ELECTRIC SHOCK
DO NOT OPEN
Quick Menu .......................................................... 24
Media Browser Menu............................................ 24
TV Menu Features and Functions ........................ 25
General TV Operation .......................................... 27
Using the Channel List ......................................... 27
ConguringParentalSettings ............................... 27
Electronic Programme Guide (EPG) .................... 27
Software Upgrade................................................. 27
Troubleshooting&Tips ......................................... 28
AV and HDMI Signal Compatibility ...................... 29
In extreme weather (storms, lightning) and long
inactivity periods (going on holiday) disconnect
the TV set from the mains. The mains plug is
used to disconnect the TV set from the mains
and therefore it must remain readily operable.
CAUTION: TO REDUCE THE RISK OF ELECTRIC SHOCK DO
NOT REMOVE COVER (OR BACK).
NO USER-SERVICEABLE PARTS INSIDE. REFER
SERVICING TO QUALIFIED SERVICE PERSONNEL.
To operate your TV in extreme ambient conditions
may cause the damage of the device.
Note: Follow the on screen instructions for operating the
related features.
This sign is present wherever there is very
important information regarding the operation
and maintenance of the appliance in the literature
accompanying it.
IMPORTANT - Please read these instructions fully before installing or operating
WARNING: Never let people (including
children) with reduced physical, sensory or
mental capabilities or lack of experience and / or
knowledge use electrical devices unsupervised.
•For ventilation purposes, leave a free space of at
least 10 cm all around the set.
•Do not block ventilation holes.
•Do not place the TV on sloping or unstable surfaces,
the TV may tip over.
•Use this device in moderate climates.
•The power cord plug should be easily accessible. Do
not place the TV, furniture, etc. on the power cord.
Adamagedpowercord/plugcancausereorgive
you an electric shock. Handle the power cord by the
plug, do not unplug the TV by pulling the power cord.
Never touch the power cord/plug with wet hands
as this could cause a short circuit or electric shock.
Never make a knot in the power cord or tie it with
other cords. When damaged it must be replaced,
thisshouldonlybedonebyqualiedpersonnel.
•Do not use this TV in a humid or damp environment.
Do not expose the TV to liquids. In case the cabinet
contacts any liquids unplug the TV immediately
andhaveitcheckedbyqualiedpersonnelbefore
operating it any further.
•Do not expose the TV to direct sunlight,
openamesorplaceitnearintenseheat
sources such as electric heaters.
• Listening in excessive volumes from earphones and
headphones may cause hearing loss.
•Ensure that no open ame sources, such
as lit candles, are placed on top of the TV.
• To prevent injuries, this TV must be securely
attached to a wall carefully by following the instructions (if
the option is available).
• Occasionally, a few non-active pixels may appear on the
screenas a xed blue, greenor red point. Please note
that this does not affect the performance of your product.
Takecarenottoscratchthescreenwithngernailsorother
hard objects.
• Specicationsshownabovearesubjecttochangewithout
notice
• Before cleaning, unplug the TV from the wall socket. Only
use a soft, dry cloth while cleaning.
Warning
Risk of electric shock
Caution
Important
Notice
Serious injury or death risk
Dangerous voltage risk
Injury or property damage risk
Operating the system correctly
Additional notes marked
English - 17 -
Page 19
Getting Started
Notications&Features&Accessories
Environmental Information
This television is designed to consume less energy
to help save the environment. To reduce energy
consumption, you should take the following steps:
If you set the Power Save Mode as Eco, the TV will
switch to energy-saving mode. The Power Save Mode
settings can be found in the ‘Picture’ section of the
Main Menu. Note that some picture settings will be
unavailable to be changed.
If Picture Off is selected, “Screen will be off in
3 seconds.” message will be displayed. Select
PROCEED and press OK to continue. The screen
will be off immediately.
When the TV is not in use, please switch off or
disconnect the TV from the mains plug. This will also
reduce energy consumption.
StandbyNotications
1) If the TV does not receive any input signal (e.g.
from an aerial or HDMI source) for 5 minutes, the TV
will go into standby. When you next switch-on, the
following message will be displayed: “TV switched to
stand-by mode automatically because there was
no signal for a long time.” Press OK to continue.
2) If the TV has been left on and not been operated
for a while, the TV will go into standby. When you next
switch-on, the following message will be displayed.
“TV switched to stand-by mode automatically
because no operation was made for a long time.”
Press OK to continue.
Accessories Included
•Remote Control
•Batteries: 2 x AAA
•Instruction Book
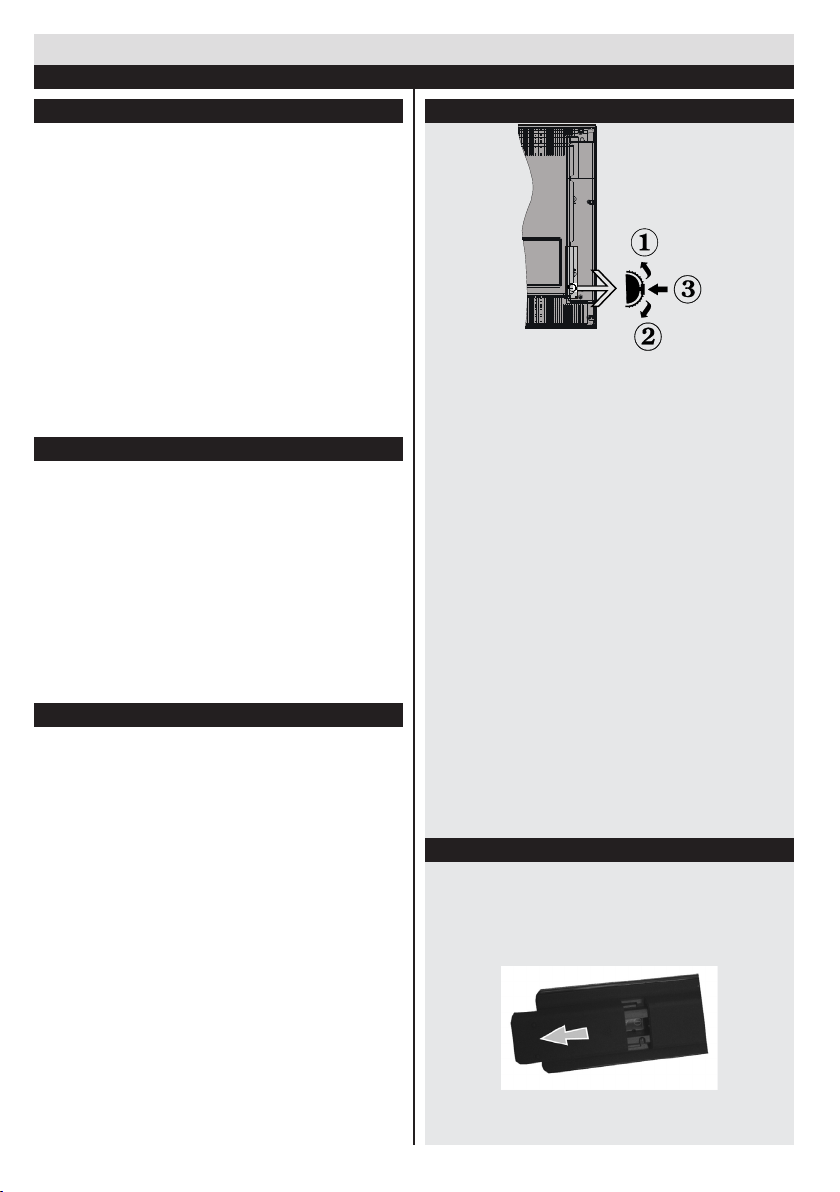
TV Control Switch & Operation
1. Up direction
2. Down direction
3. Programme/Volume / AV / Standby-On selection
switch
The Control button allows you to control the Volume/
Programme/ Source and Standby-On functions of
the TV.
To change volume: Increase the volume by pushing
the button up. Decrease the volume by pushing the
button down.
To change channel: Press the middle of the button,
the channel information banner will appear on screen.
Scroll through the stored channels by pushing the
button up or down
To change source: Press the middle of the button
twice, the source list will appear on screen. Scroll
through the available sources by pushing the button
up or down.
To turn the TV off: Press the middle of the button
down and hold it down for a few seconds, the TV will
turn into standby mode.
Inserting the Batteries into the Remote
Lift the cover on the back of the remote upward
gently. Install two AAA batteries. Make sure to
match the + and - ends of the batteries in the
battery compartment (observe the correct polarity)
Replace the cover.
English - 18 -
Page 20
Connect Power
satellite
aerial
REAR
OF
THE TV
IMPORTANT: The TV set is designed to operate on
220-240V AC, 50 Hz socket. After unpacking, allow
the TV set to reach the ambient room temperature
before you connect the set to the mains. Plug the
power cable to the mains socket outlet.
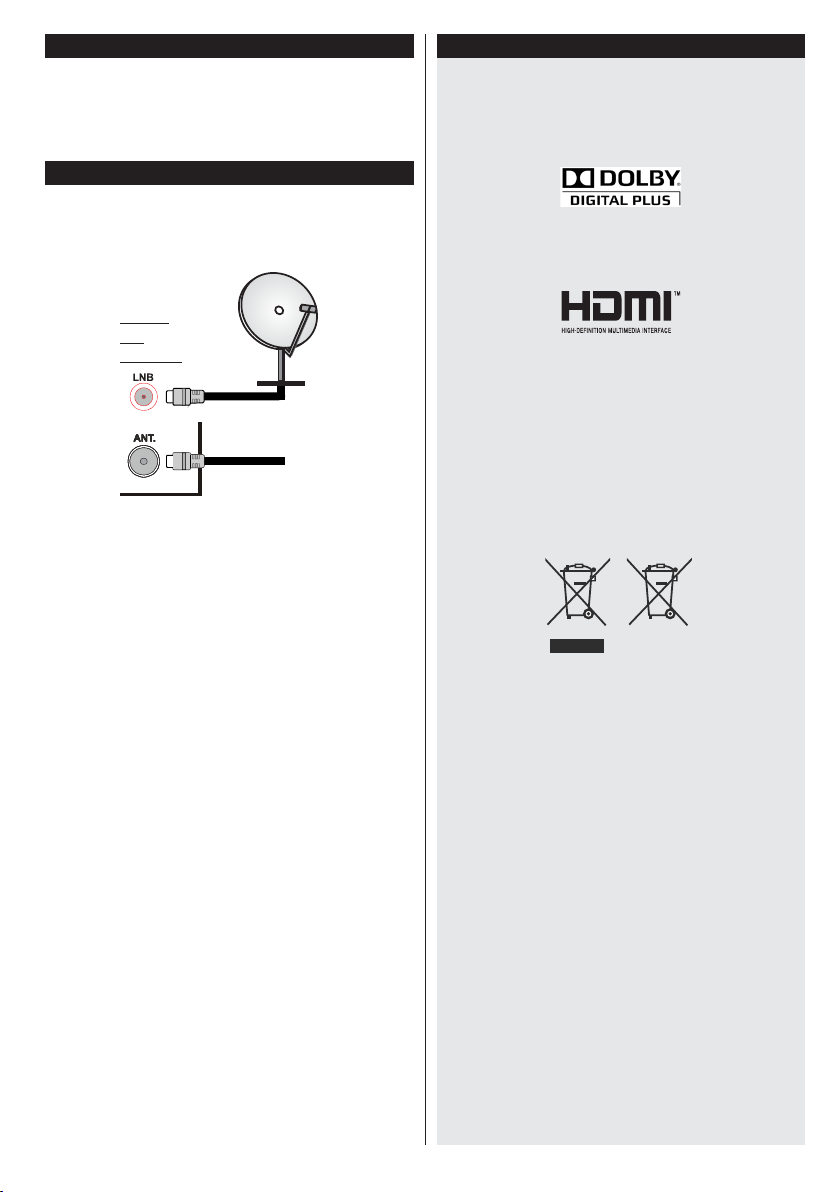
Antenna Connection
Connect the aerial or cable TV plug to the AERIAL
INPUT (ANT) socket or satellite plug to SATELLITE
INPUT (LNB) socket located on the back of the TV.
or
cable
Notication
Manufactured under license from Dolby Laboratories.
TRADEMARK ACKNOWLEDGMENT
“Dolby” and the double-D symbol are trademarks of
Dolby Laboratories.
“HDMI,theHDMIlogoandHigh-DenitionMultimedia
Interface are trademarks or registered trademarks of
HDMI Licensing LLC.”
Information for Users on Disposal of Old
Equipment and Batteries
These symbols indicate that equipment with these
symbols should not be disposed of as general
household waste. If you want to dispose of the
product or battery, please consider the collection
systems or facilities for appropriate recycling.
Caution: “Pb” sign will occur below the crossed-out
wheelie bin symbol if the battery contains lead.
Battery
Products
“In conformity with the WEEE Regulation.”
English - 19 -
Page 21
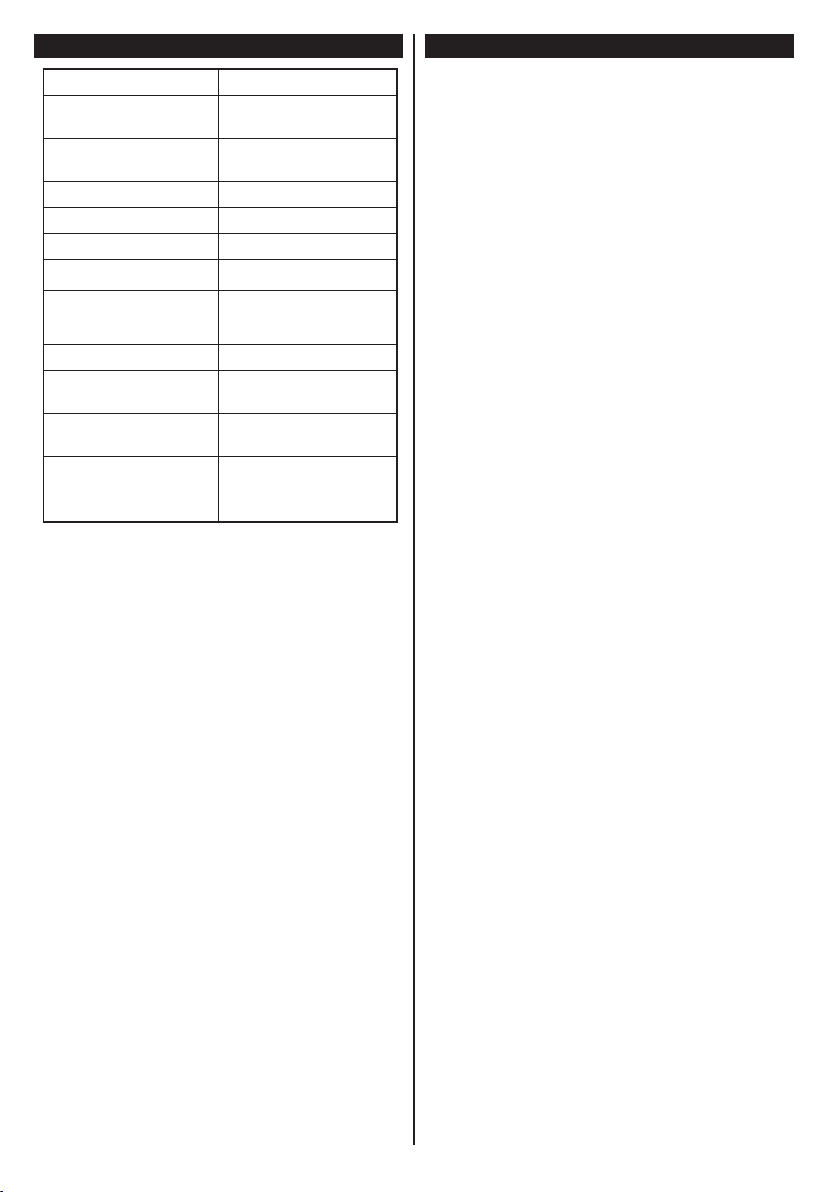
Specication
TV Broadcasting PAL B/G D/K K I/I’
Receiving Channels
Number of Preset
Channels
Channel Indicator On Screen Display
RF Aerial Input 75 Ohm (unbalanced)
Operating Voltage 220-240V AC, 50Hz.
Audio German+Nicam Stereo
Audio Output Power
(WRMS.) (10% THD)
Power Consumption 75 W
TV Dimensions DxLxH
(with foot)
TV Dimensions DxLxH
(without foot)
Operation
temperature and
operation humidity:
VHF (BAND I/III) - UHF
(BAND U) - HYPERBAND
10000
2 x 6
220 x 923 x 588
39/68 x 923 x 544
0ºC up to 40ºC, 85%
humidity max
Features
•Remote controlled colour LCD TV.
•Fully integrated digital/cable/satellite TV (DVB-
T/C/S-S2)
•HDMI inputs are for connecting a device that has
a HDMI socket.
•USB input.
•OSD menu system.
•Scart socket for external devices (such as DVD
Players, PVR, video games, etc.)
•Stereo sound system.
•Teletext.
•Headphone connection.
•Automatic programming system.
•Manual tuning.
•Automatic power down after up to six hours.
•Sleep timer.
•Child lock.
•Automatic sound mute when no transmission.
•NTSC playback.
•AVL (Automatic Volume Limiting).
•PLL (Frequency Search).
•PC input.
•Plug&Play for Windows 98, ME,2000, XP,Vista,
Windows 7.
•Game Mode (Optional).
English - 20 -
Page 22
Getting Started
TV
Remote Control
Teletext
Press “ ” button to enter. Press again to activate mix
mode. Press once more to exit. Follow the instructions
displayed on digital teletext screen.
Digital Teletext (for UK only)
Press “ ” button to view digital teletext information.
Operate it with the coloured buttons, cursor buttons
and the OK button. The operation method may differ
depending on the contents of the digital teletext. Follow
the instructions displayed on the digital teletext screen.
When the “ ” button is pressed again, the TV returns
to television broadcast.
Using My button 1 (*)
PressMYBUTTON1forvesecondswhenonadesired
source, channel or link, until the “MY BUTTON IS SET”
messageisdisplayedonthescreen.Thisconrmsthat
the selected MY BUTTON is now associated with the
selected function.
English - 21 -
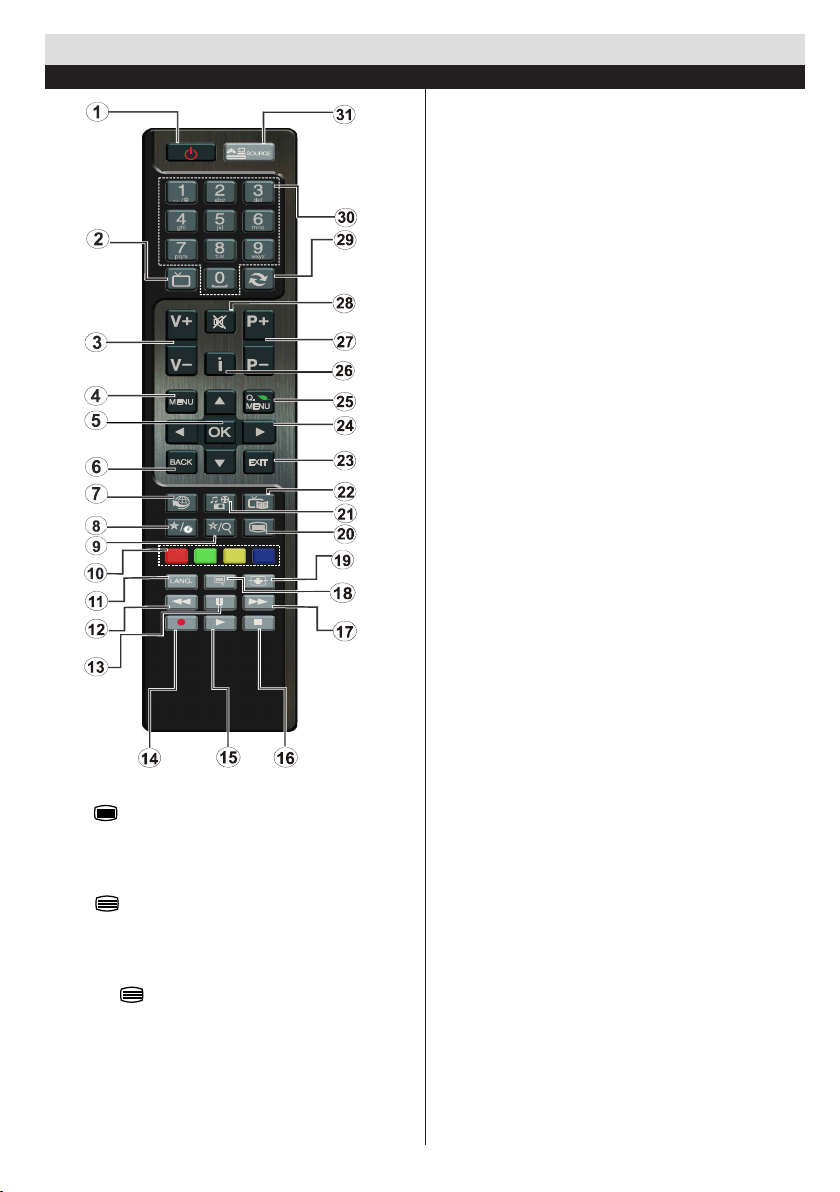
1. Standby / On
2. TV - AV / TV Channel list
3. Volume up/down
4. Menu on/off
5. OK(Conrm)/Hold(inTXTmode)
6. Return/Back/Indexpage(inTXTmode)
7. No function
8. My button 1 (*)
9. My button 2 (**)
10. Coloured buttons (Red, Green, Yellow, Blue)
11. Mono-Stereo Dual I-II / Current language (in
DVB channels)
12. Rapid reverse (in media browser mode)
13. Pause (in media browser mode)
14. No Function
15. Play (in media browser mode)
16. Stop (in media browser mode)
17. Rapid advance (in media browser mode)
18. Subtitleon-off(inDVBchannels&media
browser mode)
19. Image size
20. Teletext - Mix
21. Media Browser
22. Electronic programme guide (in DVB channels)
23. Exit
24. Navigation buttons
25. Quick Menu
26. Info/Reveal(inTXTmode)
27. Programme up-down
28. Mute
29. Previous programme
30. Numeric buttons
31. AV / Source
Using My button 2 (*)
This button's main function is to switch between DVB-T,
DVB-C and DVB-S broadcasts. However, if you press MY
BUTTON2forveseconds,youcansetafunctiontoit
as described in My Button 1.
Notethatifyouperformrsttimeinstallation,MYBUTTON
2 will return to its default function, switching between
DVB-T, DVB-C and DVB-S broadcasts.
Page 23
HEADPHONE
Getting Started
Connections
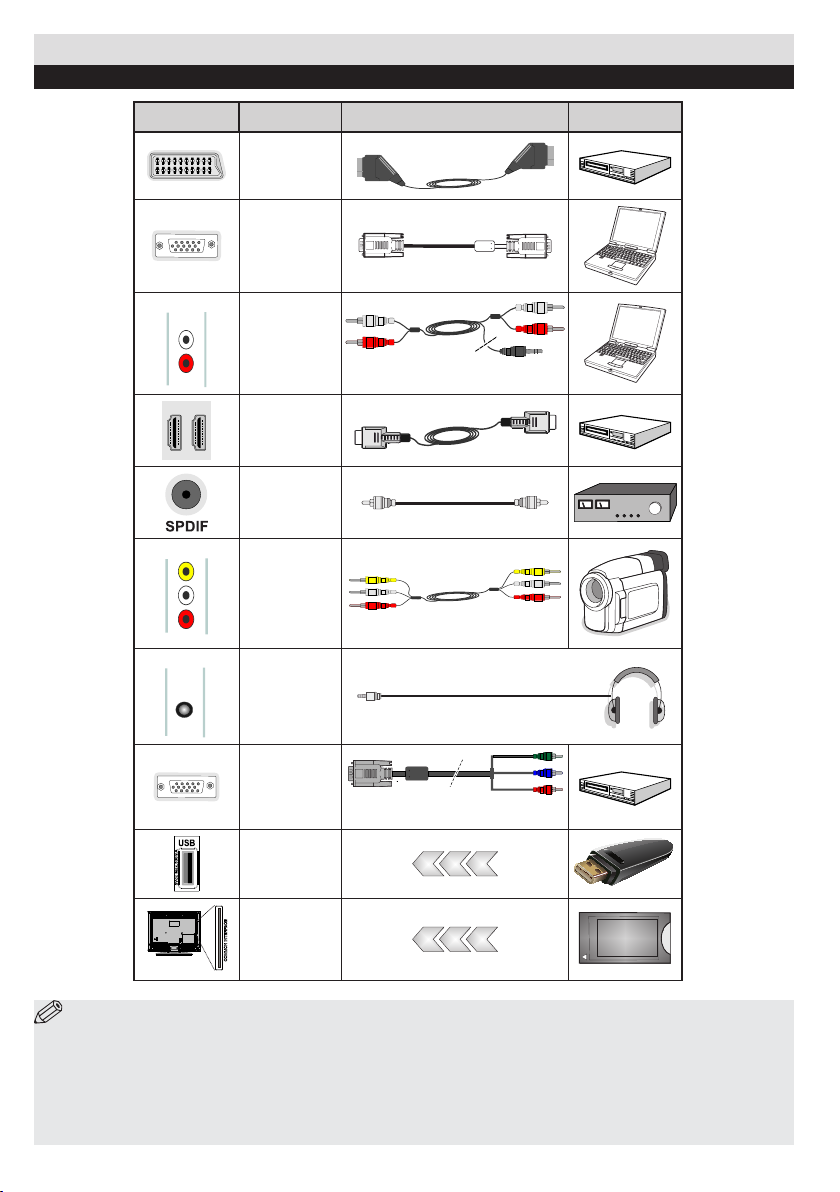
Connector Type Cables Device
Scart
Connection
(back)
VGA
Connection
(back)
SIDE AV
SIDE AV
HEADPHONE
PC/YPbPr
Audio
Connection
(side)
HDMI
Connection
(back)
SPDIF
Connection
(back)
Side AV
(Audio/Video)
Connection
(side)
Headphone
Connection
(side)
YPbPr Video
Connection
(side)
USB
Connection
(side)
CI
Connection
(side)
Side Audio
YPbPr or PCConnection Cable
YPbPr Connection
Cable
CAM
module
NOTE: When connecting a device via the YPbPr or Side AV input, you must use a connection cable
to enable connection. See the illustrations above. | To enable PC audio, you will need to use the SIDE AV
CONNECTION cable’s WHITE & RED inputs. | If an external device is connected via the SCART socket, the TV
will automatically switch to AV mode.| When receiving DTV channels (Mpeg4 H.264) or while in Media Browser
mode, output will not be available via the scart socket. | When using the wall mounting kit (optional), we recommend
that you plug all your cables into the back of the TV before mounting on the wall. | Insert or remove the CI module
only when the TV is SWITCHED OFF. You should refer to the module instruction manual for details of the settings.
English - 22 -
Page 24
Getting Started
First Time Installation - USB Connections
Switching On/Off
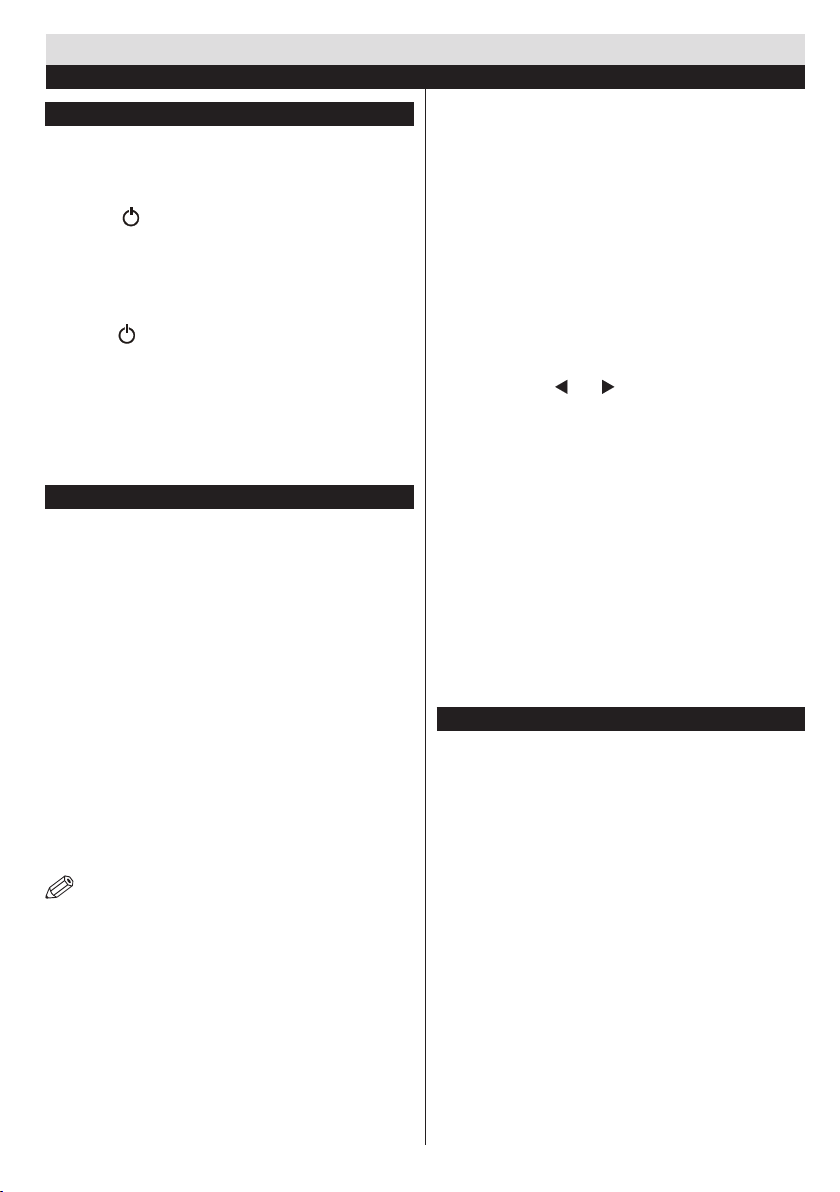
To Switch the TV On
Connect the power cord to the 220-240V AC, 50 Hz.
To switch on the TV from standby mode either:
Press the “
the remote control.
Press the side function switch until the TV comes on
from standby.
To Switch the TV Off
Press the “ “ button on the remote control or press the
side function switch until the TV switches into standby mode.
To power down the TV completely, unplug the power
cord from the mains socket.
Note: When the TV is switched to standby mode, the standby
LED can blink to indicate that features such as Standby Search,
Over Air Download or Timer is active. The LED can also blink
when you switch on the TV from standby mode.
First Time Installation
When turned on for the first time, the language
selection screen is displayed. Select the desired
language and press OK.
The First Time Installation (FTI) screen will be
displayed next. Set your preferences using the
navigationbuttonsandwhennished,pressOK to
continue.
You can activate Store mode option to be available
in “Other settings” menu and your TV’s features will
beillustratedonthetopofthescreen.Aconrmation
screen will be displayed. Select YES to proceed.
If Home Mode is selected, Store mode will not be
available after the First Time Installation. Press OK
button to continue.
Aerial Installation
If you select AERIAL option from the Search Type screen,
the television will search for digital terrestrial TV broadcasts.
NOTE: You can press MENU button to cancel.
After all the available stations are stored, the Channel
List will be displayed on the screen. If you like how the
channels are sorted according to the LCN (*), please
select “Yes” and than press OK.
Press MENU button to quit channel list and watch TV.
(*) LCN is the Logical Channel Number system that
organizes available broadcasts in accordance with a
recognizable channel sequence (if available).
Cable Installation
If you select CABLE option and press OK button on the
remote control. To continue, please select YES and
” button, P+ / P- or a numeric button on
press OK. To cancel operation, select NO and press
OK. You can select frequency ranges from this screen.
Enter the frequency range manually by using the
numeric button.
Note: Searching duration will change depending on
the selected search step.
Satellite Installation
If you select Satellite option from the Search Type
screen, you can set a satellite and watch the satellite
channels. When you select Satellite installation,
Antenna Type menu will be displayed.
There are three types of antenna selection. You can
select Antenna type as Direct, Unicable or DiSEqC
switch by using “
Direct: If you have a single receiver and a direct
satellite dish, select this antenna type. After selecting
Direct, another menu screen will be displayed. Select
an available satellite and press OK to scan for services.
Unicable: If you have multiple receivers and a
unicable system, select this antenna type. Press OK to
continue.Conguresettingsbyfollowinginstructions
on the screen. Press OK to scan for services.
DiSEqC switch: If you have multiple satellite dishes
and a DiSEqC switch, select this antenna type. After
selecting DiSEqC switch, another menu screen will
be displayed. You can set four DiSEqC options (if
available). Press GREEN button to scan all satellites
or press YELLOW button to scan only the highlighted
satellite. To save and exit press OK button.
Media Playback via USB Input
You can connect a 2.5” and 3.5” inch (hdd with
external power supply) external hard disk drives
or USB memory stick to your TV by using the USB
inputs of the TV.
IMPORTANT! Back up your files before making
any connections to the TV. Manufacturer will not be
responsibleforanyledamageordataloss.Certain
types of USB devices (e.g. MP3 Players) or USB hard
disk drives/memory sticks may not be compatible
with this TV. The TV supports FAT32 and NTFS disk
formatting but recording will not be available with NTFS
formatted disks.
While formatting a USB hard disk that has 1TB (Tera
Byte) or more file capacity, you can experience
problems with the formatting process. Do not
repeatedly quickly plug and unplug the drive. This
may cause physical damage to the USB player and
USB device itself. Do not pull out USB module while
playingale.
Some USB harddisk drives might not be supported
” or “ ” buttons.
English - 23 -
Page 25
Media Browser Menu
You can playphoto, music, and movie lesstored
on a USB disk by connecting it to your TV. Connect
a USB disk to one of the USB inputs located on the
side of the TV. Pressing the Menu button while in the
Media Browser mode will access the Picture, Sound
and Settings menu options. Pressing the Menu button
again will exit from this screen.
You can set your Media
Browser preferences by using the Settings Menu.
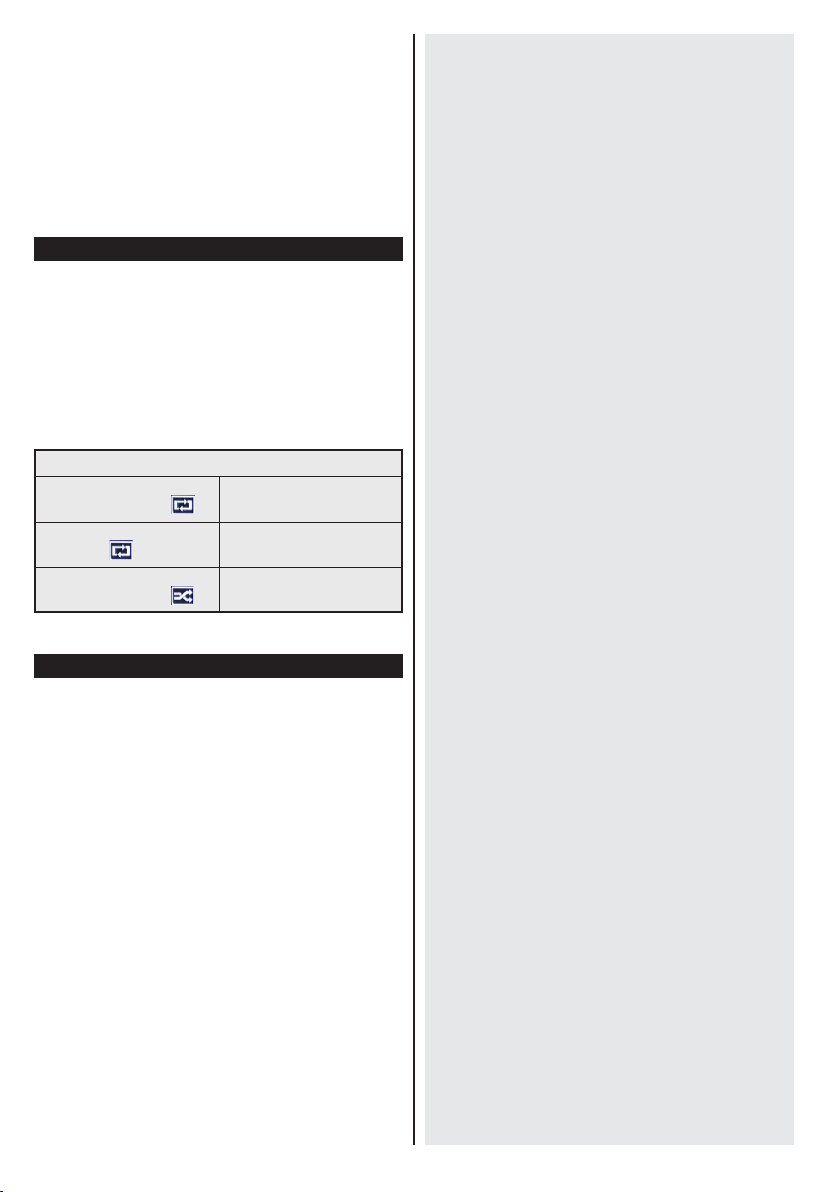
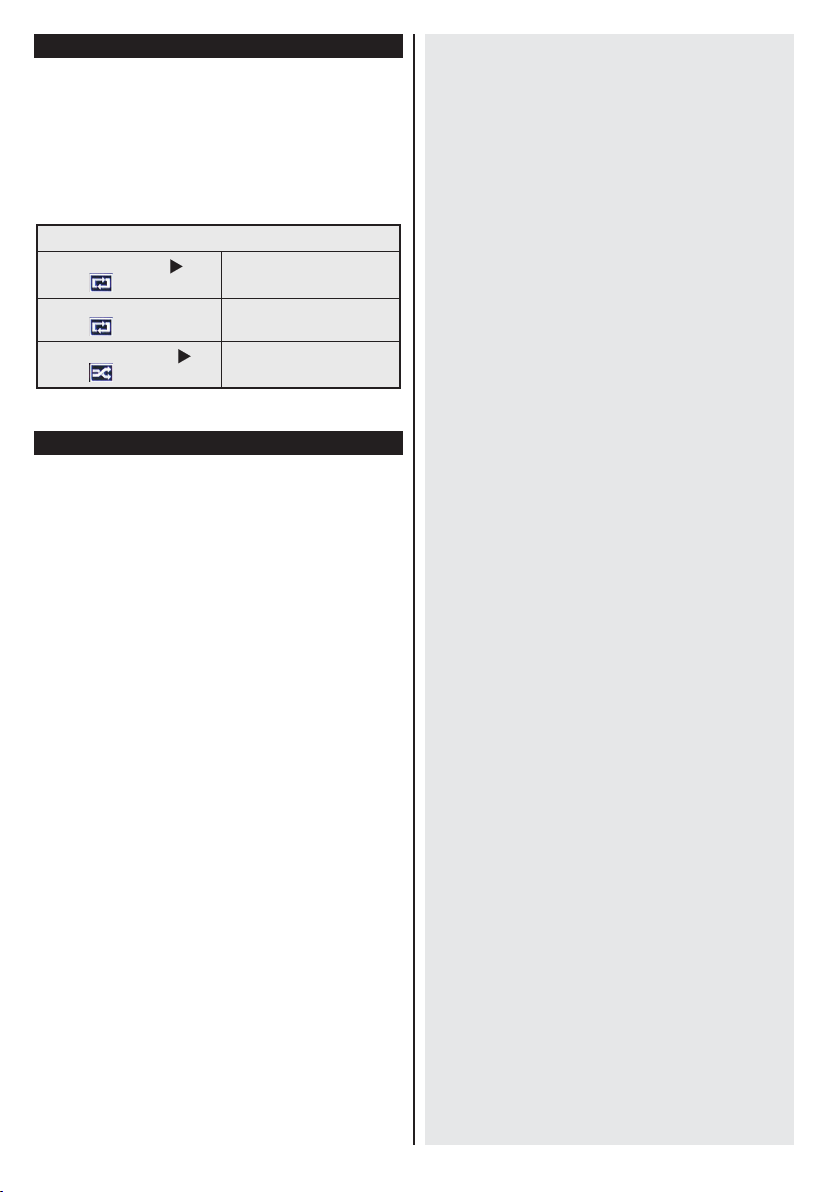
Loop/Shufe Mode Operation
Start playback with and
activate
Start playback with OK and
activate
Start playback with OK/
activate
TV plays next file and loop
the list.
Thesamelewillbeplayedin
a loop (repeat).
and
The file will be played in a
shufe.
Quick Menu
Quick Settings menu allows you to access some
options quickly. This menu includes Power Save
Mode, Picture Mode, Equalizer Settings, Favourites
and Sleep Timer options. Press Q.MENU button
on the remote control to view quick menu. See the
following chapters for the details of the listed features.
English - 24 -
Page 26
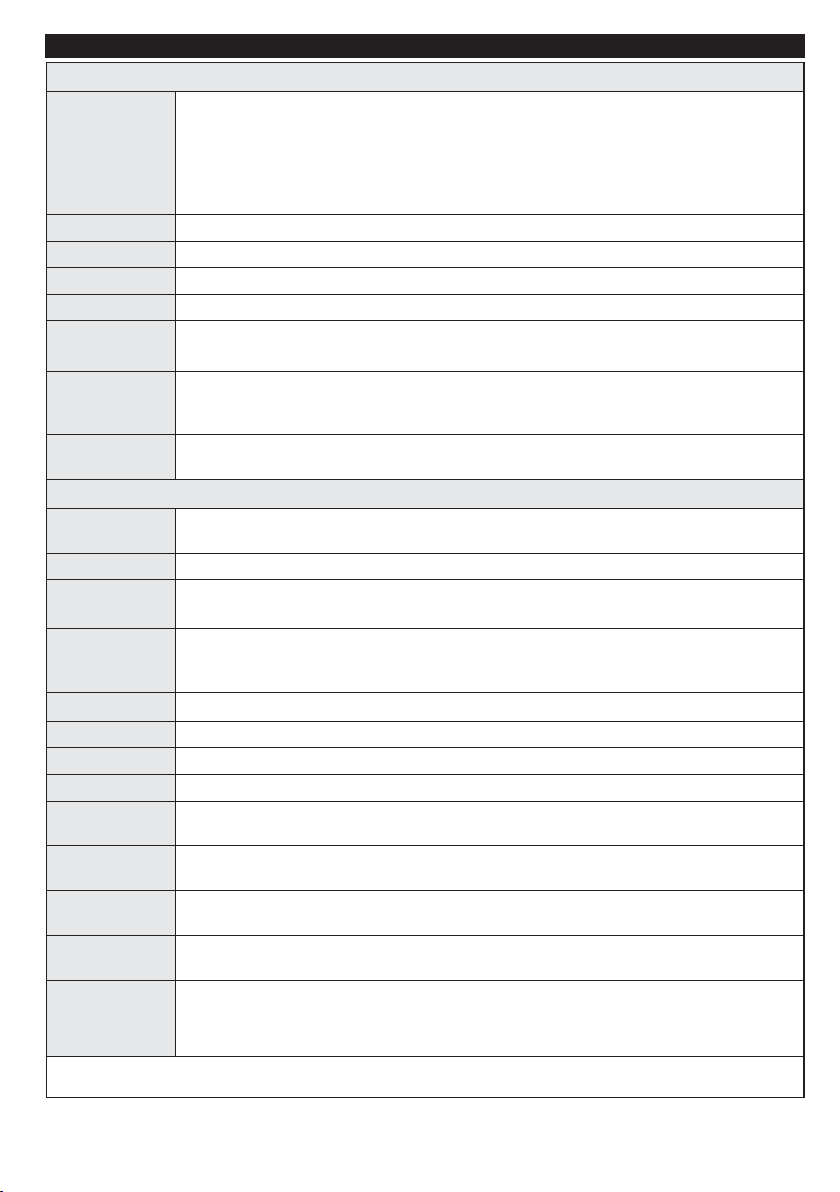
TV Menu Features and Functions
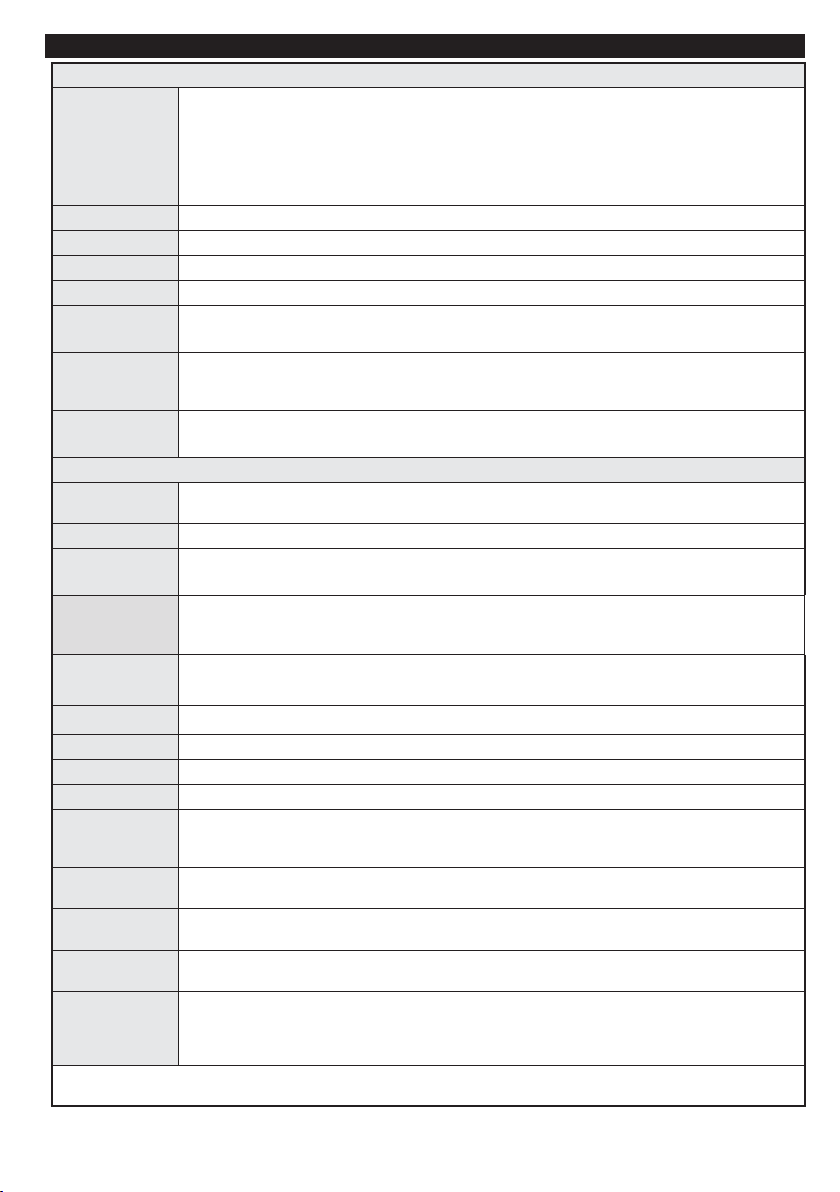
Picture Menu Contents
You can change the picture mode to suit your preference or requirements. Picture mode can be
set to one of these options: Cinema,Game,Dynamic and Natural.
Mode
While Mode option is highlighted, Pixellence demo mode will be displayed bottom of the menu screen.
Pixellence Demo Mode function optimizes the TV’s video settings and helps to acquire a better
image quality. Press OK to start Pixellence Demo Mode for experiencing Pixellence quality. Press
OK button to cancel (Except Game Mode).
Contrast Sets the lightness and darkness values of the screen.
Brightness Sets the brightness value for the screen.
Sharpness Sets the sharpness value for the objects displayed on the screen.
Colour Sets the colour value, adjusting the colors.
Power Save Mode
Backlight
(Optional)
Noise
Reduction
To set the Power Save Mode as Eco, Picture Off and Disabled.
(When the Mode is Dynamic, Power Save mode is automatically set as disabled.)
This setting controls the backlight level. The backlight function will be inactive if the Power Save Mode
is set to Eco. The backlight cannot be activated in VGA, Media Browser mode or while the picture
mode is set to Game
.
If the broadcast signal is weak and the picture is noisy, use the Noise Reduction setting to
reduce the amount of noise.
Advanced Settings
Dyanmic
Contrast
Colour Temp Sets the desired colour tone.
Picture Zoom
Film Mode
Skin Tone
Colour Shift Adjusts the desired colour tone.
RGB Gain
Reset Resets the picture settings to factory default settings.(Except Game Mode)
Autoposition
(in PC mode)
H Position (in
PC mode)
V Position (in
PC mode)
Dot Clock (in
PC mode)
Phase (in PC
mode)
While in VGA (PC) mode, some items in Picture menu will be unavailable. Instead, VGA mode settings will be added
to the Picture Settings while in PC mode.
You can change the Dynamic Contrast ratio to desired value.
Sets the desired picture size from picture zoom menu.
Note: Auto (Only available in Scart mode with SCART PIN8 high voltage/low voltage switching)
Films are recorded at a different number of frames per second to normal television
programmes. Turn this feature on when you are watching films to see the fast motion
scenes clearly.
Skin tone can be changed between -5 and 5.
YoucancongurethecolourtemperaturevaluesusingtheRGBGainfeature.
Automatically optimizes the display. Press OK to optimize.
This item shifts the image horizontally to the right hand side or left hand side of the screen.
This item shifts the image vertically towards the top or bottom of the screen.
Dot Clock adjustments correct the interference that appear as vertical banding in dot intensive
presentations like spreadsheets or paragraphs or text in smaller fonts.
Depending on the resolution and scan frequency that you input to the TV set, you may see
a hazy or noisy picture on the screen. In such a case you can use this item to get a clear
picture by trial and error method.
English - 25 -
Page 27
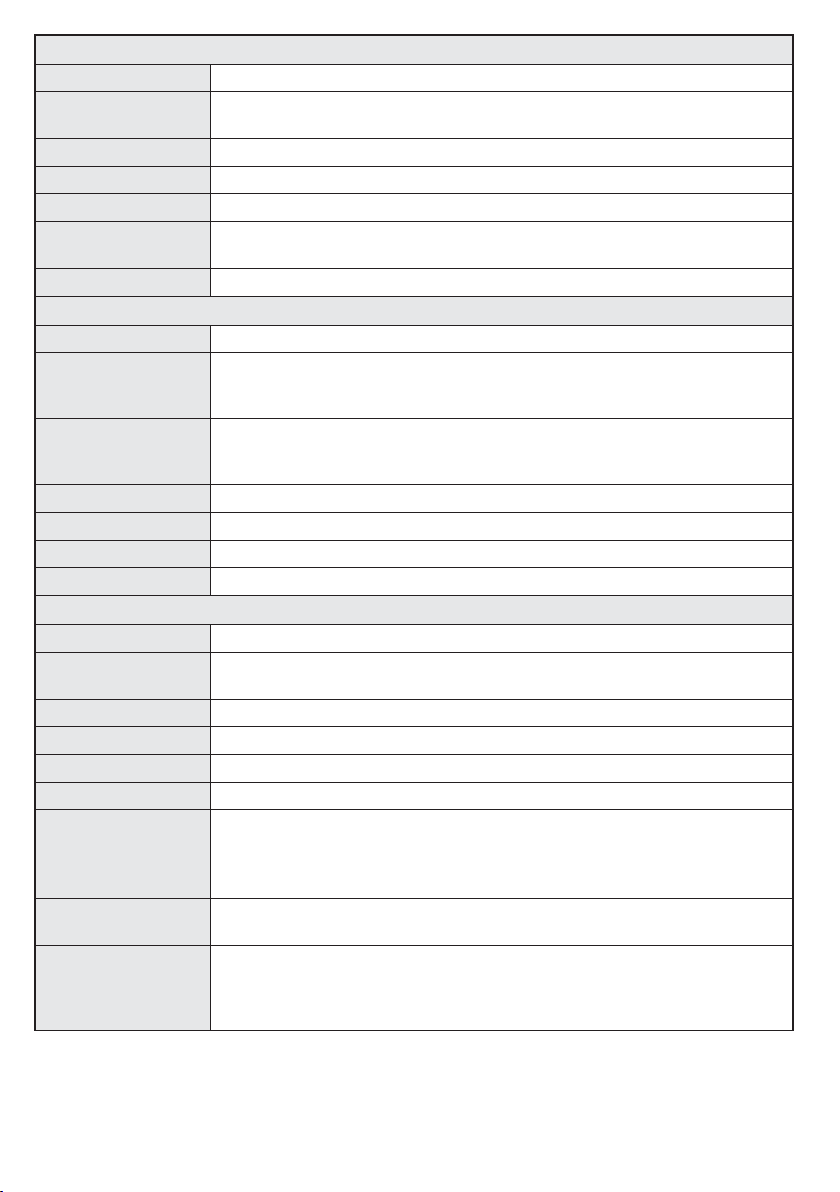
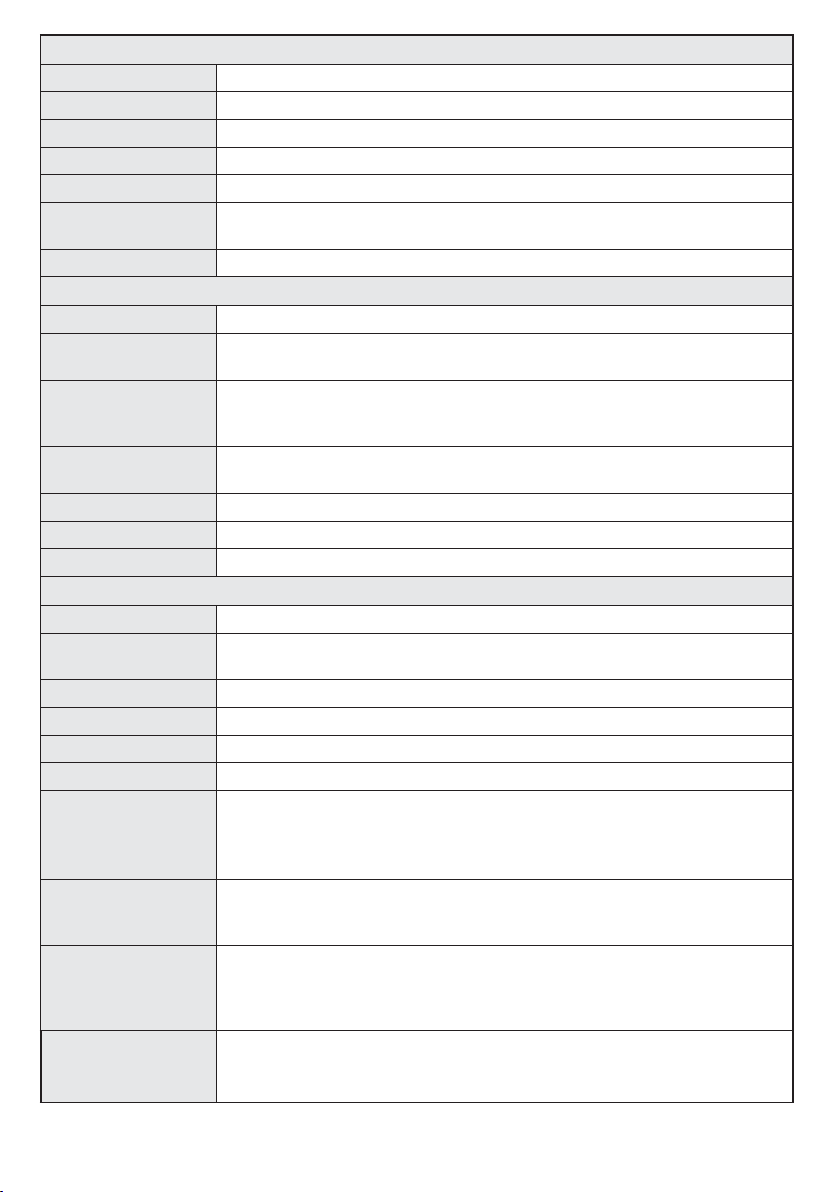
Sound Menu Contents
Volume Adjusts the volume level.
Equalizer
Balance This setting is used for emphasizing left or right speaker balance.
Headphone Sets headphone volume.
Sound Mode You can select a sound mode. (If the selected channel supports).
AVL (Automatic
Volume Limiting)
Digital Out Sets digital out audio type.
Selects the equalizer mode. Custom settings can be made only when
in user mode.
Functionsetsthesoundtoobtainxedoutputlevelbetweenprogrammes.
Settings Menu Contents
Conditional Access Controls conditional access modules when available.
Language
Parental
Timers Sets sleep timer to turn off the TV after a certain time. Sets timers for selected programmes.
Date/Time Sets date and time.
Sources Enables or disables selected source options.
Satellite Settings Displays the satellite settings.
Congureslanguagesettings(maychangedependingonthecountryselected)
Pr e f err e d an d cur r e nt s etti n gs will be available. Current settings can be
changed only if the broadcaster supports.
Enter correct password to change parental settings. You can easily adjust
menu lock, maturity lock(may change depending on the country selected) and
child lock in this menu. You can also set new pin number.
Other Settings: Displays other setting options of the TV set:
Menu Timeout Changes timeout duration for menu screens.
Scan Encrypted
Channels
Blue Background Activates or deactivates the blue background system when the signal is weak or absent.
Software Upgrade ToensurethatyourTValwayshasthemostuptodatermware.
Application Version Displays application version.
Hard of Hearing Enables any special feature sent from the broadcaster.
Audio Description
Auto TV Off
Standby Search
(Optional)
When this setting is on, the search process will locate the encrypted channels as well.
Audio description refers to an additional narration track for blind and visually
impaired viewers of visual media, including television and movies. You can use
this feature, only if the broadcaster supports that additional narration track.
Note: Audio description sound feature cannot be available in recording or time shifting mode..
You can set the timeout value of auto off feature. When the timeout value is reached
and the TV has not been operated for a selected time, the TV will go into standby mode.
If the Standby Search is set to On, when the TV is in standby mode, available
broadcasts will be searched. If the TV locates any new or missing broadcasts, a
menu screen will be displayed, asking you whether or not to execute these changes.
Channel list will be updated and changed after this process.
English - 26 -
Page 28
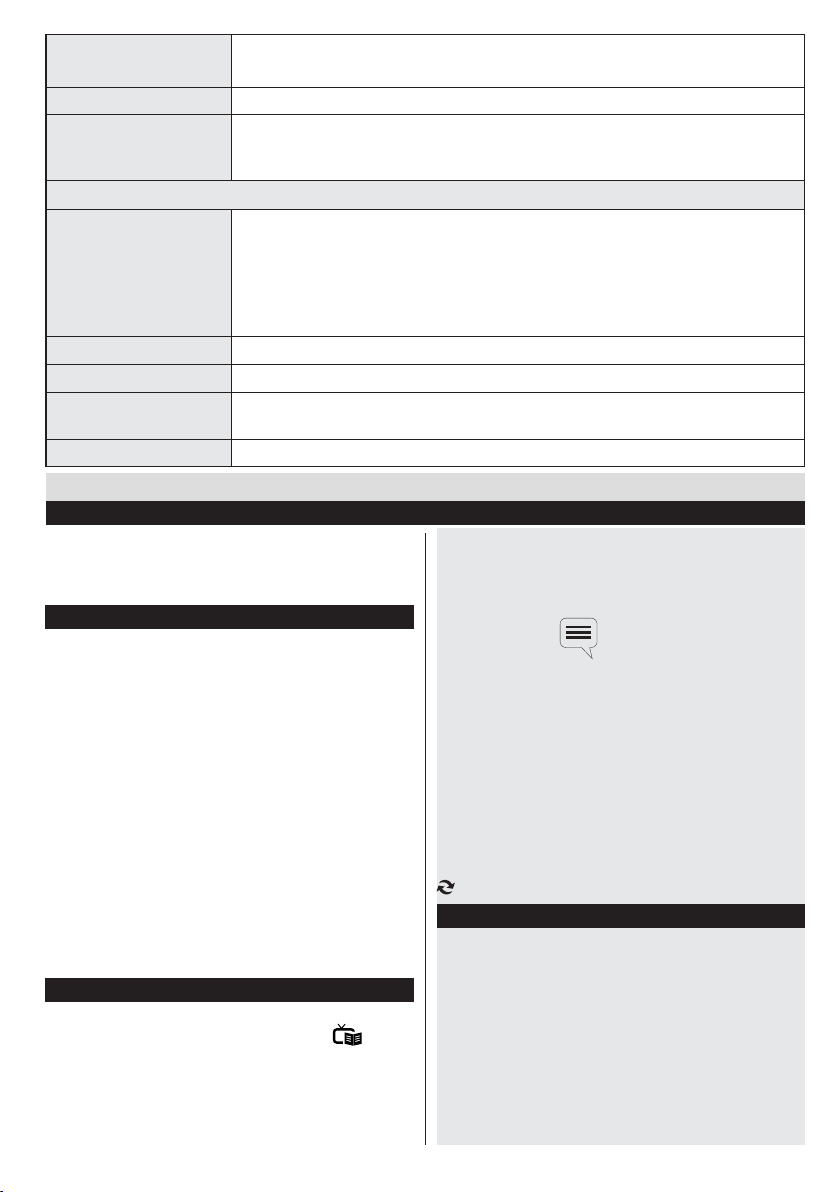
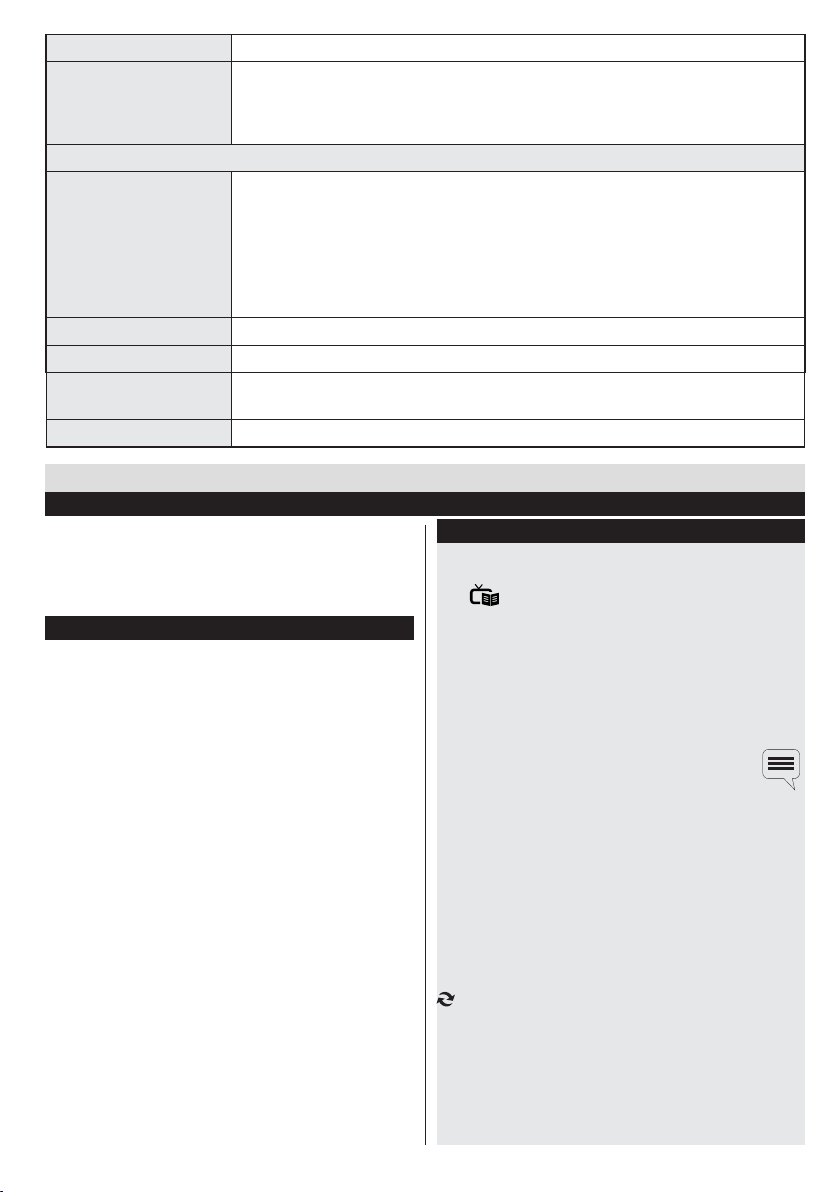
Store Mode
If you are displaying the TV in a store, you can activate this mode. Whilst Store
Mode is enabled, some items in the TV menu may not be available.
Power Up Mode This setting confrigures the power up mode preference.
Biss is a satellite signal scrambling system that is used for some broadcasts. If you need
Biss Key
to enter BISS key on a broadcast, you can use Biss Key setting located in the Other
Settings menu. Highlight Biss Key and press OK to enter keys on the desired broadcast.
Install and Retune Menu Contents
Displays automatic tuning options. Digital Aerial: Searches and stores aerial
Automatic Channel
Scan (Retune)
(If available)
DVB stations.
Searches and stores analogue stations.
and stores aerial DVB and analogue stations.
Searches and stores cable DVB and analogue stations. Satellite: Searches and
Digital Cable: Searches and stores cable DVB stations. Analogue:
DigitalAerial&Analogue:Searches
Digital Cable & Analogue:
stores satellite stations.
Manual Channel Scan This feature can be used for direct broadcast entry.
Network Channel Scan Searches for the linked channels in the broadcast system.
Analogue Fine Tune
Youcan usethissettingfornetuninganaloguechannels.Thisfeatureisnot
available if no analogue channels are stored.
First Time Installation Deletes all stored channels and settings, resets TV to factory settings.
General TV Operation
Using the Channel List
The TV sorts all stored stations in the Channel List.
You can edit this channel list, set favourites or set
active stations to be listed by using the Channel List
options.
ConguringParentalSettings
To prohibit viewing of certain programmes, channels and
menus can be locked by using the parental control system.
To display parental lock menu options, the PIN number
should be entered. The factory default PIN number is
0000. After coding the correct PIN number, parental
settings menu will be displayed.
Menu Lock: Menu lock setting enables or disables
the menu access.
Maturity Lock: When set, this option gets the maturity
information from the broadcast and if this maturity
level is disabled, disables access to the broadcast.
Child Lock: When Child Lock is set, the TV can only
be controlled by the remote control. In this case the
control panel buttons will not work.
Set PIN:DenesanewPINnumber.
Note: If the Country option is set to France, you can use 4725
as the default code.
Electronic Programme Guide (EPG)
Some, but not all channels send information about the
current and next programmes. Press the “
” button
to view the EPG menu.
Red button (Prev Day): Displays the programmes of
previous day.
Green button (Next day): Displays the programmes
of the next day.
Yellow button (Zoom): Expands programme information.
Blue button (Filter): Viewslteringoptions.
SUBTTL: Press “
” button to view Select Genre
menu. Using this feature, you can search the programme
guide database in accordance with the genre. Info
available in the programme guide will be searched and
results matching your criteria will be listed.
INFO(İ): Displays, in detailed, information on the
programme selected.
Numeric buttons (Jump): Jumps to the preferred
channel directly via numeric buttons.
OK: Displays programme options.
Text (Search): Displays “Guide Search” menu.
(Now) : Shows the current programme.
Software Upgrade
YourTViscapableofndingandupdatingautomatically
via the Aerial/Cable/Satellite signal.
Software upgrade search via user interface
Simply navigate on your main menu. Choose Settings
and select Other Settings menu. In Other Settings
menu navigate on to the Software for Upgrade item
and press OK button to check for a new software
upgrade.
English - 27 -
Page 29

Troubleshooting & Tips
Tv will not turn on
Make sure the power cord is plugged in securely to
wall outlet. The batteries in the remote control may be
exhausted. Press the Power button on the TV.
Poor picture
• Have you selected the correct TV system?
• Low signal level can cause picture distortion.Please
check antenna access.
• Check if you have entered the correct channel
frequency if you have done manual tuning.
• The picture quality may degrade when two devices
are connected to the TV at the same time. In such
a case, disconnect one of the devices.
No picture
•No Picture means that your TV is not receiving a
transmission. Have you selected the correct button on
the remote control? Try once more. Also make sure
the correct input source has been selected.
•Is the antenna connected properly?
•Is the antenna cable damaged?
•Are suitable plugs used to connect the antenna?
•If you are in doubt, consult your dealer.
No sound
• Has the TV been set to mute? To cancel mute, press the
” button, or increase the volume level.
“
• Sound is coming from only one speaker. Is the balance
set to one extreme? See Sound Menu section.
Remote control - does not operate
•The batteries may be exhausted. Replace the
bateries.
Input sources - can not be selected
•If you cannot select an input source, it is possible that
no device is connected. if not
•Check the AV cables and connections if you have tried
to connect a device.
English - 28 -
Page 30
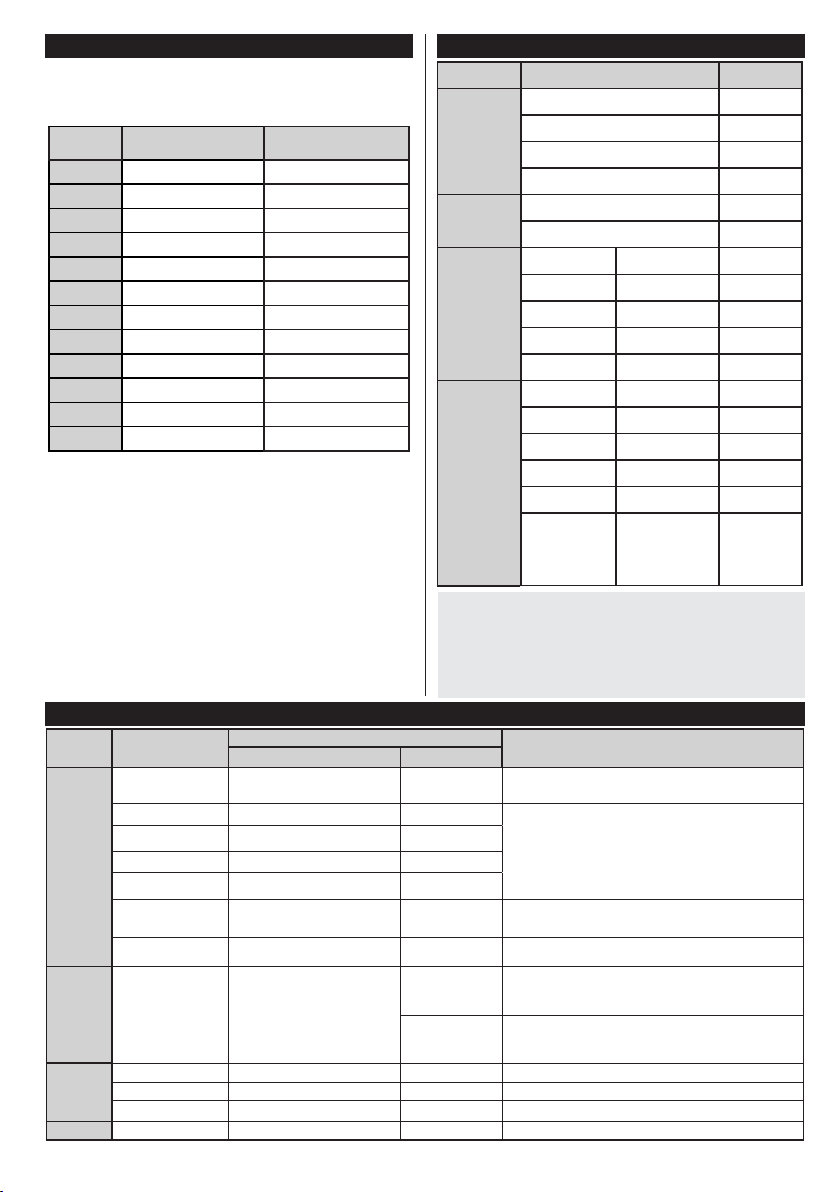
Format
Remarks
(Maximum resolution/Bit rate etc.)
Video
Audio
MPEG1: 768x576 @30P
MPEG2:1920x1080 @ 30P
mkv
H.264, MPEG4,VC-1
H.264/VP6:1920x1080 @ 30P
Sorenson: 352x288 @30P
32K, 44.1k, 48k Hz,16K, 22.05K, 24K Hz,8K, 11.025K,
.jpg .jpeg
Baseline JPEG
-
max WxH = 17000x10000 4147200bytes
.
Progressive JPEG
-
max WxH = 4000x4000 3840000bytes
Subtitle
.sub .srt--
-
PC Input Typical Display Modes
The following table is an illustration of some of the
typical video display modes. Your TV may not support
all resolutions. Your TV supports up to 1920x1080.
Index Resolution Frequency
1 640x480 60 Hz
2 800x600 56 Hz
3 800x600 60 Hz
4 1024x768 60 Hz
5 1024x768 66 Hz
6 1280x768 60 Hz
7 1280x960 60 Hz
8 1280x1024 60 Hz
9 1360x768 60 Hz
10 1400x1050 60 Hz
11 1600x1200 60 Hz
12 1920x1080 60 Hz
Supported File Formats for USB Mode
Media File Extension
AV and HDMI Signal Compatibility
Source Supported Signals Available
PAL 50/60 O
EXT
(SCART)
NTSC 60 O
RGB 50 O
RGB 60 O
Side AV
PAL 50/60 O
NTSC 60 O
480I, 480P 60Hz O
576I, 576P 50Hz O
PC/
YPbPr
720P 50Hz,60Hz O
1080I 50Hz,60Hz O
1080P 50Hz,60Hz O
480I 60Hz O
480P 60Hz O
576I, 576P 50Hz O
HDMI1
HDMI2
720P 50Hz,60Hz O
1080I 50Hz,60Hz O
24Hz, 25Hz
1080P
30Hz, 50Hz,
O
60Hz
(X: Not Available, O: Available)
In some cases a signal on the LCD TV may not be displayed
properly. The problem may be an inconsistency with
standards from the source equipment (DVD, Set-top box, etc.
). If you do experience such a problem please contact your
dealer and also the manufacturer of the source equipment.
mpg, mpeg MPEG1, MPEG2
vob MPEG2
mp4 MPEG4, Xvid , H.264
Movie
avi MPEG2, MPEG4, Xvid , H.264
v H.264/VP6/Sorenson
3gp MPEG4 , H.264 1920x1080 @ 30P
Music
.mp3 -
Photo
.bmp - - max WxH = 5760x4096 3840000bytes
MPEG 1 Layer 2
MPEG 1 Layer 3
English - 29 -
1920x1080 @ 30P
32K, 44.1k, 48k Hz,16K, 22.05K, 24K Hz (Sampling
32Kbps ~ 448Kbps(Bit rate)
rate)
32Kbps ~ 320Kbps(Bit rate)
12K Hz (Sampling rate)
Page 31
Dear Customer;
This appliance is manufactured with TFT LCD Display technology.
An image is created with colour light points calLCD pixels in TFT-LCD appliances.
Eachpixelconsistsof3sub-pixels[xedcolour(red,green,blue)lightpoints].
As a requirement of production technologies, the abovementioned sub-pixels may cause
“sub-pixel errors” by way of lighting continuously or remaining dim continuously.
Please consider the following explanation about a possible sub-pixel error.
This problem can be encountered during the production phase as well as during use.
Sub-pixel errors are mainly 2 types.
Type 1 : The sub-pixel lighting continuously (may be red, green or blue)
Type 2 : The sub-pixel which is continuously dim (seems black)
The sub-pixel errors determined according to the ISO 13406-2 standard are given in the following table.
English - 30 -
Page 32

IMPORTANT WARNINGS
1. Rights reserved by the manufacturer:
The manufacturer reserves the right to change the features stated in the product or in the user’s manual
of the product without giving any information, when required by the improvements in technology.
2. Warnings about Screen Technology:
Due to TFT and Plasma technologies, there may be inactive or continuously shining white, red or blue
pixels in the screen. This does not affect the performance of the product, and it is not a failure. The
related details are given in the related pages of the user’s manual. The manufacturer does not have any
responsibility in the cases within the compass of the criteria.
3.Acontinuousxedimageonthescreen:
DuetoTFTandPlasmatechnologies,“burning”effectmayariseinthescreenafteracontinuousxedimage
on the screen, displaying the same background continuously or watching a 4:3 video on a 16:9 television for
a long time. In order to avoid this effect, it is highly recommended that you follow the followings.
•Donotwatchaxedimagecontinuously.
•Donotwatchvideosintheformatof4:3inyourtelevisionwhichsupportstheformatof16:9.
•Trytousecontrastandbrightnessataminimumlevel.
4. In Full HD products;
The expected performance may not be achieved in TV broadcasts and the broadcasts of satellite
receiverswhich arenotsupportedby othersourcesinterms ofhighdenition,DVD playersorcable
television; and in these broadcasts, mosaic images may occur, sharpness and resolution of the image
may be low; some effects may arise on the screen. This is not a failure. It is advisable to watch high
denition broadcasts for your TV which supports high denition (1920x1080) to work with a high
performance as a requirement of the Full HD technology. The expected performance may not be
achieved in TV broadcasts and the broadcasts of satellite receivers which are not supported by other
sourcesintermsofhighdenition,DVDplayers orcabletelevision; andinthesebroadcasts,mosaic
images may occur, sharpness and resolution of the image may be low; some effects may arise on the
screen.Thisisnotafailure.Ifyourappliancesupportshighdenition,itisrecommendedthatyouuse
highdenitionbroadcastsourcesinordertoachieveahighscreenperformanceasarequirementofthe
highdenition(HD)technology.
5. About Working Sound of the Appliance:
A working sound may be generated in the electronic circuits in your appliance as a requirement of its
technology depending on the current on it while running or in standby status. This sound can sometimes be
heard depending on the sensitivity of human ear and watching distance although it is within the compass of
the standards. This sound does not affect the performance of your appliance and it is not a failure.
6. Make sure that the panel (screen) of your appliance is never subjected to any external
mechanical impact:
The panels (screens) of the TFT-LCS televisions are not only a piece of glass; on the contrary they
are composed of layers. If your appliance is damaged in its panel (screen) which is the front part by
an external impact, the inner layer of the screen might be broken / cracked even when no break/crack
arises in the layer of the screen which is the closest to the outer environment. This can be technically
detected by the authorized service. Therefore, make sure that the panel (screen) of your appliance is
never subjected to any external mechanical impact. Otherwise, as any damage “caused by an external
hit” is considered as a usage error, the manufacturer will not have any legal responsibility.
7. About the use of the appliance:
The appliance you purchased was produced for home-type use, and it can be used only at home and
forthespeciedpurposes,notforcommercialorcollectiveuse.Otherwise,themanufacturerandthe
dealer will not be responsible for the failures within the period of warranty and free repair, which is
determined in the provisions of the Act on the Protection of Consumers.
English - 31 -
Page 33
Vestel_musteri_hiz_sayfasi_BASKI.pdf 1 9/11/14 2:16 PM
C
M
Y
CM
MY
CY
CMY
K
Page 34
Page 35
Page 36
Cihazınızın T.C. Gümrük ve Ticaret Bakanlığı Tüketicinin Korunması ve Piyasa Gözetimi Genel Müdürlüğü’nce
tespit ve ilan edilen kullanım ömrü (cihazın fonksiyonlarını yerine getirebilmesi için gerekli yedek parça
bulundurma süresi) 10 yıldır.
ÜRETİCİ FİRMA
Vestel Elektronik Sanayi ve Ticaret A.Ş.
Organize Sanayi Bölgesi 45030 Manisa - Türkiye
Tel: 44 44 123
Web: www.vestel.com.tr/destek
E-posta: [email protected]
 Loading...