

Vestamatic WISO Time Installation And Operating Instructions Manual
H5 Wind function
If the measured wind speed exceeds the set threshold value, the sunshade
will retract immediately. The wind threshold setting (km/h) depends on the
sunshade’s or skylight’s size and design. The sunshade cannot be extended
again until after the retract time delay has expired. The desired wind speed
threshold in km/h can be set with ö or ü buttons. If a wind sensor is not
connected to the control system, set the wind threshold value to the “wire
bridge” symbol (see fig. 2). This symbol will be displayed if the maximum
programmable wind speed of 60 km/h is reached. In this case, a wire bridge
must also be fitted between wind sensor terminals 4 and 5.
Fig. 1 Fig. 2
NOTE!
The bars beneath the display showing the wind threshold
i
indicate whether or not the wind sensor is operating correctly.
If the wind sensor gives the necessary signals while turning,
the bars will fill once from left to right, indicating that the wind
sensor is operating correctly (see Fig. 1).
Reset delay wind alarm
U5.1
The reset delay for the wind alarm
enables you to programme a reset time
in minutes so that the sunshade will not
extend immediately after a wind alarm.
Wind sensor type
U5.2
This sub-menu option allows you to set
the type of wind sensor being used.
CO 1 = WS XS, Art.-no.: 01100310 or
WS XS Alu Art.-no.: 01100410 or
WISO Crystal Station Art.-no.: 01100330
CO 2 = WS Classic M Art.-no.: 01100235
CO 3 = Reserve setting
Adjustment options:
NOTE!
Display of wind function/wind alarm on the screen.
i
If the wind speed threshold value is
exceeded, the sunshade will retract
without delay and can no longer be
extended by pressing the extend but-
with a flashing retract arrow and wind sock. If the wind sock remains
continuously lit, the wind speed threshold value has been exceeded; if
the wind sock flashes, the measured wind strength is below the set wind
speed threshold value and the reset delay time starts to run. After the wind
reset delay time has expired, in automatic operation the sunshade will
be controlled using the sensor data which has been gathered. In manual
operation the sunshade can be controlled using the ö or ü buttons to
achieve the required position.
ton. The display indicates this status
H6 Motor run time / IDS function
Setting the motor run time depends on the sunshade’s size and design.
When using blinds, you are recommended to use the precise run time, so
that the slats are positioned to the correct angle (tilted) immediately after
the motor has stopped running. Use the buttons ö or ü to set the desired
motor run time (in seconds). You can also set the IDS operating mode. The
IDS (Intelligent Decentralised Sunshade control) feature is used to differentiate between sun-dependent, time-dependent, manual and safety-related central controls without any additional installation work required. For
example, you can mask the independent extend/retract commands while
the remaining central commands (such as safety-related or time-dependent
commands) continue to operate. IDS operating mode is displayed before
a run time of 3 seconds. In IDS operating mode, sub-menu items U 6.1 and
U 6.2 are unavailable.
Motor run time setting in seconds IDS operating mode setting
NOTE!
Operating mode IDS may only be used with decentralized
i
Vestamatic
sun shade will briefly retract, enabling the slats to be positioned to the correct
angle. The tilt function is per formed in both automatic and manual operation
mode. If the ü extend button is pressed while the sunshade is extending the
tilt movement will not be performed once the sunshade has extended.
®
controls with IDS functionality.
Tilt time
U6.1
Tilt time setting depends on the sunshade’s size and design; it is set (in seconds) using the ö or ü buttons. Once
the motor run time has expired, the
NOTE!
If the set tilt time flashes, this indicates that the set tilt time is
i
longer than the motor run time.
12. Display of warning signals on the screen
12.1 Wind sensor cable rupture
If the wind sensor connection cable is
damaged, this fault will be indicated
on the display by a flashing windsock
symbol, retract arrow and two middle
immediately and will be secured in the retracted position until the fault is
repaired.
segments. The sunshade will retract
Inching mode
U6.2
If this function has been activated an
inching mode of up to 2 seconds is
enabled. This means that the run time
command is not executed for 2 seconds.
H7 Multifunctional input
You can connect a commercially
avail a ble room ther mostat (Articleno. 01100271) (break contact) or rain
detector (Article-no. 01083520) to the
multifunctional input using clamps 4
option turns the multifunctional input on or off. If the multifunctional input
is deactivated, sub-menu options U 7.1 and U 7.2 cannot be selected. To
activate the multi functional input, please set this to ON.
FA 1 = The input is connected to the room thermostat (Article-no.
01100271) and works in conjunction with a lux sensor which is also connected. The sunshade will only extend if the set room temperature or sun
threshold value is exceeded. If the value falls below the set temperature or
sun threshold, the sunshade will retract again once the retract time delay
has expired. If FA 1 flashes in the display, enable the sun function in the
H4 main menu (H4 = ON).
FA 2 = The input is connected to the room thermostat (Article-no.
01100271). Device operation is triggered by room temperature alone. If the
set temperature is exceeded, the sunshade will extend or the skylight will
open. If the value falls below the set temperature, the sunshade will retract
again once the retract time delay has expired.
FA 3 = The input is connected to a rain sensor (Article-no. 01083520). If
the sensor detects rain, an immediate retract or close command will be performed in automatic or manual operation mode.
FA 4 = The input is connected to a rain sensor (Article-no. 01083520). If the
sensor detects rain, an immediate retract command will be performed, but
only in automatic operation mode. In manual operation mode, the sun shade
or skylight can still be controlled manually.
when the multifunctional input is disabled, the extend/retract command will
not immediately be performed.
and 6 of the power supply. This menu
Function selection for
U7.1
multifunctional input
You can choose between four different
functions.
Multifunctional input
U7.2
reset time delay
The multifunctional input reset time
delay enables you to programme a
reset time delay (in minutes) so that
NOTE!
Display of the active multifunctional input on the
i
screen.
If the multifunctional input is activated
(ON) in menu H 7 and the function
selection is set in U 7.1, the corresponding command will be executed if
is represented by the symbol in the lower right part of the display. If
the symbol flashes, the multifunctional input is no longer active and the
reset delay time starts to run. At the end of the reset delay time, the symbol
disappears again.
H8 Time / Date
ting, the month will be automatically adjusted and cannot be altered separately.
vice-versa) independently. If you wish to use this function, set it to ON. If you wish
to change the setting manually, set the function to OFF using the ö or ü buttons.
buttons. S will flash in the display for summer time and W for winter time.
12.2 Wind sensor signal monitoring
be displayed. This warns you that you need to check the wind sensor. In this case, test that the wind vanes are turning smoothly by
pushing them by hand. If, after this test, the display does not change, you
cannot be guaranteed safe use of the sunshade. This alarm can be acknowledged using any button but after an hour it will be displayed again. We
recommend that you turn off the control system and ensure that it cannot be
operated unintentionally.
the multifunctional input is active. This
In this menu, you can set the current
time using the ö or ü buttons.
Year
U8.1
In this sub-menu, you can set the
current year using the ö or ü buttons.
Programmable range: 2004 to 2099.
Date
U8.2
In this sub-menu, you can set the date
using the ö or ü buttons. The first two
digits represent the day and the last two
digits, the month. When changing the set-
Automatic summer/winter
U8.3
time changeover
In this sub-menu you can determine
whether the control carries out the changeover from summer to winter time (and
Manual summer/winter
U8.4
time changeover
This sub-menu will only appear if U 8.3
is set to OFF. You can now manually set
the appropriate time using the ö or ü
If the externally fitted wind sensor does
not send a signal for a period of 48 hours,
the windsock symbol will flash,
the time will be masked and, in its
place, the warning “48 h” symbol will
WISO Time
Art.-no.:
01817100
Contents
1. General
2. Safety precautions
3. Technical data
4. Installation
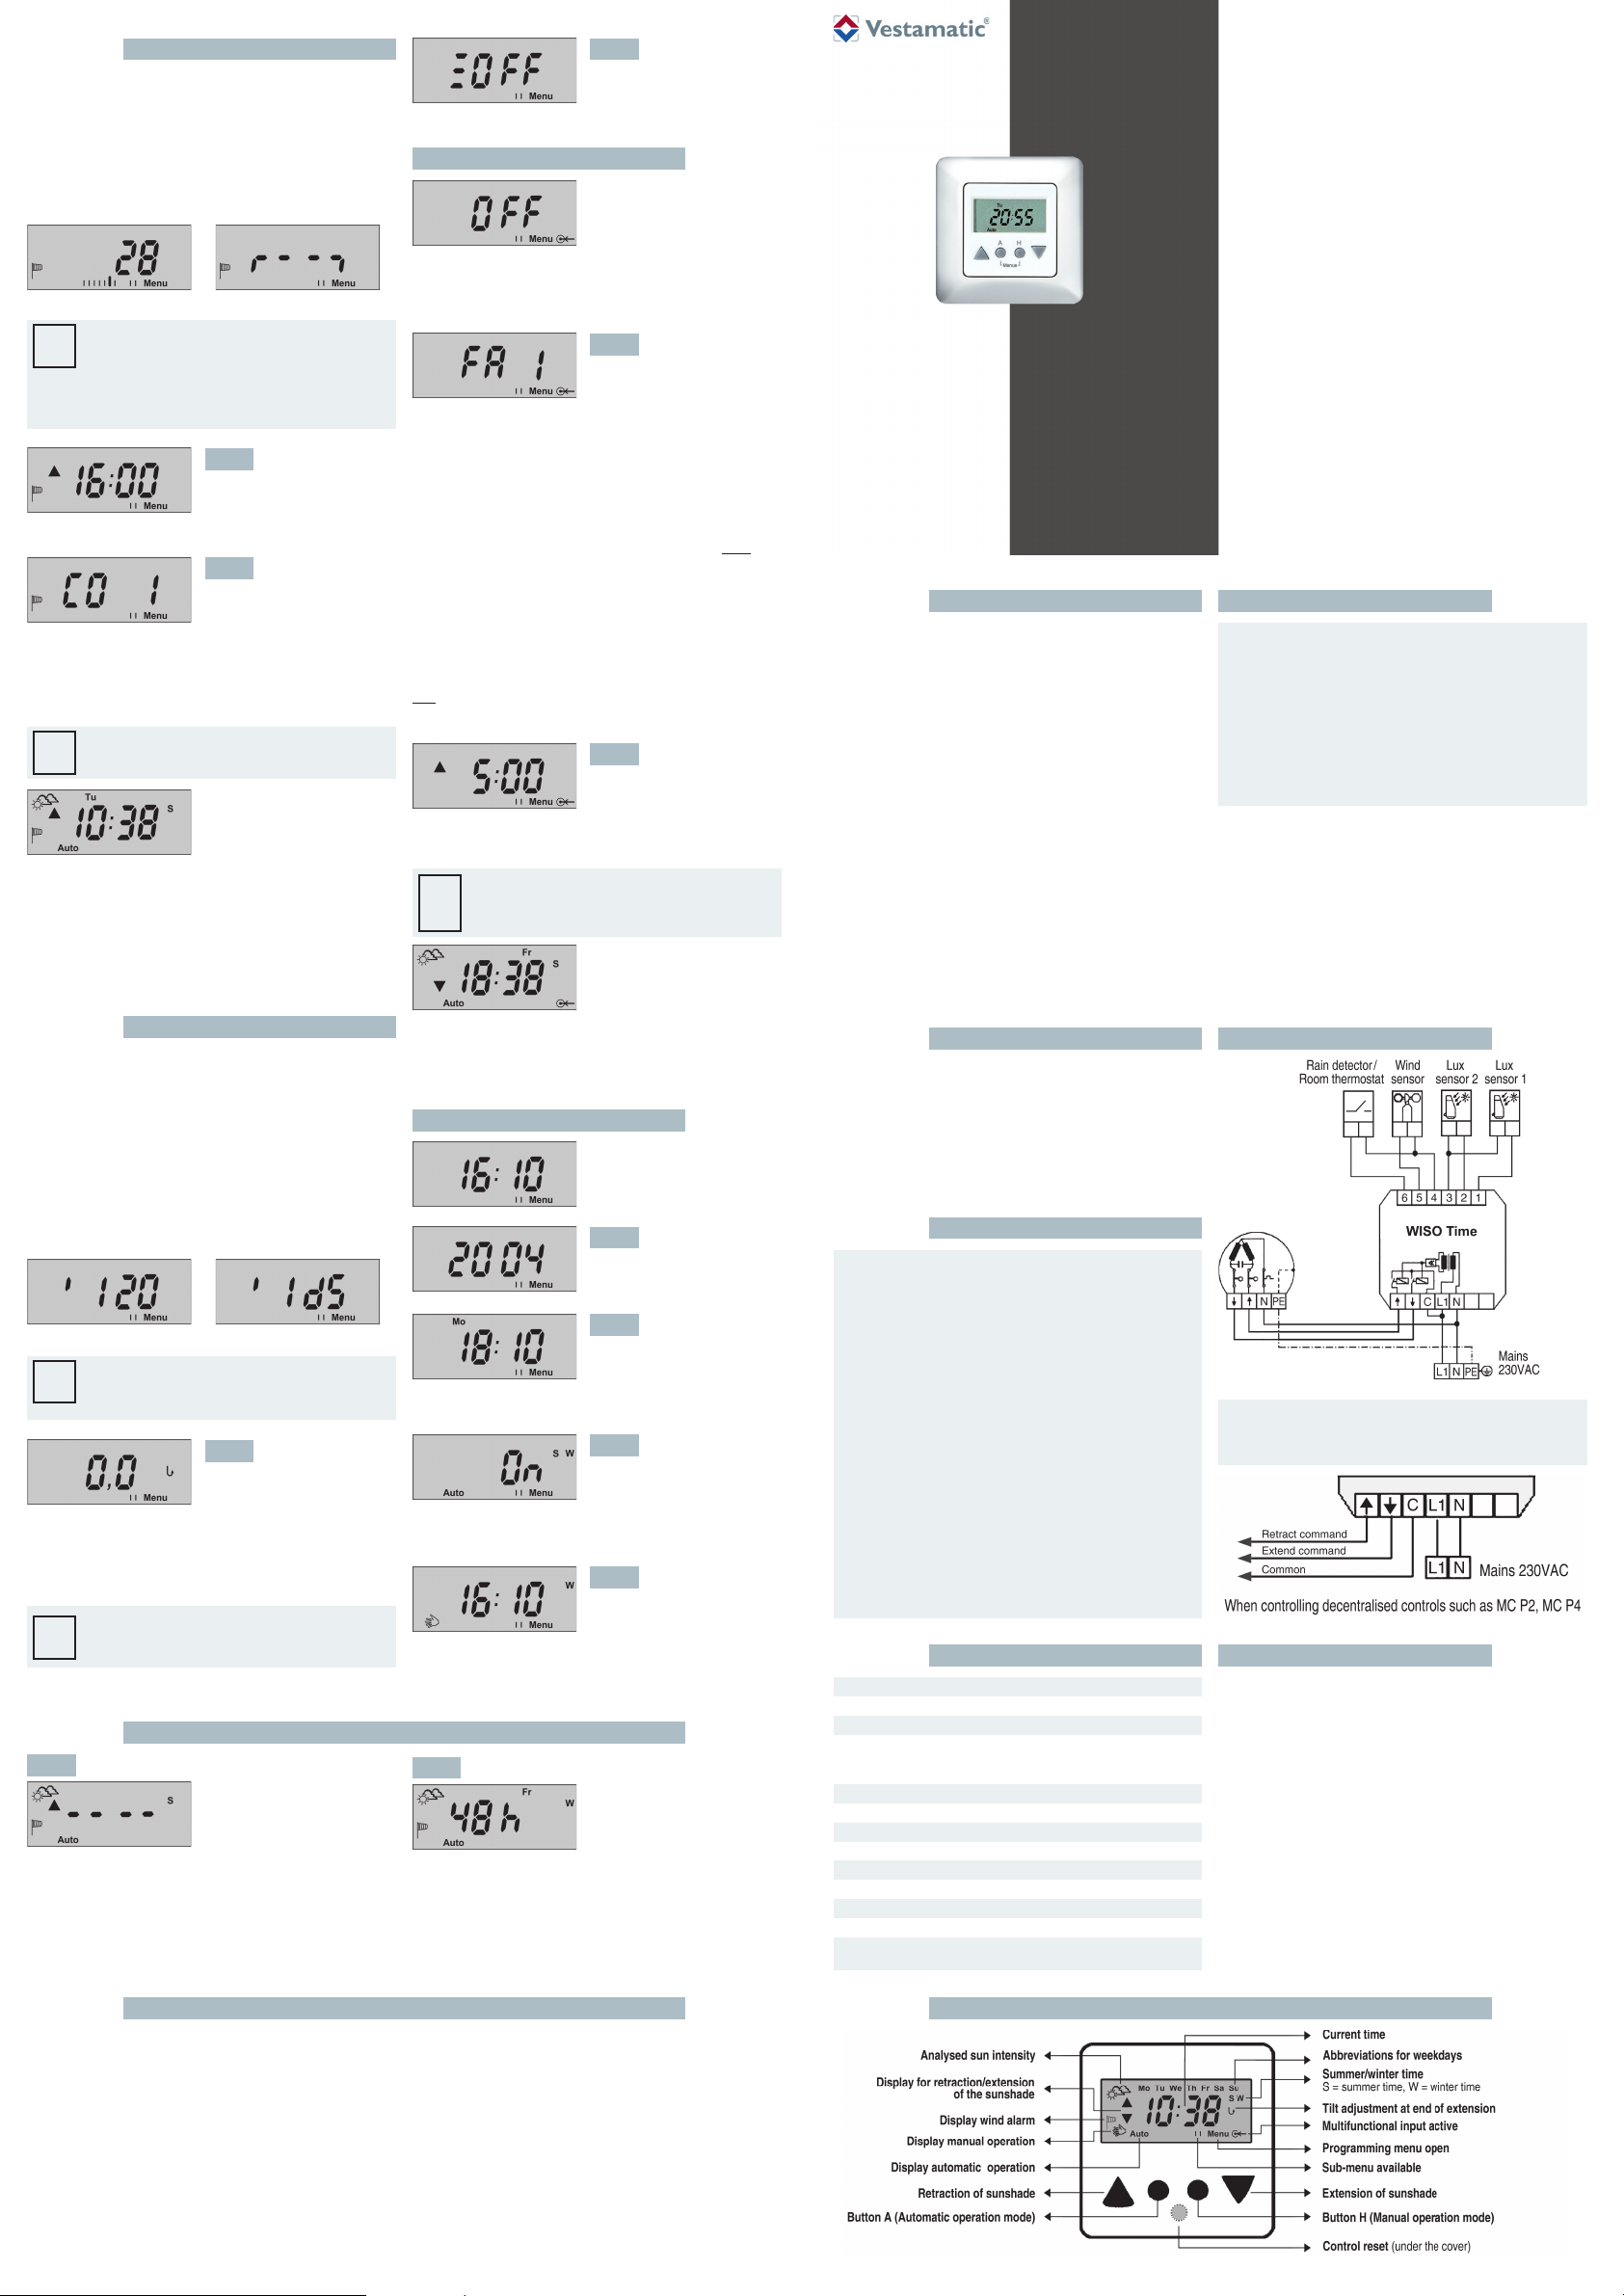
5. Wiring diagram
6. Start-up
7. Display and operating elements
8. Programming menu
9. Manufacturer’s default setting
10. Basic settings –
Operation modes – manual and automatic operation mode
11. Programming details
12. Display of warning signals on the screen
12.1 Wind sensor cable rupture
12.2 Wind sensor signal monitoring
13. Power failure / Replacing the Battery /
Restoring the control system’s default settings
The control system is designed to manually and automatically operate
awnings and venetian blinds. The control has a wide range of program
options and is produced according to high quality standards. Please read
the manual carefully before starting up the device.
2. Safety precautions
Ä
– Contact a professional electrician to install the control sys-
tem, because the control system requires a power supply of
230VAC, 50 Hz.
– Check the control system for signs of mechanical damage
– The control system should only be used for the purpose speci-
– If the control unit or the connected sunshade cannot be oper-
– When performing work on the windows, controls or connected
– This device contains a pollutant battery. The end user must
Power supply: 230VAC, 50 Hz
Impulse voltage withstand level: 2.5 kV
Rated power: 2 W
Output (retract/extend): 230VAC, 50 Hz
Maximum load: 250VAC, 3 A, cos f > 0.8 ind.
Align switching time extend: 3 – 180 seconds
Tilt time: 0 – 30 seconds
Software class: A
Operating temperature: 0 °C (32 °F) to +40 °C (104 °F)
Protection degree: IP 40
Degree of contamination: 2
Battery: CR 2032
Dimensions (L × W × H): 50 × 50 × 46 mm (without cover frame)
Colour information: signal white (similar to RAL 9016)
Conformity:
after unpacking. If you notice any shipping damage, do not
start up the control system and notify your supplier immediately.
fied by the manufacturer (refer to the operating instructions).
Any changes or modifications thereof are not permissible and
will result in loss of all warranty claims.
ated without presenting a hazard, it must be switched off and
prevented from being switched on unintentionally.
shades, protect them against unauthorised or unintentional
operation.
recycle all used batteries in accordance with regulation
91/157/EWG. Disposing of batteries in household waste is
strictly forbidden.
3. Technical data
p
WISO Time Art.-no.: 01817100
Awning control for manual or automatic
control of awnings and blinds.
Installation and Operating Instructions
4. Installation
WARNING!
Risk of injury due to improper installation and commis-
Ä
sioning.
Improper installation and commissioning may lead to personal
injury or property damage.
– When connecting the device, observe the currently valid
– Connect the control in accordance with the wiring diagram.
Therefore:
VDE standards (in particular DIN VDE 0100/0700), your
local power company’s regulations and the current accident
prevention regulations.
Notes for professional electricians
1. Switch off the power supply.
2. Connect the power supply and sensors in accordance with the wiring
diagram.
Make sure that the mains cables do not cross or touch the sensor cables.
3. Fit the power supply into a deep flush box and fix in place.
4. Fit the frame cover.
5. Fit the operating device into the power pack by applying gentle pressure
to the frame cover.
6. Switch on the power supply.
7. Check the sunshade direction by using the “Retract” and “Extend” buttons.
5. Wiring diagram1. General
ATTENTION!
When using decentralised control systems, the wire bridge
Ä
(C–L1) must be removed.
6. Start-up
After installing the control and turning on the supply voltage, the control
is in manual mode and ready for operation. All automatic functions will be
disabled but the sunshade can be operated using the retract and extend
buttons. The current time, date and daily standard extend/retract times,
as well as other basic settings, are already preset (see “9. Manufacturer’s
default setting”), so these simply need to be adapted to your own personal
requirements if necessary. To switch to automatic operation mode, press
the automatic selector button. The manual symbol will disappear and the
auto symbol will appear. The sunshade will then retract or extend, triggered by the data gathered by the sensors or the times which have been
programmed. Switch to manual operation mode by pressing the manual
operation button. Even in automatic operation, the sunshade can be operated at any time using the ö or ü buttons. To interrupt the sunshade’s
movement, press the opposite button.
Power failure / Replacing the Battery / Restoring the control system‘s default settings
In the event of a power failure, all previously programmed times and settings will be stored for up to 2 years. At the start of the power failure, the display will
flash for the first 20 minutes. After that, the screen will go blank. When the power supply returns, the control system will automatically display the current
time. If a retract or extend command is pending during the power failure, this command will be automatically performed once the power returns. To replace
the battery or restoring the control system’s default settings, remove the operating device from the power pack and remove the battery from the back of
the operating device. After replacing the battery, an automatic reset will be executed. This will reset the control system and restore the default settings.
Everything you have programmed yourself (incl. time and date) will be deleted.
The disposal of electrical equipment and batteries in household waste is strictly forbidden.
The symbol (dustbin crossed out, in line with WEEE Appendix IV) indicates separate collection of electrical and electronic products in EU coun-
É
tries. Do not dispose of the device or battery in your household waste. Ask your town or local council about the return and collection systems
available in your area to dispose of this product.
Vestamatic GmbH ∙ Dohrweg 27 ∙ D-41066 Mönchengladbach ∙ www.vestamatic.com
Printing errors and details are subject to change without notification. © Vestamatic GmbH
7. Display and operating elements
Art.-Nr.: 8500 001 GB 4116 S1
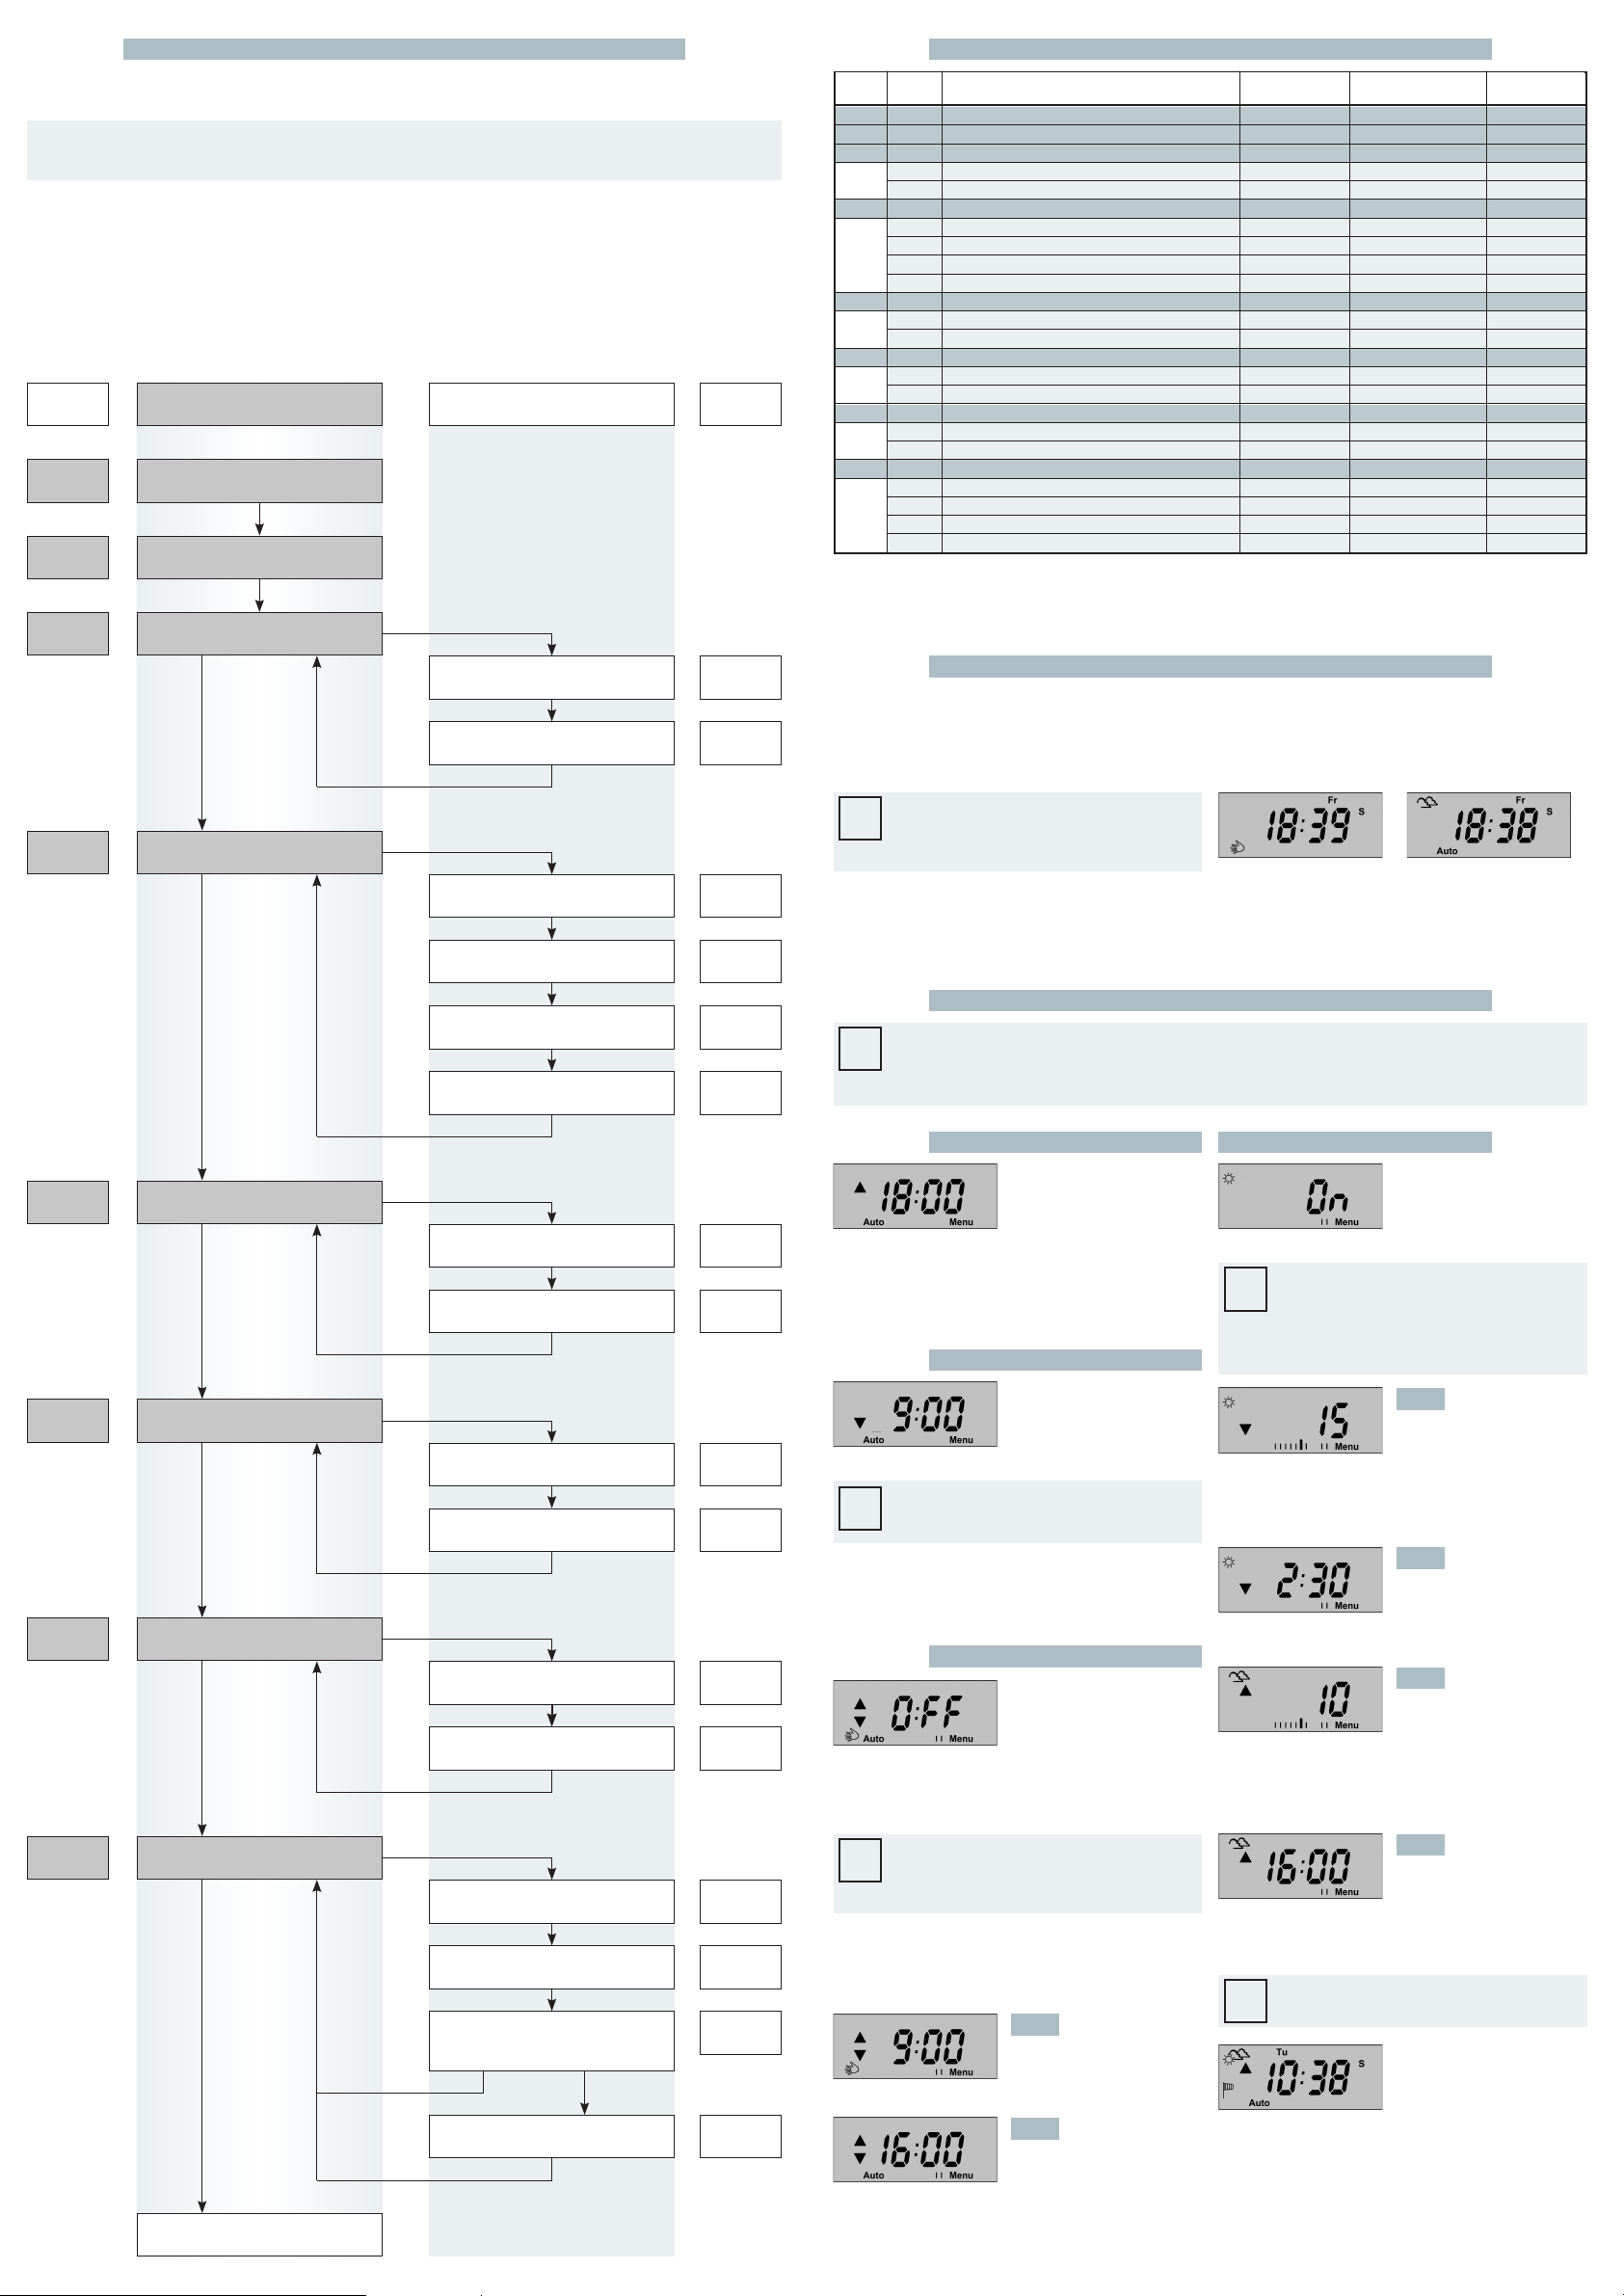
8. Programming menu
The control system features a wide range of functions which can be set to meet your individual requirements. Press and hold the button A and H for
3 seconds to go to the main menu.
– Press the menu button A again to go to the next option on the main menu.
– In the sub-menu, press the sub-menu button H to go to a sub-menu item.
– To go from a sub-menu item directly in the next main menu item, press the A button.
There are two ways of setting values in the individual menus: briefly press for step-by-step programming or press and hold for more than 2 seconds to
scroll through the available values using the ö and ü buttons.
Main menu items are indicated by the letter H and the main menu number (e.g. H5). Sub-menu items are indicated by the letter U, the main menu
number and the sub-menu number (e.g. U5.1). These ID codes appear for 1 second before the respective menu appears on the display. If a sub-menu
is available for a main menu, two flashing bars appear on the display in front of the word „Menu“. When you reach menu item H8, pressing the A button
again will enable you to exit the programming menu. If no buttons are pressed in the programming menu for over 3 minutes, the programming menu will
automatically close.
Details
H 1
MAIN MENU SUB-MENU
Time-controlled retract command
Details
Button A
H 2
Time-controlled extend command
Button A
H 3
Automatic lock
Button H
9. Manufacturer’s default setting
Main Sub-
menu menu default setting option settings
H 1 Time-controlled retract command OFF 00:00 – 23:59; OFF
H 2 Time-controlled extend command OFF 00:00 – 23:59; OFF
H 3 Automatic lock OFF ON / OFF
U 3.1 Start automatic lock 9:00 00:00 – 23:59
U 3.2 End automatic lock 16:00 00:00 – 23:59
H 4 Sun function ON ON / OFF
U 4.1 Threshold setting (extension) 15 kLux 5 – 40 kLux
U 4.2 Extend time delay (extension) 2:30 min. 00:10 – 05:00 min.
U 4.3 Threshold setting (retraction) 10 kLux 3 – 38 kLux
U 4.4 Retract time delay (retraction) 16 min. 02:00 – 40:00 min.
H 5 Wind function 28 km/h 10 – 60 km/h
U 5.1 Reset delay wind alarm 16 min. 2 – 20 min.
U 5.2 Wind sensor type CO 1 CO 1 – CO 3
H 6 Motor run time / IDS function 180 sec. IDS; 3 – 180 sec.
U 6.1 Tilt time 0.0 sec. 0.0 – 30 sec.
U 6.2 Inching mode OFF ON / OFF
H 7 Multifunctional input OFF ON / OFF
U 7.1 Function selection for multifunctional input FA 1 FA 1 – FA 4
U 7.2 Multifunctional input reset time delay 5 min. 02:00 – 15:00 min.
H 8 Time / Date current 00:00 – 23:59
U 8.1 Year current 2004 – 2099
U 8.2 Date current 01.01 – 31.12
U 8.3 Automatic summer/winter time changeover ON ON / OFF
U 8.4 Manual summer/winter time changeover W S / W
Manufacturer’s Adjustment Personal
Function
Button A
H 4 Sun function
Button A
H 5 Wind function
Button A
H 6
Motor run time / IDS function
Button A
H 7 Multifunctional input
Button A
Start automatic lock U 3.1
Button H
End automatic lock U 3.2
Button H
Button H
Threshold setting (extension)
Button H
Extend time delay (extension)
Button H
Threshold setting (retraction)
Button H
Retract time delay (retraction)
Button H
Button H
Reset delay wind alarm
Button H
Wind sensor type U 5.2
Button H
Button H
Tilt time
Button H
Inching mode U 6.2
Button H
Button H
Function selection for
multifunctional input
Button H
Multifunctional input
reset time delay
Button H
U 4.1
U 4.2
U 4.3
U 4.4
U 5.1
U 6.1
U 7.1
U 7.2
10. Basic settings: Operation modes – manual and automatic operation mode
In manual operation all automatic functions are deactivated. Only the wind function or an activated multi-functional input FA3 will remain active and be
monitored. You can operate the sunshade at any time using the ö and ü buttons. To switch to automatic operation, press the A button (automatic operation). When triggered by the data gathered by the sensors or by the programmed times, the control system will retract or extend the sunshade. Even in
automatic operation mode, the sunshade can be operated at any time using the ö and ü buttons. To stop the sunshade while it is moving, simply press
the opposite button. To switch to manual operation, press the H button (manual operation).
IMPORTANT!
A flashing Auto symbol indicates that the automatic lock
x
is active. For more detailed information, see section 11:
Programming details – menu option H 3.
Fig.: Manual operation mode Fig.: Automatic operation mode
11. Programming details
NOTE!
– You can use the ö or ü buttons to switch a function ON or OFF or to reduce or increase a setting.
i
– The selected times and values in the display screens of this manual are intended only as an example. Only the display of icons, arrows,
lettering, etc., as well as the warnings correspond to the original layout of the display.
H1 Time-controlled retract command
In automatic operation mode, this
menu item enables a daily retract time
to be programmed for each weekday,
to retract the sunshade.
H4 Sun function
This menu option allows you to turn the
sun function on or off. To enable this
function, switch the function OFF using
the ö or ü buttons. If the sun function
is disabled, sub-menus U 4.1 to U 4.4
will not be displayed.
NOTE!
If the word “ON” flashes on the screen, automatic operation
i
mode will be enabled by the room thermostat only, as FA 2
multifunctional input has been enabled (see U 7.1 function
selection FA 2). The sun/cloud symbol will not be displayed
H2 Time-controlled extend command
In automatic operation mode, this menu
item enables a daily extend time to be
programmed for each weekday, to extend the sunshade. A set tilt will not
be performed at the end of the extension.
NOTE!
There will be no time-controlled extension if the wind alarm is
i
on, or if multifunctional inputs FA 3 or FA 4 are active.
H3 Automatic lock
This menu item enables you to programme a period of time during which
automatic operation mode is disabled.
This means that no automatic retract
or extend commands (triggered by
performed during the selected period. To enable this function, switch the
function ON using the ö or ü buttons. If this function is disabled, sub-menu
options U 3.1 and U 3.2 will not be displayed.
the sun or the temperature) will be
be set individually using the ö or ü buttons. The measured sun intensity
will be displayed in the form of a bar diagram. Once the bars have exceeded
the central line, the sunshade will only extend once the extend time delay
has expired.
The extend time delay is set in minutes : seconds using the ö or ü buttons.
be set individually using the ö or ü buttons. The measured sun intensity
will be displayed in the form of a bar diagram. Once the bars fall below
the central line, the sunshade will only retract after the retract time delay
has expired.
in automatic operation mode.
U4.1
This menu item enables you to set the
threshold value (in kLux) for extending
the sunshade. The threshold value can
U4.2
The extend time delay ensures that the
sunshade will not immediately extend
if the sun threshold value is exceeded.
U4.3
This menu item enables you to set the
threshold value (in kLux) for retracting
the sunshade. The threshold value can
Threshold setting
(extension)
Extend time delay
(extension)
Threshold setting
(retraction)
H 8 Time / Date
Button A
END
Button H
Year
Button H
Date
Button H
Automatic summer/winter time
changeover
ON OFF
Button HButton H
Manual summer/winter time
changeover
Button H
U 8.1
U 8.2
U 8.3
U 8.4
NOTE!
The wind function and the FA 3 or FA 4 multifunctional inputs
i
will not be influenced by the automatic lock. If the automatic
lock is enabled, Auto will flash in the display.
When switching from manual to automatic operation mode, no extend/
retract commands will be performed if automatic lock is enabled.
Start automatic lock
U3.1
This sets the time at which the automatic lock will be started.
End automatic lock
U3.2
This sets the time at which the automatic lock will end. At this point, the connected sensors will be analysed again
and, if necessary, an extend/retract
command will be performed.
Retract time delay
U4.4
(retraction)
The retract time delay ensures that the
sunshade will not immediately retract if
value (e.g. during brief cloudy spells). The retract time delay is set in minutes using the ö or ü buttons.
the value falls below the sun threshold
NOTE!
Display of the sun function on the screen.
i
If the sun function is activated in automatic operation mode, it will be indicated by a sun/cloud symbol in the top
left-hand corner of the display.
S flashes: sun response delay
S continuous: sun threshold value exceeded
w flashes: sun retract time delay
w continuous: no sun
W continuous: sun intensity between extend/retract threshold
Art.-Nr.: 8500 001 GB 4116 S1
 Loading...