

Vestamatic Rollmat Plus V3.1, Rollmat Plus G/S V3.1 Installation And Operating Instructions Manual
Sicherheitshinweise
· Die Steuerung ist sofort auf Beschädigungen zu prüfen, im
Falle der Beschädigung darf das Gerät keinesfalls in Betrieb
genommen werden. Sollte ein Transportschaden vorliegen,
so ist unverzüglich der Lieferant zu informieren.
· Beachten Sie, dass die Rolladensteuerung Vestamatic Rollmat
Plus V3.1 zum Betrieb eine Betriebsspannung von 230 VW,
50 Hz benötigt. Beauftragen Sie mit der Installation und der
Einstellung der DIP-Schalter auf der Geräterückseite bitte
einen Elektrofachbetrieb.
· Die Steuerung ist nur für den sachgemäßen Gebrauch (wie in
der Bedienungsanleitung beschrieben) bestimmt. Änderungen oder Modifikationen dürfen nicht vorgenommen werden,
da ansonsten jeglicher Gewährleistungsanspruch entfällt.
· Wenn anzunehmen ist, dass ein gefahrloser Betrieb der
Steuerung nicht gewährleistet ist, so ist diese unverzüglich
außer Betrieb zu nehmen und gegen unbeabsichtigten Betrieb
zu sichern. Dasselbe gilt, w enn Arbeiten an den Fenstern oder
Rolladen durchgeführt werden, an welchen diese Steuerung
betrieben wird.
D
Montage- und Bedienungsanleitung
Installation and Operating Instructions
RollmatPlusV3.1
83101211 F1.qxd 24.09.01 16:42 Seite 1
Kurzinformation/Short description
Detaillierte Angaben und Programmierhinweise finden Sie auf den folgenden Seiten.
Please find details and programming instructions on the following pages.
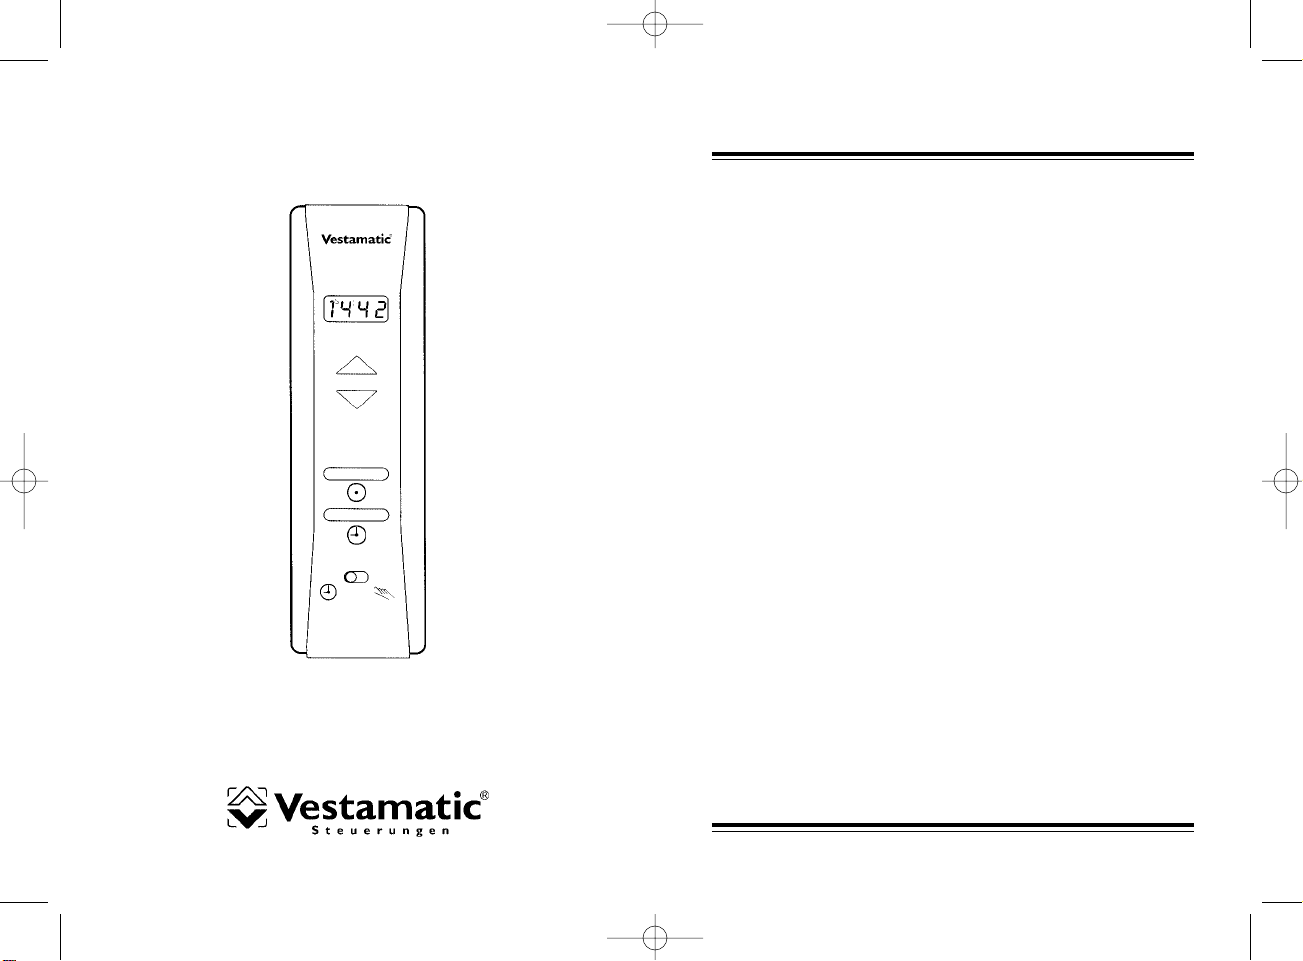
A
Reset-Taste
B
Sommer-/Winterzeit
C
Tageszeit
D
Auffahrzeit
E
Abfahrzeit
A
Reset button
B
Summer/winter time
C
Current time
D
Up time
E
Down time
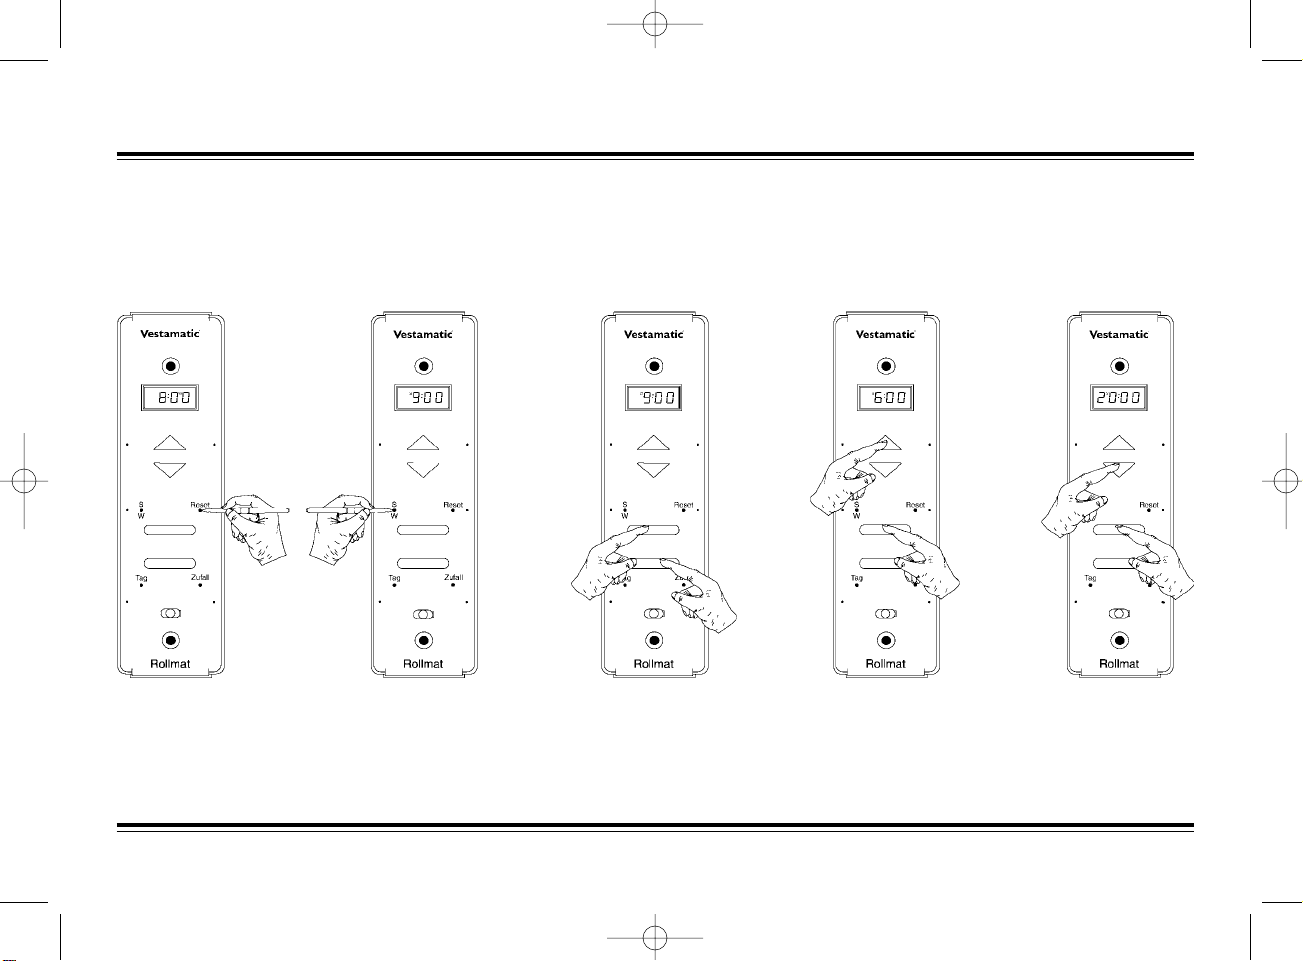
Nach erfolgter Installation die Abdeckhaube
durch leichtes Ziehen entfernen und ResetTaste drücken. Dadurch werden die werksseitig voreingestellten Zeiten aktiviert.
Entspricht die momentane Einstellung nicht
der aktuellen Zeit, aktualisieren Sie diese
durch Drücken der S/W-Taste. Die gewählte
Einstellung erscheint im Display und die
Tageszeit ändert sich um eine Stunde.
1. Stell-Taste drücken (gedrückt halten)
2. Uhr-Taste drücken Rschneller Vorlauf
Uhr-Taste tippen Rlangsamer Vorlauf
oder
1. Uhr-Taste drücken (gedrückt halten)
2. Stell-Taste drücken Lschneller Rücklauf
Stell-Taste tippen Llangsamer Rücklauf
Wichtig: Wahlschalter auf (A) stellen
1. Stell-Taste drücken (gedrückt halten)
2. Auf-Taste drücken Rschneller Vorlauf
Auf-Taste tippen Rlangsamer Vorlauf
oder
1. Auf-Taste drücken (gedrückt halten)
2. Stell-Taste drücken Lschneller Rücklauf
Stell-Taste tippen L langsamer Rücklauf
Wichtig: Wahlschalter auf
(A)
stellen
1. Stell-Taste drücken (gedrückt halten)
2. Ab-Taste drücken Rschneller Vorlauf
Ab-Taste tippen Rlangsamer Vorlauf
oder
1. Ab-Taste drücken (gedrückt halten)
2. Stell-Taste drücken Lschneller Rücklauf
Stell-Taste tippen L langsamer Rücklauf
After having completed the installation, carefully pull to remove the cover cap and press
the reset button. This will activate the times
preset by the manufacturer.
If the manufacturer setting does not correspond
to the correct current time, update the setting
to the current time by pressing the summer/
winter button. The display will indicate the
selected time and the time will be changed by
one hour.
1. Keep the set button pressed
2. Press the time button Rfast forward
Tap the time button Rslow forward
or
1. Keep the time button pressed
2. Press the set button Lfast reverse
Tap the set button Lslow reverse
Important: Set the selector switch to (A)
1. Keep the set button pressed
2. Press the up button Rfast forward
Tap the up button Rslow forward
or
1. Keep the up button pressed
2. Press the set button Lfast reverse
Tap the set button Lslow reverse
Important: Set the selector switch to (A)
1. Keep the set button pressed
2. Press the down button Rfast forward
Tap the down button Rslow forward
or
1. Keep the down button pressed
2. Press the set button Lfast reverse
Tap the set button Lslow reverse
83101211 F1.qxd 24.09.01 16:42 Seite 3

Inhalt
Einleitung Allgemeines Seite 5
Hand-Steuerung Seite 6
Automatik-Steuerung Seite 7
Programmierung Allgemeines Seite 8
der Grund- Sommer-/Winterzeit Seite 9
funktionen Tageszeit (aktuelle Uhrzeit) Seite 10
Hinweis Seite 11
Auffahrzeit Seite 12
Abfahrzeit Seite 13
Zufallsgenerator Seite 14
Programmierung Wochen-Funktion Seite 15
der Sonder- Astro-Funktion / Fahrzeitkorrektur Seite 16 – 19
funktionen Astro-Funktion – Einstellung BRD Seite 20
Astro-Funktion – Einstellung Europa Seite 21
Wende-Funktion Seite 22
Beispiel Einstellung DIP-Schalter Seite 23
Inhalt
Fehlersuchanleitung Seite 24
Installation Hinweise für den Elektrofachbetrieb Seite 25 – 26
Montageanleitung / Technische Daten Seite 27
Anschlussplan Seite 28
Anschlussbild Seite 29
Übersicht Bedienungselemente Seite 30
- 4 -
D
- 3 -
D
83101211 F1.qxd 24.09.01 16:42 Seite 5

Einleitung Hand-Steuerung
Die Rolladensteuerung Vestamatic Rollmat Plus V3.1 verfügt
über einen Wahlschalter, der die Auswahl Hand-Steuerung (H)
oder Automatik-Steuerung (A) regelt.
Um die Hand-Steuerung zu aktivieren, Wahlschalter auf (H)
stellen (ganz nach rechts schieben bis zum „Klick“).
Alle Automatik-Funktionen sind somit außer Kraft gesetzt.Wird
die Auf-Taste bzw. Ab-Taste gedrückt, fährt der Rolladen hoch
bzw.runter.
Um die Fahrt zu stoppen, drücken Sie einfach die Gegentaste,
d.h.:
· fährt der Rolladen gerade hoch, drücken Sie die Ab-Taste,
· fährt der Rolladen gerade runter, drücken Sie die Auf-Taste.
Ein weiteres Hoch- bzw. Runterfahren ist erst nach erneutem
Drücken der Auf-Taste bzw. Ab-Taste möglich. Das garantiert
eine exakte Positionierung des Rolladens.
- 6 -
D
Allgemeines Einleitung
Der Kauf der Rolladensteuerung Vestamatic Rollmat Plus V3.1
war eine gute Entscheidung. Sie haben damit ein hochwer tiges
Produkt erworben. Es verfügt über eine Vielzahl sinnvoller Programmiermöglichkeiten und wird nach höchsten Qualitätsanforderungen hergestellt. Das garantier t Ihnen eine optimale Ausnutzung und hohe Zuverlässigkeit.Nehmen Sie sich bitte etwas
Zeit und lesen diese Bedienungsanleitung vor der Inbetriebnahme. Wir haben uns bemüht, die Programmieranweisungen
so verständlich wie möglich zu gestalten.
Der Lieferumfang der Rolladensteuerung Vestamatic Rollmat
Plus V3.1 besteht aus:
1. Abdeckhaube
2. Grundgehäuse
Im Falle eines Stromausfalls beginnt das gesamte Display zu
blinken.Die zuvor programmierten Zeiten bleiben dennoch mehrere Jahre gespeichert.
Sie können die von Ihnen programmierten Zeiten oder andere
Funktionen in einem Schnelllauf überprüfen. Drücken Sie für
die Aktivierung des Schnelllaufs die Uhr- und Tag-Taste für
3 Sekunden gemeinsam. Die Uhr-Funktion läuft dann um den
Faktor 60 schneller. Um den Schnelllauf zu beenden drücken
Sie kurz die Uhr- und Tag-Taste nochmals gemeinsam.
- 5 -
D
83101211 F1.qxd 24.09.01 16:42 Seite 7

Automatik-Steuerung Einleitung
Um die Automatik-Steuerungzu aktivieren, Wahlschalter auf (A)
stellen (ganz nach links schieben bis zum „Klick“).
Die Automatik-Steuerung ist somit aktiviert. Der Rolladen fährt
nun zu den jeweilig programmierten Zeiten hoch und runter.Es
ist aber auch weiterhin möglich, den Rolladen außerhalb der
programmierten Zeiten durch Drücken der Auf-Taste bzw. Ab-
Taste hoch bzw. runter zu fahren (der Programmablauf wird
dadurch nicht gestört).
Wird die Auf-Taste bzw. Ab-Taste gedrückt, fährt der Rolladen
hoch bzw.runter.
Um die Fahrt zu stoppen, drücken Sie einfach die Gegentaste,
d.h.:
· fährt der Rolladen gerade hoch, drücken Sie die Ab-Taste,
· fährt der Rolladen gerade runter, drücken Sie die Auf-Taste.
Ein weiteres Hoch- bzw. Runterfahren ist erst nach erneutem
Drücken der Auf-Taste bzw. Ab-Taste möglich.
Die Automatik kann auch für längere Zeit unterbrochen werden.
Hierzu genügt es, den Wahlschalter auf Hand-Steuerung (H) zu
stellen.
Nach Rückstellung auf Automatik-Steuerung wird dann der letzte
Befehl ausgeführt, den die Rolladensteuerung Vestamatic
Rollmat Plus V3.1 in Automatik-Stellung ausgeführt hätte. Das
Gleiche geschieht bei Wiedereinschaltung des Stromes nach
einem Netzausfall.
Grundfunktionen Allgemeines
Nachdem die fachgerechte Installation beendet ist (Hinweise dazu
auf den Seiten 25 bis 28), können Sie mit der Programmierung
beginnen.
Wichtig: Beachten Sie bitte, dass sich die Rolladensteuerung
Vestamatic Rollmat Plus V3.1 bei Netzausfall nicht
programmieren lässt.
Entfernen Sie zuvor durch leichtes Ziehen die Abdeckhaube
und drück e n Sie die Reset-Taste.Nehmen Sie dazu einen Kugelschreiber oder etwas in ähnlicher Form.
Das Drücken der Reset-Taste bewirkt, dass die werksseitig vorprogrammierten Zeiten aktiviert werden.
· Aktuelle Tageszeit – 0ß8:0ß0 Uhr
· Auffahrzeit – 0ß6:0ß0 Uhr
· Abfahrzeit – 2ß0:0ß0 Uhr
Auf den nächsten Seiten wird beschrieben, wie Sie diese Zeiten
auf Ihre persönlichen Bedürfnisse einstellen können.
- 8 -
D
- 7 -
D
83101211 F1.qxd 24.09.01 16:42 Seite 9

Sommer-/Winterzeit Grundfunktionen
Im Display sehen Sie, welche Zeit eingestellt ist.
Das (S) oben links im Display steht für Sommerzeit.
(0S9:0ß0)
Das (W) oben rechts im Display steht für Winterzeit.
(0ß8:0W0)
Entspricht die momentane Einstellung nicht der aktuellen Zeit,
können Sie diese einfach durch Drücken der S/W-Taste aktuali-
sieren.Die gewählte Einstellung erscheint dann sofort im Display
und die Tageszeit ändert sich entsprechend um eine Stunde.
Grundfunktionen Tageszeit
Zur Einstellung der aktuellen Tageszeit bedienen Sie sich der
Tastenkombination aus Stell-Taste und Uhr-Taste.
Die Einstellung kann wie folgt durchgeführt werden:
1. Zuerst die Stell-Taste drücken (gedrückt halten), danach:
A. Uhr-Taste drücken (gedrückt halten) erzeugt einen
schnellen V orlauf
der Tageszeit.
B. Ein kurzes Tippen der Uhr-Taste erzeugt einen
langsamen
Vorlauf
der Tageszeit.
oder
2. Zuerst die Uhr-Taste drücken (gedrückt halten), danach:
A. Stell-Taste drücken (gedrückt halten) erzeugt einen
schnellen Rücklauf
der Tageszeit.
B. Ein kurzes Tippen der Stell-Taste erzeugt einen
langsamen
Rücklauf
der Tageszeit.
- 10 -
D
- 9 -
D
83101211 F1.qxd 24.09.01 16:42 Seite 11

Hinweis Grundfunktionen
Ausgeliefert wird die Rolladensteuerung Vestamatic Rollmat
Plus V3.1 mit einer werksseitigen Einstellung folgender Auf- bzw.
Abfahrzeiten (Tag-Funktion ist aktiv):
· Tägliche Auffahrzeit – 0ß6:0ß0 Uhr
· Tägliche Abfahrzeit – 2ß0:0ß0 Uhr
Die werksseitige DIP-Schaltereinstellung entnehmen Sie bitte
den Tabellen auf Seite 20 und Seite 23.
Wichtig: Für die nächsten Programmierschritte ist es wichtig,
dass der Wahlschalter „Automatik-/Hand-Steuerung“
auf Automatik-Steuerung (A) steht.
Überprüfen Sie die momentane Einstellung. Steht der
Wahlschalter nicht auf (A), korrigieren Sie die Einstellung. Dazu schieben Sie den Wahlschalter bis zum
„Klick“ ganz nach links.
Grundfunktionen Auffahrzeit
Zur Einstellung der Auffahrzeit bedienen Sie sich der Tastenkombination aus Stell-Taste und Auf-Taste.
Die Einstellung kann wie folgt durchgeführt werden:
1. Zuerst die Stell-Taste drücken (gedrückt halten), danach:
A. Auf-Taste drücken (gedrückt halten) erzeugt einen
schnellen V orlauf
der Auffahrzeit.
B. Ein kurzes Tippen der Auf-Taste erz eugt einen
langsamen
Vorlauf
der Auffahrzeit.
oder
2. Zuerst die Auf-Taste dr ücken (gedrückt halten), danach:
A. Stell-Taste drücken (gedrückt halten) erzeugt einen
schnellen Rücklauf
der Auffahrzeit.
B. Ein kurzes Tippen der Stell-Taste erzeugt einen
langsamen
Rücklauf
der Auffahrzeit.
I
m Display können Sie den eingestellten W ert ablesen.Wird die zur
Programmierung notwendige Tastenkombination nicht mehr betätigt, schaltet das Display wieder auf die aktuelle Tageszeit um. Zur
Überprüfung des eingestellten Wertes genügt ein kurzes Drücken
der Auf-Taste. Im Display erscheint jetzt abermals die von Ihnen
eingestellte Auffahrzeit.Nach ca. 2 Sekunden schaltet das Display
wieder auf die aktuelle Tageszeit um.
- 11 -
D
- 12 -
D
83101211 F1.qxd 24.09.01 16:42 Seite 13

Abfahrzeit Grundfunktionen
Zur Einstellung der Abfahrzeit bedienen Sie sich der Tastenkombination aus Stell-Taste und Ab-Taste.
Die Einstellung kann wie folgt durchgeführt werden:
1. Zuerst die Stell-Taste drücken (gedrückt halten), danach:
A. Ab-Taste drücken (gedrückt halten) erzeugt einen
schnellen V orlauf
der Abfahrzeit.
B. Ein kurzes Tippen der Ab-Taste erzeugt einen
langsamen
Vorlauf
der Abfahrzeit.
oder
2. Zuerst die Ab-Taste drücken (gedrückt halten), danach:
A. Stell-Taste drücken (gedrückt halten) erzeugt einen
schnellen Rücklauf
der Abfahrzeit.
B. Ein kurzes Tippen der Stell-Taste erzeugt einen
langsamen
Rücklauf
der Abfahrzeit.
I
m Display können Sie den eingestellten W ert ablesen.Wird die zur
Programmierung notwendige Tastenkombination nicht mehr betätigt, schaltet das Display wieder auf die aktuelle Tageszeit um. Zur
Überprüfung des eingestellten Wertes genügt ein kurzes Drücken
der Ab-Taste. Im Display erscheint jetzt abermals die von Ihnen
eingestellte Abfahrzeit.Nach ca. 2 Sekunden schaltet das Display
wieder auf die aktuelle Tageszeit um.
Grundfunktionen Zufallsgenerator
Der Zufallsgenerator erzeugt eine sogenannte Zufallszeit. Sie
bewirkt, dass der Rolladen mit einer Abweichung von bis zu
+/-15 Minuten von den zuvor programmierten Zeiten(*) hochbzw.runterfährt.
Das „unregelmäßige“ Hoch- und Runterfahren des Rolladens
vermittelt den Eindruck eines bewohnten Hauses und bietet
somit einen zusätzlichen Schutz bei längerer Abwesenheit.
Um den Zufallsgenerator zu aktivieren, drücken Sie einfach die
Zufall-Taste.
Im Display erscheint jetzt
rechts oben ein (Z).
(0ß8:0ß0Z
Hinweis: Der Zufallsgenerator setzt die ggf. eingestellte Wende-
Funktion (siehe Seite 22) außer Kraft.
Zum Deaktivieren des Zufallsgenerators drücken Sie bitte erneut
die Zufall-Taste. Jetzt ist der Zufallsgenerator wieder ausgeschaltet, das (Z) im Display erlischt und der Rolladen fährt dann
wieder exakt zu den von Ihnen programmierten Zeiten hoch und
runter.
(*)Anmerkung: Bei Aktivierung der Astro-Funktion +/-15 Minu-
ten von der sich dort ergebenden Zeit.
- 14 -
D
- 13 -
D
83101211 F1.qxd 24.09.01 16:42 Seite 15

Wochen-Funktion Sonderfunktionen
Die Wochen-Funktion ermöglicht es Ihnen, für jeden Tag der
Woche eine andere Auf- bzw. Abfahrzeit zu programmieren.
Um die Wochen-Funktion zu aktivieren, müssen die DIP-Schalter
auf dem Grundgehäuse gemäß Tabelle (siehe Seite 23) eingestellt werden.
Folgende Zeiten sind in dieser Betriebsart werksseitig voreingestellt:
· Auffahrzeit Montag bis Freitag – 0ß6:0ß0 Uhr
· Abfahrzeit Montag bis Freitag – 2ß0:0ß0 Uhr
· Samstag / Sonntag – keine Zeit voreingestellt.
Sollten andere Auf- bzw. Abfahrzeiten gewünscht werden,
gehen Sie wie folgt vor:
(QS8:0ß0)
Drücken Sie die Tag-T aste.
Im Display erscheint nach jedem
Drücken ein neuer Wochentag.
(0w8:0ß0)
… u.s.w.
Um für den Tag, der gerade im Display angezeigt wird, die Aufund Abfahrzeit zu programmieren, verfahren Sie wie bereits auf
den Seiten 12 und 13 beschrieben.
Sonderfunktionen Astro-Funktion
Die Astro-Funktion ist im Prinzip ein elektronischer Kalender.In
Abhängigkeit aller gespeicherten Sonnenauf- und Sonnenuntergangszeiten wird so – unter Berücksichtigung der geographischen
Lage Ihres Wohnortes – automatisch eine Fahrzeitkorrektur
durchgeführt. Grundlage der Fahrzeitkorrektur sind die zuvor
von Ihnen eingestellten Auf- und Abfahrzeiten.
Erläuterungen zur Programmierung der Astro-Funktion finden
Sie ab Seite 18.
Beispiel:
Sie haben die Astro-Funktion aktiviert und zuvor folgende Aufbzw. Abfahrzeiten gemäß Anleitung (Seiten 12 und 13) programmiert:
Auffahrzeit –
0ß6:3ß0
Uhr (½ Std. vor Sonnenaufgangszeit,
gemäß Diagramm Seite 19)
Abfahrzeit –
1ß9:3ß0
Uhr (½ Std. vor Sonnenuntergangszeit,
gemäß Diagramm Seite 19)
Die aktuelle Kalenderwoche sei KW 14.
In unserem Beispiel fährt der Rolladen nicht, wie programmiert,
um 6§= Uhr hoch, sondern zum Sonnenaufgang um ca. 7== Uhr.
Am Abend fährt der Rolladen zur programmierten Zeit um
19§= Uhr runter.
- 16 -
D
- 15 -
D
83101211 F1.qxd 24.09.01 16:42 Seite 17

Astro-Funktion Sonderfunktionen
Merke:
Liegt die programmierte Auffahrzeit vor der Sonnenaufgangszeit, fährt der Rolladen zur Sonnenaufgangszeit hoch.
Liegt die programmierte Auffahrzeit nach der Sonnenaufgangszeit, fährt der Rolladen zur programmierten Auffahrzeit hoch.
Liegt die programmierte Abfahrzeit nach der Sonnenuntergangszeit, fährt der Rolladen zur Sonnenuntergangszeit runter.
Liegt die programmierte Abfahrzeit vor der Sonnenuntergangszeit, fährt der Rolladen zur programmierten Abfahrzeit runter.
Wichtig: Die Aktivierung der Astro-Funktion setzt automatisch
die Wochen-Funktion außer Kraft.
Sonderfunktionen Astro-Funktion
Aktivierung der Astro-Funktion und Einstellung der aktuellen
Kalenderwoche erfolgen in einem Programmierschritt.
Drücken Sie zuerst die Stell-Taste (gedrückt halten) und danach
2 x die Tag-Taste.
Im Display sollte jetzt
folgendes erscheinen:
(ßßßß0ß1A
Stellen Sie jetzt die aktuelle Kalenderwoche ein.
Drücken Sie dazu die Tag-Taste (Stell-Taste weiterhin gedrückt
halten). Jedes weitere Drücken der Tag-Taste bewirkt ein Hochzählen um eine Woche.
Haben Sie die aktuelle Kalenderwoche eingestellt und beide
Tasten losgelassen, ist die Astro-Funktion aktiviert. Das Display
schaltet wieder auf die aktuelle Uhrzeit um.Das (A) oben rechts
bleibt weiterhin sichtbar.
Zum Deaktivieren der Astro-Funktion drücken Sie die Tag-Taste
(Stell-Taste weiterhin gedrückt halten) so oft, bis im Display „0ß0 “
erscheint.
Hinweis: Um ein optimales Arbeiten der Astro-Funktion zu er-
zielen, muss über die DIP-Schalter die geographische
Lage Ihres Wohnortes eingestellt werden (siehe
Tabelle Seite 20 und Seite 21).
- 18 -
D
- 17 -
D
83101211 F1.qxd 24.09.01 16:42 Seite 19

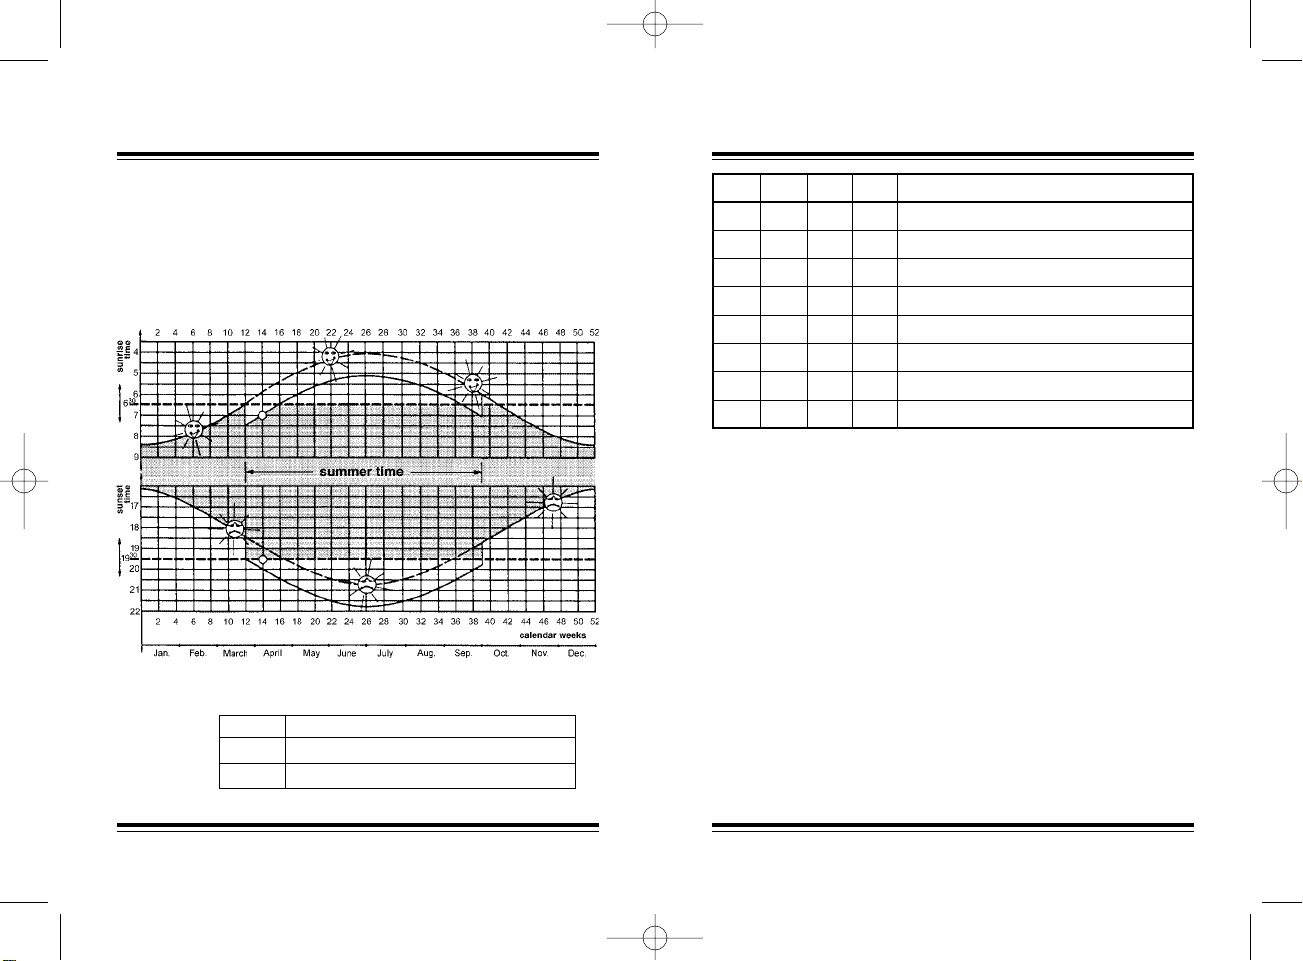
Astro-Funktion / Fahrzeitkorrektur Sonderfunktionen
Schaltungsverlauf im Laufe eines Jahres, unter Berücksichtigung von Sommer-/Winterzeit, bei einer vorgewählten Auffahrzeit von 6§= Uhr und einer Abfahrzeit von 19§= Uhr.Diese Zeiten
beziehen sich auf 10° östliche Länge und 50° nördliche Breite.
Das entspricht etwa der geographischen Lage der Stadt Würzburg. Wird der DIP-Schalter 6 auf „ON“ gestellt, verzögert sich
das Abfahren des Rolladens um 30 Minuten.
Fahrzeitkorrektur:
Sonderfunktionen Astro-Funktion – Einstellung BRD
Y12345C
= Werkseinstellung: Schleswig-Holstein,
Nord-Niedersachsen
- 20 -
D
- 19 -
D
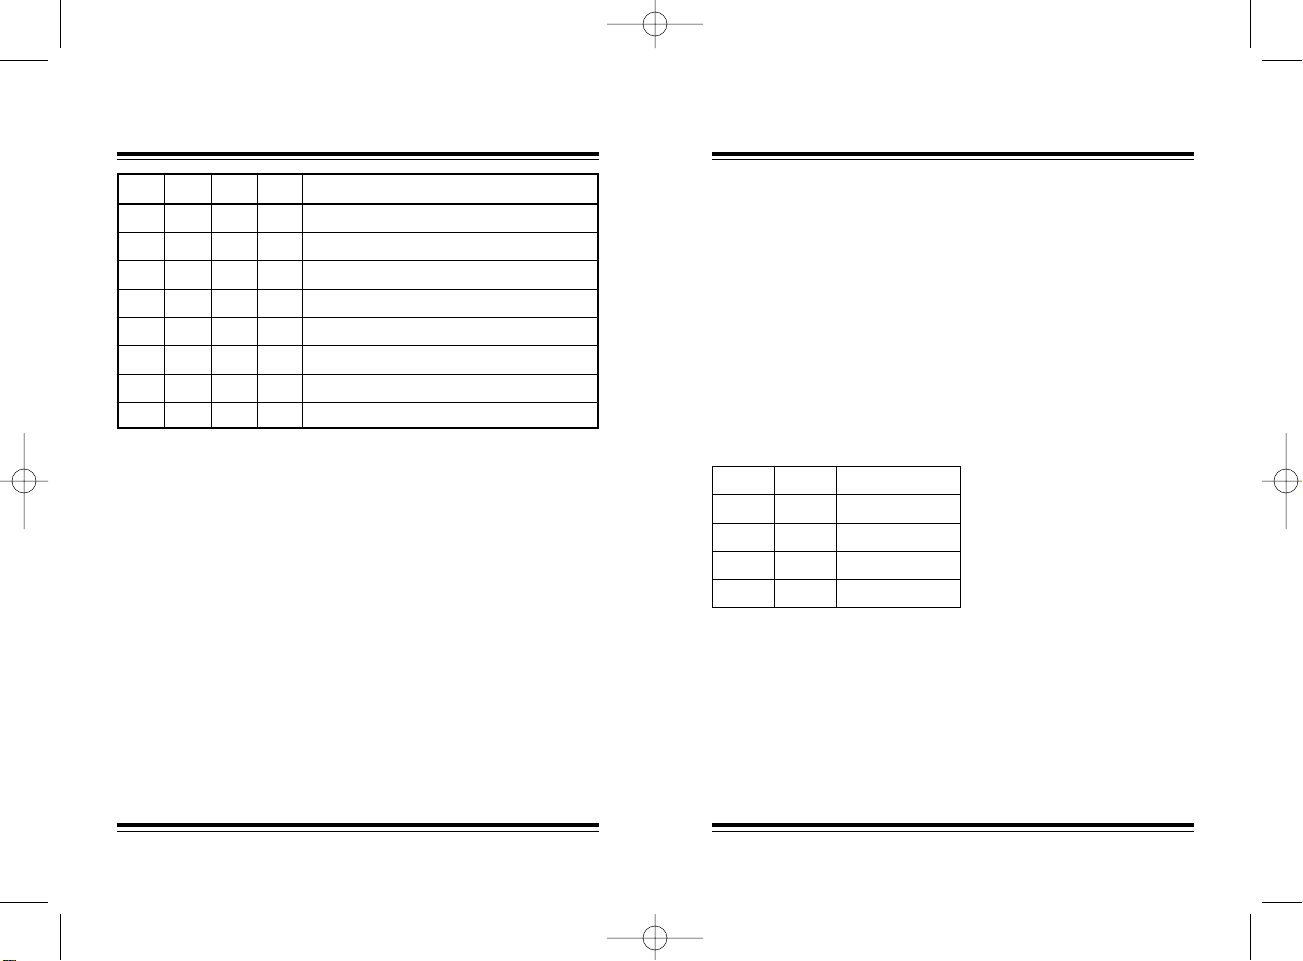
DIP 6 Korrektur
OFF keine V erz ögerung
ON Ab-Befehl 30 Minuten später
DIP 2 DIP 3 DIP 4 DIP 5 Gebiet
OFF OFF OFF OFF Schleswig-Holstein, Nord-Niedersachsen
OFF OFF OFF ON Mecklenburg-Vorpommern
OFF OFF ON OFF Nordrhein-Westfalen, Süd-Niedersachsen
OFF OFF ON ON Brandenburg, Sachsen-Anhalt
OFF ON OFF OFF Rheinland-Pfalz, Saarland, Hessen
OFF ON OFF ON Sachsen, Thüringen
OFF ON ON OFF Baden-Württemberg
OFF ON ON ON Bayern
83101211 F1.qxd 24.09.01 16:42 Seite 21
Astro-Funktion – Einstellung Europa Sonderfunktionen
- 21 -
D
Sonderfunktionen Wende-Funktion
Die Wende-Funktion be wirkt, dass der Rolladen, nachdem er zur
programmierten Zeit automatisch runtergefahren ist, für kurze
Zeit wieder hochfährt (z.B. zur Belüftung oder als Öffnung für
Haustiere).
Die Wendezeit ist über die DIP-Schalter 7 und 8 einstellbar und
wird nur im Automatikbetrieb zu den programmierten Tages-,
Wochen- und Astro-Abfahrzeiten ausgeführt. Die W endez eit wird
ebenfalls durch Drücken der Ab-Taste im Automatikbetrieb ausgeführt.
Wichtig: Erst nach Ablauf des Abfahr-Impulses von 2 Minuten
wird die Wende-Funktion eingeleitet.
Einstellung Wendezeit:
Ist eine Wendezeit eingestellt, so wird dieses durch
Anzeigen des Symbols (O)
im Display angezeigt.
Während Ausführung der
Wendezeit blinkt dieses
Zeichen im Display.
- 22 -
D
DIP 2 DIP 3 DIP 4 DIP 5 Gebiet
ON OFF OFF OFF Skandinavien
ON OFF OFF ON Großbritannien
ON OFF ON OFF Nord-Frankreich, Benelux
ON OFF ON ON Deutschland
ON ON OFF OFF Süd-Frankreich
ON ON OFF ON Schweiz, Österreich, Nord-Italien
ON ON ON OFF Spanien
ON ON ON ON Süd-Italien, Sizilien, Korsika, Sardinien
DIP 7 DIP 8 Wendezeit
OFF OFF keine
OFF ON 2 Sekunden
ON OFF 4 Sekunden
ON ON 10 Sekunden
83101211 F1.qxd 24.09.01 16:42 Seite 23

Beispiel Einstellung DIP-Schalter Sonderfunktionen
Die nachfolgende Tabelle zeigt die verschiedenen Einstellmöglichkeiten.
Die Stellung von S1 entscheidet, ob die Tages- oder die WochenFunktion gewählt wurde.
Werksseitige
Voreinstellungen:
Tag-Funktion (S1 = OFF)
keine Astro-Korrekturzeit (S6 = OFF)
keine Wende-Funktion (S7 und S8 = OFF)
Tag
Y123$5678X
Beispiel der DIP-Schalterstellung für Nordrhein-Westfalen.
Andere Länder siehe Seiten 20 und 21.
Woche
Y!wert678X
DIP-Schalter S2 – S5 sind bei dieser Einstellung ohne Funktion.
DIP-Schalter S6 siehe Seite 19, S7 und S8 Seite 22.
- 23 -
D
Fehlersuchanleitung
Der Rolladen fährt nicht automatisch hoch und runter.
· Ist die Spannungsversorgung gewährleistet?
(Bei Stromausfall blinkt das Display)
· Steht der Wahlschalter auf Automatik (A)?
· Überprüfen Sie, ob die programmierten Auf- und Abfahr-
zeiten noch gespeicher t sind (kurzes Antippen der Auf- bzw.
Ab-Taste im Automatik-Modus).
- 24 -
D
83101211 F1.qxd 24.09.01 16:42 Seite 25

Hinweise für den Elektrofachbetrieb Installation
Einbau und Grundeinstellungen:
1. Betriebsspannung abschalten.
2. Gurtwickler aus dem Gurtwicklerkasten entfernen.
3. DIP-Schalter auf die gewünschte Funktion einstellen (siehe
Seiten 19 bis 23).
4. Vestamatic Rollmat Plus V3.1 gemäß Anschlussplan (siehe
Seite 28) anschließen.
Achtung: Beim Anschluss sind die geltenden VDE-Be-
stimmungen, insbesondere DIN VDE 0100/0700
sowie die geltenden Vorschriften der örtlichen
EVU und UVV zu beachten.
5. Vestamatic Rollmat Plus V3.1 in den Gurtwicklerkasten einbauen.
6. Wahlschalter auf Hand-Steuerung (H) stellen, d.h. bis zum
Anschlag nach rechts schieben.
7. Betriebsspannung einschalten und Reset-Taste drücken.
8. Überprüfen, ob die Motorlaufrichtung mit den Richtungstasten
übereinstimmt.Liegt keine Übereinstimmung vor , Klemmen 6
und 7 vertauschen.
- 25 -
D
Installation Hinweise für den Elektrofachbetrieb
Wichtig: Eine parallele Ansteuerung von mehreren Rolladen-
Antriebsmotoren lässt sich nur über Trennrelais bzw.
Gruppensteuergeräte realisieren.
Bei einem Stromausfall ändert sich der DisplayKontrast. Der schwächere Display-Kontrast ist kein
Anzeichen einer leeren Batterie.
Für übergroße Gurtwickler-Mauerkästen verwenden Sie bitte
unsere Zwischenplatte, Artikel-Nr. 01201500.
Zur Ansteuerung von 2 Antrieben empfehlen wir unsere
Trennrelais:
Trennrelais TR N2A, Artikel-Nr. 01054120
Trennrelais TR N2S, Artikel-Nr. 01054220.
- 26 -
D
83101211 F1.qxd 24.09.01 16:42 Seite 27

Montageanleitung / T echnische Daten Installation
Montageanleitung
Technische Daten
Betriebsspannung: 230 VW, 50 Hz
Leistungsaufnahme: 2 W
Ausgang: 230 VW, 50 Hz
Schaltleistung: 8 A, 230 VW, cos f > 0,8
Schaltzeit: 120 Sekunden
Betriebstemperaturbereich: 0 – 40 °C
Schutzart: IP 40
Dieses Gerät enthält eine schadstoffhaltige Batterie.
Der Endverbraucher ist zur ordnungsgemäßen Rückgabe verpflichtet (Richtlinie 91/157/EWG).
Technische Änderungen vorbehalten!
- 27 -
D
Installation Anschlussplan
- 28 -
D
83101211 F1.qxd 24.09.01 16:42 Seite 29

Anschlussbild
Vestamatic Rollmat Plus V3.1
- 29 -
D
Übersicht Bedienungselemente
Vestamatic Rollmat Plus V3.1
- 30 -
D
Auf-Taste
S/W-Taste
Stell-Taste
Uhr-Taste
Tag-Taste
Display
Ab-Taste
Reset-Taste
Zufall-Taste
Wahlschalter
Automatik/Hand
83101211 F1.qxd 24.09.01 16:42 Seite 31

Safety precautions
· Check the control for any signs of damage immediately after
unpacking. Do not start up the control in case there is any
damage. If there is damage due to the shipping, please notify
the supplier immediately.
· Please note that the Vestamatic Rollmat Plus V3.1 roller shutter
control requires an operating voltage of 230 VW, 50Hz. Make
sure to contact a professional electrician for the installation
and setting of the DIP switches on the rear panel of the device .
· The control was designed for correct use as described in the
operating instructions. Any changes or modifications thereof
are not permissible and will result in loss of all warranty claims.
· If safe operation of control or roller shutter can not be guaranteed, the control must be turned off immediately and protected against unintentional operation. The same applies for
work on windows or roller shutters that are operated by this
control.
- 32 -
G
Installation and Operating Instructions
Rollmat Plus V3.1
83101211 F1.qxd 24.09.01 16:42 Seite 33

Contents
Introduction General page 35
Manual mode page 36
Automatic mode page 37
Programming General page 38
the basic Summer/winter time page 39
functions Current time page 40
Note page 41
Up time page 42
Down time page 43
Random generator page 44
Programming Week function page 45
the special Astro function / Run time correction page 46 – 49
functions Astro function – Germany page 50
Astro function – Europe page 51
Reverse function page 52
Example for DIP switch setting page 53
- 33 -
G
Contents
Trouble shooting page 54
Installation Notes for professional electricians page 55 – 56
Installation instructions / Technical data page 57
Wiring diagram page 58
Overview operating elements Inside back cover
Wiring diagram Back cover
- 34 -
G
83101211 F1.qxd 24.09.01 16:42 Seite 35

General Introduction
Congratulations for buying the Vestamatic Rollmat Plus V3.1
roller shutter control
.
You have purchased a high-quality product
that features many practical programming options and has been
manufactured according to the highest quality standards which
will guarantee optimum efficiency and reliability.Please take the
time to read these operating instructions carefully before starting up.We have tried to make sure that all programming instructions are easy to understand.
The delivery extent of the Vestamatic Rollmat Plus V3.1 roller
shutter control includes the following items:
1. Cover cap
2. Basic housing
In case of power failure, the entire displa y starts flashing.Yet, the
previously programmed times remain saved for several years.
The times or functions, you have previously programmed, can
be checked by performing a quick run. Press the time and day
button simultaneously for 3 seconds to activate the quick run.
The time function will now run 60 times faster. Shor tly tap the
time and day button simultaneously to stop the quick run.
- 35 -
G
Introduction Manual mode
The Vestamatic Rollmat Plus V3.1 roller shutter control features
a selector switch with which manual mode (H) or automatic
mode (A) can be selected.
Push the selector switch to (H), all the way to the right until you
hear the “click” in order to activate the manual mode.
All automatic functions are now disabled. Pressing the up or
down button will move the roller shutters up or down.
Simply press the opposite button to stop the motion, i.e.:
· press the down button, if the roller shutter is moving up,
· press the up button, if the roller shutter is moving down.
Accurate positioning of the roller shutter is guaranteed because
the roller shutter will only move up or down again after the up or
down button has been pressed.
- 36 -
G
83101211 F1.qxd 24.09.01 16:42 Seite 37

Automatic mode Intr oduction
Push the selector switch to (A), all the way to the left until you
hear the “click” in order to activate the automatic mode.
The automatic mode is now activated and the roller shutter will
move up and down at the programmed times. Regardless of the
programmed times, it is still possible to move the roller shutter
up and down by pressing the up or down button and the programming remains unaffected.
If you press the up or down button longer than 2 seconds, the
roller shutter moves up or down.
Simply press the opposite button to stop the motion, i.e.:
· press the down button, if the roller shutter is moving up,
· press the up button, if the roller shutter is moving down.
The roller shutter will only move up or down again after the up
or down button has been pressed.
By simply pushing the selector switch to manual mode (H), the
automatic mode can be interrupted for an extended period of
time.
After selecting the automatic mode again, the Vestamatic Rollmat
Plus V3.1 roller shutter control will ex ecute the last pending command from the automatic mode.The last pending command will
also be executed when resetting after power failure.
- 37 -
G
Basic functions General
After the installation has been completed correctly (for instructions please see pages 55 to 58), you can start programming.
Important: Please note that the Vestamatic Rollmat Plus V3.1
roller shutter control cannot be programmed in case
of power failure.
Carefully pull to remove the cover cap and press the reset button
with a ball-point pen or something else suitable.
Pressing the reset button will activate the default times preprogrammed by the manufacturer.
· Current time – 0ß8:0ß0
· Up time – 0ß6:0ß0
· Down time – 2ß0:0ß0
On the following pages, you will find instructions how to customize these times to your personal requirements.
- 38 -
G
83101211 F1.qxd 24.09.01 16:42 Seite 39

Summer/winter time Basic functions
The display will indicate which time has been set.
The (S) in the upper left hand corner of the display stands for
summer time.
(0S9:0ß0)
The (W) in the upper right hand corner of the display stands for
winter time.
(0ß8:0W0)
If the present setting is incorrect and does not correspond with
the current time, you can simply update the time by pressing the
summer/winter button. The selected setting will appear in the
display and the time will be changed by one hour.
- 39 -
G
Basic functions Current time
By operating the combination of set and time button you can set
the current time.
Setting the time can be performed as follows:
1. Press the set button first and keep it pressed, then:
A. Press the time button and keep it pressed to
fast forward
the time.
B. Shortly tap the time button to
slow forward
the time.
or
2. Press the time button first and keep it pressed, then:
A. Press the set button and keep it pressed to
fast reverse
the time.
B. Shortly tap the set button to
slow reverse
the time.
- 40 -
G
83101211 F1.qxd 24.09.01 16:42 Seite 41

Note Basic functions
The Vestamatic Rollmat Plus V3.1 roller shutter control is deliv-
ered with the following manufacturer’s default up and down times
(day function is activated):
· Daily up time – 0ß6:0ß0 every morning
· Daily down time – 2ß0:0ß0 every evening
Please find the manufacturer’s default DIP switch settings
in the tables on page 50 and page 53.
Important: It is important to push the selector switch “auto-
matic/manual mode”to automatic mode (A),in order
to be able to perform the following programming
steps.
Check the current setting. If the selector switch is
not set on (A), correct the setting by pushing it all
the way to the left until you hear the “click”.
- 41 -
G
Basic functions Up time
By operating the combination of set and up button you can set
the up time.
Setting the up time can be performed as follows:
1. Press the set button first and keep it pressed, then:
A. Press the up button and keep it pressed to
fast forward
the up time.
B. Shortly tap the up button to
slow forward
the up time.
or
2. Press the up button first and keep it pressed, then:
A. Press the set button and keep it pressed to
fast reverse
the up time.
B. Shortly tap the set button to
slow reverse
the up time.
The display will now indicate the set v alue.Once the programming
buttons are no longer operated, the display will indicate the current time again. Tapping the up button will check the set value
and the display will again indicate the previously set up time.
After approx.2 seconds, the display will indicate the current time
again.
- 42 -
G
83101211 F1.qxd 24.09.01 16:42 Seite 43

Down time Basic functions
By operating the combination of set and down button you can
set the down time.
Setting the down time can be performed as follows:
1. Press the set button first and keep it pressed, then:
A. Press the down button and keep it pressed to
fast forward
the down time.
B. Shortly tap the down button to
slow forward
the down
time.
or
2. Press the down button first and keep it pressed, then:
A. Press the set button and keep it pressed to
fast reverse
the down time.
B. Shortly tap the set button to
slow reverse
the down time.
The display will now indicate the set v alue.Once the programming
buttons are no longer operated, the display will indicate the current time again. Tapping the down button will check the set
value and the display will again indicate the previously set down
time. After approx. 2 seconds, the display will indicate the current time again.
- 43 -
G
Basic functions Random generator
The random generator generates the so-called random time
which causes the roller shutters to move up or down with a deviation of +/-15 minutes to the previously programmed times(*).
The “randomly” moving up and down roller shutters give the
impression of an inhabited house and thus provide additional
protection in case the house owner is absent for an extended
period of time.
Simply press the random button to activate the random gener ator.
The display will now indicate
a (Z) in the upper right hand
corner.
(0ß8:0ß0Z
Note: The random generator will disable any previously set
reverse function (please see page 52).
Press the random button again to deactivate the random generator. The random generator is now turned off, the (Z) in the
display will disappear and the roller shutter will move up and
down accurately at the times you have previously programmed.
(*)Annotation: If the Astro function is activated, the times will
deviate by +/-15 minutes from the actual sunrise and sunset times.
- 44 -
G
83101211 F1.qxd 24.09.01 16:42 Seite 45

Week function Special functions
The week function enables you to program a particular up and
down time for each individual day of the week.
In order to activate the week function, all DIP switches in the rear
of the housing must be set according to the table on page 53.
The following times were preset for this operation mode by the
manufacturer:
· Up time Monday through Friday – 0ß6:0ß0
· Down time Monday through Friday – 2ß0:0ß0
· Saturday / Sunday – no preset time.
If you wish different up or down
times, perform the following
steps:
(QS8:0ß0)
Press the day button.The display
will show a new day of the week
after every press.
(0w8:0ß0)
… etc.
Perform the steps described on page 42 to 43 to program the
up and down times for the currently displayed day.
- 45 -
G
Special functions Astro function
The Astro function is basically an electronical calendar.Depending on the stored sunrise and sunset times, the up or down times
are automatically corrected under consideration of the geographical location of your residence.This correction is based on
the up or down times you previously set.
For more information on the programming of the Astro function
please see page 48.
Example:
You have activated the Astro function and previously programmed the following up and down times according to the
instructions on page 42 and page 43:
Up time –
0ß6:3ß0
(½ an hour before sunrise according to
the diagram on page 49)
Down time –
1ß9:3ß0
(½ an hour before sunset according to
the diagram on page 49)
Given the current calendar week 14.
In this example, the roller shutter does not move up at 6 : 30, as
programmed but moves up at 7:00 when the sun rises.
In the evening, it moves down at 19:30 at the programmed time.
- 46 -
G
83101211 F1.qxd 24.09.01 16:42 Seite 47

Astro function Special functions
Note:
If the up time is programmed before sunrise, the roller shutter
moves up at sunrise.
If the up time is programmed after sunrise, the roller shutter
moves up at the programmed up time.
If the down time is programmed after sunset, the roller shutter
moves down at sunset.
If the down time is programmed before sunset, the roller shutter
moves down at the programmed down time.
Important: Activating the Astro function automatically disab les
the week function.
- 47 -
G
Special functions Astro function
Activating the Astro function and setting the current calendar
week will be performed in one programming step.
First press the set button and keep it pressed. Then press the
day button twice.
The display will indicate
the following:
(ßßßß0ß1A
Now set the current calendar week by pressing the day button.
Keep pressing the set button. Each additional pressing of the
day button will move to the next calendar week.
After you have set the current calendar week and released both
buttons, the Astro function will be activated.The display will now
switch to the current time. The display will continue to indicate
the (A) in the upper right hand cor ner.
Keep the set button pressed and press the day button until the
display indicates “0ß0 ” in order to deactivate the Astro function.
Note: In order to obtain optimum performance of the Astro func-
tion, the geographical location of your residence must be
set by means of the DIP switches (see tables on page 50
and 51).
- 48 -
G
83101211 F1.qxd 24.09.01 16:42 Seite 49
Astro function / Run time correction Special functions
Below the switching sequence is presented in the course of an
entire year under consideration of summer/winter time, at an up
time preset at 6: 30 and a down time preset at 19: 30. These
times relate to 10° of eastern longitude and 50° of northern latitude which corresponds to the geographical location of the city
of Würzburg. Setting DIP switch 6 to “ON” will delay the down
time of the roller shutter by 30 minutes.
Run time
correction:
- 49 -
G
DIP 6 Correction
OFF no delay
ON down command 30 minutes delayed
Special functions Astro function – Germany
Y12345C
= Manufacturer’s default setting:
Schleswig-Holstein,
Northern Lower-Saxony
- 50 -
G
DIP 2 DIP 3 DIP 4 DIP 5 Area
OFF OFF OFF OFF Schleswig-Holstein, Northern Lower-Saxony
OFF OFF OFF ON Mecklenburg-Vorpommern
OFF OFF ON OFF North-Rhine Westphalia, Southern Lower-Saxony
OFF OFF ON ON Brandenburg, Saxony-Anhalt
OFF ON OFF OFF Rhineland-Palatinate, Saarland, Hesse
OFF ON OFF ON Saxony , Thuringia
OFF ON ON OFF Baden-Württemberg
OFF ON ON ON Bavaria
83101211 F1.qxd 24.09.01 16:43 Seite 51

Astro function – Europe Special functions
- 51 -
G
DIP 2 DIP 3 DIP 4 DIP 5 Area
ON OFF OFF OFF Scandinavia
ON OFF OFF ON Great Britain
ON OFF ON OFF Nor ther n France, Benelux
ON OFF ON ON Germany
ON ON OFF OFF Southern France
ON ON OFF ON Switzerland, Austria, Norther n Italy
ON ON ON OFF Spain
ON ON ON ON Southern Italy, Sicily, Corsica, Sardinia
Special functions Reverse function
After the roller shutter has moved down automatically at the programmed time, the reverse function causes the roller shutter to
shortly move up airing purposes or to let pets go outside.
The reverse time can be set with DIP switches 7 and 8 and will
only be executed at the programmed day, week and sunrise and
sunset times during automatic operation.The reverse function can
also be executed by pressing the down button during automatic
operation.
Important: The reverse function is only initiated 2 minutes after
the down pulse has been transmitted.
Setting reverse time:
The display will indicate the
set reverse time with the
symbol (O).
This symbol flashes on the
display during execution of
the reverse time.
- 52 -
G
DIP 7 DIP 8 Reverse time
OFF OFF none
OFF ON 2 seconds
ON OFF 4 seconds
ON ON 10 seconds
83101211 F1.qxd 24.09.01 16:43 Seite 53

Example for DIP switch setting Special functions
The table below shows the various setting options.
The position of S1 determines whether day or week function
was selected.
Preset default
setting:
Day function (S1 = OFF)
No Astro correction time (S6 = OFF)
No reverse function (S7 and S8 = OFF)
Day
Y123$5678X
Example of the DIP switch position for North-Rhine Westphalia.
For other states, please see pages 50 and 51.
Week
Y!wert678X
DIP switches S2 – S5 do not have any function for this setting.
For DIP switch S6, see page 49, for S7 and S8 see page 52.
- 53 -
G
Trouble shooting
The roller shutter does not move up and down automatically.
· Is the power supply connected?
(The display flashes in case of power failure)
· Is the selector switch set to automatic (A)?
· Check, if the programmed up and down times are still stored
in the memory by shortly tapping the up or down button in
the automatic mode.
- 54 -
G
83101211 F1.qxd 24.09.01 16:43 Seite 55

Notes for prof essional electricians Installation
Installation and basic settings:
1. Switch off the power supply.
2. Remove the band winder from the band winder case.
3. Set the DIP switches to the desired function (see pages 49
to 53).
4. Connect the Vestamatic Rollmat Plus V3.1 according to the
wiring diagram (see page 58).
Attention: Currently valid VDE standards must be ob-
served when connecting the device, in particular DIN VDE 0100/0700 as well as the currently
valid regulations of your local power company
and accident prevention regulations.
5. Install the Vestamatic Rollmat Plus V3.1 in the band winder
case.
6. Set the selector switch to manual mode (H), i.e. push it to the
right all the way to the stop.
7. Switch on the power supply and press the reset button.
8. Check, if the direction of the motor rotation corresponds with
the direction buttons. If not, exchange terminal 6 with terminal 7.
- 55 -
G
Installation Notes for professional electricians
Important: Parallel control of se veral roller shutter drive motors
can only be implemented by means of isolating
relays or group control devices.
In case of power failure, the displa y contrast will f ade
which does not
indicate that the battery is empty.
For extra large band winder cases, we recommend to use
our intermediate plate, ar ticle-no. 01201500.
For control via two drives, we recommend our isolating relays:
Isolating relays TR N2A, article-no. 01054120
Isolating relays TR N2S, article-no. 01054220.
- 56 -
G
83101211 F1.qxd 24.09.01 16:43 Seite 57
Installation instructions / Technical data Installation
Installation instructions
Technical data
Operating voltage: 230 VW, 50 Hz
Power input: 2 W
Output: 230 VW, 50 Hz
Switching capacity: 8 A, 230 VW, cos f > 0.8
Switching time: 120 seconds
Operating temperature range: 0 °C (32 °F) to 40 °C (104 °F)
Protection class: IP 40
This device comprises a battery containing toxic substances.
The consumer is obliged to correctly recycle the battery
(Guideline 91/157/EWG).
All technical data is subject to change!
- 57 -
G
Installation Wiring diagram
- 58 -
G
83101211 F1.qxd 24.09.01 16:43 Seite 59

Übersicht Bedienungselemente / Overview operating elements
Vestamatic Rollmat Plus V3.1
D G
Display
Display
Auf-Taste
Up button
Tag-Taste
Day button
Uhr-Taste
Time button
Stell-Taste
Set button
S/W-Taste
Summer/winter button
Wahlschalter
Automatik/Hand
Selector switch
automatic/manual
Zufall-Taste
Random button
Reset-Taste
Reset button
Ab-Taste
Down button
Notizen / Notes
D G
83101211 F1.qxd 24.09.01 16:43 Seite 61

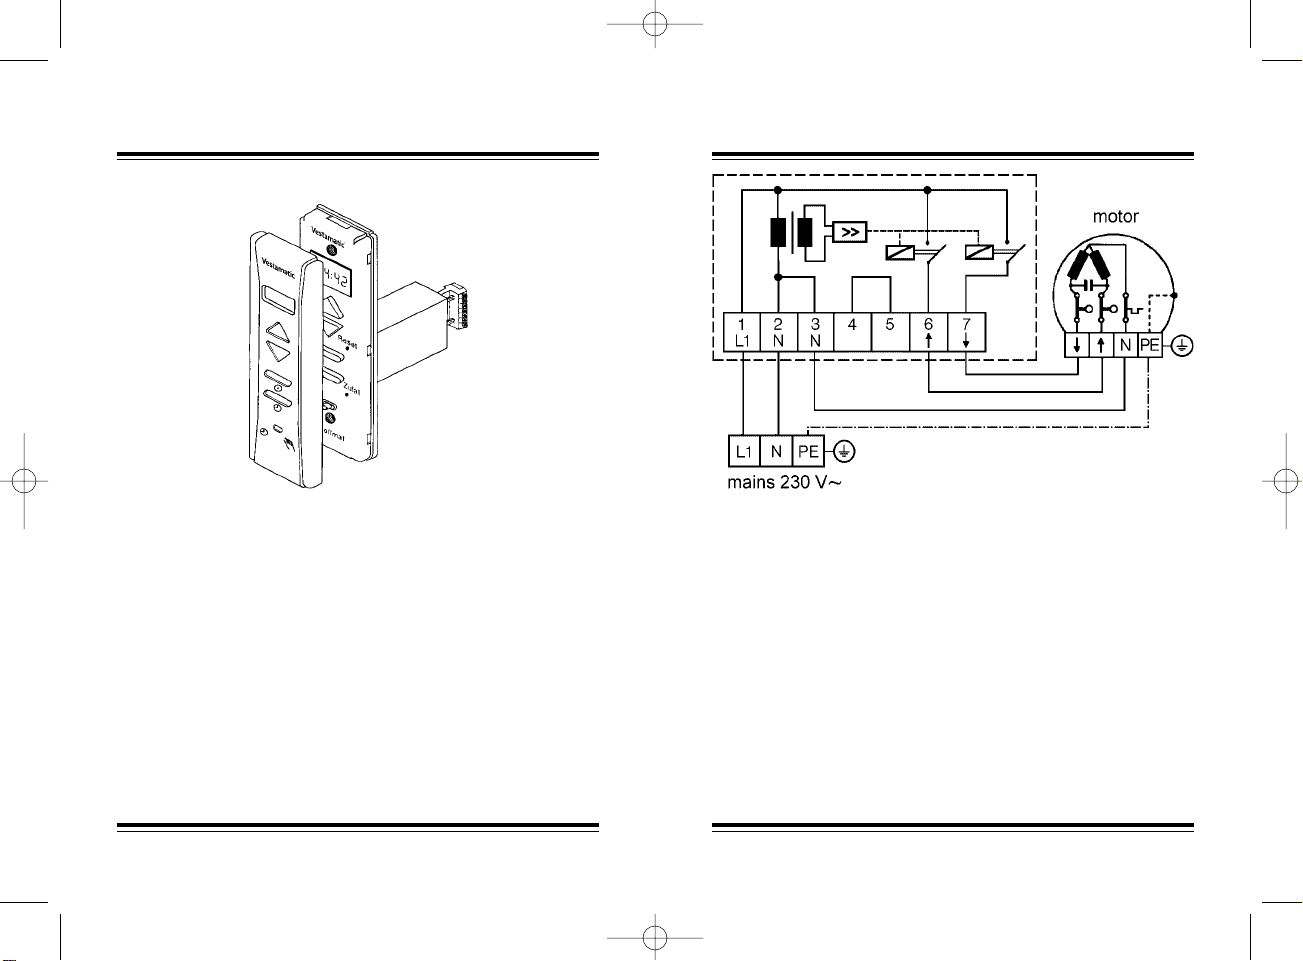
Anschlussbild / Wiring diagram
Vestamatic Rollmat Plus V3.1
D G
Art.-Nr.: 83101211 F1
83101211 F1.qxd 24.09.01 16:43 Seite 63
 Loading...