

Page 1
G
Quattro Lite
85601221 H1
Quattro Lite
Art.-no.:
01813620
Short description
Compatible with popular switch ranges
Simple operation with arrow buttons on a blue illuminated display
Factory-set date / time / duration
Daily up/down commands programmable
Week function, up and down times programmable individually for each
weekday
Random function, random times for presence simulation
Sun function, option of connecting lux sensor
Manual and automatic operation
Automatic daylight saving time, adjustable
Data storage in event of power failure
Compatible with popular switch ranges
Safety precautions
– Contact a professional electrician to install the control system,
Ä
– The control system should only be used for the purpose specified
– If the control unit or the connected sunshade cannot be operated
– When performing work on the windows, controls or connected
– This device contains a pollutant battery. The end user must recycle
because the control system requires a power supply of 230VAC,
50 Hz.
– Check the control system for signs of mechanical damage after
unpacking. If you notice any shipping damage, do not start up the
control system and notify your supplier immediately.
by the manufacturer (refer to the operating instructions). Any
changes or modifications thereof are not permissible and will
result in loss of all warranty claims.
without presenting a hazard, it must be switched off and prevented
from being switched on unintentionally.
shades, protect them against unauthorised or unintentional operation.
all used batteries in accordance with regulation 91/157/EWG.
Disposing of the batteries in household waste is strictly forbidden.
Quattro Lite
Shutter control for manual or automatic control
of electric roller shutters.
Art.-no.: 01813620
Installation and Operating Instructions
Installation
WARNING!
Risk of injury due to improper installation and commissioning.
Ä
Improper installation and commissioning may lead to personal injury
or property damage.
Therefore:
– When connecting the device, observe the currently valid VDE
– Connect the control in accordance with the wiring diagram.
Notes for professional electricians
1. Switch off the power supply.
2. Connect the power supply in accordance with the wiring diagram.
3. Fit the power supply into a deep flush box and fix in place.
4. Fit the frame cover.
5. Fit the operating device into the power pack by applying gentle pressure to
the frame cover.
6. Switch on the power supply.
7. Check the sunshade direction by using the “Up” and “Down” buttons.
Ä
standards (in particular DIN VDE 0100/0700), your local power
company’s regulations and the current accident prevention regulations.
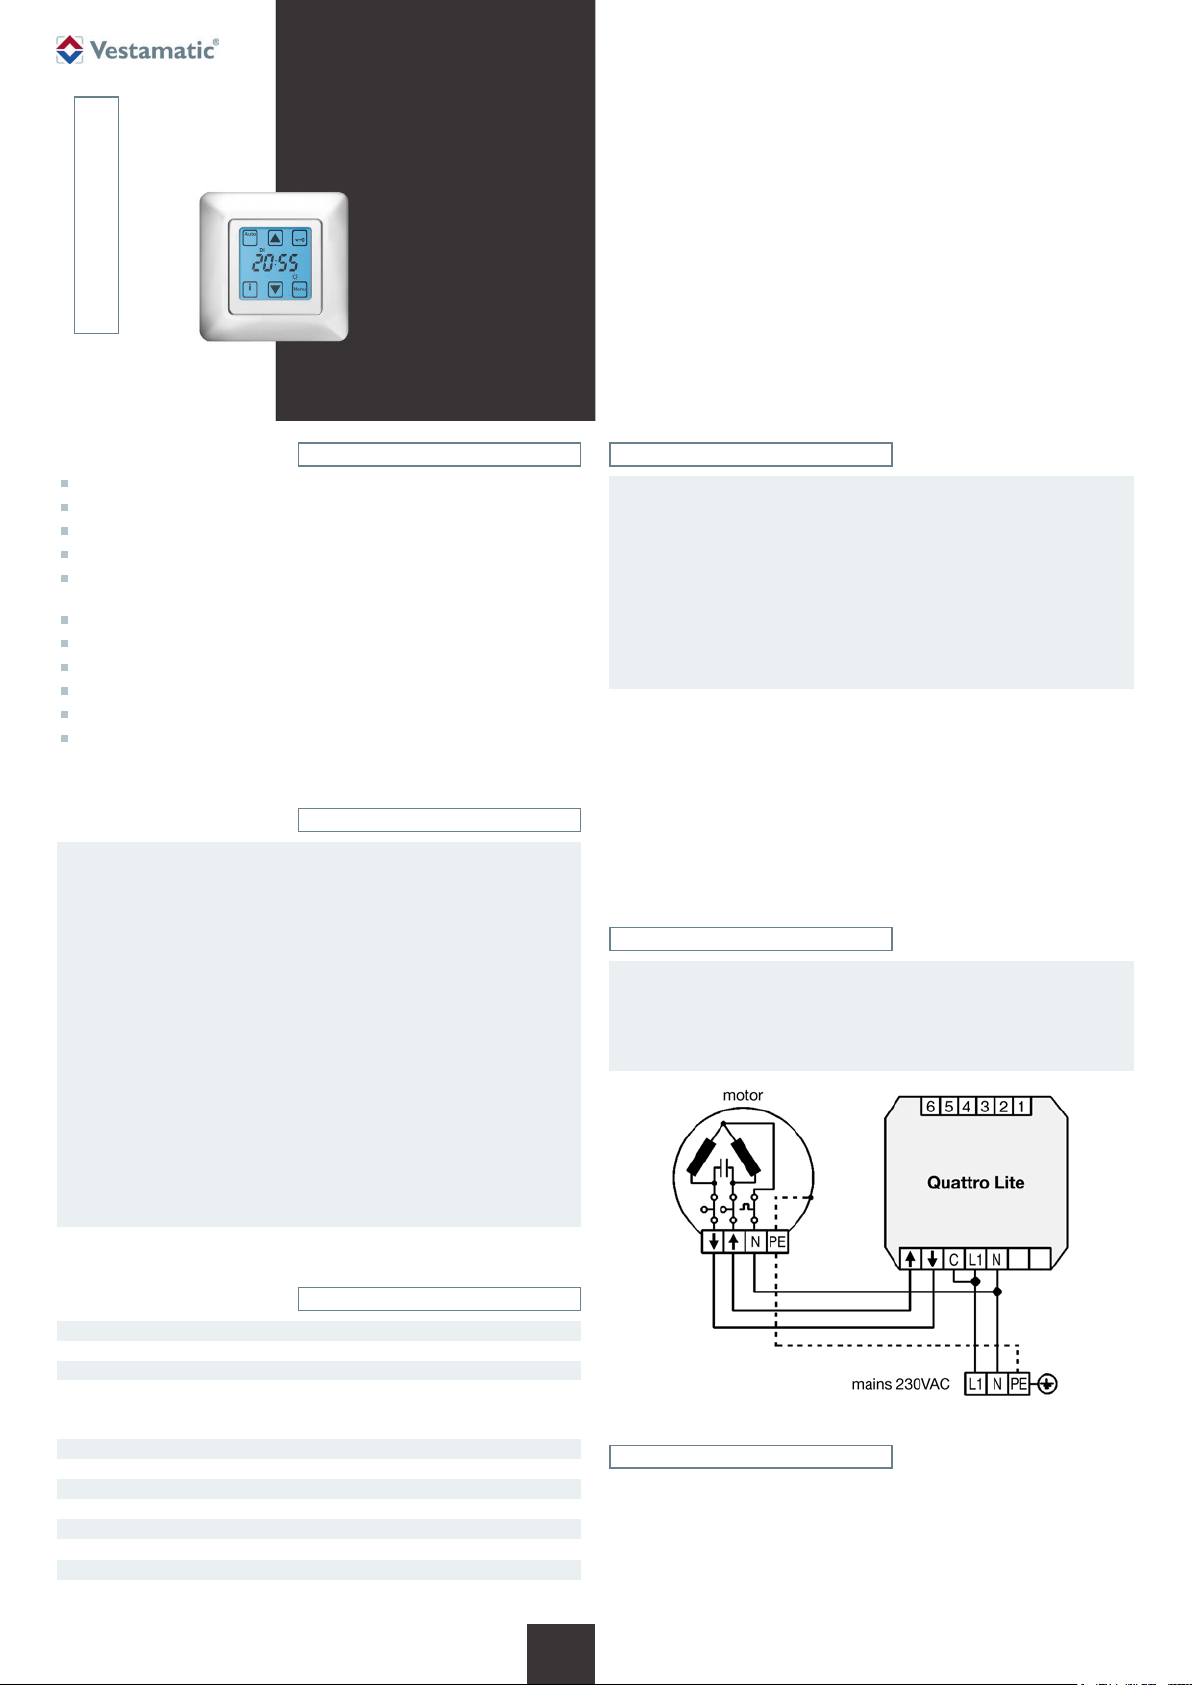
Wiring diagram
WARNING!
The installation regulations in compliance with VDE 0100 must
be observed!
When controlling multiple drives, isolating relays or suitable control
units must be used.
Technical data
Power supply: 230VAC, 50 Hz
Impulse voltage withstand level: 2.5 kV
Rated power: 2 W
Output (Up/Down):
Maximum load: 250VAC, 3 A, cos f > 0.8 ind.
Align switching time: 120 seconds
Software class: A
Operating temperature: 0°C (32°F) to +40°C (104°F)
IP class: IP 30
Degree of contamination: 2
Battery: CR 2032
Dimensions (L × W × H): 50 × 50 × 46 mm (without cover frame)
Colour information: similar to RAL 9016
Conformity:
230VAC, 50 Hz
p
1/4
G
Disposal of waste
The disposal of electrical equipment and batteries in household waste is
strictly forbidden.
The symbol (dustbin crossed out, in line with WEEE Appendix IV)
indicates separate collection of electrical and electronic products in EU
É
countries. Do not dispose of the device or battery in your household
waste. Ask your town or local council about the return and collection
systems available in your area to dispose of this product.
Subject to modifications.© Vestamatic GmbH
Art.-Nr.: 85601221 H1 • Vestamatic GmbH • Dohrweg 27 • D-41066 Mönchengladbach • www.vestamatic.com
Page 2

Quattro Lite
Start-up
After installing the control and turning on the supply voltage, the control is in manual mode and ready for operation. All automatic functions are still disabled but the
sunshade can be operated manually with the up/down button. The current time, the date, the standard daily up/down times and additional default settings are programmed by the manufacturer (see table “manufacturer’s default setting”) and only need to be adjusted to your personal requirements. Please touch the manual/
automatic button (top left) in order to change from the manual to the automatic operation mode. The hand symbol H will disappear and the button will indicate Auto.
The sunshade will now automatically move up and down at the programmed times. Touching the “Auto” button again will change back to the manual mode. Even
in the automatic mode, sunshades can always be operated with the o or u buttons. In order to stop moving sunshades, simply touch the opposite direction button.
Display elements
Info button
Touching the Info button i only in automatic mode – will display the actual up/down times of each day, as well as all the activated special functions, such as random
and sun protection function. The display indicates these functions with the corresponding symbols (Z, S, M). If either the sun function is activated, the currently
measured light intensity is displayed by means of a bar graph indicator.
Manufacturer’s default setting
Main menu functions
press button
1st Up time daily 06:00 h 00:00 – 23:59 h
m
m _
1st Down time daily 20:00 h 00:00 – 23:59 h
m _
Random time
Sun function OFF ON / OFF
m
m _
Time / Date
_
_
_
END
m
_
Sub menu functions
press button
2nd Up time (Mo – Su) OFF, - - : - - 00:00 – 23:59 h
2nd Down time (Mo – Su) OFF, - - : - - 00:00 – 23:59 h
Threshold setting 0 -50 to +50
Year current 2003 – 2099
Day and month current 01.01 – 31.12
Automatic daylight saving time ON ON / OFF
Manual daylight saving time W S / W
_
Manufacturer’s
default setting
OFF ON / OFF
Adjustment option Personal settings
Art.-Nr.: 85601221 H1 • Vestamatic GmbH • Dohrweg 27 • D-41066 Mönchengladbach • www.vestamatic.com
2/4
G
Subject to modifications.© Vestamatic GmbH
Page 3

Quattro Lite
Programming menu
The control system features a wide range of functions that can be set to meet your individual requirements. Press and hold the menu button mfor 3 seconds to
go to the main menu.
In the main menu, to go to the next main menu item, press the menu button m again.
In the sub-menu, press the sub-menu button _ to go to a sub-menu item.
In the sub-menu, press the sub-menu button _ to go to the next sub-menu item.
In the main/sub-menu, press the Escape button e to go back one item.
Press and hold the Escape button e to end the programming process. Any changes made will be automatically saved.
Values can be programmed in the individual menus either by briefly pressing the o and u buttons for step-by-step programming, or by pressing and holding the o and
u buttons for more than 2 seconds to scroll through the available values.
If no button is pressed for over 3 minutes in the programming menu, the programming menu will close automatically.
1) Random change of the up/down time by +/- 15 minutes
2) At sunshine, the sunshade moves down to the sun sensor
Up/down times (The control offers you three options to set the daily up/down times.)
Day program:
On each day of the week (Mo – Su)
the up/down times are identical.
Programming in the
1st up and 1st down time
Make sure, that the 2nd up and 2nd down time
is disabled (default setting).
Disabling occurs between 23:59 h and 00:00 h
and is indicated as - -:- - in the display.
3 1
main menu submenu main menu submenu
3) Setting the light intensity for the sun function
4) Automatic summer/winter time changeover (automatic/manual)
Programming details
Week program: 4 2
Here different up/down times can be set
for each day of the week.
Programming in the
2nd up and 2nd down time (Mo – Su)
Delete the 1st up and 1st down time in the
main menu.
Disabling occurs between 23:59 h and 00:00 h
and is indicated as - -:- - in the display.
A combination of random is not possible.
Up/down commands will be accurately executed
at the programmed time.
3/4
G
Combination of day and week program:
3412 = 4 up/down commands
1. On each day of the week the up/down times are identical.
2. Up/down times differ each day. The second up/down times
can be set for partial sunshade without sensor.
Programming in
1st up/down time and 2nd up/down times
Please be sure, the 1st up and 1st down time as well as all
2nd up and 2nd down times are programmed.
and
Subject to modifications.© Vestamatic GmbH
Art.-Nr.: 85601221 H1 • Vestamatic GmbH • Dohrweg 27 • D-41066 Mönchengladbach • www.vestamatic.com
Page 4

Quattro Lite
Random time (can only be used for the 1st up/down time)
The random time function changes the first programmed up/down time by +/- 15 minutes and thus gives the impression of an inhabited house.
Sun function
With the sun function activated, the lux sensor, which is attached to the window, continuously checks the sun intensity. As soon as an individually selected sun
threshold is attained, and the sun response delay has elapsed, the timer triggers the drive to move down the sunshade. The sunshade then moves down to the
sensor and backs up a bit again. If the sunshade does not move down at those lighting conditions, you perceive as correct, you can easily adjust the sun intensity
threshold. The sun intensity is displayed by means of a bar graph indicator. As soon as the bar undershoots the mark in the center and the response delay has
elapsed, the closed sunshade will move up again. If the bar does not reach the mark in the center, the closed roller shutter will move up again after the response
delay has eleapsed.
Threshold settings
The threshold
can be
individually
adjusted between
-50 and +50.
NOTE!
The sun function operates only in the automatic mode and only bet-
i
ween the programmed up and down times. After the evening down
command, the sun function is automatically disabled because the
sunshade is closed. The display will indicate the moon symbol. In the
automatic mode, the current sun intensity can always be indicated by
touching the Info button
and displaying the bar graph indicator.
i
Time / Date
The time, year and date settings are set by pressing the o and u buttons.
Press the _ button to go to the respective setting.
Automatic and manual daylight saving time
“ON” setting = the control automatically performs daylight saving time adjustment twice a year.
“OFF” setting = daylight saving time adjustment is disabled and can be manually
set in the next sub-menu (press _ button) by pressing the o and u buttons.
Response and reset delay (for sun function)
Response and reset delay are necessary in order to prevent the sunshade from
continuously moving up and down at quickly changing lighting conditions.
After the sun threshold has been exceeded for 1 minute, the response delay
will delay the downwards motion of the sunshade. The reset delay prevents the
sunshade from immediately moving up after the sun threshold is undershot for
16 minutes, e.g. due to temporary clouds.
Assembly of Lux sensor
1. Carefully pull out the display.
2. Insert the plug of the lux sensor into the socket on the rear of the panel.
3. Carefully push the display back into the cover frame.
4. Attach the lux sensor at the desired location on the window pane.
5. Activate the sun function in the menu and switch the control to the automatic
mode.
Description, maintenance and cleaning of the touchscreen display
Please note, that the touchscreen display is a sensitive electronic device. The slightest
touch on its surface will initiate a switching operation. Excessive pressing, scratching or
operation with a sharp-edged object can cause irreparable damage or even destroy the
display. Therefore, you should absolutely avoid touching the display surface with a pointed
or sharp-edged object. Use an lens cleaning cloth to clean the touchscreen.
Power failure / Replacing the Battery / Restoring the control system‘s default settings
In the event of a power failure, all previously programmed times and settings will be stored
for up to 2 years. At the start of the power failure, the display will flash for the first 10 minutes.
After that, the screen will go blank. When the power supply returns, the control system will
automatically display the current time. If a retract or extend command is pending during
the power failure, this command will be automatically performed once the power returns.
To replace the battery or restoring the control system’s default settings, remove the operat ing
device from the power pack and remove the battery from the back of the operating device.
After replacing the battery, an automatic reset will be executed. This will reset the control
system and restore the default settings. Everything you have programmed yourself (incl.
time and date) will be deleted.
4/4
Subject to modifications.© Vestamatic GmbH
G
Art.-Nr.: 85601221 H1 • Vestamatic GmbH • Dohrweg 27 • D-41066 Mönchengladbach • www.vestamatic.com
 Loading...