

Vestamatic 01813330, Time Control Installation And Operating Instructions Manual
Time Control
Art.-no.:
01813330
Installation and Operating Instructions
Contents 3. Technical data
2. Safety precautions
4. Installation
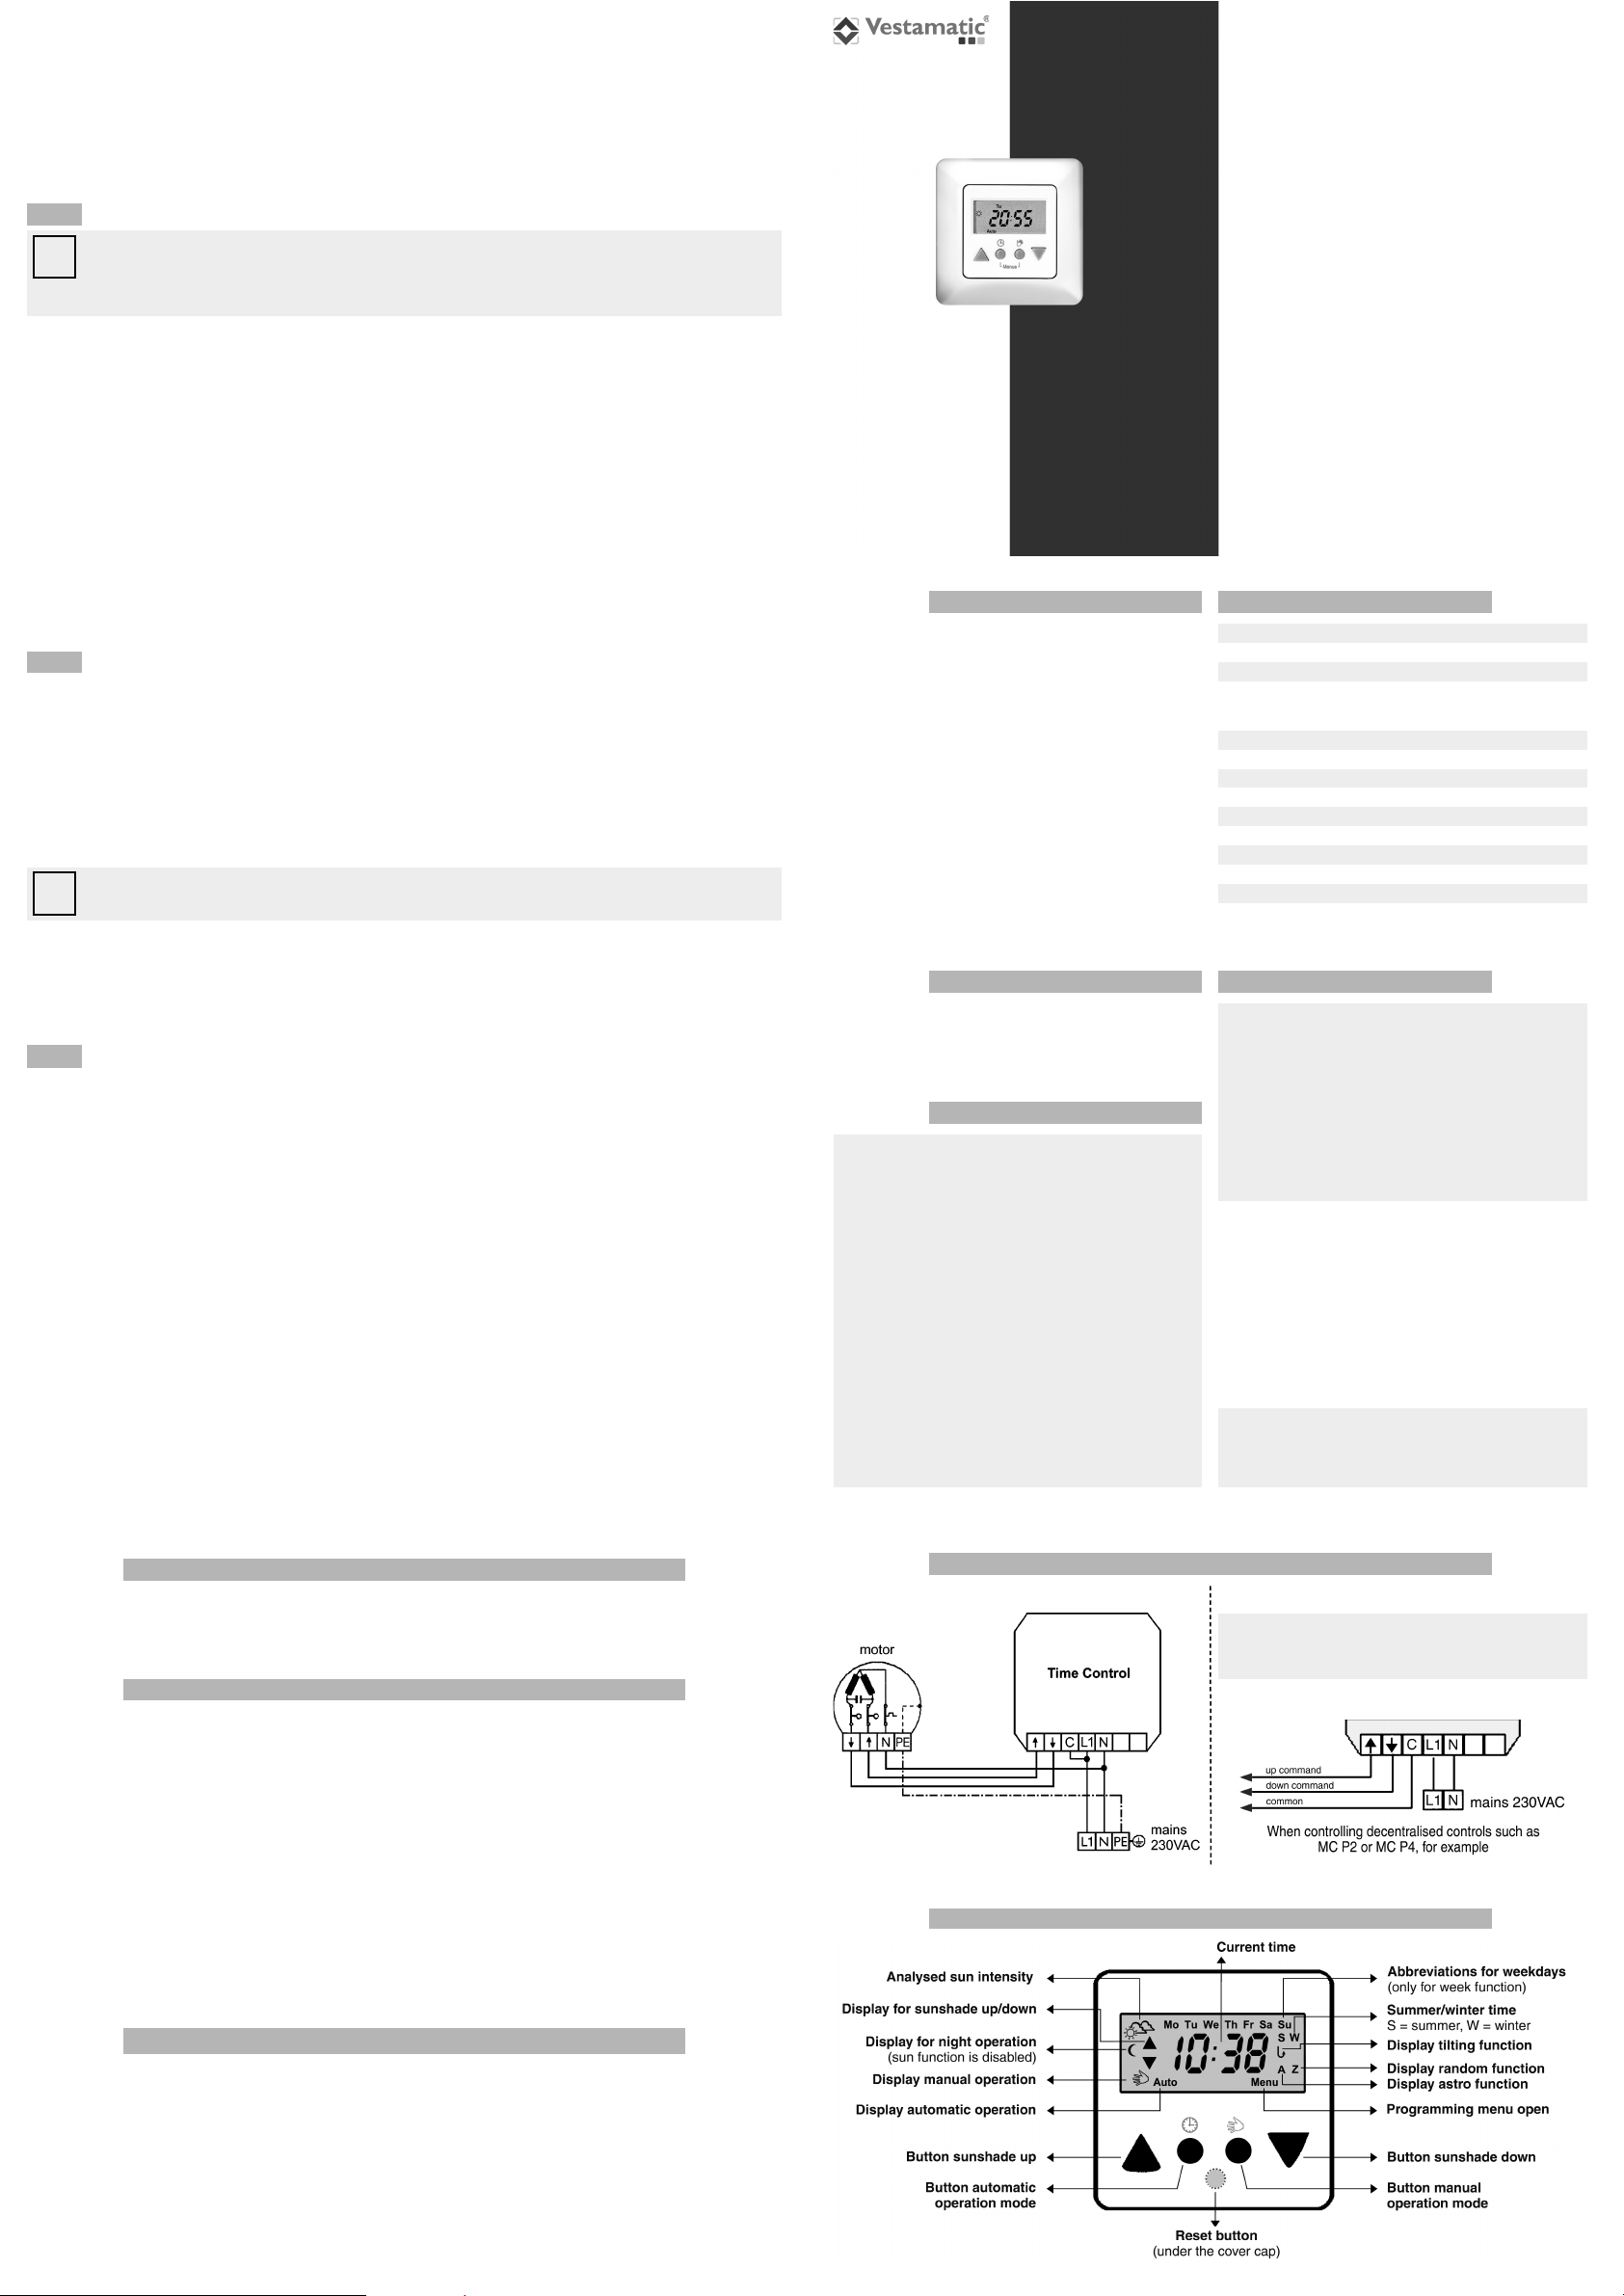
5. Wiring diagram
1. General
The control system is used to manually and automatically operate electric
shutters. Its numerous functions can be individually customised to suit your
particular needs.
– Contact a professional electrician to install the control system,
because the control system requires a power supply of
230VAC, 50 Hz.
– Check the control system for signs of mechanical damage
after unpacking. If you notice any shipping damage, do not
start up the control system and notify your supplier immediately.
– The control system should only be used for the purpose
specified by the manufacturer (refer to the operating instructions). Any changes or modifications thereof are not permissible and will result in loss of all warranty claims.
– If the control unit cannot be operated without presenting a
hazard, it must be switched off and prevented from being
switched on unintentionally.
– When performing work on the windows, controls or connected
shades, protect them against unauthorised or unintentional
operation.
– This device contains a pollutant battery. The end user must
recycle all used batteries in accordance with regulation
91/157/EWG. Disposing of the batteries in household waste
is strictly forbidden.
Ä
WARNING!
Risk of injury due to improper installation and
commissioning.
Improper installation and commissioning may lead to personal
injury or property damage.
Therefore:
– When connecting the device, observe the currently valid
VDE standards (in particular DIN VDE 0100/0700), your
local power company’s regulations and the current accident
prevention regulations.
– Connect the control in accordance with the wiring diagram.
Ä
1. General
2. Safety precautions
3. Technical data
4. Installation
5. Wiring diagram
6. Display and operating elements
7. Programming menu
8. Manufacturer’s default settings
9. Basic settings
9.1 Manual/automatic operation mode
9.2 Switching from manual to automatic operation
10. Programming details
11. Restoring the control system’s default settings
12. Power failure / Replacing the batteries
13. Installing the lux sensor
Notes for professional electricians
1. Switch off the power supply.
2. Connect the power supply in accordance with the wiring diagram.
3. Fit the power supply into a deep flush box and fix in place.
4. Fit the frame cover.
5. Fit the operating device into the power pack by applying gentle pressure
to the frame cover.
6. Switch on the power supply.
7. You can test the direction of the sunshade using the “Up” and “Down”
buttons.
Time Control Art.-no.: 01813330
Shutter control for manual or automatic
control of electric shutters.
Power supply: 230VAC, 50 Hz
Impulse voltage withstand level: 2.5 kV
Rated power: 2 W
Output (Up/Down): 230VAC, 50 Hz
Maximum load: 250VAC, 3A, cos
f >
0.8 ind.
Align switching time down: 3 – 120 seconds
Tilt time: 0 – 30 seconds
Software class: A
Operating temperature: 0 °C (32 °F) to +40 °C (104 °F)
IP class: IP 40
Degree of contamination: 2
Battery: CR 2032
Dimensions (L × W × H): 50 × 50 × 46 mm (without cover frame)
Colour information: signal white (similar to RAL 9016)
Mark of conformity:
p
ATTENTION!
Parallel control of more than one roller shutter drive
motor can only be implemented by means of isolating
relays and group control devices.
Ä
ATTENTION!
When using decentralised control systems the wire
bridge
(C-L1)
must be removed.
Ä
The disposal of electrical equipment and batteries in household waste is strictly forbidden.
The symbol (dustbin crossed out, in line with WEEE Appendix IV)
indicates separate collection of electrical and electronic products in EU countries.
Do not dispose of the device or battery in your household waste. Ask your town or local council about the return and collection systems available
in your area to dispose of this product.
Vestamatic GmbH · Dohrweg 27 · D-41066 Mönchengladbach · www.vestamatic.com
É
Printing errors and details are subject to change without notification. © Vestamatic GmbH
Use the reset button to reset the control. By doing this all your programming and the time and date will be lost and the factory default time settings will be
reloaded.To do this, hold the display frame and gently remove the control system from the power supply.Then gently remove the control system cover and
press the reset button beneath buttons
U
and H. Then replace the cover onto the control system and plug it back into the power supply.
In the event of a power failure, the control is equipped with several years' reserve power. As soon as the mains power fails, the display will start to flash
and after 10 minutes it will switch itself off.This does not mean that the battery is flat. When the mains power returns, the control system will display the
correct time. If an up or down command is pending during the power failure, this command will be automatically carried out when the mains power returns.
If, after a power failure, the control system no longer displays the correct time or date you probably need to change the battery. In this case, your customised settings and the time and date will be lost, and the factory default time settings will be reloaded.
In this case, proceed as follows:
– Hold the display frame and gently remove the operating device from the power supply.You will find a CR 2032-type battery in the back of the operating device.
– Remove this battery and replace it with a battery of the same type (make sure you insert the battery correctly).
– Then gently remove the operating device cover and press the reset button beneath buttons
U
and H.
– Then fit the cover back onto the operating device and plug it into the power supply.
To set the time and your required data, proceed as described in the section “10. Programming details”.
11. Restoring the control system’s default settings
To use the sun function, each control system must be fitted with a lux sensor. However, only 1 lux sensor may be connected to the control system and the
lux sensor cable must not be extended under any circumstances. Install the lux sensor as follows.
1. Remove the operating device from the power supply.
2. Plug the lux sensor connector into the socket on the front of the power supply.
3. Gently press the operating device back into the power supply.
4. Mount the lux sensor in the required position on the window pane.
5. Switch the control system to automatic operation mode.
13. Installing the lux sensor
12. Power failure / Replacing the batteries
6. Display and operating elements
If the colon on the display is not flashing, this indicates that you are in the sub-menu for setting the current time. Use the up and down buttons (Qor q) to
set the time.
Press the sub-menu button
H
once to go to the sub-menu for setting the year (U8.1).
Press the menu button
U
once to exit the menu and the seconds of the displayed time will start at 0.
U8.1 Sub-menu for setting the year
If there is no colon on the display, this indicates that you are in the sub-menu for setting the year. Use the up and down buttons (
Q
or q) to set the year
between 2008 and 2099.
Press the sub-menu button
H
once to go to the menu for setting the date (U8.2).
Press the menu button
U
once to exit the menu.
U8.2 Sub-menu for setting the date
Use the up and down buttons (
Q
or q) to set the date. Press and hold one of the two buttons to scroll through the available values.The two left digits show
the day and the two right digits show the month.The day of the week will be set automatically.
Press the sub-menu button
H
once to go to the menu for setting the summer/winter time changeover (U8.3).
Press the menu button
U
once to exit the menu.
U8.3 Sub-menu for setting the summer/winter time changeover
In this sub-menu you can set the automatic or manual summer/winter changeover. Use the up and down buttons (
Q
or q) to choose between automatic or
manual summer/winter changeover. The status will be shown by “
0ßfßf
”or “
0ßn
” on the display. If you are in manual changeover (display = “
0ßfßf
”), press
the sub-menu button
H
once to go to the sub-menu for setting the manual summer/winter changeover (U8.4).
If you are in automatic changeover (display = “
0ßn
”), press the sub-menu button Honce to return to the menu for setting the time (H8).
Press the menu button
U
once to exit the menu structure. Programming is complete.
U8.4 Sub-menu for setting manual summer/winter time changeover
This sub-menu is only available if automatic summer/winter changeover has been deactivated. Use the up and down buttons (
Q
or q) to set summer or
winter time. The display will show a flashing S or W symbol and a hand symbol.
Press the sub-menu button
H
once to return to setting the time and date (H8).
Press the menu button
U
once to exit the menu structure. Programming is complete.
H8 Setting the time and date
Artikel-Nr.: 84100702 B1
When connected to a lux sensor, the control system automatically lowers the shutter according to sun intensity.The sensor is attached to the window pane
using the suction pad and permanently monitors sun intensity. If the individually-set threshold value is exceeded, the shutter control will lower the shutter
once the sun response delay has elapsed.The shutter will be lowered until it is shading the sensor. To free up the sensor for further monitoring, the shutter
is then raised a few centimeters until it reaches the designated “shade position”. In automatic operation mode, the sun and cloud symbols represent sun
intensity. If there is no sun, the cloud symbol
w
will be displayed. If the sun intensity reading is lower than the set response value, the sun/cloud symbol
W
will be displayed.If it is higher than the set response value, the sun symbol Swill be displayed.The sun symbol flashes to indicate the sun response
delay and the cloud symbol flashes to indicate the sun reset delay. Use the up and down buttons (
Q
and q) to disable or enable the sun function. On the
display, “
0ßfßf
”or “
0ßn
” will show the status.
Press the sub-menu button
H
once to go to the sub-menu for setting the sun sensitivity (U6.1).
Press the menu button
U
once to go to the menu for setting the motor run time (H7).
U 6.1 Sub-menu for setting the sensitivity
This menu allows you to set the sun sensitivity, which indicates the sensitivity of the lux sensor. As the lux sensor's sensitivity level is increased, less light
is needed to trigger a lowering of the shutter.
To set the sensitivity proceed as follows:
If you require the shutter to be lowered when there is low sun intensity, increase the sensitivity by pressing the Up button
Q
until the required level is
reached (100 = very sensitive, 75 = fairly sensitive, 50 = normal sensitivity, 25 = fairly insensitive, 1 = very insensitive). If you only require shade during
periods of high sun intensity, change the value by pressing the Down button
q
. In this way you can individually set the sensitivity level between 1 and 100.
Press the sub-menu button Honce to go back to the sun function setting menu (H6).
Press the menu button
U
once to go to the menu for setting the motor run time (H7).
NOTE!
– Disable the sun function if you do not intend to use it over a long period of time.
– The lux sensor only operates in automatic operation mode within the programmed up and down times and/or Astro(up and down) times.
– If the
M-
symbol appears in the display, this indicates the sun function is turned off.
i
NOTE!
Only manual mode possible.
i
U 5.2 Sub-menu for setting the up time correction
Here you can adjust the Astro up time by +/- 59 minutes.
Press the sub-menu button
H
once to go to the sub-menu for setting the down time correction (U5.3).
Press the menu button
U
once to go to the menu for setting the sun function (H6).
U 5.3 Sub-menu for setting the down time correction
Here you can adjust the Astro down time by +/- 59 minutes.
Press the sub-menu button Honce to go back to the Astro function setting menu (H5).
Press the menu button
U
once to go to the menu for setting the sun function (H6).
H6 Setting the sun function
H7 Setting the Motor run time/ Inching mode
The menu option “Setting the motor run time” gives you the opportunity to set the motor run time individually, for example to allow the shutters to lower only
partially.You can set the motor run time for lowering between 3 and 120 seconds using the up and down buttons (
Q
or q).
Press the sub-menu button Honce to go to the sub-menu for setting the tilting function (U7.1).
Press the menu button
U
once to go to the menu for setting the time and date (H8).
U7.1 Sub-menu for setting the tilting function
The tilting function means that after the shutters have been lowered at a programmed time, they then go up again for a short time.This is to allow for ventilation or even partial opening of the shutters. The tilting function is only active in automatic operation mode once the shutters have been automatically
lowered. To use the tilting function, set the tilting time between 0 and 30 seconds using the up and down buttons (
Q
or q). This function is also indicated
by the flashing tilting symbol.
Press the sub-menu button
H
once for setting the inching mode (U7.2).
Press the menu button
U
once to go to the menu for setting the time and date (H8).
U7.2 Sub-menu for setting the inching mode
Use the Up and Down buttons (
Q
and q) to disable or enable the inching mode.The status will be shown on the display by "
0ßfßf
" or "
0ßn
". If this function
has been activated, an inching operation of up to 2 seconds is enabled which is operated via the Up
Q
or Down qbutton. If one of the buttons is held for
longer than 2 seconds, the shutter reverts to the preset motor run time.
Press the sub-menu button
H
to return to the motor run time setting menu (H7).
Press the menu button
U
once to go to the menu for setting the time and date (H8).
The following lux sensors are available for the control system:
LS 1 TQ, cable length 1 m, article-no. 01130130
LS 2 TQ, cable length 2 m, article-no. 01130230
LS 3 TQ, cable length 3 m, article-no. 01130330
LS 5 TQ, cable length 5 m, article-no. 01130530
Direct motor connection Connection of decentralized motor controls
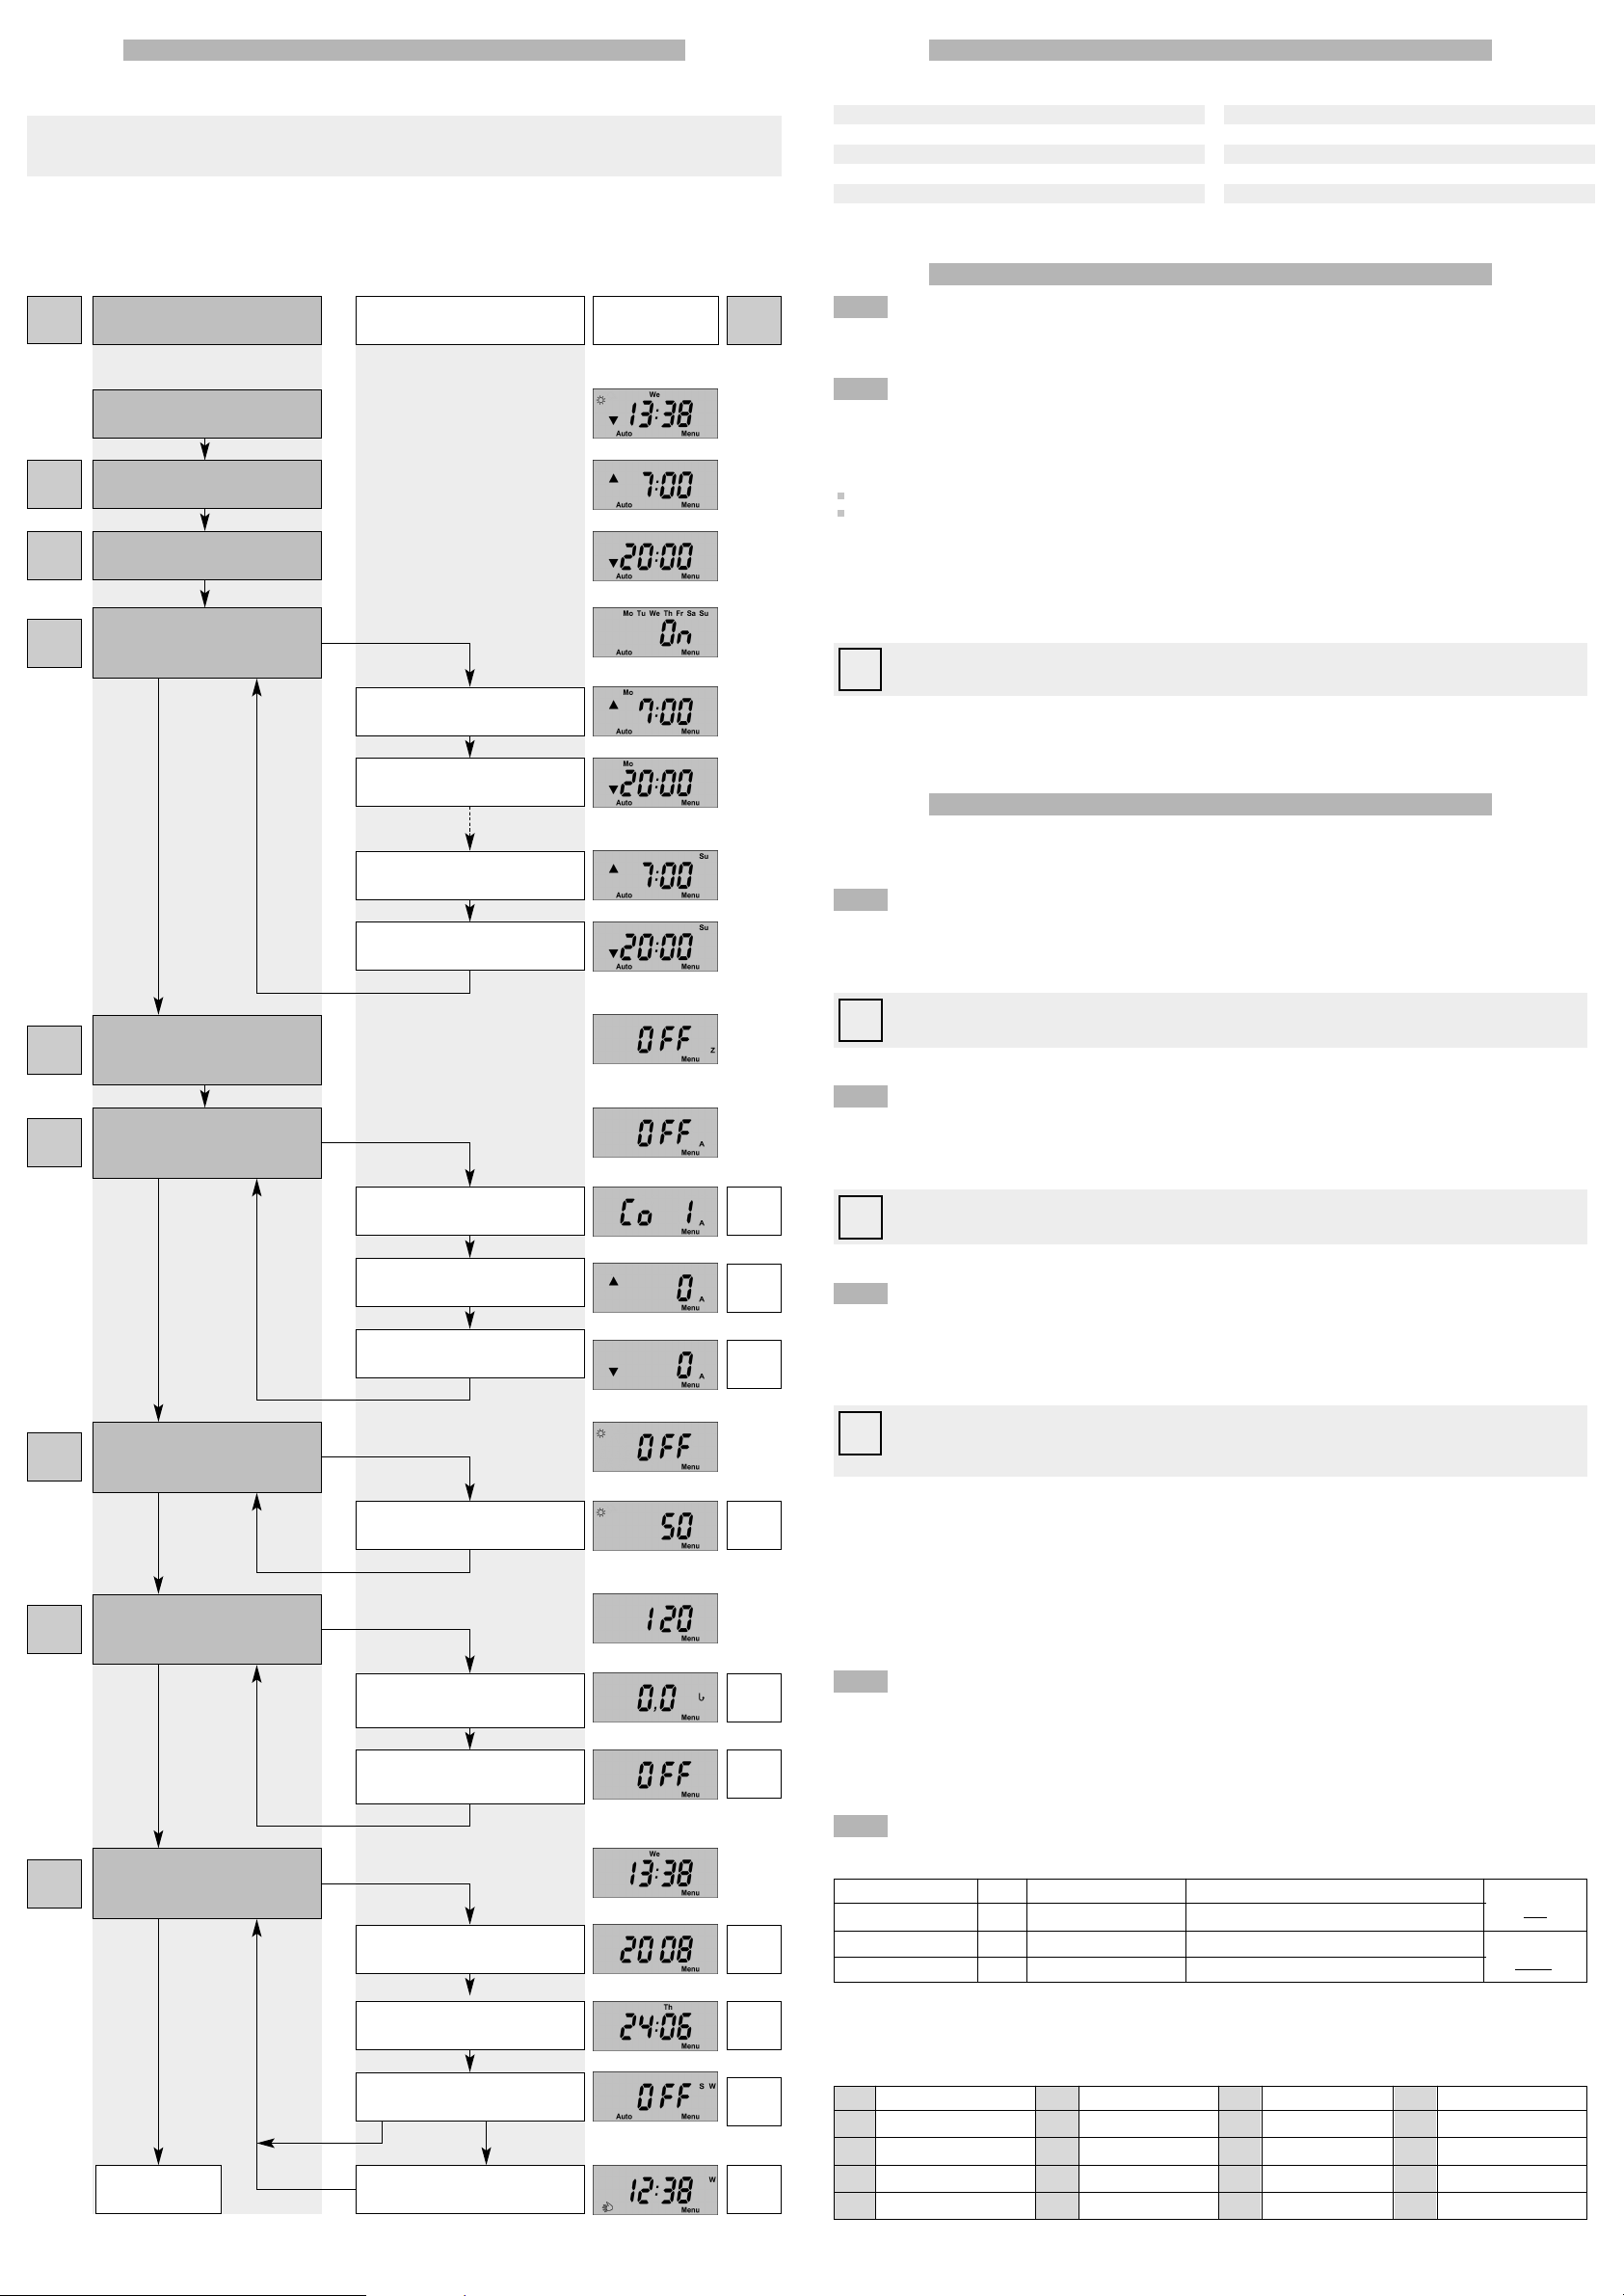
The control has a wide range of functions which can be set to meet your individual requirements. Press and hold the automatic button Uand the manual
button
H
simultaneously for 3 seconds to go to the main menu.
– Press the automatic button Uagain to go to the next option on the main menu.
– Press the manual button
H
to go to a sub-menu option.
– Press the manual button Hagain to go to the next option on the sub-menu.
NOTE!
– Using this function will deactivate any previously set up (H1) and/or down (H2) times.
– If a particular up or down time is disabled (OFF), the corresponding Astro function will also be disabled.
i
7. Programming menu
9. Basic settings
10. Programming details
There are two ways of setting values in the individual menus: briefly press for step-by-step programming or press and hold for more than 2 seconds to
scroll through the available values using the
ö
and übuttons. For each main menu item or sub-menu item you will receive a short message telling you
which menu item you are currently in. Main menu items are indicated by the letter H and the main menu number (e.g. H5). Sub-menu items are indicated
by the letter U, the main menu number and the sub-menu number (e.g.U5.1).
If no button is pressed for over 3 minutes in the programming menu, the programming menu will close automatically.
To activate automatic operation, please press the automatic operation button U. The roller shutter control indicates the change of operating mode by briefly
displaying A and by changing the display from
H
(manual operation) to AUTO (automatic operation). Automatic control is now activated and the roller shutter
will go up and down at the programmed times. It is also still possible to raise or lower the roller shutter outside the programmed times by pressing the
Up and Down buttons. This does not affect the programmed procedure.
Simply press the opposite button to stop the motion, i.e.:
press the down button
q
, if the roller shutter is moving up,
press the up button
Q
, if the roller shutter is moving down.
You will only be able to raise or lower the shutters by pressing the Up or Down button again.
You can switch operating modes at any time.To return to manual operation, press the manual button
H
. The control will revert to manual operation. This
will be indicated with the H symbol and AUTO will change to
H
on the display.
Automatic control is now deactivated and the roller shutter will no longer go up and down at the programmed times. However, it is still possible to raise or
lower the roller shutters by pressing the Up and Down buttons.
Display of automatic travel times
In automatic operation the travel times for the current day are displayed by pressing the up and down buttons briefly (< 1 second). If the random, Astro or
tilting functions are active, this will be indicated by the corresponding symbol (Z, A,
JJ
).
Once the device has been correctly installed and the power supply switched on, the current time will be displayed on the control display. By default the
control system operates in manual operation mode and all automatic functions are disabled.
9.1 Manual/automatic operation mode
9.2 Switching from manual to automatic operation
To go to the individual menus and sub-menus of the control, please proceed as follows:
Press the automatic button
U
and manual button H simultaneously for 3 seconds to open the menu structure.
In this menu you can programme the up time for each day of the week.This up time can be combined with the random time.
The up symbol
Q
flashes to show the up time.You can set the time between
0 0:0 0
and
2 3:5 9
using the up and down buttons (Qor q).
To deactivate this function, enter a time between
2 3:5 9
and
0 0:0 0
. The display will show
o f f
.
Press the menu button Uonce to go to the menu for setting the down time (H2).
H1 Setting the daily up time
In this menu you can programme the down time for each day of the week. This down time can be combined with the random time.
The down symbol
q
flashes to show the down time.You can set the time between
0 0:0 0
and
2 3:5 9
using the up and down buttons (Qor q).
To deactivate this function, enter a time between
2 3:5 9
and
0 0:0 0
. The display will show
o f f
.
Press the menu button Uonce to go to the menu to activate the week function (H3).
H2 Setting the daily down time
The random generator produces a “random time”.This means that shutters go up or down with a deviation of up to +/- 15 minutes from the programmed
times. This “irregular” raising and lowering of the shutter will give the impression that the house is occupied and offers extra security when you are absent
for long periods.To activate the random generator, please proceed as follows:
The Z symbol flashes to indicate random time. Use the up and down buttons (
Q
or q) to switch the random time on or off.The status will be shown by
“
0ßfßf
”or “
0ßn
” on the display.
Press the menu button
U
again to go to the menu for setting the astro function (H5).
H4 Setting the random function
The Astro function is an electronic calendar.Depending on the sunrise and sunset times, the up/down times will be automatically adjusted according to your
residence's geographical location (see Astro table). Nevertheless, these times will be checked against the programmed up/down times.
Press the sub-menu button
H
once to go to the sub-menu for setting the up time correction (U5.2).
Press the menu button Uonce to go to the menu for setting the sun function (H6).
Press the sub-menu button
H
once to go to the sub-menu for setting your place of residence (U5.1).
Press the menu button
U
once to go to the menu for setting the sun function (H6).
U 5.1 Sub-menu for setting the place of residence
For the Astro function to work correctly you must enter your place of residence as the sun rises and sets at different times in different areas of Europe.
You will find the code for your place of residence in the Astro table below.
H5 Setting the astro function
In this menu you can switch the week function on or off. If the week function is active, the current day of the week will be displayed.
The status will be shown by “
0ßfßf
” or “
0ßn
” on the display. You can switch the week function “
0ßn
” or “
0ßfßf
” using the up and down buttons (Qor q).
If the week function is active, press the sub-menu button
H
once to go to the sub-menu for setting the daily up and down times.
Press the menu button
U
again to go to the menu for setting the random function (H4).
Sub-menu for setting up and down times for each day of the week
H3 Activating the week function
NOTE!
This function is not available in manual operation.
i
In this menu you can programme the up and down times for each day of the week.
The up symbol Qand the day of the week will flash on the display. You can set the up time between
0 0:0 0
and
2 3:5 9
using the up and down buttons
(
Q
or q).
To deactivate this function, enter a time between
2 3:5 9
and
0 0:0 0
. The display will show
o f f
.
To change the down time, please press the sub-menu button Honce. The down symbol qand the day of the week will flash on the display.You can set
the down time between
0 0:0 0
and
2 3:5 9
using the up and down buttons (Qor q).
To deactivate this function, enter a time between
2 3:5 9
and
0 0:0 0
. The display will show
o f f
.
To change to a particular day of the week, keep pressing the sub-menu button
H
until the appropriate day is displayed.Once all the days of the week have
been viewed, the sub-menu goes back to Monday.
Press the menu button
U
once to go to the menu for setting the random function (H4).
Artikel-Nr.: 84100702 B1
MAIN MENU SUB-MENU Display
Press and hold buttons
Auto Uand Hand Hfor 3 seconds
daily up time
Button
U
daily down time
Button
U
Sun function
ü
OFF / ON
ö ü
OFF / ON
ö
Button
U
Button
H
Astro function
ü
OFF / ON
ö ü
OFF / ON
ö
Button
U
Button
H
Motor run time
Button
U
Button
H
Week function
ü
OFF / ON
ö ü
OFF / ON
ö
Button
U
Button
H
Random function
ü
OFF / ON
ö ü
OFF / ON
ö
Button
U
Button
H
Button
H
etc.
Up time Monday*
Down time Monday*
Button
H
Down time Sunday*
Button
H
Up time Sunday*
Button
H
Manual summer/winter time
changeover
Button
H
Button
H
Button
H
Sun sensitivity*
Button
H
Tilt time
Time / Date
Button
U
Button
H
Menu END
Button
H
Button
H
Year
Inching mode
* Does not appear if “OFF” is shown in main menu displays H3, H5 and H6.
Date
Autom. summer/winter time changeover
ON OFF
Button
H
Button
H
Button
H
Zone Code*
Up correction*
Down correction*
H1
Details
Details
H2
H3
U5.1
U5.2
U5.3
U6.1
U7.1
U7.2
U8.1
U8.2
U8.3
U8.4
H4
H5
H6
H7
H8
8. Manufacturer’s default settings
Time and date are factory preset. The following settings are also preset but may be adapted to your own personal requirements as necessary.
NOTE!
If the daily up time is disabled (OFF), the corresponding Astro function (up) will also be disabled.
i
NOTE!
If the daily down time is disabled (OFF), the corresponding Astro function (down) will also be disabled.
i
H1 Setting automatic up time: daily
0 7:0ß0
hrs
H2 Setting automatic down time: daily
2 0:0ß0
hrs
H3 Setting the week function:
0ßfßf
H4 Setting the random time:
0ßfßf
H5 Setting the astro function:
0ßfßf
H6 Setting the sun function:
0ßfßf
H7 Setting the motor run time: 120 seconds
H7 Setting the tilting time: 0.0 seconds
H8 Setting the summer/winter time changeover: automatic
H7 Setting the inching mode:
0ßfßf
Programmed up time before the morning Astro time roller shutter moves up at Astro time
Programmed up time after the morning Astro time roller shutter moves up at programmed Up time
Programmed down time after the evening Astro time roller shutter moves down at Astro time
Programmed down time before the evening Astro time roller shutter moves down at programmed Down time
thus always at
the later
time
thus always at
the earlier
time
Code
1
2
3
4
Code
5
6
7
8
Code
9
10
11
12
Code
13
14
15
16
Location of residence
Schleswig-Holstein, northern Lower Saxony
Mecklenburg-Western Pomerania
North Rhine-Westphalia,
southern Lower Saxony
Brandenburg, Saxony-Anhalt
Location of residence
Rhineland-Palatinate, Saarland, Hesse
Saxony, Thuringia
Baden-Wuerttemberg
Bavaria
Location of reseidence
Scandinavia
Great Britain
Northern France, Belgium,
The Netherlands, Luxembourg
Germany
Location of residence
Southern France
Switzerland, Austria, northern Italy
Spain
Southern Italy, Sicily, Corsica, Sardinia
 Loading...