

Page 1
AHD DVR User Manual
0
AHD DVR
User Manual
Page 2

AHD DVR User Manual
1
Important Safeguards and Warnings
Do not place heavy objects on the DVR.
Do not let any solid or liquid on the DVR.
Please brush the printed circuit boards, connectors, fans, machine box and so on regularly. Before cleaning please
switch off the power supply and unplug it.
Do not disassemble or repair the DVR by yourself. Do not replace the electronic components by yourself.
Contents
1. Production Introduction..................................................................................................................................................... 1
1.1 Product Overview ........................................................................................................................................................... 1
1.1.1 Introduction ................................................................................................................................................... 1
1.1.2 Installation Guidelines ................................................................................................................................... 2
1.2 Main Functions ............................................................................................................................................................... 2
2. Open-package Check, Products Understanding and Cable Connection .......................................................................... 4
2.1 Open-package Check ..................................................................................................................................................... 4
2.2 Understanding of Front Panel ......................................................................................................................................... 4
2.3 Understanding of Rear Panel ......................................................................................................................................... 4
2.4 Installation Connections Sketch Map ............................................................................................................................. 6
3. Basic Operation ................................................................................................................................................................ 7
3.1 Login............................................................................................................................................................................... 7
3.2 Preview ........................................................................................................................................................................... 8
3.3 Desktop Shortcut Menu .................................................................................................................................................. 8
3.3.1 QuickPlay ...................................................................................................................................................... 8
3.3.2 Record Mode ............................................................................................................................................... 11
3.3.3 PTZ Control ................................................................................................................................................. 12
3.3.4 Color Setting ............................................................................................................................................... 12
3.3.5 Output Adjust ............................................................................................................................................... 13
Page 3

AHD DVR User Manual
2
3.3.6 Version Info ................................................................................................................................................. 13
3.3.6.1 State.................................................................................................................................................. 13
3.3.6.2 HDD Info ........................................................................................................................................... 14
3.3.6.3 LOG .................................................................................................................................................. 14
3.3.6.4 BPS ................................................................................................................................................... 15
3.3.6.5 Version ............................................................................................................... ............................... 15
3.3.6.6 Online Users ..................................................................................................................................... 15
3.3.7 Close System .............................................................................................................................................. 16
4. Main Menu ................................................................................................................................................................... 17
4.1 Quick Setting ................................................................................................................................................................ 17
4.2 Record Set ................................................................................................................................................................... 18
4.3 Network ........................................................................................................................................................................ 21
4.3.1 PPPOE Setup ............................................................................................................................................. 22
4.3.2 DDNS Setup ................................................................................................................................................ 23
4.3.3 NTP Setup ................................................................................................................................................... 24
4.3.4 IP Filter ........................................................................................................................................................ 24
4.3.5 Network Transmission, Port, UPNP ............................................................................................................ 25
4.3.6 EMAIL Setup ............................................................................................................................................... 26
4.3.7 FTP Setup ................................................................................................................................................... 26
4.3.8 3G Config .................................................................................................................................................... 27
4.3.9 Wireless Net Config .................................................................................................................................... 28
4.4 Alarm Set ...................................................................................................................................................................... 29
4.4.1 Motion Detect .............................................................................................................................................. 29
4.4.2 Video Loss .................................................................................................................................................. 31
4.4.3 Alarm Input .................................................................................................................................................. 32
4.4.4 Alarm Output ............................................................................................................................................... 33
4.4.5 Abnormality ................................................................................................................................................. 33
4.5 Switch ........................................................................................................................................................................... 34
4.6 System Management.................................................................................................................................................... 36
Page 4

AHD DVR User Manual
3
4.6.1 HDD Management ...................................................................................................................................... 36
4.6.2 PTZ Config .................................................................................................................................................. 37
4.6.3 Display ........................................................................................................................................................ 38
4.6.4 Backup ........................................................................................................................................................ 39
4.6.5 Account Management ................................................................................................................................. 40
4.6.6 Default ......................................................................................................................................................... 43
4.6.7 Auto Maintain .............................................................................................................................................. 44
4.6.8 Upgrade ...................................................................................................................................................... 44
4.6.9 P2P QR Code ............................................................................................................................................. 45
5. Network Access Settings and Cloud Technology Introduced ....................................................................................... 46
5.1 LAN Access Settings .................................................................................................................................................... 46
5.2 Cloud Technology Functions and Using Introduction .................................................................................................... 46
5.3 Client ISS Software Operation ...................................................................................................................................... 47
5.4 Mobile Phone Monitoring .............................................................................................................................................. 47
Appendix 1. Mouse Operation ............................................................................................................................................ 48
Page 5

AHD DVR User Manual
1
1. Production Introduction
1.1 Product Overview
1.1.1 Introduction
Congratulations on your purchase of this Vesco DVR. You've made a fine choice for keeping a watchful eye over your
home or business. Let's take a moment to talk about some of them.
Oh my, this is a big manual. How long will this take?
Yes, but you won't have to read all of it - you should be up and running by page 17!
It can take a few hours to connect everything and run through the setup procedure.
The second half of this manual is for advanced users only - the DVR is Diverse in it's Configurable Capabilities. The
out-of-the-box settings do a great job. Some users will want to get into the nitty-gritty detail so that information is presented
for those who need it.
The Basic Setup
The default settings of the DVR will cover the most basic installation requirements of the DVR.
To get the most out of your hard drive , we've configured the DVR to record only when it detects motion - that way you won't
fill the hard drive with video of nothing happening.
Before installing anything, connect the DVR and cameras and test your system.
We ensure everything is working properly when we ship them out but sometimes things can be damaged in
transport and occasionally components can fail. Better to find out now before everything is fixed in place!
Getting the DVR Setup
There are three stages to getting your DVR set up. lf you want to use the default settings, you'll only need to complete
steps one and two.
Step 1.Connecting the DVR (page 6 to page 9)
This section details what you can connect to the different inputs/outputs of the DVR.
Everyone's setup will vary a little bit - it depends on what cameras came with the DVR (if any) and what device(s) you've
already got.
Step 2.Basic DVR Setup
The DVR needs a few things to be set properly before it can do its thing. Follow the instructions from page 11 to page 24 to
get everything working.
Step 3.Optional: Advanced DVR Configuration
The Second part of this manual covers advanced DVR operations. This DVR comes with all the professional-grade
capabilities
If you're not an advanced user don't worry. The out-of-the-box settings really do work well and we'd only suggest changing
Page 6

AHD DVR User Manual
2
them if you've got a really specific plan in mind.
You’ll need to read a page or two of this section if:
you've got a PTZ capable camera - see page 48.
yo u want to alter the motion detection sensitivity or the areas it applies to (page 42).
you want to change some of the advanced options for recording quality and resolution (s ee page 28).
1.1.2 Installation Guidelines
Do n ot expose the DVR to moisture.
Water is the arch-enemy of electrical components and also poses a high risk of electric shock.
Avoid dusty locations.
Dust has a tendency to build up inside the DVR case leading to a high risk of failure or even fire.
Only install the DVR in a well ventilated space.
Like all electronics the circuitry and hard drive in the DVR produce heat and this heat needs a way out.
Do not open the DVR case (except to install/swap the hard drive inside).
There are no other user serviceable parts inside.
Never open the case with the DVR plugged in.
and never turn the DVR on with the case open.
Use only the supplied power adapter.
Other adapters may cause damage to the DVR or cause a fire.
Do not cut or modify any cable for any reason.
Doing so will void your warranty and pose a risk of fire or electrical shock.
Do not expose the DVR to sudden bumps or shocks.
The DVR is as robust as possible but many of the internal components are quite fragile.
Remember that the DVR is in all likelihood going to be left on 24 hours a day 7 days a week. Keep this in mind when
choosing a location for installation.
1.2 Main Functions
Real-time surveillance
. Analog interface VGA interface and HDMI interface .
. Surveillance functions through monitor or display.
. The phone wireless monitor function.
Page 7

AHD DVR User Manual
3
Storage
. Non-working hard drive processing which is convenient to radiate heat, reduce power and extend the life-span.
. Special storage format which insures the data safety.
Compression
. Real-time compression by individual hard drive which insures the audio and video signal stable synchronization.
Backup
. Through SATA interface and USB interface such as USB equipment, removable hard drive and so on.
. Through the Internet download the files in the hard disk.
Playback
· Individual real-time video recording as well as searching, playback, network surveillance, recordi ng check, downloading
and so on.
· Multi-channel playback mode.
· Zoom at arbitrary region.
Net operating
. Through the internet for real time surveillance, operate Settings menu, video download backup operation, etc.
. Remote control PTZ.
. Remote checks the recording and real-time playback.
Alarm linkage
. Only one channel relay alarm output which is convenient for the alarm linkage and light control at the spot. (Optional).
. protecting circuits at the alarm input and output interface which protects the main machine from damage.
Communication interface
. RS485 interface which fulfills the alarm input and PTZ control.
. Standard Ethernet network interface which fulfills the telecommuting function.
. IPC signal input function.
· With USB interface, 3G and WIFI wireless network connection
Intelligent features
. Mouse action function.
. Fast copy and paste operating for the same setting.
. Support cloud access technology, Makes network monitoring easier to control (Optional).
. This device can receive multi-type signal input.
Page 8
AHD DVR User Manual
4
2. Open-package Check, Products Understanding and Cable
Connection
2.1 Open-package Check
When you receive the DVR, please check first.
First, please check whether there is any visible damage to the package appearance.
Then, please open the machine and check the data wire in the front panel, power wire, the connection between the fan
power and the main board.
Note: Please carefully check the bottom and back of the product for consistency. The Label that is located by the base
plate or on the rear panel. Has a very important significance, please protect this label. When contacting service, will need
you to provide label type and serial number.
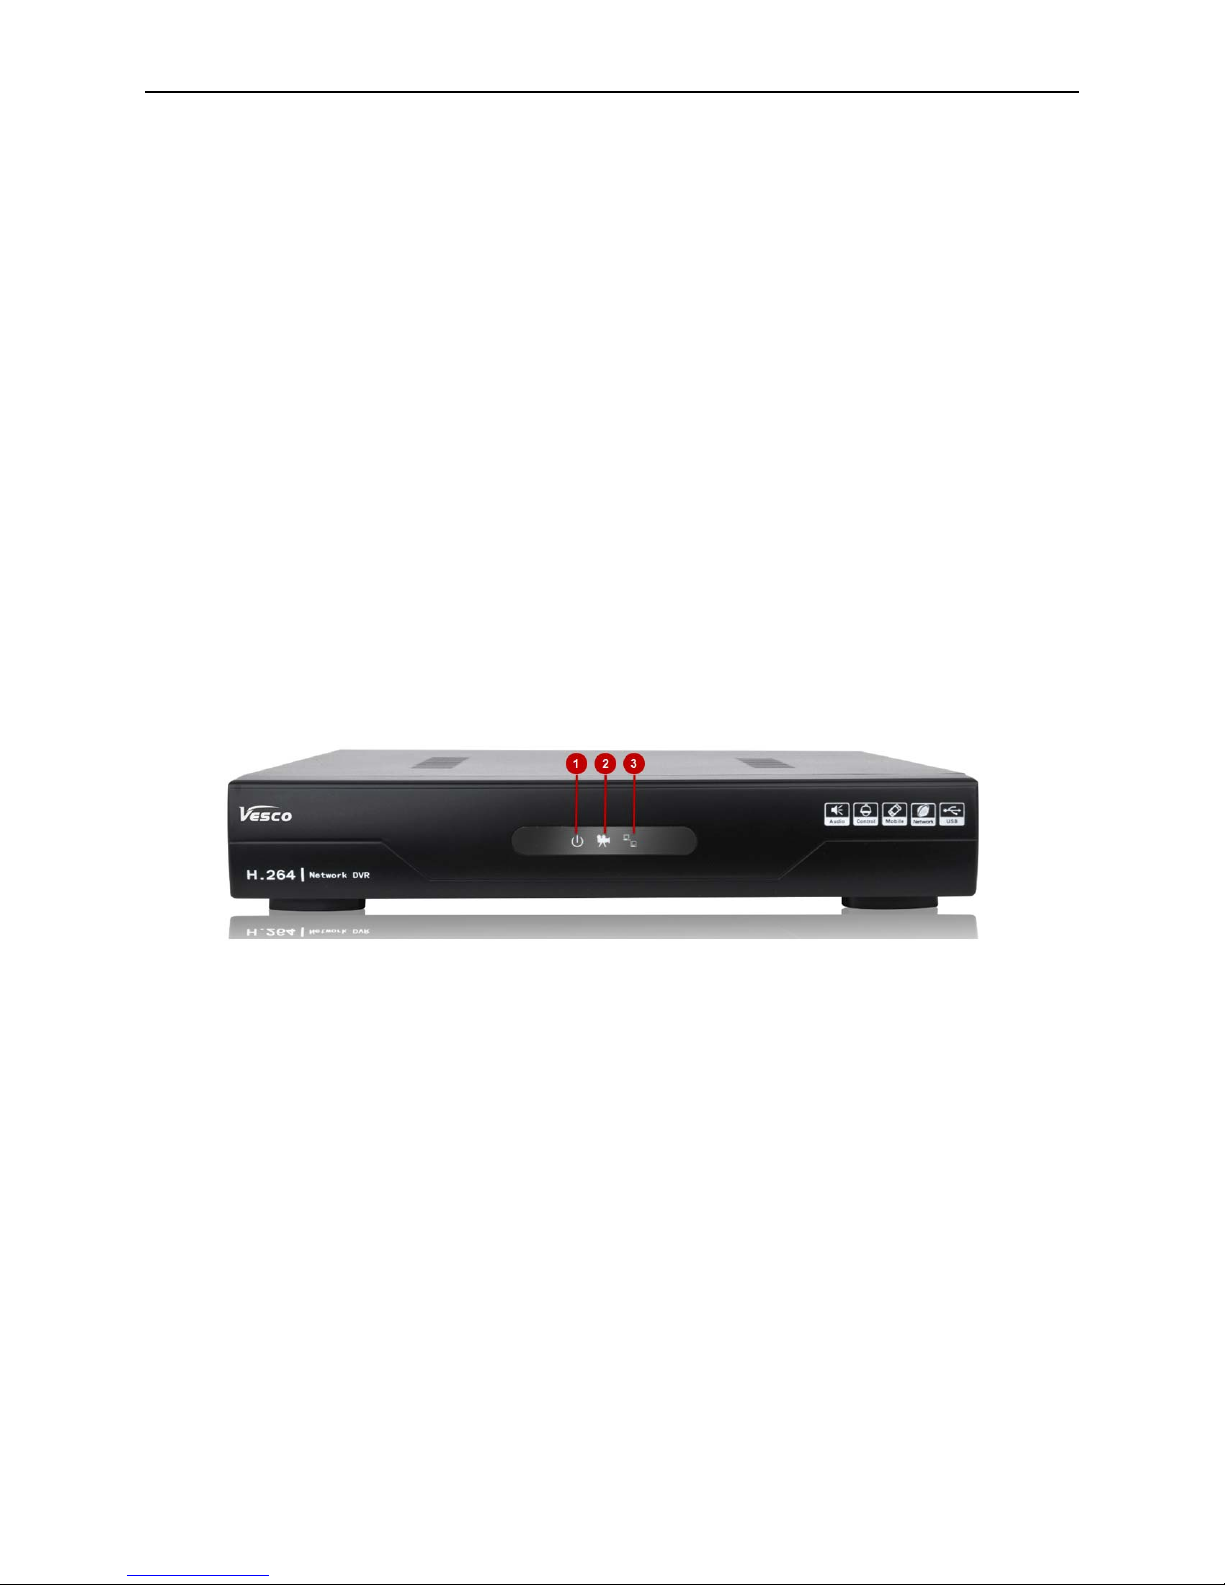
2.2 Understanding of Front Panel
1) Po wer Indicator: This LED is illuminated when the DVR is connected to po wer an d switched on.
2) Recording Indicator: This LED is illuminated when the DVR is recording.
3) Network Indicator: This LED is illuminated when the DVR is connected to the Internet.
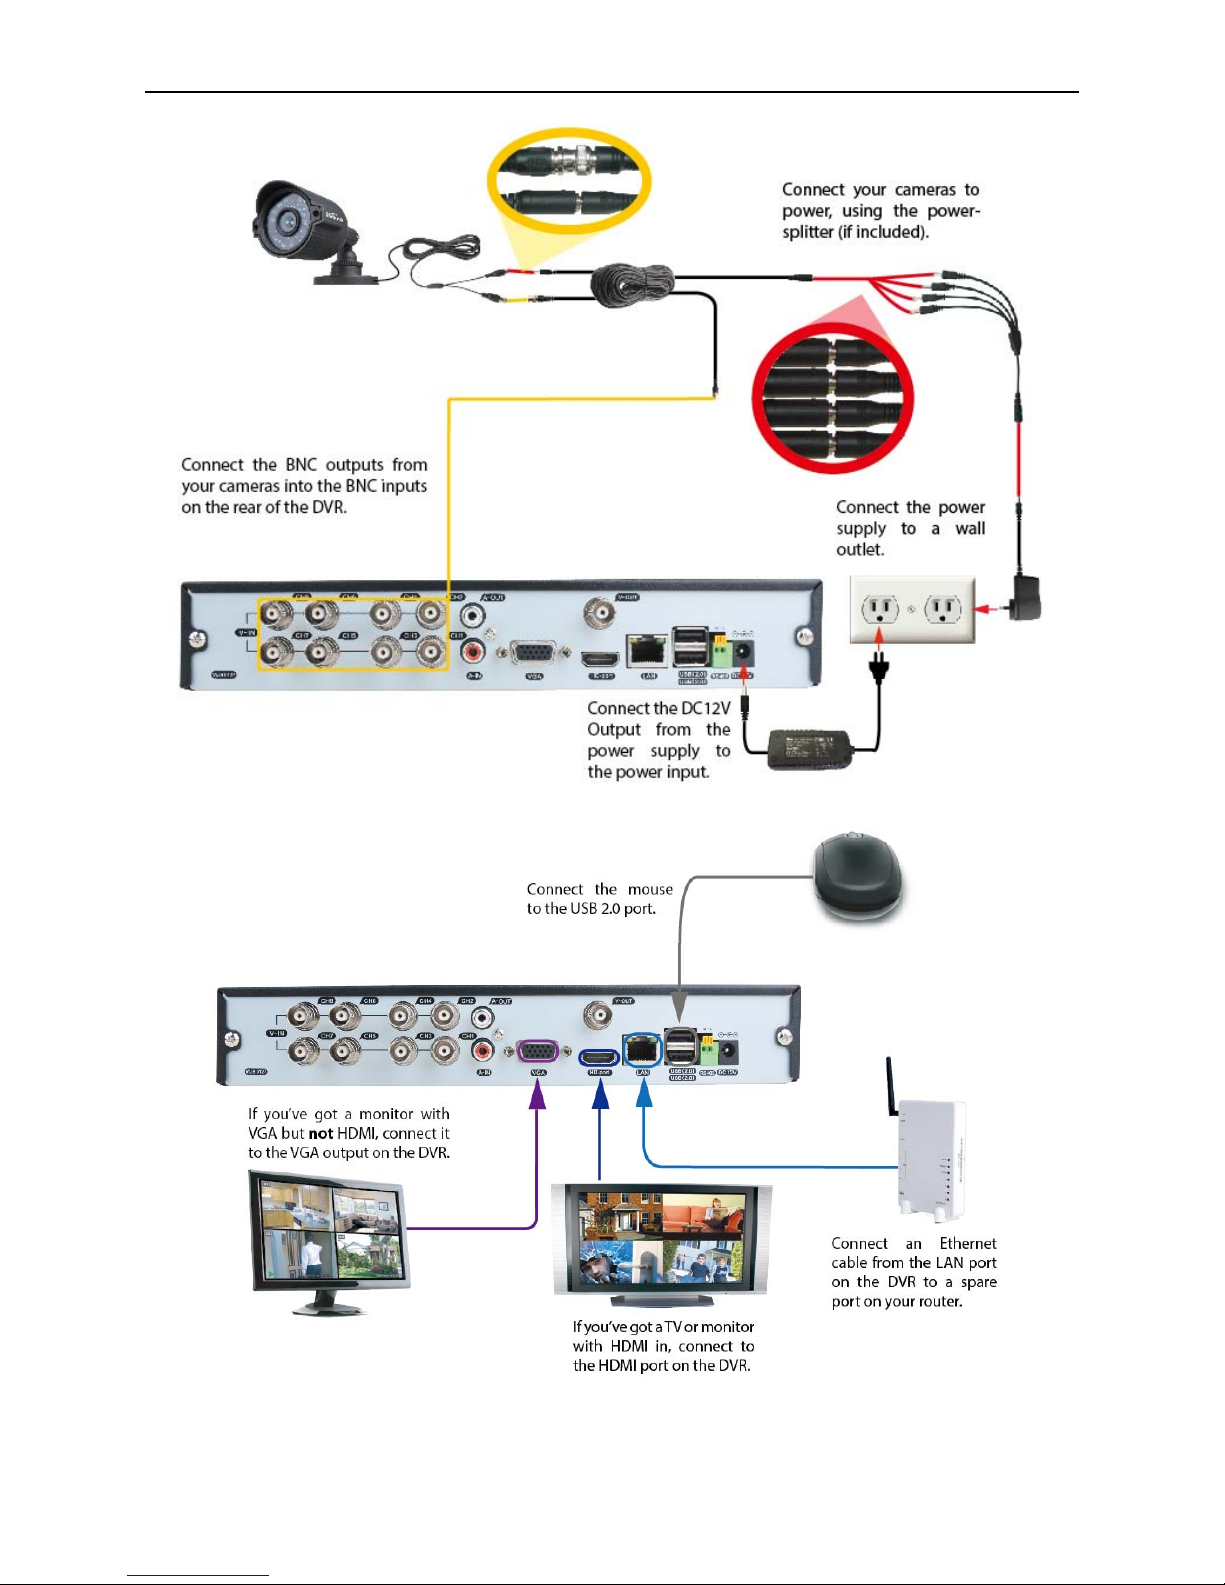
2.3 Understanding of Rear Panel
Connecting Diagram
Page 9
AHD DVR User Manual
5
Page 10
AHD DVR User Manual
6
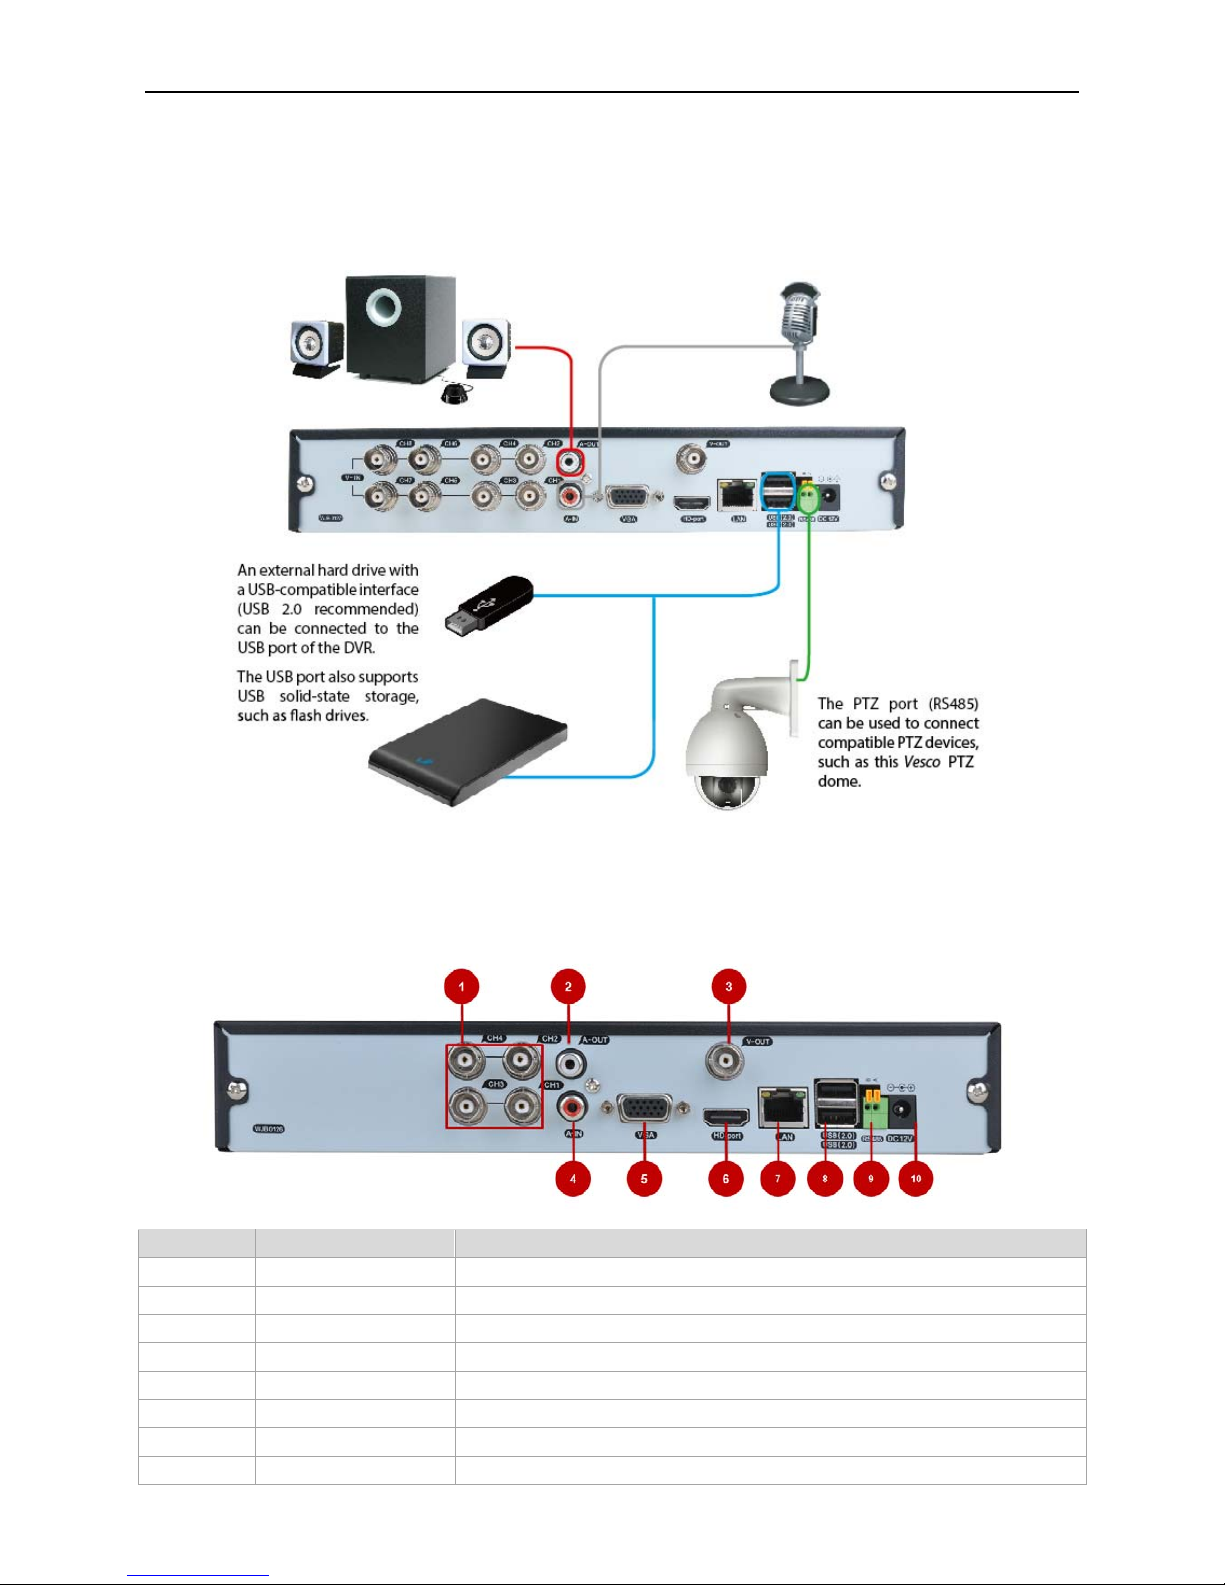
Connecting Additional Devices
2.4 Installation Connections Sketch Map
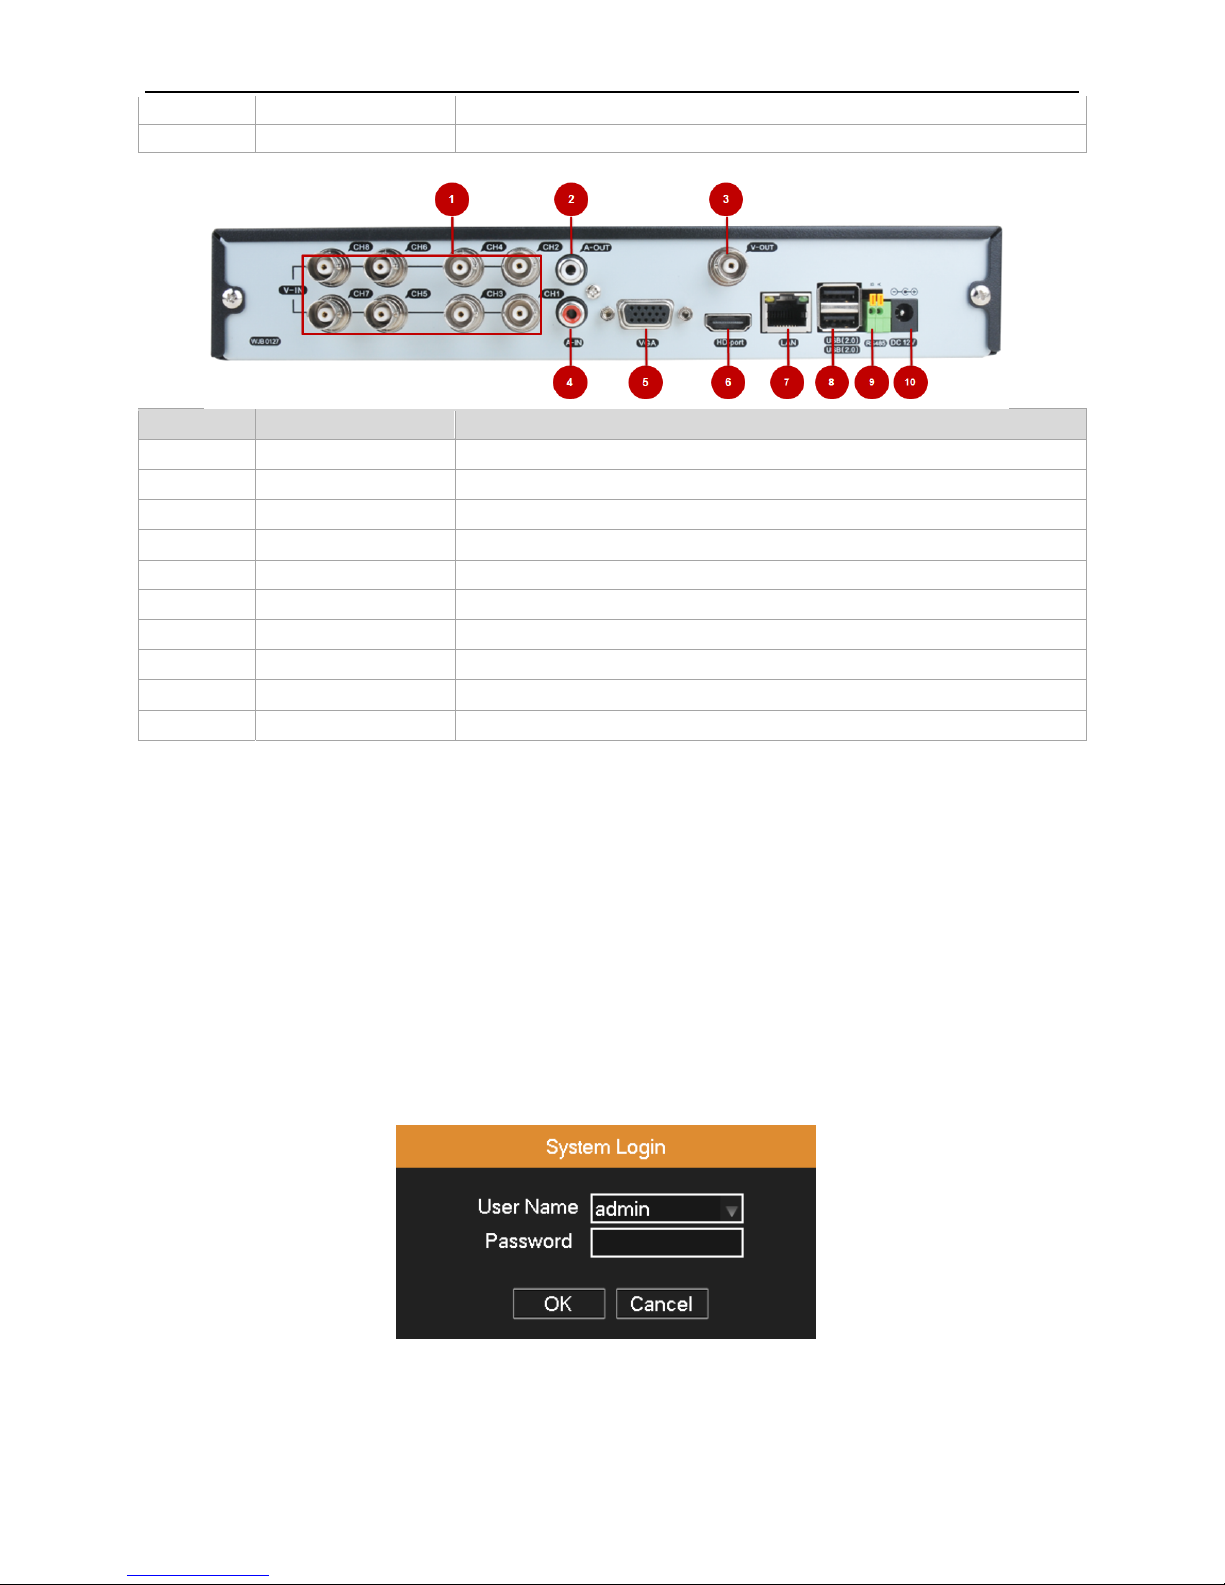
The Rear Panel of the DVR
4-CH DVR
ITEM NAME FUNCTION
1 VIDEO IN Video input from up to 4 cameras
2 AUDIO OUT BNC Audio output for amplified speaker
3 VIDEO OUT BNC connector for TV or Monitor
4 AUDIO IN Audio input
5 VGA VGA output for 19" or larder monitor
6 HDMI HDMI video output
7 LAN Network(ethernet) port
8 USB PORTS 2 USB 2.0 for mouse and external UBS backup
The Audio Output can be used to connect
stereo speakers, headphones or other external
sound device.
The Audio ports can be used to connect audio devices to
the DVR. Obviously, your microphone probably won't look
like that one - they're often built into cameras.
Page 11
AHD DVR User Manual
7
9 RS485 RS485 for keyboard or PTZ control
10 DC IN Power input for 12V DC power supply
8-CH DVR
ITEM NAME FUNCTION
1 VIDEO IN Video input from up to 4 cameras
2 AUDIO OUT BNC Audio output for amplified speaker
3 VIDEO OUT BNC connector for TV or Monitor
4 AUDIO IN Audio input
5 VGA VGA output for 19" or larder monitor
6 HDMI HDMI video output
7 LAN Network(ethernet) port
8 USB PORTS 2 USB 2.0 for mouse and external UBS backup
9 RS485 RS485 for keyboard or PTZ control
10 DC IN Power input for 12V DC power supply
3. Basic Operation
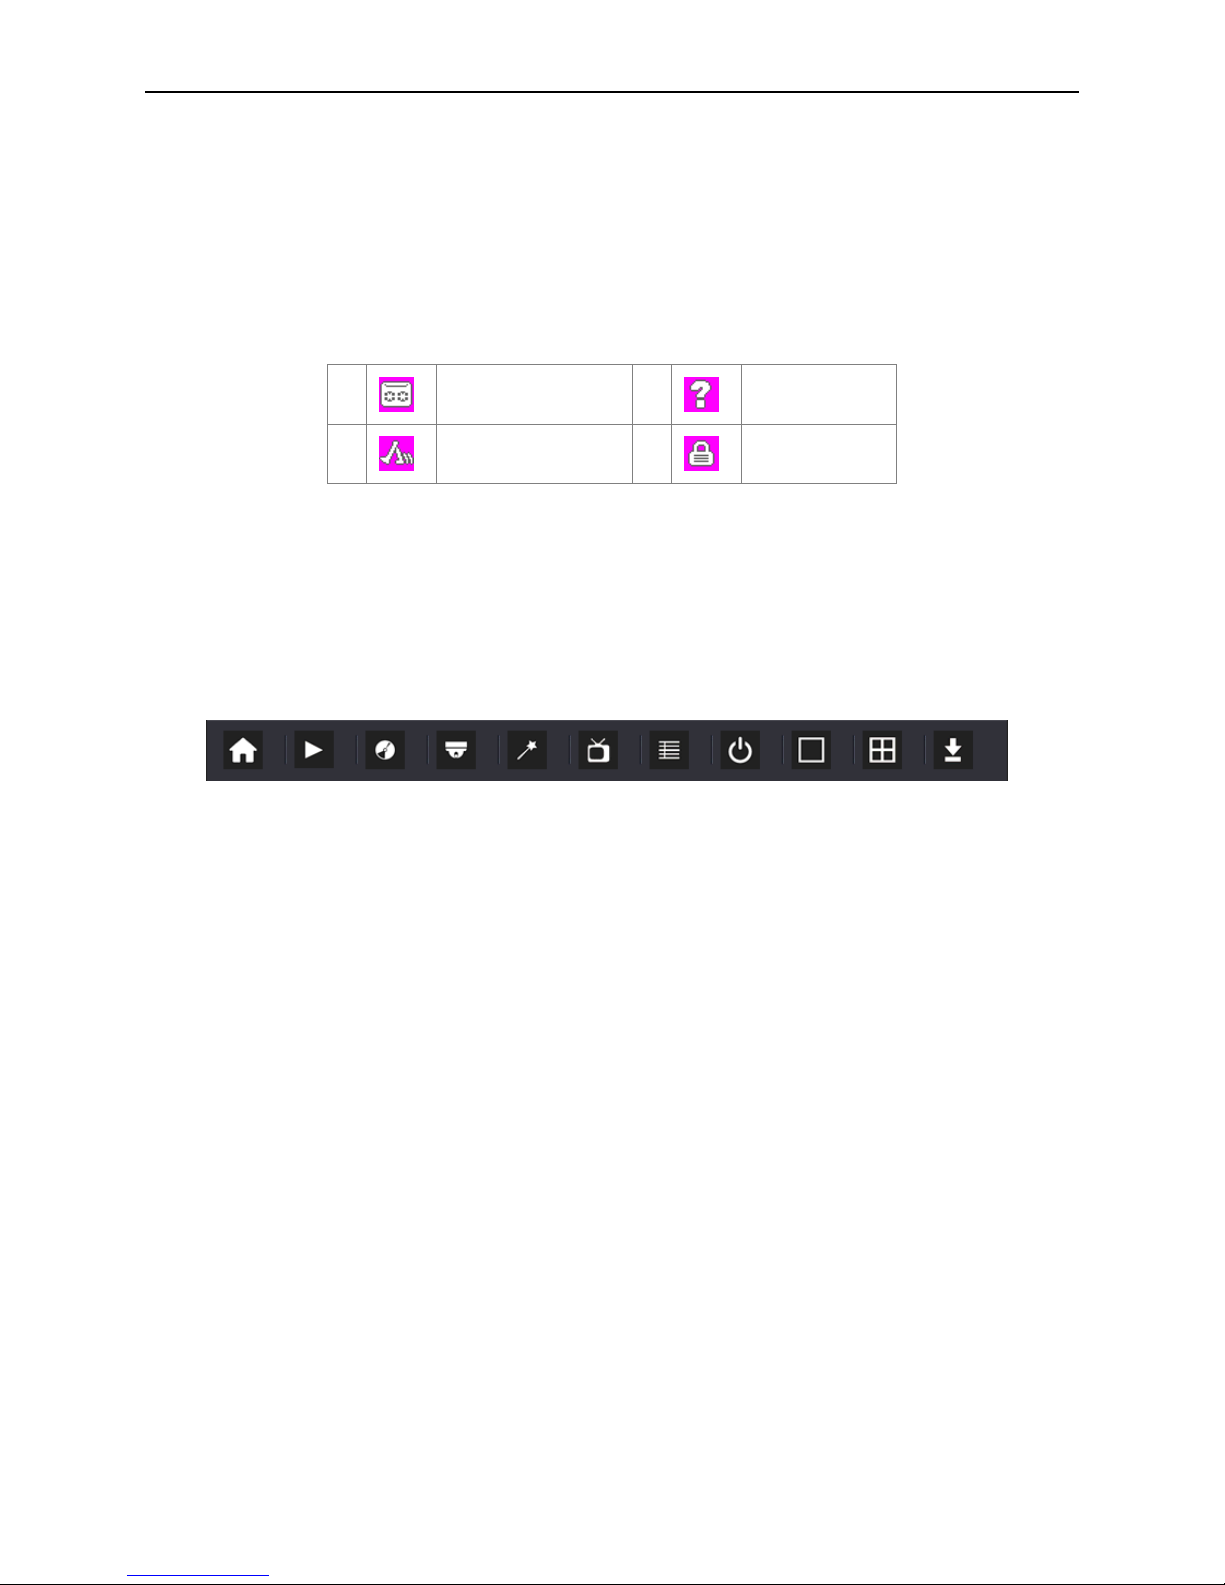
3.1 Login
When the DVR boots up, the user must login and the system provides the corresponding functions with the users right.
There are 3 user settings: Admin, Guest and Default. Admin default has no PW. Admin is as super user. Guest and
default are the common users at the factory presetting.
Picture 3.1 SYSTEM LOGIN
Password protection: If the password is continuous wrong three times, the alarm will start. If the password is continuous
wrong five times, the account will be locked. (After reboot or half an hour, the account will be unlocked automatically).
Page 12
AHD DVR User Manual
8
For your system security, please modify the username & password after first login.
3.2 Preview
You can right click mouse to choose the switch between the windows.
The system date, time and channel name are shown in each viewing window. The surveillance video and the alarm status
are shown in each window.
1
Recording status 3
Video loss
2
Motion detect 4
Camera lock
Table 3.1 Preview Icons
3.3 Desktop Shortcut Menu
In preview mode you can right click mouse to get a desktop shortcut menu, as shown in picture 3.2. The menu includes:
Main Menu, QuickPlay, Record Mode, PTZ, Color Setting, Output Adjust, System Info, Close System, View 1, View 4 and
Exit Menu.
Picture 3.2 Desktop Shortcut Menu
3.3.1 QuickPlay
Select "Desktop Shortcut Menu""QuickPlay", Play the video files in the hard disk.
Note: The hard disk that saves the video files must be set as read-write or read-only state.
Page 13
AHD DVR User Manual
9
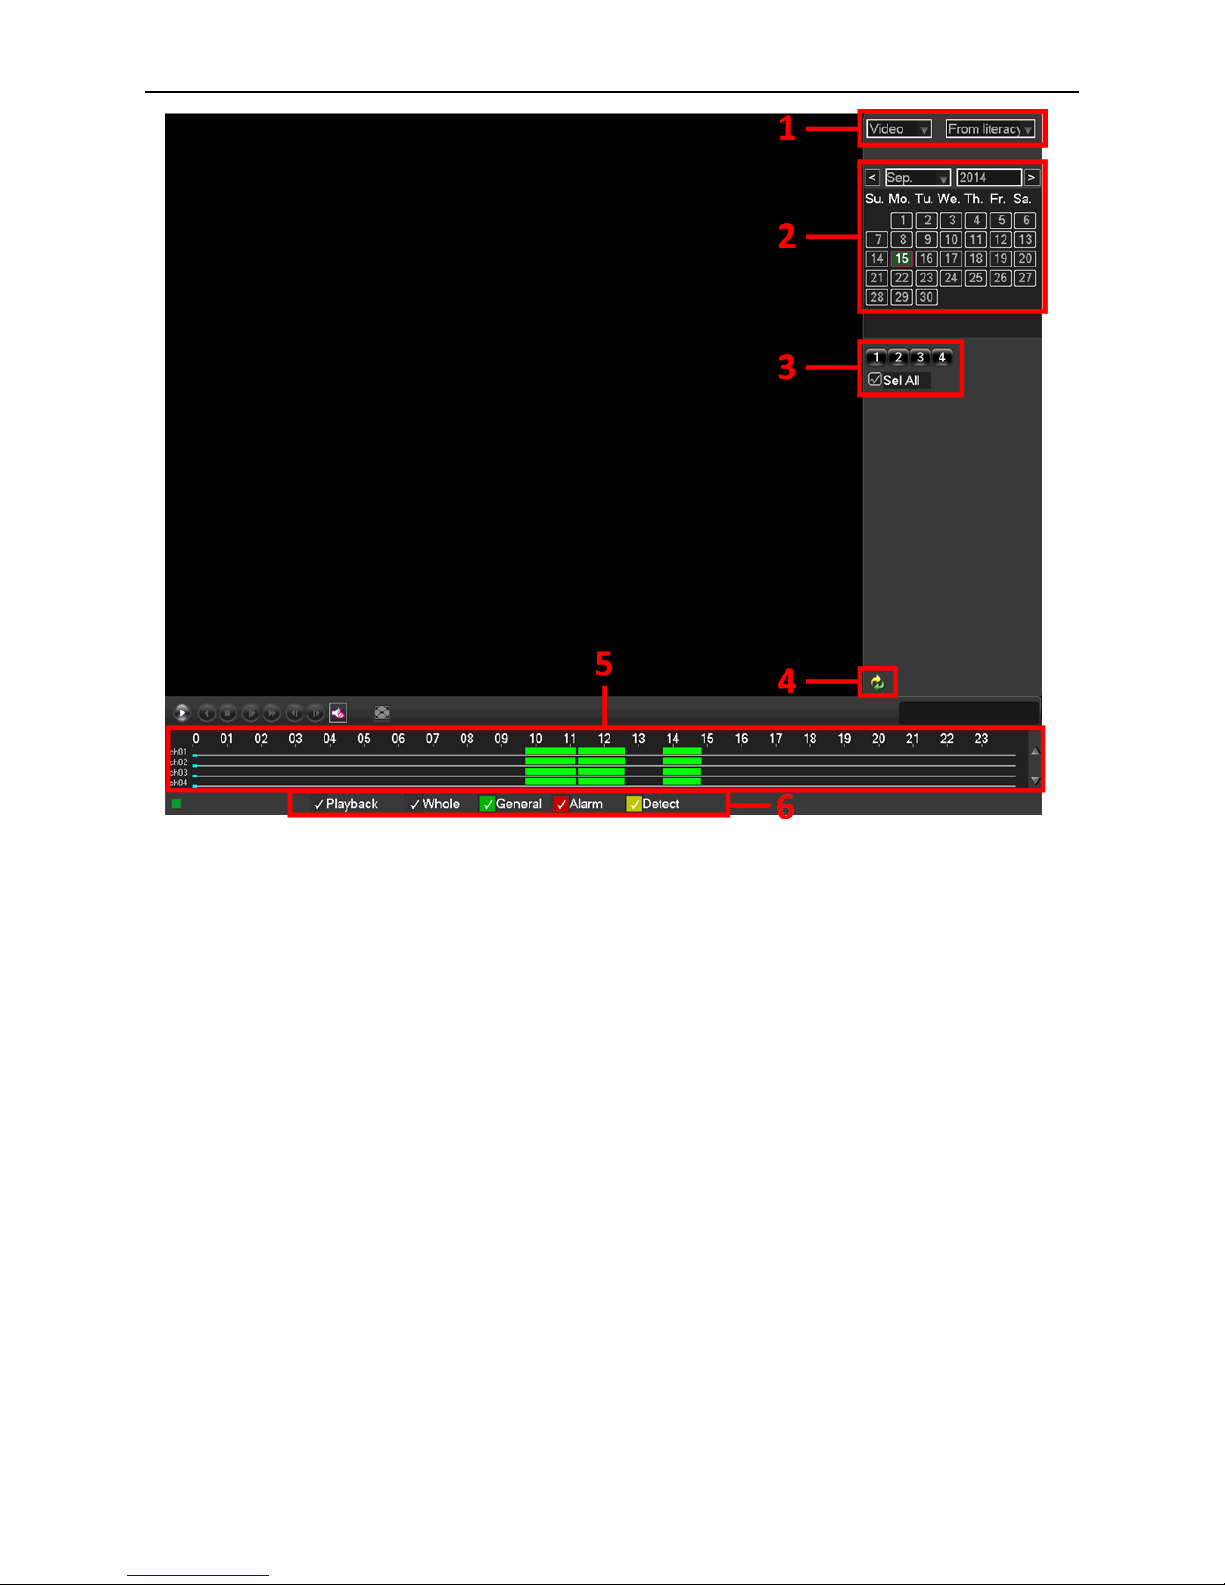
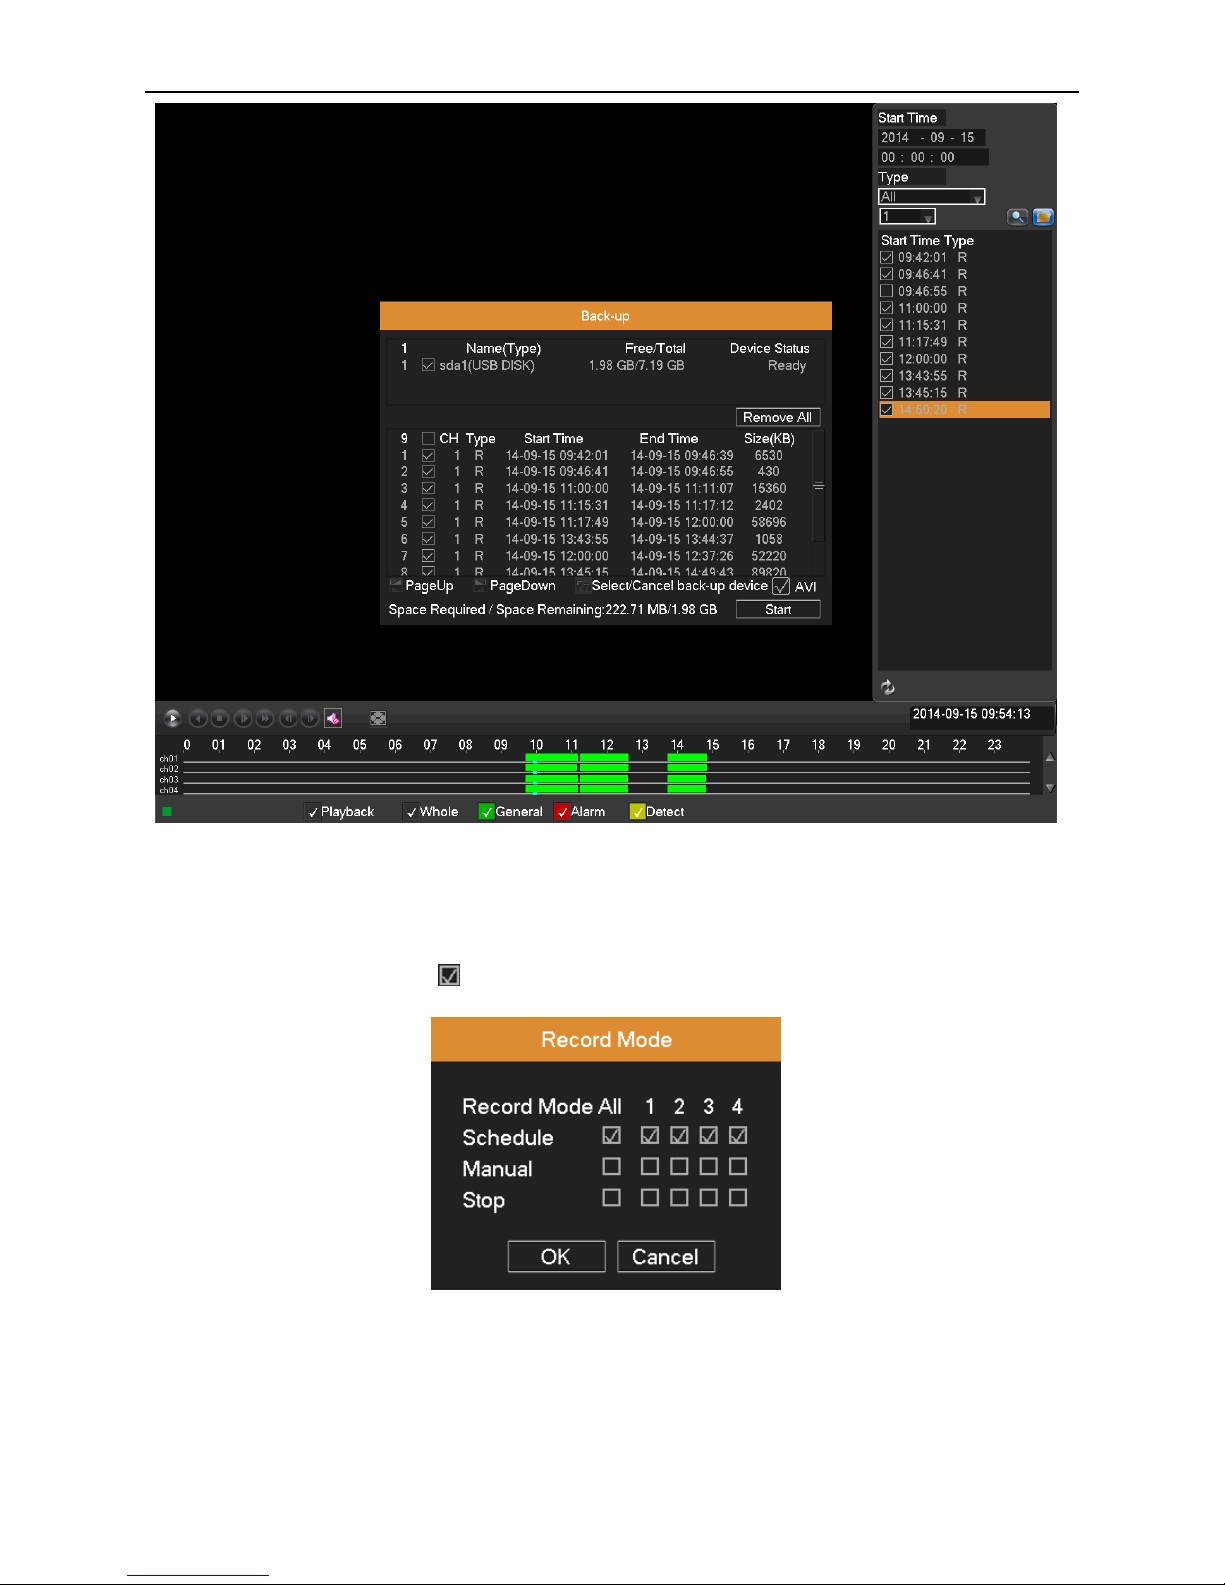
Picture 3.3 Playback
1. HDD Switch 2. Recording Search Calendar 3.Playback Channel Selection
4. Playback Page Switch 5. Playback Time Selection 6. Playback File Type
Select a HDD, a certain date in the calendar, and the channels which need to search video, set the recording type, tick off
“Playback” to realize multi-channel playback synchronously, find the playback time in the Playback Time Selection and
double click it.
Page 14
AHD DVR User Manual
10
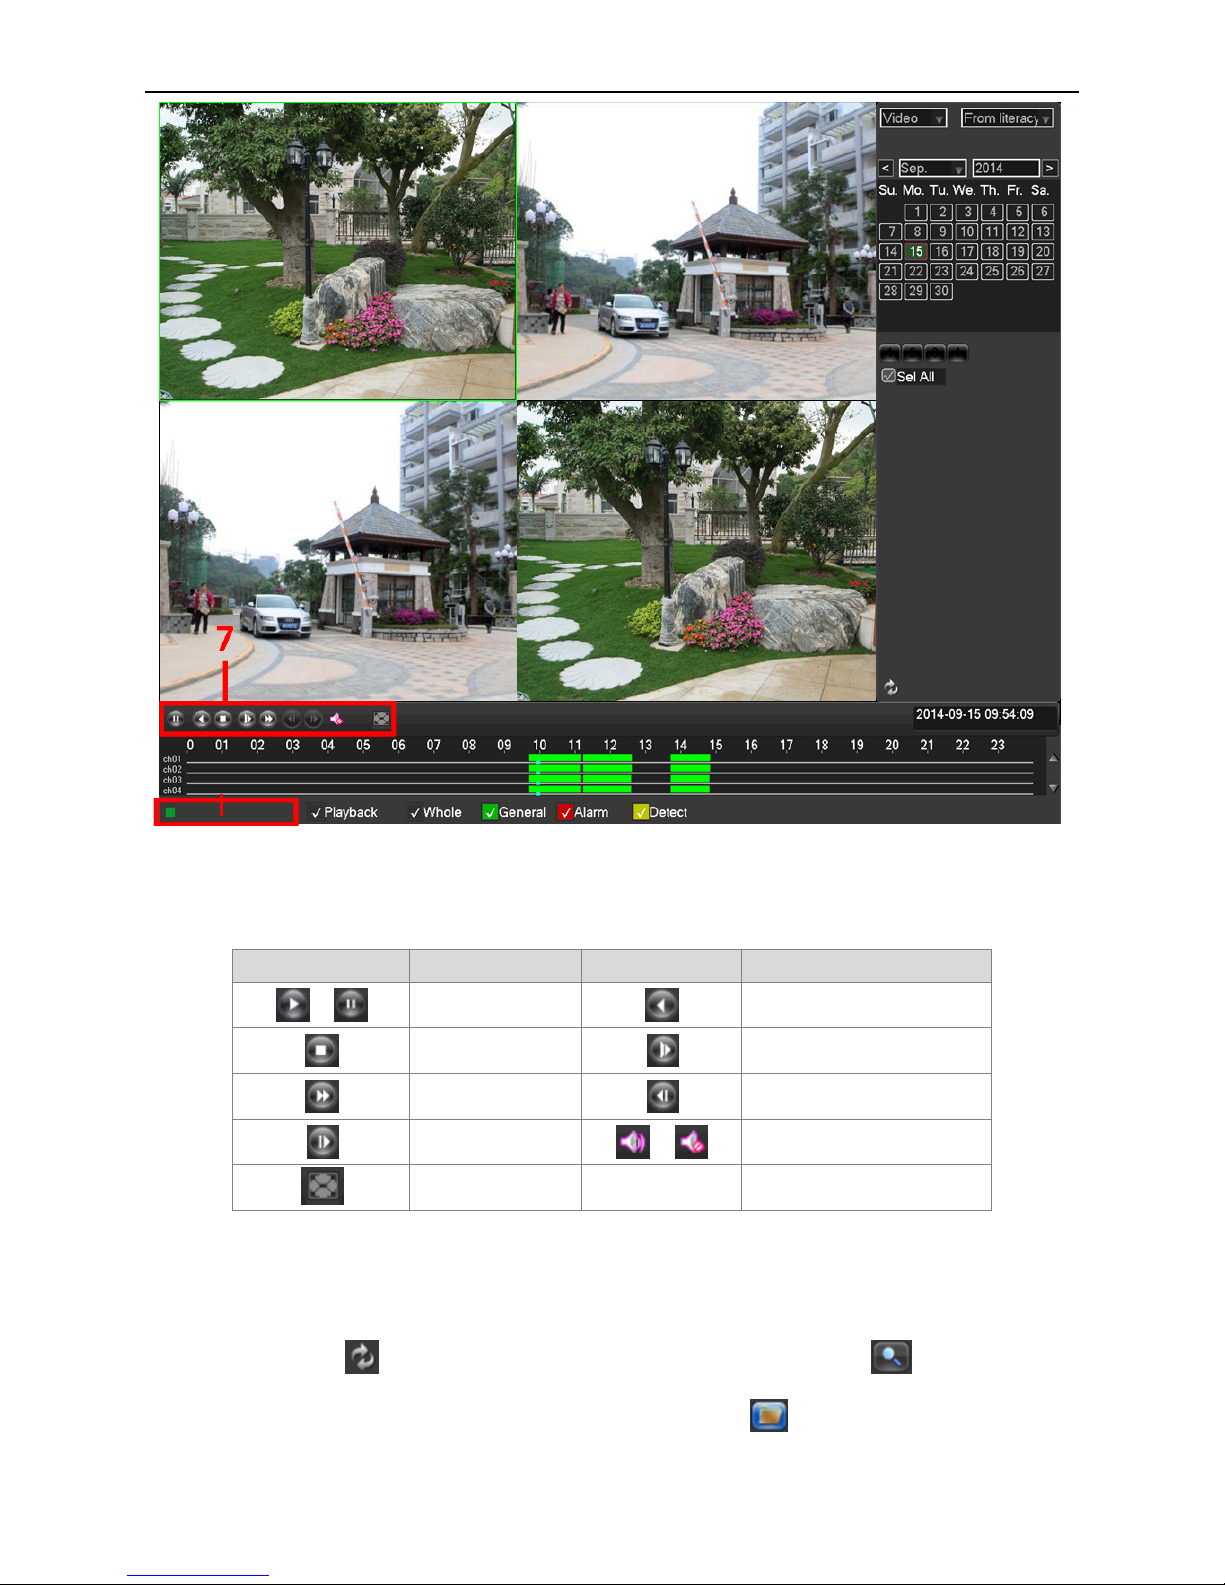
Picture 3.4
7. Playback Control Keys
8. Operation hint: Display the function of the cursors place.
Button Function Button Function
/
Play/Pause
Backward
Stop
Slow play
Fast play
Previous frame
Next frame
/
Open Sound / Mute
Full screen
Table 3.2 Playback control key list
Note: Frame by frame playback is only performed in the pause playback state.
Click Page Switch button , select the file’s start time, type and channel, click Search button to show the eligible
file information in the video file list, then select the files and click Backup button to pop up the Back-up window.
Select a backup device and the files, click “Start” button to back up the selected files.
8
Page 15
AHD DVR User Manual
11
Picture 3.5
3.3.2 Record Mode
Please check current channel status: “ ” means it is in recording status. (Take 4CH DVR for example)
Picture 3.6 record mode
Schedule: It records according to the parameters in “Main Menu” “Record Set”“Record Plan”.
Manual: Click Manual button and the corresponding channels are recording no matter the channel in any state.
Stop: Click Stop button and the corresponding channels stop recording no matter the channel in any state.
Page 16
AHD DVR User Manual
12
3.3.3 PTZ Control
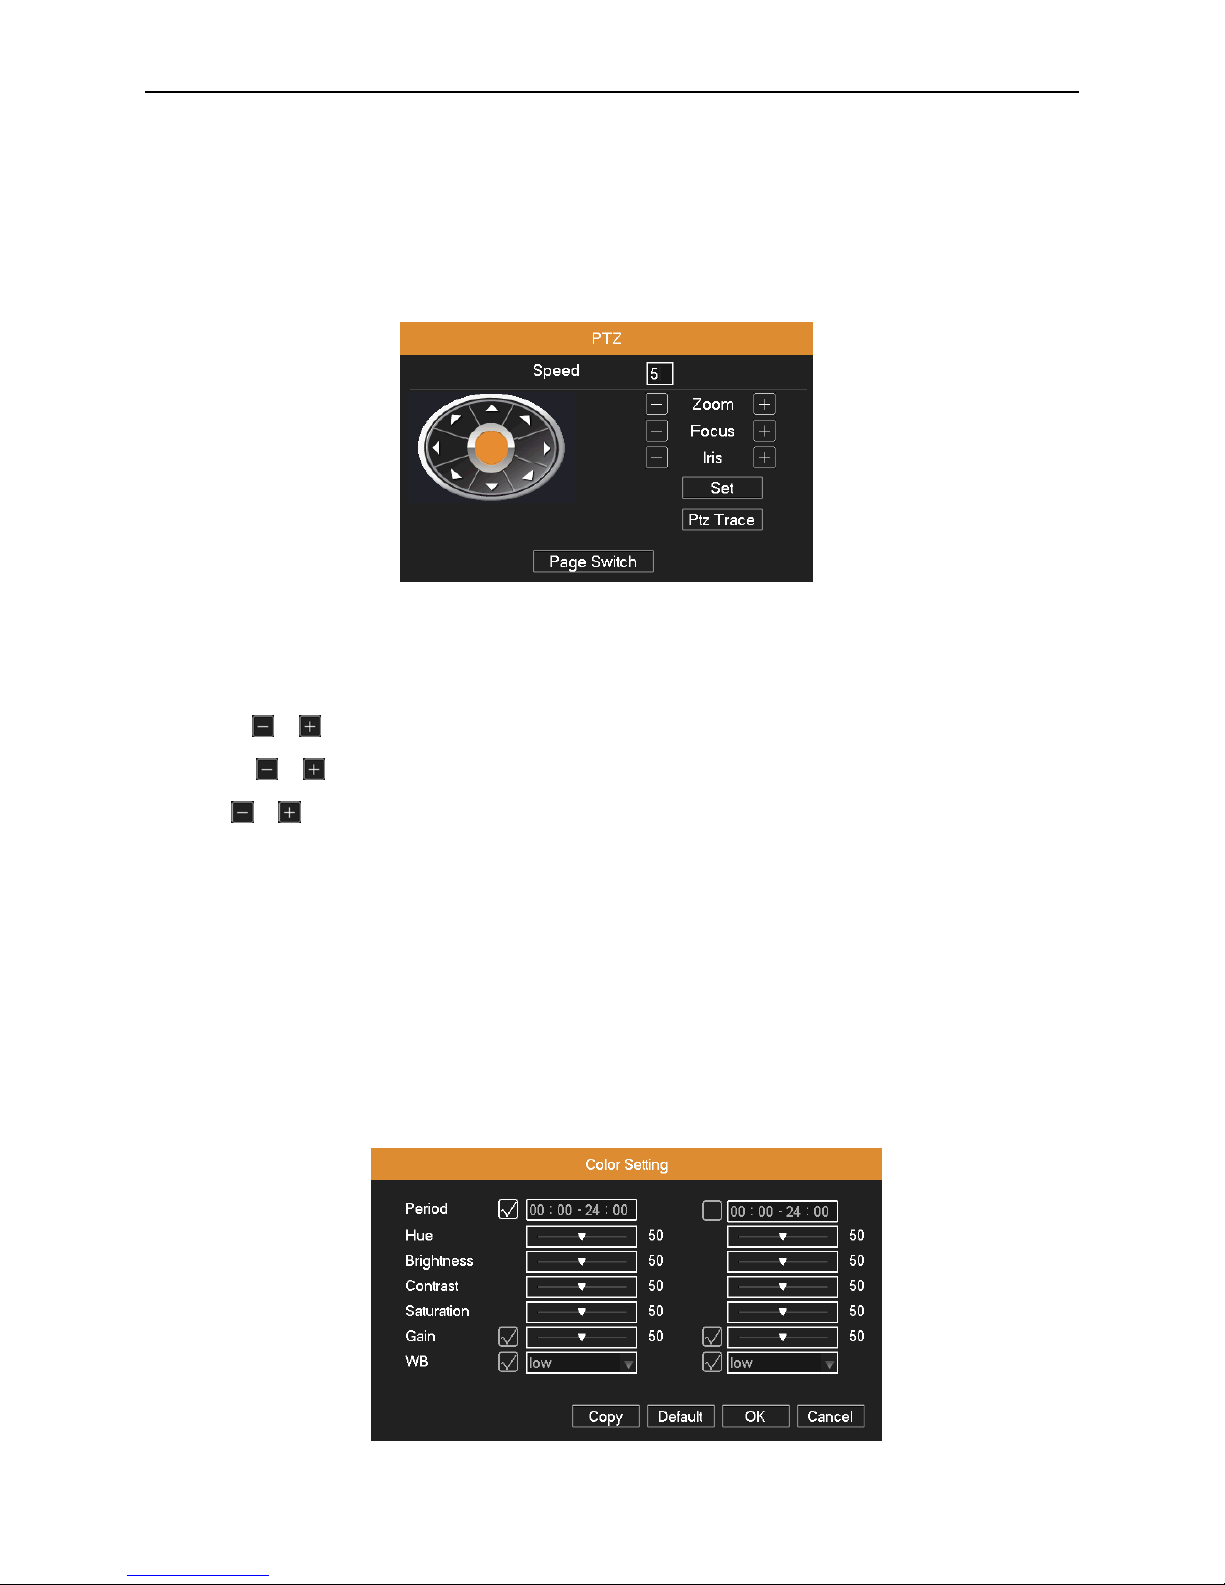
Operation interface is as followed. The functions include: PTZ direction control, step, zoom, focus, iris, and set up trace,
preset, tour, pattern, auto scan, auto pan and so on.
Note : 1. Decoder 485+、485- line connects with DVR 485+、485- line. The connection is right.
2. Click “Main Menu”“System”“PTZ” to set the PTZ parameters.
3. The PTZ functions are decided by the PTZ protocols.
Picture 3.7 PTZ Control
Speed: Set the PTZ rotation speed. Default range: 1 ~ 8.
Direction control: Control the PTZ rotation. 8 directions control is supportive. (4 directions in Front panel is supportive).
Zoom: Click / button to adjust the zoom multiple of camera.
Focus: Click / button to adjust the focus of camera.
Iris: Click / button to adjust the iris of camera.
PTZ Trace: To full-screen show the channel image. Press left mouse and control PTZ to rotate orientation. Press left
mouse and then rotate the mouse to adjust the zoom multiple of camera.
Set: Enter the function operation menu.
Page Switch: Switch between different windows.
3.3.4 Color Setting
You can use the desktop shortcut menu and enter the Color Setting interface to set the selective image parameters. The
image parameters include: hue, brightness, contrast, saturation. You can set different parameters at different time sections.
Picture 3.8 Color Setting
Page 17
AHD DVR User Manual
13
3.3.5 Output Adjust
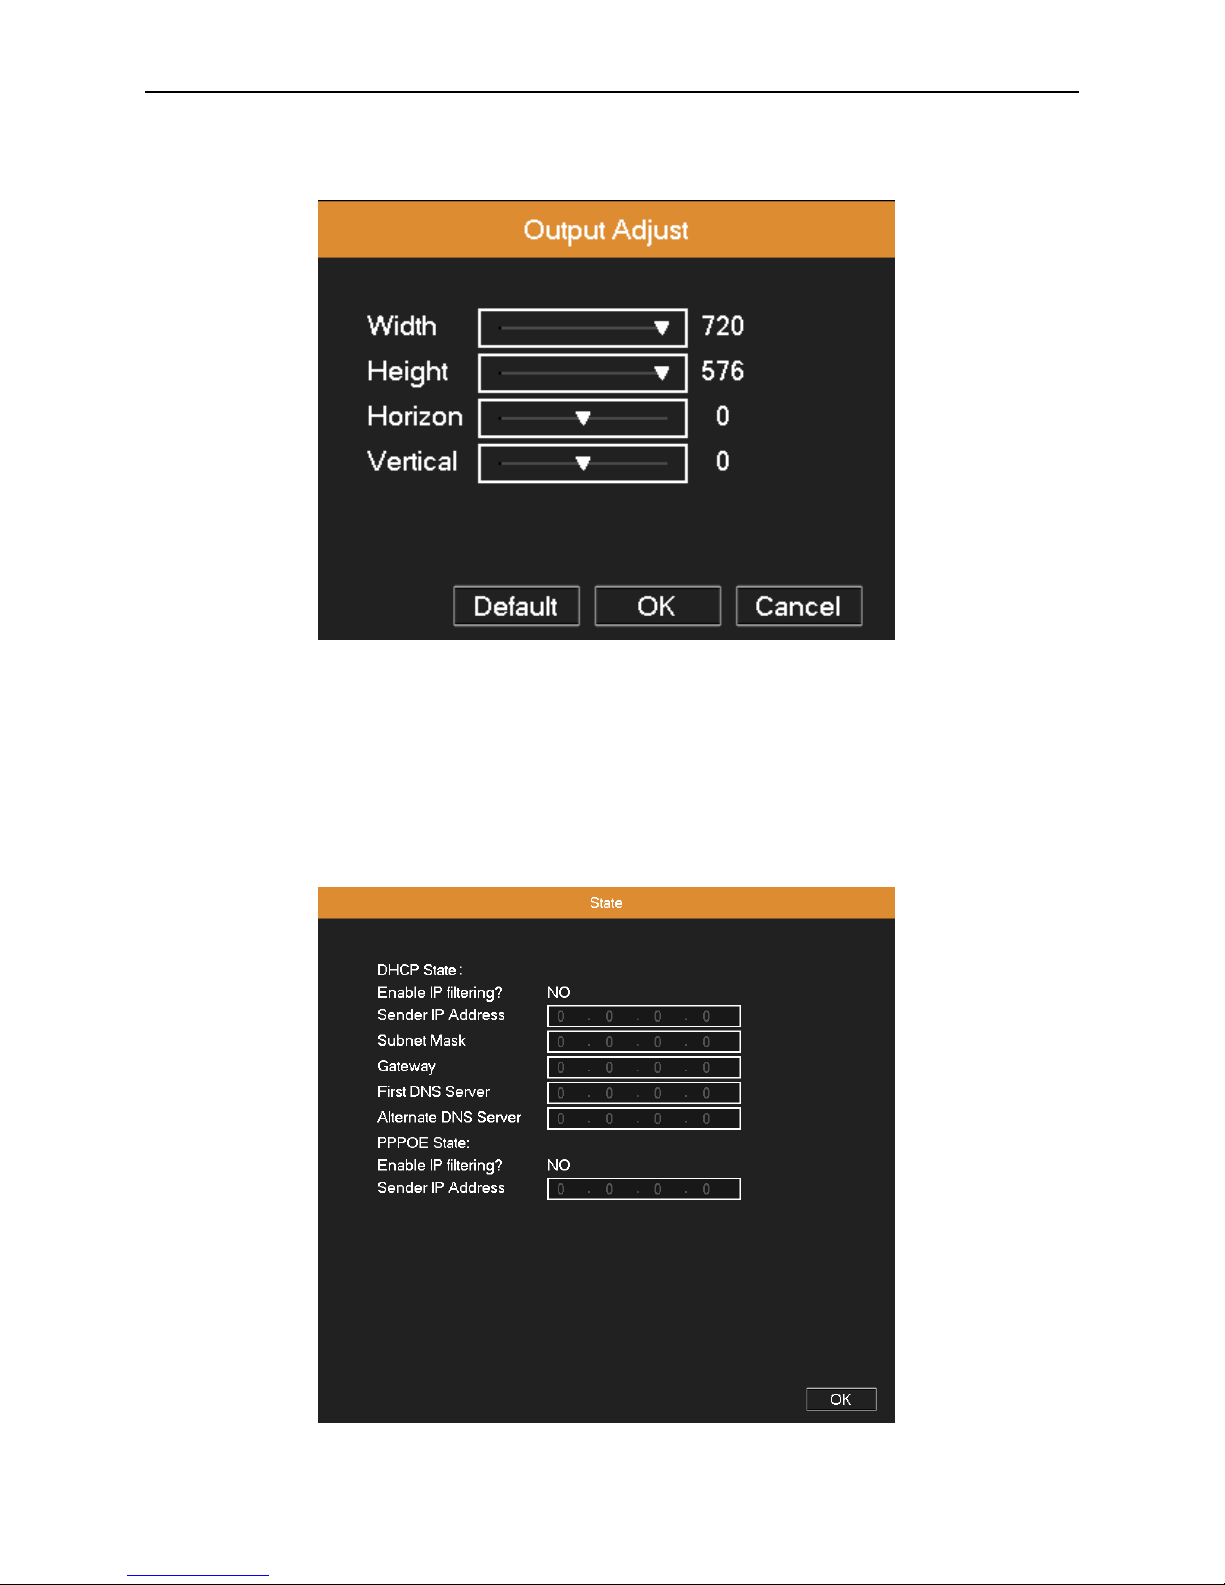
Adjust output area parameters (some models with this function only for CVBS output).
Picture 3.9 Output adjust
3.3.6 Version Info
System Information menu items include: State, HDD Info, Log, BPS, Version, Online Users.
3.3.6.1 State
Display the network state: DHCP, IP address, subnet mask, gateway, DNS server, PPPOE and so on.
Picture 3.10 State
Page 18
AHD DVR User Manual
14
3.3.6.2 HDD Info
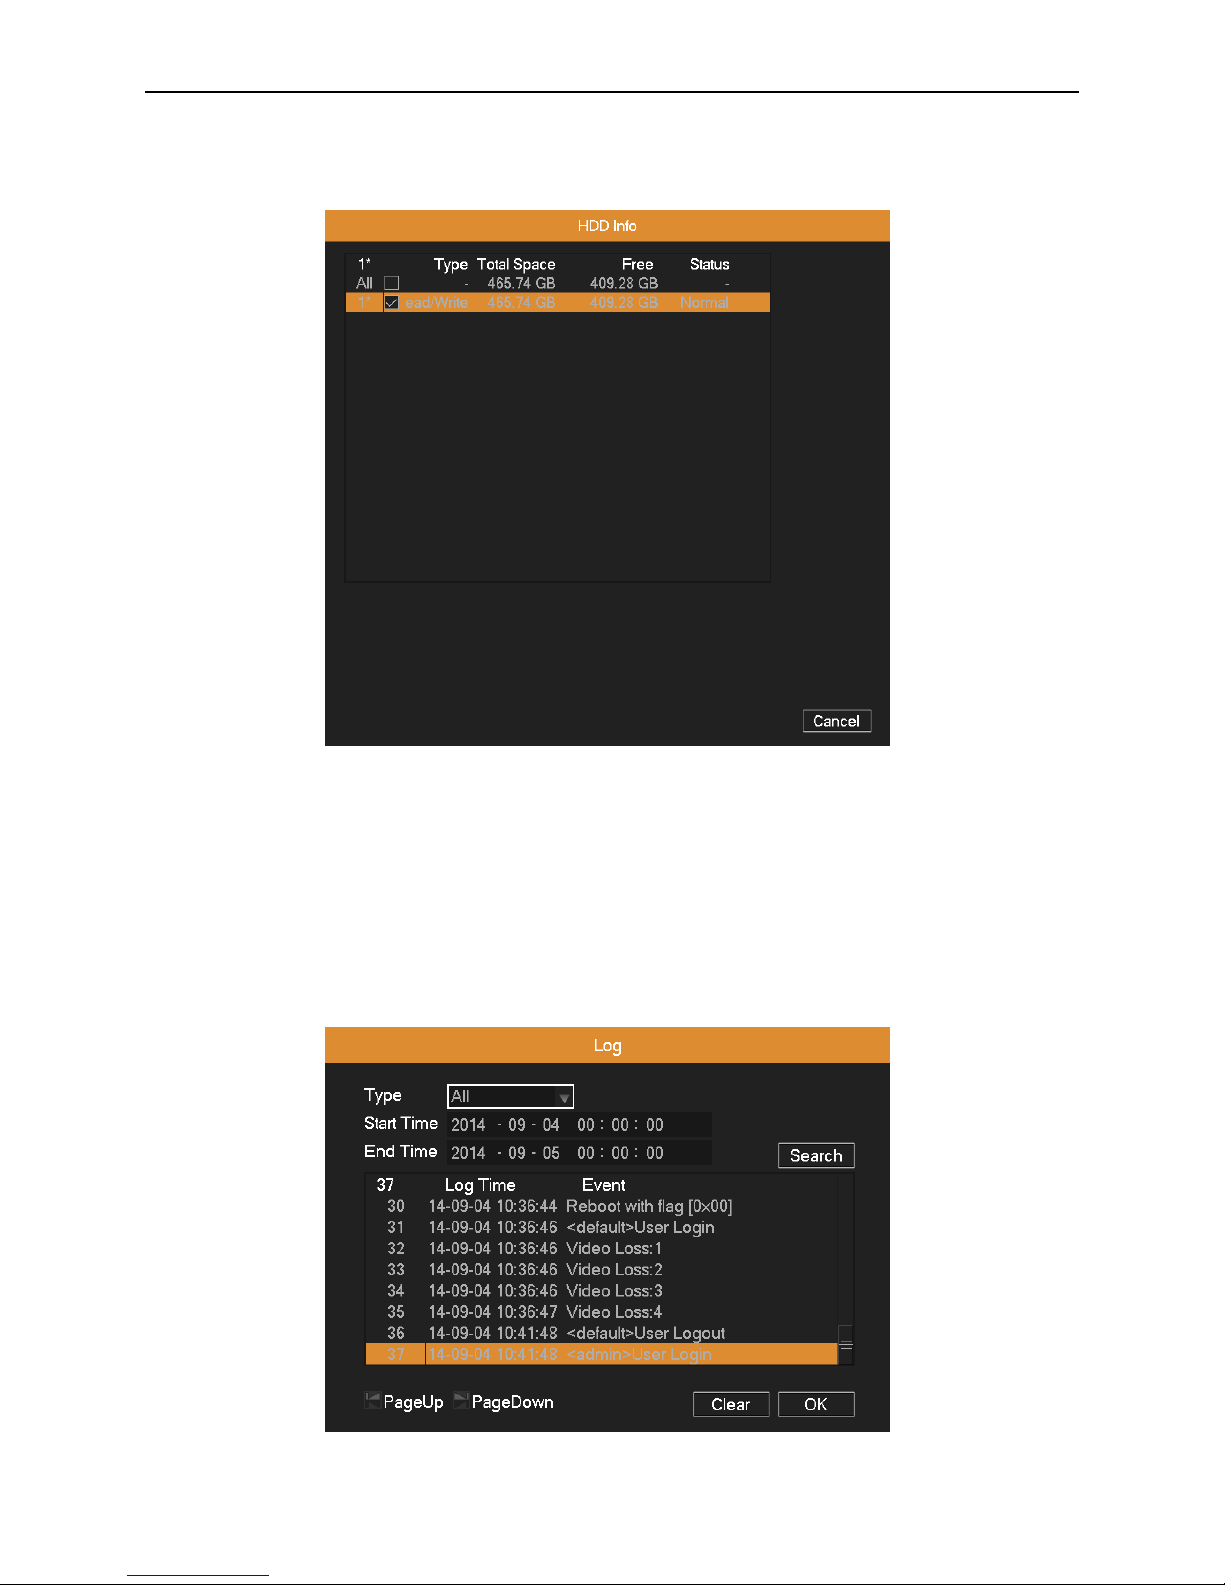
Display the hard disk state: hard disk type, overall capability, residual capability and so on.
Picture 3.11 Hard Disk Information
3.3.6.3 LOG
Look up system log according to the set mode.
Log information include: system operation, configuration operation, data management, alarm affair, recording operation,
user management and so on. Set the time section to look up and click Search button. The log information will display as a
list. Press Page Up or Page Down button to look up and press Clear button to clear all the log information.
Picture 3.12 Log Information
Page 19
AHD DVR User Manual
15
3.3.6.4 BPS
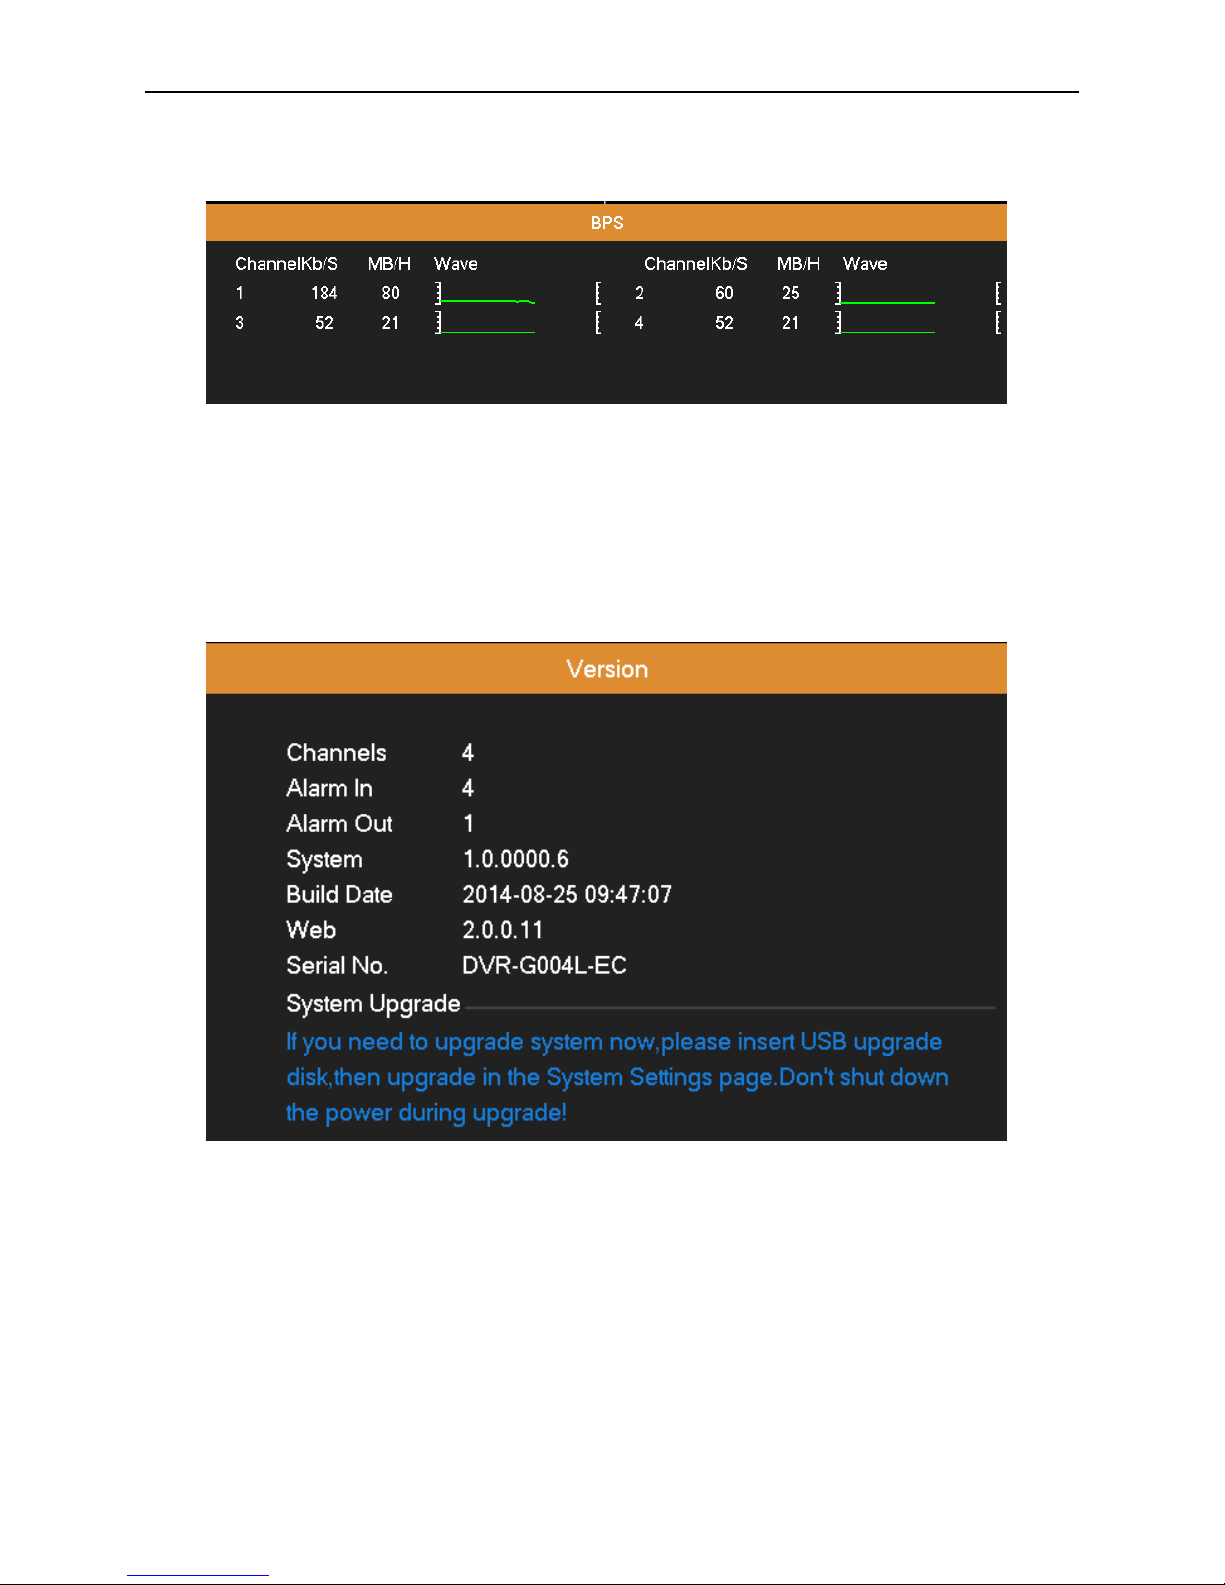
Display the code stream (Kb/S) and hard disk capability (MB/H) in real time.
Picture 3.13 Code Stream Statistics
3.3.6.5 Version
Display the basic information such as hardware information, software version, issue data, SerialNo and so on.
Note: The Serial No is needed when using cloud technology, please enter the Serial No correctly when using cloud
technology to do remote control, or you can’t login.
Picture 3.14 Edition Information
3.3.6.6 Online Users
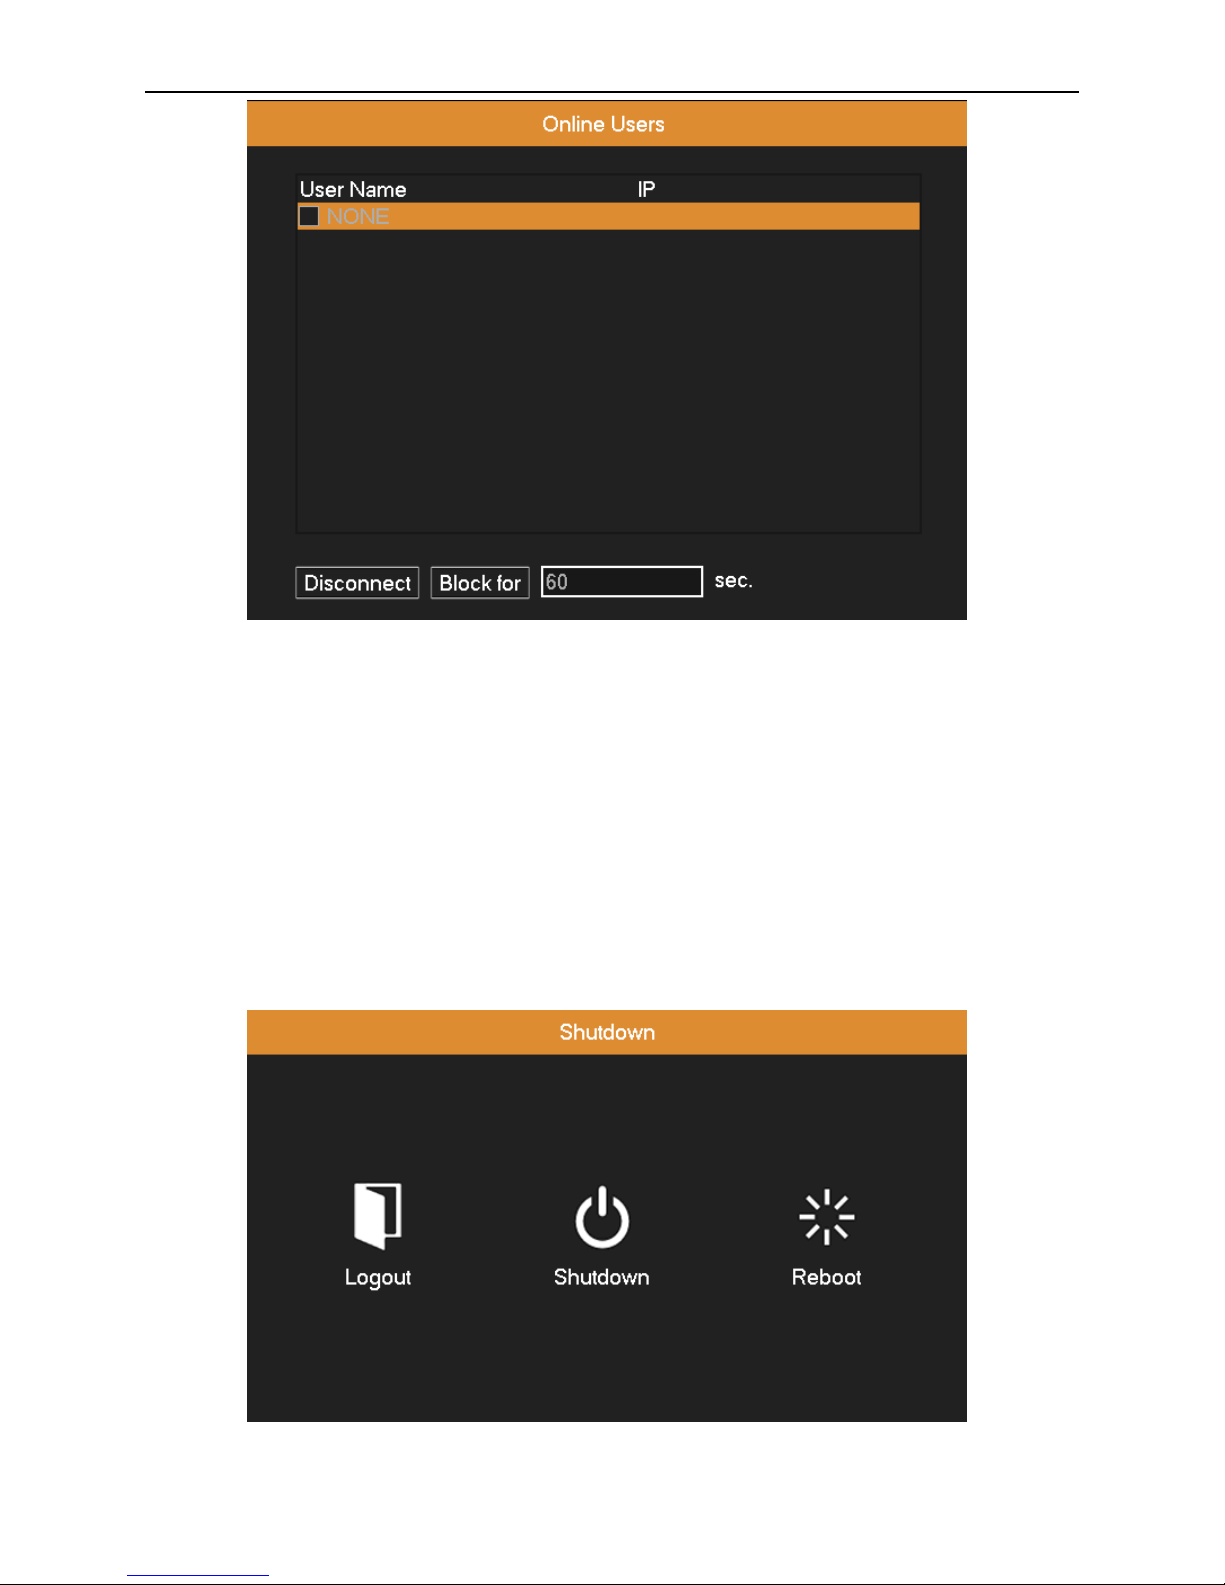
Look up the network user information in the local DVR. You can choose the network user and cut the connection. Then the
user is locked until next boot-strap.
Page 20
AHD DVR User Manual
16
Picture 3.15 Online User.
3.3.7 Close System
Logout, shutdown the system or reboot up.
Logout: Quit the menu. Offer the password for next entrance.
Shutdown: Quit the system. Turn off the power supply.
When press the shut down button, there is a schedule hint. After three seconds, the system is shut down. Midway cancel is
of no effect.
Reboot: Quit the system. Reboot up the system.
Picture 3.16 shutdown
Page 21
AHD DVR User Manual
17
4. Main Menu
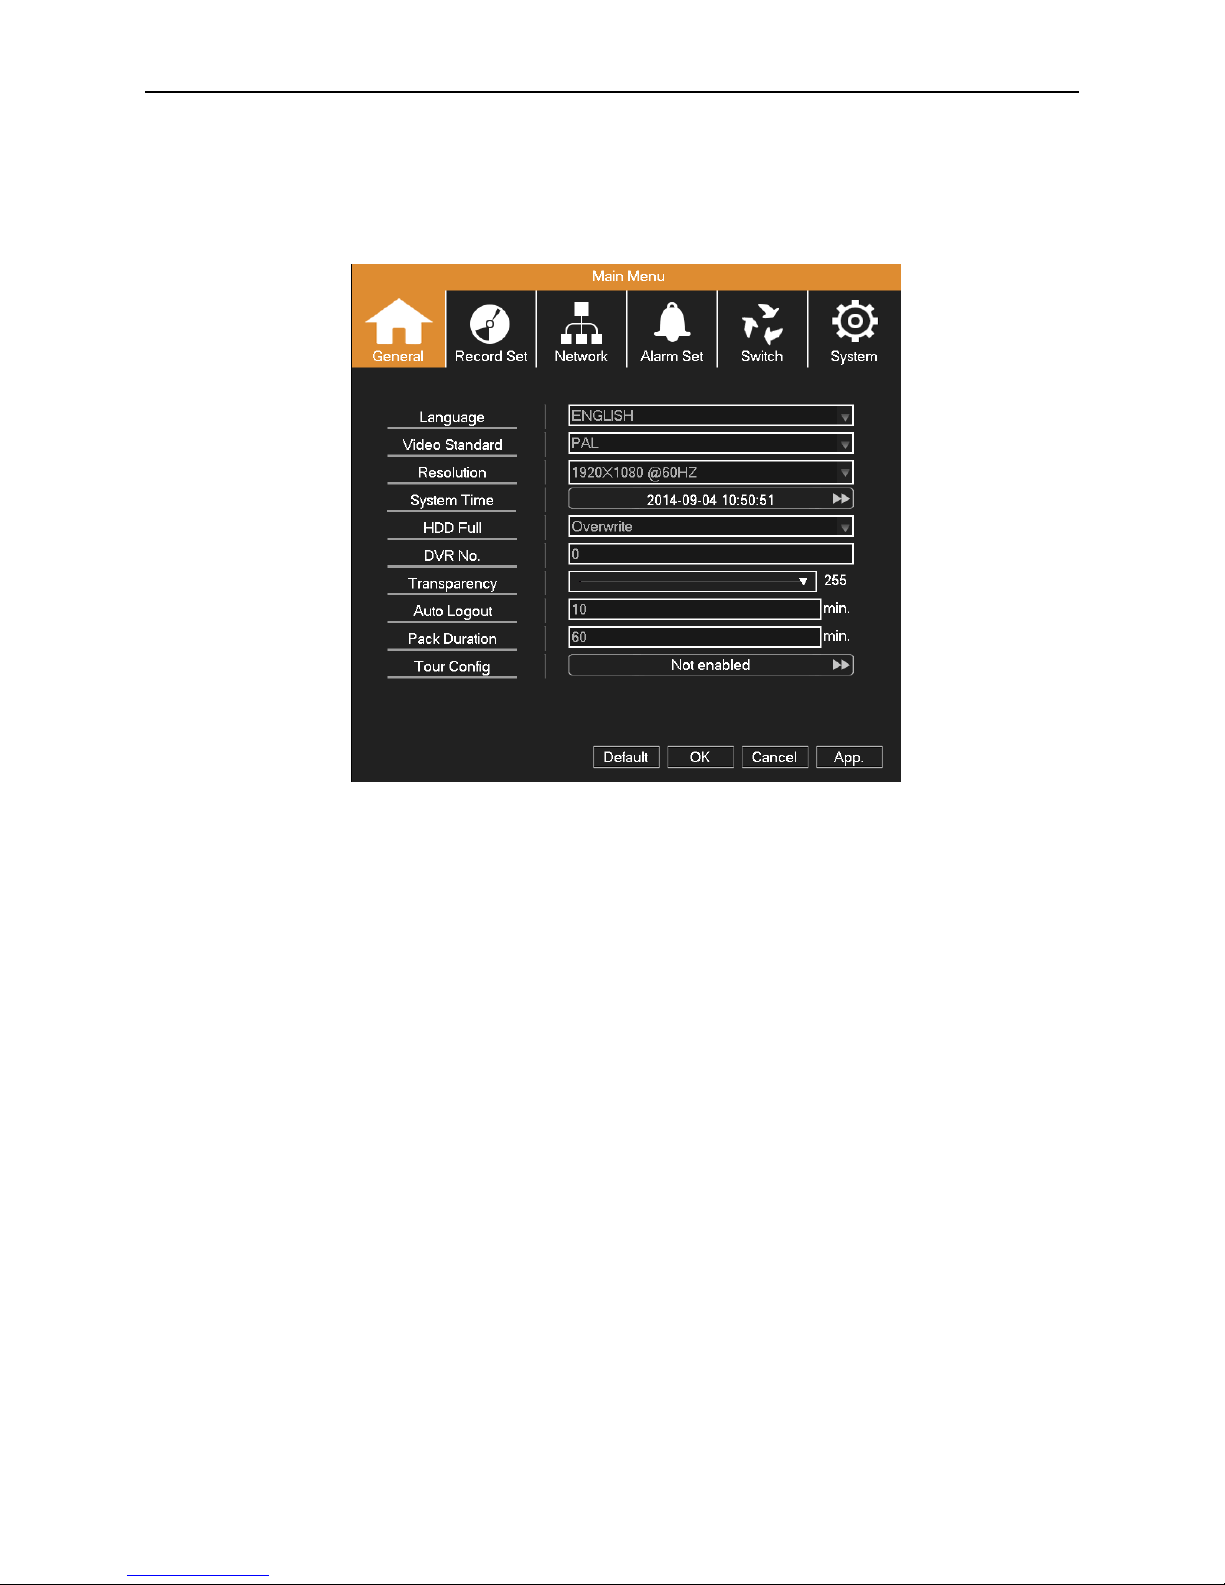
When a user logs in to the system, right click in any place, the shortcut menu will appear at the bottom of the screen, then
click the first item to enter the main menu interface. As picture 4.1 shows.
Picture 4.1 Main menu
4.1 Quick Setting
Language: Choose related operating language.
Video Standard: Set DVR’s video system (PAL or NTSC are optional).
Resolution: Set output resolution.
System Time: Set DVR’s current system date & time, time format, etc.
HDD Full: Select Stop Record: when the hard drive is full, stop recording.
Select overwrite: when the hard drive is full, overwrite the earliest recording files.
DVR No: Using it in this situation would mean to control many DVRs. Only click “ADD” on remote control and enter local
number, the related DVR can respond.
When Local No is “0”, it will response the same series DVR’s operation.
Transparency: Adjust the transparency of operating menu.
Auto Logout: If there is no any operation within the specified period, the device will automatically log out and return to
login interface.
Pack Duration: Set the time length of each video file. “60 minutes” is default value (A maximum of 90 minutes).
Page 22
AHD DVR User Manual
18
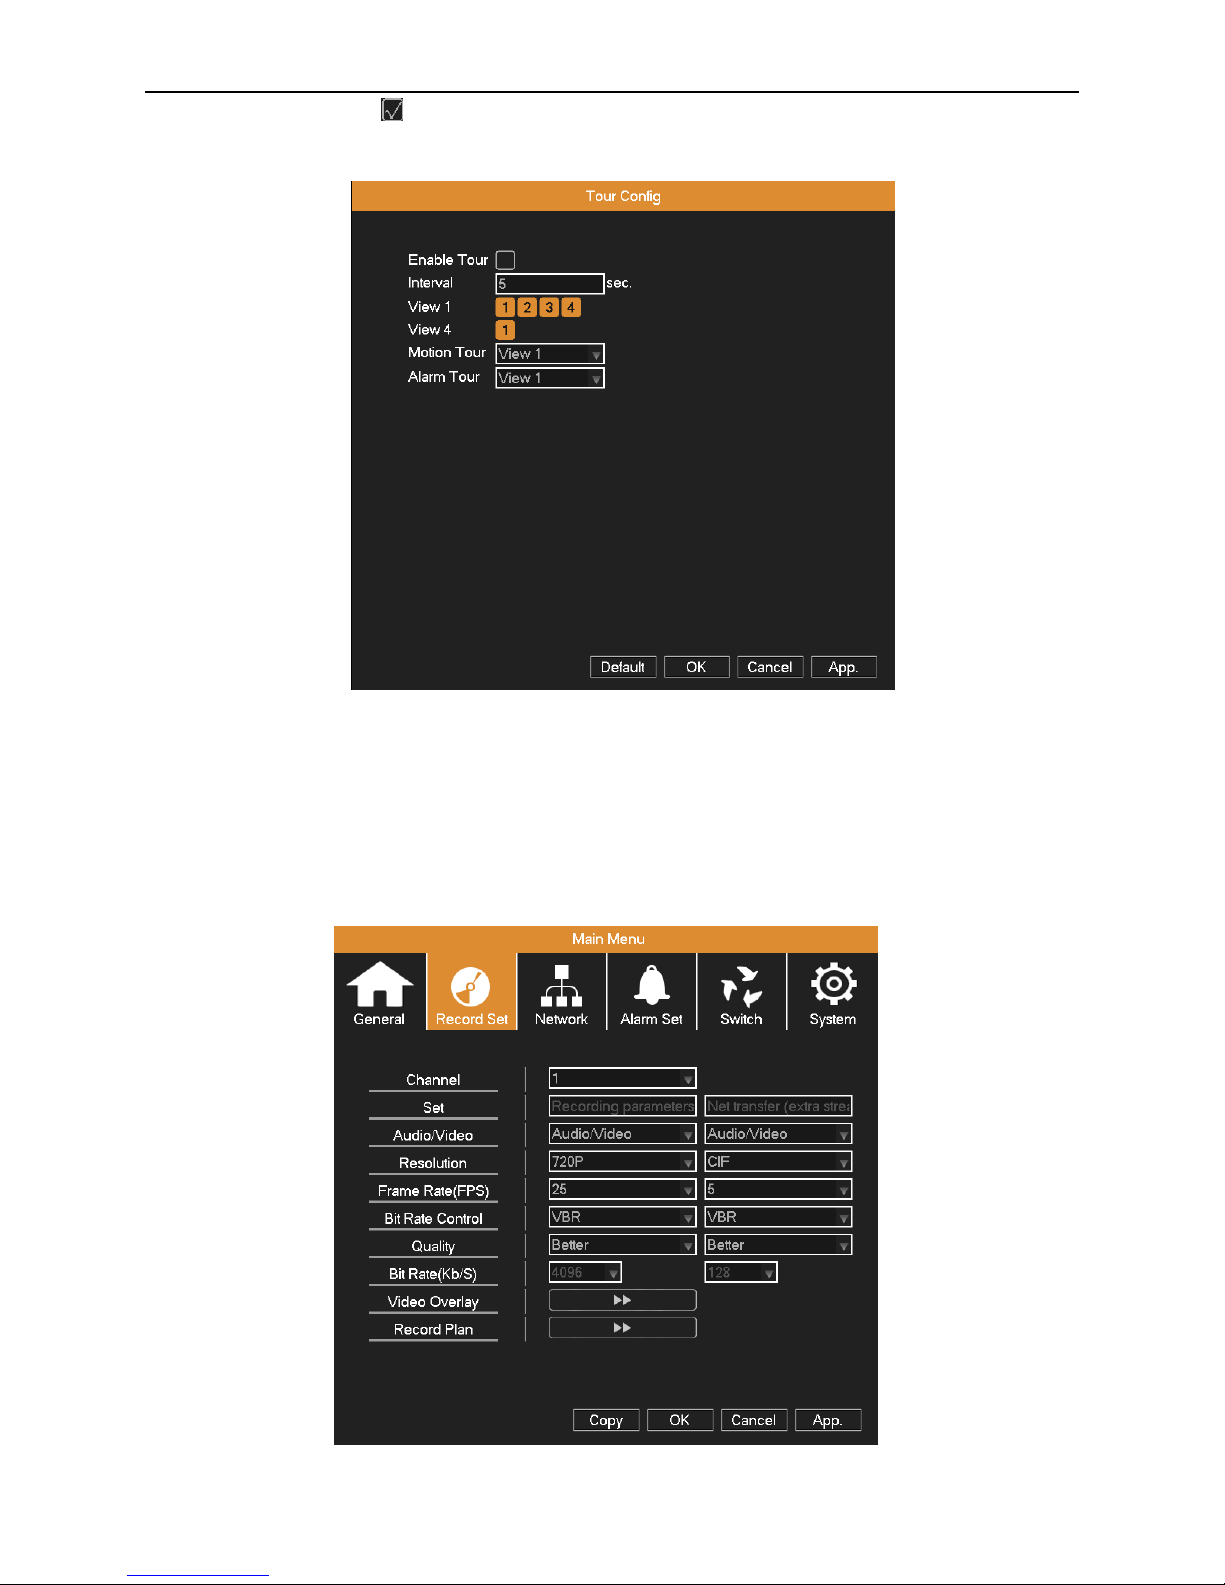
Tour: Set scre en tour display, shows tour was opened. Select the display mode and channel combination, set interval
time for a certain dwell picture switching to next dwell picture.
Picture 4.2 Tour setting
4.2 Record Set
Set recording parameter (main stream) and network parameter (extra stream) of video and audio signal.
Set DVR’s recording plan.
Note: There is at least one read-write hard disk.
Picture 4.3 Record config
Page 23
AHD DVR User Manual
19
Channel: Choose the corresponding channel number to set its recording parameters.
Set: Recording parameter (main stream) and network parameter (extra stream).
Video/Audio: Set whether to record video and audio simultaneously.
Resolution: Set recording resolution. The Higher resolution, the better recording quality, occupies more HDD capacity.
Conversely, the lower resolution, the worse recording quality, occupies less HDD capacity.
Frame Rate (FPS): Set recording FPS; the higher recording FPS, the better fluency of recording images and occupies
more HDD capacity. Conversely, the lower recording FPS, the worse fluency of recording images and occupies less HDD
capacity.
Bit Rate Control: Constant bit rate (CBR) or variable bit rate (VBR) which means recording stream changes automatically
according to image changes.
Quality: Adjust the video quality, six grades are optional.
Bit Rate (Kb/S): Set recording stream statics under fixed stream state (CBR). The Higher stream statics, the better
recording quality and occupies more HDD capacity. Conversely, the lo wer stream statics, the worse rec ording quality and
occupies less HDD capacity.
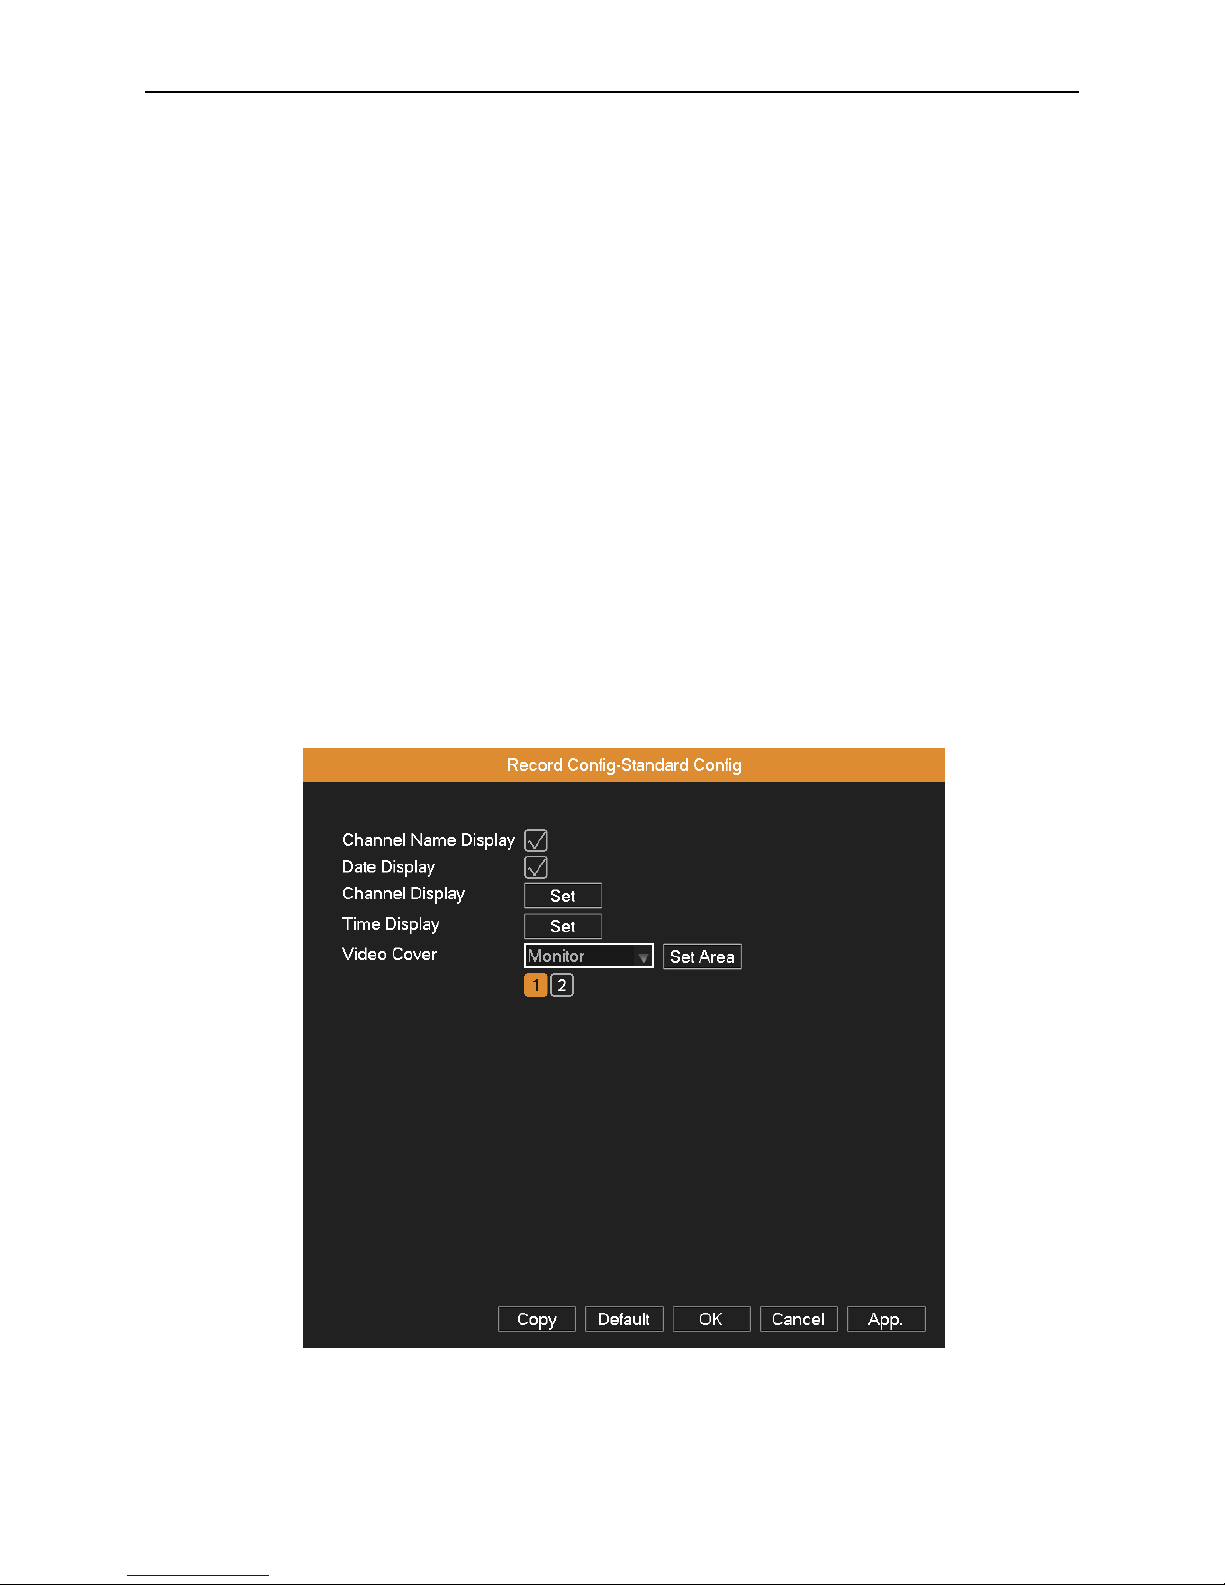
Video Overlay: Set whether to display channel name, time and date on screen overlay, and adjust the position of time title
and channel title on screen. Select the monitor and click Set Area button to enter relative channel, user can choose the size
of region overlay, each channel can maximum set 2 regions (the video output is black of the covered region).
Picture 4.4 Video Overlay
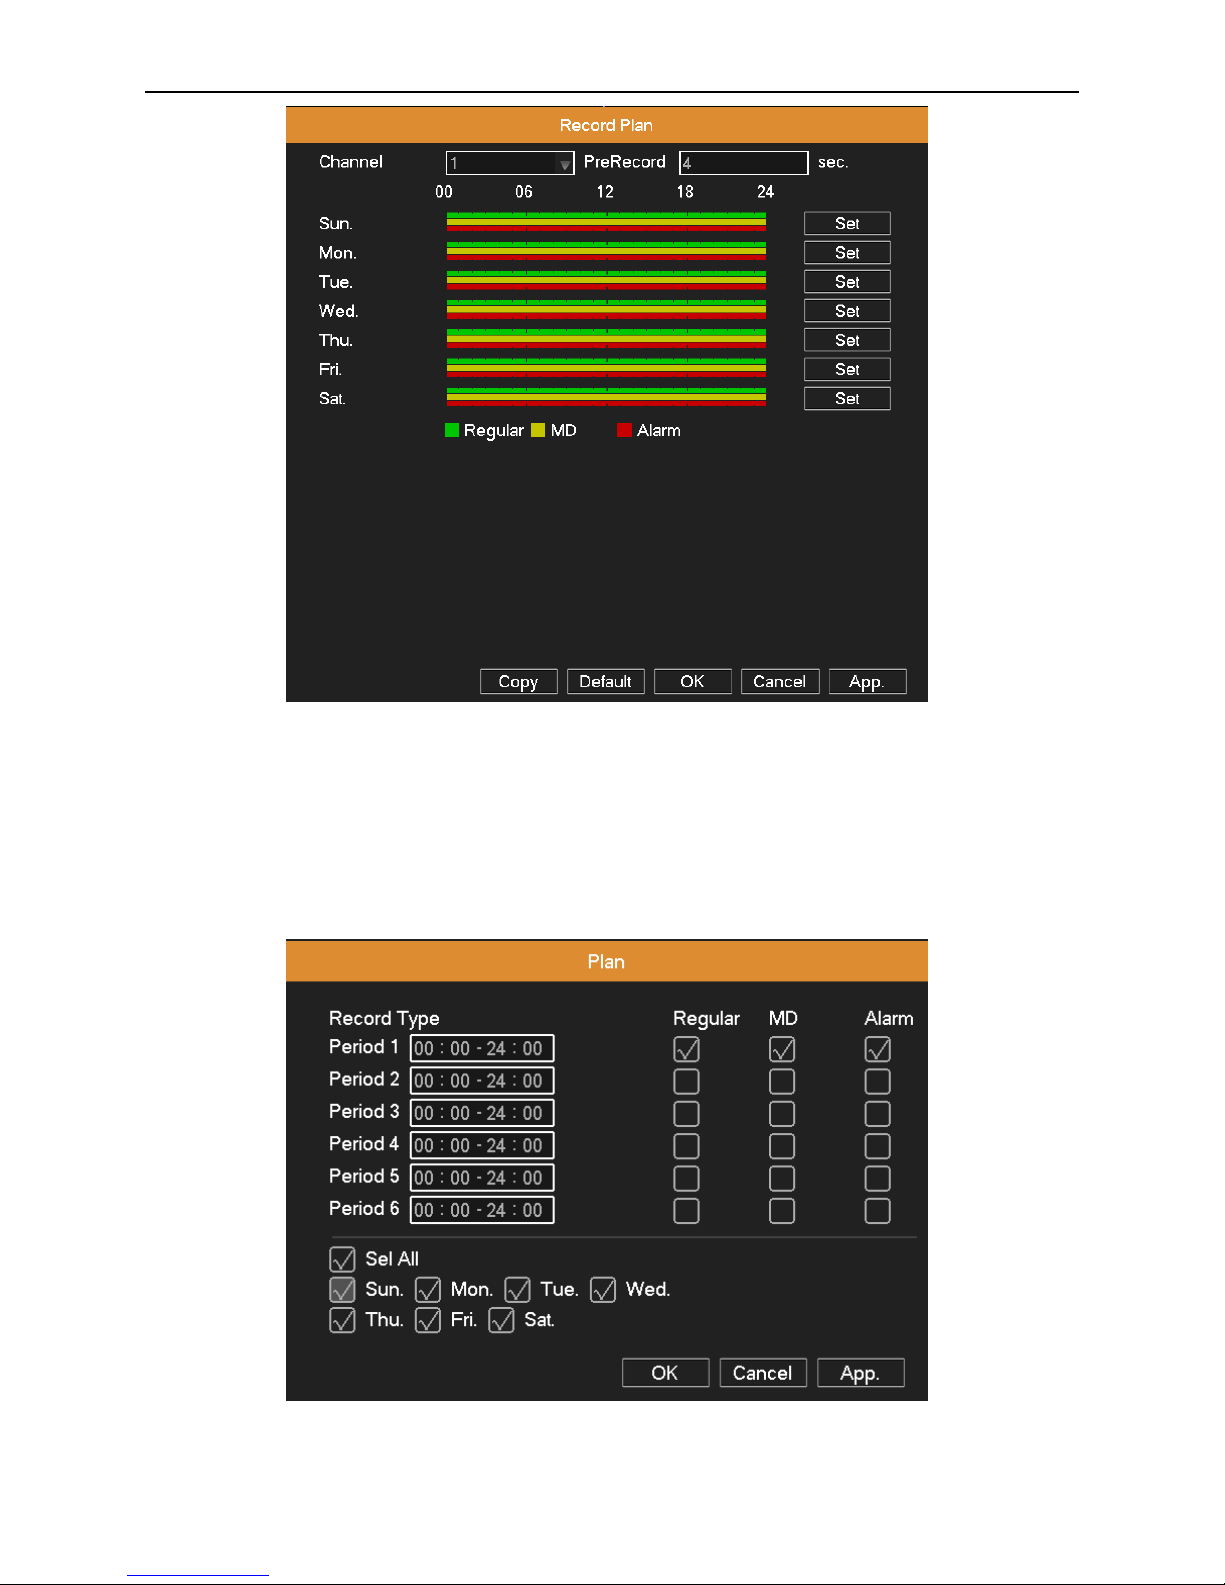
Record Plan: Set DVR’s recording plan and trigger mode. The column means the seven days of a week from Monday to
Sunday; the row means 24 hours of a day
Page 24
AHD DVR User Manual
20
Picture 4.5 Recording Plan
Channel: Choose the corresponding channel number to set the recording plan.
Pre Record: Record 1-5 seconds before the action. (Time length is decided by the code stream)
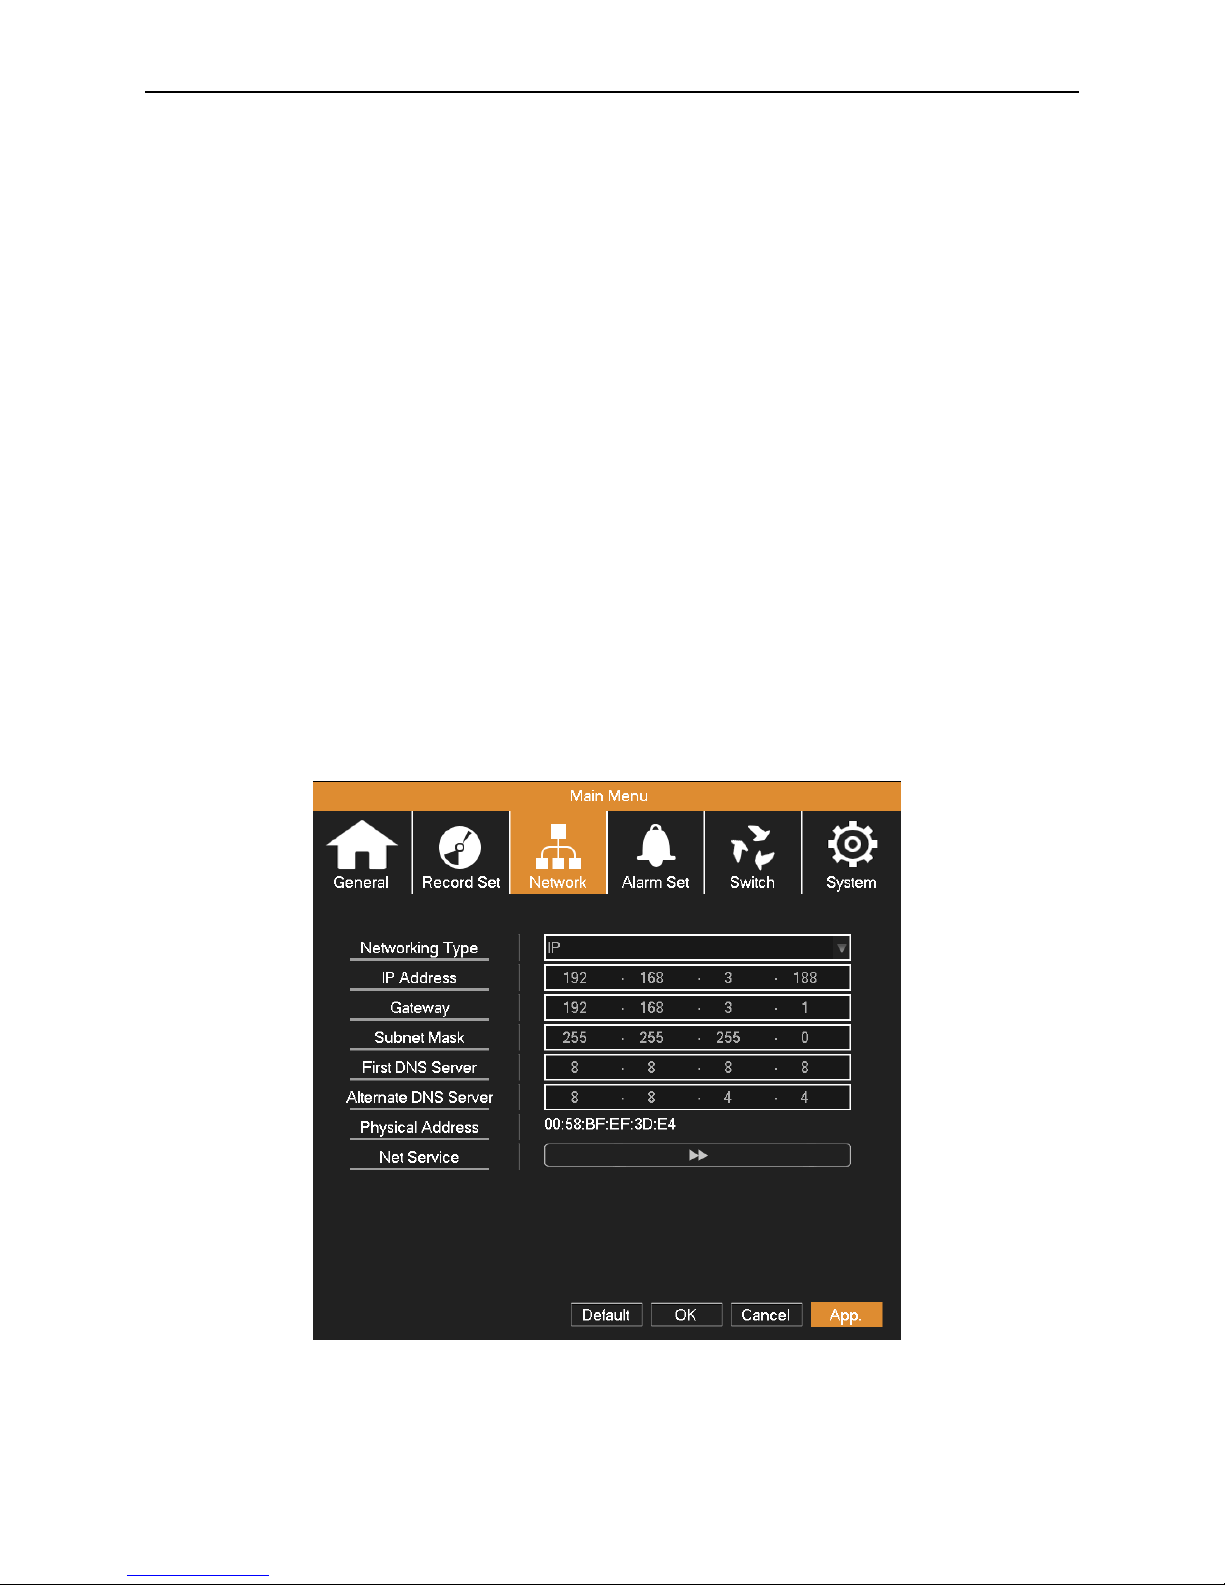
Set: Click Set button to pop up the Plan window, select one day or all days of recording plan, set recording type and period,
then click OK, the recording will start only in the set range.
Picture 4.6 Plan
Page 25
AHD DVR User Manual
21
Recording type:
Regular: Perform the regular recording in the set time section. The video file type is “R”.
Detect: Trigger the “motion detect”, “camera mask” or “video loss” signal. When above alarm is set as opening
recording, the “detection recording” state is turned on. The video file type is “M”.
Alarm: Trigger the external alarm signal in the set time section. When above alarm is set as opening recording, the
“detection recording” state is turned on. The video file type is “A”.
Note: Please refer to 4.4 Alarm Function for the related alarm function settings.
4.3 Network
Networking Type: Automatically get or manually enter IP address.
IP Address: Set the IP address.
Gateway: Set the default gateway.
Subnet Mask: Set the subnet mask code.
First DNS Server: Set the preferred DNS. Using DDNS function needs to set the address of DNS server as their local DNS
address.
Alternate DNS Server: Set the spare DNS.
Picture 4.7 Network Setup
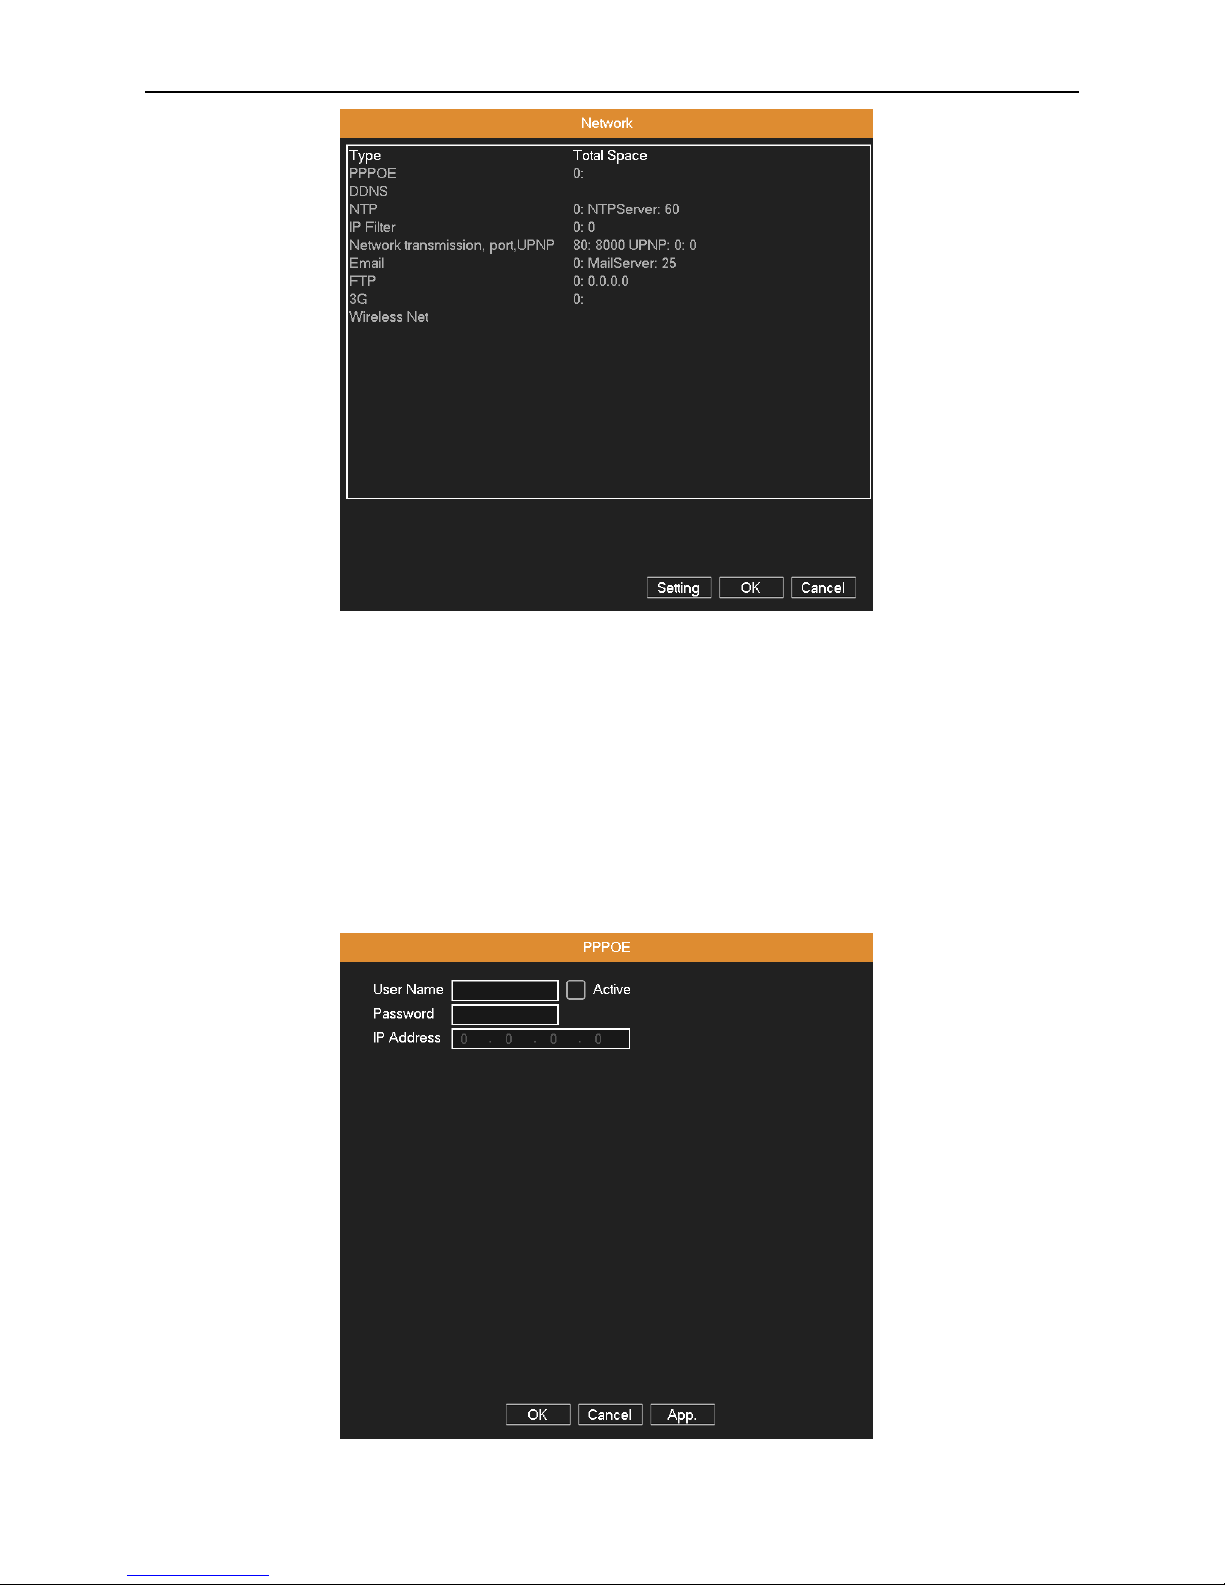
Net Service: Click Net Service button to enter the interface as shown in Picture 4.8, first select a Network Service entry
and click Set button, or double-click a Network Service entry to set parameter items.
Page 26
AHD DVR User Manual
22
Picture 4.8 Network Service
4.3.1 PPPOE Setup
Activate the PPPOE function, enter the user name and password provided by ISP (Internet service provider) provides. After
saving it reboot up your system. Then the DVR will build a network connection based on PPPOE. The IP address will
change into dynamic IP address after above operations well done.
Operation: After PPPOE dialing successfully look up the IP address and obtain the current IP address. Then use this IP
address to visit the DVR through user port.
Picture 4.9 PPPOE
Page 27
AHD DVR User Manual
23
4.3.2 DDNS Setup
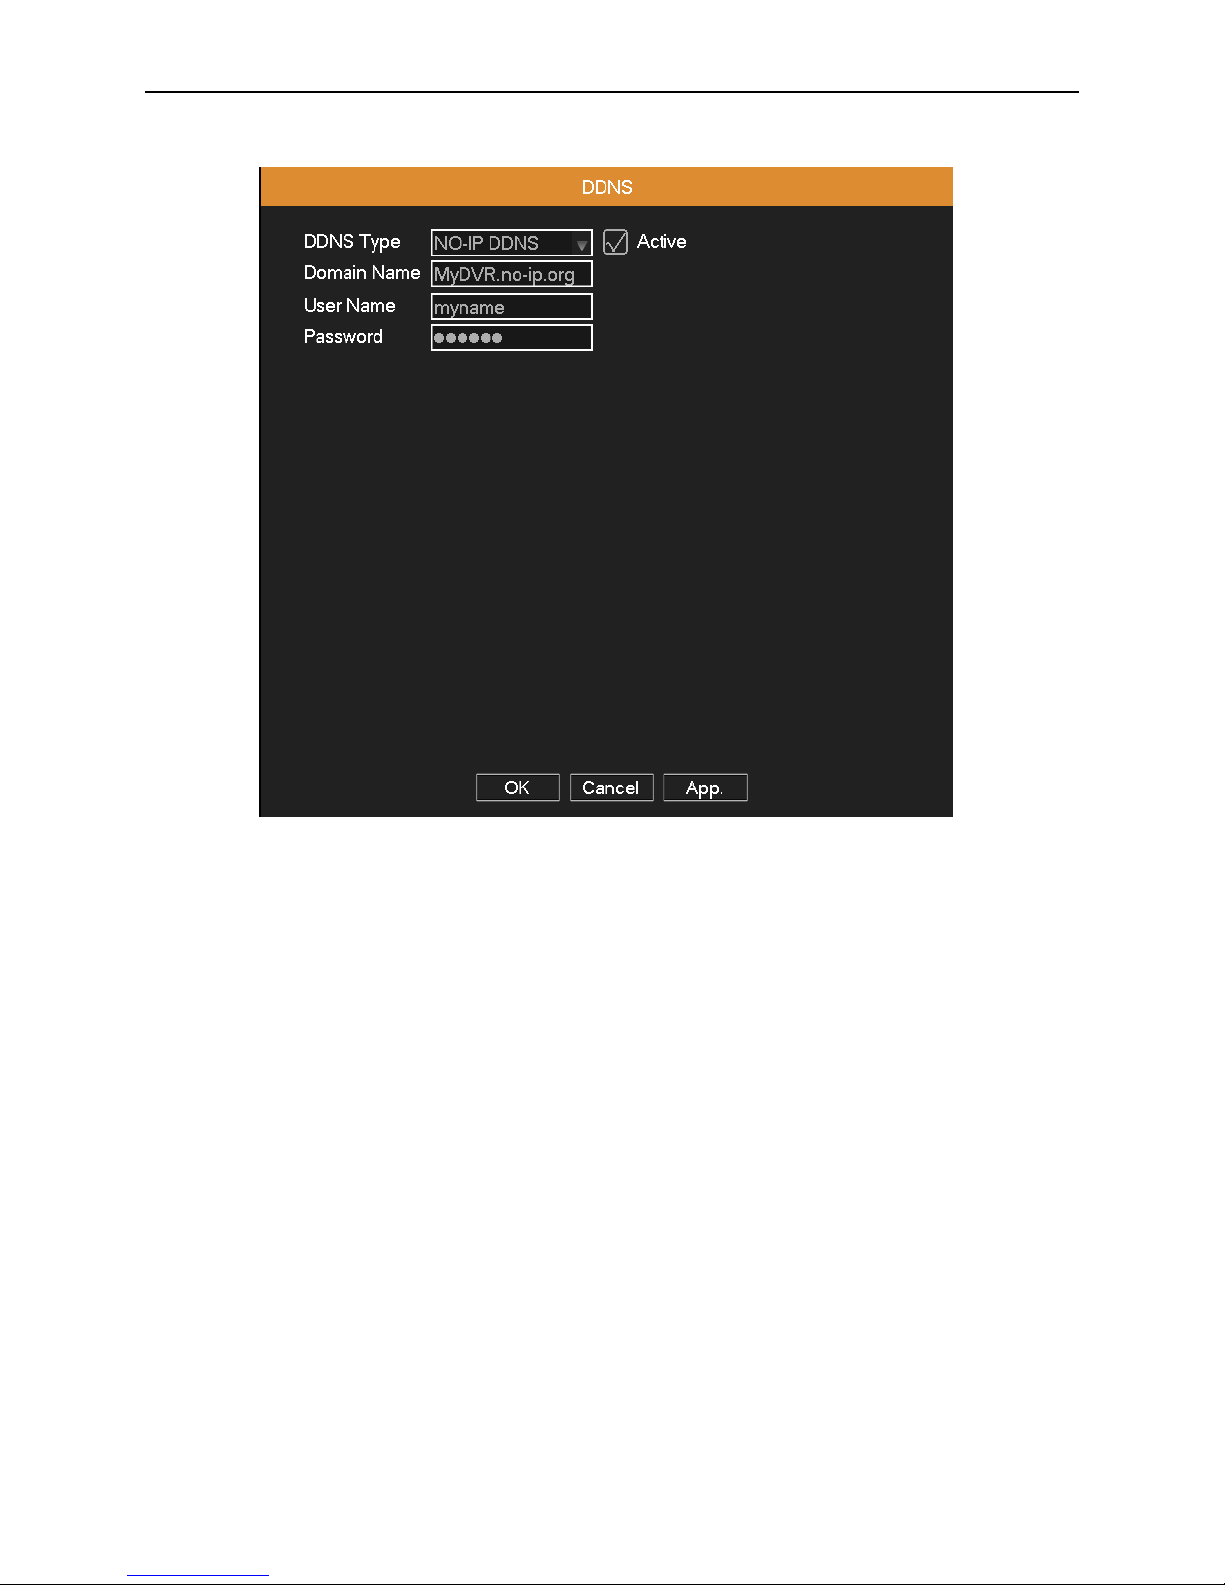
Picture 4.10 DDNS
Active: Activate the DDNS function.
DDNS Type: Choose DDNS supplier.
Domain Name: Input the domain name registered by DDNS.
User Name: Input the account registered by DDNS.
Password: Input the password registered by DDNS.
When the DDNS is successfully configured and start, you can open IE and enter the domain name to visit your DVR
remotely.
Note: The DNS setup must be configured correctly in the network setup.
Page 28
AHD DVR User Manual
24
4.3.3 NTP Setup
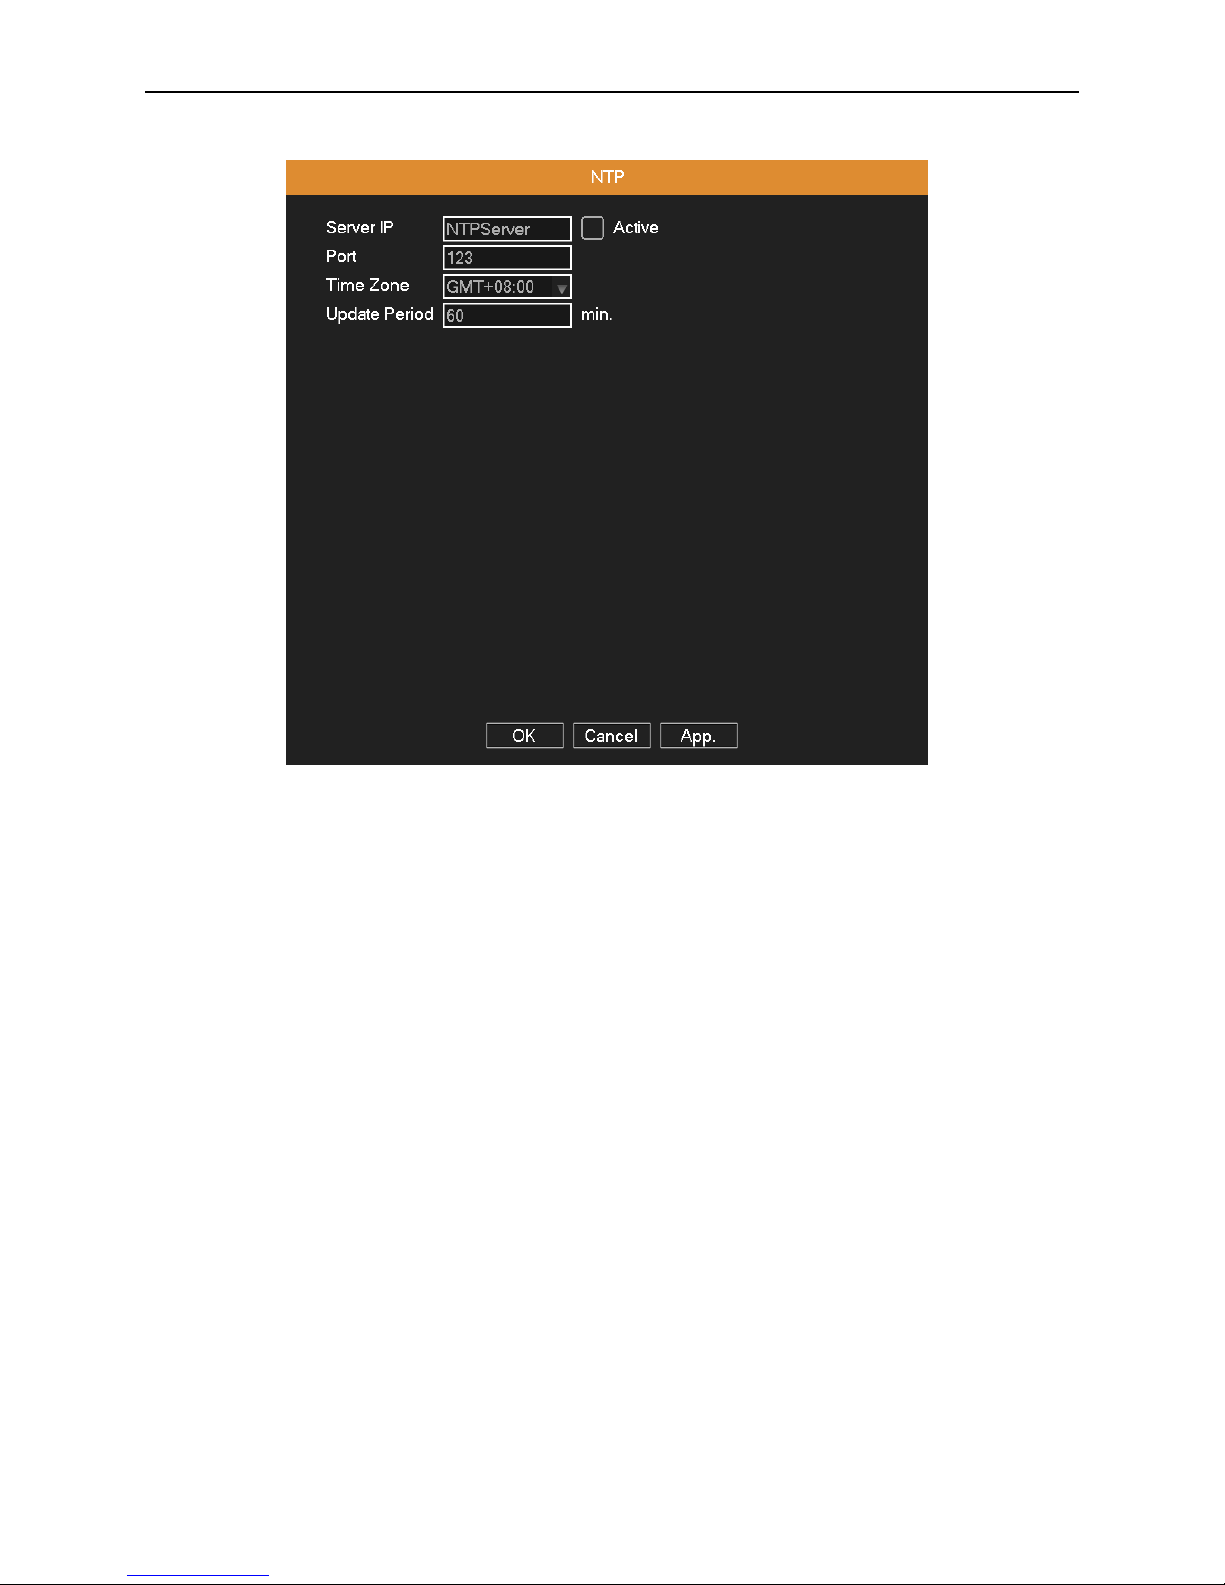
Picture 4.11 NTP
Server IP: Enter the address of NTP server.
Port: Default: 123. You can set the port according to NTP server.
Time zone: London GMT+0; Berlin GMT +1; Cairo GMT +2; Moscow GMT +3; New Delhi GMT + 5; Bangkok GMT +7;
Hong Kong Beijing GMT +8; Tokyo GMT +9; Sydney GMT +10; Hawaii GMT-10; Alaska GMT-9; Pacific time GMT-8;
American mountain time GMT-7; American mid time GMT-6; American eastern time GMT-5; Atlantic time GMT-4; Brazil
GMT-3; Atlantic mid time GMT-2.
Update Period: The check interval about synchronizing system time with NTP server.
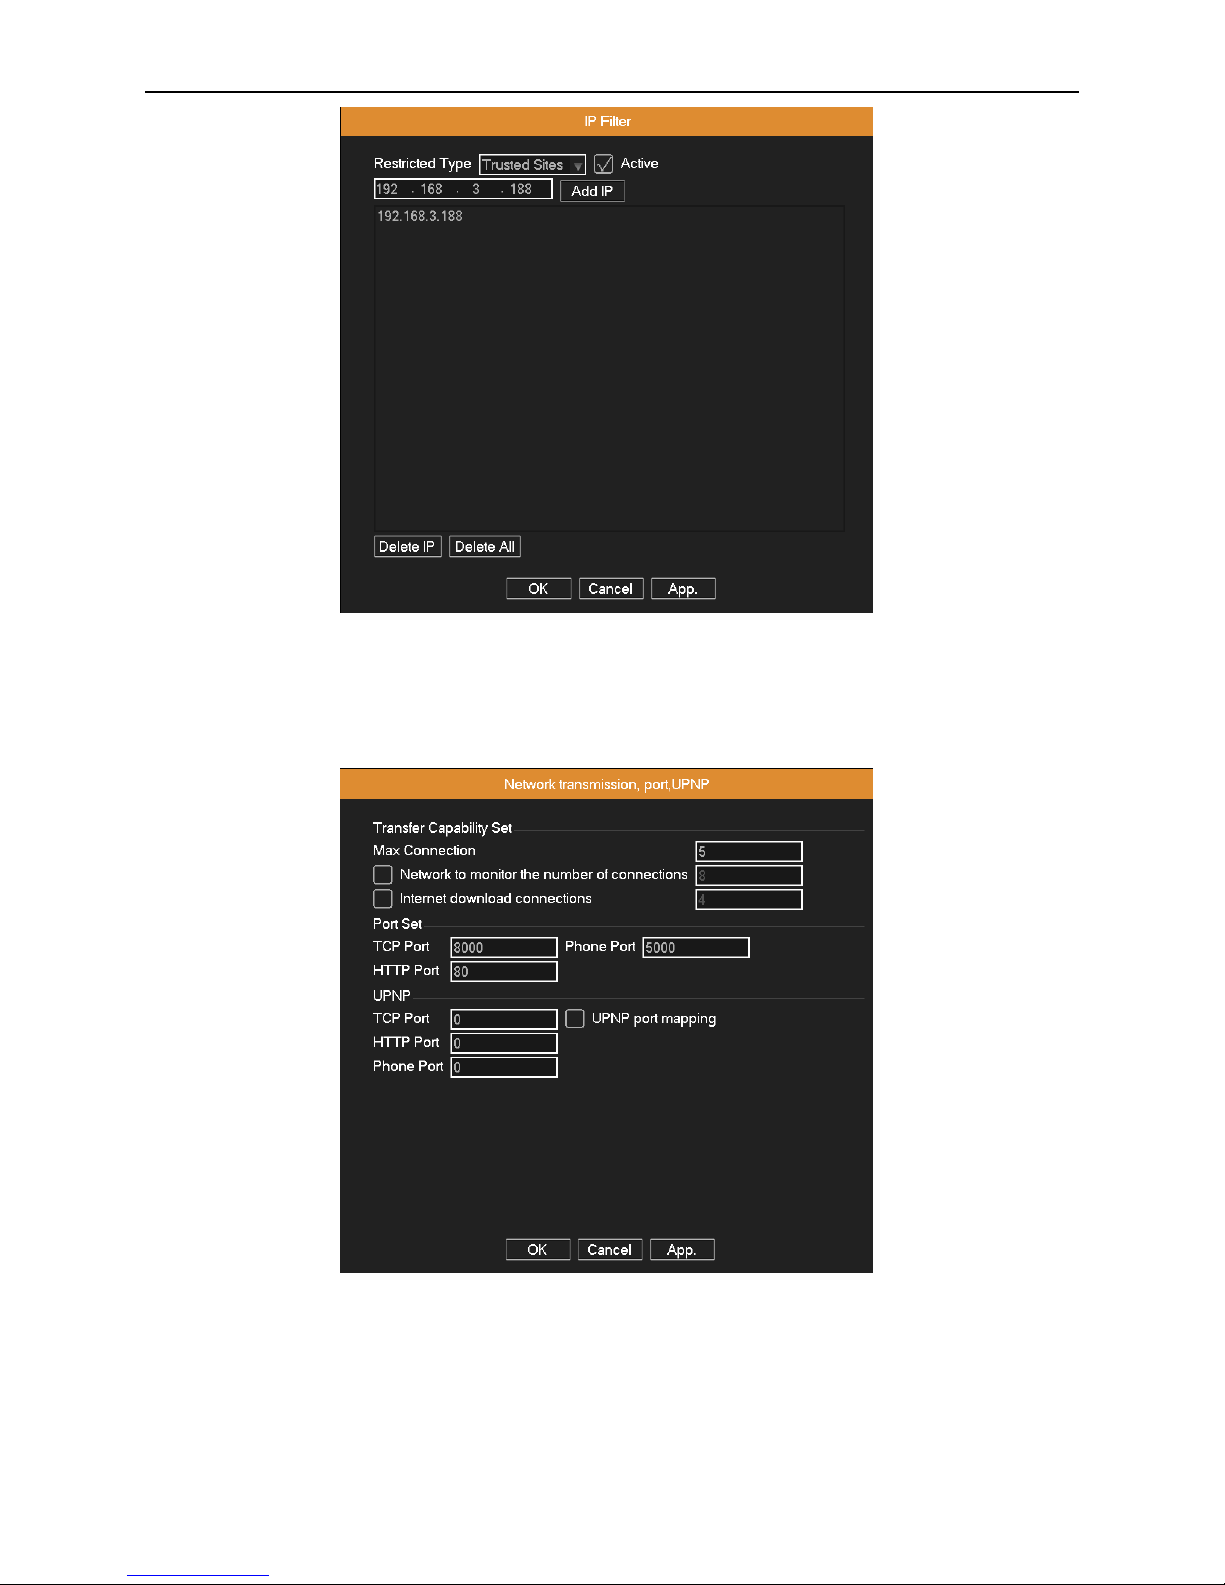
4.3.4 IP Filter
When choosing the trusted list, only the listed IP address can connect the DVR. If not in the list, it cannot connect the DVR.
Select the IP address in the list and click Delete IP button to delete it.
Page 29
AHD DVR User Manual
25
Picture 4.12 IP purview
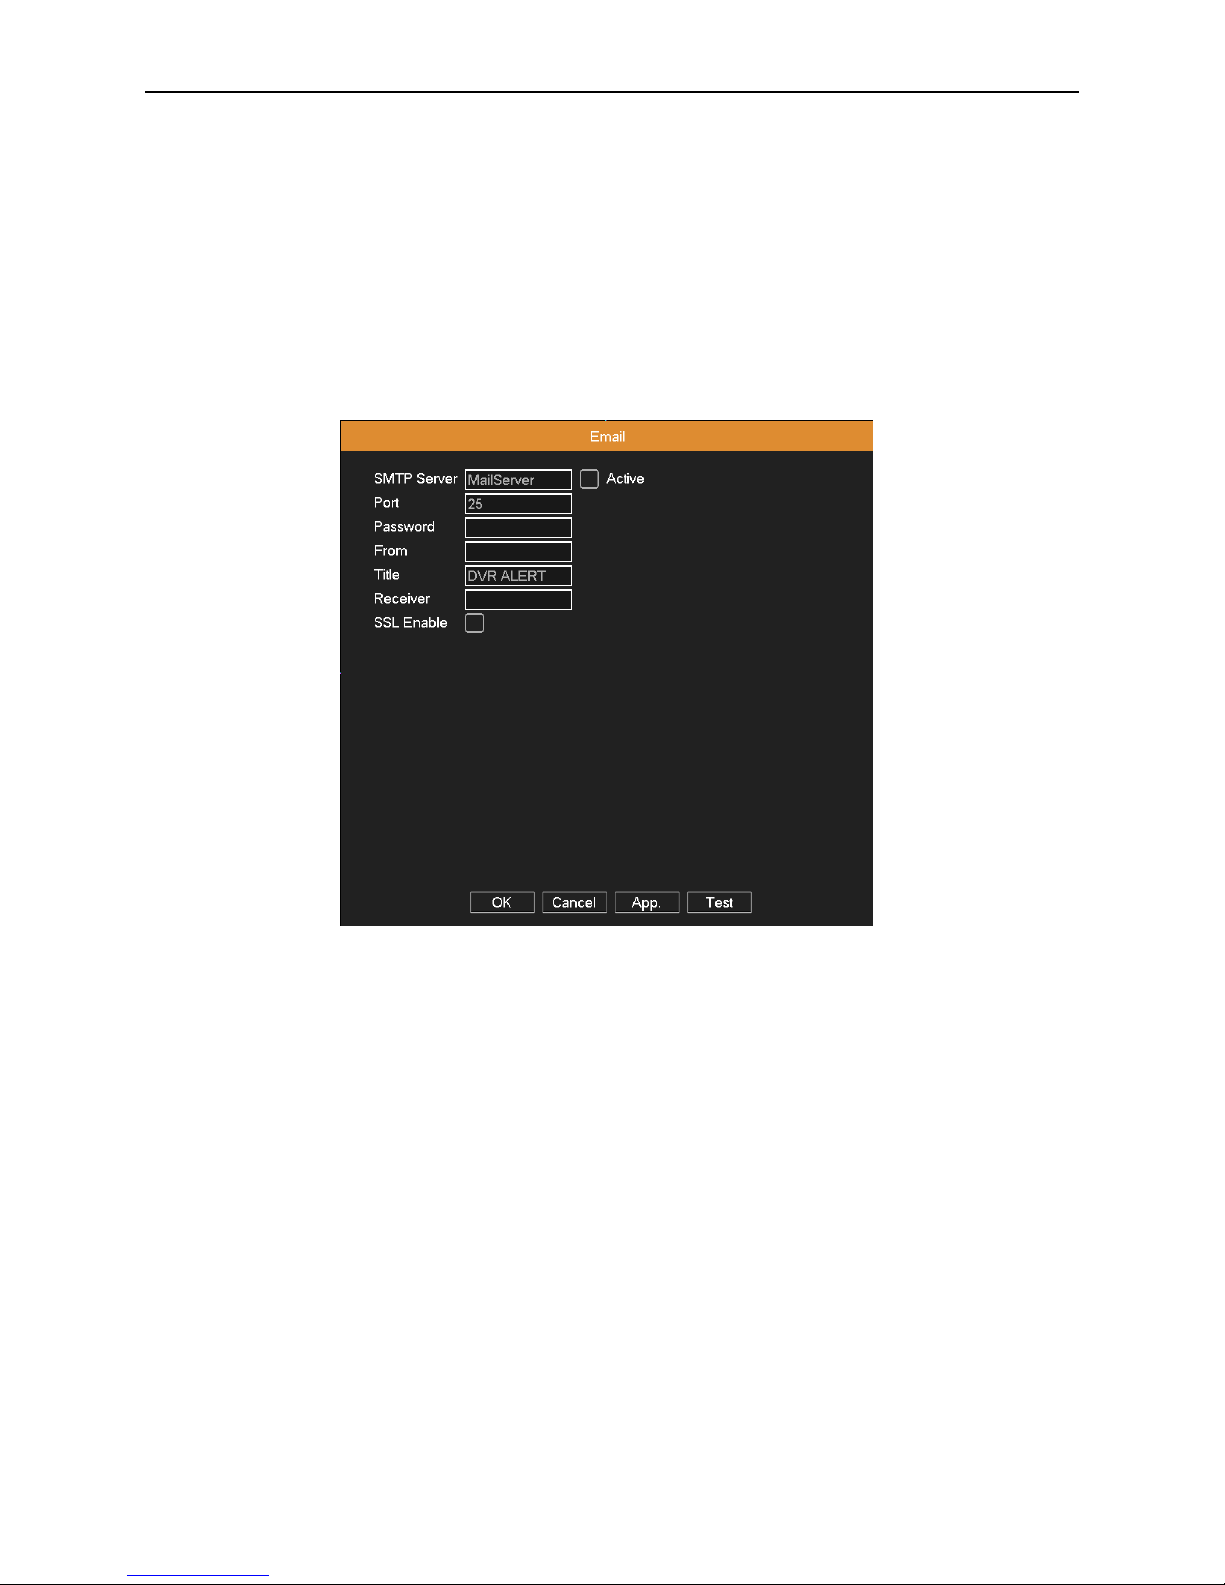
4.3.5 Network Transmission, Port, UPNP
Picture 4.13
Transfer Capability Set: Set the maximum number of connection users, network monitoring and internet download.
Port Set: View and set TCP Port, Phone Port and HTTP Port.
TCP Port: While use the client software to monitor, required by this port number.
Page 30
AHD DVR User Manual
26
Phone Port: Need to map this port on the router while accessing by mobile phone.
HTTP Port: Need to add this port number while browsing by IE.
UPNP: UPNP protocol will be automatic port forwarding on the router , before using this feature, make sure UPNP feature is
enabled on your router.
4.3.6 EMAIL Setup
If the alarm is turned on or the alarm linkage photos are taken, send an email about the alarm information and the photos to
the appointed address.
Picture 4.14 Email
SMTP server: For example, SMTP server address of 126 email is “smtp.126.com”.
Port: Email server port number.
Password: Input the password corresponding to the user.
From: Set the email sender address.
Title: The subject of the message, you can set your own.
Receiver: Send an email to the appointed receivers when the alarm is turned on.
SSL Enable: Decide whether to use SSL (Secure Socket Layer) protocol to login.
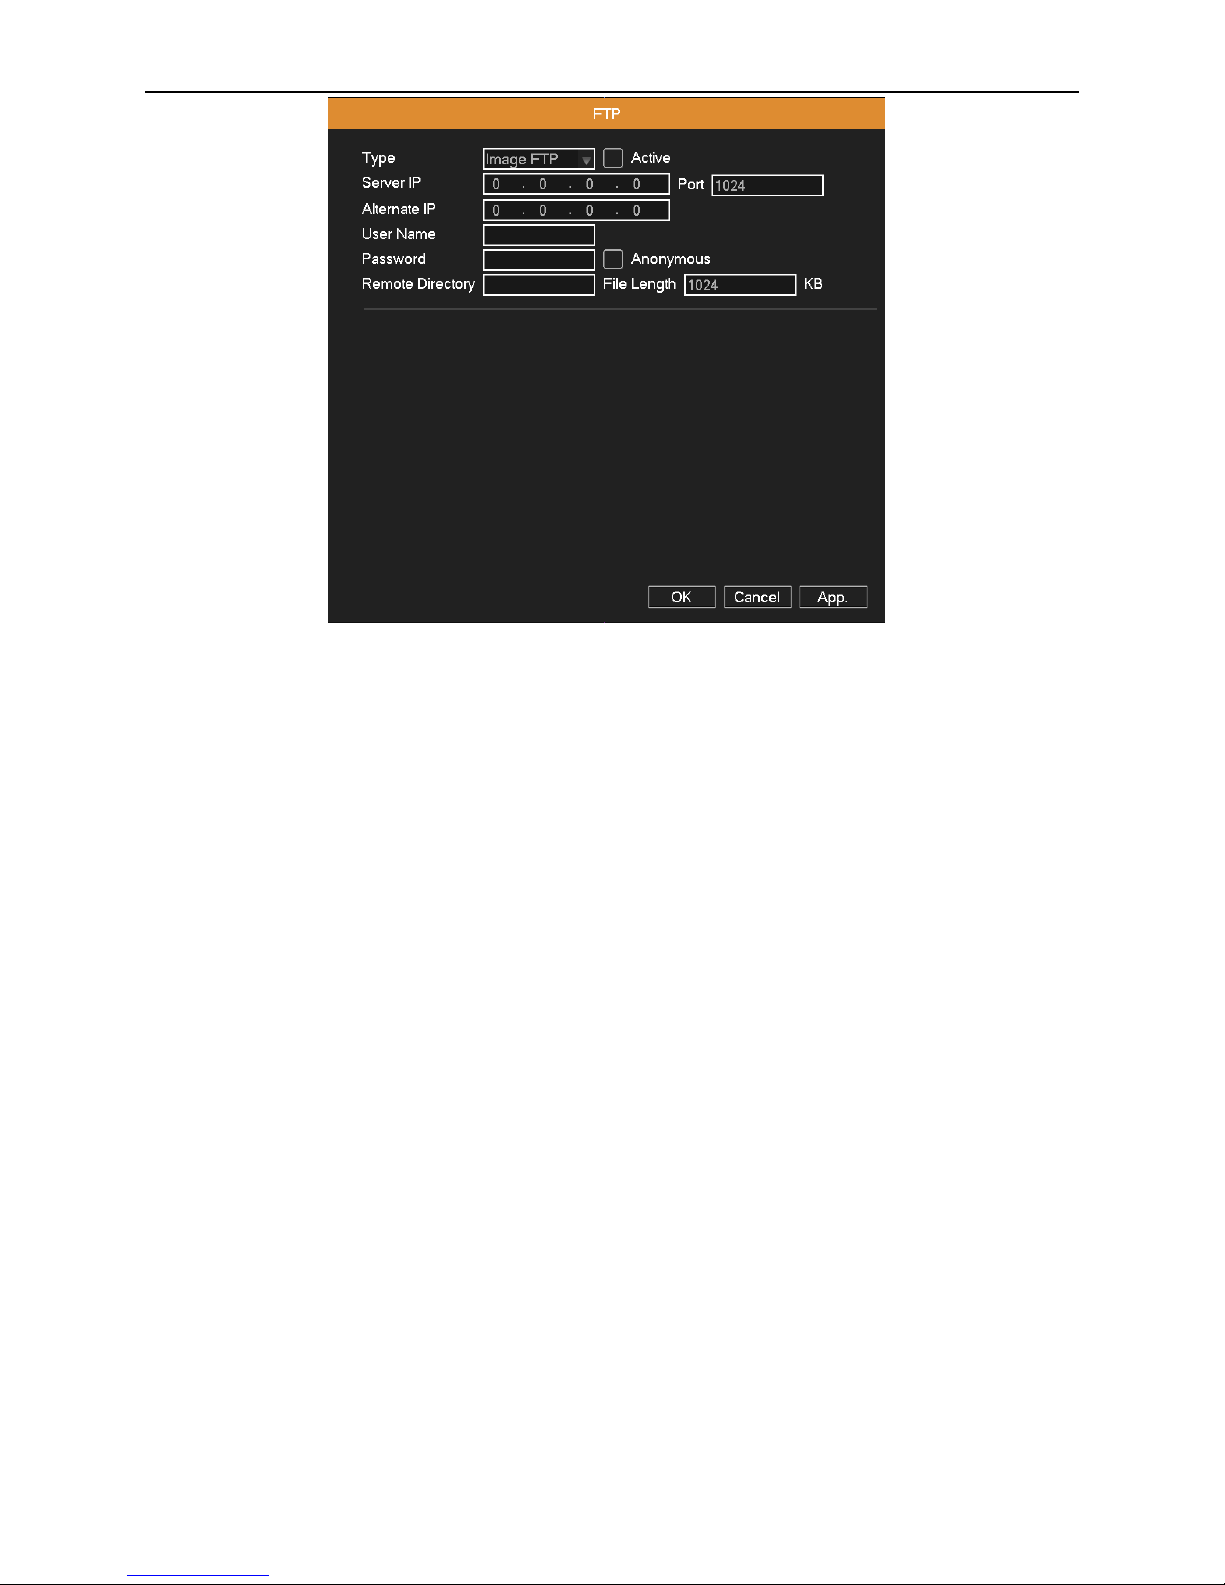
4.3.7 FTP Setup
FTP used when there get alarm, or alarm linkage to recording, snap pictures, you can specify the FTP server to upload
video and capture specific images.
Page 31
AHD DVR User Manual
27
Picture 4.15 FTP
Active: Enable the FTP function.
Server IP: FTP server's IP address.
Port: FTP port, default port is “21”.
Alternate IP: Spare FTP server's IP address.
User name: A user which has permission to log F T P.
Password: User’s password.
Anonymous: Select it for anonymous user.
Remote Directory: File upload’s directory.
File Length: Set the max length for each package of upload files, default is 1024KB.
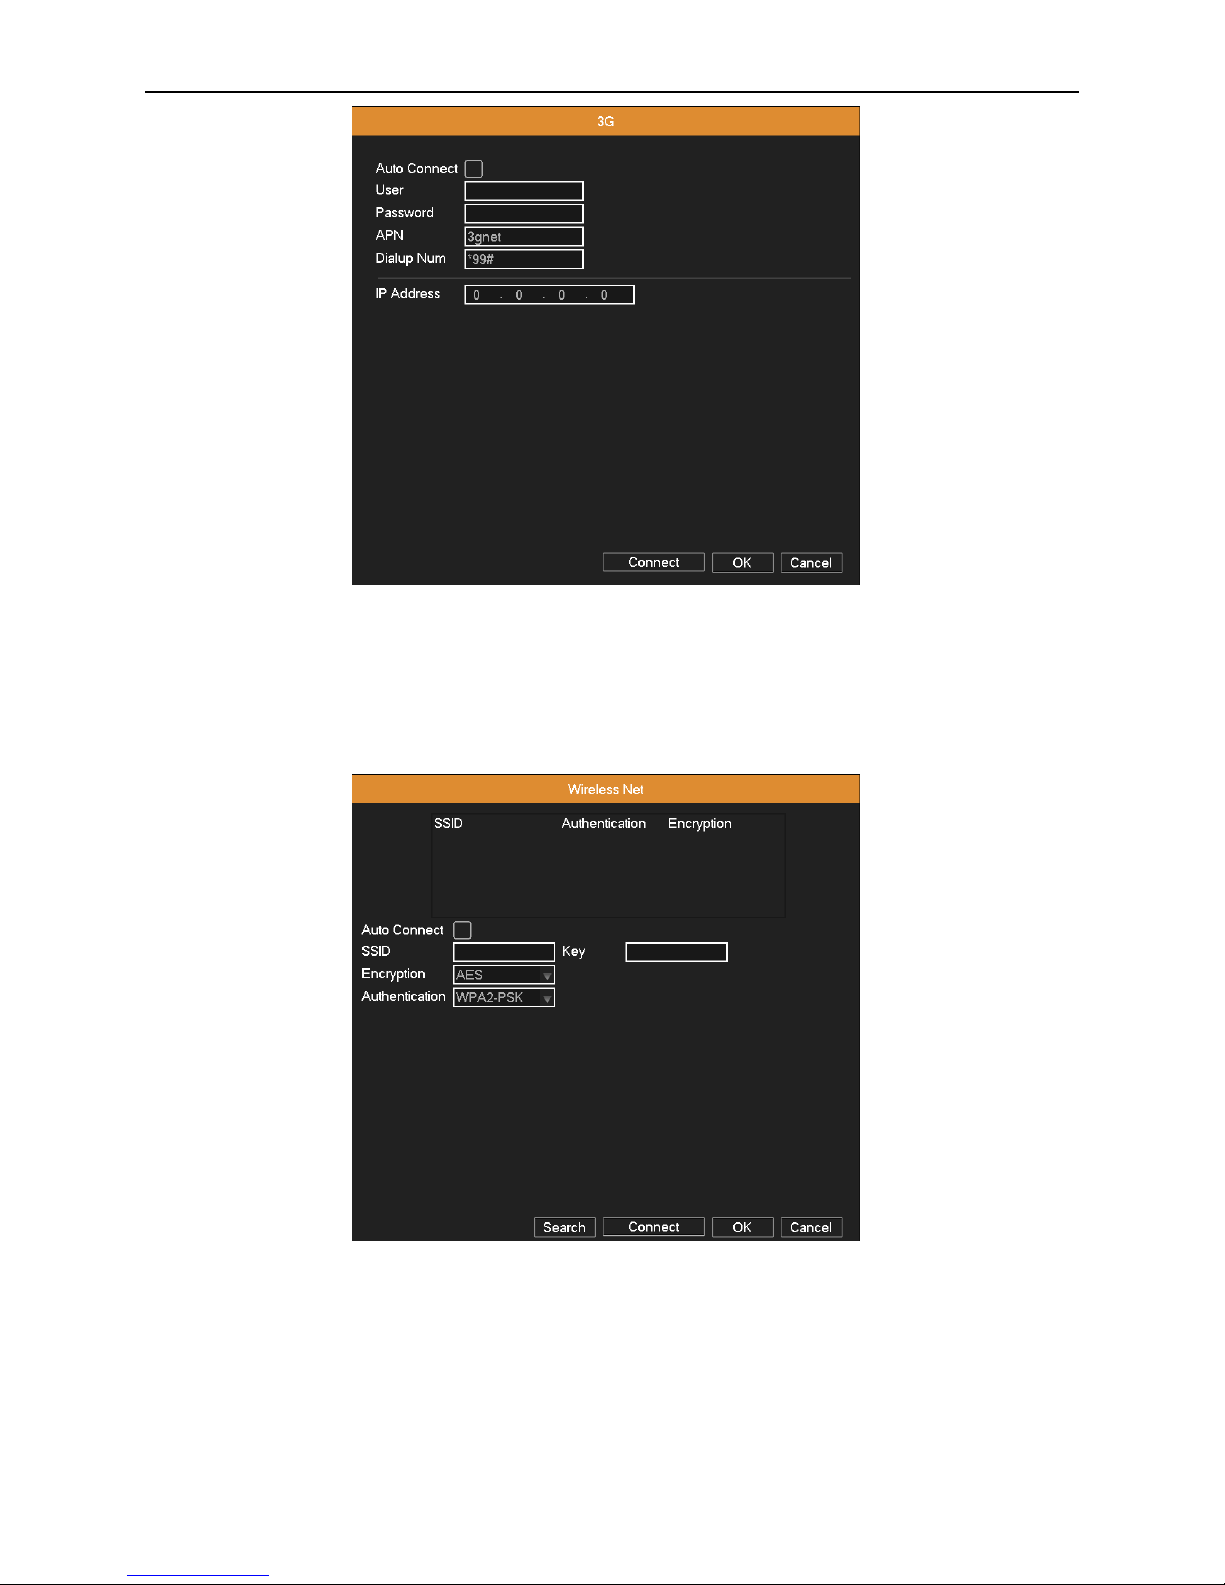
4.3.8 3G Config
Dial-up Internet access through 3G card to realize the device access by client.
Auto Connect: Enable the Wireless function.
User: Dial-up of 3G User Name.
Password: Dial-up user's password.
APN: 3G access point, the default OK.
Dialup Num: 3G dial-up number, the default OK
IP Address: Dial-up IP address number obtained.
Page 32
AHD DVR User Manual
28
Picture 4.16 Wireless config
4.3.9 Wireless Net Config
Connect to wireless router by wireless module. View the device with IP under the condition that DVR has been connected
to WIFI module.
Picture 4.17 Wi-Fi
Search: Click “Search” button to get the available wireless network in the list.
Auto Connect: Enable the Wi-Fi function.
SSID: Name of wireless LAN automatically fit the connected wireless device.
Key: Wireless network’s password.
Encryption: Set the router’s encryption type.
Authentication: Set the router’s authentication type.
Page 33
AHD DVR User Manual
29
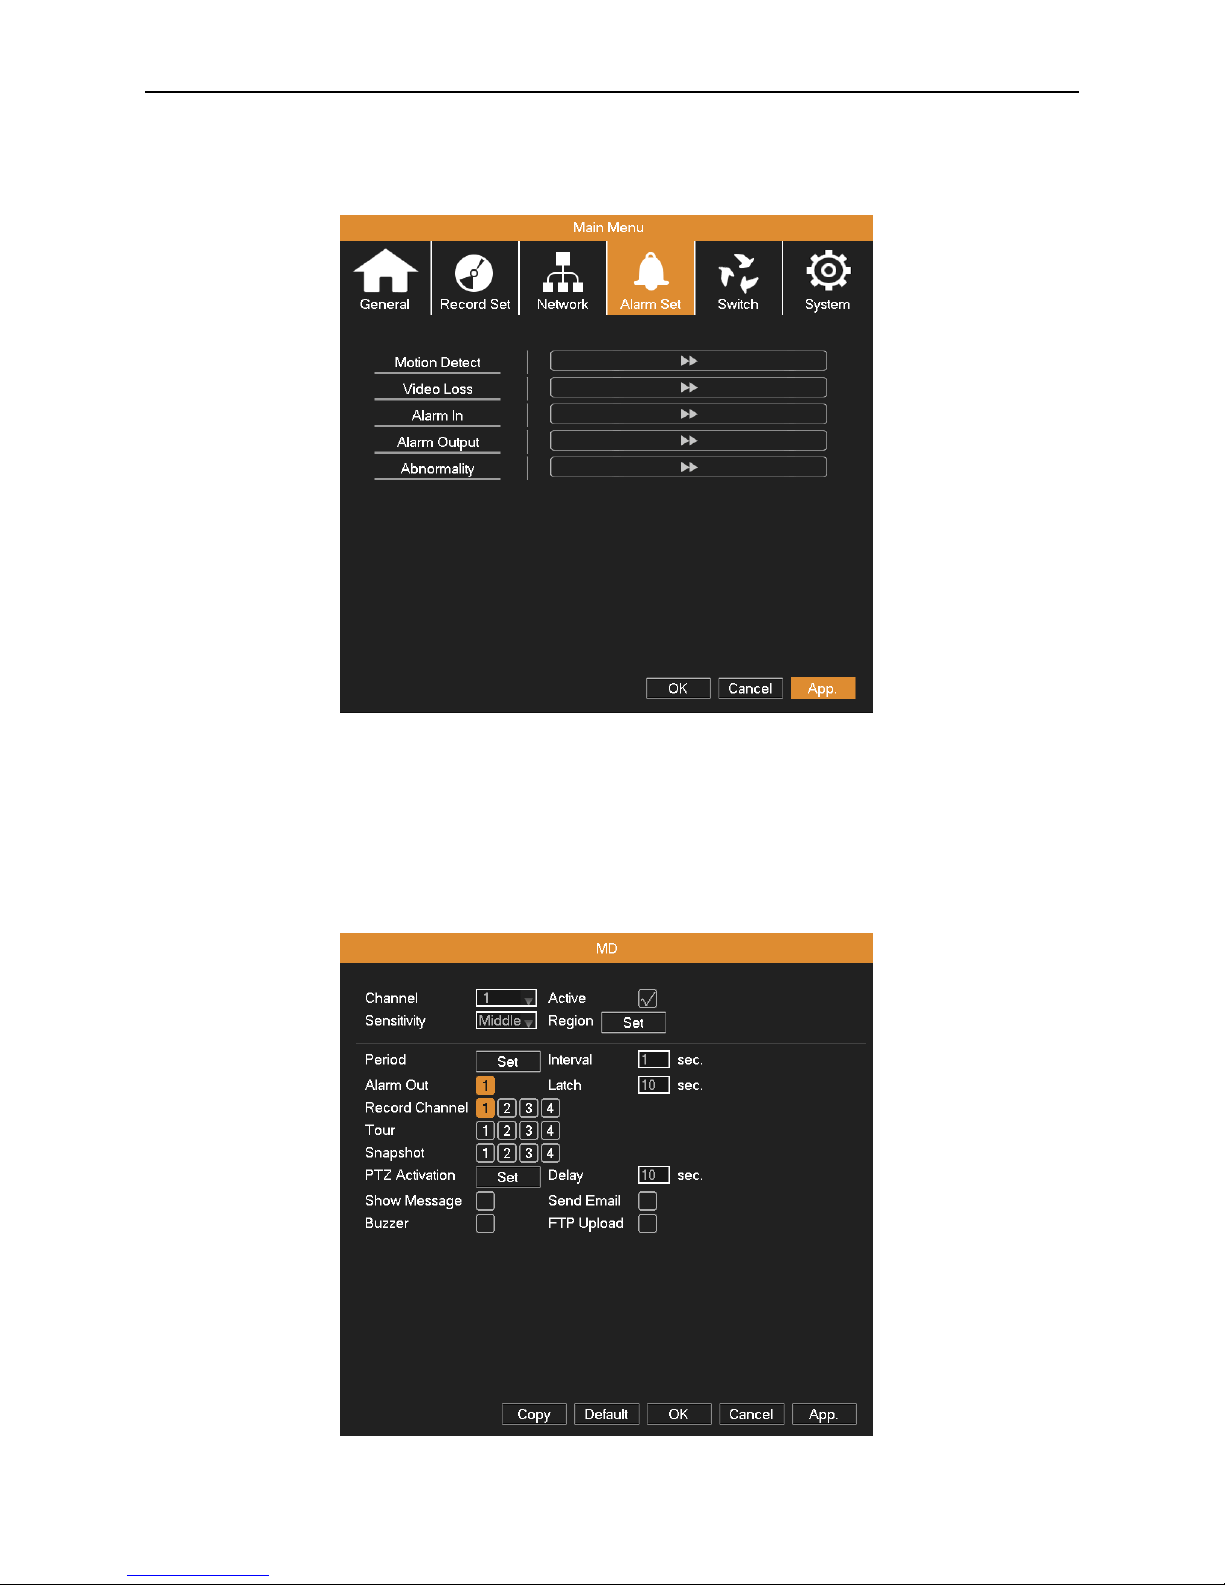
4.4 Alarm Set
Alarm functions include: Motion Detect, Video Loss, Alarm Input, Alarm Output and Abnormality.
Picture 4.18 Alarm
4.4.1 Motion Detect
When system detects the motion signal that reaches the sensitivity you set, the motion detection alarm and the linka ge
function are turned on.
Picture 4.19 motion detect
Page 34
AHD DVR User Manual
30
Channel: Choose a channel which needs to set the motion detection.
Active: Enable the motion detection function.
Sensitivity: Adjust the sensitivity of motion detection (six options) according to the practical situation.
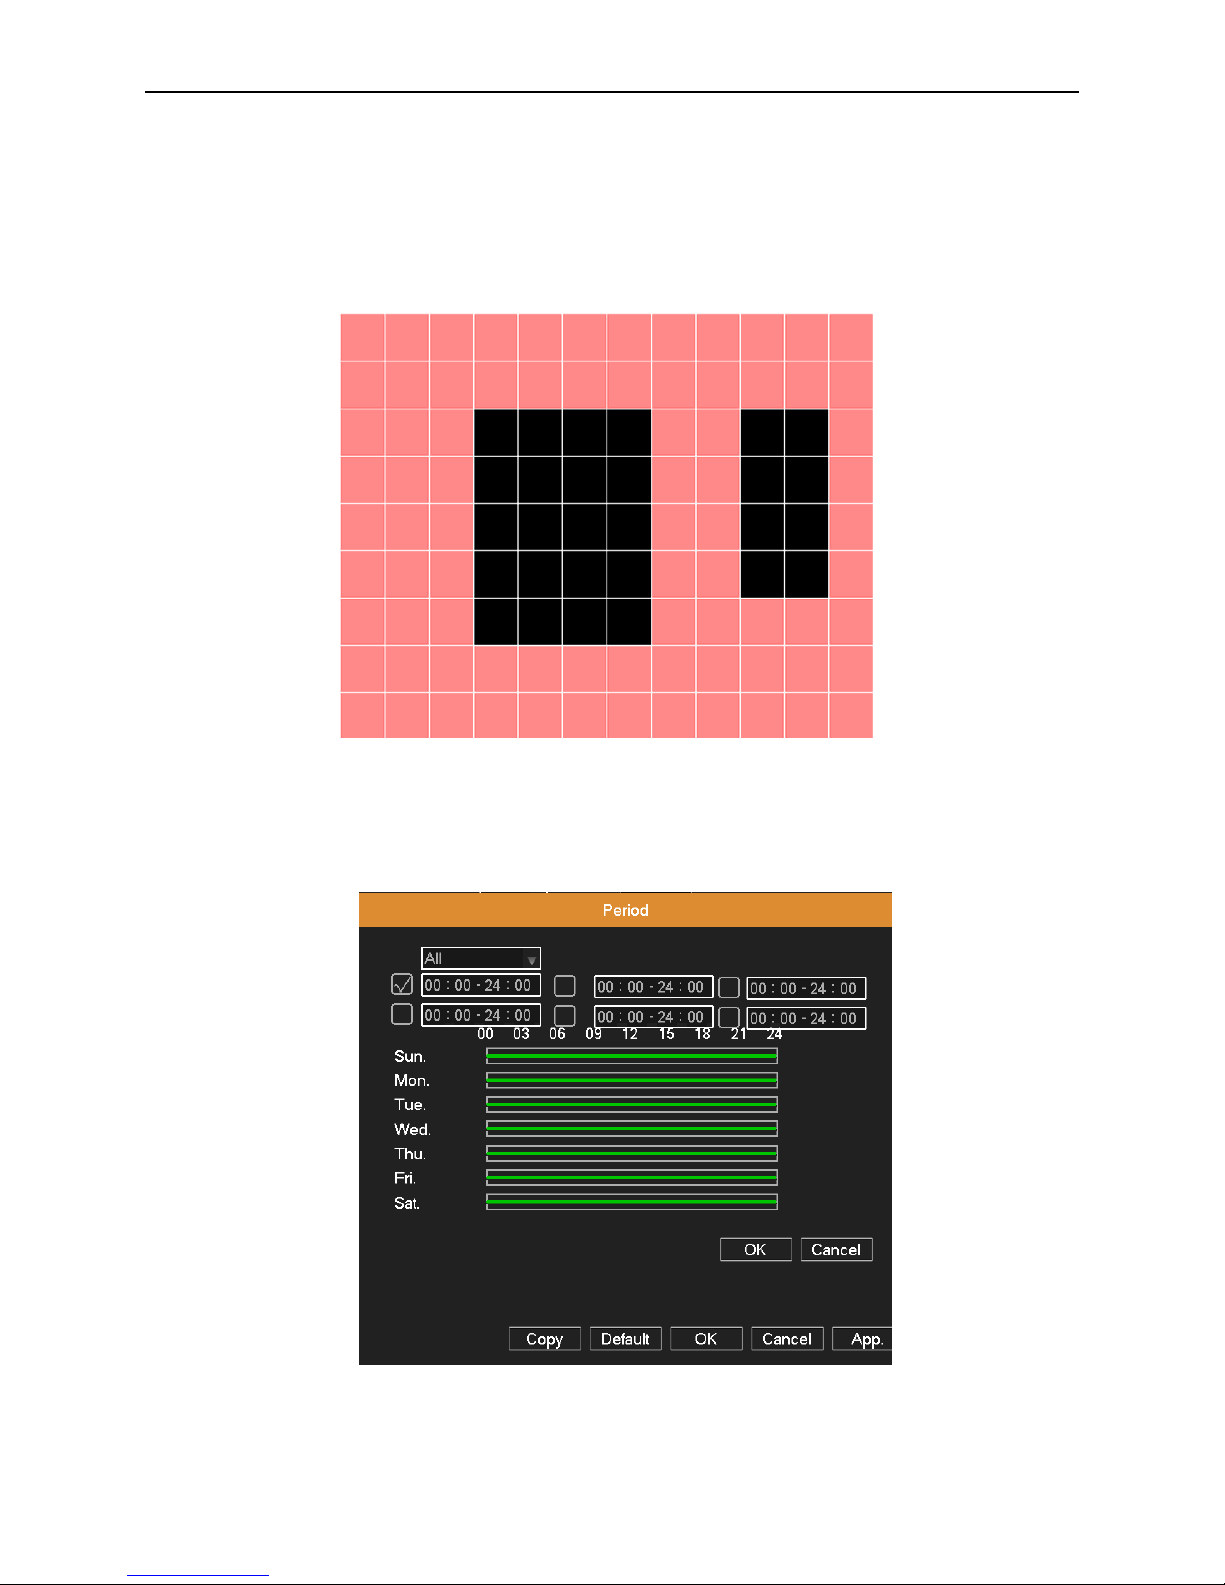
Region: Click Set button, drag the mouse to draw the detection area. Black block means the unfenced area. Coverage
block means the dynamic defensive area.
Picture 4.20 set the area
Period: Click Set button, select one day or all days of detection plan, set the time period (each day is divided into six time
sections), then click OK, it will start detecting only in the set range.
Picture 4.21 Period
Interval: Only one alarm signal is turned on even there are several motion detection signals in this interval.
Page 35
AHD DVR User Manual
31
Alarm Out: Start the external equipment of corresponding linkage alarm when the motion detection alarm is turned on.
Delay: Delay a few moments to stop when the alarm state is turned off. The range is 10~300 seconds.
Record channel: Choose the recording channel (multiple options supportive). Trigger the recording signal when the alarm
is turned on.
Note:Set in the “Main Menu” “Record Set” “Record Plan” and perform the linkage recordin g. And set
“Desktop Shortcut Menu” “Record Mode” to be configured, motion detection linkage recording can work.
Tour: Choose the recording channel (multiple options supportive), which will tour preview with single screen when the
alarm is turned on.
Snapshot: Choose the snapshot channel (multiple options supportive), which will capture a snapshot when the alarm is
turned on.
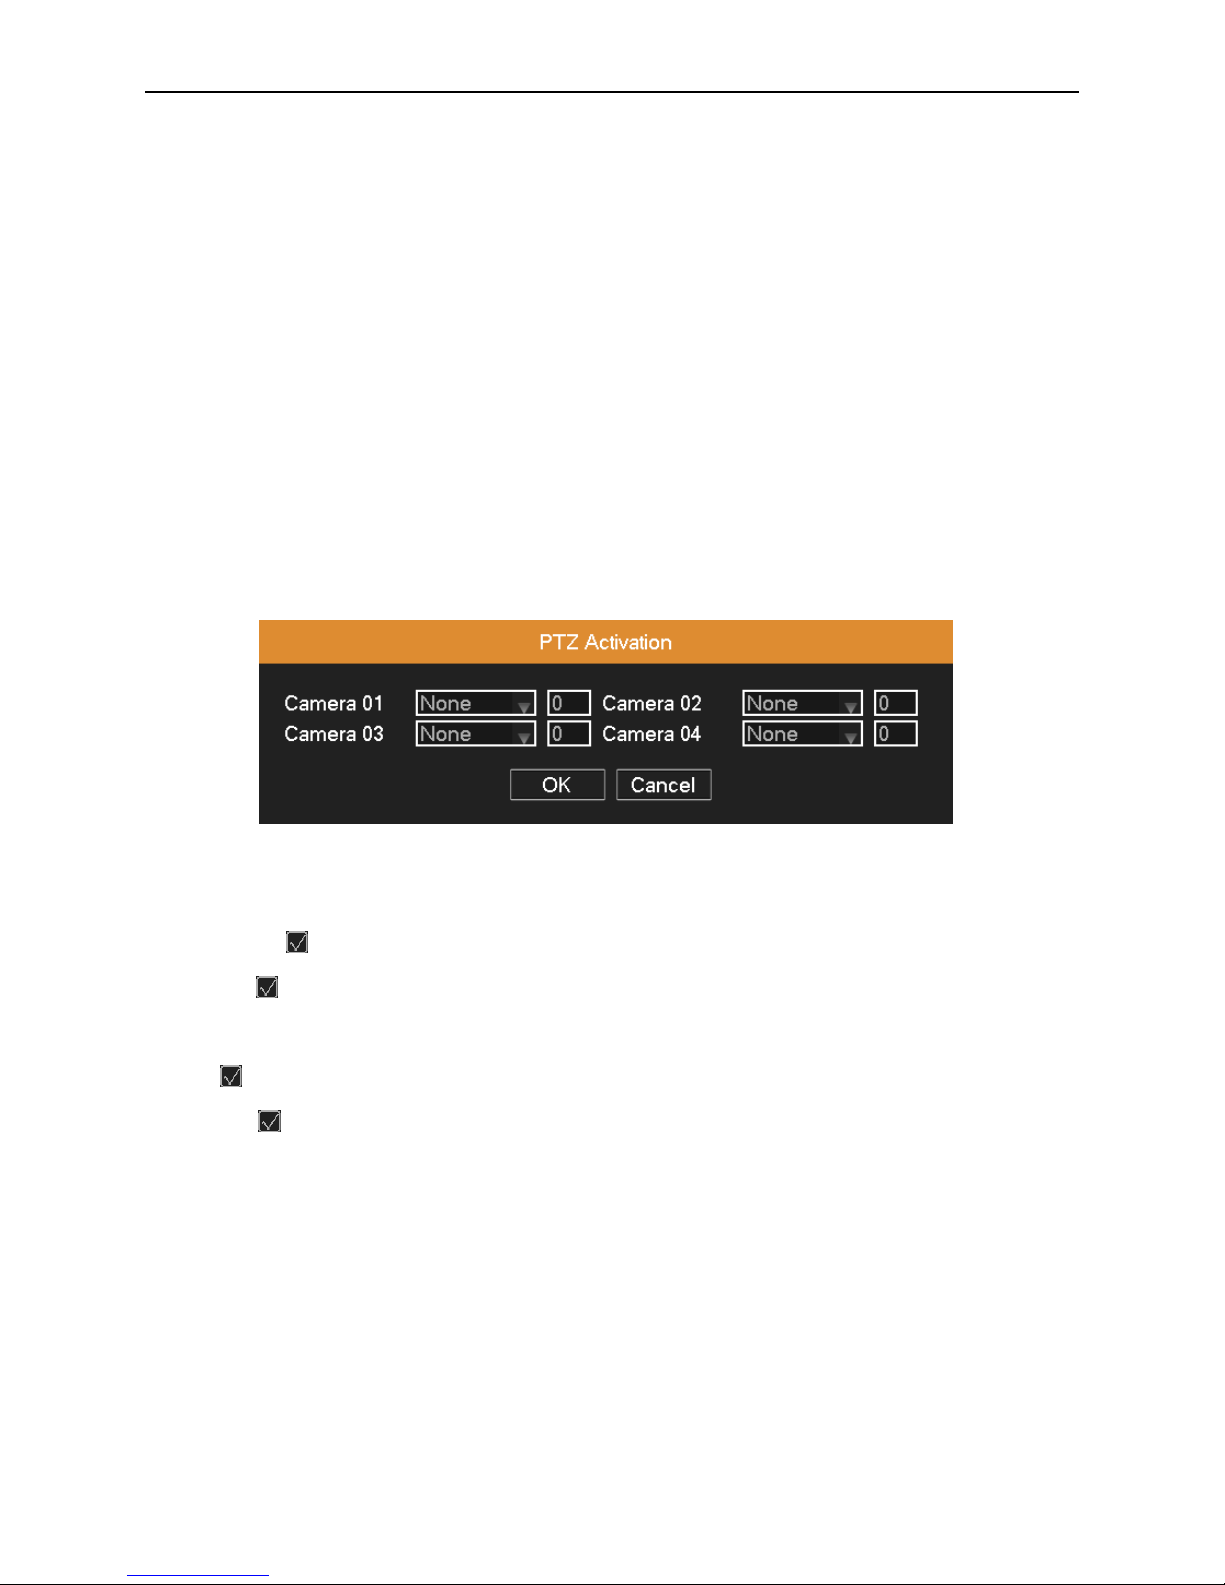
PTZ Activation: Set the PTZ linkage when the alarm is turned on.
Note: Using PTZ linkage needs to set preset, cruise between points and scan etc (“Desktop Shortcut Menu”
“PTZ”“Set”).
Picture 4.22 PTZ activation
Delay: After stopping alarm, it is the extended period to stop alarm recording, the range is 10~300 seconds.
Show Message: means popping the alarm information dialog box in the local host computer’s screen.
Send Email: means sending an email to user when the alarm is turned on.
Note: Sending email function needs to do relative setting in “Main Menu”“Network”“Net Service”.
Buzzer: means when alarm occurs, the equipment issues the "DiDi" sounds of two long ring.
FTP Upload: means when alarm occurs, it will send alarm events to the FTP server.
Note: FTP upload function needs to do relative setting in “Main Menu”“Network”“Net Service”.
Copy: User can copy and apply channel settings to the other channel.
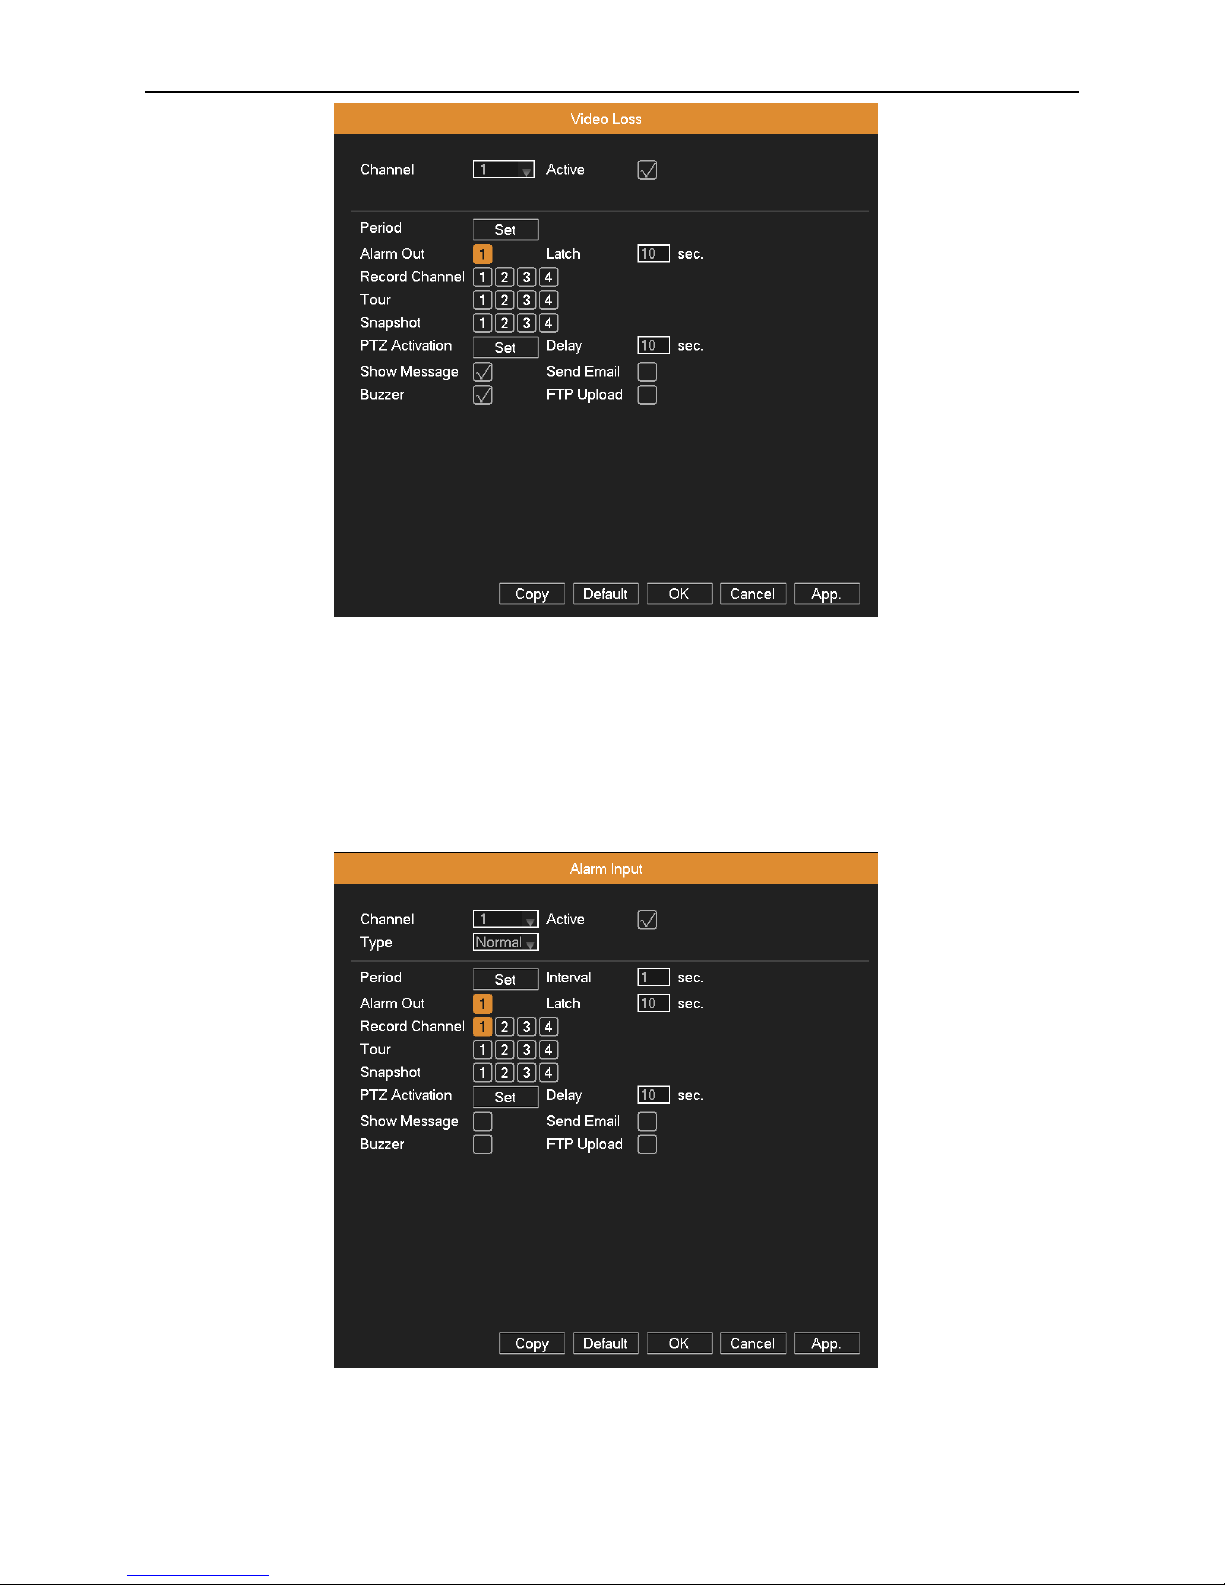
4.4.2 Video Loss
When the equipment cannot obtain the channel video signal, the video loss alarm and the linkage function is turned on.
Page 36
AHD DVR User Manual
32
Picture 4.23 video loss
Set method: refer to Chapter 4.4.1. Motion Detect.
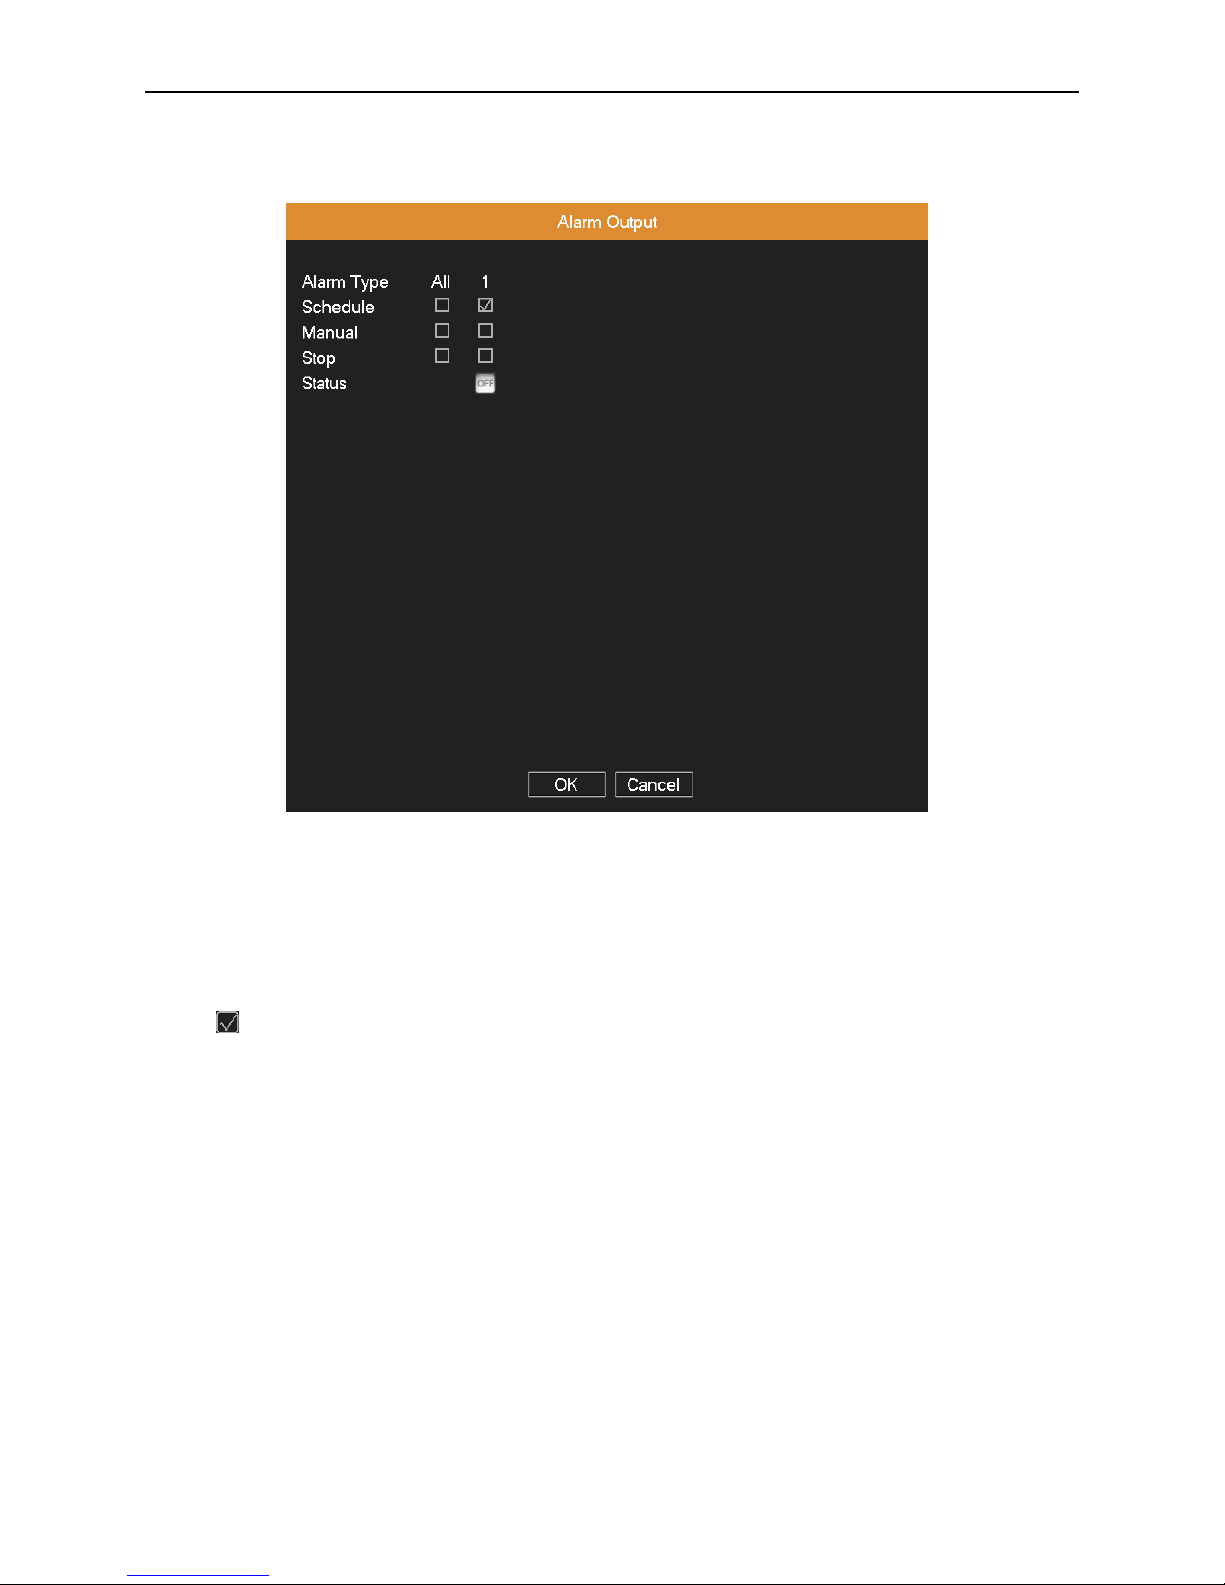
4.4.3 Alarm Input
When the equipment obtains the external alarm signal, the alarm function is turned on.
Picture 4.24 alarm input
Set method: refer to Chapter 4.4.1. Motion Detect.
Page 37
AHD DVR User Manual
33
4.4.4 Alarm Output
Control the alarm output state of all channels.
Picture 4.25 alarm output
Schedule: Alarm is turned on according to the schedule configuration.
Manual: The relative channel outputs alarm signal no matter the channel in any state.
Stop: The relative channel stops alarming no matter the channel in any state.
Status: means this channel has alarm output, otherwise without alarm output.
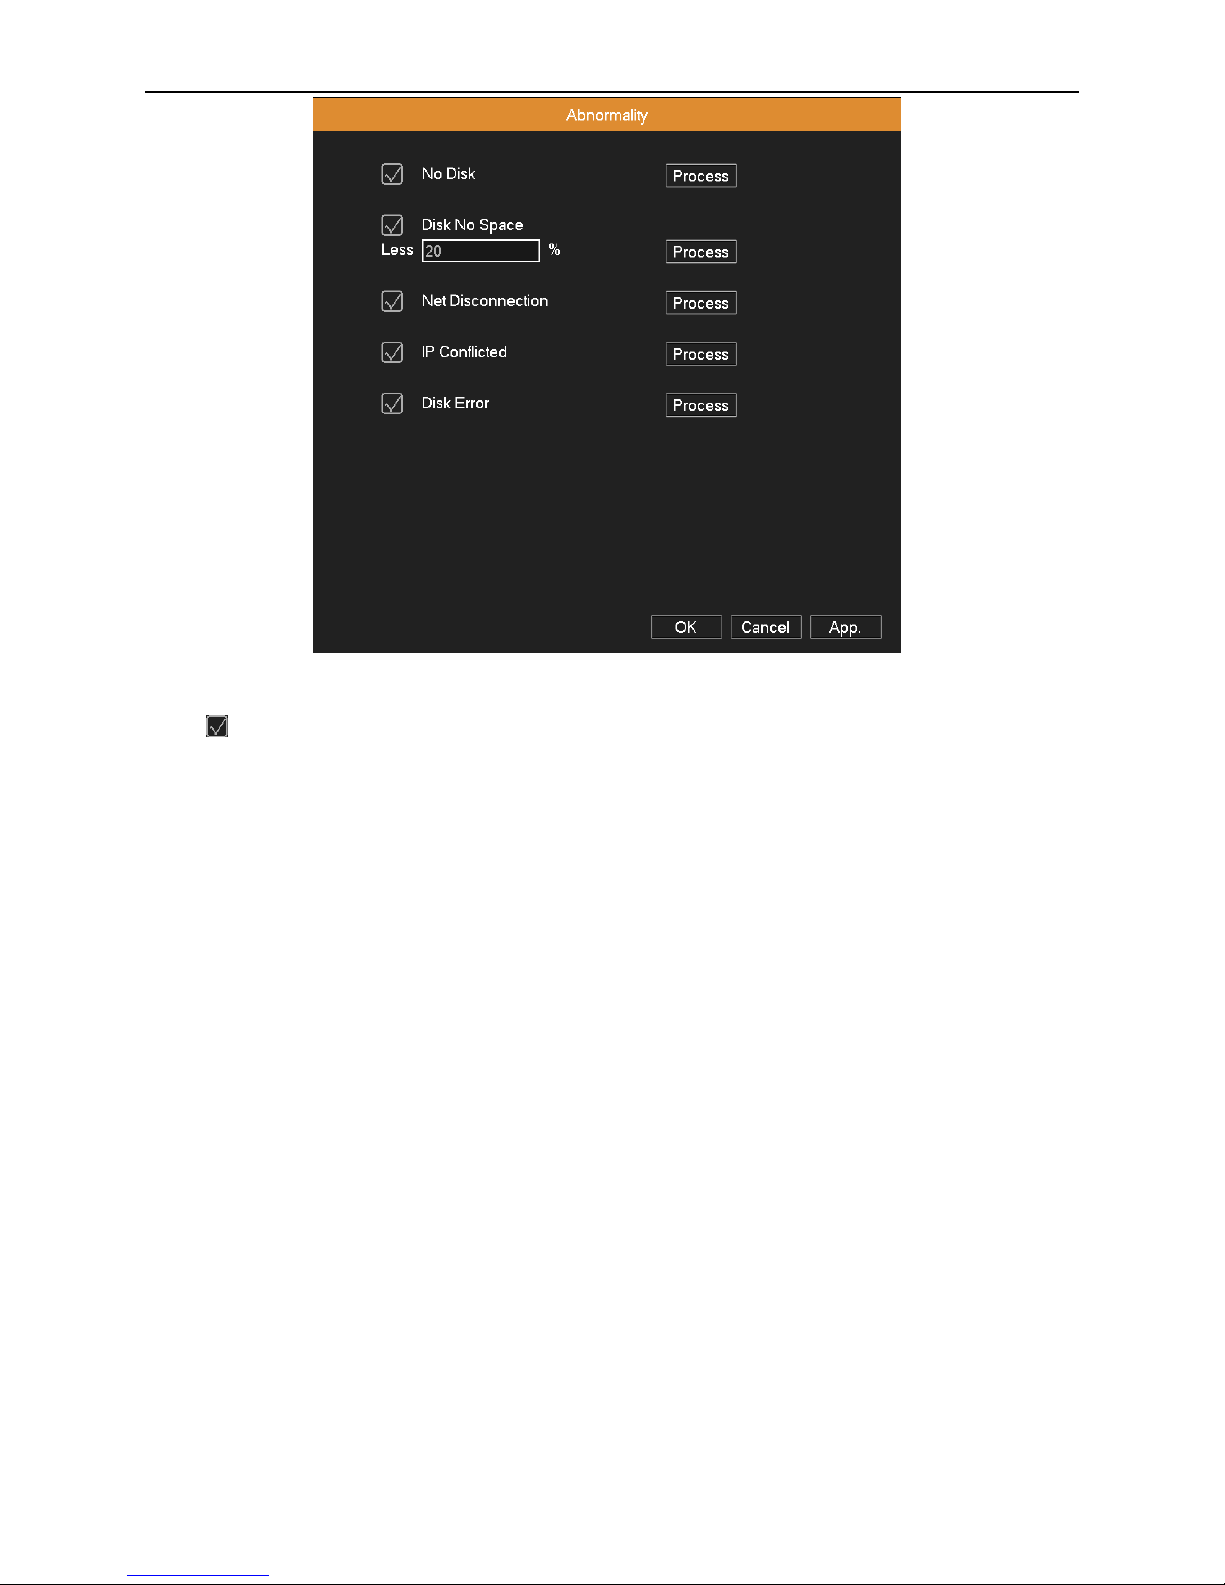
4.4.5 Abnormality
It will trigger the relevant alarm according to the process setting once some abnormalities (no disk, no disk space, net
disconnection, IP conflict, disk error) happen, which is convenient for customers to know DVR abnormality.
Page 38
AHD DVR User Manual
34
Picture 4.26 Abnormality
Select to enable abnormality type, click Process button to set the trigger options. Alarm out, delay, show message,
send email and record are refer to Chapter 4.4.1 Motion Detect.
Less: Set a threshold value for remaining HDD space. If the threshold value is reached, DVR will have cue as the setting of
process.
4.5 Switch
This device can receive multi-type signal input.
Support:
1) Full analog HD 720P mode: This mode can only access 720P analog HD cameras;
2) Mixed mode: This mode supports analog HD and SD analog cameras;
3) Full SD an alog mode: This mode only supports SD analog cameras.
Warning:
1: Don’t switch the channel mode if not necessary, once changed, the original related date maybe lost even cause the
machine to abnormal use.
2: Please don’t operate this function if non-professional.
Channel mode: Customer can switch this device to the different mode.
Page 39
AHD DVR User Manual
35
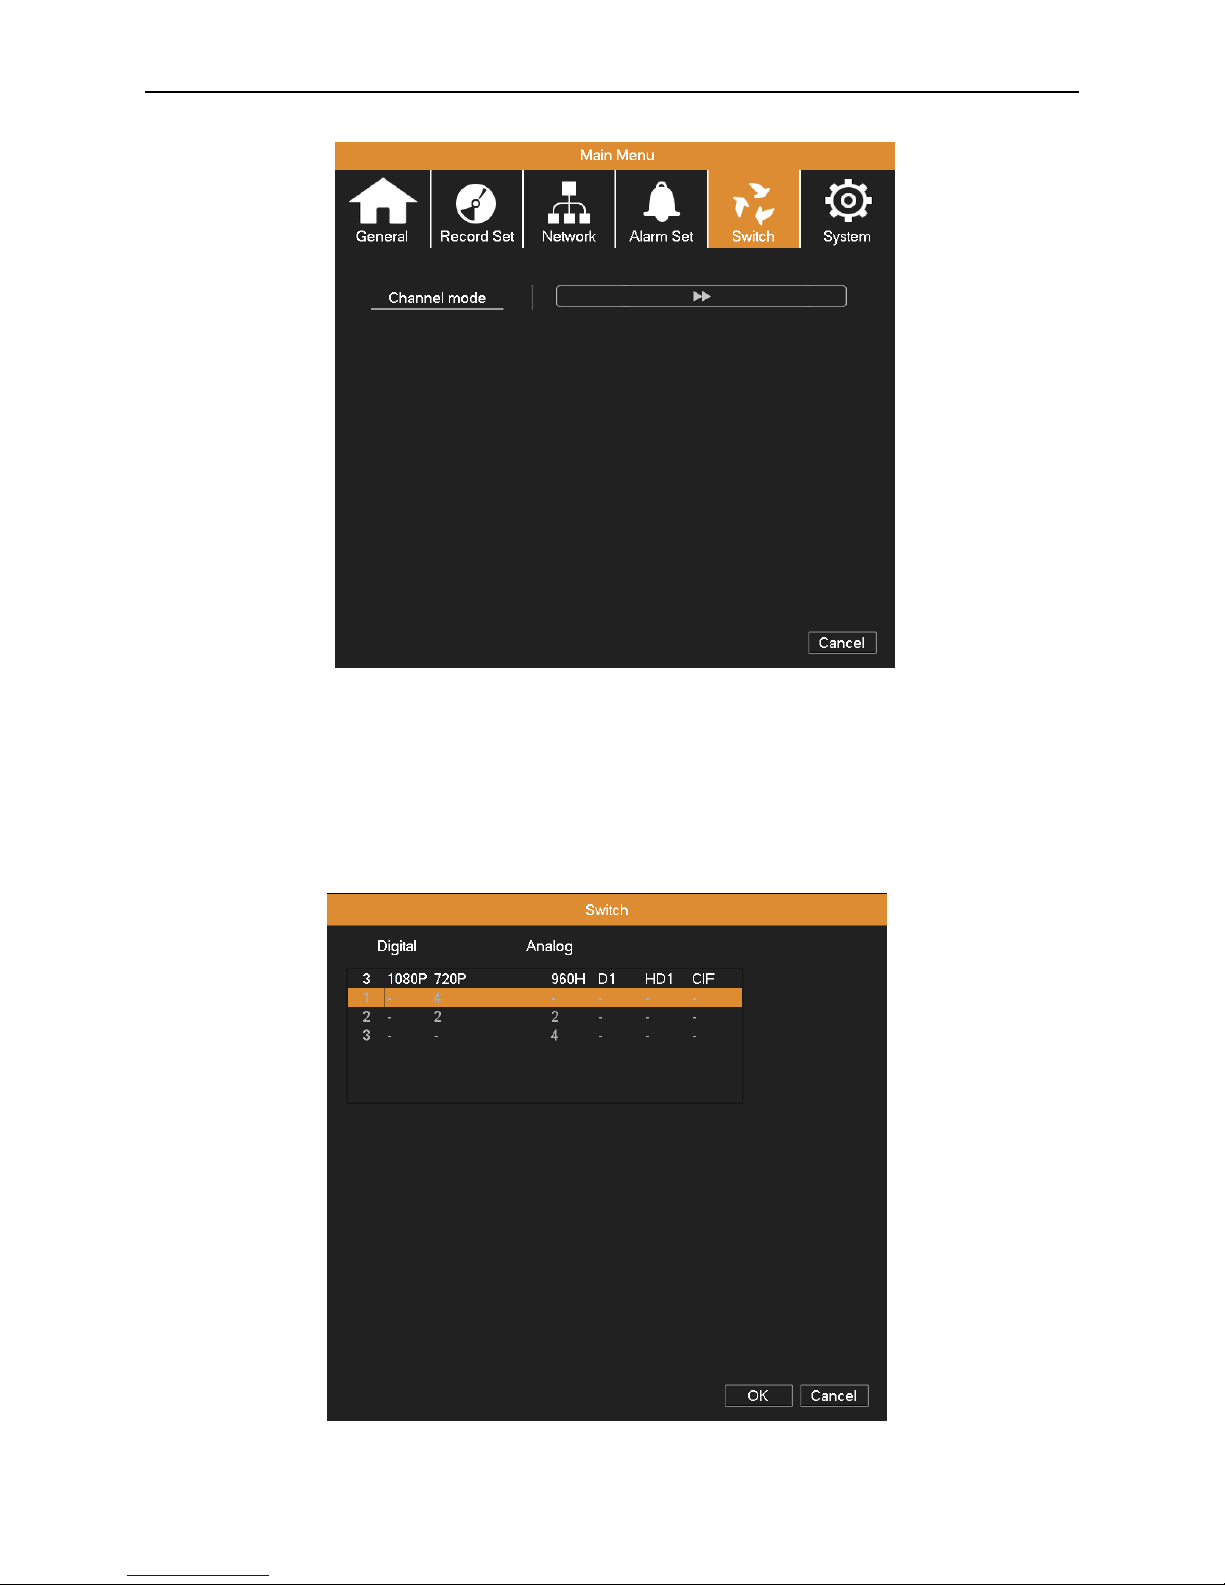
1. Choose “Main Menu” “Switch”, show as picture 4.27.
Picture 4.27 Switch
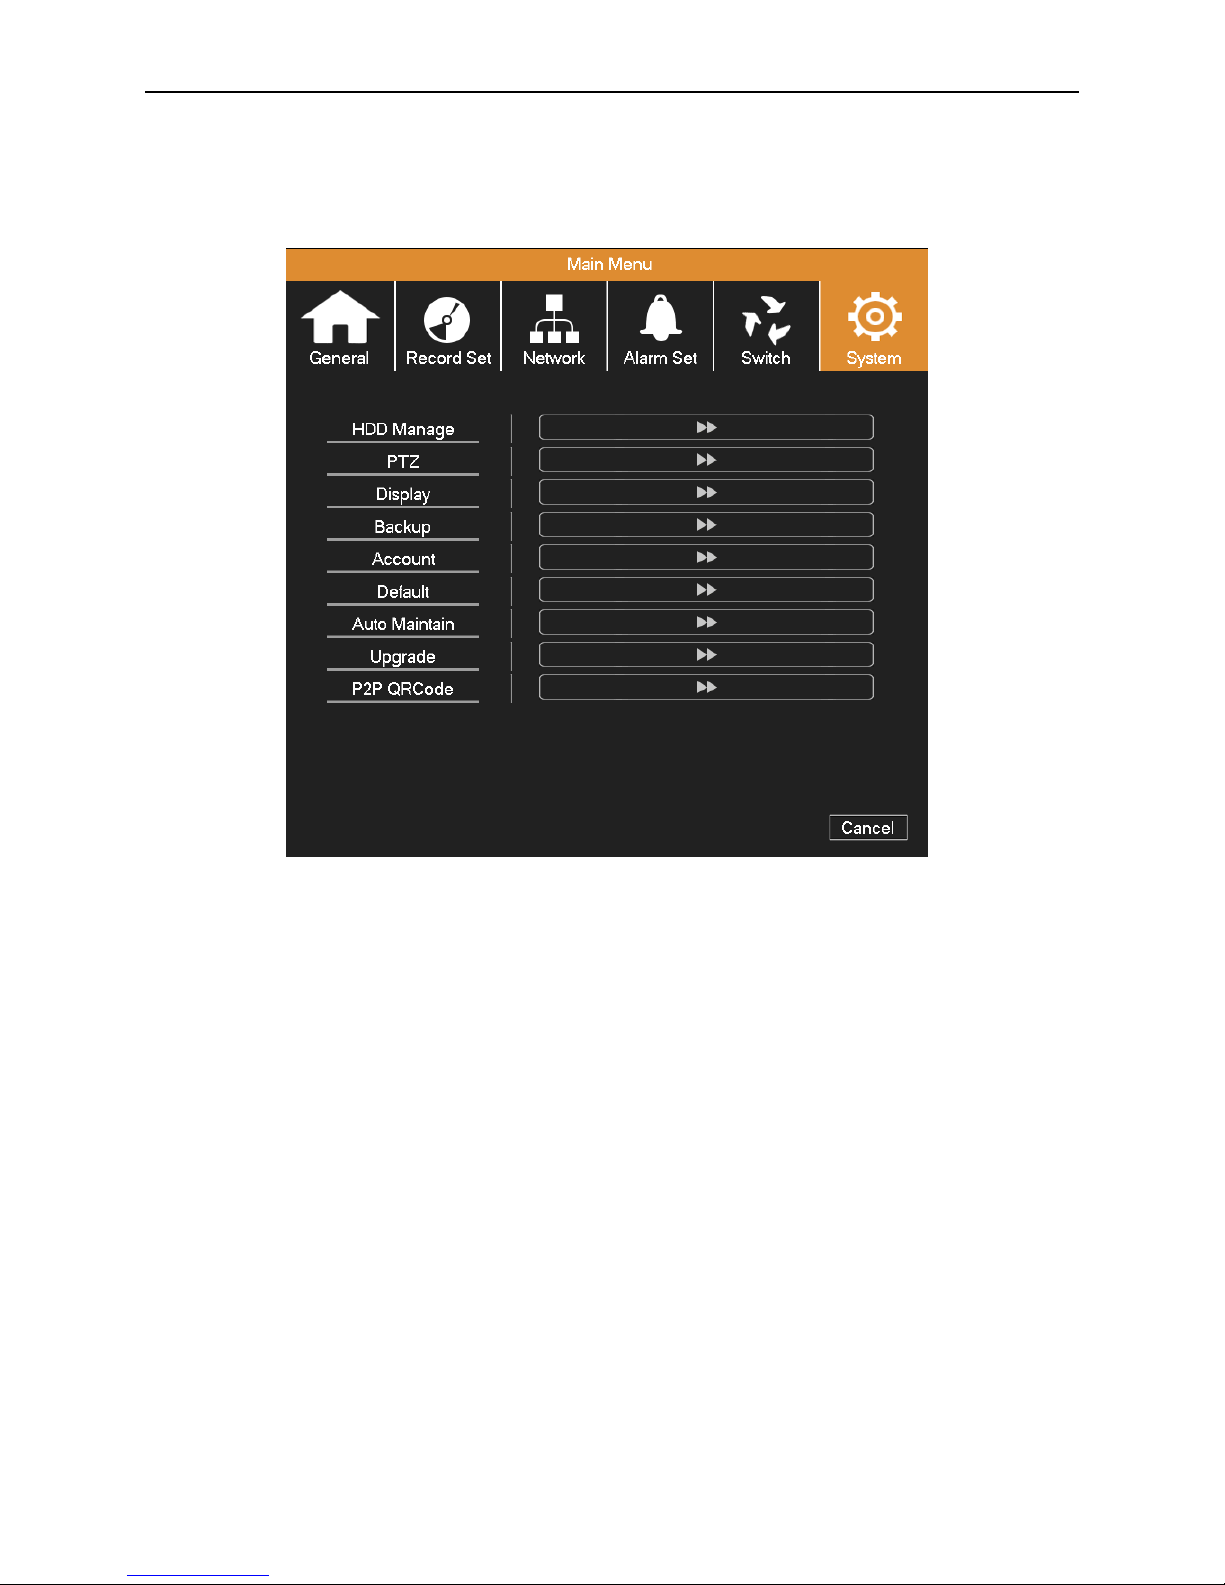
2. In channel type list, there are 3 available channel combination ways (picture 4.28). In a nalog channels, the numbers
under resolution means the maximum analogue channels which can be connected under that resolution. In digital channels,
the numbers under resolution means the maximum IP camera or other network device channels which can be connected
under that resolution. Customers can choose any of the combination according to their demands. Click OK to finish the
type switch (needs restart).
Picture 4.28 Channel Type
Page 40
AHD DVR User Manual
36
4.6 System Management
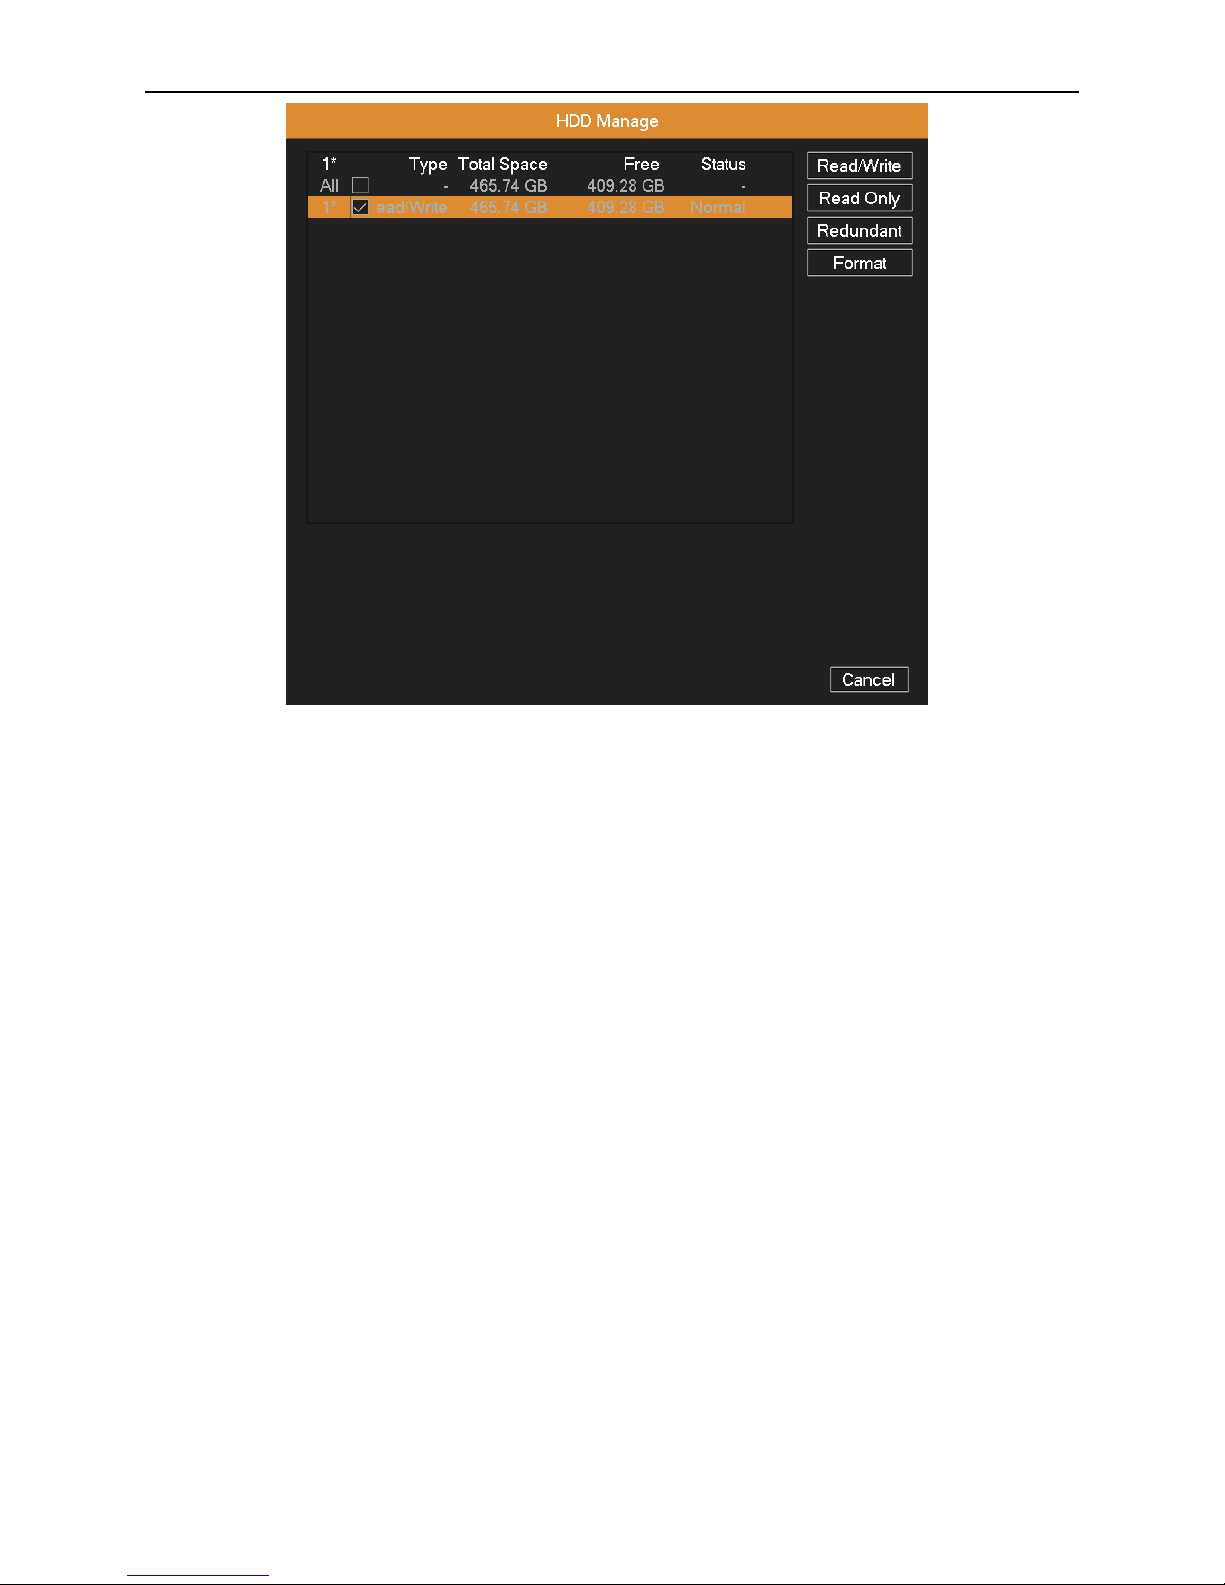
Set the system parameters such as HDD Manage, PTZ, Display, Backup, Account, Default, Auto Maintain, Upgrade and
P2P QRCode.
Picture 4.29 System
4.6.1 HDD Management
Configure and manage the hard disk.
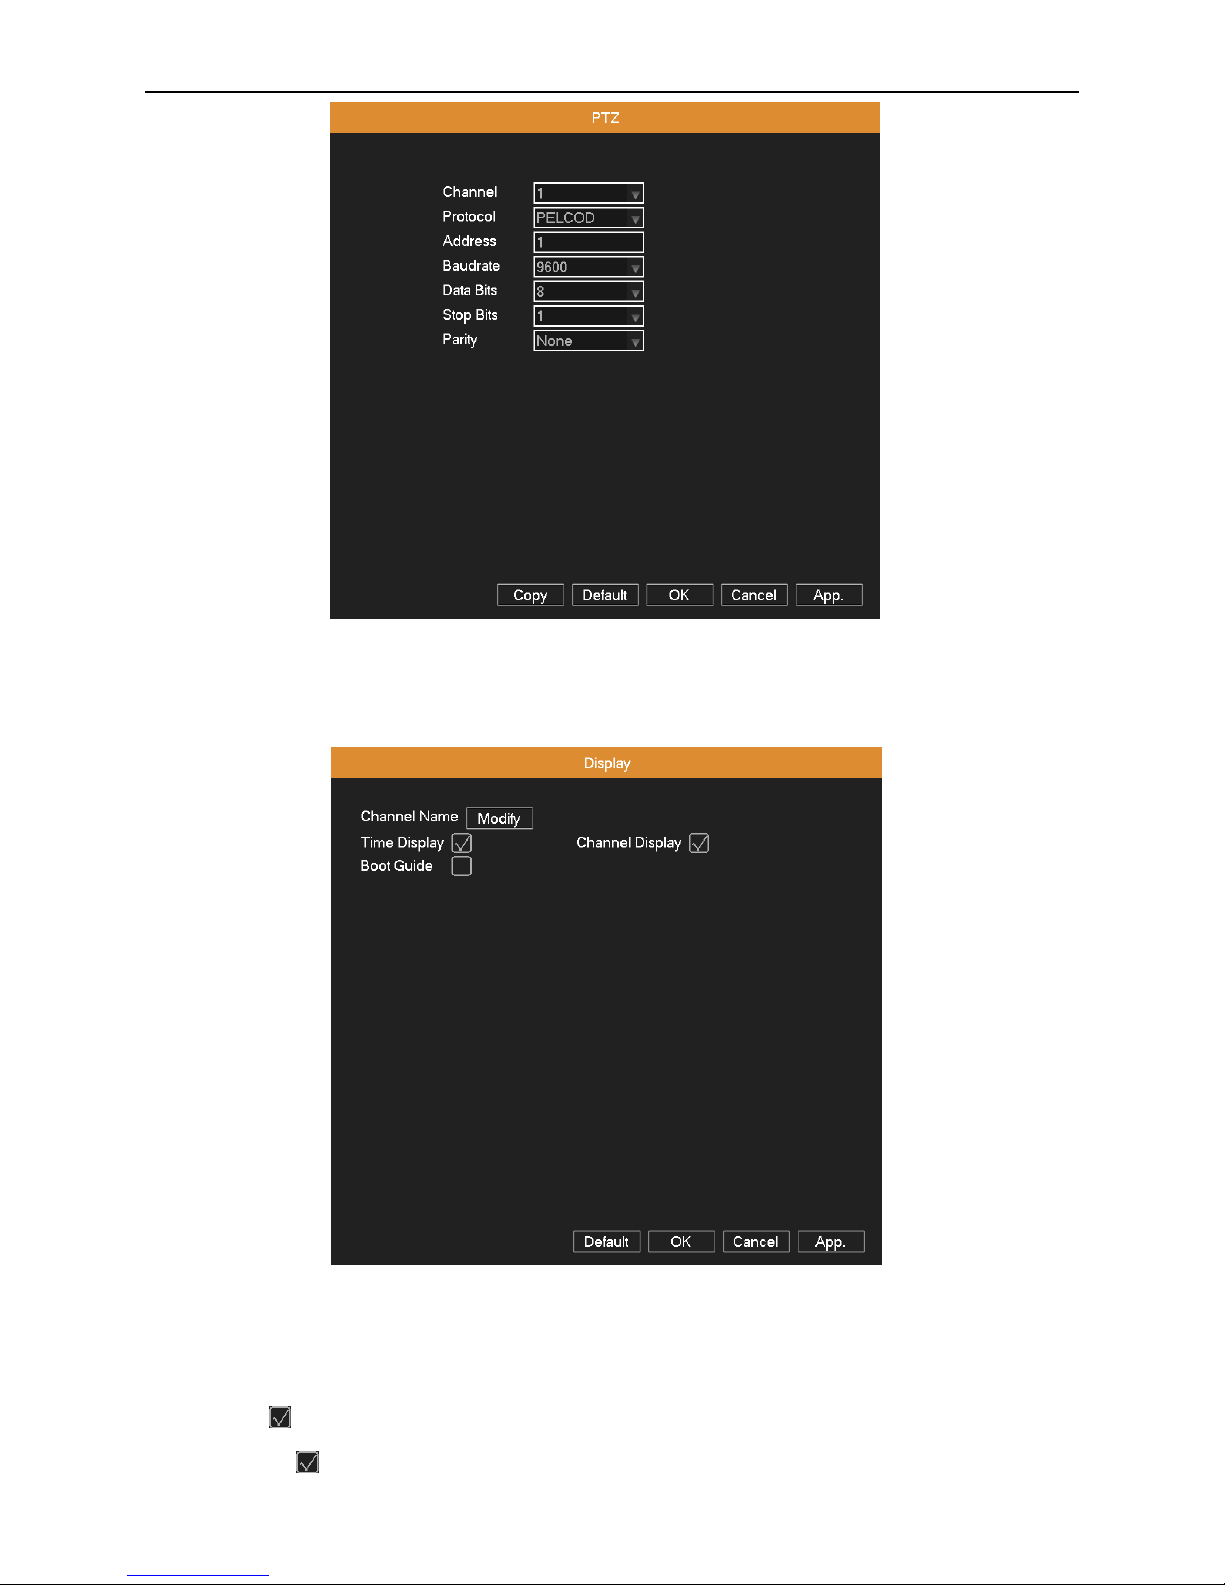
The menu displays the current hard disk’s information: type, total space, free space, status, etc.
The HDD operation include: set up the write-read disk, read-only disk, redu ndant disk and format. Choose the hard disk
and click the function button on the right to execute.
Read/Write: The equipment can read data and write data.
Read Only: The equipment can read data but cannot write data.
Redundant: In the case of DVR already has the write-read disk, double backup the video files in the write-read disk.
Format: All of the data on the selected disk will be lost after formatting.
Page 41
AHD DVR User Manual
37
Picture 4.30 HDD Management
4.6.2 PTZ Config
Channel: Choose the dome camera’s input channel.
Protocol: Choose the corresponding dome protocol (take PELCOD as an example).
Address: Set as the corresponding dome address. Default: 1.
Baud rate: Choose the corresponding dome baud rate. Default: 9600.
Date Bit: Include 4 options. Default: 8.
Stop Bit: Include 2 options. Default: 1.
Parity: Include odd check, even check, mark check, space check. Default: None.
Note: The parameters of protocol, address, baud rate should be consistent with relative PTZ or dome for the user
to control PTZ and dome.
Page 42
AHD DVR User Manual
38
Picture 4.31 PTZ
4.6.3 Display
Picture 4.32 GUI display
Channel Name: Click Modify button to enter the channel name menu. Modify the channel name. The 16 Chinese
characters and 25 letters are supportive.
Time Display: means to display the system data and time in the surveillance window.
Channel Display: means to display the system channel number in the surveillance window.
Page 43
AHD DVR User Manual
39
Boot Guide: means to display the setup guide once the DVR has loaded. It will walk you through some of the more
important settings of your DVR.
4.6.4 Backup
You can back up the video files to external storage device.
Note: The storage dev ice must be installe d bef ore the f ile b ackup. If the backup is terminated midway, the files that
have been copied in the storage device can be playback individually.
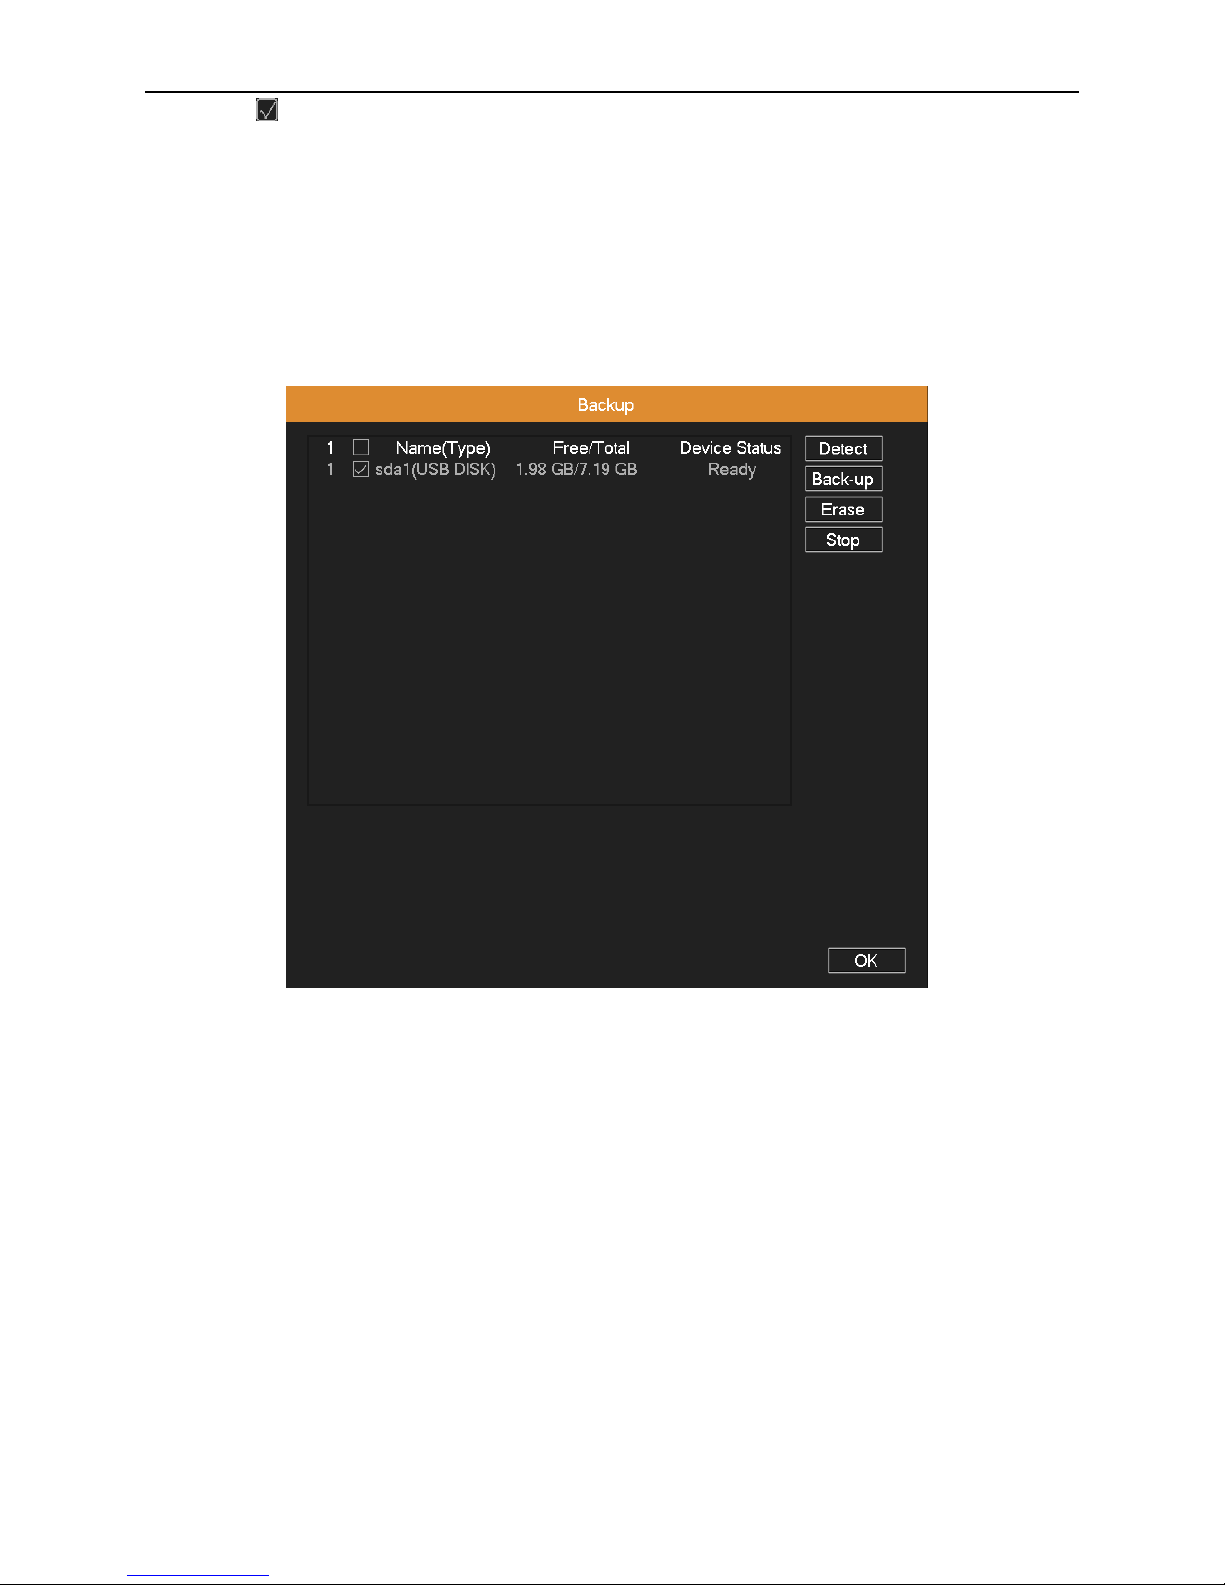
Picture 4.33 Storage device detect
Detect: Detect the storage device connected with the DVR such as hard disk or universal disk.
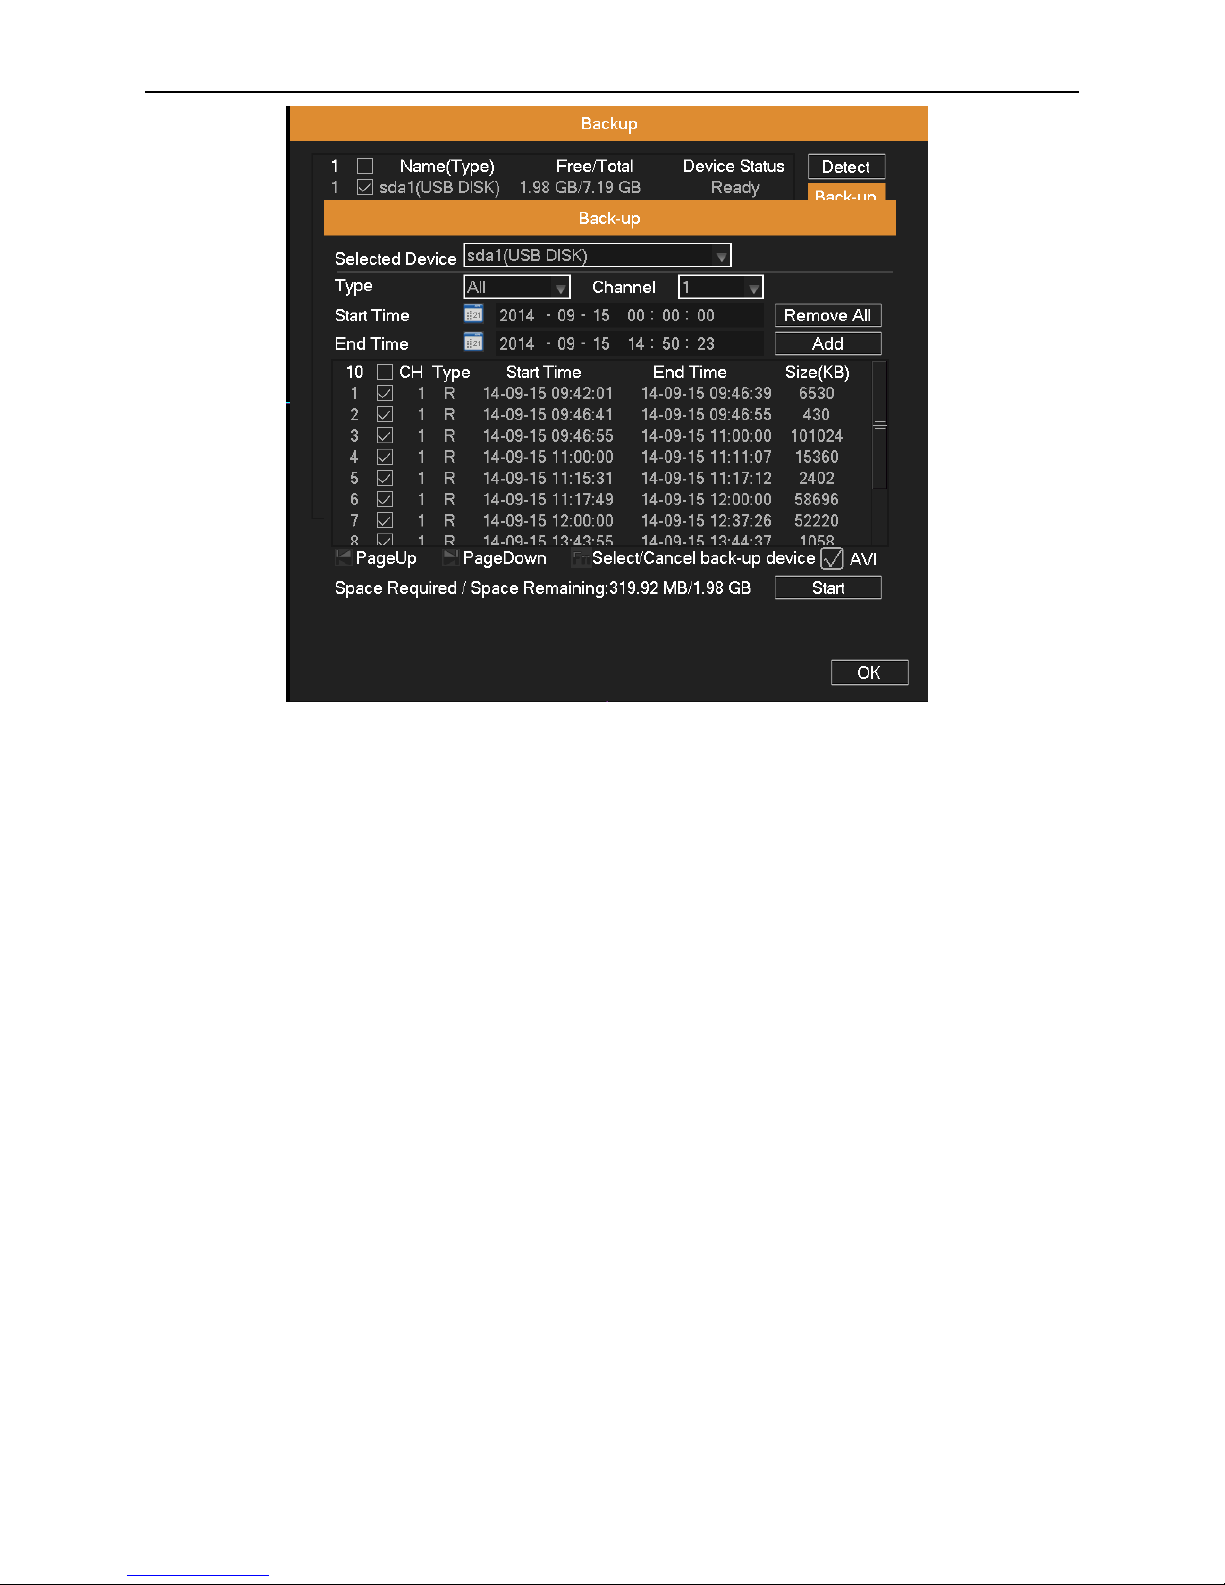
Back-up: Click Back-up button to pop up a dialog box, as shown in picture 4.34. You can choose the backup files
according to the type, channel and time.
Erase: Choose the file and click Erase to delete the file.
Stop: Stop the backup.
Page 44
AHD DVR User Manual
40
Picture 4.34 Backup
Selected Device: Choose a storage device for backing up files.
Type: Choose the file type.
Channel: Choose a channel or all channels which need to back up data.
Time: Choose the start & end time.
Remove All: Clear the file information.
Add: Show the file information satisfying the criteria you set.
Start/Pause: Click Play button to start the backup and click Pause button to stop the backup.
Backup format: AVI is optional.
4.6.5 Account Management
Manage user permissions.
Note:
1. You can add or delete the user group according to user definition. The factory setup include: user\admin. You can set
new user’s group as you wish. Users can be specified permissions within its group.
2. The user management include: group\user. The group name and user name cannot be the same. Each user only
belongs to one group.
Page 45
AHD DVR User Manual
41
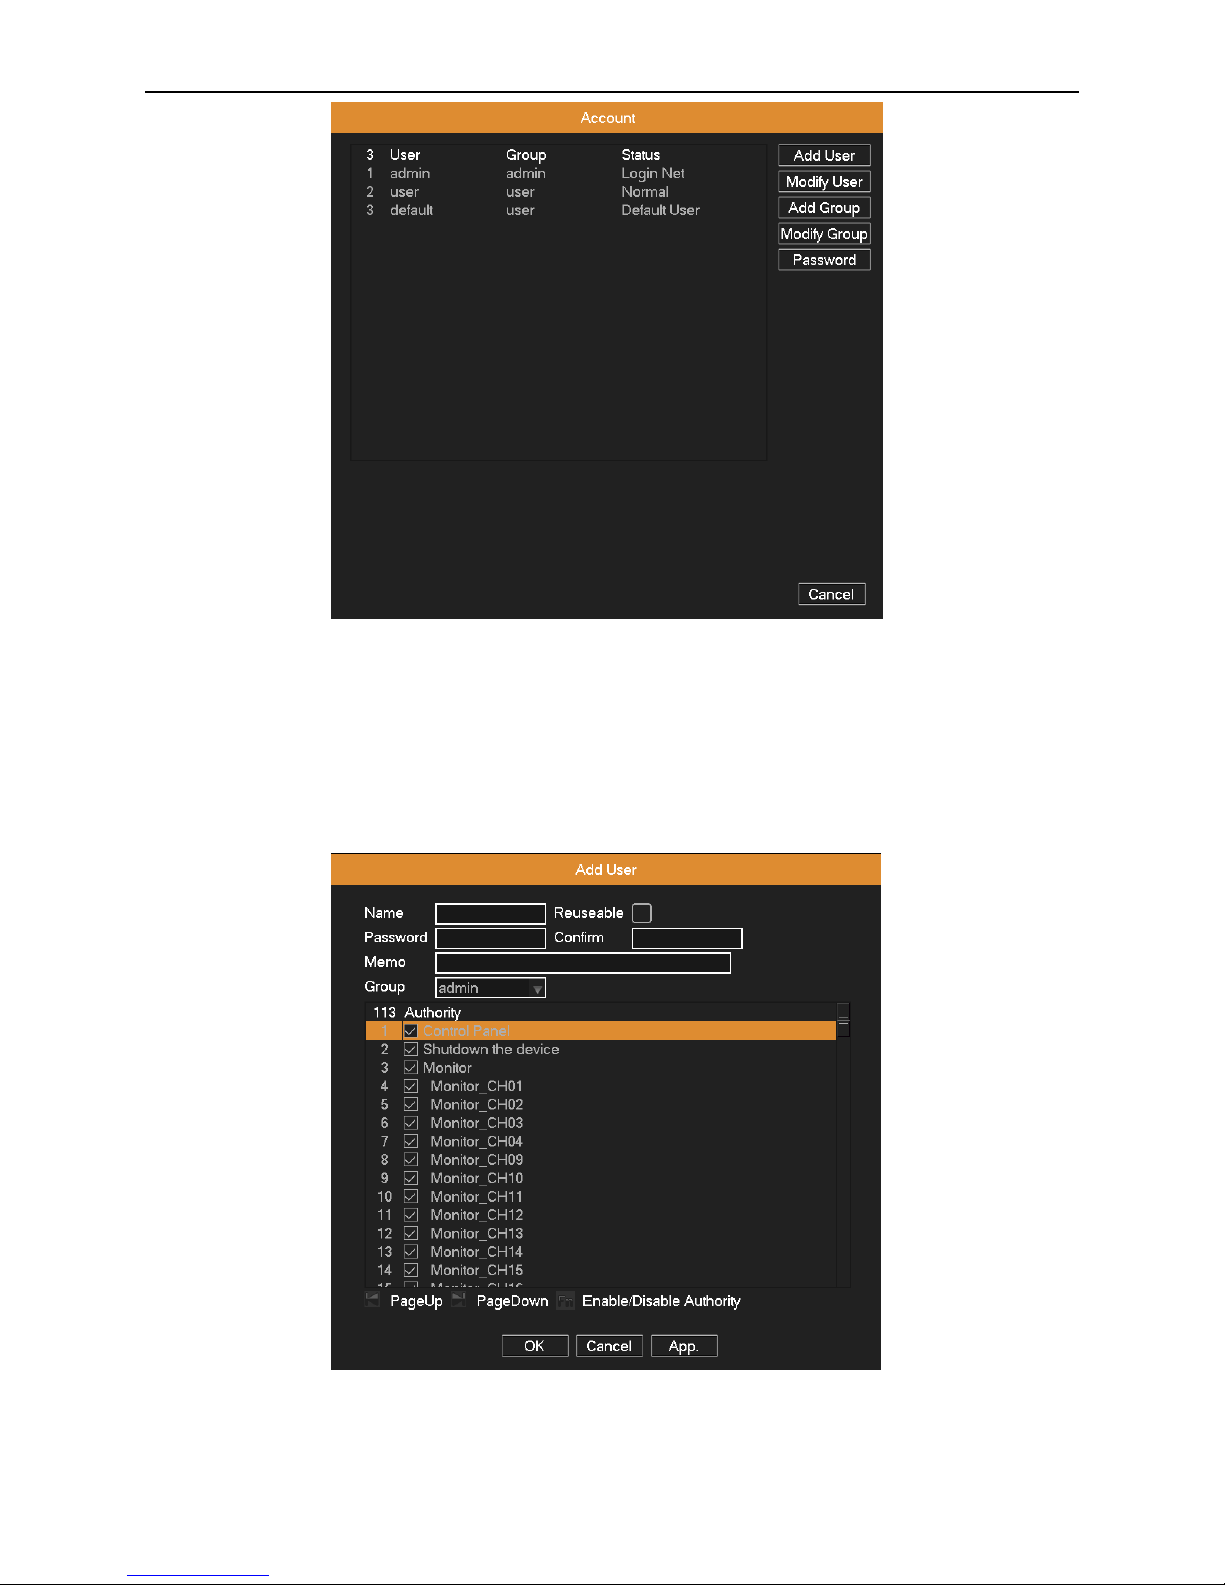
Picture 4.35 user management
Add user: Click Add User button, input the new user’s name and password, choose the group and permissions, and then
click OK. Enabling Reusable function means that this account can be used by multiple users at the same time.
Once you have selected the user group, its permissions can only be the subclass of group.
We recommend that the common user’s permission is lower than the advanced user.
Picture 4.36 add user
Modify User: Click Modify User button, select a user you want to modify, and then modify this user’s attribute. Click Delete
Page 46
AHD DVR User Manual
42
button to delete the current user. (The default user cannot be deleted, like admin, user and default)
Picture 4.37 Modify user
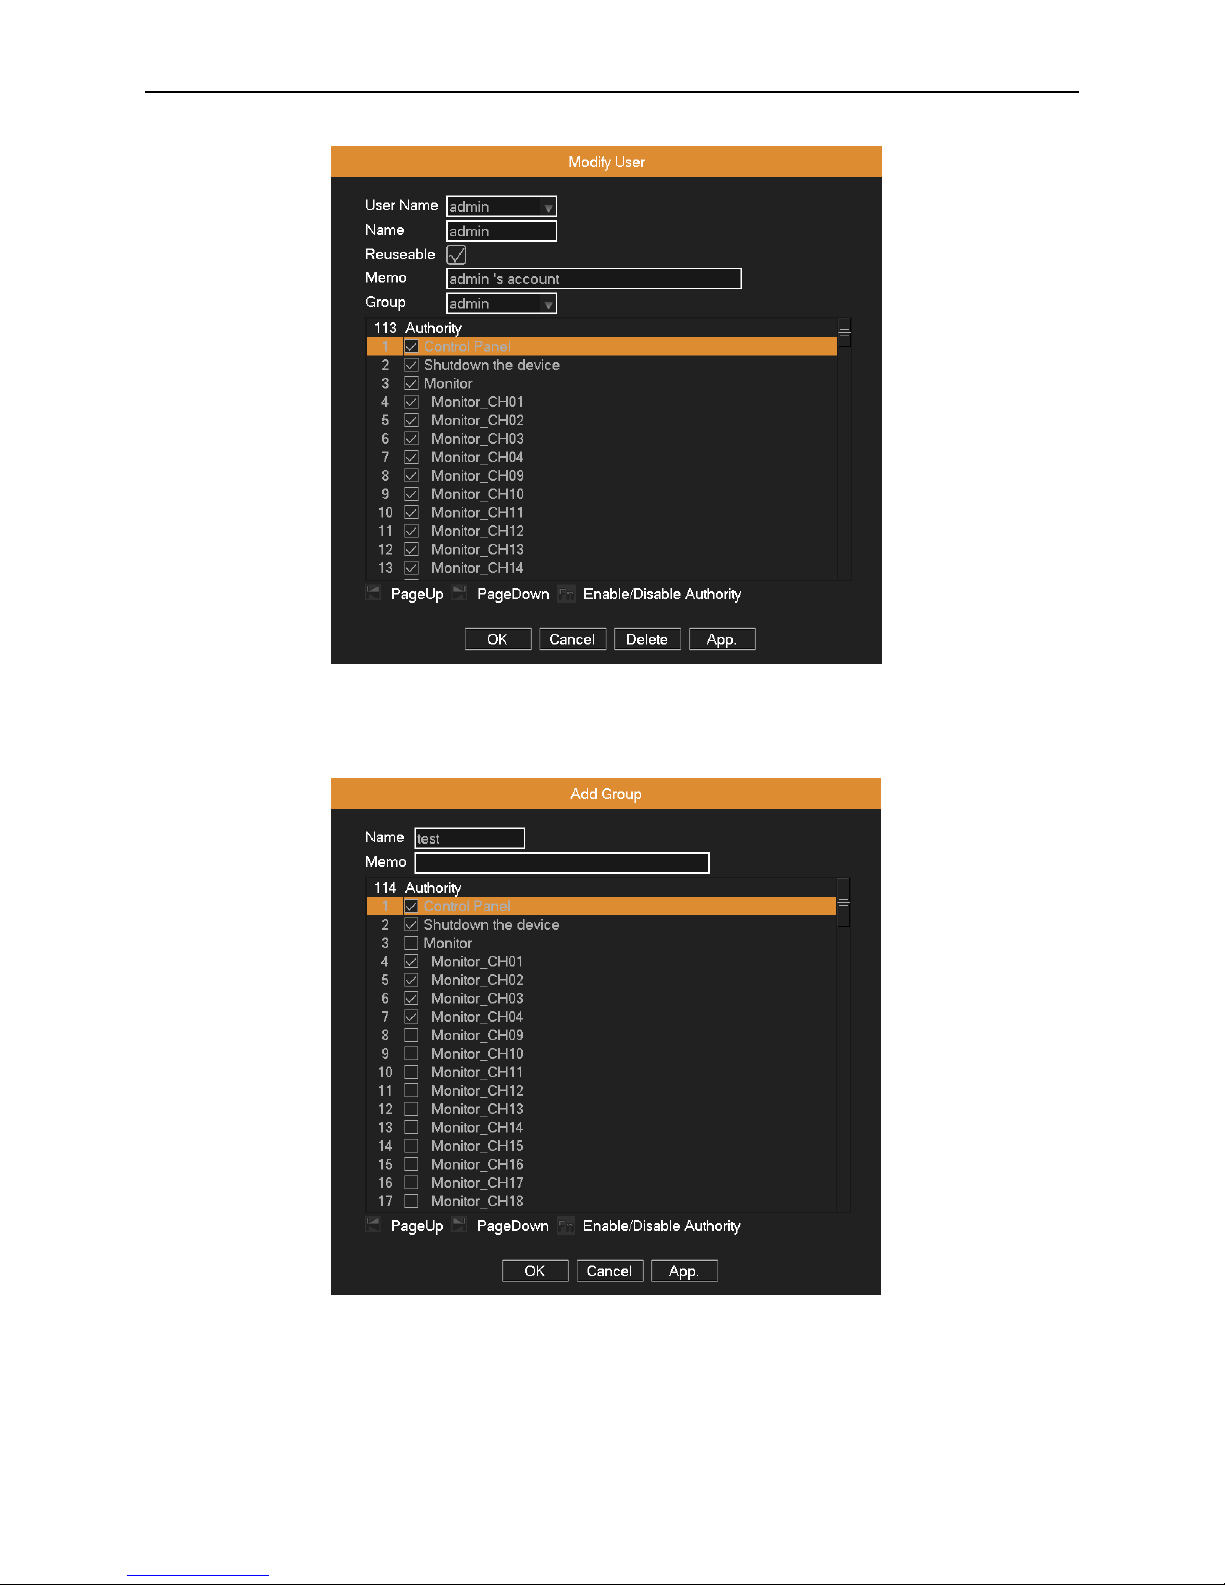
Add Group: Click Add Group button, input the new group’s name, choose this group’s permissions, and then click OK.
Picture 4.38 add group
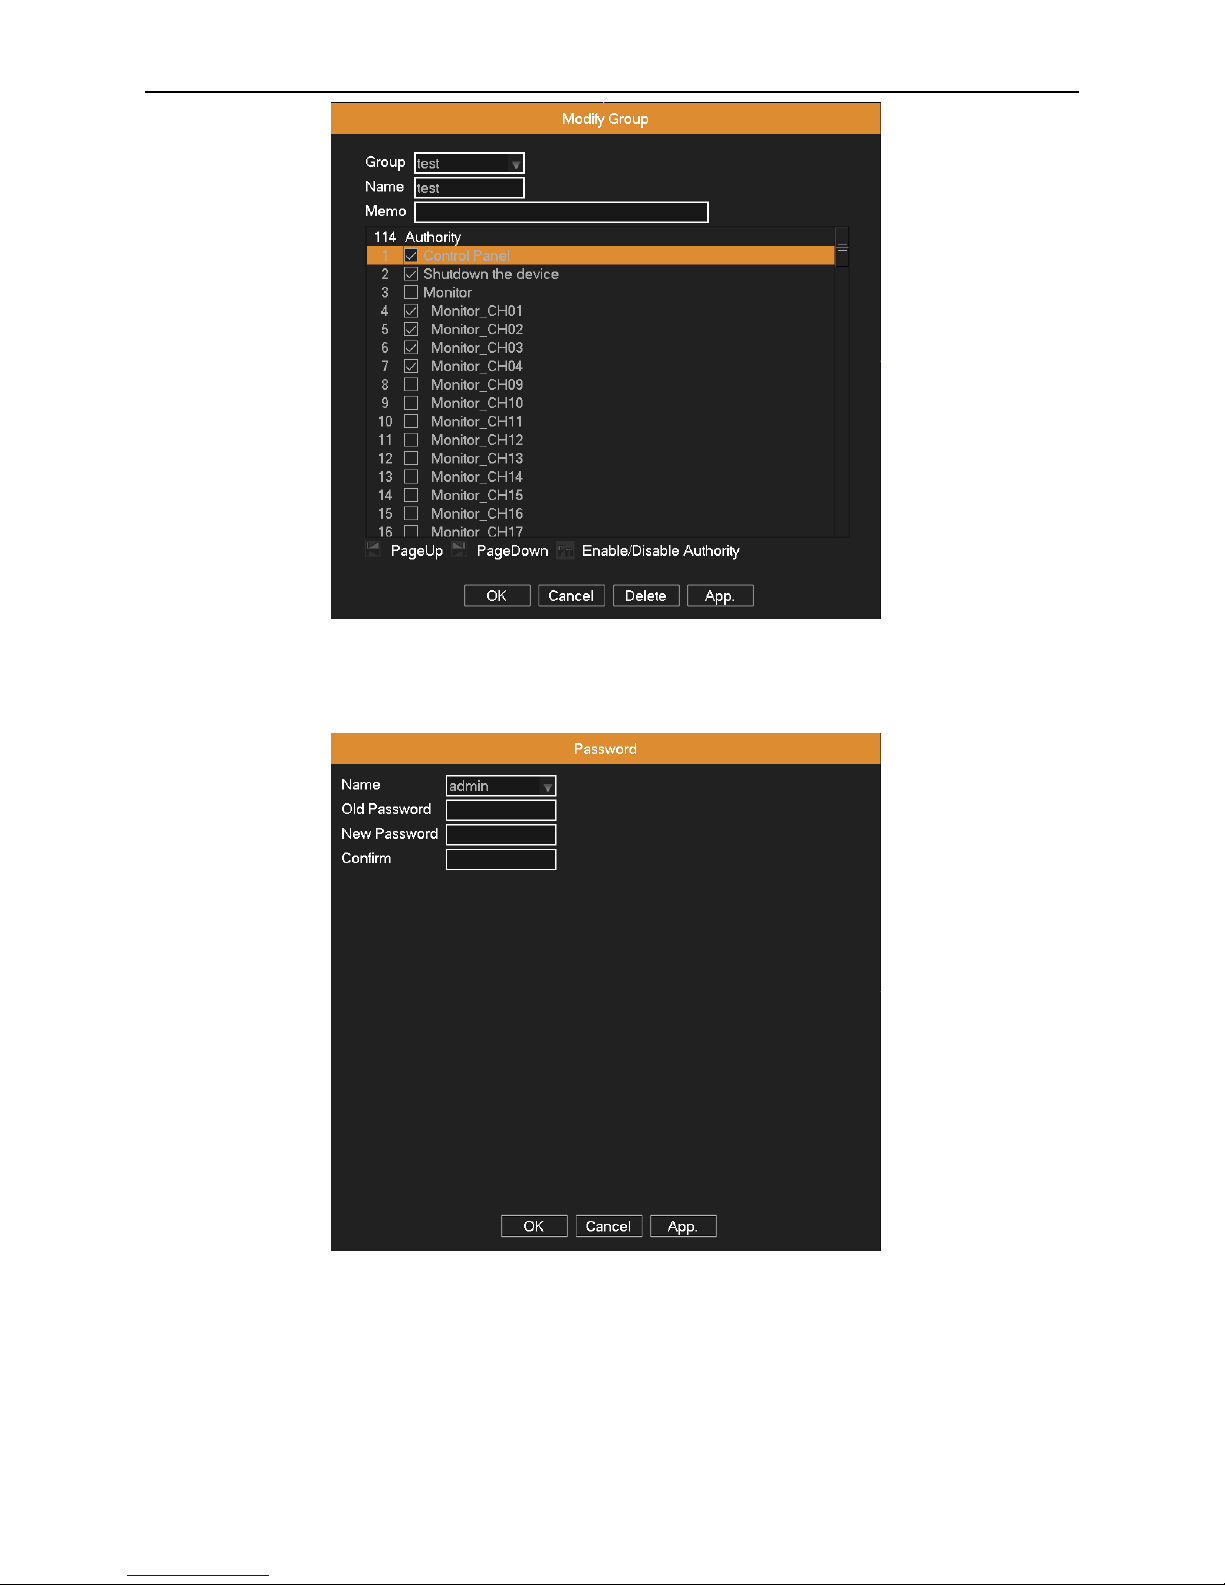
Modify Group: Click Modify Group button, select a group you want to modify, and then modify this group’s attribute. Click
Delete button to delete the current group. The group cannot be deleted if there are users in the group.
Page 47
AHD DVR User Manual
43
Picture 4.39 modify group
Modify Password: Click Password button, select a user and then modify this user’s password.
Picture 4.40 modify password
Note: The user who possesses the user control permission can modify his/her own or other user password.
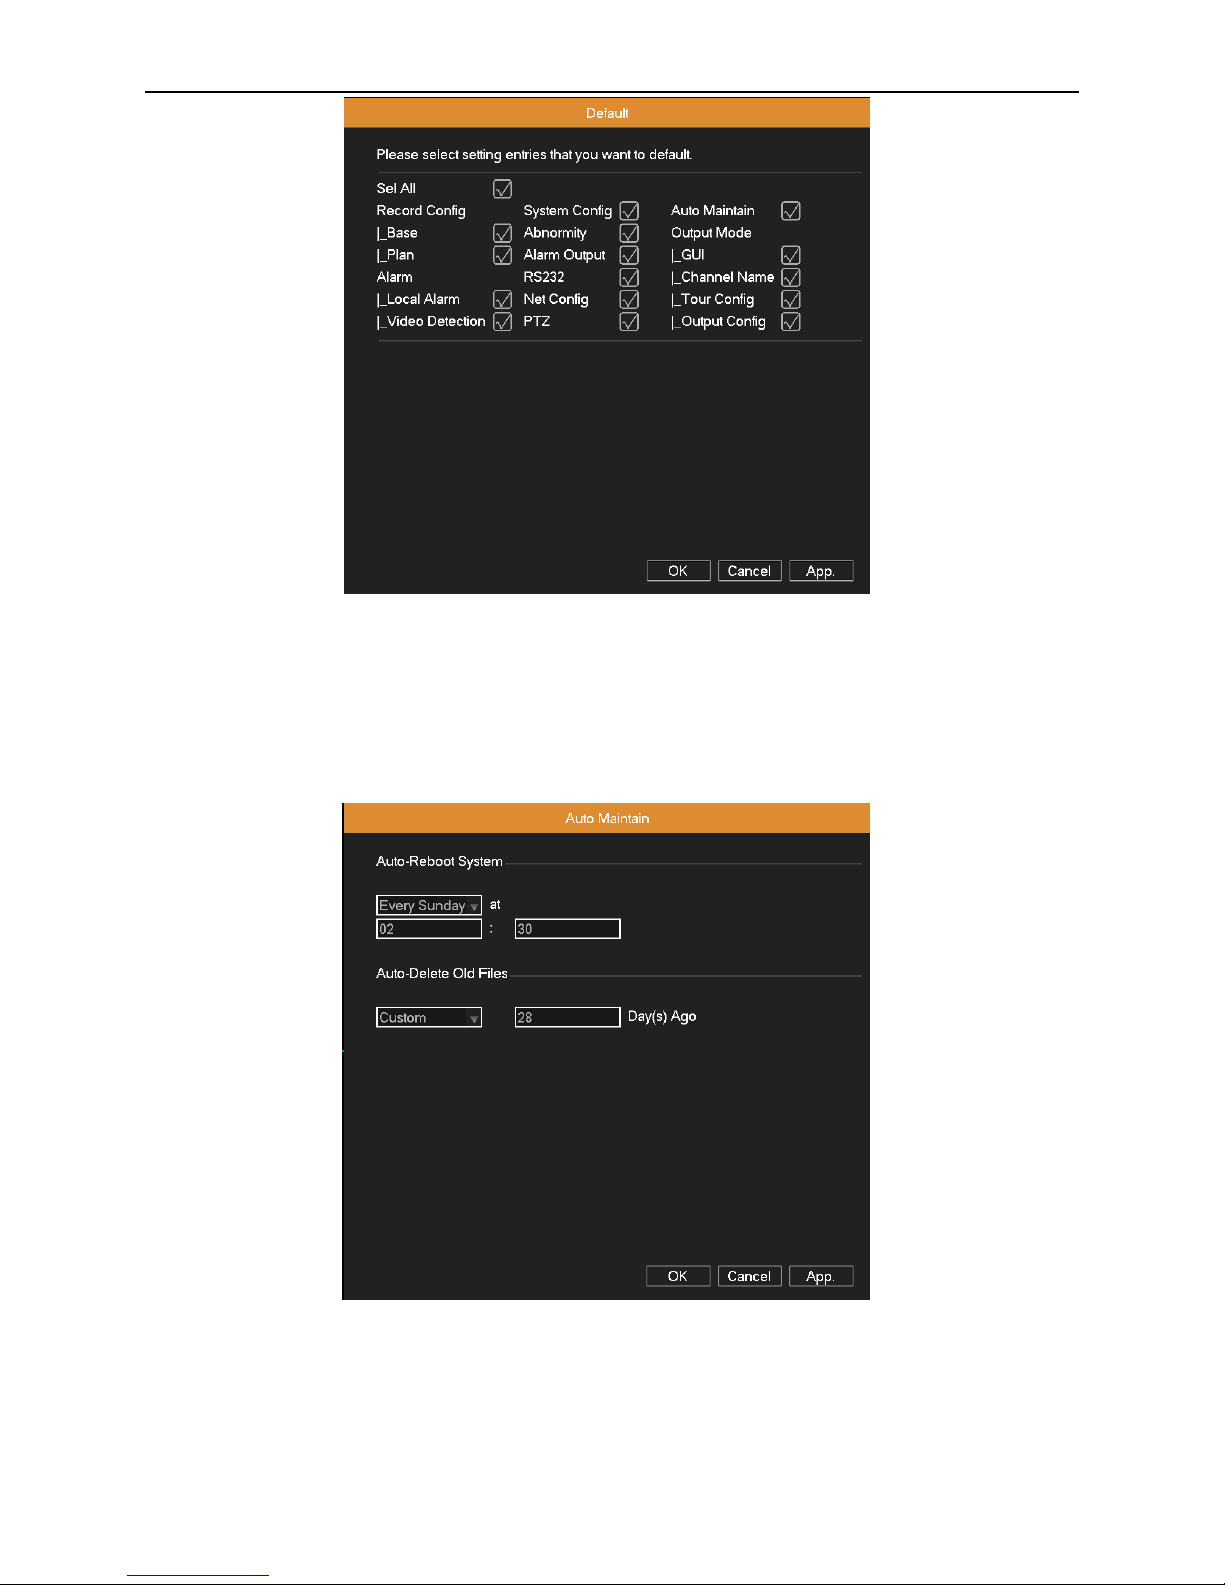
4.6.6 Default
The system will be restored to default setup (can selectively restore the selected options).
Page 48
AHD DVR User Manual
44
Picture 4.41 resume default
4.6.7 Auto Maintain
User can set the device to timing reboot the system, and automatically delete the files if they are longer than the specified
interval.
Picture 4.42 Auto Maintain
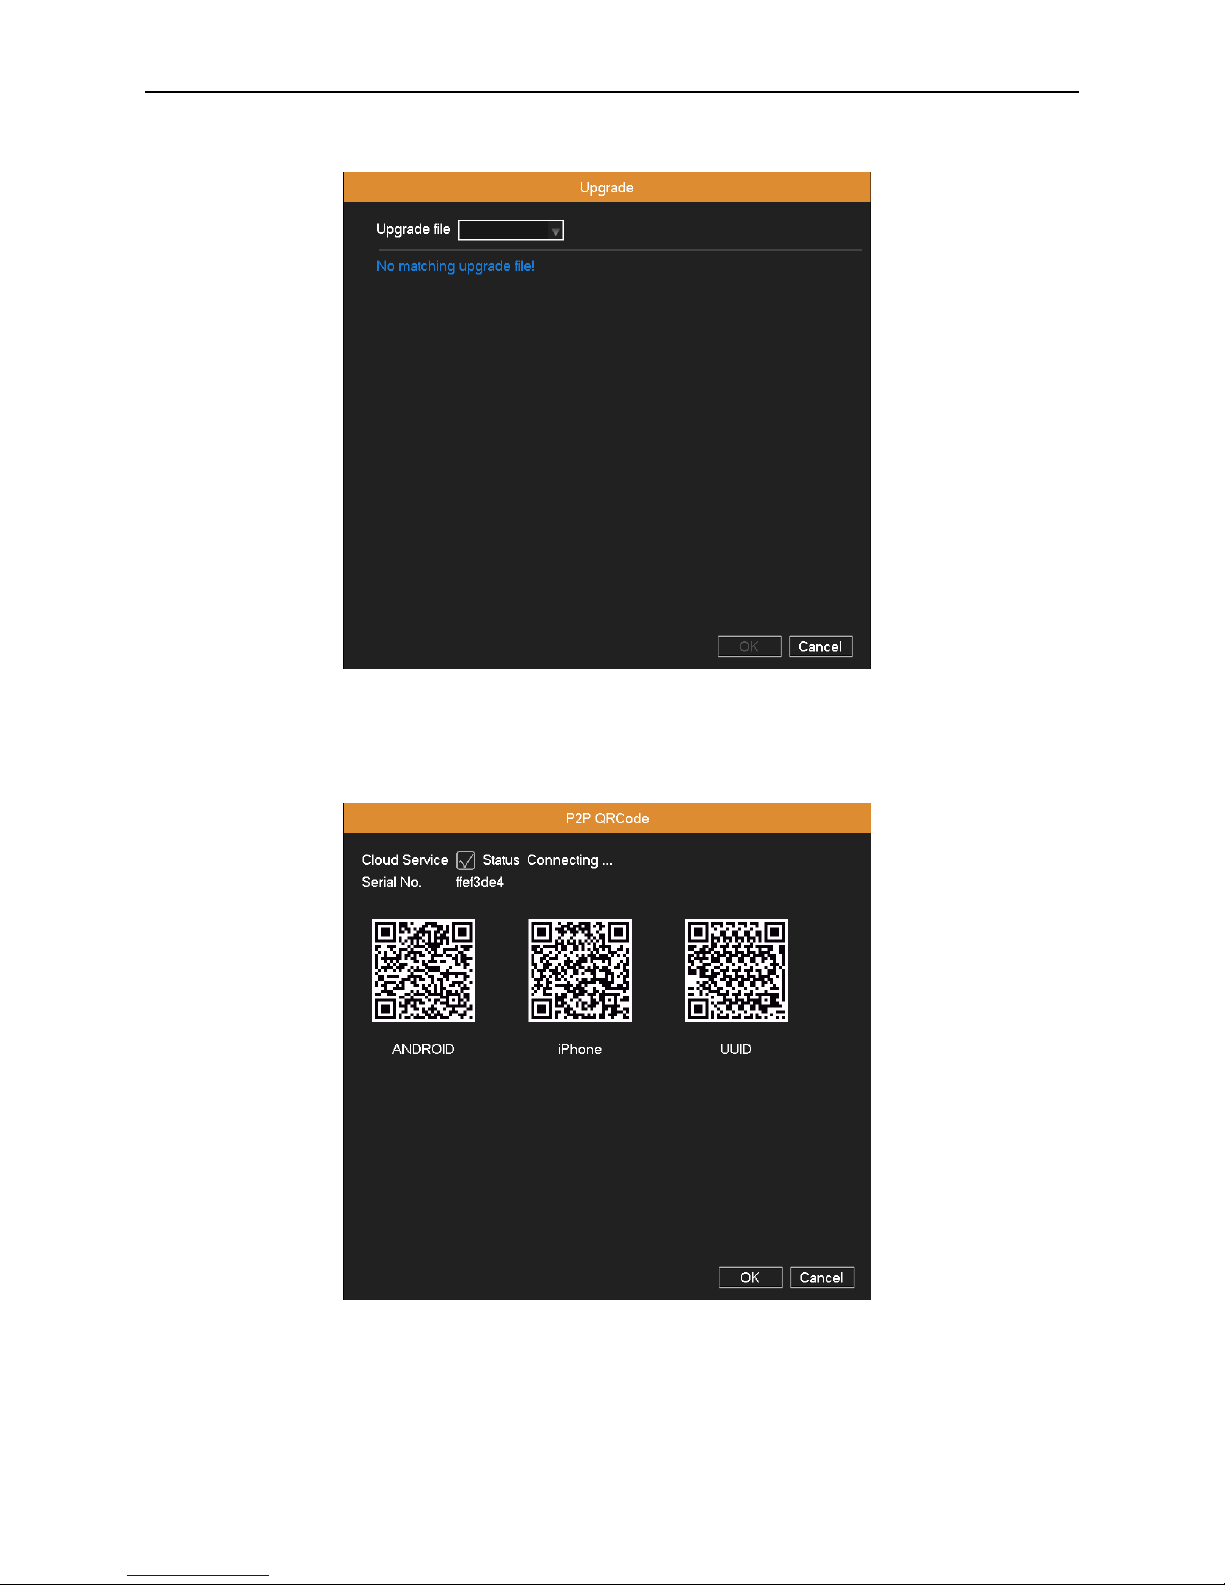
4.6.8 Upgrade
User can get the upgrade file from your dealers, and upgrade the system once DVR has the new software version.
Page 49
AHD DVR User Manual
45
Copy the upgrade file into the USB disk, and then insert it to USB port on the DVR. Enter into “Main
Menu”“System”“Upgrade”, then find the upgrade file in the drop-down box, click OK button to start upgrading.
Picture 4.43 upgrade
4.6.9 P2P QR Code
Picture 4.44 P2P QR Code
User can use the Cloud Service client on iPhone™, iPad™ and Android™ phone to view the channel video remotely
through P2P function. When adding a new device, select the “Cloud” connection mode, click into the scanning state, then
scan the corresponding QR Code.
Page 50

AHD DVR User Manual
46
5. Network Access Settings and Cloud Technology Introduced
5.1 LAN Access Settings
1、Network connection
(1) Before the WEB operation, make sure your DVR is properly connected to the network.
(2) Enter DVR “Main Menu” “Network” to set correct IP address, subnet mask, DNS and gateway or set to obtain IP
address automatically by DHCP. Port retains the default settings. (The IP segment of device should be the same with PC, if
disconnected, please check device IP was connected successfully.)
2、Login
Step 1: After connecting successfully, then you can login to view.
Open a web browser; enter the IP address of the login device in the address bar. As the device with IP address
192.168.1.10, HTTP port 80 for example, then enter: http://192.168.1.10 in the address bar and connections. If HTTP port
is not 80, such as 81, then need to add port when viewing, as: http://192.168.1.10:81
Note: If the PC connects the device at first time, when open system, the security warning will pop up whether to accept the
WEB control web. cab, please choose to accept the user, the system will automatically identify the installation. (If the
system is prohibited to download, please confirm whether you have closed other prohibited controls to download software
and reduce the IE security level, permit unsigned plug-in to operate. Connection as shown below will pop up after the
success of the interface.
Step 2: Enter the user name and password, the company factory default administrator user name admin, password is
blank.
5.2 Cloud Technology Functions and Using Introduction
Cloud technology is the latest network remote access technology; with cloud technology, without any complex network
settings to achieve remote access easily.
Note: Some of the devices don’t have this function, pls prevail in kind.
Main features of cloud technology
One step to realize DVR Internet, operating easily and conveniently. No need to have professional network knowledge,
DDNS and port mapping; instantly connect just use and review.
WAN remote access & Cloud technology use
1.Open a web browser, enter cloud access address(The method of looking at cloud server address: Boot and select
“desktop shortcut menu” “System information ” “Version information ”“Cloud server”).
There are two ways to remote control the device with cloud technology:
Page 51

AHD DVR User Manual
47
2.By Serial number:Device: enter Serial No of DVR can realize remote access (way to get Serial No: start up and choose
“desktop shortcut menu” “info” “version”)
3. By user: need to register a user name, and then enter the user name and password to login; need to add the device
after login, when finish adding device, click on the current equipment for preview, playback, configuration and operation
According to the user access, multi device can be added and remote access at the same time
5.3 Client ISS Software Operation
ISS is a powerful center control software. It is distributed architecture combining with the functions of multi window, multi
user, multi languages, voice intercom and alarm center all in one. With friendly interface and simple operation, it’s
convenient to permission settings.
Please take out the CD-ROM in the accessories, copy the ISS install software in the CD-ROM. After installation on the local
PC, double click the “ISS”, open the control interface, default without password, the client can set the login password (Note:
The password for the ISS client password, non-DVR login password).
Details please refer to the “ISS operation manual” in the CD or ISS software help information.
5.4 Mobile Phone Monitoring
This device supports the user to use the phone for remote video surveillance operation. Use extra stream technology to do
mobile phone monitoring. Support channel switching and multi-channel monitoring simultaneously. Convenient and simple
to use, preview once network connected.
There are two ways to download the mobile phone monitor software:
Accessories package CD: English/Tool/mobile phone monitor. Find corresponding mobile app package for installation .
Download mobile app through scanning the QR code. Find the QR code from the device and scan the corresponding QR
code to download and install the mobile app.
For more details please refer to cell phone monitoring software help information..
Device can only be visited by mobile phone after the mobile phone connects with the wireless router if the device is o n
LAN.
Note: Device can also be visited via cloud technology by mobile phone APP.
Page 52
AHD DVR User Manual
48
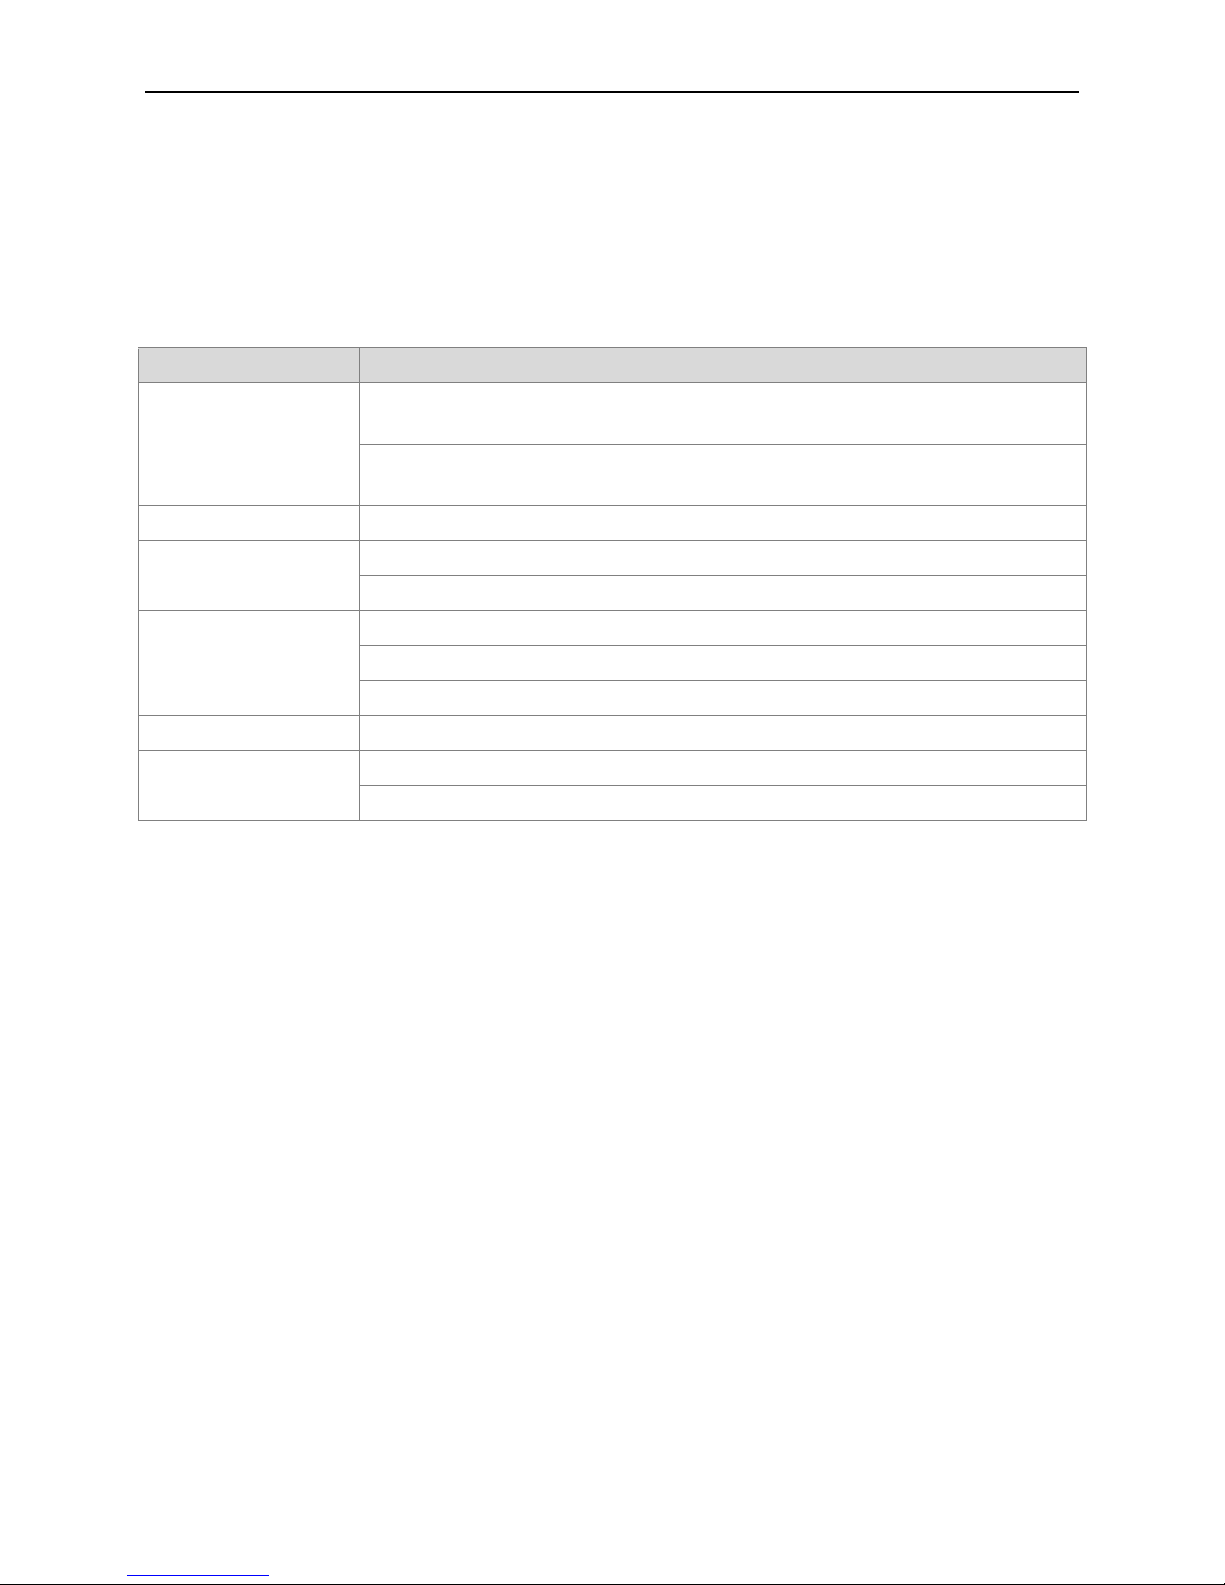
Appendix 1. Mouse Operation
*Take right hand as an example
The mouse in USB connection is supportive.
Operation Function
Double left click
Double click one item in the file list to playback the video
Double click the playback video to zoom in or out the screen
Double click the channel to make it full screen display in preview state
double click again to resume the multi-window display
Left click Select the corresponding function under the menu page
Right click
Pop-up desktop shortcut menu in preview state
Current shortcut menu in the menu
Press middle button
Add or subtract number in the number setting
Switch the items in the combo box
Page up or down in the list
Move mouse Choose the widget or move the item in the widget
Drag mouse
Set the motion detect area
Set the cover area
Page 53

AHD DVR User Manual
49
Analog High Definition Digital Video Recorder User Manual
 Loading...