

Page 1
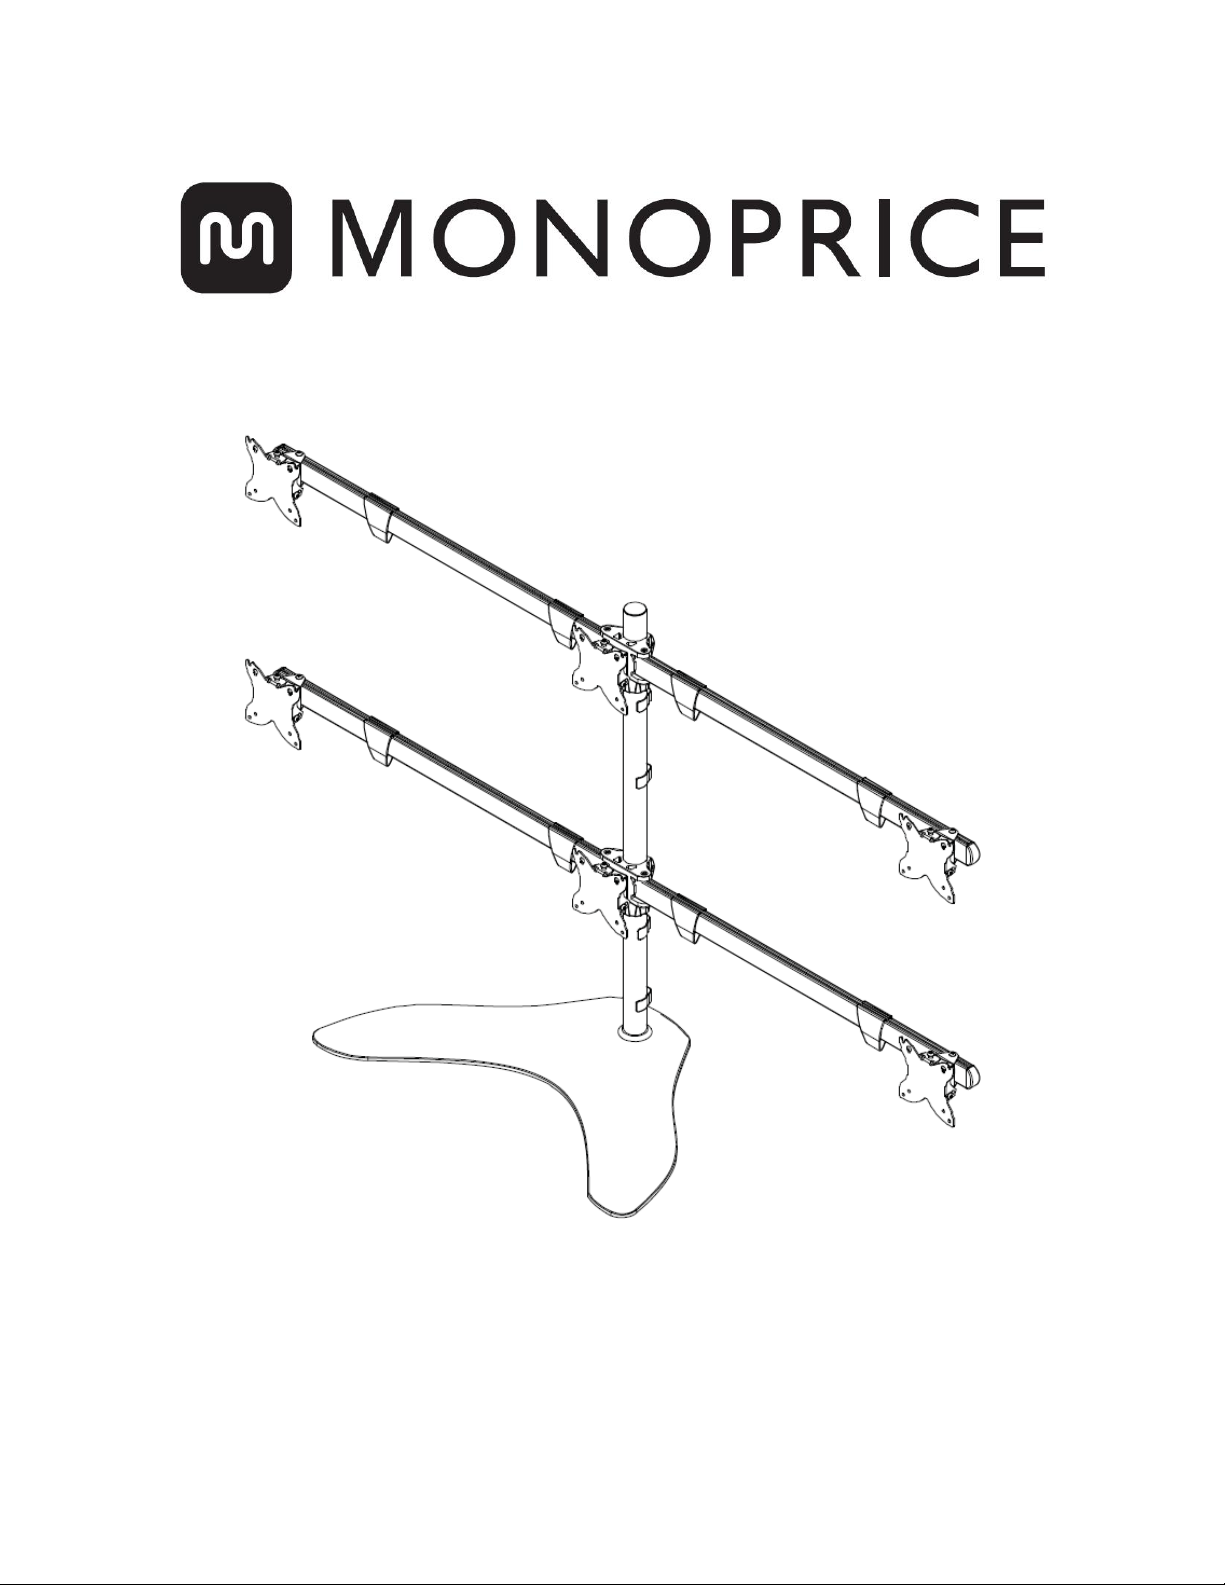
Hex (6) Monitor Free Standing Desk Mount
P/N: 15709
User's Manual
Page 2

2
INTRODUCTION
Thank you for purchasing this Hex (6) Monitor Free Standing Desk Mount!
This desk mount is capable of mounting four 15" ~ 30" monitors, with 75 x 75 or 100 x 100
VESA® mounting patterns and weighing up to 22 lbs. each. It allows for overall height,
individual leveling, tilt, swivel, and horizontal adjustments, and includes cable management
clips and all the hardware necessary to assemble the stand and mount four monitors.
FEATURES
• Compatible with 15" ~ 30" monitors
• Supports six monitors weighing up to 22 lbs. (10 kg) each
• Compatible with 75 x 75 and 100 x 100 VESA® mounting patterns
• Overall height, individual leveling, tilt, swivel, rotation, and horizontal position
adjustments
• Includes cable management clips
• Includes all necessary mounting hardware
CUSTOMER SERVICE
The Monoprice Customer Service department is dedicated to ensuring that your ordering,
purchasing, and delivery experience is second to none. If you have any problem with your
order, please give us an opportunity to make it right. You can contact a Monoprice
Customer Service representative through the Live Chat link on our website
www.monoprice.com during normal business hours (Mon-Fri: 5am-7pm PT, Sat-Sun: 9am-
6pm PT) or via email at [email protected]
Page 3
3
PACKAGE CONTENTS
Please take an inventory of the package contents to ensure you have all the items listed
below. If anything is missing or damaged, please contact Monoprice Customer Service for a
replacement.
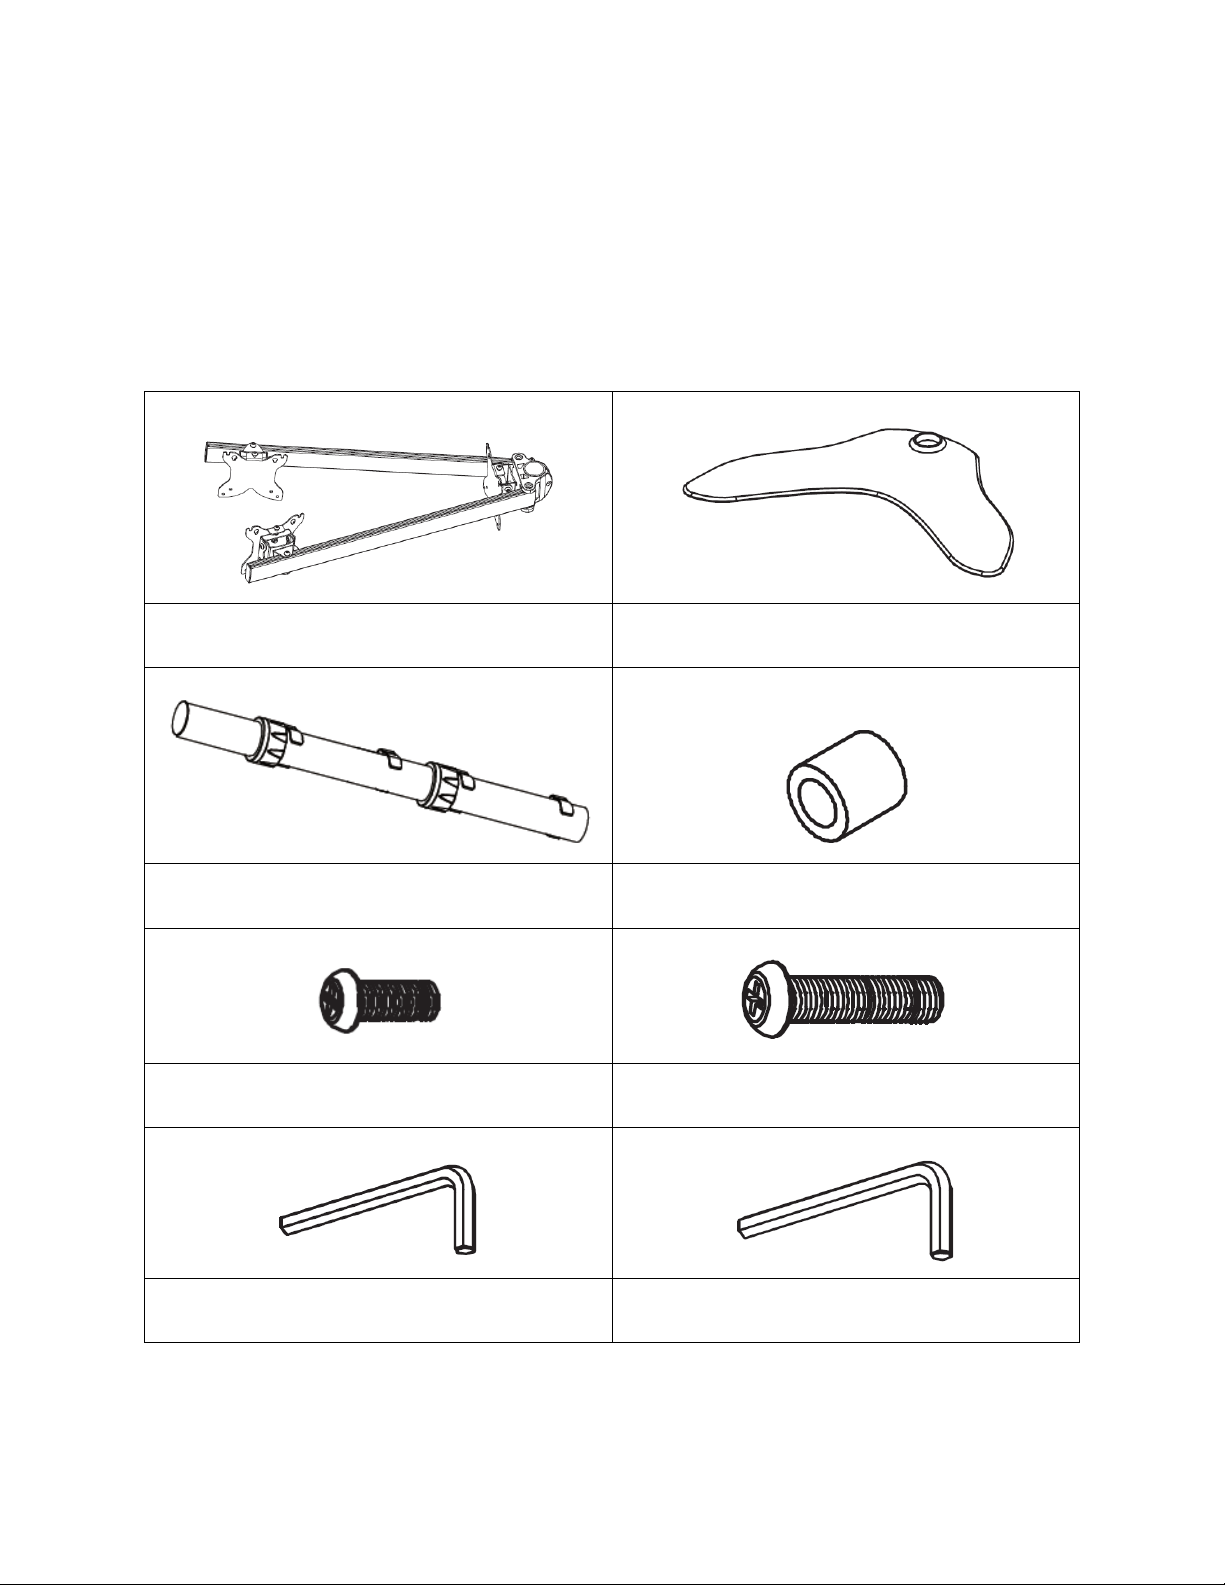
A Arm Assembly (x2)
B Base
C Pole Assembly
D ø8.0 x ø5.5 x 5.0 mm Bushings (x16)
E Short M4x12 Screws (x16)
F Long M4x16 Screws (x16)
G 4mm Hex Wrench
H 5mm Hex Wrench
Page 4
4
INSTALLATION
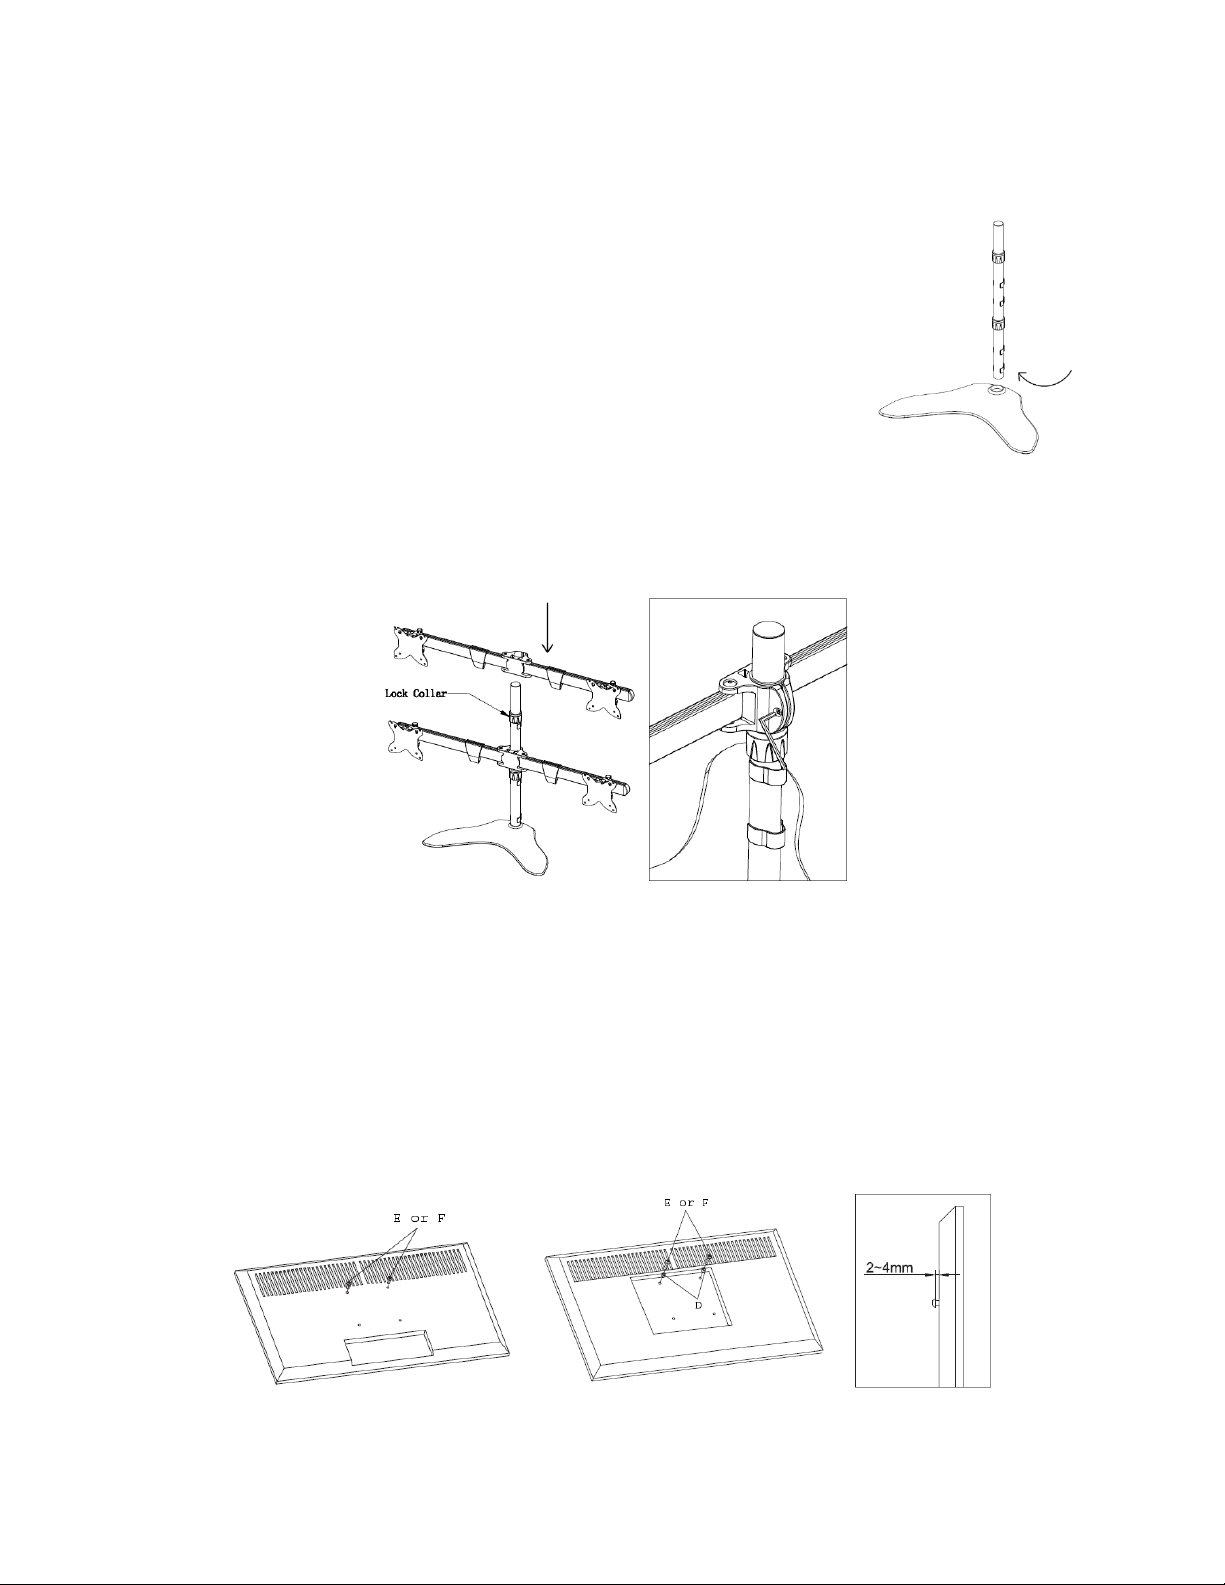
1. Place the Base (B) on a desk or table.
2. Insert the Pole Assembly (C) into the hole in the base, then
turn it clockwise to tighten the connection.
3. Place one Arm Assembly (A) onto the Pole Assembly (C),
adjust the height as desired, then use the 5mm Hex Wrench
(G) to tighten the screw as shown in the following figure to
the right. You can also adjust the height by loosening the lock collar and extending
the pole assembly up or down as desired. Repeat using the second Arm Assembly
(A).
4. Place a towel or blanket on a table or on the floor, then place one of your monitors
face down on the towel/blanket.
5. Insert two (2) Short M4x12 Screws (E) or Long M4x16 Screws (F) into the upper two
VESA® mounting holes. Tighten them to the point where there is 2-4mm between
the back of the monitor and the screw head. If necessary, use the ø8.0 x ø5.5 x 5.0
mm Bushings (D) to reduce the space between the screw heads and the back of the
monitor.
Page 5
5
6. Repeat steps 4 and 5 for the other five monitors.
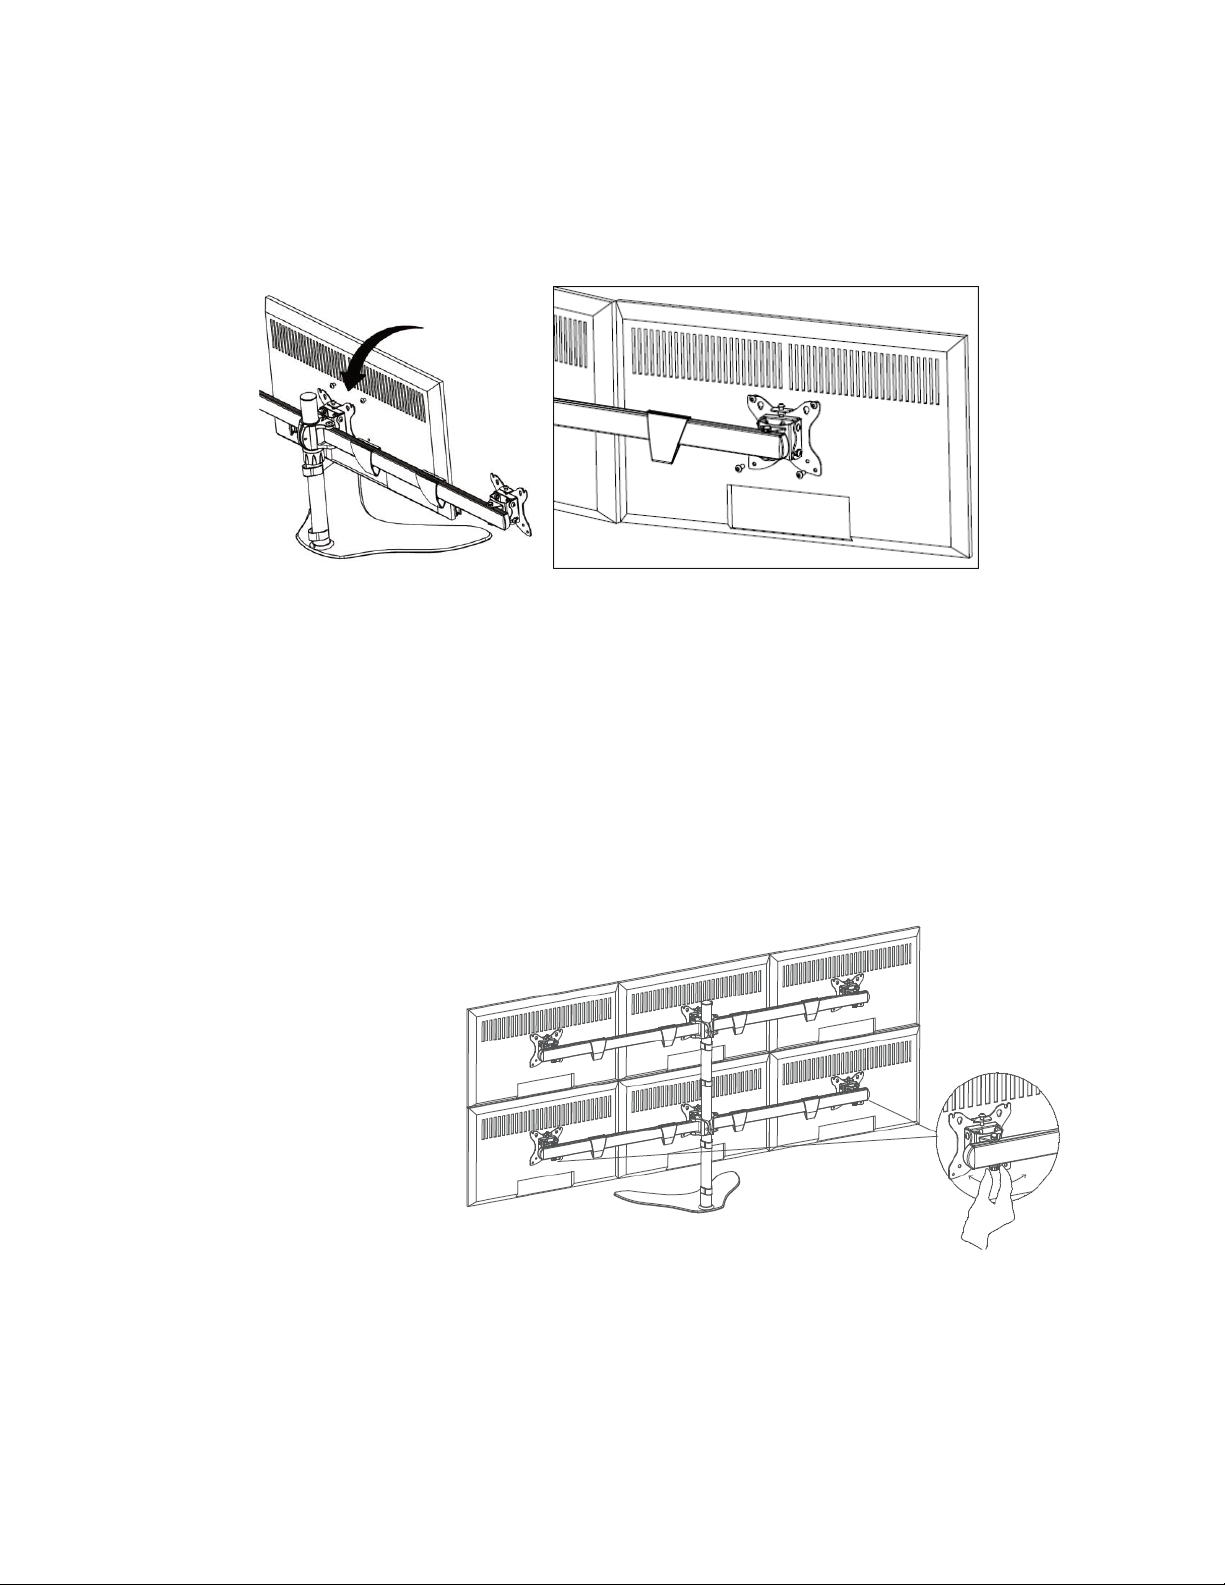
7. Place one of the monitors onto a mounting bracket by placing the extended screws
into the grooves on the bracket.
8. Insert two (2) additional Short M4x12 Screws (E) or Long M4x16 Screws (F) through
the bracket into the lower VESA® mounting holes. Tighten the screws to secure the
bracket to the back of the monitor. Use the ø8.0 x ø5.5 x 5.0 mm Bushings (D) as
necessary to reduce the space between the screw heads and the back of the
monitor.
9. Repeat steps 7 and 8 for the other five monitors.
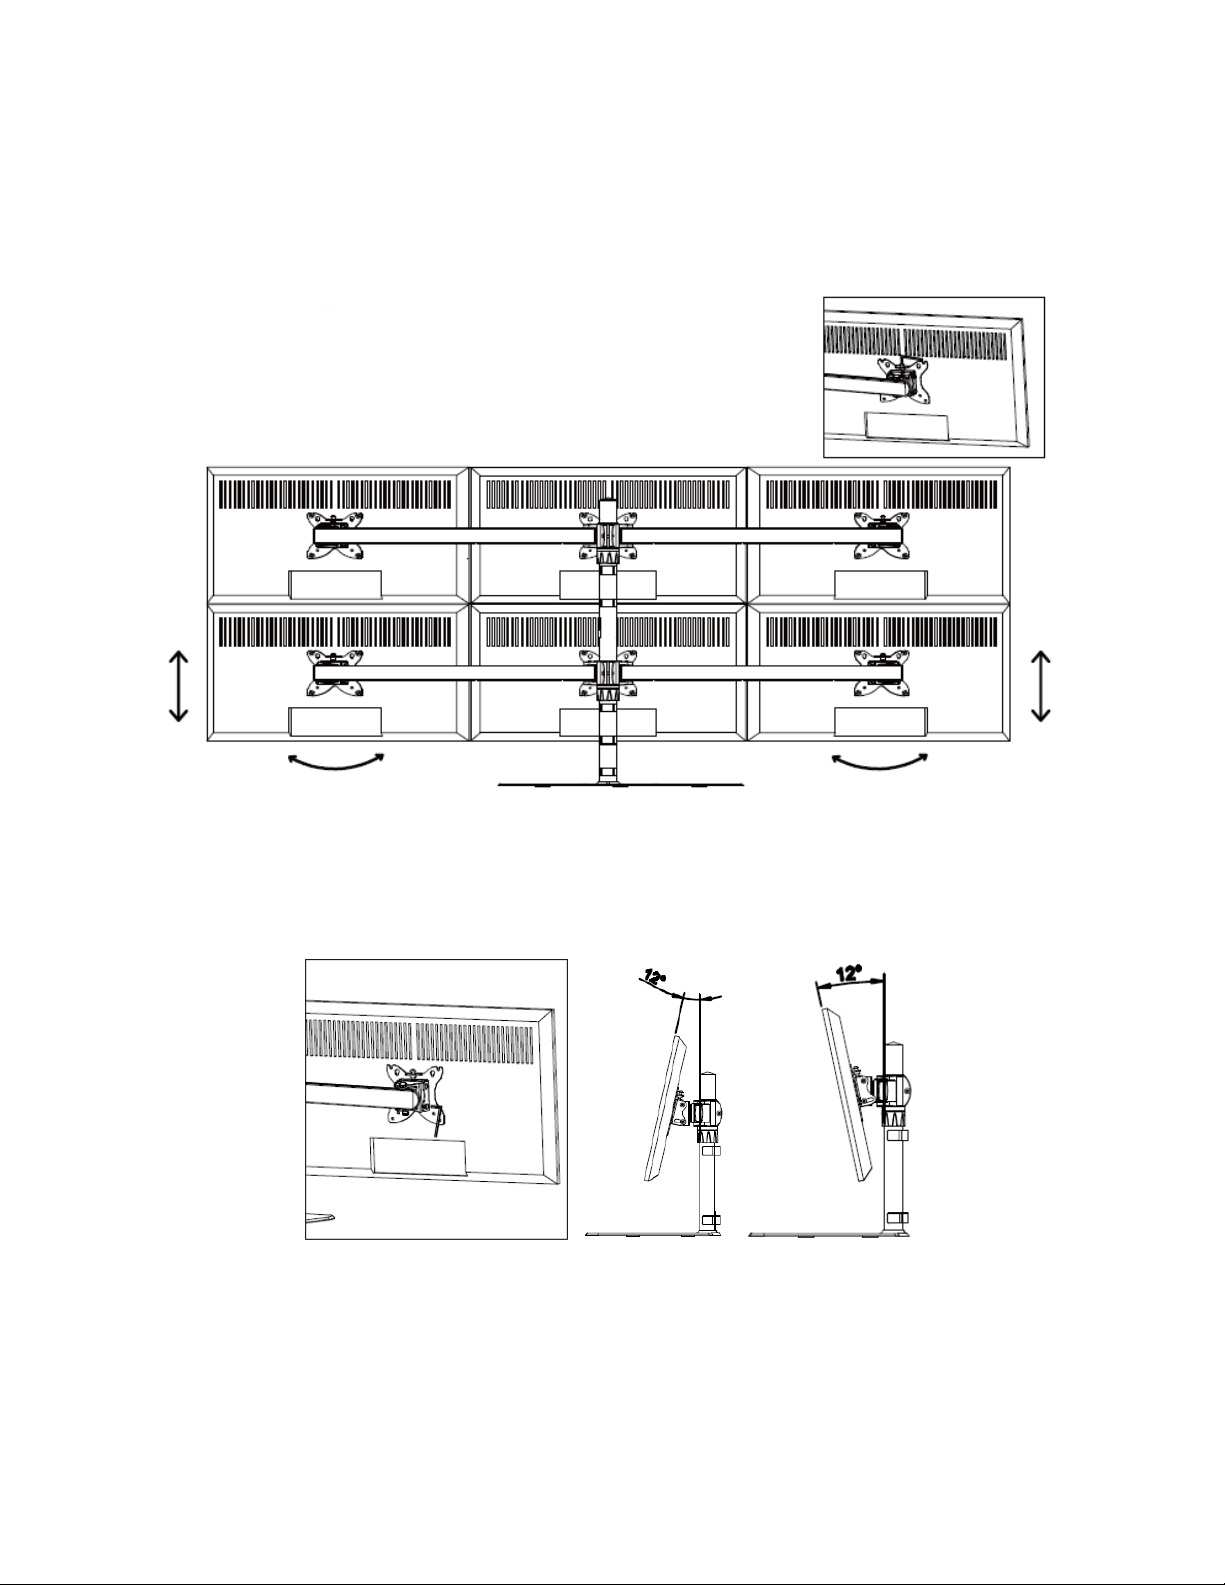
10. Loosen the thumbscrews that hold each bracket to the mounting arm, then slide
the monitors and
bracket assemblies
so that the monitor
bezels are almost
touching at the
center of the desk
mount assembly.
Tighten the
thumbscrews to
secure the brackets
in place.
Page 6
6
11. If the monitors are not level, use the included 5mm Hex Wrench (G) to tighten the
screw at the top of the lower bracket, thereby raising the bracket's level. To lower
the bracket's level, loosen the screw.
12. To adjust the tilt, first use the included 5mm Hex Wrench (H) to slightly loosen the
two screws on each side of the mounting bracket, adjust the tilt as desired, then
tighten the screws to secure the bracket in place.
Page 7
7
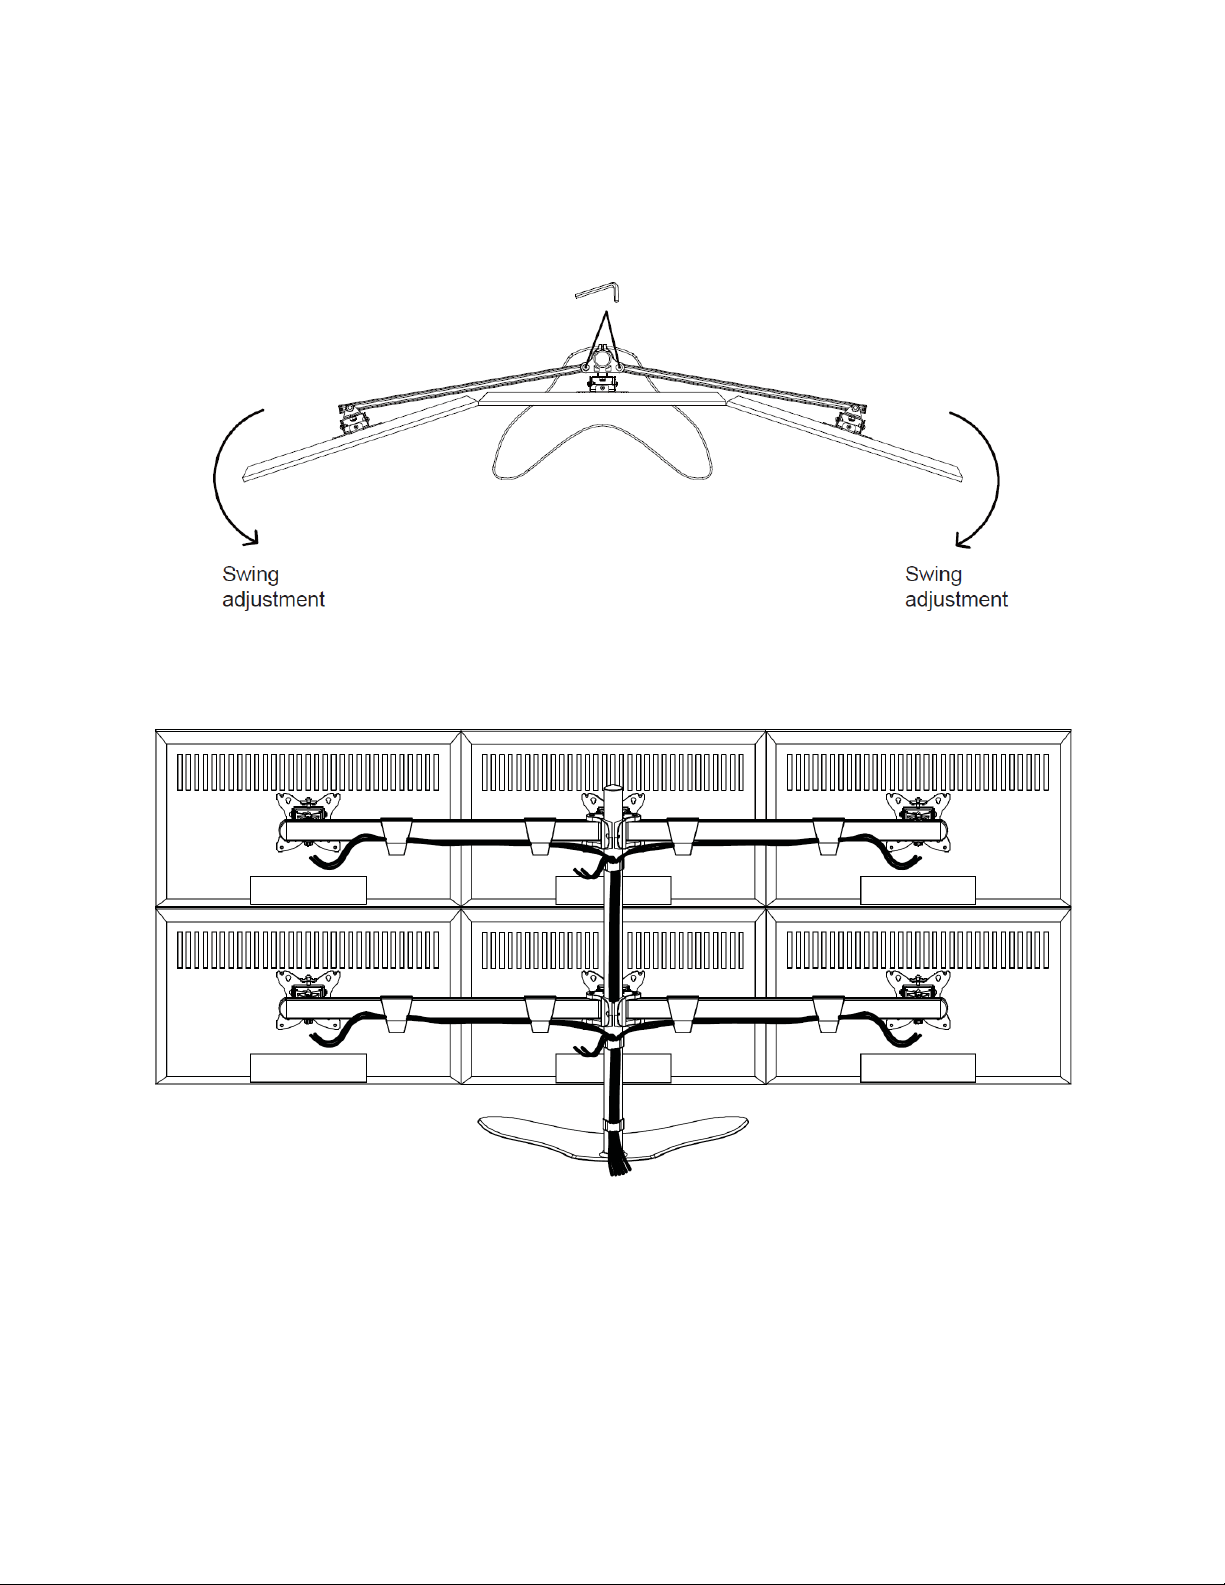
13. To adjust the monitor angles, use the included 5mm Hex Wrench (H) to slightly
loosen the two screws at the base of the arms, adjust the angle, then tighten the
screws to secure the arms in place.
14. Install the cables and use the included cable management clips to keep hold the
cables neatly in place.
Page 8
8
TECHNICAL SUPPORT
Monoprice is pleased to provide free, live, online technical support to assist you with any
questions you may have about installation, setup, troubleshooting, or product
recommendations. If you ever need assistance with your new product, please come online
to talk to one of our friendly and knowledgeable Tech Support Associates. Technical
support is available through the online chat button on our website www.monoprice.com
during regular business hours, 7 days a week. You can also get assistance through email by
sending a message to [email protected]
SPECIFICATIONS
Model
15709
Number of Supported Monitors
Six (6)
Supported TV Sizes
15" ~ 30"
Maximum Supported Weight
22 lbs. (10 kg) per monitor
Supported VESA® Sizes
75 x 75 and 100 x 100
Height Adjustment Range*
11.2" ~ 17.7" (284 ~ 750 mm)
Swivel Adjustment Range
Up to 150°
Rotation Adjustment Range
360°
Tilt Adjustment Range
±12°
*
The usable height adjustment range depends on the size and number of monitors in use.
Page 9

9
REGULATORY COMPLIANCE
Notice for FCC
Modifying the equipment without Monoprice’s authorization may result in the equipment
no longer complying with FCC requirements for Class B digital devices. In that event, your
right to use the equipment may be limited by FCC regulations, and you may be required to
correct any interference to radio or television communications at your own expense.
This equipment has been tested and found to comply with the limits for a Class B digital
device, pursuant to Part 15 of the FCC Rules. These limits are designed to provide
reasonable protection against harmful interference in a residential installation. This
equipment generates, uses and can radiate radio frequency energy and, if not installed and
used in accordance with the instructions, may cause harmful interference to radio
communications. However, there is no guarantee that interference will not occur in a
particular installation. If this equipment does cause harmful interference to radio or
television reception, which can be determined by turning the equipment off and on, the
user is encouraged to try to correct the interference by one or more of the following
measures:
• Reorient or relocate the receiving antenna.
• Increase the separation between the equipment and receiver.
• Connect the equipment into an outlet on a circuit different from that to which the
receiver is connected.
• Consult the dealer or an experienced radio/TV technician for help.
Notice for Industry Canada
This Class B digital apparatus complies with Canadian ICES-003.
Cet appareil numérique de la classe B est conforme à la norme NMB-003 du Canada.
Page 10
10
EU Declaration of Conformity
Monoprice, Inc. declares the product described within this user guide or manual is in
compliance with below applicable directives. The full text of the EU Declaration of
Conformity is available at the following internet address:
https://www.monoprice.com/product?p_id=15709 or the CE DoC can be found within this
user manual
• EMC Directive 2004/108/EC
• Low Voltage Directive 2014/35/EU
• RoHS2 Directive 2011/65/EU
• WEEE Directive 2012/19/EC
• Packaging & Packaging Waste Directive 94/62/EC
• REACH Directive 1907/2006/EC
WEEE Information
User information for consumer products covered by EU Directive 2012/19/EU on Waste
Electric and Electronic Equipment (WEEE)
This document contains important information for users with regards to the proper
disposal and recycling of Monoprice products. Consumers are required to comply with this
notice for all electronic products bearing the following symbol:
For Consumers in the European Union: This EU Directive requires that the product bearing
this symbol and or its packaging must not be disposed of with unsorted municipal waste.
The symbol indicates that this product should be disposed of separately from regular
household waste streams. It is your responsibility to dispose of this and other electrical and
electronics products via designated collection facilities appointed by the government or
Page 11
11
local authorities. Correct disposal and recycling will help prevent potential negative
consequences to the environment and human health. For more detailed information about
the disposal of your unwanted product, please contacts your local authorities, waste
disposal service, or the shop where you purchased the product.
Safety Notice
WARNING: Do not use this product near water, for example, in a wet basement or near
swimming pool or in an area where accidental contact with water or liquid might occurs
WARNING: Avoid using this product during an electrical storm. There may be a remote risk
of electric shock from the surge caused by lightning
WARNING: The external power adapter or AC power cord is the equipment's disconnection
device. The power outlet must be located nearby the equipment and its access must be
easy
WARNING: Use this product in a well ventilated area
VESA® is a registered trademark of the Video Electronics Standards Association.
 Loading...